Embed Size (px)
Citation preview

Disediakan Oleh:
PensyarahJawatan
MOHD KHAIRULNIZAM BIN MOHD SALLEHPen.Pensyarah Kanan J36Teknologi Maklumat (Rangkaian)
JTSKM ,Institut Latihan Perindustrian MersingMersing, Johor
KURSUS ASAS MEMBINA WEBSITE
Jabatan Teknologi Sains Komputer dan Makl umat
PENGENALANKEPADA
MICROSOFT FRONTPAGES
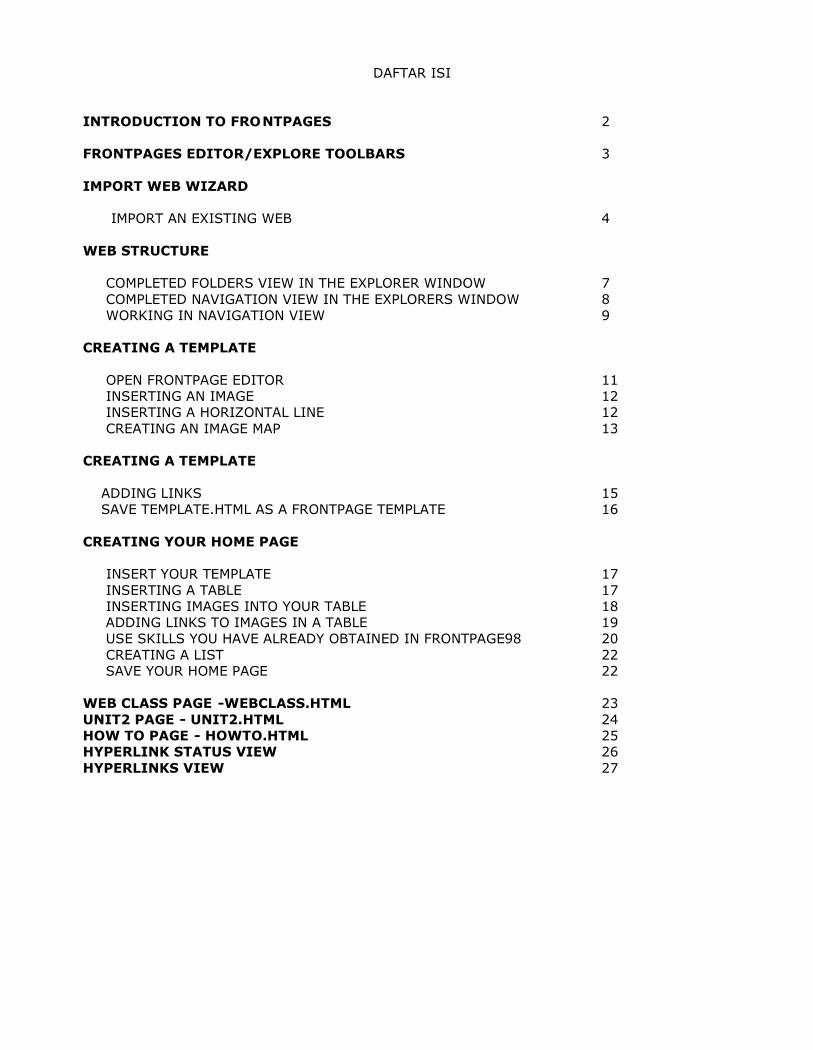
DAFTAR ISI
INTRODUCTION TO FRONTPAGES
FRONTPAGES EDITOR/EXPLORE TOOLBARS
IMPORT WEB WIZARD
IMPORT AN EXISTING WEB
WEB STRUCTURE
COMPLETED FOLDERS VIEW IN THE EXPLORER WINDOW COMPLETED NAVIGATION VIEW IN THE EXPLORERS WINDOW WORKING IN NAVIGATION VIEW
CREATING A TEMPLATE
OPEN FRONTPAGE EDITOR INSERTING AN IMAGE INSERTING A HORIZONTAL LINE CREATING AN IMAGE MAP
CREATING A TEMPLATE
ADDING LINKS SAVE TEMPLATE.HTML AS A FRONTPAGE TEMPLATE
CREATING YOUR HOME PAGE
INSERT YOUR TEMPLATE INSERTING A TABLE INSERTING IMAGES INTO YOUR TABLE ADDING LINKS TO IMAGES IN A TABLE USE SKILLS YOU HAVE ALREADY OBTAINED IN FRONTPAGE98 CREATING A LIST SAVE YOUR HOME PAGE
WEB CLASS PAGE -WEBCLASS.HTMLUNIT2 PAGE - UNIT2.HTMLHOW TO PAGE - HOWTO.HTMLHYPERLINK STATUS VIEWHYPERLINKS VIEW
2
3
4
789
11121213
1516
17171819202222
2324252627
2
User Services
3
User Services
4
User Services
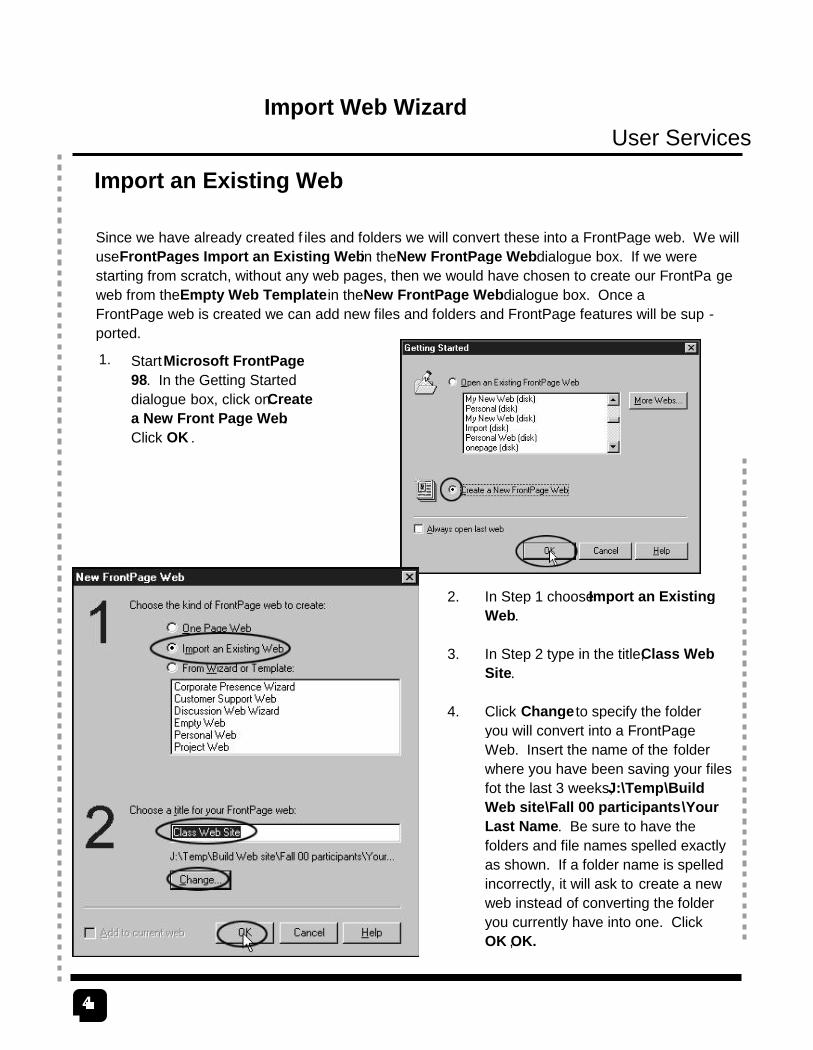
Import an Existing Web
Since we have already created f iles and folders we will convert these into a FrontPage web. We willuseFrontPages Import an Existing Web in theNew FrontPage Web dialogue box. If we werestarting from scratch, without any web pages, then we would have chosen to create our FrontPa geweb from theEmpty Web Template in theNew FrontPage Web dialogue box. Once aFrontPage web is created we can add new files and folders and FrontPage features will be sup -ported.
1. StartMicrosoft FrontPage98. In the Getting Starteddialogue box, click onCreatea New Front Page Web.Click OK .
2.
3.
4.
In Step 1 chooseImport an ExistingWeb.
In Step 2 type in the title,Class WebSite.
Click Change to specify the folderyou will convert into a FrontPageWeb. Insert the name of the folderwhere you have been saving your filesfot the last 3 weeks, J:\Temp\BuildWeb site\Fall 00 participants\YourLast Name. Be sure to have thefolders and file names spelled exactlyas shown. If a folder name is spelledincorrectly, it will ask to create a newweb instead of converting the folderyou currently have into one. ClickOK OK.,
Import Web Wizard
5
User Services
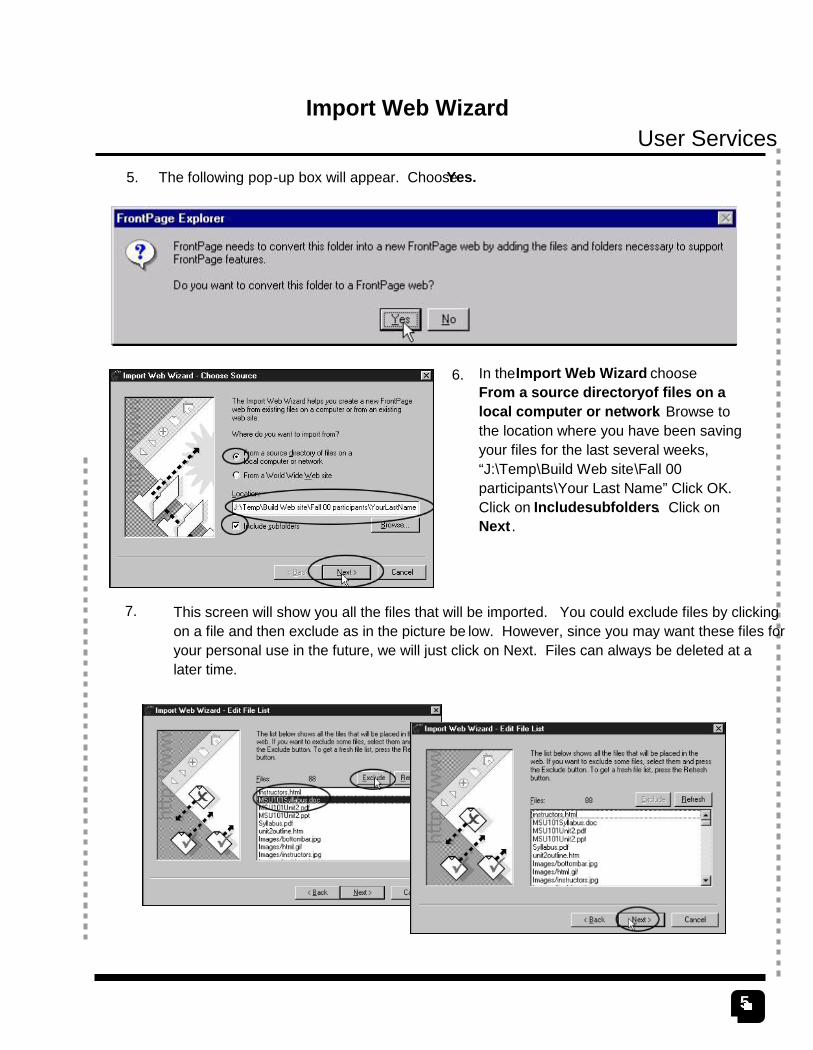
In theImport Web Wizard chooseFrom a source directoryof files on alocal computer or network. Browse tothe location where you have been savingyour files for the last several weeks,“J:\Temp\Build Web site\Fall 00participants\Your Last Name” Click OK.Click on Includesubfolders. Click onNext .
This screen will show you all the files that will be imported. You could exclude files by clickingon a file and then exclude as in the picture be low. However, since you may want these files foryour personal use in the future, we will just click on Next. Files can always be deleted at alater time.
Import Web Wizard
6.
7.
The following pop-up box will appear. ChooseYes.5.
6
User Services
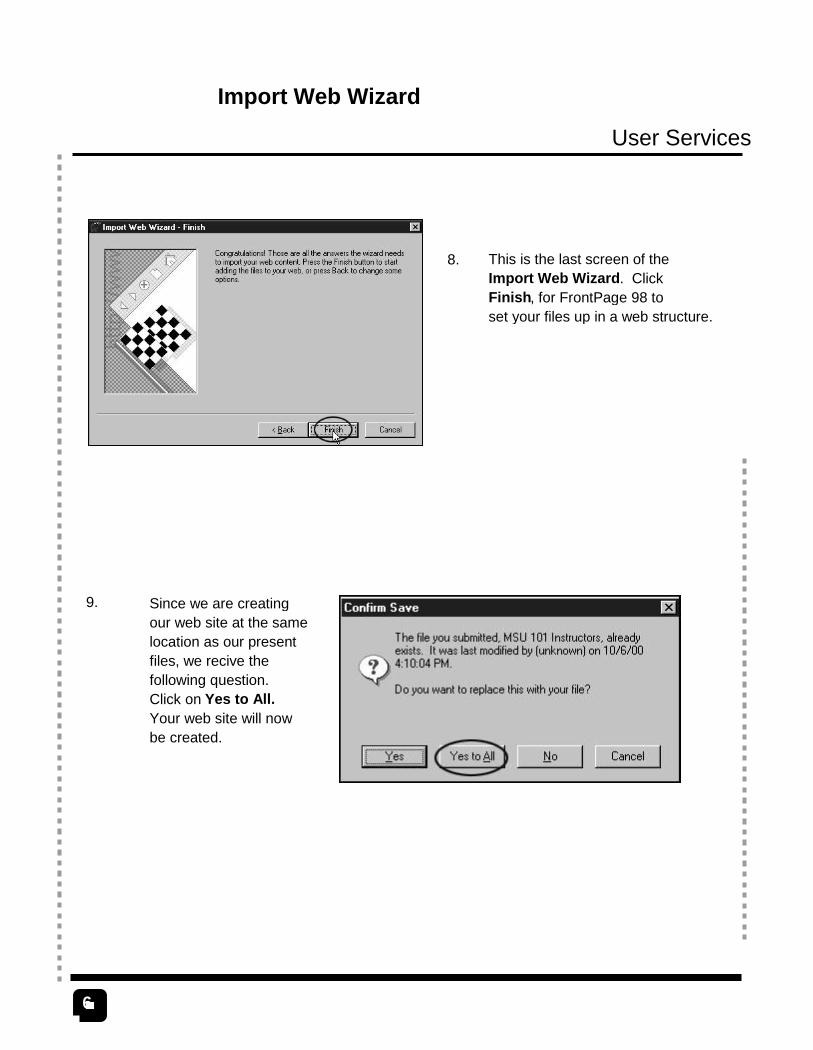
This is the last screen of theImport Web Wizard. ClickFinish, for FrontPage 98 toset your files up in a web structure.
8.
Since we are creatingour web site at the samelocation as our presentfiles, we recive thefollowing question.Click on Yes to All.Your web site will nowbe created.
9.
Import Web Wizard
7
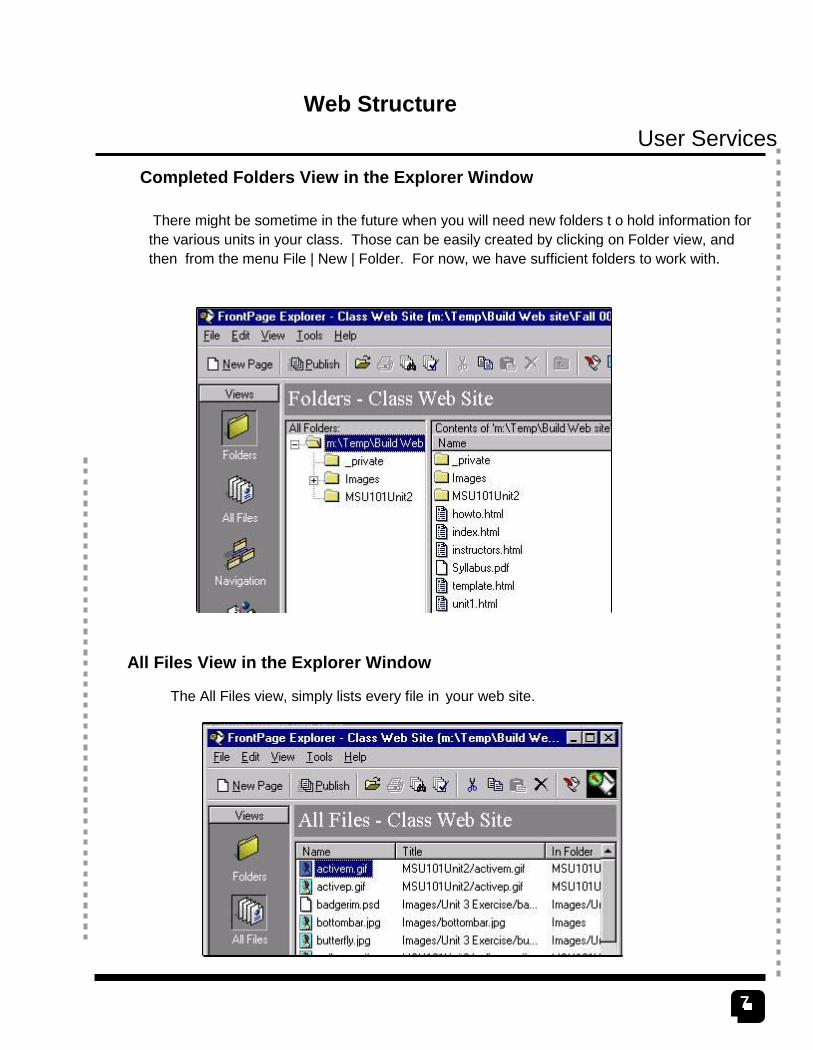
User ServicesCompleted Folders View in the Explorer Window
All Files View in the Explorer Window
Web Structure
There might be sometime in the future when you will need new folders t o hold information forthe various units in your class. Those can be easily created by clicking on Folder view, andthen from the menu File | New | Folder. For now, we have sufficient folders to work with.
The All Files view, simply lists every file in your web site.
8
User Services
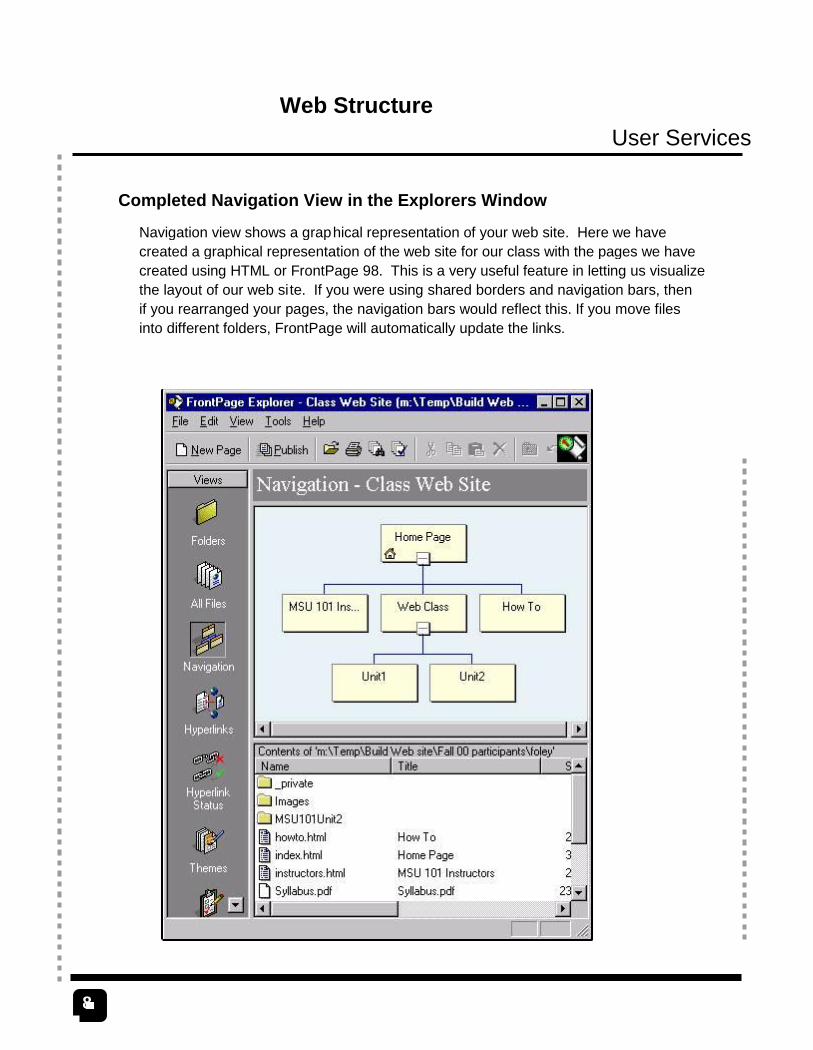
Completed Navigation View in the Explorers Window
Web Structure
Navigation view shows a graphical representation of your web site. Here we havecreated a graphical representation of the web site for our class with the pages we havecreated using HTML or FrontPage 98. This is a very useful feature in letting us visualizethe layout of our web site. If you were using shared borders and navigation bars, thenif you rearranged your pages, the navigation bars would reflect this. If you move filesinto different folders, FrontPage will automatically update the links.

9
User Services
Working in Navigation View
First we create our Home Page graphic.Click on the New Page icon. Threeweb pages will link directly from theHome Page. We have already createdthe instuctors page Drag the instruc -.tors page, instructors.html from the,bottom pane to the top pane ofNaviga-tion view so it becomes a child of theHome Page graphic. When the next pop -up wndow asks: Do you want FrontPageto create navigation bars linking yourpages together? Click onNo.
Click once on theHome Pagegraphic. Click onNew Page icon.A new page graphic is created.Right clickon the new graphic,click Rename andrenameNewPage1 Web Classto . Click on theHome Page graphic. Click onNew Page icon. Another new pagegraphic is created. Rightclick onthe new graphic, click Rename andrename New Page2 to How To .The name on the graphic is also, thetitle for the page.
Web Structure
1.
2.
10
User Services
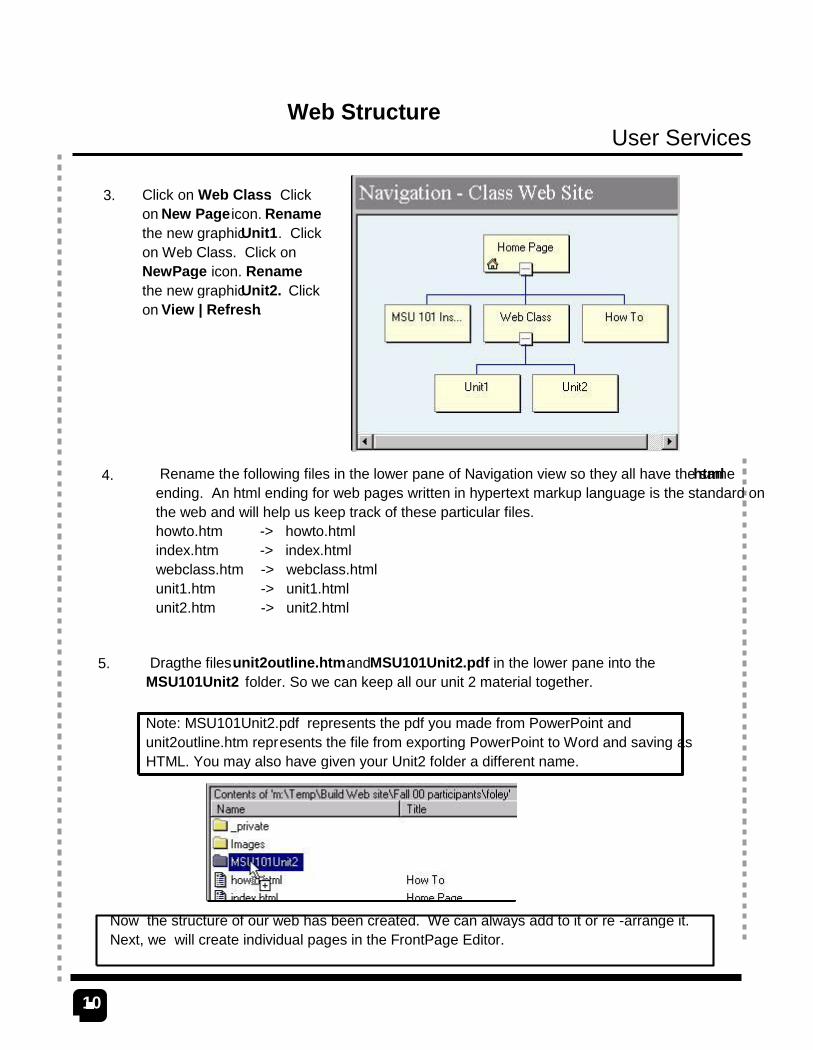
Click on Web Class. Clickon New Page icon. Renamethe new graphicUnit1. Clickon Web Class. Click onNewPage icon. Renamethe new graphicUnit2. Clickon View | Refresh.
Dragthe filesunit2outline.htm andMSU101Unit2.pdf in the lower pane into theMSU101Unit2 folder. So we can keep all our unit 2 material together.
Now the structure of our web has been created. We can always add to it or re -arrange it.Next, we will create individual pages in the FrontPage Editor.
Web Structure
3.
4.
5.
Rename the following files in the lower pane of Navigation view so they all have the samehtmlending. An html ending for web pages written in hypertext markup language is the standard onthe web and will help us keep track of these particular files.howto.htm -> howto.htmlindex.htm -> index.htmlwebclass.htm -> webclass.htmlunit1.htm -> unit1.htmlunit2.htm -> unit2.html
Note: MSU101Unit2.pdf represents the pdf you made from PowerPoint andunit2outline.htm represents the file from exporting PowerPoint to Word and saving asHTML. You may also have given your Unit2 folder a different name.
11
User ServicesCreating a Template
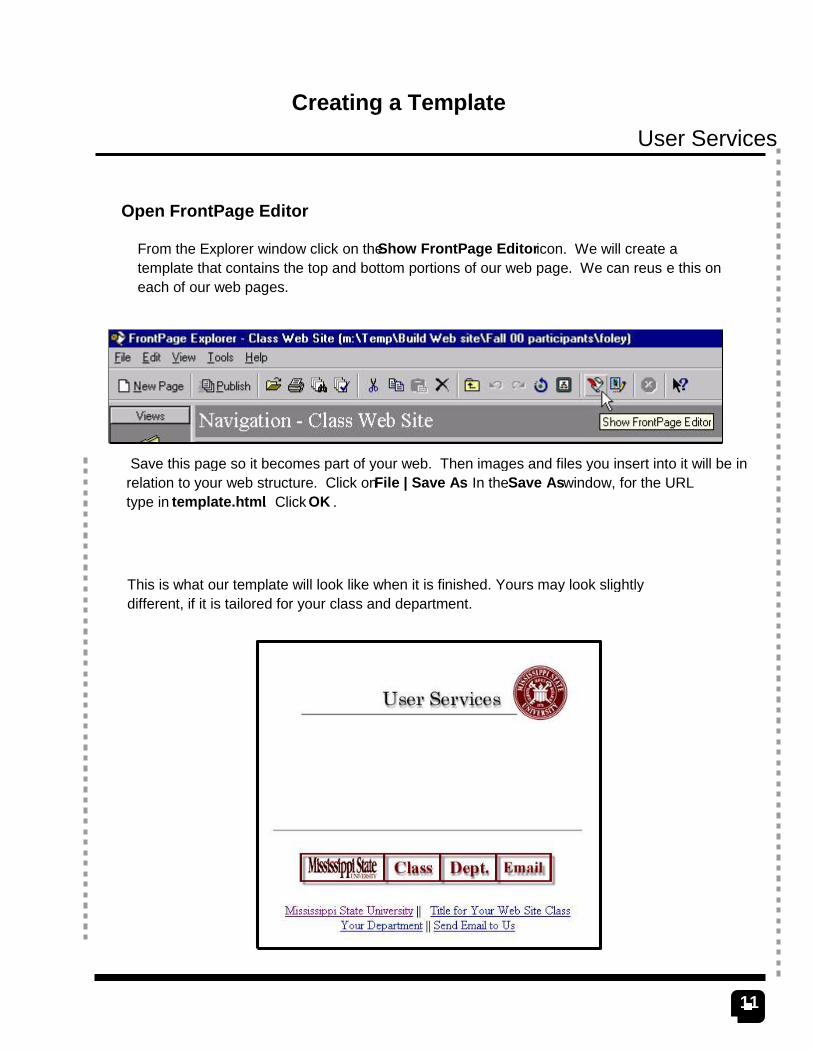
Save this page so it becomes part of your web. Then images and files you insert into it will be inrelation to your web structure. Click onFile | Save As. In theSave As window, for the URLtype in template.html. Click OK .
Open FrontPage Editor
From the Explorer window click on theShow FrontPage Editor icon. We will create atemplate that contains the top and bottom portions of our web page. We can reus e this oneach of our web pages.
This is what our template will look like when it is finished. Yours may look slightlydifferent, if it is tailored for your class and department.
12
User Services
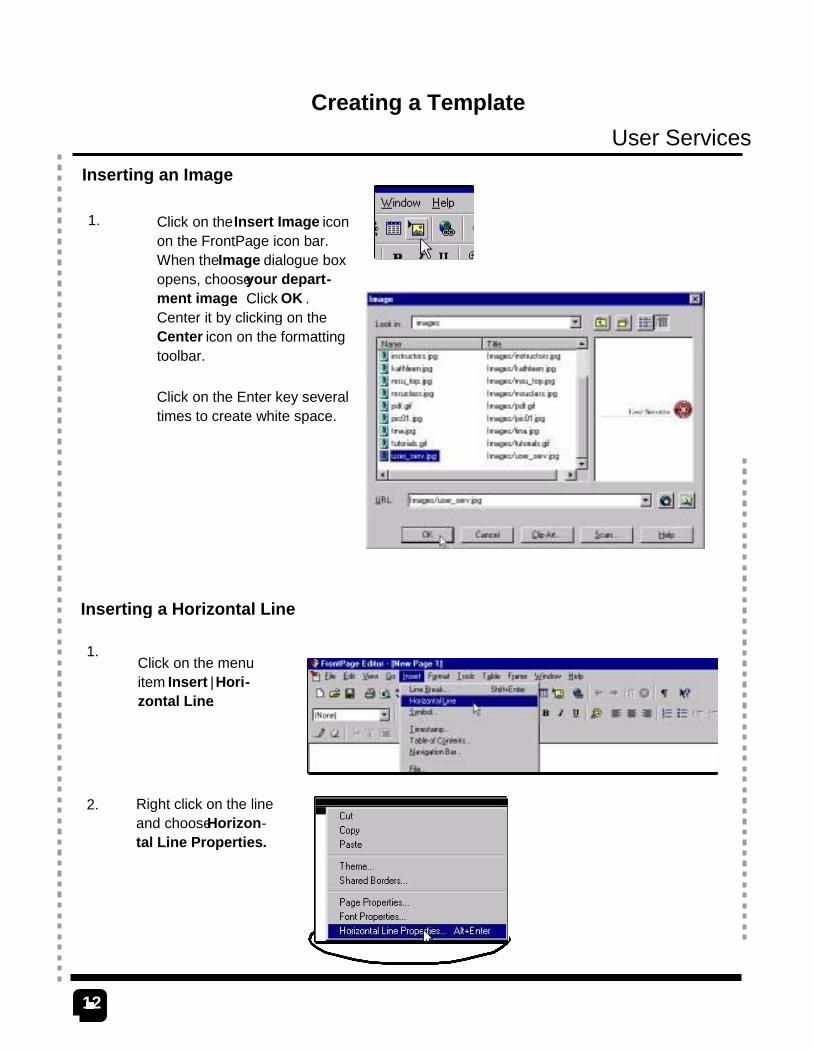
Click on the menuitem Insert Hori-|zontal Line.
Right click on the lineand chooseHorizon-tal Line Properties.
Creating a Template
Inserting a Horizontal Line
1.
2.
Click on theInsert Image iconon the FrontPage icon bar.When theImage dialogue boxopens, chooseyour depart-ment image. Click OK .Center it by clicking on theCenter icon on the formattingtoolbar.
1.
Click on the Enter key severaltimes to create white space.
Inserting an Image
13
User Services
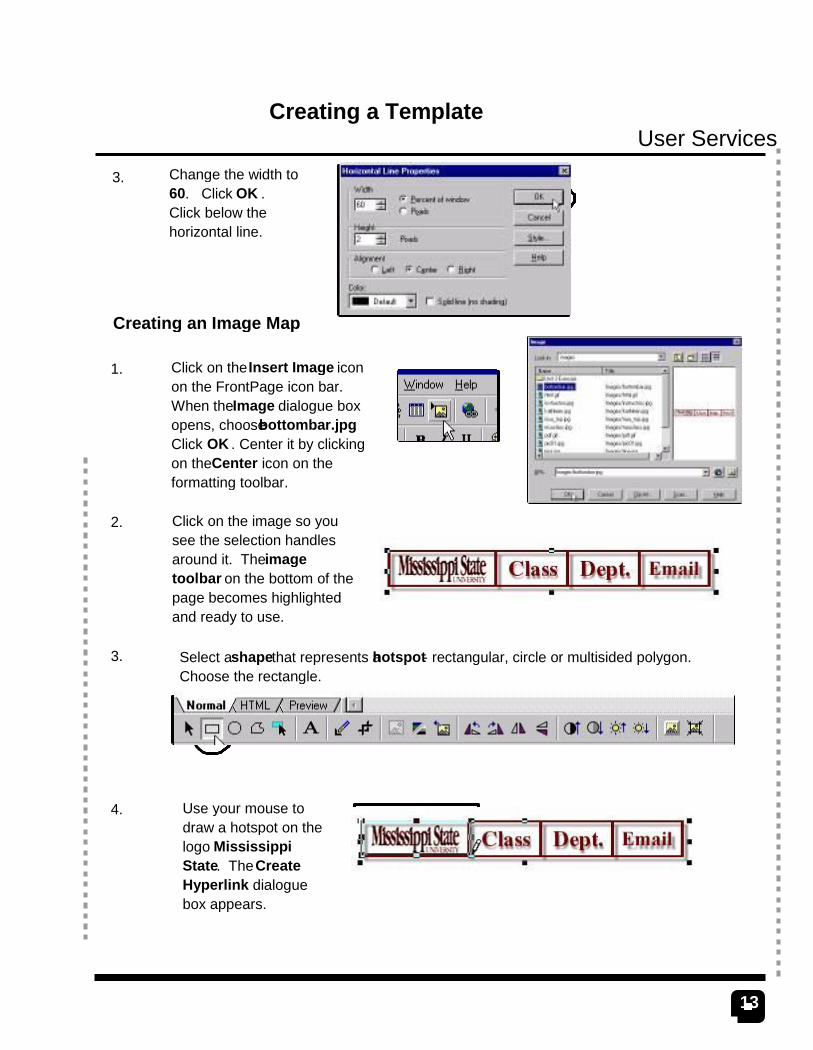
Click on the Insert Image iconon the FrontPage icon bar.When theImage dialogue boxopens, choosebottombar.jpg.Click OK . Center it by clickingon theCenter icon on theformatting toolbar.
Click on the image so yousee the selection handlesaround it. The imagetoolbar on the bottom of thepage becomes highlightedand ready to use.
Select a shape that represents a hotspot- rectangular, circle or multisided polygon.Choose the rectangle.
Use your mouse todraw a hotspot on thelogo MississippiState. TheCreateHyperlink dialoguebox appears.
1.
2.
3.
4.
Creating an Image Map
Creating a Template
Change the width to60. Click OK .Click below thehorizontal line.
3.
14
User Services
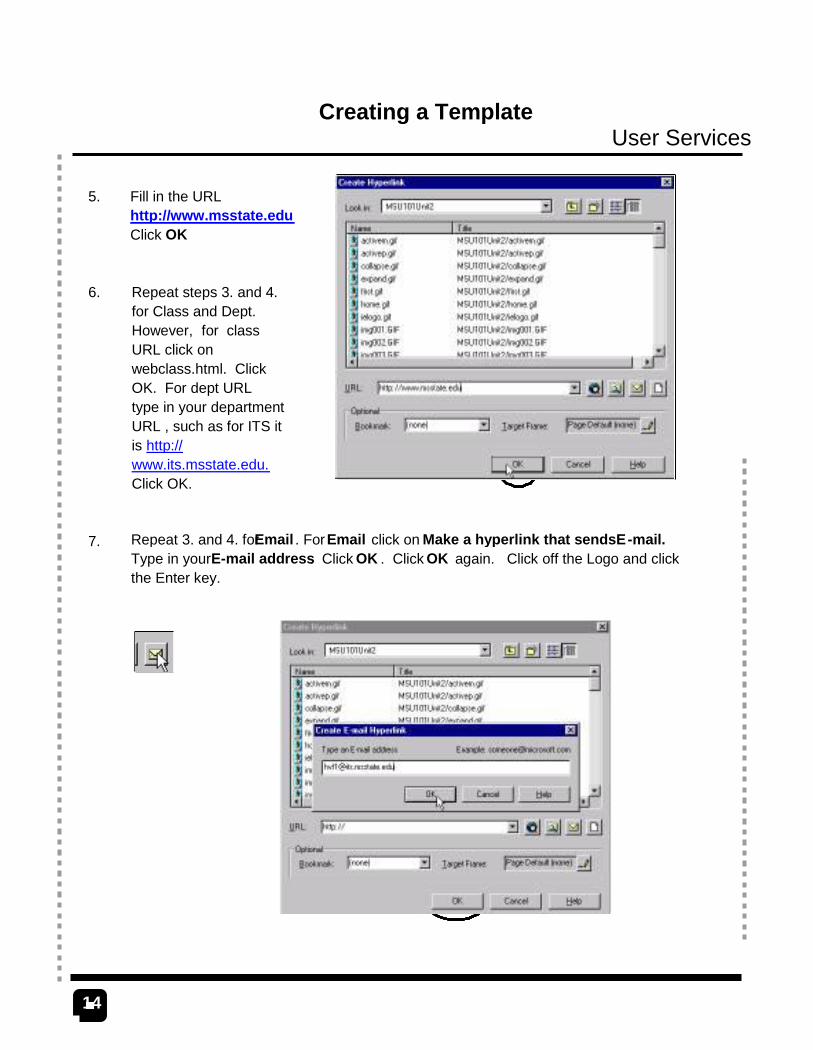
Fill in the URLhttp://www.msstate.eduClick OK
Repeat 3. and 4. forEmail . ForEmail click on Make a hyperlink that sendsE-mail.Type in yourE-mail address. Click OK . Click OK again. Click off the Logo and clickthe Enter key.
5.
6.
7.
Creating a Template
Repeat steps 3. and 4.for Class and Dept.However, for classURL click onwebclass.html. ClickOK. For dept URLtype in your departmentURL , such as for ITS itis http://www.its.msstate.edu.Click OK.
15
User Services
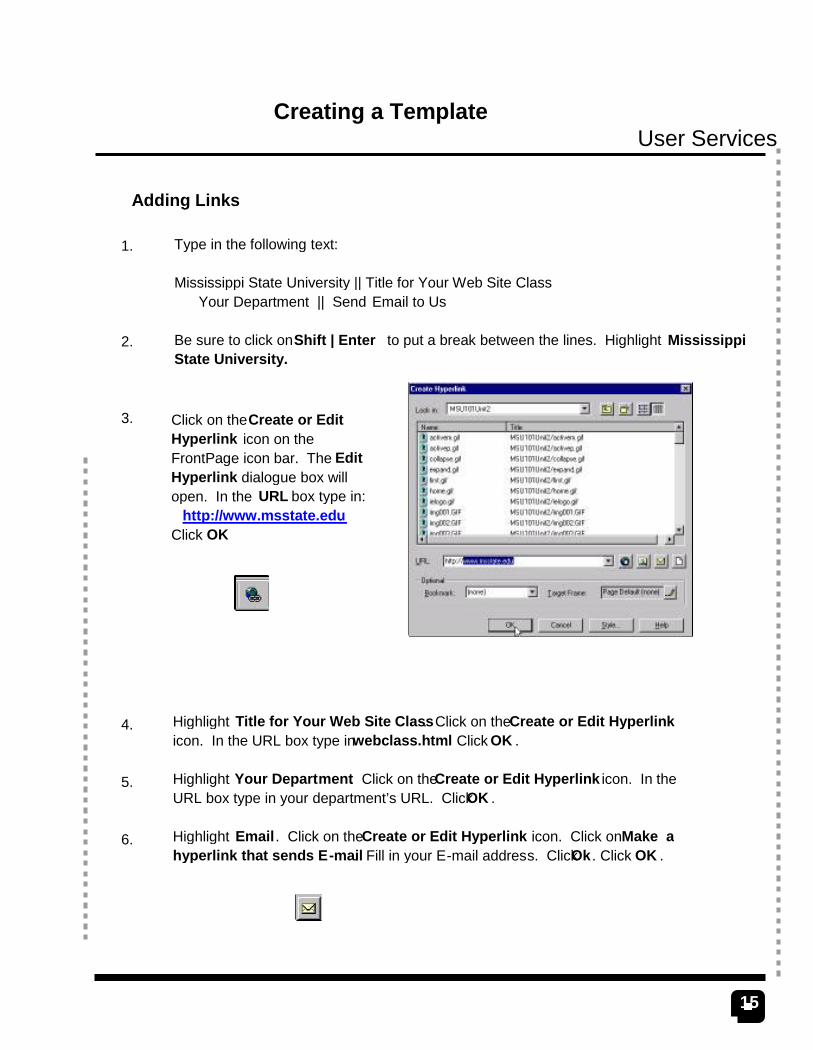
Adding Links
Type in the following text:
Mississippi State University || Title for Your Web Site Class Your Department || Send Email to Us
Be sure to click onShift | Enter to put a break between the lines. Highlight MississippiState University.
Click on theCreate or EditHyperlink icon on theFrontPage icon bar. The EditHyperlink dialogue box willopen. In the URL box type in:
http://www.msstate.edu.Click OK
Highlight Title for Your Web Site Class. Click on theCreate or Edit Hyperlinkicon. In the URL box type in webclass.html. Click OK .
Highlight Your Department. Click on theCreate or Edit Hyperlink icon. In theURL box type in your department’s URL. ClickOK .
Highlight Email . Click on theCreate or Edit Hyperlink icon. Click onMake ahyperlink that sends E-mail. Fill in your E-mail address. ClickOk . Click OK .
1.
2.
3.
4.
5.
6.
Creating a Template
16
User Services
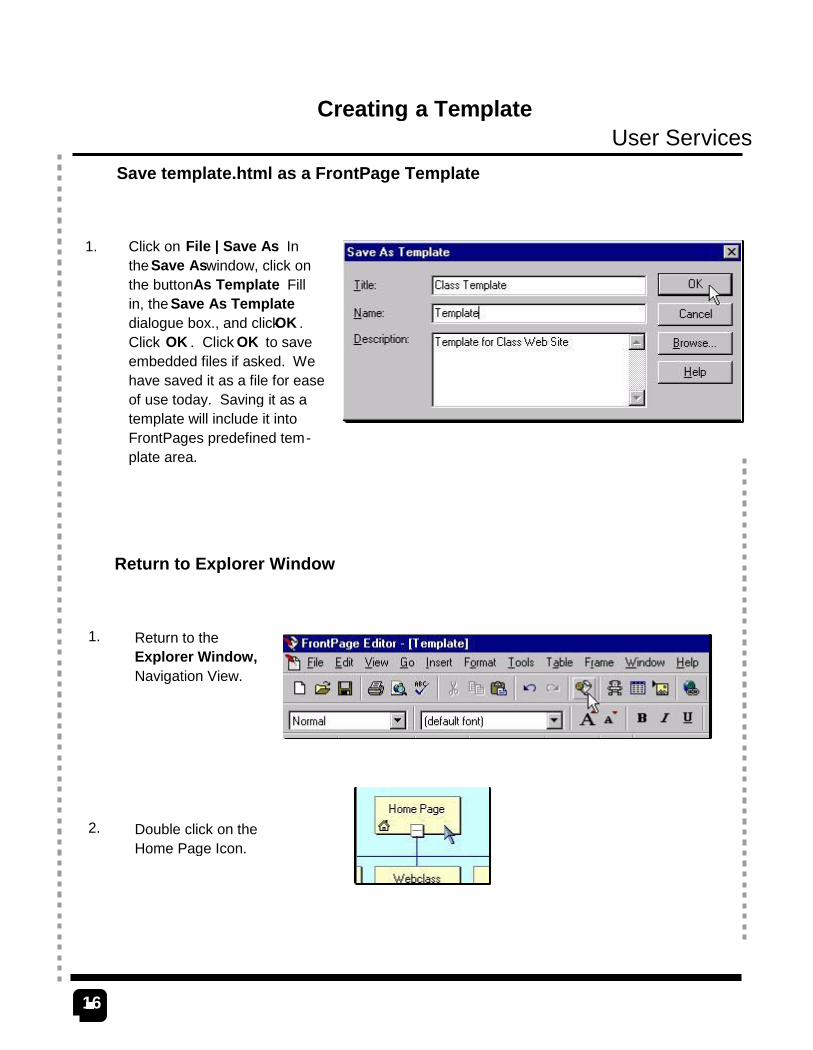
Return to theExplorer Window,Navigation View.
Double click on theHome Page Icon.
Click on File | Save As. Inthe Save As window, click onthe buttonAs Template. Fillin, the Save As Templatedialogue box., and clickOK .Click OK . Click OK to saveembedded files if asked. Wehave saved it as a file for easeof use today. Saving it as atemplate will include it intoFrontPages predefined tem-plate area.
Save template.html as a FrontPage Template
Return to Explorer Window
Creating a Template
1.
1.
2.
17
User Services
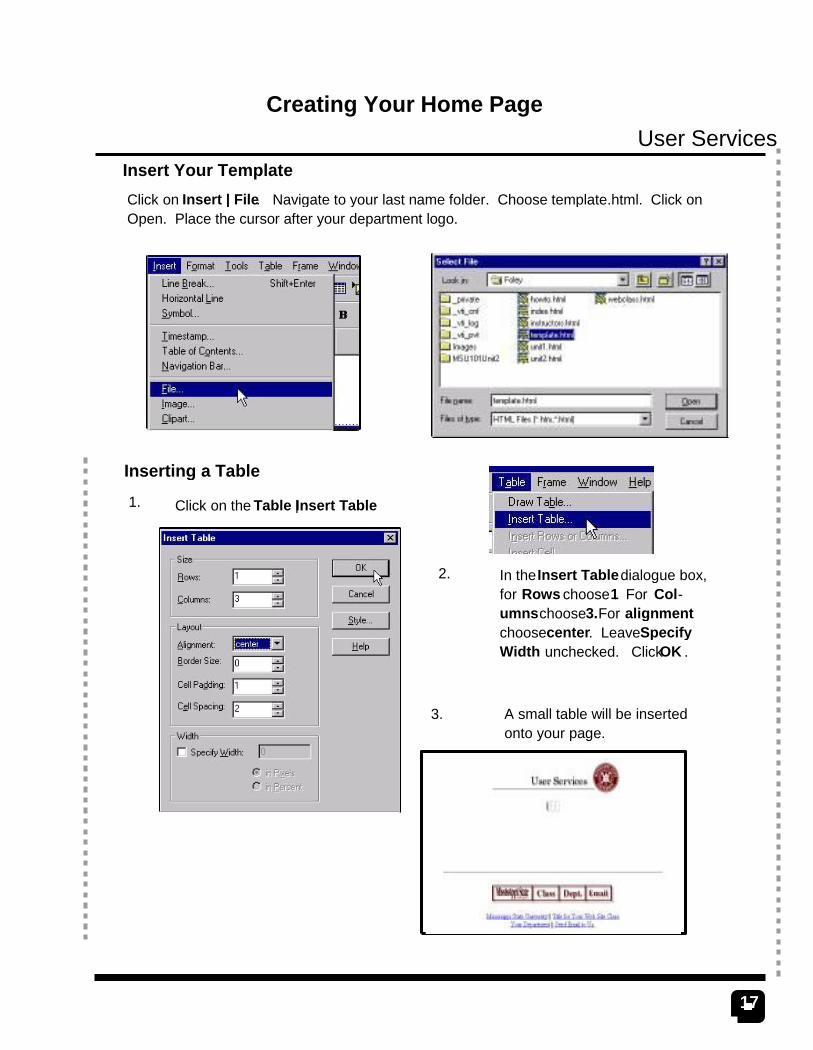
Click on the Table Insert Table |
In the Insert Table dialogue box,for Rows choose . For 1 Col-umnschoose For3. alignmentchoosecenter. LeaveSpecifyWidth unchecked. ClickOK .
Creating Your Home Page
Inserting a Table
A small table will be insertedonto your page.
1.
2.
3.
Click on Insert | File. Navigate to your last name folder. Choose template.html. Click onOpen. Place the cursor after your department logo.
Insert Your Template
18
User Services
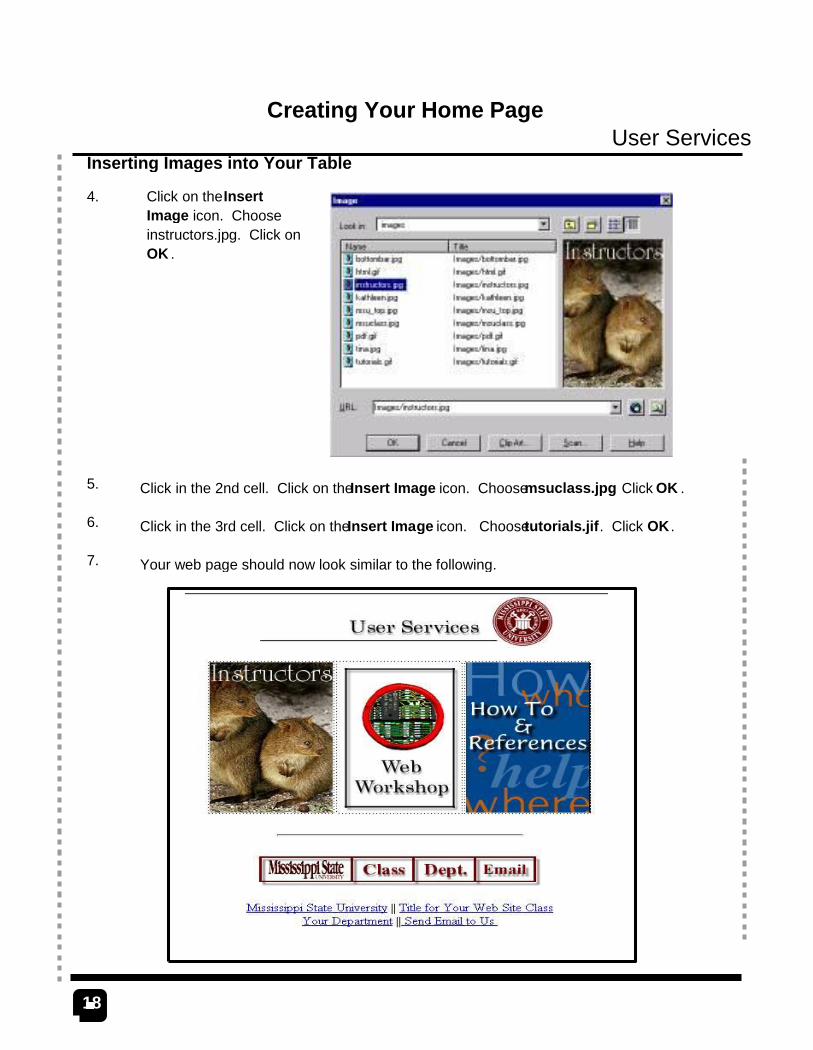
Click on theInsertImage icon. Chooseinstructors.jpg. Click onOK .
Click in the 2nd cell. Click on theInsert Image icon. Choosemsuclass.jpg. Click OK .
Click in the 3rd cell. Click on theInsert Image icon. Choosetutorials.jif. Click OK .
Your web page should now look similar to the following.
Creating Your Home Page
4.
5.
6.
7.
Inserting Images into Your Table
19
User Services
Click on the1st picture. Click on theCreate or Edit Hyperlink icon. Click oninstructors.htmlto place it into the URL box. Click OK.
Click on the2nd picture. Click on theCreate or Edit Hyperlink icon. Click onwebclass.html to place it into the URL box. ClickOK .
Click on the3rd picture. Click on theCreate or Edit Hyperlink icon. Click onhowto.htmlto place it into the URL box. ClickOK .
Creating Your Home Page
Adding Links to Images in a Table
1.
2.
3.

20
User Services
Use Skills You Have Already Obtained in FrontPage98
Type in the following line below the images you just inserted, center it with theCenter icon on theformatting toolbar and create links with theCreate or Edit Hyperlink icon on the FrontPageicon toolbar.
Instructors || Your Class Tit le || How To & References
The links are as follow: Instructors - instructors.html Build Your Own Web Site -webclass.html How to & References -howto.html
Type in the following lines. Center them.
Butler Computer Lab Hours Library Computer Lab Hours
Link them each to http://www.its.msstate.edu/pub_labs.html
1.
2.
Creating Your Home Page
The next part will look similar to the following.
21
User Services
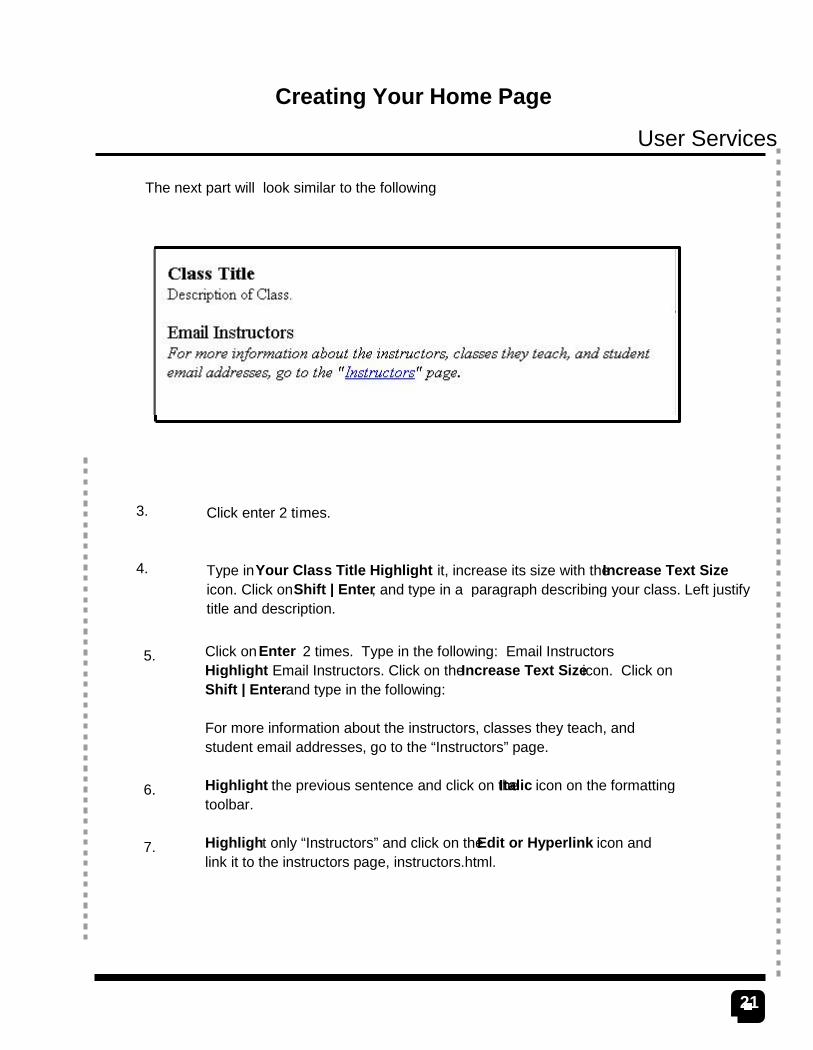
Click onEnter 2 times. Type in the following: Email InstructorsHighlight Email Instructors. Click on theIncrease Text Size icon. Click onShift | Enter and type in the following:
For more information about the instructors, classes they teach, andstudent email addresses, go to the “Instructors” page.
Highlight the previous sentence and click on theItalic icon on the formattingtoolbar.
Highlight only “Instructors” and click on theEdit or Hyperlink icon andlink it to the instructors page, instructors.html.
5.
6.
7.
Creating Your Home Page
Type inYour Class Title Highlight. it, increase its size with theIncrease Text Sizeicon. Click onShift | Enter, and type in a paragraph describing your class. Left justifytitle and description.
The next part will look similar to the following
Click enter 2 times.3.
4.
22
User Services
Create Your Web Class Page - webclass.html
The next 3 pages you create, will allow you to pra ctice using the features ofFrontPage you have already learned. First an example page is shown. Change thetext to be more appropriate for your class. Next is a listing of the FrontPagecommands used to create the page.
Return to theExplorer window and click onNavigation View Double-click. on theWeb Class graphic. Your finished Webclass page will look similar to the followingpage in this handout.
Creating Your Home Page
Save Your Home Page
Click on File | Save.1.
Creating a List
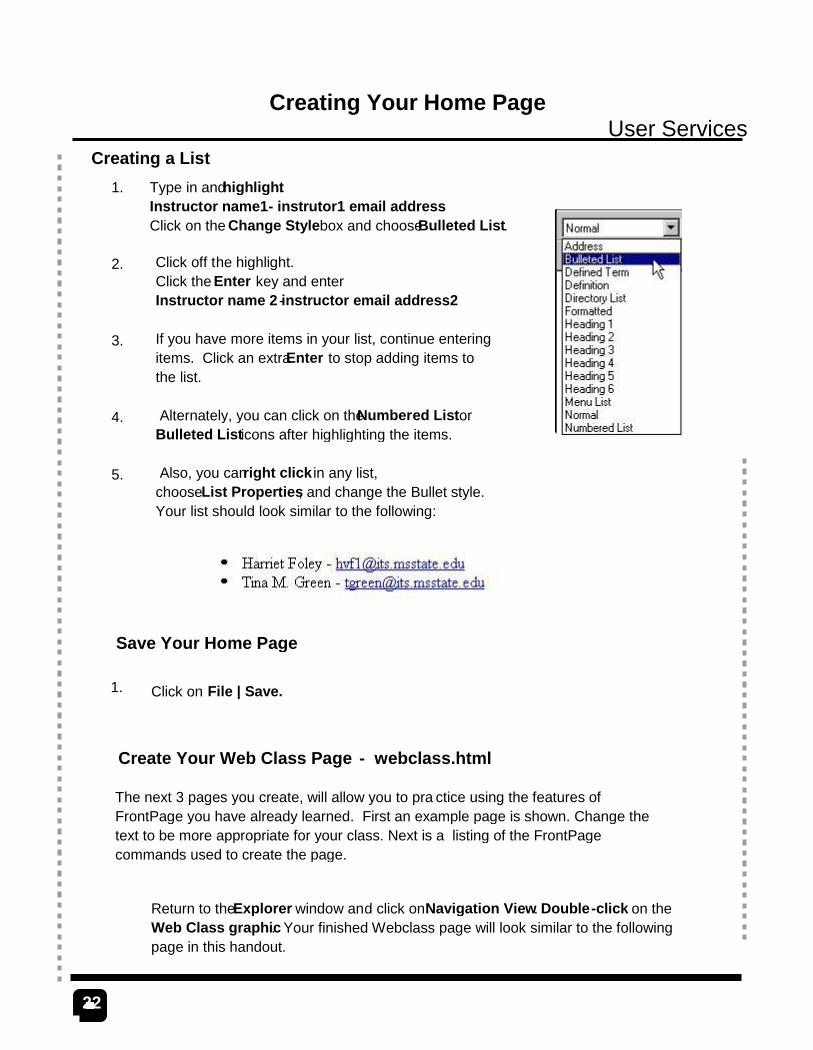
Click off the highlight.Click the Enter key and enterInstructor name 2 instructor email address2-
If you have more items in your list, continue enteringitems. Click an extraEnter to stop adding items tothe list.
Alternately, you can click on the Numbered List orBulleted List icons after highlighting the items.
Also, you canright click in any list,chooseList Properties, and change the Bullet style.Your list should look similar to the following:
1.
2.
3.
4.
5.
Type in and highlight:Instructor name1- instrutor1 email addressClick on the Change Style box and chooseBulleted List.
23
User Services
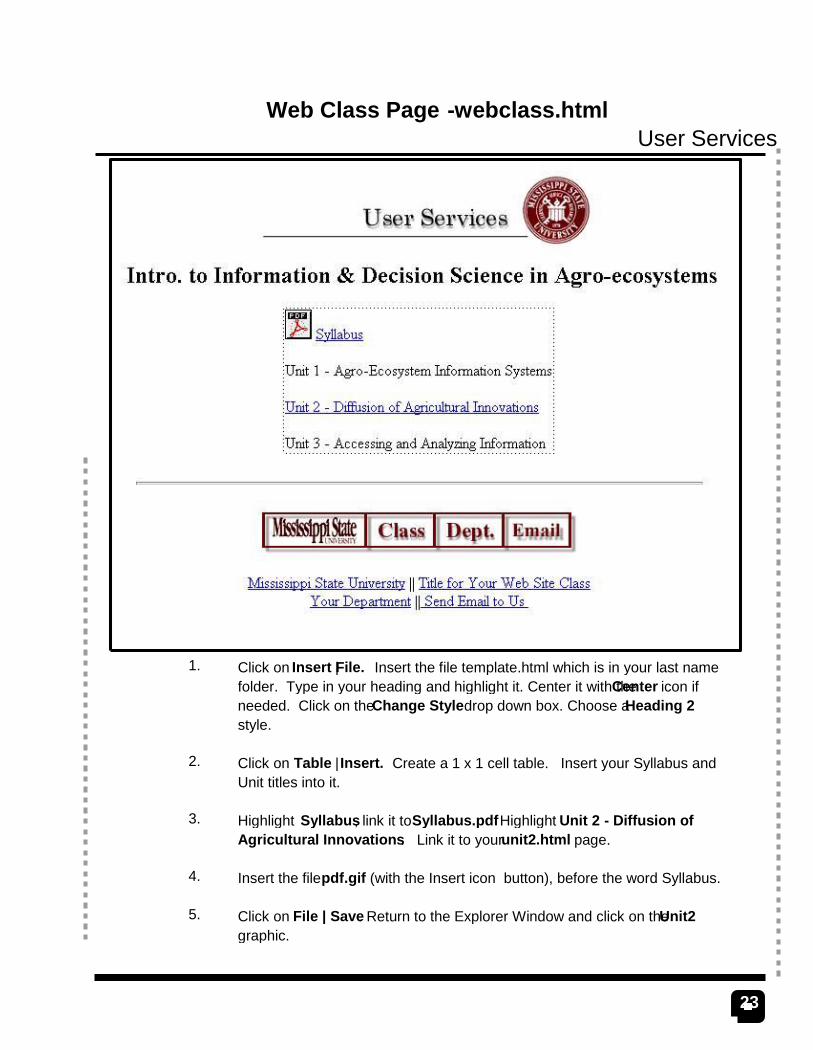
Click on Insert File. | Insert the file template.html which is in your last namefolder. Type in your heading and highlight it. Center it with theCenter icon ifneeded. Click on theChange Style drop down box. Choose aHeading 2style.
Click on Table Insert. | Create a 1 x 1 cell table. Insert your Syllabus andUnit titles into it.
Highlight Syllabus, link it toSyllabus.pdf Highlight Unit 2 - Diffusion ofAgricultural Innovations. Link it to yourunit2.html page.
Insert the file pdf.gif (with the Insert icon button), before the word Syllabus.
Click on File | Save. Return to the Explorer Window and click on theUnit2graphic.
1.
2.
3.
4.
5.
Web Class Page -webclass.html
24
User Services
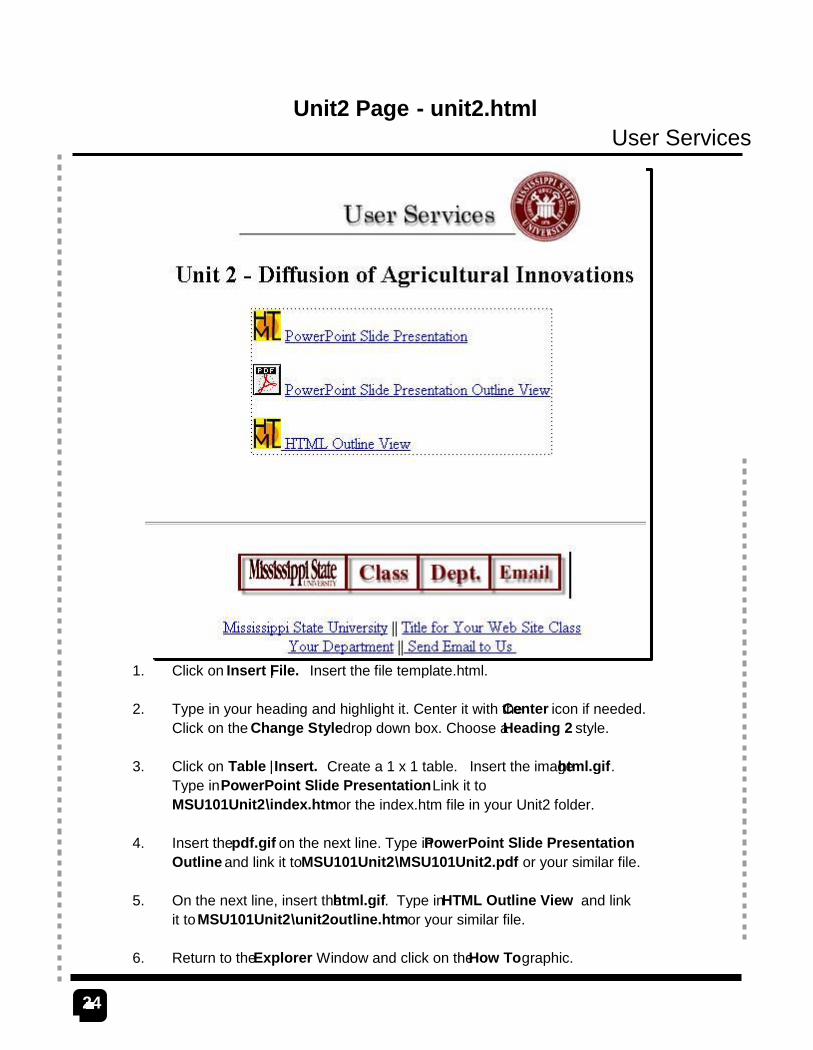
Click on Insert File. | Insert the file template.html.
Type in your heading and highlight it. Center it with theCenter icon if needed.Click on the Change Style drop down box. Choose aHeading 2 style.
Click on Table Insert. | Create a 1 x 1 table. Insert the imagehtml.gif.Type inPowerPoint Slide Presentation. Link it toMSU101Unit2\index.htmor the index.htm file in your Unit2 folder.
Insert thepdf.gif on the next line. Type inPowerPoint Slide PresentationOutline and link it toMSU101Unit2\MSU101Unit2.pdf or your similar file.
On the next line, insert thehtml.gif. Type inHTML Outline View and linkit toMSU101Unit2\unit2outline.htm or your similar file.
Return to theExplorer Window and click on theHow Tographic.
1.
2.
3.
4.
5.
6.
Unit2 Page - unit2.html
25
User Services
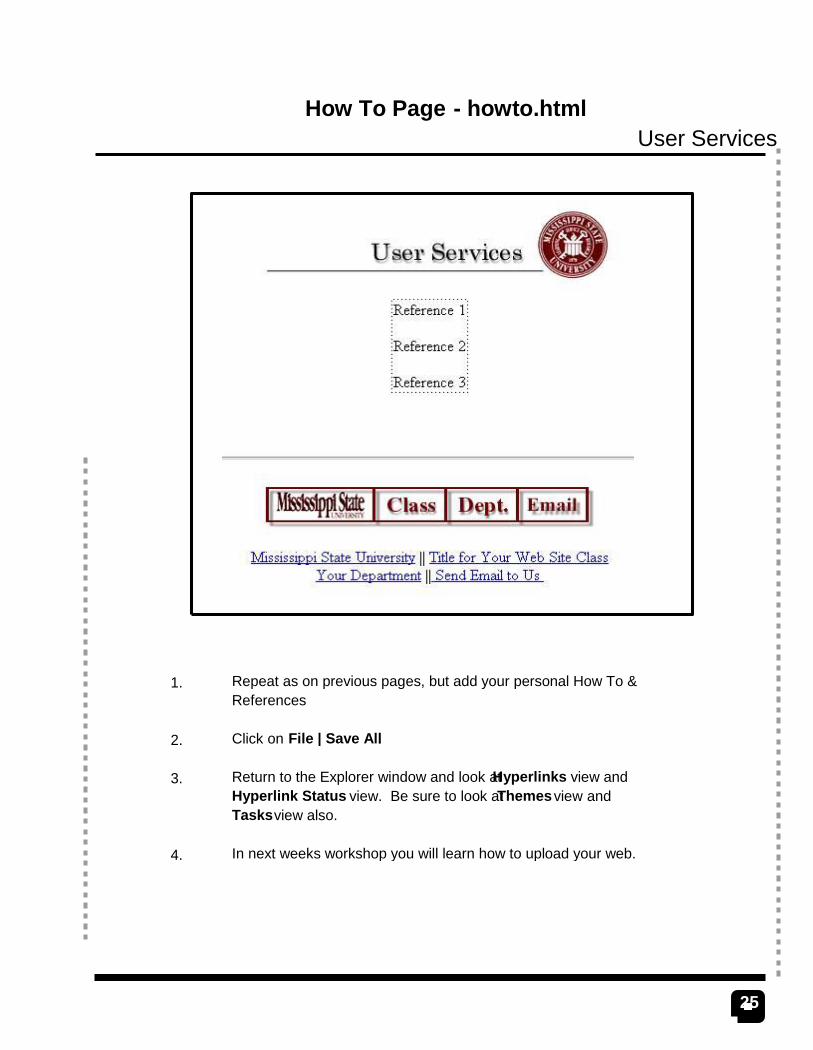
Repeat as on previous pages, but add your personal How To &References
Click on File | Save All.
Return to the Explorer window and look atHyperlinks view andHyperlink Status view. Be sure to look atThemes view andTasks view also.
In next weeks workshop you will learn how to upload your web.
1.
2.
3.
4.
How To Page - howto.html
26
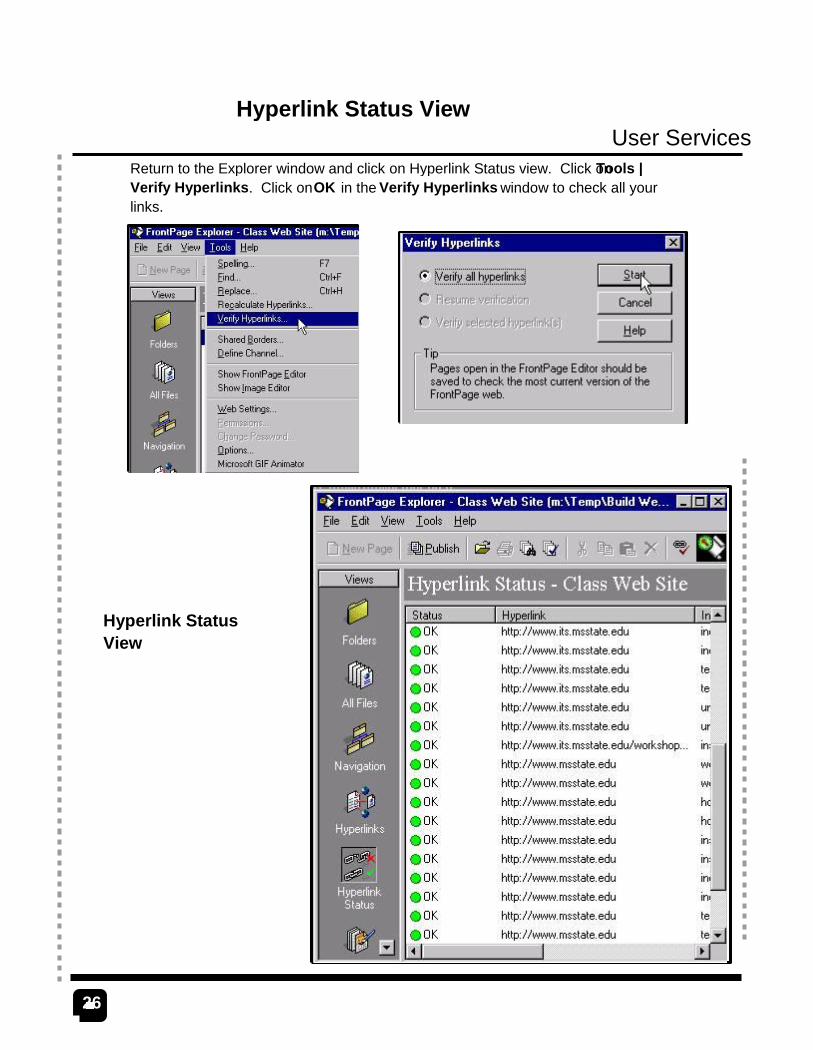
User ServicesReturn to the Explorer window and click on Hyperlink Status view. Click onTools |Verify Hyperlinks. Click onOK in the Verify Hyperlinks window to check all yourlinks.
Hyperlink StatusView
Hyperlink Status View
27
User Services
Hyperlinks View
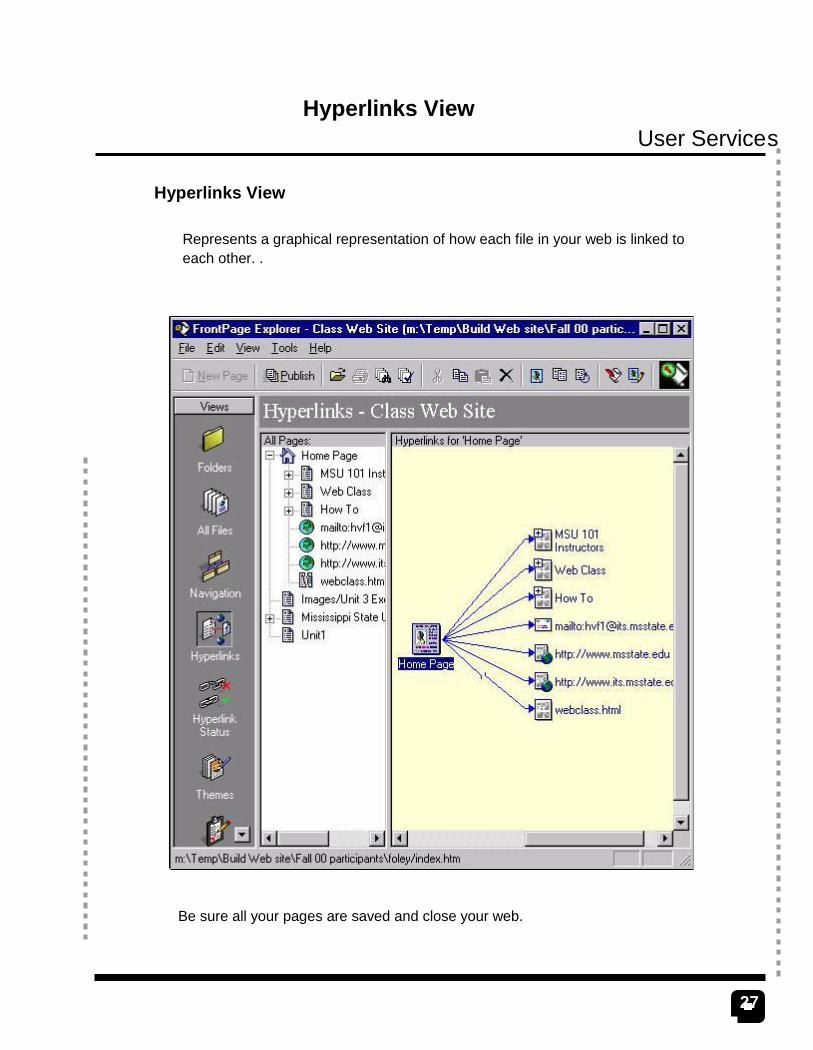
Represents a graphical representation of how each file in your web is linked toeach other. .
Hyperlinks View
Be sure all your pages are saved and close your web.