Embed Size (px)
Citation preview
pH Sensor Patches, Probes and Cuvettes
Installation and Operation ManualDocument Number pHSENSOR-TRANS-REFLECT-02-201111
Offices: Ocean Optics, Inc. World Headquarters830 Douglas Ave., Dunedin, FL, USA 34698Phone 727.733.2447Fax 727.733.3962
8 a.m.– 8 p.m. (Mon-Thu), 8 a.m.– 6 p.m. (Fri) EST
E-mail: [email protected] (General sales inquiries)[email protected] (Questions about orders)[email protected] (Technical support)
Additional Offices:
Ocean Optics Asia 137 Xianxia Road, Suite 1802, Changning District, Shanghai, PRC. 200051Phone 86.21.5206.8686Fax 86.21.5206.8686E-Mail [email protected]
Ocean Optics EMEA
Geograaf 24, 6921 EW DUIVEN, The NetherlandsPhone 31-(0)26-3190500Fax 31-(0)26-3190505 E-Mail [email protected]
Regional Headquarters Maybachstrasse 11 73760 Ostfildern Phone 49-711 34 16 96-0 Fax 49-711 34 16 96-85 E-Mail [email protected]
Copyright © 2011 Ocean Optics, Inc.All rights reserved. No part of this publication may be reproduced, stored in a retrieval system, or transmitted, by any means, electronic, mechanical, photocopying, recording, or otherwise, without written permission from Ocean Optics, Inc.This manual is sold as part of an order and subject to the condition that it shall not, by way of trade or otherwise, be lent, re-sold, hired out or otherwise circulated without the prior consent of Ocean Optics, Inc. in any form of binding or cover other than that in which it is published.TrademarksAll products and services herein are the trademarks, service marks, registered trademarks or registered service marks of their respective owners.Limit of LiabilityOcean Optics has made every effort to make this manual as complete and as accurate as possible, but no warranty or fitness is implied. The information provided is on an “as is” basis. Ocean Optics, Inc. shall have neither liability nor responsibility to any person or entity with respect to any loss or damages arising from the information contained in this manual.
PHSENSOR-TRANS-REFLECT-201111 i
Table of Contents
About This Manual......................................................................................................... iii
Document Purpose and Intended Audience.............................................................................. iii
Document Summary.................................................................................................................. iii
Product-Related Documentation ............................................................................................... iii
Upgrades....................................................................................................................... iv
Chapter 1: Products...........................................................................1
Overview ....................................................................................................................... 1
Transmissive pH Patches/Probe.................................................................................... 1
System Components ................................................................................................................. 1
Hardware Setup and Installation ............................................................................................... 2
Probe Assembly Description ..................................................................................................... 3
Reflective pH Patches/Probe (nonintrusive)................................................................... 4
Sensor System Components..................................................................................................... 4
Hardware Setup and Installation ............................................................................................... 5
Smart pH Cuvettes ........................................................................................................ 8
Sensor System Components..................................................................................................... 8
Hardware Setup and Installation ............................................................................................... 9
Chapter 2: Desktop Software Installation and Operation ...............11
Calibrating the pH Sensor System................................................................................. 11
Using SpectraSuite........................................................................................................ 11
Performing a Factory Calibration with SpectraSuite ................................................................. 11
Performing a User Calibration with SpectraSuite ...................................................................... 14
Taking pH Measurements with SpectraSuite ............................................................................ 16
Jaz Software Installation and Operation ........................................................................ 17
Performing a Factory Calibration with Jaz................................................................................. 17
Performing a User Calibration with Jaz ..................................................................................... 20
Taking pH Measurements with Jaz ........................................................................................... 22
Appendix A: Algorithms Used ..........................................................25
Table of Contents
ii PHSENSOR-TRANS-REFLECT-201111
Appendix B: Troubleshooting...........................................................27
Overview ....................................................................................................................... 27
Transmissive pH Probes ........................................................................................................... 27
Reflective pH Patches ............................................................................................................... 27
Smart pH Cuvettes .................................................................................................................... 28
All Form Factors ........................................................................................................................ 28
Sterilization.................................................................................................................... 28
Index ...................................................................................................29
PHSENSOR-TRANS-REFLECT-201111 iii
About This Manual
Document Purpose and Intended AudienceThis document provides you with installation and operation instructions for your pH Sensor components.This manual includes information for the following Ocean Optics products:
Transmissive pH Patch/Probe
Reflective pH Patches/Probes (non-intrusive)
Smart pH Cuvettes
Document Summary
Chapter Description
Chapter 1: Products Contains descriptions and specifications for Transmissive and Reflective patches/probes and Smart Cuvettes.
Chapter 2: Desktop Software Installation and Operation
Provides installation and operation instructions for SpectraSuite and Jaz software.
Appendix A: Algorithms Used Lists the algorithms used for pH sensors.
Appendix B: Troubleshooting Contains troubleshooting suggestions.
Product-Related Documentation
Jaz Installation and Operation Manual
Smart pH Cuvettes Instructions
Transmissive pH Probe Instructions
Various USB spectrometer documents such as the USB4000 Spectrometer Installation and Operation Manual.
SpectraSuite Spectrometer Operating Software Installation and Operation Manual
Various UV-Vis-NIR light source documents such as the Halogen Light Source (HL-2000/HL-2000-LL/HL-2000-HP) Installation and Operation Manual
About This Manual
iv PHSENSOR-TRANS-REFLECT-201111
You can access documentation for Ocean Optics products by visiting our website at http://www.oceanoptics.com. Select Technical → Operating Instructions, then choose the appropriate document from the available drop-down lists. Or, use the Search by Model Number field at the bottom of the web page.
You can also access operating instructions for Ocean Optics products on the Software and Technical Resources CD included with the system.
Engineering-level documentation is located on our website at Technical → Engineering Docs.
UpgradesOccasionally, you may find that you need Ocean Optics to make a change or an upgrade to your system. To facilitate these changes, you must first contact Customer Support and obtain a Return Merchandise Authorization (RMA) number. Please contact Ocean Optics for specific instructions when returning a product.

PHSENSOR-TRANS-REFLECT-201111 1
Chapter 1
Products
OverviewOcean Optics’ fully integrated pH systems provide full spectral analysis to help eliminate errors from dye leaching or from changes in turbidity, temperature, and ionic strength. Inherent calibration based on the physical properties of the immobilized indicator dye eliminates the need for frequent calibration. The ratiometric algorithm provides accurate and reproducible measurements at a high resolution.
The pH sensor is designed to very fast response with high signal strength. These sensors are compatible with aqueous solutions, ethanol/methanol solutions, ammonia, peroxides, and sodium hypochlorite solutions.
The available sensor patches, probes and cuvette products include the following:
Transmissive pH Patches/Probe
Reflective pH Patches/Probe (nonintrusive)
Smart pH Cuvettes
Transmissive pH Patches/Probe
System ComponentsThe Transmissive pH Probe system consists of the following:
Transmissive pH Probe -- T-300/TP-300 sleeve combined with RE-BIF-BORO)
1: Products
2 PHSENSOR-TRANS-REFLECT-201111
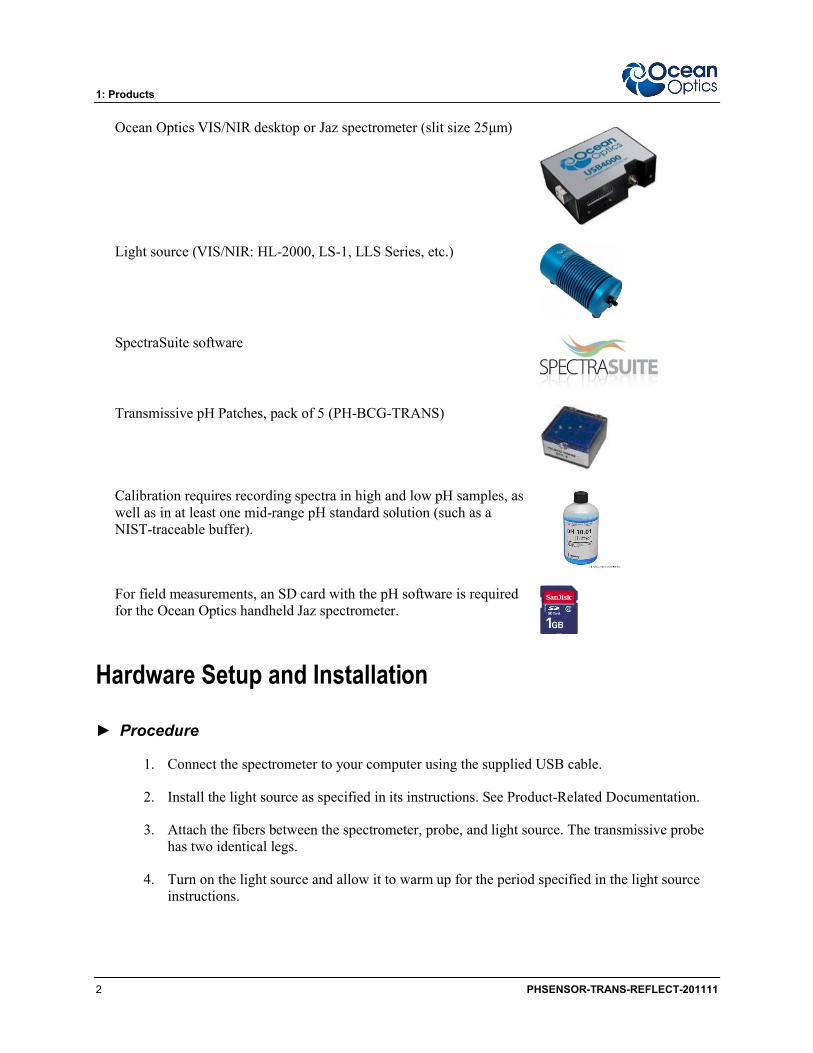
Ocean Optics VIS/NIR desktop or Jaz spectrometer (slit size 25μm)
Light source (VIS/NIR: HL-2000, LS-1, LLS Series, etc.)
SpectraSuite software
Transmissive pH Patches, pack of 5 (PH-BCG-TRANS)
Calibration requires recording spectra in high and low pH samples, as well as in at least one mid-range pH standard solution (such as a NIST-traceable buffer).
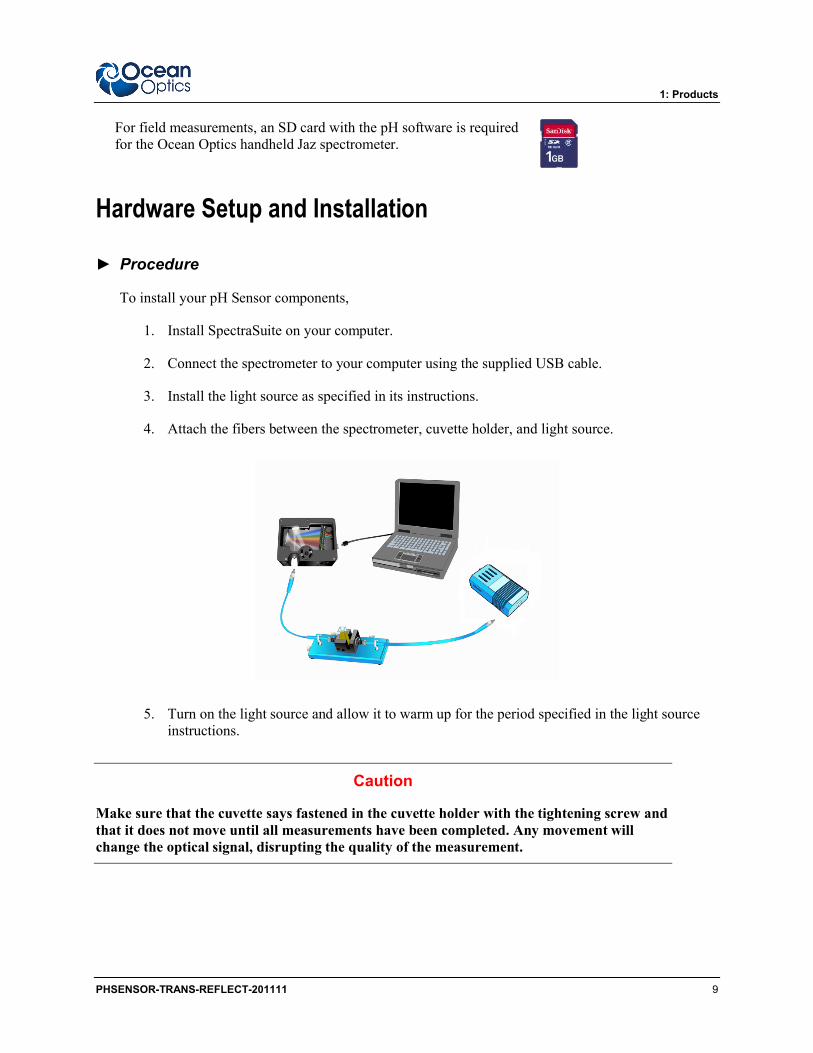
For field measurements, an SD card with the pH software is required for the Ocean Optics handheld Jaz spectrometer.
Hardware Setup and Installation
► Procedure
1. Connect the spectrometer to your computer using the supplied USB cable.
2. Install the light source as specified in its instructions. See Product-Related Documentation.
3. Attach the fibers between the spectrometer, probe, and light source. The transmissive probe has two identical legs.
4. Turn on the light source and allow it to warm up for the period specified in the light source instructions.
1: Products
PHSENSOR-TRANS-REFLECT-201111 3
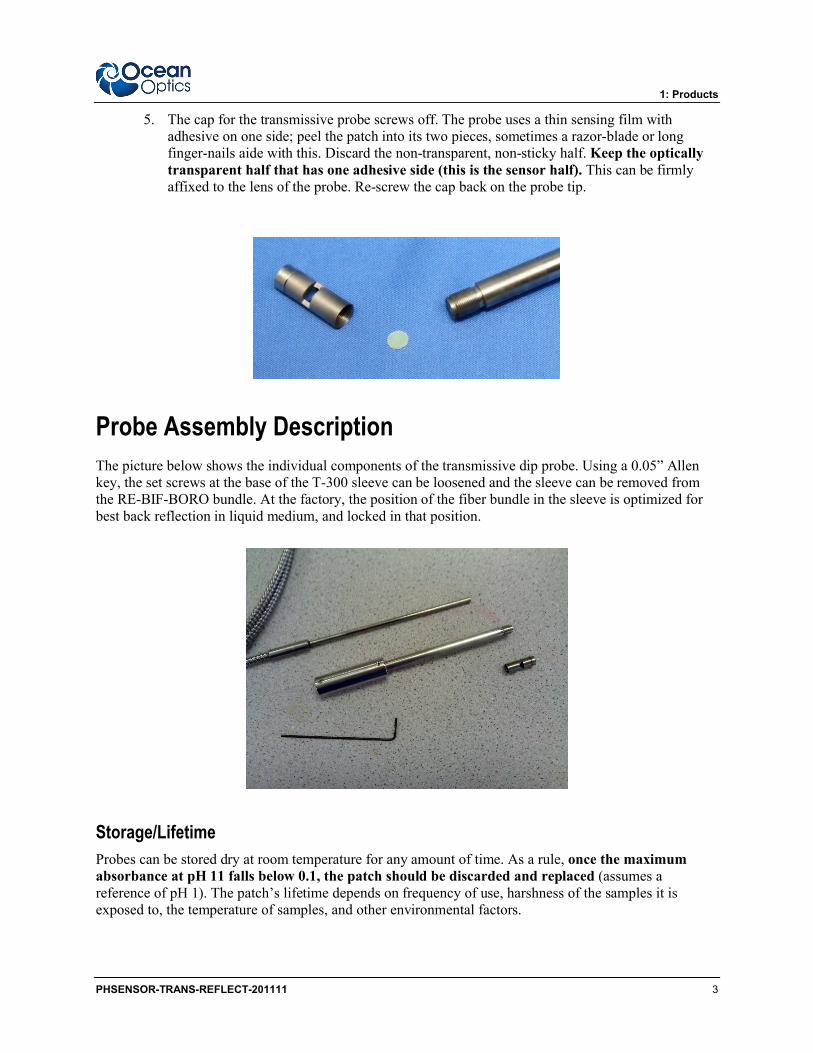
5. The cap for the transmissive probe screws off. The probe uses a thin sensing film with adhesive on one side; peel the patch into its two pieces, sometimes a razor-blade or long finger-nails aide with this. Discard the non-transparent, non-sticky half. Keep the optically transparent half that has one adhesive side (this is the sensor half). This can be firmly affixed to the lens of the probe. Re-screw the cap back on the probe tip.
Probe Assembly DescriptionThe picture below shows the individual components of the transmissive dip probe. Using a 0.05” Allen key, the set screws at the base of the T-300 sleeve can be loosened and the sleeve can be removed from the RE-BIF-BORO bundle. At the factory, the position of the fiber bundle in the sleeve is optimized for best back reflection in liquid medium, and locked in that position.
Storage/LifetimeProbes can be stored dry at room temperature for any amount of time. As a rule, once the maximum absorbance at pH 11 falls below 0.1, the patch should be discarded and replaced (assumes a reference of pH 1). The patch’s lifetime depends on frequency of use, harshness of the samples it is exposed to, the temperature of samples, and other environmental factors.
1: Products
4 PHSENSOR-TRANS-REFLECT-201111
Performance Specifications
Specification Ocean Optics pH Probe Value
pH range 5 – 9
Analytical Wavelength 620nm
Baseline Correction Wavelengths 512nm (isosbestic) or 750nm
Calibration Options User Calibration with 6 Buffers
Factory Calibration with 3 Buffers
Immediate Startup with No Buffers (requires undisturbed setup)
Typical Absorbance Range 0.20 – 0.40
Typical pK Range 6.1 – 6.5
Typical Slope Range 2.2 – 3.0
User Calibration Accuracy <1% of reading across range
Factory Reset Accuracy 0% at Reset Point
1% Within 1 pH unit of reset
Up to 4% at 3 pH units from reset
Resolution 0.02 pH
Response Time, t(90) 30 seconds
Stability No detectable drift for up to 12 hours
1% per day for long term monitoring
Interferences Cannot be used with colored or turbid liquids
Yellow liquids can be used if the 750nm baseline is used
Baseline Correction Wavelengths 512nm (isosbestic) or 750nm
Reflective pH Patches/Probe (nonintrusive)
Sensor System Components The nonintrusive Reflective pH Patch system consists of the following:
Reflective pH Probe – R1000-4-ANGLE
1: Products
PHSENSOR-TRANS-REFLECT-201111 5
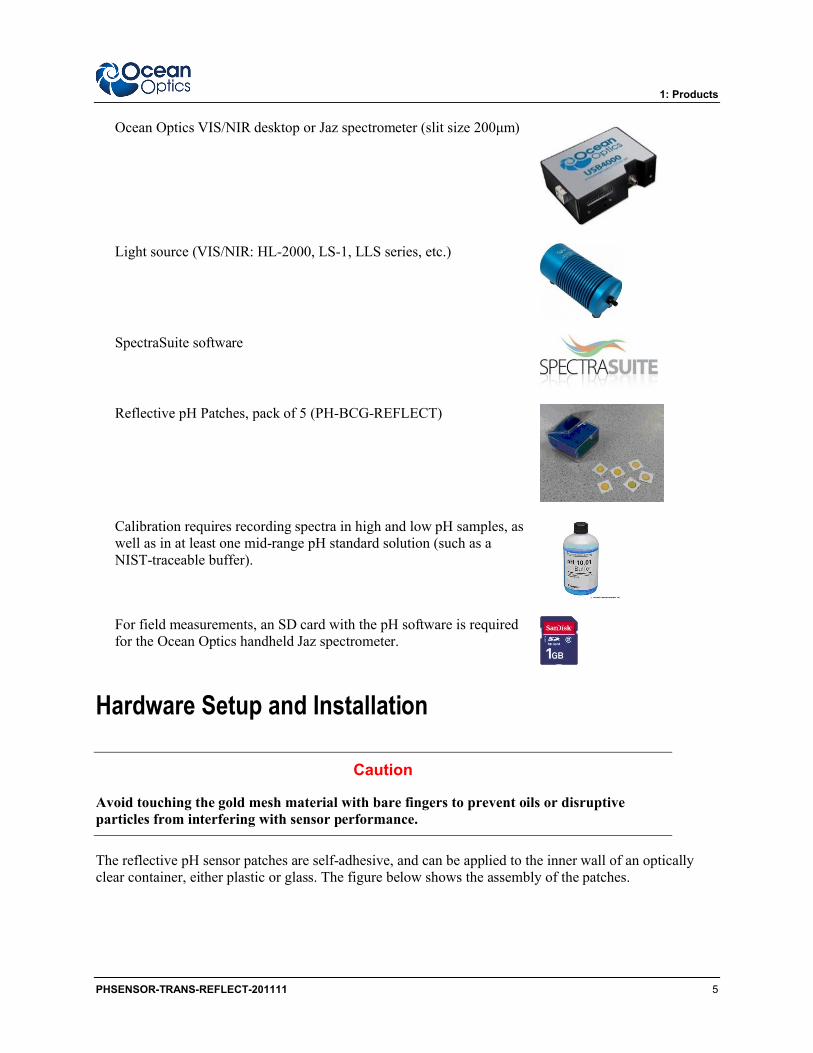
Ocean Optics VIS/NIR desktop or Jaz spectrometer (slit size 200μm)
Light source (VIS/NIR: HL-2000, LS-1, LLS series, etc.)
SpectraSuite software
Reflective pH Patches, pack of 5 (PH-BCG-REFLECT)
Calibration requires recording spectra in high and low pH samples, as well as in at least one mid-range pH standard solution (such as a NIST-traceable buffer).
For field measurements, an SD card with the pH software is required for the Ocean Optics handheld Jaz spectrometer.
Hardware Setup and Installation
Caution
Avoid touching the gold mesh material with bare fingers to prevent oils or disruptive particles from interfering with sensor performance.
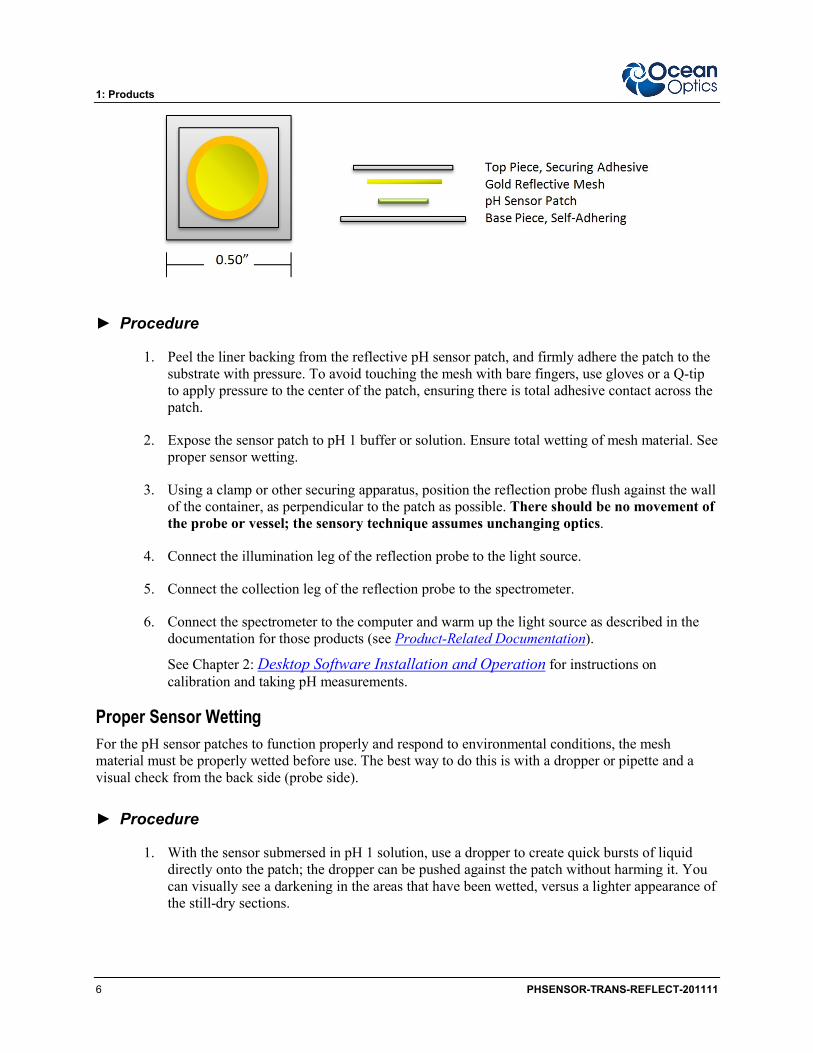
The reflective pH sensor patches are self-adhesive, and can be applied to the inner wall of an optically clear container, either plastic or glass. The figure below shows the assembly of the patches.
1: Products
6 PHSENSOR-TRANS-REFLECT-201111
► Procedure
1. Peel the liner backing from the reflective pH sensor patch, and firmly adhere the patch to the substrate with pressure. To avoid touching the mesh with bare fingers, use gloves or a Q-tip to apply pressure to the center of the patch, ensuring there is total adhesive contact across the patch.
2. Expose the sensor patch to pH 1 buffer or solution. Ensure total wetting of mesh material. See proper sensor wetting.
3. Using a clamp or other securing apparatus, position the reflection probe flush against the wall of the container, as perpendicular to the patch as possible. There should be no movement of the probe or vessel; the sensory technique assumes unchanging optics.
4. Connect the illumination leg of the reflection probe to the light source.
5. Connect the collection leg of the reflection probe to the spectrometer.
6. Connect the spectrometer to the computer and warm up the light source as described in the documentation for those products (see Product-Related Documentation).
See Chapter 2: Desktop Software Installation and Operation for instructions on calibration and taking pH measurements.
Proper Sensor WettingFor the pH sensor patches to function properly and respond to environmental conditions, the mesh material must be properly wetted before use. The best way to do this is with a dropper or pipette and a visual check from the back side (probe side).
► Procedure
1. With the sensor submersed in pH 1 solution, use a dropper to create quick bursts of liquid directly onto the patch; the dropper can be pushed against the patch without harming it. You can visually see a darkening in the areas that have been wetted, versus a lighter appearance of the still-dry sections.
1: Products
PHSENSOR-TRANS-REFLECT-201111 7
2. Continue streaming jets of liquid onto the patch until the entire backside looks uniformly dark and wet. This only needs to be done initially; once the mesh has been wetted, there is free and fast diffusion of ions in and out of the sensor material.
Storage/LifetimePatches can be stored dry at room temperature for any amount of time. As a rule, once the maximum absorbance at pH 11 falls below 0.1, the patch should be discarded and replaced (assumes a reference of pH 1). The patch’s lifetime depends on frequency of use, harshness of the samples it is exposed to, the temperature of samples, and other environmental factors.
Performance Specifications
Specification Ocean Optics pH Probe Value
pH range 4 – 9
Analytical Wavelength 617nm
Baseline Correction Wavelengths 509nm (isosbestic) or 800nm
Calibration Options User Calibration with 6 Buffers
Factory Calibration with 3 Buffers
Immediate Startup with No Buffers (requires undisturbed setup)
Typical Absorbance Range 0.12 – 0.25
Typical pK Range 6.1 – 6.5
Typical Slope Range 2.2 – 3.0
User Calibration Accuracy Up to 2% of reading
Factory Reset Accuracy 0% at reset point
1% Within 1 pH unit of reset
Up to 4% at 3 pH units from reset
Resolution About 0.03 pH unit in most cases (determined by distance of optics, probe type, and age of patch)
Response Time, t(90) 30 seconds (determined by salinity of sample and liquid flow at sensor interface)
Stability No detectable drift for up to 12 hours
1% per day for long term monitoring
Interferences Strong green or blue sample color may cause up to 0.25 pH unit increase
1: Products
8 PHSENSOR-TRANS-REFLECT-201111
Smart pH Cuvettes
Sensor System Components
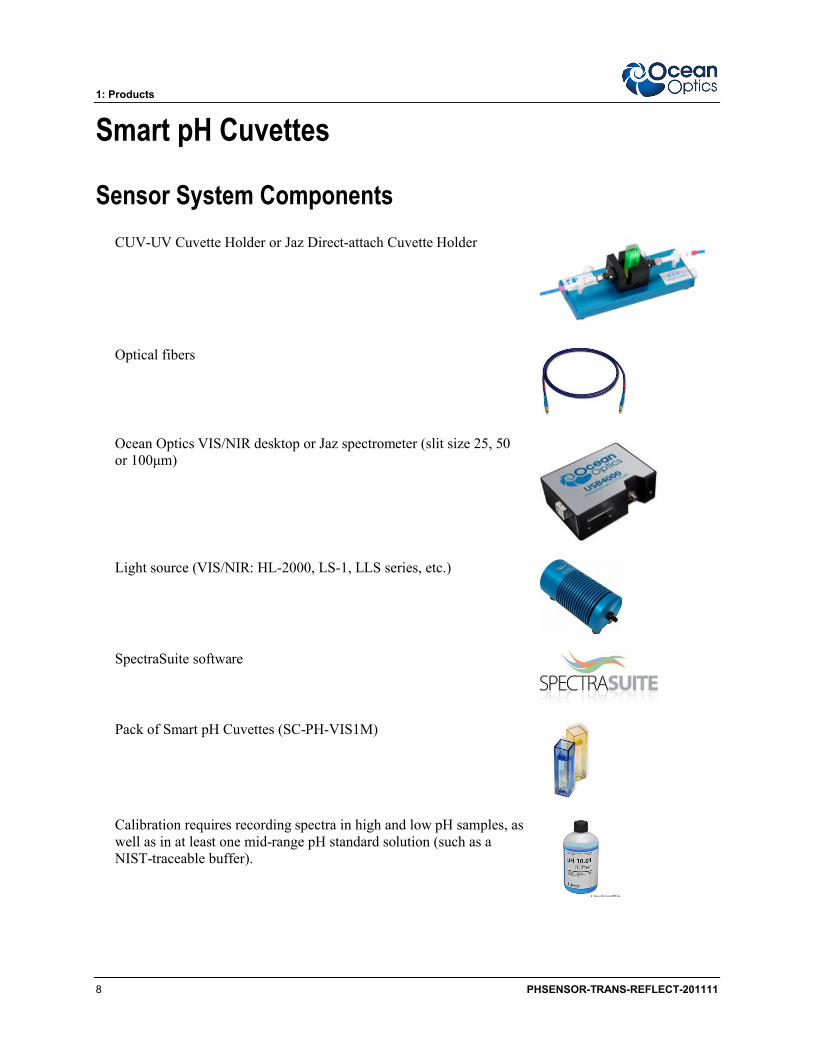
CUV-UV Cuvette Holder or Jaz Direct-attach Cuvette Holder
Optical fibers
Ocean Optics VIS/NIR desktop or Jaz spectrometer (slit size 25, 50 or 100μm)
Light source (VIS/NIR: HL-2000, LS-1, LLS series, etc.)
SpectraSuite software
Pack of Smart pH Cuvettes (SC-PH-VIS1M)
Calibration requires recording spectra in high and low pH samples, as well as in at least one mid-range pH standard solution (such as a NIST-traceable buffer).
1: Products
PHSENSOR-TRANS-REFLECT-201111 9
For field measurements, an SD card with the pH software is required for the Ocean Optics handheld Jaz spectrometer.
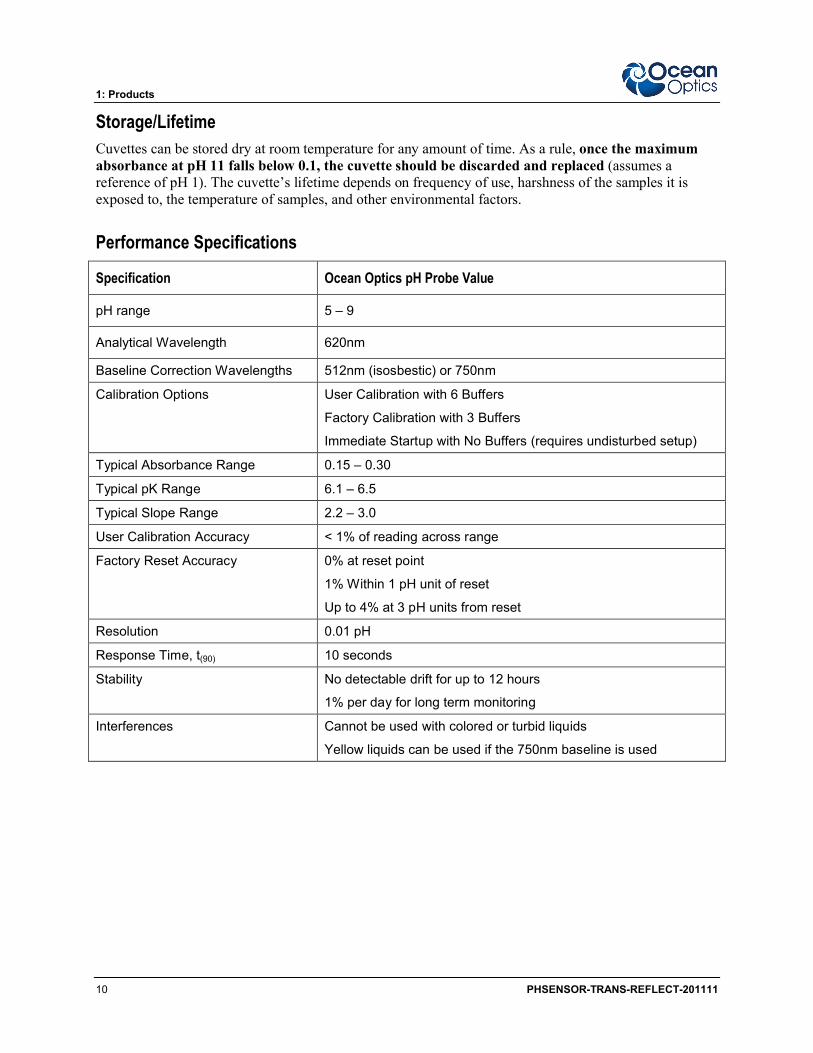
Hardware Setup and Installation
► Procedure
To install your pH Sensor components,
1. Install SpectraSuite on your computer.
2. Connect the spectrometer to your computer using the supplied USB cable.
3. Install the light source as specified in its instructions.
4. Attach the fibers between the spectrometer, cuvette holder, and light source.
5. Turn on the light source and allow it to warm up for the period specified in the light source instructions.
Caution
Make sure that the cuvette says fastened in the cuvette holder with the tightening screw and that it does not move until all measurements have been completed. Any movement will change the optical signal, disrupting the quality of the measurement.
1: Products
10 PHSENSOR-TRANS-REFLECT-201111
Storage/LifetimeCuvettes can be stored dry at room temperature for any amount of time. As a rule, once the maximum absorbance at pH 11 falls below 0.1, the cuvette should be discarded and replaced (assumes a reference of pH 1). The cuvette’s lifetime depends on frequency of use, harshness of the samples it is exposed to, the temperature of samples, and other environmental factors.
Performance Specifications
Specification Ocean Optics pH Probe Value
pH range 5 – 9
Analytical Wavelength 620nm
Baseline Correction Wavelengths 512nm (isosbestic) or 750nm
Calibration Options User Calibration with 6 Buffers
Factory Calibration with 3 Buffers
Immediate Startup with No Buffers (requires undisturbed setup)
Typical Absorbance Range 0.15 – 0.30
Typical pK Range 6.1 – 6.5
Typical Slope Range 2.2 – 3.0
User Calibration Accuracy < 1% of reading across range
Factory Reset Accuracy 0% at reset point
1% Within 1 pH unit of reset
Up to 4% at 3 pH units from reset
Resolution 0.01 pH
Response Time, t(90) 10 seconds
Stability No detectable drift for up to 12 hours
1% per day for long term monitoring
Interferences Cannot be used with colored or turbid liquids
Yellow liquids can be used if the 750nm baseline is used
PHSENSOR-TRANS-REFLECT-201111 11
Chapter 2
Desktop Software Installation and Operation
Calibrating the pH Sensor SystemThe pH sensor patches and cuvettes include a pre-calibrated pK value determined at the factory. This value was originally obtained at 22°C, and it is recalculated using the temperature compensation algorithm based on the temperature that was entered in SpectraSuite’s calibration wizard. Using the factory calibration method is ideal for being able to start making pH measurements quickly, though it is less accurate than performing an independent user calibration.
Using SpectraSuiteThe following sections describe performing a calibration and taking pH measurments using SpectraSuite software. For more information on using SpectraSuite software, refer to the SpectraSuite Software Installation and Operation Manual (see Product-Related Documentation).
Performing a Factory Calibration with SpectraSuite
Using Factory Calibration
► Procedure
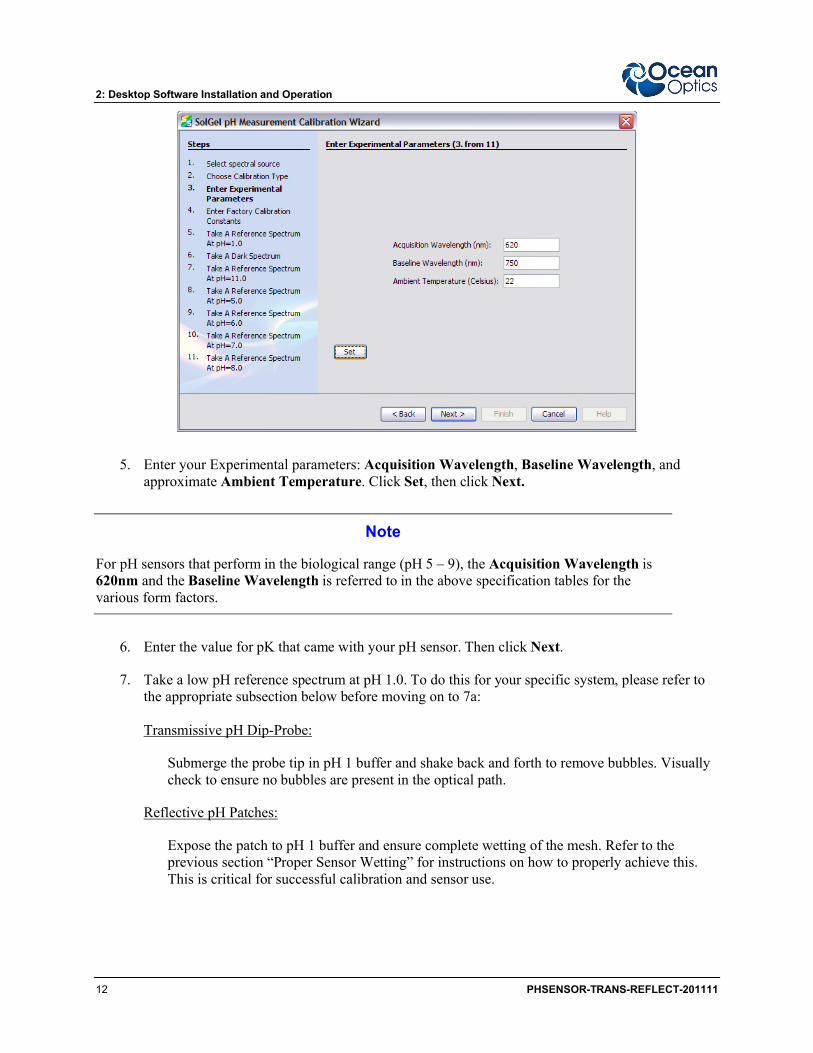
1. Open SpectraSuite and select File | New | New Sol Gel pH Measurement.
2. Click the Calibration Wizard button to begin the calibration.
3. Select the spectrometer to use and click Next.
4. Select Use Factory Calibration and then click Next. The Enter Experimental Parametersscreen appears.
2: Desktop Software Installation and Operation
12 PHSENSOR-TRANS-REFLECT-201111
5. Enter your Experimental parameters: Acquisition Wavelength, Baseline Wavelength, and approximate Ambient Temperature. Click Set, then click Next.
Note
For pH sensors that perform in the biological range (pH 5 – 9), the Acquisition Wavelength is 620nm and the Baseline Wavelength is referred to in the above specification tables for the various form factors.
6. Enter the value for pK that came with your pH sensor. Then click Next.
7. Take a low pH reference spectrum at pH 1.0. To do this for your specific system, please refer to the appropriate subsection below before moving on to 7a:
Transmissive pH Dip-Probe:
Submerge the probe tip in pH 1 buffer and shake back and forth to remove bubbles. Visually check to ensure no bubbles are present in the optical path.
Reflective pH Patches:
Expose the patch to pH 1 buffer and ensure complete wetting of the mesh. Refer to the previous section “Proper Sensor Wetting” for instructions on how to properly achieve this. This is critical for successful calibration and sensor use.
2: Desktop Software Installation and Operation
PHSENSOR-TRANS-REFLECT-201111 13
Smart pH Cuvettes:
Use a dropper or pipette to add buffer to the cuvette. Ensure the cuvette is over half way filled so that the optical path is entirely through the liquid phase. Do not remove the cuvette from the holder to dump out the liquid. Use a dropper or pipette for both addition and removal of standards and analytes within the cuvette. It is recommended to perform one rinse of the buffer or sample before taking a measurement or reference.
a. Wait 30 seconds, then click Acquire. The system will automatically adjust the integration time to prevent saturation. The spectrum shown should have a maximum intensity around 80% of the saturation level. If saturation is occurring, reduce the integration time appropriately. If the signal is too low, increase the integration time until the intensity at 620nm is at least over 1000 counts.
b. You can click Acquire repeatedly to update the spectrum after adjusting the integration time; the last time you press the button will be the last reference that is saved.
c. Once the signal looks strong, make sure you’ve updated the acquisition and then click Next.
8. Take a dark spectrum. To do this, block the light source and click Acquire Dark Spectrum. Then click Next. Be sure to allow enough time for the system to complete an entire scan while in the dark before acquiring the spectrum.
9. Unblock the light source.
10. Take a high reference spectrum for pH 11.0.
Transmissive pH Dip-Probe:Submerge the probe tip in pH 11 buffer and shake back and forth to remove bubbles. It’s a good idea to rinse the probe with buffer before submersion to ensure residual buffer from before does not contaminate your sample.
Reflective pH Patches:Remove the pH 1 buffer without moving the setup, either via pipettor or other device. Replace with pH 11 buffer, and then remove and add fresh buffer to ensure proper rinsing.
Smart pH Cuvettes:
Remove the pH 1 buffer with a pipette, without moving the cuvette or optical components. Replace with pH 11 buffer, and then remove and add fresh buffer to ensure proper rinsing.
Allow 30 seconds, and then click Acquire. When complete, click Next.
11. Depending on the value for pK you previously entered, the wizard will ask you to expose the probe to either pH 5 or pH 8. For pK values less than 6.5, pH 8 is used; for pK value greater than 6.5, pH 5 is used. Similar to the buffer exposure instructions above, appropriately expose the sensor to the requested pH buffer. Allow 30 seconds, click Acquire, and then click Finish.
2: Desktop Software Installation and Operation
14 PHSENSOR-TRANS-REFLECT-201111
12. You are now ready to take pH measurements. See Taking pH Measurements with SpectraSuite.
Performing a User Calibration with SpectraSuite
► Procedure
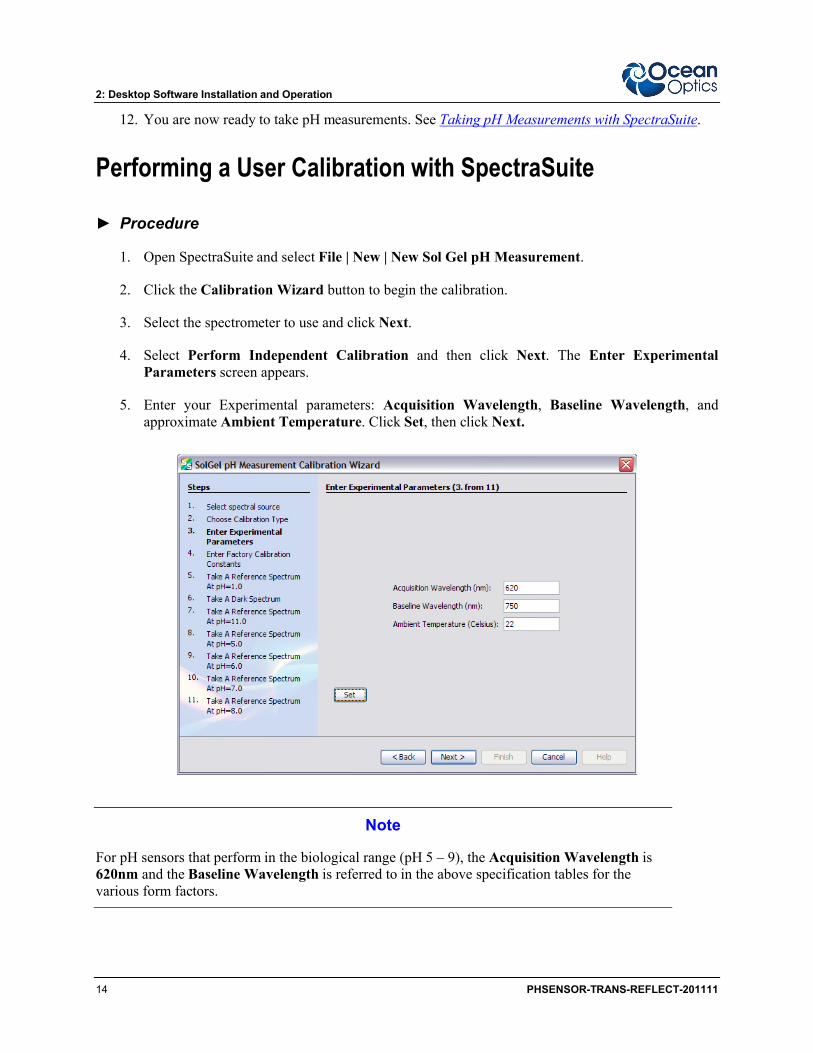
1. Open SpectraSuite and select File | New | New Sol Gel pH Measurement.
2. Click the Calibration Wizard button to begin the calibration.
3. Select the spectrometer to use and click Next.
4. Select Perform Independent Calibration and then click Next. The Enter Experimental Parameters screen appears.
5. Enter your Experimental parameters: Acquisition Wavelength, Baseline Wavelength, and approximate Ambient Temperature. Click Set, then click Next.
Note
For pH sensors that perform in the biological range (pH 5 – 9), the Acquisition Wavelength is 620nm and the Baseline Wavelength is referred to in the above specification tables for the various form factors.
2: Desktop Software Installation and Operation
PHSENSOR-TRANS-REFLECT-201111 15
6. Take a low pH reference spectrum at pH 1.0. To do this for your specific system, please refer to the appropriate subsection below before moving on to 7a:
Transmissive pH Dip-Probe:
Submerge the probe tip in pH 1 buffer and shake back and forth to remove bubbles. Visually check to ensure no bubbles are present in the optical path.
Reflective pH Patches:
Expose the patch to pH 1 buffer and ensure complete wetting of the mesh. Refer to the previous section “Proper Sensor Wetting” for instructions on how to properly achieve this. This is critical for successful calibration and sensor use.
Smart pH Cuvettes:
Use a dropper or pipette to add buffer to the cuvette. Ensure the cuvette is over half way filled so that the optical path is entirely through the liquid phase. Do not remove the cuvette from the holder to dump out the liquid. Use a dropper or pipette for both addition and removal of standards and analytes within the cuvette. It is recommended to perform one rinse of the buffer or sample before taking a measurement or reference.
a. Wait 30 seconds, then click Acquire. The spectrum shown should have a maximum intensity around 80% of the saturation level. If saturation is occurring, reduce the integration time appropriately. If the signal is too low, increase the integration time until the intensity at 620nm is at least over 1000 counts.
b. You can click Acquire repeatedly to update the spectrum after adjusting the integration time; the last time you press the button will be the last reference that is saved.
c. Once the signal looks strong, make sure you’ve updated the acquisition and then click Next.
7. Take a dark spectrum. To do this, block the light source and click Acquire Dark Spectrum. Then click Next. Be sure to allow enough time for the system to complete an entire scan while in the dark before acquiring the spectrum.
8. Unblock the light source.
9. Take a high reference spectrum for pH 11.0.
Transmissive pH Dip-Probe:Submerge the probe tip in pH 11 buffer and shake back and forth to remove bubbles. It’s a good idea to rinse the probe with buffer before submersion to ensure residual buffer from before does not contaminate your sample.
Reflective pH Patches:Remove the pH 1 buffer without moving the setup, either via pipettor or other device. Replace with pH 11 buffer, and then remove and add fresh buffer to ensure proper rinsing.
2: Desktop Software Installation and Operation
16 PHSENSOR-TRANS-REFLECT-201111
Smart pH Cuvettes:
Remove the pH 1 buffer with a pipette, without moving the cuvette or optical components. Replace with pH 11 buffer, and then remove and add fresh buffer to ensure proper rinsing.
Allow 30 seconds, and then click Acquire. When complete, click Next.
10. Follow the wizard and repeat Step 9 for pH buffers 5, 6, 7, and 8 (follow on-screen prompts). Again, it is a good idea to rinse the sensor with buffer before submersion to prevent sample contamination. Then, click Finish.
You are now ready to take pH measurements.
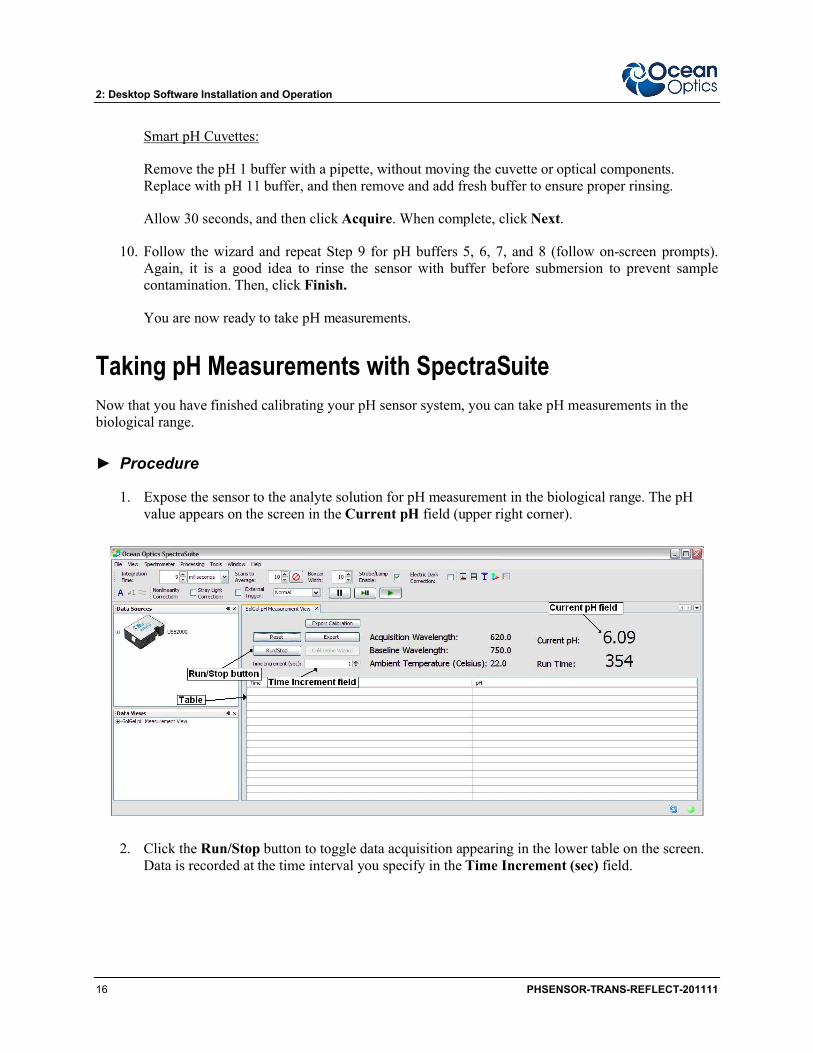
Taking pH Measurements with SpectraSuiteNow that you have finished calibrating your pH sensor system, you can take pH measurements in the biological range.
► Procedure
1. Expose the sensor to the analyte solution for pH measurement in the biological range. The pH value appears on the screen in the Current pH field (upper right corner).
2. Click the Run/Stop button to toggle data acquisition appearing in the lower table on the screen. Data is recorded at the time interval you specify in the Time Increment (sec) field.
2: Desktop Software Installation and Operation
PHSENSOR-TRANS-REFLECT-201111 17
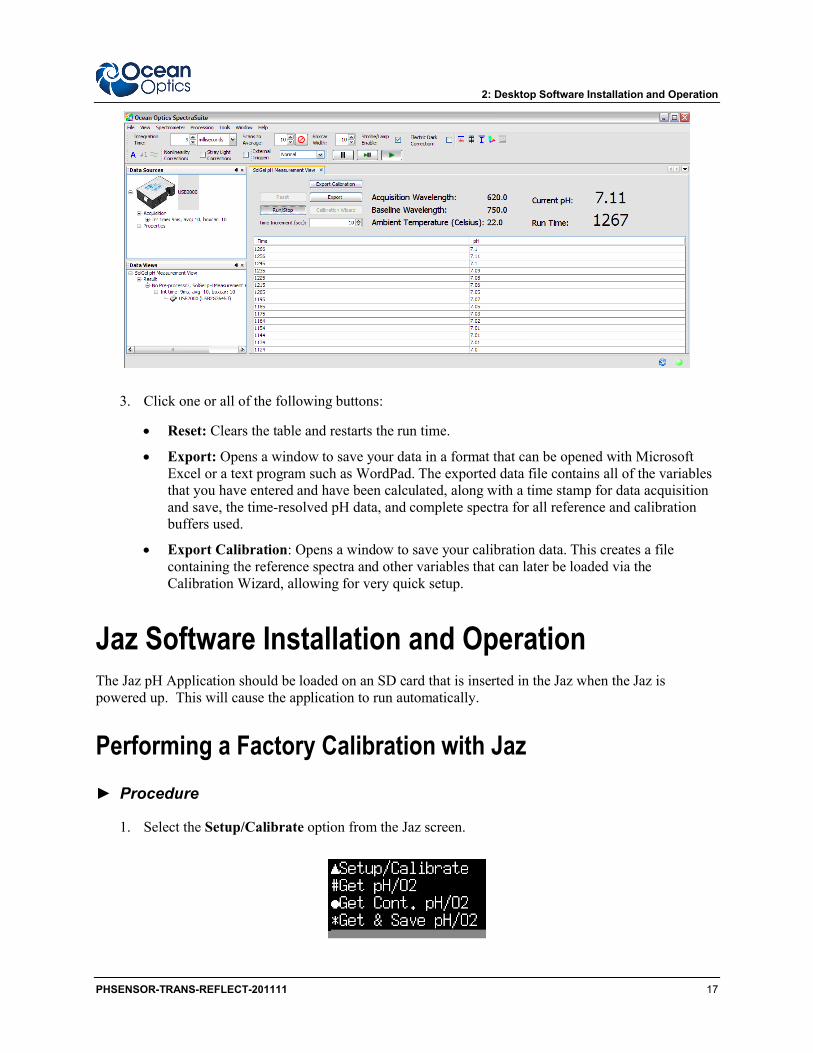
3. Click one or all of the following buttons:
Reset: Clears the table and restarts the run time.
Export: Opens a window to save your data in a format that can be opened with Microsoft Excel or a text program such as WordPad. The exported data file contains all of the variables that you have entered and have been calculated, along with a time stamp for data acquisition and save, the time-resolved pH data, and complete spectra for all reference and calibration buffers used.
Export Calibration: Opens a window to save your calibration data. This creates a file containing the reference spectra and other variables that can later be loaded via the Calibration Wizard, allowing for very quick setup.
Jaz Software Installation and OperationThe Jaz pH Application should be loaded on an SD card that is inserted in the Jaz when the Jaz is powered up. This will cause the application to run automatically.
Performing a Factory Calibration with Jaz
► Procedure
1. Select the Setup/Calibrate option from the Jaz screen.
2: Desktop Software Installation and Operation
18 PHSENSOR-TRANS-REFLECT-201111
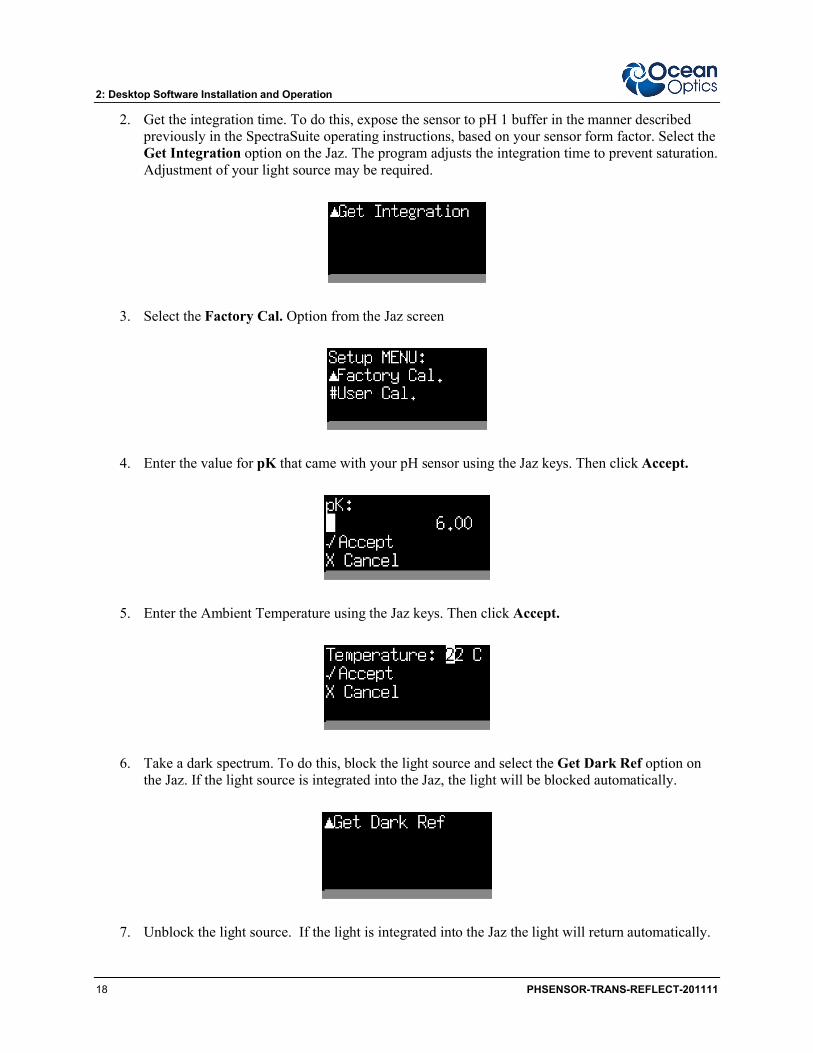
2. Get the integration time. To do this, expose the sensor to pH 1 buffer in the manner described previously in the SpectraSuite operating instructions, based on your sensor form factor. Select the Get Integration option on the Jaz. The program adjusts the integration time to prevent saturation. Adjustment of your light source may be required.
3. Select the Factory Cal. Option from the Jaz screen
4. Enter the value for pK that came with your pH sensor using the Jaz keys. Then click Accept.
5. Enter the Ambient Temperature using the Jaz keys. Then click Accept.
6. Take a dark spectrum. To do this, block the light source and select the Get Dark Ref option on the Jaz. If the light source is integrated into the Jaz, the light will be blocked automatically.
7. Unblock the light source. If the light is integrated into the Jaz the light will return automatically.
2: Desktop Software Installation and Operation
PHSENSOR-TRANS-REFLECT-201111 19
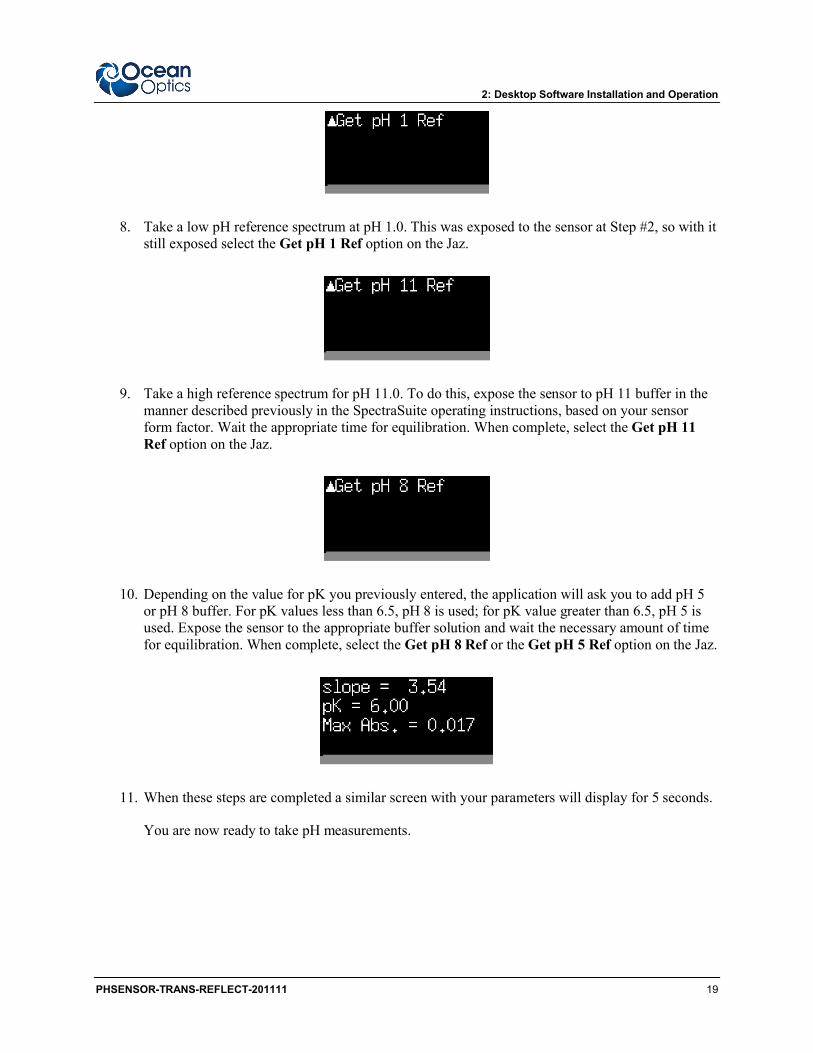
8. Take a low pH reference spectrum at pH 1.0. This was exposed to the sensor at Step #2, so with it still exposed select the Get pH 1 Ref option on the Jaz.
9. Take a high reference spectrum for pH 11.0. To do this, expose the sensor to pH 11 buffer in the manner described previously in the SpectraSuite operating instructions, based on your sensor form factor. Wait the appropriate time for equilibration. When complete, select the Get pH 11 Ref option on the Jaz.
10. Depending on the value for pK you previously entered, the application will ask you to add pH 5 or pH 8 buffer. For pK values less than 6.5, pH 8 is used; for pK value greater than 6.5, pH 5 is used. Expose the sensor to the appropriate buffer solution and wait the necessary amount of time for equilibration. When complete, select the Get pH 8 Ref or the Get pH 5 Ref option on the Jaz.
11. When these steps are completed a similar screen with your parameters will display for 5 seconds.
You are now ready to take pH measurements.
2: Desktop Software Installation and Operation
20 PHSENSOR-TRANS-REFLECT-201111
Performing a User Calibration with Jaz
► Procedure
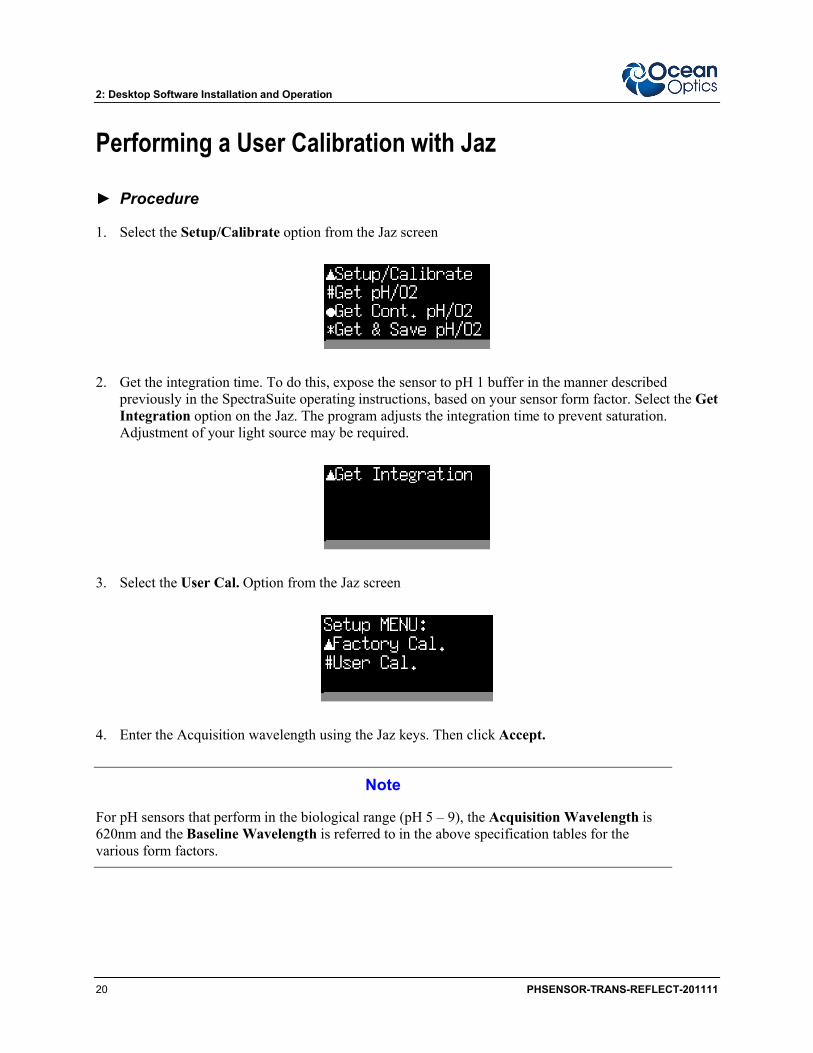
1. Select the Setup/Calibrate option from the Jaz screen
2. Get the integration time. To do this, expose the sensor to pH 1 buffer in the manner described previously in the SpectraSuite operating instructions, based on your sensor form factor. Select the Get Integration option on the Jaz. The program adjusts the integration time to prevent saturation. Adjustment of your light source may be required.
3. Select the User Cal. Option from the Jaz screen
4. Enter the Acquisition wavelength using the Jaz keys. Then click Accept.
Note
For pH sensors that perform in the biological range (pH 5 – 9), the Acquisition Wavelength is 620nm and the Baseline Wavelength is referred to in the above specification tables for the various form factors.
2: Desktop Software Installation and Operation
PHSENSOR-TRANS-REFLECT-201111 21
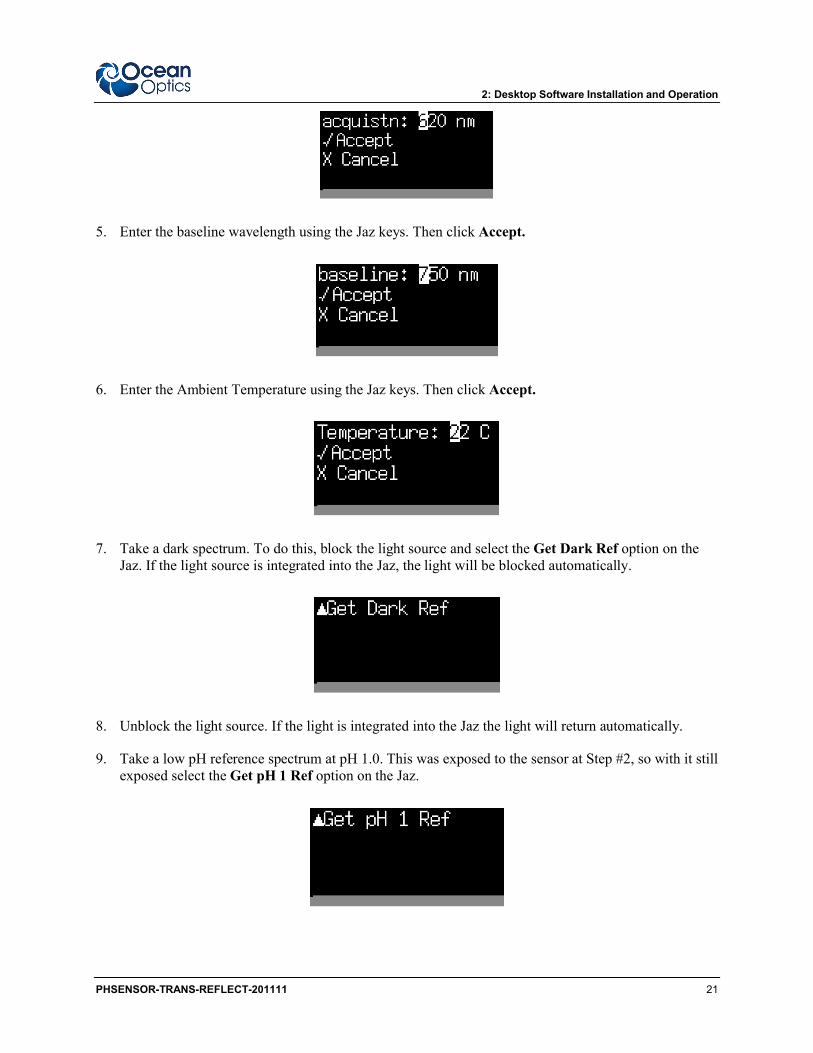
5. Enter the baseline wavelength using the Jaz keys. Then click Accept.
6. Enter the Ambient Temperature using the Jaz keys. Then click Accept.
7. Take a dark spectrum. To do this, block the light source and select the Get Dark Ref option on the Jaz. If the light source is integrated into the Jaz, the light will be blocked automatically.
8. Unblock the light source. If the light is integrated into the Jaz the light will return automatically.
9. Take a low pH reference spectrum at pH 1.0. This was exposed to the sensor at Step #2, so with it still exposed select the Get pH 1 Ref option on the Jaz.
2: Desktop Software Installation and Operation
22 PHSENSOR-TRANS-REFLECT-201111
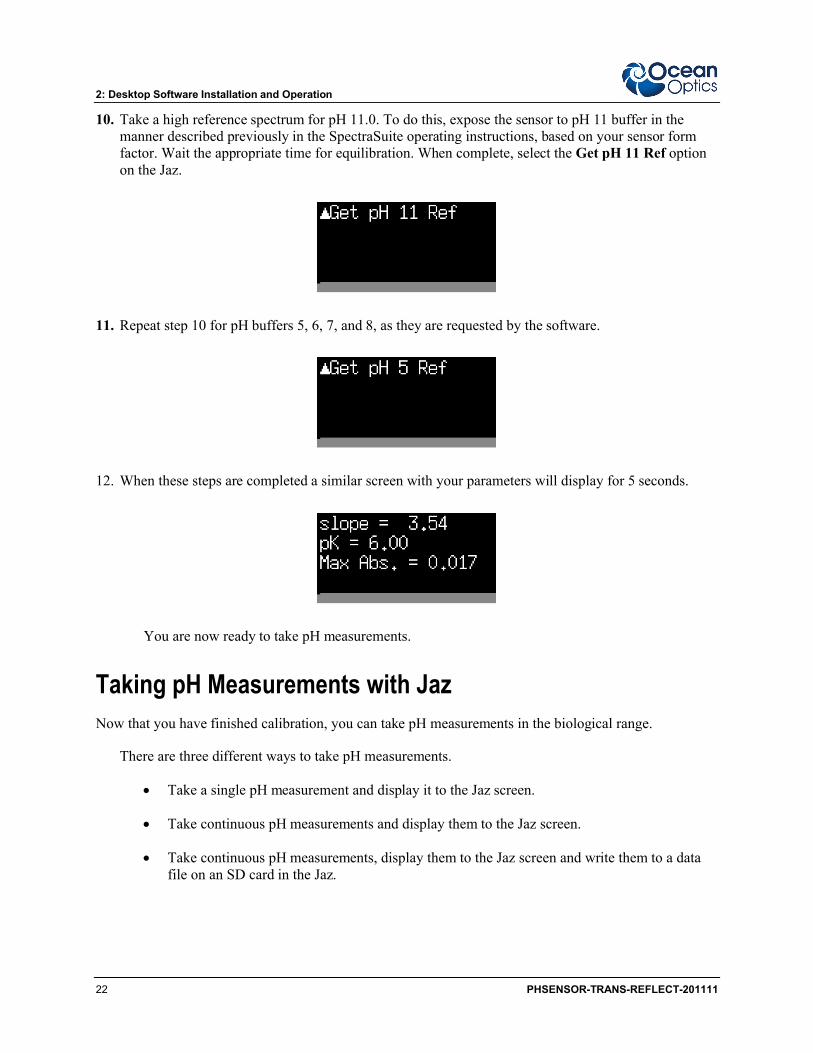
10. Take a high reference spectrum for pH 11.0. To do this, expose the sensor to pH 11 buffer in the manner described previously in the SpectraSuite operating instructions, based on your sensor form factor. Wait the appropriate time for equilibration. When complete, select the Get pH 11 Ref option on the Jaz.
11. Repeat step 10 for pH buffers 5, 6, 7, and 8, as they are requested by the software.
12. When these steps are completed a similar screen with your parameters will display for 5 seconds.
You are now ready to take pH measurements.
Taking pH Measurements with JazNow that you have finished calibration, you can take pH measurements in the biological range.
There are three different ways to take pH measurements.
Take a single pH measurement and display it to the Jaz screen.
Take continuous pH measurements and display them to the Jaz screen.
Take continuous pH measurements, display them to the Jaz screen and write them to a data file on an SD card in the Jaz.
2: Desktop Software Installation and Operation
PHSENSOR-TRANS-REFLECT-201111 23
Take a Single pH Measurement and Display It to the Jaz Screen
► Procedure
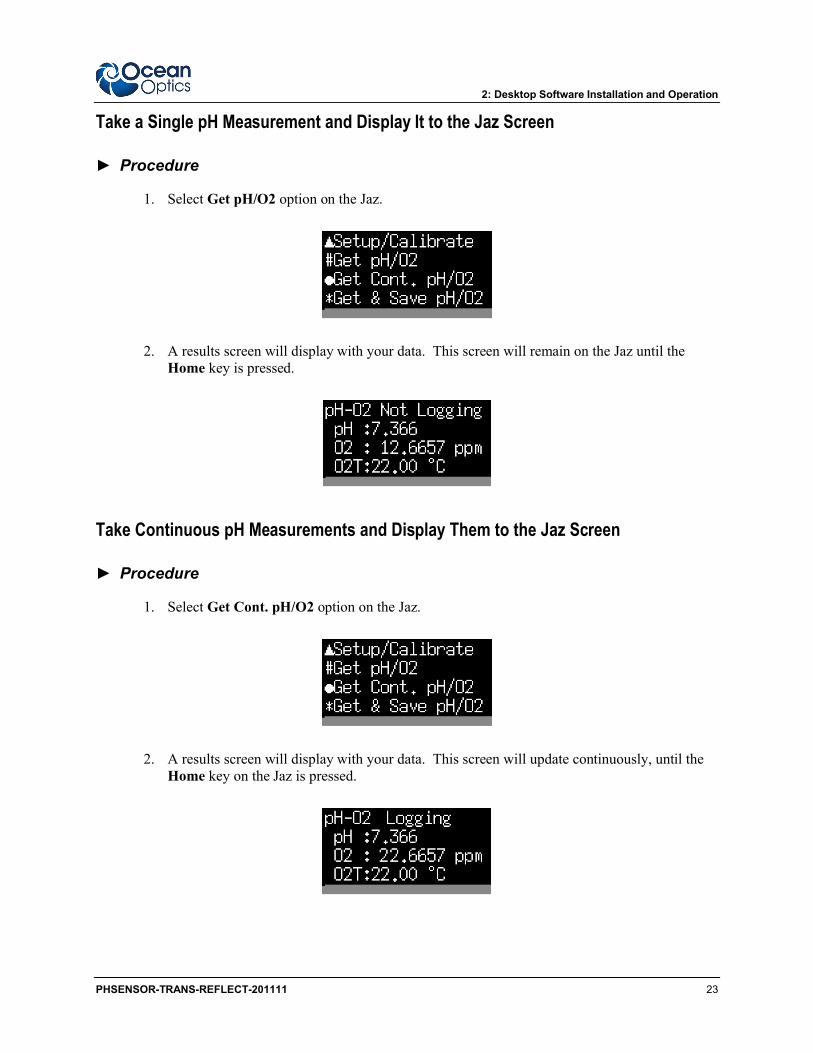
1. Select Get pH/O2 option on the Jaz.
2. A results screen will display with your data. This screen will remain on the Jaz until the Home key is pressed.
Take Continuous pH Measurements and Display Them to the Jaz Screen
► Procedure
1. Select Get Cont. pH/O2 option on the Jaz.
2. A results screen will display with your data. This screen will update continuously, until the Home key on the Jaz is pressed.
2: Desktop Software Installation and Operation
24 PHSENSOR-TRANS-REFLECT-201111
Take Continuous pH Measurements and Write Them to a Data File
► Procedure
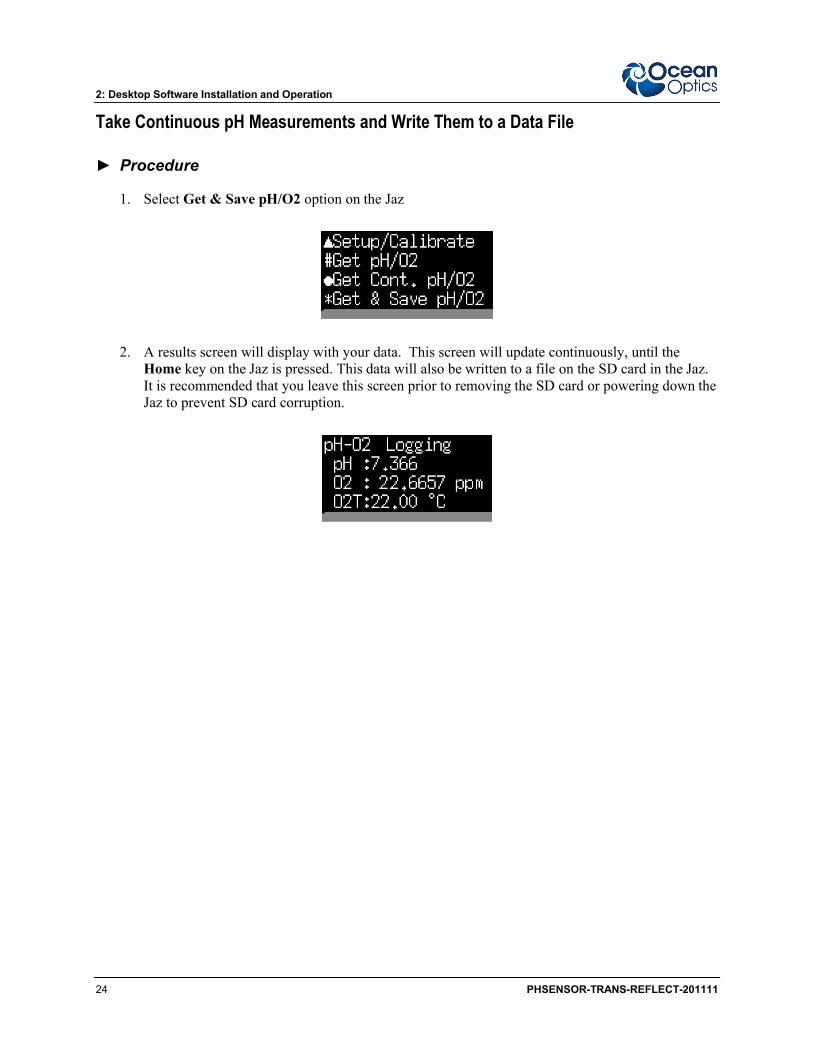
1. Select Get & Save pH/O2 option on the Jaz
2. A results screen will display with your data. This screen will update continuously, until the Home key on the Jaz is pressed. This data will also be written to a file on the SD card in the Jaz. It is recommended that you leave this screen prior to removing the SD card or powering down the Jaz to prevent SD card corruption.
PHSENSOR-TRANS-REFLECT-201111 25
Appendix A
Algorithms Used
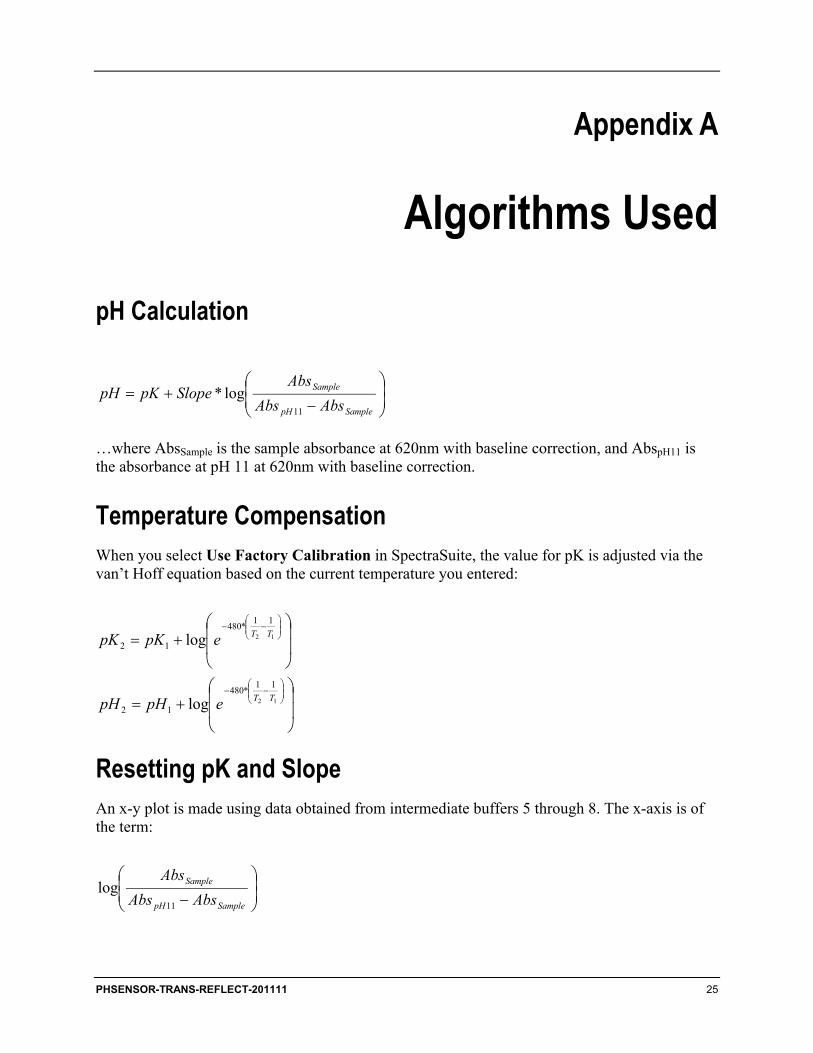
pH Calculation
SamplepH
Sample
AbsAbs
AbsSlopepKpH
11
log*
…where AbsSample is the sample absorbance at 620nm with baseline correction, and AbspH11 is the absorbance at pH 11 at 620nm with baseline correction.
Temperature CompensationWhen you select Use Factory Calibration in SpectraSuite, the value for pK is adjusted via the van’t Hoff equation based on the current temperature you entered:
12
12
11*480
12
11*480
12
log
log
TT
TT
epHpH
epKpK
Resetting pK and SlopeAn x-y plot is made using data obtained from intermediate buffers 5 through 8. The x-axis is of the term:
SamplepH
Sample
AbsAbs
Abs
11
log
A: Algorithms Used
26 PHSENSOR-TRANS-REFLECT-201111
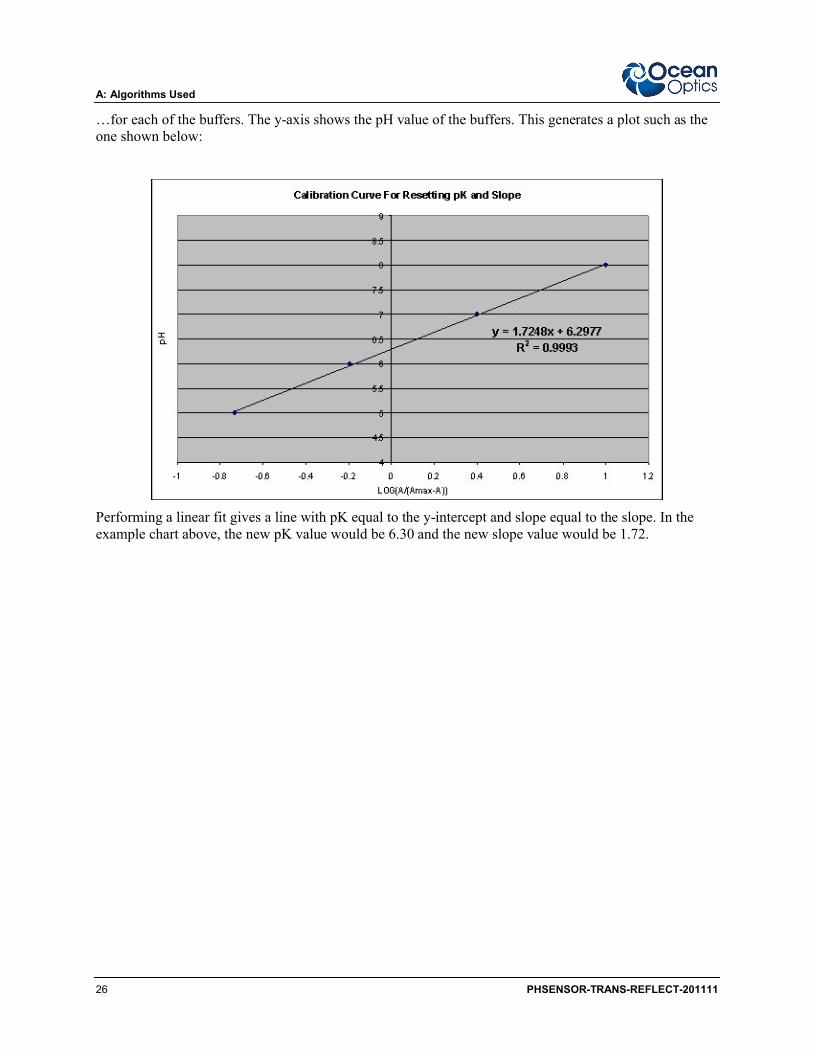
…for each of the buffers. The y-axis shows the pH value of the buffers. This generates a plot such as the one shown below:
Performing a linear fit gives a line with pK equal to the y-intercept and slope equal to the slope. In the example chart above, the new pK value would be 6.30 and the new slope value would be 1.72.
PHSENSOR-TRANS-REFLECT-201111 27
Appendix B
Troubleshooting
OverviewThe following are common sources of error.
Transmissive pH Probes
Problem Possible Cause/Suggested Solution
Bubbles If there are bubbles present in the optical path, the signal will be disrupted and reported values will not be correct. Perform a visual check to ensure there are no bubbles.
Saturation If the spectrometer is still saturating after SpectraSuite auto-adjusts the integration time, you may be using a spectrometer with too large a slit. An attenuator will fix the issue.
Colored or turbid analyte If there is sediment or color in the solution being measured, this will disrupt the quality of reading. Reflective pH Patches should be used in these cases.
Reflective pH Patches
Problem Possible Cause/Suggested Solution
Improper wetting The mesh must be fully wetted for proper sensor performance.
Insufficient scan time Reflective pH patches typically have a much lower optical signal, and therefore a complete spectrometer scan occurs much slower than the transmissive form factors. A scan may take up to 2 seconds to complete, and improper references and readings will be made if the user takes an acquisition before the electronics have sufficiently caught-up.
B: Troubleshooting
28 PHSENSOR-TRANS-REFLECT-201111
Problem Possible Cause/Suggested Solution
Unsteady and improper setup
If the vessel or probe has play in its ability to move, this will disrupt the quality of the reading; all components should be entirely static and fixed. Additionally, the probe should be as close to the patch as possible, flush against the container. Containers with wall thicknesses greater than 2mm are not recommended.
Smart pH Cuvettes
Problem Possible Cause/Suggested Solution
Moving cuvette The cuvette should not be removed once usage has begun; use only a pipette or dropper to add and remove liquids.
Saturation If the spectrometer is still saturating after SpectraSuite auto-adjusts the integration time, you may be using a spectrometer with too large a slit. An attenuator will fix the issue.
Colored or turbid analyte If there is sediment or color in the solution being measured, this will disrupt the quality of reading. Reflective pH Patches should be used in these cases.
All Form Factors
Problem Possible Cause/Suggested Solution
Insufficient Equilibration Time
While Smart pH Cuvettes may only need a few seconds to fully respond, the reflective patches may require up to 60 seconds for low salinity samples. If references and calibration points are taken without sufficient equilibration time, the sensor will not read valid values.
Group 2 Elements If your reference buffers or sample to be measured contain a notable amount of alkaline earth metal salts (group 2 elements), the sensor will not give valid readings. Likewise, borate buffers have about a 0.50 pH unit error from their actual value.
SterilizationAll form factors can be sterilized by ethylene oxide or gamma exposure.
PHSENSOR-TRANS-REFLECT-201111 29
Index
Aalgorithms, 25
pH calculation, 25resetting pK and slope, 25temperature compensation, 25
Ccalibration, 11
using SpectraSuite, 11calibration with Jaz
factory, 17user, 20
calibration with SpectraSuitefactory, 11user, 14
Ddocument
audience, iipurpose, iisummary, ii
documentation, ii
Ffactory calibration
with Jaz, 17with SpectraSuite, 11
Iinstallation
reflective pH patches/probe, 5Smart Cuvettes, 9transmissive pH patch/probe, 2
JJaz
continuous pH measurement to data file, 24continuous pH measurements, 23single pH measurement, 23software, 17taking pH measurements, 22
Llifetime
reflective pH patches, 7Smart Cuvettes, 10transmissive pH probe, 3
OOxygen Sensors
How Oxygen Sensors Work, 5
PpH measurements
with Jaz, 22with SpectraSuite, 16
pH SensorsSet Up, 11, 14
products, 1
Rreflective pH patches
lifetime, 7storage, 7
reflective pH patches/probe, 4hardware installation, 5hardware setup, 5wetting, 6
reflective pH probespecifications, 7

Index
30 PHSENSOR-TRANS-REFLECT-201111
SSD card
write continous pH measurements, 24setup
reflective pH patches/probe, 5Smart Cuvettes, 9transmissive pH patches/probe, 2
Smart Cuvettes, 8hardware installation, 9hardware setup, 9lifetime, 10specifications, 10storage, 10
softwaredesktop, 11installation, 11Jaz, 17operation, 11
specificationsreflective pH probe, 7Smart Cuvettes, 10transmissive pH probe, 4
SpectraSuitetaking pH measurements, 16using to calibrate, 11
sterilization, 28storage
reflective pH patches, 7Smart Cuvettes, 10transmissive pH probe, 3
Ttransmissive pH patches/probe, 1
hardware installation, 2hardware setup, 2
transmissive pH probe, 3lifetime, 3specifications, 4storage, 3
troubleshooting, 27all form factors, 28reflective pH patches, 27Smart pH cuvettes, 28transmissive pH probe, 27
Uupgrades, iiiuser calibration
with Jaz, 20with SpectraSuite, 14
Wwetting
reflective pH patches/probe, 6