Embed Size (px)
Citation preview
| 1
Manual
piccure+
English Version (v.3)
Photo by Nicolas Reusens

| 2
We are very glad that you have started using piccure+ or want to give it a try. We put a lot of effort into makingpiccure+ easy and intuitive to use. This handbook serves as a reference for anybody who wants to dive deeper intothe details and learn all the ins and outs of the program.
Generally, you should be able to use piccure+ without reading through this handbook.
Nevertheless, we would recommend you take a look at the few sections marked with an * in the Table of Contents.This will give you the basic knowledge you need.
If you should have any problems, please do not hesitate to send an email to our support staff [email protected].
Before contacting support, please have a quick look through the handbook to see whether the problem you areexperiencing is described and a solution provided. This will allow us to provide quality customer support and tohandle those questions that are not covered in the manual.
General remarks

| 3
1. Getting started 4Overview - Why piccure+?Changelog for version 3Presets/Suggestions for parameter settingsFAQ*InstallationStandalone version
- RAW filesUsing piccure+ as a plug-in in Adobe® Photoshop®, Lightroom®, DxO Optics Pro®,or Capture One® *Working fast and efficiently with piccure+*
2. Tutorial—Quick tour through piccure+ * 26
3. Lens+ 33How to get the best results*
4. Motion+ 34How to get the best results*Defining SmartSpots*
5. Summary 43
6. Support & Legal Information 44LensDiscovery32-bit versus 64-bit (Warning)
Table of Contents
* Recommended
| 4
piccure+ is the successor of piccure, a special softwaresolution to reverse the effects of camera shake inimages.
piccure+ is a software solution that employs highlysophisticated, intelligent algorithms to correct anumber of possible causes of image degradation:
§ Optical imperfections in the lens (e.g. lenssoftness, chromatic aberration) via Lens+.
§ Camera shake (camera moved during exposure)via Motion+.
Is it really new?Even though there have been a number of softwaresolutions on the market for these respective problems,piccure+ is unique.
§ It does not need to rely on a set of predefinedlens/camera profiles because opticalaberrations for your lens are calculatedindividually.
§ It has an easy-to-use interface andautomatically detects problems in images fromcamera movement—no tedious trial and errorprocess.
piccure+ is the only software solution that can help youcorrect optical imperfections from scanned material oreven from self-built lenses.
piccure+ can help if the image suffers from opticalaberrations or camera movement/shake. However, thequality of the results depends on many factors.
While piccure+ allows you to rescue many of your blurryimages, it won’t do the trick in the following cases:
§ Image is out of focus (similar to the way thingslook without your glasses).
§ Objects are moving within the image, but thecamera was steady.
§ Night shots where only lights are visible.§ Noisy images (depending on the camera).
Why piccure+?
System requirements§ Windows 7 or later, Mac OS X 10.9 or later.§ At least 4 GB of RAM and a 2.0 GHz dual core
(Motion+ functionality).§ At least 8 GB RAM and a 3.0 GHz dual core (Lens+
functionality).§ Standalone: No Adobe® products needed.§ Plug-in: Adobe® Photoshop ® CS4 or later; Adobe
Lightroom ® version 3 or later; or Adobe Photoshop®Elements version 7 or later. Also: DxO Optics Pro 9or later or Capture One 8 or later.
When can it (not) help?

| 5
We have not been idle. With the free update to version 3.0 of piccure+, you will receive some excellentimprovements. The biggest improvement is the significant increase in speed thanks to the new Kingfisher AdaptiveHeterogeneous Computation Engine (AHCE). The computation engine leverages the capabilities of Nvidia® graphicscards and the CPU (currently Windows only).
The most important changes for version 3 include the following:§ Completely redesigned and improved AHCE rendering engine for maximum increase in speed (Windows only,
Quality+ setting)—up to 6x faster processing.§ Significant overall increase in speed even without AHCE: 50–75% faster RAW processing speed; 20–50%
reduction in computation times across settings (CPU only, all platforms).§ Two additional settings for finer adjustment of optical aberrations (five instead of three).§ Finer adjustment of “Sharpness” (now called Rendering) in Quality+. Sharpness setting 10 in version 3 equals a
Sharpness setting of 0 in version 2.5 or earlier. There are thus 10 new “lower and smoother” sharpness settingsavailable with version 3.
§ New cameras are supported. Fifty-six cameras were added to the list bringing the total to 689 (RAW).§ Improved and redesigned user interface.§ Additionally, several bugs were eliminated:
§ Full Retina support (Mac OS X).§ Color space bug in Adobe Photoshop® where certain color spaces were not displayed correctly.§ Opening the standalone program caused problems in Mac OS X if the user did not have administrator rights
(“Could not create … folder”).§ piccure+ sometimes disappeared (focus lost) in Adobe Lightroom®.§ You can now edit other images in Adobe® Lightroom® while processing an image in piccure+.
§ The update is free of charge. In order to update, please click Menu/Update. If you run into problems, you canalso download the latest version from the website and reinstall it. Please note that this update affects thecompatibility of certain operating systems and plug-ins.
Changelog for version 3

| 6
The biggest update with piccure+ is the introduction of the Kingfisher Adaptive Heterogeneous Computation engine.It leverages the computation power of the graphics card as well as the CPU. This can mean a significant increase inspeed.§ If AHCE is available, Quality+ will appear in blue.§ AHCE is currently only available in Windows and only for Nvidia® graphics card with compute capability 3.0 or
later. You can check the compute capability of your graphics card on the Nvidia® homepage:https://developer.nvidia.com/cuda-gpus.
§ In order for AHCE to leverage the GPU, a minimum of 2 GB GPU RAM is required. At least 1.5 GB of GPU RAMneeds to be free and available. Otherwise an error message about insufficient GPU RAM will be shown.
§ The increase in speed will largely depend on the amount of free GPU RAM. The larger the RAM of the graphicscard, the higher the speed increase. For maximum performance, we recommend 4+ GB of GPU RAM. Shared GPURAM will not have the same performance as on-board GPU RAM.
§ You can disable the GPU through the Menu in case you run into problems. Two settings are available: CPU onlyand GPU support.
Troubleshooting§ GPUs are currently not supported under Mac (even if you have a Nvidia® GPU).§ If you have a Nvidia® GPU and it is not detected, please check that the GPU has compute capability 3.0 or later
and you have installed the latest graphics cards drivers from nvidia.com. The same process should be done ifyou experience crashes. If you have an additional on-board graphics card (e.g. Intel), update its drivers as well.
§ If a GPU is detected but insufficient GPU RAM is available, close all applications using the GPU (e.g. disable GPUsupport for Photoshop and restart Photoshop).
§ We recommend GPU Shark (http://www.ozone3d.net/gpushark/) to monitor and troubleshoot GPU problems. Ifyou run into problems, please provide us with a screenshot from GPU Shark while running piccure+. Without thescreenshot, we will not be able to help you. Always check that you have the latest GPU driver installed.
Kingfisher Adaptive Heterogeneous Computing Engine (AHCE)
If GPU support is ava ilable for Quality+, the text for Quality+ will appear blue . Pleasecheck the tooltips for warnings in order to troubleshoot problems or to improveperformance.

| 7
§ piccure+ is currently the only software solution on the market that allows for the correction of complex opticalaberrations that vary across the image plane. This means piccure+ can detect that optical aberrations in thecenter of the image are smaller and a different shape than aberrations at the edge.
§ Optical aberrations can be very complex and usually do not follow a typical Gaussian-distribution (as assumedby most deconvolution solutions).
§ piccure+ employs a two-step approach. First, the optical aberrations are determined specifically for the image athand based on complex mathematical computations. Second, those aberrations are reversed in a process calleddeconvolution.
§ piccure+ thus differs from existing software solutions in two important ways—the complexity involved indetermining the optical aberrations and also reversing them. Every pixel in the image plane is reconstructedbased on the information of hundreds of pixels in the surrounding area.
§ piccure+ does not replace, but complements, existing solutions. The lens-correction modules cannot reverseoptical aberrations causing an image to look blurry. Lens-profile based solutions can correct chromaticaberrations (causing colors to be off in the corners), vignetting (corners are darker than the center), andgeometric distortions. “Sharpness” is either adjusted through classic “unsharp masking” (fake sharping whichdestroys image information) or deconvolution approaches assuming a Gaussian point-spread-function.
§ As soon as the “real” optical aberrations start differing from Gaussian-blur kernels, existing solutions cannotaccurately correct them. piccure+ incorporates mathematical models that go beyond the Gaussian-blur kernel.
§ Last, but not least, piccure+ can help reverse camera shake.
Adaptive deconvolution: the technology behind piccure+
As a ray of light passes through an optical system, it becomes a complex-shapedblurred pattern when it reaches the image sensor. Particularly at fast apertures,aberrations can become so severe that the image becomes barely usable . piccure+accounts for complex optical aberrations that vary across the image plane. Correctionvaries for every pixel—soft corners are treated differently from a sharp image center.These butterfly-like shapes emerge from a single ray of light passing through(expensive) camera lenses.

| 8
This flow chart will help you to recognize the optimal parameter settings.
Finding the optimal settings (1/2)
Does the image suffer from camera shake or lens softness?
Camera shake:Motion+
Lens softness:Lens+
“Don’t know”:Lens+
Click “Preview” and check the result
Sett
ing
1
Do you see “ringing” artifacts?
Yes:Quality+
No:Speed
Sett
ing
Click “Preview” and check the result
2
Do you still see “ringing” artifacts?
Yes:Try a lower setting for “Camera shake intensity” or “Optical aberrations”
Sett
ing
Click “Preview” and check the result
3
Do you see a reduction in blur or is blur still visible?
Sett
ing
Click “Preview” and check the result
Yes, significant reduction:Keep as is
No, severe blur:Try a higher setting for “Camera shake intensity” or “Optical aberrations”
4

| 9
Finding the optimal settings (2/2)
Is the rendering “too harsh” or ”too soft” ?
Too harsh:Choose lower Rendering
Too soft:Choose higher Rendering
Click “Preview” and check the result
Sett
ing
Does the image suffer from image noise?
Yes:Switch on Denoise
No:Leave as is
Sett
ing
Click “Preview” and check the result
6
5
Finding the optimal parameters can usually be achieved within a few steps. The following pages contain additionalinformation about “getting it right”. For the mode Motion+, SmartSpots can be a powerful way to significantlyimprove the images.
A few more general remarks:§ First choose the mode (Lens+, Motion+), then check what rendering you prefer (Speed vs Quality vs Quality+),
optimize the setting for Camera shake intensity or Optical aberrations, then adjust the Rendering and finallyactivate Denoise if necessary.
§ Correct chromatic aberrations with existing image editors if possible—it’s much faster.§ Quality+ gives the best and finest rendering. However, it also takes the longest. Check whether the wait is
worth the quality. If you have a Nvidia® GPU and AHCE is supported—go for Quality+.§ Save processing time by clicking Preview instead of rendering the entire image. Zoom in (e.g. 50% or 100%
zoom).§ Generally you do not need to fine-tune the images individually. Rather, find a couple of settings you prefer and
stick with them.

| 10
It is hard to give definite advice on the best parameter setting since they largely depend on the equipmentused, on the image itself, and on personal preferences. However, we have prepared a quick overview of thebest / most commonly used settings for standard situations that you may find useful. We still recommendtesting individual settings for a series yourself.
Smartphonespiccure+ does not work very well on JPGs, especially JPGs from smartphones. Some smartphones have theability to save the image as TIF or even DNG. You can achieve great improvements in those cases (usuallyabove 10 MP): Select Lens+, Micro, and enable Denoising (values around 15–25 usually work best). TheQuality setting should be Quality+.
Little aberration is visible. The picture looks quite sharp. Usually f5.6 or slower apertureWe would recommend using Lens+ and Micro. If you are shooting landscape images and they suffer fromdiffraction, try the setting between Micro and Normal. This setting was optimized for landscape images. Forsmartphones, we recommend importing RAW images if possible and going with Quality+ as well as enablingDenoising. Generally speaking, we would recommend disabling Denoising.
Some aberration is visible, especially towards the edges; smearing appears but no color fringing/chromaticaberrations. Usually f3.5 or slower.Go for Lens+ and Normal. You may set the Quality slider to Quality+ if you are not satisfied right away. Wewould recommend a rendering setting around 15 for the start. Enable Denoise if digital grain becomes aproblem, but start with low values around 10.
Heavy aberrations are visible, especially towards the edges; smearing appears and there are clear colorfringing/chromatic aberrations. Usually faster than f3.5.Go for Lens+ and Strong. We recommend Quality+. We also suggest a rendering setting around 15 for thestart. Enable Denoise if digital grain becomes a problem but start with low values around 10. You can enablecorrecting chromatic aberrations for the setting Strong by ticking the checkbox Chromatic Aberrations.
If camera shake is more of a problem…Choose Motion+ and start with a setting between Micro and Medium. For detailed improvement ideas, checkout the section on Motion+.
Finding the optimal settings (2/2)
5.6
3.5
Open
Iconmade by http://www.freepik.com. Iconis licensed Creative Commons BY3.0

| 11
Working efficiently with piccure+The following tips should help you save computing time.
If you have a large set of images to process, automate the process by using the batch functionality in the standaloneversion or the action script support in Adobe® Photoshop®. This is especially true for Lens+ and Motion+ (micro-shakereduction).
Check on one image (single-image mode, preview, 50/100% zoom) to determine whether you want to keep theparameter settings before processing a large batch of images. Click Preview instead of Process to validate thesettings to save computation time. This will apply the settings only to the visible section.
If you decide to fine-tune parameter settings in the single-image mode, do so by zooming in (50/100%) and adjustingthe parameters until you get the best results. Click Preview to check the effects. If you are adjusting parametersettings in Fit mode, the entire image needs to be recomputed which takes significantly longer (often by a factor of5). Once you are satisfied with the results in 100%, apply it to the entire image by clicking Process.
Changing the camera-shake intensity or the optical-aberration setting will mean waiting. Please check the defaultparameters and refer to the most efficient use of the parameters in the subsequent sections of the manual beforeadjusting them.
✔
✔
✔
✔

| 12
RAW files
piccure+ can import RAW files and will convert the result into a TIF file upon processing. It relies on the DCRAWengine by Dave Coffin and supports 632 cameras (see: http://www.cybercom.net/~dcoffin/dcraw/).
RAW files will be converted to 16-bit sRGB TIFs automatically. You may choose a different RAW converter for adifferent color space.
Standalone
Adobe® Camera RAW® (or others)
You can import RAW files with the RAW converter of your choice and process theresulting TIFs (we recommend TIF). We do not recommend using any color spaceother than sRGB unless you specifically know what you are doing. Unless youknow what “embedding color profiles” means as well as how to deal with colorprofiles in print and web (many browsers only display sRGB), stay with sRGB. Ifyou do not have a (hardware) color calibrated screen, stay with sRGB. Colorspaces such as ProPhotoRGB and AdobeRGB do not have more colors. The colorsare different and unless you really know what you are doing, the colors will comeout wrong. Correcting vignetting,, chromatic aberrations and geometric distortionsis no problem.Also: Disable the sharpening (set amount to zero) that is otherwise applied bydefault!
• Check the import settings for your RAW converter.Make sure the color depth is 16-bit (not 8-bit) andunless you know what you are doing, choose sRGB
!

| 13
A few comments on integrating piccure+ in your workflowYou can pre-process the image before using piccure+ with the following operations:§ Process the RAW file.§ Correct chromatic aberrations (thus saving piccure+ processing time).§ Correct vignetting.§ Correct lens distortion.§ Denoise with DxO PRIME (several users found the results very good). Usually denoising prior to using piccure+ is
a bad idea.
Please do not:§ Sharpen the image (e.g. SmartSharpen or "Correct Lens Softness“).§ Crop the image.§ Adjust saturation, brightness, or contrast (at least do not adjust them significantly).
It is best to use piccure+ on RAW files or TIFs created from RAWs. JPGs only have 8-bit perchannel (vs. 14/16-bit in RAW/TIF), contain compression artifacts, and are often sharpened bythe camera. JPGs are, in essence, data shredders for your image material. RAW files can beprocessed with the standalone version of piccure+.
We generally recommend correcting chromatic aberrations with existing image editors. Lens-profile-based solutions often provide good results and with a few clicks, they can be easilycorrected. piccure+ will take quite some time in correcting them, as this is a difficult problem forsoftware. Correcting blur, lens softness, and diffraction are piccure+’s key strengths.
!

| 14
How do I integrate piccure+ into my worflow?We recommend using piccure+ at the very beginning of your workflow. Ideally, import the RAWs through piccure+ orwork directly on the imported RAW files. We recommend shooting in RAW since JPG introduces compression artifactsand cameras often artificially sharpen JPGs. In addition, JPGs only offer 256 colors per channel which really limitsany post-processing. Think of JPG as a data shredder. We also recommend not cropping the picture or adjusting thebrightness, color, etc. Additional information can be found in the handbook (below).
What is the best workflow in Adobe® Lightroom®/other programs and how can I apply the geometric distortioncorrection?Please see the instructions on “Using piccure+ as a plug-in” for more information.
How can I save the images in the standalone? There is no saving option?In the standalone version, all images are stored automatically to a newly created project file folder and have theextension “_picc” added to the filename. The location of the folder can be changed by clicking on “Save as” in thebottom left. The Save as option will only be available in the Batch mode (when you see the little Thumbnails). RAWfiles will be automatically converted into TIFs (16-bit, sRGB).
I have a single file. Why can’t I simply click “Save as” in the standalone? What are the projects for? Why do I needthem?The idea behind the standalone program and the projects is that a large number of images can be processedautomatically. If you are interested in only processing one image at a time, we would recommend creating oneproject for all your images (e.g. create a project called My Images). Drag images one by one into that project whenyou want to process them. You do not need to create a new project for each individual image. The resulting imagewill then automatically be saved into the project folder. The standalone version is intended for batch processing largesets of images. You may find the plug-in version more convenient for processing individual images.
FAQ

| 15
Why can’t I delete an images from the project list? Do I really need to process them all?Simply uncheck the box and they won’t be processed. Single images currently can not be deleted from a project list.
How can I correct chromatic aberrations?Correcting chromatic aberrations is possible in Lens+. In order to do so, set the Optical aberrations to Strong. Thecheckbox for correcting chromatic aberrations will become visible. Tick it. It is not possible to correct chromaticaberrations in settings other than Strong. We also recommend setting the Quality to Quality+ (see next question).However, most image processors offer a very powerful correction tool for chromatic aberrations. If profiles areavailable or you have some experience correcting them, please do so prior to using piccure+. Correcting chromaticaberrations is not piccure+’s greatest strength and there are simply better workflows available as of today.
How can I get the best quality?Choose Quality+ as the quality setting. For Lens+, the combination Normal and Quality+ will show the bestimprovement in many cases, but it also takes the longest amount of time.
Why can’t I select the lens I am using? What lens-profile are you using?piccure+ does not use any lens or equipment profiles. The optical aberrations and camera movement are determinedfrom the image itself.
FAQ

| 16
Windows installation instructions§ Download piccure+ from our product page.§ Double check that you are logged in as an
administrator.§ Before installation, close all Adobe® Photoshop®,
Lightroom® and Photoshop® Elements applications.§ Double-click on the downloaded file (piccure.exe),
and install piccure+ by following the instructions onthe screen.
§ Deactivate your anti-virus software (just check the*.exe) beforehand to avoid installation freezes orerror messages.
§ If piccure+ does not show up as a plug-in or youreceive an error message (e.g. DLL is missing), runthe installation routine again and select Repair.
§ If you run into problems, the problem, in mostcases, is a result of your security softwarehindering proper installation.
§ Download piccure+ from our product page.§ Double check that you are logged in as an
administrator.§ Before installation, close all Adobe® Photoshop®,
Lightroom®, and Photoshop® Elements applications.§ Double-click on the downloaded file (piccure.dmg.)
to mount a new drive (Piccure_Release).§ Go to the new drive (in the Finder window, it will
be on the left side, right below your hard drive).§ Double click on the file (piccure.m3.pkg), and follow
the instructions on the screen.
Mac OS X installation instructions
Please note: piccure+ will be fully functional for 30 days without activation (free trial). Simply download it fromthe homepage. After the trial period has expired, you can purchase a license key at www.piccureplus.com
There is no physical software delivery.

| 17
Installation Troubleshootingpiccure+ doesn’t show up in filter menu
§ Close all programs.§ Run the installation again.§ Choose “Repair” and try again.
I get an error message that a DLL is missing…
§ Close all programs.§ Run the installation again.§ Choose “Repair” and try again.
The plug-in does not show up in Lightroom®
This may be caused if the “Store Presets with Catalog”option in Lightroom®’s Preferences is checked.§ Go to Edit > Preferences > Presets OR Lightroom®
> Preferences > Presets.§ Then uncheck this box.
piccure+ doesn’t activate with license key
§ Make sure your date, time, and time-zone settingsare correct (most of the time, this is the problem).
§ Make sure your computer has an internetconnection.
§ Deactivate your firewall.§ Copy and paste product key and check no
unwanted characters are copied (e.g. an extraspace).
§ Retry.

| 18
Manually adding piccure+ to Adobe® Lightroom®
§ While Adobe® Lightroom® is still open, click Edit> Preferences OR Lightroom > Preferences.Click on the ExternalEditing tab.
§ Click on Choose and locate piccure+. Typically it can be found at either, C:\ProgramFiles\piccure+\External\piccureExternal.exe OR Macintosh HD |Applications | piccure+ | PiccureExternal.
§ Select PiccureExternal and click Choose.§ Set the file format to TIFF, Color Space to sRGB, Bit Depth to 16-bit, Resolution to 240, and Compress to None.
You can also choose another color space (e.g. ProPhotoRGB or AdobeRGB).§ Under Preset, click the drop down selector and choose, Save Current Settings as New Preset from the list (it is
the first dropdown in the field Additional External Editor).§ Type in the name piccure+ and click Create.
Installation Troubleshooting

| 19
Standalone version (1/2)In order to launch the standalone version of piccure+, please do the following:
§ Open the Finder and open Applications. Locate the piccure+ folder, open it and double click on piccure+ to launch the application.
1
Mac Windows
§ Click Start|Programs|Piccure+|Piccure+
After launch, you will see the following startup screen. In order to start processing images, you can2
A
B
C
Add images for processing via Drag & Drop fromyour Explorer.
Select a number of images by clicking Select photos.
Load an existing image project from the projectnavigator.
C
A
B

| 20
Standalone version (2/2)Once you’ve selected your images, you can just start correcting them. Before you hit Process, you will need todefine what error should be corrected.§ Select Lens+ to correct optical aberrations, such as lens softness and chromatic aberrations. This is the default
setting and unless you see motion traces go for Lens+.§ Select Motion+ if you want to reduce the effects of camera shake.
3
§ For optimal parameter settings, please refer tothe later sections in this manual. Select Lens+ tocorrect optical aberrations and Motion+ if youwant to reduce the effects of camera shake.Select the individual images and adjust theparameters as needed.
§ Select target folder where the results should besaved. The saved images will keep the format, bit-depth, and color-profile of the original image. Fileswill be overwritten automatically. RAW files will besaved as 16-bit TIFFs with a pre-specified colorprofile.
§ Check images to be processed; Once the imagehas been processed, the icon will turn blue. Ifthe image is not selected, it will not beprocessed. Double click on the processed imageto switch to single-image mode(full/split/compare). Alternatively, select theimage and then change the image mode.
§ If an image has been processed, selecting theimage and changing the image mode enablesyou to evaluate the result in detail. Thefollowing modes are available: full screen, splitmode, and compare. To go back to batch mode,simply click the batch mode button.

| 21
Adobe® Lightroom®:
§ Start Adobe Lightroom® and open the image you would liketo correct. Select Photo/Edit in/piccure+.
§ Save the current photo as a copy (TIFF, 16 Bit) and runpiccure+. piccure+ supports the following color profiles:sRGB, ProPhotoRGB, and AdobeRGB. Unless you know whatcolor profiles are, use sRGB.
§ NOTE: piccure+ cannot edit RAW files directly as this is notpossible for third-party plug-ins in Lightroom®.
§ If piccure+ is slow, closing unnecessary programs to free upresources will help speed up the process. piccure+ will showyou the result once loading is finished.
Photoshop® or Photoshop® Elements:
§ Start Photoshop® or Photoshop® Elementsand open the image you would like tocorrect.
§ Select Filter/Piccure+/Run piccure+.
If you are using Adobe Camera RAW to importthe image in Photoshop – keep in mind theadvice from p.12
Integrating piccure+ as a plug-in in your workflow
!In Lightroom you should set the value for sharpening to zero in the Development module. Do so in “Detail”

| 22
Adobe® Photoshop®You can choose between running a predefined scriptthat will save images as a TIF file in the selected folderor you can create your own action script.
In order to record an action script involving piccure+,please do the following:
If you do not see the Actions widget, click on Windowand check Actions. The Action Widget should thenbecome visible.
Plug-in version – Action Script support
1
Start recording
Stop recording
New Action
Click on New Action and name it accordingly (e.g.piccure+ workflow). Recording will then start. Recordthe following actions:
§ Open an image from the batch you would like toprocess.
§ Run piccure+, click Process, and then click Save.§ Save the image in the target format via Save As
(*important*).§ Close the image (*important*).§ Stop recording.
You can include other steps as needed.
Important: piccure+ will apply the default parametersyou defined and saved (e.g. the parameters you seewhen you start the program). You can change thesaved settings, but don’t forget to click Save Settingsin piccure+.
2
| 23
Adobe® Photoshop®
Plug-in version – Action Script support
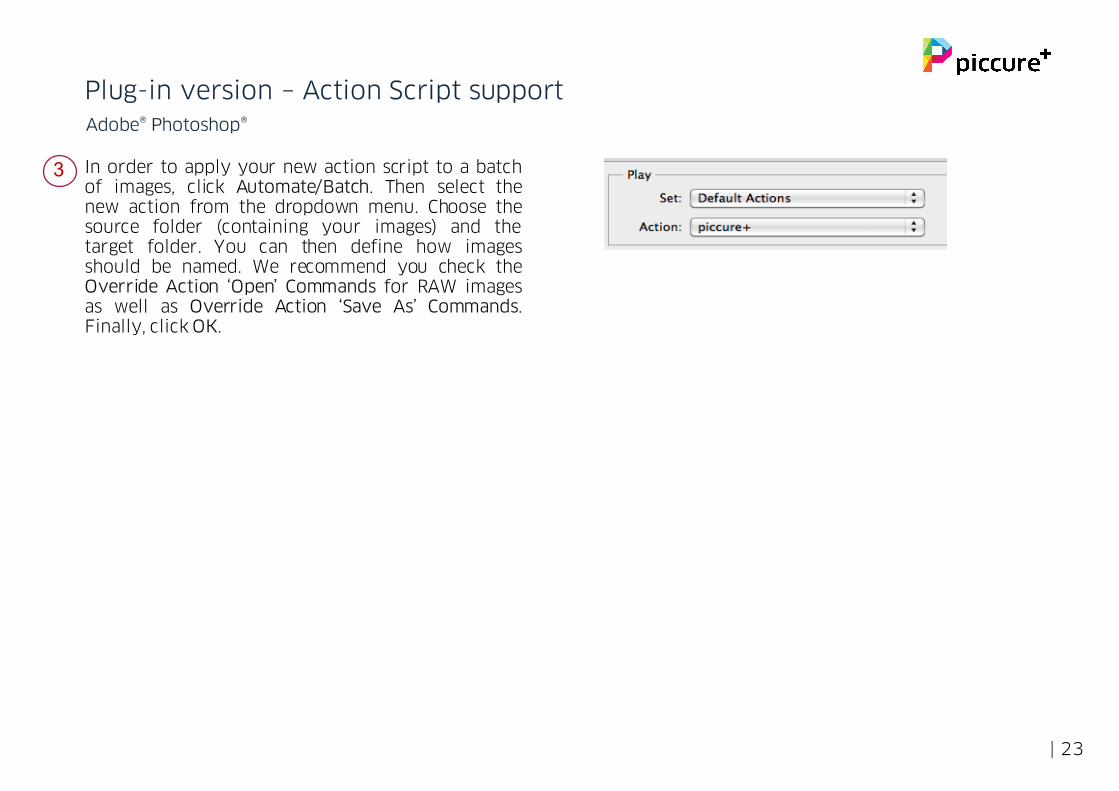
3 In order to apply your new action script to a batchof images, click Automate/Batch. Then select thenew action from the dropdown menu. Choose thesource folder (containing your images) and thetarget folder. You can then define how imagesshould be named. We recommend you check theOverride Action ‘Open’ Commands for RAW imagesas well as Override Action ‘Save As’ Commands.Finally, click OK.

| 24
Calling piccure+ from DxO Optics Pro® 9 (or later)Although piccure+ integrates as an external application into DxO Optics Pro® (version 9 or later), it is not installedautomatically. It needs to be called from within the DxO Optics Pro® interface. To do this, simply follow these steps.Please do not crop the image, sharpen the image (no “Lens Softness Correction”), or adjust saturation, brightness, etc.prior to using piccure+. Many users find using PRIME® Denoising helpful prior to running piccure+ for noisy images.
• Select the image.• Click Export to application.
§ Export to piccureExternal:§ Click on Browse” and locate piccure+. Typically it can be
found at eitherC:\Program Files\piccure+\External\piccureExternal.exe or Macintosh HD |Applications | piccure+ | PiccureExternal.
§ We recommend to Process as TIFF and export and with 16-bit Quality.

| 25
Calling piccure+ from Capture One Pro® 8 (or later)Although piccure+ integrates as an external application into Capture One Pro® (version 8 or later), it is not installedautomatically. It needs to be called from within the Capture One Pro® interface. To do this, simply follow these steps.Please do not crop the image, sharpen the image, or adjust saturation, brightness etc. prior to using piccure+.
§ Select the image.§ Click Edit with….§ Locate piccure+. Typically it can be found at either
C:\Program Files\piccure+\External\piccureExternal.exe§ or Macintosh HD |Applications | piccure+ | PiccureExternal.§ Export to TIFF 16-bit, choose ICC profile (e.g. sRGB, ProPhotoRGB or
Adobe RGB) and finally click Edit. Generally, we recommend sRGB.
1
2

| 26
Tutorial: Working with piccure+ – standalone vs. plug-inpiccure+ has two distinct working modes you can choose. Both working modes have the same capabilities. Generally, we recommend you choose the mode that best suits your preferred workflow. Here is a quick overview.
Standalone application Plug-in
§ The standalone is ideal if you want to process alarge set of images at once, are happy with thedefault settings, and do not want to individuallyadjust the RAW processing for every image.
§ The standalone gives you the ability to efficientlymanage the processed images and fine-tune theresults.
§ The plug-in version is ideal if you want to maintainfull control over everything from RAW processingto fine-tuning individual images and if you want tocheck every image in detail.
§ piccure+ is fully compatible with action scripting inAdobe® Photoshop®.
§ The plug-in is most suitable if you primarily useAdobe® Photoshop®, Photoshop Elements®, orLightroom®.
S P
Image: www.trust-your-eyes.com

| 27
Tutorial: Working with piccure+ – the user interface at a glance
Parameters
Controls
Project / Navigator
Mode
Working space

| 28
Tutorial: Switching between Batch Mode and Single-Image Mode

| 29
For the standalone version, simply run piccure+. InWindows, it can be found under Programs in the Startmenu. In Mac, it is in Applications/piccure+. Either dragan individual image into the working space or a set ofimages.
S
P Open the image you would like to correct and selectpiccure+ from the Filter menu (Adobe® Photoshop® orAdobe Photoshop® Elements). In Adobe® Lightroom®, itis called Edit in.
1 At the beginning of the process, it is important todecide which correction routine to use. You can choosebetween the lens-correction routine (Lens+)—thedefault selection—or the camera-shake-reductionfeature accessible through Motion+.
2 For Motion+, you need to decide what quality level touse on the images. We recommend Quality in mostcases and Quality+ if there are still ringing artifactsvisible.
3 Unless there is severe motion blur or lens softnessvisible in the image, you should use the low defaultsettings (camera shake intensity or optical aberration).
4 If you are running the plug-in version or runningpiccure+ for the first time, we recommend you checkyour parameter settings by switching into single-image mode and zooming into the image (100%) andclicking Preview. If you are using the standaloneversion and have multiple images open (batch mode),simply double click on the first image to switch tosingle-image mode.
5 Once you are satisfied with the parameter settings,click Process and let piccure+ do its magic.
If you have multiple images in the batch queuewaiting to be improved, switch back to the batchmode and select the individual images and adjust theparameter settings according to your needs. Onceyou hit Process, piccure+ will automatically processthem and save them to the destination folder. Youcan switch back to the batch mode by clicking on thefour little rectangles at the bottom right of theworking space.
Tutorial: Quick Start

| 30
Lens+The Lens+ feature is particularly effective for dealing withloss of sharpness due to lens softness or chromaticaberrations. Often the sharpness of the image decreasestowards the edges or the image just appears a bit fuzzy.One reason for this can be manufacturing deviations. Lens+can automatically detect these problems and correct them—even if other software solutions with pre-defined lensprofiles fail.
Motion+If the camera was not completely stable during theexposure time, images may suffer from motion blur.piccure+ was the first solution on the market to provide anautomatic heuristic to determine and eventually reduce theeffect of camera non-linear shakes. Camera shakes areoften visible through blur traces.
Lens softness (top): Example of a scanned image. Zeni tar 16mm Fisheyelens. The image does not appear crisp but can be enhanced without uglysharpening effects. Chromatic aberration s (c olor fringin g) at the edges forlarge apertures are a pain for many photographers. But they can also becorrected (bottom).
Original Corrected
Original Corrected
Camera shake (top): Sharp edges are particularly effec tive to c ountermotion blur with the SmartSpot feature.
Tutorial: Key functionality

| 31
Tutorial: Working with piccure+ – working space and controls
1
Working space: The working space is the main area.There are two working modes, a batch processingmode and a single-image mode. The batch mode isavailable in the standalone option only and allowsyou to manage the images you would like to process.The single-image mode allows for better fine-tuningand comparison of results. The plug-in version willonly work in single-image mode. In order to switchbetween the batch mode and single-image mode, youcan use the Mode control buttons at the bottom right.
2
1
Parameters: Although piccure+ is highly automated, italso gives you sufficient control over the results. Inthe beginning, you will need to decide whether youwant to correct optical aberrations in the image ormotion blur. To correct optical aberrations, selectLens+; to correct motion blur, select Motion+. Thedefault selection is Lens+. Please refer to the moredetailed descriptions on Lens+ and Motion+ foroptimal parameter settings.
22

| 32
Tutorial: Working with piccure+ – navigator, controls and modesProject/Navigator: In batch mode, you can selectdifferent projects (batches of selected images) andcompare the before/after images or adjust theparameters and process the image again. piccure+ isnot intended to be a sophisticated image-management tool, although, the project windowshould help you to manage your workflow better.Please note: if any of the images are moved, piccure+
will no longer find them. Also, images processed viathe plug-in will not show up in the project list. If youswitch to single-image mode, the navigator windowwill show you the position of the current imageselection.
3
Control: The control buttons are very straightforward. If you want to process an image or a set ofimages, click Process. In order to abort the currentoperation, click Cancel. If you have determined thecorrect settings and want to save the image, clickSave in single-image view.
4
5
Mode: The mode buttons are used if you want toswitch from batch mode to single-image mode andvice versa. You can also select different screenmodes in single-image mode.
5
Batch mode*
Full screen
Split screen
Compare mode
* Batch mode is only available in the standalone – not the plug-in versions
3
4

| 33
How to get the best results with piccure+ – Lens+ featureThe Lens+ feature is a great way to improve thesharpness of your image. It corrects a number ofoptical imperfections caused by
§ Lens softness.§ Chromatic aberration.
These imperfections can cause the image to lookslightly blurred (with blur increasing at the edges).Whereas other state-of-the-art solutions arecountering these effects through lens profiles,piccure+ approaches them in a unique andrevolutionary way. piccure+ determines the uniqueoptical imperfections of your equipment andcorrects them.
Correcting chromatic aberrations takes some time—it may be faster to correct them in anotherapplication or during the RAW import if you arehappy with the results.
Note: Blurry images from smartphones or tabletswill most likely not be improved. The reason is thestrong compression of the JPG output file and the“post processing” that is applied. If you have asmartphone shooting RAW (e.g. DNG), that’s adifferent story: Choose Lens+, Quality+, Micro, andactivate Denoising. Results can be pretty cool.
1 Quality+: Quality+ together with “Micro” or “Normal”should give you great results even for larger opticalaberrations.
Optical aberration:Micro: Recommended for smartphones and f5.6 orslower (quality lenses). The default setting (Quality)should suffice. For smartphones, we recommendQuality+.Normal: If you want to correct an image taken with aregular lens which does not have chromaticaberrations, keep the slider on Normal (f5.6-f3.5).Strong: If the image suffers from a steep falloff ofsharpness towards the edges, choose Strong. Usuallyfor f3.5 or faster. You can also correct chromaticaberrations if you tick the checkbox.
Rendering: This is more or less self-explanatory. Wewould recommend you leave this setting in the lowerthird. However, feel free to choose the setting youfind the most appealing.
Denoise: Reduces the digital noise in an image. Pleaseevaluate on a case-by-case basis whether you wantto go with the Denoising.
2
Iconmade by http://www.freepik.com. Iconis licensed Creative Commons BY3.0
5.6
3.5
Open

| 34
How to get the best results with piccure+ (1/3) – Motion+ featureIf the image shows traces from camera shake, selectMotion+ from the dropdown menu. Lens+ is notcapable of correcting motion blur. Generally, werecommend you start with a camera shake intensitysetting between Micro and Medium. Zoom in to100% on the area that matters the most and hitPreview. Increase the setting for camera shakeintensity if the motion is still visible. Choose asmaller setting if ringing artifacts appear.
It is a good idea to try the Quality+ setting if ringingartifacts persist. It will take more time but caneliminate those effects.
piccure+ works best with micro-blurs and canachieve quite significant improvements. It can alsohelp for larger blurs, but please bear in mind thatthe greater the camera shake, the more informationhas been irrecoverably lost.
Ringing artifacts Blur visible
1

| 35
3. Press Preview (to save processing time) and seewhether you get an improvement. If the result hasimproved somewhat, but you are not 100% satisfied,try another SmartSpot. Usually trying out two to threecan really help get a great result.
4. If you still see large camera movement in theimproved picture, please select a higher camera shakeintensity setting (e.g. Medium). If, on the other hand,ringing artifacts become very visible, select a lowersetting. The Quality+ setting will help to eliminateringing artifacts. Check the Preview whether animprovement is visible before applying it to the entireimage.
5. Repeat steps 2-4 until you are satisfied. Oncesatisfied, choose Quality or Quality+ and fine-tune thesharpness. Finalize the image by pressing Process.
How to get the best results with piccure+ (2/3) – Motion+ feature
A good SmartSpot has clear edges with high contrast where the camera movement becomes visible (Alt+Mouse click).
Here’s how:1. Ideally, zoom in a little (e.g. 50% zoom) and adjustthe camera shake intensity to the second setting(below Medium; however, for heavy blurs, choose alarger setting).
2. Show piccure+ a SmartSpot to obtain better results.You can do this by pressing Alt while clicking with themouse on a spot with edges/contrast and a clear traceof the camera movement. The best SmartSpots arespots with many edges where the camera movementbecomes very visible. Please see a more detailedexplanation of SmartSpot on the following pages.
Sometimes, you may not be immediately satisfied withthe result. However, with a few adjustments, you canoften significantly increase the quality of the results!
2

| 36
How to get the best results with piccure+ (3/3) – Motion+ feature
Summary:§ The following recommendations apply for the Motion+ feature only.§ Start with a camera shake intensity between Micro and Medium. If adjusting the camera shake intensity does not
yield the appropriate results, define SmartSpots.§ After the best SmartSpot has been found, adjust camera shake intensity by increasing the setting if motion is still
visible and decreasing it if ringing occurs.§ Use the Quality+ setting if the ringing artifacts persist. Check the quality of the image in the Preview first.§ Adjust Rendering.
| 37
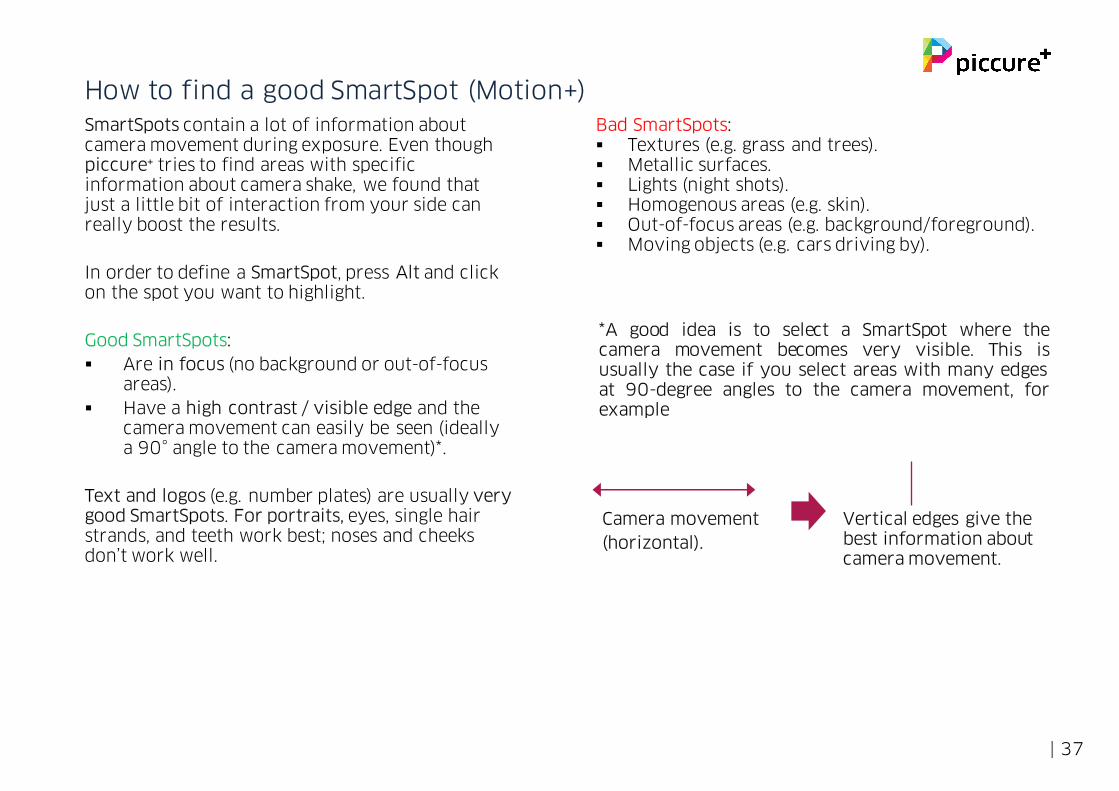
SmartSpots contain a lot of information about camera movement during exposure. Even though piccure+ tries to find areas with specific information about camera shake, we found that just a little bit of interaction from your side can really boost the results.
In order to define a SmartSpot, press Alt and click on the spot you want to highlight.
Good SmartSpots:§ Are in focus (no background or out-of-focus
areas).§ Have a high contrast / visible edge and the
camera movement can easily be seen (ideally a 90° angle to the camera movement)*.
Text and logos (e.g. number plates) are usually very good SmartSpots. For portraits, eyes, single hair strands, and teeth work best; noses and cheeks don’t work well.
*A good idea is to select a SmartSpot where thecamera movement becomes very visible. This isusually the case if you select areas with many edgesat 90-degree angles to the camera movement, forexample
Camera movement(horizontal).
Vertical edges give the best information about camera movement.
How to find a good SmartSpot (Motion+)Bad SmartSpots:§ Textures (e.g. grass and trees).§ Metallic surfaces.§ Lights (night shots).§ Homogenous areas (e.g. skin).§ Out-of-focus areas (e.g. background/foreground).§ Moving objects (e.g. cars driving by).
| 38
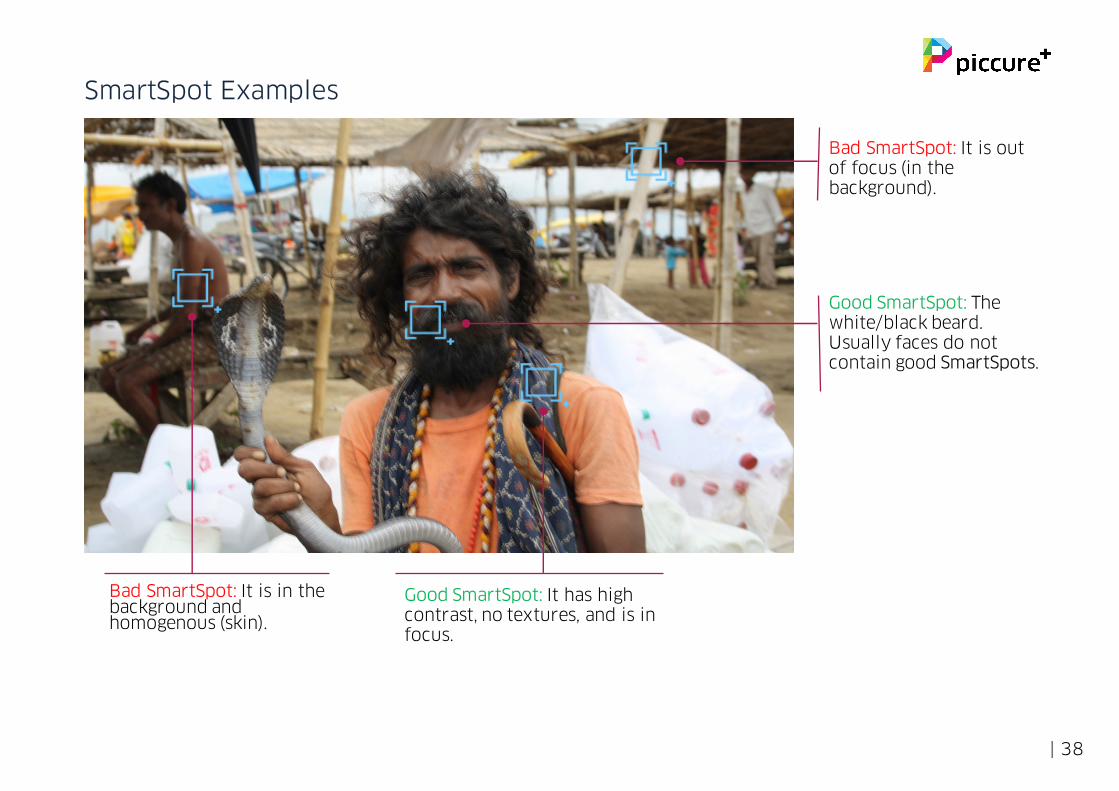
Bad SmartSpot: It is out of focus (in the background).
SmartSpot Examples
Bad SmartSpot: It is in the background and homogenous (skin).
Good SmartSpot: It has high contrast, no textures, and is in focus.
Good SmartSpot: Thewhite/black beard. Usually faces do not contain good SmartSpots.

| 39
Bad SmartSpot: It is out of focus, has texture, and is homogenous.
SmartSpot Examples
Good SmartSpot: It contains text (high contrast/visible edges).
Good SmartSpot: It contains text (high contrast/visible edges).
Bad SmartSpot: Faces often move and are generally not very good SmartSpots.

| 40
If you want to remove the SmartSpot, pressCtrl and click anywhere on the left panel.piccure+ will estimate the camera movementwithout using a SmartSpot.
In order to define a SmartSpot, simply pressthe Alt key and click on the spot. piccure+ willhighlight the area.
Defining, moving, and removing SmartSpots (Motion+)
If you want to move the spot, simply press Alt and clickanother spot on the image.
NOTE: In order for the changes to become effective, youeither have to hit Preview or Process to apply thesettings to the entire image.
(Alt+Click)
(Ctrl+Click)

| 41
At some point, the image blur will be too large (ortoo out of the ordinary) for us to handle at itsoriginal image resolution. If that’s the case, go backto the Adobe Photoshop main window and use theImage Size... function in the Image menu. Decreaseyour image to 50% and give us another chance.
…if everything else fails…

| 42
About micro-shake reduction (Motion+)NOTE: If the image shows ringing artifacts, youshould choose a smaller blur size. We alsorecommend you try out the Quality+ setting. Checkthe difference on a section in 100% zoom level first(Preview). In most cases, the ringing will vanish andyou will get a picture with enhanced, crisp details.
Pixel sizes are down to a few micrometers and goodlenses can match this resolution. This means that evenrelatively short exposure times can lead to some motionblur.
Micro-shake reduction is the finest correction levelin piccure+. The micro configuration will recover the fineststructures in your images. Use the micro-reduction featureif you would like your images to look even crisper.
Using micro-shake reductionFollow these steps if your image already looks great, butyou want it to be even crisper.
Open your image of choice and run piccure+. SelectMotion+ for motion blur correction. Set camera shakeintensity to micro. Opt then for the Quality or Quality+option.

| 43
Lens+ vs. Motion+: Two different causes of imageblurriness can be corrected. Blur caused by imperfectoptics and blur caused by camera movement duringexposure time. Most of the time, Lens+ will give youthe best results. However, if movement traces areclearly visible, go for Motion+.
Speed vs. Quality: If you have time to spare, try theQuality or Quality+ setting—it will improve the qualityof the result. Check Quality+ in Preview first as it is atime-consuming process. Quality+ is particularlyhelpful if ringing artifacts occur in Motion+ mode. Inorder to activate Quality+ in Lens+ clickMenu/Advanced Lens+.
Optical aberration / Camera shake intensity: For Lens+,we recommend you stick with Normal. If the image isalready quite sharp, go for Micro. For Motion+, you canimprove the quality of the result by adjusting thesettings in piccure+. Try a higher setting if the imagestill looks shaky or a smaller setting if the imageshows strange ringing artifacts.
Rendering: Sharper means your image will be morecrisp; less sharp can help to suppress noise.
Denoise: Reduces the digital noise in an image. Pleaseevaluate on a case-by-case basis whether you want touse Denoising.
Preview: This button applies settings only to thevisible image section and saves processing time.
Reset: This button will restore the default settings.
Save Settings: You can now define the default values.piccure+ will also remember window position and sizeas well as screen mode.
Process: This button applies your settings to the entireimage. Only do this after you are satisfied with thepreview section of the image and want to apply thesettings to the entire image.
Cancel/Back: Hit the cancel button if you are notsatisfied with the piccure+ results.
Save: Save the image.
NOTE: In order for changes to be applied, eitherPreview or Process will have to be clicked.
Summary

| 44
Support About the companyFor feedback, questions about the plug-in, or comments you want to share with us, please contact us by email at [email protected]
Legal informationIntelligent Imaging Solutions GmbHHintere Grabenstraße 3072070 TübingenGermany
Amtsgericht Stuttgart, HRB 740303VAT ID: DE282053082
CEO: Prof. Dr. Hanns RuderFor more information, visit www.piccure.com
piccure+ has been developed by Intelligent ImagingSolutions, a state-funded, technology-based researchcompany founded in 2012 by professors and scientists.Since then, the company has mainly focused on developingand advancing piccure.

| 45
LensDiscoveryLensDiscovery is the first open-science project with the aim of understanding how well lenses really perform inpractice and understanding how big deviations in quality can be. Whenever you read a lens review, you can bepretty sure that the reviewer will have used the best possible lens. With sample lenses not coming off the regularassembly line, purchasing a new lens can become a tricky and frustrating experience. There is essentially no way totell how good a lens really is in practice. When Roger Cicala took a look at off-the-shelf lenses, his results wererather disappointing.
Important: LensDiscovery does not collect any information that can directly identify your camera equipment orimages. LensDiscovery also does not collect any information that contains usable information about the imagecontent of the images processed.
How often do you get frustrated with the sharpness of your equipment or wondered why a lens received greatpraise if you only see moderate sharpness at best?
Since it is practically impossible to do detailed laboratory tests on every manufactured lens, there is no informationavailable to users about how good the lenses actually are when they come off the assembly line.
However, with piccure+, this may just become possible. piccure+ determines the unique optical aberrations for everyprocessed image and thus reveals a lot about lens-to-lens quality variations. With advanced statistical methods, itwill soon be possible to understand how good lenses really are in normal life.

| 46
LensDiscoveryWhat data are you collecting?
All data that you share with the team behind piccure+ is sent to our servers over secure internet connections (SSL). If you are interested inknowing what data is sent to our servers, you can easily take a look at it. Just open the subfolder Profiles in piccure+’s Application folder.Opening the TXT file will reveal the user and hardware-specific information that is shared.
Some of the information that we collect is not directly linked to the EXIF file of the image , so we would like to explain why this informationis collected.
Camera: 07ac54d612bd1ac6f058f08a13cfe120
The serial number of the camera is taken but abbreviated and encrypted. It’s basically your camera ’s license plate with the last fewnumbers missing . This allows us to know with some certainty whether two pictures were taken with the same equipment , but we cannot tellwhich specific camera it was or whether a random picture was taken with a certain piece of equipment.
Lens: 50 50 1.4 1.4
Lens ID: 88 54 50 50 0C 0C 4B 06
This information just tells us about your lens. It is not possible to identify you in any way with this information. We just need it so we canbuild up our lens catalogue.
Software: b69326e7048ccfc7553da63d6231defc
The software ID is linked to your piccure+ installation. However, the only reason we have this information is so we can match identicallenses, particularly when the camera ID is not available. The Software ID is not shared in any way and it does not include any informationabout whether the software is in trial, act ivated, or expired. The ID is not unique and is just a random number, so it is possible that severalusers have the same ID.
The other files conta in information regarding the optica l aberrations of your equipment . They do not contain any image information. Thesefiles are also used to increase processing speed for your images.
What are you doing with my data?
The data shared though piccure+ is used to build up a database about the real and experienced sharpness of various lenses. Unless youactively give your permission, we will not collect any data.

| 47
Warning: 32-bit vs. 64-bit version (no Lens+ support)If you see the warning regarding the 32-bit system architecture, you may not be able use the Lens+ functionality ofpiccure+. You can still try but probably will encounter a “Not enough memory” error message.
The reason is that 32-bit systems do not support the amount of RAM needed.
If you are running a 64-bit operating system and you run piccure+ as a plug-in in Adobe® Photoshop®, Lightroom®, orPhotoshop Elements®, please check whether you can run the 64-bit version of Adobe® Photoshop®, Lightroom®, orPhotoshop Elements®. It may be possible you executed the 32-bit version even though your system supports a 64-bit architecture. As a plug-in, piccure+ will only run with the same architecture as your image editing program. Youcan also run piccure+ as a standalone version. The message should then disappear. If it doesn’t, then you probablycan’t do much work on your 32-bit system.
If you see this error message in the standalone version, there is little you can do. You have a 32-bit systemarchitecture which can not easily be upgraded to a 64-bit architecture.