Embed Size (px)
Citation preview

PJ558DDLP Projector
ViewSonic®
Model No. : VS11529
- User Guide
- Guide de l’utilisateur
- Guía del usuario
- Guia do usuário
- 使用手冊 (繁體)
- 使用手冊(简体)

ViewSonic PJ558D�
Compliance Information For U.S.A.This device complies with part 15 of FCC Rules. Operation is subject to the following two conditions: (1) this device may not cause harmful interference, and (2) this device must accept any interference received, including interference that may cause undesired operation.This equipment has been tested and found to comply with the limits for a Class B digital device, pursuant to part 15 of the FCC Rules. These limits are designed to provide reasonable protection against harmful interference in a residential installation. This equipment generates, uses, and can radiate radio frequency energy, and if not installed and used in accordance with the instructions, may cause harmful interference to radio communications. However, there is no guarantee that interference will not occur in a particular installation. If this equipment does cause harmful interference to radio or television reception, which can be determined by turning the equipment off and on, the user is encouraged to try to correct the interference by one or more of the following measures:
• Reorient or relocate the receiving antenna.• Increase the separation between the equipment and receiver.• Connect the equipment into an outlet on a circuit different from that to which the receiver is
connected.• Consult the dealer or an experienced radio/TV technician for help.
Warning:You are cautioned that changes or modifications not expressly approved by the party responsible for compliance could void your authority to operate the equipment.
For Canada• This Class B digital apparatus complies with Canadian ICES-003.• Cet appareil numérique de la classe B est conforme à la norme NMB-003 du Canada.
CE Conformity for European CountriesThe device complies with the requirements of the EEC directive 89/336/EEC as amended by 92/31/EEC and 93/68/EEC Art.5 with regard to “Electromagnetic compatibility”, and 73/23/EEC as amended by 93/68/EEC Art.13 with regard to “Safety.”
Following information is only for EU-member states:The mark shown to the right is in compliance with the Waste Electrical and Electronic Equipment Directive 2002/96/EC (WEEE).The mark indicates the requirement NOT to dispose the equipment as unsorted municipal waste, but use the return and collection systems according to local law.

��ViewSonic PJ558D
Important Safety Instructions1. Read these instructions completely before using the equipment.
2. Keep these instructions in a safe place.
3. Heed all warnings.
4. Follow all instructions.
5. Do not use this equipment near water. Warning: To reduce the risk of fire or electric shock, do not expose this apparatus to rain or moisture.
6. Clean with a soft, dry cloth. If further cleaning is required, see “Cleaning the Display” in this guide for further instructions.
7. Do not block any ventilation openings. Install the equipment in accordance with the manufacturer’s instructions.
8. Do not install near any heat sources such as radiators, heat registers, stoves, or other devices (including amplifiers) that produce heat.
9. Do not attempt to circumvent the safety provisions of the polarized or grounding-type plug. A polarized plug has two blades with one wider than the other. A grounding type plug has two blades and a third grounding prong. The wide blade and the third prong are provided for your safety. If the plug does not fit into your outlet, consult an electrician for replacement of the outlet.
10. Protect the power cord from being tread upon or pinched, particularly at the plug, and the point where if emerges from the equipment. Be sure that the power outlet is located near the equipment so that it is easily accessible.
11. Only use attachments/accessories specified by the manufacturer.
12. Use only with the cart, stand, tripod, bracket, or table specified by the manufacturer, or sold with the equipment. When a cart is used, use caution when moving the cart/equipment combination to avoid injury from tipping over.
13. Unplug this equipment when it will be unused for long periods of time.
14. Refer all servicing to qualified service personnel. Service is required when the unit has been damaged in any way, such as: if the power-supply cord or plug is damaged, if liquid is spilled onto or objects fall into the unit, if the unit is exposed to rain or moisture, or if the unit does not operate normally or has been dropped.
ViewSonic PJ558D���
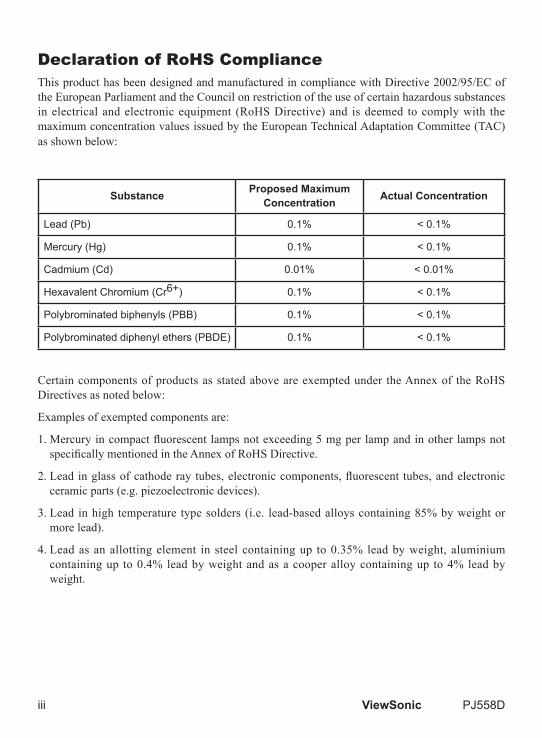
Declaration of RoHS ComplianceThis product has been designed and manufactured in compliance with Directive 2002/95/EC of the European Parliament and the Council on restriction of the use of certain hazardous substances in electrical and electronic equipment (RoHS Directive) and is deemed to comply with the maximum concentration values issued by the European Technical Adaptation Committee (TAC) as shown below:
Substance Proposed Maximum Concentration Actual Concentration
Lead(Pb) 0.1% <0.1%
Mercury(Hg) 0.1% <0.1%
Cadm�um(Cd) 0.01% <0.01%
HexavalentChrom�um(Cr6+) 0.1% <0.1%
Polybrom�natedb�phenyls(PBB) 0.1% <0.1%
Polybrom�natedd�phenylethers(PBDE) 0.1% <0.1%
Certain components of products as stated above are exempted under the Annex of the RoHS Directives as noted below:
Examples of exempted components are:
1. Mercury in compact fluorescent lamps not exceeding 5 mg per lamp and in other lamps not specifically mentioned in the Annex of RoHS Directive.
2. Lead in glass of cathode ray tubes, electronic components, fluorescent tubes, and electronic ceramic parts (e.g. piezoelectronic devices).
3. Lead in high temperature type solders (i.e. lead-based alloys containing 85% by weight or more lead).
4. Lead as an allotting element in steel containing up to 0.35% lead by weight, aluminium containing up to 0.4% lead by weight and as a cooper alloy containing up to 4% lead by weight.

ivViewSonic PJ558D
Copyright InformationCopyright © ViewSonic® Corporation, 2007. All rights reserved.Macintosh and Power Macintosh are registered trademarks of Apple Computer, Inc.Microsoft, Windows, Windows NT, and the Windows logo are registered trademarks of Microsoft Corporation in the United States and other countries.ViewSonic, the three birds’ logo, OnView, ViewMatch, and ViewMeter are registered trademarks of ViewSonic Corporation.VESA is a registered trademark of the Video Electronics Standards Association. DPMS and DDC are trademarks of VESA.PS/2, VGA and XGA are registered trademarks of International Business Machines Corporation.Disclaimer:ViewSonic Corporation shall not be liable for technical or editorial errors or omissions contained herein; nor for incidental or consequential damages resulting from furnishing this material, or the performance or use of this product.In the interest of continuing product improvement, ViewSonic Corporation reserves the right to change product specifications without notice. Information in this document may change without notice.No part of this document may be copied, reproduced, or transmitted by any means, for any purpose without prior written permission from ViewSonic Corporation.
Product RegistrationTo meet your future needs, and to receive any additional product information as it becomes available, please register your product on the Internet at: www.viewsonic.com. The ViewSonic Wizard CD-ROM also provides an opportunity for you to print the registration form, which you may mail or fax to ViewSonic.
For Your RecordsProduct Name:
Model Number:Document Number:Serial Number:Purchase Date:
PJ558DViewSonic DLP ProjectorVS11529PJ558D-1_UG_ENG Rev. 1C 02-27-07
The lamp in this product contains mercury. Please dispose of in accordance with local, state or federal laws.
Engl�sh
ViewSonic PJ558D1
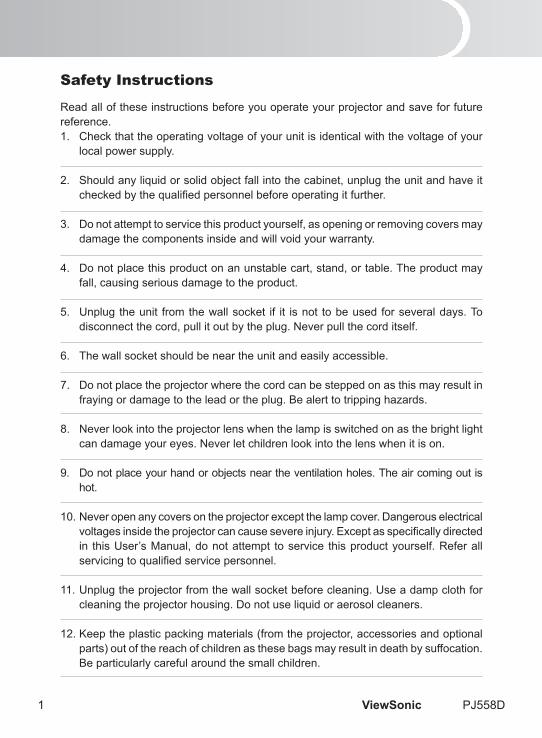
Safety Instructions
Readallofthese�nstruct�onsbeforeyouoperateyourprojectorandsaveforfuturereference.1. Checkthattheoperat�ngvoltageofyourun�t�s�dent�calw�ththevoltageofyour
localpowersupply.
2. Shouldanyl�qu�dorsol�dobjectfall�ntothecab�net,unplugtheun�tandhave�tchecked by the qualified personnel before operating it further.
3. Donotattempttoserv�ceth�sproductyourself,asopen�ngorremov�ngcoversmaydamagethecomponents�ns�deandw�llvo�dyourwarranty.
4. Donotplaceth�sproductonanunstablecart,stand,ortable.Theproductmayfall,caus�ngser�ousdamagetotheproduct.
5. Unplug theun�t fromthewallsocket �f �t �snot tobeused forseveraldays.Tod�sconnectthecord,pull�toutbytheplug.Neverpullthecord�tself.
6. Thewallsocketshouldbeneartheun�tandeas�lyaccess�ble.
7. Donotplacetheprojectorwherethecordcanbesteppedonasth�smayresult�nfray�ngordamagetotheleadortheplug.Bealerttotr�pp�nghazards.
8. Neverlook�ntotheprojectorlenswhenthelamp�ssw�tchedonasthebr�ghtl�ghtcandamageyoureyes.Neverletch�ldrenlook�ntothelenswhen�t�son.
9. Donotplaceyourhandorobjectsnearthevent�lat�onholes.Thea�rcom�ngout�shot.
10.Neveropenanycoversontheprojectorexceptthelampcover.Dangerouselectr�calvoltages inside the projector can cause severe injury. Except as specifically directed �n th�sUser’sManual,donotattempt toserv�ce th�sproductyourself.Referallservicing to qualified service personnel.
11.Unplugtheprojectorfromthewallsocketbeforeclean�ng.Useadampclothforclean�ngtheprojectorhous�ng.Donotusel�qu�doraerosolcleaners.
12.Keeptheplast�cpack�ngmater�als(fromtheprojector,accessor�esandopt�onalparts)outofthereachofch�ldrenasthesebagsmayresult�ndeathbysuffocat�on.Bepart�cularlycarefularoundthesmallch�ldren.

2ViewSonic PJ558D
13.Forvent�lat�onreasons,thefancont�nuestooperateaftertheprojectorhasbeenpoweredoff.Pleasedonotunplugthepowercordunt�lthefanstops.
14.The projector �s equ�pped w�th vent�lat�on holes (�ntake) and vent�lat�on holes(exhaust).Donotblockorplaceanyth�ngneartheseslots,or�nternalheatbu�ld-upmayoccur,caus�ngp�cturedegradat�onordamagetotheprojector.
15.Whenyoureplacetheprojectorlamp,nevertouchthenewbulbw�thyourbarehands.The�nv�s�bleres�dueleftbytheo�lonyourhandsmayshortenthebulbl�fe.Use lint-free gloves or finger cots are recommended.
16.Theproductshouldbes�tuatedawayfromheatsourcessuchasrad�ators,heatregisters, stoves, or other products (including amplifiers) that produce heat.
17.Donotoverloadwalloutlets,extens�oncords,or�ntegralconven�encereceptaclesas this can result in a risk of fire or electric shock.

Engl�sh
ViewSonic PJ558D3
Notes on AC Power Cord
AC Power Cord must meet requirement of country where you use a projector. Confirm an ACplugtypew�thgraph�csbelowandproperACPowerCordmustbeused.Ifsuppl�edACPowerCorddoesnotmatchyourACoutlet,contactyoursalesdealer.Th�sprojector�sequ�ppedw�thaground�ngtypeACl�neplug.Makesurethatyouroutlet fits the plug. Do not defeat the safety purpose of this grounding type plug. We h�ghlyrecommendus�ngav�deosourcedev�cealsoequ�ppedw�thaground�ngtypeAC line plug to prevent from signal interference due to voltage fluctuation.

4ViewSonic PJ558D
CONTENTS
ProductIntroduct�on.................................................................................................5ProjectorFeatures.............................................................................................5PackageContents.............................................................................................6
Gett�ngtoKnowtheProjector...................................................................................7ProjectorComponents.......................................................................................7RemoteControlComponents..........................................................................10
Installat�on..............................................................................................................11Connect�ngtheProjector.................................................................................11Power�ngOn/OfftheProjector........................................................................12Adjust�ngtheProjectedImage........................................................................13Adjust�ngtheProjectorZoomandFocus.......................................................14Adjust�ngProject�onImageS�ze......................................................................14
Us�ngtheProjector.................................................................................................16ControlPanel...................................................................................................16RemoteControl...............................................................................................17BatteryReplacement.......................................................................................17RemoteControlOperat�on..............................................................................18
MenuOpt�ons.........................................................................................................19Color(Computer/V�deoMode)........................................................................20Image(ComputerMode).................................................................................22Image(V�deoMode)........................................................................................23Management(Computer/V�deoMode)............................................................24Aud�o(Computer/V�deoMode)........................................................................25Language........................................................................................................26
Ma�ntenance...........................................................................................................27Clean�ngtheLens...........................................................................................27Clean�ngtheProjectorHous�ng.......................................................................27Replac�ngtheLamp........................................................................................28
Specifications.........................................................................................................30
Append�x.................................................................................................................31Ind�catorMessages.........................................................................................31PresetS�gnals.................................................................................................32Troubleshoot�ng...............................................................................................33

Engl�sh
ViewSonic PJ558D5
Product IntroductionProjector FeaturesTheprojector�ntegratesh�gh-performanceopt�caleng�neproject�onandauser-fr�endlydes�gntodel�verh�ghrel�ab�l�tyandeaseofuse.
Theprojectoroffersthefollow�ngfeatures: S�nglech�p0.55”TexasInstrumentsDLP™technology XGA(1024x768p�xels) Compacts�ze,l�ghtwe�ghtforportab�l�ty 1.2xmanualzoomlens Auto�magere-s�z�ng(Auto-Sync.)to1024x768fullscreenw�thscal�ngcompress�on
compat�b�l�tyforVGA,SVGA,XGAandSXGA*. State-of-the-artmot�onadapt�vehardwarede�nterlac�ngw�th3:2pulldown Compat�b�l�tyw�thMac�ntosh®computers Compat�b�l�tyw�thNTSC,PAL,SECAM,andHDTV Mult�-funct�onremotecontrol D-Sub15-p�ncableforanalogv�deoconnect�v�ty User-fr�endly,mult�-languageon-screend�splay(OSD) Advancedelectron�ckeystonecorrect�on
*meanscompressed.

6ViewSonic PJ558D
Package ContentsWhenyouunpacktheprojector,makesureyouhaveallthesecomponents:
Savetheor�g�nalsh�pp�ngcartonandpack�ngmater�al;theyw�llcome�nhandy�fyouevertosh�pyourun�t.Formax�mumprotect�on,repackyourun�tas�twasor�g�nallypackedatthefactory.
Accessor�esandcomponentsmayvarybyreta�lerandreg�on. L�th�um battery �s loaded �n the remote control. Remove the transparent
�nsulat�ontapebypull�ng�tbeforeuse.
Projectorw�thLensCap ACPowerCord VGACable(D-SUBtoD-SUB)
S-V�deoCable Compos�teV�deoCable Aud�oCable
VGA(D-SUB)toHDTV(RCA)Cable
ProjectorCarry�ngCase
User’sManualRemoteControl(IR)w�thL�th�umbattery
POWER
MUTE
4:3/16:9 KEYSTONE
LASER
ENTER BLANK
MENU
VOLUME
AUTO SOURCE
Opt�onalAccessory:
Qu�ckStartGu�de
RS232Cable USBCable
Engl�sh
ViewSonic PJ558D7
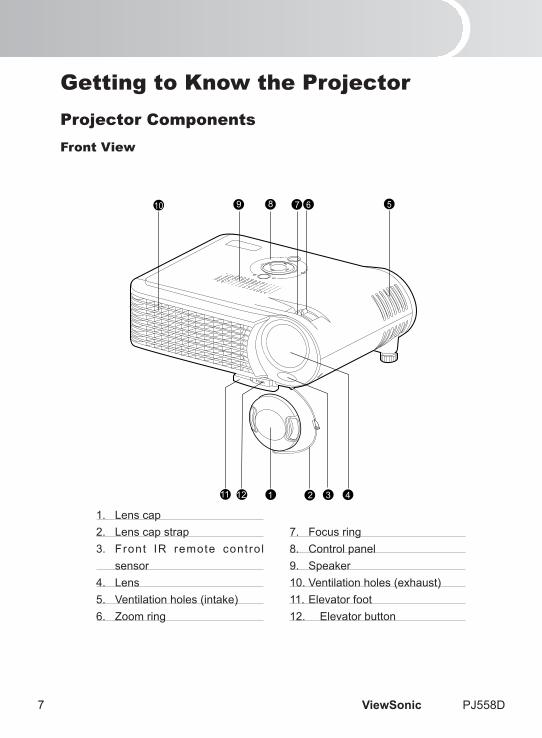
Getting to Know the ProjectorProjector ComponentsFront View
1. Lenscap2. Lenscapstrap3. Front IR remote contro l
sensor4. Lens5. Vent�lat�onholes(�ntake)6. Zoomr�ng
1 2 4
78910 56
1211 3
7. Focusr�ng8. Controlpanel9. Speaker10.Vent�lat�onholes(exhaust)11.Elevatorfoot12. Elevatorbutton

�ViewSonic PJ55�D
Rear View
1. Interfaceconnector2. RearIRremotecontrolsensor3. Securitylockreceptacle4. ACpowersocket5. Ventilationholes(intake)6. Tilt-adjustmentfoot
Bottom View
1. Lampcover2. Ceilingmount
12
3
4 56 6
2 2
1
2
Thisprojectorcanbeusedwithaceilingmountforsupport.Theceilingmountisnotincludedinthepackage.
English
ViewSonic PJ55�D�
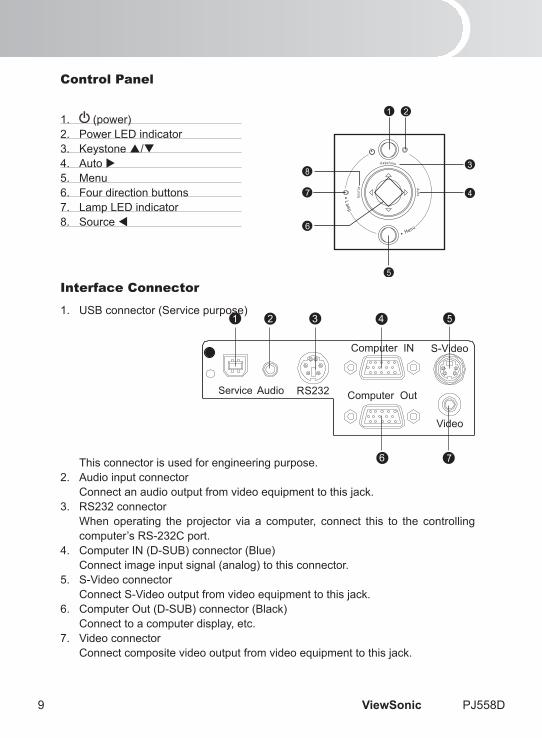
Control Panel
1. (power)2. PowerLEDindicator3. Keystone/4. Auto5. Menu6. Fourdirectionbuttons7. LampLEDindicator�. Source
Interface Connector
1. USBconnector(Servicepurpose)
Thisconnectorisusedforengineeringpurpose.2. Audioinputconnector Connectanaudiooutputfromvideoequipmenttothisjack.3. RS232connector When operating the projector via a computer, connect this to the controlling
computer’sRS-232Cport.4. ComputerIN(D-SUB)connector(Blue) Connectimageinputsignal(analog)tothisconnector.5. S-Videoconnector ConnectS-Videooutputfromvideoequipmenttothisjack.6. ComputerOut(D-SUB)connector(Black) Connecttoacomputerdisplay,etc.7. Videoconnector Connectcompositevideooutputfromvideoequipmenttothisjack.
7
21 3
6
4 5

10ViewSonic PJ558D
Remote Control Components1. Powerbutton2. Fourd�rect�onbuttons3. Menubutton4. Enterbutton5. Keystone/buttons6. Volume/buttons7. Sourcebutton8. Mutebutton9. Blankbutton10.4:3/16:9button11.Autobutton
POWER
MUTE
4:3/16:9 KEYSTONE
LASER
ENTER BLANK
MENU
VOLUME
AUTO SOURCE
1
2
3
4
7
65
8
9
10
11

Engl�sh
ViewSonic PJ558D11
InstallationConnecting the Projector
Aud�oCable VGA (D-SUB) to HDTV (RCA)Cable
RS232Cable V�deoCable VGACable(D-SUBtoD-SUB) S-V�deoCable
Desktoptype Laptoptype
2 3
6
1
1
3
54
When connect�ng cable, power cords of both a projector and externalequ�pmentshouldbed�sconnectedfromACoutlet.
The figure above is a sample connection. This does not mean that all of thesedevicescanormustbeconnectedsimultaneously.
12ViewSonic PJ558D
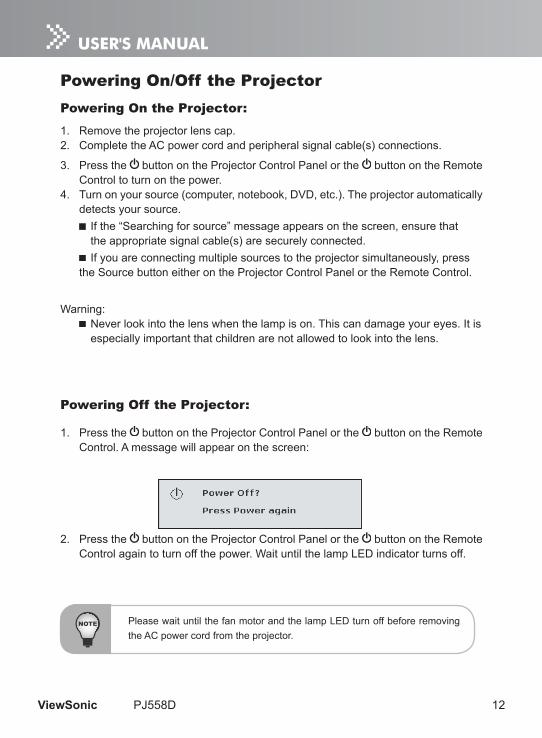
Powering On/Off the ProjectorPowering On the Projector:
1. Removetheprojectorlenscap.2. CompletetheACpowercordandper�pherals�gnalcable(s)connect�ons.
3. Pressthe buttonontheProjectorControlPanelorthe buttonontheRemoteControltoturnonthepower.
4. Turnonyoursource(computer,notebook,DVD,etc.).Theprojectorautomat�callydetectsyoursource.
Ifthe“Search�ngforsource”messageappearsonthescreen,ensurethat theappropr�ates�gnalcable(s)aresecurelyconnected.
Ifyouareconnect�ngmult�plesourcestotheprojectors�multaneously,presstheSourcebuttone�therontheProjectorControlPanelortheRemoteControl.
Warn�ng: Neverlook�ntothelenswhenthelamp�son.Th�scandamageyoureyes.It�s
espec�ally�mportantthatch�ldrenarenotallowedtolook�ntothelens.
Powering Off the Projector:
1. Pressthe buttonontheProjectorControlPanelorthe buttonontheRemoteControl.Amessagew�llappearonthescreen:
2. Pressthe buttonontheProjectorControlPanelorthe buttonontheRemoteControlaga�ntoturnoffthepower.Wa�tunt�lthelampLED�nd�catorturnsoff.
Pleasewa�tunt�lthefanmotorandthelampLEDturnoffbeforeremov�ngtheACpowercordfromtheprojector.

Engl�sh
ViewSonic PJ558D13
Adjusting the Projected ImageAdjusting the Projector Height
Theprojector�sequ�ppedw�thanelevatorfoottoadjustthe�magehe�ght.Tora�seorlowerthe�mage:
1. Turntheprojectoroverandlocatetheelevatorfoot.Presstheelevatorbuttontoextendthefootso�tmaybeadjusted.
2. Wh�lehold�ngdowntheelevatorbutton,adjustthefoottothedes�redhe�ght,thenreleasethebuttontolocktheelevatorfoot�ntopos�t�on.
3. Use tilt-adjustment foot to fine-tune tilt-adjustment.4. Lowertheprojectorso�trestson�tsfoot;adjustasneeded.
Toavo�ddamag�ngtheprojector,makesurethattheelevatorfootandt�lt-adjustmentfootarefullyretractedbeforeplac�ngtheprojector�n�tscarry�ngcase.
1
2 3

14ViewSonic PJ558D
Adjusting the Projector Zoom and Focus
1. Adjustthe�mages�zebyrotat�ngthezoomr�ng. Rotatetother�ghttoreducethe�mage. Rotatetothelefttoenlargethe�mage.2. Focusthe�magebyrotat�ngthefocusr�ng. Ast�ll�mage�srecommendedforfocus�ng.
Adjusting Projection Image SizeRefertothegraph�candtablebelowtodeterm�nethescreens�zeandproject�ond�stance.
ZoomR�ng
FocusR�ng
D�stancebetweenthescreenandthecenterofthelens

English
ViewSonic PJ558D15
Positiontheprojectorinahorizontalposition;otherpositionscancauseheatbuild-upanddamagetotheprojector.
Makesuretheheatventilationholesarenotblocked. Donotusetheprojectorinasmokyenvironment.Smokeresiduemaycause
builduponcriticalparts(i.e.DMD,lensassembly,etc.)
PROJECTIONDISTANCE(METER)
4:3SCREENSIZE-
DIAGONAL(INCH)
Wide
Tele
1.0
27.50
25.60
2.1
57.70
53.70
3.0
82.40
76.50
5.0
137.4
128.0
10.0
275.00
256.00
*Thistableisforuserreferenceonly.

16ViewSonic PJ558D
Using the ProjectorControl Panel
1. Referto“Power�ngOn/OfftheProjector”.2. PowerLED�nd�cator Referto“Ind�catorMessages”.3. Keystone/ Adjusts�maged�stort�oncausedbyt�lt�ngtheprojector.4. Auto Automat�callyadjustsfrequencyandphase.Th�sfunct�on�sava�lableforcomputer
modeonly.5. Menu D�splaysorex�tstheon-screend�splaymenus.6. Fourd�rect�onbuttons Thefourd�rect�onbuttons///canbeusedtoscrollthroughOSD(On-Screen
D�splay)menusandmakeadjustments.7. LampLED�nd�cator Referto“Ind�catorMessages”.8. Source Manuallyselectsan�nputsource.

Engl�sh
ViewSonic PJ558D17
Remote Control1. Power Referto“Power�ngOn/OfftheProjector”.2. Fourd�rect�onbuttons Thefourd�rect�onbuttons/// canbeused
toscrollthroughOSD(On-ScreenD�splay)menusandmakeadjustments.
3. Menu PresstheMenubuttontoact�vatetheOSD(On-
ScreenD�splay)menu.Usethed�rect�onalbuttonsand Menu button to nav�gate through the OSD(On-ScreenD�splay)menu.
4. Enter Confirms the selection5. Keystone/ Adjusts �mage d�stort�on caused by t�lt�ng the
projector.6. Volume/ Press the Volume button to �ncrease the
volume;presstheVolumebuttontoreducethevolume.
7. Source Manuallyselectsan�nputsource.8. Mute Cutsoffthesoundtemporar�ly.9. Blank Cutsoffthescreentemporar�ly.10.4:3/16:9 Pressthe4:3/16:9tosw�tchthe�mageaspectrat�ofrom4:3to16:9.11.Auto Automat�callyadjustsfrequencyandphase.
POWER
MUTE
4:3/16:9 KEYSTONE
LASER
ENTER BLANK
MENU
VOLUME
AUTO SOURCE
1
2
3
4
7
65
8
9
10
11
Battery Replacement
Keepthebatteryoutofthereachofch�ldren.There�sadangerofdeathbyacc�dentallyswallow�ngthebattery.
Do not recharge the used battery or expose the battery to fire or water. Donotd�sposeoftheusedbatteryalongw�thhouseholdwaste.D�sposeofusedbatter�es
accord�ngtolocalregulat�ons. Avo�dexcess�veheatandhum�d�ty.Dangerofexplos�onmayhappen�fabattery�s�ncorrectly
replaced.Replaceonlyw�ththesametyperecommendedbythemanufacturer.

18ViewSonic PJ558D
7m
7m5m
5m
5m
5m
15
15
10
10
POWER
MUTE
4:3/16:9 KEYSTONE
LASERENTER
BLANKMENU
VOLUME
AUTOSOURCE
POWER
MUTE
4:3/16:9 KEYSTONE LASER ENTER BLANKMENU
VOLUME
AUTOSOURCE
Remote Control Operation
Po�nttheremotecontrolatthe�nfraredremotesensorandpressabutton.
Theremotecontrolmaynotoperatewhenthere�ssunl�ghtorotherstronglight such as a fluorescent lamp shining on the remote sensor.
Operate the remote control from a pos�t�on where the remote sensor �sv�s�ble.
Donotdroptheremotecontrolorjolt�t. Keeptheremotecontroloutoflocat�onsw�thexcess�velyh�ghtemperature
orhum�d�ty. Donotgetwaterontheremotecontrolorplacewetobjectson�t. Donotd�sassembletheremotecontrol.
A. Stra�ghtD�stance:w�th�nabout7 meters from the front of the remote
sensor.B. D�rect�on: Angle:w�th�nabout15degreesofthe
remote sensor �n vert�cal d�rect�on ;w�th�nabout10degreesoftheremotesensor�nhor�zontald�rect�on.
D�stance:w�th�nabout5metersfromthefrontoftheremotesensor.

Engl�sh
ViewSonic PJ558D19
Menu OptionsTheprojectorhasmult�-languageOSD(On-ScreenD�splay)menusthatcanonlybed�splayedwhenan�nputsource�spresent.Themenuscanbeaccessedus�nge�thertheProjectorControlPanelortheRemoteControl.TheOSD(On-ScreenD�splay)menusallowyoutomake�mageadjustmentsandchangeavar�etyofsett�ngs.
1. PresstheMenubuttonontheProjectorControlPanelortheMenubuttonontheRemoteControl.
2. Selectthemenutabw�ththe/buttonse�therontheProjectorControlPanelortheRemoteControl.
3. Selectthedes�redmenuopt�on�temw�ththe/buttonse�therontheProjectorControlPanelortheRemoteControl.
4. Adjustthesett�ngsw�ththe/buttonse�therontheProjectorControlPanelortheRemoteControl.
Refertoeachmenuopt�onsect�onformoredeta�ls.5. Toreturnbacktothema�nmenu,presstheMenubuttonontheProjectorControl
PanelortheMenubuttonontheRemoteControl.6. Toex�tfromthemenu,presstheMenubuttonontheProjectorControlPanelor
theMenubuttonontheRemoteControl.
The�llustrat�ons�nth�smanualareforthepurposeofexplanat�onandmayd�fferfromtheactualsett�ngofyourprojector.

20ViewSonic PJ558D
Color (Computer/Video Mode)
Opt�on Act�ons/Descr�pt�onsBr�ghtness Adjuststhebr�ghtnessofthe�mage.
Pressthebuttontodarkenthe�mage. Pressthebuttontol�ghtenthe�mage.Contrast Thecontrastcontrolsthedegreeofd�fferencebetweenthe
l�ghtestanddarkestpartsofthep�cture.Adjust�ngthecontrastchangestheamountofblackandwh�te�nthe�mage.
Pressthebuttontodecreasethecontrast. Pressthebuttonto�ncreasethecontrast.ColorTemperature Adjusts thecolor temperature.Ath�gher temperature, thescreen
lookscolder;atlowertemperature,thescreenlookswarmer.
Gamma Gammaaffectshowdarkscenery�sd�splayed.W�thagreatergammavalue,darksceneryw�lllookbr�ghter.
Wh�teSegment Thewh�tesegmentcontroladjuststhewh�tepeak�nglevelof theDMDch�p.0standsform�n�malsegment,and10standsformax�mumsegment.Ifyoupreferastronger�mage,adjusttowardsthemax�mumsett�ng.Forasmoothandmorenatural�mage,adjusttowardsthem�n�mumsett�ng.

Engl�sh
ViewSonic PJ558D21
Opt�on Act�ons/Descr�pt�onsSaturat�on Adjustsav�deo�magefromblackandwh�tetofullysaturated
color.
Pressthebuttontodecreasetheamountofcolor�nthe �mage.
Pressthebuttonto�ncreasetheamountofcolor�nthe �mage.
T�nt Adjuststhecolorbalanceofredandgreen.
Pressthebuttonto�ncreasetheamountofgreen�nthe �mage.
Pressthebuttonto�ncreasetheamountofred�nthe�mage.ColorR Adjuststheredcolor.ColorG Adjuststhegreencolor.ColorB Adjuststhebluecolor.
“Saturat�on”and“T�nt”funct�onsarenotsupportedundercomputermode.

22ViewSonic PJ558D
Image (Computer Mode)
Opt�on Act�ons/Descr�pt�onsKeystone Adjusts�maged�stort�oncausedbyt�lt�ngproject�on. (+15degrees)Aspect Ratio Selects this function to fit Auto, 16:9, 4:3 aspect ratio.
Auto:Keepthe�magew�thor�g�nalw�dth-he�ghtrat�o. 16:9: The input source will be scaled to fit the width of the screen. 4:3 : The input source will be scaled to fit the projection screen.16:9Image Pressthe/buttonstochoosethe�magepos�t�onshowed onPos�t�ontop,center,orbottom.H.Pos�t�on Pressthebuttontomovethe�mageleft.(Hor�zontalPos�t�on) Pressthebuttontomovethe�mager�ght.V.Pos�t�on Pressthebuttontomovethe�magedown.(Vert�calPos�t�on) Pressthebuttontomovethe�mageup.Frequency “Frequency”changesthed�splaydatafrequencytomatch thefrequencyofyourcomputer’sgraph�ccard.Ifyou experience a vertical flickering bar, use this function to make an adjustment.Track�ng “Track�ng”synchron�zesthes�gnalt�m�ngofthed�splayw�th the graphic card. If you experience an unstable or flickering �mage,useth�sfunct�ontocorrect�t.

Engl�sh
ViewSonic PJ558D23
Image (Video Mode)
Opt�on Act�ons/Descr�pt�onsKeystone Adjusts�maged�stort�oncausedbyt�lt�ngproject�on. (+15degrees)Aspect Ratio Select this function to fit Auto, 16:9, 4:3 aspect ratio.
Auto:Keepthe�magew�thor�g�nalw�dth-he�ghtrat�oand maximize the image to fit native horizontal or vertical p�xels. 16:9 : The input source will be scaled to fit the width of the screen. 4:3 : The input source will be scaled to fit the projection screen.16:9Image Pressthe/buttonstochoosethe�magepos�t�onshowedPos�t�on ontop,center,orbottom.Sharpness Adjuststhesharpnessofthe�mage.
Pressthebuttontodecreasethesharpness. Pressthebuttonto�ncreasethesharpness.

24ViewSonic PJ558D
Management (Computer/Video Mode)
Opt�on Act�ons/Descr�pt�onsECOMode Choose“On”tod�mtheprojectorlampwh�chw�lllowerpower consumpt�on,extendthelampl�feandreduceno�se.Choose“Off” toreturnnormalmode.MenuLocat�on ChoosetheMenulocat�ononthed�splayscreen.ProjectCe�l�ng Choose“On”toreversethe�magehor�zontally.Choose“Off”to returnnormalmode.ProjectRear Choose“On”toreversethe�magevert�cally.Choose“Off” toreturnnormalmode.SourceLock Whensourcelock�sturnedoff,theprojectorw�llsearchforother s�gnals�fthecurrent�nputs�gnal�slost.Whensourcelock�s turnedon,�tw�ll“Lock”thecurrentsourcechannelbeforeyou press“Source”buttonfornextchannel.LampHour D�splaysthelamp’selapsedoperat�ngt�me(�nhours). ElapseLamp Chooseth�sfunct�ontoshowortoh�dewarn�ngmessageRem�nd�ng whenthechang�nglampmessage�sd�splayed.Themessage w�llshowup30hoursbeforeendofl�fe.OSD AdjuststheOSD’stransparency.TransparencyReset Pressthebuttonandthenchoose“Yes”toreturnthed�splay parametersonallmenustothefactorydefaultsett�ngs.
Engl�sh
ViewSonic PJ558D25
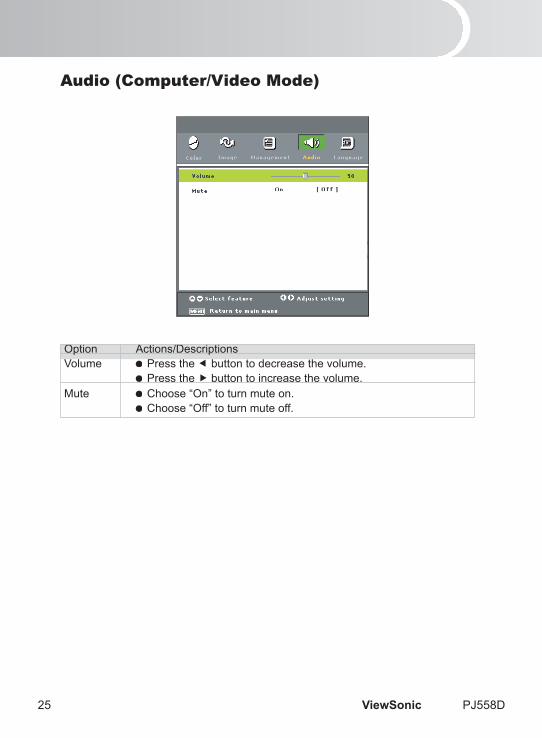
Audio (Computer/Video Mode)
Opt�on Act�ons/Descr�pt�onsVolume Pressthebuttontodecreasethevolume. Pressthebuttonto�ncreasethevolume.Mute Choose“On”toturnmuteon. Choose“Off”toturnmuteoff.

26ViewSonic PJ558D
Opt�on Act�ons/Descr�pt�onsLanguage Choosethemult�l�ngualOSDmenu.Usethe/buttonsto selectyourpreferredlanguage. PresstheMenubuttonontheProjectorControlPanelortheMenu button on the Remote Control to confirm the selection.
Language

Engl�sh
ViewSonic PJ558D27
MaintenanceTheprojectorneedsproperma�ntenance.Youshouldkeepthelenscleanasdust,d�rtorspotsw�llprojectonthescreenandd�m�n�sh�magequal�ty.Ifanyotherpartsneedreplacing, contact your dealer or qualified service personnel. When cleaning any part of the projector, always switch off and unplug the projector first.
Warn�ng: Never open any of the covers on the projector. Dangerous electr�cal voltages
�ns�detheprojectorcancausesevere�njury.Donotattempttoserv�ceth�sproductyourself. Refer all servicing to qualified service personnel.
Cleaning the LensGently w�pe the lens w�th lens clean�ng paper. Do not touch the lens w�th yourhands.
Cleaning the Projector HousingGentlyw�pew�thasoft cloth. If d�rt andsta�nsarenoteas�ly removed,useasoftclothdampedw�thwater,orwaterandneutraldetergent,andw�pedryw�thasoft,drycloth.
TurnofftheprojectorandremovetheACpowercordfromthepoweroutletbeforebeg�nn�ngma�ntenancework.
Makesurethelens�scoolbeforeclean�ng. Donotusedetergentsorchem�calsotherthanthosenotedabove.Donotuse
benzeneorth�nners. Donotusechem�calsprays. Useasoftclothorlenspaperonly.

28ViewSonic PJ558D
Replacing the LampProjector lamps have a finite life. Replace the lamp when:
Awarn�ngmessage“Lamp�sapproach�ngtheendof�tsusefull�fe�nfullpoweroperat�on.ReplacementSuggested!”appearsonthescreen.
The�magebecomesdarkerandhuesbecomeweakerafteralamphasbeenforalongper�odoft�me.
TheprojectorlampLED�nd�catorturns�ntored.Refertosect�ont�tled“Ind�catorMessages”forfurtherdeta�ls.
The lampbecomesh�gh temperatureafter turn�ngoff theprojectorw�th thepower button. If you touch the lamp, you may scald your finger. When you replacethelamp,wa�tforatleast45m�nutesforthelamptocooldown.
Donottouchthelampglassatanyt�me.Thelampmayexplodedueto�mproperhandl�ng,�nclud�ngthetouch�ngofthelampglass.
Lampl�fet�memayd�fferfromlamptolampandaccord�ngtotheenv�ronmentofuse.There�snoguaranteeofthesamel�fet�meforeachlamp.Somelampsmayfa�lorterm�natethe�rl�fet�me�nashorterper�odoft�methanothers�m�larlamps.
Alampmayexplodeasaresultofv�brat�on,shockordegradat�onasaresultofhoursofuseas�tsl�fet�medrawstoanend.R�skofexplos�onmayd�fferaccord�ngtotheenv�ronmentorcond�t�ons�nwh�chtheprojectorandlamparebe�ngused.
Wear protective gloves and eyeglasses when fixing or detaching the lamp. Fasteron-off-cyclesw�lldamagethelampandreducelampl�fe.Wa�tatleast
for5m�nutestoturnofftheprojectorafterpower�ngon. Donotoperatethelamp�nprox�m�tytopaper,cloth,orothercombust�ble
material nor cover it with such materials. Otherwise it could cause a fire. Do not operate the lamp in an atmosphere containing an inflammable substance,
such as thinner. Otherwise it could cause a fire or explosion. Thoroughlyvent�latetheareaortheroomwhenoperat�ngthelamp�nanoxygen
atmosphere(�nthea�r).Ifozone�s�nhaled,�tcouldcauseheadaches,nausea,d�zz�ness,etc.
The�norgan�cmercury�s�nvolved�nthelamp.Ifthelampbursts,themercury�ns�dethelampw�llgooutoftheprojector.Leavethearea�mmed�ately�fthelampshatterswh�lebe�ngoperatedandvent�latetheareaforatleast30m�nutes�nordertoavo�dthe�nhalat�onofmercuryfumes.Otherw�se�tcouldbeharmfultouser’shealth.

Engl�sh
ViewSonic PJ558D29
1. Turnoff theprojectorandunplugtheACpowercord.
2. Place a protect�ve sheet (cloth)beneath the projector. Turn theprojectoroversoyoucanaccessthelampcover.
3. Removetheaccesspanelscrewsandopenthepanel.
4. Removethescrewsonthebottomofthelampassembly.
5. Graspthelamphandleandpullthelampassemblyd�rectlyoutof theprojector.
6. Replacew�ththenewlamp.7. Place back the screws on the
bottomoflampassembly.8. Placethepanelandscrewbackthe
screwsonthelampcover.
D�sposeoftheusedlampaccord�ngtolocalregulat�ons. Ensurethatscrewsaret�ghtenedproperly.Screwsnott�ghtenedfullymay
result�n�njuryoracc�dents. S�ncethelamp�smadeofglass,donotdroptheun�tanddonotscratchthe
glass. Donotreusetheoldlamp.Th�scouldcausethelamptoexplode. BesuretoturnofftheprojectorandunplugtheACpowercordbeforereplac�ng
thelamp. Donotusetheprojectorw�ththelampcoverremoved.

30ViewSonic PJ558D
SpecificationsProjectionSystem Singlepanel0.55”DLPprojectorNativeresolution 786,432dotx1(1024x768x1)Lens ManualZoom(1.2X)AspectRatio Auto,16:9,4:3ScreenSize 30”-300”Lamp 230WProjectionType Front,Rear,CeilingInputSource D-Sub 15 pin, S-Video, Composite Video, Stereo PhoneJack,RS232,USBScanningFrequency HorizontalFreq. 31-79KHz VerticalFreq. 56-85HzDigitalKeystoneCorrection Vertical:+/-15degreesIntegratedSpeaker 1Wx1RemoteControl MultifunctionalOSDLanguage MultilanguageOperationalAmbient Temperature:0-400C Humidity:30-85%PowerSupply AC100-240V,50/60HzPowerConsumption 300Watts(Typical)Dimension(WxDxH) 265x202x97mmWeight 2.5kgs(5.4lbs)
Note: Design and Specifications are subject to change without prior notice.

Engl�sh
ViewSonic PJ558D31
PowerLED Amber Sol�d
LampLED Green Sol�d
LampLED Amber Sol�d
LampLED Green Flash�ng
PowerLED Green Sol�d
AppendixIndicator MessagesLEDType Color Status Mean�ngPowerLED Green Flash�ng Theprojector�spoweredandready. Theprojectorsystemhassomeproblemsw�th�ts fan,sotheprojectorcannotstartup. Theprojector�s�ngoodcond�t�ononwork�ng. Thelamp�s�ngoodcond�t�onand�sproject�ngat max�mumbr�ghtness. Thelamphasreached�tsendofl�feandmustbe changedsoon.Thelampw�llcont�nuetooperate unt�l�tfa�ls.Changethelamp.Ifthelamp�soff, thentheballastw�llbecomemalfunct�on. Theprojector�sshutt�ngdown.Thefanmotor�s cool�ngthelampforshutdown.Donotunplugthe powercableorturnthepowersw�tchoffbefore thelampLEDturnsoff.Thefanmotorw�llturnoff whenthelamphascooled.LampLED Amber Flash�ng Temperature�stooh�gh.Thelampw�llturnoff.

32ViewSonic PJ558D
Preset Signals
*meanscompressed.
HDTV Preset Signals S�gnal Hor�zontalFrequency(kHz) Vert�calFrequency(Hz) 480p 31.469kHz 59.94Hz 720p 45.0kHz 60Hz 1080� 33.716kHz 29.97Hz
Mode
Resolution
Vertical Frequency Horizontal Frequency Timing (Hz) (kHz)
480p 640 x 480 59.94 31.46 60 Hz
720p 1280 x 720 60 45 60 Hz
VGA
640 x 480 72.8 37.86 60 Hz
640 x 480 75 37.5 75 Hz
640 x 480 85 43.2 85 Hz
720 x 400 70 31.5 60 Hz
720 x 400 85 37.9 85 Hz
SVGA
800 x 600 56.2 35.1 56 Hz
800 x 600 60.3 37.8 60 Hz
8000 x 600 72.1 48 72 Hz
800 x 6000 75 46.8 75 Hz
XGA
1024 x 768 60 48.3 60 Hz
1024 x 768 70 56.4 70 Hz
1024 x 768 75 60 75 Hz
1024 x 768 84.9 68.8 85 Hz
1024 x 768 60 48.3 60 Hz
1024 x 768 75 60.2 60 Hz
SXGA*
1280 x 1024 60 63.98 60 Hz
1280 x 1024 75 79.9 75 Hz
1152 x 870 75 68.6 60 Hz
1152 x 864 75 67.5 75 Hz
Mac 16” 832 x 624 74.5 49.7 60 Hz
Mac 480-66A 640 x 480 66.667 35 66 Hz

Engl�sh
ViewSonic PJ558D33
TroubleshootingRefertothesymptomsandmeasuresl�stedbelowbeforesend�ngtheprojectorforrepa�rs.Iftheproblempers�sts,contactyourlocalresellerorserv�cecenter.Pleasereferto“Ind�catorMessages”aswell.
SymptomNopower.
Powergoesoutdur�nguse.
Nop�cture.
Noaud�o.
P�cturenotd�splayedcorrectly.
CauseTheACpowercord�snotplugged�n.TheACpowercord�snotconnectedtotheprojector.Thelampcoverloose.
Thetemperature�stooh�gh.
Thevent�lat�onholesareblocked.
Theprojector�snotturnedon.Thebr�ghtnesssett�ng�sm�n�m�zed.Theconnect�onssetuparenotcorrectly.Theconnecteddev�cesarenotfunct�on�ngproperly.
Theprojector�snotturnon.Themutefunct�on�son.Thevolumesett�ng�sm�n�m�zed.Theconnect�onshavenotbeensetupcorrectly.Theconnecteddev�cesarenotfunct�on�ngproperly.
The�nputs�gnal�snotsupportedbytheprojector.
MeasurePlug�ntheACpowercord.
ConnecttheACpowercordtotheprojectorcorrectly.T�ghtenthescrewsonthelampcover.UnplugtheACpowercordandwa�tforashortwh�le,thenturnthepowerbackon.Placetheprojectorsothatthevent�lat�onholesarenotblocked.Turntheprojectoron.
Adjustthebr�ghtness�nthe“Color”menu.Checkthatallconnect�onsaresetupcorrectly.Checkthatallconnecteddev�cesarefunct�on�ngproperly.Turntheprojectoron.Setthemutetooff.Adjustthevolume�nthe“Aud�o”menu.Checkthatallconnect�onsaresetupcorrectly.Checkthatallconnecteddev�cesarefunct�on�ngproperly.Refreshthe�nputs�gnalrate.

34ViewSonic PJ558D
P�ctureblurred.Partofp�ctureoutoffocus.
Image�sdark.
Colorstool�ght.Badshad�ng.
Remotecontroldoesn’twork.
Thelens�sd�rty.
Thelensfocus�snotadjustedopt�mally.Theproject�ond�stance�snotw�th�ntheprojector’ssupportedrange.Theprojector’sscreenplacementangle�st�ltedtoofar.Thefrequencyortrack�nghasnotbeenadjustedproperly.Thelenscap�sattachedtothelens.Thebr�ghtnessorcontrasthasnotbeenadjustedproperly.
Thelamp�sneartheendof�tsserv�cel�fe.Thesaturat�on,t�nt,colorR,colorGorcolorBhasnotbeenadjustedproperly.Thescreen�sd�rty.Thelamp�sneartheendof�tsserv�cel�fe.Thebatterycouldbeweak.Thepolar�ty�snotcorrect.
Theremotecontrol�snotbe�ngusedw�th�ntheeffect�verange.Therearesomeobstruct�onsbetweentheremotecontrolandprojector.There are some fluorescent or otherbr�ghtl�ghtssh�n�ngattheprojector’s�nfraredremotesensor.
W�pecleanw�thasoft,dryclothorlenspaper.Adjustthefocusw�ththefocusr�ng.Placetheprojectorw�th�nthesupportedrange.
Adjustthescreenplacementangle.Adjustfrequencyandtrack�ng�nthe“Image(ComputerMode)”menuproperly.Removethelenscap.
Adjustthebr�ghtnessorcontrast�nthe“Color(Computer/V�deoMode)”menuproperly.Replacew�thanewlamp.
Adjustthesaturat�on,t�nt,colorRorcolorG�nthe“Color(Computer/V�deoMode)”menuproperly.W�pecleanw�thasoft,drycloth.Replacew�thanewlamp.Replacew�thanewbattery.Insertthebatteryw�thcorrectpolar�t�es.Usetheremotecontrolw�th�ntheeffect�verange.Checkthattherearenotanyobstruct�onsbetweentheremotecontrolandprojector.Checkthattherearenotanyfluorescent or other bright l�ghtssh�n�ngattheprojector’s�nfraredremotesensor.

ViewSonic PJ558D35
Customer SupportFor technical support or product service, see the table below or contact your reseller.
Note : You will need the product serial number.
Country/Region
Web SiteT=Telephone
F=FaxE-mail
Un�tedStates www.v�ewson�c.com/support/T=8006886688
F=9094681202serv�ce.us@v�ewson�c.com
Canada www.v�ewson�c.com/support T=8664634775 serv�ce.ca@v�ewson�c.com
Un�tedK�ngdom www.v�ewson�ceurope.com/uk T=02079490307 serv�ce.eu@v�ewson�ceurope.com
Europe,M�ddle
East,Balt�c
countr�es,and
NorthAfr�ca
www.v�ewson�ceurope.comContactyour
resellerserv�ce.eu@v�ewson�ceurope.com
Austral�aand
NewZealand
www.v�ewson�c.com.au/
support/
AUS=1800880818
NZ=0800008822serv�[email protected]�ewson�c.com
S�ngapore/
Malays�a/
Tha�land
www.v�ewson�c.com.sg/
support/T=6564616044 serv�[email protected]�ewson�c.com
SouthAfr�ca/
Othercountr�eswww.v�ewson�c.com
T=88622246-3456
F=88622249-1751serv�[email protected]�ewson�c.com
HongKongwww.hk.v�ewson�c.com/
support/T=85231022900 serv�[email protected]�ewson�c.com
Macauwww.hk.v�ewson�c.com/
support/T=853700303 serv�[email protected]�ewson�c.com
Korea www.v�ewson�c.com T=0802659080 serv�[email protected]�ewson�c.com

36ViewSonic PJ558D
Limited WarrantyVIEWSONIC®PROJECTOR
What the warranty covers:ViewSonic warrants its products to be free from defects in material and workmanship, under normal use, during the warranty period. If a product proves to be defective in material or workmanship during the warranty period, ViewSonic will, at its sole option, repair or replace the product with a like product. Replacement product or parts may include remanufactured or refurbished parts or components.
How long the warranty is effective:North and South America: 3 years for all parts excluding the lamp, 3 years for labor, 1 year for the original lamp from the date of the first consumer purchase.Europe: 3 years for all parts excluding the lamp, 3 years for labor, 1 year for the original lamp from the date of the first consumer purchase.Other regions or countries: Please check with your local dealer or local ViewSonic office for the warranty information.Lamp warranty subject to terms and conditions, verification and approval. Applies to manufacturer’s installed lamp only.All accessory lamps purchased separately are warranted for 90 days.
Who the warranty protects:This warranty is valid only for the first consumer purchaser.
What the warranty does not cover:1. Any product on which the serial number has been defaced, modified or removed.2. Damage, deterioration or malfunction resulting from:
a. Accident, misuse, neglect, fire, water, lightning, or other acts of nature, unauthorized product modification, or failure to follow instructions supplied with the product.
b. Repair or attempted repair by anyone not authorized by ViewSonic.c. Any damage of the product due to shipment.d. Removal or installation of the product.e. Causes external to the product, such as electric power fluctuations or failure.f. Use of supplies or parts not meeting ViewSonic’s specifications.g. Normal wear and tear.h. Any other cause which does not relate to a product defect.
3. Any product exhibiting a condition commonly known as “image built-in” which results when a static image is displayed on the product for an extended period of time.
4. Removal, installation, and set-up service charges.
How to get service:1. For information about receiving service under warranty, contact ViewSonic Customer
Support (Please refer to Customer Support page). You will need to provide your product’s serial number.

ViewSonic PJ558D37
2. To obtain warranted service, you will be required to provide (a) the original dated sales slip, (b) your name, (c) your address, (d) a description of the problem, and (e) the serial number of the product.
3. Take or ship the product freight prepaid in the original container to an authorized ViewSonic service center or ViewSonic.
4. For additional information or the name of the nearest ViewSonic service center, contact ViewSonic.
Limitation of implied warranties:There are no warranties, express or implied, which extend beyond the description contained herein including the implied warranty of merchantability and fitness for a particular purpose.
Exclusion of damages:ViewSonic’s liability is limited to the cost of repair or replacement of the product. ViewSonic shall not be liable for:1. Damage to other property caused by any defects in the product, damaged based upon
inconvenience, loss of use of the product, loss of time, loss of profits, loss of business opportunity, loss of goodwill, interference with business relationships, or other commercil loss, even if advised of the possibility of such damages.
2. Any other damages, whether incidental, consequential or otherwise.3. Any claim against the customer by other party.
Effect of state law:This warranty gives you specific legal rights, and you may also have other rights which vary from state to state. Some states do not allow limitations on implied warranties and/or do not allow the exclusion of incidental or consequential damages, so the above limitations and exclusions may not apply to you.
Sales outside the U.S.A. and Canada: For warranty information and service on ViewSonic products sold outside of the U.S.A. and Canada, contact ViewSonic or your local ViewSonic dealer.The warranty period for this product in mainland China (Hong Kong, Macao and Taiwan Excluded) is subject to the terms and conditions of the Maintenance Guarantee Card.
4.3: Projector Warranty PRJ_LW01 Rev. 1g 06-30-06


![User Guide...User. {{]}]} {}]}](https://img.pdfslide.net/doc/110x75/60918ca14327954d24291644/-user-guide-user-.jpg)