Embed Size (px)
Citation preview
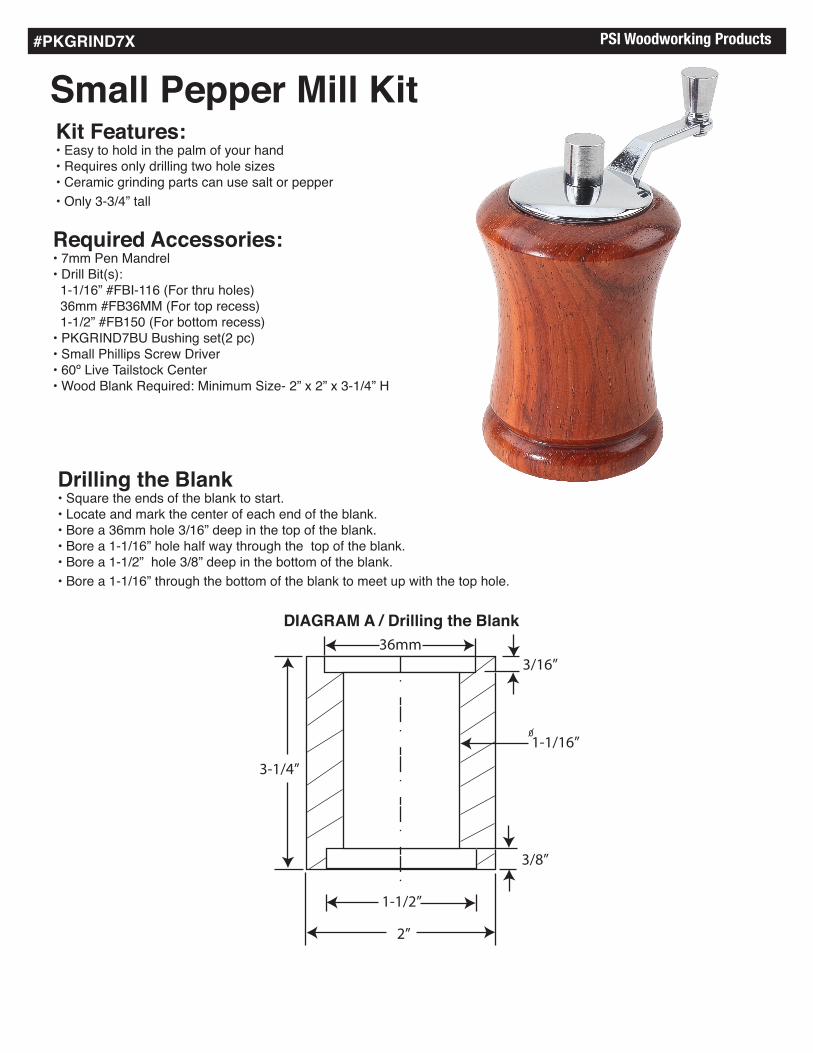
Required Accessories:• 7mm Pen Mandrel• Drill Bit(s):
1-1/16” #FBI-116 (For thru holes)36mm #FB36MM (For top recess)1-1/2” #FB150 (For bottom recess)
• PKGRIND7BU Bushing set(2 pc)• Small Phillips Screw Driver• 60º Live Tailstock Center• Wood Blank Required: Minimum Size- 2” x 2” x 3-1/4” H
#PKGRIND7X PSI Woodworking Products
Small Pepper Mill KitKit Features: • Easy to hold in the palm of your hand• Requires only drilling two hole sizes• Ceramic grinding parts can use salt or pepper• Only 3-3/4” tall
DIAGRAM A / Drilling the Blank
**Take out (s) where appropriate****Take out (2/3 pcs) where appropriate**
36mm3/16”
3/8”
1-1/16”0
1-1/2”
2”
3-1/4”
Drilling the Blank• Square the ends of the blank to start.• Locate and mark the center of each end of the blank.• Bore a 36mm hole 3/16” deep in the top of the blank.• Bore a 1-1/16” hole half way through the top of the blank.• Bore a 1-1/2” hole 3/8” deep in the bottom of the blank.• Bore a 1-1/16” through the bottom of the blank to meet up with the top hole.

#PKGRIND7X PSI Woodworking Products
Assembly• Layout parts according to diagram C• Glue the upper cup into the recess on the upper blank.• Insert the grinding assembly, shaft in first through the hole in the bottom. Push on
the spring.• Mount the crank wheel over the extended rod. Screw the adjusting grind knob over
the threads.• Line up the grinder housing rim shoulders to match the holes in the grinder base.
Cover with the bottom plate, extended portion toward the bottom (see diagram E) Screw in through the grinder base and housing securely into the wood.
• When filled with pepper or salt, to adjust the grind just loosen or tighten the knob.• To reload the mill, remove the knob and crank wheel and reload through the top.
Diagram D / Bushings #PKGRIND7BU
© 2012 PSI Woodworking Philadelphia PA 19115 - v10/18
ø1.375”
1/4”
3/8”
ø1.058”same
.248 Holes through
Turning the Blank (see diagram B)• Mount an end bushing wide end first on the mandrel.• Slide the blank on the mandrel onto the bushing.• Mount the other end bushing, narrow end in first into the blank.• Lock the setup tight on the mandrel, secure with the tail stock.• Turn the blank into the profile desired. Finish the wood with a food safe finish.NOTE: The wood is not turned down to meet the bushings
DIAGRAM B / Turning the
HeadstockBottom End
Spacer Bushings
Spacer BushingsTop End
End Bushings Profile of your choice
End Bushings
BlankKnurled Nut
Live Center
Crank Wheel
Upper Cup
Housing
Spring
Grinder MillGrinder Base
Bottom Plate
Grind Adj. Knob
2 Mounting Screws (Longer)
2 Mounting Screws (Shorter)
This part has hole in it for shaft
Diagram C Grind Assembly
Grinder Assembly
Diagram E