Embed Size (px)
Citation preview

Date: 20.03.2018 Page 1 of 12
Information Sheet 470a
Planning and Application Description Planning and application, checklists for the system application of Floortec 2C Mineralico SL 470
General planning instructions
• This document should be made accessible to all those participating in the coating procedure, so that everyone is informed about the procedure and the individual steps. Only in this way can a flawless process sequence be ensured.
• If feasible, the installation of the flooring plaster system should be scheduled in the project planning to take place after all other work segments, or as close to the end as possible, to prevent mechanical damage.
• A time window of 4-7 work days should be slated for performing the essential work steps of the system build-up.
• Allow extra time for additional work, such as preliminary filling, etc. (for the implementation as well as for extended drying times).
• The surfaces may be walked on carefully about 12 hours after completion of the 2C PU Sealing. The complete curing of 2C PU Sealer takes 7 days.
• If the finished surfaces are to be covered, this must be done with water vapor permeable covering materials such as felt board or nonwoven without film lamination, in order to avoid impairing the curing process of the mineral filler material and to prevent possible moisture accumulation under the covering material.
• During the implementation period, other craftspeople should avoid the rooms being coated, and the surfaces should be protected against dust or dirt contamination.
• In case of heated floor constructions, the floor heating is to be turned off at least 3 days before the onset of work or lowered to no more than +15 to 18°C. It may only be restarted 7 days after system application at the earliest.
• In particular, pay attention to the minimum drying times and individual residual moisture in newly created or soon to be created screed surfaces.
• Even beforehand, observe room, substrate, and material temperatures. • Take measures to prevent direct incidence of sunlight onto the surfaces to be treated through large
window fronts or floor-level windows. Close venetian blinds or cover window fronts.
Information Sheet 470a
Page 2 of 12
Construction site equipment
• If possible, examine and, as appropriate, prepare the tools and equipment required for the particular work step one day in advance.
• Also ready the needed materials in due time and check for adequate quantities. • Equip the mixing place such that a flawless process sequence for mixing and transporting the material
to the installation site is ensured. • Apply tinted 2C Mineralico SL 470 within 2 weeks. If the product is applied later, it must be reshaken.
List of materials and tools
The required materials and tools are to be provided in due time and in sufficient quantity.
Materials Article number Consumption (per application)
Com-pleted
Priming with
Multi Floor Primer LF 3084 3084.0005 50-80 g/m² undiluted material
or
Special Primer LF 3085 3085.0005 100-150 g/m²
Filling with
Floor Leveling Compound 3115 3115.0025 4,5 kg/m² with 3 mm film thickness
or 4,5 kg/m²
with 3 mm film thickness
Floor Leveling Compound FX 3109 3109.0025
Perimeter Insulation Strips SK 3018 (optional)
3018 as required
Facade Smoothing Filler F 1539 (optional) 1539.0004 as required
Double intermediate priming with
Multi Floor Primer LF 3084 3084.0005 2x 50-80 g/m² undiluted material
Create the plaster floor with
Floortec 2C Mineralico SL 470 mixed with Floortec Hardener 471
0470.0020 4,5–5 kg/m² prepared mixture, incl. hardener
0471.0005
Priming with
Floortec 2C Epoxy Primer 473 mixed with Floortec Epoxy Hardener 849
0473.0002 Ca. 85 ml/m² prepared mixture
0849.0500
Double sealing with
Floortec 2C PU Sealer 474 0474.5,5 2x 50 ml/m² prepared mixture

Information Sheet 470a
Page 3 of 12
List of materials and tools
Tools and accessories
Designation Article number Consumption Com-pleted
Collomix mortar mixing tool DLX 152 HF 3347.0152 1 unit per application team
High-performance stirrer at least 1,300 W e.g., Collomix mixer Xo 4
3347.0004. 1 unit per application team
Collomix coupling HEXAFIX®/M14 exterior 3347.0015 optional depending on stirrer
Festool 2K Stirring Rod 1841 1841.0120 optional depending on stirrer
Adapter for HEXAFIX® stirrers 1841.0300 optional depending on stirrer
Surface filler knife (size 25, 40 or 50 cm wide)
1828.0025
1 unit per application team
1828.0040
1828.0050
Broom and apparatus handle with handle socket
1348.0140 1 unit per application team
1347.0000
Metal floor squeegee, height-adjustable incl. handle socket
1324.0560 1 unit per application team
Double-edge Notched Blade TKB R2 (for 3115)
1326.0028.0012 2 units per application team
Double-edge Notched Blade TKB R3 (for 470) 1326.0028.0013 2 units per application team
De-aerating roller 1137.0026.0000 1 unit per application team
Spiked screed soles, blunt 1196.0001 2 pairs per application team
Overshoes 1846.0000 as required (pack of 20)
Vacuum cleaner, e.g., Festool dust extractor CTL MIDI with Cleaning set for tradesmen D 36 HW RS Plus
3479.0000 -
3424.0008
Perimeter Insulation Strip SK 3018 3018.0025 Dependent on the room
Short-fiber paint roller 1217.0025 1 unit per application team
Microfiber paint roller 1221.0025 1 unit per application team
Rotary disk sanding machine 3694.0000 -
Driving plate for the sanding-pad attachment for the rotary disk sanding machine
3694.0020 1 unit per sanding machine
Sanding pad, green for rotary disk sanding machine
3694.0400.0001 1 unit per 100 m²
Bucket trowel, 10 cm 3782.0010 1 unit per application team
Stop watch or timer - 1 unit per application team

Information Sheet 470a
Page 4 of 12
Personnel planning and allocation
• An adequate number of workers for the individual work steps is crucial for the success of the coating procedure.
• In particular, floor-coating tasks are usually limited by tight scheduling. When the performance deadlines have been set, substitute personnel should be available on call in case of need.
• The following tables can serve as a rough orientation for personnel requirements. A site-oriented planning is indispensable, for example in complexly partitioned areas.
Recommended minimum number of workers for the leveling with filler
Size Total number of
workers For mixing
and transport For creating a textured
surface and leveling
Up to approx. 100 m²
3 2 1
Up to approx. 200 m²
5 3 2
Up to approx. 500 m²
7 4 3
Up to approx. 1000 m²
9 5 4
Recommended minimum number of workers for applying 2C Mineralico SL 470
Size Total number of workers *
For mixing and transport
For creating a textured surface
and leveling
For re-smoothing/
design
Up to approx. 100 m²
4 2 1 1
Up to approx. 200 m²
7 3 2 1–2
Up to approx. 500 m²
9 4 3 2
Up to approx. 1000 m²
12 5 4 2–3
* The data pertain to the single-colored implementation. In case of a two-colored implementation, schedule 1 to 2 additional persons in each case.
Recommended minimum number of workers for the priming and sealing
Size Total number of
workers
Up to approx. 100 m²
1–2
Up to approx. 200 m²
2–3
Up to approx. 500 m²
3–4
Up to approx. 1000 m²
4–5

Information Sheet 470a
Page 5 of 12
Detailed planning for applying Floortec 2C Mineralico SL 470
• Particularly for complex, e.g. contorted, surfaces, allocate the personnel such that the surfaces can be coated smoothly and expeditiously.
• The application paths of several application teams must be planned such that the work can always be done wet in moist. Pay attention to the open time (max 15 min, depending on site conditions), especially when re-smoothing.
• Processing teams of two persons each are recommended in principle for the application and the smoothing procedures; they are provided with mixed material by one or two persons, respectively.
• Depending on the object, it is advisable to prepare a drawing of the respective room and to allocate the teams and jointly determine the implementation process based on this drawing.
Implementation process
Sketch of the respective room for the planning of the application paths, application course, and design orientation
Information Sheet 470a
Page 6 of 12
System build-up in individual steps
Before beginning the coating work
Figure Description Note
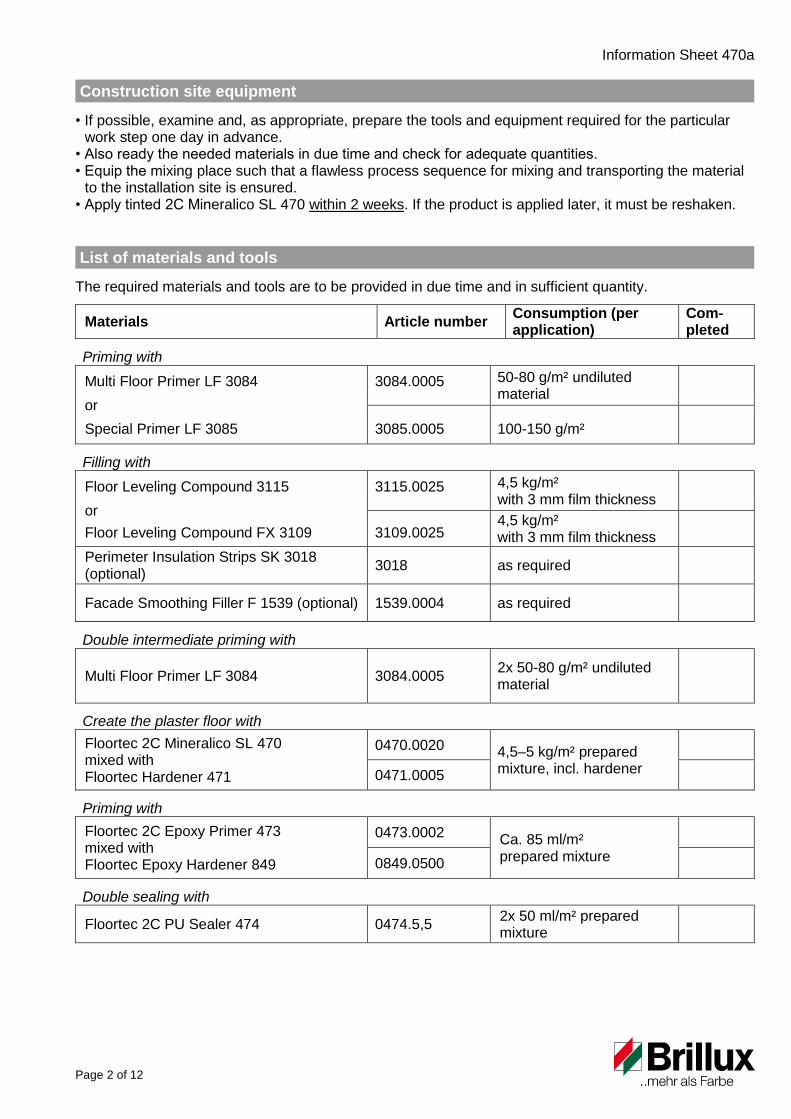
Inspection of the substrate Inspect the substrate for load-bearing capacity and cracks.
Inspection by means of visual inspection, crack inspection, moisture measurement, adhesive-strength inspection, etc. Expansion joints must be retained. Clearly mark the beginning and end points of the joints on the walls.
Follow the instructions on surface preparation in the Data Sheets for the system products.
Information Sheet 470a
Page 7 of 12
System build-up in individual steps
Day 1: Leveling of the floor surfaces with filler
Figure Description Note
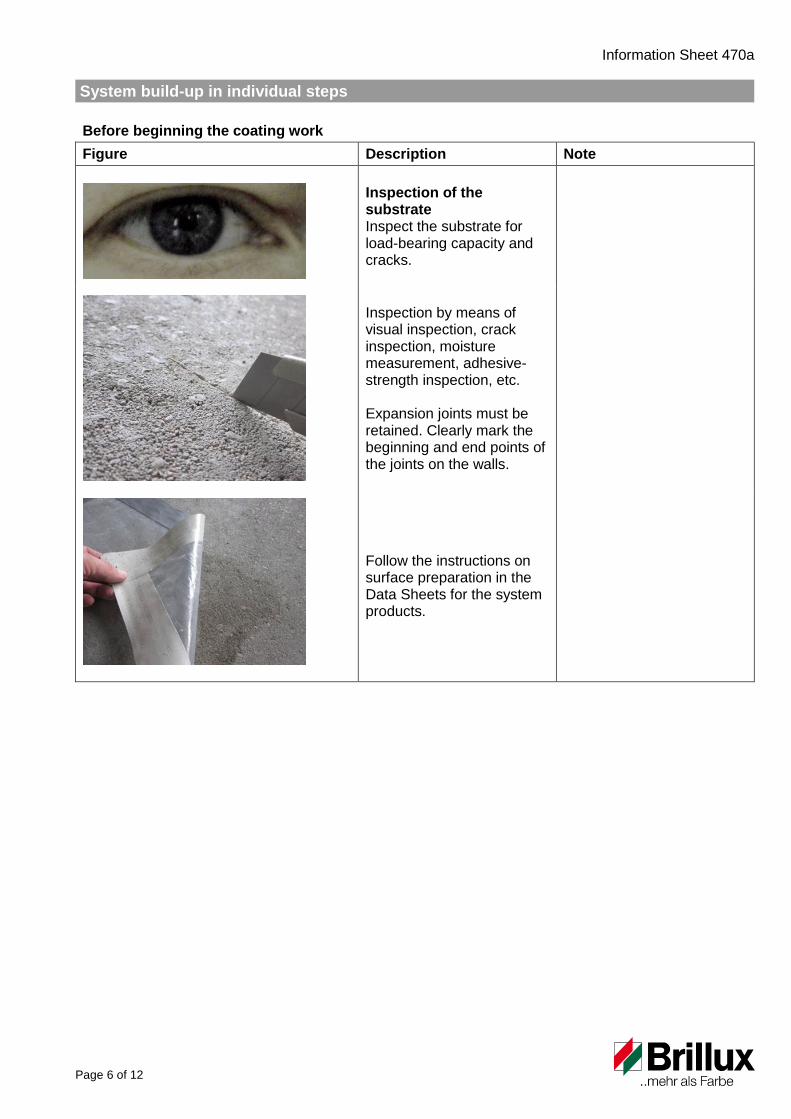
Vacuum and clean prepared floor surfaces. Apply Perimeter Insulation Strips SK 3018.
Priming depending on the substrate with Multi Floor Primer LF 3084 (1:3 with water) or Special Primer LF 3085.
New screeds can exhibit increased absorbency, such that they should be primed 2x where required to avoid potential pore formation in the subsequent leveling with filler to the greatest possible extent.
Mix Floor Leveling Compound 3115 or Floor Leveling Compound FX 3109 with a suitable stirrer and stirring rod until it is lump-free. Preferably, use the Collomix mortar mixing tool DLX 152 HF 3347.
Ensure that the correct quantity of water, 5.5 liters/25 kg, is added. Use a measuring bucket. Allow to stand for at least 3 minutes, then stir again before application.
Filling: Spread Floor Leveling Compound 3115 (Metal Floor Squeegee 1324 with Double-edge Notched Blade TKB R2) using a squeegee.
Spread Floor Leveling Compound FX 3109 evenly with the Metal Floor Squeegee 1324 (without notched blade) or the Stainless Steel Trowel 3792.
In a layer at least 3 mm thick
Work over the fresh leveling layer in transverse directions (once horizontally and once vertically) with the de-aeration roller
Information Sheet 470a
Page 8 of 12
System build-up in individual steps
Day 2: First part - intermediate priming with Multi Floor Primer LF 3084
Figure Description Note
Inspect the substrate (implemented leveled filling)!!!
Always pay attention to the residual moisture of the leveling layer (film test 15 minutes) For the further build-up, sand the filled surfaces beforehand (grain size P60/ P80) and then vacuum them. In the process, scrape the trowel across the surface with exerted pressure. This pore filling is also possible after intermediate priming. However, the filled areas must then be primed again.
Fill existing pores with Facade Smoothing Filler F 1539. Intermediate drying with this processing method approx. 60 minutes or over night.
Intermediate priming: 2-fold priming with Multi Floor Primer LF 3084 (diluted 1:1 with water).
Apply with Short Fiber Paint Roller 1217, preferably in alternate directions. Avoid creating imperfections, apply evenly.
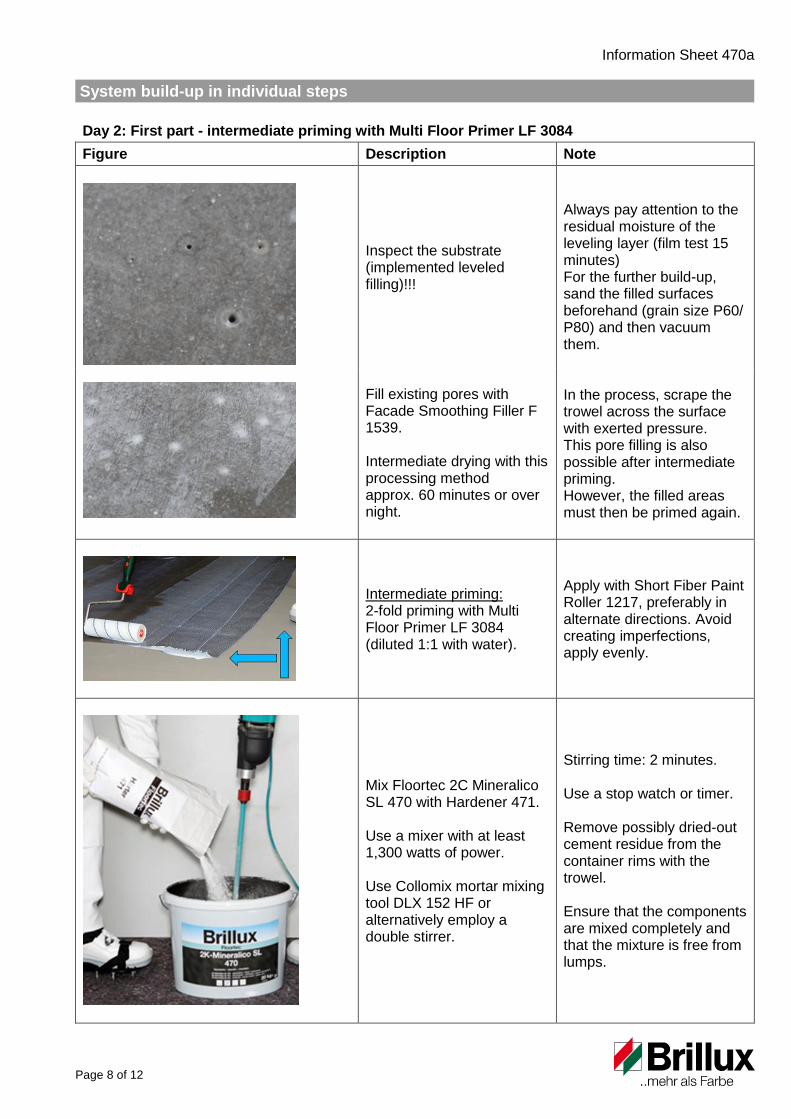
Mix Floortec 2C Mineralico SL 470 with Hardener 471. Use a mixer with at least 1,300 watts of power. Use Collomix mortar mixing tool DLX 152 HF or alternatively employ a double stirrer.
Stirring time: 2 minutes. Use a stop watch or timer. Remove possibly dried-out cement residue from the container rims with the trowel. Ensure that the components are mixed completely and that the mixture is free from lumps.

Information Sheet 470a
Page 9 of 12
System build-up in individual steps
Day 2: Second part - application of Floortec 2C Mineralico 470 SL
Figure Description Note
Coating: Always pour all of the mixed material out of the respective containers immediately.
The mixed material cures in the container within a few minutes and can then no longer be applied. For the smallest areas, inlay work, etc., weigh out the required partial quantities.
Spread Floortec 2C Mineralico SL 470 using a squeegee. Metal Floor Squeegee 1324 with Double-edge Notched Blade TKB R3.
Always work over the surfaces with the squeegee completely and avoid material accumulations.
Re-smooth (texture) the spread filler material with a Surface Filler Knife 1828 with handle socket or a Venetian Trowel 1764 to create an individual design. It is best to work in a diagonal direction. Do not level at right-angles or in lines. The flooring professionals should wear spiked screed soles, blunt.
Re-smooth material dripping off of the surface filler knife; drip marks remain visible after drying. After approx. 2 hours, the surfaces can be carefully walked on wearing socks and overshoes, for example, in order to remove masking tape. Protect surfaces to prevent them being walked on by unauthorized persons (cordon off the area)
Information Sheet 470a
Page 10 of 12
System build-up in individual steps
Day 3: First part - remove perimeter insulation strips, vacuum and polish surfaces
Figure Description Note
Use a utility knife to cut the perimeter insulation strips flush with the floor surface and remove them.
After-treatment: Vacuum surfaces. Utilize hard-floor/brush adapter.
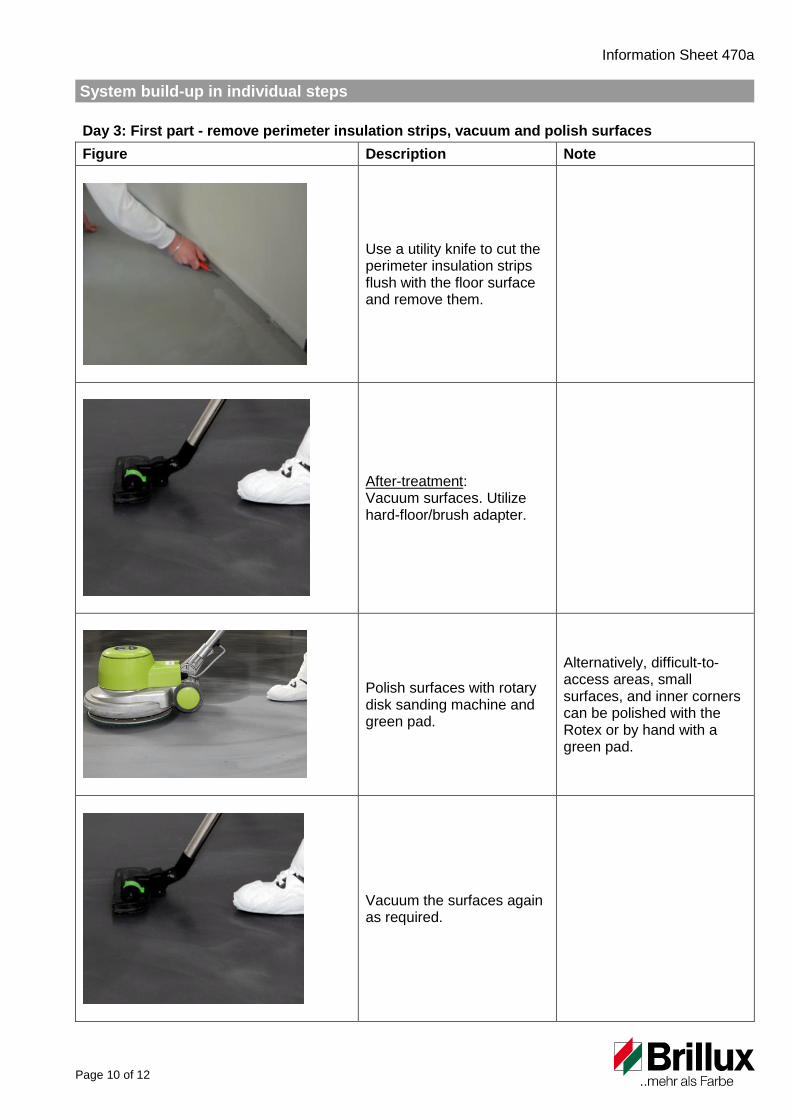
Polish surfaces with rotary disk sanding machine and green pad.
Alternatively, difficult-to-access areas, small surfaces, and inner corners can be polished with the Rotex or by hand with a green pad.
Vacuum the surfaces again as required.
Information Sheet 470a
Page 11 of 12
System build-up in individual steps
Day 3: Second part - prime surfaces with 2C Epoxy Primer 473
Figure Description Note
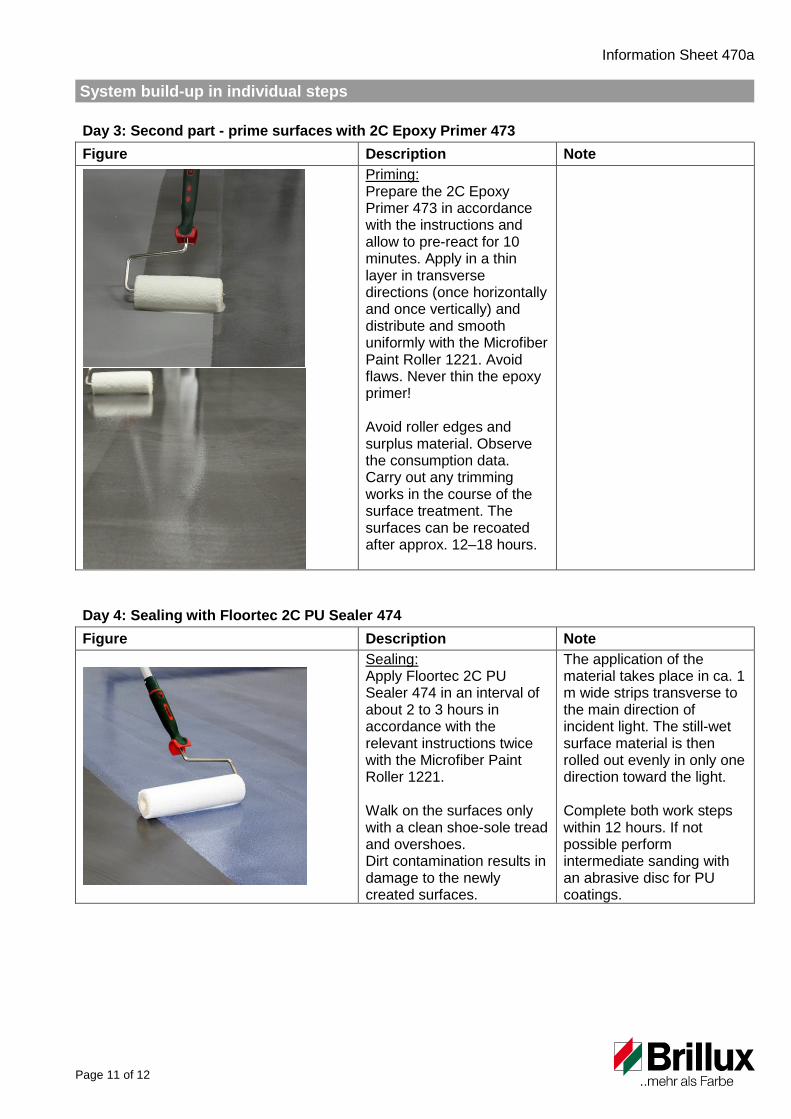
Priming: Prepare the 2C Epoxy Primer 473 in accordance with the instructions and allow to pre-react for 10 minutes. Apply in a thin layer in transverse directions (once horizontally and once vertically) and distribute and smooth uniformly with the Microfiber Paint Roller 1221. Avoid flaws. Never thin the epoxy primer! Avoid roller edges and surplus material. Observe the consumption data. Carry out any trimming works in the course of the surface treatment. The surfaces can be recoated after approx. 12–18 hours.
Day 4: Sealing with Floortec 2C PU Sealer 474
Figure Description Note
Sealing: Apply Floortec 2C PU Sealer 474 in an interval of about 2 to 3 hours in accordance with the relevant instructions twice with the Microfiber Paint Roller 1221. Walk on the surfaces only with a clean shoe-sole tread and overshoes. Dirt contamination results in damage to the newly created surfaces.
The application of the material takes place in ca. 1 m wide strips transverse to the main direction of incident light. The still-wet surface material is then rolled out evenly in only one direction toward the light. Complete both work steps within 12 hours. If not possible perform intermediate sanding with an abrasive disc for PU coatings.

Information Sheet 470a
Page 12 of 12
Notes
Cleaning and Maintenance instructions After completion of the work and acceptance of the surfaces by the user, the Cleaning and Maintenance Instruction - Information Sheet 470p - must be given to the customer. By handing over these cleaning and care instructions, the flooring professional is in compliance with his or her obligations in accordance with DIN 18365. Further information Follow the instructions on the Data Sheets of the products used.
Remark
This planning and application description is based on intensive development work and many years of practical experience. The contents do not form a legal contract. The user and/or the purchaser is not released from the responsibility of checking that our products are suitable for the proposed use. In addition our Terms of Conditions and Payment apply. When a new version of this Data Sheet appears with updated information the previous version no longer applies. The current version is available on our website. Brillux Weseler Straße 401 48163 Münster GERMANY Phone +49 251 7188-0 Fax +49 251 7188-105 [email protected] www.brillux.com