Embed Size (px)
Citation preview
1
LEARNING OUTCOMEAfter using a mini–solar panel and tracking and recording data on the sun’s position in the sky, students are able to identify relationships between position of the sun and a solar panel’s output power.
LESSON OVERVIEWThrough one day of activities, students track and record data on the sun’s position in the sky and on the output of a solar panel tracking the sun. On a second day, students graph and analyze the data to identify relationships between the following:
(1) The time of day,
(2) The altitude and azimuth of the sun, and
(3) The positioning of a solar panel set to receive maximum solar energy.
From this analysis, they propose how to position a stationary solar panel to receive the most solar energy possible over the course of a day.
This is the first of two related lessons. In the second lesson, Positioning Solar Panels II: Explorations with Stationary Panels, students evaluate their proposals for positioning a stationary solar panel and compare stationary and tracking systems.
MATERIALS• Bubble level
• Compass
Per work group
• One 1V, 400 mA mini–solar panel with conversion curve (See the lesson Calibration Curve for a Radiation Meter.) or a light meter that measures in lux or watts per square meter.
• Digital multimeter or ammeter
• Student handouts
SAFETY
Tell students not to look directly at the sun. Permanent eye damage might result. Instead, tell them to use a maximum current reading to indicate when a solar panel faces the sun directly.
TEACHING THE LESSONAllow for continuous data collection by performing the activity with all of your classes on the same day. If successive classes are working in small groups, numerically assign groups to particular setups. During lunch, preparatory, and supervisory periods, consider making arrangements for a few students to collect data. You might decide to collect early morning and late afternoon data yourself.
Preparation: Prepare the required number of Sun Trackers and printouts of the Panel Tracker.
Positioning Solar Panels I: Explorations with Tracking Suggested Level: Grades 6 through 9

2
Sun Tracker: Print out the Sun Tracker template. Straighten one bend in a large ( jumbo) paper clip. Lay it on a table and bend the straightened section up 90 degrees. Punch this section through the middle of a 10 x 12 inch piece of corrugated cardboard and securely tape the still-bent portion of the paper clip to the cardboard. The straightened section of the paper clip should now form a three-inch-tall post sticking out of the cardboard.
Run the straightened section of paper clip through the center cross of the Sun Tracker template and glue the template to the cardboard. Adjust the post to stick up at 90 degrees from the surface of the paper. Use an object having a 90-degree angle to guide you.
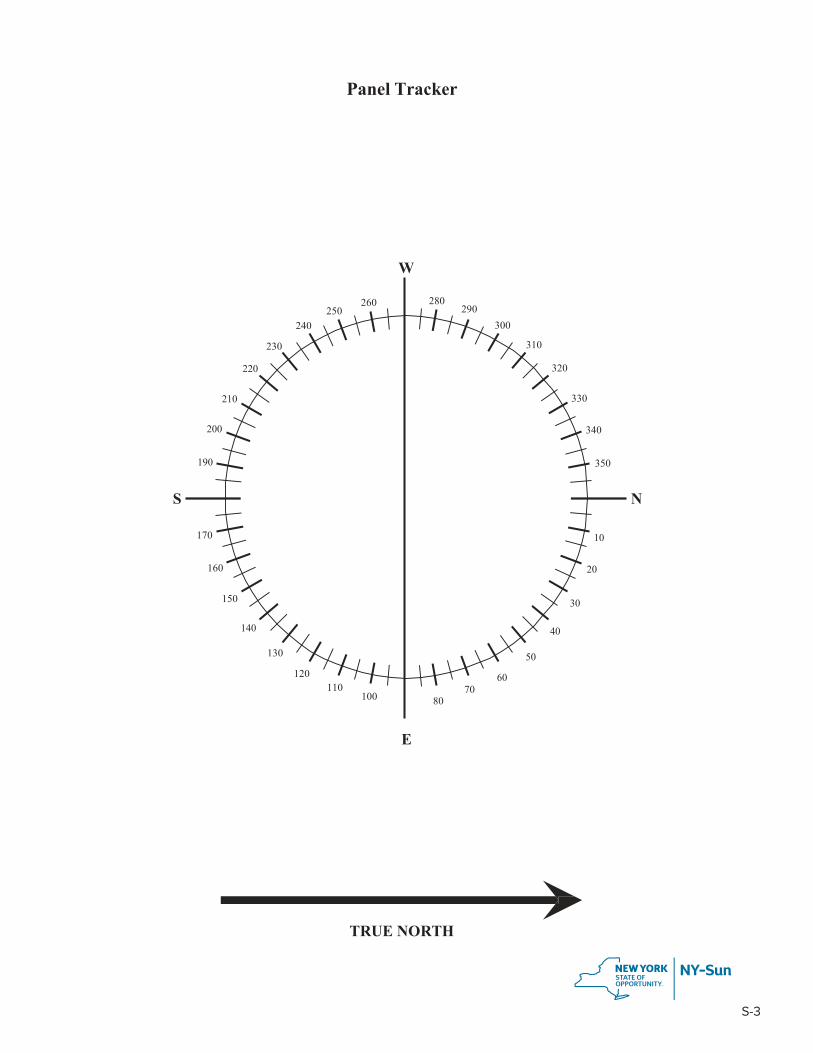
Panel Tracker: Glue the Panel Tracker template to a piece of cardboard.
Position the trackers: Position the trackers where they will be as conveniently available to students as possible and where they will receive sunlight for as many daylight hours as possible. They should not be obscured by the shadows of trees, buildings, or other objects.
Use a compass to face the trackers true north and a bubble level to level them. (Note that the compass printed on the Sun Tracker is deliberately off by 180 degrees from the magnetic compass.) Make sure to adjust the compass to account for magnetic north.
Secure the trackers using weights or strong tape to prevent them from being blown away. If they need to be moved during the day, clearly mark their positions so they can be returned to the exact same location for continuing data collection.
Suggested Approach: To introduce the activity, discuss why the apparent path of the sun across the sky is important in positioning solar panels to receive the most light. Explain what is really happening that makes the sun appear to travel across the sky. Define the terms used in the lesson.
Ask for opinions on how to position a solar panel to absorb the most light in a given moment. Discuss the pros and cons of stationary-mounted versus tracking solar panels.
Divide the class into small groups. Go over the Sun Tracker, Panel Tracker, and Data Log with them. If the trackers will need to be moved during the day, you may want to show students how to use a bubble level and compass. Demonstrate how to use an ammeter and a panel’s conversion curve to obtain milliamps and then convert to watts per square meter (W/m2) (See the lesson Calibration Curve for a Radiation Meter.). Distribute the handout Tracking Solar Panel: Data Collection, and have students take several readings and record their data in the Data Log.
Once a day’s worth of data has been collected, copy completed sets of Data Logs and Sun Tracker sheets for redistribution to student teams.
Distribute a matched Data Log and Sun Tracker sheet to each team. Distribute the handout Tracking Solar Panel: Data Analysis and Graphs 1 though 4. Help students with the graphs and their questions as appropriate.
Use the responses to Question 8 of the data analysis as experimental setups for Positioning Solar Panels II: Explorations with Stationary Panels.
ACCEPTABLE STUDENT RESPONSESData Collection
The data collected will vary but specific patterns should emerge. For each row, the sun’s altitude and the tilt of the solar panel should add up to approximately 90 degrees. The length of shadow should decrease as the sun’s altitude increases. The sun’s azimuth and the angle east of north of the solar panel should be identical within an acceptable margin of error.
Data Analysis
1) You must position a solar panel perpendicular to the sun’s rays to receive the maximum intensity of light.
2) Some variation on the equation: altitude (º) + tilt (º) + 90º = 180º

3
3) Accurate representation of the data collected
4) Accurate representation of the data collected
5) Accurate representation of the data collected
6) Accurate representation of the data collected
7) Students should notice that the sun appears to move faster across the sky at midday.
8) Answers and reasoning will vary. Use the responses to generate class discussion and as experimental setups for Positioning Solar Panels II: Explorations with Stationary Panels.
BACKGROUND INFORMATIONThe sun only appears to move across the sky as a result of the earth’s daily rotation on its axis. The sun’s apparent position in the sky is commonly described by two coordinates, altitude and azimuth. Altitude is the angular distance above the horizon. Altitude is determined by the angle between a line drawn from the eye of the observer to the sun and the plane of the horizon. Azimuth is the angular distance eastward from a defined direction, generally true north or true south. In this activity, azimuth is referenced from true north.
(STUDENT HANDOUT FOLLOWS)
© NYSERDA, 2015 The purpose of this curriculum is to educate students on the role that energy, and, in particular, solar electric power can play in providing clean energy for our homes, schools, and workplaces. These materials may be reproduced for educational uses by teachers and non-formal educators in a classroom situation or a teacher training workshop. No portion of this curriculum may be reproduced for purposes of profit or personal gain. No portion of these materials may be altered or changed in any material way.
SUN-k12-SKL7-positioningsolarpanels-fs-1-v1 2/16

S-1
Name Date
Solar Kit Lesson 7 S-1
Name Date
Sun Tracker
TRUE NORTH
W
220
230
240250
260 280290
300
310
320
210
200
190
330
340
350
S N
170 10
160 20
150 30
140
130
120110
40
50
6070
100 80
E

S-2
Solar Kit Lesson 7 S-2
How to Use the Sun Tracker
Write the time of observation on the
Sun Tracker.
Record the solar
S
Draw a line along the shadow.
Paper clip post
TrueNorth
azimuth (degreesE Weast of north) in
the Data Log.
N
Measuring the Sun’s Azimuth
String
Altitude of sun
Paper clip post
Use a protractor to measure the sun’s altitude.
Record the length of the shadow in the Data Log.
Thumbtack
Measuring the Sun’s Altitude
S-3Solar Kit Lesson 7 S-3
Panel Tracker
W
220
230
240250
260 280290
300
310
320
210
200
190
330
340
350
S N
170 10
160 20
150 30
140
130
120110
40
50
6070
100 80
E
TRUE NORTH

S-4
How to Use the Panel Tracker
N
TrueNorth
W E
Solar panel
90-degreetriangle used Sas a “square”
Record the direction the panel faces (degrees east of north) in the Data Log.

S-5
Name Date
Solar Kit Lesson 7 S-5
Name Date
Date
Data LogStation Number
Time(hh:mm)
Tilt of solar panel(○)
Angle of solar panel(○ east of north)
Sun’s azimuth (○ east of north)
Shadow length (cm)
Sun’s altitude(○)
Light intensity(W/m2)

S-6
Name DateName
Date
Tracking Solar Panel: Data Collection
1) Connect the ammeter to the solar panel. Point the solar panel toward the sun and position it to obtain the maximum current reading from the ammeter. Maintaining the panel’s direction, place the panel so its bottom edge runs through the center X of the Panel Tracker. Double-check that it is still positioned for maximum current. Record the time of day in the Data Log and note the ammeter reading on a separate sheet of paper.
2) Use a protractor to measure the solar panel’s angle from horizontal. Record this in the
Data Log.
3) Measure the solar panel’s angle east of north. Place the square along the edge of the solar panel so that the corner of the square is at the center of the Panel Tracker. The solar panel’s angle east of north is where the edge of the square crosses the circle. Record this value in the Data Log.
4) Draw a line on the Sun Tracker along the post’s shadow. Write the time at the end of the
shadow. The sun’s angle east of north is known as the solar azimuth. Record the solar azimuth in the Data Log.
5) Measure the length of the shadow. Record this in the Data Log.
6) The angle of the sun above the horizon is called the solar altitude. Use a string and
protractor as shown in the diagram to measure the solar altitude. (Use the line you drew for the shadow instead of the actual shadow as this may have already moved.) Record this inthe Data Log.
7) Convert the ammeter reading from Step 1 to light intensity (W/m2) and record this in the
Data Log.
8) Repeat the above measurements in 10-minute intervals for as long as your teacher instructs you.
1
S-7
Name Date
Name
Date
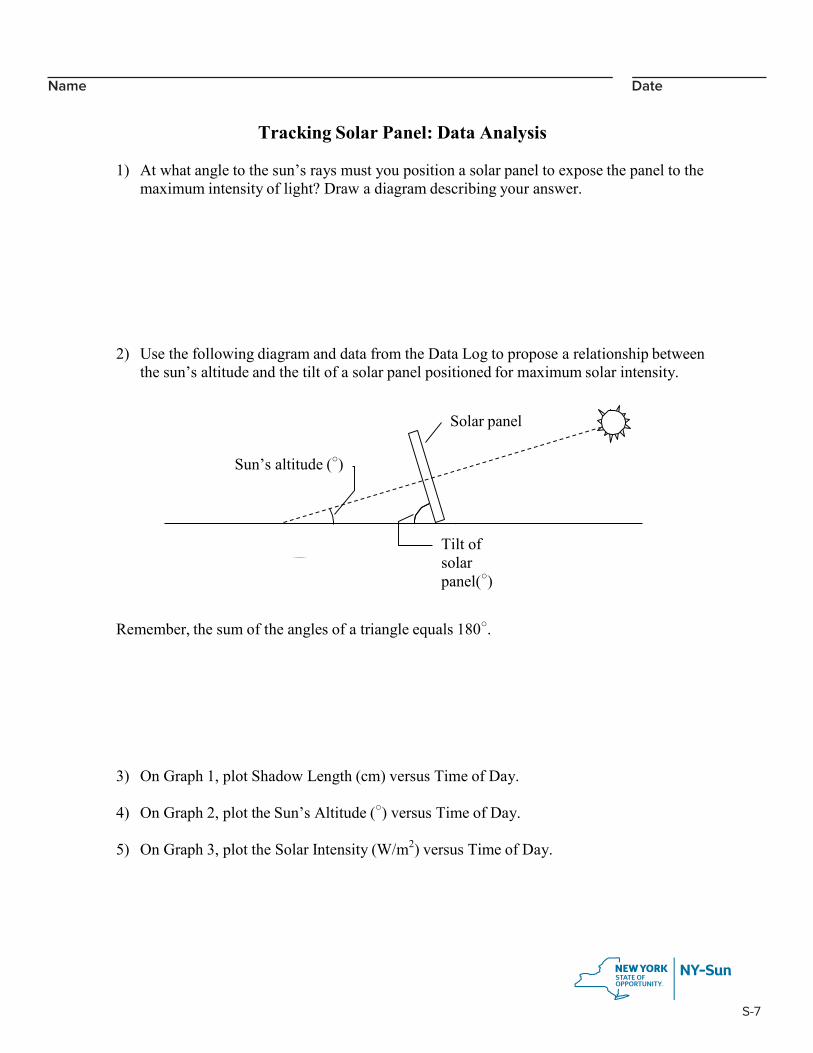
Tracking Solar Panel: Data Analysis
1) At what angle to the sun’s rays must you position a solar panel to expose the panel to the maximum intensity of light? Draw a diagram describing your answer.
2) Use the following diagram and data from the Data Log to propose a relationship between the sun’s altitude and the tilt of a solar panel positioned for maximum solar intensity.
Solar panel
Sun’s altitude (○)
Tilt ofsolar panel(○)
Remember, the sum of the angles of a triangle equals 180○.
3) On Graph 1, plot Shadow Length (cm) versus Time of Day.
4) On Graph 2, plot the Sun’s Altitude (○) versus Time of Day.
5) On Graph 3, plot the Solar Intensity (W/m2) versus Time of Day.

S-8
6) For each row of data, draw an arrow on Graph 4 in the appropriate azimuth direction ofthe sun. Start each line at the Reference Point. Label the outer end of each arrow with the time of day.
7) Looking at Graph 4, is there any time of day when the sun appears to move faster across
the sky? What is it?
8) During the lab, you always directed the solar panel to receive the maximum intensity of light. To do this, you used the feedback system of your eyes, your brain, and your hands. It is complicated and expensive to build a similar solar-tracking system with such itemsas light sensors, electronic control systems, and motors. Generally speaking, the added cost of design, materials, and maintenance outweighs the benefits of installing a solar-tracking system. Because of this, most solar-electric systems are stationary—the panels don’t move.
For stationary panels, you need to decide how to position them to receive the most solar energy over the course of a day. Review your data and graphs. At what angle east ofnorth and what angle of tilt up from horizontal would you recommend positioning a solar panel to receive the most solar energy over the course of a day at this time of year?
Recommended position to receive the most solar energy over the course of a day at this time of year:
Angle east of north
Angle of tilt (if any) from horizontal
Briefly, explain your reasoning.

S-9
Solar Kit Lesson 7 S-9
Sun’
s Alti
tude
(○)
Shad
ow L
engt
h (c
m)
Graph 1: Shadow Length versus Time of Day
Time of Day
Graph 2: Altitude versus Time of Day
Time of Day
Name DateName Date

S-10
Name Date
Solar Kit Lesson 7 S-10
Name DateSo
lar
Inte
nsity
(W/m
2 )
Graph 3: Solar Intensity versus Time of Day
Time of Day
Graph 4: Solar Azimuth versus Time of Day
S
130
140
150160
170 190200
210
220
230
120
110
100
240
250
260
90 270
Reference PointN
