Embed Size (px)
Citation preview
Chapter 5
23
Practice Installation and Maintenance
Changes made to the land during construction have far reachingeffects both on and off the site. Contractors can make importantcontributions to protect water quality by installing the appropriatepractices. Because of the many potential effects on the local ecosys-tem, the services of qualified engineering, design and environmentalprofessionals are necessary in the land grading and constructionactivities associated with developing a site.
Although this manual describes practices that can help protect sur-face water and shallow groundwater from pollutants, rememberthat pollutants can also move through the soil on the constructionsite and enter groundwater supplies. This can be prevented by re-moving any pollutants that may be on site before construction beginsand by preventing pollutants from entering the site.
The practices in this section are organized by the type of control orfunction that they provide. Each section has an index tab, so thatfinding the practice is easier. To help the contractor, site manager,job foreman or inspector, each section is broken into the followingsix basic parts.
1. A Practice Description that defines the practice, describes whereand for what it is used, and may include other basic information.
2. The Recommended Minimum Requirements section givessome suggested specifications or requirements for the prac-tices that should be respected as minimums. It also suggestseither a qualified or registered design professional (seeGlossary) as the designer of the practice. Note: Site specificdesigns for the watershed, topography and soils may dictatemore restrictive requirements.
3. The Construction/Installation section gives step-by-step proce-dures for installing the practices, with a construction verificationchecklist at the end. For some practices, several options are given
Introduction
Use of ThisSection
24
(i.e., Soil Bioengineering for Slope Protection covers ninedifferent practices). Each option will be listed in italics in theleft-hand margin.
4. The Troubleshooting section indicates when the services of thedesign professional who put together the design plan are needed.
5. The Maintenance section is designed to help the site manager ora designated employee ensure that needed inspections andmaintenance activities are completed. This section may also aidthe city or county inspector whose job it is to inspect the practices.
6. The Common Problems section lists problems that are oftenfound on sites and recommendations for solutions.
Many of the common problems can be avoided by using therecommended minimum requirements and following theconstruction sequence.
Before construction begins, the site manager or job foreman shouldmeet with the design professionals and be supplied with a com-plete Erosion, Sediment and Stormwater Control Plan including adetailed site map, construction/grading schedule, seeding sched-ule and maintenance/inspection schedule.
Review all federal, state and local regulations.
Locate all utilities on each site.
The following Decision-Making Chart can help to determine whichpractices to use in particular situations.
Maintenance needs and any safety hazards created by the practice shouldbe communicated to the affected landowners, homeowners’ associa-tion or other parties responsible for ongoing maintenance. Present andfuture landowners should be made aware of the potential consequencesof changing vegetation types, poor maintenance practices or other ac-tions that could cause a practice to function poorly or fail.
Prior toConstruction
Post-Construction
25
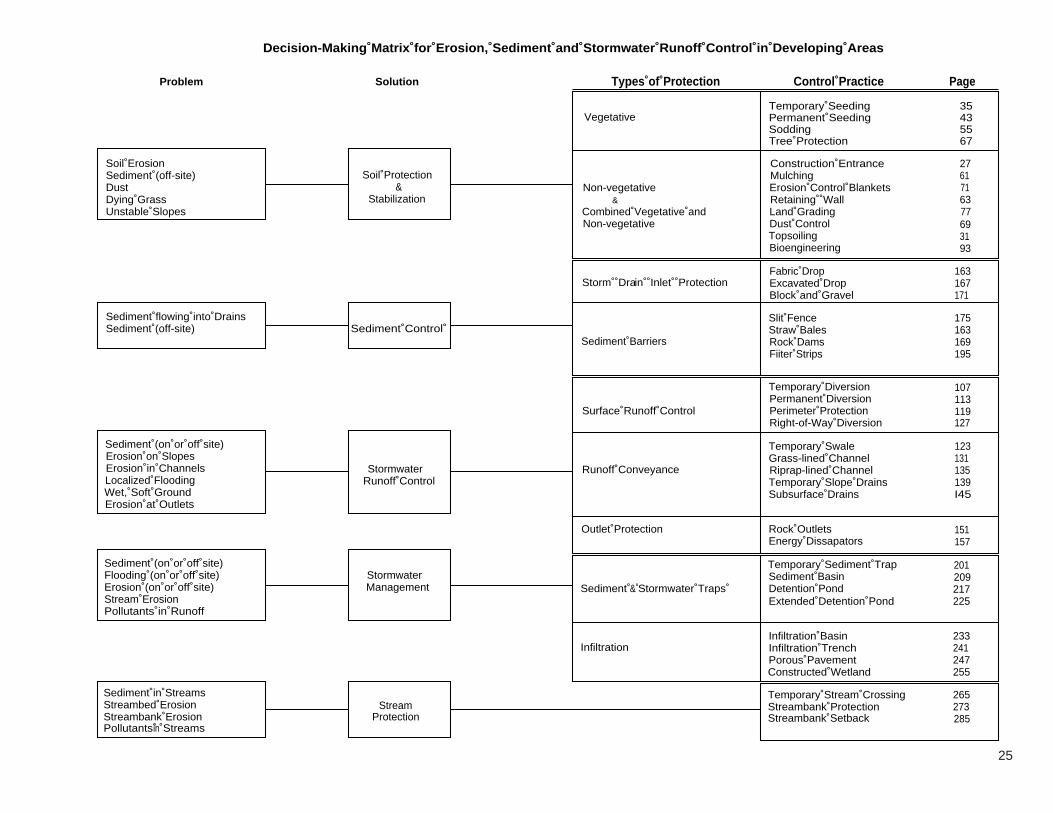
Soil ErosionSediment (off-site)DustDying GrassUnstable Slopes
Problem Solution
Decision-Making Matrix for Erosion, Sediment and Stormwater Runoff Control in Developing Areas
Soil Protection&
Stabilization
Sediment flowing into DrainsSediment (off-site) Sediment Control
Types of Protection Control Practice Page
Construction Entrance 27
Non-vegetative
Vegetative
&Combined Vegetative andNon-vegetative
Mulching 61Erosion Control Blankets 71Retaining Wall 63Land Grading 77Dust Control 69Topsoiling 31Bioengineering 93
Storm Drain Inlet ProtectionFabric Drop 163Excavated Drop 167Block and Gravel 171
Sediment Barriers
Surface Runoff Control
Sediment (on or off site)Erosion on SlopesErosion in ChannelsLocalized FloodingWet, Soft GroundErosion at Outlets
StormwaterRunoff Control
Runoff Conveyance
Outlet Protection
Slit Fence 175Straw Bales 163Rock Dams 169Fiiter Strips 195
Temporary Diversion 107Permanent Diversion 113Perimeter Protection 119Right-of-Way Diversion 127
Temporary Swale 123Grass-lined Channel 131Riprap-lined Channel 135Temporary Slope Drains 139Subsurface Drains I45
Rock OutletsEnergy Dissapators
151157
Sediment (on or off site)Flooding (on or off site)Erosion (on or off site)Stream ErosionPollutants in Runoff
StormwaterManagement Sediment & Stormwater Traps
Temporary Sediment Trap 201Sediment Basin 209Detention Pond 217Extended Detention Pond 225
Sediment in StreamsStreambed ErosionStreambank ErosionPollutants in Streams
StreamProtection
InfiltrationInfiltration Basin 233Infiltration Trench 241Porous Pavement 247Constructed Wetland 255
Temporary Stream Crossing 265Streambank Protection 273Streambank Setback 285
Temporary SeedingPermanent SeedingSoddingTree Protection
35435567

Chapter 5
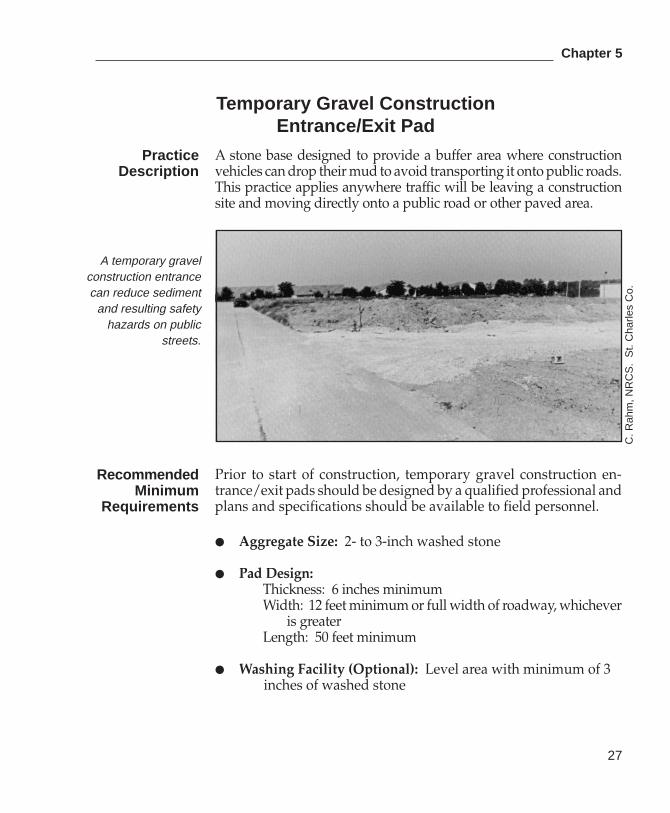
A stone base designed to provide a buffer area where constructionvehicles can drop their mud to avoid transporting it onto public roads.This practice applies anywhere traffic will be leaving a constructionsite and moving directly onto a public road or other paved area.
Prior to start of construction, temporary gravel construction en-trance/exit pads should be designed by a qualified professional andplans and specifications should be available to field personnel.
● Aggregate Size: 2- to 3-inch washed stone
● Pad Design:Thickness: 6 inches minimumWidth: 12 feet minimum or full width of roadway, whichever
is greaterLength: 50 feet minimum
● Washing Facility (Optional): Level area with minimum of 3inches of washed stone
Temporary Gravel ConstructionEntrance/Exit Pad
PracticeDescription
C. R
ahm
, NR
CS
. S
t. C
harle
s C
o.
RecommendedMinimum
Requirements
A temporary gravelconstruction entrancecan reduce sediment
and resulting safetyhazards on public
streets.
27
Temporary Gravel Construction Entrance/Exit Pad
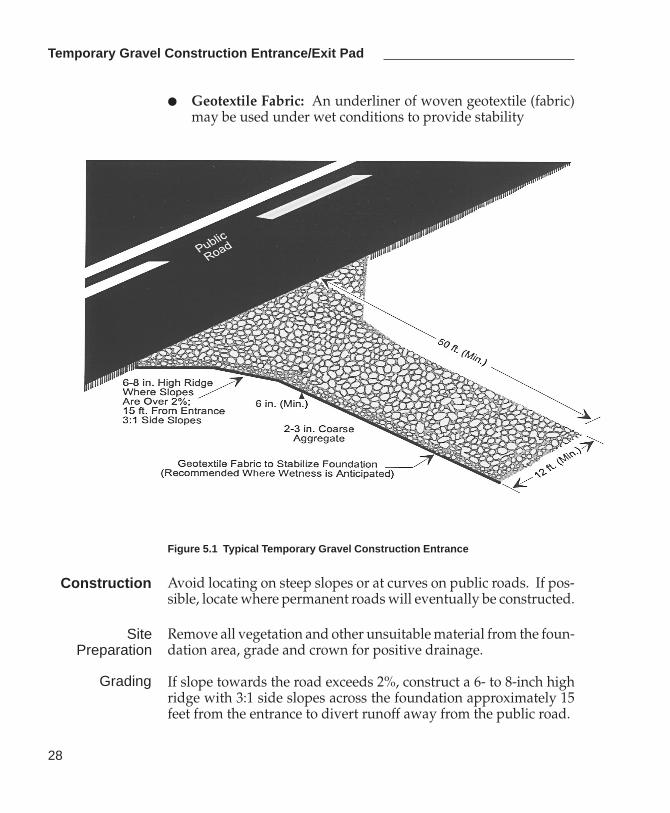
● Geotextile Fabric: An underliner of woven geotextile (fabric)may be used under wet conditions to provide stability
Figure 5.1 Typical Temporary Gravel Construction Entrance
Avoid locating on steep slopes or at curves on public roads. If pos-sible, locate where permanent roads will eventually be constructed.
Remove all vegetation and other unsuitable material from the foun-dation area, grade and crown for positive drainage.
If slope towards the road exceeds 2%, construct a 6- to 8-inch highridge with 3:1 side slopes across the foundation approximately 15feet from the entrance to divert runoff away from the public road.
Construction
SitePreparation
Grading
28
Chapter 5
Stabilization
Maintenance
CommonProblems
Install pipe under the pad if needed to maintain drainage ditchesalong public roads.
Place stone to dimensions and grade shown on plans. Leave sur-face smooth and sloped for drainage.
Divert all surface runoff and drainage from the stone pad to a sedi-ment trap or basin.
If wet conditions are anticipated, place geotextile filter fabric on thegraded foundation to improve stability.
Inspect stone pad and sediment disposal area weekly and after stormevents or heavy use.
Reshape pad as needed for drainage and runoff control.
Topdress with clean 2-inch stone as needed.
Immediately remove mud or sediment tracked or washed onto pub-lic road.
Repair any broken road pavement immediately.
Remove all temporary road materials from areas where permanentvegetation will be established.
Inadequate runoff control; sediment washes onto public road—in-stall diversions or other runoff control measures.
Stone too small, pad too thin or geotextile fabric absent; results inruts and muddy conditions as stone is pressed into soil—increasestone size or pad thickness, or add geotextile fabric.
Pad too short for heavy construction traffic—extend pad beyondthe minimum 50-foot length as necessary.
29

Temporary Gravel Construction Entrance/Exit Pad
30
Chapter 5
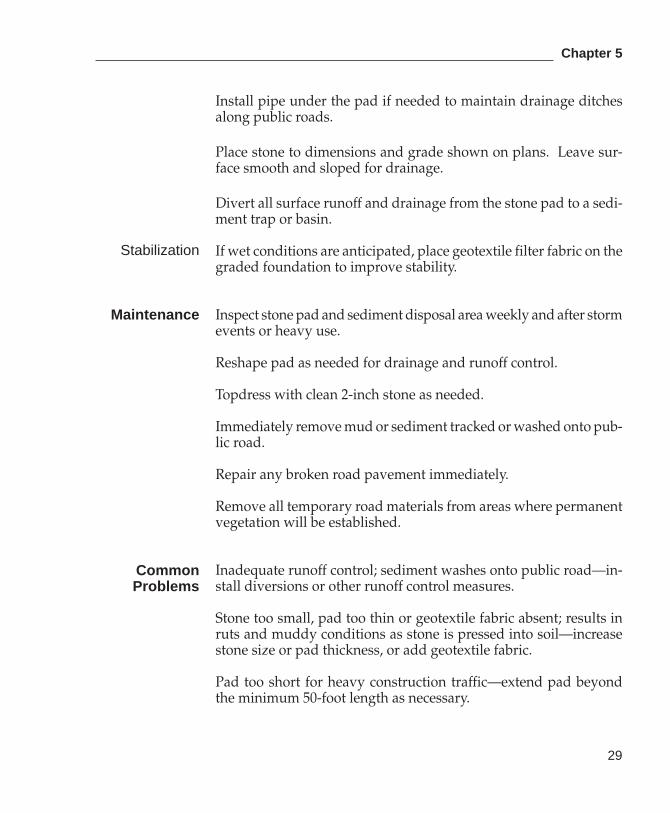
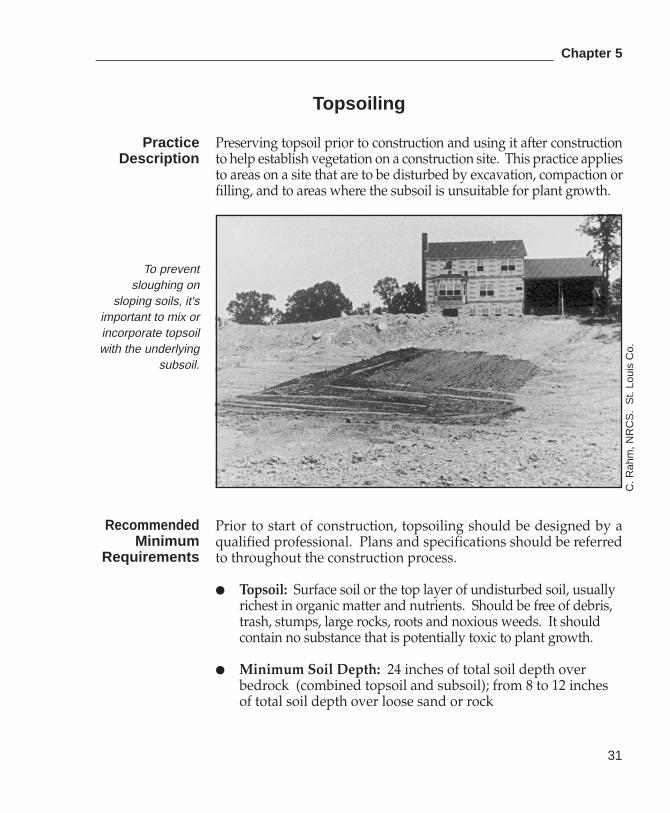
Preserving topsoil prior to construction and using it after constructionto help establish vegetation on a construction site. This practice appliesto areas on a site that are to be disturbed by excavation, compaction orfilling, and to areas where the subsoil is unsuitable for plant growth.
Prior to start of construction, topsoiling should be designed by aqualified professional. Plans and specifications should be referredto throughout the construction process.
● Topsoil: Surface soil or the top layer of undisturbed soil, usuallyrichest in organic matter and nutrients. Should be free of debris,trash, stumps, large rocks, roots and noxious weeds. It shouldcontain no substance that is potentially toxic to plant growth.
● Minimum Soil Depth: 24 inches of total soil depth overbedrock (combined topsoil and subsoil); from 8 to 12 inchesof total soil depth over loose sand or rock
Topsoiling
PracticeDescription
To preventsloughing on
sloping soils, it'simportant to mix orincorporate topsoilwith the underlying
subsoil.
C. R
ahm
, NR
CS
. S
t. Lo
uis
Co.
RecommendedMinimum
Requirements
31
Topsoiling
32
● pH Range: From 6.0 to 7.5. If the pH is less than 5.2, limeshould be incorporated in accordance with soil test results.
Establish erosion and sediment control practices such as perimeterdikes, diversions, grade stabilization structures, berms, dikes, sedi-ment basins, etc., before stripping.
Strip topsoil from areas that will be disturbed by excavation, fillingor compaction by equipment. Determine depth of stripping by tak-ing soil cores at several locations within each area to be stripped.
Stockpile topsoil so that natural drainage is not obstructed. Avoidstockpiling on steep slopes. Side slopes of stockpile should not ex-ceed 2:1. Use sediment fences or other barrier where necessary toretain sediment.
Protect stockpile by temporary seeding as soon as possible, but notmore than 30 working days after formation of stockpile. If stock-piles will not be used within 12 months, they should be stabilizedby permanent vegetation to control erosion and weed growth.
Established grades should be maintained according to the approvedplan and should not be altered by adding topsoil.
Where the pH of the existing subsoil is below 5.2, incorporate agri-cultural limestone in amounts indicated by soil tests or specifiedfor the seeding mixture to be used (See Temporary or Permanent Seed-ing). Incorporate lime into the subsoil to a depth of at least 2 inchesby disking. Retest the soil to determine the pH and if pH is not 5.2or higher, repeat the process.
Immediately prior to spreading topsoil, loosen the subgrade bydisking or scarifying to a depth of at least 2 inches to ensure bond-ing of the topsoil and subsoil.
Construction
SitePreparation
Stockpiling
Grading
Limingof Subsoil
Roughening
Stripping
Chapter 5
33
Spreading frozen or muddy topsoil can prevent proper grading orseeding. Uniformly spread topsoil to a minimum compacted depthof 4 inches. For long-term growth of vegetation without irrigation,minimum soil depth (subsoil and topsoil) should be 8 to 12 inchesover loose sand or rock fragments, and 24 inches of soil depth isneeded over bedrock.
Verify that topsoil was spread evenly and incorporated with under-lying subsoil.
Consult with registered design professional if any of the follow-ing occur:
● Depth of topsoil is significantly different than anticipated.
● Topsoil appears to contain contaminants.
● No topsoil is present on site.
Inspect topsoiled areas frequently until vegetation is established.
Repair eroded or damaged areas and revegetate.
Topsoil pH too low; results in poor or no vegetation establishment—add agricultural limestone to adjust pH.
Topsoil contains sterilants or toxic chemicals; results in poor or novegetation establishment—remove contaminated topsoil.
Topsoil compacted too much during application; results in poor veg-etation establishment—loosen by disking or scarifying.
Topsoil not properly bonded to subsoil; results in poor drainageand possible sloughing on steep slopes—remove topsoil, roughensubgrade and respread topsoil.
Topsoil removed and not replaced; inadequate vegetation establishment—fertilize according to soil test results, reseed or sod site, and irrigate.
Troubleshooting
CommonProblems
Maintenance
ConstructionVerification
SpreadingTopsoil

Topsoiling
34