Embed Size (px)
DESCRIPTION
An article from John Stropko
Citation preview
06 I
I CE article _ obturation
“There’s a difference between interest and commit-ment. When you’re interested in something, you do itwhen it’s convenient. When you’re committed tosomething, you accept no excuses, only results.”
—Ken Blanchard
_Abstract
The author has been in private practice and a con-tinuing student for the past 50 years. The first half wasspent practicing restorative dentistry, and the secondhalf in a specialty practice limited to endodontics. Onthe road to predictability, it became apparent therewas a definite relationship present between rootcanal treatment, periodontal status, prosthetics and/or subsequent restorative procedures. Each operatorhas to decide what steps for a more predictable out-come they are willing to trust another to do. This arti-cle is an attempt to share some “secrets of success”and perhaps serve as a checklist for a system thatworks in the attempt to achieve predictability of endo -dontic treatments.
During the earlier years of the past century, severaltechniques were devised for the obturation of thecanal system after removal of the diseased pulp, ornecrotic tissue. Some of the most popular were silverpoints, lateral condensation of gutta-percha (GP),Sargenti paste and chloropercha. Currently there areseven techniques that utilize gutta-percha as the obturation material of choice: 1) Single cone2) Lateral condensation3) Chloropercha technique4) Vertical compaction of warm GP (Schilder, contin-
uous wave, System “B”, McSpadden, System “A”)5) Carrier-based (Thermafil)6) Injection of thermo-plasticized GP (often referred
to as “squirting” using a Calamus or Obtura unit)7) Mechanically assisted compaction (Pac Mac).
In 1967, Dr Herb Schilder, often referred to as “the father of modern endodontics,” introduced theconcept of filling the root canals in three dimensions.1
The Schilder Technique involved a new and differentapproach for obturation of the canal system and resulted in much controversy. Evidently, the contro-versy did create interest from some doctors, because
Fig. 1_Typical rotaries, one of
several popular brands.
(Photos/Provided by John J. Stropko,
DDS, unless otherwise noted)
roots2_2013
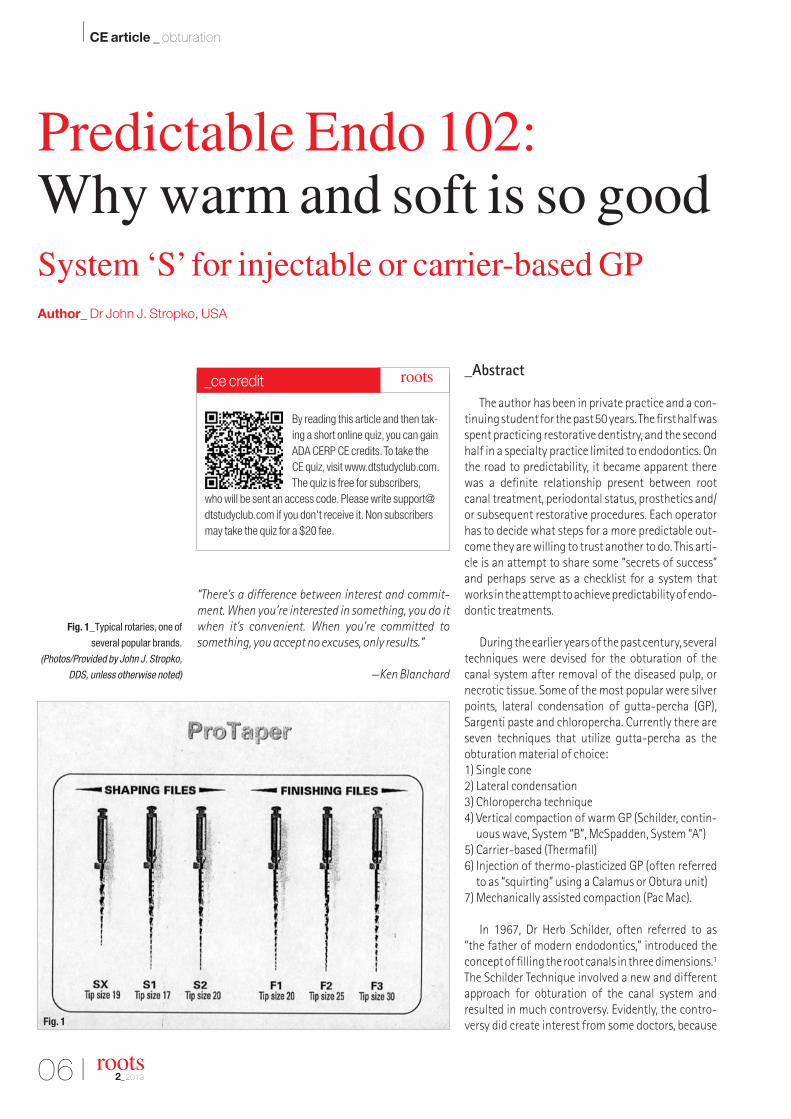
Predictable Endo 102: Why warm and soft is so goodSystem ‘S’ for injectable or carrier-based GPAuthor_ Dr John J. Stropko, USA
By reading this article and then tak-ing a short online quiz, you can gain ADA CERP CE credits. To take theCE quiz, visit www.dtstudyclub.com. The quiz is free for subscribers,
who will be sent an access code. Please write [email protected] if you don’t receive it. Non subscribersmay take the quiz for a $20 fee.
_ce credit roots
Fig. 1
I 07
CE article _ obturation I
roots2_2013
in the mid 1970s new ideas and techniques evolvedthat became most of what are the currently acceptedconcepts of modern endodontic principles and tech-niques. Today, the numerous clinical reports, pub-lished research and the rapid advancements in tech-nology have significantly changed the operator’s ob-turation preferences. Ease of communication, alongwith modern marketing, has become a very importantdeterminant when making a choice of techniques.More recent studies have discounted some previousobturation materials that were popular, but someform of GP still remains the most acceptable andwidely used. The purpose of this article is to share asimple, six-step protocol (System “S”) in a straightfor-ward manner, to achieve predictability of endodontictreatment for the benefit of the patient.
There are six important components to the System“S” protocol: 1) Proper shaping with patency.2) Adequate cleaning, disinfection and drying.3) Delivery of pre-warmed GP to apex (Calamus/
Obtura).4) Coronal seal for the rest of the system.5) Respect for the endo-pros relationship.6) Use of the surgical operating microscope (SOM) for
the entire endodontic treatment.
The author believes that as long as the gutta-perchais introduced to the apical third of the canal system,pre-warmed and pre-softened, the deformation andadaptation to the canal walls is more predictable, re-sulting in a better seal that is significantly less “sealer-dependent”. It has been shown that the pre-warmedtechniques (Obtura and Thermafil) produce a betterseal than lateral condensation.2 Due to the lack of de-formity inherent at room temperature, the techniquesutilizing non-softened GP are more “sealer-depend-ent”. The two most popular thermoplastic obturationtechniques are the “carrier-based” (e.g., Thermafil) and“direct injection” (e.g., Calamus/Obtura). The pros and
cons of each will be discussed, but regardless of thetechnique used, the “shape” of the prepared canal system is of utmost importance and must be discussed.
_Access and shaping the canal system
In the early ’70s, Schilder clearly stated the re-quirements for the proper shape using GP to achievethree-dimensional obturation of the canal system:1) The root canal preparation should develop a con-
tinuously tapering cone shape.2) It should have decreasing cross-sectional diameters
at every point apically and increasing at each pointas the access cavity is approached.
3) It should have multiple planes, which introducesthe concept of “flow”.
4) The foramen should not be transported.5) The apical opening should be kept as small as prac-
tical in all cases.
There were several other requirements more clini-cally definitive. Following are a few of them: Afterplacement of the rubber dam, an appropriate access ismade. Unless the access is large enough for adequatevision, appropriate instrumentation may be compro-mised and canals missed. A perfect example is a max-illary first molar; if the access is made as though therewas an MB2, it is amazing how many times an MB2 isfound. A general rule of thumb is, if you access for it,you are more likely to find it. A proper access will alsofacilitate the creation of the continuously taperingshape of the canal, necessary for the warm GP tech-nique. Occasionally after caries or old restorations areremoved, a “pre-endodontic” restoration may to be re-quired to control and maintain a sterile environmentuntil the endodontic treatment is complete. This canusually be accomplished using a bonded compositetechnique.
Shaping should be confined to the anatomy of canalsystem, following the natural curvatures. Instrumen-
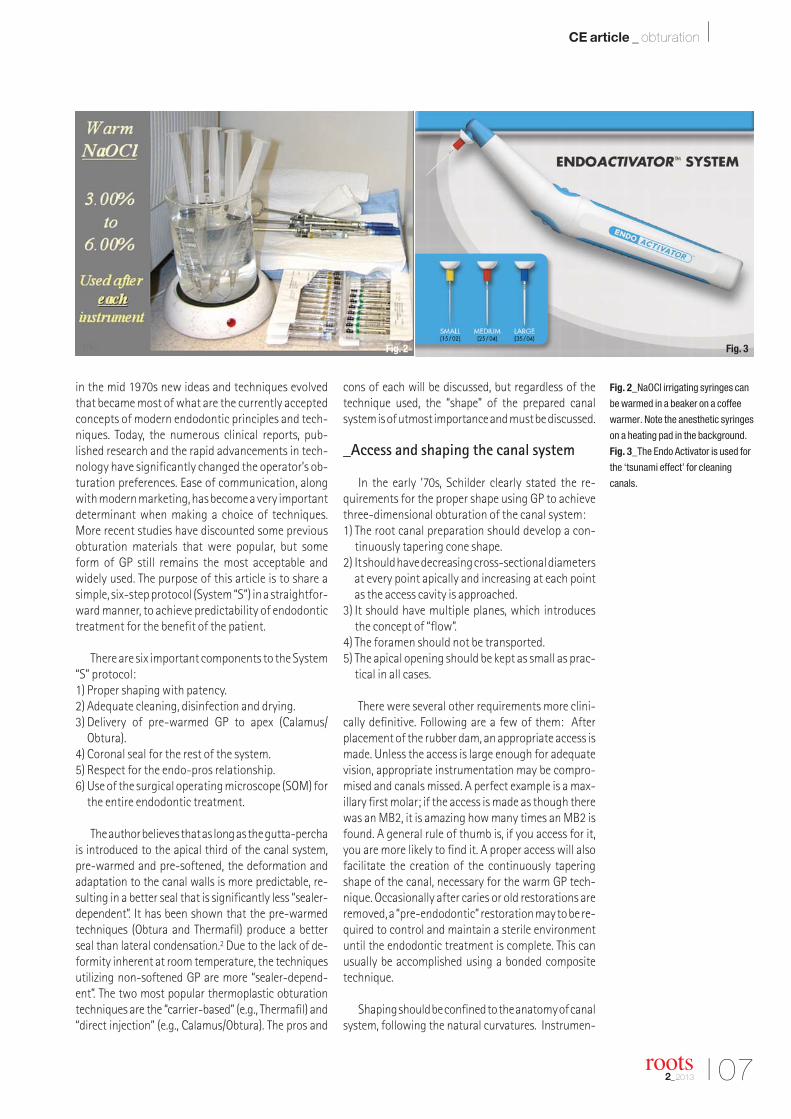
Fig. 2_NaOCl irrigating syringes can
be warmed in a beaker on a coffee
warmer. Note the anesthetic syringes
on a heating pad in the background.
Fig. 3_The Endo Activator is used for
the ‘tsunami effect’ for cleaning
canals.
Fig. 2 Fig. 3
08 I
I CE article _ obturation
tation beyond the apex is unnecessary and may need-lessly enlarge and deform the apical foramen.3 Usingthe Schilder protocol to achieve the desired shape ofthe canal system was a time-consuming process. It in-volved the tedious use of pre-curved files and reamersto follow the anatomical curvatures of the canal. Otherrequirements that caused some controversy then (andstill does), besides the size of the access opening, wasthe need to keep the apical foramen as small as possi-ble, and to maintain patency throughout the entireprocess. The majority of more recent published re-search and clinical studies have confirmed the rationalfor an appropriate access and correct shaping.
In the early 1990s, technology brought about theintroduction of rotary instruments, relieving the op-erator of considerable time spent creating an accept-able shape. The ProFile rotary bur (Tulsa Dental) with0.04 and 0.06 taper, was introduced to the profession.Creating the shape necessary for the successful use ofthe warm obturation techniques was made easier andfaster. By the beginning of this century, numerous designs gradually evolved utilizing varying tapers, active or passive cutting blades, etc. (Fig. 1). At first,the biggest problem with the rotary files was break-age during use. But modern nickel titanium (NiTi)metallurgy technology has developed more, andmore dependable, rotary files. As a result, today theseparation of a rotary instrument during use is of vir-tually little or no concern.
It has also been shown that proper shape permitsmore thorough irrigation and the removal of signifi-cantly more debris from the prepared canal system.Disinfecting irrigation should be used between eachinstrument during the entire shaping process and pa-tency continually maintained with a #10 file. Note:The quantity of irritants used is not as important asthe frequency of use. The irrigation protocol, instru-ments, fluids, etc., are in constant evolution and be-coming more effective. However, a clean and sterileenvironment of the canal system prior to obturationis still the objective.
_Irrigation for cleaning the canal system
After shaping is completed, final cleaning can beeffectively accomplished by the alternative use of:1) Warm 3- to 6-per cent NaOCl.2) 17 per cent aqueous EDTA for approximately 30
seconds (smear layer removal).3) Warm 3- to 6-per cent NaOCl (further disinfect and
stop action of the EDTA).
The NaOCl can be effectively warmed by plac-ing the irrigating syringes in a beaker of water seton a small coffee warmer (Fig. 2). The canal(s) arecompletely flooded with the desired solution; anEndo Activator (DENTSPLY) is appropriately usedfor the “tsunami effect”, then re-irrigated with thesame solution for flushing of debris (Fig. 3). TheNaOCl is then effectively removed with a capillarytip (Ultradent) attached to a high-speed evacua-tor. Other solutions (hydrogen perozide, chlorhex-idine, 17 per cent aqueous EDTA, MTAD, etc.) canalso be used alternately, depending on operatorpreference.
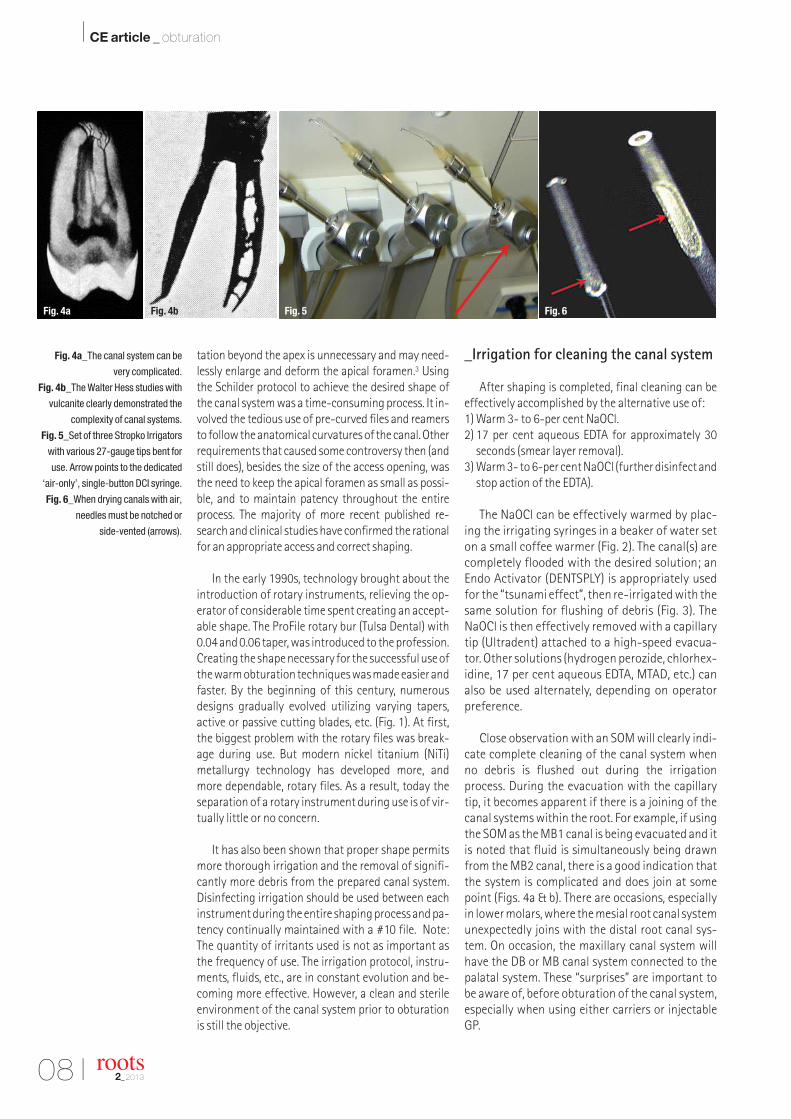
Close observation with an SOM will clearly indi-cate complete cleaning of the canal system whenno debris is flushed out during the irrigationprocess. During the evacuation with the capillarytip, it becomes apparent if there is a joining of thecanal systems within the root. For example, if usingthe SOM as the MB1 canal is being evacuated and itis noted that fluid is simultaneously being drawnfrom the MB2 canal, there is a good indication thatthe system is complicated and does join at somepoint (Figs. 4a & b). There are occasions, especiallyin lower molars, where the mesial root canal systemunexpectedly joins with the distal root canal sys-tem. On occasion, the maxillary canal system willhave the DB or MB canal system connected to thepalatal system. These “surprises” are important tobe aware of, before obturation of the canal system,especially when using either carriers or injectableGP.
Fig. 4a_The canal system can be
very complicated.
Fig. 4b_The Walter Hess studies with
vulcanite clearly demonstrated the
complexity of canal systems.
Fig. 5_Set of three Stropko Irrigators
with various 27-gauge tips bent for
use. Arrow points to the dedicated
‘air-only’, single-button DCI syringe.
Fig. 6_When drying canals with air,
needles must be notched or
side-vented (arrows).
roots2_2013
Fig. 4a Fig. 4b Fig. 5 Fig. 6
I 09
CE article _ obturation I
roots2_2013
_Drying canals with F•I•R•E
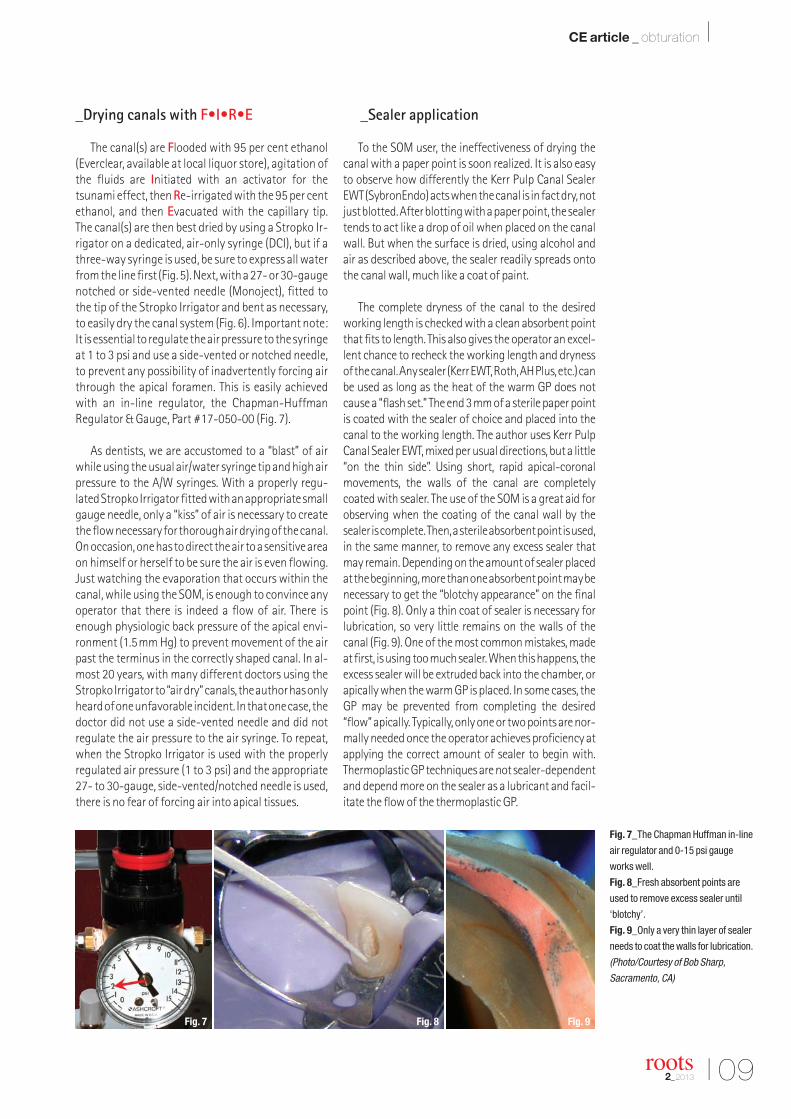
The canal(s) are Flooded with 95 per cent ethanol(Everclear, available at local liquor store), agitation ofthe fluids are Initiated with an activator for thetsunami effect, then Re-irrigated with the 95 per centethanol, and then Evacuated with the capillary tip.The canal(s) are then best dried by using a Stropko Ir-rigator on a dedicated, air-only syringe (DCI), but if athree-way syringe is used, be sure to express all waterfrom the line first (Fig. 5). Next, with a 27- or 30-gaugenotched or side-vented needle (Monoject), fitted tothe tip of the Stropko Irrigator and bent as necessary,to easily dry the canal system (Fig. 6). Important note:It is essential to regulate the air pressure to the syringeat 1 to 3 psi and use a side-vented or notched needle,to prevent any possibility of inadvertently forcing airthrough the apical foramen. This is easily achievedwith an in-line regulator, the Chapman-HuffmanRegulator & Gauge, Part #17-050-00 (Fig. 7).
As dentists, we are accustomed to a “blast” of airwhile using the usual air/water syringe tip and high airpressure to the A/W syringes. With a properly regu-lated Stropko Irrigator fitted with an appropriate smallgauge needle, only a “kiss” of air is necessary to createthe flow necessary for thorough air drying of the canal.On occasion, one has to direct the air to a sensitive areaon himself or herself to be sure the air is even flowing.Just watching the evaporation that occurs within thecanal, while using the SOM, is enough to convince anyoperator that there is indeed a flow of air. There isenough physiologic back pressure of the apical envi-ronment (1.5mm Hg) to prevent movement of the airpast the terminus in the correctly shaped canal. In al-most 20 years, with many different doctors using theStropko Irrigator to “air dry” canals, the author has onlyheard of one unfavorable incident. In that one case, thedoctor did not use a side-vented needle and did notregulate the air pressure to the air syringe. To repeat,when the Stropko Irrigator is used with the properlyregulated air pressure (1 to 3 psi) and the appropriate27- to 30-gauge, side-vented/notched needle is used,there is no fear of forcing air into apical tissues.
_Sealer application
To the SOM user, the ineffectiveness of drying thecanal with a paper point is soon realized. It is also easyto observe how differently the Kerr Pulp Canal SealerEWT (SybronEndo) acts when the canal is in fact dry, notjust blotted. After blotting with a paper point, the sealertends to act like a drop of oil when placed on the canalwall. But when the surface is dried, using alcohol andair as described above, the sealer readily spreads ontothe canal wall, much like a coat of paint.
The complete dryness of the canal to the desiredworking length is checked with a clean absorbent pointthat fits to length. This also gives the operator an excel-lent chance to recheck the working length and drynessof the canal. Any sealer (Kerr EWT, Roth, AH Plus, etc.) canbe used as long as the heat of the warm GP does notcause a “flash set.” The end 3mm of a sterile paper pointis coated with the sealer of choice and placed into thecanal to the working length. The author uses Kerr PulpCanal Sealer EWT, mixed per usual directions, but a little“on the thin side”. Using short, rapid apical-coronalmovements, the walls of the canal are completelycoated with sealer. The use of the SOM is a great aid forobserving when the coating of the canal wall by thesealer is complete. Then, a sterile absorbent point is used,in the same manner, to remove any excess sealer thatmay remain. Depending on the amount of sealer placedat the beginning, more than one absorbent point may benecessary to get the “blotchy appearance” on the finalpoint (Fig. 8). Only a thin coat of sealer is necessary forlubrication, so very little remains on the walls of thecanal (Fig. 9). One of the most common mistakes, madeat first, is using too much sealer. When this happens, theexcess sealer will be extruded back into the chamber, orapically when the warm GP is placed. In some cases, theGP may be prevented from completing the desired“flow” apically. Typically, only one or two points are nor-mally needed once the operator achieves proficiency atapplying the correct amount of sealer to begin with.Thermoplastic GP techniques are not sealer-dependentand depend more on the sealer as a lubricant and facil-itate the flow of the thermoplastic GP.
Fig. 7_The Chapman Huffman in-line
air regulator and 0-15 psi gauge
works well.
Fig. 8_Fresh absorbent points are
used to remove excess sealer until
‘blotchy’.
Fig. 9_Only a very thin layer of sealer
needs to coat the walls for lubrication.
(Photo/Courtesy of Bob Sharp,
Sacramento, CA)
Fig. 7 Fig. 8 Fig. 9
10 I
I CE article _ obturation
_Important consideration between usinginjection or carrier-based obturation
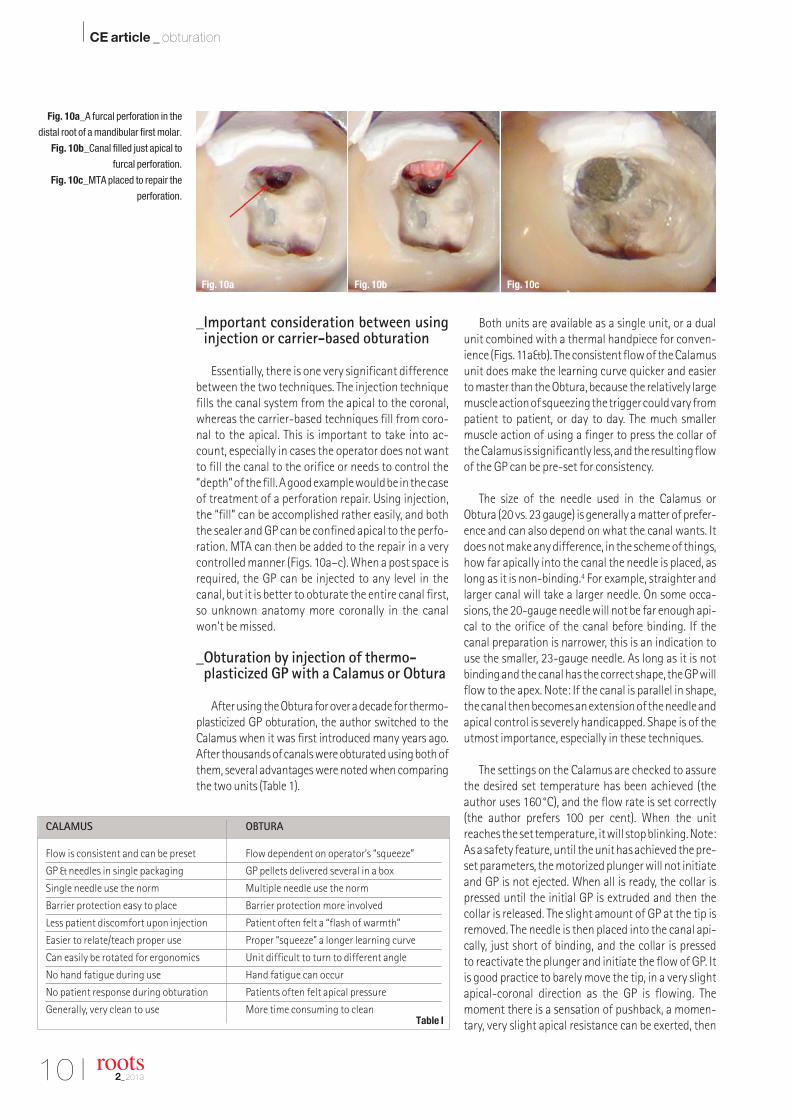
Essentially, there is one very significant differencebetween the two techniques. The injection techniquefills the canal system from the apical to the coronal,whereas the carrier-based techniques fill from coro-nal to the apical. This is important to take into ac-count, especially in cases the operator does not wantto fill the canal to the orifice or needs to control the“depth” of the fill. A good example would be in the caseof treatment of a perforation repair. Using injection,the “fill” can be accomplished rather easily, and boththe sealer and GP can be confined apical to the perfo-ration. MTA can then be added to the repair in a verycontrolled manner (Figs. 10a–c). When a post space isrequired, the GP can be injected to any level in thecanal, but it is better to obturate the entire canal first,so unknown anatomy more coronally in the canalwon’t be missed.
_Obturation by injection of thermo-plasticized GP with a Calamus or Obtura
After using the Obtura for over a decade for thermo-plasticized GP obturation, the author switched to theCalamus when it was first introduced many years ago.After thousands of canals were obturated using both ofthem, several advantages were noted when comparingthe two units (Table 1).
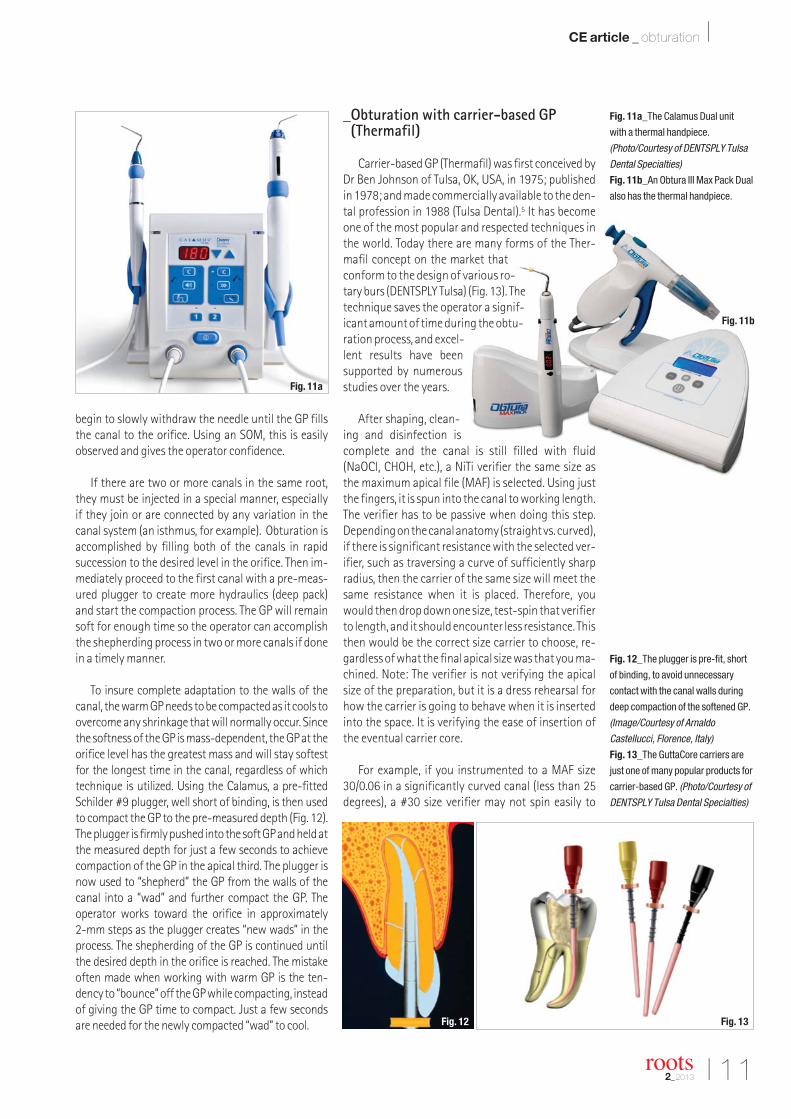
Both units are available as a single unit, or a dualunit combined with a thermal handpiece for conven-ience (Figs. 11a&b). The consistent flow of the Calamusunit does make the learning curve quicker and easierto master than the Obtura, because the relatively largemuscle action of squeezing the trigger could vary frompatient to patient, or day to day. The much smallermuscle action of using a finger to press the collar of the Calamus is significantly less, and the resulting flowof the GP can be pre-set for consistency.
The size of the needle used in the Calamus or Obtura (20 vs. 23 gauge) is generally a matter of prefer-ence and can also depend on what the canal wants. Itdoes not make any difference, in the scheme of things,how far apically into the canal the needle is placed, aslong as it is non-binding.4 For example, straighter andlarger canal will take a larger needle. On some occa-sions, the 20-gauge needle will not be far enough api-cal to the orifice of the canal before binding. If thecanal preparation is narrower, this is an indication touse the smaller, 23-gauge needle. As long as it is notbinding and the canal has the correct shape, the GP willflow to the apex. Note: If the canal is parallel in shape,the canal then becomes an extension of the needle andapical control is severely handicapped. Shape is of theutmost importance, especially in these techniques.
The settings on the Calamus are checked to assurethe desired set temperature has been achieved (the author uses 160°C), and the flow rate is set correctly(the author prefers 100 per cent). When the unitreaches the set temperature, it will stop blinking. Note:As a safety feature, until the unit has achieved the pre-set parameters, the motorized plunger will not initiateand GP is not ejected. When all is ready, the collar ispressed until the initial GP is extruded and then thecollar is released. The slight amount of GP at the tip isremoved. The needle is then placed into the canal api-cally, just short of binding, and the collar is pressed to reactivate the plunger and initiate the flow of GP. Itis good practice to barely move the tip, in a very slightapical-coronal direction as the GP is flowing. The moment there is a sensation of pushback, a momen-tary, very slight apical resistance can be exerted, then
Fig. 10a_A furcal perforation in the
distal root of a mandibular first molar.
Fig. 10b_Canal filled just apical to
furcal perforation.
Fig. 10c_MTA placed to repair the
perforation.
roots2_2013
Flow is consistent and can be preset Flow dependent on operator’s “squeeze”
GP & needles in single packaging GP pellets delivered several in a box
Single needle use the norm Multiple needle use the norm
Barrier protection easy to place Barrier protection more involved
Less patient discomfort upon injection Patient often felt a “flash of warmth”
Easier to relate/teach proper use Proper “squeeze” a longer learning curve
Can easily be rotated for ergonomics Unit difficult to turn to different angle
No hand fatigue during use Hand fatigue can occur
No patient response during obturation Patients often felt apical pressure
Generally, very clean to use More time consuming to clean
CALAMUS OBTURA
Table I
Fig. 10a Fig. 10b Fig. 10c
I 11
CE article _ obturation I
roots2_2013
begin to slowly withdraw the needle until the GP fillsthe canal to the orifice. Using an SOM, this is easily observed and gives the operator confidence.
If there are two or more canals in the same root,they must be injected in a special manner, especially if they join or are connected by any variation in thecanal system (an isthmus, for example). Obturation isaccomplished by filling both of the canals in rapid succession to the desired level in the orifice. Then im-mediately proceed to the first canal with a pre-meas-ured plugger to create more hydraulics (deep pack)and start the compaction process. The GP will remainsoft for enough time so the operator can accomplishthe shepherding process in two or more canals if donein a timely manner.
To insure complete adaptation to the walls of thecanal, the warm GP needs to be compacted as it cools toovercome any shrinkage that will normally occur. Sincethe softness of the GP is mass-dependent, the GP at theorifice level has the greatest mass and will stay softestfor the longest time in the canal, regardless of whichtechnique is utilized. Using the Calamus, a pre-fittedSchilder #9 plugger, well short of binding, is then usedto compact the GP to the pre-measured depth (Fig. 12).The plugger is firmly pushed into the soft GP and held atthe measured depth for just a few seconds to achievecompaction of the GP in the apical third. The plugger isnow used to “shepherd” the GP from the walls of thecanal into a “wad” and further compact the GP. The operator works toward the orifice in approximately 2-mm steps as the plugger creates “new wads” in theprocess. The shepherding of the GP is continued untilthe desired depth in the orifice is reached. The mistakeoften made when working with warm GP is the ten-dency to “bounce” off the GP while compacting, insteadof giving the GP time to compact. Just a few seconds are needed for the newly compacted “wad” to cool.
_Obturation with carrier-based GP(Thermafil)
Carrier-based GP (Thermafil) was first conceived byDr Ben Johnson of Tulsa, OK, USA, in 1975; publishedin 1978; and made commercially available to the den-tal profession in 1988 (Tulsa Dental).5 It has becomeone of the most popular and respected techniques inthe world. Today there are many forms of the Ther-mafil concept on the market thatconform to the design of various ro-tary burs (DENTSPLY Tulsa) (Fig. 13). Thetechnique saves the operator a signif-icant amount of time during the obtu-ration process, and excel-lent results have beensupported by numerousstudies over the years.
After shaping, clean-ing and disinfection iscomplete and the canal is still filled with fluid(NaOCl, CHOH, etc.), a NiTi verifier the same size as the maximum apical file (MAF) is selected. Using justthe fingers, it is spun into the canal to working length.The verifier has to be passive when doing this step. Depending on the canal anatomy (straight vs. curved),if there is significant resistance with the selected ver-ifier, such as traversing a curve of sufficiently sharpradius, then the carrier of the same size will meet thesame resistance when it is placed. Therefore, youwould then drop down one size, test-spin that verifierto length, and it should encounter less resistance. Thisthen would be the correct size carrier to choose, re-gardless of what the final apical size was that you ma-chined. Note: The verifier is not verifying the apicalsize of the preparation, but it is a dress rehearsal forhow the carrier is going to behave when it is insertedinto the space. It is verifying the ease of insertion ofthe eventual carrier core.
For example, if you instrumented to a MAF size30/0.06 in a significantly curved canal (less than 25degrees), a #30 size verifier may not spin easily to
Fig. 11a_The Calamus Dual unit
with a thermal handpiece.
(Photo/Courtesy of DENTSPLY Tulsa
Dental Specialties)
Fig. 11b_An Obtura III Max Pack Dual
also has the thermal handpiece.
Fig. 12_The plugger is pre-fit, short
of binding, to avoid unnecessary
contact with the canal walls during
deep compaction of the softened GP.
(Image/Courtesy of Arnaldo
Castellucci, Florence, Italy)
Fig. 13_The GuttaCore carriers are
just one of many popular products for
carrier-based GP. (Photo/Courtesy of
DENTSPLY Tulsa Dental Specialties)
Fig. 11a
Fig. 11b
Fig. 12 Fig. 13
12 I
I CE article _ obturation
length; you would try a #25 size verifier instead. In alllikelihood, the #25 will go to length without signifi-cant resistance. The resistance it encounters is a func-tion of the file/carrier being distorted by the curvatureof the canal space; the greater the curvature, thegreater the distortion and resistance (and the greaterthe chance of contacting the carrier on two opposingsides during insertion, possibly stripping the GP fromthe core). Dropping down one size eases that im-pingement without compromising the carrier’s abil-ity to transport the softened gutta-percha to length.The use of the size verifier is critical to the successfulplacement of the eventual carrier, but is often doneimproperly, or not at all.
Once the appropriate carriers are chosen, the canalspaces are dried completely with paper points, the“FIRE technique,” etc. A small amount of sealer is ap-plied to the canal walls with a paper point (pin-headdrop) into the shaped canal. If the canal is not dry, theexcess moisture will prematurely cool the advancingwave of GP, resulting in a “pig-tail” of GP extrudedinto the PA area. The same will occur with excesssealer, and it will extrude along with the GP.
The carriers are placed singly into the oven, thecorrect time chosen, and the cores allowed to heat tothe proper temperature. The small plastic, and allGutta-Core carriers, are heated on the first setting (20to 22 seconds); size 30 to 60 Thermafil Plus heatedwith the second setting (40 to 42 seconds); and size70 or larger, the third setting (44 to 46 seconds). Thecarriers can be reheated, if necessary, and the timesetting for the larger carriers is not critical, as long asthey are heated for at least 40 seconds.
Insertion of the heated carrier is slow and deliber-ate; you need to allow the excess material to be ventedcoronally. Insertion rates are 2 to 3mm per second,which would translate to an average time of seven to10 seconds for most canals from orifice to workinglength. With the larger carriers, you may experience a “rebound” effect after the carrier is inserted a fewmillimeters into the canal. Release the carrier and itwill “rise” slightly from the canal space. This is the GPventing and pushing the carrier back out of the canalslightly as it vents. Once the rebound is stopped, youcan continue the insertion, stopping every few mil-limeters to check for rebound until the carrier is in-serted to length. Pushing through the rebound andnot allowing the GP to vent coronally will precipitatesignificant extrusions.
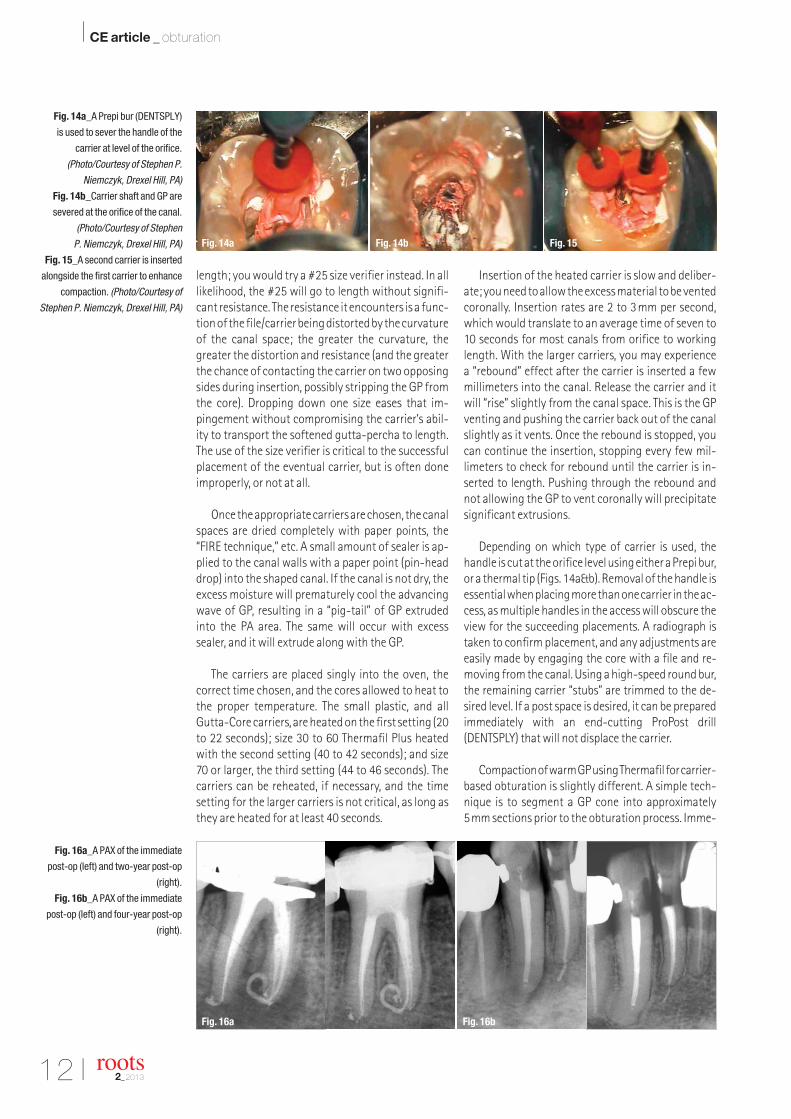
Depending on which type of carrier is used, thehandle is cut at the orifice level using either a Prepi bur,or a thermal tip (Figs. 14a&b). Removal of the handle isessential when placing more than one carrier in the ac-cess, as multiple handles in the access will obscure theview for the succeeding placements. A radiograph istaken to confirm placement, and any adjustments areeasily made by engaging the core with a file and re-moving from the canal. Using a high-speed round bur,the remaining carrier “stubs” are trimmed to the de-sired level. If a post space is desired, it can be preparedimmediately with an end-cutting ProPost drill(DENTSPLY) that will not displace the carrier.
Compaction of warm GP using Thermafil for carrier-based obturation is slightly different. A simple tech-nique is to segment a GP cone into approximately5mm sections prior to the obturation process. Imme-
Fig. 14a_A Prepi bur (DENTSPLY)
is used to sever the handle of the
carrier at level of the orifice.
(Photo/Courtesy of Stephen P.
Niemczyk, Drexel Hill, PA)
Fig. 14b_Carrier shaft and GP are
severed at the orifice of the canal.
(Photo/Courtesy of Stephen
P. Niemczyk, Drexel Hill, PA)
Fig. 15_A second carrier is inserted
alongside the first carrier to enhance
compaction. (Photo/Courtesy of
Stephen P. Niemczyk, Drexel Hill, PA)
Fig. 16a_A PAX of the immediate
post-op (left) and two-year post-op
(right).
Fig. 16b_A PAX of the immediate
post-op (left) and four-year post-op
(right).
roots2_2013
Fig. 14a Fig. 14b Fig. 15
Fig. 16a Fig. 16b
I 13
CE article _ obturation I
roots2_2013
diately after the Thermafil carrier is separated with aPrepi bur (DENTSPLY), the GP at the orifice is still softand can be readily compacted. To facilitate thoroughadaptation, a small and lubricated plugger (about asize 8 to 8.5 Schilder) can be used to apically compactthe warm GP alongside the carrier. Push apically to apredetermined distance, hold briefly and remove theplugger. Then, using one of the pre-cut segments ofGP, place it into the void created by the plugger, andcompact it into place. More segments of GP may benecessary depending on the size of the canal. In caseswhen the canal may be ribbon-shaped and large in the M-D or B-L direction, the apical third of the canalis obturated in the conventional manner. Then an ac-cessory carrier can be inserted alongside the initialcarrier (Fig. 15). The second core of the second carrierfunctions as a gentle spreader to assist in the lateralcompaction and spread of the softened GP. The warmGP from the first and second carriers fuse together so any voids are eliminated.
_Excess filling material
Historically, any time a case was obturated, therewas much concern when anything was extruded be-yond the apical terminus. Many endodontic failureswere blamed on vertical over-extension, but in realitythe culprit was an “under-filled” canal system. AsSchilder stated, “You can only fill a canal 100 per cent.”If the canal is filled 100 per cent, any excess material extruded would be of no consequence. In fact, if the author obturated a canal system and there was no ex-cess filling material, the GP would be routinely removedand re-obturated until there was. The point was, “Howelse could you be sure the canal system was obturated100 per cent unless there was some excess filling ma-terial present at the apex?” Cases that have a significantamount of excess filling material but are properlyshaped, cleaned and packed do heal. Over time, the excess material will slowly be resorbed (Figs. 16a & b).
The biggest fear of the new user of injection or carrier-based GP is, “There will be a great amount ofexcess filling material at the terminus.” The oppositeis generally true. At first, the most common problemfor the new user was the inability to get to the termi-nus and completely fill/obturate the canal system. Theusual reason for this was either an improper shape,the absence of patency or fear of the operator to useenough pressure during the injection and com-paction process.
A good way to imagine what is happening, whileusing thermo-plasticized GP in a properly shaped and patent canal, is to envision everyone in a theaterrushing to get out the same door in a big hurry. The GPmolecules are relatively large and warm, so the con-tinually tapering shape is, in itself, a limiting factor for
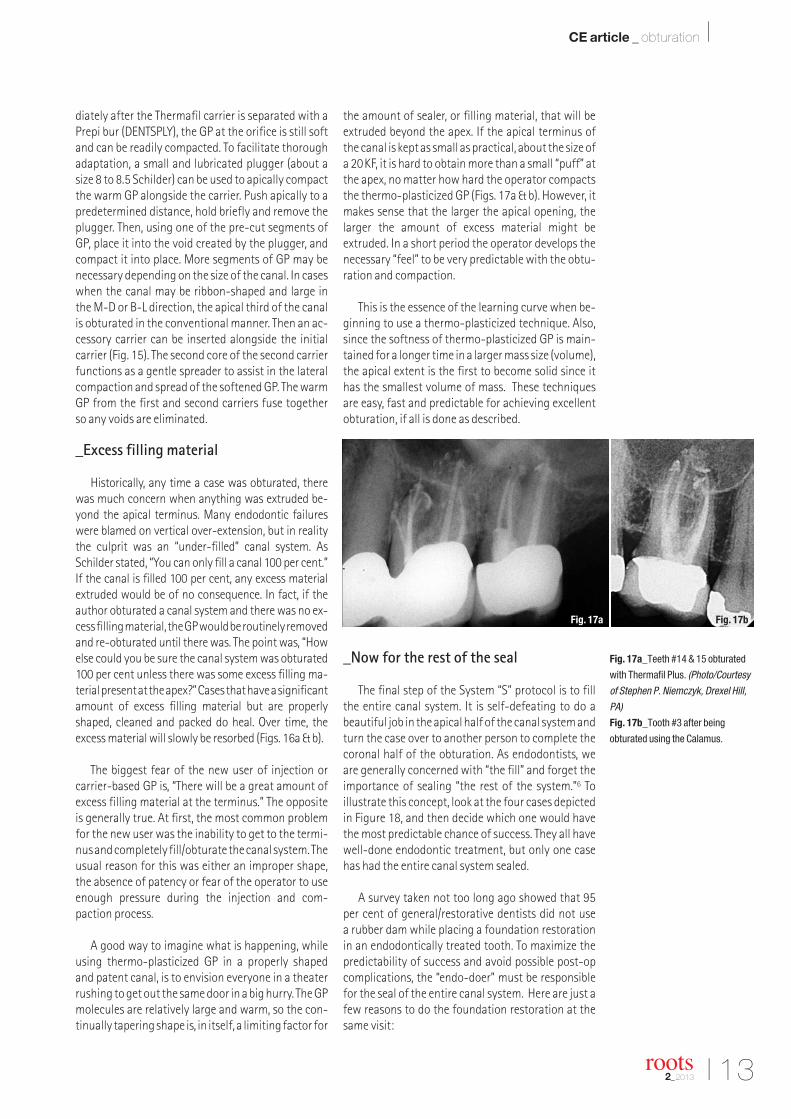
the amount of sealer, or filling material, that will beextruded beyond the apex. If the apical terminus ofthe canal is kept as small as practical, about the size ofa 20KF, it is hard to obtain more than a small “puff” atthe apex, no matter how hard the operator compactsthe thermo-plasticized GP (Figs. 17a & b). However, itmakes sense that the larger the apical opening, thelarger the amount of excess material might be extruded. In a short period the operator develops thenecessary “feel” to be very predictable with the obtu-ration and compaction.
This is the essence of the learning curve when be-ginning to use a thermo-plasticized technique. Also,since the softness of thermo-plasticized GP is main-tained for a longer time in a larger mass size (volume),the apical extent is the first to become solid since ithas the smallest volume of mass. These techniquesare easy, fast and predictable for achieving excellentobturation, if all is done as described.
_Now for the rest of the seal
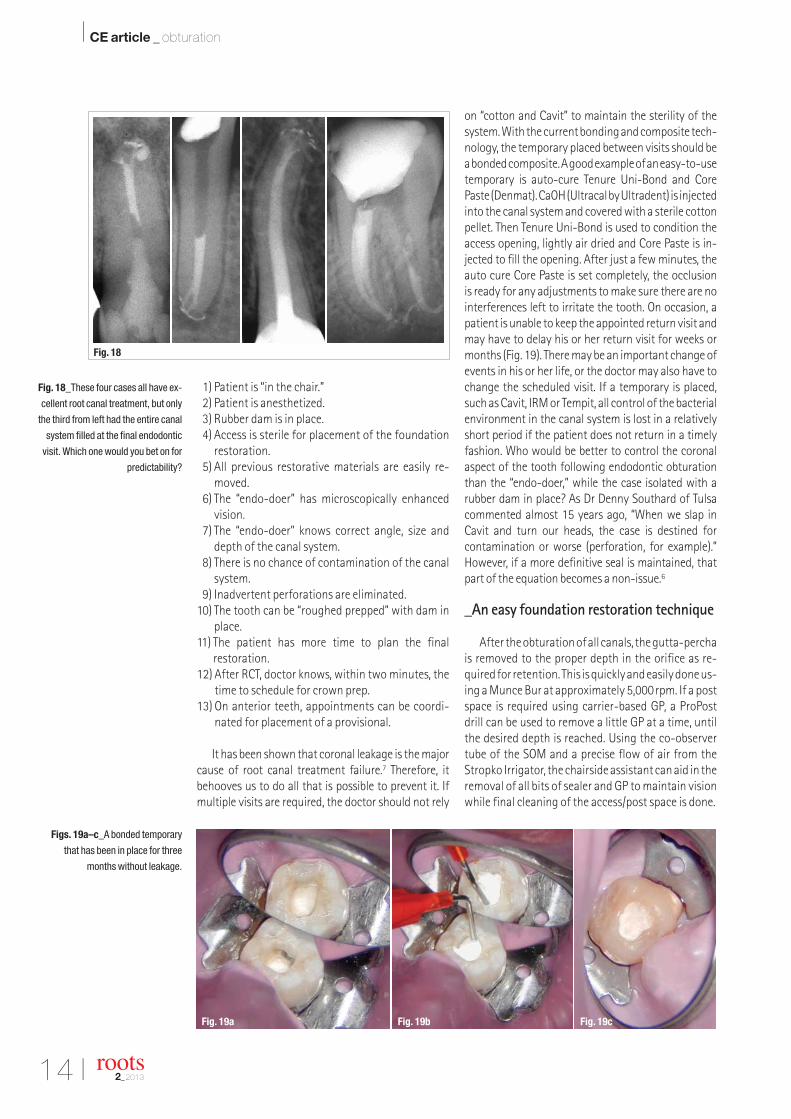
The final step of the System “S” protocol is to fill the entire canal system. It is self-defeating to do abeautiful job in the apical half of the canal system andturn the case over to another person to complete thecoronal half of the obturation. As endodontists, weare generally concerned with “the fill” and forget theimportance of sealing “the rest of the system.”6 To illustrate this concept, look at the four cases depictedin Figure 18, and then decide which one would havethe most predictable chance of success. They all havewell-done endodontic treatment, but only one casehas had the entire canal system sealed.
A survey taken not too long ago showed that 95 per cent of general/restorative dentists did not use a rubber dam while placing a foundation restorationin an endodontically treated tooth. To maximize thepredictability of success and avoid possible post-opcomplications, the “endo-doer” must be responsiblefor the seal of the entire canal system. Here are just afew reasons to do the foundation restoration at thesame visit:
Fig. 17a_Teeth #14 & 15 obturated
with Thermafil Plus. (Photo/Courtesy
of Stephen P. Niemczyk, Drexel Hill,
PA)
Fig. 17b_Tooth #3 after being
obturated using the Calamus.
Fig. 17a Fig. 17b
14 I
I CE article _ obturation
1) Patient is “in the chair.”2) Patient is anesthetized.3) Rubber dam is in place.4) Access is sterile for placement of the foundation
restoration.5) All previous restorative materials are easily re-
moved.6) The “endo-doer” has microscopically enhanced
vision.7) The “endo-doer” knows correct angle, size and
depth of the canal system.8) There is no chance of contamination of the canal
system.9) Inadvertent perforations are eliminated.
10) The tooth can be “roughed prepped” with dam inplace.
11) The patient has more time to plan the finalrestoration.
12) After RCT, doctor knows, within two minutes, thetime to schedule for crown prep.
13) On anterior teeth, appointments can be coordi-nated for placement of a provisional.
It has been shown that coronal leakage is the majorcause of root canal treatment failure.7 Therefore, it behooves us to do all that is possible to prevent it. Ifmultiple visits are required, the doctor should not rely
on “cotton and Cavit” to maintain the sterility of thesystem. With the current bonding and composite tech-nology, the temporary placed between visits should bea bonded composite. A good example of an easy-to-usetemporary is auto-cure Tenure Uni-Bond and CorePaste (Denmat). CaOH (Ultracal by Ultradent) is injectedinto the canal system and covered with a sterile cottonpellet. Then Tenure Uni-Bond is used to condition theaccess opening, lightly air dried and Core Paste is in-jected to fill the opening. After just a few minutes, theauto cure Core Paste is set completely, the occlusion is ready for any adjustments to make sure there are nointerferences left to irritate the tooth. On occasion, apatient is unable to keep the appointed return visit andmay have to delay his or her return visit for weeks ormonths (Fig. 19). There may be an important change ofevents in his or her life, or the doctor may also have tochange the scheduled visit. If a temporary is placed,such as Cavit, IRM or Tempit, all control of the bacterialenvironment in the canal system is lost in a relativelyshort period if the patient does not return in a timelyfashion. Who would be better to control the coronal aspect of the tooth following endodontic obturationthan the “endo-doer,” while the case isolated with arubber dam in place? As Dr Denny Southard of Tulsacommented almost 15 years ago, “When we slap inCavit and turn our heads, the case is destined for contamination or worse (perforation, for example).”However, if a more definitive seal is maintained, thatpart of the equation becomes a non-issue.6
_An easy foundation restoration technique
After the obturation of all canals, the gutta-perchais removed to the proper depth in the orifice as re-quired for retention. This is quickly and easily done us-ing a Munce Bur at approximately 5,000rpm. If a postspace is required using carrier-based GP, a ProPostdrill can be used to remove a little GP at a time, untilthe desired depth is reached. Using the co-observertube of the SOM and a precise flow of air from theStropko Irrigator, the chairside assistant can aid in theremoval of all bits of sealer and GP to maintain visionwhile final cleaning of the access/post space is done.
Fig. 18_These four cases all have ex-
cellent root canal treatment, but only
the third from left had the entire canal
system filled at the final endodontic
visit. Which one would you bet on for
predictability?
Figs. 19a–c_A bonded temporary
that has been in place for three
months without leakage.
roots2_2013
Fig. 18
Fig. 19a Fig. 19b Fig. 19c
I 15
CE article _ obturation I
roots2_2013
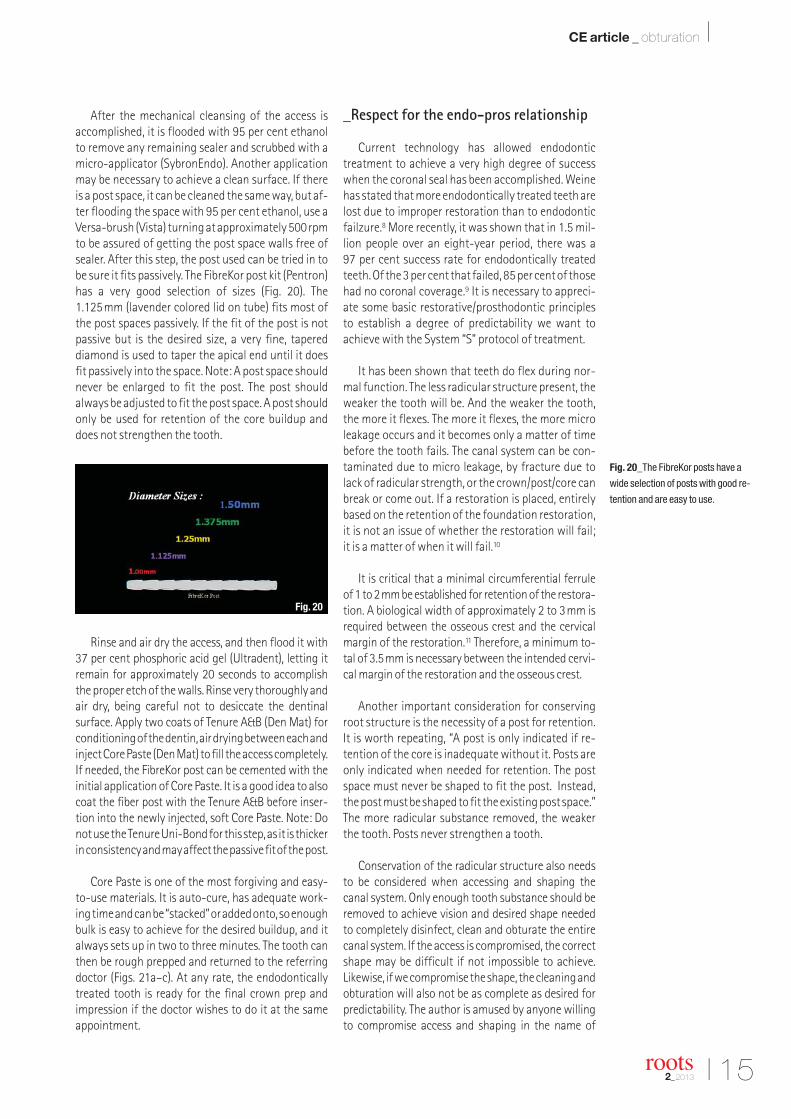
After the mechanical cleansing of the access is accomplished, it is flooded with 95 per cent ethanolto remove any remaining sealer and scrubbed with amicro-applicator (SybronEndo). Another applicationmay be necessary to achieve a clean surface. If thereis a post space, it can be cleaned the same way, but af-ter flooding the space with 95 per cent ethanol, use aVersa-brush (Vista) turning at approximately 500rpmto be assured of getting the post space walls free ofsealer. After this step, the post used can be tried in tobe sure it fits passively. The FibreKor post kit (Pentron)has a very good selection of sizes (Fig. 20). The1.125mm (lavender colored lid on tube) fits most ofthe post spaces passively. If the fit of the post is notpassive but is the desired size, a very fine, tapered diamond is used to taper the apical end until it doesfit passively into the space. Note: A post space shouldnever be enlarged to fit the post. The post should always be adjusted to fit the post space. A post shouldonly be used for retention of the core buildup anddoes not strengthen the tooth.
Rinse and air dry the access, and then flood it with37 per cent phosphoric acid gel (Ultradent), letting it remain for approximately 20 seconds to accomplishthe proper etch of the walls. Rinse very thoroughly andair dry, being careful not to desiccate the dentinal surface. Apply two coats of Tenure A&B (Den Mat) forconditioning of the dentin, air drying between each andinject Core Paste (Den Mat) to fill the access completely.If needed, the FibreKor post can be cemented with theinitial application of Core Paste. It is a good idea to alsocoat the fiber post with the Tenure A&B before inser-tion into the newly injected, soft Core Paste. Note: Donot use the Tenure Uni-Bond for this step, as it is thickerin consistency and may affect the passive fit of the post.
Core Paste is one of the most forgiving and easy-to-use materials. It is auto-cure, has adequate work-ing time and can be “stacked” or added onto, so enoughbulk is easy to achieve for the desired buildup, and it always sets up in two to three minutes. The tooth canthen be rough prepped and returned to the referringdoctor (Figs. 21a–c). At any rate, the endodonticallytreated tooth is ready for the final crown prep and impression if the doctor wishes to do it at the same appointment.
_Respect for the endo-pros relationship
Current technology has allowed endodontic treatment to achieve a very high degree of successwhen the coronal seal has been accomplished. Weinehas stated that more endodontically treated teeth arelost due to improper restoration than to endodonticfailzure.8 More recently, it was shown that in 1.5 mil-lion people over an eight-year period, there was a 97 per cent success rate for endodontically treatedteeth. Of the 3 per cent that failed, 85 per cent of thosehad no coronal coverage.9 It is necessary to appreci-ate some basic restorative/prosthodontic principlesto establish a degree of predictability we want toachieve with the System “S” protocol of treatment.
It has been shown that teeth do flex during nor-mal function. The less radicular structure present, theweaker the tooth will be. And the weaker the tooth,the more it flexes. The more it flexes, the more microleakage occurs and it becomes only a matter of timebefore the tooth fails. The canal system can be con-taminated due to micro leakage, by fracture due tolack of radicular strength, or the crown/post/core canbreak or come out. If a restoration is placed, entirelybased on the retention of the foundation restoration,it is not an issue of whether the restoration will fail; it is a matter of when it will fail.10
It is critical that a minimal circumferential ferrule of 1 to 2mm be established for retention of the restora-tion. A biological width of approximately 2 to 3mm isrequired between the osseous crest and the cervicalmargin of the restoration.11 Therefore, a minimum to-tal of 3.5mm is necessary between the intended cervi-cal margin of the restoration and the osseous crest.
Another important consideration for conservingroot structure is the necessity of a post for retention.It is worth repeating, “A post is only indicated if re-tention of the core is inadequate without it. Posts areonly indicated when needed for retention. The postspace must never be shaped to fit the post. Instead,the post must be shaped to fit the existing post space.”The more radicular substance removed, the weakerthe tooth. Posts never strengthen a tooth.
Conservation of the radicular structure also needsto be considered when accessing and shaping thecanal system. Only enough tooth substance should beremoved to achieve vision and desired shape needed to completely disinfect, clean and obturate the entirecanal system. If the access is compromised, the correctshape may be difficult if not impossible to achieve.Likewise, if we compromise the shape, the cleaning andobturation will also not be as complete as desired forpredictability. The author is amused by anyone willingto compromise access and shaping in the name of
Fig. 20_The FibreKor posts have a
wide selection of posts with good re-
tention and are easy to use.
Fig. 20

16 I
I CE article _ obturation
tooth conservation. What good does all that toothstructure do if the tooth is lost to disease?
Once the referring doctors are made aware of thefavorable benefits that will be derived, it becomes difficult for a conscientious person to object to thisconcept of eliminating untoward possibilities that can lead to failure of treatment.
_Conclusion
The System “S” protocol demands thoroughness in treatment of the entire canal system. The author usesa Calamus for obturation, but carrier-based techniquesof using warm GP can be used with the same degree of success, as long as they are done correctly. System“S” requires a commitment to complete all six steps toavoid the many pitfalls that present themselves duringtreatment of the entire endodontic canal system.
A survey of endodontists taken about nine yearsago stated that 38 per cent always used an SOM, 30 per cent sometimes used it, and 32 per cent neverused it.12 Hopefully, things have changed. The use of an
SOM is essential for us, as “endo-doers,” to achieve the high level of predictability our current technologyallows us to deliver. We only know what we see, and ifwe don’t see it we don’t know it. A good example is thehigh per centage of fourth canals (93 per cent) that canbe found in the maxillary molar segment. The clinicaluse of the SOM significantly increased the number ofcanals that were discovered.13 If these canals are notfound, and the operator doesn’t take the time to locateand treat them, the predictability of success will be farless. It behooves all of us to do everything humanly possible to give our patients dental treatment that willcreate the health they expect from our profession.
In general, our current endodontic vision has beendirected to treatment of the apical half of the rootcanal system. It should not be a problem integratingthe basic principles of bonding technology, restorativeprinciples and post core placement into our normalendodontic treatment protocol. We, as a specialty,should be thinking in terms of being responsible forthe entire canal system and doing everything humanlypossible to increase the predictability of our treat-ment. When endodontic treatment fails, it seems likeeveryone “stands around in a circle and points at oneanother.” Adhering to proven principles eliminates theprobability of contamination of the canal system byproviding a solid foundation for the restorative aspectof the patient treatment.
Obviously, those who are so concerned with the endodontic lack of respect for radicular structure havenot witnessed what often happens to that same toothwhen preparing it for a crown. It is imperative for theendodontic and restorative to be a team, working to-gether for predictability, in the interest of the patient.
Our job as “endo-doers” is to learn, become teach-ers and educate the patients, staff and doctors we workwith, so we can achieve dental health as a team. Let’snot “cave into” the demands of public convenience orpolitical pressure, but rather be governed by provendental principles, so we can achieve predictable endo -dontic success, saving the teeth our patients are bornwith. Isn’t that what endodontics is all about?_
Editorial note: A complete list of references is available fromthe publisher.
Figs. 21a–c_The canal systems
have been filled 100 per cent and are
ready for restorations without any
concern for micro-leakage until they
are more permanently restored.
roots2_2013
John J. Stropko received his DDS from Indiana University in1964. For the next 24 years he practiced general and restora-tive dentistry. In 1989, he received a certificate for endodon-tics from Boston University and has recently retired from hisprivate practice limited to microendodontics in Scottsdale, Arizona. Stropko is an internationally recognized authority onmicroendodontics and has performed numerous live micro -endodontic and microsurgical demonstrations. He has been a visiting clinical instructor at the Pacific Endodontic Research
Foundation (PERF); an adjunct assistant professor at Boston University; an assistantprofessor of graduate clinical endodontics at Loma Linda University; a member of the endodontic faculty at the Scottsdale Center for Dentistry in Scottsdale, Arizona, as an instructor of microsurgery; and is a co-founder of Clinical Endodontic Seminars.His research on in-vivo root canal morphology has been published in the Journal ofEndo dontics. He has published in several journals and texts, is the inventor of theStropko Irrigator, and is an internationally known speaker. Stropko and his wife, Barbara,currently reside in Prescott, Arizona. Contact him at [email protected]
Disclosure: Dr Stropko is a distributor of the Stropko Irrigator and receives royalties from Dentsply International.
_about the author roots
Fig. 20a Fig. 20b Fig. 20c
Acknowledgements
As with any article, there is always
the support and background help that
nobody ever sees. I wish to thank my
wife, Barbara, for her support while
working on this article. Also, sincere
appreciation to Dr William "Ben"
Johnson, Dr Stephen P. Niemczyk
and Dr Clifford J. Ruddle for always
being there to give advice and help
when I needed it.