Embed Size (px)
Citation preview
Printed Help - TxEIS Health
3.0.0000

3.0.0000
i
Table of Contents Health ............................................................................................................................................................ 1
About Health .............................................................................................................................................. 1 Directory - Student Information.................................................................................................................. 1 Maintenance .............................................................................................................................................. 1
Student Health ....................................................................................................................................... 2 Mass Screening ................................................................................................................................... 20 Nurse's Daily Log ................................................................................................................................. 27 Tables .................................................................................................................................................. 30
Letters ...................................................................................................................................................... 32 Run Letter ............................................................................................................................................ 32 Create Letter ........................................................................................................................................ 34
Reports .................................................................................................................................................... 35 HealthReports ...................................................................................................................................... 35 Create Health Report ........................................................................................................................... 61
3.0.0000

3.0.0000
1
Health
About Health
TxEIS Health is an application within the TxEIS Student system that is used to maintain student health information, such as immunization and tuberculosis (TB) data; vision, hearing, spinal, and acanthosis screenings; and emergency data. You can record information about accidents, medical conditions, and physical examinations. Letters and reports can be generated. The application also provides a Nurse's Daily Log.
Directory - Student Information
The Student Directory allows you to search for a student and retrieve the student's record to the page from which you accessed the directory.
Locate a student:
1. You can search for a student by last and/or first name. Other options allow you to narrow the searchfurther. Enter data in any or all of the following fields:
● In the Last Name field, type all or part of the student's last name. For example, you can type smto find all students whose last name begins with Sm.
● In the First Name field, type all or part of the student's first name. For example, you can type joto find all students whose first name begins with Jo.
● In the Campus ID field, type the three-digit campus ID to filter the search results for a specificcampus. Leave blank to search all campuses to which you have access.
● In the Texas Unique Stu ID field, type all or part of the student's Texas Unique State ID. Forexample, you can type 55 to find all students whose ID contains 55.
● In the Grade Level field, type a grade level to narrow the search to one grade level. Leave blankto search all grade levels.
● In the Active Cd field, select Active, Inactive, or All to indicate if you want to limit the searchresults to active students only, inactive students only, or all students.
● Depending on the application, there may be additional fields allowing you to filter the searchresults for specific students.
□ In Registration on the Maintenance > Student Maintenance tabs, the Next Year Studentsfield allows you the option to retrieve students with record status 5 (i.e., not currentlyenrolled in this district, will attend next year) in the search results. When you select a record-status-code 5 student to be retrieved, a warning message is displayed to inform you that thestudent is not enrolled in the current year.
2. Click Search. The students who meet the criteria entered are displayed.
● If more students are retrieved than can be displayed on one page, you can page through the list.
● In most applications, the Total Students field in the bottom-right corner of the directory displaysthe total number of students retrieved.
3. When you locate the student you want to retrieve, click the student ID. The directory closes, and thestudent's information is displayed on the page from which you accessed the directory.
4. Click Cancel or Close to return to the previous page without selecting a student.
Maintenance
3.0.0000
Health
2
Student Health
Demo
Health > Maintenance > Student Health > Demo
The Demo tab displays the demographic data for the retrieved student. The tab is not enabled until you retrieve a student.
The fields cannot be updated on this page. The data is maintained in Registration on the Maintenance > Student Enrollment > Demo1 and Demo2 tabs.
Enter demographic information:
1. Select a student.
● The following demographic data is displayed for the student:
□ Student ID and name□ Grade level□ Gender□ Ethnicity (Hispanic/Latino) and race□ State ID□ Eligibility for Medicaid□ Enrollment status - indicates whether the student is active or withdrawn□ Original entry date - indicates the student's original entry date. The original entry date is set
by the first enrollment record.□ Withdrawal date - indicates the last withdrawal date if the student has ever withdrawn□ Control number/instructor - indicates the control number assigned to the student
Note: If no control number is assigned to the student in the Registration application, N/A isdisplayed.
● Age - calculated using the system date
Note: If the student is less than two years old, the age is in months.
● Track
2. The Medical Alert button is displayed if a medical warning exists for the student on the Emergencytab. Click Medical Alert to view the student's medical alert information.
3. If the Documents button is provided, click Documents to view or attach supporting documentation.If any documents are currently attached, the button has a note icon.
Immunization
Health > Maintenance > Student Health > Immunization
The Immunization tab allows you to view and update a student's immunization records. The tab is not enabled until you retrieve a student.
Notes:
■ You can use the Import Immunizations From TREx utility in Registration.
■ The page is read only (i.e., the Save button is disabled) if any of the following is set to read-only inSecurity Administration for the current or prior year:
● Health > Maintenance
● Health > Maintenance > Student Health
3.0.0000
Printed Help - TxEIS Health
3
● Health > Maintenance > Student Health > Immunization
Add immunization data:
1. Select a student.
● The student's existing immunization records are displayed.
● The list can be re-sorted by clicking the column heading.
● A blank row is displayed in the grid allowing you to enter immunization data. If records exist, theblank row is at the bottom of the grid.
2. The Medical Alert button is displayed if a medical warning exists for the student on the Emergencytab. Click Medical Alert to view the student's medical alert information.
3. The ID field displays a sequence number for the student's immunization entries and cannot beupdated.
4. In the Date field, type the date on which the immunization was administered in the MMDDYYYYformat.
5. In the Immunization Type field, click or use the up and down arrow keys to select the type of immunization.
Notes:
● The list of immunization types is maintained on the Maintenance > Tables > Immunization Typetab.
● Immunization type codes 90-99 are user-defined.
6. In the Series # field, click or use the up and down arrow keys to select the sequence in the immunization series.
Note: You may enter the same series number for multiple doses of 14-Influenza.
7. Select Reaction if the student had a reaction to the immunization.
8. In the Partial Dosage field, if the student received a partial dosage, type the percentage of dosagethe student received.
Note: For the dosage to be considered complete, the total of all partial amounts must equal or begreater than 94%.
9. In the Exemption Type field, click or use the up and down arrow keys to select the type of exemption, if applicable.
10. In the Affidavit Date field, type the date in the MMDDYYYY format.
Notes:
● An affidavit date is mandatory for conscience, lifetime, religious, and medical exemption types.
● An exemption affidavit for a medical exemption is valid for one year.
● An exemption affidavit for reasons of conscience is valid for two years for new applicants.Exemption affidavits for reasons of conscience filed during the 2003-2004 school year are validfor five years.
11. Press ENTER to add a new row to the grid in which to add data for another immunization record.
12. You can modify data for an existing record. The modified row is displayed in a bold font when a fieldin the row is in use; then the field is displayed in italic font when you tab out of the field. When yousave the record, the row is displayed in a normal font.
13. Click Save.
3.0.0000
Health
4
14. If the Documents button is provided, click Documents to view or attach supporting documentation.If any documents are currently attached, the button has a note icon.
15. To delete an immunization record, click . The row is shaded red to indicate that it will be deletedwhen the record is saved.
● You can select multiple rows to be deleted at the same time.
● Click Save. The selected rows are deleted.
Note: You can save edits and delete records in the same step (i.e., the changes are all committed when the record is saved).
Screening - Vision
Health > Maintenance > Student Health > Screening > Vision
The Screening tab allows you to add or update information about a student's vision screenings. The tab is not enabled until you retrieve a student.
Note: If you are viewing data for a prior school year, and you have been granted historical read-only access in Security Administration, the data is read-only.
Add a vision screening record:
1. Select a student.
● The student’s existing vision screening records are displayed.
● The list can be re-sorted.
2. The Medical Alert button is displayed if a medical warning exists for the student on the Emergencytab. Click Medical Alert to view the student's medical alert information.
3. Click +Add. The fields in the free-form area below the grid are enabled.
4. In the Screening Date field, type the date on which the vision test was administered. Use the
MMDDYYYY format. Or, click to select the date from the calendar. The field is required.
5. Under Results, enter data in the following fields:
● In the Pass/Fail field, click to select the overall result of the vision test.
Note: To record a religious exemption, the field must be set to Exempt.
● In the Color Blind field, click to select the result of the color blind test.
● Select Glasses if the student was wearing glasses when tested.
If the field is selected, the Glasses column in the grid displays Yes. If not, the column displaysNo.
● In the Both, Right, and Left fields, type the test results for both eyes, the right eye, and the lefteye. The number should be three digits.
6. Under Screener, type the screener's first name, middle initial, and last name.
● The first name can be up to nine characters.
● The middle initial is one character.
● The last name can be up to 14 characters.
7. Under Exam, enter data in the following fields:
● In the Type field, click to select the type of vision test administered.
3.0.0000
Printed Help - TxEIS Health
5
Note: To record a religious exemption, the field must be set to Other.
● In the Status field, click to select the status of the follow-up exam, if applicable.
Note: To record a religious exemption, the field must be set to Not Examined.
● In the Referral Date field, type the date on which the student was referred to a specialist. Use
the MMDDYYYY format. Or, click to select the date from the calendar.
This field is also updated when you generate a vision referral letter from the Letters > Run Letter> Print Letters tab and click Update Referrals.
● In the Follow-up Date field, type the date of the follow-up exam in the MMDDYYYY format. Or,
click to select the date from the calendar.
8. Under Specialist, if the student visited a specialist after the screening, type the specialist's firstname, middle initial, and last name.
● The first name can be up to nine characters.
● The middle initial is one character.
● The last name can be up to 14 characters.
9. Under Exemption Information, enter data in the following fields:
● In the Type field, click to select the type of exemption.
Note: To record a religious exemption, the field must be set to Religious.
● In the Date field, type a valid affidavit date in the MMDDYYYY format. Or, click to select the date from the calendar.
10. Click Comments to add comments for the record. The comments dialog box opens, and anyexisting comments are displayed.
Type comments, and then click OK. Otherwise, click Cancel.
● If comments exist for the screening record, a paperclip icon is displayed on the button.
● The first 1000 characters of the comments will print on the Medical Profile report (SHS0810).
11. Click Save.
12. If the Documents button is provided, click Documents to view or attach supporting documentation.If any documents are currently attached, the button has a note icon.
13. To clear the data and add a new vision screening record, click +Add.
14. To edit an existing record, click the record. The data is displayed in the fields in the lower free-formarea allowing you to make changes. Click Save.
15. To delete a vision screening record, click the record, and then click Delete. A message is displayedasking if you want to delete the record.
Click OK to delete the record. The record is deleted. Otherwise, click No.
16. Click Print Comments to print the comments and screening information. The Comments - Visionreport opens in a new window. Review, save, or print the report.
Screening - Hearing
Health > Maintenance > Student Health > Screening > Hearing
The Screening tab allows you to add or update information about a student's hearing screenings. The tab is not enabled until you retrieve a student.
3.0.0000

Health
6
Note: If you are viewing data for a prior school year, and you have been granted historical read-only access in Security Administration, the data is read-only.
Add a hearing screening record:
1. Select a student.
● The student’s existing hearing screening records are displayed.
● The list can be re-sorted.
2. The Medical Alert button is displayed if a medical warning exists for the student on the Emergencytab. Click Medical Alert to view the student's medical alert information.
3. Click +Add. The fields in the free-form area below the grid are enabled.
4. In the Screening Date field, type the date on which the hearing test was administered. Use the
MMDDYYYY format. Or, click to select the date from the calendar. The field is required.
5. Under Sweepcheck/Threshold, for each frequency (1000, 2000, and 4000) for the right and leftears, enter data in the following fields:
Note: Either the sweepcheck, threshold, or both tests may be performed.
● In the Sweep. fields, click to select the results for the sweepcheck.
□ Select Y if the student responds to the tone frequency.□ Select N if the student does not respond to the tone frequency.□ Select I if the results are inconclusive.
● In the Thresh. fields, type the lowest decibel level at which the student responds. The field is twodigits.
6. Under Screener, type the screener's first name, middle initial, and last name.
● The first name can be up to nine characters.
● The middle initial is one character.
● The last name can be up to 14 characters.
7. Under Exam, enter data in the following fields:
● In the Pass/Fail field, click to select the overall result of the hearing test.
Note: To record a religious exemption, the field must be set to Exempt.
● In the Status field, click to select the status of the follow-up exam, if applicable.
Note: To record a religious exemption, the field must be set to Not Examined.
● In the Referral Date field, type the date on which the student was referred to a specialist, if
applicable. Use the MMDDYYYY format. Or, click to select the date from the calendar.
This field is also updated when you generate a hearing referral letter from the Letters > RunLetter > Print Letters tab and click Update Referrals.
● In the Follow-up Date field, type the date of the follow-up exam. Use the MMDDYYYY format.
Or, click to select the date from the calendar.
8. Under Specialist, if the student visited a specialist after the screening, type the specialist's firstname, middle initial, and last name.
● The first name can be up to nine characters.
● The middle initial is one character.
● The last name can be up to 14 characters.
3.0.0000
Printed Help - TxEIS Health
7
9. Under Exemption Information, enter data in the following fields:
● In the Type field, click to select the type of exemption.
Note: To record a religious exemption, the field must be set to Religious.
● In the Date field, type a valid affidavit date in the MMDDYYYY format. Or, click to select the date from the calendar.
10. Click Comments to add comments for the record. The comments dialog box opens, and anyexisting comments are displayed.
Type comments, and then click OK. Otherwise, click Cancel.
● If comments exist for the screening record, a paperclip icon is displayed on the button.
● The comments will print on the Medical Profile report (SHS0810).
11. Click Save.
12. If the Documents button is provided, click Documents to view or attach supporting documentation.If any documents are currently attached, the button has a note icon.
13. To clear the data and add a new hearing screening record, click +Add.
14. To edit an existing record, click the record. The data is displayed in the fields in the lower free-formarea allowing you to make changes. Click Save.
15. To delete a hearing screening record, click the record, and then click Delete. A message isdisplayed asking if you want to delete the record.
Click OK to delete the record. The record is deleted. Otherwise, click No.
16. Click Print Comments to print the comments and screening information. The Comments - Hearingreport opens in a new window. Review, save, or print the report.
Screening - Spinal
Health > Maintenance > Student Health > Screening > Spinal
The Screening tab allows you to add or update information about a student's spinal screenings. The tab is not enabled until you retrieve a student.
Note: If you are viewing data for a prior school year, and you have been granted historical read-only access in Security Administration, the data is read-only.
Add a spinal screening record:
1. Select a student.
● The student’s existing spinal screening records are displayed.
● The list can be re-sorted.
2. The Medical Alert button is displayed if a medical warning exists for the student on the Emergencytab. Click Medical Alert to view the student's medical alert information.
3. Click +Add. The fields in the free-form area below the grid are enabled.
4. In the Screening Date field, type the date on which the spinal test was administered. Use the
MMDDYYYY format. Or, click to select the date from the calendar. The field is required.
5. Under Results, enter data in the following fields:
● In the Signs/Symptoms field, click to indicate signs and symptoms observed.
Note: To record a religious exemption, the field must be set to Exempt.
3.0.0000

Health
8
● In the Degrees field, type the degree of curvature found, if applicable. The field is two digits.
● In the Treatment field, click to select the treatment needed, if applicable.
6. Under Screener, type the screener's first name, middle initial, and last name.
● The first name can be up to nine characters.
● The middle initial is one character.
● The last name can be up to 14 characters.
7. Under Exam, enter data in the following fields:
● Select Prior Treatment if the student received prior treatment.
● Select Rescreen if this test is a rescreen.
● In the Referral Date field, type the date on which the student was referred to a specialist, if
applicable. Use the MMDDYYYY format. Or, click to select the date from the calendar.
This field is also updated when you generate a spinal referral letter from the Letters > Run Letter> Print Letters tab and click Update Referrals.
● In the Follow-up Date field, type the date of the follow-up exam. Use the MMDDYYYY format.
Or, click to select the date from the calendar.
8. Under Specialist, if the student visited a specialist after the screening, type in the specialist firstname, middle initial and last name.
● The first name can be up to nine characters.
● The middle initial is one character.
● The last name can be up to 14 characters.
9. Under Exemption Information, enter data in the following fields:
● In the Type field, click to select the type of exemption.
Note: To record a religious exemption, the field must be set to Religious.
● In the Date field, type a valid affidavit date in the MMDDYYYY format. Or, click to select the date from the calendar.
10. Click Findings to enter the results of the spinal test. The findings window opens.
Note: If findings already exist for the screening record, a note icon is displayed on the button.
● Click +Add to add a finding.
□ In the Finding field, click to select a spinal view/type. □ Click OK to save the information, or click Cancel to close the window without saving the
information.
● To delete a finding, click . The row is shaded red to indicate that it will be deleted when therecord is saved.
□ You can select multiple rows to be deleted at the same time.□ Click OK. The selected rows will be deleted when the record is saved.
11. Click Comments to add comments for the record. The comments dialog box opens, and anyexisting comments are displayed.
Type comments, and then click OK. Otherwise, click Cancel.
● If comments exist for the screening record, a paperclip icon is displayed on the button.
● The comments will print on the Medical Profile report (SHS0810).
3.0.0000
Printed Help - TxEIS Health
9
12. Click Save.
13. If the Documents button is provided, click Documents to view or attach supporting documentation.If any documents are currently attached, the button has a note icon.
14. To clear the data and add a new spinal screening record, click +Add.
15. To edit an existing record, click the record. The data is displayed in the fields in the lower free-formarea allowing you to make changes. Click Save.
16. To delete a spinal screening record, click the record, and then click Delete. A message is displayedasking if you want to delete the record.
Click OK to delete the record. The record is deleted. Otherwise, click No.
17. Click Print Comments to print the comments and screening information. The Comments - Spinalreport opens in a new window. Review, save, or print the report.
Screening - Acanthosis
Health > Maintenance > Student Health > Screening > Acanthosis
The Screening tab allows you to add or update information about a student's acanthosis screenings. The tab is not enabled until you retrieve a student.
Acanthosis nigricans is a condition that may serve as an indicator for risk of type 2 diabetes. Acanthosis screenings can help identify students who have high insulin levels and who may be at risk of developing the disease. It can easily be evaluated by means of a visual examination.
Notes:
■ If you used the Mass Screening - Acanthosis page to update a student with a positive AN Marker, theHeight, Weight, Blood Pressure (1st), and Blood Pressure (2nd) fields are required on this page.
■ If you are viewing data for a prior school year, and you have been granted historical read-only accessin Security Administration, the data is read-only.
Add an acanthosis screening record:
1. Select a student.
● The student’s existing acanthosis screening records are displayed.
● The list can be re-sorted.
2. The Medical Alert button is displayed if a medical warning exists for the student on the Emergencytab. Click Medical Alert to view the student's medical alert information.
3. Click +Add. The fields in the free-form area below the grid are enabled.
4. In the Screening Date field, type the date on which the acanthosis screening was performed. Use
the MMDDYYYY format. Or, click to select the date from the calendar. The field is required.
5. Under Screening Information, enter data in the following fields:
● In the Height field, type the student's height in inches in the ##.## format.
● In the Weight field, type the student's weight in pounds in the ###.# format.
● In the AN Marker field, click to select whether the student is positive or negative for acanthosis nigricans.
Notes:
□ To record a religious exemption, the field must be set to 0.
3.0.0000
Health
10
□ If the field is set to 1 - (Positive), the Height, Weight, Blood Pressure (1st), and Blood Pressure (2nd) fields are required.
● The Body Mass Index field will be calculated upon saving the page. It is determined by the height and weight entered.
● In the Referral Date field, type the date on which the student was referred to a specialist. Use
the MMDDYYYY format. Or, click to select the date from the calendar.
This field is also updated when you generate an acanthosis referral letter from the Letters > Run Letter > Print Letters tab and click Update Referrals.
● In the Exam Date field, type the date on which the specialist performed an examination of the
student. Use the MMDDYYYY format. Or, click to select the date from the calendar.
Note: The field is required if the Exam Status field is set to Examined.
● In the Exam Status field, click to select the status of the examination.
□ If the field is set to Examined, the Exam Date field is required. □ If the student has not been seen by a physician, the field should be set to Not Examined. □ If the student has left the district, the field should be set to Transferred. □ To record a religious exemption, the field must be set to Exempt.
● Select Seen by Physician if the student was seen by a health care provider to whom he was referred.
● Select Received Treatment if the student received treatment.
6. Under Blood Pressure (1st), in the Systolic and Diastolic fields, type the systolic and diastolic readings for the first blood pressure check. The fields must be three digits.
7. Under Blood Pressure (2nd), in the Systolic and Diastolic fields, type the systolic and diastolic readings for the second blood pressure check.
8. Under Exemption Information, enter data in the following fields:
● In the Type field, click to select the type of exemption.
Note: To record a religious exemption, the field must be set to Religious.
● In the Date field, type a valid affidavit date in the MMDDYYYY format. Or, click to select the date from the calendar.
9. Under Screener, type the screener's first name, middle initial, and last name.
● The first name can be up to nine characters.
● The middle initial is one character.
● The last name can be up to 14 characters.
10. Click Comments to add comments for the record. The comments dialog box opens, and any existing comments are displayed.
Type comments, and then click OK. Otherwise, click Cancel.
● If comments exist for the screening record, a paperclip icon is displayed on the button.
● The comments will print on the Medical Profile report (SHS0810).
11. Click Save.
12. If the Documents button is provided, click Documents to view or attach supporting documentation. If any documents are currently attached, the button has a note icon.
13. To clear the data and add a new acanthosis screening record, click +Add.
3.0.0000
Printed Help - TxEIS Health
11
14. To edit an existing record, click the record. The data is displayed in the fields in the lower free-form area allowing you to make changes. Click Save.
15. To delete an acanthosis screening record, click the record, and then click Delete. A message is displayed asking if you want to delete the record.
Click OK to delete the record. The record is deleted. Otherwise, click No.
16. Click Print Comments to print the comments and screening information. The Comments - Acanthosis report opens in a new window. Review, save, or print the report.
Screening - TB
Health > Maintenance > Student Health > Screening > TB
The Screening tab allows you to add or update information about a student's tuberculosis (TB) skin tests. The tab is not enabled until you retrieve a student.
Note: If you are viewing data for a prior school year, and you have been granted historical read-only access in Security Administration, the data is read-only.
Add a TB screening record:
1. Select a student.
● The student’s existing TB screening records are displayed.
● The list can be re-sorted.
2. The Medical Alert button is displayed if a medical warning exists for the student on the Emergency tab. Click Medical Alert to view the student's medical alert information.
3. Click +Add. The fields in the free-form area below the grid are enabled.
4. In the Screening Date field, type the date on which the TB skin test was administered. Use the
MMDDYYYY format. Or, click to select the date from the calendar. The field is required.
5. Under Test Information, enter data in the following fields:
● In the Administration field, click to select the action taken regarding the test.
Note: To record a religious exemption, the field must be set to Other Record Received.
● In the Type field, click to select the type of skin test administered.
● In the Results field, click to select the result of the test.
Note: To record a religious exemption, the field must be set to Exempt.
6. Under Follow-up Information, enter data in the following fields:
● In the Date field, if the test result was doubtful or positive, type the date for the next test in the
MMDDYYYY format. Or, click to select the date from the calendar.
Leave blank if the test was negative.
● In the Action field, click to select the follow-up action taken.
7. Under Screener, type the screener's first name, middle initial, and last name.
● The first name can be up to nine characters.
● The middle initial is one character.
● The last name can be up to 14 characters.
8. Under Exemption Information, enter data in the following fields:
3.0.0000
Health
12
● In the Type field, click to select the type of exemption.
Note: To record a religious exemption, the field must be set to Religious.
● In the Date field, type a valid affidavit date in the MMDDYYYY format. Or, click to select the date from the calendar.
9. Click Comments to add comments for the record. The comments dialog box opens, and any existing comments are displayed.
Type comments, and then click OK. Otherwise, click Cancel.
● If comments exist for the screening record, a paperclip icon is displayed on the button.
● The comments will print on the Medical Profile report (SHS0810).
10. Click Save.
11. If the Documents button is provided, click Documents to view or attach supporting documentation. If any documents are currently attached, the button has a note icon.
12. To clear the data and add a new TB test record, click +Add.
13. To edit an existing record, click the record. The data is displayed in the fields in the lower free-form area allowing you to make changes. Click Save.
14. To delete a TB test record, click the record, and then click Delete. A message is displayed asking if you want to delete the record.
Click OK to delete the record. The record is deleted. Otherwise, click No.
15. Click Print Comments to print the comments and screening information. The Comments - TB Skin Test report opens in a new window. Review, save, or print the report.
Screening - Physical Exam
Health > Maintenance > Student Health > Screening > Physical Exam
The Screening tab allows you to view and update information about a student's physical exams. The tab is not enabled until you retrieve a student.
Note: If you are viewing data for a prior school year, and you have been granted historical read-only access in Security Administration, the data is read-only.
Add physical exam data:
1. Select a student.
● The student's existing physical exam records are displayed.
● The list can be re-sorted.
2. The Medical Alert button is displayed if a medical warning exists for the student on the Emergency tab. Click Medical Alert to view the student's medical alert information.
3. Click +Add. The fields in the free-form area below the grid are enabled.
4. In the Exam Date field, type the date of the exam in the MMDDYYYY format. Or, click to select the date from the calendar. The field is required.
5. Under Exam Information, enter data in the following fields:
● In the Height field, type the student's height in inches in the ##.## format.
● In the Weight field, type the student's weight in pounds in the ###.# format.
3.0.0000
Printed Help - TxEIS Health
13
● In the Follow-up field, click to select whether a follow-up visit is required. The field is required.
● In the Lice field, click to select the result of the lice check.
● In the Dental Caries field, click to select the result of the dental check.
6. Under Blood Pressure, in the Systolic and Diastolic fields, type the systolic and diastolic readings for the blood pressure check.
7. Click Save.
8. If the Documents button is provided, click Documents to view or attach supporting documentation. If any documents are currently attached, the button has a note icon.
9. To clear the data and add a new exam record, click +Add.
10. To edit an existing exam record, click the record. The data is displayed in the fields in the lower free-form area allowing you to make changes. Click Save.
11. To delete an exam record, click the record, and then click Delete. A message is displayed asking if you want to delete the record.
Click OK to delete the record. The record is deleted. Otherwise, click No.
Screening - Consolidated
Health > Maintenance > Student Health > Screening > Consolidated
The Screening tab allows you to add or update information about a student's vision, hearing, spinal, acanthosis, and physical exam screenings on a consolidated page. The tab is not enabled until you retrieve a student.
Note: If you are viewing data for a prior school year, and you have been granted historical read-only access in Security Administration, the data is read-only.
Add a screening record:
1. Select a student. The student’s most recent screening records are displayed.
2. The Medical Alert button is displayed if a medical warning exists for the student on the Emergency tab. Click Medical Alert to view the student's medical alert information.
3. For each type of screening, click New to add a new record if an existing record is displayed. You do not need to click New if this is the student's first screening record.
4. For each type of screening, click Comment to add a comment to the record you are creating. If a comment already exists for the screening record, a page icon is displayed on the button.
5. For each type of screening, click Print Comment to print the information for the record that is displayed, including the comments. If there is no screening record, the button cannot be clicked.
6. Create new student screening records as needed. If you need to change a record, go to that screening tab.
● The fields and buttons under Vision are described on the Screening - Vision tab.
● The fields and buttons under Hearing are described on the Screening - Hearing tab.
● The fields and buttons under Spinal are described on the Screening - Spinal tab.
□ Click Findings to enter the results of the spinal test. The findings dialog box is displayed.
Note: If findings already exist for the screening record, the button is outlined in red to indicate that findings exist.
3.0.0000
Health
14
□ Click +Add to add a finding.
o In the Finding field, click to select a spinal view/type.
o Click OK to save the information, or click Cancel to close the dialog box without
saving the information.
□ To delete a finding, click . The row is shaded red to indicate that it will be deleted when the record is saved.
o You can select multiple rows to be deleted at the same time.
o Click OK. The selected rows will be deleted when the record is saved.
● The fields and buttons under Acanthosis are described on the Screening - Acanthosis tab.
● The fields under Physical Exam are described on the Screening - Physical Exam tab.
7. Click Save.
8. If the Documents button is provided, click Documents to view or attach supporting documentation. If any documents are currently attached, the button has a note icon.
Emergency
Health > Maintenance > Student Health > Emergency
The Emergency tab allows you to view and update a student's emergency information, such as emergency medical contacts (e.g., doctor and dentist) and medical alerts. You can also quickly print an emergency profile report for the student in the event of a medical emergency. The tab is not enabled until you retrieve a student.
Only medical contacts can be updated on this page. Nonmedical contacts cannot be updated on this page; they are maintained in Registration.
Note: If you are viewing data for a prior school year, and you have been granted historical read-only access in Security Administration, the data is read-only.
Add emergency data:
1. Select a student. The student's emergency information is displayed.
2. The Medical Alert button is displayed if a medical warning exists for the student. Click Medical Alert to view the student's medical alert information, which is maintained on this tab.
3. In the Insurance Type field, click to select the student's type of insurance coverage.
4. In the Release on File field, click to indicate if a signed parental release is on file that allows emergency care to be provided to the student.
5. In the Provisional Enrollment field, click to indicate if the student is provisionally enrolled (pending receipt of immunization records).
6. In the Hearing Aid field, click to indicate in which ear the student wears a hearing aid. Select No if the student does not wear a hearing aid.
7. In the Medical Alert 1 and 2 fields, type up to two medical warnings for the student. These fields can be up to 80 characters.
● For each medical warning entered, do the following:
□ Click Actn/Intervention to add optional instructions about what to do if the student is exhibiting symptoms of a medical situation. These may be necessary actions or interventions an employee may need to take on the student's behalf. The Medical Alert # Action Intervention dialog box is displayed. These fields can be up to 3270 characters.
3.0.0000
Printed Help - TxEIS Health
15
Note: If action/intervention comments already exist for the medical alert, the button has a red and white cross icon to indicate that comments exist. Type or update comments, and then click OK.
□ Click Cancel not to add comments. □ Select Consent to Display Alert if the data in the Medical Alert field (s) and
Actn/Intervention comments should be displayed outside of the Health application where other school personnel (e.g., instructors, counselors, and administrators) can view the information. If this field is not selected, the information will only be available to healthcare professionals from within the TxEIS Health application.
□ If Consent to Display Alert is selected for a Medical Alert field that contains text, the Medical Alert! button is displayed throughout the Student system (Attendance, Discipline, Grade Reporting, Registration, Scheduling, and Special Education) and in txGradebook.
□ If a medical alert does not exist or is deleted, the Consent to Display Alert cannot be selected.
□ To delete a medical alert, highlight to select the data in the Medical Alert and Action/Intervention field(s) and press DELETE.
□ Click Save to save the changes.
Note: If you delete all of the comments in the Medical Alert field(s), you must delete the corresponding Actn/Intervention comments.
8. Click Comments to add comments for the record. The comments dialog box opens, and any existing comments are displayed. These notes may pertain to severity or other specific information about the condition. This information is only viewable by healthcare professionals and will not be displayed outside of the Health application. The field can be up to 3270 characters.
● Type, update, or delete comments, and then click OK. Otherwise, click Cancel.
● Click Save.
If comments exist, a paperclip icon is displayed on the button.
9. Click Print Emergency Profile to generate a report of all emergency contact for the student. This may be useful in the event of a medical emergency, as it provides all of the student's contact information, parent contacts, emergency contacts, and medical alerts on one page.
The Emergency Profile Report opens in a new window. Review, save, or print the report.
10. In the emergency contact grid, the student's emergency contacts are listed. The student's parents/guardians and other nonmedical contacts are listed first, and medical contacts (e.g., doctor and dentist) are listed next.
11. Click +Add to add a medical emergency contact. A dialog box is displayed.
Note: Only medical contacts can be added on this page. Nonmedical contacts cannot be added on this page; they are maintained in Registration.
● Under Contact Information, enter data in the following fields:
□ In the Contact Type field, click to select the type of contact. □ In the Employer/Title field, type the contact's employer and title. The field can be up to 25
characters. □ In the First Name, Middle Name, and Last Name fields, type the contact's full name.
o The first name can be up to 17 characters.
o The middle name can be up to 14 characters.
o The last name can be up to 25 characters.
Note: These fields are disabled if the Contact Type field is set to Hospital.
● Under Address, type the contact's complete address.
3.0.0000
Health
16
□ In the Street Number field, type the contact's street number. The field can be up to six digits.
□ In the Street Name field, type the contact's street name. The field can be up to 17 characters.
□ In the Apartment Number field, type the contact's apartment number. The field can be up to seven characters.
□ In the City field, type the city in which the contact lives. The field can be up to 17 characters.
□ In the State field, type the abbreviation for the state in which the contact lives. The field is two characters.
□ In the ZIP Code field, type the contact's zip code. The field is five digits. □ In the +4 ZIP field, type the extension for the zip code. The field is four digits.
● Under Phone, type the contact's applicable phone numbers.
□ In the Phone Preference field, type or click to select the contact's preferred phone number. The field is optional; however, if you select a phone preference, you must enter the corresponding phone number. For example, if you select Cell, you must type a phone number in the Cell Phone Number field.
□ In the Home Phone Number fields, type the area code and phone number for the contact's home phone number in the ###-###-#### format.
□ In the Business Phone Number fields, type the area code and phone number for the contact's business phone number. If applicable, in the corresponding Ext field, type the extension for the contact's business phone number. The Ext field can be up to five digits.
□ In the Cell Phone Number field, type the area code and phone number for contact's cell phone number in the ###-###-#### format.
□ In the Other Phone Number fields, type the area code and phone number for the contact's other phone number. If applicable, in the corresponding Ext field, type the extension for the contact's business phone number. The Ext field can be up to five digits.
□ Click OK. The new contact is displayed in the grid.
12. Click Save.
13. If the Documents button is provided, click Documents to view or attach supporting documentation. If any documents are currently attached, the button has a note icon.
14. To view information for a contact, click . A dialog box opens displaying the contact information. Click OK to close the dialog box.
15. To delete a contact, click . The row is shaded red to indicate that it will be deleted when the record is saved.
● You can select multiple rows to be deleted at the same time.
● Click Save. A message is displayed asking you to confirm that you want to delete the row.
Click Yes to continue. The selected rows are deleted. Otherwise, click No.
Note: You can save edits and delete records in the same step (i.e., the changes are all committed when the record is saved).
Medical Condition
Health > Maintenance > Student Health > Medical Condition
The Medical Condition tab allows you to add or update information about a student's medical condition. The tab is not enabled until you retrieve a student.
Note: If you are viewing data for a prior school year, and you have been granted historical read-only access in Security Administration, the data is read-only.
3.0.0000
Printed Help - TxEIS Health
17
Add a medical condition record:
1. Select a student.
● The student’s existing medical condition records are displayed.
● The list can be re-sorted.
2. The Medical Alert button is displayed if a medical warning exists for the student on the Emergency tab. Click Medical Alert to view the student's medical alert information.
3. Click New. The fields in the free-form area below the grid are enabled.
4. Under Medical Condition Information, enter data in the following fields:
● In the Medical Condition field, click to select the medical condition.
Note: The list of medical conditions is maintained on the Maintenance > Tables > Medical Condition tab.
● In the Start Date field, type the date on which the condition started in the MMDDYYYY format.
Or, click to select the date from the calendar.
● In the End Date field, type the date on which the condition ended in the MMDDYYYY format, if
applicable. Or, click to select the date from the calendar.
● Select Doctor’s Orders if a doctor order is on file. If a doctor order is on file, you must type a date in the Order Date field.
● In the Order Date field, if a doctor order is on file, type the date in the MMDDYYYY format. Or,
click to select the date from the calendar.
5. Click Comments to add comments for the record. The comments dialog box opens, and any existing comments are displayed.
● Type comments, and then click OK. Otherwise, click Cancel not to add comments.
Note: Only the first 1000 characters of the comment will print on the Health reports (SHS0400 and SHS0830).
● If comments exist for the record, a paperclip icon is displayed on the button.
6. Click Save.
7. If the Documents button is provided, click Documents to view or attach supporting documentation. If any documents are currently attached, the button has a note icon.
8. To clear the data and add a new medical condition record, click New.
9. To edit an existing medical condition record, click the record. The data is displayed in the fields in the lower free-form area allowing you to make changes. Click Save.
10. To delete a medical condition record, click the record, and then click Delete. A message is displayed asking if you want to delete the record.
Click OK to delete the record. The record is deleted. Otherwise, click No.
Communicable Disease
Health > Maintenance > Student Health > Communicable Disease
The Communicable Disease tab allows you to add or update information about a student's communicable diseases. The tab is not enabled until you retrieve a student.
Note: If you are viewing data for a prior school year, and you have been granted historical read-only access in Security Administration, the data is read-only.
3.0.0000
Health
18
Add a communicable disease record:
1. Select a student.
● The student’s existing communicable disease records are displayed.
● The list can be re-sorted.
2. The Medical Alert button is displayed if a medical warning exists for the student on the Emergency tab. Click Medical Alert to view the student's medical alert information.
3. Click New. The fields in the free-form area below the grid are enabled.
4. Under Disease Information, enter data in the following fields:
● In the Onset Date field, type the date of the disease onset in the MMDDYYYY format. Or, click
to select the date from the calendar.
● In the Disease field, click to select the communicable disease contracted by the student.
● In the Follow-up Date field, if a follow-up visit is required, type the date of the visit in the
MMDDYYYY format. Or, click to select the date from the calendar.
● Select Parent Notified if the student's parent or guardian was notified.
5. Under Physician's Name, type the physician's first name, middle initial, and last name.
● The first name can be up to 17 characters.
● The middle initial is one character.
● The last name can be up to 25 characters.
6. Under Notified, enter data in the following fields:
● In the How field, click to select the method used to notify the student's parent/guardian and others, if applicable.
● In the Who field, click to indicate who was notified.
7. Under Disease, enter data in the following fields:
● Select Doctor Confirmed if a doctor confirmed the disease.
● Select In School if the student was in school at the onset of the disease.
8. Click Comments to add comments for the record. The comments dialog box opens, and any existing comments are displayed.
Type comments, and then click OK. Otherwise, click Cancel not to add comments.
● If comments exist for the communicable disease record, a paperclip icon is displayed on the button.
● The comments will print on the Communicable Diseases report (SHS0835).
9. Click Save.
10. If the Documents button is provided, click Documents to view or attach supporting documentation. If any documents are currently attached, the button has a note icon.
11. To clear the data and add a new communicable disease record, click New.
12. To edit an existing record, click the record. The data is displayed in the fields in the lower free-form area allowing you to make changes. Click Save.
13. To delete a communicable disease record, click the record, and then click Delete. A message is displayed asking if you want to delete the record.
Click OK to delete the record. The record is deleted. Otherwise, click No.
3.0.0000
Printed Help - TxEIS Health
19
Accident
Health > Maintenance > Student Health > Accident
The Accident tab allows you to add or update accident records. The tab is not enabled until you retrieve a student.
Note: If you are viewing data for a prior school year, and you have been granted historical read-only access in Security Administration, the data is read-only.
About document attachments
Add an accident record:
1. Select a student.
● The student’s existing accident records are displayed.
● The list can be re-sorted.
2. The Medical Alert button is displayed if a medical warning exists for the student on the Emergency tab. Click Medical Alert to view the student's medical alert information.
3. Click New. The fields in the free-form area below the grid are enabled.
4. Under Accident, enter data in the following fields:
● In the Accident Date field, type the date of the accident in the MMDDYYYY format. Or, click to select the date from the calendar. The field is required.
● In the Time field, type the time of the accident in the HH:MM format, where HH is the hour, and MM is the minute. Select AM or PM. The field is required.
● In the Nature of Accident field, click to select the nature of the accident.
● In the Body Part Injured field, click to select the part of the body injured in the accident.
● In the Location field, click to select the place where the accident occurred.
● In the Attending Name field, type the name of the person who attended to the student first. The field can be up to 30 characters.
● In the Physician Name field, type the name of the physician who examined the student. The field can be up to 27 characters.
5. Under Results, enter data in the following fields:
● In the Insurance field, click to indicate the student's type of insurance coverage.
● Select Parent Notified if the parent was notified.
● Select Hospitalized if the student was hospitalized.
● Select Fatality if there was a fatality.
● In the School Days Lost field, type the number of days lost from school, if any. The field can be up to two whole numbers and one decimal place (e.g., 10.5).
6. Click Comments to add comments for the record. The comments dialog box opens, and any existing comments are displayed.
Type comments, and then click OK. Otherwise, click Cancel.
● If comments exist for the accident record, a paperclip icon is displayed on the button.
● The first 1000 characters of the comments will print on the Accident Report (SHS0820).
7. Click Save.
3.0.0000
Health
20
8. If the Documents button is provided, click Documents to view or attach supporting documentation. If any documents are currently attached, the button has a note icon.
9. To clear the data and add a new accident record, click New.
10. To edit an existing record, click the record. The data is displayed in the fields in the lower free-form area allowing you to make changes. Click Save.
11. To delete an accident record, click the record, and then click Delete. A message is displayed asking if you want to delete the record.
Click OK to delete the record. The record is deleted. Otherwise, click No.
Contacts
Health > Maintenance > Student Health > Contacts
The Contacts tab displays a student's primary and emergency contact information. These are people who may need to be contacted in the event of an emergency. The tab is not enabled until you retrieve a student.
The fields cannot be updated on this page.
View contact information:
1. Select a student.
● The student's contact information is displayed.
● The data for nonmedical contacts is maintained in the Registration application on the Contact tab.
● The data for medical contacts is maintained in the Health application on the Emergency tab.
2. The Medical Alert button is displayed if a medical warning exists for the student on the Emergency tab. Click Medical Alert to view the student's medical alert information.
3. If the Documents button is provided, click Documents to view or attach supporting documentation. If any documents are currently attached, the button has a note icon.
Mass Screening
Mass Screening - Vision
Health > Maintenance > Mass Screening > Vision
The Vision page allows you to add vision screening data for a group of students. All students in the group must be screened on the same date. Either the grade level or instructor must be the same for all students in the group.
Add vision screening records:
1. In the Screening Date field, type the date on which the vision test was administered. Use the
MMDDYYYY format. Or, click to select the date from the calendar. The field is required.
2. Select the group of students by entering criteria in one or more of the following fields:
● In the Grade field, click to select the grade level. If you do not select a grade level, you must select an instructor in the Instructor field.
● In the Instructor field, click to select the instructor. If you do not select an instructor, you must select a grade level in the Grade field.
3.0.0000
Printed Help - TxEIS Health
21
● In the Course field, click to select the course section. Courses are listed by period. If you select a period for which there are multiple course sections, all students in all sections are selected.
● Select Show Already Screened to display students who meet the selected criteria and already have vision screening data added for the screening date. The field is not selected by default, and screened students are not displayed.
3. Click Retrieve.
● The students who meet the selected criteria are displayed. The student ID, name, and grade level are listed.
● If more students are retrieved than can be displayed on one page, you can page through the list.
4. Under Default Values, specify the default values for the screening.
● Click Select Page to select all students displayed on the page.
□ If you select all students, the values for the Exam Type, Pass/Fail/Rescreen, Glasses, Both, Right, and Left fields are applied to all selected students.
□ Do not select all students unless they all have the same exam type, pass/fail/rescreen, glasses, and eye results settings.
● In the Exam Type field, click to select the type of vision test administered. The field is required.
● In the Pass/Fail/Rescreen field, click to select the overall result of the vision test. The field is required.
● Select Glasses if all students in the group were wearing glasses when tested.
● In the Both, Right, and Left fields, type the test results for both eyes, the right eye, and the left eye. The number should be three digits.
5. Under Screener, type the screener's first name, middle initial, and last name.
● The first name can be up to nine characters.
● The middle initial is one character.
● The last name can be up to 14 characters.
6. Select Select for the students who meet the criteria specified under Default Values.
● The first name can be up to nine characters.
● The middle initial is one character.
● The last name can be up to 14 characters.
● As you select students, the specified default values are displayed for the student in the grid.
● Do not select students who do not meet the specified criteria.
● To unselect a student, click Select again. The default values are cleared.
● If there are multiple pages of students, you cannot save multiple changes at one time. You must save the page before going to the next page.
7. Click Save to save the information for the students displayed on the page.
● The selected students remain displayed on the page, but they appear dimmed and cannot be selected.
● You can select different default values for the remaining students.
3.0.0000
Health
22
8. To redisplay screened students (i.e., students for whom data was previously entered and saved), select Show Already Screened, and then click Retrieve. The students are displayed, but the data cannot be updated.
Note: To modify data for individual students who were already screened, you must update the student's record on the Maintenance > Student Health > Screening - Vision tab.
Mass Screening - Hearing
Health > Maintenance > Mass Screening > Hearing
The Hearing page allows you to add hearing screening data for a group of students. All students in the group must be screened on the same date. Either the grade level or instructor must be the same for all students in the group.
Add hearing screening records:
1. In the Screening Date field, type the date on which the hearing test was administered. Use the
MMDDYYYY format. Or, click to select the date from the calendar. The field is required.
2. Select the group of students by entering criteria in one or more of the following fields:
● In the Grade field, click to select the grade level. If you do not select a grade level, you must select an instructor in the Instructor field.
● In the Instructor field, click to select the instructor. If you do not select an instructor, you must select a grade level in the Grade field.
● In the Course field, click to select the course section. Courses are listed by period. If you select a period for which there are multiple course sections, all students in all sections are selected.
● Select Show Already Screened to display students who meet the selected criteria and already have hearing screening data added for the screening date. The field is not selected by default, and screened students are not displayed.
3. Click Retrieve.
● The students who meet the selected criteria are displayed. The student ID, name, and grade level are listed.
● If more students are retrieved than can be displayed on one page, you can page through the list.
4. Under Default Values, specify the default values for the screening.
● Click Select Page to select all students displayed on the page.
□ If you select all students, the values in the Pass/Fail/Rescreen and Sweepcheck/Threshold fields are applied to all selected students.
□ Do not select all students unless they all have the same pass/fail/rescreen and sweepcheck/threshold settings.
● In the Pass/Fail/Rescreen field, click to select the overall result of the hearing test.
● Under Sweepcheck/Threshold, for each frequency (1000, 2000, and 4000) for the right and left ears, enter data in the following fields:
Note: Either the sweepcheck, threshold, or both tests may be performed.
● In the first field for each frequency for each ear, click to select the results for the sweepcheck.
□ Select Y if the students responded to the tone frequency. □ Select N if the students did not respond to the tone frequency. □ Select I if the results are inconclusive.
3.0.0000
Printed Help - TxEIS Health
23
● In the second field for each frequency for each ear, type the lowest decibel level at which the students responded. The field is two digits.
5. Under Screener, type the screener's first name, middle initial, and last name.
● The first name can be up to nine characters.
● The middle initial is one character.
● The last name can be up to 14 characters
6. Select Select for the students who meet the criteria specified under Default Values.
● The first name can be up to nine characters.
● The middle initial is one character.
● The last name can be up to 14 characters
● As you select students, the specified default values are displayed for the student in the grid.
● Do not select students who do not meet the specified criteria.
● To unselect a student, click Select again. The default values are cleared.
● If there are multiple pages of students, you cannot save multiple changes at one time. You must save the page before going to the next page.
7. Click Save to save the information for the students displayed on the page.
● The selected students remain displayed on the page, but they appear dimmed and cannot be selected.
● You can select different default values for the remaining students.
8. To redisplay screened students (i.e., students for whom data was previously entered and saved), select Show Already Screened, and then click Retrieve. The students are displayed, but the data cannot be updated.
Note: To modify data for individual students who were already screened, you must update the student's record on the Maintenance > Student Health > Screening - Hearing tab.
Mass Screening - Spinal
Health > Maintenance > Mass Screening > Spinal
The Spinal page allows you to add spinal screening data for a group of students. All students in the group must be screened on the same date. Either the grade level or instructor must be the same for all students in the group.
Add spinal screening records:
1. In the Screening Date field, type the date on which the spinal screening was administered. Use the
MMDDYYYY format. Or, click to select the date from the calendar. The field is required.
2. Select the group of students by entering criteria in one or more of the following fields:
● In the Grade field, click to select the grade level. If you do not select a grade level, you must select an instructor in the Instructor field.
● In the Instructor field, click to select the instructor. If you do not select an instructor, you must select a grade level in the Grade field.
● In the Course field, click to select the course section. Courses are listed by period. If you select a period for which there are multiple course sections, all students in all sections are selected.
3.0.0000
Health
24
● Select Show Already Screened to display students who meet the selected criteria and already have spinal screening data added for the screening date. The field is not selected by default, and screened students are not displayed.
3. Click Retrieve.
● The students who meet the selected criteria are displayed. The student ID, name, and grade level are listed.
● If more students are retrieved than can be displayed on one page, you can page through the list.
4. Under Default Values, specify the default values for the screening.
● Click Select Page to select all students displayed on the page.
● If you select all students, the values in the Signs/Symptoms, Degrees, Prior Treatment, and Rescreen fields are applied to all selected students.
● Do not select all students unless they all have the same signs/symptoms, degrees, prior treatment, and rescreen settings.
● In the Signs/Symptoms field, click to indicate signs and symptoms observed. The field is required.
● In the Degrees field, type the degree of curvature found. The field is required and two digits.
● Select Prior Treatment if the all students in the group received prior treatment.
● Select Rescreen if this test is a rescreen.
5. Under Screener, type the screener's first name, middle initial, and last name.
● The first name can be up to nine characters.
● The middle initial is one character.
● The last name can be up to 14 characters
6. Select Select for the students who meet the criteria specified under Default Values.
● As you select students, the specified default values are displayed for the student in the grid.
● Do not select students who do not meet the specified criteria.
● To unselect a student, click Select again. The default values are cleared.
● If there are multiple pages of students, you cannot save multiple changes at one time. You must save the page before going to the next page.
7. Click Save to save the information for the students displayed on the page.
● The selected students remain displayed on the page, but they appear dimmed and cannot be selected.
● You can select different default values for the remaining students.
8. To redisplay screened students (i.e., students for whom data was previously entered and saved), select Show Already Screened, and then click Retrieve. The students are displayed, but the data cannot be updated.
Note: To modify data for individual students who were already screened, you must update the student's record on the Maintenance > Student Health > Screening - Spinal tab.
Mass Screening - Acanthosis
Health > Maintenance > Mass Screening > Acanthosis
3.0.0000
Printed Help - TxEIS Health
25
The Acanthosis page allows you to add acanthosis screening data for a group of students. All students in the group must be screened on the same date. Either the grade level or instructor must be the same for all students in the group.
Add acanthosis screening records:
1. In the Screening Date field, type the date on which the acanthosis screening was administered. Use
the MMDDYYYY format. Or, click to select the date from the calendar. The field is required.
2. Select the group of students by entering criteria in one or more of the following fields:
● In the Grade field, click to select the grade level. If you do not select a grade level, you must select an instructor in the Instructor field.
● In the Instructor field, click to select the instructor. If you do not select an instructor, you must select a grade level in the Grade field.
● In the Course field, click to select the course section. Courses are listed by period. If you select a period for which there are multiple course sections, all students in all sections are selected.
● Select Show Already Screened to display students who meet the selected criteria and already have acanthosis screening data added for the screening date. The field is not selected by default, and screened students are not displayed.
3. Click Retrieve.
● The students who meet the selected criteria are displayed. The student ID, name, and grade level are listed.
● If more students are retrieved than can be displayed on one page, you can page through the list.
● By default, the AN Marker field for all students is set to 0-Negative (no acanthosis).
4. Under Default Values, specify the default values for the screening.
Click Select Page to select all students displayed on the page. □ If you select all students, the value in the AN Marker field is applied to all selected
students. □ Do not select all students unless they all have the same degree of acanthosis.
● In the An Marker field, click to select whether the students are positive or negative for acanthosis nigricans.
Note: If the AN Marker field is positive, the Height, Weight, Blood Pressure (1st), and Blood Pressure (2nd) fields are required on the Maintenance >Student Health > Screening - Acanthosis page.
5. Under Screener, type the screener's first name, middle initial, and last name.
● The first name can be up to nine characters.
● The middle initial is one character.
● The last name can be up to 14 characters
6. Select Select for the students who meet the criteria specified under Default Values.
● As you select students, the specified default values are displayed for the student in the grid.
● Do not select students who do not meet the specified criteria.
● To unselect a student, click Select again. The default values are cleared.
● If there are multiple pages of students, you cannot save multiple changes at one time. You must save the page before going to the next page.
7. Click Save.
3.0.0000
Health
26
● The selected students remain displayed on the page, but they appear dimmed and cannot be selected.
● You can select different default values for the remaining students.
8. To redisplay screened students (i.e., students for whom data was previously entered and saved), select Show Already Screened, and then click Retrieve. The students are displayed, but the data cannot be updated.
Note: To modify data for individual students who were already screened, you must update the student's record on the Maintenance > Student Health > Screening - Acanthosis tab.
Mass Screening - TB
Health > Maintenance > Mass Screening > TB
The tuberculosis (TB) page allows you to add TB screening data for a group of students. All students in the group must be screened on the same date. Either the grade level or instructor must be the same for all students in the group.
Add TB screening records:
1. In the Screening Date field, type the date on which the TB test was administered. Use the
MMDDYYYY format. Or, click to select the date from the calendar. The field is required.
2. Select the group of students by entering criteria in one or more of the following fields:
● In the Grade field, click to select the grade level. If you do not select a grade level, you must select an instructor in the Instructor field.
● In the Instructor field, click to select the instructor. If you do not select an instructor, you must select a grade level in the Grade field.
● In the Course field, click to select the course section. Courses are listed by period. If you select a period for which there are multiple course sections, all students in all sections are selected.
● Select Show Already Screened to display students who meet the selected criteria and already have TB screening data added for the screening date. The field is not selected by default, and screened students are not displayed.
3. Click Retrieve.
● The students who meet the selected criteria are displayed. The student ID, name, and grade level are listed.
● If more students are retrieved than can be displayed on one page, you can page through the list.
4. Under Default Values, specify the default values for the screening.
● Click Select Page to select all students displayed on the page.
● If you select all students, the values in the Administration, Type, and Results fields are applied to all selected students.
● Do not select all students unless they all have the same administration, type, and results settings.
● In the Administration field, click to select the action taken regarding the test. The field is required.
● In the Type field, click to select the type of skin test administered. The field is required.
● In the Results field, click to select the result of the test. The field is required.
3.0.0000
Printed Help - TxEIS Health
27
5. Under Screener, type the screener's first name, middle initial, and last name.
● The first name can be up to nine characters.
● The middle initial is one character.
● The last name can be up to 14 characters
6. Select Select for the students who meet the criteria specified under Default Values.
● The first name can be up to nine characters.
● The middle initial is one character.
● The last name can be up to 14 characters
● As you select students, the specified default values are displayed for the student in the grid.
● Do not select students who do not meet the specified criteria.
● To unselect a student, click Select again. The default values are cleared.
● If there are multiple pages of students, you cannot save multiple changes at one time. You must save the page before going to the next page.
7. Click Save to save the information for the students displayed on the page.
● The selected students remain displayed on the page, but they appear dimmed and cannot be selected.
● You can select different default values for the remaining students.
8. To redisplay screened students (i.e., students for whom data was previously entered and saved), select Show Already Screened, and then click Retrieve. The students are displayed, but the data cannot be updated.
Note: To modify data for individual students who were already screened, you must update the student's record on the Maintenance > Student Health > Screening - TB tab.
Nurse's Daily Log
Inquiry
Health > Maintenance > Nurse's Daily Log > Inquiry
The Inquiry page allows you to view nurse's daily log records for a date range or student. You can view records for all campuses to which you have access. From the page you can edit an existing record or add a new record.
Inquire about a student:
1. In the From Date and To Date fields, type the beginning and ending dates of the date range in the
MMDDYYYY format. Or, click to select the dates from the calendar.
● The dates are required.
● The From Date field displays the first day of the school year by default.
● The To Date field displays the current date by default.
2. In the Student autosuggest field, begin typing the student's first name, last name, or ID.
As you begin typing the name or ID, a drop-down list displays students whose name or ID matches the characters you have typed. The drop-down list also displays student last names, first names, middle names, grade levels, and WD if the student is withdrawn or a no show. From the drop-down list you can select the student.
3.0.0000
Health
28
3. Select Show all campuses to show records for all campuses to which you have access.
Note: Records from campuses to which you are not logged on are displayed; however, you cannot edit or view the data on the Maintenance > Nurse's Daily Log > Details page.
4. Click Retrieve. All records that match the criteria are displayed.
● The list can be re-sorted.
● If more courses are retrieved than can be displayed on one page, you can page through the list.
Note: The Medical Alert message is displayed in the Medical Alert column if the student has a medical warning entered on the Maintenance > Student Health > Emergency tab. Click Medical Alert to view the student's medical alert information.
5. To edit an existing record, click the record. The Detail page is displayed allowing you to edit the record.
Click Inquiry to return to the Inquiry page. If you updated the record on the Details page, the record on the Inquiry page reflects the changes.
6. To add a new record, click New. The Detail page is displayed.
Click Inquiry to return to the Inquiry page. The new record is displayed on the Inquiry page.
New
Health > Maintenance > Nurse's Daily Log > New
The New (Detail) page allows you to add or update a record in the nurse's daily log.
Notes:
● If a prior school year is selected, the fields are disabled.
● If you are viewing data for a campus you are not logged on to, the data is display-only.
Add or update a record in the nurse's daily log:
1. You can access the page in the following ways:
● To add a new record, do one of the following:
□ Go to Health > Maintenance > Nurse's Daily Log > New. □ From Health > Maintenance > Nurse's Daily Log > Inquiry, click New.
The Detail page is displayed with blank fields.
● To update a record, retrieve the record on the Inquiry page, and then click the record.
□ The Detail page is displayed. The fields display data for the existing record.
□ In the Log Date field, type the date of the visit in the MMDDYYYY format. Or, click to select the date from the calendar. The current date is displayed by default.
2. Under Log Information, enter data in the following fields:
● In the Time In field, type the time the visitor came to the clinic. Use the HH:MM format, where HH is the hour, and MM is the minute. Select AM or PM. The current time (i.e., system time) is displayed by default.
● In the Time Out field, type the time the visitor left the clinic. Use the HH:MM format, where HH is the hour, and MM is the minute. Select AM or PM.
● In the Period In field, type the period when the visitor came to the clinic. The field is two digits.
● In the Period Out field, type the period when the visitor left the clinic. The field is two digits.
3.0.0000
Printed Help - TxEIS Health
29
● In the Visitor Type field, click to select the type of visitor.
● In the Activity Code field, click to select the type of visit.
● In the Visit field, click to indicate if the visit is an initial or follow-up visit.
● In the Stu ID# field, if the visitor is a student, type the six-digit student ID number. If you do not know the ID, click Stu ID# to access the directory.
Note: If the visitor is not a student (i.e., the Visitor Type field is not set to 03-Student) , the Stu ID# field is disabled.
● The Name fields display the visitor's first name, middle initial, and last name if the visitor is a student. If the visitor is not a student, type the visitor's full name.
● In the Symptom field, type a description of the visitor's symptoms. The field can be up to 70 characters.
● Click Comments to add comments about the record. The comments dialog box opens, and any existing comments are displayed.
□ If comments already exist for the record, a paperclip icon is displayed on the button. □ Type comments, and then click OK. Otherwise, click Cancel not to add comments. □ If you accessed this page from the Inquiry page, and you are viewing data for a campus to
which you are not logged on, the comments are read-only.
3. The Medical Alert button is displayed if a medical warning exists for the student on the Health > Maintenance > Student Health > Emergency tab. Click Medical Alert to view the student's medical alert information.
4. Under Vital Statistics, enter data in the following fields for any readings taken:
● In the Temp field, type the visitor's temperature in Fahrenheit degrees. Use the ###.## format.
● In the Pulse field, type the visitor's pulse in beats per minute. The field can be up to three digits.
● In the Height field, type the visitor's height in inches in the ##.## format.
● In the Weight field, type the visitor's weight in pounds in the ###.# format.
● In the Resp field, type the visitor's rate of respiration in breaths per minute. The field can be up to two digits.
● In the Systolic field, type the visitor's systolic blood pressure reading. The field can be up to three digits.
● In the Diastolic field, type the visitor's diastolic blood pressure reading. The field can be up to three digits.
5. Under Action, select one or more actions taken in response to the visit, if applicable.
If the visit is for a screening, in the Screening field, click to select the type of screening performed.
Note: If more than one screening was performed, add a separate log entry for each screening.
6. Under Diagnosis, enter data in the following fields:
● In the Illness field, click to indicate if the illness is acute or chronic.
● In the Injury field, click to indicate if the visitor suffered an injury.
● In the Communicable Disease field, click to indicate if the visitor has a communicable disease.
7. Under Transportation, enter data in the following fields, if applicable:
3.0.0000

Health
30
● In the Home field, if the visitor was sent home, click to indicate who provided transportation. Leave blank if the visitor did not go home.
● In the Miles field, if a nurse or other employee provided transportation, type the mileage. The field can be up to five digits. Use the decimal point to indicate a partial mile, if applicable.
● In the Doctor/Hospital field, if the visitor was sent to a doctor or hospital, click to indicate who provided transportation. Leave blank if the visitor did not go to a doctor or hospital.
8. Under Contacts, indicate if the employee, parent, doctor, or other contact was notified and how.
9. Click Save.
10. To clear the data and add a new record, click New.
11. To delete the record, click Delete. A message is displayed asking if you want to delete the record.
Click OK to delete the record. The record is deleted. Otherwise, click No.
12. Click Info to view data from the Inquiry page. This allows you to view previous entries without having to leave the current page. The Log Information directory opens.
● The list can be re-sorted.
● If more students are retrieved than can be displayed on one page, you can page through the list.
● Click Close to close the directory.
13. To go to the Inquiry page, click Inquiry.
Tables
Immunization Type
Health > Maintenance > Tables > Immunization Type
The Immunization Type tab allows you to add user-defined immunization type codes. Codes 1-89 are system codes that cannot be changed. Only codes 90-99 can be added or updated.
The data in the table is used to populate the Immunization Type field on the Maintenance > Student Health > Immunization tab.
Notes:
■ User-defined immunization type codes are not used when calculating for state requirements.
■ If you are viewing data for a prior school year, and you have been granted historical read-only access in Security Administration, the data is read-only.
Add an immunization type code:
1. In the immunization type grid, the existing immunization type codes are listed. The system codes (1-89) are listed first, and user-defined codes (90-99) are listed next.
2. Click +Add to add an immunization type code. A dialog box opens.
3. Under Immunization Type, enter data in the following fields:
● In the Code field, type the code for the immunization type. The field is two digits and must be 90-99.
● In the Description field, type the description of the immunization code. The field can be up to 80 characters.
● Click OK. The new immunization type code is displayed in the grid. Otherwise, click Cancel.
3.0.0000
Printed Help - TxEIS Health
31
4. Click Save.
5. To edit an immunization type code description, click . The dialog box opens allowing you to make changes.
● Click OK to accept the changes, or click Cancel.
● Click Save.
6. To delete an immunization type code, click . The row is shaded red to indicate that it will be deleted when the record is saved.
● You can select multiple rows to be deleted at the same time.
● Click Save. A message is displayed asking if you want to delete the record.
Click OK to delete the record. The selected rows are deleted.
Notes:
□ You cannot delete an immunization code that is used in a student record. □ You can save changes and delete records in the same step (i.e., the changes are all
committed when the record is saved). If any changes do not pass validation (i.e., cannot be deleted or have validation errors), none of the changes are saved.
Medical Condition
Health > Maintenance > Tables > Medical Condition
The Medical Condition tab allows you to add user-defined medical condition codes. User-defined codes begin with UD; only user-defined codes can be added or updated. All other codes are system codes that cannot be changed.
The data in the table is used to populate the Medical Condition field on the Maintenance > Student Health > Medical Condition tab.
Note: If you are viewing data for a prior school year, and you have been granted historical read-only access in Security Administration, the data is read-only.
Add a medical condition code:
1. In the medical condition grid, the existing medical condition codes are listed. The system codes are listed first, and user-defined codes are listed next.
2. Click +Add to add a medical condition code. A dialog box opens.
3. Under Medical Condition, enter data in the following fields:
● In the Code field, type the code for the medical condition. The field must be five characters.
Note: User-defined codes must begin with UD followed by three characters (e.g., UDABC).
● In the Description field, type the description of the medical condition code. The field can be up to 80 characters.
● In the level field, click to select the security level for the medical condition. The more confidential the condition, the higher the security level. For example, select Level 3 for a highly confidential condition such as AIDS.
● Click OK. The new medical condition code is displayed at the bottom of the grid. Otherwise, click Cancel.
4. Click Save.
3.0.0000
Health
32
5. To edit a medical condition description, click . The dialog box opens allowing you to make changes.
● Click OK to accept the changes, or click Cancel.
● Click Save.
6. To delete a medical condition code, click . The row is shaded red to indicate that it will be deleted when the record is saved.
● You can select multiple rows to be deleted at the same time.
● Click Save. A message is displayed asking if you want to delete the record.
● Click OK to delete the record. The selected rows are deleted.
Notes:
□ You cannot edit or delete a medical condition code that is used in a student record. □ You can save changes and delete records in the same step (i.e., the changes are all
committed when the record is saved). If any changes do not pass validation (i.e., cannot be deleted or have validation errors), none of the changes are saved.
Letters
Run Letter
Letter Criteria
Health > Letters > Run Letter > Letter Criteria
The Letter Criteria tab allows you to set criteria for printing Health letters for immunizations, referrals, or screenings.
Notes:
■ For Immunization Due letters, if a students is in PK and will still be four years old on September 1 of the next school year, the grade level will not be incremented to KG; therefore, KG rules will not apply to the student (DTP, Polio, MMR, Varicella, and Hep A).
■ Vaccine doses can be administered four or fewer days before the minimum interval or age.
■ Referral letters print for students who failed a screening and have no referral date in their record for the current year.
■ The blank referral date is updated with the current date when you click Update Referrals from the Print Letters tab. An existing referral date is not replaced, because a letter is not generated if the referral date is not blank.
■ Hearing or vision referrals are generated when the Pass/Fail field is set to Fail or Inconclusive.
■ Spinal referrals are generated when the Signs/Symptoms field is set to Kyphosis, Other, or Scoliosis.
■ Acanthosis referrals are generated when the AN Marker field is set to a value other than 0 (negative).
■ Spinal and acanthosis screening letters print for students who do not have a religious exemption.
■ The affidavit date must be prior to the generation date of the screening letters in order for the letters to not print due to the religious exemption.
■ Students must have record status 1, 2, or 3 in order to have a letter generated.
Select criteria:
3.0.0000
Printed Help - TxEIS Health
33
1. Select the letters you want to print:
● Under Immunizations, select the immunization(s) for which to print letters.
To select all immunizations, select the check box next to Immunizations.
● Under Referrals, select the type of referrals for which to print letters.
● Under Screenings, select the type of screening for which to print letters.
2. Under Label Criteria, make the following selections for the labels:
● Select Grade Level to print the student's grade level on the label.
● Select Campus Name to print the campus name and ID on the label.
● Select "To Parent/Guardian of" to print "To the Parent/Guardian of" on the label.
● Select Student ID to print the student ID on the label.
Note: The labels are designed using the Avery 5162 template, which prints 14 labels per page, 1 1/3" x 4" each.
3. Under Run Criteria, make the following selections for the letters:
● In the Letter Template field, click to select the letter type. Only letter types for the selected letter category are displayed in the drop down.
● In the Address To Print field, click to indicate if the student's or contact's address should be printed on the letters.
□ Contact address is from Registration > Maintenance > Student Enrollment > Contact (top priority contact, which is the contact with the lowest priority number (e.g., 1)).
□ Student mailing address is from Registration > Maintenance > Student Enrollment > Demo1.
● In the Letter Sort Order, click to select the order in which you would like the letters to print.
□ Contact Zip Code: contact’s zip code, zip + 4, student's last name, student's first name, student's middle initial, grade level, and student ID
□ Student Zip Code: student's mailing zip code, mailing zip +4, student's last name, student's first name, student's middle initial, grade level, and student ID
□ Student Name: student’s last name, first name, middle initial, grade level, and student ID
● In the As of Date field, type the date in the MMDDYYYY format. Or, click to select the date from the calendar. The date is used to determine what is due.
● In the Campus field, click to select the campus. Leave blank to select all campuses.
● In the Status field, click to select active or withdrawn students. Leave blank to print letters for all students.
● In the Grade field, click to select a grade level. Leave blank to print letters for all grade levels.
● In the Student ID field, type a student ID to print the report for one student. Leave blank to select all students. If you do not know the ID, click Student ID to access the directory.
● Select Use Next Year Grade Level to generate immunization letters using the next school year grade level and immunization criteria.
4. Click Run to process the letters. The Print Letters tab is displayed. To return to the Letter Criteria tab, click Return.
Note: For referral letters, the students' referral dates are updated with the date on which the letter was printed.
3.0.0000
Health
34
Print Letters
Health > Letters > Run Letter > Print Letters
The Print Letters tab allows you to preview and print Health letters. You cannot access the tab until you run letters from the Letter Criteria tab.
Note: The letters print in the following order when the Address To Print field is set to
● Parent: Parent's zip code, student's last name, student's first name, and student's middle name.
● Student: Student's zip code, student's last name, student's first name, and student's middle name.
Print letters:
1. On the Letter Criteria tab, make selections for the letters, and then click Run.
The Print Letters tab is displayed, and the letters open in PDF format in an embedded Adobe Reader window. From the Adobe Reader toolbar, you can print the letters, save them to your PC, and perform other functions allowed by Reader.
2. The Preview Errors button is displayed if there are students with missing or incomplete guardian information. Click Preview Errors to preview the error report.
● Review, save, or print the report.
● Click View Letters to close the error report and return to the letters preview.
3. Click Preview Labels to view the labels.
● Review, save, or print the labels.
● Click View Letters or Close Labels to close the labels and return to the letters preview.
4. Click Preview List to view a list of the letters generated.
● Review, save, or print the list.
● Click View Letters or Close List to close the list and return to the letters preview.
5. If you have run one of the referral letters, the Update Referrals button is displayed. Click Update Referrals to populate the Referral Date field on the screening tab for Vision, Hearing, Spinal, or Acanthosis with the date the referral letter is run. This indicates that the parent/guardian was notified that the student was referred to a specialist, assuming the letter was sent.
6. Click Return to return to the Letter Criteria tab. A message is displayed warning you that returning to the Letter Criteria tab will clear unprinted letters. Click Yes to continue.
Create Letter
Create Letter
Health > Letters > Create Letter
The Create Letter page allows you to create, edit, and delete Health letters.
Copying a letter
Create a letter:
1. A list of existing letters is displayed. The Letter Body field indicates if the body of the letter has been typed in the editor.
2. Click New to create a new letter. The Update Letter page opens, and the text editor is displayed.
3.0.0000
Printed Help - TxEIS Health
35
● The buttons on the toolbar allow you to change the font, size of font, attributes (e.g., bold, italic, underline, strikeout), alignment, spacing, etc. of the text you type.
● Click Cancel to close the Update Letter page without creating a new letter.
3. In the ID field, type the letter ID code. The code must be two characters.
4. In the Type field, click to select the letter type.
5. In the Description field, type a description of the letter. The description can be up to 50 characters.
6. Type or edit the letter using as many variables as necessary.
● To add a variable, position the cursor where you want to insert a variable. Variables must be inserted one at a time.
● Click Variables to select a variable.
Note: The available variables change according to the selected letter type.
7. Click Save.
8. Click Preview to view the letter. The letter opens in PDF format in an embedded Adobe Reader window.
● Under Margins, adjust the left, right, top, and bottom margins as needed.
Use three digits for the margin with two decimal places (e.g., 1.00). The margins are in inches.
● Click Refresh Margins if you changed the margins. The letter is redisplayed with the new margins.
● From the Adobe Reader toolbar, you can print the letters, save them to your PC, and perform other functions allowed by Adobe Reader.
● Click Save to save changes to the margins.
● Click Edit to return to the letter editor.
9. Click Cancel to close the letter editor and return to the Create Letter page.
10. To edit a letter, click a letter in the grid to select it, and then click Edit. The Update Letters page opens, and the letter is displayed in the editor.
● Edit the letter ID, type, description, or body as needed.
● Click Save.
11. To delete a letter, click a letter in the grid to select it, and then click Delete.
Reports
HealthReports
Health Reports - Daily Log
Health > Reports > Health Reports > Daily Log
The Daily Log Report Group page allows you to view and print reports using Health data. Reports can be run for a prior year unless otherwise noted. You must have security rights to view these reports.
Select a report:
1. The following Daily Log reports are available. Select the report to see the parameter options.
Daily Log
3.0.0000
Health
36
SHS0300 - Nurse's Daily Log Summary
SHS0350 - Nurse's Daily Log Detail
2. Click Run Preview to generate the selected report. Review, save, or print the report.
Note: Parameters in bold type on the parameters page are required.
3. Click Clear Options to clear data from the parameter fields.
4. Click Return to Reports to return to the list of available reports.
Health Reports - Immunizations
Health > Reports > Health Reports > Immunizations
The Immunizations Report Group page allows you to view and print reports using Health data. Reports can be run for a prior year unless otherwise noted. You must have security rights to view these reports.
Note: Parameters in bold type on the parameters page are required.
Select a report:
1. The following Immunizations reports are available. Select the report to see the parameter options.
Immunizations
SHS0102 - Immunization Due Report
SHS0110 - Annual Immunization Status Report (DSHS)
SHS0130 - Provisional Enrollment List
SHS0800 - Student Immunization List
2. Click Run Preview to generate the selected report. Review, save, or print the report.
3. Click Clear Options to clear data from the parameter fields.
4. Click Return to Reports to return to the list of available reports.
Health Reports - Screenings
Health > Reports > Health Reports > Screenings
The Screenings Report Group page allows you to view and print reports using Health data. Reports can be run for a prior year unless otherwise noted. You must have security rights to view these reports.
Note: Parameters in bold type on the parameters page are required.
Select a report:
1. The following Screenings reports are available. Select the report to see the parameter options.
Screenings
SHS0250 - Hearing Screening Due List
SHS0251 - Vision Screening Due List
SHS0290 - Spinal Screening Due List
SHS0295 - Vision Screening Report (DSHS)
SHS0296 - Hearing Screening Report (DSHS)
SHS0297 - Spinal Screening Report (DSHS)
3.0.0000
Printed Help - TxEIS Health
37
SHS0298 - Acanthosis Screening Report (UTPA BHO)
SHS0825 - Screening Problem Report
2. Click Run Preview to generate the selected report. Review, save, or print the report.
3. Click Clear Options to clear data from the parameter fields.
4. Click Return to Reports to return to the list of available reports.
Health Reports - Student
Health > Reports > Health Reports > Student
The Student Report Group page allows you to view and print reports using Health data. Reports can be run for a prior year unless otherwise noted. You must have security rights to view these reports.
Note: Parameters in bold type on the parameters page are required.
Select a report:
1. The following Student reports are available. Select the report to see the parameter options.
Student
SHS0160 - Tuberculosis Test Due List
SHS0400 - Rolodex Cards
SHS0810 - Medical Profile Report
SHS0820 - Accident Report
SHS0830 - Medical Condition Report
SHS0835 - Communicable Diseases Report
SHS0840 - Medical Alert Report
SHS0900 - Emergency Profile Report
2. Click Run Preview to generate the selected report. Review, save, or print the report.
3. Click Clear Options to clear data from the parameter fields.
4. Click Return to Reports to return to the list of available reports.
Health Reports - All
Health > Reports > Health Reports > All
The Student Health Reports page allows you to view and print reports using Health data. Reports can be run for a prior year unless otherwise noted. You must have security rights to each group to view these reports. If you do not have rights to a particular group, it is not displayed.
Note: Parameters in bold type on the parameters page are required.
Select a report:
1. The following Health reports are available. Select the report to see the parameter options.
Daily Log
SHS0300 - Nurse's Daily Log Summary
SHS0350 - Nurse's Daily Log Detail
3.0.0000
Health
38
Immunizations
SHS0102 - Immunization Due Report
SHS0110 - Annual Immunization Status Report (DSHS)
SHS0130 - Provisional Enrollment List
SHS0800 - Student Immunization List
Screenings
SHS0250 - Hearing Screening Due List
SHS0251 - Vision Screening Due List
SHS0290 - Spinal Screening Due List
SHS0295 - Vision Screening Report (DSHS)
SHS0296 - Hearing Screening Report (DSHS)
SHS0297 - Spinal Screening Report (DSHS)
SHS0298 - Acanthosis Screening Report (UTPA BHO)
SHS0825 - Screening Problem Report
Student
SHS0160 - Tuberculosis Test Due List
SHS0400 - Rolodex Cards
SHS0810 - Medical Profile Report
SHS0820 - Accident Report
SHS0830 - Medical Condition Report
SHS0835 - Communicable Diseases Report
SHS0840 - Medical Alert Report
SHS0900 - Emergency Profile Report
2. Click Run Preview to generate the selected report. Review, save, or print the report.
3. Click Clear Options to clear data from the parameter fields.
4. Click Return to Reports to return to the list of available reports.
SHS0102 - Immunization Due Report
Health > Reports > Health Reports > Immunizations > SHS0102 - Immunization Due Report
The report lists immunizations due as of a specified date. It can be printed for all immunizations or for a specific type.
Texas DSHS immunization requirements: http://www.dshs.texas.gov/immunize/school/school-requirements.aspx
Vaccine grace periods
3.0.0000
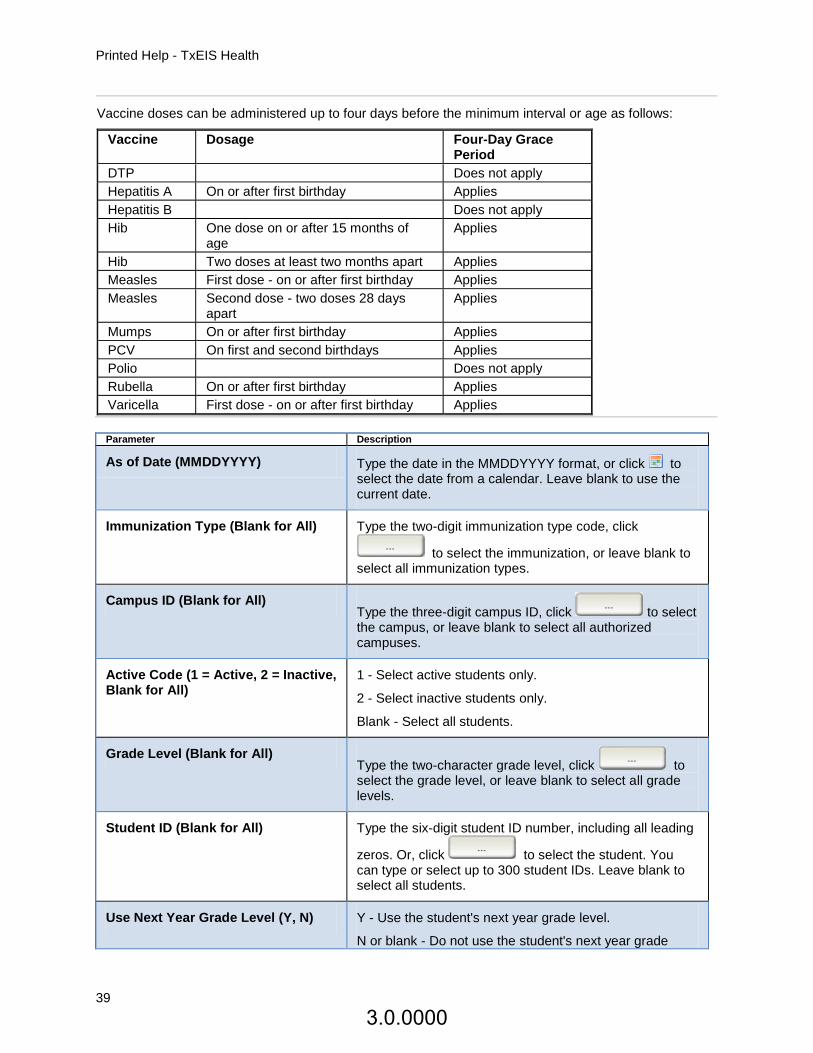
Printed Help - TxEIS Health
39
Vaccine doses can be administered up to four days before the minimum interval or age as follows:
Vaccine Dosage Four-Day Grace Period
DTP Does not apply
Hepatitis A On or after first birthday Applies
Hepatitis B Does not apply
Hib One dose on or after 15 months of age
Applies
Hib Two doses at least two months apart Applies
Measles First dose - on or after first birthday Applies
Measles Second dose - two doses 28 days apart
Applies
Mumps On or after first birthday Applies
PCV On first and second birthdays Applies
Polio Does not apply
Rubella On or after first birthday Applies
Varicella First dose - on or after first birthday Applies
Parameter Description
As of Date (MMDDYYYY) Type the date in the MMDDYYYY format, or click to select the date from a calendar. Leave blank to use the current date.
Immunization Type (Blank for All) Type the two-digit immunization type code, click
to select the immunization, or leave blank to select all immunization types.
Campus ID (Blank for All) Type the three-digit campus ID, click to select the campus, or leave blank to select all authorized campuses.
Active Code (1 = Active, 2 = Inactive, Blank for All)
1 - Select active students only.
2 - Select inactive students only.
Blank - Select all students.
Grade Level (Blank for All) Type the two-character grade level, click to select the grade level, or leave blank to select all grade levels.
Student ID (Blank for All) Type the six-digit student ID number, including all leading
zeros. Or, click to select the student. You can type or select up to 300 student IDs. Leave blank to select all students.
Use Next Year Grade Level (Y, N) Y - Use the student's next year grade level.
N or blank - Do not use the student's next year grade
3.0.0000
Health
40
level.
Note: For students in PK who will still be four years old on September 1 of the next school year, the grade level will not be incremented to KG; therefore, KG rules will not apply to the student (DTP, Polio, MMR, Varicella, and Hep A).
SHS0110 - Annual Immunization Status Report (DSHS)
Health > Reports > Health Reports > Immunizations > SHS0110 - Annual Immunization Status Report (DSHS)
The report summarizes total enrollment and the number of students in grade levels PK, KG, and 7 who are up to date, provisionally enrolled, exempt, delinquent, or have a history of illness. The report is submitted to the Department of State Health Services (DSHS).
The report can be sorted or filtered. To restore the report to the original view, click Reset.
Notes about filtering:
■ If you are filtering by age, add a leading zero if the age is less than ten (e.g., 09).
■ When you filter the Annual Immunization Status Report (DSHS) - Detail:
● Select Immunization Code or Category Code for Column.
● Select Equals for Operator.
● Type a number (immunization codes and category codes) for Value.
Category Code Values 1 - Completely Vaccinated 2 - Provisional 3 - Conscience/Religious Exemptions 4 - Medical Exemptions 5 - Delinquent 6 - History of Illness Immunization Code Values 1 - DTaP 2 - Tdap/Td 3 - Hepatitis A 4 - Hepatitis B 5 - MMR 6 - Polio 7 - Varicella 8 - Pneumococcal (PCV) 9 - Meningococcal (MCV4) 10 - Not currently collected (previously Influenza) 11 - Hib
Vaccine grace periods
3.0.0000
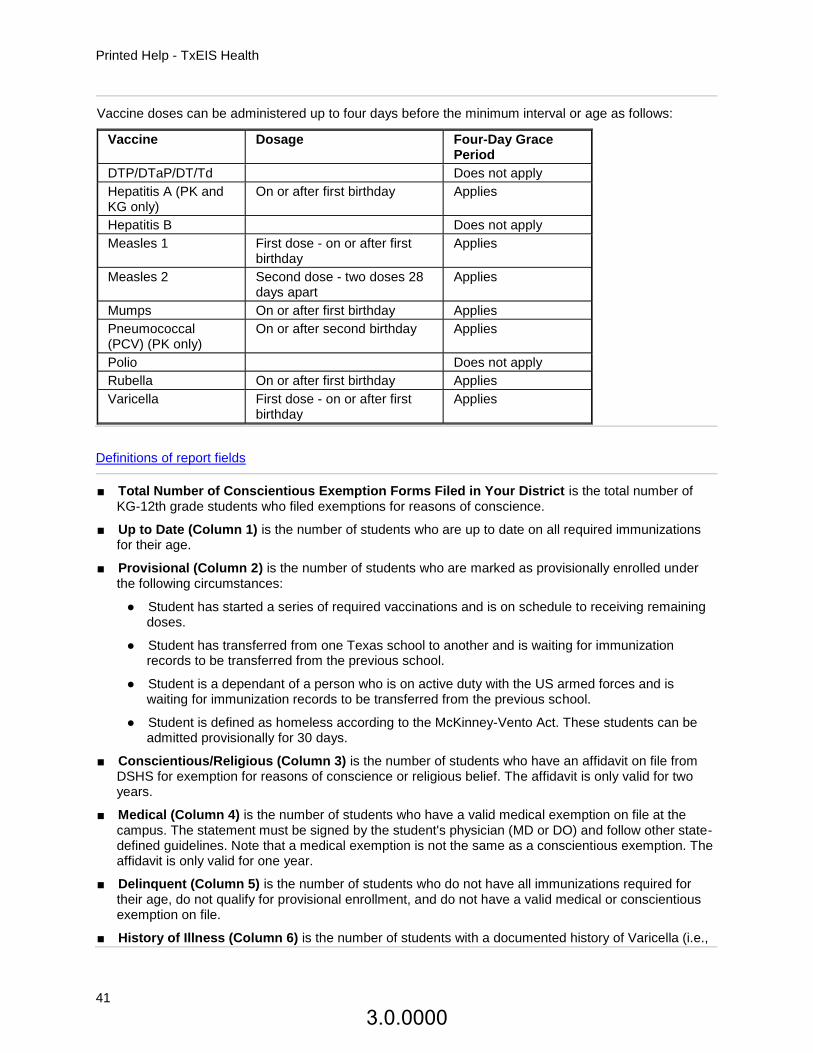
Printed Help - TxEIS Health
41
Vaccine doses can be administered up to four days before the minimum interval or age as follows:
Vaccine Dosage Four-Day Grace Period
DTP/DTaP/DT/Td Does not apply
Hepatitis A (PK and KG only)
On or after first birthday Applies
Hepatitis B Does not apply
Measles 1 First dose - on or after first birthday
Applies
Measles 2 Second dose - two doses 28 days apart
Applies
Mumps On or after first birthday Applies
Pneumococcal (PCV) (PK only)
On or after second birthday Applies
Polio Does not apply
Rubella On or after first birthday Applies
Varicella First dose - on or after first birthday
Applies
Definitions of report fields
■ Total Number of Conscientious Exemption Forms Filed in Your District is the total number of KG-12th grade students who filed exemptions for reasons of conscience.
■ Up to Date (Column 1) is the number of students who are up to date on all required immunizations for their age.
■ Provisional (Column 2) is the number of students who are marked as provisionally enrolled under the following circumstances:
● Student has started a series of required vaccinations and is on schedule to receiving remaining doses.
● Student has transferred from one Texas school to another and is waiting for immunization records to be transferred from the previous school.
● Student is a dependant of a person who is on active duty with the US armed forces and is waiting for immunization records to be transferred from the previous school.
● Student is defined as homeless according to the McKinney-Vento Act. These students can be admitted provisionally for 30 days.
■ Conscientious/Religious (Column 3) is the number of students who have an affidavit on file from DSHS for exemption for reasons of conscience or religious belief. The affidavit is only valid for two years.
■ Medical (Column 4) is the number of students who have a valid medical exemption on file at the campus. The statement must be signed by the student's physician (MD or DO) and follow other state-defined guidelines. Note that a medical exemption is not the same as a conscientious exemption. The affidavit is only valid for one year.
■ Delinquent (Column 5) is the number of students who do not have all immunizations required for their age, do not qualify for provisional enrollment, and do not have a valid medical or conscientious exemption on file.
■ History of Illness (Column 6) is the number of students with a documented history of Varicella (i.e.,
3.0.0000
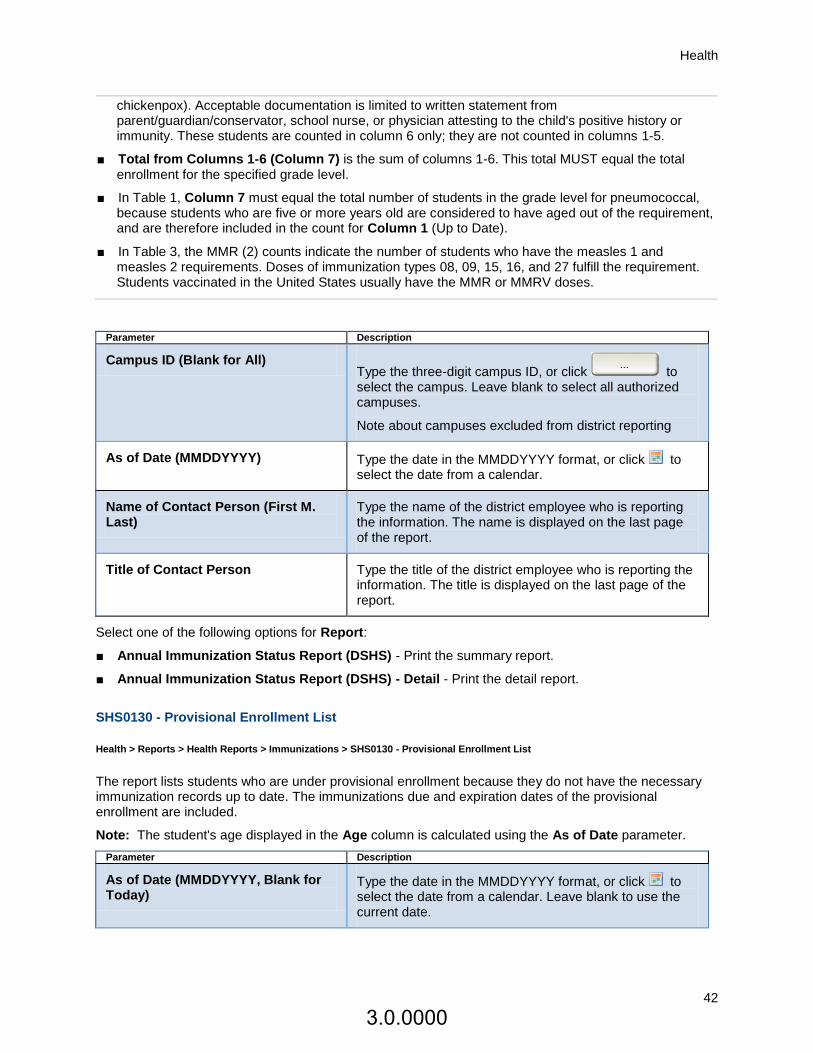
Health
42
chickenpox). Acceptable documentation is limited to written statement from parent/guardian/conservator, school nurse, or physician attesting to the child's positive history or immunity. These students are counted in column 6 only; they are not counted in columns 1-5.
■ Total from Columns 1-6 (Column 7) is the sum of columns 1-6. This total MUST equal the total enrollment for the specified grade level.
■ In Table 1, Column 7 must equal the total number of students in the grade level for pneumococcal, because students who are five or more years old are considered to have aged out of the requirement, and are therefore included in the count for Column 1 (Up to Date).
■ In Table 3, the MMR (2) counts indicate the number of students who have the measles 1 and measles 2 requirements. Doses of immunization types 08, 09, 15, 16, and 27 fulfill the requirement. Students vaccinated in the United States usually have the MMR or MMRV doses.
Parameter Description
Campus ID (Blank for All) Type the three-digit campus ID, or click to select the campus. Leave blank to select all authorized campuses.
Note about campuses excluded from district reporting
As of Date (MMDDYYYY) Type the date in the MMDDYYYY format, or click to select the date from a calendar.
Name of Contact Person (First M. Last)
Type the name of the district employee who is reporting the information. The name is displayed on the last page of the report.
Title of Contact Person Type the title of the district employee who is reporting the information. The title is displayed on the last page of the report.
Select one of the following options for Report:
■ Annual Immunization Status Report (DSHS) - Print the summary report.
■ Annual Immunization Status Report (DSHS) - Detail - Print the detail report.
SHS0130 - Provisional Enrollment List
Health > Reports > Health Reports > Immunizations > SHS0130 - Provisional Enrollment List
The report lists students who are under provisional enrollment because they do not have the necessary immunization records up to date. The immunizations due and expiration dates of the provisional enrollment are included.
Note: The student's age displayed in the Age column is calculated using the As of Date parameter.
Parameter Description
As of Date (MMDDYYYY, Blank for Today)
Type the date in the MMDDYYYY format, or click to select the date from a calendar. Leave blank to use the current date.
3.0.0000
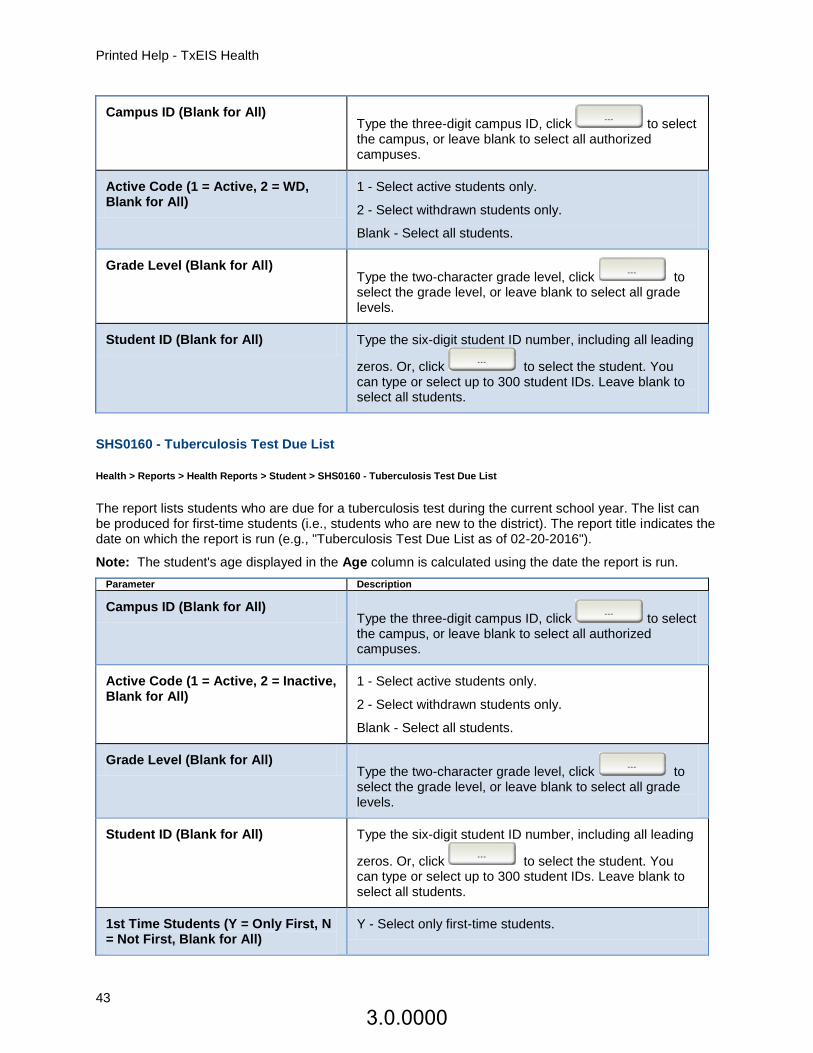
Printed Help - TxEIS Health
43
Campus ID (Blank for All) Type the three-digit campus ID, click to select the campus, or leave blank to select all authorized campuses.
Active Code (1 = Active, 2 = WD, Blank for All)
1 - Select active students only.
2 - Select withdrawn students only.
Blank - Select all students.
Grade Level (Blank for All) Type the two-character grade level, click to select the grade level, or leave blank to select all grade levels.
Student ID (Blank for All) Type the six-digit student ID number, including all leading
zeros. Or, click to select the student. You can type or select up to 300 student IDs. Leave blank to select all students.
SHS0160 - Tuberculosis Test Due List
Health > Reports > Health Reports > Student > SHS0160 - Tuberculosis Test Due List
The report lists students who are due for a tuberculosis test during the current school year. The list can be produced for first-time students (i.e., students who are new to the district). The report title indicates the date on which the report is run (e.g., "Tuberculosis Test Due List as of 02-20-2016").
Note: The student's age displayed in the Age column is calculated using the date the report is run.
Parameter Description
Campus ID (Blank for All) Type the three-digit campus ID, click to select the campus, or leave blank to select all authorized campuses.
Active Code (1 = Active, 2 = Inactive, Blank for All)
1 - Select active students only.
2 - Select withdrawn students only.
Blank - Select all students.
Grade Level (Blank for All) Type the two-character grade level, click to select the grade level, or leave blank to select all grade levels.
Student ID (Blank for All) Type the six-digit student ID number, including all leading
zeros. Or, click to select the student. You can type or select up to 300 student IDs. Leave blank to select all students.
1st Time Students (Y = Only First, N = Not First, Blank for All)
Y - Select only first-time students.
3.0.0000
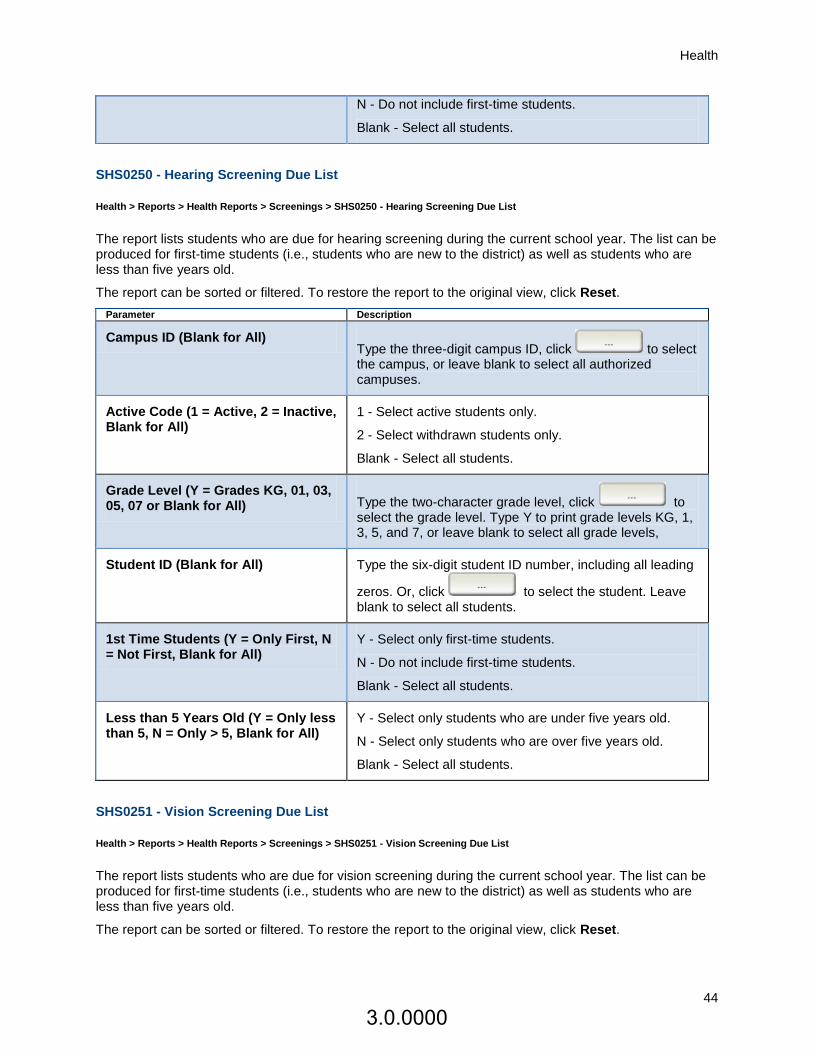
Health
44
N - Do not include first-time students.
Blank - Select all students.
SHS0250 - Hearing Screening Due List
Health > Reports > Health Reports > Screenings > SHS0250 - Hearing Screening Due List
The report lists students who are due for hearing screening during the current school year. The list can be produced for first-time students (i.e., students who are new to the district) as well as students who are less than five years old.
The report can be sorted or filtered. To restore the report to the original view, click Reset.
Parameter Description
Campus ID (Blank for All) Type the three-digit campus ID, click to select the campus, or leave blank to select all authorized campuses.
Active Code (1 = Active, 2 = Inactive, Blank for All)
1 - Select active students only.
2 - Select withdrawn students only.
Blank - Select all students.
Grade Level (Y = Grades KG, 01, 03, 05, 07 or Blank for All) Type the two-character grade level, click to
select the grade level. Type Y to print grade levels KG, 1, 3, 5, and 7, or leave blank to select all grade levels,
Student ID (Blank for All) Type the six-digit student ID number, including all leading
zeros. Or, click to select the student. Leave blank to select all students.
1st Time Students (Y = Only First, N = Not First, Blank for All)
Y - Select only first-time students.
N - Do not include first-time students.
Blank - Select all students.
Less than 5 Years Old (Y = Only less than 5, N = Only > 5, Blank for All)
Y - Select only students who are under five years old.
N - Select only students who are over five years old.
Blank - Select all students.
SHS0251 - Vision Screening Due List
Health > Reports > Health Reports > Screenings > SHS0251 - Vision Screening Due List
The report lists students who are due for vision screening during the current school year. The list can be produced for first-time students (i.e., students who are new to the district) as well as students who are less than five years old.
The report can be sorted or filtered. To restore the report to the original view, click Reset.
3.0.0000
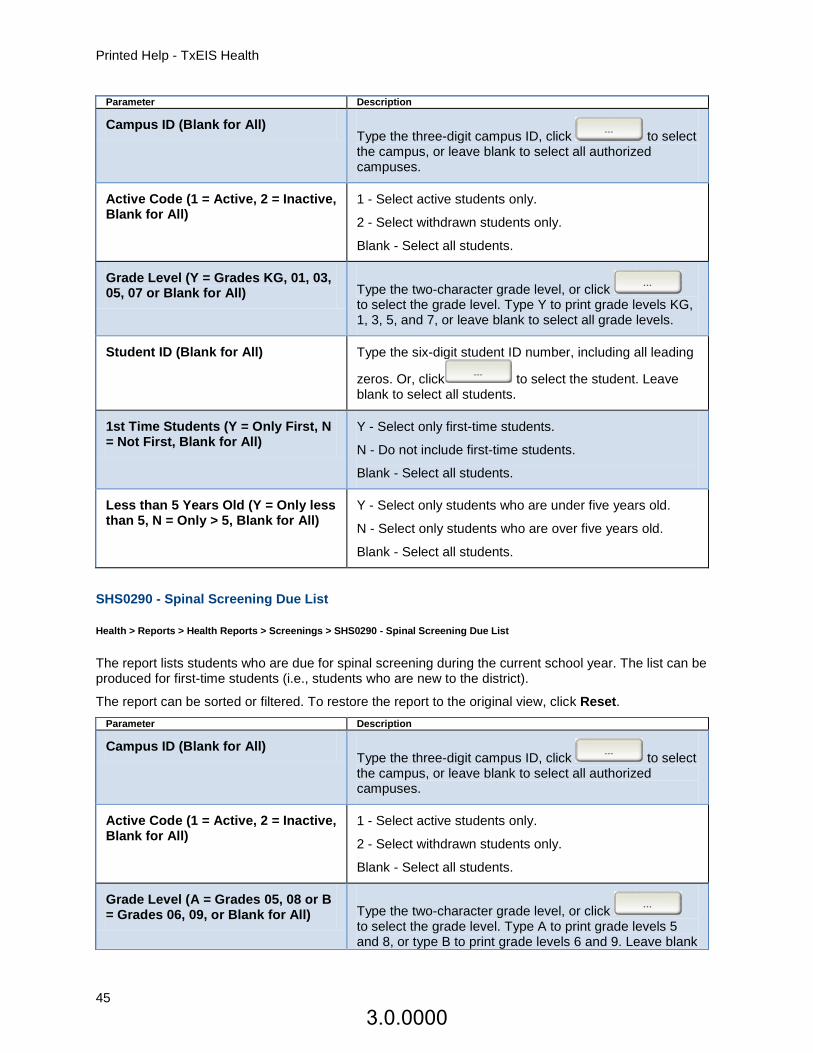
Printed Help - TxEIS Health
45
Parameter Description
Campus ID (Blank for All) Type the three-digit campus ID, click to select the campus, or leave blank to select all authorized campuses.
Active Code (1 = Active, 2 = Inactive, Blank for All)
1 - Select active students only.
2 - Select withdrawn students only.
Blank - Select all students.
Grade Level (Y = Grades KG, 01, 03, 05, 07 or Blank for All) Type the two-character grade level, or click
to select the grade level. Type Y to print grade levels KG, 1, 3, 5, and 7, or leave blank to select all grade levels.
Student ID (Blank for All) Type the six-digit student ID number, including all leading
zeros. Or, click to select the student. Leave blank to select all students.
1st Time Students (Y = Only First, N = Not First, Blank for All)
Y - Select only first-time students.
N - Do not include first-time students.
Blank - Select all students.
Less than 5 Years Old (Y = Only less than 5, N = Only > 5, Blank for All)
Y - Select only students who are under five years old.
N - Select only students who are over five years old.
Blank - Select all students.
SHS0290 - Spinal Screening Due List
Health > Reports > Health Reports > Screenings > SHS0290 - Spinal Screening Due List
The report lists students who are due for spinal screening during the current school year. The list can be produced for first-time students (i.e., students who are new to the district).
The report can be sorted or filtered. To restore the report to the original view, click Reset.
Parameter Description
Campus ID (Blank for All) Type the three-digit campus ID, click to select the campus, or leave blank to select all authorized campuses.
Active Code (1 = Active, 2 = Inactive, Blank for All)
1 - Select active students only.
2 - Select withdrawn students only.
Blank - Select all students.
Grade Level (A = Grades 05, 08 or B = Grades 06, 09, or Blank for All) Type the two-character grade level, or click
to select the grade level. Type A to print grade levels 5 and 8, or type B to print grade levels 6 and 9. Leave blank
3.0.0000
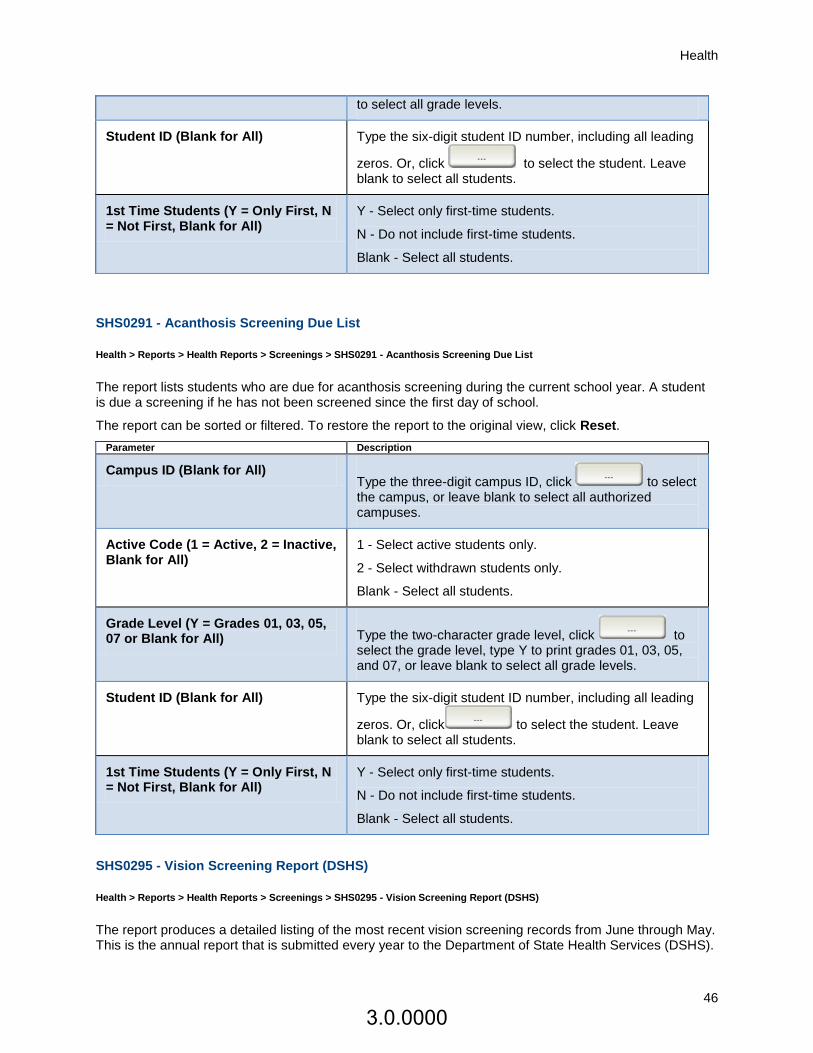
Health
46
to select all grade levels.
Student ID (Blank for All) Type the six-digit student ID number, including all leading
zeros. Or, click to select the student. Leave blank to select all students.
1st Time Students (Y = Only First, N = Not First, Blank for All)
Y - Select only first-time students.
N - Do not include first-time students.
Blank - Select all students.
SHS0291 - Acanthosis Screening Due List
Health > Reports > Health Reports > Screenings > SHS0291 - Acanthosis Screening Due List
The report lists students who are due for acanthosis screening during the current school year. A student is due a screening if he has not been screened since the first day of school.
The report can be sorted or filtered. To restore the report to the original view, click Reset.
Parameter Description
Campus ID (Blank for All) Type the three-digit campus ID, click to select the campus, or leave blank to select all authorized campuses.
Active Code (1 = Active, 2 = Inactive, Blank for All)
1 - Select active students only.
2 - Select withdrawn students only.
Blank - Select all students.
Grade Level (Y = Grades 01, 03, 05, 07 or Blank for All) Type the two-character grade level, click to
select the grade level, type Y to print grades 01, 03, 05, and 07, or leave blank to select all grade levels.
Student ID (Blank for All) Type the six-digit student ID number, including all leading
zeros. Or, click to select the student. Leave blank to select all students.
1st Time Students (Y = Only First, N = Not First, Blank for All)
Y - Select only first-time students.
N - Do not include first-time students.
Blank - Select all students.
SHS0295 - Vision Screening Report (DSHS)
Health > Reports > Health Reports > Screenings > SHS0295 - Vision Screening Report (DSHS)
The report produces a detailed listing of the most recent vision screening records from June through May. This is the annual report that is submitted every year to the Department of State Health Services (DSHS).
3.0.0000
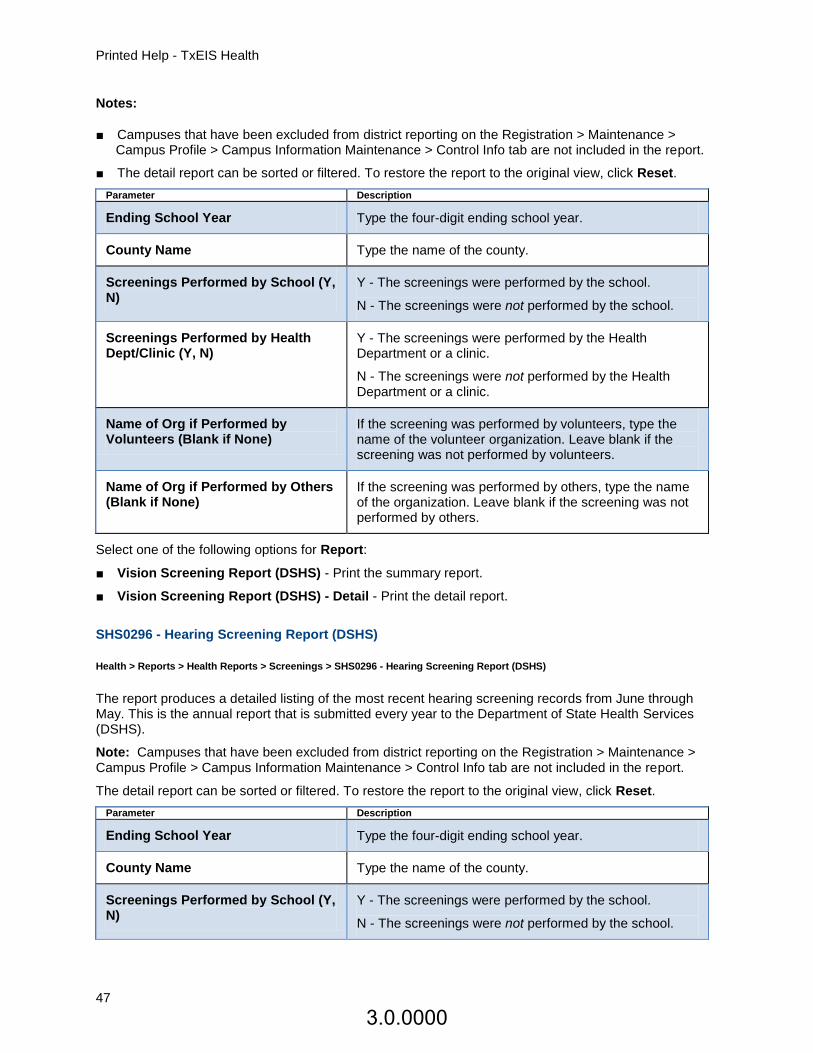
Printed Help - TxEIS Health
47
Notes:
■ Campuses that have been excluded from district reporting on the Registration > Maintenance > Campus Profile > Campus Information Maintenance > Control Info tab are not included in the report.
■ The detail report can be sorted or filtered. To restore the report to the original view, click Reset.
Parameter Description
Ending School Year Type the four-digit ending school year.
County Name Type the name of the county.
Screenings Performed by School (Y, N)
Y - The screenings were performed by the school.
N - The screenings were not performed by the school.
Screenings Performed by Health Dept/Clinic (Y, N)
Y - The screenings were performed by the Health Department or a clinic.
N - The screenings were not performed by the Health Department or a clinic.
Name of Org if Performed by Volunteers (Blank if None)
If the screening was performed by volunteers, type the name of the volunteer organization. Leave blank if the screening was not performed by volunteers.
Name of Org if Performed by Others (Blank if None)
If the screening was performed by others, type the name of the organization. Leave blank if the screening was not performed by others.
Select one of the following options for Report:
■ Vision Screening Report (DSHS) - Print the summary report.
■ Vision Screening Report (DSHS) - Detail - Print the detail report.
SHS0296 - Hearing Screening Report (DSHS)
Health > Reports > Health Reports > Screenings > SHS0296 - Hearing Screening Report (DSHS)
The report produces a detailed listing of the most recent hearing screening records from June through May. This is the annual report that is submitted every year to the Department of State Health Services (DSHS).
Note: Campuses that have been excluded from district reporting on the Registration > Maintenance > Campus Profile > Campus Information Maintenance > Control Info tab are not included in the report.
The detail report can be sorted or filtered. To restore the report to the original view, click Reset.
Parameter Description
Ending School Year Type the four-digit ending school year.
County Name Type the name of the county.
Screenings Performed by School (Y, N)
Y - The screenings were performed by the school.
N - The screenings were not performed by the school.
3.0.0000
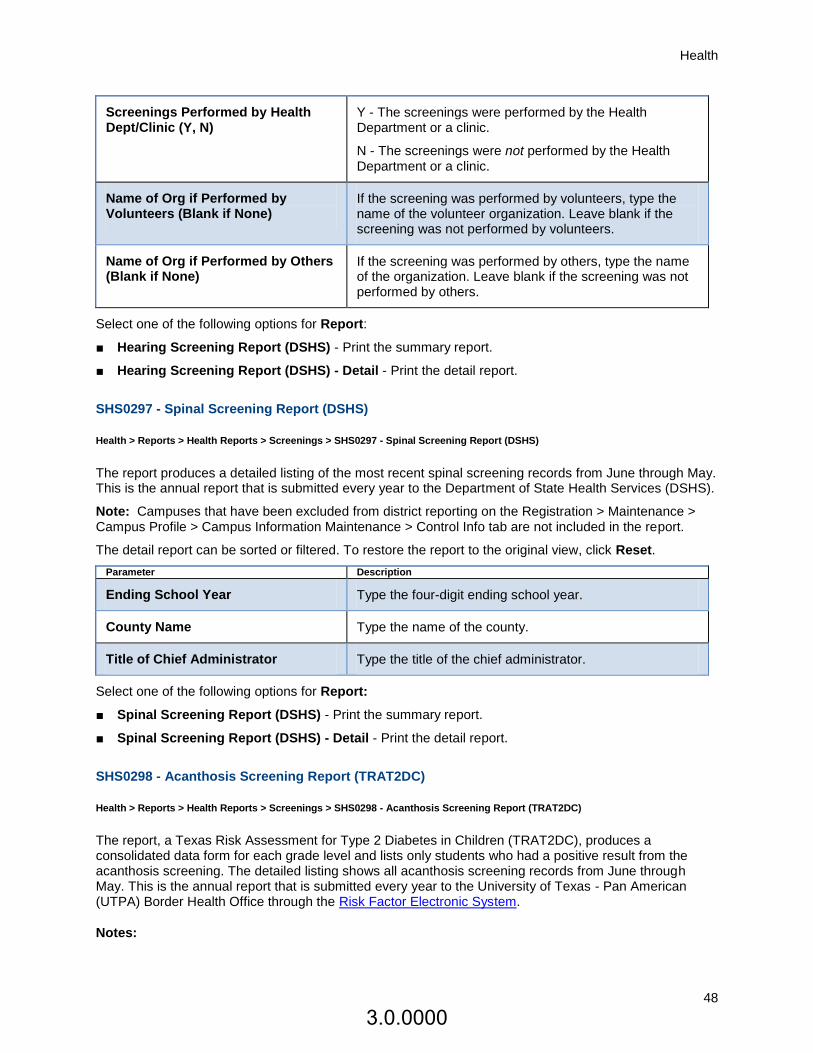
Health
48
Screenings Performed by Health Dept/Clinic (Y, N)
Y - The screenings were performed by the Health Department or a clinic.
N - The screenings were not performed by the Health Department or a clinic.
Name of Org if Performed by Volunteers (Blank if None)
If the screening was performed by volunteers, type the name of the volunteer organization. Leave blank if the screening was not performed by volunteers.
Name of Org if Performed by Others (Blank if None)
If the screening was performed by others, type the name of the organization. Leave blank if the screening was not performed by others.
Select one of the following options for Report:
■ Hearing Screening Report (DSHS) - Print the summary report.
■ Hearing Screening Report (DSHS) - Detail - Print the detail report.
SHS0297 - Spinal Screening Report (DSHS)
Health > Reports > Health Reports > Screenings > SHS0297 - Spinal Screening Report (DSHS)
The report produces a detailed listing of the most recent spinal screening records from June through May. This is the annual report that is submitted every year to the Department of State Health Services (DSHS).
Note: Campuses that have been excluded from district reporting on the Registration > Maintenance > Campus Profile > Campus Information Maintenance > Control Info tab are not included in the report.
The detail report can be sorted or filtered. To restore the report to the original view, click Reset.
Parameter Description
Ending School Year Type the four-digit ending school year.
County Name Type the name of the county.
Title of Chief Administrator Type the title of the chief administrator.
Select one of the following options for Report:
■ Spinal Screening Report (DSHS) - Print the summary report.
■ Spinal Screening Report (DSHS) - Detail - Print the detail report.
SHS0298 - Acanthosis Screening Report (TRAT2DC)
Health > Reports > Health Reports > Screenings > SHS0298 - Acanthosis Screening Report (TRAT2DC)
The report, a Texas Risk Assessment for Type 2 Diabetes in Children (TRAT2DC), produces a consolidated data form for each grade level and lists only students who had a positive result from the acanthosis screening. The detailed listing shows all acanthosis screening records from June through May. This is the annual report that is submitted every year to the University of Texas - Pan American (UTPA) Border Health Office through the Risk Factor Electronic System.
Notes:
3.0.0000

Printed Help - TxEIS Health
49
■ Campuses that have been excluded from district reporting on the Registration > Maintenance > Campus Profile > Campus Information Maintenance > Control Info tab are not included in the report.
■ The report is due to UTPA Border Health Office on the first Friday of June by 3:00 p.m. Central Standard Time.
The detail report can be sorted or filtered. To restore the report to the original view, click Reset.
Parameter Description
Ending School Year Type the four-digit ending school year.
Grade Level (Blank for All) Type the two-character grade level, click to select the grade level, or leave blank to select all grade levels.
Name of School Nurse Type the name of the school nurse.
Select one of the following options for Report:
■ Acanthosis Screening Report (TRAT2DC) - Print the summary report.
■ Acanthosis Screening Report (TRAT2DC) - Detail - Print the detail report.
SHS0300 - Nurse's Daily Log Summary
Health > Reports > Health Reports > Daily Log > SHS0300 - Nurse's Daily Log Summary
The report provides totals of information entered in the Nurse’s Daily Log. It also lists the number of cases by period.
Parameter Description
Begin Date (MMDDYYYY, Blank for All)
Type the date in the MMDDYYYY format, or click to select the date from a calendar. Leave blank to select all dates.
End Date (MMDDYYYY, Blank = Begin Date)
Type the date in the MMDDYYYY format, or click to select the date from a calendar. Leave blank to use the date entered for Begin Date.
Begin Period (##, Blank for All) Type the two-digit begin period, or leave blank to select all periods.
End Period (##, Blank = Begin Period)
Type the two-digit end period, or leave blank to use the same period as the begin period.
Campus ID (Blank for All) Type the three-digit campus ID, click to select the campus, or leave blank to select all authorized campuses.
Visitor Type (01-03, 99, Blank for All) Type a two-digit visitor type code, or leave blank to select all visitor types.
Activity Code (01-23, 99, Blank for All)
Select a two-digit activity code, or leave blank to select all activity codes.
3.0.0000
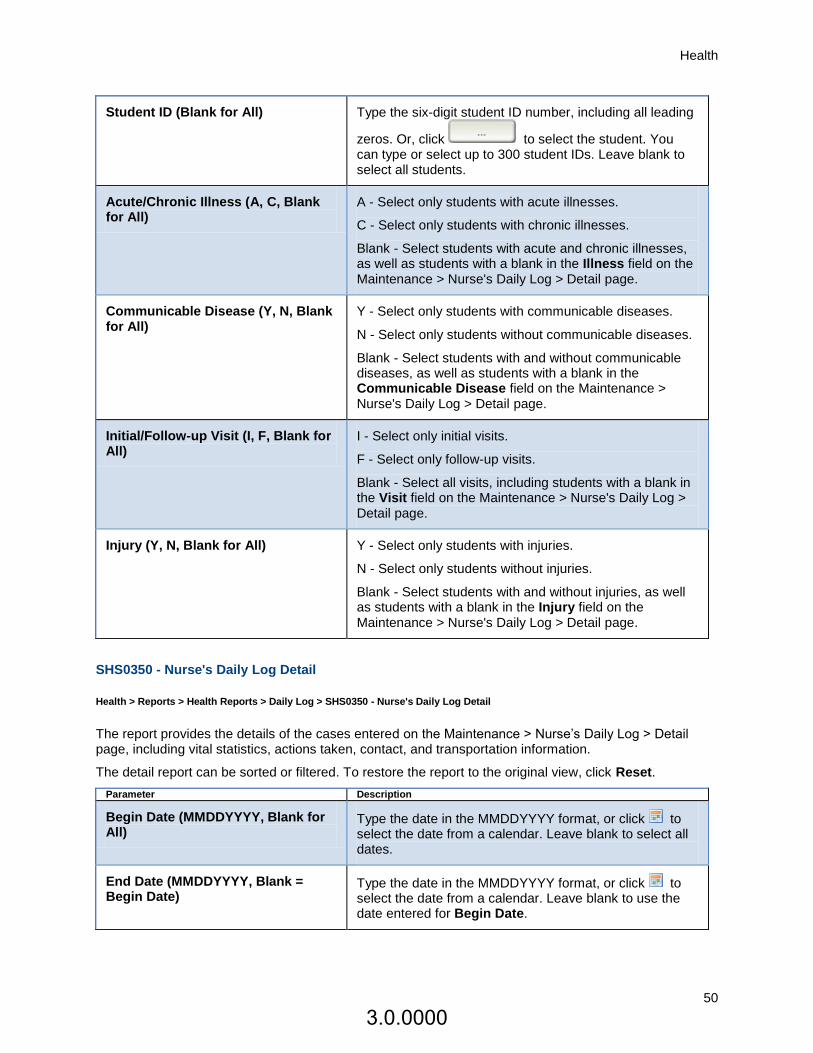
Health
50
Student ID (Blank for All) Type the six-digit student ID number, including all leading
zeros. Or, click to select the student. You can type or select up to 300 student IDs. Leave blank to select all students.
Acute/Chronic Illness (A, C, Blank for All)
A - Select only students with acute illnesses.
C - Select only students with chronic illnesses.
Blank - Select students with acute and chronic illnesses, as well as students with a blank in the Illness field on the Maintenance > Nurse's Daily Log > Detail page.
Communicable Disease (Y, N, Blank for All)
Y - Select only students with communicable diseases.
N - Select only students without communicable diseases.
Blank - Select students with and without communicable diseases, as well as students with a blank in the Communicable Disease field on the Maintenance > Nurse's Daily Log > Detail page.
Initial/Follow-up Visit (I, F, Blank for All)
I - Select only initial visits.
F - Select only follow-up visits.
Blank - Select all visits, including students with a blank in the Visit field on the Maintenance > Nurse's Daily Log > Detail page.
Injury (Y, N, Blank for All) Y - Select only students with injuries.
N - Select only students without injuries.
Blank - Select students with and without injuries, as well as students with a blank in the Injury field on the Maintenance > Nurse's Daily Log > Detail page.
SHS0350 - Nurse's Daily Log Detail
Health > Reports > Health Reports > Daily Log > SHS0350 - Nurse's Daily Log Detail
The report provides the details of the cases entered on the Maintenance > Nurse’s Daily Log > Detail page, including vital statistics, actions taken, contact, and transportation information.
The detail report can be sorted or filtered. To restore the report to the original view, click Reset.
Parameter Description
Begin Date (MMDDYYYY, Blank for All)
Type the date in the MMDDYYYY format, or click to select the date from a calendar. Leave blank to select all dates.
End Date (MMDDYYYY, Blank = Begin Date)
Type the date in the MMDDYYYY format, or click to select the date from a calendar. Leave blank to use the date entered for Begin Date.
3.0.0000
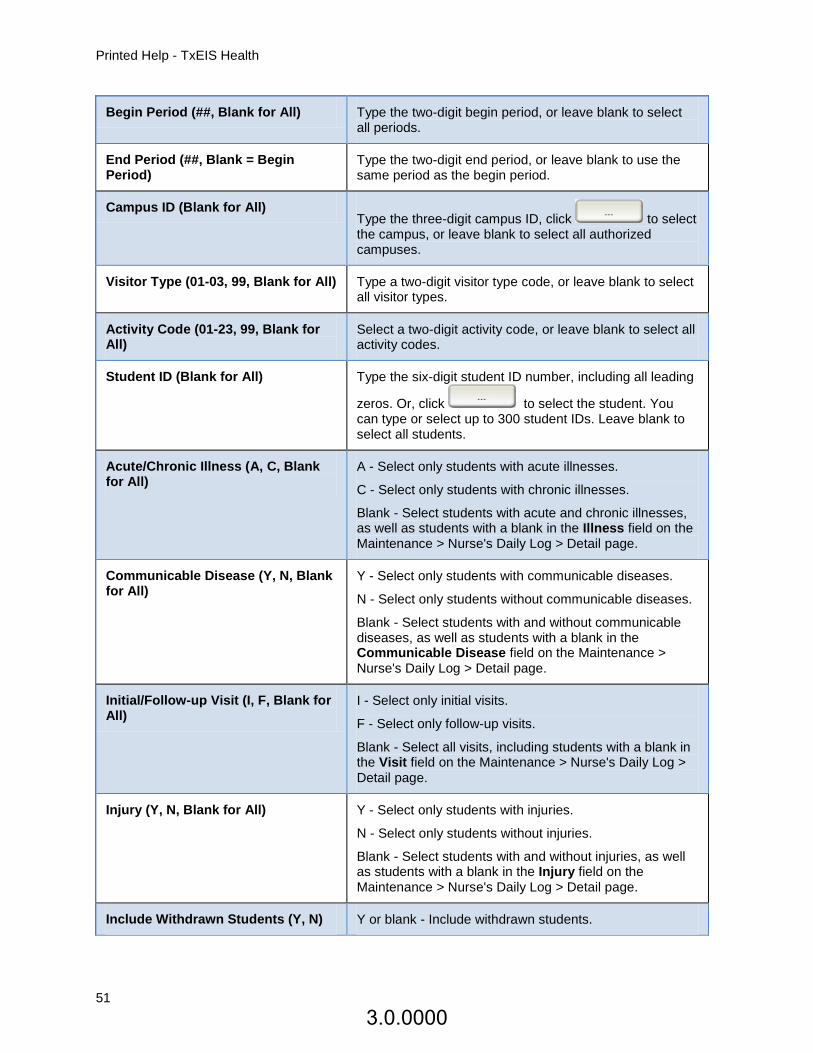
Printed Help - TxEIS Health
51
Begin Period (##, Blank for All) Type the two-digit begin period, or leave blank to select all periods.
End Period (##, Blank = Begin Period)
Type the two-digit end period, or leave blank to use the same period as the begin period.
Campus ID (Blank for All) Type the three-digit campus ID, click to select the campus, or leave blank to select all authorized campuses.
Visitor Type (01-03, 99, Blank for All) Type a two-digit visitor type code, or leave blank to select all visitor types.
Activity Code (01-23, 99, Blank for All)
Select a two-digit activity code, or leave blank to select all activity codes.
Student ID (Blank for All) Type the six-digit student ID number, including all leading
zeros. Or, click to select the student. You can type or select up to 300 student IDs. Leave blank to select all students.
Acute/Chronic Illness (A, C, Blank for All)
A - Select only students with acute illnesses.
C - Select only students with chronic illnesses.
Blank - Select students with acute and chronic illnesses, as well as students with a blank in the Illness field on the Maintenance > Nurse's Daily Log > Detail page.
Communicable Disease (Y, N, Blank for All)
Y - Select only students with communicable diseases.
N - Select only students without communicable diseases.
Blank - Select students with and without communicable diseases, as well as students with a blank in the Communicable Disease field on the Maintenance > Nurse's Daily Log > Detail page.
Initial/Follow-up Visit (I, F, Blank for All)
I - Select only initial visits.
F - Select only follow-up visits.
Blank - Select all visits, including students with a blank in the Visit field on the Maintenance > Nurse's Daily Log > Detail page.
Injury (Y, N, Blank for All) Y - Select only students with injuries.
N - Select only students without injuries.
Blank - Select students with and without injuries, as well as students with a blank in the Injury field on the Maintenance > Nurse's Daily Log > Detail page.
Include Withdrawn Students (Y, N) Y or blank - Include withdrawn students.
3.0.0000
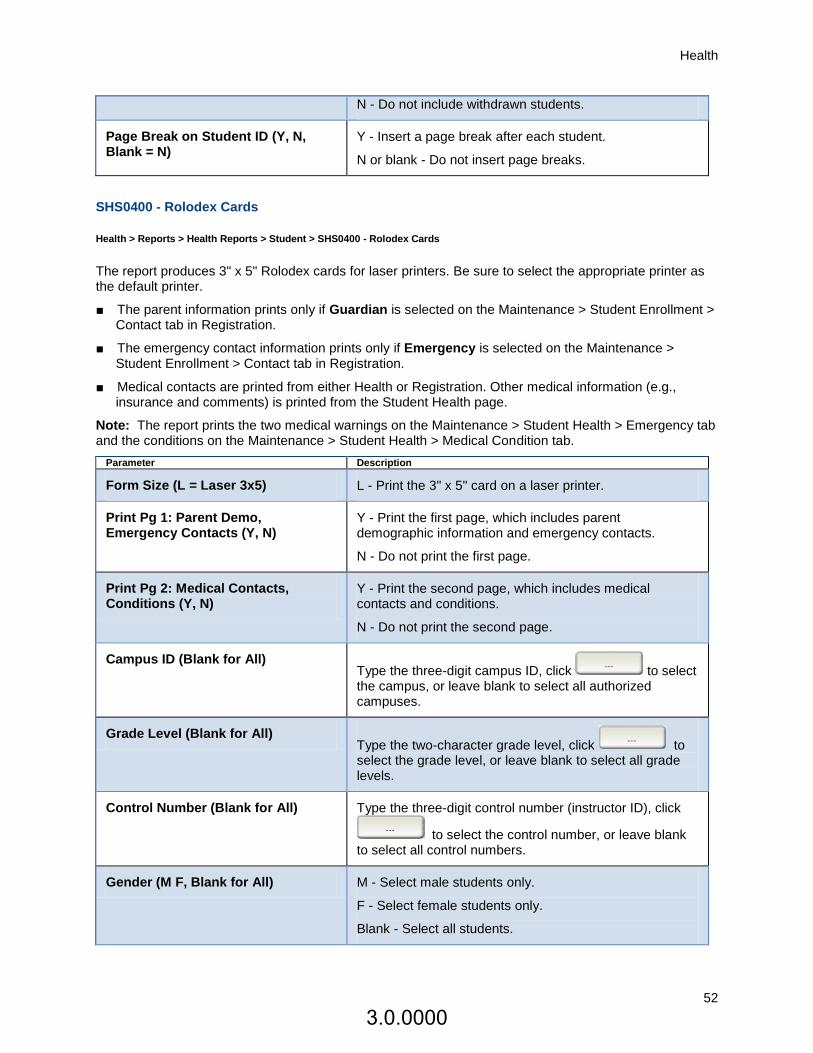
Health
52
N - Do not include withdrawn students.
Page Break on Student ID (Y, N, Blank = N)
Y - Insert a page break after each student.
N or blank - Do not insert page breaks.
SHS0400 - Rolodex Cards
Health > Reports > Health Reports > Student > SHS0400 - Rolodex Cards
The report produces 3" x 5" Rolodex cards for laser printers. Be sure to select the appropriate printer as the default printer.
■ The parent information prints only if Guardian is selected on the Maintenance > Student Enrollment > Contact tab in Registration.
■ The emergency contact information prints only if Emergency is selected on the Maintenance > Student Enrollment > Contact tab in Registration.
■ Medical contacts are printed from either Health or Registration. Other medical information (e.g., insurance and comments) is printed from the Student Health page.
Note: The report prints the two medical warnings on the Maintenance > Student Health > Emergency tab and the conditions on the Maintenance > Student Health > Medical Condition tab.
Parameter Description
Form Size (L = Laser 3x5) L - Print the 3" x 5" card on a laser printer.
Print Pg 1: Parent Demo, Emergency Contacts (Y, N)
Y - Print the first page, which includes parent demographic information and emergency contacts.
N - Do not print the first page.
Print Pg 2: Medical Contacts, Conditions (Y, N)
Y - Print the second page, which includes medical contacts and conditions.
N - Do not print the second page.
Campus ID (Blank for All) Type the three-digit campus ID, click to select the campus, or leave blank to select all authorized campuses.
Grade Level (Blank for All) Type the two-character grade level, click to select the grade level, or leave blank to select all grade levels.
Control Number (Blank for All) Type the three-digit control number (instructor ID), click
to select the control number, or leave blank to select all control numbers.
Gender (M F, Blank for All) M - Select male students only.
F - Select female students only.
Blank - Select all students.
3.0.0000
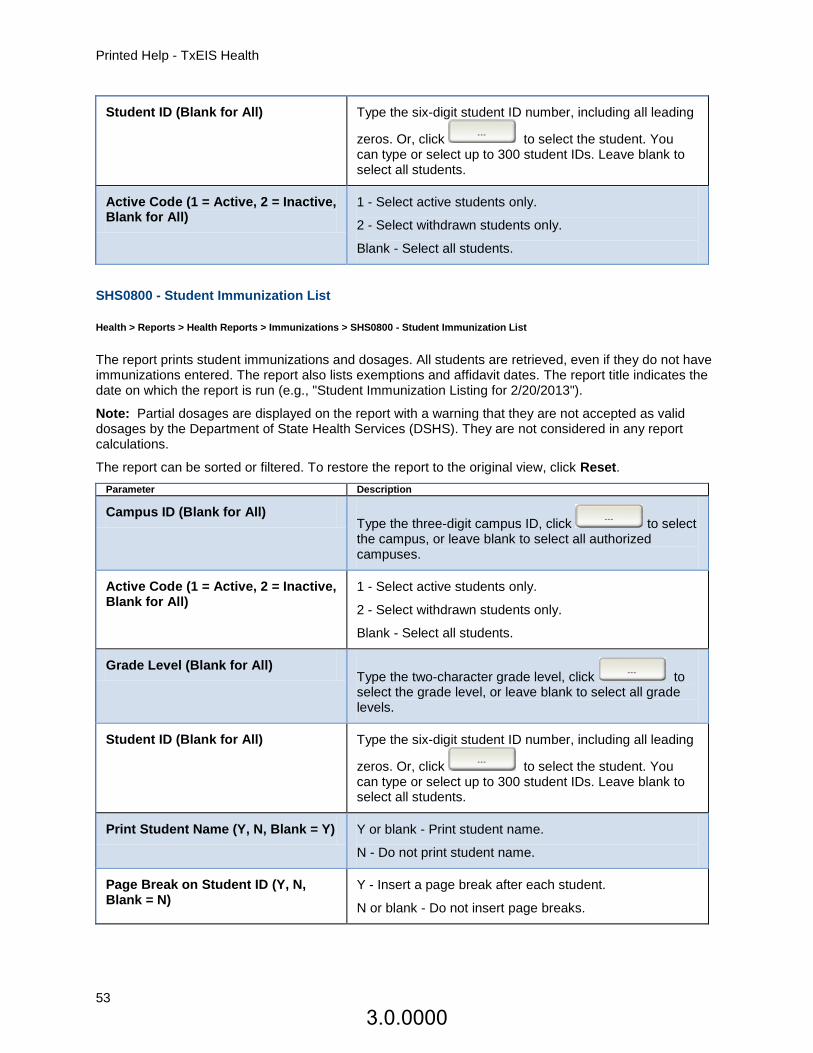
Printed Help - TxEIS Health
53
Student ID (Blank for All) Type the six-digit student ID number, including all leading
zeros. Or, click to select the student. You can type or select up to 300 student IDs. Leave blank to select all students.
Active Code (1 = Active, 2 = Inactive, Blank for All)
1 - Select active students only.
2 - Select withdrawn students only.
Blank - Select all students.
SHS0800 - Student Immunization List
Health > Reports > Health Reports > Immunizations > SHS0800 - Student Immunization List
The report prints student immunizations and dosages. All students are retrieved, even if they do not have immunizations entered. The report also lists exemptions and affidavit dates. The report title indicates the date on which the report is run (e.g., "Student Immunization Listing for 2/20/2013").
Note: Partial dosages are displayed on the report with a warning that they are not accepted as valid dosages by the Department of State Health Services (DSHS). They are not considered in any report calculations.
The report can be sorted or filtered. To restore the report to the original view, click Reset.
Parameter Description
Campus ID (Blank for All) Type the three-digit campus ID, click to select the campus, or leave blank to select all authorized campuses.
Active Code (1 = Active, 2 = Inactive, Blank for All)
1 - Select active students only.
2 - Select withdrawn students only.
Blank - Select all students.
Grade Level (Blank for All) Type the two-character grade level, click to select the grade level, or leave blank to select all grade levels.
Student ID (Blank for All) Type the six-digit student ID number, including all leading
zeros. Or, click to select the student. You can type or select up to 300 student IDs. Leave blank to select all students.
Print Student Name (Y, N, Blank = Y) Y or blank - Print student name.
N - Do not print student name.
Page Break on Student ID (Y, N, Blank = N)
Y - Insert a page break after each student.
N or blank - Do not insert page breaks.
3.0.0000
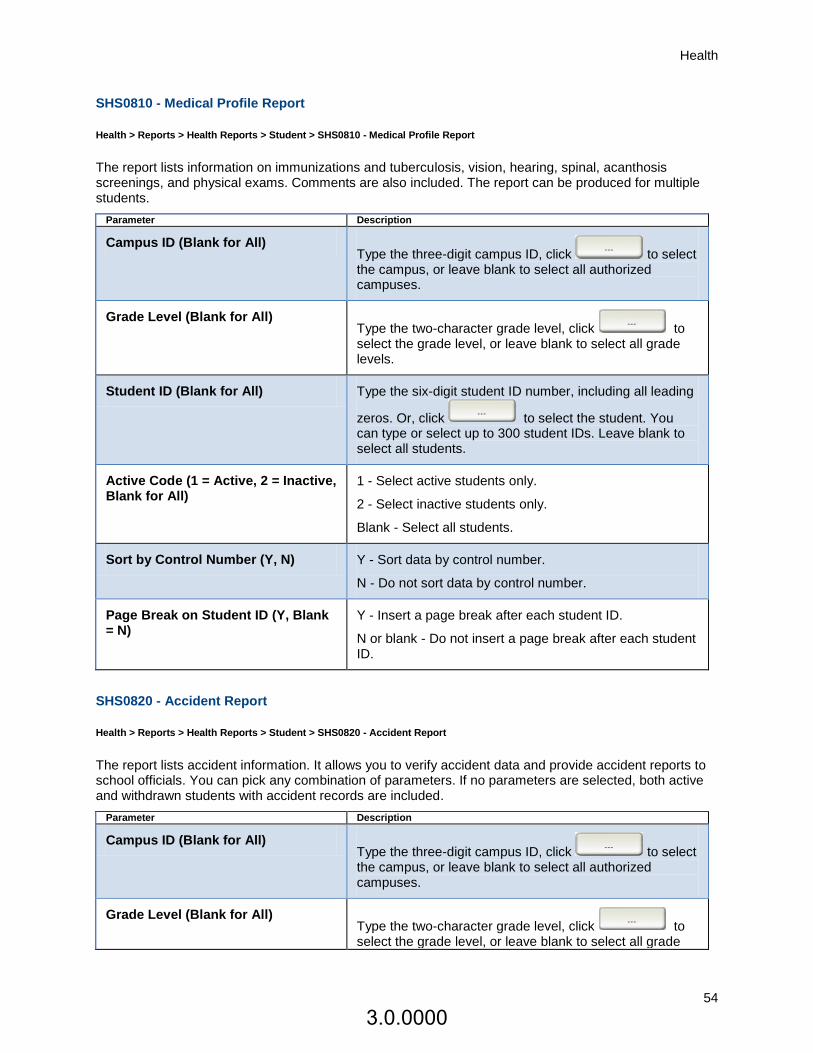
Health
54
SHS0810 - Medical Profile Report
Health > Reports > Health Reports > Student > SHS0810 - Medical Profile Report
The report lists information on immunizations and tuberculosis, vision, hearing, spinal, acanthosis screenings, and physical exams. Comments are also included. The report can be produced for multiple students.
Parameter Description
Campus ID (Blank for All) Type the three-digit campus ID, click to select the campus, or leave blank to select all authorized campuses.
Grade Level (Blank for All) Type the two-character grade level, click to select the grade level, or leave blank to select all grade levels.
Student ID (Blank for All) Type the six-digit student ID number, including all leading
zeros. Or, click to select the student. You can type or select up to 300 student IDs. Leave blank to select all students.
Active Code (1 = Active, 2 = Inactive, Blank for All)
1 - Select active students only.
2 - Select inactive students only.
Blank - Select all students.
Sort by Control Number (Y, N) Y - Sort data by control number.
N - Do not sort data by control number.
Page Break on Student ID (Y, Blank = N)
Y - Insert a page break after each student ID.
N or blank - Do not insert a page break after each student ID.
SHS0820 - Accident Report
Health > Reports > Health Reports > Student > SHS0820 - Accident Report
The report lists accident information. It allows you to verify accident data and provide accident reports to school officials. You can pick any combination of parameters. If no parameters are selected, both active and withdrawn students with accident records are included.
Parameter Description
Campus ID (Blank for All) Type the three-digit campus ID, click to select the campus, or leave blank to select all authorized campuses.
Grade Level (Blank for All) Type the two-character grade level, click to select the grade level, or leave blank to select all grade
3.0.0000

Printed Help - TxEIS Health
55
levels.
Control Number (Blank for All) Type the three-digit control number (instructor ID), click
to select the control number, or leave blank to select all control numbers.
Active Code (1 = Active, 2 = Inactive, Blank for All)
1 - Select active students only.
2 - Select withdrawn students only.
Blank - Select all students.
Student ID (Blank for All) Type the six-digit student ID number, including all leading
zeros. Or, click to select the student. You can type or select up to 300 student IDs. Leave blank to select all students.
Accident Location (Blank for All) Type the three-character accident location code. Leave blank to select all locations.
Nature of Accident (Blank for All) Type the two-character code for the nature of the accident. Leave blank to select all types of accidents.
Begin Date (MMDDYYYY) Type the date in the MMDDYYYY format, or click to select the date from a calendar.
■ If only Begin Date is typed, the report uses the same date for End Date.
■ If Begin Date and End Date are blank, the report includes all records. The date range displayed on the report is the date of the first record to the end of the school year.
■ If a date range is entered, the date range is displayed on the report.
End Date (MMDDYYYY) Type the date in the MMDDYYYY format, or click to select the date from a calendar. Leave blank to use the begin date.
SHS0825 - Screening Problem Report
Health > Reports > Health Reports > Screenings > SHS0825 - Screening Problem Report
The report lists students who were referred to a specialist as a result of vision, hearing, spinal, acanthosis, or tuberculosis screening. The report allows you to keep track of referral results. Data for each campus is printed on separate pages.
Parameter Description
Campus ID (Blank for All) Type the three-digit campus ID, click to select the campus, or leave blank to select all authorized campuses.
3.0.0000
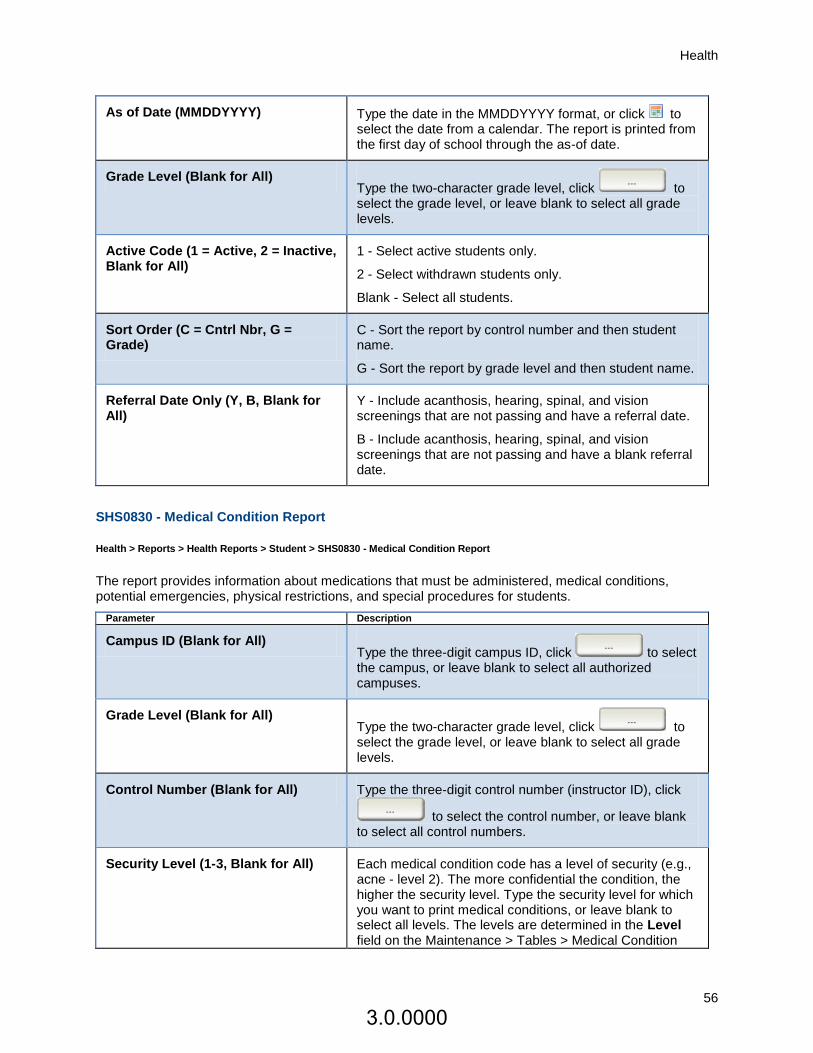
Health
56
As of Date (MMDDYYYY) Type the date in the MMDDYYYY format, or click to select the date from a calendar. The report is printed from the first day of school through the as-of date.
Grade Level (Blank for All) Type the two-character grade level, click to select the grade level, or leave blank to select all grade levels.
Active Code (1 = Active, 2 = Inactive, Blank for All)
1 - Select active students only.
2 - Select withdrawn students only.
Blank - Select all students.
Sort Order (C = Cntrl Nbr, G = Grade)
C - Sort the report by control number and then student name.
G - Sort the report by grade level and then student name.
Referral Date Only (Y, B, Blank for All)
Y - Include acanthosis, hearing, spinal, and vision screenings that are not passing and have a referral date.
B - Include acanthosis, hearing, spinal, and vision screenings that are not passing and have a blank referral date.
SHS0830 - Medical Condition Report
Health > Reports > Health Reports > Student > SHS0830 - Medical Condition Report
The report provides information about medications that must be administered, medical conditions, potential emergencies, physical restrictions, and special procedures for students.
Parameter Description
Campus ID (Blank for All) Type the three-digit campus ID, click to select the campus, or leave blank to select all authorized campuses.
Grade Level (Blank for All) Type the two-character grade level, click to select the grade level, or leave blank to select all grade levels.
Control Number (Blank for All) Type the three-digit control number (instructor ID), click
to select the control number, or leave blank to select all control numbers.
Security Level (1-3, Blank for All) Each medical condition code has a level of security (e.g., acne - level 2). The more confidential the condition, the higher the security level. Type the security level for which you want to print medical conditions, or leave blank to select all levels. The levels are determined in the Level field on the Maintenance > Tables > Medical Condition
3.0.0000
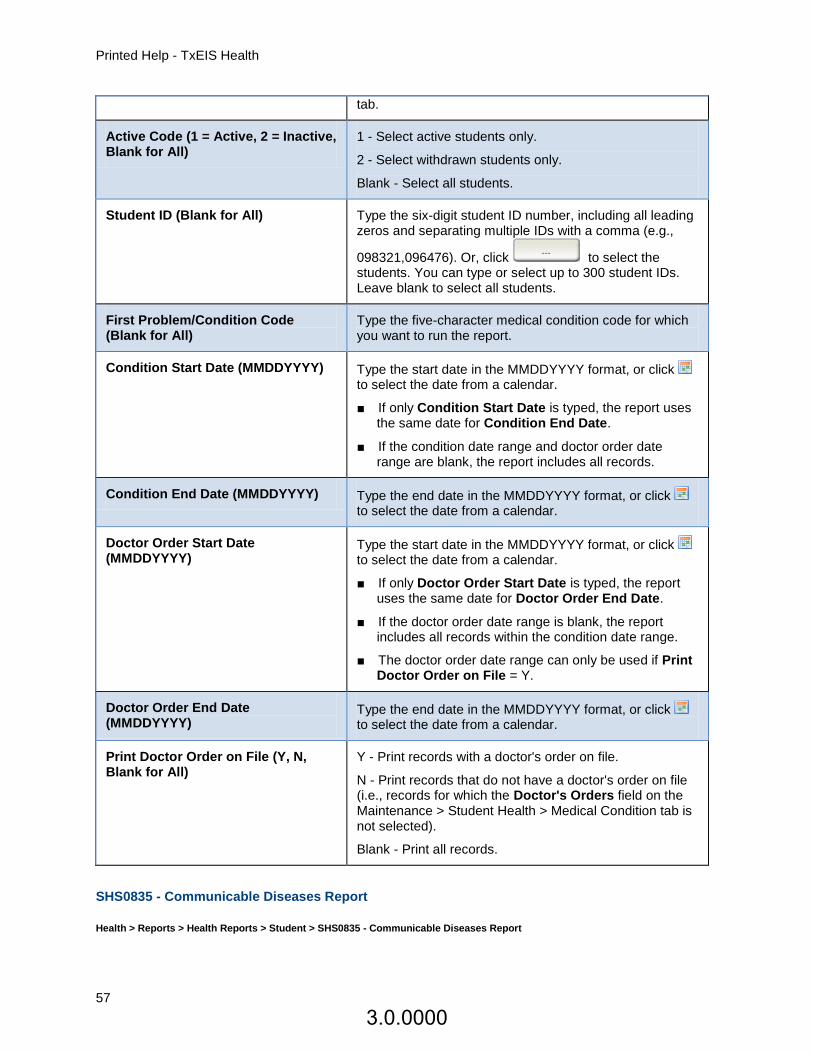
Printed Help - TxEIS Health
57
tab.
Active Code (1 = Active, 2 = Inactive, Blank for All)
1 - Select active students only.
2 - Select withdrawn students only.
Blank - Select all students.
Student ID (Blank for All) Type the six-digit student ID number, including all leading zeros and separating multiple IDs with a comma (e.g.,
098321,096476). Or, click to select the students. You can type or select up to 300 student IDs. Leave blank to select all students.
First Problem/Condition Code (Blank for All)
Type the five-character medical condition code for which you want to run the report.
Condition Start Date (MMDDYYYY) Type the start date in the MMDDYYYY format, or click to select the date from a calendar.
■ If only Condition Start Date is typed, the report uses the same date for Condition End Date.
■ If the condition date range and doctor order date range are blank, the report includes all records.
Condition End Date (MMDDYYYY) Type the end date in the MMDDYYYY format, or click to select the date from a calendar.
Doctor Order Start Date (MMDDYYYY)
Type the start date in the MMDDYYYY format, or click to select the date from a calendar.
■ If only Doctor Order Start Date is typed, the report uses the same date for Doctor Order End Date.
■ If the doctor order date range is blank, the report includes all records within the condition date range.
■ The doctor order date range can only be used if Print Doctor Order on File = Y.
Doctor Order End Date (MMDDYYYY)
Type the end date in the MMDDYYYY format, or click to select the date from a calendar.
Print Doctor Order on File (Y, N, Blank for All)
Y - Print records with a doctor's order on file.
N - Print records that do not have a doctor's order on file (i.e., records for which the Doctor's Orders field on the Maintenance > Student Health > Medical Condition tab is not selected).
Blank - Print all records.
SHS0835 - Communicable Diseases Report
Health > Reports > Health Reports > Student > SHS0835 - Communicable Diseases Report
3.0.0000
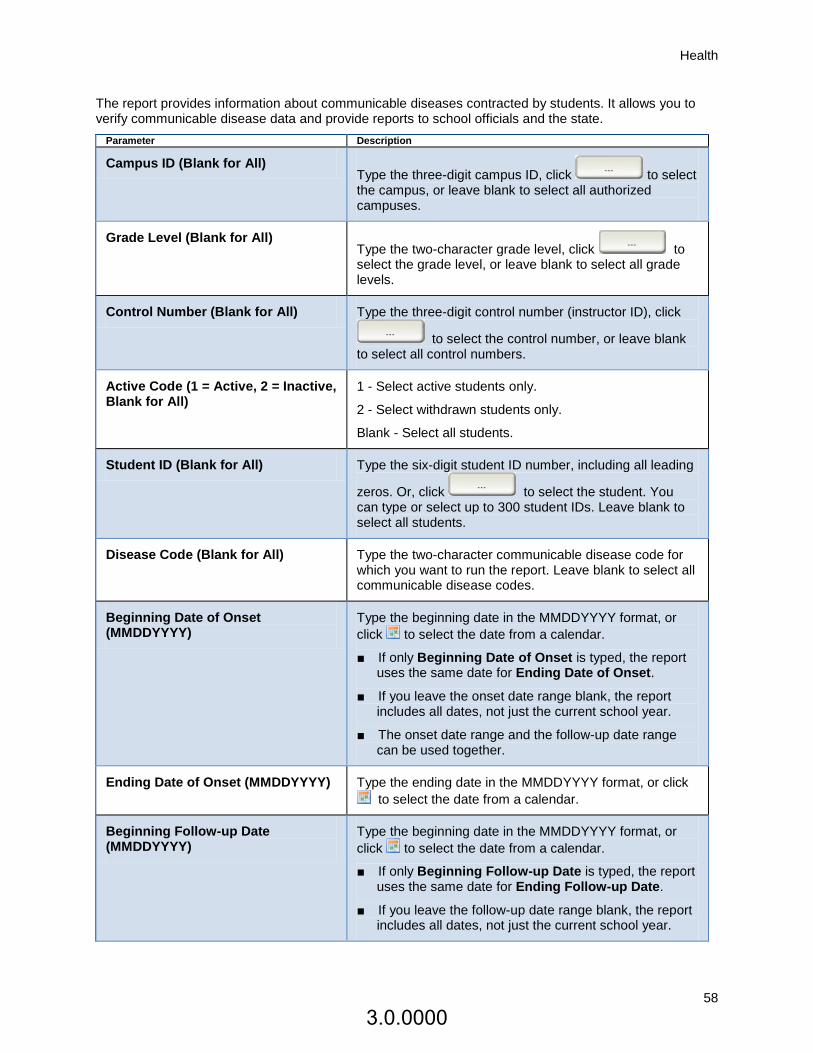
Health
58
The report provides information about communicable diseases contracted by students. It allows you to verify communicable disease data and provide reports to school officials and the state.
Parameter Description
Campus ID (Blank for All) Type the three-digit campus ID, click to select the campus, or leave blank to select all authorized campuses.
Grade Level (Blank for All) Type the two-character grade level, click to select the grade level, or leave blank to select all grade levels.
Control Number (Blank for All) Type the three-digit control number (instructor ID), click
to select the control number, or leave blank to select all control numbers.
Active Code (1 = Active, 2 = Inactive, Blank for All)
1 - Select active students only.
2 - Select withdrawn students only.
Blank - Select all students.
Student ID (Blank for All) Type the six-digit student ID number, including all leading
zeros. Or, click to select the student. You can type or select up to 300 student IDs. Leave blank to select all students.
Disease Code (Blank for All) Type the two-character communicable disease code for which you want to run the report. Leave blank to select all communicable disease codes.
Beginning Date of Onset (MMDDYYYY)
Type the beginning date in the MMDDYYYY format, or
click to select the date from a calendar.
■ If only Beginning Date of Onset is typed, the report uses the same date for Ending Date of Onset.
■ If you leave the onset date range blank, the report includes all dates, not just the current school year.
■ The onset date range and the follow-up date range can be used together.
Ending Date of Onset (MMDDYYYY) Type the ending date in the MMDDYYYY format, or click
to select the date from a calendar.
Beginning Follow-up Date (MMDDYYYY)
Type the beginning date in the MMDDYYYY format, or
click to select the date from a calendar.
■ If only Beginning Follow-up Date is typed, the report uses the same date for Ending Follow-up Date.
■ If you leave the follow-up date range blank, the report includes all dates, not just the current school year.
3.0.0000
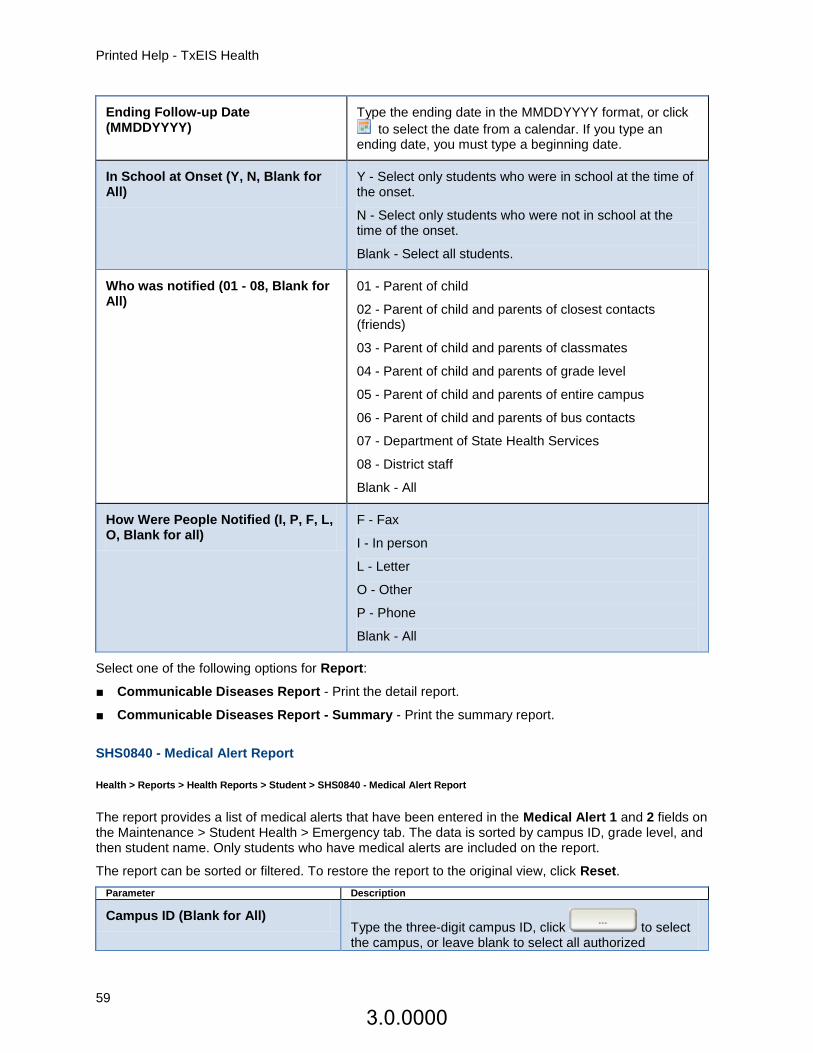
Printed Help - TxEIS Health
59
Ending Follow-up Date (MMDDYYYY)
Type the ending date in the MMDDYYYY format, or click
to select the date from a calendar. If you type an ending date, you must type a beginning date.
In School at Onset (Y, N, Blank for All)
Y - Select only students who were in school at the time of the onset.
N - Select only students who were not in school at the time of the onset.
Blank - Select all students.
Who was notified (01 - 08, Blank for All)
01 - Parent of child
02 - Parent of child and parents of closest contacts (friends)
03 - Parent of child and parents of classmates
04 - Parent of child and parents of grade level
05 - Parent of child and parents of entire campus
06 - Parent of child and parents of bus contacts
07 - Department of State Health Services
08 - District staff
Blank - All
How Were People Notified (I, P, F, L, O, Blank for all)
F - Fax
I - In person
L - Letter
O - Other
P - Phone
Blank - All
Select one of the following options for Report:
■ Communicable Diseases Report - Print the detail report.
■ Communicable Diseases Report - Summary - Print the summary report.
SHS0840 - Medical Alert Report
Health > Reports > Health Reports > Student > SHS0840 - Medical Alert Report
The report provides a list of medical alerts that have been entered in the Medical Alert 1 and 2 fields on the Maintenance > Student Health > Emergency tab. The data is sorted by campus ID, grade level, and then student name. Only students who have medical alerts are included on the report.
The report can be sorted or filtered. To restore the report to the original view, click Reset.
Parameter Description
Campus ID (Blank for All) Type the three-digit campus ID, click to select the campus, or leave blank to select all authorized
3.0.0000
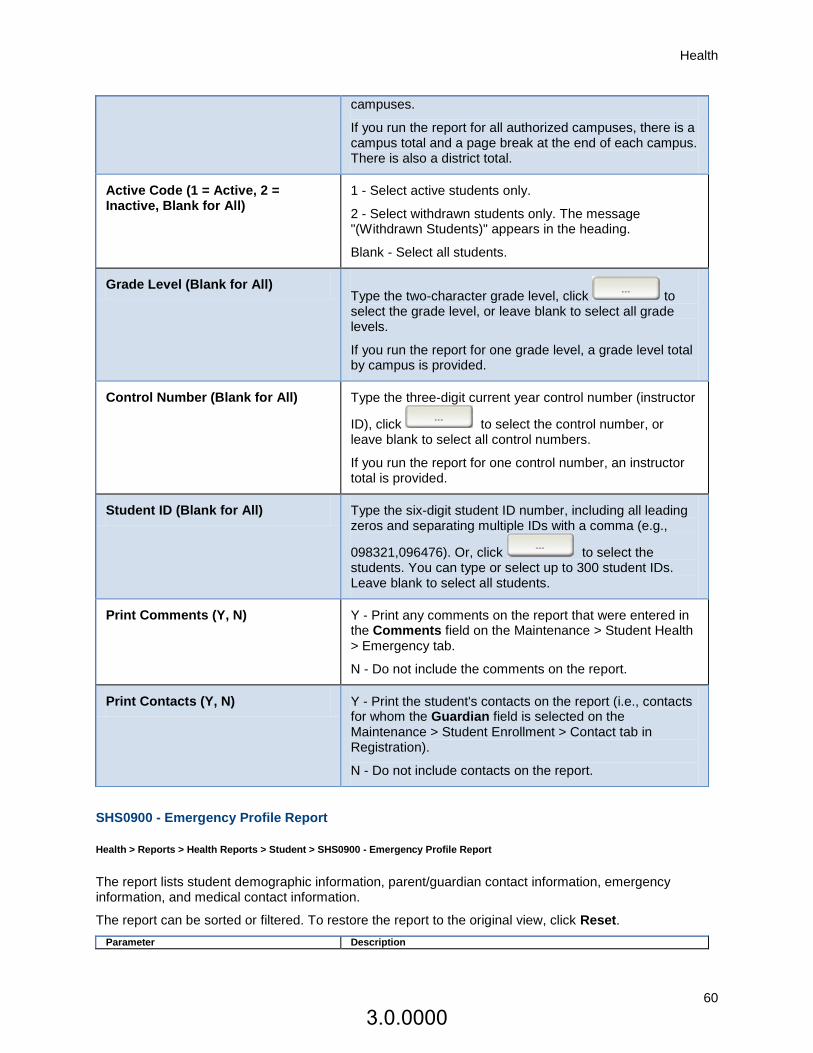
Health
60
campuses.
If you run the report for all authorized campuses, there is a campus total and a page break at the end of each campus. There is also a district total.
Active Code (1 = Active, 2 = Inactive, Blank for All)
1 - Select active students only.
2 - Select withdrawn students only. The message "(Withdrawn Students)" appears in the heading.
Blank - Select all students.
Grade Level (Blank for All) Type the two-character grade level, click to select the grade level, or leave blank to select all grade levels.
If you run the report for one grade level, a grade level total by campus is provided.
Control Number (Blank for All) Type the three-digit current year control number (instructor
ID), click to select the control number, or leave blank to select all control numbers.
If you run the report for one control number, an instructor total is provided.
Student ID (Blank for All) Type the six-digit student ID number, including all leading zeros and separating multiple IDs with a comma (e.g.,
098321,096476). Or, click to select the students. You can type or select up to 300 student IDs. Leave blank to select all students.
Print Comments (Y, N) Y - Print any comments on the report that were entered in the Comments field on the Maintenance > Student Health > Emergency tab.
N - Do not include the comments on the report.
Print Contacts (Y, N) Y - Print the student's contacts on the report (i.e., contacts for whom the Guardian field is selected on the Maintenance > Student Enrollment > Contact tab in Registration).
N - Do not include contacts on the report.
SHS0900 - Emergency Profile Report
Health > Reports > Health Reports > Student > SHS0900 - Emergency Profile Report
The report lists student demographic information, parent/guardian contact information, emergency information, and medical contact information.
The report can be sorted or filtered. To restore the report to the original view, click Reset.
Parameter Description
3.0.0000
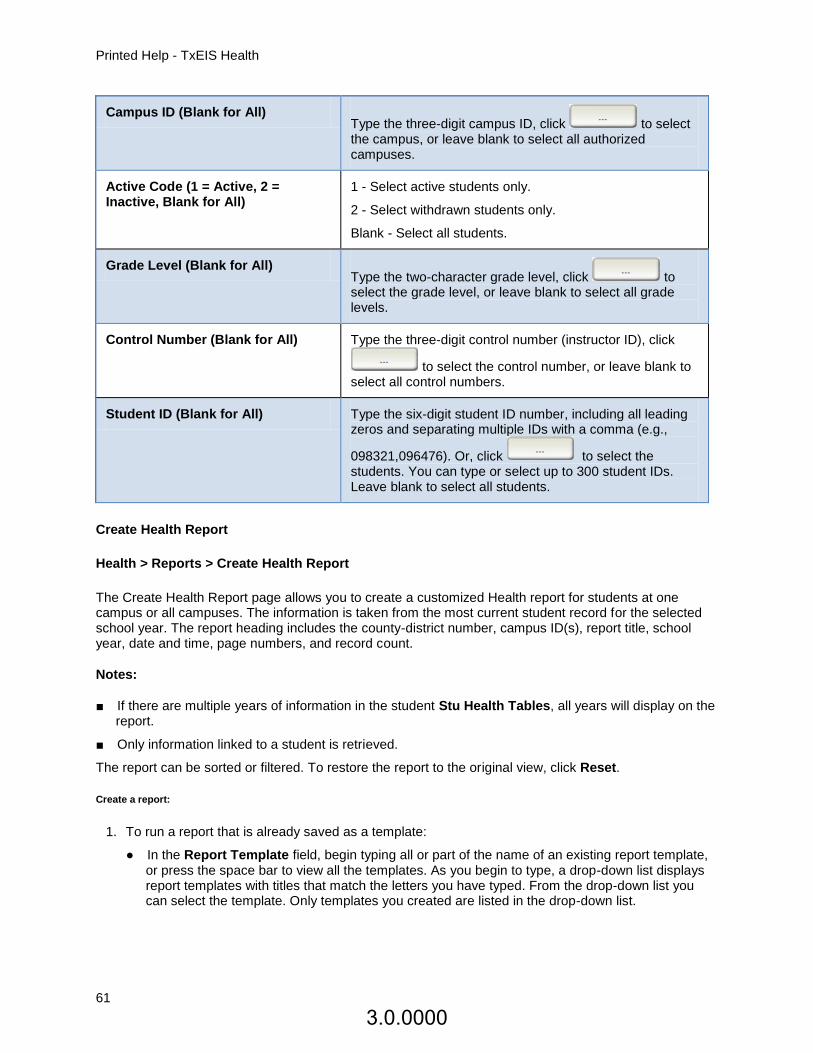
Printed Help - TxEIS Health
61
Campus ID (Blank for All) Type the three-digit campus ID, click to select the campus, or leave blank to select all authorized campuses.
Active Code (1 = Active, 2 = Inactive, Blank for All)
1 - Select active students only.
2 - Select withdrawn students only.
Blank - Select all students.
Grade Level (Blank for All) Type the two-character grade level, click to select the grade level, or leave blank to select all grade levels.
Control Number (Blank for All) Type the three-digit control number (instructor ID), click
to select the control number, or leave blank to select all control numbers.
Student ID (Blank for All) Type the six-digit student ID number, including all leading zeros and separating multiple IDs with a comma (e.g.,
098321,096476). Or, click to select the students. You can type or select up to 300 student IDs. Leave blank to select all students.
Create Health Report
Health > Reports > Create Health Report
The Create Health Report page allows you to create a customized Health report for students at one campus or all campuses. The information is taken from the most current student record for the selected school year. The report heading includes the county-district number, campus ID(s), report title, school year, date and time, page numbers, and record count.
Notes:
■ If there are multiple years of information in the student Stu Health Tables, all years will display on the report.
■ Only information linked to a student is retrieved.
The report can be sorted or filtered. To restore the report to the original view, click Reset.
Create a report:
1. To run a report that is already saved as a template:
● In the Report Template field, begin typing all or part of the name of an existing report template, or press the space bar to view all the templates. As you begin to type, a drop-down list displays report templates with titles that match the letters you have typed. From the drop-down list you can select the template. Only templates you created are listed in the drop-down list.
3.0.0000
Health
62
● If you do not know the name of the report template, click Directory to select a report template from the directory. From the directory, you can select templates you created as well as public templates.
● Once the template is selected, press ENTER to populate the selections.
2. To create and save a new template, type the name of a new report template in the Report Template field.
● Only alphanumeric characters are allowed.
● If you type a name that is already used, it will overwrite the previous template.
● Select Public to make the report accessible to other users. All users in the district who have access to this page will be able to use the template.
● After entering the title and selecting the columns to include, click Save.
3. In the Report Title field, type a title for the report, up to 35 characters.
4. Under Campus Options, select Campus to print information for the campus to which you are logged on, or select All Campuses to print information for all campuses in the district to which you have access.
5. The fields are grouped by student table. Select the fields to include in the report.
You can select an entire group of fields by selecting the group name (e.g., Demographic Information).
6. Click Create Report to generate the report. The report displays the selected data. Review, save, or print the report.
7. To delete a report template, select the template in the Report Template field, and click Delete.
3.0.0000