Embed Size (px)
Citation preview

Chapter
5
Printer Sharing between Windows and Linux
Ah, printers. They’re the enterprise’s necessary evil. They consume paper, toner, time, and patience. And oftentimes our enterprises have a lot of printers. Maybe it would be better if we had fewer? Or, if not fewer, we could at least get more people printing on the printers we do have.
That’s what this chapter is about. That is, you can leverage your existing Linux or Windows printer investment and share it.
Then the fun begins.As with previous chapters, we’ll ensure things are set up and working first by making our
Windows clients talk to printers on Windows servers and our Linux clients talk to printers on Linux servers. In Figure 5.1, you can see our intended design. That is, we want to have a Win-dows 2003 server host a printer and also have our Linux server host a printer. Then, we want to have our Windows and Linux clients be able to print to whichever printer we want.
Leveraging Windows Printers
Setting up a Windows printer has been made easier over the years. In our examples, we’ll physically attach a printer to our Windows server. In addition, you might have other options, such as printer that is “networkable” via, say, an HP Jetdirect or similar
print server
device
. We can’t possibly go over all the potential options out there—there are just too darn many printer manufacturers with their own ways of doing things. However, we’ll try to show you how to best prepare for those cases as you consult the manuals for the printers and their accompanying networking devices.
To get started, we’ll physically attach our printer to our Windows server’s parallel port. Our printer is a Canon BJC-7000.
Setting up a Windows Printer
First things first: Let’s tell our server about our new printer. We’ll do this in four steps.
1.
We’ll load the appropriate Windows drivers onto our server machine.
4428.book Page 265 Tuesday, August 2, 2005 8:54 PM

266
Chapter 5 �
Printer Sharing between Windows and Linux
F I G U R E 5 . 1
We will be setting up our Linux Samba server and our Windows 2003 server
to share printers and have our Windows and Linux clients print to them.
2.
Then, we’ll share the printer so Windows computers and Linux computers running Samba can find it.
3.
We’ll enable Windows’
Internet Printing
, otherwise known as IPP (Internet Printing Pro-tocol), which will allow for both Windows and Linux clients to simply point to a web address to find the printer.
4.
We’ll enable “old-school” Unix printing support via the LPD (Line Printer Daemon) protocol.
Windows Client(xppro1.ad.corp.com)Windows 2003
Active Directory Domain ControllerWindows SMB Printing
Windows Internet PrintingWindows LPD Printing(windc1.ad.corp.com)
Linux ServerMember of Active Directory domain
Unix LPD printingSamba printingCUPS printing
(adsambafp1.ad.corp.com)
SalesPerson1
SalesPerson1 SalesPerson1
Linux Client(adlincli1.ad.corp.com)
1. Client printing directlyvia IPP/WindowsInternet Printing
2. Client spooling toWindows SMB viaSamba
3. Client Printing directlyvia LPD
1. Client printing viaWindows SMB
2. Client printing viaWindows InternetPrinting
3. Client printing viaLPD (possible, butnot shown)
WinPrinter1
LinPrinter1
1. Client printing directlyvia LPR (possible, butnot shown)
2. Client spooling to Samba(possible, but not shown)
3. Client spooling to IPP(via CUPS)
1. Client spooling to IPP(via CUPS)
2. Client spooling to Sambavia SMB
3. Client printing directlyvia LPR
4428.book Page 266 Tuesday, August 2, 2005 8:54 PM

Leveraging Windows Printers
267
Loading Windows Printer Drivers
We’ll tell Windows to maintain the spooler (which holds jobs in queue as they go to the printer) here on our server,
windc1.ad.corp.com
. But be forewarned, the vocabulary the wizard uses can be a bit misleading. We’ll explain this as we go.
To set up a new Windows printer:
1.
Select Start �
Control Panel �
Printers and Faxes �
Add Printer to initiate the “Add Printer Wizard.” Once the wizard starts, click “Next.”
2.
At the “Local or Network Printer” dialog select “Local printer attached to this computer.” This is because in our examples we have physically attached the printer to the server via parallel port. However, note that you would use this same option to connect to HP Jetdirect or other networkable printer devices because even though those devices are over the net-work, the spooler (or software that holds the queue for printing) resides on
this
box. This can be confusing because the other option, “A network printer, or a printer attached to another computer” seems very tempting—but don’t use it. You’d use that option to print to a printer that was already set up on another server.
3.
In the “Local or Network Printer” dialog, you also have the option to “Automatically detect and install my Plug and Play printer.” I suggest you leave this check box disabled. In the upcoming dialogs you’ll be able to specify which drivers are best suited to use.
4.
At the “Select a Printer Port” dialog, select the “Use the following port,” select the “LPT1” setting, and click “Next.”
5.
At the “Install Printer Software” dialog, select the manufacturer and printer model. In our example, we chose “Canon Bubble-Jet BJC-7000.” Windows has built-in drivers for this printer. Then click “Next.”
6.
At the “Name your Printer” screen, you can enter a name for the printer. Clear out the sug-gested name and enter
WinPrinter1
and click “Next.”
7.
At the “Printer Sharing” screen, you can give it a share name for others to see. By default, Windows truncates the name so all clients can handle it—including Windows 9
x
and all ancient computers. However, we’re assuming you have no ancient machines in our pretend world, so go ahead and change the name back to WinPrinter1 and click “Next.”
8.
At the “Location and Comment” screen enter something that might be appropriate, like
1st floor by the coffee machine
; you might also enter a comment such as who tends to the supplies and other care and feeding. When ready, click “Next.”
9.
At the “Print Test Page” we always select “Yes.” That way, we know Windows actually sees the printer.
Enabling Windows Internet Printing (IPP)
Windows and Linux share a modern, neat way of offering printing services to clients. It’s an Internet standard called IPP, or Internet Printing Protocol, and it’s documented in the Internet Printing Protocol (IPP) in RFC 2910. The idea is that if you know a web page address (e.g.,
http://<
something
>
), you’ll be able to print to the printer. RFC 2910 says that printer traffic will come over port 631 (as opposed to the normal port 80 traffic for http).
4428.book Page 267 Tuesday, August 2, 2005 8:54 PM

268
Chapter 5 �
Printer Sharing between Windows and Linux
Everything in Windows that involves anything http means that Windows IIS needs to be con-figured. At installation time, we recommended that you install IIS on your Windows server, so you should be ready to go here. If you haven’t loaded IIS, you’ll have to do that now. Again, IPP is optional but very neat, and we’ll be setting it up so our Windows and Linux clients will know the web address of our printers and be able to be off and running.
Here’s the trick, though. Windows doesn’t call it IPP, they have their own name: Windows Internet Printing. In addition, Microsoft’s Windows Internet Printing doesn’t use the standard port 631—it uses regular ol’ port 80. According to Microsoft, this is because the original RFC didn’t specify a port, and that’s what Microsoft wrote to. Now the RFC specifies port 631, but Microsoft was already committed to port 80. This really isn’t a problem, though it might be nice if Microsoft had an easy-breezy way to make Windows Internet Printing completely support the RFC standard. But they don’t. So, as we go along in this journey, we’ll tell our Linux clients how to use Windows Internet Printing over port 80 so the Windows server can pick up the traffic, run with it, and start printing.
Let’s configure it now.
Installing IIS and Internet Printing (If Not Previously Performed)
The first step in using IPP is to ensure that Windows IIS and the Internet Printing extension is installed. To install IIS (or to check if it’s installed):
1.
Select Start �
Control Panel �
Add or Remove Programs.
2.
Select “Add / Remove Windows Components.”
3.
In the list of components, double-click “Web Application Server” and select the “Internet Information Services (IIS)” check box.
4.
Double-click the “Internet Information Services (IIS)” entry to see the optional components underneath. Ensure “Internet Printing” is selected, as shown in Figure 5.2.
5.
Click “OK” to close the “Internet Information Services (IIS)” screen. Click “OK” to close the “Application Server” screen.
6.
Click “Next” to continue at the Windows Components screen.
7.
Click “Finish,” then close Add/Remove Programs
Verifying Windows Internet Printing Is Installed
You just verified that IIS with the “Internet Printing” option is installed. So, theoretically, Win-dows Internet Printing is ready to go. However, it’s always best to confirm that it’s enabled. To confirm Windows Internet Printing is enabled:
1.
Select Start �
Programs �
Administrative Tools �
Internet Information Services Manager (IIS).
2.
Drill down to Windc1 �
Web Services Extensions. Ensure “Internet Printing” is present and has a status of “Allowed.”
Setting up IIS to Allow Windows Internet Printing from Linux Clients
By default the only clients who can print via IPP are (who woulda guessed?) Windows clients. If we want Linux clients to be able to print using Windows Internet Printing, we need to open up additional access to “anonymous access.”
4428.book Page 268 Tuesday, August 2, 2005 8:54 PM

Leveraging Windows Printers
269
F I G U R E 5 . 2
Use Add/Remove Programs to install “Internet Printing.”
Enabling anonymous printing allows a Linux user to send bazillions of pages of print jobs to any printer hosted by the Windows print server. As it stands now, Windows users can already do this, but you should know what you’re getting into.
Allowing access to Anonymous opens up a potential security issue. This is
because Anonymous will have read/write access to the spool files.
To do this:
1.
In the IIS manager, drill down to WinDC1 �
Web Sites �
Default Web Site �
Printers. Right-click “Printers” and select “Properties.”
2.
Select the “Directory Security” tab. In the “Authentication and access control” section select “Edit” to open the “Authentication Methods” dialog.
3.
In the “Authentication Methods” dialog, select “Enable anonymous access” and ensure “Integrated Windows authentication” is enabled, as shown in Figure 5.3. You can leave everything else the same.
4.
Click “OK” to return to the “Printers Properties” dialog.
5.
Click “OK” to return to the IIS Manager. Close the IIS Manager.
4428.book Page 269 Tuesday, August 2, 2005 8:54 PM
270
Chapter 5 �
Printer Sharing between Windows and Linux
F I G U R E 5 . 3
You can secure IIS to allow authentication in a number of ways. Here, we
suggest you specify only “Integrated Windows authentication.”
You can also control access to Internet printers based on the IP address (as opposed to user credentials). To specify which computers can use the printers, in the Printers Properties screen, select “Edit”
under
“IP address and domain
name restrictions
.”
Preparing for Older Clients
As time marches on, newer and better ways to do things come along. Printing is definitely one of those things that have gotten easer and better over time. However, there might be occasions when you have Windows or Linux clients that are stuck in the stone age. Consequently, you need to configure your server so your older clients can still print. Let’s make some adjustments to our Windows servers so our older Windows clients can print. Additionally, we’ll set up a ser-vice on our Windows server so that older Unix (and Linux) clients can print using an older pro-tocol called LPD.
Preparing for Older Windows Clients
Modern Windows clients need little preparation to start printing with Windows servers right away. However, if you have old and crusty clients such as Windows 9
x
or Windows NT 4 lying
4428.book Page 270 Tuesday, August 2, 2005 8:54 PM

Leveraging Windows Printers
271
around, it might be in your best interest to enable those computers to automatically download the drivers from this Windows server.
To do that, right-click over the printer definition in the Printers applet in Control Panel and select “Properties.” In the “Sharing” tab, select “Additional Drivers” (in the lower right side). Then select the category of driver you want to additionally install, such as Windows NT 4.0. Note that in Figure 5.4, no older client drivers are actually selected.
Once you select the additional drivers, you’ll be prompted for the files. This is where the pain can occur. That is, you need to dig up the drivers from either the old NT 4 CD-ROM or down-load them from a manufacturer’s website—or maybe they don’t exist at all.
Preparing for Older Unix/Linux Clients
As you’re about to see, we’ll want our Linux clients to print to Windows servers via modern methods, such as the traditional Windows printing protocol (SMB, the same protocol used for Windows file sharing in Chapter 4) or the newer Windows Internet Printing.
However, the original old-school way to print from Unix to Unix was via a client-side pro-gram called Line Printer Request, or “LPR,” which sent data to a Unix server running “LPD” or Line Printer Daemon. This method is falling by the wayside but is still in heavy use, especially on legacy systems. To that end, Windows can pretend to run LPD. That way, older Unix and Linux clients that don’t want to (or cannot) print via one of the new-school ways can still inter-operate and print.
F I G U R E 5 . 4
If desired, you can add automatic downloading driver support for older
Windows clients.
4428.book Page 271 Tuesday, August 2, 2005 8:54 PM
272
Chapter 5 �
Printer Sharing between Windows and Linux
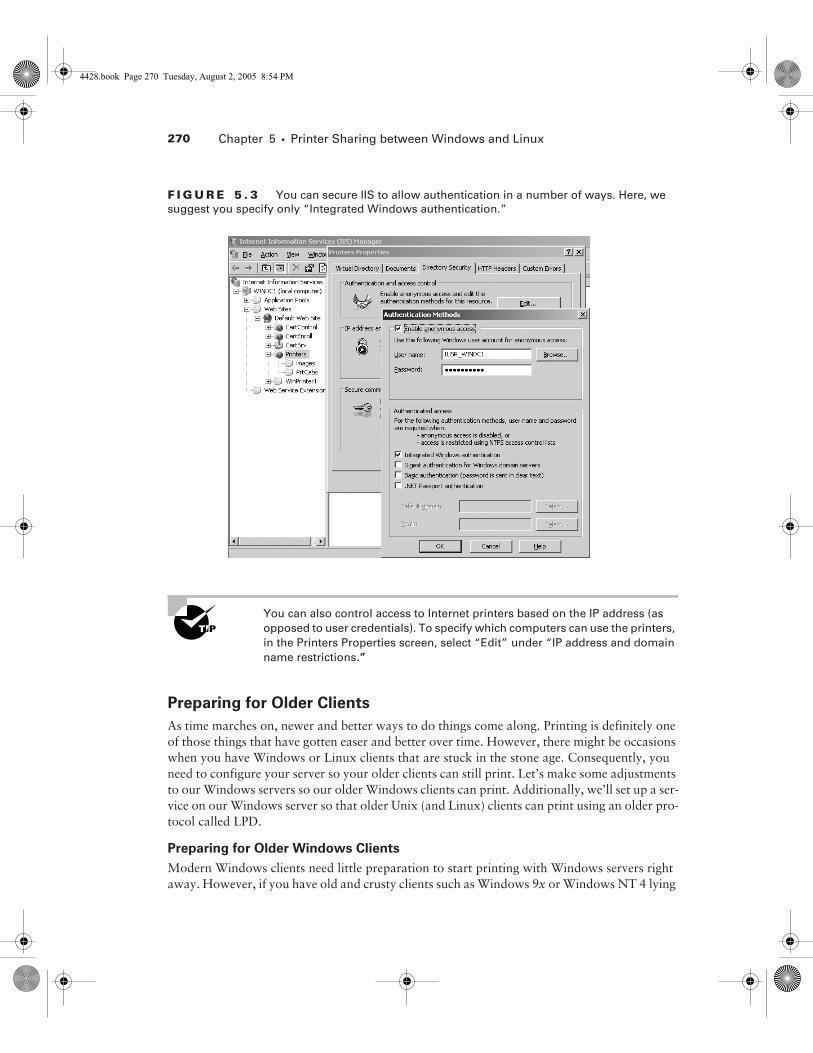
So we’ll teach Windows to run the LPD (via a service called “Print Services for Unix”) so an older Unix or Linux machine needn’t change in any way to print to Windows. Again, this isn’t the preferred method—it’s here for completeness. Additionally, the “Print Services for Unix” are not part of the Services for Unix 3.5 we loaded in earlier chapters. “Print Services for Unix” are just a regular, built-in part of Windows 2003 and Windows XP.
To enable Print Services for Unix:
1. Select Start � Control Panel � Add or Remove Programs.
2. Select “Add / Remove Windows Components.”
3. In the list of components, double-click “Other Network File and Print Services” and select the “Print Services for Unix,” as shown in Figure 5.5.
4. Click “OK” to return to the Windows Components screen and click “Next” to continue.
5. Click “Finish” when finished.
Performing Printing Tests
Now that our Windows server is all set up to accept print jobs from Windows and Linux clients, let’s do some testing.
F I G U R E 5 . 5 “Print Services for Unix” is built into Windows 2003 and Windows XP and enables LPD printing.
4428.book Page 272 Tuesday, August 2, 2005 8:54 PM
Leveraging Windows Printers 273
Printing from Windows Clients
There are several ways you can locate printers from a Windows client:
Using Active Directory We’ll be exploring this option later, but here’s the short story. Once SMB printers are available (either from Windows or Linux Samba), they can be “published” in Active Directory. Then our Active Directory–aware clients can easily find them, connect to them, and print to them.
Using Network Neighborhood to browse You can, if you like, browse for SMB printers using Network Neighborhood. Just browse, browse, browse, find the printer and double-click it to load the drivers. You’ll get a chance to do this later.
Using \\servername\printername We’ll explore this in this chapter. That is, we’ll just enter the name of the server and the printer and, voilà! We’ll be printing in no time.
Using Windows Internet Printing This method of printing allows us to take advantage of the new Windows Internet Printing we just set up. We can point our Windows clients to the printer using only a web-browser. We’ll also explore this in this chapter.
Using \\servername\printername
The most common way to connect to a Windows printer is by opening the “Printers and Faxes” applet in Control Panel and selecting “Add a printer” to start the “Add Printer Wizard.”
At the “Local or Network Printer” screen, you’ll be able to select “A network printer, or a printer attached to another computer.” You’ll then have the option to “Connect to this printer (or to browse for a printer, select this option and click Next),” as shown in Figure 5.6. Either type the name of the printer (\\windc1\WinPrinter1 ), or leave it blank and click “Next” and browse for the printer.
Note that browsing for the printer is different from searching for the printer. Browsing relies on Windows’ Browser service. Searching, as we’ll perform at the end of the chapter, relies on records within Active Directory that we can search for.
When ready, enter the name of the server and printer as shown in Figure 5.6 and click “Next.” You will be asked if you want to make this the default printer. Click “Next” to say yes, then click “Finish” to close the wizard.
At the “Local or Network Printer” screen, instead of selecting a network printer you can browse for a printer. To do this, select the option “Connect to this printer” option and click “Next”—but note that browsing for the printer is dif-ferent from searching for the printer. Browsing relies on Windows’ Browser service. Searching, as we’ll perform at the end of the chapter, relies on records within Active Directory that we can search for.
Using Windows Internet Printing
Another way to connect to the printer on WinDC1 is to use the Windows Internet Printing we set up earlier. To connect to a printer from an XP client:
1. Fire up Internet Explorer.
4428.book Page 273 Tuesday, August 2, 2005 8:54 PM

274 Chapter 5 � Printer Sharing between Windows and Linux
F I G U R E 5 . 6 You can enter the SMB name of the printer in the “Add Printer Wizard.”
2. Enter the address in the form of http:// <server_name>/printers , such as http://windc1/printers . A list of shared printers on the server appears.
3. Click the name of the printer. You’ll see several possible “Printer Actions.” Select “Connect to this printer,” as shown in Figure 5.6, and you’ll be prompted to add the printer as shown in Figure 5.7.
You already installed the printer in the previous step, so re-installing it here won’t have any effect.
You can now try to send a test print to the printer!
F I G U R E 5 . 7 Windows Internet Printing offers an easy way to connect to printers.
4428.book Page 274 Tuesday, August 2, 2005 8:54 PM

Leveraging Windows Printers 275
Printing to Windows Servers from Linux Clients
Of course, Windows to Windows printing should “just work.” The fun part starts when Linux clients try to print to Windows server. There are three ways they can do this:
Printing via LPD Linux can talk old school to Windows (which is happy to talk old school, too).
Printing via SMB Linux can send native SMB printing requests to Windows machines—just like the majority of Windows clients do.
Printing via Internet Printing (IPP) Since we just set up Windows Internet Printing, it might be nice to use it. Again, note that Windows uses port 80 (where the RFC specifies port 631), so we have to tell our Linux clients to use port 80 and not 631.
Linux Clients Printing to Windows LPD
As stated, the old-fashioned way to print on Unix is called LPD. It’s still well supported by modern Linux distributions. When you have a modern Linux client and a modern Windows server, you’re not likely to use it because you have the (better) options of using IPP and/or SMB printing. However, for completeness, let’s ensure that our Windows can embrace Linux printer jobs and utilize LPD.
We’ll configure our Linux client (which is a member of our Active Directory), adlincli1, to print via LPD. Rather than Webmin, we’ll use Fedora’s standard printer configuration tool, which does a good job. Indeed, the Printer Queue Setup Wizard is quite friendly to work with. In general, the standard Fedora tools work well enough for client tasks, so we chose not to install Webmin on our clients.
In the Unix world, historically everything was printed in a common lingua franca known as the Postscript language, and the old-school Unix-to-Unix way of printing would be to just choose a generic Postscript driver. This clever technique sidesteps the worry about specific printer drivers on every Unix client system; we’ll further explore this curiosity later.
However, in this case, we need to tell our Linux client about the proper printer driver we need because our target machine is a Windows print server. We’ll select the BJC-7000 specifi-cally (when we come to that step). To configure our Linux client machine to print a Windows LPD server:
1. From the “Applications” menu, drill down to System Settings � Printing. Wait for the “Printer configuration” tool to appear.
2. Click the “New” button to add a new print queue.
3. Click “Forward” on the explanatory page that follows.
4. On the “Queue name” page, enter WinPrinter1ViaLPD in the “Name” field. In the “Short description” field, enter Windows Printer One Via LPD or another descriptive name that you like. Click “Forward.”
5. On the “Queue type” page, pull down the “Select a queue type” menu and pick “Net-worked Unix (LPD),” as shown in Figure 5.8.
6. The “Server” and “Queue” fields appear. Enter windc1 in the “Server” field and WinPrinter1 in the “Queue” field. Click “Forward.”
4428.book Page 275 Tuesday, August 2, 2005 8:54 PM

276 Chapter 5 � Printer Sharing between Windows and Linux
7. On the “Printer model” page, pull down the “Manufacturer” menu and pick “Canon.” Then scroll through the list of models and pick “BJC 7000.” Click “Forward.”
8. The “Finish, and Create the New Print Queue” page appears. Click “Finished.”
9. When asked whether you wish to print a test page, click the “Yes” button. A test page will emerge from your printer after a short delay.
For a more interesting test, we also suggest launching OpenOffice Writer from the “Office” section of the “Applications” menu. Create a simple document and pick “Print” from the “File” menu. Be sure to select “WinPrinter1ViaLPD” as the printer to use, then click “Print” in the “Print” dialog to send your test document to the Windows-hosted printer.
F I G U R E 5 . 8 Once your Windows server has LPD set up, you can choose LPD printing as an option.
Linux Clients Printing via Samba to Windows SMB
Linux can also handle printing to native Windows SMB printer shares, thanks to Samba. The pro-cess is just as smooth as the just-demonstrated LPD (and quite similar), though there is one snag.
You’ll choose this option when you have control over your Linux clients but can’t change (or don’t want to change) much on the Windows server. In cases like these, printing directly to Win-dows via Linux SMB printing support is ideal.
When you have the option of setting up Windows Internet Printing on the Windows server, the case for SMB isn’t quite as strong. Given a choice between the two, Windows Internet Print-ing is probably the easiest way to go. That’s because IPP is an open standard; the rules aren’t likely to change.
Since SMB is not a fully open and documented standard, there’s always a chance that a new version or service pack of Windows will exercise features the Samba team hasn’t seen before. That makes SMB printing a moving target, which can lead to temporary but annoying problems for Samba file sharing and printing. In addition, in our tests we had difficulty printing test pages from the Fedora printer configuration tool, although printing from actual applications worked fine. True, SMB printer sharing offers the ability to install drivers automatically, but those driv-ers are for Windows only, so they don’t help your Linux clients support new printers. Active Directory does offer a searchable database of printers, but as of this writing, Fedora’s printer
4428.book Page 276 Tuesday, August 2, 2005 8:54 PM

Leveraging Windows Printers 277
configuration tool doesn’t support searching it. Given these facts, we think your best choice is to set up Windows Internet Printing. However, when you can’t, SMB printing from Linux is a fine alternative.
Setting up adlincli1 to print via SMB isn’t difficult. Once again, we’ll use Fedora’s stan-dard printer configuration tool. The Printer Queue Setup Wizard works fine for SMB printing, except for a problem we observed in our tests of the “print a test page” feature.
1. Pull down the “Applications” menu and drill down to System Settings � Printing. Wait for the printer configuration tool to come up.
2. Click the “New” button to add a new print queue.
3. Click “Forward” on the following page.
4. On the “Queue name” page, enter WinPrinter1ViaSMB in the “Name” field. In the “Short description” field, enter Windows Printer One Via SMB or another descriptive name that you like. Click “Forward.”
5. On the “Queue type” page, pull down the “Select a queue type” menu and pick “Net-worked Windows (SMB).”
6. A list of shares appears. If the server you want appears, great—click the arrow to the left of it to display a list of shares and double-click the shared printer you want. The “Authen-tication” dialog should appear with the “Workgroup,” “Server” and “Share” fields already filled in. If it does not, as in our tests, click the “Specify” button.
7. If not already done, set the “Workgroup” field to AD, as shown in Figure 5.9.
8. If not already done, set the “Server” field to WinDC1.
9. If not already done, set the “Share” field to WinPrinter1 .
10. Set the “User name” field to administrator .
11. Set the “Password” field to p@ssw0rd.
F I G U R E 5 . 9 Select your Windows queue and then enter your Active Directory credentials.
4428.book Page 277 Tuesday, August 2, 2005 8:54 PM

278 Chapter 5 � Printer Sharing between Windows and Linux
For the record, Windows applications that provide SMB print services are ker-berized. That means, theoretically, you shouldn’t have to enter your username and password when printing from Windows clients to Windows servers. How-ever, the Linux client GUI isn’t quite there yet with kerberization. So, when printing from Linux to Windows clients, you will likely still need to enter your credentials. See Chapter 4 for more information about kerberization.
12. Click “OK” to dismiss the “Authentication” dialog.
13. Note that WinDC1 is added to the list of servers if it was not previously detected. Make sure “WinPrinter1 (Specified)” is selected beneath it.
14. Click “Forward.”
15. On the “Printer model” page, pull down the “Manufacturer” menu and pick “Canon.” Then scroll through the list of models and pick “BJC 7000.” Click “Forward.”
16. The “Finish, and Create the New Print Queue” page appears. Click “Finished.”
17. When asked whether you wish to print a test page, you may click the “Yes” button. How-ever, in our tests, this did not produce a successful test page—but actual printing from applications worked just fine.
For a more meaningful test, especially if the test page feature does not work for you, we sug-gest launching OpenOffice Writer from the “Office” section of the “Applications” menu. As in the previous example, create a simple document and pick “Print” from the “File” menu. Be sure to select “WinPrinter1ViaSMB” as the printer to use, then click “Print” in the “Print” dialog to send your test document to the Windows-hosted printer.
Linux Clients Printing via IPP to Windows Internet Printing
Leveraging Windows Internet Printing is the best bet for supporting Linux clients printing to Win-dows servers because Windows Internet Printing is compatible with the Internet Printing Protocol (IPP), an open standard. Again, however, it should be noted that the genuine RFC 2910 standard clearly states that the printing traffic is required (in big ALL CAP letters) to utilize port 631, whereas Windows Internet Printing only supports port 80 by default. To be fair, it is possible to add an addi-tional virtual “website” listening on port 631 to your IIS configuration, but this ought to happen right out of the box when IPP is installed. We’ll continue configuring adlincli1 and have it print to our Windows servers via IPP/Windows Internet Printing.
Windows Internet Printing printers don’t advertise their existence in a way that makes it easy for Fedora clients to browse them. By contrast, you’ll see later that when we set up printers on Fedora that Fedora goes the extra mile and broadcasts their existence. This allows for users on Fedora to more easily find Fedora printers. Windows clients can browse or search for Windows Internet Print-ing printers if they are published in Active Directory, but this doesn’t currently help Fedora clients.
So Fedora clients won’t be able to just “find” Windows printers via Windows Internet Print-ing. We need to manually type the path and server where the printer is located the first time we use such a printer. And, since Windows Internet Printing normally responds on port 80 while Fedora’s expectation is to deliver on port 631, we’ll need to properly instruct the client about the required port change.
4428.book Page 278 Tuesday, August 2, 2005 8:54 PM

Leveraging Windows Printers 279
Let’s jump right to the end of this little story by taking a look at the dialog box we’ll enter our printer information into, as shown in Figure 5.10. (Don’t worry, we’ll describe all the step-by-steps in a second.)
F I G U R E 5 . 1 0 Printing to a Windows server with Windows Internet Printing requires you to specifically enter the port number (80) and the printer path.
To talk to a Windows Internet Printing server, we need to know three pieces of information:
Server The “Server” field will always look like this
servername:80
In our example, the server name is WinDC1, so the correct setting is:
WinDC1:80
Path The “Path” field will always look like this:
/printers/printername/.printer
In our example, the printer name is WinPrinter1, so the correct setting is:
/printers/WinPrinter1/.printer
The /printers/ prefix is necessary because Windows Internet Printing is delivered by the web server, which may have other uses. So printers don’t belong in the top folder. The /.printer suffix is a common convention and mandatory when using Windows Internet Printing.
Now we know enough to set up our Fedora system as a client of Windows Internet Printing. To have our Linux client print to Windows via IPP:
1. Pull down the “Applications” menu and drill down to System Settings � Printing. Wait for the “Printer configuration” tool to appear.
2. Click the “New” button to add a new print queue.
4428.book Page 279 Tuesday, August 2, 2005 8:54 PM

280 Chapter 5 � Printer Sharing between Windows and Linux
3. Click “Forward” on the explanatory page that follows.
4. On the “Queue name” page, enter WinPrinter1ViaIPP in the “Name” field. In the “Short description” field, enter Windows Printer One Via IPP or another descriptive name that you like. Click “Forward.”
5. On the “Queue type” page, pull down the “Select a queue type” menu and pick “Net-worked Unix (CUPS).”
6. The “Server” and “Queue” fields appear. Enter WinDC1:80 in the “Server” field (note that we specify port 80). Enter /printers/WinPrinter1/.printer in the “Path” field (see Figure 5.10). Click “Forward.”
7. On the “Printer model” page, pull down the “Manufacturer” menu and pick “Canon.” Then scroll through the list of models and pick “BJC 7000.” Click “Forward.”
8. The “Finish, and Create the New Print Queue” page appears. Click “Finished.”
9. When asked whether you wish to print a test page, click the “Yes” button. A test page will emerge after a short delay.
As in the previous scenarios, we also suggest using OpenOffice Writer to carry out a more interesting test. Be sure to select “WinPrinter1ViaIPP” as the printer to use.
Leveraging Linux PrintersThe LPD (Line Printer Daemon protocol) and the associated lpr command formed the core of the Linux print spooling system for many years. Even today, the lpr command and the LPD remote printing protocol are still available as part of the modern Linux/Unix printing system.
This more modern system is called CUPS (Common Unix Printing System). CUPS is imple-mented by the cupsd daemon, and it also speaks the more modern IPP protocol (Internet Print-ing Protocol). To understand how Linux printing works today, it is necessary to understand a few things about the history of printing on Linux and Unix systems.
Understanding Linux Printing
For many years Unix printing facilities were heavily oriented toward plain-text, 80-column printing. Later, Adobe’s Postscript language became the standard Unix answer to the question of attractively formatted printing. Those who wanted to print attractive documents in a porta-ble way were advised to purchase a Postscript printer with a built-in interpreter for the Post-script language. The popularity of Postscript printers for use with Macintoshes made this a reasonable choice, and Unix systems were generally high-end workstations, so the higher price of Postscript printers was not an issue.
At the time when Postscript printers were most popular, placing the smarts to interpret the Postscript language in the printer made sense because Postscript is a high-level, human-readable language that can describe a page in a very sophisticated way. Ten years ago, translating that lan-guage into dots on a page required a large percentage of any computer’s resources.
4428.book Page 280 Tuesday, August 2, 2005 8:54 PM
Leveraging Linux Printers 281
Printing to Network Print Servers
Of course, in today’s office environment and even in the home, printers are not always con-nected directly to a Linux or Windows server. Instead, printers are often connected directly to the network via a device called a dedicated print server. The sole function of a dedicated print server is to accept a stream of printer commands from print clients and to communicate those commands to the attached printer.
However, even though a printer has a dedicated print server, it still needs support from a gen-eral purpose computer running Windows or Linux to provide temporary print job storage and to host additional management features too complex to store in the limited memory of the net-work print device.
Printing to a dedicated print server from Windows is generally straightforward because man-ufacturers provide Microsoft with drivers for their network print devices along with drivers for their printers. But what about Linux?
IPP-Compatible Print Servers
As it turns out, most print server manufacturers today support IPP in their latest products, and they support it in just the way Fedora Linux expects: on port 631. That means that we can add a queue for such a printer using the “Networked Unix (CUPS)” queue type in Fedora’s printer configuration tool. Not all such boxes advertise themselves on the local network, so you will usually need to enter the print server’s IP address and a printer path. Windows users also need to do this using the Internet Printing feature of the Add Printer Wizard. The exact server IP and printer path information to use is readily available in the documentation of each print server. Standalone print servers offer a web-based configuration interface, which can be operated with equal ease from Linux- and Windows-based web browsers.
Examples of IPP-compatible print servers on the market as of this writing include the Linksys WPS54GU2, which offers a wireless network interface and support for both parallel and USB printers. Another similar unit is the Netgear PS101NA, a less expensive device with a wired Ethernet interface and a parallel printer port.
HP Jetdirect Print Servers
One type of dedicated print server requires special mention, the Hewlett-Packard Jetdirect printer server. It’s possible to print to newer Jetdirect print servers using IPP, but you can also print from Linux to a Jetdirect print server using HP’s own Jetdirect protocol.
Newer models of Jetdirect printer servers offer a browser-based configuration interface that can be accessed from any operating system. Once the printer server has been configured, you can click the “New” button in the Fedora printer configuration tool and select the “Networked Jetdirect” queue type on the first page of the wizard. When prompted, enter the IP address of the Jetdirect box in the “Printer” field and leave the port number set to 9100 to talk to a standard Jetdirect box. The rest of the steps are identical to those for a local printer.
4428.book Page 281 Tuesday, August 2, 2005 8:54 PM

282 Chapter 5 � Printer Sharing between Windows and Linux
Of course, not all printers understood Postscript even at the height of its popularity. Cheaper printers in general rarely had Postscript interpreters built in. These printers instead “spoke” much simpler languages like HP’s PCL (Printer Command Language) or Epson’s ESCP2 (named for the escape sequence of characters that enabled it). These languages were interpreted at the host computer so that only control characters were sent to the printer itself. Using these printers on a Linux system required an open-source page rendering solution.
Matters grew worse with the introduction of Winprinters, which were (and sometimes still are) printers that, to save a few pennies, do not offer even the rudimentary smarts to handle a language like PCL or ESCP2. Instead, the computer to which they are attached is required to micromanage printing, right down to the precisely timed transmission of rows of pixels. The specifications for these printers were rarely made available to open source developers. Generally speaking, no one much cared for Winprinters because they put considerable and largely unnec-essary demands on the host computer. They also couldn’t be easily moved to computers running alternative operating systems.
Today, computers have CPU and memory to spare, and an open-source Postscript inter-preter, called Ghostscript, is a standard part of every Fedora Linux system. Ghostscript sup-ports many different printer languages on the back end, including hundreds of printers that do not speak Postscript natively (and even quite a few Winprinters!). Ghostscript accepts Postscript as input and renders a bitmap of the actual pages. Then it feeds the results to the printer in its native control language. If Ghostscript supports your printer, or it speaks Postscript natively, then you can attach that printer to a Linux system.
Why Linux Printing and Windows Printing Are Different
All Windows applications use a single interface to the operating system to create graphics called the GDI (Graphics Device Interface). GDI draws stuff on the screen, and it’s also what’s used to help stuff get printed on the page.
While it’s true that there can be differences between printer drivers and on-screen graphics drivers, in a general sense Windows programmers can write one set of code both for the screen and the printer.
Because Windows is so popular, it wasn’t difficult for Microsoft to convince printer manu-facturers to create GDI printer drivers. Even Postscript printers have GDI drivers, which trans-late GDI API requests to Postscript commands. We’ll take advantage of that fact later, when we wish to print from Windows clients to Linux servers without the need for a printer-specific print driver on each Windows client.
On the Linux side, the situation is different. Linux applications draw to the screen using the X Window System or libraries, like GNOME’s gtk library, which are built on top of it.
However, the X Window System was not originally intended for printing (although some support for printing was added very recently). Linux and other Unix systems use Adobe’s Postscript printer language for printing tasks. Applications, or the development libraries they rely on, must provide separate code for on-screen graphics and Postscript printer graphics. That’s why Postscript-compatible printers, as well as the free Ghostscript inter-preter software that permits non-Postscript printers to handle Postscript, hold such key roles in Linux printing.
4428.book Page 282 Tuesday, August 2, 2005 8:54 PM

Leveraging Linux Printers 283
Linux-Compatible (and Not-So-Compatible) Printers
Does this mean that every printer works with Linux? Well, no. Some Winprinters continue to provide only a proprietary and undocumented interface. Since their manufacturers will not release information to the Ghostscript developers, nothing can be done to support those printers.
The good news is that virtually all “business-class” printers (such as most modern laser print-ers) work well with Linux. In addition, certain printer manufacturers have been particularly generous in their support of Linux. Thanks to HP’s thorough and detailed support, virtually all of HP’s printers are highly Linux-compatible, even including home-oriented multifunction ink-jet models such as the HP PSC 2175. HP provides a driver called hpijs that does the back-end work to make this possible, and hpijs is a standard part of Fedora Linux.
Epson has made a similar effort, and most current Epson printers are also highly Linux-compatible via Epson’s gnome-print driver. And although most of the low-end inkjet Lex-mark printers are not particularly Linux-friendly, Lexmark’s business-class laser printers are thoroughly supported.
Of course, we need more precise information to decide whether a specific printer is suitable for Linux. How can we most easily sort out the compatible printers from the rest? The website www.linuxprinting.org offers both a compatibility database and a list of recommended printers for Linux at:
www.linuxprinting.org/printer_list.cgi
If you’re shopping for a new printer specifically for your Linux system, compatibility should be your first consideration. You can find Linux printer recommendations at:
www.linuxprinting.org/suggested.html
How Linux Printing Works Today
Nearly all modern Linux applications generate Postscript code when asked to print a document. Sometimes they do this directly, other times via printing APIs supported by gtk or KDE’s Qt library. The Postscript code is then sent to CUPS, often via the lpr command. If the printer does not reside on the same computer, the Postscript code is delivered to the print server via IPP.
CUPS maintains a queue of print jobs for each printer. This way, the application can con-tinue operating in the foreground while printing tasks are carried out in the background. In the background, CUPS then launches a printer driver.
Printer drivers consist of a .ppd file and, if the printer does not natively speak Postscript, a filter program as well. The filter program is usually a simple wrapper shell script that launches Ghostscript with appropriate parameters for the printer. The filter program is responsible for translating Postscript (or occasionally simple plaintext) input to the native language of the printer. Finally, this raw printer-friendly data is fed to the printer by CUPS, either via the USB port or an old-fashioned parallel port interface. See Figure 5.11 for a diagram of the Linux printing architecture.
4428.book Page 283 Tuesday, August 2, 2005 8:54 PM

284 Chapter 5 � Printer Sharing between Windows and Linux
F I G U R E 5 . 1 1 The Linux printing architecture
Printing from Windows: Postscript vs. Native Drivers
Figure 5.11 shows how Linux printing works in a pure Linux environment. But Linux can also accept print jobs from Windows clients. Windows print jobs can arrive via LPD, IPP, or SMB. LPD and IPP are natively supported by CUPS with no additional configuration. SMB is sup-ported by Samba, which passes all printing requests through to CUPS.
Individual Windows clients have printer drivers that output the native language of the printer, or an intermediate, Windows-specific language that is more compact for transmission over the network. Windows print servers then interpret the intermediate language and pass the result to the printer. So what happens when Windows clients talk to Linux print servers? There are two ways to approach the problem.
Postscript Printing from Windows to Linux
A Windows client can print to a Linux server using a Postscript driver, just as a Linux client would. This means that you can load any ol’ Postscript printer driver on all your Windows sys-tems (like an Apple Color LaserWriter 12/600), instead of the “real” printer model name and number…and you’re off to the races. This assumes that your printer has similar physical capa-bilities to the Postscript printer the driver is intended for, especially the same paper size.
We’ll do this later in several steps and talk more about the process as we do it. However, the best news is that once one Windows client system is all set up, we can automatically tell our
Office Application
PPD Files
Ghostscript
Non-Postscriptprinters Postscript Printers
CUPS daemonSpooling services
Postscript
Postscript
Postscript
Filter program
Raw printer data
Postscript
4428.book Page 284 Tuesday, August 2, 2005 8:54 PM

Leveraging Linux Printers 285
Linux server what to tell new Windows clients when they want to print. In other words, other clients will pick up the printer type information saved on the server and avoid even the need to pick a driver.
Additionally, you might have some old-and-crusty printer that doesn’t have proper “net-working” drivers available. If the printer is supported by Ghostscript, then the printer can always be shared over the network. For instance, you could take that $50 low-end inkjet printer and get it on your network. That’s cool.
Raw Printing from Windows to Linux
Using a Postscript driver does have one disadvantage. Sometimes printer drivers offer special features, like specifying the printer resolution or how much ink is available in the ink well or stapling options. Those features can’t usually be supported if we use the Post-script approach.
When these features are essential for our application, we need to use the correct native Windows printer driver. To do that reliably with a Linux print server, we’ve found it is best to create a separate raw printer queue with the Fedora printer configuration tool. Creating a raw queue, instead of a queue for a specific model of printer, tells CUPS not to try to interpret the data it receives from the client in any way. Instead of trying to determine whether the data is Postscript code, CUPS will pass it directly to the printer without modification. In this chap-ter, we’ll demonstrate the raw queue approach with SMB, but bear in mind that we could also use it with IPP or LPD.
Understanding Linux Printer Device Names
Last but not least, before we start configuring printer queues on a Linux server, you should understand how physical printer devices are labeled in Linux. Since we’re using a parallel printer that is not automatically detected by Fedora Linux, we’ll need to tell Fedora to which port we’ve connected it. Windows calls the first parallel printer port LPT1, the second port LPT2, and so on.
Linux calls these devices /dev/lp0, /dev/lp1, and so forth. Just remember that the Linux printer device names start from zero, not from one, and you’ll be in great shape.
As for USB, Fedora Linux can automatically detect quite a few USB printers when they are connected. For instance, Fedora Core 3 automatically detects an HP PSC 2175 printer and offers to create a queue for it. However, it is sometimes useful to add a second queue for the same printer. In fact, we need this capability to support both a raw queue for Win-dows clients with native drivers and a Postscript queue for Linux clients, so it does help to be able to recognize a USB printer device name when you see one in the printer configura-tion tool.
USB printer devices are called /dev/usb/lp0, /dev/usb/lp1, and so forth. And because USB devices can identify themselves by name, the printer configuration tool will also display the model name to the right of the device name.
4428.book Page 285 Tuesday, August 2, 2005 8:54 PM

286 Chapter 5 � Printer Sharing between Windows and Linux
Setting up a Linux Printer
Now that you know what’s going on “under the hood” and why, we’re ready to start printing via a Linux server. We’ll begin by attaching a printer to our Linux domain member server, adsambafp1.ad.corp.com (refer back to Figure 5.1).
Here are the short-term goals for this section:� We’ll configure CUPS and Samba to support IPP, LPD, and SMB (Windows) printing on
two queues, one a typical CUPS queue expecting Postscript, the other a raw queue intended for use with Windows clients.
� We’ll demonstrate Linux-to-Linux printing via IPP over the Postscript-friendly queue.� Finally, we’ll “go for the gold” and demonstrate Windows-to-Linux printing by all three
methods. Here, we’ll show how to use both the Postscript-based queue and the raw printer queue. For those interested in the raw approach, we’ll also look at how to support Win-dows click-and-print automatic downloading of printer drivers via SMB with Samba, and we’ll show how to publish Samba SMB printers in Active Directory.
First, we’ll physically attach our printer to our Linux server’s parallel port. However, unlike in our Windows examples, the printer we’ll use is a Canon i560. We use this printer because we want to demonstrate click-and-print driver downloading. Since the driver for the BJC-7000 printer we used earlier is standard in Windows XP, there is nothing to download, so the i560 is a much better demonstration of that feature.
However, Fedora Linux doesn’t ship with a driver specifically for the Canon i560, so how will we support it on the Linux side in the CUPS-and-Postscript case? The answer is that the Canon i560 is backward compatible with the Canon BJC-7000, so we’ll use the BJC-7000 driver on Linux. However, on the Windows side, when we’re ready to demonstrate SMB print-ing with a native printer driver and a raw queue, we’ll use the “real” i560 driver to create an interesting test case for automatic driver downloading.
Now we need to tell the server about the printer we’ve attached to it. We’ll also need to deal with the sharing issues just mentioned. We’ll do this in three main steps:
1. We’ll use the Fedora printer configuration tool to add a new queue, or spool, for the printer we’ve just connected. We’ll tell Fedora that the printer is connected to the local parallel port, /dev/lp0, and we’ll configure this queue to translate Postscript print jobs to the printer’s native language. At the same time, we’ll enable sharing of the printer via IPP and LPD. Later, we’ll demonstrate IPP with both Windows and Linux clients and LPD with a Windows client.
2. We’ll add an additional raw spool that accepts raw printer data and forwards it directly to the printer. We’ll configure Samba to offer SMB printing via this raw spool; we’ll do this using Webmin. Later, we’ll demonstrate how to use this printer share with a Win-dows client.
3. We’ll configure the Linux server to support click-and-print driver downloading. Later, we’ll demonstrate that capability with two Windows clients: one to upload the driver for the first time and another to show that driver downloading works.
4428.book Page 286 Tuesday, August 2, 2005 8:54 PM

Leveraging Linux Printers 287
Adding a Postscript Spool for Our Printer
To add and share a new spool for the Canon i560 printer that accepts Postscript print jobs, just follow these steps. Bear in mind that we must use the older (but compatible) Canon BJC-7000 driver. That’s because no driver specifically for the Canon i560 is included with Fedora or avail-able on www.linuxprinting.org as of this writing.
What if we needed to use a printer that wasn’t supported by Fedora? We’d check www.linuxprinting.org for an appropriate driver. www.linuxprinting.org offers PPD files for many printers. These can then be imported into the CUPS printing system using the “Import PPD” option on the “Actions” menu of the Fedora printer configuration tool.
1. Pull down the “Applications” menu and drill down to System Settings � Printing. Wait for the printer configuration tool to appear.
2. Click the “New” button to add a new print queue.
3. Click “Forward” on the explanatory page that follows.
4. On the “Queue name” page, enter LinPrinter1 in the “Name” field. In the “Short description” field, enter Linux Printer One or another descriptive name that you like. Click “Forward.”
5. On the “Queue type” page, pull down the “Select a queue type” menu and pick “Locally-connected” as shown in Figure 5.12.
6. In the list box beneath that menu, select “/dev/lp0.” Then click “Forward.”
7. On the “Printer model” page, pull down the “Manufacturer” menu and pick “Canon.” Then scroll through the list of models and pick “BJC 7000.” Click “Forward.”
8. The “Finish, and Create the New Print Queue” page appears. Click “Finished.”
9. When asked whether you wish to print a test page, click the “Yes” button. A test page will emerge after a short delay.
10. Leave the printer configuration tool on the screen in order to continue with the next section.
Adding a Raw Spool for Our Printer
The spool we just created is useful for Linux clients, as well as for Windows clients using Post-script printer drivers. However, sometimes we want to use special features of a native Windows printer driver. Here are the steps to create a raw spool that accepts print jobs from Windows cli-ents using the native Canon i560 printer driver:
1. Pull down the “Applications” menu and drill down to System Settings � Printing. Wait for the printer configuration tool to appear.
2. Click the “New” button to add a new print queue.
3. Click “Forward” on the explanatory page that follows.
4428.book Page 287 Tuesday, August 2, 2005 8:54 PM

288 Chapter 5 � Printer Sharing between Windows and Linux
F I G U R E 5 . 1 2 Adding a local printer to a Linux server
4. On the “Queue name” page, enter LinPrinter1Raw in the “Name” field. In the “Short description” field, enter Linux Printer One Raw Spool or another descriptive name that you like. Click “Forward.”
5. On the “Queue type” page, pull down the “Select a queue type” menu and pick “Locally-connected.”
6. In the list box beneath that menu, select “/dev/lp0.” Then click “Forward.”
7. On the “Printer model” page, pull down the “Manufacturer” menu and pick “Generic.” Then scroll through the list of generic printer types and print “Raw Queue.” Click “Forward.”
8. The “Finish, and Create the New Print Queue” page appears. Click “Finished.”
9. When asked whether you wish to print a test page, click the “Yes” button. A test page will emerge after a short delay.
10. Leave the printer configuration tool on the screen in order to continue with the next section.
Sharing Printers via IPP and LPD with CUPS
The Common Unix Printing System (CUPS) is now aware of the printer and ready to accept jobs for it in two formats, raw and Postscript. Now, it’s time to share the printer via IPP. We will also lock this printer down so only specific client computers can print to it. We will choose to only allow local computers to print to this printer.
Lastly, we’ll enable old-fashioned LPD printing as well, just in case we have some old Unix machine that needs to print.
To configure our Linux server to enable printing via IPP and LPD:
1. Pull down the “Applications” menu and drill down to System Settings � Printing. Wait for the printer configuration tool to appear.
2. Make sure “LinPrinter1” is selected in the list of printer queues in the printer configuration tool’s main window.
3. Pull down the “Action” menu and pick “Sharing”.
4428.book Page 288 Tuesday, August 2, 2005 8:54 PM

Leveraging Linux Printers 289
4. The “Sharing Properties” dialog appears. Make sure the “Queue” tab is selected. Check the box labeled “This queue is available to other computers.” This enables IPP printer sharing.
5. To lock the printer down so that only certain client computers can print to it, select the “Allowed Hosts” list box and make sure “All Hosts” is selected. Then click “Remove,” fol-lowed by “Add” to display the “Add allowed hosts” dialog.
6. Click the “Network Address” radio button.
7. Now we'll specify the local network address to prohibit computers on other networks from printing to this printer. In the first field beneath “Network Address,” enter 192.168.2.0 . This is the network address that is allowed to access the printer.
8. In the second field, to the right of the first, enter 255.255.255.0 . This is the network mask. A zero for the last byte means that clients with addresses beginning with 192.168.2 and ending with any byte are allowed to print.
9. Click “OK.”
10. Click the “General” tab.
11. Click the radio box labeled “Enable LPD protocol.”
12. Click “OK.”
13. Choose “Quit” from the “Action” menu or just click the “X” button in the upper-right cor-ner to close the printer configuration tool.
14. When the message “Do you want to save the changes you have made to your printer con-figuration?” appears, be sure to click “Save.”
15. Repeat steps 1–14 for LinPrinter1Raw. Be sure to select “LinPrinter1Raw” rather than “LinPrinter1” when repeating step 2.
Sharing Printers via SMB with Samba
Now that the Fedora printer configuration tool has configured CUPS to drive the printer, we’ll add support for native Windows SMB printing via LinPrinter1Raw. Samba takes care of this chore for us, and Webmin provides a friendly way to set it up. Samba makes it especially easy by allowing us to set up a special “all printers” share that is automatically understood to mean “share all of the connected printers in the same way.”
Why do we share both of the print spools? Isn’t LinPrinter1Raw the only appropri-ate spool for Windows clients? Well, no. We can use a Postscript queue with Win-dows SMB clients if we want to. All we have to do is choose a Postscript printer driver instead of the Canon i560 driver on the client side. In this chapter, though, we’ll use Postscript drivers for LPD and IPP printing and the native Canon i560 driver for SMB printing. Just bear in mind that you’re not required to do it that way.
Samba needs a spool directory to store print jobs in. Conveniently, Fedora ships Samba with a ready-made directory for this purpose: /var/spool/samba. We’ll just specify this directory when prompted for the spool directory.
4428.book Page 289 Tuesday, August 2, 2005 8:54 PM

290 Chapter 5 � Printer Sharing between Windows and Linux
Follow these steps to complete the process:
1. Log into Webmin with the username root and the password p@ssw0rd at the URL: https://adsambafp1.ad.corp.com:10000/.
2. Click “Servers.”
3. Click “Samba Windows File Sharing.”
4. On the “Samba Windows File Sharing” page, click “Create a new printer share.”
5. On the “Create Printer Share” page, select “All Printers Share.”
6. Leave the “Unix Printer” menu set to “Default.”
7. Set “Spool Directory” to /var/spool/samba
8. Set “Available” to “Yes.”
9. Set “Browseable” to “Yes.”
10. Set “Share Comment” to “All Printers.”
11. Click “Save.”
LinPrinter1, LinPrinter1Raw, and any other printer queues you add to the server are now set up to be automatically shared via SMB so that Windows clients can use them in a familiar way. But before we demonstrate that, we’ll improve matters even more by adding support for click-and-print printer driver uploading and downloading.
Setting up Samba to Enable Windows Click-and-Print
Driver Downloads
Microsoft’s click-and-print system is a neat trick: clients can automatically download drivers from the server. Windows servers simply dish out the driver when the client asks. It all happens in the background and it’s magical.
Samba has the same ability. All we have to do is create a Samba file share called print$ and create a single subdirectory in it. We call that subdirectory W32X86 because Windows XP clients understand this to mean “drivers for Windows 2000 and/or Windows XP.”
We’ll map the share to the local directory /usr/local/samba/windrivers on the server. As mentioned previously, /usr/local is the correct parent directory for a directory created by the local administrator for a purpose not specific to one user. We’ll also create the W32X86 sub-directory to actually house the Windows XP drivers.
We can create the whole subdirectory path in a single command, thanks to the -p option of mkdir. The -p option causes mkdir to create any parent directories that do not already exist, instead of generating an error.
We will also need to secure the share properly. We don’t want ordinary domain users to be able to delete or tamper with drivers, but we do need to allow the administrator user to upload driv-ers. We will arrange this by restricting write access to the share only to administrator. Webmin provides a friendly way to set this up. Samba implements these settings “under the hood” through settings in the file named /etc/samba/smb.conf.
There are a few more steps that must be taken, just once, from a Windows client to actually upload the drivers to the print$ share. We’ll show those steps later when we demonstrate SMB printing to Linux from a Windows client.
4428.book Page 290 Tuesday, August 2, 2005 8:54 PM

Leveraging Linux Printers 291
To prepare the Samba server to accept Windows print drivers:
1. At the command line, execute the following command:
mkdir -p /usr/local/samba/windrivers/W32X86
2. Log into Webmin with the username root and the password p@ssw0rd at the URL: https://adsambafp1.ad.corp.com:10000/, if you haven’t already.
3. If you are not already at the Windows File Sharing page, click “Servers,” then “Samba Win-dows File Sharing.”
4. Click the “Create a new file share” link. The “Create File Share” page appears.
5. Make sure the radio box next to “Share name” is selected. In the “Share name” text field, enter print$ .
6. In the “Directory to share” field, enter /usr/local/samba/windrivers/W32X86 .
7. Click the “No” box for “Automatically create directory?”
8. Click the “Yes” box for “Available?”
9. Click the “Yes” box for “Browseable?”
10. In the “Share Comment” field, enter Click And Print Drivers .
11. Click “Save.”
12. print$ should appear in the list of shares. Click print$.
13. The “Edit File Share” page appears. Click “Security and Access Control.”
14. Make sure “Writable” is set to “No.”
15. On the “Read/Write Users” line, enter AD\administrator .
16. Verify that “Guest Access” is set to “None” and “Limit to possible list” is set to “No.”
17. Click “Save.” The “Samba Windows File Sharing” page will reappear.
18. Scroll to the bottom of the page and click “Restart Samba Servers.”
That’s it—the server is configured! Time to test our new printing capabilities.
Performing Printing Tests
Our Linux server is now ready and willing to accept print jobs from both Windows and Linux clients. Let’s test that out.
Printing from Linux Clients
Printing from Linux to Linux is, of course, very straightforward. The process is made especially easy because a CUPS server broadcasts its existence to systems on the local network. That makes CUPS IPP printing as convenient on Linux as SMB printing is on Windows. We don’t have to use the Add a New Queue Wizard at all.
We’re going to use adsambafp1, our Linux Active Directory domain member server, for our printing tests. We’ll use adlincli1, our Linux domain member client, for our client-side tests.
4428.book Page 291 Tuesday, August 2, 2005 8:54 PM

292 Chapter 5 � Printer Sharing between Windows and Linux
But bear in mind that Active Directory plays no role in this and the procedure would be exactly the same in a pure Linux environment.
Everything we need to do can be accomplished with the Fedora printer configuration tool on adlincli1.
To configure our Linux client to print to a Linux server:
1. Pull down the “Applications” menu and drill down to System Settings � Printing. Wait for the printer configuration tool to appear.
2. Click the “New” button to add a new print queue.
3. Click “Forward” on the explanatory page that follows.
4. Double-click the right-pointing arrow next to “Browsed queues.”
5. LinPrinter1 appears in the list. Select it with the mouse.
6. Pull down the “Test” menu and pick “CUPS Test Page.” Click “Yes” after the page appears successfully.
As before, we suggest using OpenOffice Writer to carry out a more interesting test. Select “LinPrinter1” as the printer to use. Notice that we didn’t have to explicitly add this printer, since it is automatically detected on the local network.
Before we move on, there are two scenarios that we’re not going to specifically cover in step-by-steps, and you might be asking yourself why not.
CUPS can only automatically find printers on the same subnet. What if I need to print to a CUPS printer that isn’t on the same LAN? It is possible to set up automatic relaying of printer browsing information between CUPS hosts on separate subnets. However, the relevant options, BrowsePoll and BrowseRelay, are not currently supported by the Fedora GUI. Currently con-figuration files must be edited by hand to implement this. We simply don’t have space to address this in detail in this book, but you can learn more with this command:
man cupsd.conf
We can also, of course, add a CUPS printer manually. To do that, we would follow the same steps used earlier to add a queue for a Windows Internet Printing shared printer. The only dif-ference would be in the “Server” field, which would not require the :80 at the end. That’s because the CUPS IPP server listens on port 631, the default IPP port, instead of port 80. This is also good to know in certain types of VPN environments and other situations where “broad-casting” does not work.
What about printing from Linux clients to Linux servers using LPD or SMB? We don’t really recommend either when you have control over both the client and the server. IPP is both modern and an open standard. However, when an older Unix server that cannot be upgraded offers an LPD server, you may find it useful to follow exactly the same procedure we demon-strated earlier to print to a Windows server using LPD. Printing from Linux to Linux with SMB is not the best option, but it can be accomplished following the same procedure we used to print from Linux to Windows using LPD.
4428.book Page 292 Tuesday, August 2, 2005 8:54 PM

Leveraging Linux Printers 293
Printing from Windows Clients
Printing from Windows clients to Linux servers can be accomplished in three ways:� We’ll examine printing from Windows clients to Linux servers via IPP first. This requires
minimal effort to set up and can be done in no time flat. We think, over the long haul, you’ll use this option the most.
� Next, we’ll examine printing from Windows clients to Linux servers via the native SMB printing protocol of Windows. Since we’re here anyway, we’ll also show how to upload printer drivers to enable click-and-print functionality for other clients on the network.
� The last method demonstrates something you likely won’t use much. That is, you’ll force your Windows client into talking the “old and crusty” LPD-style of printing, and your Linux print server will happily oblige. We demonstrate this primarily to show how Win-dows clients can print to legacy Unix LPD print servers that can’t be upgraded to CUPS. It’s also handy for those with archaic Unix LPD clients, although this book naturally focuses on Windows-and-Linux combinations.
Windows Clients Printing via IPP to Linux
Printing via IPP from Windows to Linux isn’t difficult. We just need to know the correct URL for the printer. A Windows client can’t automatically detect the URL using the web browser as it would if the server were running Windows Internet Printing.
There’s a simple way to specify the right URL. When printing to a CUPS server via IPP, the correct URL will always look like this:
http://servername:631/printers/printername
servername, in our case, is adsambap1. and printername should be LinPrinter1, so the correct URL is:
http://adsambafp1:631/printers/LinPrinter1
Communicating with a printer via IPP to a Linux CUPS server also requires that we manually select a printer driver on the Windows side. When we do, we need to make a choice. We can choose a Postscript printer, which will work well with the LinPrinter1 spool, or we can choose to install the Canon i560 driver software from Canon’s website or driver CD-ROM, which will work correctly with the LinPrinter1Raw spool.
For this example, we’ll go with Postscript. This is always a good bet when talking to a Linux print server. To convince Windows to use a Postscript driver, we select Apple from the Manu-facturer list. Then we select Apple Color LaserWriter 12/600 from the Printers list. The Apple Color LaserWriter 12/600 is a true Postscript printer, one that accepts Postscript as its native language. So Windows will send Postscript to CUPS, believing it is destined for a true Postscript printer, and CUPS will automatically recognize it and translate it to the native language of our actual printer using Ghostscript.
4428.book Page 293 Tuesday, August 2, 2005 8:54 PM

294 Chapter 5 � Printer Sharing between Windows and Linux
Now you know everything you need to know to make IPP work between Windows and a Linux CUPS server. To configure our Windows client to print via IPP to a Linux server with a generic Postscript driver:
1. Open the “Printers and Faxes” applet in Control Panel and select “Add a printer.” This launches the “Add Printer Wizard” as we’ve seen before.
2. At the “Local or Network Printer” screen, select “A network printer, or a printer attached to another computer.” Then click “Next.”
3. On the page that follows, select the radio box labeled “Connect to a printer on the Internet or on a home or office network.” In the “URL” field, enter the following:
http://adsambafp1:631/printers/LinPrinter1
4. Click “Next.” The client will talk to the server for a moment and then the “Select the man-ufacturer and model of your printer” dialog will appear.
5. Select “Apple” from the manufacturers list. Select “Apple Color LaserWriter 12/600” from the Printers list. Click “Next” to move on.
6. You will be asked whether to make this the default printer; click “Yes” or “No” as suits your preference.
7. Click “Finish” on the confirmation screen to end the wizard.
8. You can now test actual printing using the “Print” option on the “File” menu of an appli-cation such as Microsoft Word. Just select “LinPrinter1” from the list of printers available when printing.
Windows Clients Printing via SMB to Linux
SMB is, of course, the traditional, native printing protocol of Windows. Not surprisingly, con-vincing Windows clients to print via SMB to a Linux server running Samba isn’t hard to do. How-ever, for a bit of “extra credit,” we’ll set up click-and-print. That way, when other Windows clients stumble on this printer, they will automatically download the drivers and be good to go!
How does click-and-print work? When a Windows client prints to a Windows print server, the client automatically downloads the printer drivers from the print server. This happens trans-parently to the user. Very elegant.
But what if a client running Windows 98 tries to print to a print server running Windows Server 2003? After all, the new Windows XP / Windows 2003 printer drivers won’t work with old Windows 98.
Windows provides a practical workaround. An administrator can install the printer on a Win-dows 98 machine then configure the client to print to the Windows 2003 server. This causes the server to automatically upload the Windows 98 drivers. From that point on, the Windows 98 drivers are available to any Windows 98 client who uses that print queue on the server.
Linux print servers use a similar trick to support Windows clients. Think of a Linux Samba print server as a Windows server that runs an exotic version of Windows that doesn’t support reg-ular Windows XP / Windows 2003 printer drivers. Just as in the Windows 98 / Windows 2003 scenario, the answer is to upload the drivers from a Windows XP client. You as the administrator
4428.book Page 294 Tuesday, August 2, 2005 8:54 PM
Leveraging Linux Printers 295
can install a printer on a Windows machine, then upload the drivers to the Linux print server where they are available to any other Windows clients who print to that print server.
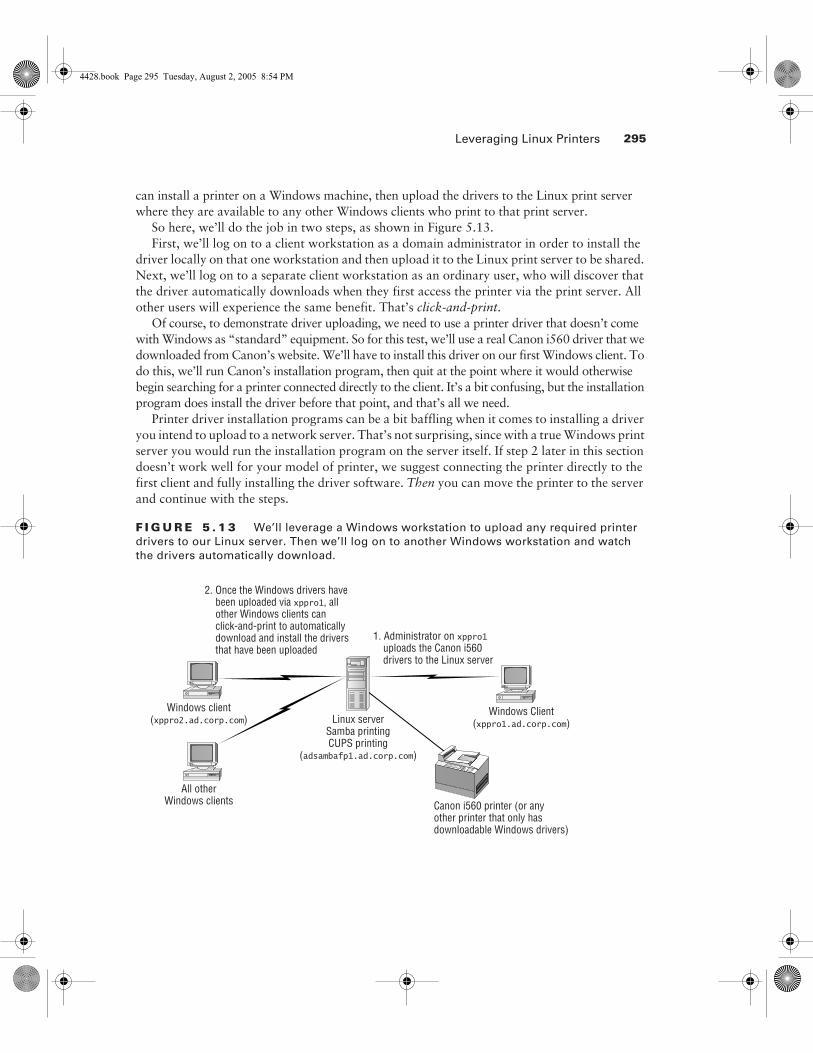
So here, we’ll do the job in two steps, as shown in Figure 5.13.First, we’ll log on to a client workstation as a domain administrator in order to install the
driver locally on that one workstation and then upload it to the Linux print server to be shared. Next, we’ll log on to a separate client workstation as an ordinary user, who will discover that the driver automatically downloads when they first access the printer via the print server. All other users will experience the same benefit. That’s click-and-print.
Of course, to demonstrate driver uploading, we need to use a printer driver that doesn’t come with Windows as “standard” equipment. So for this test, we’ll use a real Canon i560 driver that we downloaded from Canon’s website. We’ll have to install this driver on our first Windows client. To do this, we’ll run Canon’s installation program, then quit at the point where it would otherwise begin searching for a printer connected directly to the client. It’s a bit confusing, but the installation program does install the driver before that point, and that’s all we need.
Printer driver installation programs can be a bit baffling when it comes to installing a driver you intend to upload to a network server. That’s not surprising, since with a true Windows print server you would run the installation program on the server itself. If step 2 later in this section doesn’t work well for your model of printer, we suggest connecting the printer directly to the first client and fully installing the driver software. Then you can move the printer to the server and continue with the steps.
F I G U R E 5 . 1 3 We’ll leverage a Windows workstation to upload any required printer drivers to our Linux server. Then we’ll log on to another Windows workstation and watch the drivers automatically download.
Windows Client(xppro1.ad.corp.com)Linux server
Samba printingCUPS printing
(adsambafp1.ad.corp.com)
Windows client(xppro2.ad.corp.com)
All otherWindows clients Canon i560 printer (or any
other printer that only hasdownloadable Windows drivers)
2. Once the Windows drivers havebeen uploaded via xppro1, allother Windows clients canclick-and-print to automaticallydownload and install the driversthat have been uploaded
1. Administrator on xppro1uploads the Canon i560drivers to the Linux server
4428.book Page 295 Tuesday, August 2, 2005 8:54 PM

296 Chapter 5 � Printer Sharing between Windows and Linux
Keep in mind that we could have chosen to use a Postscript printer driver for SMB as well. If we had, there would be no need to set up click-and-print because the Postscript driver ships as standard equipment with Windows. However, since printer drivers occasionally have desirable features that can’t be reached conveniently through the Postscript driver, it’s worthwhile to dem-onstrate how to use native drivers and click-and-print as well.
Ideally, before you begin, we suggest that you configure a second XP client system if you don’t have one just lying around. It’s on this new XP client system that we’ll actually witness the proper downloading of the driver (which we’re initially loading on xppro1 and uploading to our Linux Samba server).
If you want to have another machine handy, here are our suggestions. Follow exactly the same procedure you followed for xppro1 except:� The hostname should be xppro2.� The IP address should be 192.168.2.115.
Once xppro2 is ready, we can demonstrate SMB printing and click-and-print driver downloading.
First things first: let’s get our printer drivers loaded on our first client machine (xppro1). Then, we’ll upload them via Samba for our other clients, such as xppro2, to utilize.
To load our printer drivers onto our Windows XP system:
1. Make sure you are logged in as AD\Administrator.
2. Install the Canon i560 driver software on xppro1 from the printer manufacturer’s CD or website. When you reach the point where the installation program says it is trying to detect a printer connected to the local computer, click “Cancel.”
3. Open the “Printers and Faxes” applet in Control Panel and select “Add a printer.” This launches the “Add Printer Wizard” as we’ve seen several times before.
4. At the “Local or Network Printer” screen, select “A network printer, or a printer attached to another computer.” Then click “Next.”
5. On the page that follows, select the radio box “Connect to this printer (or to browse, for a printer, select this option and click “Next”).” Then click “Next” to browse for the printer.
6. A list of print servers will appear, including ADSAMBAFP1. Double-click ADSAMBAFP1 to make LinPrinter1Raw visible and select it with the mouse as shown in Figure 5.14. Then click “Next.”
7. A message box will appear saying that “the server for the printer does not have the correct driver installed.” Click “OK” to manually select the correct driver on this first client.
8. The “Select the manufacturer and model of your printer” dialog will appear. Select “Canon” from the manufacturers list. Select “i560” from the Printers list. Click “Next” to move on.
9. You will be asked whether to make this the default printer; click “Yes” or “No” as suits your preference.
4428.book Page 296 Tuesday, August 2, 2005 8:54 PM

Leveraging Linux Printers 297
10. Click “Finish” on the confirmation screen to end the wizard.
11. You can now test actual printing using the “Print” option on the “File” menu of an appli-cation such as Microsoft Word. Just select “LinPrinter1” from the list of printers available when printing.
Using xppro1, we’ve added the printer queue to ADSAMBAFP1—but we’re not done yet. Next, we need to take advantage of click-and-print by uploading the Canon i560 driver to the Samba print server. We do this via the “Sharing” tab of the “Properties” dialog for LinPrinter1Raw. While we’re there, we can also list the printer in Active Directory to enable searches for the printer. Just follow these steps:
1. Open the “Printers and Faxes” applet in Control Panel.
2. Right-click “LinPrinter1Raw” and pick “Properties.”
3. Click the “Sharing” tab.
4. If you wish, enable the “List in the directory” setting. This enables searches for this printer in Active Directory. We’ll talk more about enabling searching for Active Directory in the next major section.
5. In the “Drivers” box, click “Additional Drivers.”
6. From the list of driver types, check the box for “Intel Windows 2000 or XP” (Intel-compatible processors are in all typical Windows office PCs).
7. Click “OK.”
8. A “Copying Files” progress box will appear while the drivers are uploaded to the server.
9. Click “Close.”
F I G U R E 5 . 1 4 Selecting LinPrinter1Raw from the Samba server via SMB browsing on a Windows client
4428.book Page 297 Tuesday, August 2, 2005 8:54 PM

298 Chapter 5 � Printer Sharing between Windows and Linux
Our first client is now ready to print to LinPrinter1Raw. More importantly, we can now add a sec-ond client without the need to manually install the Canon i560 driver. It’s time to demonstrate that.
Now we’re ready to try a new client and see if it will automatically download the drivers from our Samba server. To test the automatic driver downloads from our Samba server:
1. Log in as any domain user. AD\salesperson1 is a reasonable choice.
2. Open the “Printers and Faxes” applet in Control Panel and select “Add a printer” to launch the “Add Printer Wizard.”
3. At the “Local or Network Printer” screen, select “A network printer, or a printer attached to another computer.” Then click “Next.”
4. On the page that follows, select the radio box labeled “Connect to this printer (or to browse, for a printer, select this option and click “Next”).” Then click “Next” to browse for the printer.
5. A list of print servers will appear, including ADSAMBAFP1. Double-click ADSAMBAFP1 to make LinPrinter1Raw visible and select it with the mouse as shown in Figure 5.14. Then click “Next.”
6. A “Copying Files” progress box will appear. The driver software will download from the server automatically. This is click-and-print at work.
7. You will be asked whether to make this the default printer; click “Yes” or “No” as suits your preference.
8. Click “Finish” on the confirmation screen to end the wizard.
9. You can now test actual printing using the “Print” option on the “File” menu of an appli-cation such as Microsoft Word. Just select “LinPrinter1Raw” from the list of printers avail-able when printing.
Again, the amazing thing here is that we’re using a Linux Samba print server to serve up Win-dows print drivers to Windows boxes. Now that’s slick.
Windows Clients Printing via LPD to Linux
Before we can print via LPD from a Windows client, we need to install the “Print Services for Unix”—exactly as we performed earlier as shown in Figure 5.5.
LPD support in the Windows “Add Printer Wizard” has a strange approach. That is, we must add the printer as a “Local printer attached to this computer,” and then we set up a remote LPD port. That’s because, technically, the initial spooling of the print job happens here—on this local system. This isn’t very intuitive, but it does work well.
Here’s the procedure:
1. Be sure to have the “Print Services for Unix” installed. Again, this is found in the Add/Remove Programs applet and is described earlier in Figure 5.5.
2. Select Start � Control Panel � Printers and Faxes � Add Printer to initiate the Add Printer Wizard. Once the wizard starts, click “Next.”
3. At the “Local or Network Printer” screen, select “Local printer attached to this computer” and be sure to de-select the “Automatically detect and install my Plug-and-Play printer” box. Then click “Next.”
4428.book Page 298 Tuesday, August 2, 2005 8:54 PM

Leveraging Active Directory 299
4. On the “Select a Printer Port” page, click the “Create a new port” box and select “LPR Port” from the menu. Click “Next” to move on.
5. The “Add LPR compatible printer” dialog appears. Enter adsambafp1.ad.corp.com in the “Name or address of server providing lpd” field. Enter linprinter1 in the “Name of printer or print queue on that server” field. Then click “OK.”
6. At the “Install Printer Software” dialog, select the Manufacturer and Printer model. We’ll stick to our Postscript approach in this example, so select Apple as the manufacturer and Apple Color LaserWriter 12/600 as the model. Then click “Next.”
7. At the “Name your Printer” screen, you can enter a name for the printer. Replace the sug-gested name with LinPrinter1ViaLPR , then click “Next.”
8. At the “Printer Sharing” screen, you can give a share name for others to see. This might seem strange, but it’s actually a fine idea if you wish to “re-export” the printer via SMB. Well, it might not be a fine idea from a Windows XP machine, but if this were a Windows 2003 print server, this might be a fun idea. Once you do so, other clients can access the printer via tra-ditional SMB Windows network printing without the need to additionally go through the hassle of installing the “Print Services for Unix” LPD driver.
9. At the “Location and Comment” screen enter what you like. When ready, click “Next.”
10. At the “Print Test Page” prompt, select “Yes” to verify that we added the printer suc-cessfully.
What We Accomplished with Linux Printers
We’ve done quite a few nifty things with our Linux printer.We shared it via IPP, using CUPS. That’s the best way to share the printer with Linux clients,
and it can also be used with Windows.We also shared the printer via SMB, the traditional method of sharing printers with Win-
dows clients. We showed how to use a raw queue to make sure print jobs from native Windows drivers are passed without modification to the printer. We also demonstrated how to list the printer in Active Directory and deliver native drivers automatically over SMB using click-and-print. Not bad for a free operating system!
We also made it available via LPD, which is convenient for archaic Unix clients and demon-strates what Windows clients need to do when talking to an archaic Unix server.
Leveraging Active DirectoryActive Directory is a robust directory service. We’ve already leveraged it for user authentication, but Active Directory can also be used to locate printers in a central directory.
We can tell Active Directory about the various SMB printers we have—both Windows and Samba—and be able to enjoy an easily searchable method of connecting right to them. Once we connect, downloading the drivers is already happening automatically, as shown in the last section.
4428.book Page 299 Tuesday, August 2, 2005 8:54 PM
300 Chapter 5 � Printer Sharing between Windows and Linux
In this section, we’re specifically concerned with getting all the printers we know into Active Directory, as well as having both Windows and Linux clients search Active Directory to find the printers in the most expeditious manner possible.
Here’s the bad news, though: There’s no great way (that we know of) to allow for Linux clients to perform an easy-breezy search of Active Directory to find printers. Maybe someday, but not today. However, at least we can give our Windows clients the ability to search Active Directory and easily pick the printer they want to, even if it lives on a Samba server.
Publishing Printers into Active Directory
The mechanism we’ll use to get printers as records in Active Directory is called publishing. When we publish a printer, we simply make it available in Active Directory to search. It’s a snap to publish a printer once you have the queues set up. In our previous examples, we set up three queues:
WinPrinter1 This was created on windc1.ad.corp.com. It uses normal print drivers and offers automatic downloading of drivers.
Linprinter1 This was created on adsambafp1.ad.corp.com. This queue is ready and willing to accept Postscript input and give it to CUPS, which takes care of rendering pages in the printer’s native language via Ghostscript and ultimately feeds those pages to the printer.
LinPrinter1Raw This was also created on adsambafp1.ad.corp.com. This queue expects clients to use regular Windows printer drivers, and it will pass the data on in raw form to CUPS, which will spit it back up to the printer. Like WinPrinter1, this queue supports auto-matic downloading of native Windows printer drivers.
Here, we have one queue that lives on a Windows server and two that live on a Samba server. The goal is to have all three be searchable in Active Directory.
Automatically Publishing Printers in Active Directory
When we added WinPrinter1 to windc1.ad.corp.com, Windows 2003 went the extra mile for us and published the printer in Active Directory. We didn’t need to tell it to, it just did. We can see this by right-clicking over the printer’s icon and clicking the “Sharing” tab, as shown in Figure 5.15.
Unchecking the “List in the directory” check box (and clicking “OK”) will make the printer not show up when Active Directory searches are performed. However, this does not prevent the browse, browse, browse method using Network Neighborhood.
Manually Publishing Printers in Active Directory
Using the properties of the printer dialog is one way to add printers so that they are searchable within Active Directory. Another way is to manually publish printers in Active Directory.
To publish printers manually in Active Directory:
1. Select Start � Programs � Administrative Tools and then select “Active Directory Users and Computers.”
4428.book Page 300 Tuesday, August 2, 2005 8:54 PM

Leveraging Active Directory 301
F I G U R E 5 . 1 5 The “Sharing” tab determines if the printer should be listed in Active Directory.
2. Pick a location in Active Directory where you want to publish the printer. This can be just about anywhere inside Active Directory, and in most cases location isn’t really that impor-tant. One option is to create an OU that just contains published printers, but that’s at your option. Once decided, right-click the OU and select New � Printer. The “New Object – Printer” dialog appears.
3. In the “New Object – Printer” dialog, enter the queue name. For instance, if you want to pub-lish LinPrinter1 from ADSAMBAFP1, enter the SMB name, \\adsambafp1\linprinter1 as seen in Figure 5.16.
4. Click “OK,” and it will validate that the queue exists. Then it will put it into Active Directory.
Once performed, Active Directory will represent the printer with an icon within the OU you specify. If you’re feeling particularly frisky, you can set certain attributes about these printers in Active Directory, such as the location, if it’s color-capable, if it can print dual sided, and more. All you need to do is to select the properties of the entry. The resulting screen can be seen in Figure 5.17.
This way you can make it easy to search Active Directory for particular printers with par-ticular attributes.
At this point you should repeat these steps for the other queue you created: LinPrinterRaw. That way, if someone on a Windows client wants to print to the printer using the native Windows drivers, they can easily search for it in Active Directory and have the drivers automatically download.
4428.book Page 301 Tuesday, August 2, 2005 8:54 PM

302 Chapter 5 � Printer Sharing between Windows and Linux
F I G U R E 5 . 1 6 You can add any SMB printer to Active Directory to make it searchable.
F I G U R E 5 . 1 7 You can select and enter attributes that can help users search for specific printers.
4428.book Page 302 Tuesday, August 2, 2005 8:54 PM

Leveraging Active Directory 303
It should be noted that the “Location” field has a super-secret special super power to help Active Directory clients locate printers. I simply don’t have room to go into it all here, but I’ve written it up in detail. To read the article, come to my website at www.moskowitz-inc.com/writing/articles.html and look for “October 2002: (Feature): Printer Magic.” You’ll find it in no time.
Searching for Printers in Active Directory
Searching for Printers in Active Directory should be easy as punch. And it is, for both Windows and Linux clients.
The good news is that it’s easy to find and start using printers when the client is Windows. The bad news is that there’s no easy-breezy way to start using printers from our Linux clients after we find them in Active Directory.
Finding Printers in Active Directory with Windows Clients
To find printers in Active Directory from your Windows machines:
1. Log in as any domain user. AD\salesperson1 is a reasonable choice.
2. Open the “Printers and Faxes” applet in Control Panel and select “Add a printer” to launch the “Add Printer Wizard.”
3. At the “Local or Network Printer” screen, select “A network printer, or a printer attached to another computer.” Then click “Next.”
4. At the “Specify a Printer” screen, select “Find a printer in the directory” and click “Next.” The “Find Printers” dialog appears.
5. At the “Find Printers” dialog, you can specify “Find Now” to select all printers or click the “Features” tab to select printers with specific features you want to display, such as only those which print in color. Once done, click “Find Now” as seen in Figure 5.18.
6. Double-click the printer you want to add, and the wizard will continue as normal.
Finding Printers in Active Directory Using Linux Clients
On the Linux side, no GUI tools currently exist for this purpose. But we have verified that one can find the relevant information the hard way, by making an LDAP query from the Linux com-mand line. And that means a friendly GUI for that purpose is very possible. So with any luck, an enterprising Linux coder will soon create a GUI to search for printers in Active Directory and add queues for them on a Fedora Linux client.
4428.book Page 303 Tuesday, August 2, 2005 8:54 PM

304 Chapter 5 � Printer Sharing between Windows and Linux
F I G U R E 5 . 1 8 Just find the printer you want, double-click it, and go!
Here’s the command we used to successfully list published printers from the command line of adldaplincl1.ad.corp.com, which is already configured to communicate with the LDAP server on windc1.ad.corp.com:
ldapsearch -x -D "cn=dirsearch,cn=Users,dc=ad,dc=corp,dc=com" -w p@ssw0rd objectClass=printQueue
This command binds to the Active Directory LDAP server using the usual credentials from Chapter 3 and, using the filter objectclass=printQueue, prints information about all published printers. There’s quite a bit of information there, but the most interesting fields are uNCName (for printers shared via SMB) and url (for printers shared via IPP). For instance, this command:
ldapsearch -x -D "cn=dirsearch,cn=Users,dc=ad,dc=corp,dc=com" -w p@ssw0rd objectClass=printQueue | grep -i uNCName
Outputs the following in our tests:
uNCName: \\WinDC1.ad.corp.com\WinPrinter1
uNCName: \\ADSAMBAFP1\LinPrinter1Raw
uNCName: \\ADSAMBAFP1\LinPrinter1
Armed with this information, we suspect it won’t be long before someone decides to add a friendly GUI for this purpose to Fedora Linux.
4428.book Page 304 Tuesday, August 2, 2005 8:54 PM

Final Thoughts 305
Final ThoughtsPrinter interoperability is a main selling point in getting Windows and Linux to play nicely. It’s one of those features that users just expect to work all the time. If you can leverage the printers you have, you’ll be the big hero.
Both Windows and Linux do a great job in working with standards for printing. The main standards that are supported on both sides are LPR/LPD for older-style Unix printing, SMB printing for Windows/Samba, and IPP. As mentioned previously, Windows’ IPP doesn’t use the RFC compliant port of 631, it uses port 80, so be sure to compensate, as we’ve specified in the chapter.
Samba does a great job in setting up new printers and automatically allowing driver down-loads when necessary. Windows does a great job in making it easy to search for printers in Active Directory.
In all, it’s a match made in printer heaven.
4428.book Page 305 Tuesday, August 2, 2005 8:54 PM