Embed Size (px)
Citation preview

PROCEDURE TO FILL APPLICATION FORMS FOR GGS INDRAPRASTHA UNIVERSITY
STEP - 1: The website for filling the forms is https://ipu.ac.in
Candidate can fill in the online application form for the admission to Guru Gobind Singh Indraprastha
University from the university websitehttps://ipu.ac.in
STEP - 2: Application Forms
The Application form is fully automated and the payment to be made online only. There are two
forms, one for capturing the personal/general information and another one for capturing the course
and payment related details. A candidate has to fill in his/her general information for proceeding
towards the course selection and payment section on the 2nd Form.
STEP – 3: Exam Category
For filling in the general information, candidate has to select anyone out of the 3 exam categories:
Engineering/Professional/M.Phil/PG Diploma/PG Ayurveda Programmes,
PhD
Post Graduate Medical Courses / Super Speciality Medical Courses / Under Graduate
Medical Courses / B.Sc. (Yoga).
Note:-A candidate can select and fill as many courses as he wants in the same form,
whenever he/she wants , if all the selected courses belongs to a single exam category . If a
candidate wants to fill multiple courses across the different exam categories then he/she will
have to register separately for both the courses i.e. individual registration needs to be done
for choosing the courses of separate exam categories
For any technical queries please contact GGSIPU helpdesk toll free no
1800 266 9060 or email on [email protected]
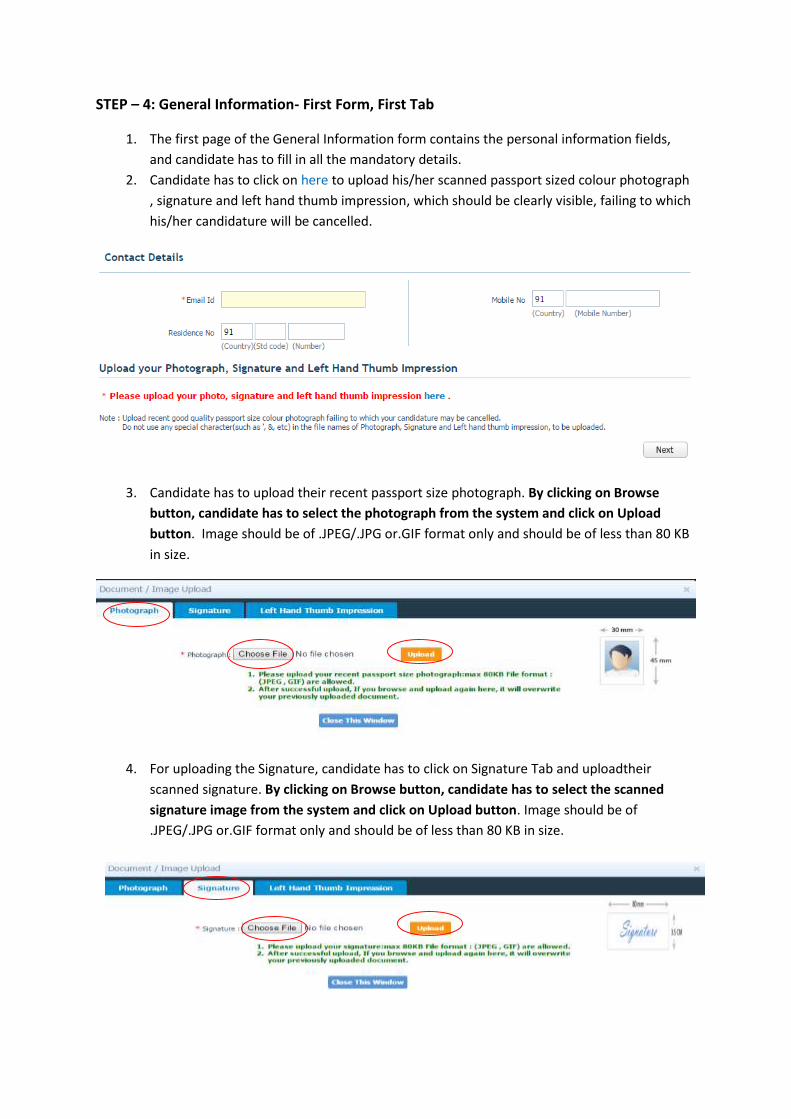
STEP – 4: General Information- First Form, First Tab
1. The first page of the General Information form contains the personal information fields,
and candidate has to fill in all the mandatory details.
2. Candidate has to click on here to upload his/her scanned passport sized colour photograph
, signature and left hand thumb impression, which should be clearly visible, failing to which
his/her candidature will be cancelled.
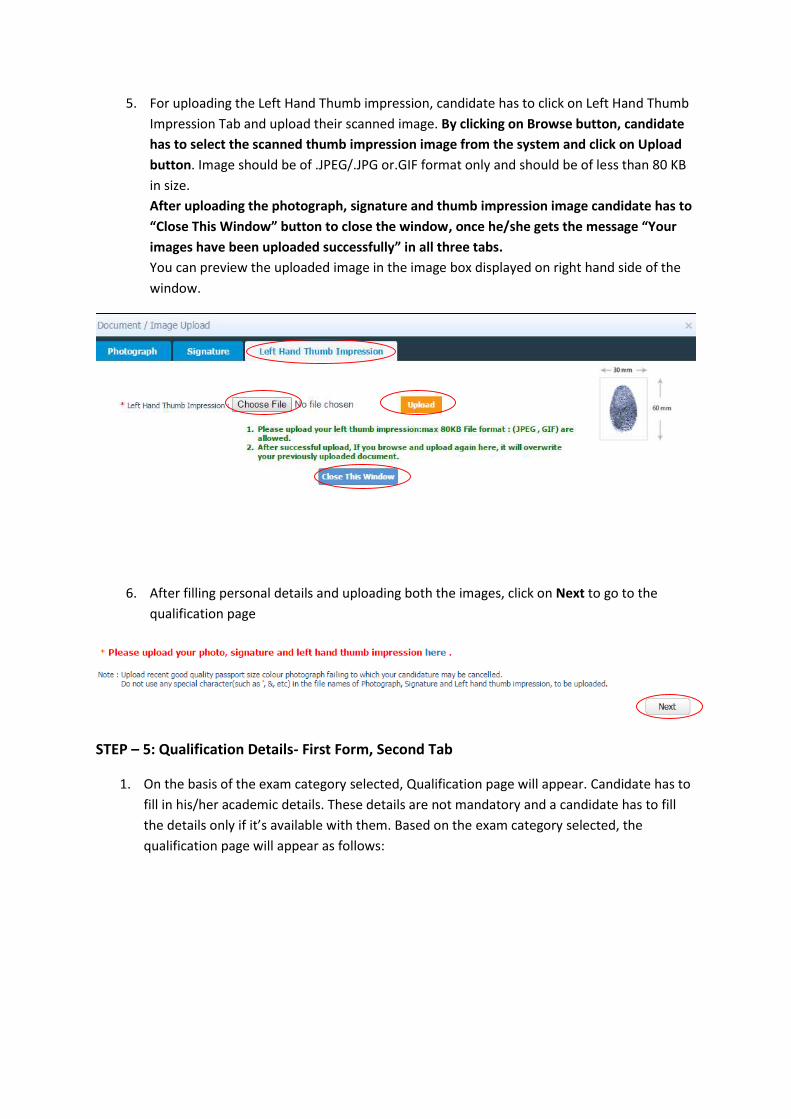
3. Candidate has to upload their recent passport size photograph. By clicking on Browse
button, candidate has to select the photograph from the system and click on Upload
button. Image should be of .JPEG/.JPG or.GIF format only and should be of less than 80 KB
in size.
4. For uploading the Signature, candidate has to click on Signature Tab and uploadtheir
scanned signature. By clicking on Browse button, candidate has to select the scanned
signature image from the system and click on Upload button. Image should be of
.JPEG/.JPG or.GIF format only and should be of less than 80 KB in size.
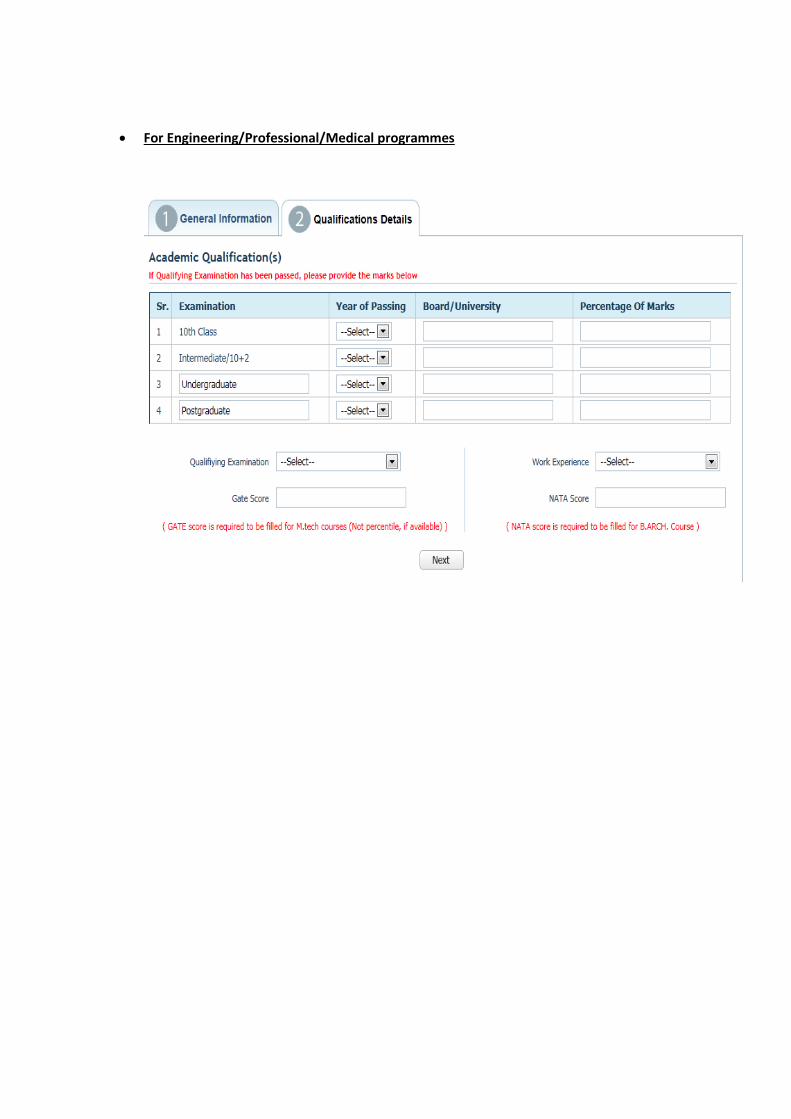
5. For uploading the Left Hand Thumb impression, candidate has to click on Left Hand Thumb
Impression Tab and upload their scanned image. By clicking on Browse button, candidate
has to select the scanned thumb impression image from the system and click on Upload
button. Image should be of .JPEG/.JPG or.GIF format only and should be of less than 80 KB
in size.
After uploading the photograph, signature and thumb impression image candidate has to
“Close This Window” button to close the window, once he/she gets the message “Your
images have been uploaded successfully” in all three tabs.
You can preview the uploaded image in the image box displayed on right hand side of the
window.
6. After filling personal details and uploading both the images, click on Next to go to the
qualification page
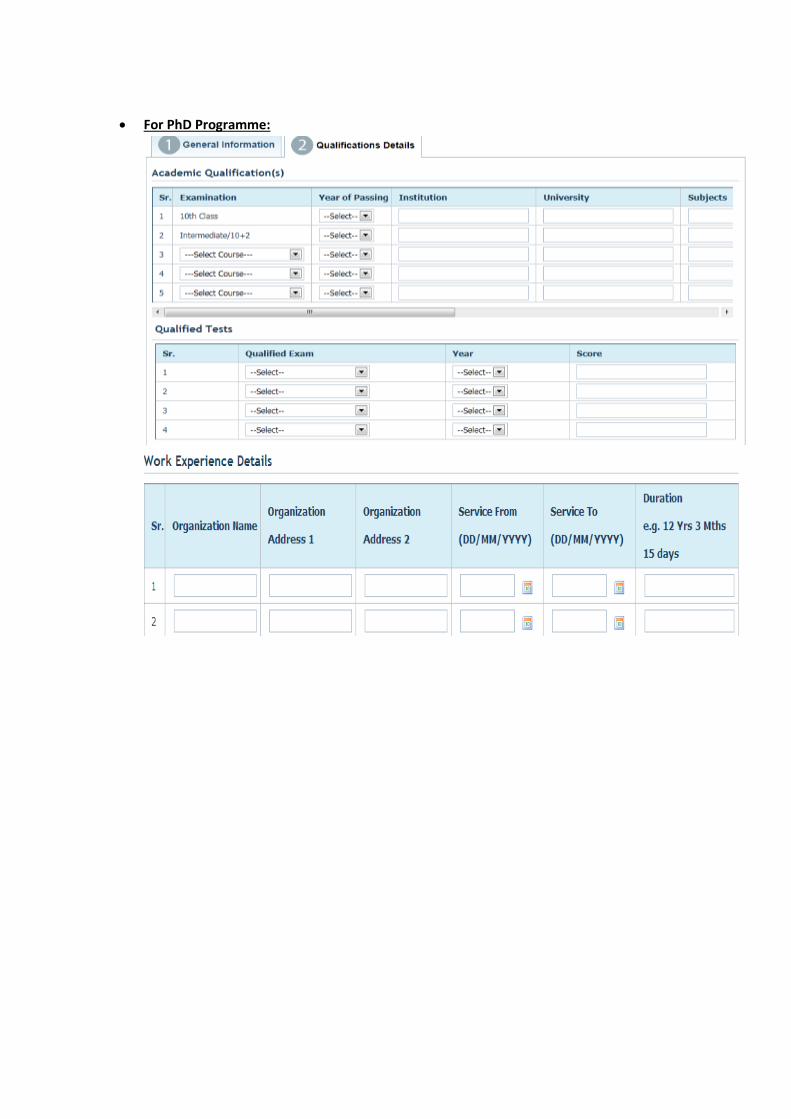
STEP – 5: Qualification Details- First Form, Second Tab
1. On the basis of the exam category selected, Qualification page will appear. Candidate has to
fill in his/her academic details. These details are not mandatory and a candidate has to fill
the details only if it’s available with them. Based on the exam category selected, the
qualification page will appear as follows:
For Engineering/Professional/Medical programmes
For PhD Programme:
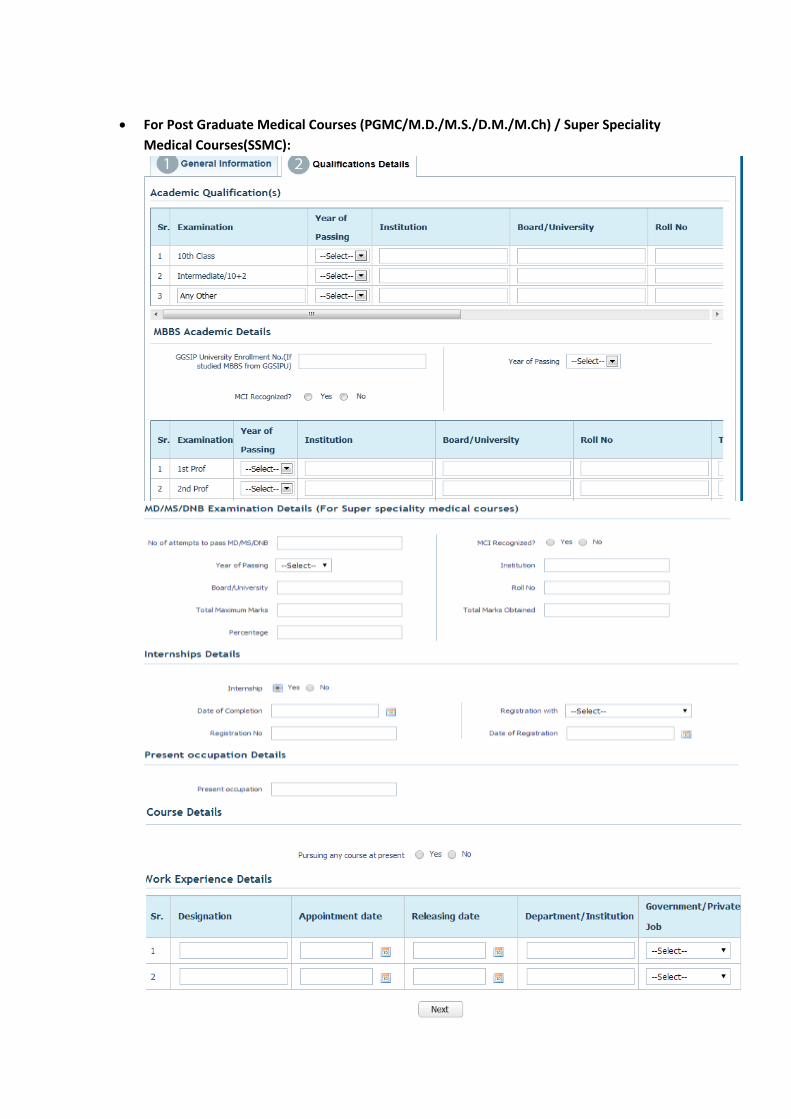
For Post Graduate Medical Courses (PGMC/M.D./M.S./D.M./M.Ch) / Super Speciality
Medical Courses(SSMC):
2. After filling in the Academic details, as per the exam categories selected, candidate has to
press ‘next’ and he/she will be redirected to the final submit page
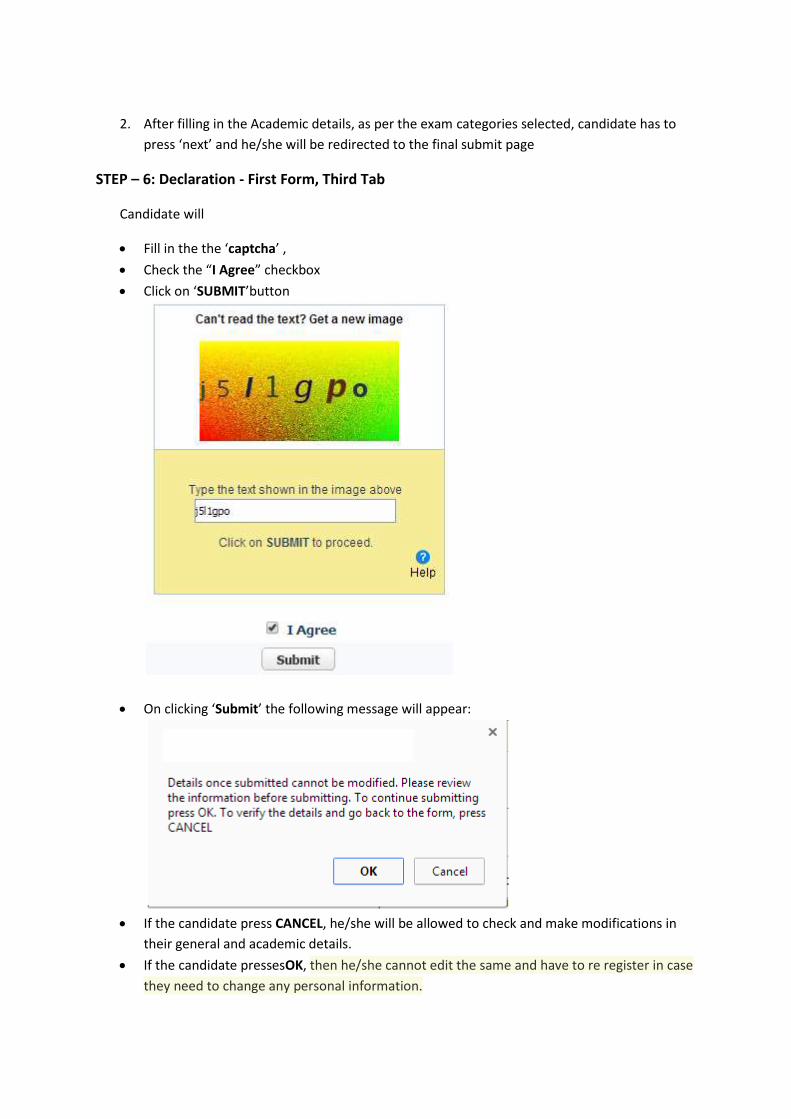
STEP – 6: Declaration - First Form, Third Tab
Candidate will
Fill in the the ‘captcha’ ,
Check the “I Agree” checkbox
Click on ‘SUBMIT’button
On clicking ‘Submit’ the following message will appear:
If the candidate press CANCEL, he/she will be allowed to check and make modifications in
their general and academic details.
If the candidate pressesOK, then he/she cannot edit the same and have to re register in case
they need to change any personal information.
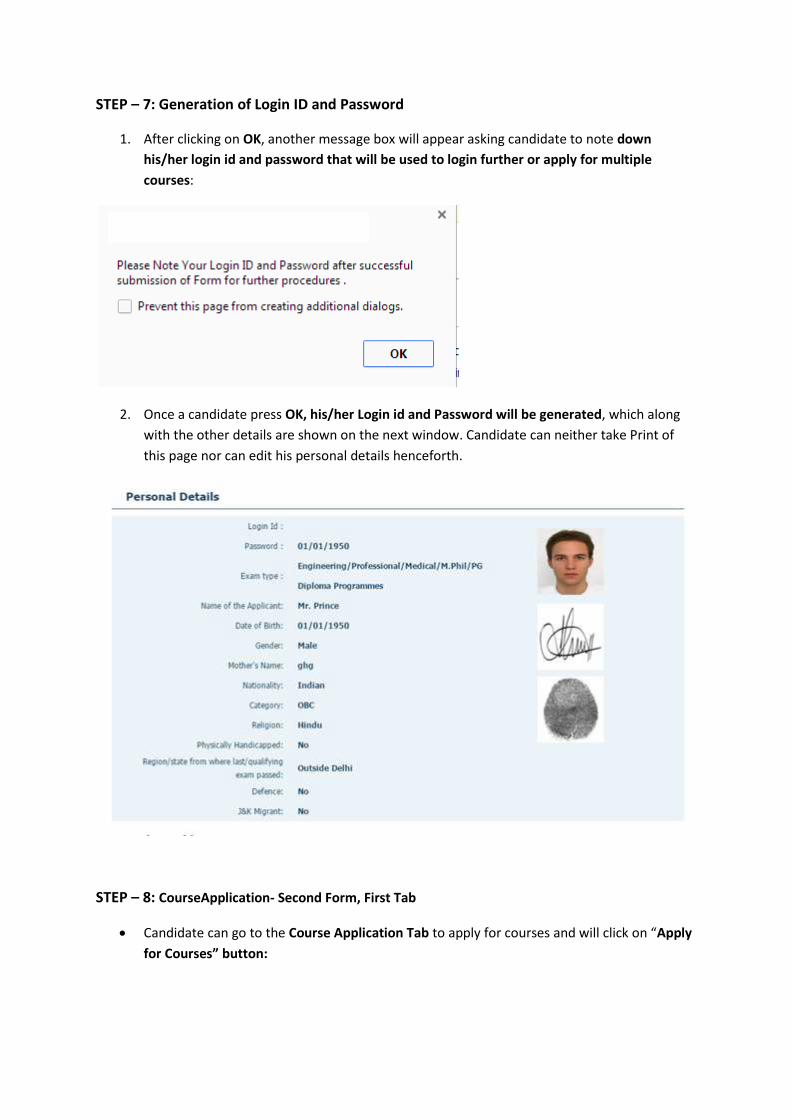
STEP – 7: Generation of Login ID and Password
1. After clicking on OK, another message box will appear asking candidate to note down
his/her login id and password that will be used to login further or apply for multiple
courses:
2. Once a candidate press OK, his/her Login id and Password will be generated, which along
with the other details are shown on the next window. Candidate can neither take Print of
this page nor can edit his personal details henceforth.
STEP – 8: CourseApplication- Second Form, First Tab
Candidate can go to the Course Application Tab to apply for courses and will click on “Apply
for Courses” button:
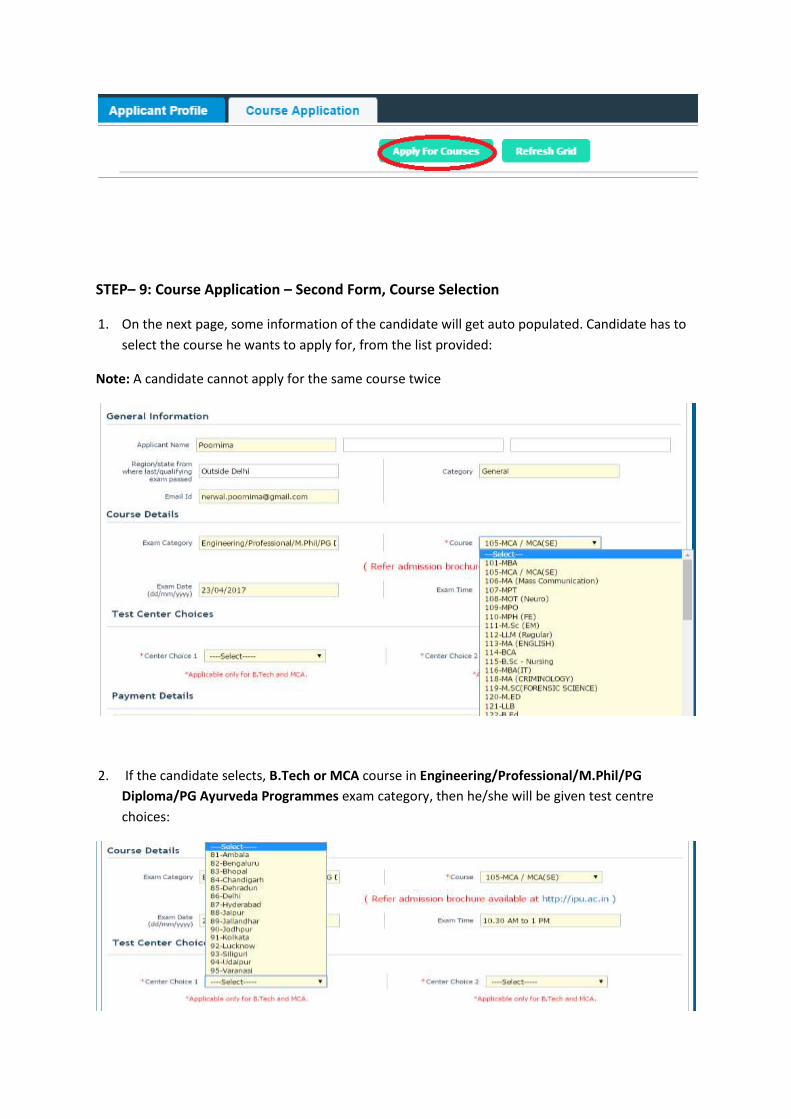
STEP– 9: Course Application – Second Form, Course Selection
1. On the next page, some information of the candidate will get auto populated. Candidate has to
select the course he wants to apply for, from the list provided:
Note: A candidate cannot apply for the same course twice
2. If the candidate selects, B.Tech or MCA course in Engineering/Professional/M.Phil/PG
Diploma/PG Ayurveda Programmes exam category, then he/she will be given test centre
choices:

3. If a candidate applies for PGMC course (Course code 102), then he/she must enter 8 digit NEET
Roll Number to proceed.
Note – No exam will be conducted for the courses registered with Post Graduate Medical
Courses / Super Speciality Medical Courses / Under Graduate Medical Courses / B.Sc. (Yoga)
exam category.
4. Candidate has to pay INR 1000 for each course that he/she applies for.
5. After selecting the course, candidate will:
Check the “I Agree” checkbox
Click on ‘SUBMIT’button
6. On clicking on ‘SUBMIT’ ,candidate will be given a message box to preview the details that
he/she has filled so that just in case a candidate wants to change any of the details provided by
him/her, then he/she can click on ‘CANCEL’:
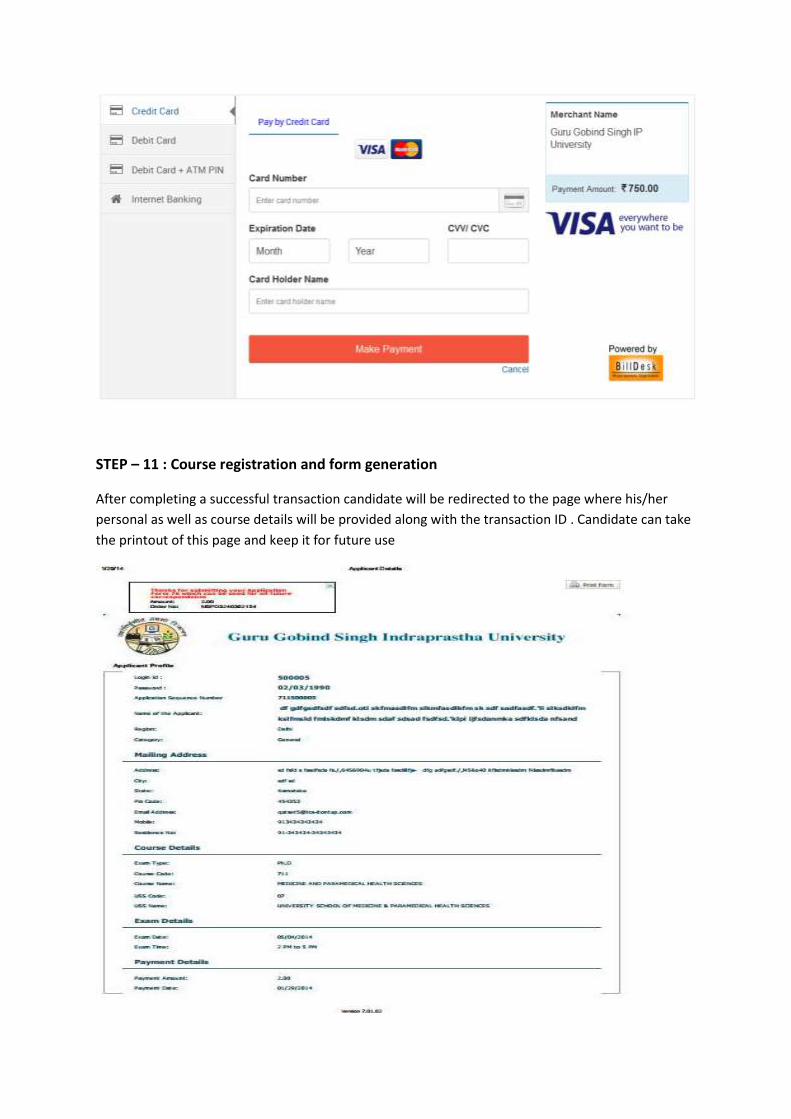
STEP – 10 : Payment through Billdesk
After checking the details and clicking on OK, the candidate will be redirected to the billdesk page for
the course payment by clicking on “Make Payment” button
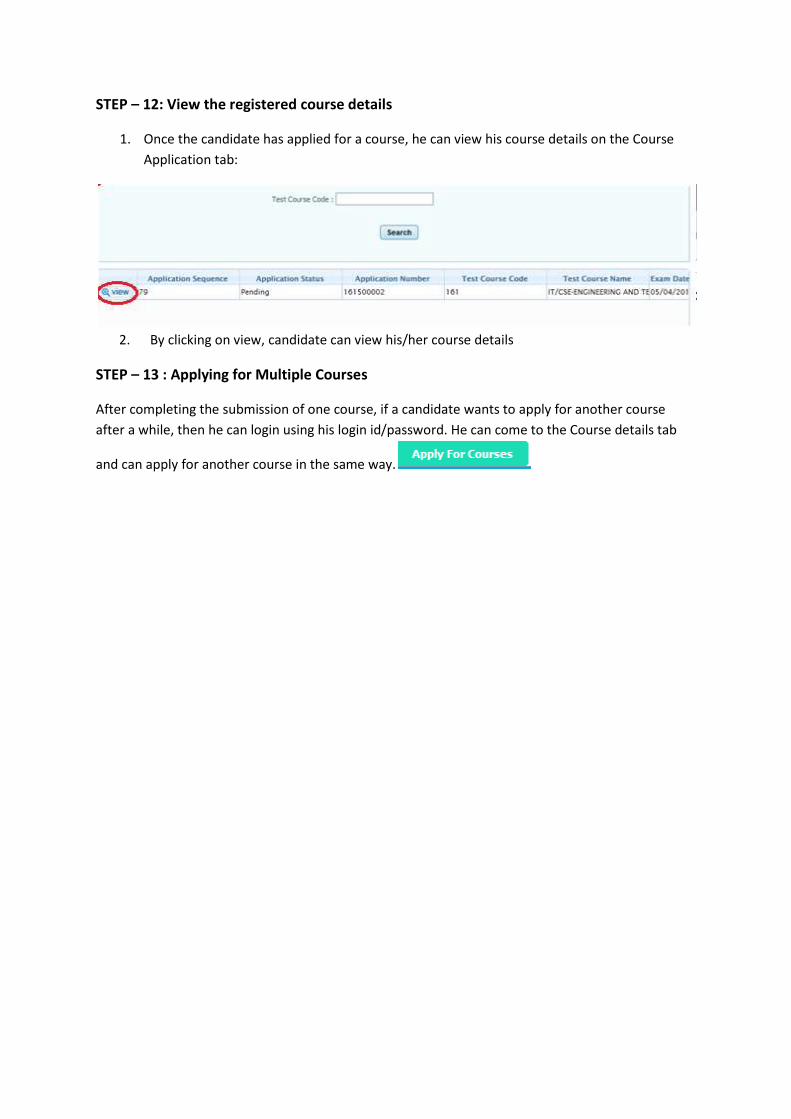
STEP – 11 : Course registration and form generation
After completing a successful transaction candidate will be redirected to the page where his/her
personal as well as course details will be provided along with the transaction ID . Candidate can take
the printout of this page and keep it for future use
STEP – 12: View the registered course details
1. Once the candidate has applied for a course, he can view his course details on the Course
Application tab:
2. By clicking on view, candidate can view his/her course details
STEP – 13 : Applying for Multiple Courses
After completing the submission of one course, if a candidate wants to apply for another course
after a while, then he can login using his login id/password. He can come to the Course details tab
and can apply for another course in the same way.


![CBIZ / ZURICH LIFE Fill-Able Contracting/Appointment Forms · CBIZ / ZURICH LIFE Fill-Able Contracting/Appointment Forms ... [Form# IFA-1001] ... cancellation of debt,](https://img.pdfslide.net/doc/110x75/5b78ecee7f8b9ad77e8c5a83/cbiz-zurich-life-fill-able-contractingappointment-forms-cbiz-zurich-life.jpg)