Embed Size (px)
Citation preview

Introduction to ProSMART: Proforma’s Sales Marketing and Relationship Tool How to Log On and Get Started
ProSMART - 2/20/2002 1
Table of Contents
INTRODUCING PROSMART: PROFORMA’S SALES MARKETING AND RELATIONSHIP TOOL...4
Where is ProSMART Located? ........................................................................................................................... 5
ProSMART Access & Structure .......................................................................................................................... 5
THE PROSMART HOME PAGE............................................................................................................7 The Company Message ....................................................................................................................................... 8 Dreams and Goals ............................................................................................................................................... 8 Alerts ................................................................................................................................................................. 10 View Top 5 Tasks ............................................................................................................................................. 18
MANAGING CONTACTS.....................................................................................................................20
View/Search for Contacts ................................................................................................................................... 20
Contact Management: Related Links................................................................................................................ 23 Add Company ................................................................................................................................................... 23 New Prospects................................................................................................................................................... 25 Export Contacts................................................................................................................................................. 25 Import Contacts................................................................................................................................................. 26 Task List............................................................................................................................................................ 28
Create Contacts ................................................................................................................................................... 28 View Contacts ................................................................................................................................................... 29 Add Contact ...................................................................................................................................................... 29 Groups Assigned To.......................................................................................................................................... 31 Communication Log.......................................................................................................................................... 31
GROUP MANAGEMENT .....................................................................................................................33
Create a Group.................................................................................................................................................... 33
View/Search for a Group: .................................................................................................................................. 36 Update Group Membership............................................................................................................................... 37 Add Member(s) to Group.................................................................................................................................. 38 Delete Member(s) from Group.......................................................................................................................... 39
TASK MANAGEMENT.........................................................................................................................40
Viewing the Task List ......................................................................................................................................... 40
CAMPAIGN MANAGEMENT...............................................................................................................42
View/Search for User Campaigns...................................................................................................................... 42 To View Information about Campaigns:........................................................................................................... 42 To Create a User Campaign: ............................................................................................................................. 43
ProSMART - 2/20/2002 2
View Central Campaigns (Owner Only)........................................................................................................... 46
To View Central Campaigns ............................................................................................................................. 46 Assigning Participants to the Central Campaign (Owner Only) ....................................................................... 48
The Media Library.............................................................................................................................................. 49 To Search the Media Library - Categories ........................................................................................................ 49 To Search the Media Library - General ............................................................................................................ 51
RESPONSE MANAGEMENT...............................................................................................................53
Direct Mail ........................................................................................................................................................... 53 To View Bad Postal Addresses ......................................................................................................................... 53
Email .................................................................................................................................................................... 54 To View Bad Email Addresses ......................................................................................................................... 54
REPORT MANAGEMENT....................................................................................................................55
Coming Soon........................................................................................................................................................ 55
TRAINING AND SUPPORT .................................................................................................................56
New Features ....................................................................................................................................................... 56
Manual ................................................................................................................................................................. 56
Online Tutorials .................................................................................................................................................. 56
USER ACCOUNT MANAGEMENT......................................................................................................57
Managing your ProSMART Account................................................................................................................ 57
Profile/Preferences .............................................................................................................................................. 57 User Settings ..................................................................................................................................................... 58 Edit Password.................................................................................................................................................... 58
Prospect Assignment (Owner Only) .................................................................................................................. 59 Manage your Prospect Drip............................................................................................................................... 59
User Listing.......................................................................................................................................................... 61 View User Listing ............................................................................................................................................. 61 Adding a User ................................................................................................................................................... 62
PROSMART TERMS & DEFINITIONS ................................................................................................63 General Terms ................................................................................................................................................ 63 Contact Type Descriptions ............................................................................................................................. 64 Company Type Descriptions .......................................................................................................................... 64
ProSMART - 2/20/2002 3
Introducing ProSMART: Proforma’s Sales Marketing and Relationship Tool ProOffice is the home of ProSMART, the Proforma Owner Sales, Marketing and Relationship Tool. This new marketing database and lead management system is designed to give Proforma Owners the ability to efficiently and effectively market to their customers and sales contacts, thereby increasing overall sales. This pipeline will allow Owners to provide automated touches to these two equally important segments of their business. By combining a solid, accurate database with a proven system for efficiently managing Owner leads, the overall goal of increasing sales and penetrating further into existing accounts is well within reach. This will invariably lead to increased sales. With ProSMART, you can easily manage your contacts, groups, campaigns, and marketing tasks. You will be able to see your Dreams and Goals right in front of you so that you never lose sight of what you are working towards. Use a campaign that our Marketing group has put together, or create one of your own; the choice is yours. For your convenience, ProSMART includes a Media Library for automated marketing touches. An important focus in this process of increasing sales is effectively targeting contacts and converting them into customers. Additionally, an Owner can more efficiently focus his or her marketing efforts to their existing customers in order to penetrate further into accounts, thereby capitalizing on well-established relationships. This first phase of ProSMART creates a foundation for future benefits such as collecting historical experience information for use in additional market research and analysis, a platform to support centralized direct marketing activities and management reporting tools to be used in a continuous improvement effort. ProSMART is a way to help increase brand awareness, and it allows the Owner to pick and choose exactly what marketing materials to send out and to whom, through the use of a fully stocked Media Library. Campaigns are personalized for you from you to the customer or contact. Finally, ProSMART is synchronized with the Proforma Selling System. With ProSMART, you can be as involved or as interactive as desired. Whether you want to participate in the campaigns initiated by the Support Center or create your own, ProSMART will help you manage those efforts and, more importantly, the responses.
ProSMART - 2/20/2002 4
Where is ProSMART Located? ProSMART is part of the ProOffice order processing system. ProSMART can be accessed even if you are not fully converted to the main ProOffice system. Although it is part of the overall system, one can begin using ProSMART without having completed the ProOffice conversion process. In that sense, the two are independent from one another. ProSMART is found at the following URL:
http://prooffice.proforma.com/prosmart Because ProSMART is part of the overall system, the main navigation and function elements are consistent with those found throughout the rest of the application. So, once you have an understanding of how to move through ProOMS, ProSMART, or ProOffice, you will not have any trouble moving through and operating within any other components. See “ProOffice: An Introduction” for more details on general navigation and functionality information.
ProSMART Access & Structure With ProSMART, each Proforma Owner will receive a predetermined number of new prospects per month. These prospects will be funneled into the individual ProSMART database for them to further act upon and process. The Proforma Ad Fund will subsidize these initial contacts. An Owner is able, however, to purchase additional prospects above the initial subsidized amount. The ability to control this monthly amount is found right in ProSMART, and the Owner will be billed separately for their additional prospect purchase. Only the Owner will be able to determine the amount of additional prospects their business receives in the monthly drip. ProSMART has two levels of security access for Owners: Owner and Sales Rep access. Owners will have a full-access level of security. They will be able to fully control what happens in their ProSMART system. The “Sales Rep level” access will only allow a Sales Rep to see and operate on the contacts, groups, etc. that are assigned to or created by that Sales Rep. The Sales Rep will not be able to see or operate against other sales reps’ information. In contrast, the Owner will have full access to all data created or delivered to his or her business. For example, the Owner will be able to assign access for others to ProSMART, distribute contacts, manage the number of contacts requested monthly, etc. ProSMART handles information on two main levels: Company and Contact level. For the most part, Contacts are the focus of ProSMART. Any communications are sent to Contacts and history is tracked at the Contact level. Any one Company can have multiple Contacts. Since all of this marketing will be done at the Contact level, communications will not be sent “generically” to the Company level. This Company/Contact relationship can further be understood through the following:
There will be a primary Contact designated for each Company All marketing will be directed at the Contact level Account protection will be enforced at the Contact level
Within ProSMART, a single Contact can be assigned to one or many Groups. A Group is a logical collection of Contacts that will be acted upon for marketing activities. A Group can be associated with one or many marketing campaigns. This allows an Owner to continue to reinforce the brand identity and Proforma name.
ProSMART - 2/20/2002 5
While ProSMART uses terms and concepts common to many marketing and contacting programs or systems, there may be some terms or concepts with which the User is not familiar. For this reason, a list of definitions for some of the commonly used terms throughout ProSMART is listed at the end of this guide in a section called “ProSMART Terms & Definitions.” Most categories within ProOffice contain a general Search screen. This screen is divided into two types of searches, a Simple Search and an Advanced Search. The Simple Search contains the fields that are queried most often and will be used in most cases. The Advanced Search contains more fields and will be used for more sophisticated searches. If a search field is filled in, the system will consider it part of the search. If there is more than one field filled in, the system will consider the relationship between the fields to be an “And” relationship. What this means is that all fields must meet the criteria for every completed field in the search or no results will be returned.
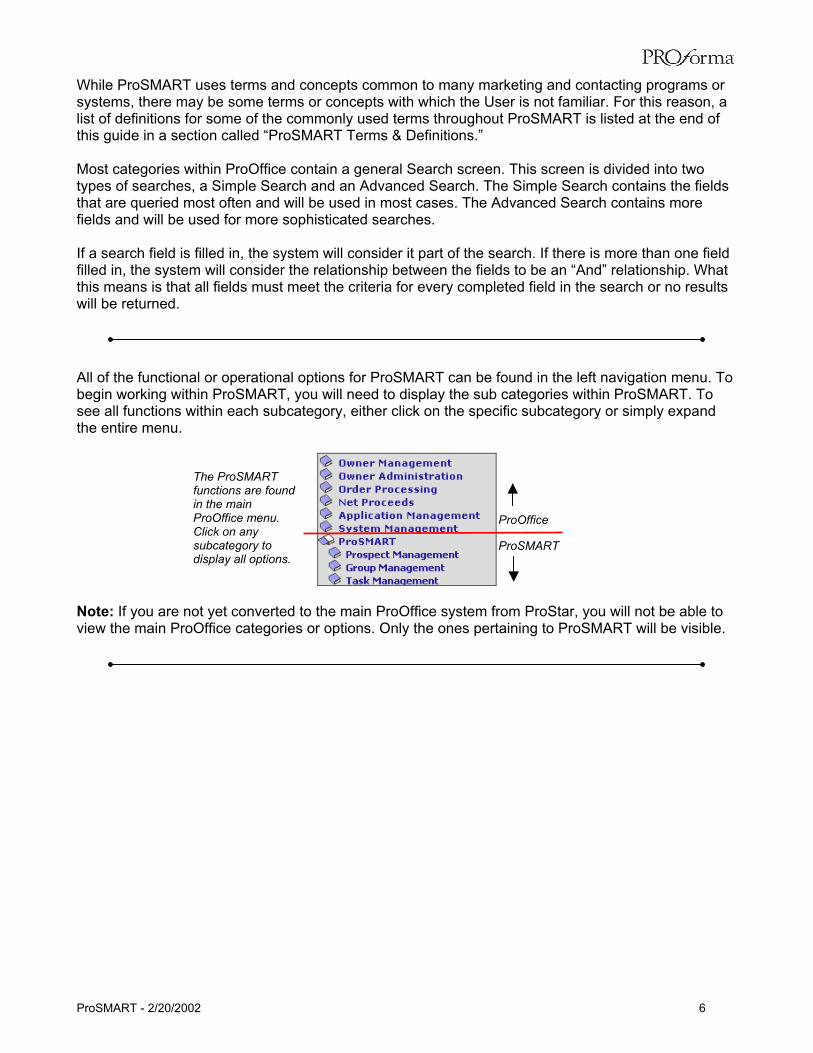
All of the functional or operational options for ProSMART can be found in the left navigation menu. To begin working within ProSMART, you will need to display the sub categories within ProSMART. To see all functions within each subcategory, either click on the specific subcategory or simply expand the entire menu.
The ProSMART functions are found in the main ProOffice menu. Click on any subcategory to display all options.
ProSMART
ProOffice
Note: If you are not yet converted to the main ProOffice system from ProStar, you will not be able to view the main ProOffice categories or options. Only the ones pertaining to ProSMART will be visible.
ProSMART - 2/20/2002 6
The ProSMART Home Page When first accessing ProSMART, you will be taken to the ProSMART Home Page. This is where you can find out some initial information about any new Central Marketing Campaigns and your individual marketing efforts. This Home Page is personalized to greet the User by name, Proforma Owner ID, and Proforma business name. Divided into four main sections, this page serves as the central place to manage the contacting and marketing activities provided by ProSMART. To View the ProSMART Home Page:
1. Enter your preassigned Login and Password in the login page of ProOffice. Remember, ProSMART is located within ProOffice, and the URL for ProSMART is
http://prooffice.proforma.com/prosmart.
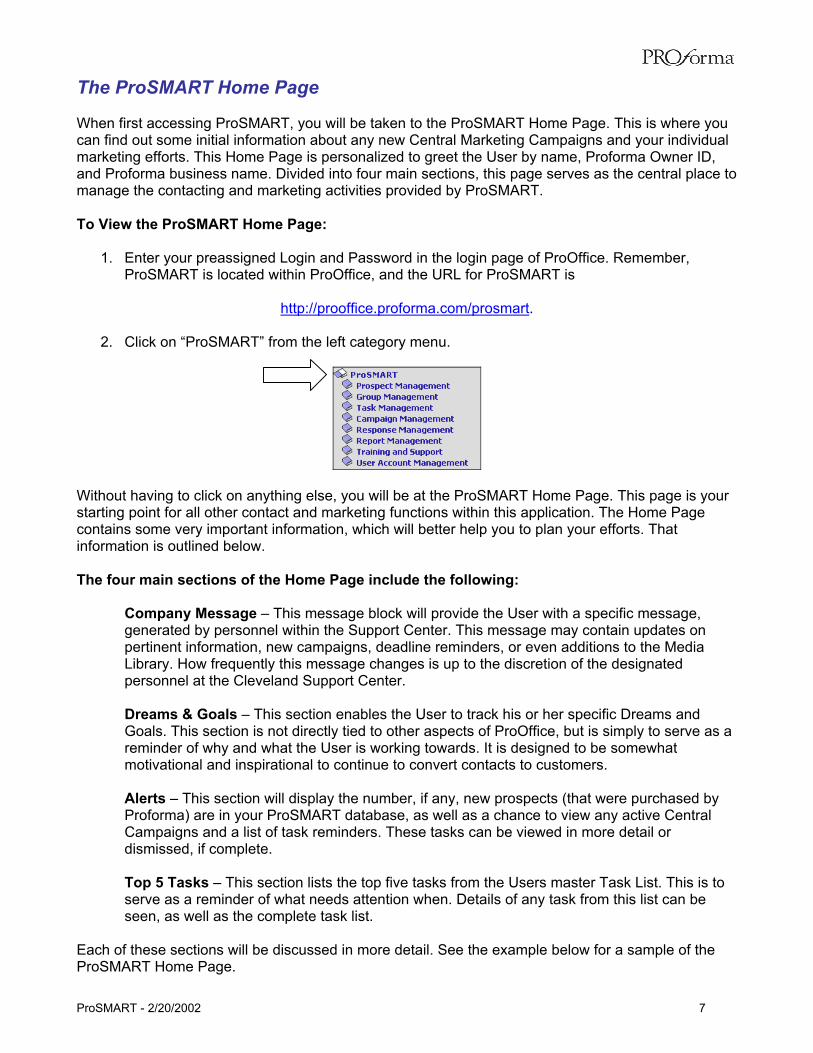
2. Click on “ProSMART” from the left category menu.
Without having to click on anything else, you will be at the ProSMART Home Page. This page is your starting point for all other contact and marketing functions within this application. The Home Page contains some very important information, which will better help you to plan your efforts. That information is outlined below. The four main sections of the Home Page include the following:
Company Message – This message block will provide the User with a specific message, generated by personnel within the Support Center. This message may contain updates on pertinent information, new campaigns, deadline reminders, or even additions to the Media Library. How frequently this message changes is up to the discretion of the designated personnel at the Cleveland Support Center.
Dreams & Goals – This section enables the User to track his or her specific Dreams and Goals. This section is not directly tied to other aspects of ProOffice, but is simply to serve as a reminder of why and what the User is working towards. It is designed to be somewhat motivational and inspirational to continue to convert contacts to customers.
Alerts – This section will display the number, if any, new prospects (that were purchased by Proforma) are in your ProSMART database, as well as a chance to view any active Central Campaigns and a list of task reminders. These tasks can be viewed in more detail or dismissed, if complete.
Top 5 Tasks – This section lists the top five tasks from the Users master Task List. This is to serve as a reminder of what needs attention when. Details of any task from this list can be seen, as well as the complete task list.
Each of these sections will be discussed in more detail. See the example below for a sample of the ProSMART Home Page.
ProSMART - 2/20/2002 7
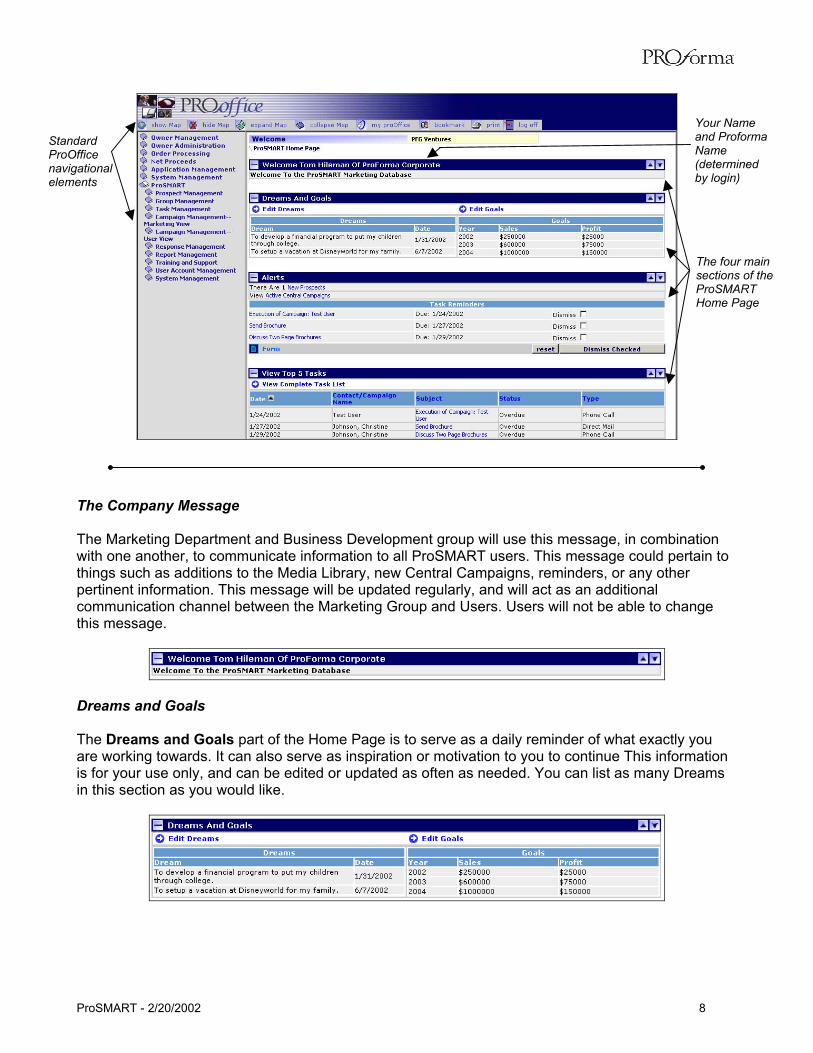
Your Name and Proforma Name (determined by login)
Standard ProOffice navigational elements
The four main sections of the ProSMART Home Page
The Company Message The Marketing Department and Business Development group will use this message, in combination with one another, to communicate information to all ProSMART users. This message could pertain to things such as additions to the Media Library, new Central Campaigns, reminders, or any other pertinent information. This message will be updated regularly, and will act as an additional communication channel between the Marketing Group and Users. Users will not be able to change this message.
Dreams and Goals The Dreams and Goals part of the Home Page is to serve as a daily reminder of what exactly you are working towards. It can also serve as inspiration or motivation to you to continue This information is for your use only, and can be edited or updated as often as needed. You can list as many Dreams in this section as you would like.
ProSMART - 2/20/2002 8
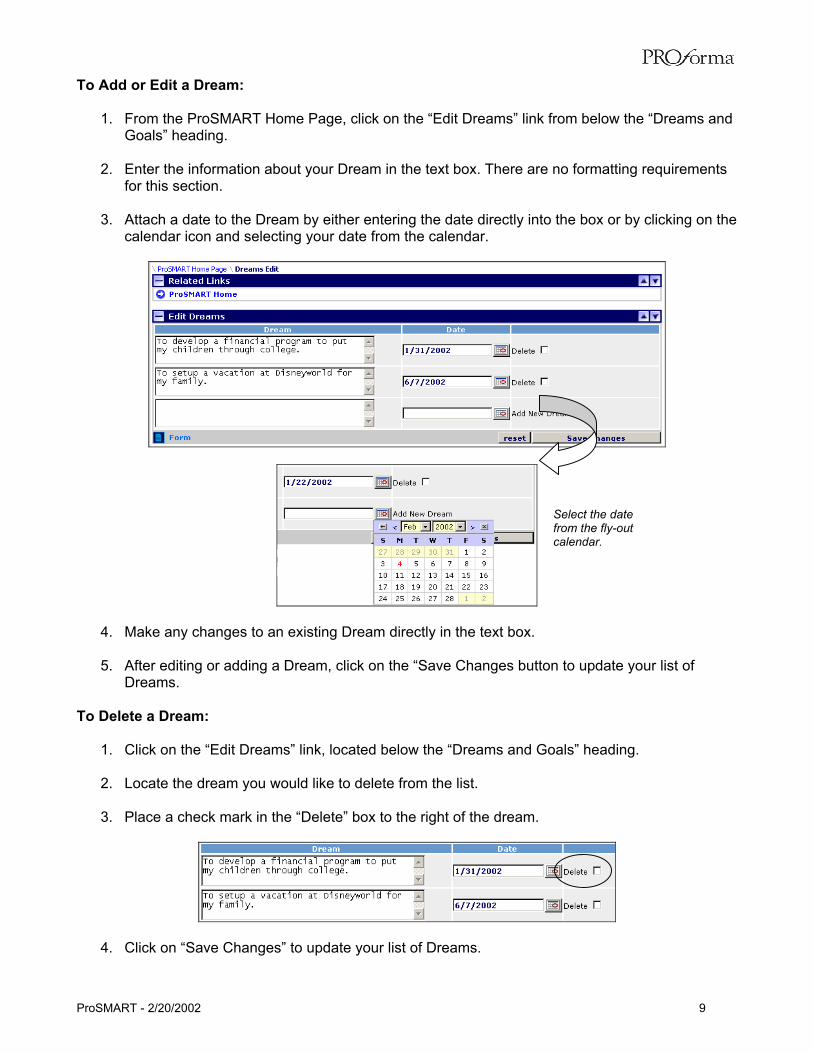
To Add or Edit a Dream:
1. From the ProSMART Home Page, click on the “Edit Dreams” link from below the “Dreams and Goals” heading.
2. Enter the information about your Dream in the text box. There are no formatting requirements
for this section.
3. Attach a date to the Dream by either entering the date directly into the box or by clicking on the calendar icon and selecting your date from the calendar.
4. Make any changes to an existing Dream directly in the text box. 5. After editing or adding a Dream, click on the “Save Changes button to update your list of
Dreams. To Delete a Dream:
1. Click on the “Edit Dreams” link, located below the “Dreams and Goals” heading. 2. Locate the dream you would like to delete from the list.
3. Place a check mark in the “Delete” box to the right of the dream.
Select the date from the fly-out calendar.
4. Click on “Save Changes” to update your list of Dreams.
ProSMART - 2/20/2002 9
To Add or Edit your Goals:
1. Click on the “Edit Goals” link, located below the “Dreams and Goals” heading. 2. Enter your Goal information in the appropriate spaces. There is an area for Sales and for Profit
for the next three years.
3. Click on the “Save Changes” button once this information is entered in order to secure your changes.
Your Goals can be updated as often as you feel it is necessary. Remember, this is for your use only. Alerts This section of the Home Page is used to draw your attention to a few important pieces of information: any new prospects that you have in your database, any active Central Campaigns and reminders for active Central Campaigns. Note that the “new prospect” designation refers to new prospects, purchased from an outside data vendor, that have been added to your database from the monthly prospect drip.
If your Alert indicates that you have new contacts in your database, you can view the details of the addition(s) right from this point. As with most aspects of ProOffice, there is often more than one way to get to the same place. The same holds true here. You can also view your new contacts by choosing the corresponding option from the left navigation menu.
ProSMART - 2/20/2002 10
To View New Prospects:
1. Click on “New Prospects,” which is highlighted in blue, located below the “Alerts” header on the ProSMART Home Page.
2. A list of new contacts will then be displayed for your review. Note that at this point you will only
see some general information about the record.
This list contains the following for each contact:
Company Name Contact Name Type of Contact
Postal Code Product Lines*
* Note: you will not be able to sort on Product Lines since there may be more than one product line associated with a contact. As indicated by the blue highlighted text, more details can be seen about either the Company or the Contact. To View the Details of the Company or Contact:
1. Determine which set of details you would like to view, either Company or Contact level. 2. Click on the name, which is highlighted in blue.
You will notice that with each detail page (for Company Name and Contact Name) there are both Basic and Advanced Details. This page also contains a “Communication Log,” so you can quickly see a record of any communications that have taken place with this particular contact.
ProSMART - 2/20/2002 11
An example of both of these detail pages is shown below.
Sample of Company details, both Basic and Advanced
ProSMART - 2/20/2002 12
Sample of Contact details, both Basic and Advanced
After working with this contact, you may find that there is information that needs to be updated or added in order to complete the record. Any of the information found on this page can be edited.
ProSMART - 2/20/2002 13
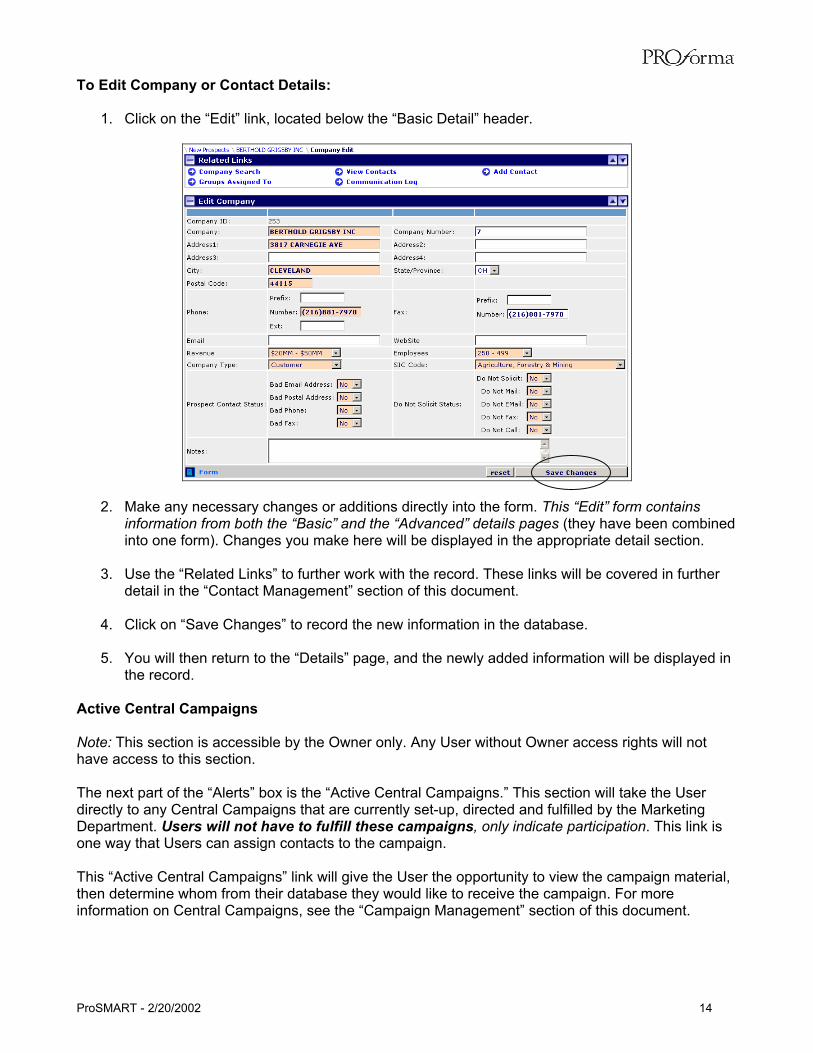
To Edit Company or Contact Details:
1. Click on the “Edit” link, located below the “Basic Detail” header.
2. Make any necessary changes or additions directly into the form. This “Edit” form contains information from both the “Basic” and the “Advanced” details pages (they have been combined into one form). Changes you make here will be displayed in the appropriate detail section.
3. Use the “Related Links” to further work with the record. These links will be covered in further
detail in the “Contact Management” section of this document.
4. Click on “Save Changes” to record the new information in the database.
5. You will then return to the “Details” page, and the newly added information will be displayed in the record.
Active Central Campaigns Note: This section is accessible by the Owner only. Any User without Owner access rights will not have access to this section. The next part of the “Alerts” box is the “Active Central Campaigns.” This section will take the User directly to any Central Campaigns that are currently set-up, directed and fulfilled by the Marketing Department. Users will not have to fulfill these campaigns, only indicate participation. This link is one way that Users can assign contacts to the campaign. This “Active Central Campaigns” link will give the User the opportunity to view the campaign material, then determine whom from their database they would like to receive the campaign. For more information on Central Campaigns, see the “Campaign Management” section of this document.
ProSMART - 2/20/2002 14
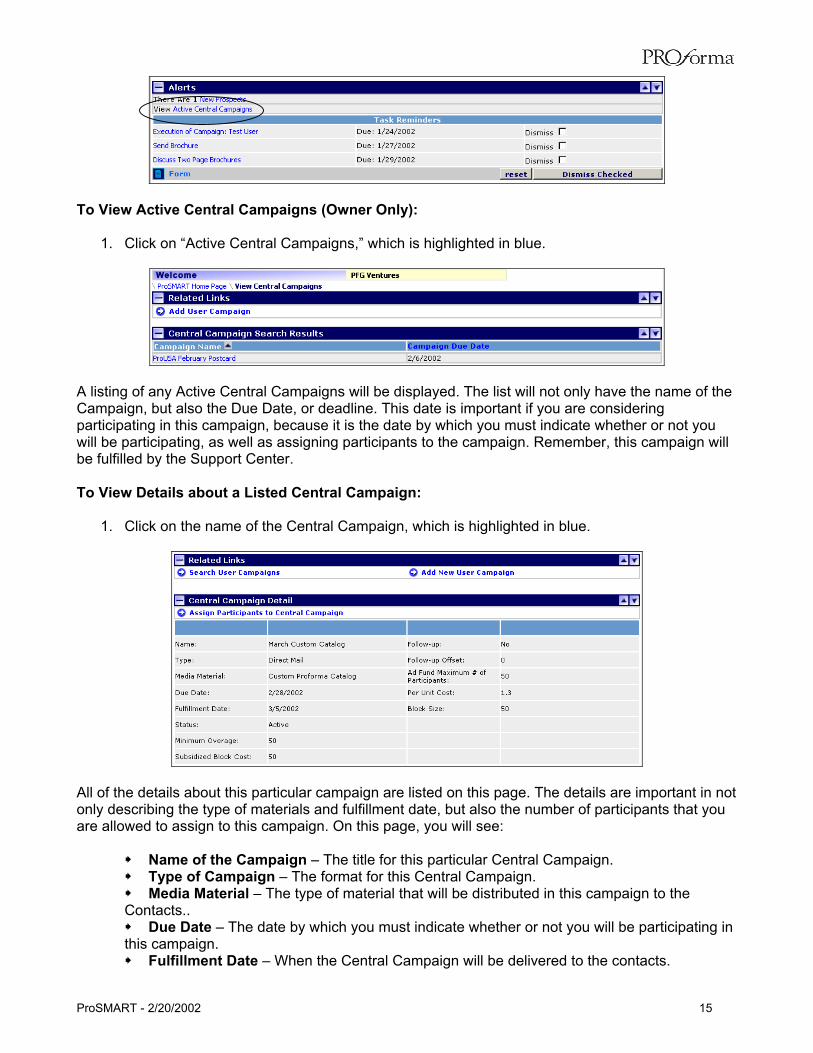
To View Active Central Campaigns (Owner Only):
1. Click on “Active Central Campaigns,” which is highlighted in blue.
A listing of any Active Central Campaigns will be displayed. The list will not only have the name of the Campaign, but also the Due Date, or deadline. This date is important if you are considering participating in this campaign, because it is the date by which you must indicate whether or not you will be participating, as well as assigning participants to the campaign. Remember, this campaign will be fulfilled by the Support Center. To View Details about a Listed Central Campaign:
1. Click on the name of the Central Campaign, which is highlighted in blue.
All of the details about this particular campaign are listed on this page. The details are important in not only describing the type of materials and fulfillment date, but also the number of participants that you are allowed to assign to this campaign. On this page, you will see:
Name of the Campaign – The title for this particular Central Campaign. Type of Campaign – The format for this Central Campaign. Media Material – The type of material that will be distributed in this campaign to the
Contacts.. Due Date – The date by which you must indicate whether or not you will be participating in
this campaign. Fulfillment Date – When the Central Campaign will be delivered to the contacts.
ProSMART - 2/20/2002 15
Status – Whether or not this is an active campaign. If it is not active, it is closed and you
will not be able to participate in the Campaign. Minimum Overage – The minimum number by which you can exceed the subsidized block
size. Subsidized Block Cost – The size (number) of the block that will be paid by the Ad Fund. Follow-up – Whether or not this campaign requires a follow-up. Follow-Up Offset – If there is to be a follow-up, the number of days after the fulfillment
date. Ad Fund Maximum Number of Participants – The number of contacts from your
database (that will be subsidized by the Ad Fund) that you can assign to this campaign. Per Unit Cost – The cost to send this campaign to each additional contact over the
subsidized block size. In the example above, the cost is $1 per unit, in a block size of $50. So, there would be a $50 charge for an additional block. Block Size – The size of the block that must be purchased. In the example above, you can
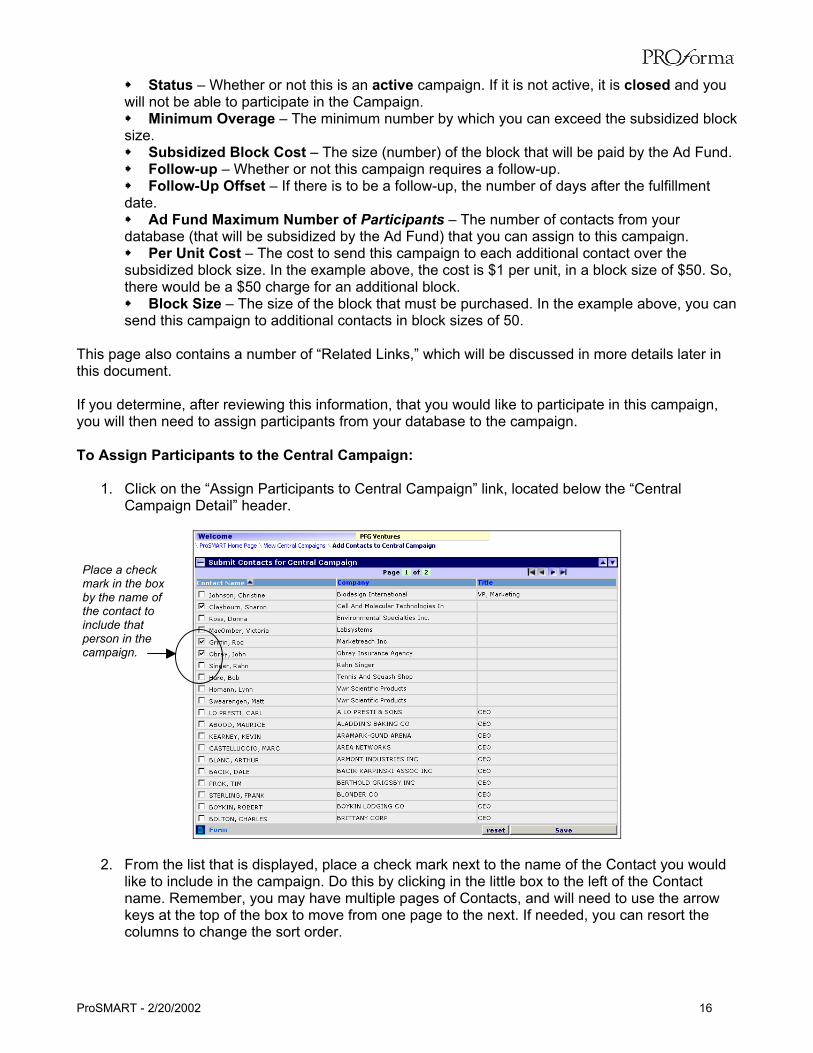
send this campaign to additional contacts in block sizes of 50. This page also contains a number of “Related Links,” which will be discussed in more details later in this document. If you determine, after reviewing this information, that you would like to participate in this campaign, you will then need to assign participants from your database to the campaign. To Assign Participants to the Central Campaign:
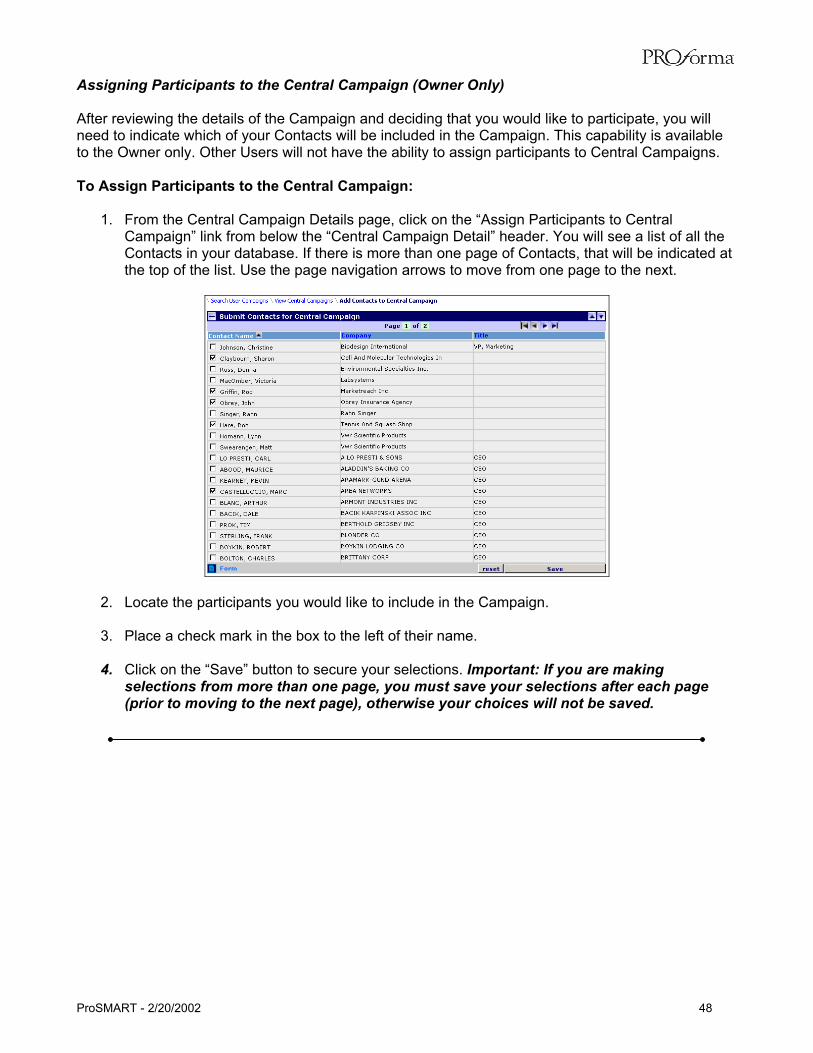
1. Click on the “Assign Participants to Central Campaign” link, located below the “Central Campaign Detail” header.
Place a check mark in the box by the name of the contact to include that person in the campaign.
2. From the list that is displayed, place a check mark next to the name of the Contact you would
like to include in the campaign. Do this by clicking in the little box to the left of the Contact name. Remember, you may have multiple pages of Contacts, and will need to use the arrow keys at the top of the box to move from one page to the next. If needed, you can resort the columns to change the sort order.
ProSMART - 2/20/2002 16
3. You must click on the “Save” button at the end of each page in order to have the chosen
Contacts included. If you move to the next page without saving the information, those Contacts will not be included.
4. Click on the “Save” button to record your selections.
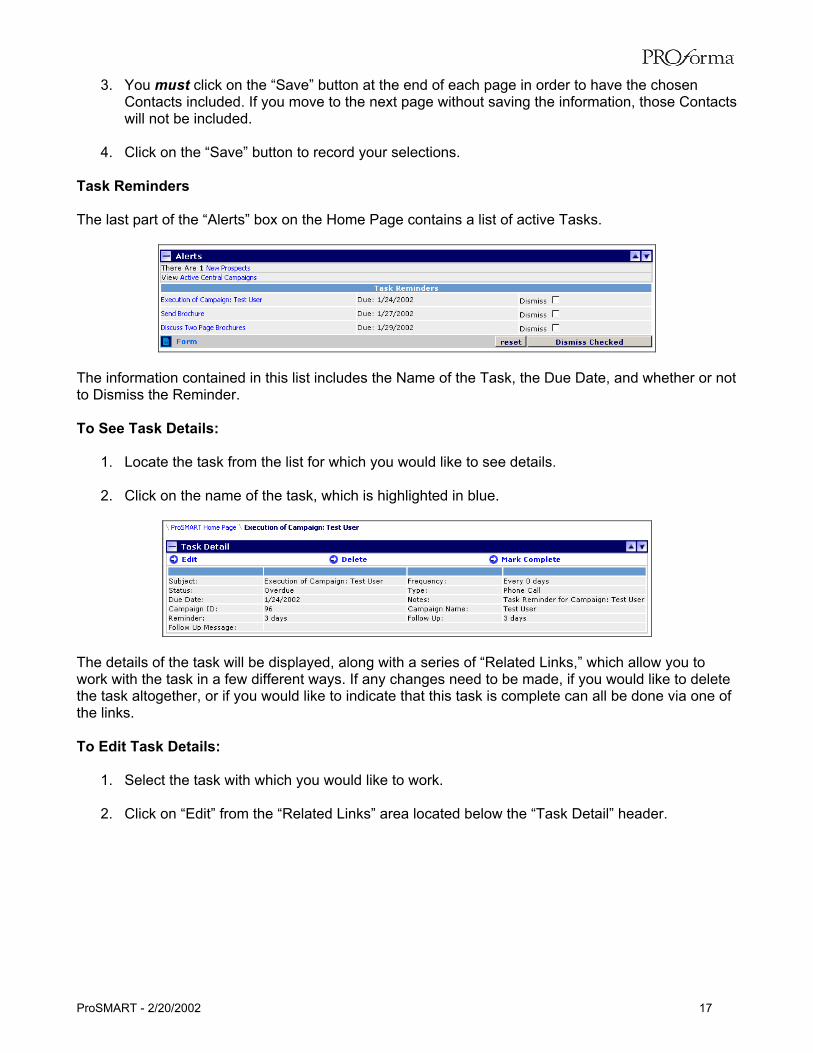
Task Reminders The last part of the “Alerts” box on the Home Page contains a list of active Tasks.
The information contained in this list includes the Name of the Task, the Due Date, and whether or not to Dismiss the Reminder. To See Task Details:
1. Locate the task from the list for which you would like to see details. 2. Click on the name of the task, which is highlighted in blue.
The details of the task will be displayed, along with a series of “Related Links,” which allow you to work with the task in a few different ways. If any changes need to be made, if you would like to delete the task altogether, or if you would like to indicate that this task is complete can all be done via one of the links. To Edit Task Details:
1. Select the task with which you would like to work. 2. Click on “Edit” from the “Related Links” area located below the “Task Detail” header.
ProSMART - 2/20/2002 17

3. Make any desired changes to the task directly into the form. 4. Click on the “Save Changes” button to secure the changes you have made.
To Dismiss a Task Reminder:
1. Locate the task from the list that you would like to dismiss. 2. Place a check mark in the little box to the right of the task (click directly in the box)
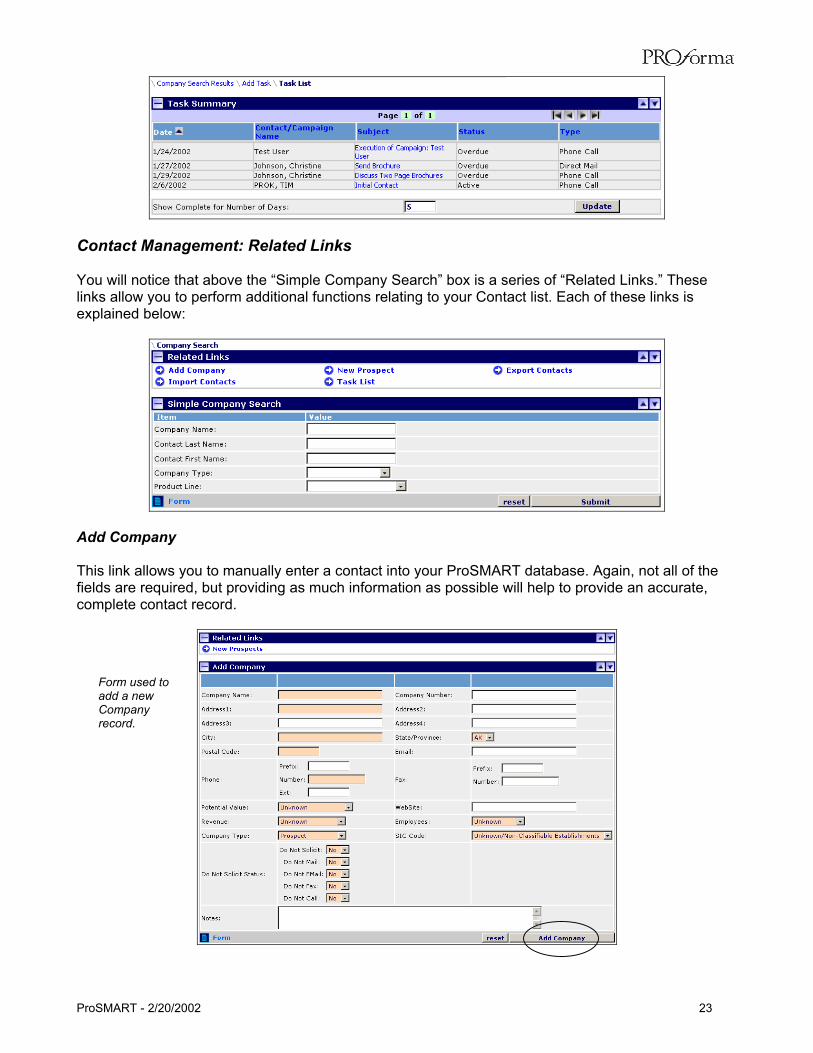
3. Click on the “Dismiss Checked” button to remove that task from your list. View Top 5 Tasks The last section of the ProSMART Home Page displays, to the User, their Top 5 Tasks from their complete Task List. This will help the User to plan and organize their marketing activities for the day/week. The list will indicate if a task is overdue, prompting the User to take some sort of action on the task. This Task List contains a bit more information than what is seen in the Task Reminders portion of “Alerts.” Included in this list is:
Task Due Date Contact/Campaign Name Subject
Status Type of Task
Once again, simply clicking on the Task “Subject,” which is highlighted in blue, will show the details of a particular Task.
ProSMART - 2/20/2002 18
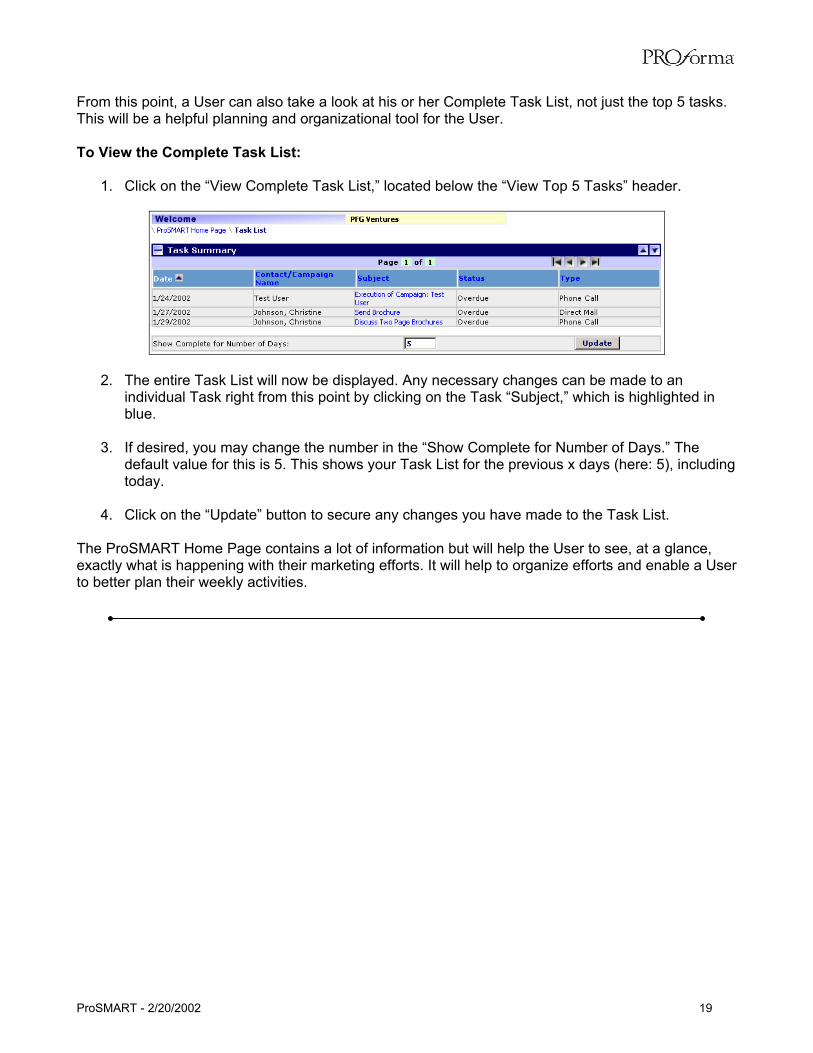
From this point, a User can also take a look at his or her Complete Task List, not just the top 5 tasks. This will be a helpful planning and organizational tool for the User. To View the Complete Task List:
1. Click on the “View Complete Task List,” located below the “View Top 5 Tasks” header.
2. The entire Task List will now be displayed. Any necessary changes can be made to an individual Task right from this point by clicking on the Task “Subject,” which is highlighted in blue.
3. If desired, you may change the number in the “Show Complete for Number of Days.” The
default value for this is 5. This shows your Task List for the previous x days (here: 5), including today.
4. Click on the “Update” button to secure any changes you have made to the Task List.
The ProSMART Home Page contains a lot of information but will help the User to see, at a glance, exactly what is happening with their marketing efforts. It will help to organize efforts and enable a User to better plan their weekly activities.
ProSMART - 2/20/2002 19
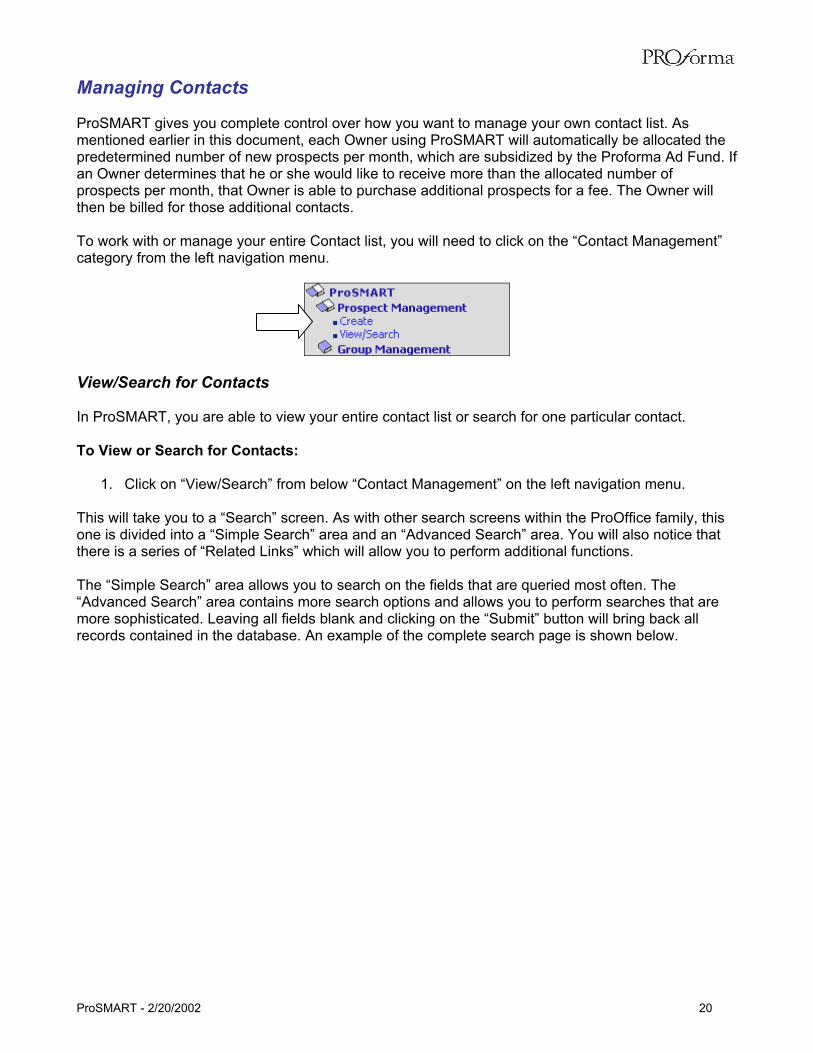
Managing Contacts ProSMART gives you complete control over how you want to manage your own contact list. As mentioned earlier in this document, each Owner using ProSMART will automatically be allocated the predetermined number of new prospects per month, which are subsidized by the Proforma Ad Fund. If an Owner determines that he or she would like to receive more than the allocated number of prospects per month, that Owner is able to purchase additional prospects for a fee. The Owner will then be billed for those additional contacts. To work with or manage your entire Contact list, you will need to click on the “Contact Management” category from the left navigation menu.
View/Search for Contacts In ProSMART, you are able to view your entire contact list or search for one particular contact. To View or Search for Contacts:
1. Click on “View/Search” from below “Contact Management” on the left navigation menu. This will take you to a “Search” screen. As with other search screens within the ProOffice family, this one is divided into a “Simple Search” area and an “Advanced Search” area. You will also notice that there is a series of “Related Links” which will allow you to perform additional functions. The “Simple Search” area allows you to search on the fields that are queried most often. The “Advanced Search” area contains more search options and allows you to perform searches that are more sophisticated. Leaving all fields blank and clicking on the “Submit” button will bring back all records contained in the database. An example of the complete search page is shown below.
ProSMART - 2/20/2002 20
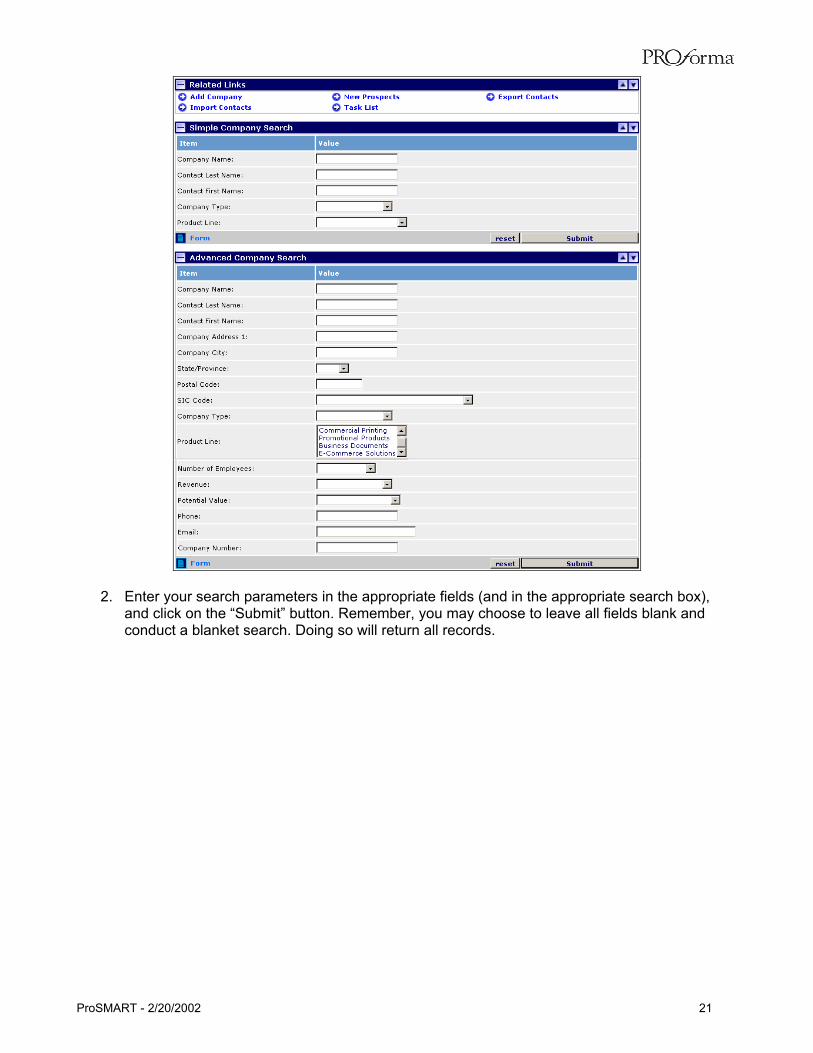
2. Enter your search parameters in the appropriate fields (and in the appropriate search box), and click on the “Submit” button. Remember, you may choose to leave all fields blank and conduct a blanket search. Doing so will return all records.
ProSMART - 2/20/2002 21
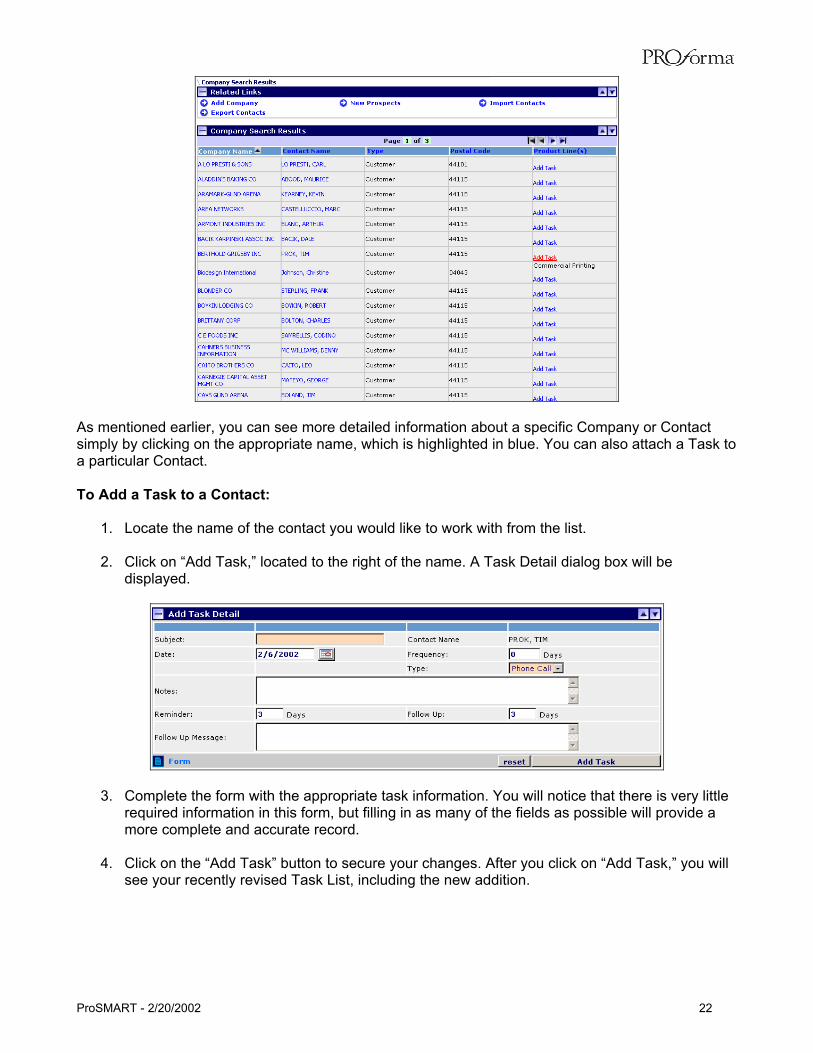
As mentioned earlier, you can see more detailed information about a specific Company or Contact simply by clicking on the appropriate name, which is highlighted in blue. You can also attach a Task to a particular Contact. To Add a Task to a Contact:
1. Locate the name of the contact you would like to work with from the list. 2. Click on “Add Task,” located to the right of the name. A Task Detail dialog box will be
displayed.
3. Complete the form with the appropriate task information. You will notice that there is very little required information in this form, but filling in as many of the fields as possible will provide a more complete and accurate record.
4. Click on the “Add Task” button to secure your changes. After you click on “Add Task,” you will
see your recently revised Task List, including the new addition.
ProSMART - 2/20/2002 22
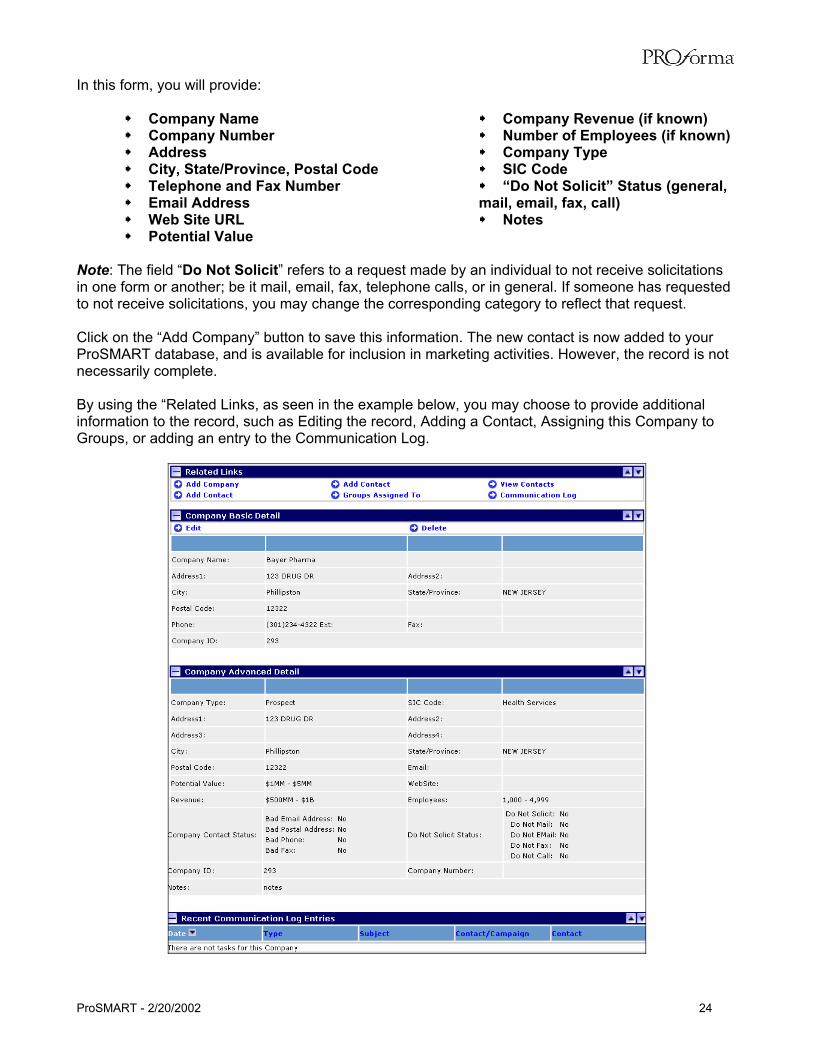
Contact Management: Related Links You will notice that above the “Simple Company Search” box is a series of “Related Links.” These links allow you to perform additional functions relating to your Contact list. Each of these links is explained below:
Add Company This link allows you to manually enter a contact into your ProSMART database. Again, not all of the fields are required, but providing as much information as possible will help to provide an accurate, complete contact record.
Form used to add a new Company record.
ProSMART - 2/20/2002 23
In this form, you will provide:
Company Name Company Number Address City, State/Province, Postal Code Telephone and Fax Number Email Address Web Site URL Potential Value
Company Revenue (if known) Number of Employees (if known) Company Type SIC Code “Do Not Solicit” Status (general,
mail, email, fax, call) Notes
Note: The field “Do Not Solicit” refers to a request made by an individual to not receive solicitations in one form or another; be it mail, email, fax, telephone calls, or in general. If someone has requested to not receive solicitations, you may change the corresponding category to reflect that request. Click on the “Add Company” button to save this information. The new contact is now added to your ProSMART database, and is available for inclusion in marketing activities. However, the record is not necessarily complete. By using the “Related Links, as seen in the example below, you may choose to provide additional information to the record, such as Editing the record, Adding a Contact, Assigning this Company to Groups, or adding an entry to the Communication Log.
ProSMART - 2/20/2002 24
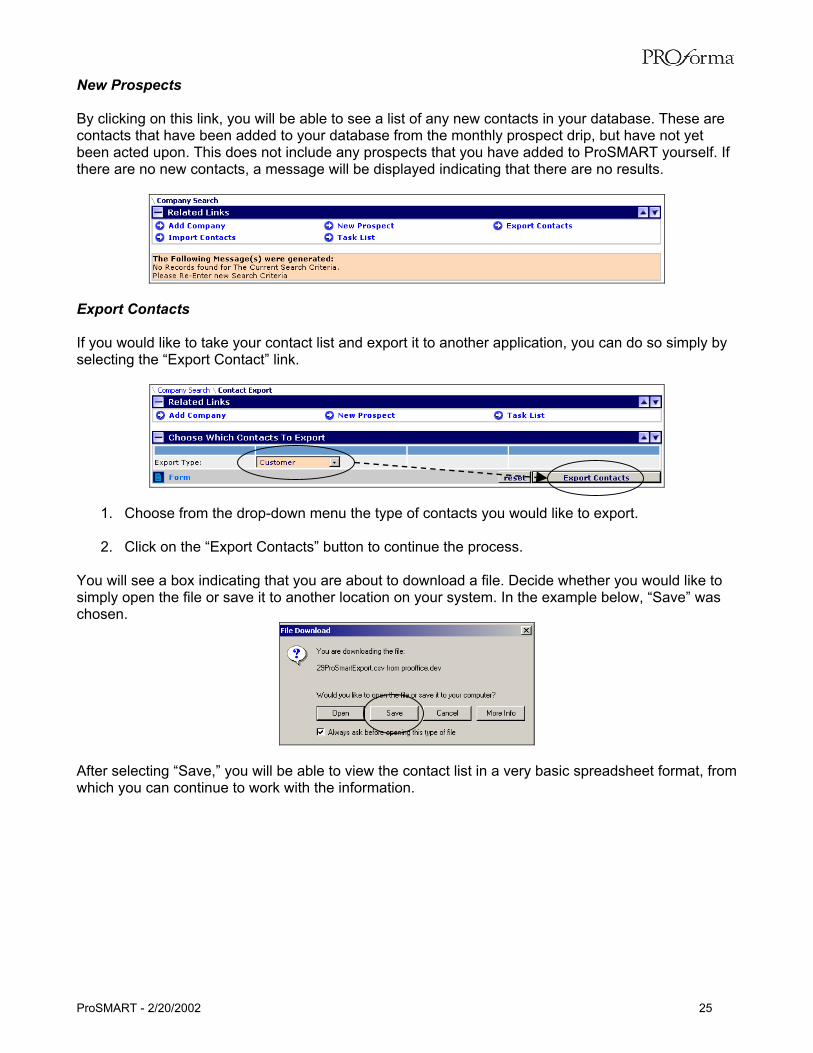
New Prospects By clicking on this link, you will be able to see a list of any new contacts in your database. These are contacts that have been added to your database from the monthly prospect drip, but have not yet been acted upon. This does not include any prospects that you have added to ProSMART yourself. If there are no new contacts, a message will be displayed indicating that there are no results.
Export Contacts If you would like to take your contact list and export it to another application, you can do so simply by selecting the “Export Contact” link.
1. Choose from the drop-down menu the type of contacts you would like to export. 2. Click on the “Export Contacts” button to continue the process.
You will see a box indicating that you are about to download a file. Decide whether you would like to simply open the file or save it to another location on your system. In the example below, “Save” was chosen.
After selecting “Save,” you will be able to view the contact list in a very basic spreadsheet format, from which you can continue to work with the information.
ProSMART - 2/20/2002 25
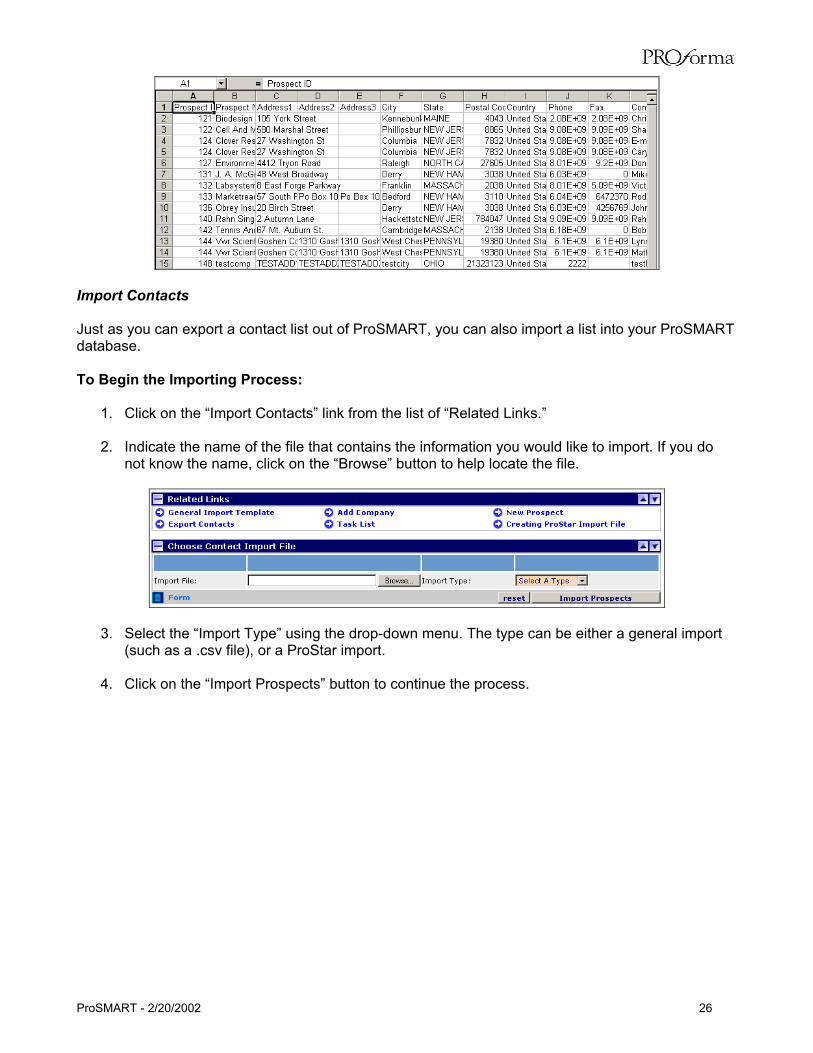
Import Contacts Just as you can export a contact list out of ProSMART, you can also import a list into your ProSMART database. To Begin the Importing Process:
1. Click on the “Import Contacts” link from the list of “Related Links.” 2. Indicate the name of the file that contains the information you would like to import. If you do
not know the name, click on the “Browse” button to help locate the file.
3. Select the “Import Type” using the drop-down menu. The type can be either a general import (such as a .csv file), or a ProStar import.
4. Click on the “Import Prospects” button to continue the process.
ProSMART - 2/20/2002 26
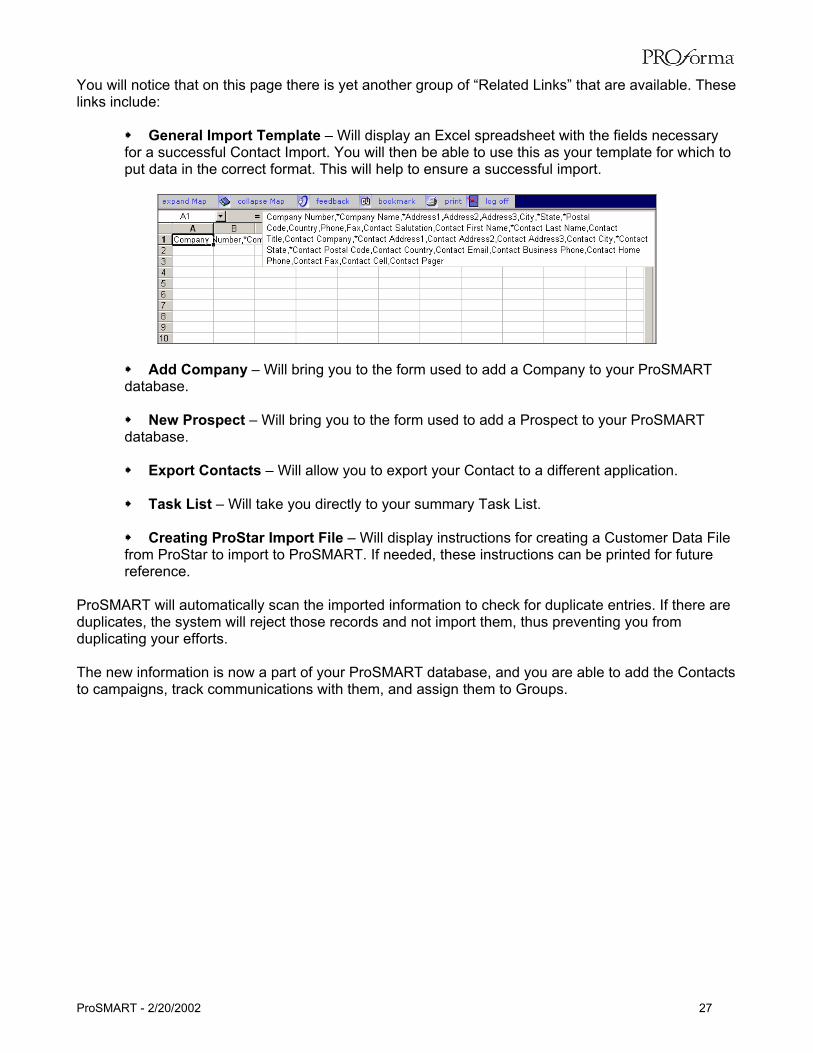
You will notice that on this page there is yet another group of “Related Links” that are available. These links include:
General Import Template – Will display an Excel spreadsheet with the fields necessary for a successful Contact Import. You will then be able to use this as your template for which to put data in the correct format. This will help to ensure a successful import.
Add Company – Will bring you to the form used to add a Company to your ProSMART database. New Prospect – Will bring you to the form used to add a Prospect to your ProSMART
database.
Export Contacts – Will allow you to export your Contact to a different application.
Task List – Will take you directly to your summary Task List.
Creating ProStar Import File – Will display instructions for creating a Customer Data File from ProStar to import to ProSMART. If needed, these instructions can be printed for future reference.
ProSMART will automatically scan the imported information to check for duplicate entries. If there are duplicates, the system will reject those records and not import them, thus preventing you from duplicating your efforts. The new information is now a part of your ProSMART database, and you are able to add the Contacts to campaigns, track communications with them, and assign them to Groups.
ProSMART - 2/20/2002 27
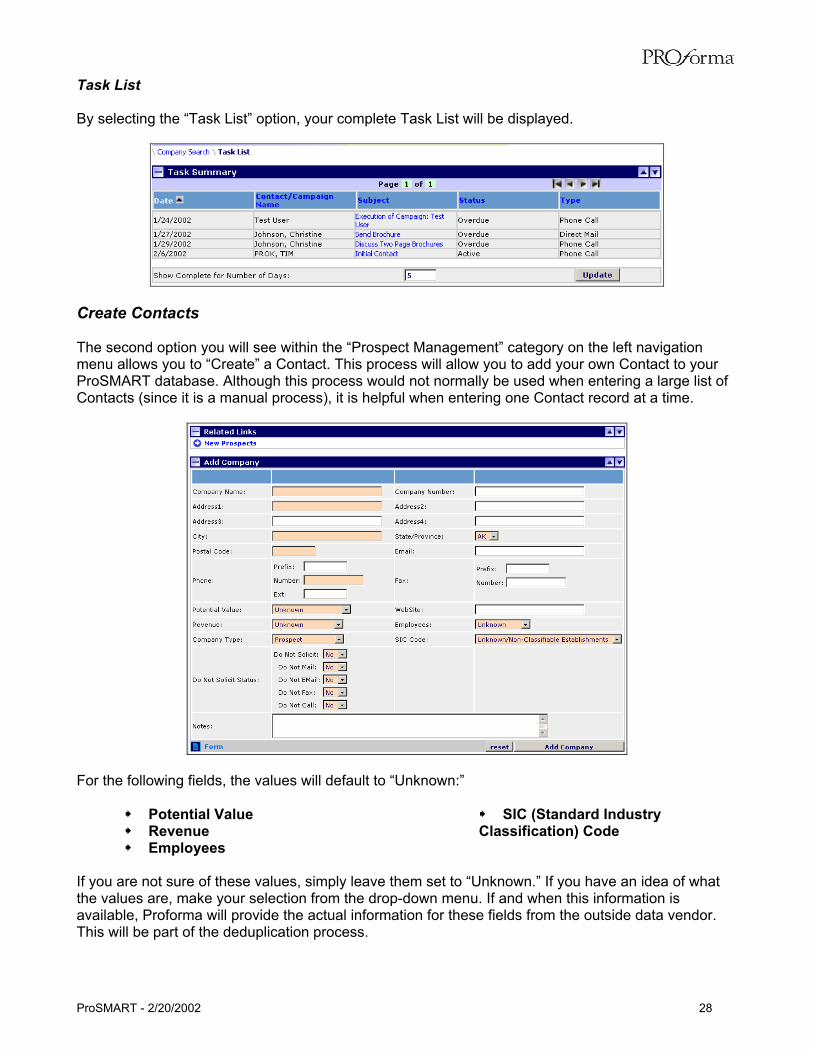
Task List By selecting the “Task List” option, your complete Task List will be displayed.
Create Contacts The second option you will see within the “Prospect Management” category on the left navigation menu allows you to “Create” a Contact. This process will allow you to add your own Contact to your ProSMART database. Although this process would not normally be used when entering a large list of Contacts (since it is a manual process), it is helpful when entering one Contact record at a time.
For the following fields, the values will default to “Unknown:”
Potential Value Revenue Employees
SIC (Standard Industry Classification) Code
If you are not sure of these values, simply leave them set to “Unknown.” If you have an idea of what the values are, make your selection from the drop-down menu. If and when this information is available, Proforma will provide the actual information for these fields from the outside data vendor. This will be part of the deduplication process.
ProSMART - 2/20/2002 28
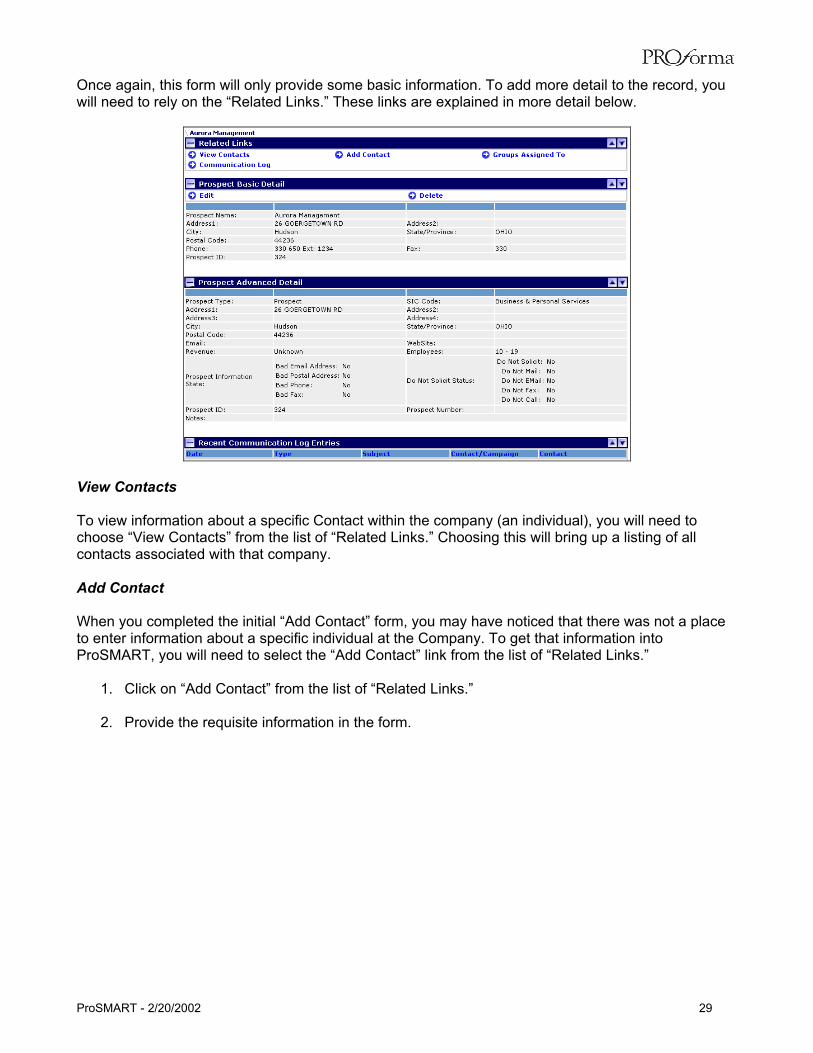
Once again, this form will only provide some basic information. To add more detail to the record, you will need to rely on the “Related Links.” These links are explained in more detail below.
View Contacts To view information about a specific Contact within the company (an individual), you will need to choose “View Contacts” from the list of “Related Links.” Choosing this will bring up a listing of all contacts associated with that company. Add Contact When you completed the initial “Add Contact” form, you may have noticed that there was not a place to enter information about a specific individual at the Company. To get that information into ProSMART, you will need to select the “Add Contact” link from the list of “Related Links.”
1. Click on “Add Contact” from the list of “Related Links.” 2. Provide the requisite information in the form.
ProSMART - 2/20/2002 29

Can choose more than one Product Line by holding down the [Ctrl] key when making your selection.
Note: “Product Lines” is a multi-selectable field, meaning that you can choose more than one Product Line to attach to this Contact record. To select more than one Product Line, simply hold down the [Ctrl] key when making your selection. This is indicated in the example above.
3. Click on the “Add Contact” button to secure the new information.
There is another series of “Related Links” that can be used to provide more information to this contact record. Keep in mind that multiple entries are naturally supported in ProSMART, just as in the rest of ProOffice. This means that if you need to, you can enter multiple addresses, phone numbers, email addresses, etc.
ProSMART - 2/20/2002 30
Groups Assigned To Selecting the “Groups Assigned To” link from this point in the application will bring up a list of all the Groups that this individual has been assigned to. Since a Contact can belong to many Groups, this list may contain many different entries. Communication Log Selecting the “Communication Log” link will bring up a list of all communication actions initiated or planned with this particular contact. To View the Communication Log:
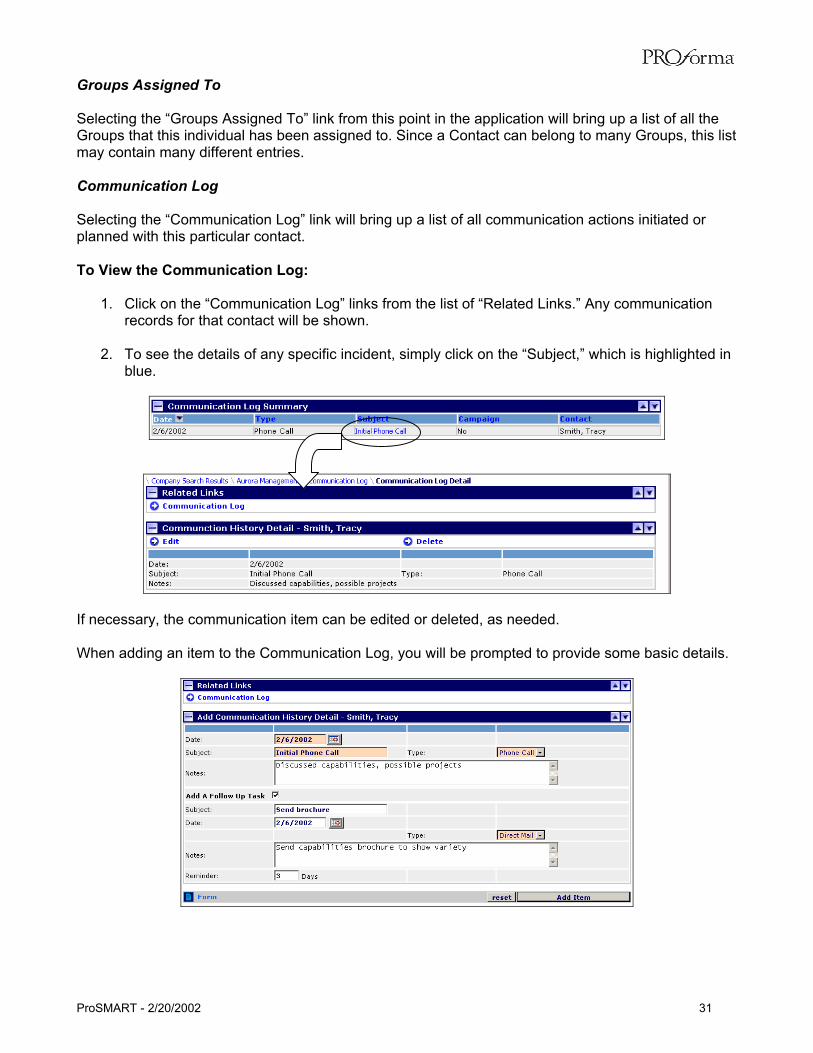
1. Click on the “Communication Log” links from the list of “Related Links.” Any communication records for that contact will be shown.
2. To see the details of any specific incident, simply click on the “Subject,” which is highlighted in
blue.
If necessary, the communication item can be edited or deleted, as needed. When adding an item to the Communication Log, you will be prompted to provide some basic details.
ProSMART - 2/20/2002 31
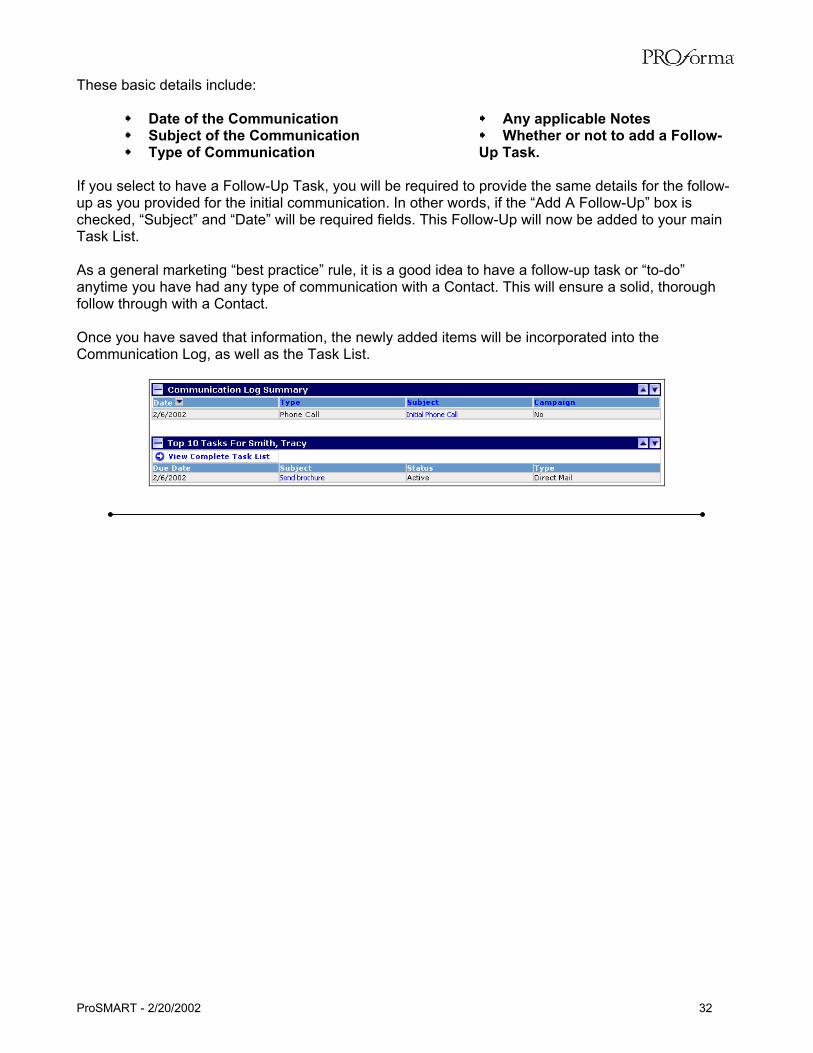
These basic details include:
Date of the Communication Subject of the Communication Type of Communication
Any applicable Notes Whether or not to add a Follow-
Up Task. If you select to have a Follow-Up Task, you will be required to provide the same details for the follow-up as you provided for the initial communication. In other words, if the “Add A Follow-Up” box is checked, “Subject” and “Date” will be required fields. This Follow-Up will now be added to your main Task List. As a general marketing “best practice” rule, it is a good idea to have a follow-up task or “to-do” anytime you have had any type of communication with a Contact. This will ensure a solid, thorough follow through with a Contact. Once you have saved that information, the newly added items will be incorporated into the Communication Log, as well as the Task List.
ProSMART - 2/20/2002 32
Group Management In ProSMART, a Group is a subset of Contacts; a logical collection of Contacts. One contact can be associated with many groups, and one group can be associated with many different campaigns. In groups, you do not need to differentiate between contacts and customers. Campaigns will be discussed in more detail later in this document. To begin working with Groups, click on “Group Management” from the left navigation menu.
There are two main options available in this section; View/Search for Groups and Create a Group. Create a Group Since there is no limit to the number of groups that you can have in ProSMART, and any one contact can belong to multiple groups, there will be many times when you will want to create a new Group. The process of creating a new Group is a 2-step process. The first step involves establishing the parameters of the new Group, and the second step involves assigning members to the Group. To Create a New Group: In order to create a new Group that can be used for various marketing campaigns, you must first define the Group and establish the parameters for membership. There is a simple form that is used to set up these guidelines.
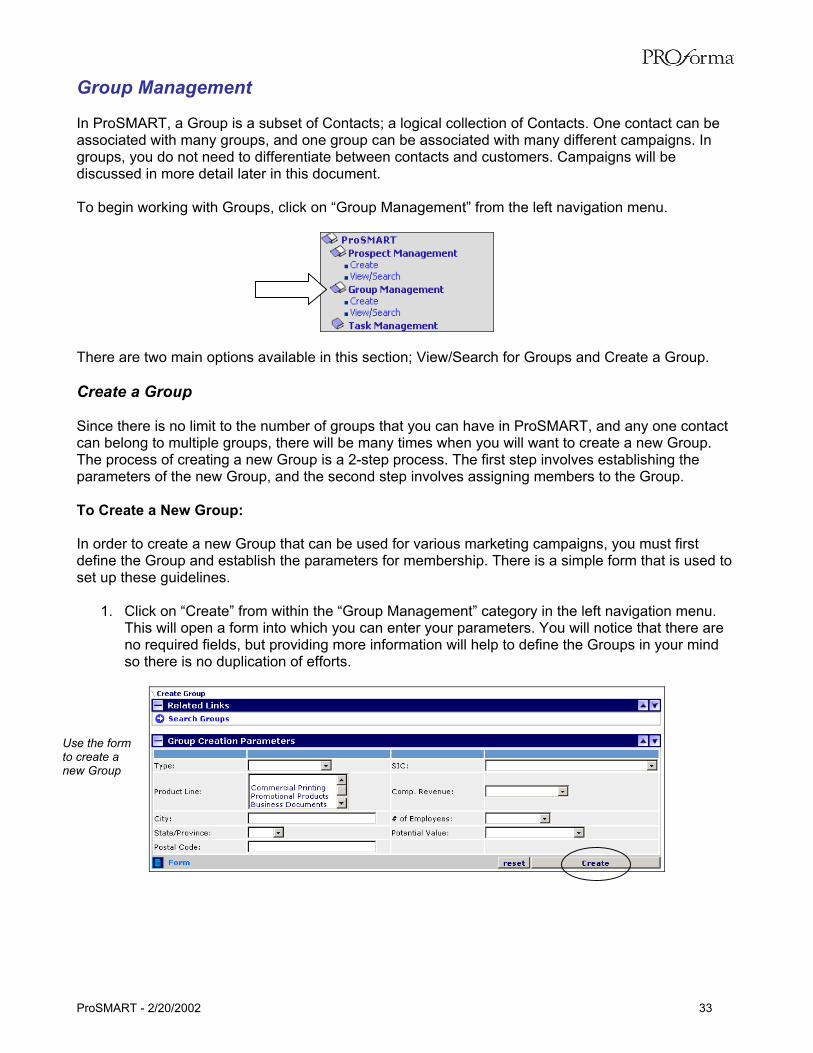
1. Click on “Create” from within the “Group Management” category in the left navigation menu. This will open a form into which you can enter your parameters. You will notice that there are no required fields, but providing more information will help to define the Groups in your mind so there is no duplication of efforts.
Use the form to create a new Group
ProSMART - 2/20/2002 33
2. Enter the Group information in the form. Include the following pieces of information:
Type (Customers, Prospects, Inactive) SIC (using the drop-down
menu) Product Line (multi-
selectable)
City, State, Postal Code Company Revenue Number of Employees Potential Value
SIC refers to Standard Industry Classification, a standard coding system. This drop-down will contain the 13 high-level categories of SIC code. More than one Product Line can be selected by holding down the [Ctrl] key while making your selection.
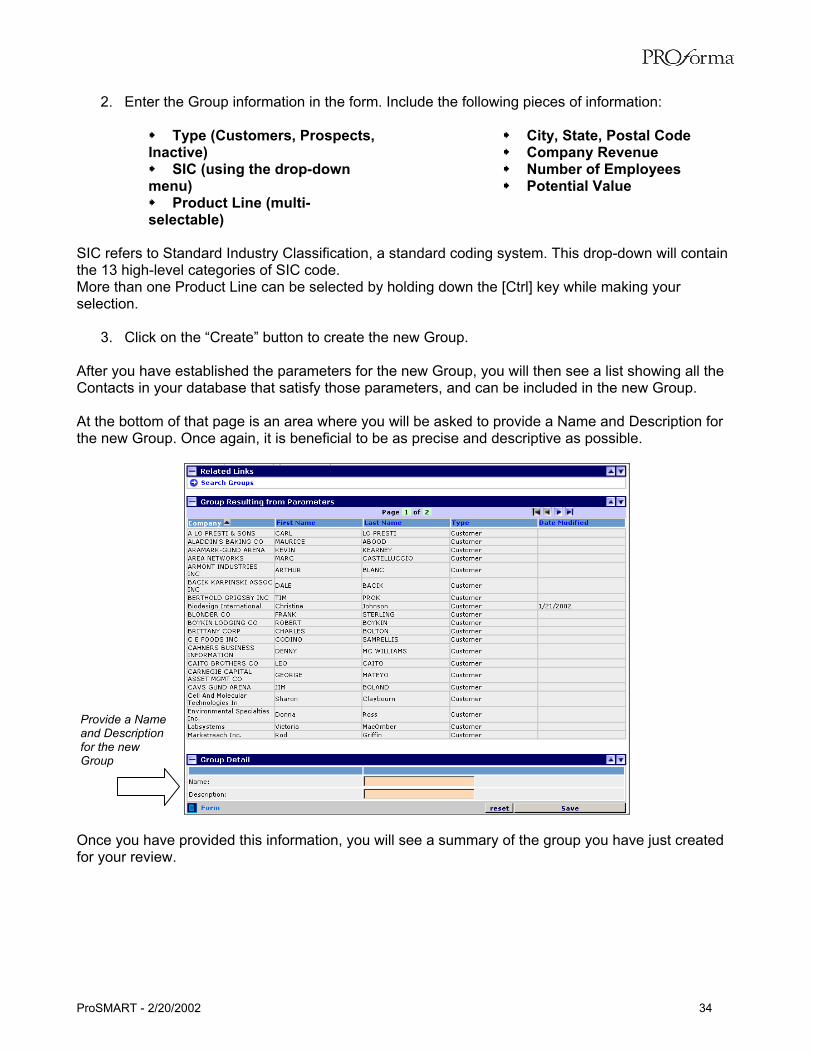
3. Click on the “Create” button to create the new Group. After you have established the parameters for the new Group, you will then see a list showing all the Contacts in your database that satisfy those parameters, and can be included in the new Group. At the bottom of that page is an area where you will be asked to provide a Name and Description for the new Group. Once again, it is beneficial to be as precise and descriptive as possible.
Provide a Name and Description for the new Group
Once you have provided this information, you will see a summary of the group you have just created for your review.
ProSMART - 2/20/2002 34
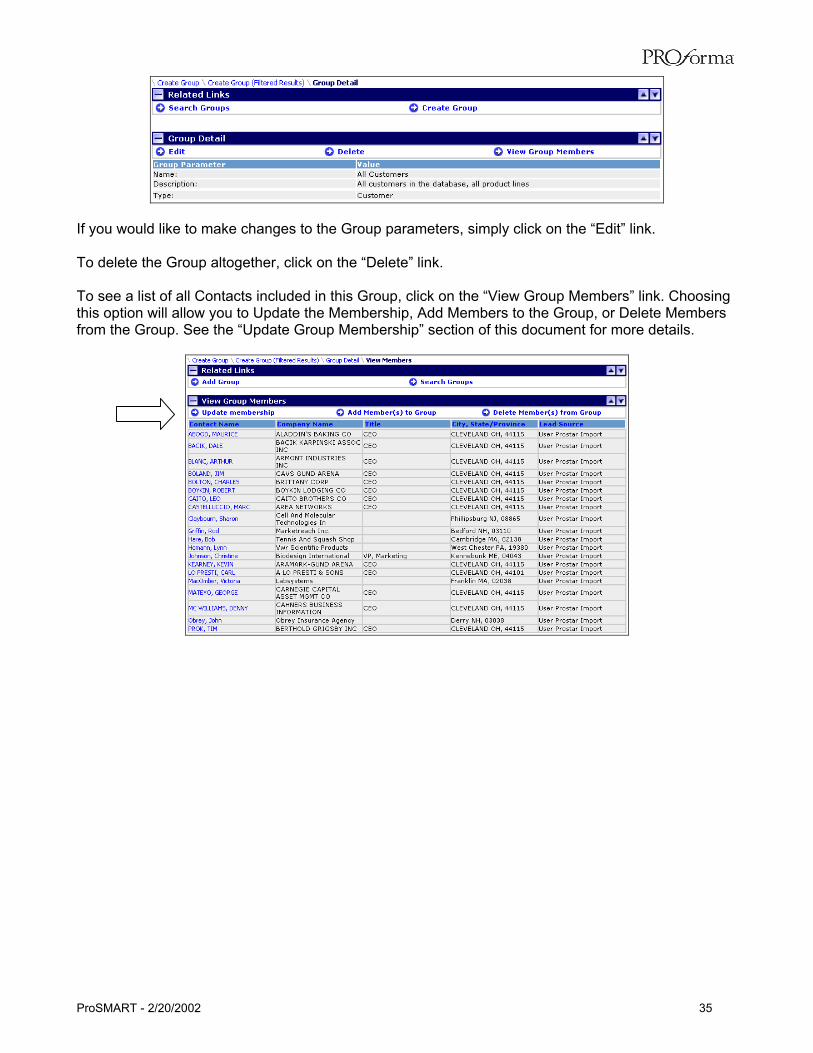
If you would like to make changes to the Group parameters, simply click on the “Edit” link. To delete the Group altogether, click on the “Delete” link. To see a list of all Contacts included in this Group, click on the “View Group Members” link. Choosing this option will allow you to Update the Membership, Add Members to the Group, or Delete Members from the Group. See the “Update Group Membership” section of this document for more details.
ProSMART - 2/20/2002 35
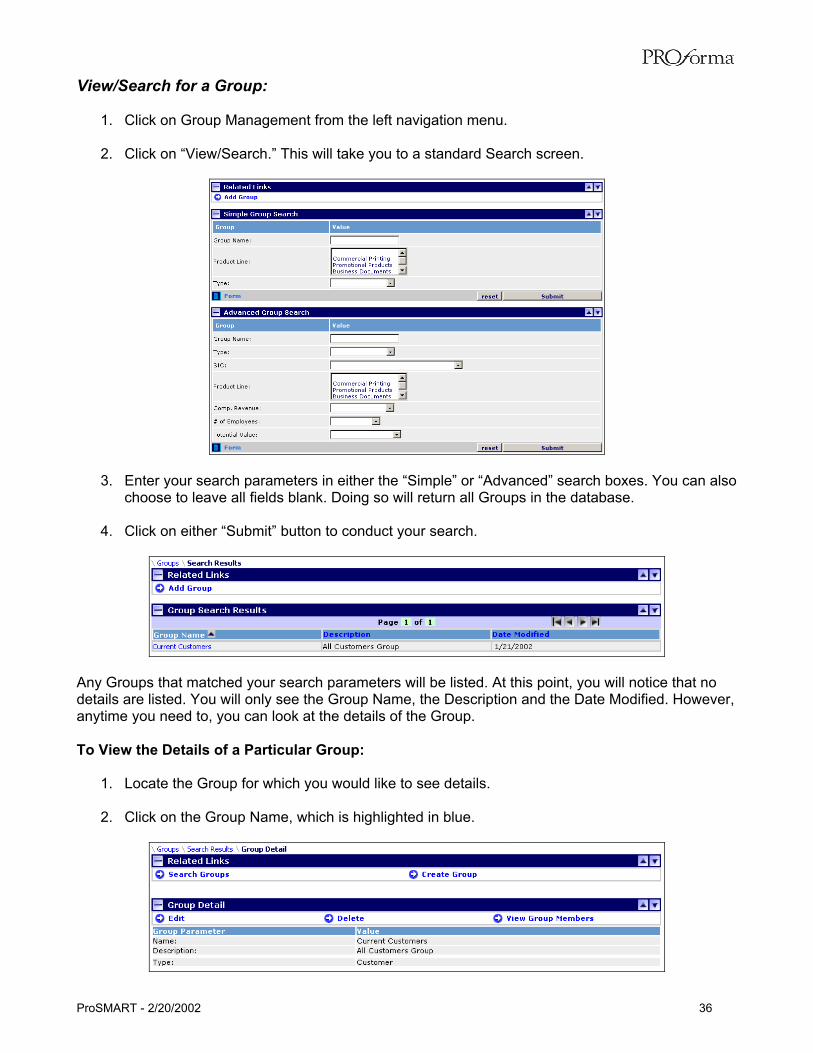
View/Search for a Group:
1. Click on Group Management from the left navigation menu. 2. Click on “View/Search.” This will take you to a standard Search screen.
3. Enter your search parameters in either the “Simple” or “Advanced” search boxes. You can also choose to leave all fields blank. Doing so will return all Groups in the database.
4. Click on either “Submit” button to conduct your search.
Any Groups that matched your search parameters will be listed. At this point, you will notice that no details are listed. You will only see the Group Name, the Description and the Date Modified. However, anytime you need to, you can look at the details of the Group. To View the Details of a Particular Group:
1. Locate the Group for which you would like to see details. 2. Click on the Group Name, which is highlighted in blue.
ProSMART - 2/20/2002 36

To View the List of Contacts Found in that Specific Group:
1. From the “Group Details” page, click on “View Group Members,” located below the “Group Detail” header.
This displays a list of all the contacts currently assigned to that particular group. The list contains some basic information, such as Contact Name, Company Name, Title, City/State or Province/Postal Code, and Lead Source. At the top of the list, there is another set of “Related Links.” These links will be used to manage the membership of this particular group, and they include: Update Group Membership This link involves Contacts that meet the criteria established for this group, but are not yet members of the Group. These could be new Contacts that have been added to your database through the monthly prospect drip or ones that you have added yourself. When new Contacts are added to your database, even though they might satisfy the criteria for a particular Group, they will not be automatically added to the Group. That will require some sort of action on your part. This is done so that there are no surprises as you work with the groups and various campaigns. It keeps control of your database in your hands.
Select, from the list, the Contacts you would like to add to a Group.
ProSMART - 2/20/2002 37
To Update the Group Membership:
1. Click on the “Update Membership” link from the list of “Related Links.” 2. This list will show any Contacts that are not currently in your group and are available for
inclusion. From the list that is returned, place a check mark next to the name of the Contact that you would like to add to the list. If you are not sure and would like to examine the Contact more closely, simply click on their name, which is highlighted in blue.
3. Click on the “Add Selected Members” button to add these Contacts to the Group.
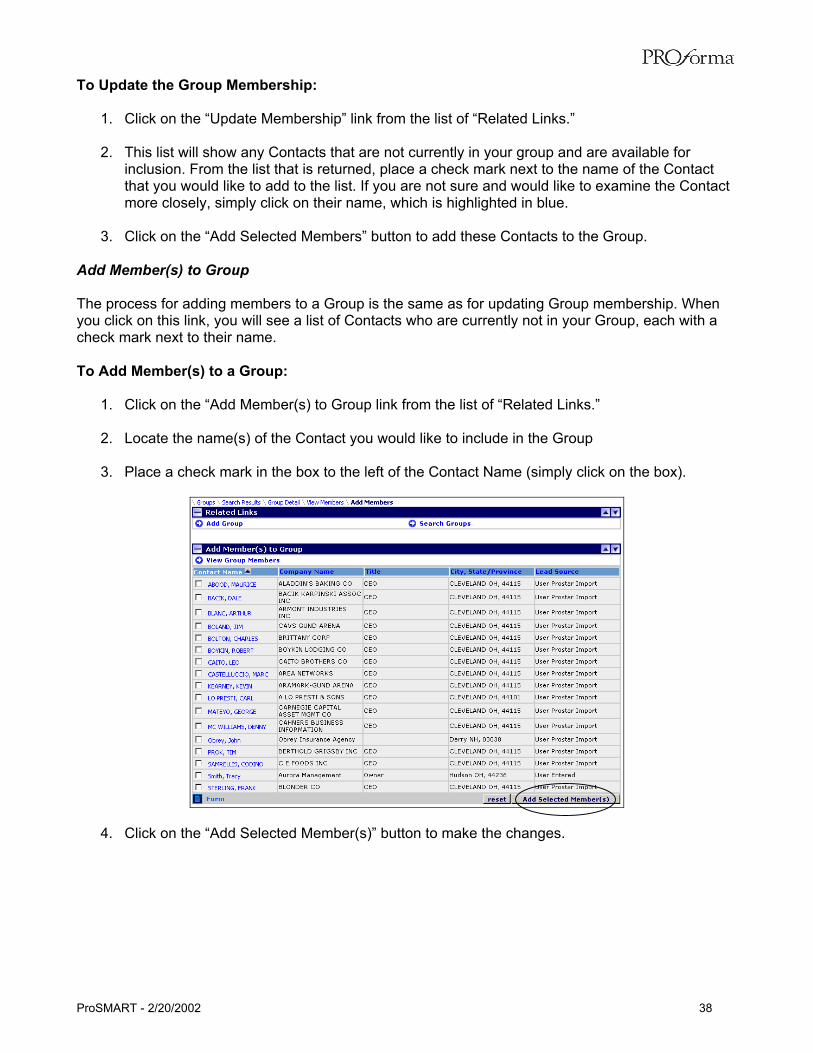
Add Member(s) to Group The process for adding members to a Group is the same as for updating Group membership. When you click on this link, you will see a list of Contacts who are currently not in your Group, each with a check mark next to their name. To Add Member(s) to a Group:
1. Click on the “Add Member(s) to Group link from the list of “Related Links.” 2. Locate the name(s) of the Contact you would like to include in the Group
3. Place a check mark in the box to the left of the Contact Name (simply click on the box).
4. Click on the “Add Selected Member(s)” button to make the changes.
ProSMART - 2/20/2002 38
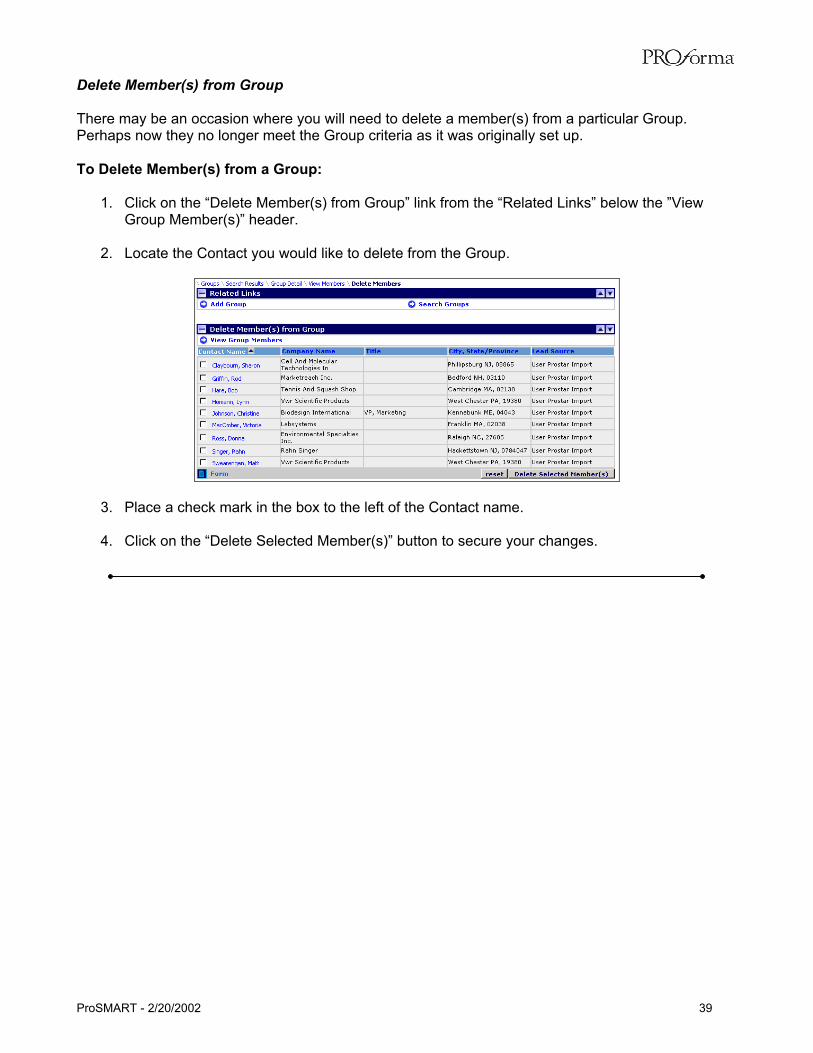
Delete Member(s) from Group There may be an occasion where you will need to delete a member(s) from a particular Group. Perhaps now they no longer meet the Group criteria as it was originally set up. To Delete Member(s) from a Group:
1. Click on the “Delete Member(s) from Group” link from the “Related Links” below the ”View Group Member(s)” header.
2. Locate the Contact you would like to delete from the Group.
3. Place a check mark in the box to the left of the Contact name. 4. Click on the “Delete Selected Member(s)” button to secure your changes.
ProSMART - 2/20/2002 39

Task Management One of the features of ProSMART is that it is a tool to help you manage your daily Task List for your marketing efforts. Through the Task Management category, you can list daily tasks, set reminders, establish follow-ups, and track your activities.
As seen in the “ProSMART Home Page” section, you can view either your Top 5 Tasks or your complete Task List right from the Home Page. As an alternate, you can also view your complete Task List using the left navigation menu. Viewing the Task List To View your Complete Task List:
1. Click on “Task Management” from the left navigation menu 2. Click on “View.” Your complete task list will be displayed, as seen in the example below. There
is also an area to determine for how many days to show the complete list. This number refers to the previous number of days, including today. The default value for this is 5, and can be changed at your discretion. However, any tasks that are classified as “Overdue” will remain on the list as a reminder.
3. If changes are made to the number of days in the “Show Complete for Number of Days” box,
click on the “Update” button to secure your changes.
Can modify this
value as needed.
ProSMART - 2/20/2002 40
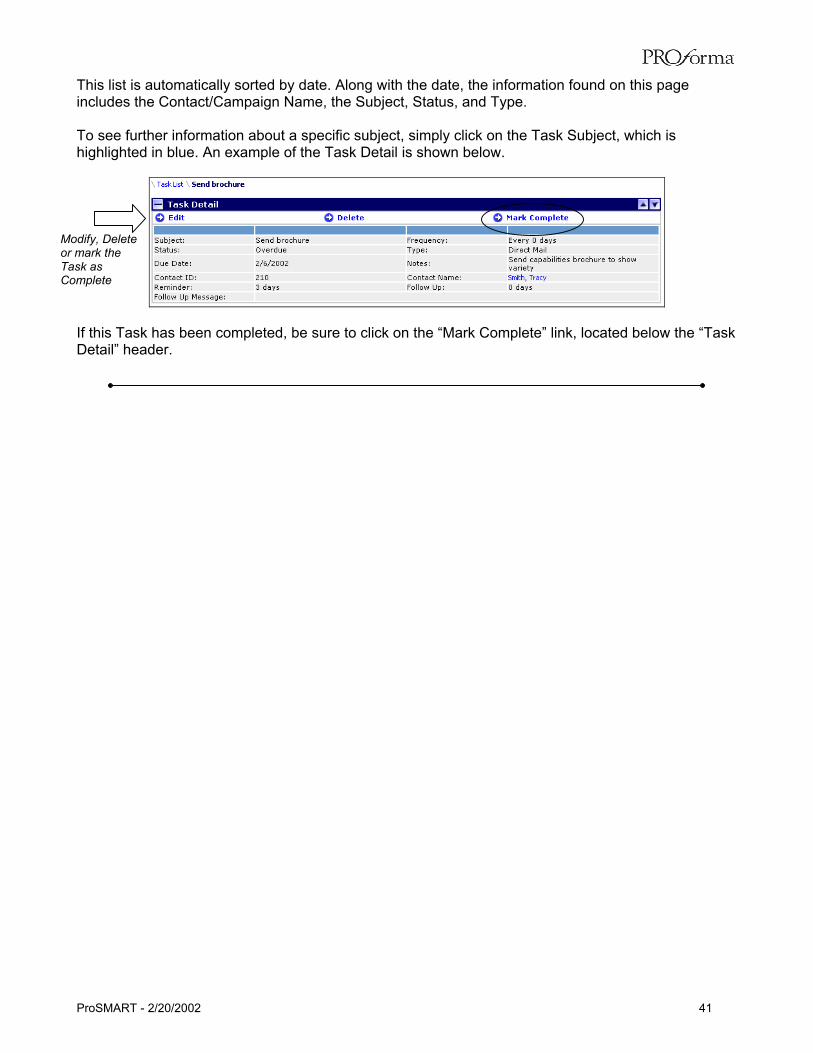
This list is automatically sorted by date. Along with the date, the information found on this page includes the Contact/Campaign Name, the Subject, Status, and Type. To see further information about a specific subject, simply click on the Task Subject, which is highlighted in blue. An example of the Task Detail is shown below.
Modify, Delete or mark the Task as Complete
If this Task has been completed, be sure to click on the “Mark Complete” link, located below the “Task Detail” header.
ProSMART - 2/20/2002 41

Campaign Management A Campaign is a marketing message that is delivered to a pre-determined list of Contacts. The message can be sent in a number of different ways, including direct mail and email, among others.
Within this main “Campaign Management” category are a couple of different options, which by now you should be accustomed to seeing: Create and View/Search. There is also one additional option within this main category, the Media Library. The Media Library is a central storage area for Proforma marketing materials and collateral. The Media Library will be discussed in more detail later in this section. View/Search for User Campaigns To View Information about Campaigns:
1. Click on “Campaign Management” from the left navigation menu. 2. Click on View/Search. This will open up a standard search page, with a Simple and an
Advanced Search area. Using this search mechanism will return any user-defined Campaigns that have been set up.
3. Enter any desired search parameters in the appropriate boxes. Remember that you can also just leave all boxes empty and conduct a blanket search. Doing so will return all records.
4. Click on the “Submit” button.
ProSMART - 2/20/2002 42
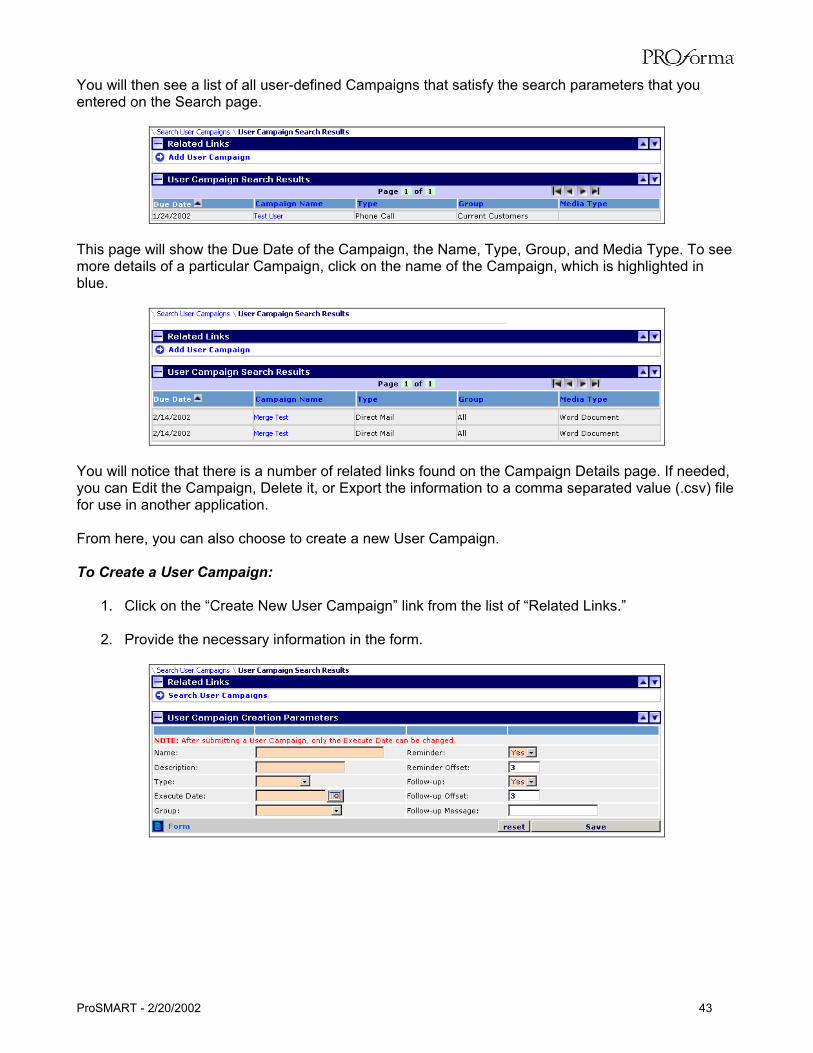
You will then see a list of all user-defined Campaigns that satisfy the search parameters that you entered on the Search page.
This page will show the Due Date of the Campaign, the Name, Type, Group, and Media Type. To see more details of a particular Campaign, click on the name of the Campaign, which is highlighted in blue.
You will notice that there is a number of related links found on the Campaign Details page. If needed, you can Edit the Campaign, Delete it, or Export the information to a comma separated value (.csv) file for use in another application. From here, you can also choose to create a new User Campaign. To Create a User Campaign:
1. Click on the “Create New User Campaign” link from the list of “Related Links.” 2. Provide the necessary information in the form.
ProSMART - 2/20/2002 43
In order to set up a new User Campaign, you will need to provide:
Campaign Name Campaign Description Type of Campaign Execution Date Group Reminder (Y/N)
Reminder Offset Follow-up (Y/N) Follow-up Offset Follow-up Message
The “Type of Campaign” will determine what types of Media you will see. For example, if the Type is “Email,” you will only see the email messages from the Media Library.
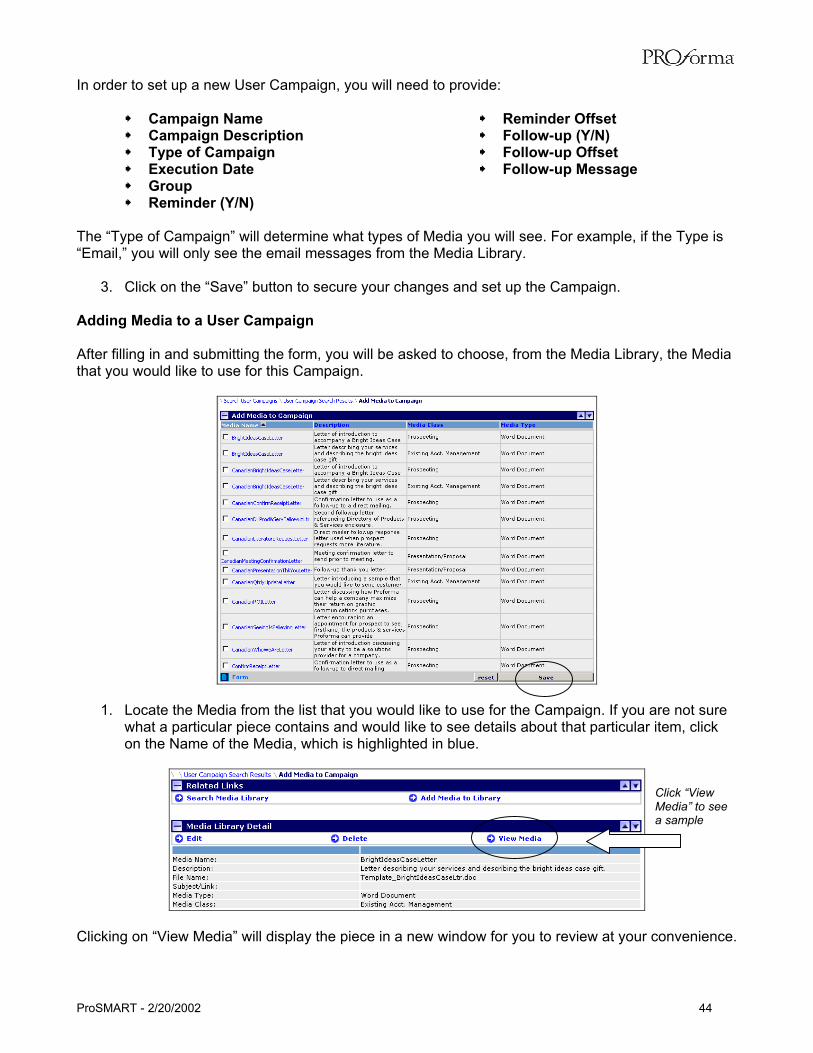
3. Click on the “Save” button to secure your changes and set up the Campaign. Adding Media to a User Campaign After filling in and submitting the form, you will be asked to choose, from the Media Library, the Media that you would like to use for this Campaign.
1. Locate the Media from the list that you would like to use for the Campaign. If you are not sure what a particular piece contains and would like to see details about that particular item, click on the Name of the Media, which is highlighted in blue.
Click “View Media” to see a sample
Clicking on “View Media” will display the piece in a new window for you to review at your convenience.
ProSMART - 2/20/2002 44
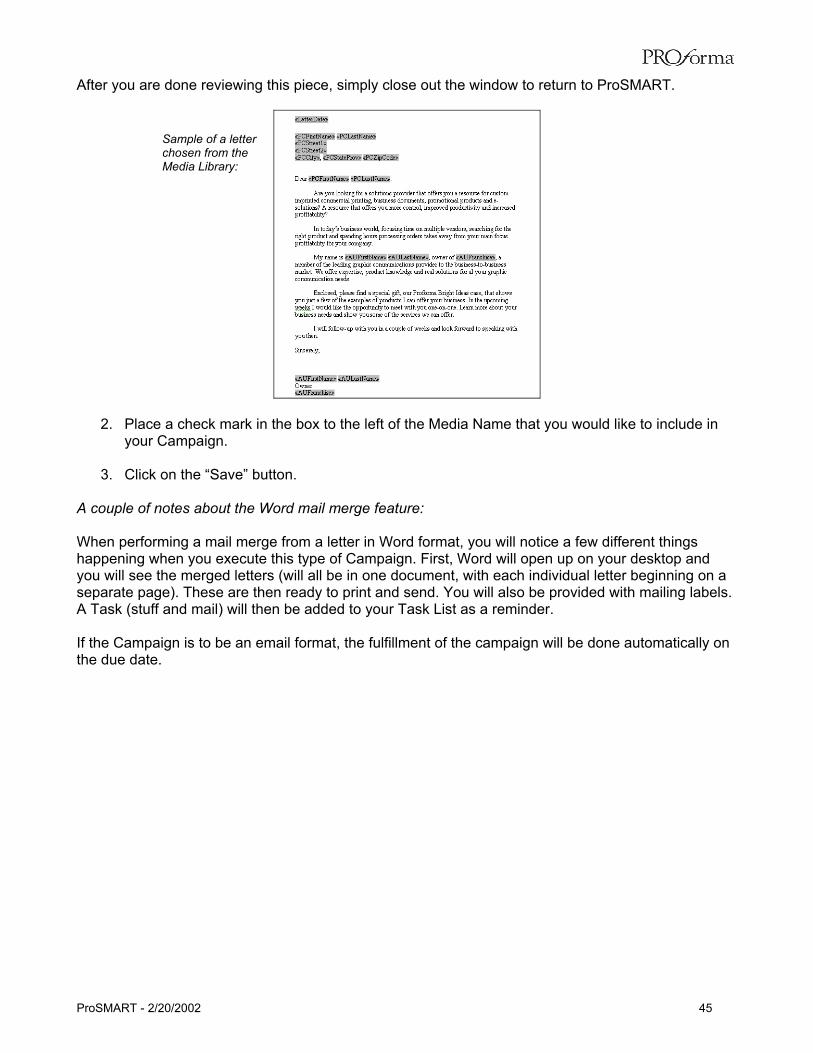
After you are done reviewing this piece, simply close out the window to return to ProSMART.
Sample of a letter chosen from the Media Library:
2. Place a check mark in the box to the left of the Media Name that you would like to include in
your Campaign.
3. Click on the “Save” button. A couple of notes about the Word mail merge feature: When performing a mail merge from a letter in Word format, you will notice a few different things happening when you execute this type of Campaign. First, Word will open up on your desktop and you will see the merged letters (will all be in one document, with each individual letter beginning on a separate page). These are then ready to print and send. You will also be provided with mailing labels. A Task (stuff and mail) will then be added to your Task List as a reminder. If the Campaign is to be an email format, the fulfillment of the campaign will be done automatically on the due date.
ProSMART - 2/20/2002 45
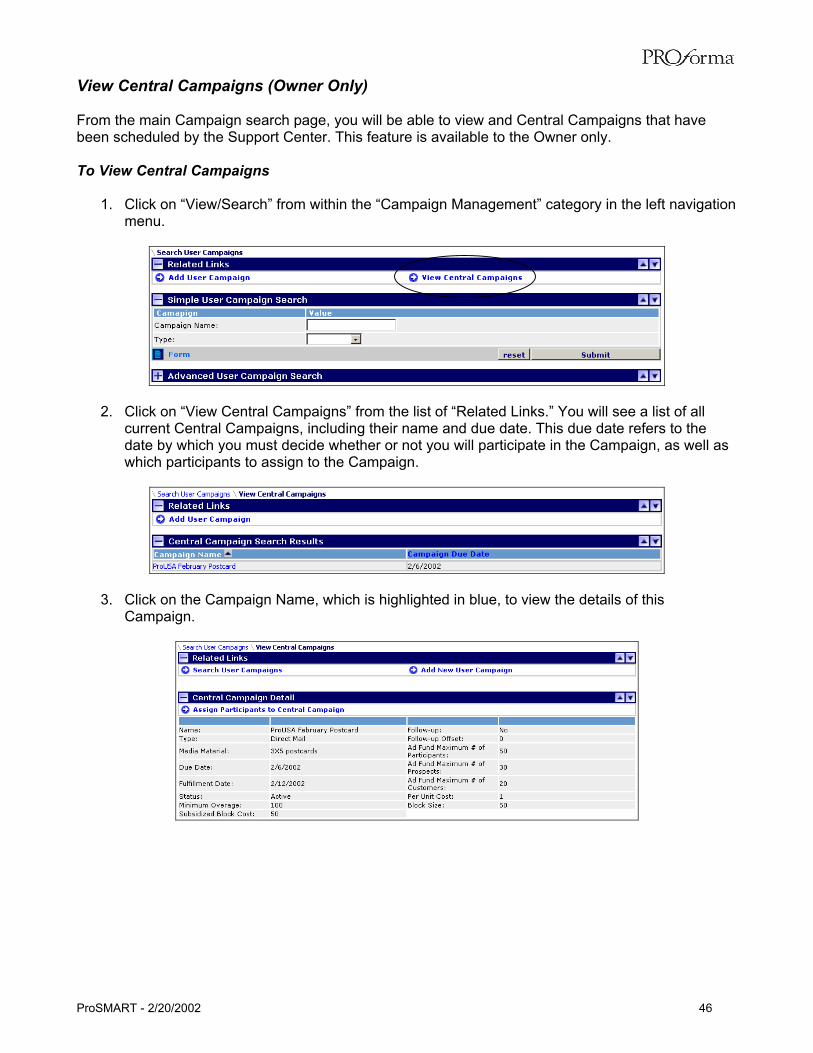
View Central Campaigns (Owner Only) From the main Campaign search page, you will be able to view and Central Campaigns that have been scheduled by the Support Center. This feature is available to the Owner only. To View Central Campaigns
1. Click on “View/Search” from within the “Campaign Management” category in the left navigation menu.
2. Click on “View Central Campaigns” from the list of “Related Links.” You will see a list of all current Central Campaigns, including their name and due date. This due date refers to the date by which you must decide whether or not you will participate in the Campaign, as well as which participants to assign to the Campaign.
3. Click on the Campaign Name, which is highlighted in blue, to view the details of this Campaign.
ProSMART - 2/20/2002 46
This screen will display the pertinent details surrounding the Campaign, including:
Campaign Name Type of Campaign Media Material Due Date Fulfillment Date (the date the
material will be sent) Status of the Campaign Minimum Overage
Subsidized Block Cost Follow-Up Follow-Up Offset Ad Fund Maximum # of
Participants Per Unit Cost Block Size
Most of these details are self-explanatory, although a few of these elements may need clarification, especially when participating in a Central Campaign for the first time. Minimum Overage – The minimum amount by which you can exceed the pre-defined number of
participants. In the example above, you must purchase at least 100 additional units. Subsidized Block Cost – The dollar amount that is subsidized by the Ad Fund.
Follow-Up – Whether or not a follow-up message will be provided with this Campaign.
Follow-Up Offset – The number of days prior to the follow-up date; a reminder will be put on your
Task List for the follow-up. Per Unit Cost – The cost of each additional unit that can be purchased. In the example above, the
Per Unit Cost is $1. If the Block Size is set to $50, it will cost $100 to add an additional 100 contacts to the campaign, over the subsidized 50. Block Size – The required number of units that must be purchased if exceeding the subsidized
amount. For example, if the Block Size were set to 50, you would need to purchase 50, 100, 150, etc. additional units.
ProSMART - 2/20/2002 47
Assigning Participants to the Central Campaign (Owner Only) After reviewing the details of the Campaign and deciding that you would like to participate, you will need to indicate which of your Contacts will be included in the Campaign. This capability is available to the Owner only. Other Users will not have the ability to assign participants to Central Campaigns. To Assign Participants to the Central Campaign:
1. From the Central Campaign Details page, click on the “Assign Participants to Central Campaign” link from below the “Central Campaign Detail” header. You will see a list of all the Contacts in your database. If there is more than one page of Contacts, that will be indicated at the top of the list. Use the page navigation arrows to move from one page to the next.
2. Locate the participants you would like to include in the Campaign. 3. Place a check mark in the box to the left of their name.
4. Click on the “Save” button to secure your selections. Important: If you are making
selections from more than one page, you must save your selections after each page (prior to moving to the next page), otherwise your choices will not be saved.
ProSMART - 2/20/2002 48
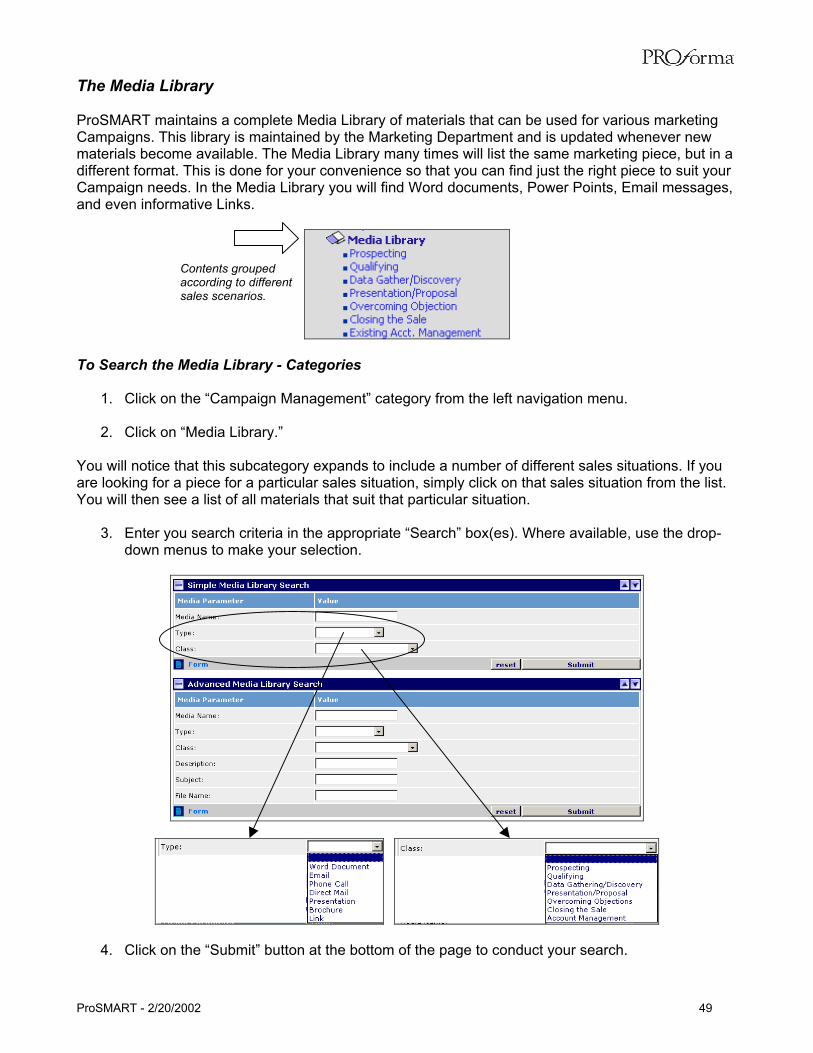
The Media Library ProSMART maintains a complete Media Library of materials that can be used for various marketing Campaigns. This library is maintained by the Marketing Department and is updated whenever new materials become available. The Media Library many times will list the same marketing piece, but in a different format. This is done for your convenience so that you can find just the right piece to suit your Campaign needs. In the Media Library you will find Word documents, Power Points, Email messages, and even informative Links.
Contents grouped according to different sales scenarios.
To Search the Media Library - Categories
1. Click on the “Campaign Management” category from the left navigation menu. 2. Click on “Media Library.”
You will notice that this subcategory expands to include a number of different sales situations. If you are looking for a piece for a particular sales situation, simply click on that sales situation from the list. You will then see a list of all materials that suit that particular situation.
3. Enter you search criteria in the appropriate “Search” box(es). Where available, use the drop-down menus to make your selection.
4. Click on the “Submit” button at the bottom of the page to conduct your search.
ProSMART - 2/20/2002 49

Leaving all fields blank will bring back all Media and all types of Media contained in the Media Library. Using the search parameters to limit your search will bring back only those pieces that satisfy your established search criteria.
To View the Details of a Particular Media Piece
1. From the list of Media materials, locate the one you would like to learn more about. 2. Click on the name of the piece, which is highlighted in blue. This will show some basic details
of the piece.
Remember, you can view the actual piece by clicking on the “View Media” link, located below the “Media Library Detail” header. There may be a case where you know the name of a piece you would like to add to a Campaign. If you would like to look for a particular Media piece, you can use the search feature. This process is explained in more detail in the following section.
ProSMART - 2/20/2002 50
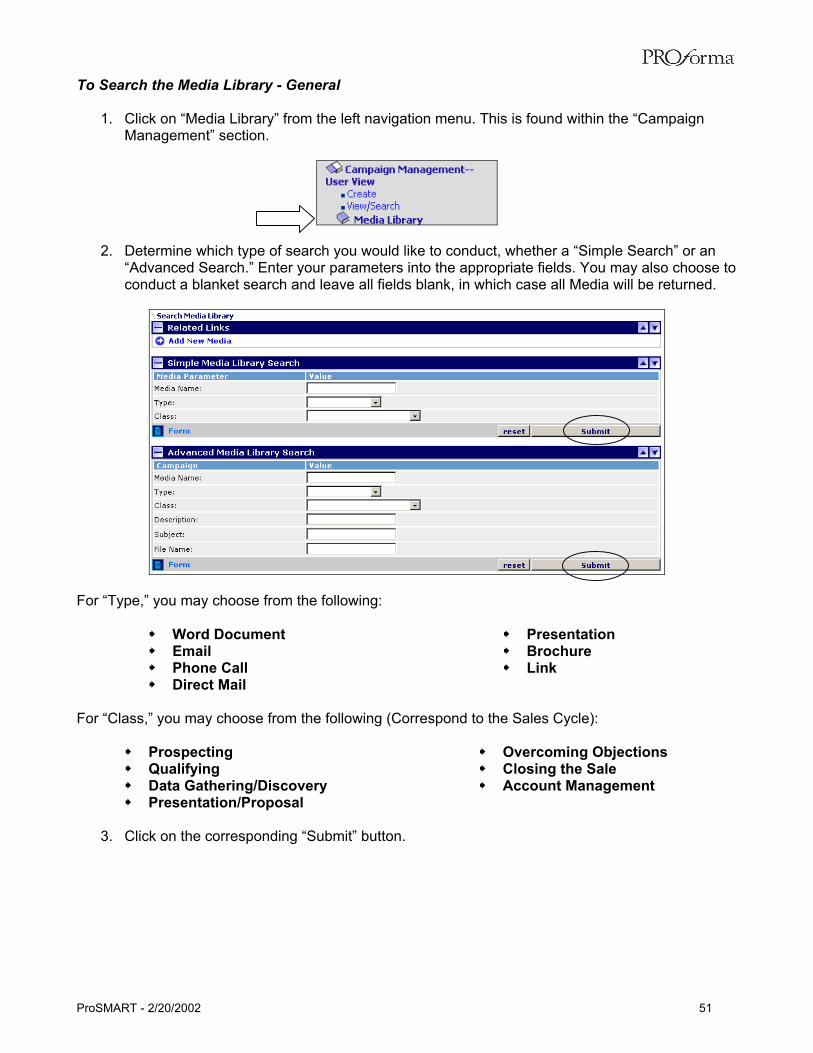
To Search the Media Library - General
1. Click on “Media Library” from the left navigation menu. This is found within the “Campaign
Management” section.
2. Determine which type of search you would like to conduct, whether a “Simple Search” or an
“Advanced Search.” Enter your parameters into the appropriate fields. You may also choose to conduct a blanket search and leave all fields blank, in which case all Media will be returned.
For “Type,” you may choose from the following:
Word Document Email Phone Call Direct Mail
Presentation Brochure Link
For “Class,” you may choose from the following (Correspond to the Sales Cycle):
Prospecting Qualifying Data Gathering/Discovery Presentation/Proposal
Overcoming Objections Closing the Sale Account Management
3. Click on the corresponding “Submit” button.
ProSMART - 2/20/2002 51
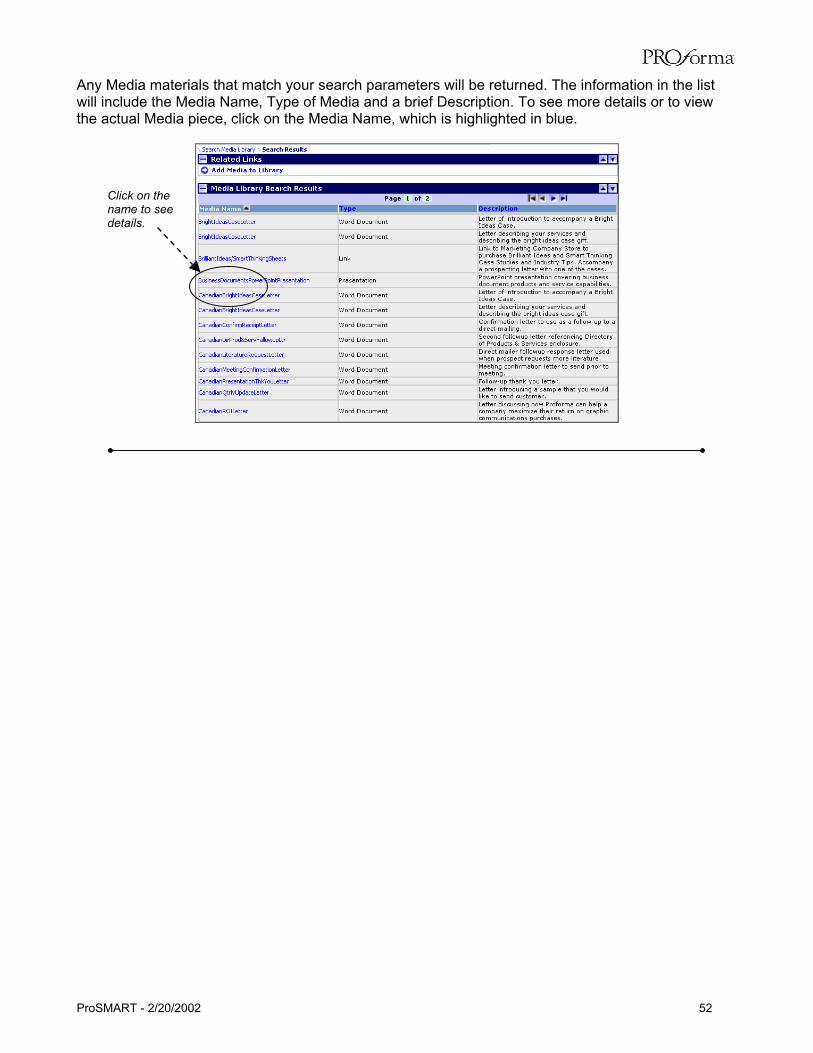
Any Media materials that match your search parameters will be returned. The information in the list will include the Media Name, Type of Media and a brief Description. To see more details or to view the actual Media piece, click on the Media Name, which is highlighted in blue.
Click on the name to see details.
ProSMART - 2/20/2002 52
Response Management ProSMART users will have the opportunity to engage in some basic Response Management as a result of their marketing efforts. This will allow him or her to filter bad addresses out of their database so that they do not continue to be used for various Campaigns. Whenever a user receives mail returned from the Postal Service or an email returned undeliverable, they will have to opportunity to indicate that the address is bad and try and locate the correct address. This section will list all addresses with the corresponding “Bad Address” flag set to “Yes” in contact records. This is primarily used as a queue for you to work through in an attempt to locate the correct addresses for these specific contacts.
Direct Mail To View Bad Postal Addresses
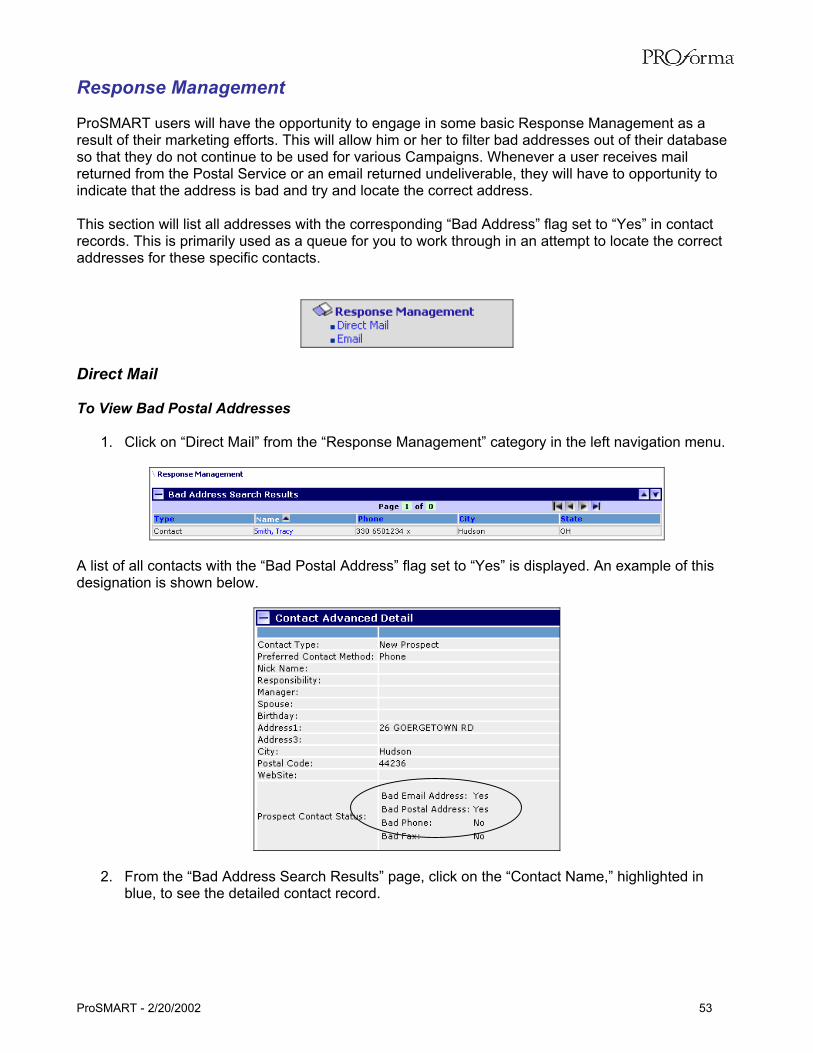
1. Click on “Direct Mail” from the “Response Management” category in the left navigation menu.
A list of all contacts with the “Bad Postal Address” flag set to “Yes” is displayed. An example of this designation is shown below.
2. From the “Bad Address Search Results” page, click on the “Contact Name,” highlighted in blue, to see the detailed contact record.
ProSMART - 2/20/2002 53
Email To View Bad Email Addresses
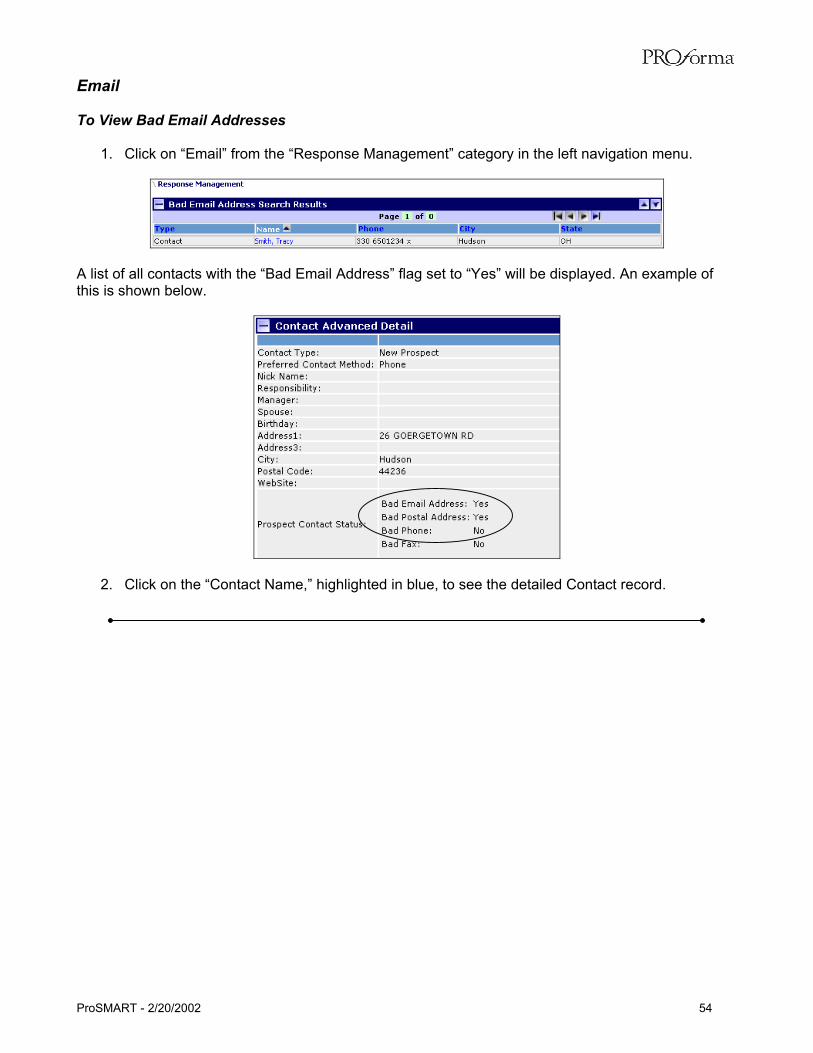
1. Click on “Email” from the “Response Management” category in the left navigation menu.
A list of all contacts with the “Bad Email Address” flag set to “Yes” will be displayed. An example of this is shown below.
2. Click on the “Contact Name,” highlighted in blue, to see the detailed Contact record.
ProSMART - 2/20/2002 54

Report Management Coming Soon The Reporting section for ProSMART is still in the process of being finalized. As soon as the Reports are defined and constructed, they will be made available to ProSMART users.
ProSMART - 2/20/2002 55
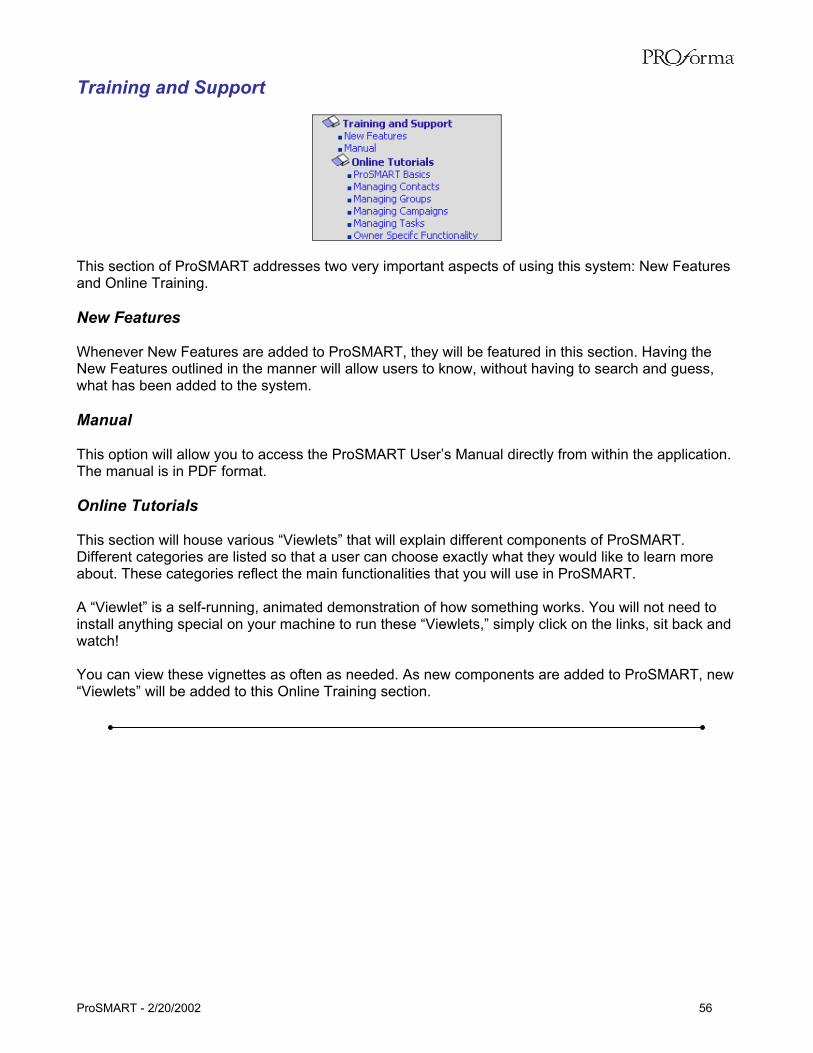
Training and Support
This section of ProSMART addresses two very important aspects of using this system: New Features and Online Training. New Features Whenever New Features are added to ProSMART, they will be featured in this section. Having the New Features outlined in the manner will allow users to know, without having to search and guess, what has been added to the system. Manual This option will allow you to access the ProSMART User’s Manual directly from within the application. The manual is in PDF format. Online Tutorials This section will house various “Viewlets” that will explain different components of ProSMART. Different categories are listed so that a user can choose exactly what they would like to learn more about. These categories reflect the main functionalities that you will use in ProSMART. A “Viewlet” is a self-running, animated demonstration of how something works. You will not need to install anything special on your machine to run these “Viewlets,” simply click on the links, sit back and watch! You can view these vignettes as often as needed. As new components are added to ProSMART, new “Viewlets” will be added to this Online Training section.
ProSMART - 2/20/2002 56

User Account Management The “User Account Management” section is where you can manage several aspects of your ProSMART account. This feature provides added convenience to you since you will not have to contact the Cleveland Support Center to make these modifications. To some extent, your security permission will dictate what settings you will be able to view and modify. This section includes things such as Passwords, Settings, Contact Assignments, and Users.
Managing your ProSMART Account
1. Click on “User Account Management” from the left navigation menu. 2. Locate the category of Account Management you would like to view.
3. Click on that category to make any necessary changes.
In this section, you can control the following: Profile/Preferences Choosing “Profile/Preferences” from the list of “Account Management” options will take you to an area where you can control some of the basic settings of ProSMART. Depending on your security access, you may or may not be able to make changes to every setting.
ProSMART - 2/20/2002 57
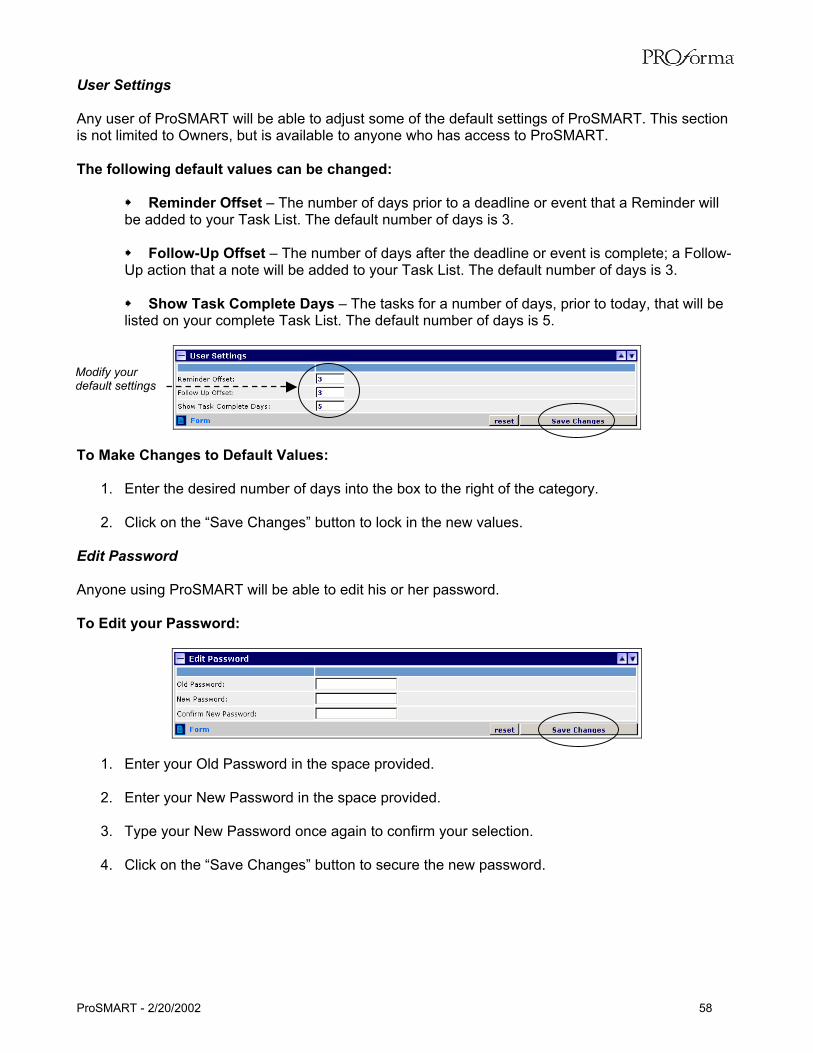
User Settings Any user of ProSMART will be able to adjust some of the default settings of ProSMART. This section is not limited to Owners, but is available to anyone who has access to ProSMART. The following default values can be changed:
Reminder Offset – The number of days prior to a deadline or event that a Reminder will be added to your Task List. The default number of days is 3.
Follow-Up Offset – The number of days after the deadline or event is complete; a Follow-
Up action that a note will be added to your Task List. The default number of days is 3.
Show Task Complete Days – The tasks for a number of days, prior to today, that will be listed on your complete Task List. The default number of days is 5.
To Make Changes to Default Values:
1. Enter the desired number of days into the box to the right of the category. 2. Click on the “Save Changes” button to lock in the new values.
Edit Password Anyone using ProSMART will be able to edit his or her password. To Edit your Password:
Modify your default settings
1. Enter your Old Password in the space provided. 2. Enter your New Password in the space provided.
3. Type your New Password once again to confirm your selection.
4. Click on the “Save Changes” button to secure the new password.
ProSMART - 2/20/2002 58
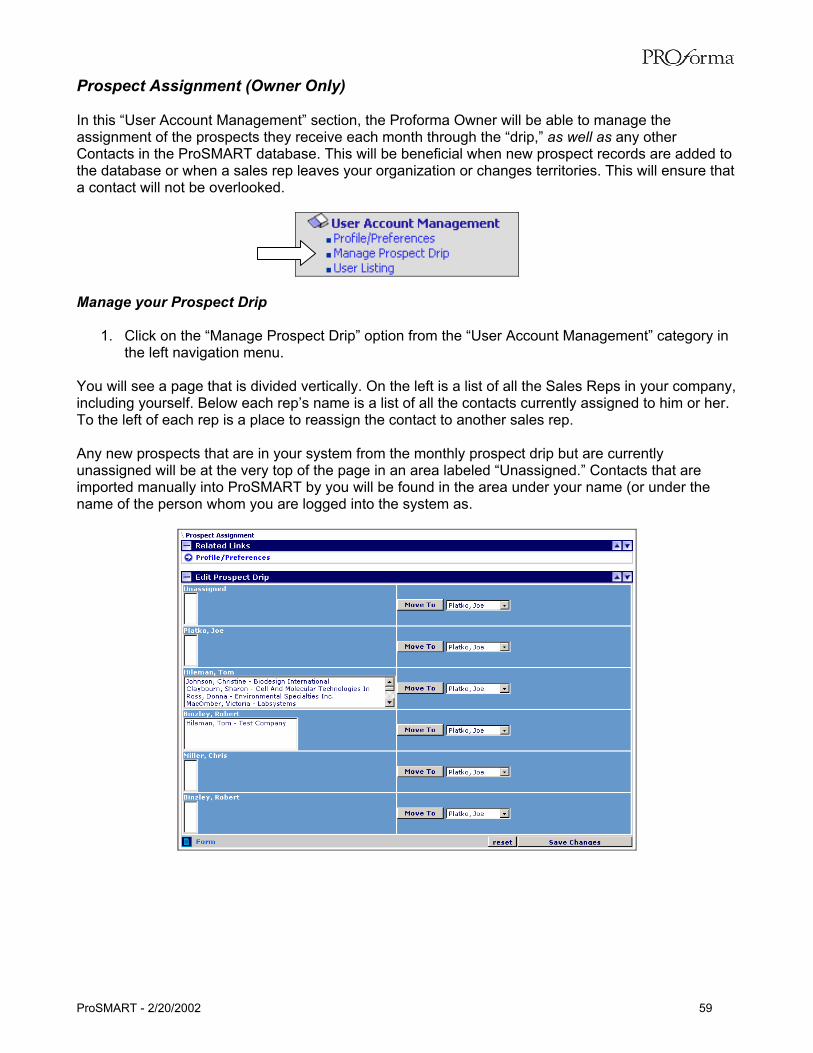
Prospect Assignment (Owner Only) In this “User Account Management” section, the Proforma Owner will be able to manage the assignment of the prospects they receive each month through the “drip,” as well as any other Contacts in the ProSMART database. This will be beneficial when new prospect records are added to the database or when a sales rep leaves your organization or changes territories. This will ensure that a contact will not be overlooked.
Manage your Prospect Drip
1. Click on the “Manage Prospect Drip” option from the “User Account Management” category in the left navigation menu.
You will see a page that is divided vertically. On the left is a list of all the Sales Reps in your company, including yourself. Below each rep’s name is a list of all the contacts currently assigned to him or her. To the left of each rep is a place to reassign the contact to another sales rep. Any new prospects that are in your system from the monthly prospect drip but are currently unassigned will be at the very top of the page in an area labeled “Unassigned.” Contacts that are imported manually into ProSMART by you will be found in the area under your name (or under the name of the person whom you are logged into the system as.
ProSMART - 2/20/2002 59
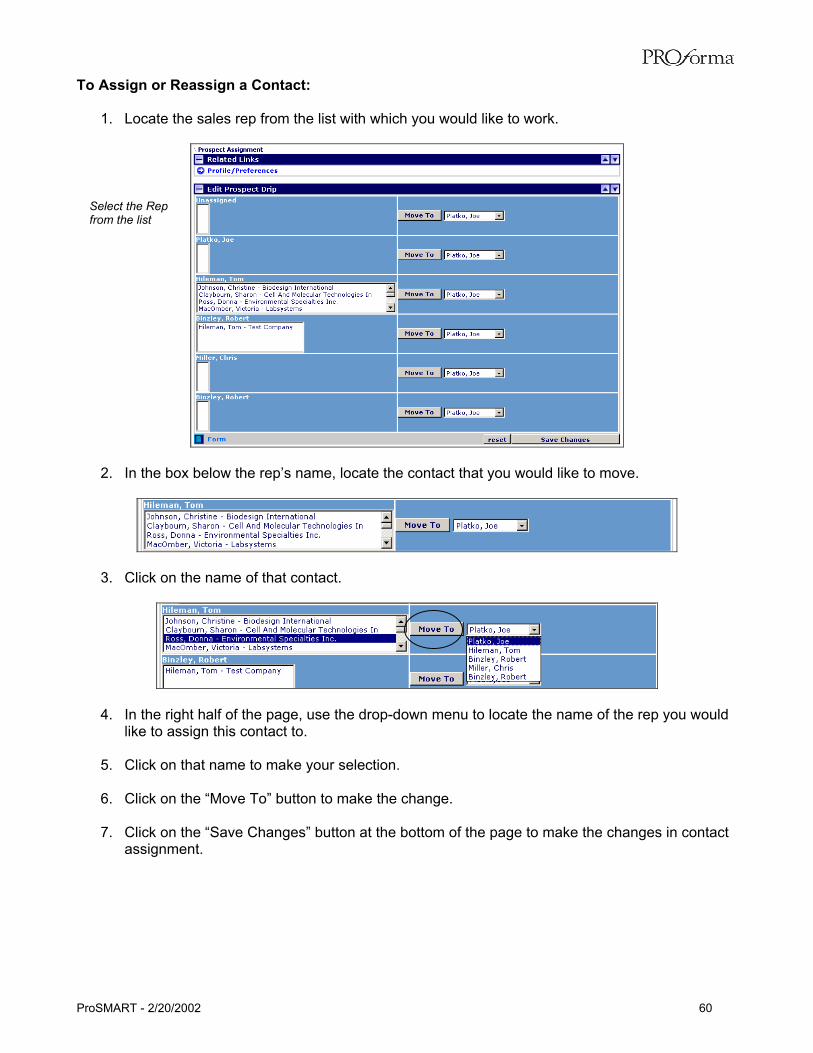
To Assign or Reassign a Contact:
1. Locate the sales rep from the list with which you would like to work.
Select the Rep from the list
2. In the box below the rep’s name, locate the contact that you would like to move.
3. Click on the name of that contact.
4. In the right half of the page, use the drop-down menu to locate the name of the rep you would like to assign this contact to.
5. Click on that name to make your selection.
6. Click on the “Move To” button to make the change.
7. Click on the “Save Changes” button at the bottom of the page to make the changes in contact
assignment.
ProSMART - 2/20/2002 60
User Listing An Owner will be able to view a list of everyone that has access to his or her ProSMART system. An Owner will also have the ability to set up new users to access their ProSMART system, and assign them with security permissions.
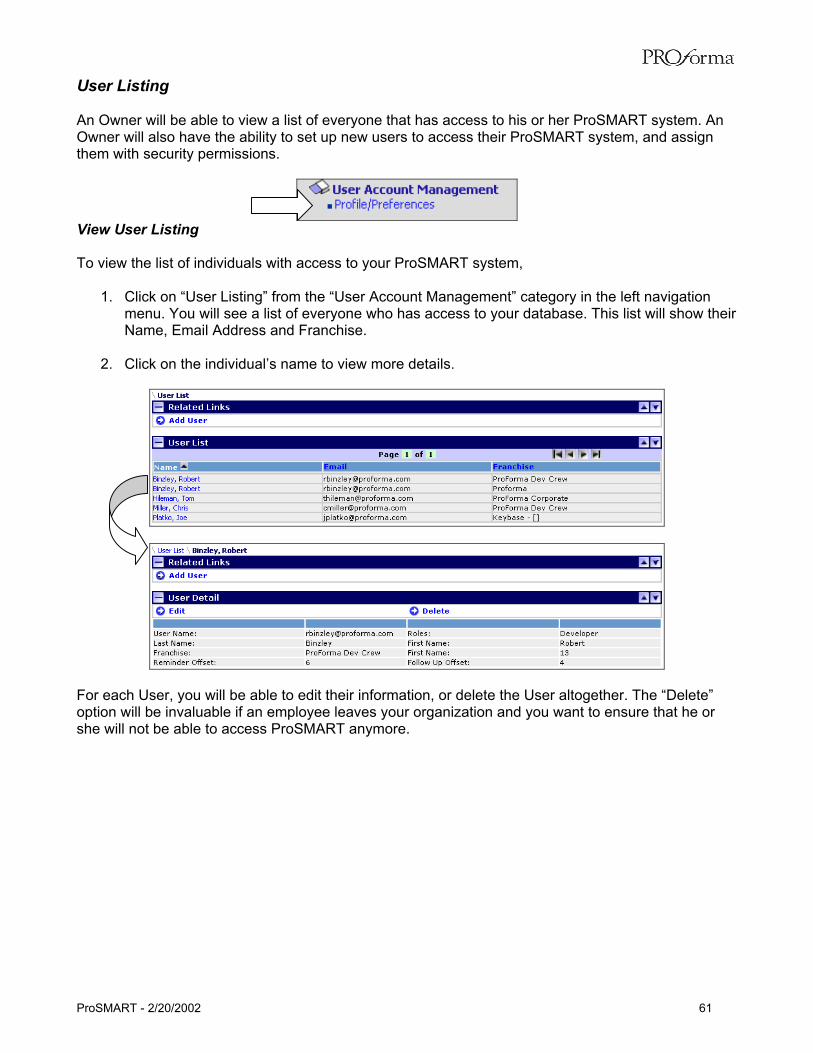
View User Listing To view the list of individuals with access to your ProSMART system,
1. Click on “User Listing” from the “User Account Management” category in the left navigation menu. You will see a list of everyone who has access to your database. This list will show their Name, Email Address and Franchise.
2. Click on the individual’s name to view more details.
For each User, you will be able to edit their information, or delete the User altogether. The “Delete” option will be invaluable if an employee leaves your organization and you want to ensure that he or she will not be able to access ProSMART anymore.
ProSMART - 2/20/2002 61
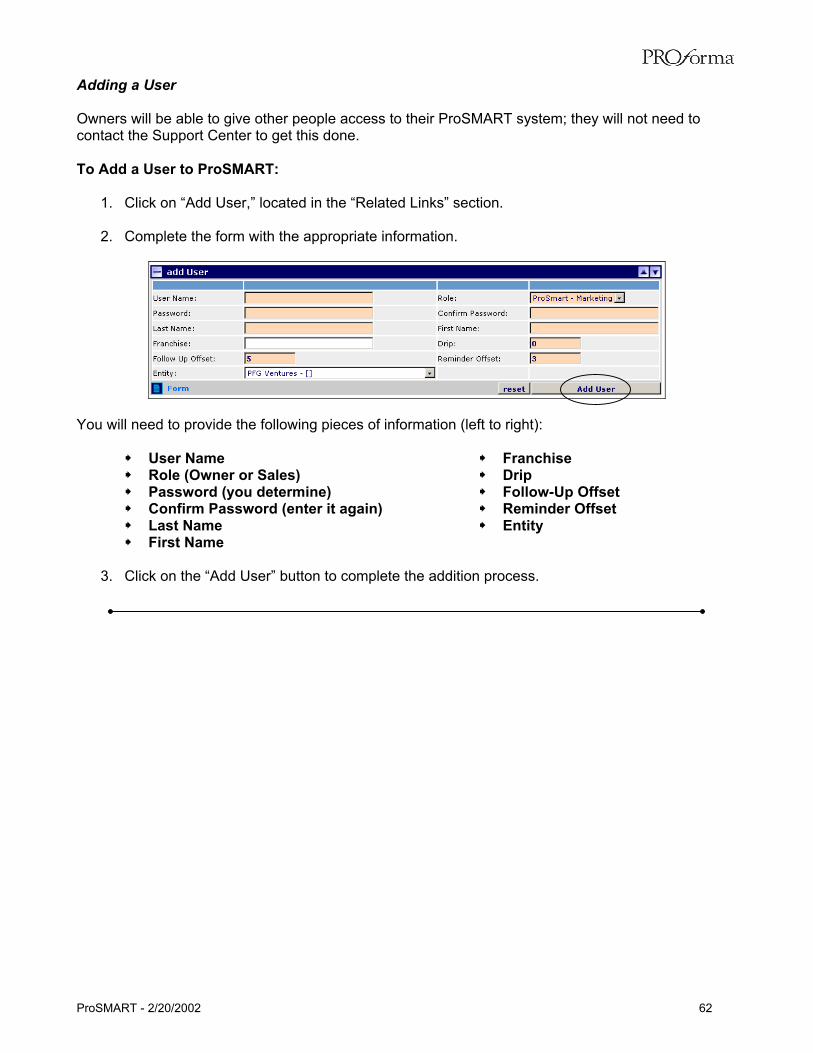
Adding a User Owners will be able to give other people access to their ProSMART system; they will not need to contact the Support Center to get this done. To Add a User to ProSMART:
1. Click on “Add User,” located in the “Related Links” section. 2. Complete the form with the appropriate information.
You will need to provide the following pieces of information (left to right):
User Name Role (Owner or Sales) Password (you determine) Confirm Password (enter it again) Last Name First Name
Franchise Drip Follow-Up Offset Reminder Offset Entity
3. Click on the “Add User” button to complete the addition process.
ProSMART - 2/20/2002 62
ProSMART Terms & Definitions General Terms
Campaign – A marketing message that is delivered to a pre-determined list of Contacts. The message can be sent in any one of a number of different ways, including direct mail and e-mail, among others. Central Campaign – A Campaign that is established by the Marketing Department at the Support Center. The Ad Fund subsidizes a certain number of participants, and the Campaign is fulfilled centrally. The Owner does not need to fulfill this Campaign. Contact – An individual within a Company. Customer – A company that has purchased from you in the last 24 months. De-duplication – The process of recognizing duplicate entries in the database that actually represent the same data point. Direct Mail – Outbound postal mail to a group of contacts or customers. Direct mail can contain letters, postcards, flyers, etc. E-Mail – Outbound electronic mail to a group of contacts or customers. The outbound mail can be in plain text or HTML format. Group – A logical collection of contacts, whether current customers or prospects, that will be acted upon for marketing activities. Media Library – Storage for marketing materials and collateral available in a central location for use by Owners. Response – An action that is taken because of another event. Response is used in this system to denote actions taken based on the return of information to a User. That is, incorrectly addressed mail is returned or an e-mail message is returned. Tasks – Actions that must be taken. To Do List – Lists of tasks that must be completed. User Account – An individual account for a User. All User accounts fall under an Owner ID and are administered by the Owner. User Campaign – A campaign defined and conducted by the individual Owner. The Ad Fund does not subsidize this campaign, and it is up to the Owner to fulfill the campaign.
ProSMART - 2/20/2002 63
Contact Type Descriptions
New Prospect – A person at a contact company that is not buying from you currently, and is not well known to you. Prospect – A person at a contact company that is not buying from you currently but is relatively well known to you. Qualified Prospect – A person at a contact company that is not buying from you currently, is relatively well known to you, and has demonstrated adequate interest, purchase time frame, and budget to you. Presentation/Proposal – A person at a contact company has been given a presentation or proposal on a specific product(s). Customer – A person who has purchased from you in the last 24 months. Inactive Customer – A contact that has indicated either a lack of interest or stated no interest in the products or services of Proforma. Company Type Descriptions
Customer – A person who has purchased from you in the last 24 months. Inactive customer – A person who has not purchased from Proforma in the last 24 months, but was a previous customer of Proforma. Prospect – A person who has never purchased from you or from Proforma.
ProSMART - 2/20/2002 64