Embed Size (px)
Citation preview
AIX Version 6.1
IBM Workload Partitions for AIX
SA23-2233-00
���


AIX Version 6.1
IBM Workload Partitions for AIX
SA23-2233-00
���

Note
Before using this information and the product it supports, read the information in “Notices,” on page 29.
First Edition (November 2007)
This edition applies to AIX Version 6.1 and to all subsequent releases of this product until otherwise indicated in new
editions.
A reader’s comment form is provided at the back of this publication. If the form has been removed, address
comments to Information Development, Department 04XA-905-6C006, 11501 Burnet Road, Austin, Texas
78758-3493. To send comments electronically, use this commercial Internet address: [email protected]. Any
information that you supply may be used without incurring any obligation to you.
© Copyright International Business Machines Corporation 2007. All rights reserved.
US Government Users Restricted Rights – Use, duplication or disclosure restricted by GSA ADP Schedule Contract
with IBM Corp.

Contents
About this document . . . . . . . . . . . . . . . . . . . . . . . . . . . . . . . v
Highlighting . . . . . . . . . . . . . . . . . . . . . . . . . . . . . . . . . . . v
Case-sensitivity in AIX . . . . . . . . . . . . . . . . . . . . . . . . . . . . . . . v
ISO 9000 . . . . . . . . . . . . . . . . . . . . . . . . . . . . . . . . . . . . v
IBM Workload Partitions for AIX . . . . . . . . . . . . . . . . . . . . . . . . . . . 1
AIX WPAR overview . . . . . . . . . . . . . . . . . . . . . . . . . . . . . . . . 1
System WPARs . . . . . . . . . . . . . . . . . . . . . . . . . . . . . . . . . 5
Application workload partitions . . . . . . . . . . . . . . . . . . . . . . . . . . . . 6
Global environment . . . . . . . . . . . . . . . . . . . . . . . . . . . . . . . . 6
Configuring system WPARs . . . . . . . . . . . . . . . . . . . . . . . . . . . . . 7
Configuring application WPARs . . . . . . . . . . . . . . . . . . . . . . . . . . . 13
Listing WPARs . . . . . . . . . . . . . . . . . . . . . . . . . . . . . . . . . 16
Listing WPAR identifiers . . . . . . . . . . . . . . . . . . . . . . . . . . . . . . 16
Logging in to a WPAR . . . . . . . . . . . . . . . . . . . . . . . . . . . . . . . 17
Backing up WPARs . . . . . . . . . . . . . . . . . . . . . . . . . . . . . . . . 17
Restoring WPARs . . . . . . . . . . . . . . . . . . . . . . . . . . . . . . . . 18
Removing WPARs . . . . . . . . . . . . . . . . . . . . . . . . . . . . . . . . 18
Starting system WPARs . . . . . . . . . . . . . . . . . . . . . . . . . . . . . . 18
Stopping WPARs . . . . . . . . . . . . . . . . . . . . . . . . . . . . . . . . 18
Using the Advanced Accounting subsystem with WPARs . . . . . . . . . . . . . . . . . . 19
Using the trace facility with WPARs . . . . . . . . . . . . . . . . . . . . . . . . . . 19
Making software available to other WPARs . . . . . . . . . . . . . . . . . . . . . . . 20
Example: Installing Apache in a WPAR . . . . . . . . . . . . . . . . . . . . . . . . 20
Example: Using DB2 Version 8 for Linux, UNIX, and Windows in a WPAR . . . . . . . . . . . 20
Example: Using WebSphere Application Server, Version 6.0 in a WPAR . . . . . . . . . . . . 22
Modified and enhanced AIX commands for WPARs . . . . . . . . . . . . . . . . . . . . 24
Appendix. Notices . . . . . . . . . . . . . . . . . . . . . . . . . . . . . . . . 29
Trademarks . . . . . . . . . . . . . . . . . . . . . . . . . . . . . . . . . . 30
Index . . . . . . . . . . . . . . . . . . . . . . . . . . . . . . . . . . . . . 31
© Copyright IBM Corp. 2007 iii

iv AIX Version 6.1 IBM Workload Partitions for AIX
About this document
Workload partitions (WPARs) are a virtualized operating system environment within a single instance of
the AIX operating system. WPARs secure and isolate the environment for the processes and signals that
are used by enterprise applications. This topic explains how to create and manage WPARs on AIX.
Highlighting
The following highlighting conventions are used in this book:
Bold Identifies commands, subroutines, keywords, files, structures, directories, and other items
whose names are predefined by the system. Also identifies graphical objects such as buttons,
labels, and icons that the user selects.
Italics Identifies parameters whose actual names or values are to be supplied by the user.
Monospace Identifies examples of specific data values, examples of text similar to what you might see
displayed, examples of portions of program code similar to what you might write as a
programmer, messages from the system, or information you should actually type.
Case-sensitivity in AIX
Everything in the AIX operating system is case-sensitive, which means that it distinguishes between
uppercase and lowercase letters. For example, you can use the ls command to list files. If you type LS, the
system responds that the command is not found. Likewise, FILEA, FiLea, and filea are three distinct file
names, even if they reside in the same directory. To avoid causing undesirable actions to be performed,
always ensure that you use the correct case.
ISO 9000
ISO 9000 registered quality systems were used in the development and manufacturing of this product.
© Copyright IBM Corp. 2007 v

vi AIX Version 6.1 IBM Workload Partitions for AIX
IBM Workload Partitions for AIX
Workload partitions (WPARs) are virtualized operating system environments within a single instance of the
AIX® operating system. WPARs secure and isolate the environment for the processes and signals that are
used by enterprise applications.
AIX WPAR overview
The WPAR environment is somewhat different from the standard AIX operating system environment.
Various aspects of the system, such as networking and resource controls, function differently in the WPAR
environment.
Differences in the WPAR environment
While the WPAR environment is similar to the environment for an application on a stand-alone system,
there are differences that some applications will recognize.
Applications might recognize differences in the following areas:
Device access
Some devices are accessible within a WPAR by default, but storage devices must be mounted as
file systems from the global environment into the WPAR. Physical devices are not supported within
a WPAR.
Default privilege
The WPAR root user does not have the same level of access as the root user in the global
environment by default.
Shared kernel
For applications that provide kernel extensions, the user-level application execution environment is
compartmentalized between WPAR instances. However, the shared kernel recognizes all WPAR
instances and must maintain the compartmentalization.
Statistic and tuning virtualization
While several AIX system utilities have been enabled to work either fully or partially in a WPAR,
there are some utilities that work only in the global environment (for example, the mpstat utility
and the sar utility). Because all WPAR instances share the same kernel and certain kernel
subsystems are optimized for system-wide usage, it is not possible to tune all kernel subsystem
parameters from a WPAR.
Network configuration
You cannot modify the network configuration (for example, addresses and routes) inside a WPAR.
Configuration of IPv6 addresses is not supported in a WPAR environment. The default
configuration of a WPAR prevents applications from using any kind of raw sockets, but system
administrators can enable them.
Devices
In order to function properly, some applications require the use of system devices. For WPARs, you can
manage and administer all devices in the global environment.
You can export a limited set of devices to one or more partitions. Applications that require access to
non-exportable devices are restricted to running in the global environment.
The current WPARs release supports pseudo-devices in WPARs. The following pseudo-devices are
exported to WPARs by default:
v /dev/clone
v /dev/console
© Copyright IBM Corp. 2007 1

v /dev/error
v /dev/errorctl
v /dev/nvram
v /dev/random
v /dev/sad
v /dev/tty
v /dev/urandom
v /dev/zero
v /dev/xti/tcp
v /dev/xti/tcp6
v /dev/xti/udp
v /dev/xti/udp6
v /dev/xti/unixdg
v /dev/xti/unixst
Devices that are exported to workload portions must operate safely and securely in the WPAR
environment.
Networking
A WPAR can have one or more network addresses assigned to support network login and network
services.
You must have the following information to configure networking:
v The name of the global network interface (for example, en0, en1, et0, or et1) to associate with the
address. In the global environment, the IP addresses assigned to a WPAR appears as an alias address
associated with this interface.
v The IPv4 address to assign to the partition.
v The network mask to apply to define the local subnet.
v A dotted-decimal broadcast address, if applicable. If a specified address is already in use or if the
specified network parameters cannot be configured for the WPAR, it will not start.
If the name of the WPAR resolves to a network address, that address is used as the default network
address for the WPAR. You can create a WPAR with no network addresses assigned. In this case, the
only external mechanism to access the partition is the clogin command from the global environment.
Related tasks
“Configuring networks for system WPARs” on page 10You can configure the network for a system WPAR using the -h flag or the -N flag for the mkwpar
command or the chwpar command.
“Configuring networks for application WPARs” on page 14You can configure the network for an application WPAR using the -h flag and the -N flag for the
wparexec command or the chwpar command.
Security
WPARs provide an isolated application environment that minimizes potential interactions with system
objects or processes outside the WPAR. Even though a WPAR is using the same operating system
instance as other WPARs or the global environment, the ability to view or interact with processes or
devices outside the partition is limited.
2 AIX Version 6.1 IBM Workload Partitions for AIX

In system workload partitions, the ability to interact with the global environment’s file systems is limited.
For non-persistent system objects, such as IPC and processes, constraints are implemented in the
following ways:
v Marking system objects as being owned by an individual WPAR
v Denying users or applications in one WPAR the ability to view or interact with system objects owned by
other WPARs
Interaction with persistent objects, such as files and devices, is also limited by maintaining separate file
systems local to an individual partition. For persistent objects, constraints are implemented in the following
ways:
v Creating and mounting unique file systems separate from file systems available in other WPARs
v Mounting shared, read-only file systems using the namefs mount type from the global environment
v Maintaining an environment within the local file system mounts for all processes using the chroot
command
WPAR isolation
System WPARs and application WPARs are isolated from other partitions. Users cannot subvert the
isolation constraints.
WPAR isolation limits the operating environment in the following ways:
v Default configuration of only certain pseudo devices in the /dev directory
v Removal of devices, such as /dev/mem and /dev/kmem, that give a more global view of the system
v Modified behavior of both the reboot command and the halt command to reboot or halt the only the
specified systemWPAR, not the entire system
WPAR isolation also prevents users from performing the following administrative tasks:
v Adjusting the system clock
v Manipulating process accounting
v Binding processes to a specific processor
v Exceeding certain system limits, even by privileged users
v Using fine grain timers less than 10 milliseconds
v Manipulating certain machine-level serviceability tools
v Loading or unloading system-level device drivers or kernel extensions
v Manipulating system paging space and certain system-level tuning parameters
v Using certain file system-level operations, such as extension, contraction, or defragmentation
System workload partitions are integrated with the AIX RBAC system, so each system workload partition
can have security privileges assigned. The settings are not applicable for application workload partitions.
Note: Workload partition isolation can also constrain the use of computational resources, such as system
memory and processor processing time.
Resource controls
WPARs support up to 8192 resource-controlled workload partitions. The number of non-resource-controlled
WPARs that can be created is constrained only by the availability of global environment memory and disk
space resources. However, a maximum of 8192 can be active at any time.
You can change the resource controls for a WPAR dynamically using the chwpar command. If the process
or thread limit is reduced on an active WPAR, processes or threads are not terminated, but new process
or thread creation is not allowed until the total count falls below the specified limit. For example, if a WPAR
has 200 active processes and you change the total process limit on the WPAR to 170, then the system will
IBM Workload Partitions for AIX 3

not terminate the extra 30 processes. New process creation within the WPAR is not allowed until the
process count falls below 170. You can enable resource controls for a WPAR when it is created. You can
also change the controls on an existing WPAR using SMIT or using the chwpar command with the -R
active = yes option.
Related tasks
“Configuring resource controls for system WPARs” on page 12You can configure the resource controls to limit the physical resources a system WPAR has access to
using the -R flag for the mkwpar command and chwpar command.
Processor use and memory use controls
Processor use controls and memory use controls allow you to allocate processor and memory resources
for the global environment.
You can use share-based allocation or percentage-based allocation for processor and memory resources.
Note: Both share-based controls and percentage-based controls can be specified. In the event of conflict,
the percentage-based controls take precedence.
Share-based allocation
The percentage of CPU or memory to allocate to the WPAR is determined by dividing the number
of shares by the total number of shares allocated to all active WPARs. The number of shares
represents how much of a particular resource a WPAR receives relative to the other WPARs.
For example, if there are three active WPARs (A, B, and C) with shares for a particular resource of
15, 10, and 5, allocation targets would be the following:
WPAR A, 15/30 or 50%
WPAR B, 10/30 or 33%
WPAR C, 5/30 or 17%
Allocation targets adjust with the number of active workload partitions. If partition A is inactive, then
the allocation targets would be the following:
WPAR B, 10/15 or 66%
WPAR C, 5/15 or 33%
Share-based allocation is specified by using the shares_CPU option with the mkwpar command
or the chwpar command.
Percentage-based allocation
The percentage of CPU or memory to allocate to the WPAR is determined by the following
user-specified values:
min%
The minimum amount of a resource that should be made available to the WPAR. If the actual
consumption is below this value, the WPAR will be given highest priority access to the
resource. The possible values are 0 to 100, with a default value of 0.
soft%
The maximum amount of a resource that a WPAR can use when there is contention for that
resource. If the WPAR’s consumption exceeds this value, the WPAR will be given the lowest
priority access to the resource. If there is no contention for the resource, the WPAR is allowed
to consume as many resources as it requires. The possible values are .01 to 100, with a
default value of 100.
hard%
The maximum amount of a resource that a WPAR can consume, even when there is no
4 AIX Version 6.1 IBM Workload Partitions for AIX

contention. If the class reaches this limit, it will not be allowed to consume any more of the
resource until its consumption percentage falls below the limit. The possible values are .01 to
100, with a default value of 100.
System WPARs
System WPARs are autonomous virtual system environments with their own private file systems, users
and groups, login, network space and administrative domain.
Most traditional system services are virtualized at the WPAR level, and they can be independently used
and managed within each WPAR. While the system WPAR environment is largely partitioned and isolated,
read-only file systems might be shared between WPARs to facilitate the sharing of application data and
text.
Shared and non-shared system WPARs
By default, a system WPAR shares the /usr file system and the /opt file systems from the global
environment using read-only namefs mounts. You can configure WPARs to have non-shared, writable /usr
file system and /opt file system.
To configure a non-shared system WPAR, run the mkwpar command with the -l flag.
You can also configure a non-shared system WPAR by specifying writable file systems of one of the
following types for the /usr file system and the /opt file system:
v jfs2
v jfs
v directory
v nfs
If you create a non-shared system WPAR, all files from the /usr file system and the /opt file system in the
global environment are copied to the WPAR. The administrator must allocate enough space in the WPAR
file systems for the files.
System software in non-shared system WPARs must be kept at the same system level as the global
environment in order to avoid unexpected results.
File systems for system WPARs
System WPARs have their own file systems similar to stand-alone AIX.
For system WPARs, local file system spaces, such as /home and /usr, are constructed from isolated
sections of the file system space for the global environment. By default, these spaces are located in the
/wpars directory of the global environment. The initial process for each WPAR is moved to the correct
path in the global file system using the chroot command. All processes run within the WPAR appear in the
base directory for the WPAR. For example, users in a WPAR would see the /wpars/part1/usr directory as
the /usr directory.
The file system configuration for a WPAR is specified when the WPAR is created. You can either use the
system defaults or customize each file system. Some of the file systems in a system WPAR are local to
the partition while others can be shared with the global environment.
The following JFS2 file systems are created with inline logs and populated similar to a stand-alone AIX
system with the following sizes:
v / (64 MB)
v /tmp (96 MB)
IBM Workload Partitions for AIX 5

v /var (128 MB)
v /home (32 MB)
Note: The initial sizes of these file systems could change depending upon the system requirements and
storage characterics.
The following JFS2 file systems are shared from the global environment using namefs mounts with the
followed permissions:
v /usr (read-only permissions)
v /opt (read-only permissions)
v /proc (read-write permissions)
You can specify the use of a flat file system structure for part or all of a WPAR namespace by specifying
that one or more directories should be local to a parent directory. This structure means that no distinct file
system is created for the parent directory. The sizes of the file systems or directories to be populated in
the WPAR must be large enough to hold the files for that partition. This structure simplifies the number of
file systems to manage for a partition, but it loses the granularity of control over user files populating the
file system. The flat file system structure might be a viable option for servers running in the WPAR that do
not offer system login privileges to users.
Related tasks
“Creating a writable directory under a shared directory” on page 10You can create a writable directory beneath a shared directory using a symbolic link from the global
environment.
Application workload partitions
Application workload partitions (WPARs) provide an environment for isolation of applications and their
resources to enable checkpoint, restart, and relocation at the application level.
Application WPARs have less overhead on system resources than system WPARs. Application WPARs do
not require their own instance of system services.
File systems for application WPARs
Application WPARs share the global environment’s file system namespace. When an application WPAR is
created, it has access to all mounts available to the global environment’s file system.
If additional dependencies are required, you can customize the WPAR during creation using the wparexec
command with the -M option. The supported file system types for application WPARs include the same
types as for system WPARs, with the exception that no file systems can be created by the wparexec
command. If a separate local file system is required, you must create it prior to creating the application
WPAR.
Related tasks
“Configuring directories and file systems for application WPARs” on page 14Application WPARs share file systems with the global environment. You can use the -M flag for the
wparexec command to configure directories and file systems.
Global environment
The global environment has an all-encompassing view of processes, IPC, file systems, devices, and other
user-level objects and system-level objects within an AIX system.
6 AIX Version 6.1 IBM Workload Partitions for AIX

This environment allows you to view and interact with processes, file systems and other system
components that are assigned to an active WPAR on the system. The global environment is the same as
the traditional AIX login environment.
You can create new WPARs only in the global environment. You cannot create new WPARs in other
WPARs. Many administrative tasks can be performed only from the global environment. Many commands
also behave differently when they are run in the global environment than they do in the WPAR
environment.
Configuring system WPARs
You can create and configure system WPARs using the mkwpar command and the chwpar command.
When you create a system WPAR, a configuration profile is stored in the WPAR database. You can export
this profile to create a specification file that contains the exact same configuration information for that
WPAR. All WPARs must be created by an authorized administrator in the global environment.
Note: These topics provide specific examples of how to run WPAR-related commands. For complete
documentation of all options for a specific command, see the related information for that task.
Naming the system WPAR
You must provide a name for the system WPAR. You can provide a name using the mkwpar command
with the -n flag.
You can specify the name for the system WPAR using the following command:
mkwpar -n wpar_name
You can also change the name of a system WPAR using the chwpar command. You can only change the
name of a system WPAR when it is stopped and in the defined state. To change the name of a system
WPAR, run the following command:
chwpar -n new_name old_name
Creating a system WPAR
You can create a new system WPAR with the mkwpar command.
Each WPAR has an isolated network environment with unique IP addresses and a unique hostname. You
can access WPARs through standard networking programs, such as telnet, ftp, and rlogin (depending on
the services running in the WPAR). Before you create a WPAR, you should log in as the root user and
complete one of the following prerequisites:
v Choose a name for the WPAR that maps to an IP address for your network.
v Add an entry for the new system WPAR to the /etc/hosts file on the server. The entry should include
the host name for the WPAR and the name of the WPAR as follows:
9.3.18.10 WPARname.austin.ibm.com WPARname
To create a new system WPAR, complete the following steps.
1. Verify that the network recognizes your workload partition address by entering the following command:
#host WPARname
The return should look similar to the following:
WPARname.austin.ibm.com is 9.3.18.10, Aliases: WPARname
2. Configure the WPAR by running the following command:
mkwpar -n WPARname
IBM Workload Partitions for AIX 7
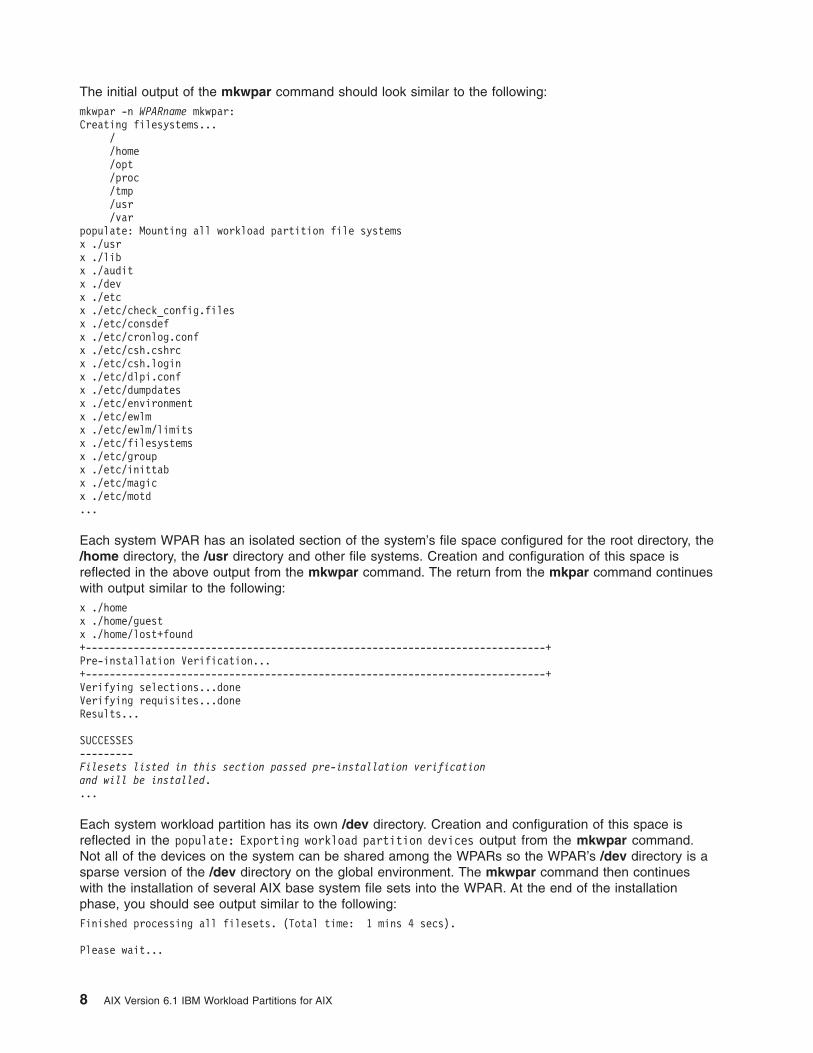
The initial output of the mkwpar command should look similar to the following:
mkwpar -n WPARname mkwpar:
Creating filesystems...
/
/home
/opt
/proc
/tmp
/usr
/var
populate: Mounting all workload partition file systems
x ./usr
x ./lib
x ./audit
x ./dev
x ./etc
x ./etc/check_config.files
x ./etc/consdef
x ./etc/cronlog.conf
x ./etc/csh.cshrc
x ./etc/csh.login
x ./etc/dlpi.conf
x ./etc/dumpdates
x ./etc/environment
x ./etc/ewlm
x ./etc/ewlm/limits
x ./etc/filesystems
x ./etc/group
x ./etc/inittab
x ./etc/magic
x ./etc/motd
...
Each system WPAR has an isolated section of the system’s file space configured for the root directory, the
/home directory, the /usr directory and other file systems. Creation and configuration of this space is
reflected in the above output from the mkwpar command. The return from the mkpar command continues
with output similar to the following:
x ./home
x ./home/guest
x ./home/lost+found
+-----------------------------------------------------------------------------+
Pre-installation Verification...
+-----------------------------------------------------------------------------+
Verifying selections...done
Verifying requisites...done
Results...
SUCCESSES
---------
Filesets listed in this section passed pre-installation verification
and will be installed.
...
Each system workload partition has its own /dev directory. Creation and configuration of this space is
reflected in the populate: Exporting workload partition devices output from the mkwpar command.
Not all of the devices on the system can be shared among the WPARs so the WPAR’s /dev directory is a
sparse version of the /dev directory on the global environment. The mkwpar command then continues
with the installation of several AIX base system file sets into the WPAR. At the end of the installation
phase, you should see output similar to the following:
Finished processing all filesets. (Total time: 1 mins 4 secs).
Please wait...
8 AIX Version 6.1 IBM Workload Partitions for AIX

/usr/sbin/rsct/install/bin/ctposti
0513-071 The ctcas Subsystem has been added.
0513-071 The ctrmc Subsystem has been added.
done
+-----------------------------------------------------------------------------+
Summaries:
+-----------------------------------------------------------------------------+
Installation Summary
--------------------
Name Level Part Event Result
-------------------------------------------------------------------------------
Tivoli_Management_Agent.cli 3.7.1.0 ROOT APPLY SUCCESS
bos.acct 5.3.0.9500 ROOT APPLY SUCCESS
bos.diag.util 5.3.0.40 ROOT APPLY SUCCESS
bos.mh 5.3.0.40 ROOT APPLY SUCCESS
bos.net.ncs 5.3.0.0 ROOT APPLY SUCCESS
bos.net.nfs.client 5.3.0.9500 ROOT APPLY SUCCESS
bos.net.nis.client 5.3.0.40 ROOT APPLY SUCCESS
bos.net.snapp 5.3.0.0 ROOT APPLY SUCCESS
bos.net.tcp.client 5.3.0.9500 ROOT APPLY SUCCESS
bos.net.tcp.server 5.3.0.9500 ROOT APPLY SUCCESS
bos.net.uucp 5.3.0.40 ROOT APPLY SUCCESS
...
bos.net.ipsec.rte 5.3.0.9500 ROOT APPLY SUCCESS
bos.perf.tune 5.3.0.9500 ROOT APPLY SUCCESS
devices.chrp.base.diag 5.3.0.40 ROOT APPLY SUCCESS
bos.net.ipsec.keymgt 5.3.0.9500 ROOT APPLY SUCCESS
ifor_ls.base.cli 5.3.0.30 ROOT APPLY SUCCESS
lum.base.cli 5.1.0.0 ROOT APPLY SUCCESS
bos.suma 5.3.0.40 ROOT APPLY SUCCESS
mkwpar: Workload partition WPARname created successfully.
To start the workload partition, execute the following as root: startwpar [-v] ’WPARname’
The configuration of the system WPAR is now complete.
Configuring directories and file systems for system WPARs
You can override the default location of the file systems for a system WPAR using the mkwpar command
with the -d option.
By default, the file systems for a new system WPAR are located in the /wpars/wpar_name directory.
You can override the default location using the following command:
mkwpar -n wpar_name -d /newfs/wpar_name
For safety and security, the specified base directory must meet the following criteria:
v The directory must be empty.
v The directory must not be a registered file system in the /etc/filesystems directory.
v The directory must have permissions of 755 (rwxr-xr-x).
v The parent directory of the base directory (/newfs, in the example) must have permissions of 700
(rwx------).
You can also change the base directory of an existing system WPAR, using the following command:
chwpar -d /newfs/newbase wpar_name
The same criteria apply for changing the base directory with the chwpar command. The base directory
can only be changed on a stopped system WPAR.
IBM Workload Partitions for AIX 9

File system customization for system WPARs
You can customize the file systems for a system WPAR using the mkwpar command with the -M option.
The following file system types are supported using the vfs attribute of the -M option:
v JFS
v JFS2
v NFS
v Namefs
You can also specify that a directory should be created instead of a file system by specifying
vfs=directory. Specify this attribute in situations where you do not want to maintain a large number of
separate file systems.
Creating a writable directory under a shared directory
You can create a writable directory beneath a shared directory using a symbolic link from the global
environment.
If you are customizing software within a system WPAR, it might be useful or necessary to have a writable
directory beneath a directory shared from the global environment. For example, it is common for open
source software to install into a /usr/local directory hierarchy by default. In order to accommodate an
unshared, writable /usr/local directory hierarchy, the global environment administrator must create a
writable /usr/local directory. Create a file system called /wpars/wparname/usr/local with the
type=wparname option.
Related concepts
“File systems for system WPARs” on page 5System WPARs have their own file systems similar to stand-alone AIX.
Configuring networks for system WPARs
You can configure the network for a system WPAR using the -h flag or the -N flag for the mkwpar
command or the chwpar command.
If you do not specify any network information when you create a system WPAR, and the name of the
WPAR resolves to an IP address on the same network as any active global interface, the mkwpar
command automatically configures the network for the WPAR. If the WPAR does not resolve, you can
specify zero or more network configurations using the -N flag for the mkwpar command or the chwpar
command. All network changes can be performed on active or inactive WPARs. The changes take effect
immediately.
Each network requires its own instance of the -N flag. For example:
mkwpar -n wpar_name -N interface=en0 address=224.128.9.3 \
netmask=255.255.255.0 broadcast=224.128.9.255 -N interface=en1 \
address=192.168.0.3 netmask=255.255.255.0 broadcast=192.168.0.255
To configure a system WPAR with a network address of 224.128.9.3 using the en0 interface for the global
environment, run the following command:
mkwpar -n wpar_name -N interface=en0 address=224.128.9.3 \
netmask=255.255.255.0 broadcast=224.128.9.255
You can also use the -N flag with the chwpar command to add additional networks on a previously
defined system WPAR. To add a network, run the following command:
chwpar -N address=224.128.9.4 wpar_name
10 AIX Version 6.1 IBM Workload Partitions for AIX
If you want to change the network settings for a system WPAR, use the address attribute to identify the
network you want to change. For example, to change the netmask and broadcast address of the network
at 224.128.9.3, run the following command:
chwpar -N address=224.128.9.3 netmask=255.255.255.128 \
broadcast=224.128.9.127 wpar_name
Related concepts
“Networking” on page 2A WPAR can have one or more network addresses assigned to support network login and network
services.
Changing the host name for a system WPAR
By default, the name for a system WPAR is used as its host name. You can use the -h flag with the
mkwpar command or the chwpar command to change the host name for a system WPAR.
To override the default host name when you create a system WPAR, run the following mkwpar command:
mkwpar -n wpar_name -h wpar_hostname
To change the host name for an existing system WPAR, run the following chwpar command:
chwpar -h new_hostname wpar_name
Removing a network from a system WPAR
You can remove a network from a system WPAR using the chwpar command with the -K flag.
To remove a network from the system WPAR, run the following chwpar command, using the address of
the network to identify it:
chwpar -K -N address=124.128.9.3 wpar_name
Note: There is no direct way to change the address of a system WPAR network; you must remove the old
network with the chwpar -K command and add the network with the new address.
Configuring domain resolution for system WPARs
You can configure the domain resolution for system WPARs using the -r flag for the mkwpar command.
Files such as the /etc/resolv.conf file do not exist in system WPARs by default.
To copy the global environment’s domain resolution configuration into the system WPARs, run the
following command:
mkwpar -n wpar_name -r
Running this command copies the following files into the system WPARs, if they exist in the global
environment:
v /etc/resolv.conf
v /etc/hosts
v /etc/netsvc.conf
v /etc/irs.conf
v /etc/networks
If the NSORDER environmental variable is set in the environment where you run the mkwpar command,
the variable is added to the /etc/environment file for the new system WPAR.
The -r flag is not supported by the chwpar command. Any changes to the domain resolution configuration
of an existing WPAR must be made by manually editing the relevant files.
IBM Workload Partitions for AIX 11

Configuring resource controls for system WPARs
You can configure the resource controls to limit the physical resources a system WPAR has access to
using the -R flag for the mkwpar command and chwpar command.
To initialize resource control settings, run the following mkwpar command:
mkwpar -n wpar_name -R active=yes CPU=10%-20%,50% totalProcesses=1024
In this example, the WPAR is entitled to the following system resources:
v A minimum of 10% of the global environment’s processors upon request
v A maximum of 20% of the global environment’s processors when there is contention
v A maximum of 50% of the global environment’s processors when there is no contention
v A maximum of 1024 processes at a time
The active attribute can be set to yes or no. When the active attribute is set to no, resource controls are
disabled, but the settings are maintained in the configuration database.
To change resource control settings dynamically for an existing active or inactive application WPAR run the
following chwpar command:
chwpar -R totalThreads=2048 shares_memory=100 wpar_name
Note: You can also use the -K flag for the chwpar command to remove individual attributes from the
profile and restore those controls to their default, as follows:
chwpar -K -R totalProcesses shares_CPU wpar_name
Related concepts
“Resource controls” on page 3WPARs support up to 8192 resource-controlled workload partitions. The number of
non-resource-controlled WPARs that can be created is constrained only by the availability of global
environment memory and disk space resources. However, a maximum of 8192 can be active at any
time.
Using specification files for system WPARs
You can create a WPAR with all of the options from a specification file using the -f flag for the mkwpar
command.
To use a specification file to create a system WPAR, run the mkwpar command as follows:
mkwpar -f /tmp/specfile1
To create a specification file as part of the WPAR creation process, run the following mkwpar command
with the -o flag:
mkwpar -n wpar_name -o /tmp/specfile2
Note: If the name of the system WPAR is provided in the specification file, the -n flag is not required.
The specification file reflects the settings being used to create the WPAR.
To generate a specification file without creating the WPAR, run the following mkwpar command with the
-w flag and the -o flag:
mkwpar -o /tmp/specfile3 -w
For a comprehensive description of the format and permitted contents of a specification file, see the
/usr/samples/wpars/sample.spec file.
12 AIX Version 6.1 IBM Workload Partitions for AIX

Using an image.data file for system WPARs
You can use an image.data file to specify additional logical volume options and file system options when
you create a system WPAR using the mkwpar command with the -L image_data= flag.
The following restrictions apply to using image.data files with system WPARs:
v WPARs use only the lv_data stanza type and the fs_data stanza type in an image.data file. All other
stanza types are ignored.
v If the logical volume device name matches an existing device name on the system, a new name is
generated, and a warning is issued.
v The file system paths specified with the FS_NAME attribute should correspond to their appearance in
the WPAR (for example, the root file system is / and the home file system is /home).
v The base directory for the global environment should not be included in image.data paths.
v All file systems must have associated LVs in the image.data file.
v All logical volumes must have associated file systems in the image.data file.
To create a system WPAR using the logical volume options and file system options in an image.data file,
run the following command:
mkwpar -L image_data=image.data file -n wpar_name
Related information
image.data file
Configuring application WPARs
You can create and configure application WPARs using the wparexec command and the chwpar
command.
When you create an application WPAR, a configuration profile is stored in the WPAR database. You can
export this profile to create a specification file that contains the exact same configuration information for
that WPAR. All WPARs must be created by an authorized administrator in the global environment.
Note: These topics provide specific examples of how to run WPAR-related commands. For complete
documentation of all options for a specific command, see the related information for that task.
Creating an application WPAR
You can create an application WPAR using the wparexec command.
You must supply the path to the application or command that you want to create an application WPAR for,
and you must supply any command line arguments when you run the wparexec command. The
application can either come from a specification file, or be specified on the command line. Unlike system
WPARs, it is not necessary to assign an explicit name to an application WPAR. Although both WPAR types
require a name, the names for application WPARs are generated based on the name of the application
running in the WPAR.
Complete the following steps to create an application WPAR:
1. Log in as the root user to the system where you want to create and configure the workload partition.
This login places you into the global environment.
2. To create and configure the workload partition, run the following command:
wparexec -n wparname -- /usr/bin/ps -ef > /ps.out
The output should look similar to the following:
IBM Workload Partitions for AIX 13

wparexec: Verifying filesystems...
wparexec: Workload partition wparname created successfully.
startwpar: COMMAND START, ARGS: wparname
startwpar: Starting workload partition ’wparname’
startwpar: Mounting all workload partition file systems
startwpar: Loading workload partition
startwpar: Shutting down all workload partition processes
rmwpar: Removing workload partition firstapp
rmwpar: Return Status = SUCCESS
startwpar: Return Status = SUCCESS
You have now successfully created an application WPAR.
Application WPARs start as soon as the wparexec command is issued, and stop as soon as the
application completes its operation. When the operation is complete, the configuration for the application
WPAR is destroyed.
Configuring directories and file systems for application WPARs
Application WPARs share file systems with the global environment. You can use the -M flag for the
wparexec command to configure directories and file systems.
Unlike system WPARs, application WPARs do not have a base directory. You cannot override the default
settings for the local file system dependencies, but you can use the -M flag for the wparexec command to
specify additional file system dependencies, such as a remote NFS mount. The directory attribute
represents the mount point and this attribute is required for all instances created with the -M flag. The
directory mount point will appear both in the WPAR and in the global environment.
Application WPARs do not create new file systems. Therefore, the local JFS and JFS2 file system types
cannot be specified. A local file system dependency can be specified, but it must already exist in the
/etc/filesystems directory.
To mount the remote /export/shared directory over the /shared directory in the global environment, run
the following wparexec command with the -M flag, using the appropriate values for your environment:
wparexec -M directory=/shared vfs=nfs host=homeserver.customer.com dev=/export/shared \
-- /path/to/application arg1 arg2 ... argN
To specify a local file system dependency, specify only the directory attribute for that mount stanza, as
follows, using the appropriate values for your environment:
wparexec -M directory=/mylocalshare -- /path/to/application arg1 arg2 ... argN
Related concepts
“File systems for application WPARs” on page 6Application WPARs share the global environment’s file system namespace. When an application WPAR
is created, it has access to all mounts available to the global environment’s file system.
Configuring networks for application WPARs
You can configure the network for an application WPAR using the -h flag and the -N flag for the wparexec
command or the chwpar command.
By default, the name of an application WPAR is used as its host name.
To override the default hostname for an application WPAR when you are creating it, run the following
wparexec command with the -h flag:
wparexec -h wpar_hostname -- /path/to/application arg1 arg2 ... argN
You can also change the host name for an application WPAR at any time using the -h flag with the
following chwpar command:
14 AIX Version 6.1 IBM Workload Partitions for AIX

chwpar -h new_hostname wpar_name
If you do not specify any network information when you create an application WPAR, and the name of the
WPAR resolves to an IP address on the same network as any active global interface, the wparexec
command automatically configures the network for the WPAR. If the WPAR name does not resolve, you
can specify zero or more network configurations using the -N flag for the wparexec command or the
chwpar command. All network changes can be performed on active or inactive WPARs. The changes take
effect immediately.
Each network requires its own instance of the -N flag. For example:
wparexec -N interface=en0 address=224.128.9.3 netmask=255.255.255.0 broadcast=224.128.9.255 \
-N interface=en1 address=192.168.0.3 netmask=255.255.255.0 broadcast=192.168.0.255 \
-- /path/to/application arg1 arg2 ... argN
You can also use the -N flag with the chwpar command to add additional networks on a previously
defined application WPAR. For example, to add a network, run the following command:
chwpar -N address=224.128.9.4 wpar_name
If you want to change the network settings for an application WPAR, use the address attribute to identify
the network you want to change. For example, to change the netmask and broadcast address of the
network at 224.128.9.3, run the following command:
chwpar -N address=224.128.9.3 netmask=255.255.255.128 broadcast=224.128.9.127 wpar_name
Related concepts
“Networking” on page 2A WPAR can have one or more network addresses assigned to support network login and network
services.
Configuring resource controls for application WPARs
You can configure the resource controls to limit the physical resources an application WPAR has access to
using the -R flag for the wparexec command and chwpar command.
To initialize resource control settings, run the following wparexec command:
wparexec -R active=yes CPU=10%-20%,50% totalProcesses=1024 -- /path/to/application arg1 arg2 ... argN
In this example, the application WPAR is entitled to the following system resources:
v A minimum of 10% of the global environment’s processors upon request
v A maximum of 20% of the global environment’s processors when there is contention
v A maximum of 50% of the global environment’s processors when there is no contention
v A maximum of 1024 processes at a time
The active attribute can be set to yes or no. When the active attribute is set to no, resource controls are
disabled, but the settings are maintained in the configuration database.
For example, to change control settings dynamically for an application WPAR, run the following chwpar
command:
chwpar -R totalThreads=2048 shares_memory=100 wpar_name
Note: You can also use the -K flag for the chwpar command to remove individual attributes from the
profile and restore those controls to their default, as follows:
chwpar -K -R totalProcesses shares_CPU wpar_name
IBM Workload Partitions for AIX 15

Working with specification files for application WPARs
You can create a specification file with all of the options for an application WPAR using the -f flag for the
wparexec command.
If you specify the application for an application WPAR to run, including the command and all arguments,
the command is not required when you create the specification file. To create a specification file for an
application WPAR, run the following command:
wparexec -f /tmp/specfile1
To create a specification file as part of the WPAR creation process, run the wparexec command with the
-o flag as follows:
wparexec -n wpar_name -o /tmp/specfile2 -- /path/to/application arg1 arg2 ... argN
The specification file reflects the settings being used to create the WPAR.
To generate a specification file without creating the WPAR, run the wparexec command with the -w flag
and the -o flag:
wparexec -o /tmp/specfile3 -- /path/to/application arg1 arg2 ... argN
For a comprehensive description of the format and permitted contents of a specification file, see the
/usr/samples/wpars/sample.spec file.
Listing WPARs
You can list summary data for system WPARs and application WPARs using the lswpar command.
You can list information about one or more WPARs using the lswpar command by specifying zero or more
workload partition names. The lswpar command supports shell-style wildcards.
For example, to list the WPARs on a system with names that start with ″mypar_″, run the following
command:
lswpar ’mypar_*’
Related information
lswpar command
Listing WPAR identifiers
You can list the identifiers for a WPAR using the lparstat command or the uname command.
WPARs have the following identifiers:
WPAR name
The name you assign to the WPAR.
WPAR configured ID
A dynamic identifier that is assigned each time the WPAR is started. For the global environment,
the value of this identifier is 0.
WPAR key
A static identifier that is the same each time you start the WPAR. For the global environment, the
value of this identifier is 0.
You can display the WPAR configured ID and the WPAR key by running the lparstat command with the
-W flag. This command also displays processor information that might be helpful for licensing.
To view WPAR identification and processor information, run lparstat command with the -W flag as follows:
16 AIX Version 6.1 IBM Workload Partitions for AIX

lparstat -W
To display the WPAR key, run the uname command with the -W flag as follows:
uname -W
Related information
lparstat command
uname command
Logging in to a WPAR
After you configure and activate a system WPAR, you can log in to it locally using the clogin command.
You can log in to a WPAR as the root user or as a different user. You might be prompted for a password
when you log in. Output for the clogin command is displayed on the console where the command was
issued. When you exit the command, the command returns to the global environment.
To log in to a system WPAR and create a shell as the root user, run the following command:
clogin wpar_name
To log in to a system WPAR and create a shell as a different user, run the following command:
clogin -l username wpar_name
Note: You can also log into a system WPAR remotely using the a network-based login command, such as
the rlogin command, the telnet command, or the rsh command.
Related information
clogin command
Backing up WPARs
You can back up a WPAR using the savewpar command, the mkcd command, or the mkdvd command.
The savewpar command uses the data created by the mkwpardata command to back up your WPAR. If
these files are not already on your system, the savewpar command will call the mkwpardata command to
create these files. The image files contain the following information:
v A list of logical volumes and their sizes
v A list of file systems and their sizes
v A list of volume groups
v The WPAR name
To back up a WPAR to the default tape device, run the following command:
savewpar wparname
To back up a WPAR to a file, run the following command:
savewpar -f file wparname
You can also back up a WPAR to a CD device using the mkcd -W command or to a DVD device using the
mkdvd -W command.
Related information
mkcd command
mkdvd command
mkwpardata command
savewpar command
IBM Workload Partitions for AIX 17

Restoring WPARs
You can restore a WPAR using the restwpar command.
You can restore a WPAR from a backup image created by the savewpar command, the mkcd command,
or the mkdvd command.
To restore the backup image from the /dev/rmt1 device, run the following command:
restwpar -f/dev/rmt1
Related information
restwpar command
Removing WPARs
You can remove a WPAR using the rmwpar command.
To remove a WPAR, it must be in the defined state, and you must provide the name of the WPAR.
To remove a WPAR, run the following command:
rmwpar wpar_name
To stop a WPAR before removing it, run the following rmwpar command with the -s flag:
rmwpar -s wpar_name
Related information
rmwpar command
Starting system WPARs
You can start a system WPAR from the global environment using the startwpar command.
To start a system WPAR, run the following command in the global environment:
startwpar wpar_name
You can also start a system WPAR in maintenance mode. Starting in maintenance mode performs all of
the actions of starting the WPAR with the exception of network configuration. You can use this flag to
prevent external access to the WPAR while you perform maintenance.
To start a system WPAR in maintenance mode, run the following command in the global environment:
startwpar -m wpar_name
Note: You cannot start WPARs that rely on NFS-mounted file systems in maintenance mode.
Related information
startwpar command
Stopping WPARs
You can stop a WPAR from the global environment using the stopwpar command.
Stopping a system WPAR follows a similar paradigm to the shutdown command and the halt command
for AIX. For application WPARs, running the stopwpar command is equivalent to removing the WPAR with
the rmwpar command.
18 AIX Version 6.1 IBM Workload Partitions for AIX

To stop a system WPAR in the same way that the shutdown command stops a system, run the following
command:
stopwpar wpar_name
To stop a system WPAR quickly in the same way that the halt command stops a system, run the following
command:
stopwpar -F wpar_name
Related information
stopwpar command
Using the Advanced Accounting subsystem with WPARs
You can use the Advanced Accounting subsystem to produce WPAR accounting reports.
Advanced Accounting produces the following records for WPARs:
v Process records
v Aggregated process records
v Aggregated application records
v File system activity records
v Network interface I/O records
v Disk I/O records
v Third-party kernel extension common aggregation records
Related information
Accounting records
Using the trace facility with WPARs
You can use the trace facility to isolate system problems by monitoring selected system events in a
WPAR.
The following tracing capabilities are available for WPARs:
v Launching a trace from within a WPAR
v Correlating a trace entry to a WPAR
v Filtering which WPAR trace entries to log from the global environment
v Filtering which WPAR entries to report from the global environment
v Running more than one kernel trace at the same time
v Additional trace utility hooks
Note: A maximum of 7 WPARs can run the trace facility at the same time.
By default you cannot run trace facility in a WPAR. To enable the trace facility from a WPAR, you must
grant PV_KER_RAS privilege to the WPAR. You can grant this privilege when you run the mkwpar
command or by running the chwpar command with the -S privs+=PV_KER_RAS flag.
Related information
trace daemon
trcrpt command
IBM Workload Partitions for AIX 19

Making software available to other WPARs
When you install software in the global environment, it is not always automatically available for use within
your system WPAR. You can use the syncwpar command or the syncroot command to make software
available.
Application workload partitions share their file systems with the global environment and do not create new
file systems. Therefore, the syncwpar command and the syncroot command are applicable only to
system WPARs.
To make software available in one or more WPARs, run the following command in the global environment:
syncwpar wpar_name1 wpar_name2
The syncroot command performs the same function as the syncwpar command, but the syncroot
command operates only within the WPAR where it is issued.
Related information
syncroot command
syncwpar command
Example: Installing Apache in a WPAR
Installing Apache allows you to take advantage of the portability and scalability of WPARs.
Before you install Apache, you must download the Apache RPM and the following dependencies:
v expat
v lynx
You can download all of these RPM files from the following Web site:
http://www.ibm.com/servers/aix/products/aixos/linux/download.html
To install Apache, complete the following steps.
1. Install the Apache RPM file and its dependencies in the global environment using the rpm command.
Many of the installation images are installed in the /opt directory and the /usr directory. Because these
directories are shared by the global environment and all shared WPARs, it is not necessary to install
Apache separately on all WPARs.
2. Make Apache available to other WPARs.
v If the WPAR where you want to run Apache does not exist, create it using the mkwpar command or
SMIT.
v If the WPAR where you want to run Apache does exist, make the installation of Apache available to
the WPAR using the syncwpar command or SMIT.
3. Configure Apache in the WPARs where you want Apache to run. At a minimum, you should modify the
DocumentRoot variable in the /etc/opt/freeware/Apache/httpd.conf file to a directory that contains the
files you want to serve.
4. Start Apache in every WPAR where you want it to run.
Example: Using DB2 Version 8 for Linux, UNIX, and Windows in a
WPAR
You can install and use DB2® Version 8 for Linux®, UNIX®, and Windows® (DB2 8) in a WPAR
environment.
20 AIX Version 6.1 IBM Workload Partitions for AIX

Installing DB2 8 in the global environment
You can install DB2 8 in the global environment with the installation media.
Restriction: DB2 8 can be installed only in the global environment. You cannot install or update DB2 8 in
a WPAR.
For complete documentation on installing DB2 8, see the DB2 Information Center at the following Web
site:
http://publib.boulder.ibm.com/infocenter/db2luw/v8
A typical installation installs all of the necessary utilities for configuring DB2 8 in a WPAR.
After you install DB2 8, you can make it available to other WPARs with the syncwpar command.
Creating a database administration server
Creating a database administration server is a one-time process that must be performed on each WPAR.
To create a database administration server, complete the following steps.
1. Log in to the WPAR as the root user using telnet or the clogin command.
2. Verify that the host name for the WPAR where you are configuring DB2 resolves using the host
command. Run the command as follows:
host wpar_host_name
3. Modify the root user environment to set the DB_HOME environment variable to point to the
/usr/opt/db2_08_01 directory.
4. Create a new, non-administrative group called dasadmn.
5. Create a new user called dasusr with the primary group of staff.
6. Add the root user and the dasusr user to the dasadm group.
7. Create the DB2 administration server by running the following command:
$DB_HOME/instance/dascrt -u dasusr
8. Verify that the DB2 administration server is successfully created by running the following command:
$DB_HOME/instance/daslist
9. Run the following command to verify the creation process was sucessful:
$DB_HOME/instance/db2ilist
The WPAR should run successfully and show zero instances.
Creating a DB2 instance
After you create a database administration server, you can create DB2 instances on your WPARs.
Restriction: You cannot create DB2 instances in a WPAR with the db2setup tool from the installation
media.
If you are configuring existing users as DB2 instances, run the following command:
$DB_HOME/instance/db2icrt
Running this command allows you to manually provide parameters for configuring the instance.
You can also use the db2isetup script to create users and groups when you create the instance.
When you create the instance, you might receive the following error:
Enabling Asynchronous I/O:.......Failure
IBM Workload Partitions for AIX 21
This is a not a fatal error, and it can be ignored.
Removing DB2 8
You must remove all of your DB2 instances to remove DB2.
Restriction: DB2 8 can be removed only in the global environment.
To remove DB2 8, complete the following steps.
1. Remove the DB2 instances from each of your WPARs by running the following command:
$DB_HOME/instance/db2idrop
2. Remove the DB2 administration server from each of your WPARs by running the following command:
$DB_HOME/instance/dasdrop
You can now remove DB2 8 from the global environment. For complete documentation on removing DB2
8, see the DB2 Information Center at the following Web site:
http://publib.boulder.ibm.com/infocenter/db2luw/v8
Example: Using WebSphere Application Server, Version 6.0 in a WPAR
You can install and use WebSphere® Application Server, Version 6.0, in the global environment or in each
individual WPAR.
Installing WebSphere Application Server, Version 6.0, in the global
environment
You can install WebSphere Application Server, Version 6.0, in the global environment, and it will also be
installed in any WPARs in the environment.
If you install WebSphere Application Server, Version 6.0, in the global environment, the product files are
shared product binaries. These binary files are shared by all WebSphere profiles inside individual WPARs.
1. Install WebSphere Application Server, Version 6.0, in the global environment. For complete
documentation of how to install WebSphere Application Server, see the WebSphere Application Server,
Version 6.0 Information Center at the following Web site:
http://publib.boulder.ibm.com/infocenter/wasinfo/v6r0
Note: If you install WebSphere Application Server in any directory other than the default
(/usr/IBM/WebSphere/AppServer), you must complete the following steps:
v Export the file system to all WPARs with read-only access.
v Mount the directory where you installed WebSphere Application Server into each WPAR
where you want to run DB2.
2. In the global environment, modify the WAS_HOME environment variable for the root user to point to
the /usr/IBM/WebSphere/AppServer directory, or the directory where you installed WebSphere
Application Server.
3. In the WPAR, modify the WAS_HOME environment variable for the root user to point to
/usr/IBM/WebSphere/AppServer, or the appropriate mounted directory.
4. Create the /home/WASProfileRoot directory in both the global environment and in each WPAR where
you will be creating WebSphere Application Server profiles. For each profile, you must have at least
200 MB of available disk space in the directory. This procedure refers to the profile directory as the
/home/WASProfileRoot, but it is not a fixed path. You can create a directory with a different path and
then use that particular path for all steps in these instructions.
5. Create the /home/WASProfileRoot/properties directory in both the global environment and in each
WPAR where you will be creating WebSphere Application Server profiles.
22 AIX Version 6.1 IBM Workload Partitions for AIX

6. In the global environment, back up the WAS_HOME/properties/wasprofile.properties file.
7. Modify the wasprofile.properties file by updating the following values:
WS_CMT_LOG_HOME=/home/WASProfileRoot/logs/wasprofile
WS_PROFILE_REGISTRY=/home/WASProfileRoot/properties/profileRegistry.xml
Your environment is now ready for the creation of WebSphere Application Server profiles. If you run the
WAS_HOME/bin/wasprofile.sh -list Profiles command both in the global environment and in your other
WPARs, you can list the profiles. The command should run successfully and show zero profiles.
Installing WebSphere Application Server, Version 6.0, in a WPAR
You can install WebSphere Application Server, Version 6.0, directly in a WPAR if that WPAR does not
share the /usr directory with the global environment, or if the WPAR was created after WebSphere
Application Server, Version 6.0, was installed in the global environment.
Installing WebSphere Application Server, Version 6.0, in a WPAR allows you to run WebSphere Application
Server, Version 6.0, from the WPAR without referring back to the global environment. This type of
installation keeps all WebSphere Application Server, Version 6.0, processes and data independent from
other WPARs and the global environment.
1. Install WebSphere Application Server, Version 6.0, from the global environment using an installation
directory that specifies a non-shared directory in the targeted WPAR (for example, the
/wpars/wpar_name/home/WebSphere/AppServer directory). For complete documentation of how to
install WebSphere Application Server, Version 6.0, see the WebSphere Application Server, Version 6.0
Information Center at the following Web site:
http://publib.boulder.ibm.com/infocenter/wasinfo/v6r0
Note: If you install WebSphere Application Server, Version 6.0, in any directory other than the default
(/usr/IBM/WebSphere/AppServer), you must complete the following steps:
v Export the file system to all WPARs with read-only access.
v Mount the directory where you installed WebSphere Application Server, Version 6.0, into each
WPAR where you want to run DB2.
2. Log in to the WPAR.
3. Modify the WAS_HOME environment variable for the root user to point to the /usr/IBM/WebSphere/AppServer directory or the appropriate mounted directory.
4. Create the /home/WASProfileRoot directory. For each profile, you must have at least 200 MB of
available disk space in the directory. This procedure refers to the profile directory as the
/home/WASProfileRoot, but it is not a fixed path. You can create a directory with a different path and
then use that particular path for all steps in these instructions.
5. Create the /home/WASProfileRoot/properties directory.
6. Back up the WAS_HOME/properties/wasprofile.properties file.
7. Modify the wasprofile.properties file by updating the following values:
WS_CMT_LOG_HOME=/home/WASProfileRoot/logs/wasprofile
WS_PROFILE_REGISTRY=/home/WASProfileRoot/properties/profileRegistry.xml
You can repeat this procedure on as many WPARs as you desire.
Creating WebSphere Application Server profiles
You can create WebSphere Application Server profiles in both the global environment and in individual
WPARs.
1. Log in to the global environment or the WPAR where you want to create the profile.
2. Run the wasprofile command.
IBM Workload Partitions for AIX 23

Note: Do not use the default profile location was_install_path/profiles as the profile location. The
following example shows the recommended usage for the profilePath parameter:
$WAS_HOME/bin/wasprofile.sh \
-create \
-profileName AppServer01 \
-profilePath /home/WASProfileRoot/profiles/AppServer01 \
-templatePath $WAS_HOME/profileTemplates/default \
-nodeName.......[name of Node ] \
-hostName.......[name of Host / "hostname" ] \
-cellName.......[name of Cell ]
Removing WebSphere Application Server
To remove WebSphere Application Server from the global environment and all WPARs delete all profiles
and remove the application.
1. Delete all of the WebSphere Application Server profiles from the WPARs that have them using the
following command:
$WAS_HOME/bin/wasprofile.sh -delete -profileName name_of_profile
Note: You must run this command on every WPAR that has a WebSphere Application Server profile.
2. In the global environment, delete all existing WebSphere Application Server profiles.
3. Remove WebSphere Application Server by running the following command:
$WAS_HOME/_uninst/uninstall
Modified and enhanced AIX commands for WPARs
Some commands have different or enhanced behavior in a WPAR environment.
The following table shows how the behavior of some commands differs when they are run in a WPAR or
run in the global environment. Some commands have different behavior only when certain flags are
specified.
Table 1. Modified and enhanced AIX commands
Command Flags and arguments Behavior in a WPAR
Behavior in the global
environment
acctcom - @ WPAR name Fails with workload
partition not found
message unless WPAR
name is ″global″
Executes normally
displaying accounting
records for WPAR named
WPAR name
-@ no argument Fails with cannot open
/var/adm/pacct message
Executes normally
displaying accounting
records for all WPARs; a
WPAR name is displayed
for each record
acctctl Fails with cannot open
/var/adm/pacct message
Executes normally if user
has correct privilege
clogin -C wpar name command Not allowed in a WPAR Prompts for password and
runs command in the
WPAR or login if no
command is specified
df Displays information on
WPAR mounted file
systems only; paths are
displayed relative to the
WPAR root
Displays information on all
file systems; paths are
absolute
24 AIX Version 6.1 IBM Workload Partitions for AIX
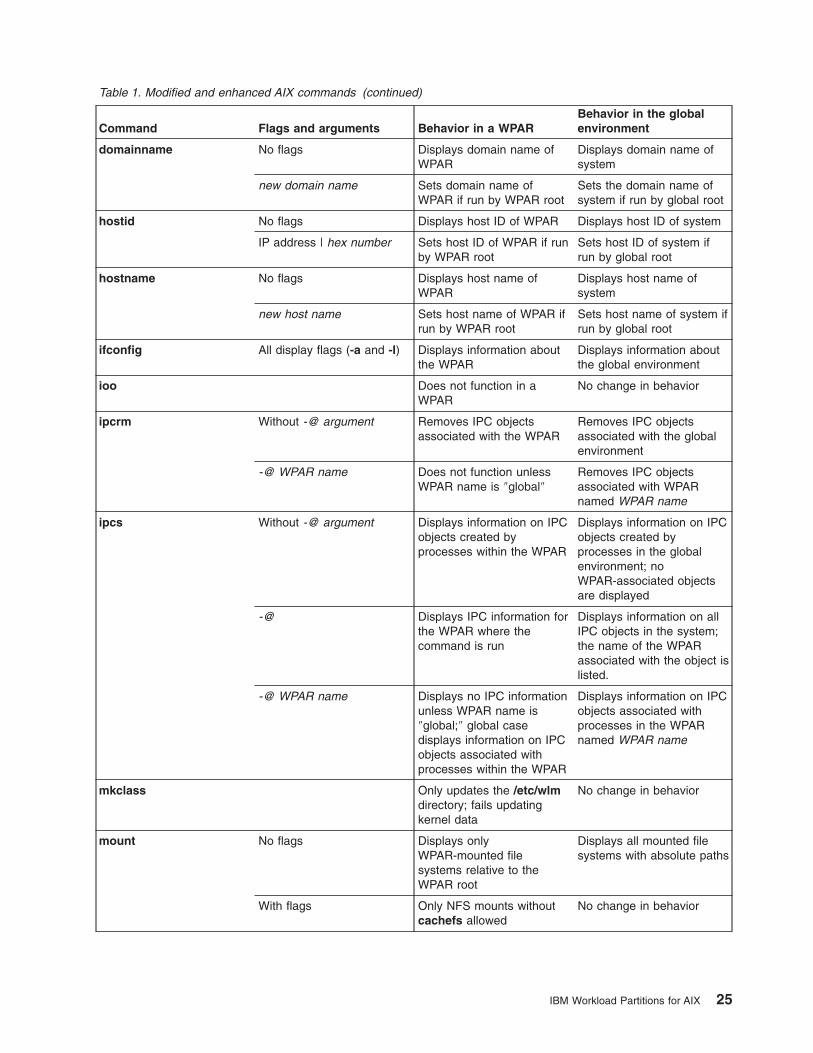
Table 1. Modified and enhanced AIX commands (continued)
Command Flags and arguments Behavior in a WPAR
Behavior in the global
environment
domainname No flags Displays domain name of
WPAR
Displays domain name of
system
new domain name Sets domain name of
WPAR if run by WPAR root
Sets the domain name of
system if run by global root
hostid No flags Displays host ID of WPAR Displays host ID of system
IP address | hex number Sets host ID of WPAR if run
by WPAR root
Sets host ID of system if
run by global root
hostname No flags Displays host name of
WPAR
Displays host name of
system
new host name Sets host name of WPAR if
run by WPAR root
Sets host name of system if
run by global root
ifconfig All display flags (-a and -l) Displays information about
the WPAR
Displays information about
the global environment
ioo Does not function in a
WPAR
No change in behavior
ipcrm Without -@ argument Removes IPC objects
associated with the WPAR
Removes IPC objects
associated with the global
environment
-@ WPAR name Does not function unless
WPAR name is ″global″
Removes IPC objects
associated with WPAR
named WPAR name
ipcs Without -@ argument Displays information on IPC
objects created by
processes within the WPAR
Displays information on IPC
objects created by
processes in the global
environment; no
WPAR-associated objects
are displayed
-@ Displays IPC information for
the WPAR where the
command is run
Displays information on all
IPC objects in the system;
the name of the WPAR
associated with the object is
listed.
-@ WPAR name Displays no IPC information
unless WPAR name is
″global;″ global case
displays information on IPC
objects associated with
processes within the WPAR
Displays information on IPC
objects associated with
processes in the WPAR
named WPAR name
mkclass Only updates the /etc/wlm
directory; fails updating
kernel data
No change in behavior
mount No flags Displays only
WPAR-mounted file
systems relative to the
WPAR root
Displays all mounted file
systems with absolute paths
With flags Only NFS mounts without
cachefs allowed
No change in behavior
IBM Workload Partitions for AIX 25

Table 1. Modified and enhanced AIX commands (continued)
Command Flags and arguments Behavior in a WPAR
Behavior in the global
environment
netstat
-c
-C
-g
-m
-M
-P
-v
-Z
These flags are not
supported.
Display network information
and statistics for the entire
system
All other flags Display network information
and statistics for the WPAR
Display network information
and statistics for the entire
system
-@ WPAR name Does not function in a
WPAR
Display network information
and statistics for the WPAR
specified, or all WPARs if
WPAR name is not
specified
nfso Has read-only functionality
in a WPAR
No change in behavior
no All flags except -a Fails with an error message No change in behavior if
user has the correct
privilege
-a No change in behavior No change in behavior if
user has the correct
privilege
projctl All flags except -qproj Fails with a not owner
message
No change in behavior if
user has the correct
privilege
qproj No change in behavior No change in behavior if
user has the correct
privilege
26 AIX Version 6.1 IBM Workload Partitions for AIX
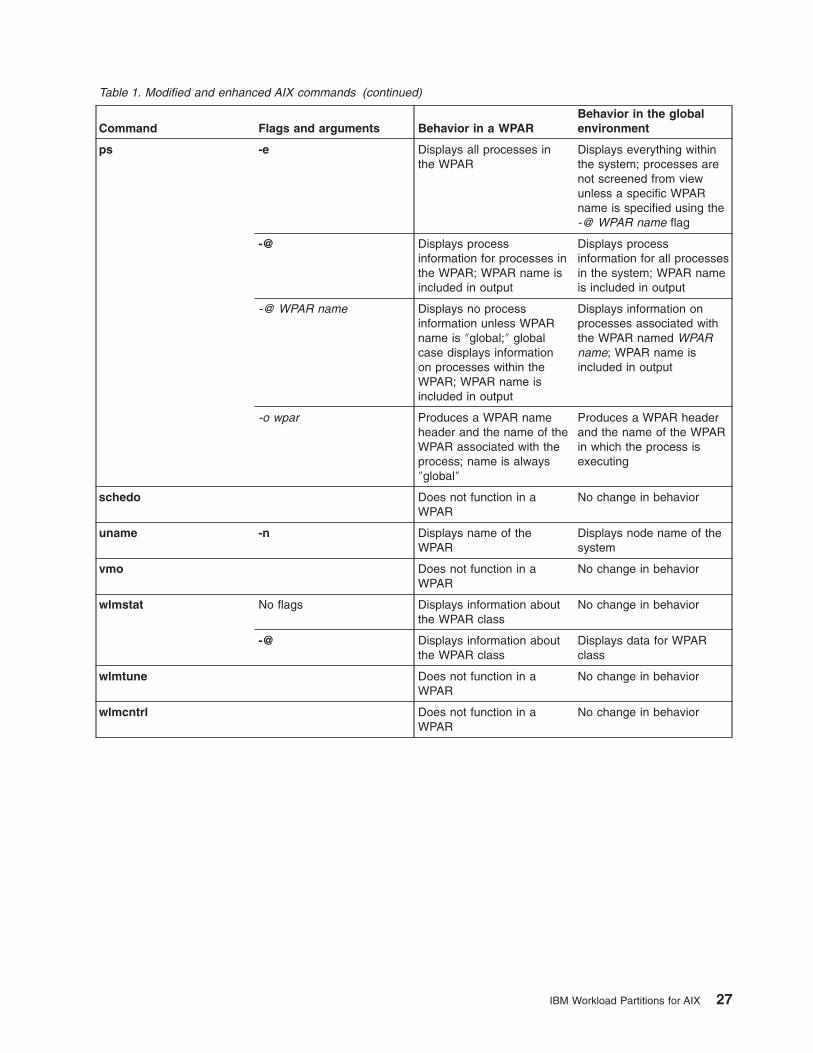
Table 1. Modified and enhanced AIX commands (continued)
Command Flags and arguments Behavior in a WPAR
Behavior in the global
environment
ps -e Displays all processes in
the WPAR
Displays everything within
the system; processes are
not screened from view
unless a specific WPAR
name is specified using the
-@ WPAR name flag
-@ Displays process
information for processes in
the WPAR; WPAR name is
included in output
Displays process
information for all processes
in the system; WPAR name
is included in output
-@ WPAR name Displays no process
information unless WPAR
name is ″global;″ global
case displays information
on processes within the
WPAR; WPAR name is
included in output
Displays information on
processes associated with
the WPAR named WPAR
name; WPAR name is
included in output
-o wpar Produces a WPAR name
header and the name of the
WPAR associated with the
process; name is always
″global″
Produces a WPAR header
and the name of the WPAR
in which the process is
executing
schedo Does not function in a
WPAR
No change in behavior
uname -n Displays name of the
WPAR
Displays node name of the
system
vmo Does not function in a
WPAR
No change in behavior
wlmstat No flags Displays information about
the WPAR class
No change in behavior
-@ Displays information about
the WPAR class
Displays data for WPAR
class
wlmtune Does not function in a
WPAR
No change in behavior
wlmcntrl Does not function in a
WPAR
No change in behavior
IBM Workload Partitions for AIX 27

28 AIX Version 6.1 IBM Workload Partitions for AIX

Appendix. Notices
This information was developed for products and services offered in the U.S.A.
IBM may not offer the products, services, or features discussed in this document in other countries.
Consult your local IBM representative for information on the products and services currently available in
your area. Any reference to an IBM product, program, or service is not intended to state or imply that only
that IBM product, program, or service may be used. Any functionally equivalent product, program, or
service that does not infringe any IBM intellectual property right may be used instead. However, it is the
user’s responsibility to evaluate and verify the operation of any non-IBM product, program, or service.
IBM may have patents or pending patent applications covering subject matter described in this document.
The furnishing of this document does not give you any license to these patents. You can send license
inquiries, in writing, to:
IBM Director of Licensing
IBM Corporation
North Castle Drive
Armonk, NY 10504-1785
U.S.A.
The following paragraph does not apply to the United Kingdom or any other country where such
provisions are inconsistent with local law: INTERNATIONAL BUSINESS MACHINES CORPORATION
PROVIDES THIS PUBLICATION "AS IS" WITHOUT WARRANTY OF ANY KIND, EITHER EXPRESS OR
IMPLIED, INCLUDING, BUT NOT LIMITED TO, THE IMPLIED WARRANTIES OF NON-INFRINGEMENT,
MERCHANTABILITY OR FITNESS FOR A PARTICULAR PURPOSE. Some states do not allow disclaimer
of express or implied warranties in certain transactions, therefore, this statement may not apply to you.
This information could include technical inaccuracies or typographical errors. Changes are periodically
made to the information herein; these changes will be incorporated in new editions of the publication. IBM
may make improvements and/or changes in the product(s) and/or the program(s) described in this
publication at any time without notice.
Licensees of this program who wish to have information about it for the purpose of enabling: (i) the
exchange of information between independently created programs and other programs (including this one)
and (ii) the mutual use of the information which has been exchanged, should contact:
IBM Corporation
Dept. LRAS/Bldg. 003
11400 Burnet Road
Austin, TX 78758-3498
U.S.A.
Such information may be available, subject to appropriate terms and conditions, including in some cases,
payment of a fee.
The licensed program described in this document and all licensed material available for it are provided by
IBM under terms of the IBM Customer Agreement, IBM International Program License Agreement or any
equivalent agreement between us.
For license inquiries regarding double-byte (DBCS) information, contact the IBM Intellectual Property
Department in your country or send inquiries, in writing, to:
© Copyright IBM Corp. 2007 29
IBM World Trade Asia Corporation
Licensing
2-31 Roppongi 3-chome, Minato-ku
Tokyo 106-0032, Japan
IBM may use or distribute any of the information you supply in any way it believes appropriate without
incurring any obligation to you.
Information concerning non-IBM products was obtained from the suppliers of those products, their
published announcements or other publicly available sources. IBM has not tested those products and
cannot confirm the accuracy of performance, compatibility or any other claims related to non-IBM products.
Questions on the capabilities of non-IBM products should be addressed to the suppliers of those products.
Any references in this information to non-IBM Web sites are provided for convenience only and do not in
any manner serve as an endorsement of those Web sites. The materials at those Web sites are not part of
the materials for this IBM product and use of those Web sites is at your own risk.
This information contains examples of data and reports used in daily business operations. To illustrate
them as completely as possible, the examples include the names of individuals, companies, brands, and
products. All of these names are fictitious and any similarity to the names and addresses used by an
actual business enterprise is entirely coincidental.
Trademarks
The following terms are trademarks of International Business Machines Corporation in the United States,
other countries, or both:
AIX
DB2
IBM
WebSphere
Linux is a registered trademark of Linus Torvalds in the United States, other countries, or both.
Microsoft, Windows, Windows NT, and the Windows logo are trademarks of Microsoft Corporation in the
United States, other countries, or both.
UNIX is a registered trademark of The Open Group in the United States and other countries.
Other company, product, or service names may be the trademarks or service marks of others.
30 AIX Version 6.1 IBM Workload Partitions for AIX

Index
AAdvanced Accounting subsystem 19
Apacheinstalling 20
applicationenvironment 1
application WPARs 6
configuring 14, 15
creating 13
file systems 6
resource controls 15
specification files 16
Bbacking up 17
Cconfiguring
application WPARs 14, 15
directories 9, 14
domain resolution 11
file systems 9, 14
networks 10, 14
resource controls 12, 15
specification files 12
system WPARs 7, 9, 10
creatingapplication WPARs 13
DB2 instance 21
system WPARs 7
WebSphere Application Server profiles 23
customizingfile systems 10
system WPARs 10
DDB2 21
installing 21
devices 1
directoriesconfiguring 14
domain resolutionconfiguring 11
Ffile systems 10
application WPARs 6
configuring 14
system WPARs 5
Gglobal environment 7
Hhost name
system WPARs 11
Iidentifiers 16
image.data file 13
installingApache 20
DB2 21
WebSphere Application Server 22, 23
Llisting 16
logging in 17
Nnaming
system WPARs 7
networks 2, 10
configuring 14
Pproducts 29
Rremoving 18
WebSphere Application Server 24
resource controls 3, 4, 15
configuring 12
restoring 18
Ssecurity 3
software 20
specification filesapplication WPARs 16
configuring 12
startingsystem WPARs 18
stoppingsystem WPARs 18
system WPARs 5, 11
configuring 7, 9, 10
creating 7
customizing 10
© Copyright IBM Corp. 2007 31

system WPARs (continued)directories 9, 10
file systems 5, 9
host name 11
image.data file 13
naming 7
networks 10
starting 18
stopping 18
Tterms 30
trace facility 19
WWebSphere Application Server
global environment 22
installing 22, 23
profiles 23
removing 24
32 AIX Version 6.1 IBM Workload Partitions for AIX

Readers’ Comments — We’d Like to Hear from You
AIX Version 6.1
IBM Workload Partitions for AIX
Publication No. SA23-2233-00
We appreciate your comments about this publication. Please comment on specific errors or omissions, accuracy,
organization, subject matter, or completeness of this book. The comments you send should pertain to only the
information in this manual or product and the way in which the information is presented.
For technical questions and information about products and prices, please contact your IBM branch office, your IBM
business partner, or your authorized remarketer.
When you send comments to IBM, you grant IBM a nonexclusive right to use or distribute your comments in any
way it believes appropriate without incurring any obligation to you. IBM or any other organizations will only use the
personal information that you supply to contact you about the issues that you state on this form.
Comments:
Thank you for your support.
Submit your comments using one of these channels:
v Send your comments to the address on the reverse side of this form.
v Send your comments via e-mail to: [email protected]
If you would like a response from IBM, please fill in the following information:
Name
Address
Company or Organization
Phone No. E-mail address

Readers’ Comments — We’d Like to Hear from You SA23-2233-00
SA23-2233-00
���
Cut or FoldAlong Line
Cut or FoldAlong Line
Fold and Tape Please do not staple Fold and Tape
Fold and Tape Please do not staple Fold and Tape
NO POSTAGENECESSARYIF MAILED IN THEUNITED STATES
BUSINESS REPLY MAIL FIRST-CLASS MAIL PERMIT NO. 40 ARMONK, NEW YORK
POSTAGE WILL BE PAID BY ADDRESSEE
IBM Corporation
Information Development
Department 04XA-905-6C006
11501 Burnet Road
Austin, TX 78758-3493
_ _ _ _ _ _ _ _ _ _ _ _ _ _ _ _ _ _ _ _ _ _ _ _ _ _ _ _ _ _ _ _ _ _ _ _ _ _ _ _ _ _ _ _ _ _ _ _ _ _ _ _ _ _ _ _ _ _ _ _ _ _ _ _ _ _ _ _ _ _ _ _ _ _ _ _ _ _ _ _ _ _ _ _ _ _ _ _ _
_ _ _ _ _ _ _ _ _ _ _ _ _ _ _ _ _ _ _ _ _ _ _ _ _ _ _ _ _ _ _ _ _ _ _ _ _ _ _ _ _ _ _ _ _ _ _ _ _ _ _ _ _ _ _ _ _ _ _ _ _ _ _ _ _ _ _ _ _ _ _ _ _ _ _ _ _ _ _ _ _ _ _ _ _ _ _ _ _
__
__
__
__
__
__
__
__
__
__
__
__
__
__
__
__
__
__
__
__
__
__
__
__
__
__
__
__
__
__
__
__
__
__
__
__
__
__
__
__
__
__
__
__
__
__
__
__
__
_


���
Printed in U.S.A.
SA23-2233-00