Embed Size (px)
Citation preview

PS Talent Manager for Human
Resources
Page ii
Table of Contents PS Talent Manager for Human Resources ..................................................................... 1
Vacancy Request/Job Opening ................................................................................................. 1 SHC Vacancy Request ............................................................................................................................ 1 Create New Job Opening ........................................................................................................................ 5 Recruiter: Review Posting ................................................................................................................... 16
View Applicant Information ................................................................................................... 24 Screen/Route Applicants....................................................................................................................... 25 Application Report by Job ID ............................................................................................................... 28 Application Report by Applicant ID ..................................................................................................... 31 Manage Applicants Page ...................................................................................................................... 35 Applicant Data Page ............................................................................................................................. 38
Manage Interviews ................................................................................................................... 43 Manage Interview Schedule .................................................................................................................. 44 Create Interview Evaluation ................................................................................................................. 48
Background Check ................................................................................................................... 55 Initiate Background Check ................................................................................................................... 56
Offer Letter ............................................................................................................................... 60 Create/Send Offer Letter ....................................................................................................................... 60
Prepare for Hire ....................................................................................................................... 70 PFH: External Candidate ..................................................................................................................... 71 PFH: Internal Candidate ...................................................................................................................... 84 PFH: Withdraw from Ready to Hire .................................................................................................... 91
Appendices: Job Aids/Quick Step Guides............................................................................. 94 Appendix A: SHC Vacancy Request ................................................................................................... 94 Appendix B: Create New Job Opening ................................................................................................ 97 Appendix C: Recruiter Review Posting ............................................................................................. 105 Appendix D: Screen/Route Applicants .............................................................................................. 110 Appendix E: Application Report by Job ID ....................................................................................... 112 Appendix F: Application Report by Applicant ID ............................................................................. 113 Appendix G: Manage Applicants Page .............................................................................................. 115 Appendix H: Applicant Data Page ..................................................................................................... 117 Appendix I: Manage Interview Schedule........................................................................................... 118 Appendix J: Create Interview Evaluation .......................................................................................... 119 Appendix K: Initiate Background Check ........................................................................................... 121 Appendix L: Create/Send Offer Letter .............................................................................................. 123 Appendix M: PFH: External Candidate ............................................................................................ 127 Appendix N: PFH: Internal Candidate .............................................................................................. 130 Appendix O: PFH: Withdraw from Ready to Hire ........................................................................... 132
Page 1
PS Talent Manager for Human Resources Welcome to the PeopleSoft Talent Manger for Human Resources training module. In this module
you will learn the tasks necessary to efficiently navigate the hiring process within PeopleSoft.
Please complete each module in the "Try It" phase. Once you have completed all modules,
launch the quiz to test your knowledge. You will need to pass this quiz in order to obtain access
to utilize these modules within PeopleSoft. If you have any questions, please contact the Talent
Acquisition team at 1-855-773-4647, option 2.
Vacancy Request/Job Opening It is the responsibility of the Human Resources Generalist or Director to create and submit
vacancy requests to the Strategic Hiring Committee via PeopleSoft. Once the vacancy request has
been approved, automated workflow will be sent to the individuals listed in the hiring team with
instructions to create the job bank posting.
SHC Vacancy Request
In this section you will learn how to create and submit a Vacancy Request to the Strategic Hiring
Committee for approval to fill a vacant position control number (PCN). Information submitted
here will assist with quickly building your job bank posting if/once the PCN is approved to post
and fill.
For questions concerning submission of a request other than Vacancy, contact the Compensation
and Organization Design Division.
View SHC FAQ's: (https://hr85.gmis.in.gov/LMS_SPD/UPK/eTalent/FAQS/SHC.docx)
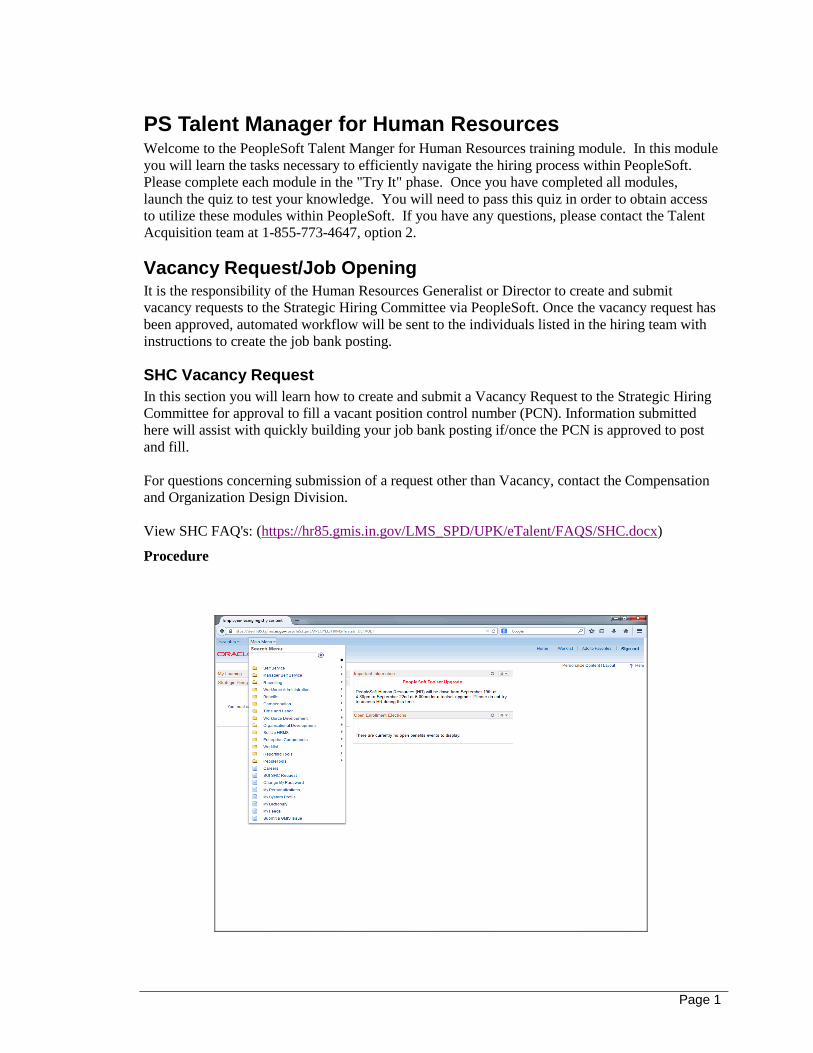
Procedure
Page 2
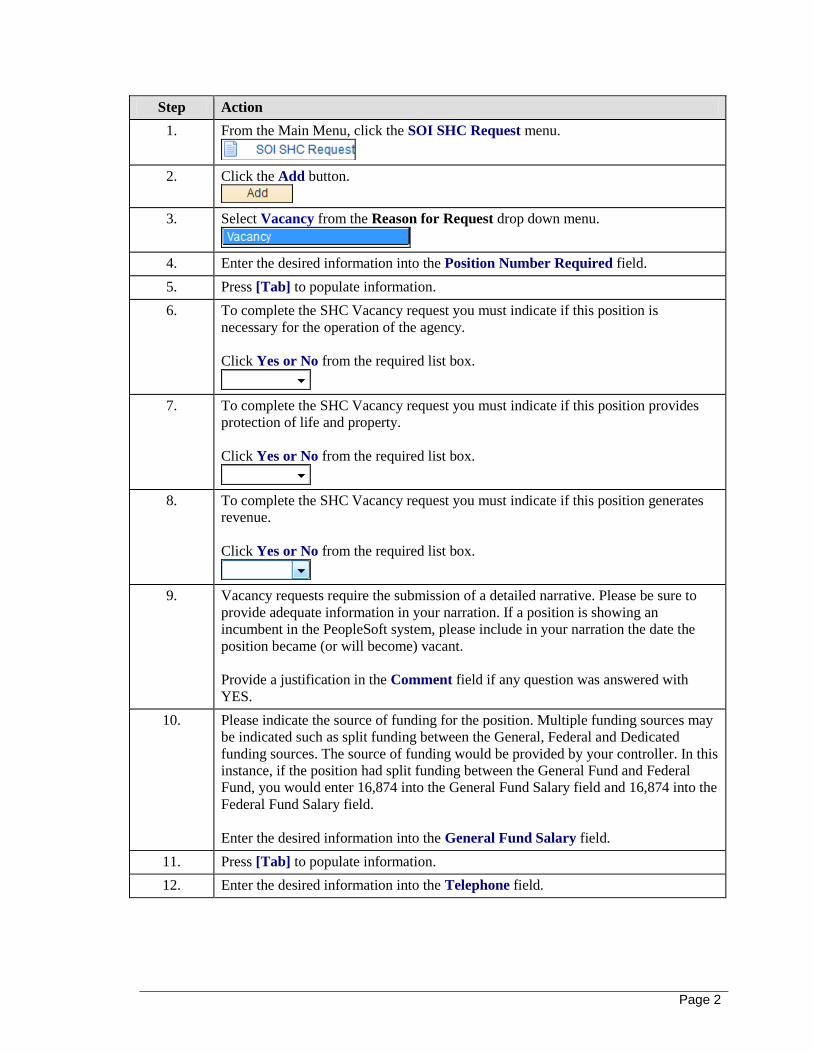
Step Action
1. From the Main Menu, click the SOI SHC Request menu.
2. Click the Add button.
3. Select Vacancy from the Reason for Request drop down menu.
4. Enter the desired information into the Position Number Required field.
5. Press [Tab] to populate information.
6. To complete the SHC Vacancy request you must indicate if this position is
necessary for the operation of the agency.
Click Yes or No from the required list box.
7. To complete the SHC Vacancy request you must indicate if this position provides
protection of life and property.
Click Yes or No from the required list box.
8. To complete the SHC Vacancy request you must indicate if this position generates
revenue.
Click Yes or No from the required list box.
9. Vacancy requests require the submission of a detailed narrative. Please be sure to
provide adequate information in your narration. If a position is showing an
incumbent in the PeopleSoft system, please include in your narration the date the
position became (or will become) vacant.
Provide a justification in the Comment field if any question was answered with
YES.
10. Please indicate the source of funding for the position. Multiple funding sources may
be indicated such as split funding between the General, Federal and Dedicated
funding sources. The source of funding would be provided by your controller. In this
instance, if the position had split funding between the General Fund and Federal
Fund, you would enter 16,874 into the General Fund Salary field and 16,874 into the
Federal Fund Salary field.
Enter the desired information into the General Fund Salary field.
11. Press [Tab] to populate information.
12. Enter the desired information into the Telephone field.
Page 3
Step Action
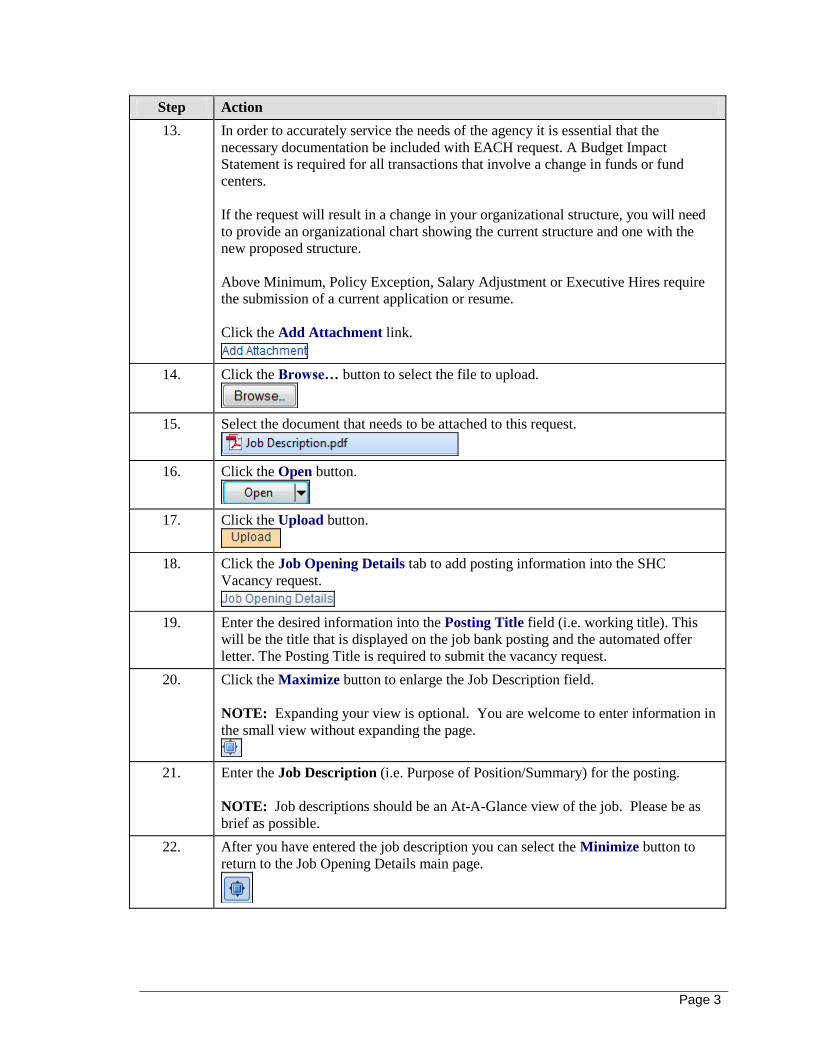
13. In order to accurately service the needs of the agency it is essential that the
necessary documentation be included with EACH request. A Budget Impact
Statement is required for all transactions that involve a change in funds or fund
centers.
If the request will result in a change in your organizational structure, you will need
to provide an organizational chart showing the current structure and one with the
new proposed structure.
Above Minimum, Policy Exception, Salary Adjustment or Executive Hires require
the submission of a current application or resume.
Click the Add Attachment link.
14. Click the Browse… button to select the file to upload.
15. Select the document that needs to be attached to this request.
16. Click the Open button.
17. Click the Upload button.
18. Click the Job Opening Details tab to add posting information into the SHC
Vacancy request.
19. Enter the desired information into the Posting Title field (i.e. working title). This
will be the title that is displayed on the job bank posting and the automated offer
letter. The Posting Title is required to submit the vacancy request.
20. Click the Maximize button to enlarge the Job Description field.
NOTE: Expanding your view is optional. You are welcome to enter information in
the small view without expanding the page.
21. Enter the Job Description (i.e. Purpose of Position/Summary) for the posting.
NOTE: Job descriptions should be an At-A-Glance view of the job. Please be as
brief as possible.
22. After you have entered the job description you can select the Minimize button to
return to the Job Opening Details main page.

Page 4
Step Action
23. Click the Maximize button to enlarge the Responsibilities field.
NOTE: This section is optional if it is an agency practice to list the essential duties
in the posting.
24. Enter the Responsibilities (i.e. Essential Duties) for the posting.
25. After you have entered the responsibilities you can select the Minimize button to
return to the Job Opening Details main page.
26. Click the Maximize button to enlarge the Preferred Experience field.
27. Review the auto-populated information in the Preferred Experience section and edit
if necessary.
NOTE: A Preferred Experience statement will not auto-populate for any job code
that does not have a standard statement stored in PeopleSoft (i.e. EXBB, formerly
non-merit job codes, etc). If you know what the manager would like to list as the
Preferred Experience statement, list it. If not, it can be listed when the job opening
is created. Contact the Talent Acquisition division with questions.
Click in the Preferred Experience text box and add any additional information.
28. After you have reviewed and/or edited the information in this section, click the
Minimize Screen button.
29. NOTE: Standard statements populate into the Benefits section (for full-time regular
positions only) and the Equal Employment Opportunity section. To add additional
information to either of these sections, repeat the steps listed above.
30. Click the Add Recruiters link.
Enter the name of the agency recruiter or use the lookup feature to search for this
person. To add more than one Recruiter, repeat these steps.
NOTE: The Recruiter field is required to submit the vacancy request.
31. Enter the desired information into the field.
32. Press [Tab] to populate information.
Page 5
Step Action
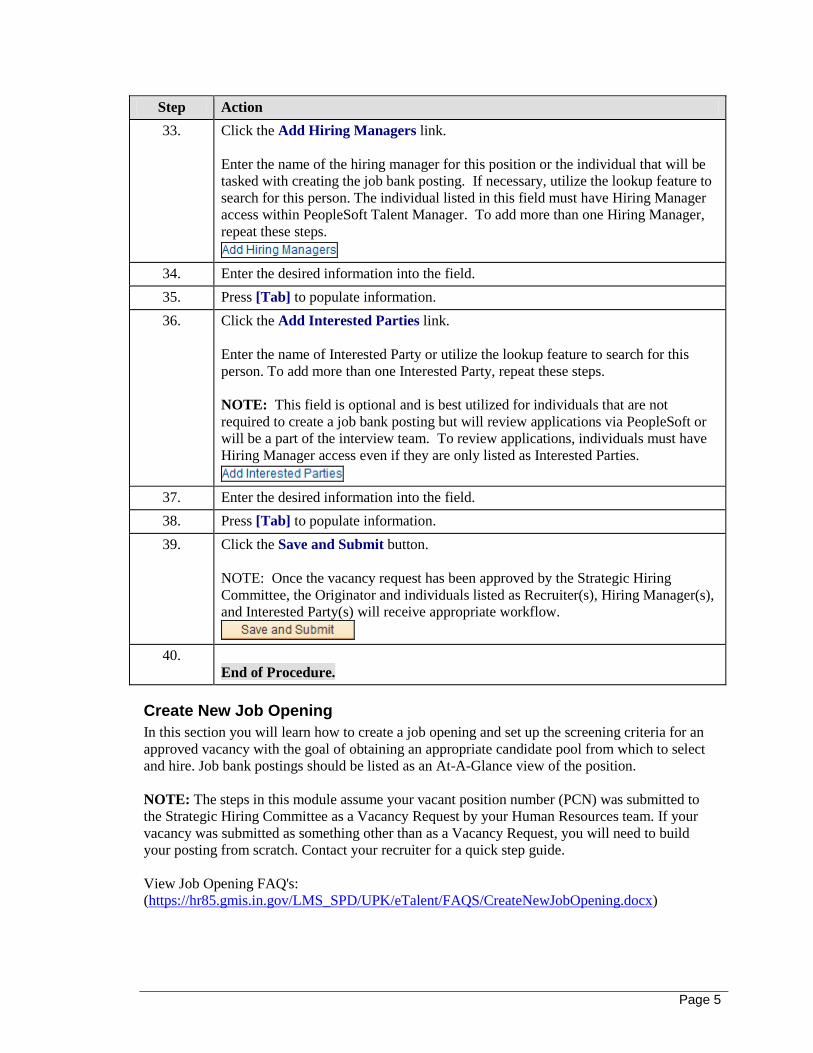
33. Click the Add Hiring Managers link.
Enter the name of the hiring manager for this position or the individual that will be
tasked with creating the job bank posting. If necessary, utilize the lookup feature to
search for this person. The individual listed in this field must have Hiring Manager
access within PeopleSoft Talent Manager. To add more than one Hiring Manager,
repeat these steps.
34. Enter the desired information into the field.
35. Press [Tab] to populate information.
36. Click the Add Interested Parties link.
Enter the name of Interested Party or utilize the lookup feature to search for this
person. To add more than one Interested Party, repeat these steps.
NOTE: This field is optional and is best utilized for individuals that are not
required to create a job bank posting but will review applications via PeopleSoft or
will be a part of the interview team. To review applications, individuals must have
Hiring Manager access even if they are only listed as Interested Parties.
37. Enter the desired information into the field.
38. Press [Tab] to populate information.
39. Click the Save and Submit button.
NOTE: Once the vacancy request has been approved by the Strategic Hiring
Committee, the Originator and individuals listed as Recruiter(s), Hiring Manager(s),
and Interested Party(s) will receive appropriate workflow.
40.
End of Procedure.
Create New Job Opening
In this section you will learn how to create a job opening and set up the screening criteria for an
approved vacancy with the goal of obtaining an appropriate candidate pool from which to select
and hire. Job bank postings should be listed as an At-A-Glance view of the position.
NOTE: The steps in this module assume your vacant position number (PCN) was submitted to
the Strategic Hiring Committee as a Vacancy Request by your Human Resources team. If your
vacancy was submitted as something other than as a Vacancy Request, you will need to build
your posting from scratch. Contact your recruiter for a quick step guide.
View Job Opening FAQ's:
(https://hr85.gmis.in.gov/LMS_SPD/UPK/eTalent/FAQS/CreateNewJobOpening.docx)

Page 6
Procedure
Step Action
1. From the Main Menu, click the Recruiting link.
2. Click the Create New Job Opening link.
3. In the Business Unit Field, enter your agency Business Unit.
4. Press [Tab] to populate the information.
5. In the position field, enter the position number (PCN) for the vacancy.
NOTE: The position number must be approved by the Strategic Hiring Committee
(SHC).
6. Press [Tab].
7. Click the Continue button.
NOTE: Do note click ‘Save as Draft’ or ‘Save and Submit’ until after reviewing the
information provided within the Posting Info. tab.
8. Review the information on this page (Job Info tab). If you are posting more than one
position, click in the Target Openings field and enter the number of positions to be
associated to the requisition. If you are only posting one position, make no changes
to the Target Openings or Available Openings fields.

Page 7
Step Action
9. Tab out of the field. You will receive a warning message if head count is different
from position, click the OK button.
10. Scroll to the section titled positions and click the Add Positions link.
11. Click the Magnifying Glass icon.
12. In Position Number field enter the next position number that has been approved by
the Strategic Hiring Committee.
13. Click the Look Up button.
14. To add more position numbers follow these steps until all approved positions have
been added. Make sure the number in the Target Openings matches the number of
position numbers you have entered into the list.
If this is a field position, it may not have an associated Recruiting Location. To add
a Recruiting Location, click the Magnifying Glass icon to find an appropriate
location. No changes are necessary if there is already a Recruiting Location listed.
NOTE: Should you wish to add multiple recruiting locations (i.e. this position
covers a territory of numerous counties, etc) change the Openings to Fill from
Limited to Unlimited. Then under Recruiting Locations, click the Add Additional
Locations link and add as many locations as necessary.
15. OPTIONAL: At the bottom of the page, enter the name of the Employees Being
Replaced exactly as it is in PeopleSoft. Click the Magnifying Glass icon to search
by Employee ID if necessary.
16. Press [Tab] to populate the information.
17. Click the Next Step link.
18. Review the information on the Min Requirements page; however, make no changes.
Click the Next Step link.
19. At this time we are not using the competencies page. Click the Next Step link.
20. Click the link with the vacancy’s posting title found in the blue Job Postings section.
This Posting Title was entered when the vacancy request was submitted to the
Strategic Hiring Committee.
Click the Human Resources Generalist 2 - Benefits link.
NOTE: You must click the link before clicking 'Save as Draft' or 'Save and
Submit'. Otherwise, the posting information added during the vacancy request
process will not populate.

Page 8
Step Action
21. Review the information listed in the sections on this page: Posting Title, Equal
Employment Opportunity, Benefits, Preferred Experience, Responsibilities (if
listed), and Job Description. Edit as necessary; however, all full-time postings
should include each of these sections with the exception of Responsibilities. If no
Responsibilities are listed/ needed to be listed for this posting, you can remove this
blank section by clicking the trash can icon in the top right corner of the
Responsibilities section.
NOTE: All sections will default with a view of Internal and External meaning any
applicant can apply. Should you wish the posting to be viewed by only internal State
employees, change all sections to Internal Only. External Only is not recommended.
Internal applicants should always be given the opportunity to apply to all positions.
NOTE: If nothing pre-populates on this page, this means that the position was
submitted to the Strategic Hiring Committee as something other than as a Vacancy
Request (i.e. reclassification, etc) or you’ve already clicked the ‘Save as Draft’ or
‘Save and Submit’ button. If your vacancy was submitted as something other than
as a Vacancy Request, you will need to build your posting from scratch. Contact
your recruiter for a quick step guide. If you had already clicked the ‘Save as Draft’
or ‘Save and Submit’ buttons, you will need to start over from step 1 of this Create
New Job Opening process.
22. If necessary you can add a section that isn’t listed. Typical uses of other Posting
Descriptions/Description Types:
Additional Comments- Use this if there is something out of the ordinary about the
job. For example, 'Successful candidate will be on call for 24 hours a day, three
days a week.'
Hire Salary- Use this if you have been authorized to hire above the minimum
salary.
Other Information- This field should only be an option for DNR and DOC per
agency practice.
To add a section that is not listed, click the Add Posting Descriptions link.

Page 9
Step Action
23. Click the Visible list and select the option that matches the other sections.
24. Click the Description Type list and select the appropriate option.
For this example, we will select Hire Salary and then add the additional information
into the Description Field.

Page 10
Step Action
25. To add another section, repeat these steps. After you have reviewed and/or edited
all necessary posting information, scroll down to the Posting Destination section.
26. Review the listed posting destinations and make any necessary changes. If no
changes are made, your job opening will be posted to both internal and external
candidates starting on the day the recruiter approves the posting and will expire after
14 calendar days. If you would like to change the amount of time your job is posted
to the job bank, change the Posting Duration (Days) section to a more appropriate
number. Contact your agency Recruiter with questions.
NOTE: If you changed your Visible fields to Internal Only, you will need to delete
the line for External by clicking the Trash Can icon.
Step Action
27. Click the Preview button to review the posting as an applicant will view it.
28. Review the information on this page and then click the Return to Previous
Page link
29. Click the OK button.
30. Click the Next Step link.

Page 11
Step Action
31. If you serve as recruiter for your assigned agency, you are responsible for setting up
the screening criteria for each posting based on the preferred experience statements
and/or preferences of that hiring manager beginning with the Education/Experience
page.
For this posting example, the preferred experience statement is: Four (4) years work
experience in human resources management including: compensation; benefits;
employee relations; employment law; affirmative action; recruiting; or human
resource development and/or retail management; plant management; field
supervisory experience; or accredited college training in a related field.
In the Work Experience & Education section, each level of education has been
provided for you. Based on the preferred experience statement for this example,
education can be substituted for related work experience. The education to work
experience substitution equation is as follows:
Associates degree = 2 years of work experience
Bachelors degree = 4 years of work experience
Masters degree or higher = 6 years of work experience*
*Six years is the highest education substitution permitted even if the candidate
possesses a degree higher than a Master’s level degree.
Using this equation, enter the appropriate amount of work experience next to each
education level.
32. In this example, if a candidate has listed an Associate’s degree as his highest level of
education, his related degree will substitute for two (2) years of related work
experience. This candidate should still possess at least two (2) years of work
experience to meet the preferred experience statement for our example. However, as
a reminder if a candidate doesn’t have the education and/or experience listed in the
preferred experience statement but the hiring manager feels the candidate possesses
the knowledge, skills and/or ability to perform the necessary functions of the
position and can justify the hiring decision should that become necessary, the Talent
Acquisition Division recommends that the hiring manager should be allowed to
consider this candidate for hire.
For additional examples of how this section could be set up based on differences in
the preferred experience statements, contact the Talent Acquisition division.
33. No other changes should be made to the Education/Experience tab. If specific
educational degrees or professional licenses are required for the position,
appropriate screening questions should be added on the Screening tab.
34. Click the Next Step link.

Page 12
Step Action
35. All Core SOI Screening Questions have been added and should not be deleted.
In an effort to provide a more qualified and streamlined applicant pool, it is
recommended that job specific screening questions be asked of each applicant. For
best results, add a job category question set or individual job specific screening
questions. For a full list of screening questions or to have questions and/or question
sets added to the database, contact the SPD Talent Acquisition division.
To add a question set, click the Load from Question Sets link.
36. Select the Check Box to the left of any relevant question set you wish to add to your
posting.
For this example select the Human Resources checkbox.
37. Click the OK button.
38. To view the questions once added, click the View Answers link to the right of the
line that was added and then click Return.
Click the View Answers link.
39. Click the Return button.
40. To delete any unnecessary questions, click the Trash Can icon next to the question.
41. If you’ve clicked the trash can icon to delete a question, you will then click the OK
button to delete it.
42. To add individual job specific screening questions, click the Add Screening
Questions link.
43. Click the Look up Question graphic to search for appropriate questions.
Page 13
Step Action
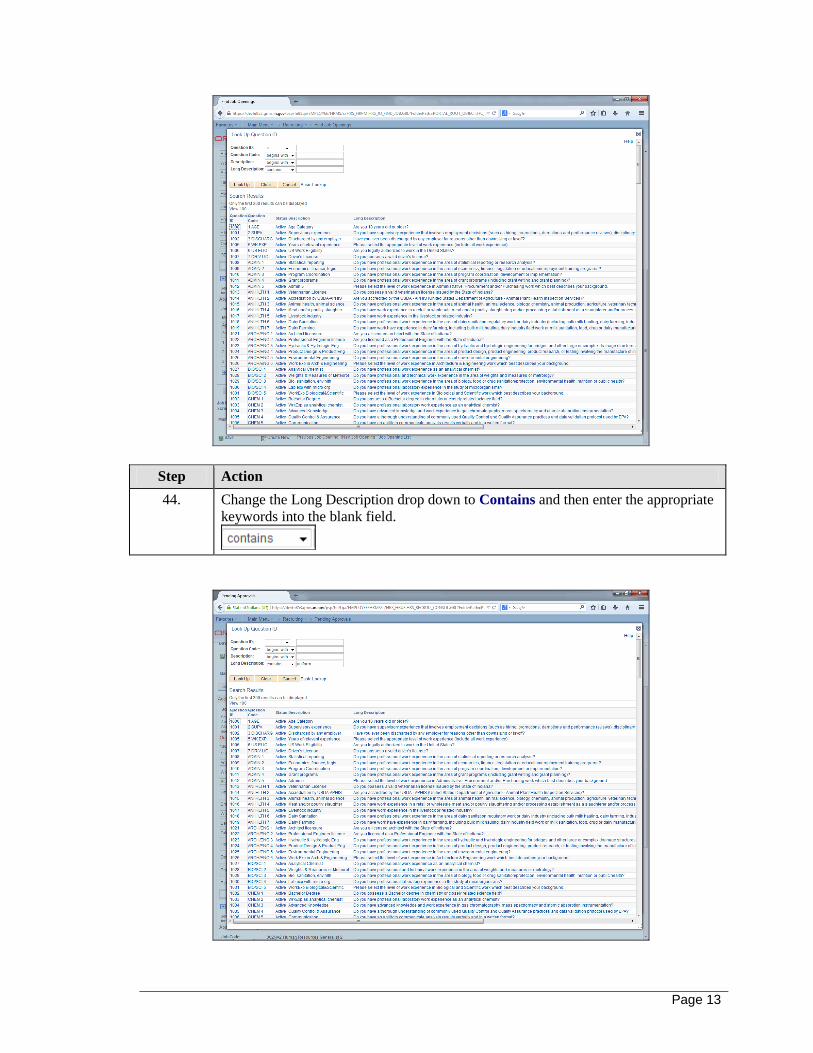
44. Change the Long Description drop down to Contains and then enter the appropriate
keywords into the blank field.

Page 14
Step Action
45. Click the Look Up button.
46. Review the options presented and then click the appropriate Question link to add to
posting.
NOTE: To add more individual screening questions, repeat these steps.
47. If you act as Recruiter for your assigned agency, you are responsible for setting up
the screening criteria for each posting based on the preferred experience statements
and/or preferences of that hiring manager. It is required that you set up Pre
Screening criteria; however Preliminary Screening is optional.
WARNING: If Pre Screening criteria are not set up, applicants will be unable to
successfully apply to the posting.
All applicants will be asked a set of Pre Screening questions prior to accessing the
complete State of Indiana application verifying each applicant is 18 years of age or
older and legally authorized to work in the United States. If an applicant answers
incorrectly to either question, that applicant will not be permitted to apply for that
position.
48. Click the Pre Screening link.
49. Click the Set Default Values button. The checkmarks will populate in all of the
‘Use in Screening’ and ‘Required’ fields for both screening questions.
50. Click the OK button. This will save your Pre Screening criteria.
51. As a reminder, it is recommended that job specific screening questions be asked of
each applicant and that the Preliminary Screening criteria be set up to better
streamline your applicant pool. By properly setting up the Preliminary Screening,
unqualified candidates can be eliminated from the applicant pool for review and
those that are the most qualified be assigned the highest point value.
In the Applicant Screening section, click the Preliminary link.
52. Click the Set Default Values button.
NOTE: Do not remove any of the default values. All items should be marked ‘used
in screening’ and the questions already marked as ‘Required’ should remain
pass/fail (i.e. preferred experience).
53. Check the Required box for the lowest level of education.
Page 15
Step Action
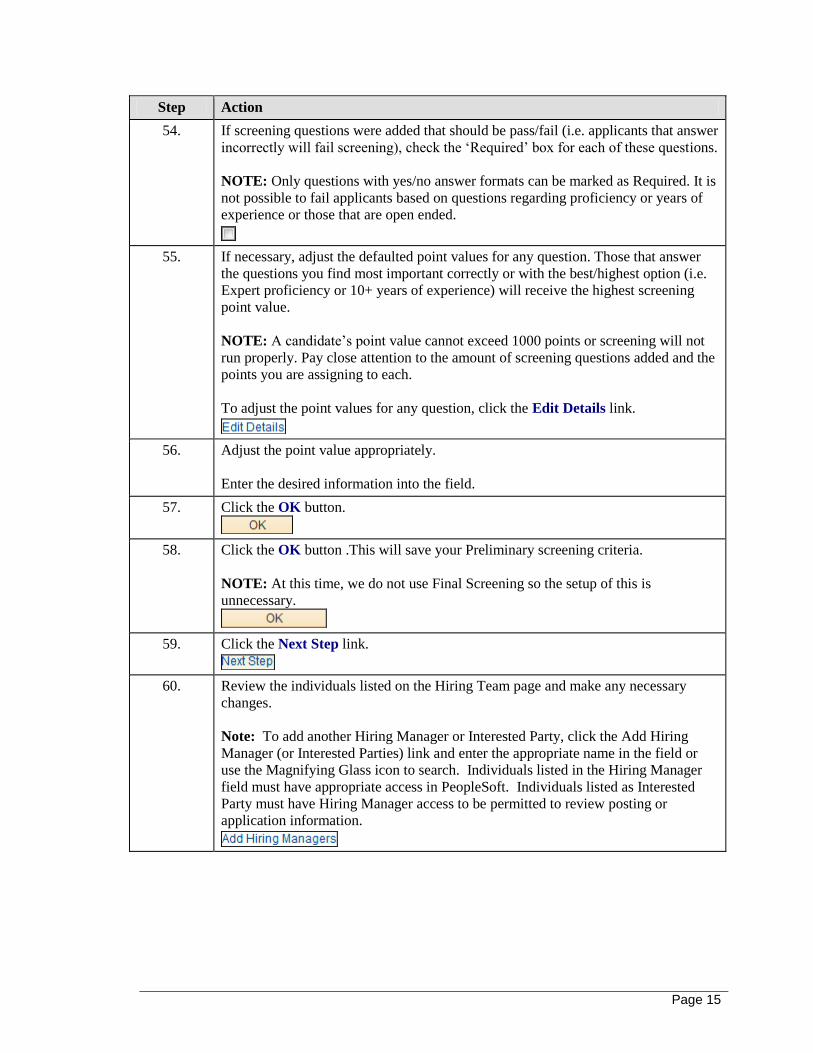
54. If screening questions were added that should be pass/fail (i.e. applicants that answer
incorrectly will fail screening), check the ‘Required’ box for each of these questions.
NOTE: Only questions with yes/no answer formats can be marked as Required. It is
not possible to fail applicants based on questions regarding proficiency or years of
experience or those that are open ended.
55. If necessary, adjust the defaulted point values for any question. Those that answer
the questions you find most important correctly or with the best/highest option (i.e.
Expert proficiency or 10+ years of experience) will receive the highest screening
point value.
NOTE: A candidate’s point value cannot exceed 1000 points or screening will not
run properly. Pay close attention to the amount of screening questions added and the
points you are assigning to each.
To adjust the point values for any question, click the Edit Details link.
56. Adjust the point value appropriately.
Enter the desired information into the field.
57. Click the OK button.
58. Click the OK button .This will save your Preliminary screening criteria.
NOTE: At this time, we do not use Final Screening so the setup of this is
unnecessary.
59. Click the Next Step link.
60. Review the individuals listed on the Hiring Team page and make any necessary
changes.
Note: To add another Hiring Manager or Interested Party, click the Add Hiring
Manager (or Interested Parties) link and enter the appropriate name in the field or
use the Magnifying Glass icon to search. Individuals listed in the Hiring Manager
field must have appropriate access in PeopleSoft. Individuals listed as Interested
Party must have Hiring Manager access to be permitted to review posting or
application information.
Page 16
Step Action
61. Click the Save & Submit button. Make note of the Job Opening ID at the top of
the page.
NOTE: Once you click Save & Submit, the individual listed as Recruiter will
receive workflow to review the posting and approve. Individuals listed as Hiring
Manager(s) and Interested Party(s) will receive workflow once the posting has been
approved and is posted to the job bank.
62.
End of Procedure.
Recruiter: Review Posting
Recruiters are required to carefully review each posting to ensure they contain appropriate
information prior to appearing on the job bank. In this section, you will learn what to review,
what is required in each posting, and how to approve or deny the posting.
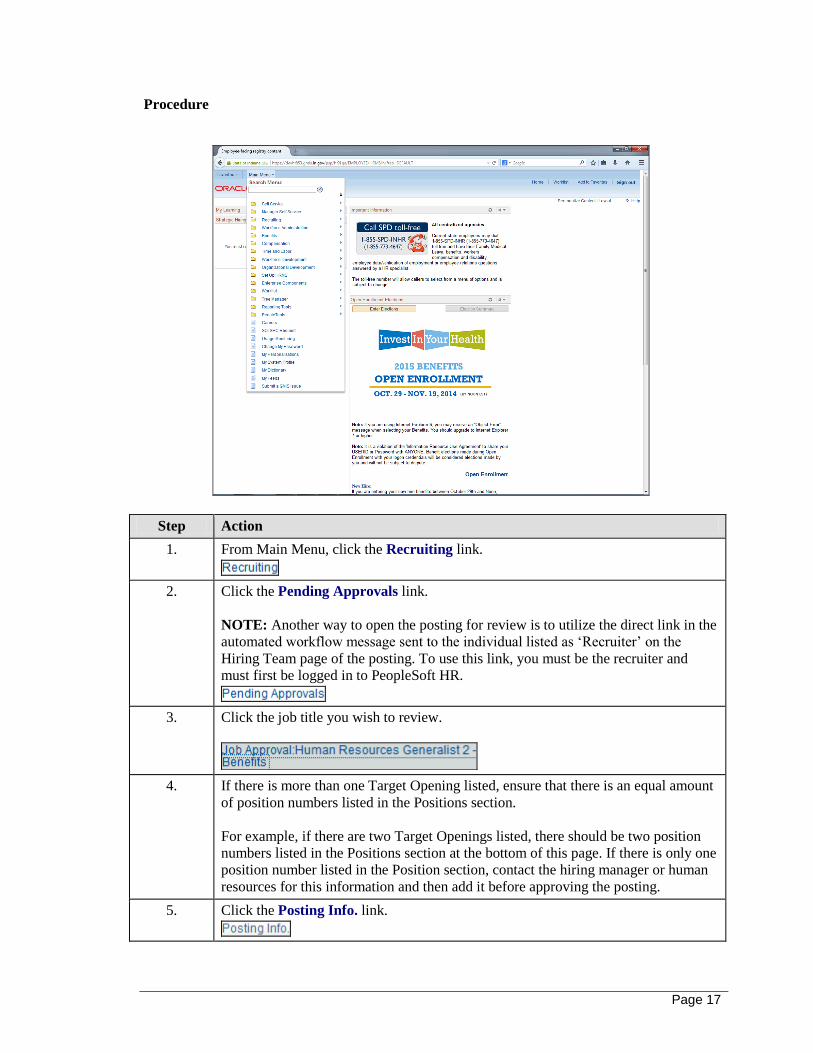
The individual listed as ‘Recruiter’ on the Hiring Team page of the posting will be notified via
automated workflow when a posting has been submitted for review. To open the posting using
the direct link in the workflow message, you must be logged in to PeopleSoft HR first. An
example of this workflow is below.
Page 17
Procedure
Step Action
1. From Main Menu, click the Recruiting link.
2. Click the Pending Approvals link.
NOTE: Another way to open the posting for review is to utilize the direct link in the
automated workflow message sent to the individual listed as ‘Recruiter’ on the
Hiring Team page of the posting. To use this link, you must be the recruiter and
must first be logged in to PeopleSoft HR.
3. Click the job title you wish to review.
4. If there is more than one Target Opening listed, ensure that there is an equal amount
of position numbers listed in the Positions section.
For example, if there are two Target Openings listed, there should be two position
numbers listed in the Positions section at the bottom of this page. If there is only one
position number listed in the Position section, contact the hiring manager or human
resources for this information and then add it before approving the posting.
5. Click the Posting Info. link.
Page 18
Step Action
6. Click the posting title. For this example, click the Human Resources Generalist 2
- Benefits link.
7. Each posting for a full-time, regular position must include:
-Equal Employment Opportunity statement
-Benefits statement
-Preferred Experience statement
-Job Description
Ensure the job description, preferred experience and responsibilities sections aren’t
too detailed. A job bank posting is meant to be an advertisement for the position.
While it should be an accurate representation, it should also be as concise as
possible.
NOTE: The benefits statement is not required in a part-time or intermittent posting.
Part-time positions offer reduced benefits; however, we do not have a pre-populated
statement for this. You are welcome to manually add a statement referencing this.
8. Ensure that the ‘Visible’ fields for all Posting Descriptions match.
9. The Preferred Experience statement should be a close match to the standard
preferred experience statement for that classification. Preferred experience
statements can be edited based on hiring managers preference; however, please keep
in mind that we still need to ensure consistent and fair hiring for all positions.
Adding knowledge, skills and abilities to the Preferred Experience section is
acceptable and recommended.
10. Ensure there are no misspellings or grammatical errors. To check for spelling errors,
click the spell-check icon.
11. Ensure that the Posting Destinations are appropriate for the position. Positions that
are more difficult to fill should be on the job bank for at least 14 days. For positions
that aren’t as difficult to fill, such as Clerical or Administrative Assistants, it is
recommended that you change the Posting Duration (Days) to 3 or 5 days.
12. Click the Preview button for a final review of posting information appearance.
13. Click the Return to Previous Page link.
14. Click the OK button to get back to the main page.
15. Click the Education/Experience tab.
Page 19
Step Action
16. As the agency/facility recruiter, you are responsible for setting up the screening
criteria for each posting based on the preferred experience statements and/or
preferences of that hiring manager beginning with the Education/Experience page.
For this posting example, the preferred experience statement is: Four (4) years work
experience in human resources management including: compensation; benefits;
employee relations; employment law; affirmative action; recruiting; or human
resource development and/or retail management; plant management; field
supervisory experience; or accredited college training in a related field.
In the Work Experience & Education section, each level of education has been
provided for you. Based on the preferred experience statement for this example,
education can be substituted for related work experience. The education to work
experience substitution equation is as follows:
Associates degree = 2 years of work experience
Bachelors degree = 4 years of work experience
Masters degree or higher = 6 years of work experience*
*Six years is the highest education substitution permitted even if the candidate
possesses a degree higher than a Master’s level degree.
Using this equation, enter the appropriate amount of work experience next to each
education level.
17. In this example, if a candidate has listed an Associate’s degree as his highest level of
education, his related degree will substitute for two (2) years of related work
experience. This candidate should still possess at least two (2) years of work
experience to meet the preferred experience statement for our example. However, as
a reminder if a candidate doesn’t have the education and/or experience listed in the
preferred experience statement but the hiring manager feels the candidate possesses
the knowledge, skills and/or ability to perform the necessary functions of the
position and can justify the hiring decision should that become necessary, the Talent
Acquisition Division recommends that the hiring manager should be allowed to
consider this candidate for hire.
For additional examples of how this section could be set up based on differences in
the preferred experience statements, contact the Talent Acquisition division.
18. No other changes should be made to the Education/Experience tab. If specific
educational degrees or professional licenses are required for the position,
appropriate screening questions should be added on the Screening tab.
19. Click the Screening tab.
Page 20
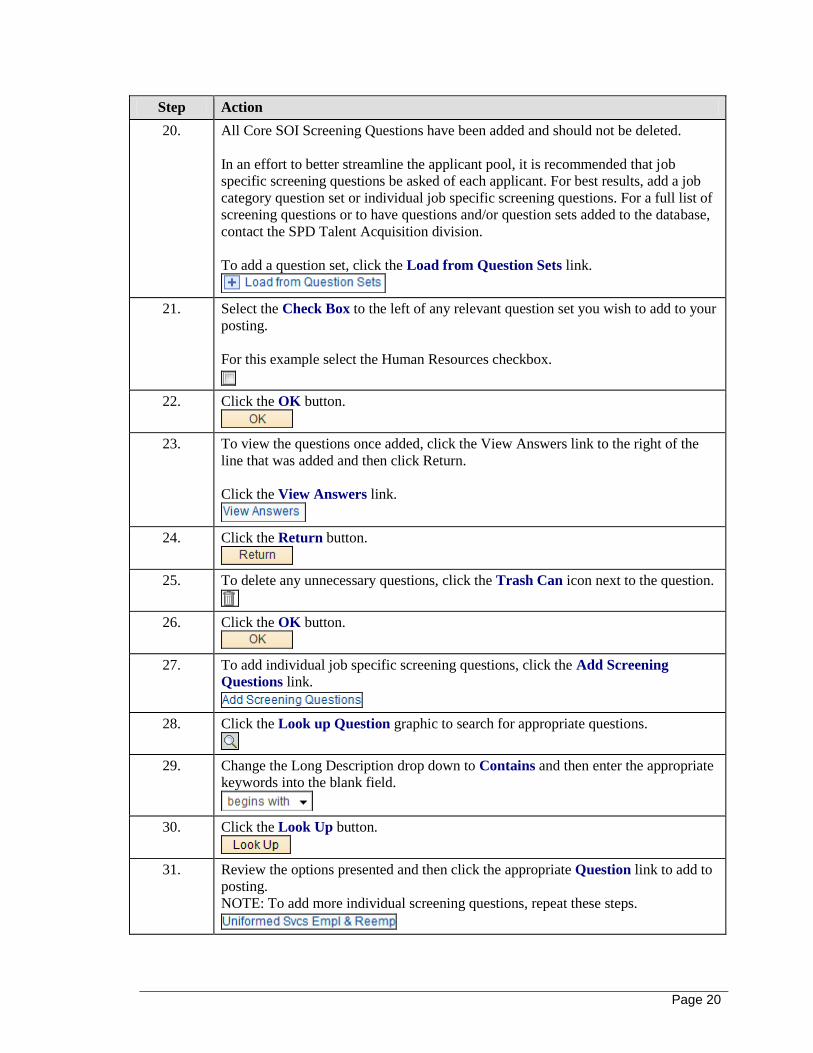
Step Action
20. All Core SOI Screening Questions have been added and should not be deleted.
In an effort to better streamline the applicant pool, it is recommended that job
specific screening questions be asked of each applicant. For best results, add a job
category question set or individual job specific screening questions. For a full list of
screening questions or to have questions and/or question sets added to the database,
contact the SPD Talent Acquisition division.
To add a question set, click the Load from Question Sets link.
21. Select the Check Box to the left of any relevant question set you wish to add to your
posting.
For this example select the Human Resources checkbox.
22. Click the OK button.
23. To view the questions once added, click the View Answers link to the right of the
line that was added and then click Return.
Click the View Answers link.
24. Click the Return button.
25. To delete any unnecessary questions, click the Trash Can icon next to the question.
26. Click the OK button.
27. To add individual job specific screening questions, click the Add Screening
Questions link.
28. Click the Look up Question graphic to search for appropriate questions.
29. Change the Long Description drop down to Contains and then enter the appropriate
keywords into the blank field.
30. Click the Look Up button.
31. Review the options presented and then click the appropriate Question link to add to
posting.
NOTE: To add more individual screening questions, repeat these steps.

Page 21
Step Action
32. As the agency/facility recruiter, you are responsible for setting up the screening
criteria for each posting based on the preferred experience statements and/or
preferences of that hiring manager. It is required that you set up Pre Screening
criteria; however Preliminary Screening is optional.
WARNING: If Pre Screening criteria are not set up, applicants will be unable to
successfully apply to the posting.
All applicants will be asked a set of Pre Screening questions prior to accessing the
complete State of Indiana application verifying each applicant is 18 years of age or
older and legally authorized to work in the United States. If an applicant answers
incorrectly to either question, that applicant will not be permitted to apply for that
position.
Scroll to the Applicant Screening section below.
Page 22
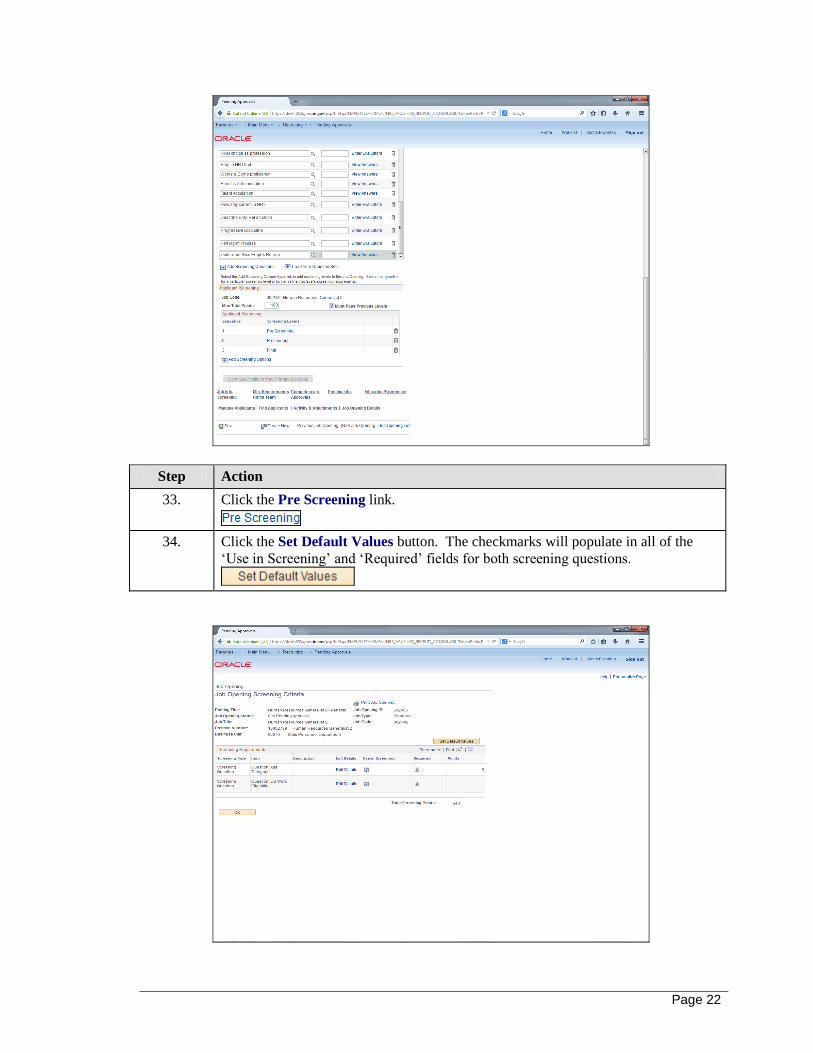
Step Action
33. Click the Pre Screening link.
34. Click the Set Default Values button. The checkmarks will populate in all of the
‘Use in Screening’ and ‘Required’ fields for both screening questions.
Page 23
Step Action
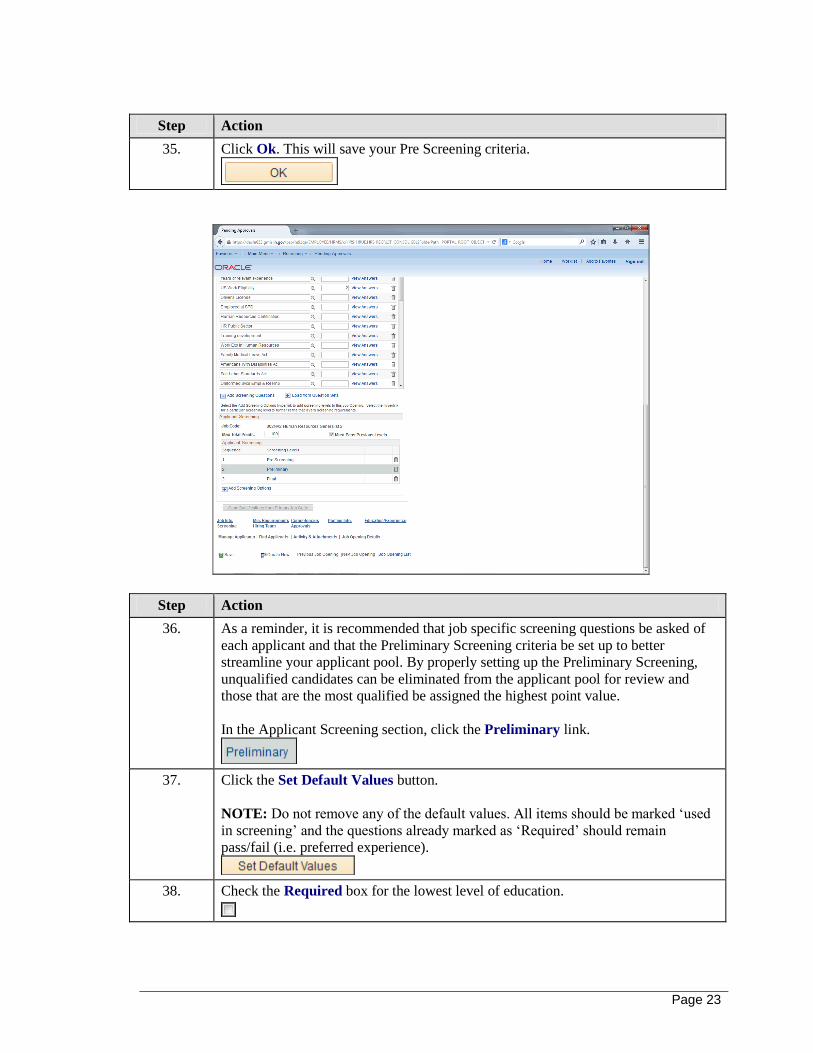
35. Click Ok. This will save your Pre Screening criteria.
Step Action
36. As a reminder, it is recommended that job specific screening questions be asked of
each applicant and that the Preliminary Screening criteria be set up to better
streamline your applicant pool. By properly setting up the Preliminary Screening,
unqualified candidates can be eliminated from the applicant pool for review and
those that are the most qualified be assigned the highest point value.
In the Applicant Screening section, click the Preliminary link.
37. Click the Set Default Values button.
NOTE: Do not remove any of the default values. All items should be marked ‘used
in screening’ and the questions already marked as ‘Required’ should remain
pass/fail (i.e. preferred experience).
38. Check the Required box for the lowest level of education.
Page 24
Step Action
39. If screening questions were added that should be pass/fail (i.e. applicants that answer
incorrectly will fail screening), check the ‘Required’ box for each of these questions.
NOTE: Only questions with yes/no answer formats can be marked as Required. It is
not possible to fail applicants based on questions regarding proficiency or years of
experience or those that are open ended.
40. If necessary, adjust the defaulted point values for any question. Those that answer
the questions you find most important correctly or with the best/highest option (i.e.
Expert proficiency or 10+ years of experience) will receive the highest screening
point value.
NOTE: A candidate’s point value cannot exceed 1000 points or screening will not
run properly. Pay close attention to the amount of screening questions added and the
points you are assigning to each.
To adjust the point values for any question, click the Edit Details link.
41. Adjust the point value appropriately.
42. Enter the desired information into the field. Enter "25".
43. Click the OK button.
44. Click the OK button .This will save your Preliminary screening criteria.
NOTE: At this time, we do not use Final Screening so the setup of this is
unnecessary.
45. Click the Hiring Team tab.
46. Ensure there are appropriate individuals listed in the Recruiter field and Hiring
Manager field. Make any necessary changes as appropriate and then click
the Approvals tab.
47. Once you’ve reviewed all posting information, click the Approve button or the Deny
button as appropriate. Workflow will be sent to the hiring manager either way.
48.
End of Procedure.
View Applicant Information In this section you will learn the various methods with which to view applicant information. The
most efficient way to view applicant information is via automated workflow containing PDF
applications that will be emailed to the hiring team by the agency Recruiter within five (5)
business days from the posting expiration date. Additionally, users can process application reports

Page 25
based on Applicant ID or Job ID. Applicant information can also be viewed from the Manage
Applicants page of the posting as well as within a candidate’s Applicant Data tab. This module
details instruction for all available methods.
Screen/Route Applicants
The automated screening process runs nightly for each posting that has just expired from the job
bank. The individual listed as Recruiter on the posting will receive automated workflow once a
posting has expired indicating that the nightly Auto-Screening Application Engine Process has
completed successfully. This section discusses the auto screening and routing process as well as
the resulting workflow.
NOTE: For the auto-screening process to run, the screening criteria must have been set up prior
to the expiration date.
View Screening FAQ's:
(https://hr85.gmis.in.gov/LMS_SPD/UPK/eTalent/FAQS/Screening.docx)
Procedure
Step Action
1. From Main Menu, click the Recruiting link.
2. Click the Find Job Openings link.
Page 26
Step Action
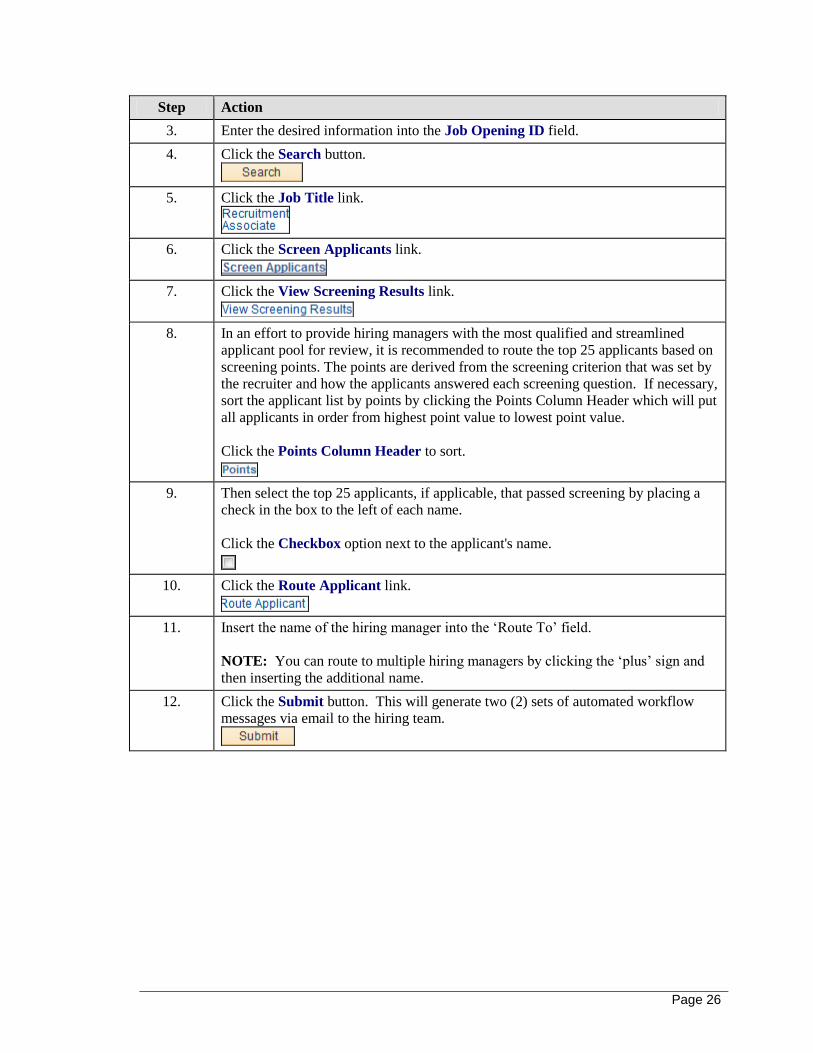
3. Enter the desired information into the Job Opening ID field.
4. Click the Search button.
5. Click the Job Title link.
6. Click the Screen Applicants link.
7. Click the View Screening Results link.
8. In an effort to provide hiring managers with the most qualified and streamlined
applicant pool for review, it is recommended to route the top 25 applicants based on
screening points. The points are derived from the screening criterion that was set by
the recruiter and how the applicants answered each screening question. If necessary,
sort the applicant list by points by clicking the Points Column Header which will put
all applicants in order from highest point value to lowest point value.
Click the Points Column Header to sort.
9. Then select the top 25 applicants, if applicable, that passed screening by placing a
check in the box to the left of each name.
Click the Checkbox option next to the applicant's name.
10. Click the Route Applicant link.
11. Insert the name of the hiring manager into the ‘Route To’ field.
NOTE: You can route to multiple hiring managers by clicking the ‘plus’ sign and
then inserting the additional name.
12. Click the Submit button. This will generate two (2) sets of automated workflow
messages via email to the hiring team.
Page 27
Step Action
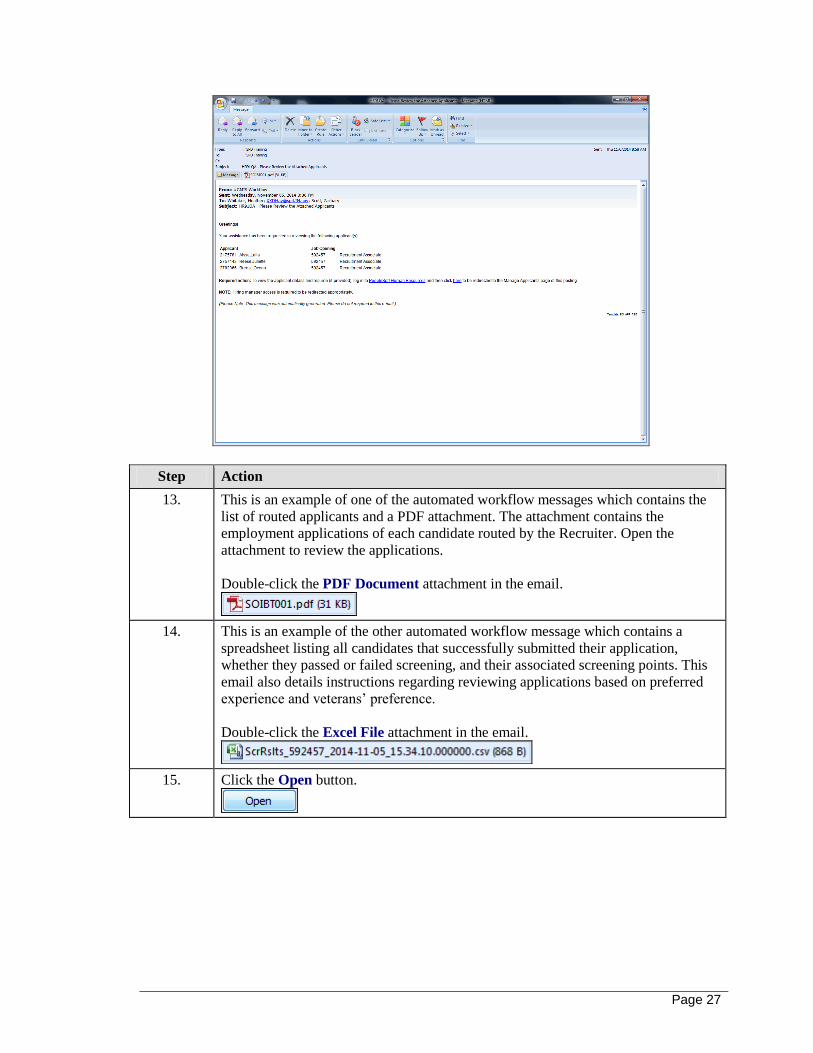
13. This is an example of one of the automated workflow messages which contains the
list of routed applicants and a PDF attachment. The attachment contains the
employment applications of each candidate routed by the Recruiter. Open the
attachment to review the applications.
Double-click the PDF Document attachment in the email.
14. This is an example of the other automated workflow message which contains a
spreadsheet listing all candidates that successfully submitted their application,
whether they passed or failed screening, and their associated screening points. This
email also details instructions regarding reviewing applications based on preferred
experience and veterans’ preference.
Double-click the Excel File attachment in the email.
15. Click the Open button.
Page 28
Step Action
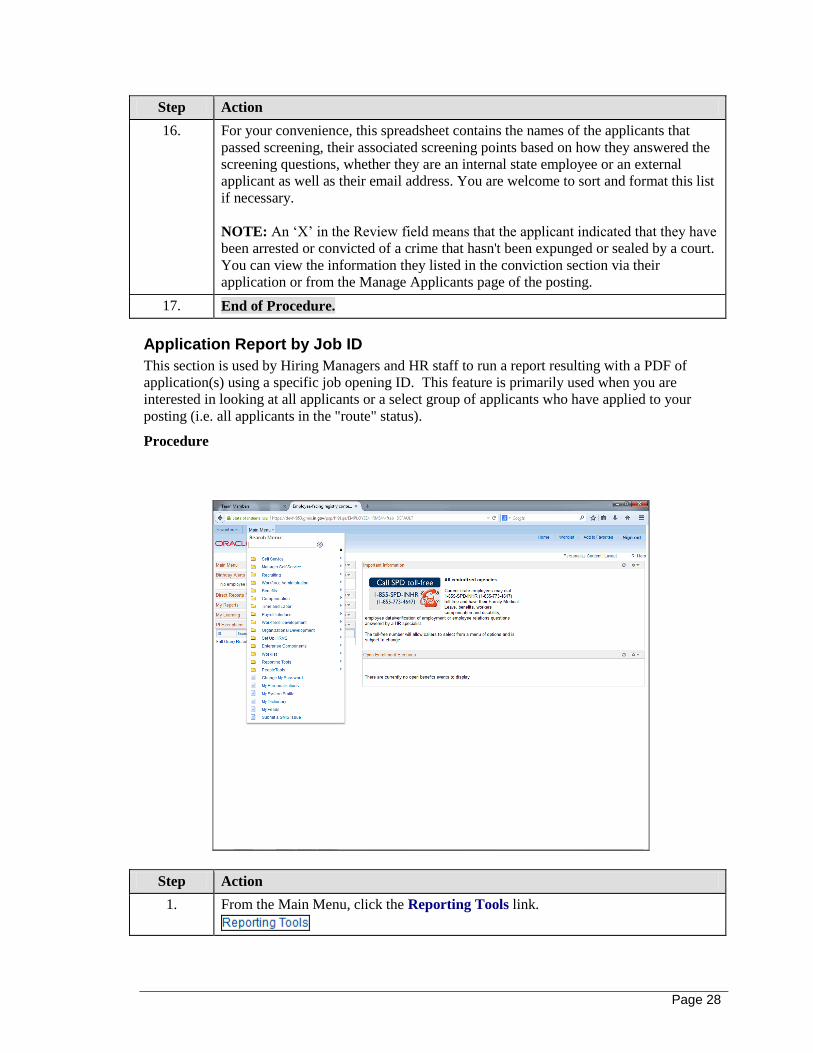
16. For your convenience, this spreadsheet contains the names of the applicants that
passed screening, their associated screening points based on how they answered the
screening questions, whether they are an internal state employee or an external
applicant as well as their email address. You are welcome to sort and format this list
if necessary.
NOTE: An ‘X’ in the Review field means that the applicant indicated that they have
been arrested or convicted of a crime that hasn't been expunged or sealed by a court.
You can view the information they listed in the conviction section via their
application or from the Manage Applicants page of the posting.
17. End of Procedure.
Application Report by Job ID
This section is used by Hiring Managers and HR staff to run a report resulting with a PDF of
application(s) using a specific job opening ID. This feature is primarily used when you are
interested in looking at all applicants or a select group of applicants who have applied to your
posting (i.e. all applicants in the "route" status).
Procedure
Step Action
1. From the Main Menu, click the Reporting Tools link.
Page 29
Step Action
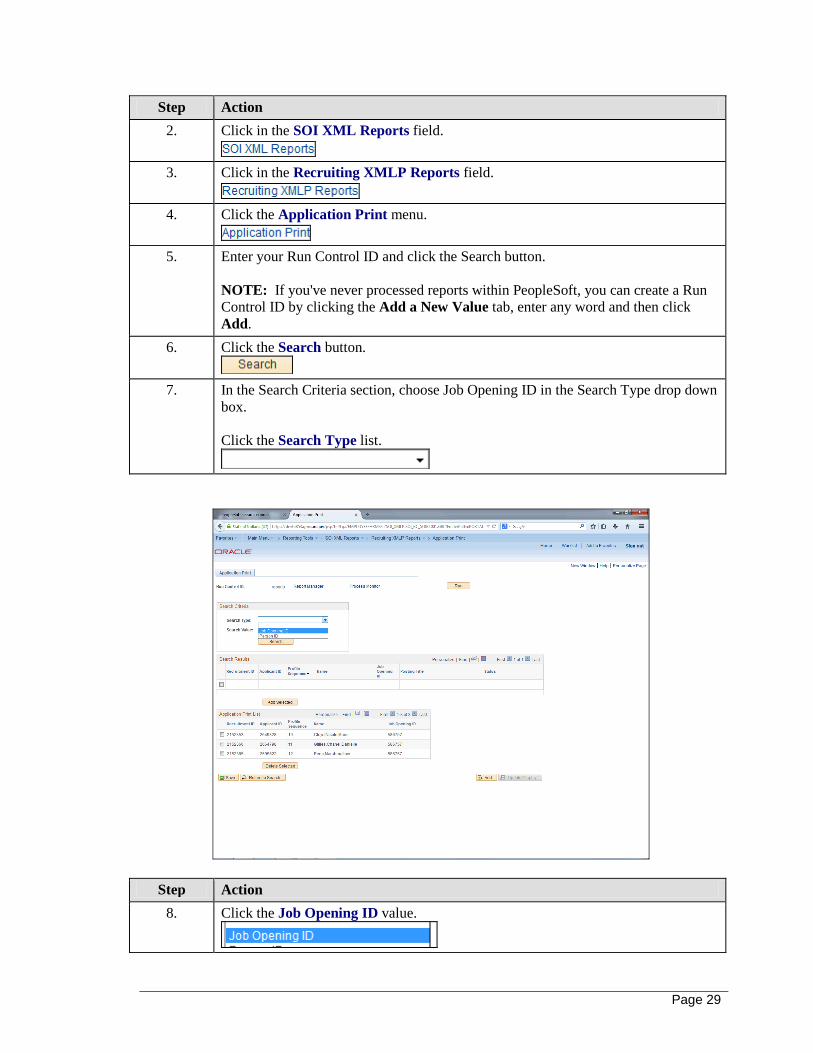
2. Click in the SOI XML Reports field.
3. Click in the Recruiting XMLP Reports field.
4. Click the Application Print menu.
5. Enter your Run Control ID and click the Search button.
NOTE: If you've never processed reports within PeopleSoft, you can create a Run
Control ID by clicking the Add a New Value tab, enter any word and then click
Add.
6. Click the Search button.
7. In the Search Criteria section, choose Job Opening ID in the Search Type drop down
box.
Click the Search Type list.
Step Action
8. Click the Job Opening ID value.
Page 30
Step Action
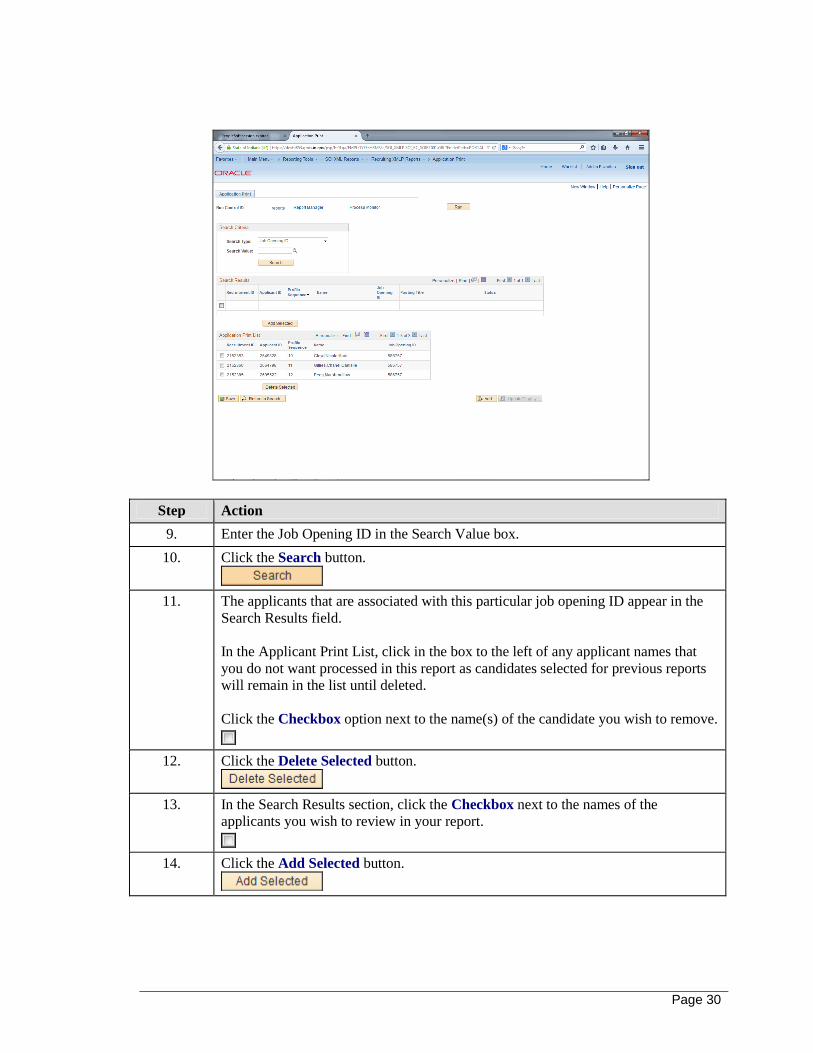
9. Enter the Job Opening ID in the Search Value box.
10. Click the Search button.
11. The applicants that are associated with this particular job opening ID appear in the
Search Results field.
In the Applicant Print List, click in the box to the left of any applicant names that
you do not want processed in this report as candidates selected for previous reports
will remain in the list until deleted.
Click the Checkbox option next to the name(s) of the candidate you wish to remove.
12. Click the Delete Selected button.
13. In the Search Results section, click the Checkbox next to the names of the
applicants you wish to review in your report.
14. Click the Add Selected button.
Page 31
Step Action
15. The applicant names that have been selected will now appear in the 'Application
Print List'.
Click the Run button.
16. Ensure the *Type field shows 'Web' and *Format field shows 'PDF'.
Click the OK button.
17. Click the Process Monitor link.
18. Click the Refresh button until you see 'Success' in the Run Status column and
'Posted' in the Distribution Status column.
19. When the status shows 'Success' and 'Posted' click the Details link.
20. Click the View Log/Trace link.
21. Select the File List Name ending in ".pdf" to review the application in the report.
22. A new window will open with the PDF report containing the selected candidate
applications.
23. Answers to open ended questions will also appear on the applications.
24. End of Procedure.
Application Report by Applicant ID
This section is used by Hiring Managers and HR staff to run a report resulting with a PDF of
application(s) using a specific candidate’s applicant ID. This feature is primarily used when you
are interested in looking only at one application at a time or the most recent version of the
candidate’s application.

Page 32
Procedure
Step Action
1. From the Main Menu, click the Reporting Tools link.
2. Click in the SOI XML Reports field.
3. Click in the Recruiting XMLP Reports field.
4. Click the Application Print menu.
5. Enter your Run Control ID and click the Search button.
NOTE: If you've never processed reports within PeopleSoft, you can create a Run
Control ID by clicking the Add a New Value tab, enter any word and then click
Add.
6. Click the Search button.
Page 33
Step Action
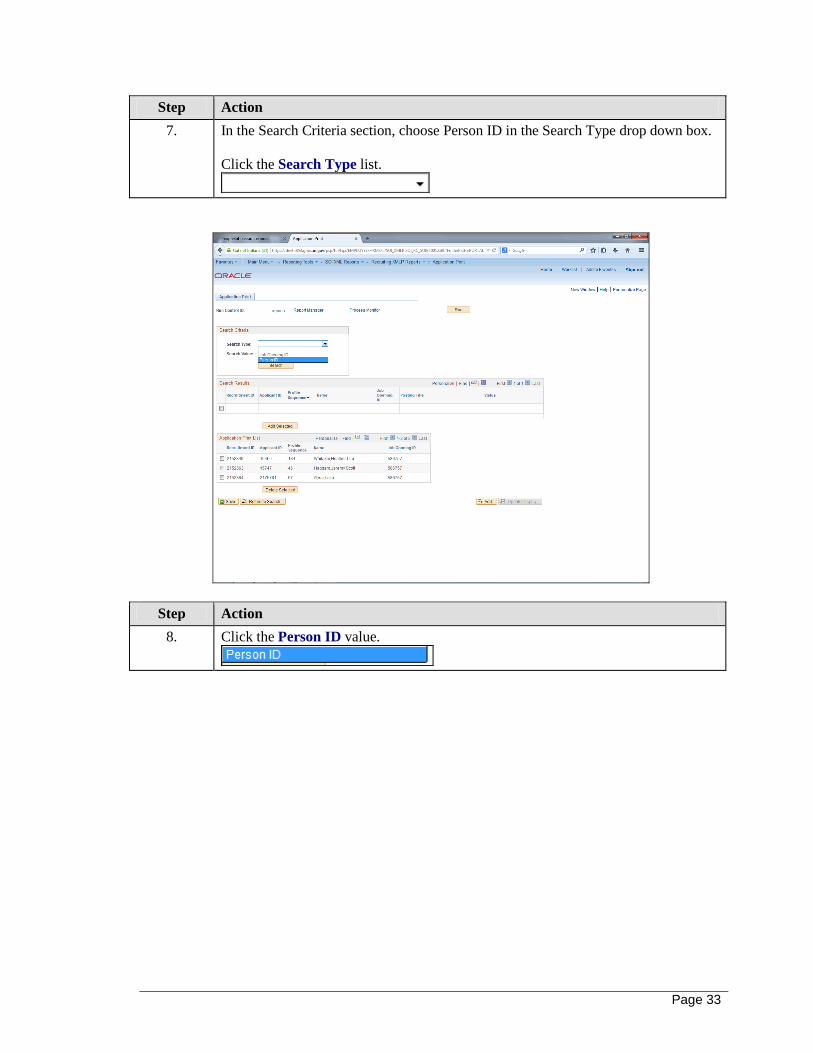
7. In the Search Criteria section, choose Person ID in the Search Type drop down box.
Click the Search Type list.
Step Action
8. Click the Person ID value.
Page 34
Step Action
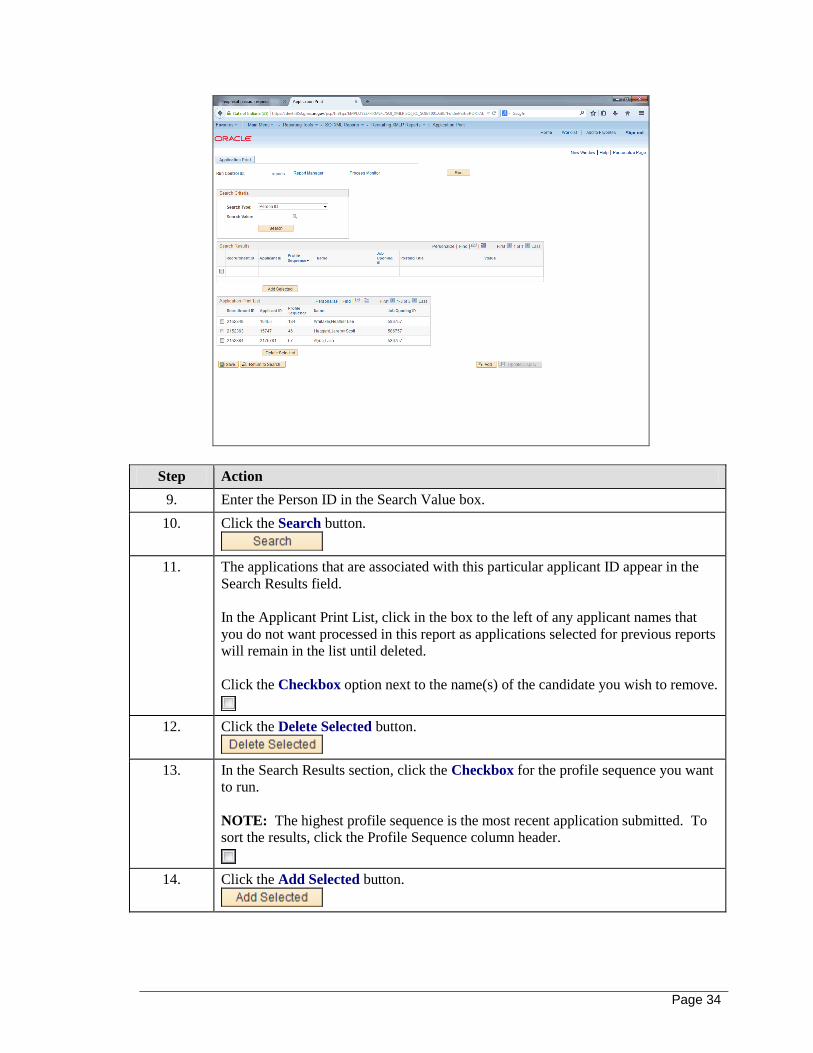
9. Enter the Person ID in the Search Value box.
10. Click the Search button.
11. The applications that are associated with this particular applicant ID appear in the
Search Results field.
In the Applicant Print List, click in the box to the left of any applicant names that
you do not want processed in this report as applications selected for previous reports
will remain in the list until deleted.
Click the Checkbox option next to the name(s) of the candidate you wish to remove.
12. Click the Delete Selected button.
13. In the Search Results section, click the Checkbox for the profile sequence you want
to run.
NOTE: The highest profile sequence is the most recent application submitted. To
sort the results, click the Profile Sequence column header.
14. Click the Add Selected button.

Page 35
Step Action
15. The selected application(s) will appear in the 'Application Print List'.
Click the Run button.
16. Ensure the Type field shows ‘Web’ and the Format field shows ‘PDF’.
Click the OK button.
17. Click the Process Monitor link.
18. Click the Refresh button until you see 'Success' in the Run Status column and
'Posted' in the Distribution Status column.
19. When the status shows 'Success' and 'Posted' click the Details link.
20. Click the View Log/Trace link.
21. Click the File List Name ending in ".pdf" to review the application in the report.
22. A new window will open with the PDF report containing the selected candidate
application(s).
NOTE: Answers to open ended questions will also appear on the application.
23. End of Procedure.
Manage Applicants Page
From the Manage Applicants page of your posting, you can:

Page 36
· View applicant information prior to the job bank expiration date
· View contact details
· View resumes, if applicable
· Determine whether or not an applicant attached a DD214
· View the full list of applicants
Procedure
Step Action
1. From the main menu, click the Recruiting link.
2. Click the Browse Job Openings menu.
3. Click the appropriate Posting Title.
4. The Applicant Status column denotes whether an applicant is a current state of
Indiana employee or is an external applicant.
Page 37
Step Action
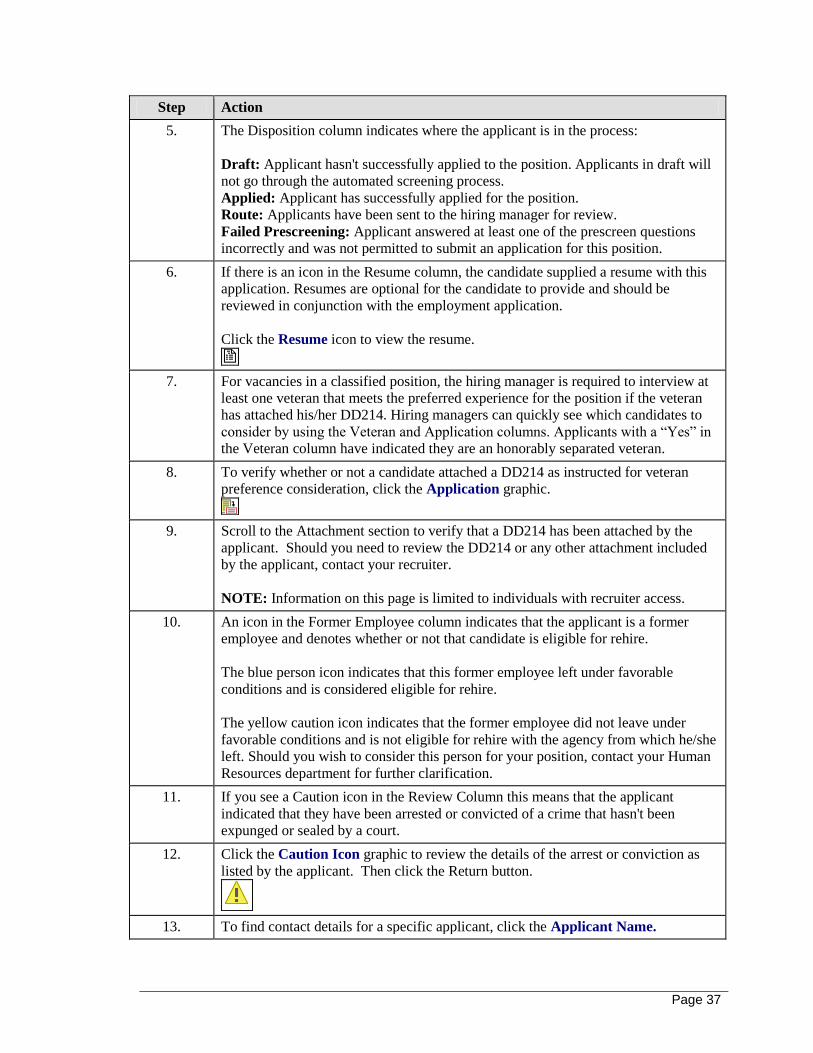
5. The Disposition column indicates where the applicant is in the process:
Draft: Applicant hasn't successfully applied to the position. Applicants in draft will
not go through the automated screening process.
Applied: Applicant has successfully applied for the position.
Route: Applicants have been sent to the hiring manager for review.
Failed Prescreening: Applicant answered at least one of the prescreen questions
incorrectly and was not permitted to submit an application for this position.
6. If there is an icon in the Resume column, the candidate supplied a resume with this
application. Resumes are optional for the candidate to provide and should be
reviewed in conjunction with the employment application.
Click the Resume icon to view the resume.
7. For vacancies in a classified position, the hiring manager is required to interview at
least one veteran that meets the preferred experience for the position if the veteran
has attached his/her DD214. Hiring managers can quickly see which candidates to
consider by using the Veteran and Application columns. Applicants with a “Yes” in
the Veteran column have indicated they are an honorably separated veteran.
8. To verify whether or not a candidate attached a DD214 as instructed for veteran
preference consideration, click the Application graphic.
9. Scroll to the Attachment section to verify that a DD214 has been attached by the
applicant. Should you need to review the DD214 or any other attachment included
by the applicant, contact your recruiter.
NOTE: Information on this page is limited to individuals with recruiter access.
10. An icon in the Former Employee column indicates that the applicant is a former
employee and denotes whether or not that candidate is eligible for rehire.
The blue person icon indicates that this former employee left under favorable
conditions and is considered eligible for rehire.
The yellow caution icon indicates that the former employee did not leave under
favorable conditions and is not eligible for rehire with the agency from which he/she
left. Should you wish to consider this person for your position, contact your Human
Resources department for further clarification.
11. If you see a Caution icon in the Review Column this means that the applicant
indicated that they have been arrested or convicted of a crime that hasn't been
expunged or sealed by a court.
12. Click the Caution Icon graphic to review the details of the arrest or conviction as
listed by the applicant. Then click the Return button.
13. To find contact details for a specific applicant, click the Applicant Name.
Page 38
Step Action
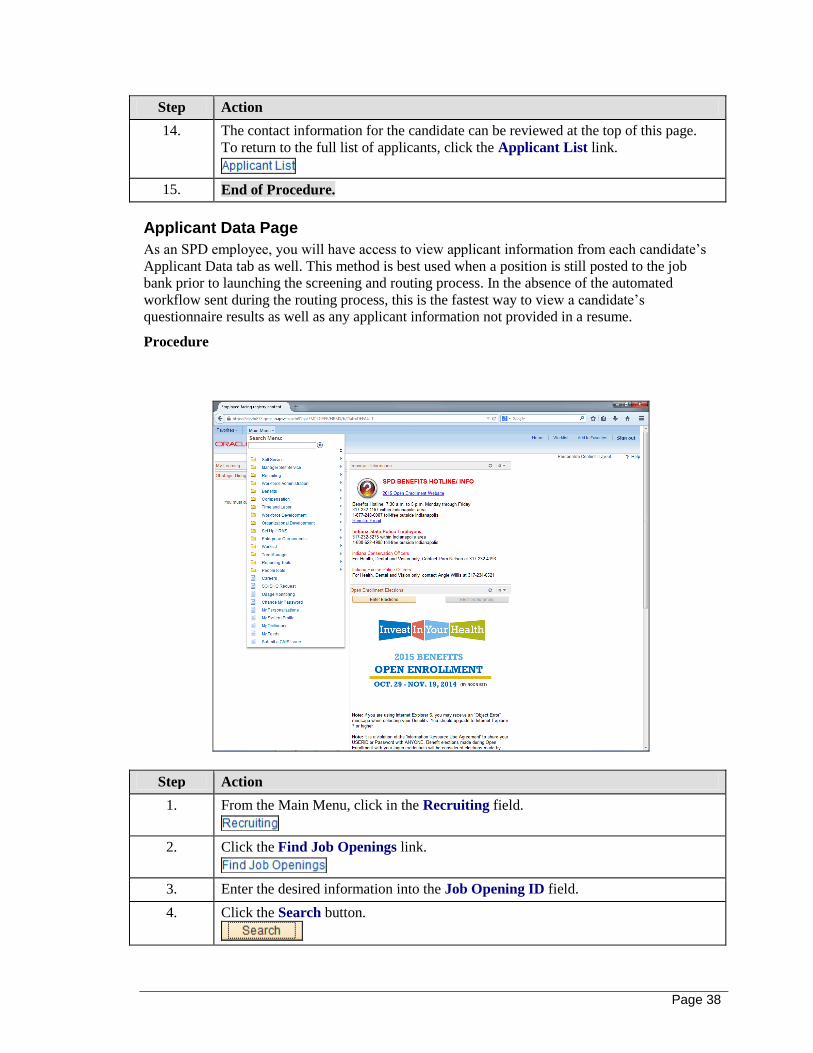
14. The contact information for the candidate can be reviewed at the top of this page.
To return to the full list of applicants, click the Applicant List link.
15. End of Procedure.
Applicant Data Page
As an SPD employee, you will have access to view applicant information from each candidate’s
Applicant Data tab as well. This method is best used when a position is still posted to the job
bank prior to launching the screening and routing process. In the absence of the automated
workflow sent during the routing process, this is the fastest way to view a candidate’s
questionnaire results as well as any applicant information not provided in a resume.
Procedure
Step Action
1. From the Main Menu, click in the Recruiting field.
2. Click the Find Job Openings link.
3. Enter the desired information into the Job Opening ID field.
4. Click the Search button.
Page 39
Step Action
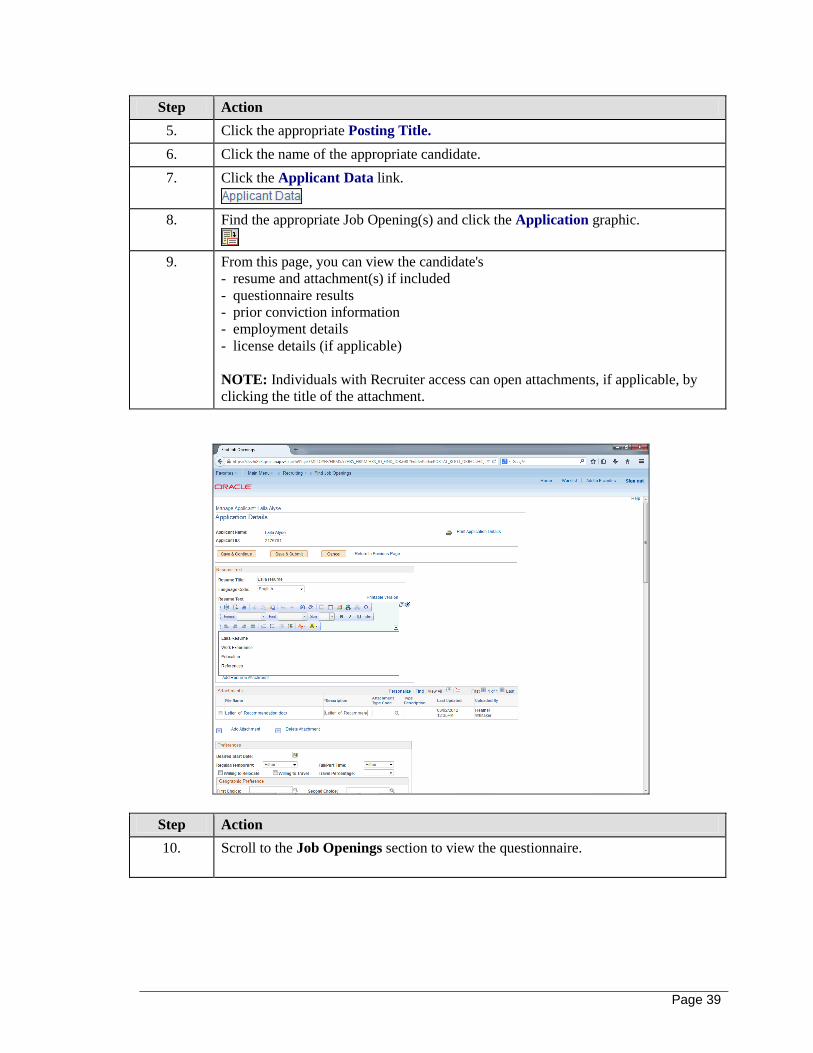
5. Click the appropriate Posting Title.
6. Click the name of the appropriate candidate.
7. Click the Applicant Data link.
8. Find the appropriate Job Opening(s) and click the Application graphic.
9. From this page, you can view the candidate's
- resume and attachment(s) if included
- questionnaire results
- prior conviction information
- employment details
- license details (if applicable)
NOTE: Individuals with Recruiter access can open attachments, if applicable, by
clicking the title of the attachment.
Step Action
10. Scroll to the Job Openings section to view the questionnaire.
Page 40
Step Action
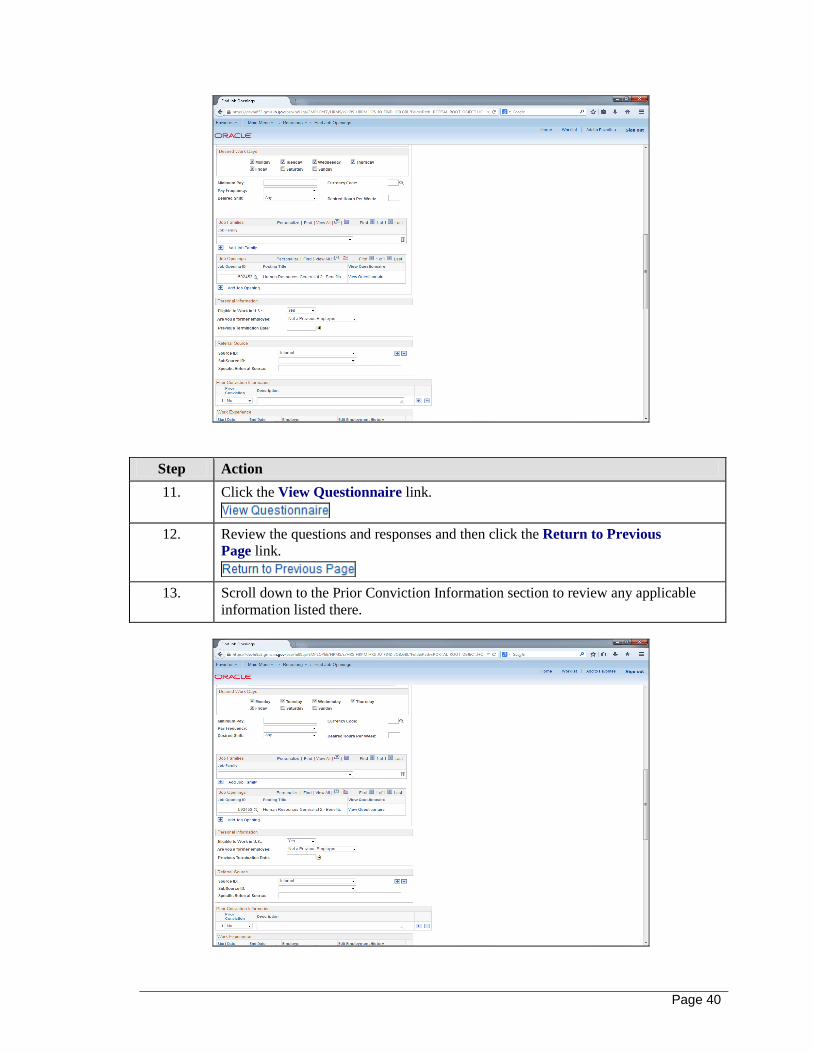
11. Click the View Questionnaire link.
12. Review the questions and responses and then click the Return to Previous
Page link.
13. Scroll down to the Prior Conviction Information section to review any applicable
information listed there.

Page 41
Step Action
14. Scroll down to the Work Experience section to review information.
Step Action
15. Click the Edit Employment History for any employer listed to review the
employment details listed by the candidate.
16. Click the Cancel button to return.
17. Scroll to the Highest Education Level to review this information.
If applicable, scroll to the Degrees section and
click the Degree link to review the detail listed by the applicant.
18. Click the Cancel button to return.
Page 42
Step Action
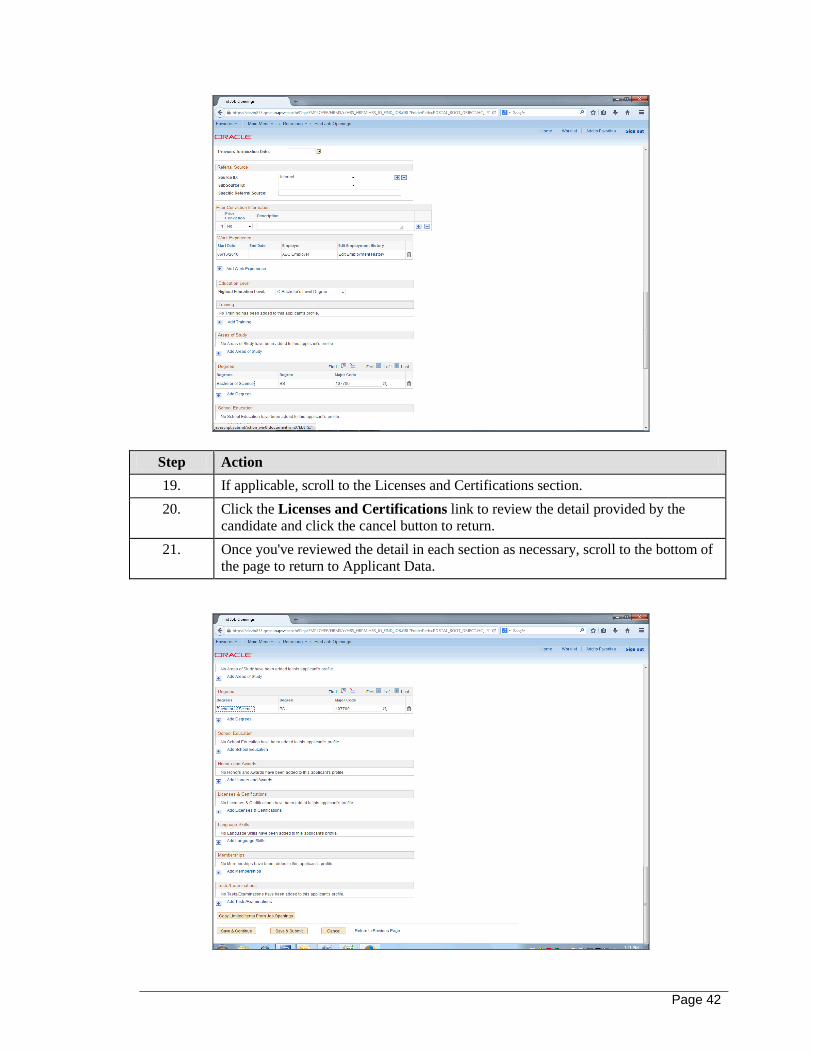
19. If applicable, scroll to the Licenses and Certifications section.
20. Click the Licenses and Certifications link to review the detail provided by the
candidate and click the cancel button to return.
21. Once you've reviewed the detail in each section as necessary, scroll to the bottom of
the page to return to Applicant Data.
Page 43
Step Action
22. Click the Return to Previous Page link.
23. End of Procedure.
Manage Interviews NOTE: This is meant to be a Train-the-Trainer section for Human Resources staff should hiring
managers have questions related to the PeopleSoft Manage Interview module. Individuals with
Hiring Manager access have been trained to schedule interviews and enter interview evaluations
within PeopleSoft for each person interviewed.
The Manage Interviews module is used by Hiring Managers to record interview schedules and
subsequent interview evaluations for candidates of interest. For most agencies this is an optional
feature; however, please note that if interview schedules/interview evaluations are not recorded
within PeopleSoft, all documents related to the Application File must be kept for all individuals
interviewed for three (3) years per the Applicant File retention schedule, Record Series Number
84-1020. (http://www.in.gov/apps/icpr/retention/icpr_retention) > Personnel, Department of >
Employment Administration Division> Application File)
It is recommended that the hiring manager, or a designee of the hiring manager, contact each
candidate of interest via phone to discuss interview scheduling options that are appropriate for all
parties. The hiring manager should then record the scheduled interview date and time within in
the posting for each candidate. Once the interview has been conducted, the hiring manager should
enter objective interview notes into the Interview Evaluation tool for each candidate.
Page 44
Manage Interview Schedule
This section is used by the Hiring Manager to reflect applicants chosen to be interviewed. In this
topic you will learn how to create interview schedules within PeopleSoft for each interviewee
after acceptance of the verbal interview invitation.
Procedure
Step Action
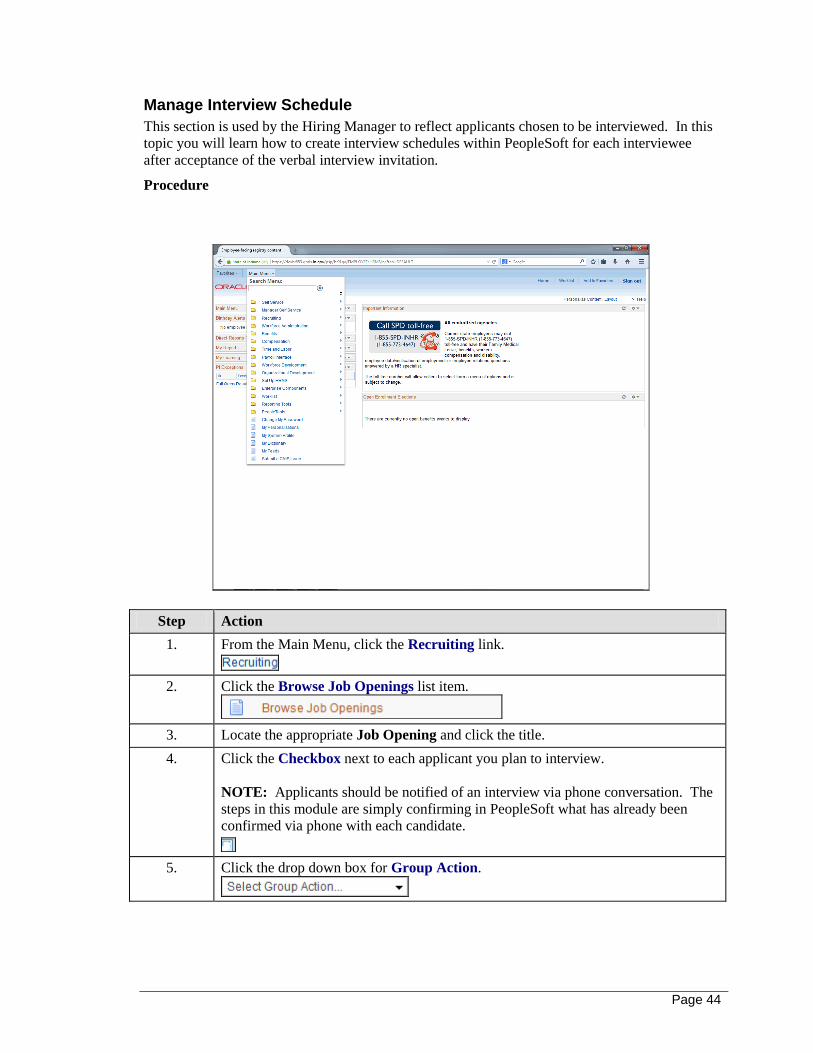
1. From the Main Menu, click the Recruiting link.
2. Click the Browse Job Openings list item.
3. Locate the appropriate Job Opening and click the title.
4. Click the Checkbox next to each applicant you plan to interview.
NOTE: Applicants should be notified of an interview via phone conversation. The
steps in this module are simply confirming in PeopleSoft what has already been
confirmed via phone with each candidate.
5. Click the drop down box for Group Action.
Page 45
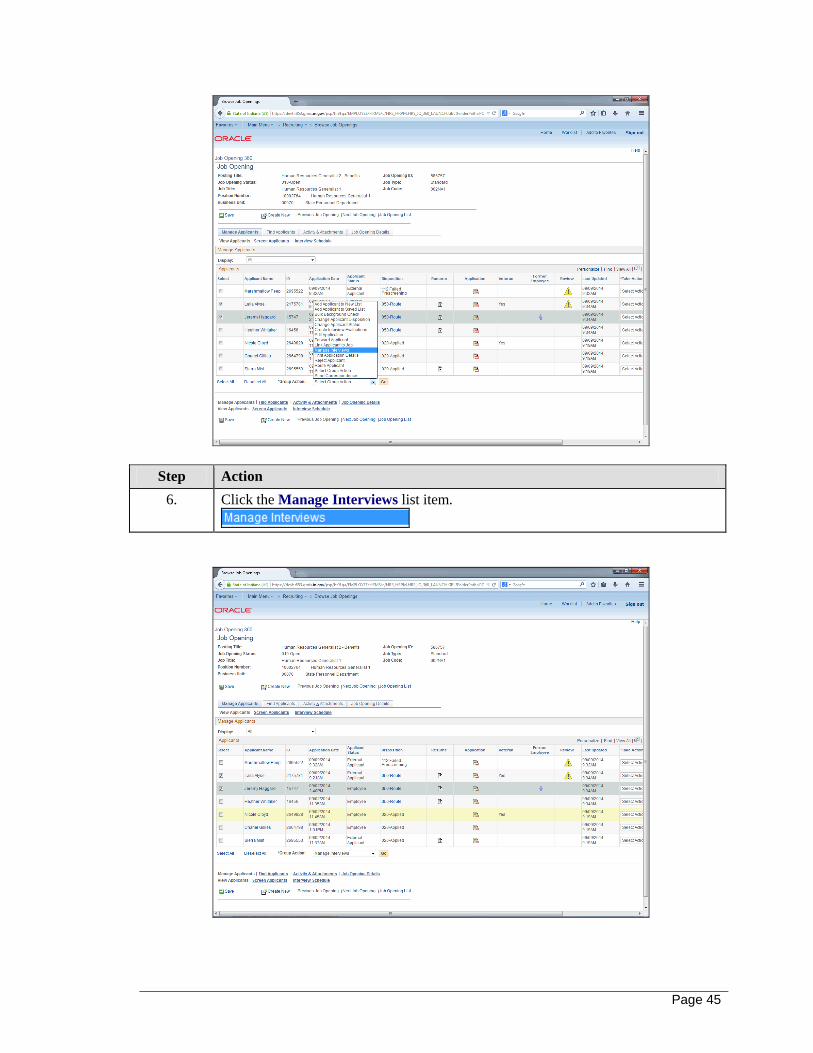
Step Action
6. Click the Manage Interviews list item.

Page 46
Step Action
7. Click the Go button.
8. Click the Expand section button. This is located next to the applicant's name.
9. Click the Expand section button next to Interview 1.
10. Click the Interview Type drop down menu.
Step Action
11. Click the Inhouse 1 list item.
Page 47
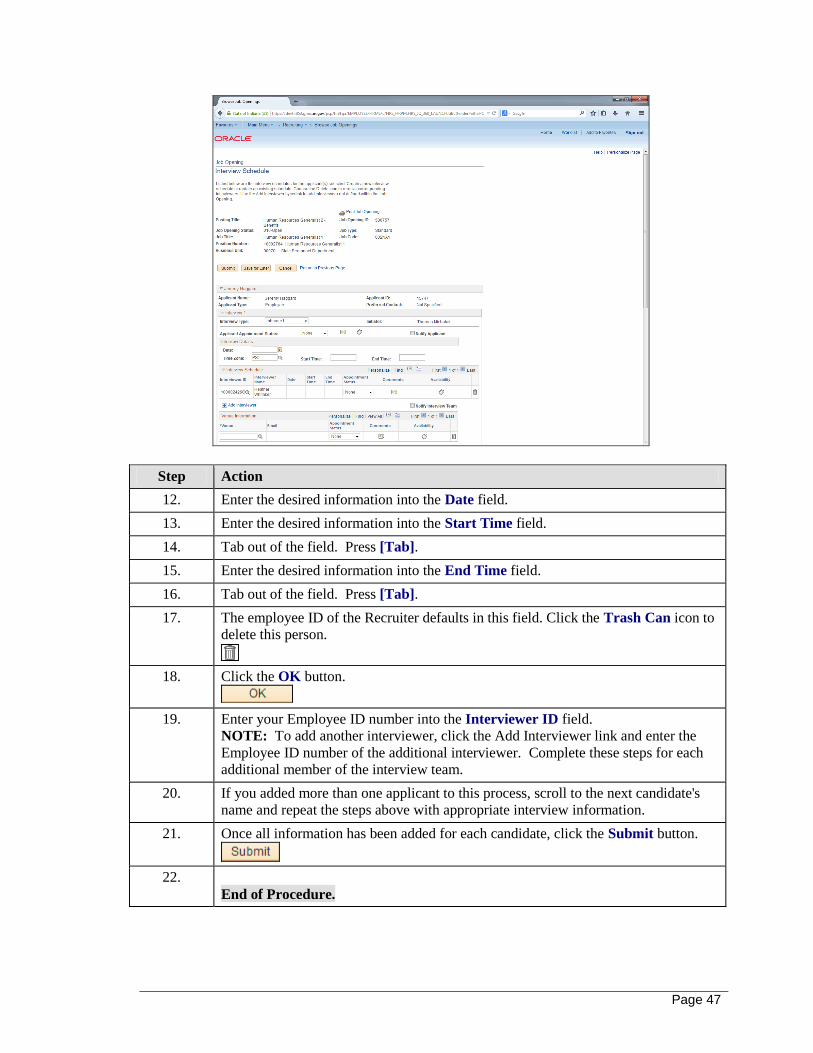
Step Action
12. Enter the desired information into the Date field.
13. Enter the desired information into the Start Time field.
14. Tab out of the field. Press [Tab].
15. Enter the desired information into the End Time field.
16. Tab out of the field. Press [Tab].
17. The employee ID of the Recruiter defaults in this field. Click the Trash Can icon to
delete this person.
18. Click the OK button.
19. Enter your Employee ID number into the Interviewer ID field.
NOTE: To add another interviewer, click the Add Interviewer link and enter the
Employee ID number of the additional interviewer. Complete these steps for each
additional member of the interview team.
20. If you added more than one applicant to this process, scroll to the next candidate's
name and repeat the steps above with appropriate interview information.
21. Once all information has been added for each candidate, click the Submit button.
22.
End of Procedure.
Page 48
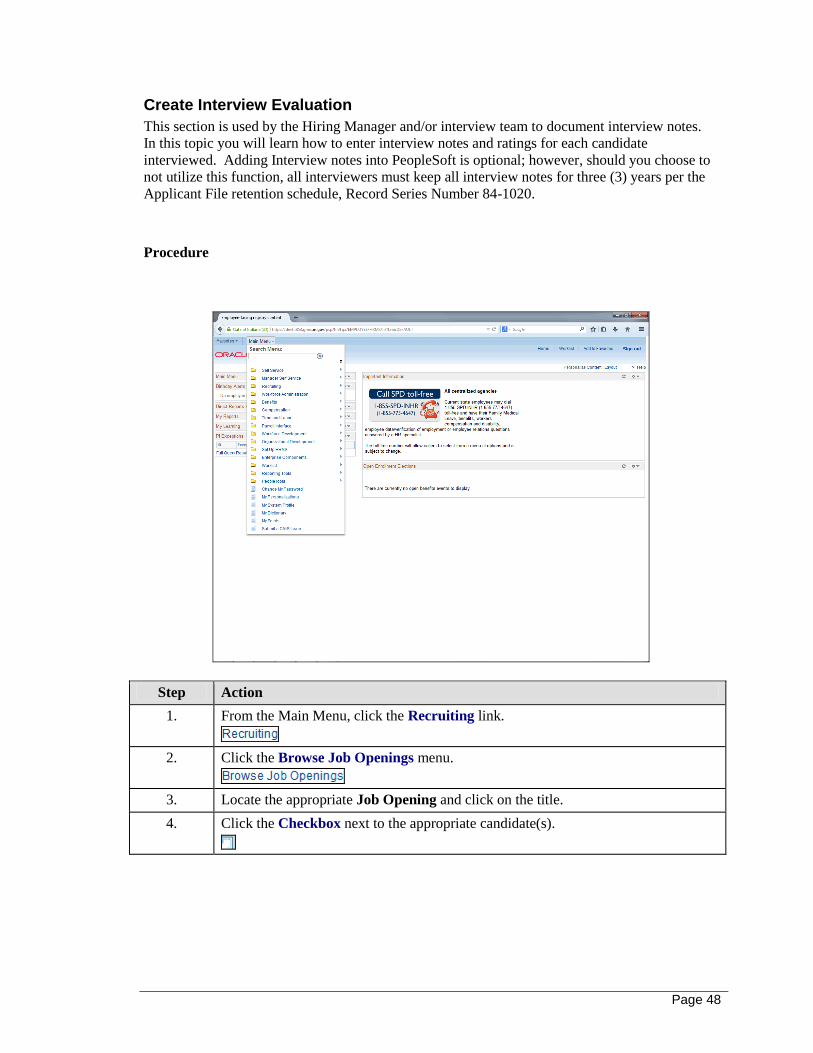
Create Interview Evaluation
This section is used by the Hiring Manager and/or interview team to document interview notes.
In this topic you will learn how to enter interview notes and ratings for each candidate
interviewed. Adding Interview notes into PeopleSoft is optional; however, should you choose to
not utilize this function, all interviewers must keep all interview notes for three (3) years per the
Applicant File retention schedule, Record Series Number 84-1020.
Procedure
Step Action
1. From the Main Menu, click the Recruiting link.
2. Click the Browse Job Openings menu.
3. Locate the appropriate Job Opening and click on the title.
4. Click the Checkbox next to the appropriate candidate(s).
Page 49
Step Action
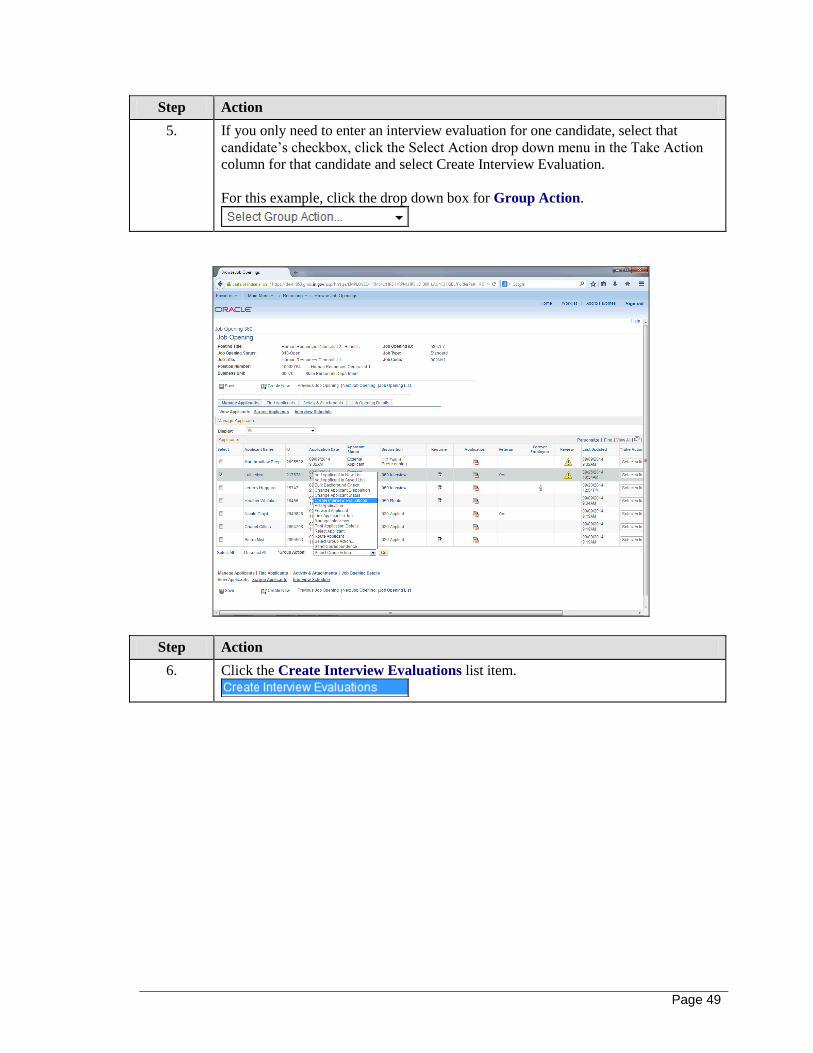
5. If you only need to enter an interview evaluation for one candidate, select that
candidate’s checkbox, click the Select Action drop down menu in the Take Action
column for that candidate and select Create Interview Evaluation.
For this example, click the drop down box for Group Action.
Step Action
6. Click the Create Interview Evaluations list item.
Page 50
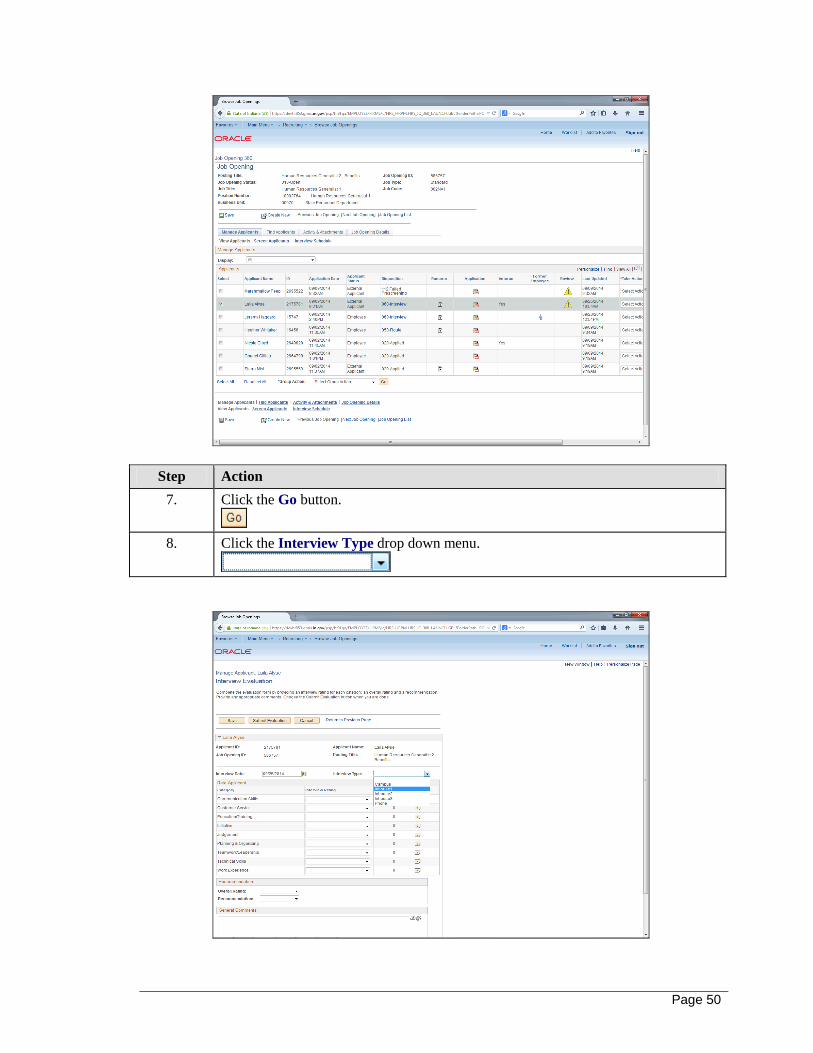
Step Action
7. Click the Go button.
8. Click the Interview Type drop down menu.
Page 51
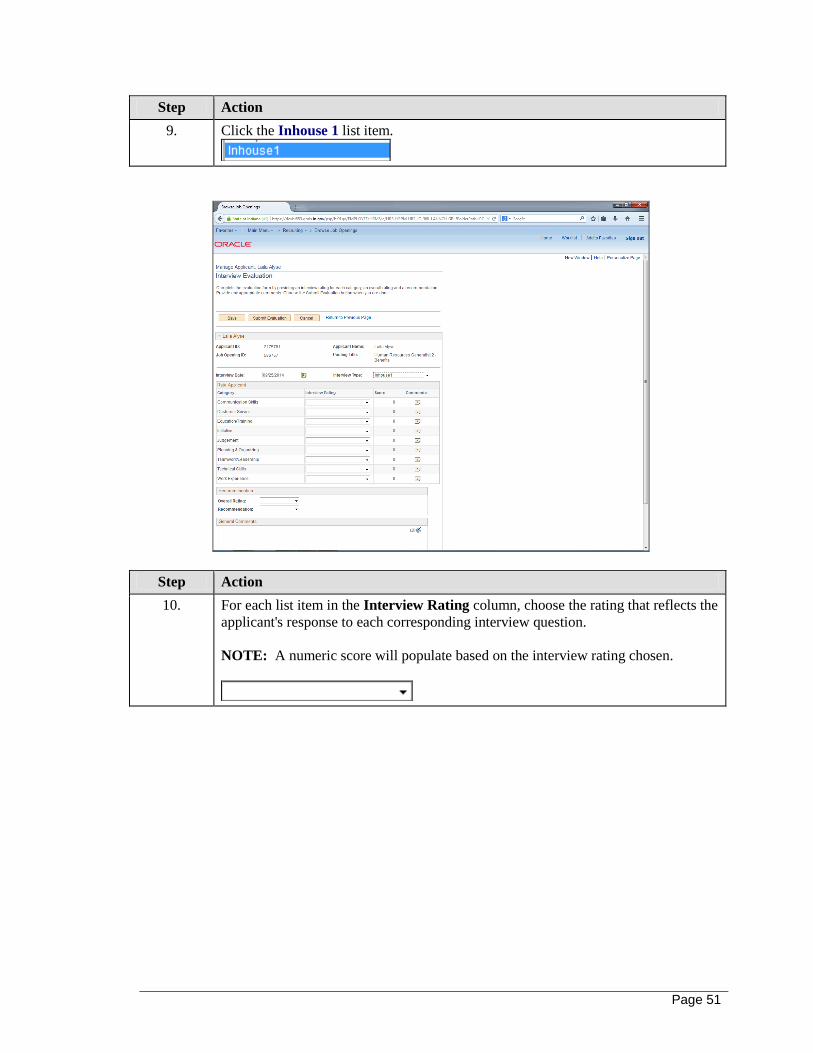
Step Action
9. Click the Inhouse 1 list item.
Step Action
10. For each list item in the Interview Rating column, choose the rating that reflects the
applicant's response to each corresponding interview question.
NOTE: A numeric score will populate based on the interview rating chosen.

Page 52
Step Action
11. Click Average from the drop down menu.

Page 53
Step Action
12. For each list item, enter objective comments by clicking the Comments icon.
13. Example for comments in the Communication Skills list item: "Candidate's speech
was clear and concise. She discussed several projects that directly related to her
written and verbal communication skills."
14. Click the Spell Check Comment icon and make any necessary corrections.
15. Click the OK button.
Step Action
16. Click the Ok button.
Page 54
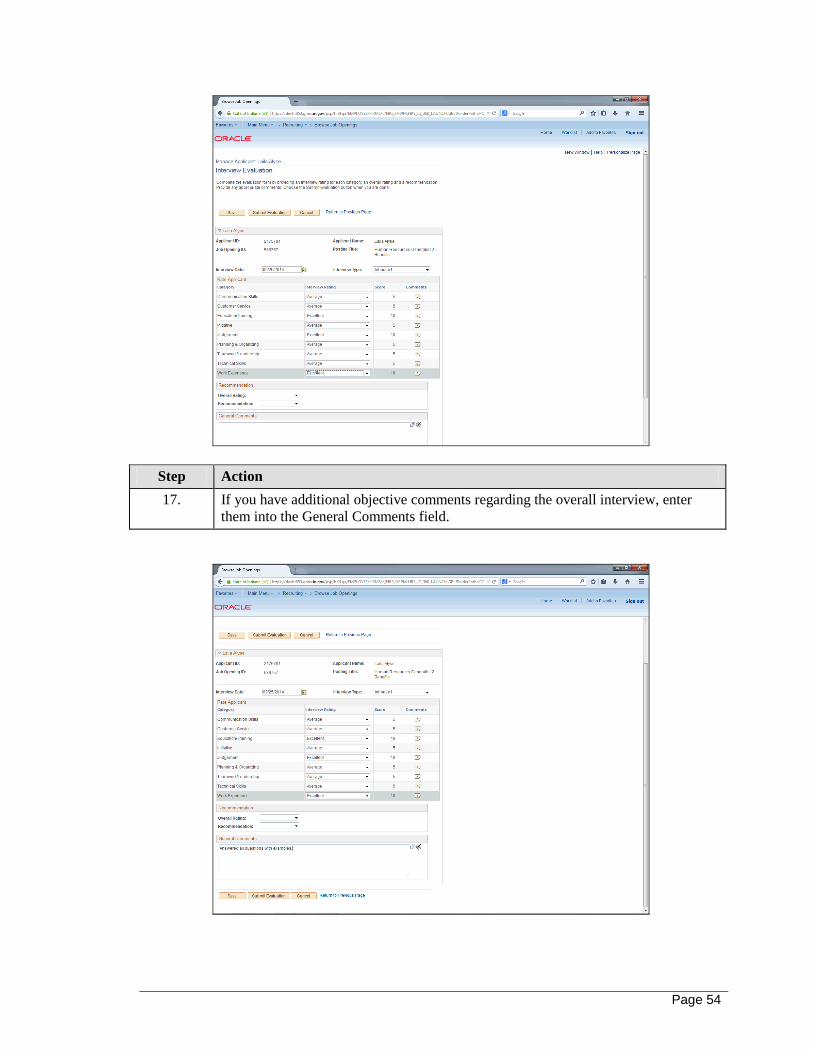
Step Action
17. If you have additional objective comments regarding the overall interview, enter
them into the General Comments field.
Page 55
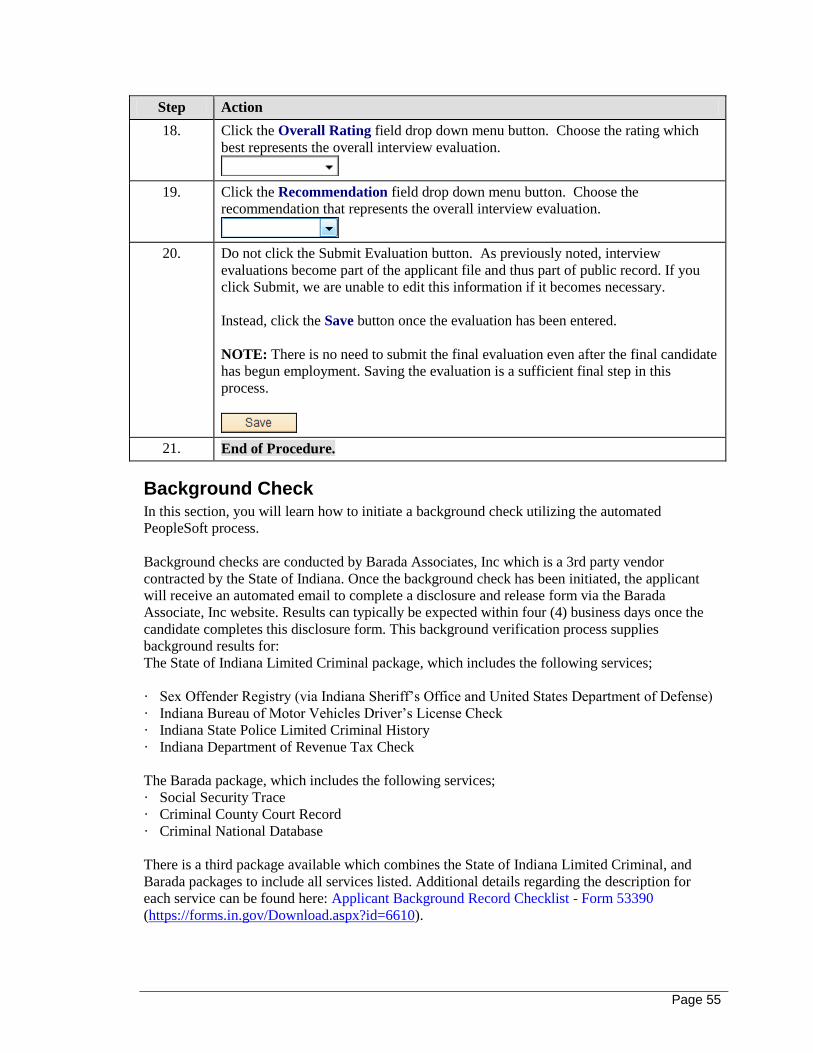
Step Action
18. Click the Overall Rating field drop down menu button. Choose the rating which
best represents the overall interview evaluation.
19. Click the Recommendation field drop down menu button. Choose the
recommendation that represents the overall interview evaluation.
20. Do not click the Submit Evaluation button. As previously noted, interview
evaluations become part of the applicant file and thus part of public record. If you
click Submit, we are unable to edit this information if it becomes necessary.
Instead, click the Save button once the evaluation has been entered.
NOTE: There is no need to submit the final evaluation even after the final candidate
has begun employment. Saving the evaluation is a sufficient final step in this
process.
21. End of Procedure.
Background Check In this section, you will learn how to initiate a background check utilizing the automated
PeopleSoft process.
Background checks are conducted by Barada Associates, Inc which is a 3rd party vendor
contracted by the State of Indiana. Once the background check has been initiated, the applicant
will receive an automated email to complete a disclosure and release form via the Barada
Associate, Inc website. Results can typically be expected within four (4) business days once the
candidate completes this disclosure form. This background verification process supplies
background results for:
The State of Indiana Limited Criminal package, which includes the following services;
· Sex Offender Registry (via Indiana Sheriff’s Office and United States Department of Defense)
· Indiana Bureau of Motor Vehicles Driver’s License Check
· Indiana State Police Limited Criminal History
· Indiana Department of Revenue Tax Check
The Barada package, which includes the following services;
· Social Security Trace
· Criminal County Court Record
· Criminal National Database
There is a third package available which combines the State of Indiana Limited Criminal, and
Barada packages to include all services listed. Additional details regarding the description for
each service can be found here: Applicant Background Record Checklist - Form 53390
(https://forms.in.gov/Download.aspx?id=6610).

Page 56
This process is only for State of Indiana Full-Time/Part-Time candidates. Directions to process a
Direct Hire, Unpaid Intern or Volunteer can be found
(http://intranet.spd.state.in.us/employment/Background Check Automation (R6-14).docx) (pages
4-5). This process does not incorporate contract candidates or any fingerprinting or verifications
ran through IDACS.
The electronic applicant disclosure and release form completed by the applicant will be stored on
our vendor’s server. Should you need a copy of this disclosure, please contact Barada Associates
Monday-Friday from 8am to 5pm at 1-800-616-5917 or
(http://intranet.spd.state.in.us/employment/Background Check Automation (R6-14).docx) (pages
6-7) for instructions to log in to Barada’s website and download the completed form. Access to
login is required. Contact the Talent Acquisition Division with questions.
Initiate Background Check
In this section, you will learn how to initiate a background check utilizing the automated
PeopleSoft process.
View Background Check FAQ's:
(https://hr85.gmis.in.gov/LMS_SPD/UPK/eTalent/FAQS/Background.docx)
Procedure
Page 57
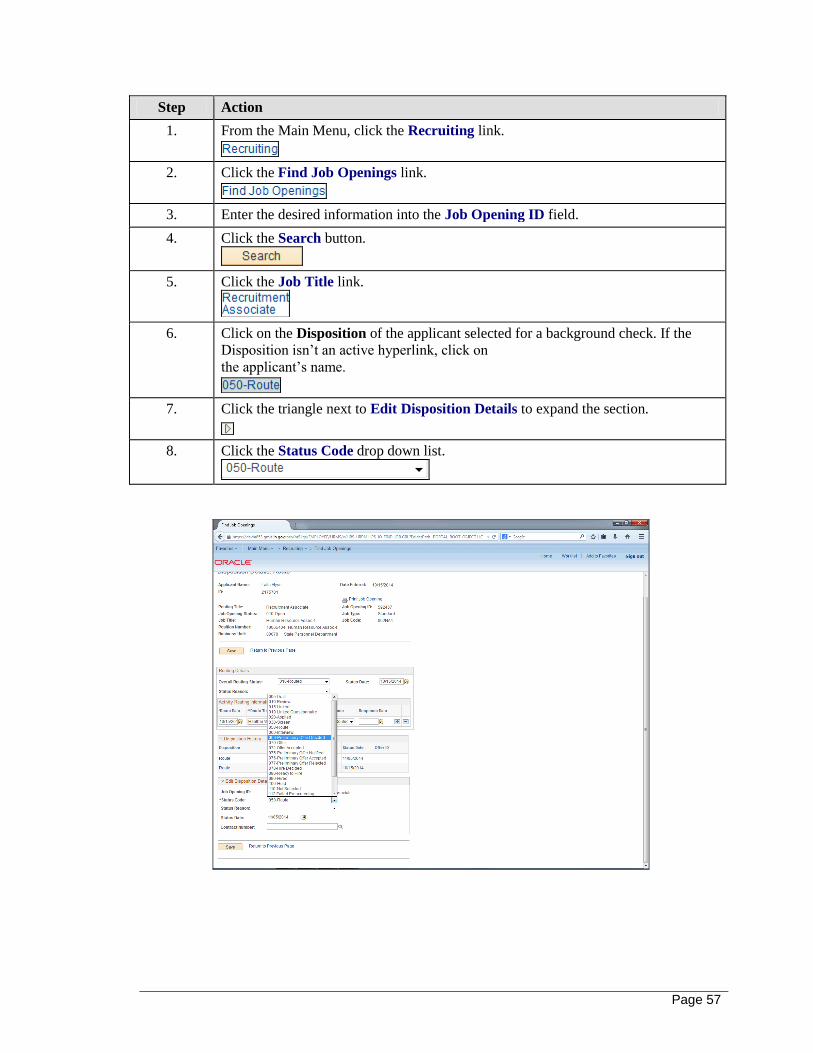
Step Action
1. From the Main Menu, click the Recruiting link.
2. Click the Find Job Openings link.
3. Enter the desired information into the Job Opening ID field.
4. Click the Search button.
5. Click the Job Title link.
6. Click on the Disposition of the applicant selected for a background check. If the
Disposition isn’t an active hyperlink, click on
the applicant’s name.
7. Click the triangle next to Edit Disposition Details to expand the section.
8. Click the Status Code drop down list.
Page 58
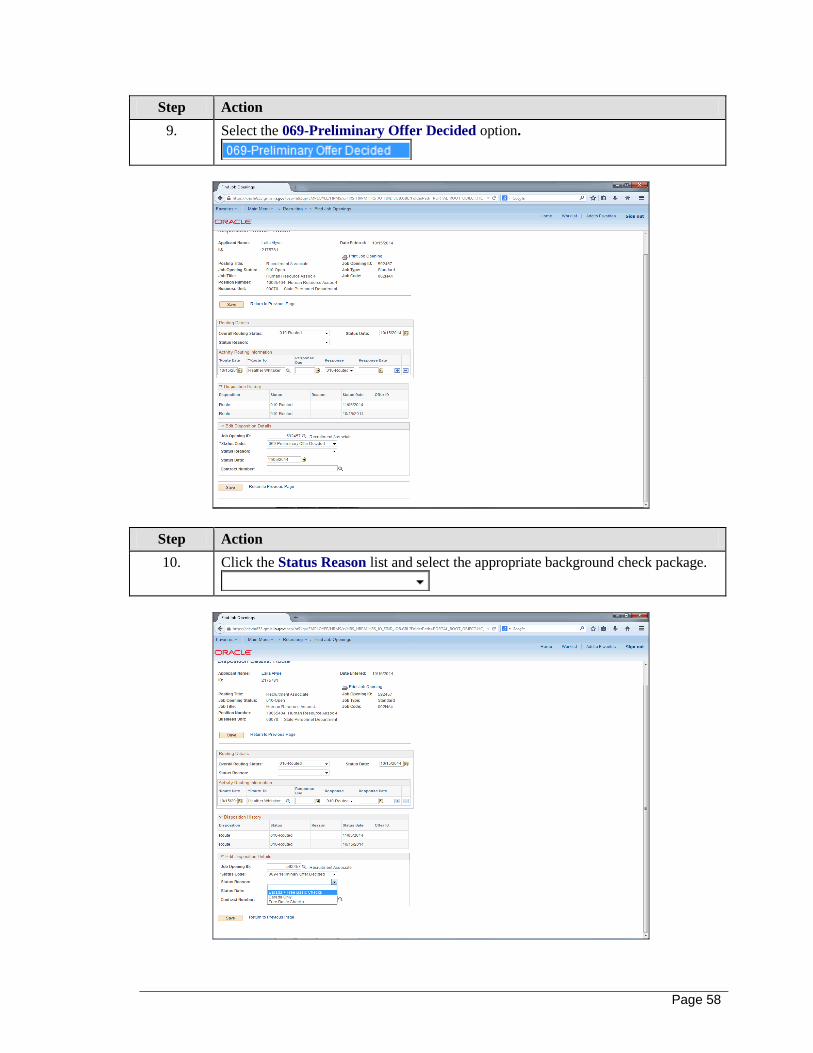
Step Action
9. Select the 069-Preliminary Offer Decided option.
Step Action
10. Click the Status Reason list and select the appropriate background check package.
Page 59
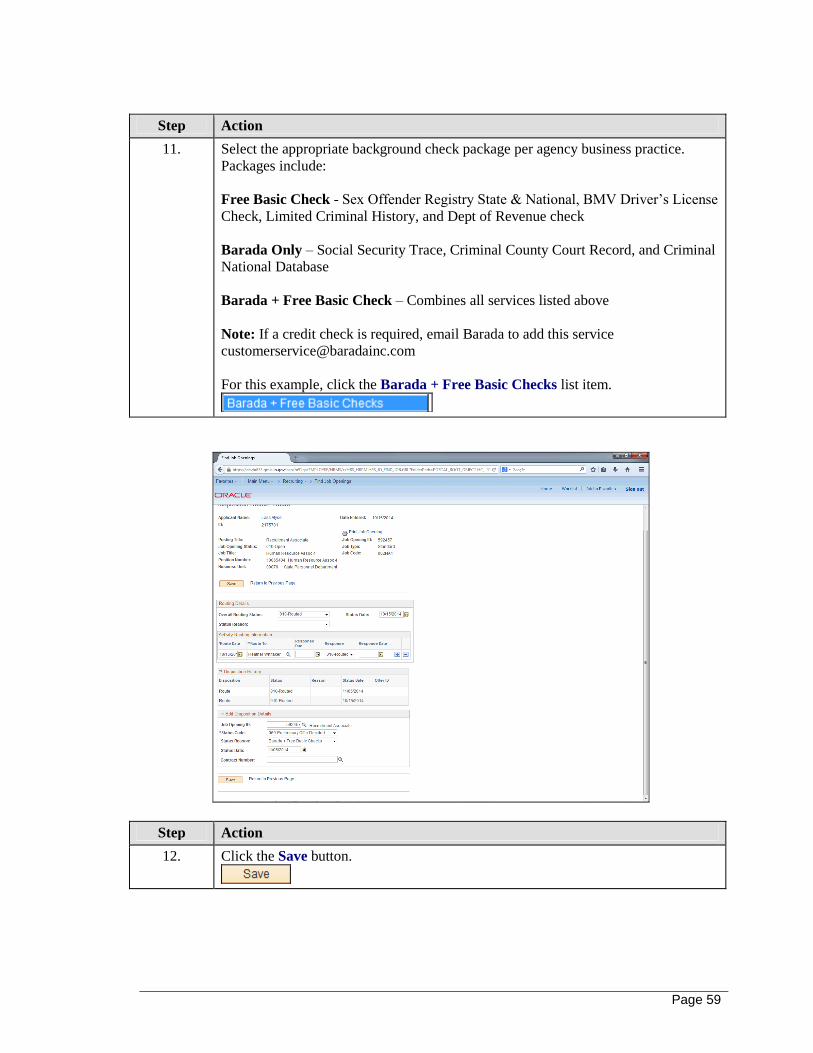
Step Action
11. Select the appropriate background check package per agency business practice.
Packages include:
Free Basic Check - Sex Offender Registry State & National, BMV Driver’s License
Check, Limited Criminal History, and Dept of Revenue check
Barada Only – Social Security Trace, Criminal County Court Record, and Criminal
National Database
Barada + Free Basic Check – Combines all services listed above
Note: If a credit check is required, email Barada to add this service
For this example, click the Barada + Free Basic Checks list item.
Step Action
12. Click the Save button.
Page 60
Step Action
13. A workflow message will be sent to the candidate requesting they complete the
Background Check Release form. The employees listed on the requisition under
‘Created By’, ‘Recruiter’, all ‘Hiring Managers’ and the initiator of the request will
be blind copied on the workflow message.
14. Note: If the candidate’s email address is invalid Barada will notify us. If this is the
case, please contact the candidate and update the email address in their applicant
profile in the ‘Applicant Data’ tab, under ‘Contact’.
The workflow will need to be resent through PeopleSoft by changing the applicant
back to ‘050-Route’ or ‘020-Applied’ status, which will result in a warning box,
please ignore. Then complete these steps again to put back into ‘069-Preliminary
Offer Accepted’ status.
15. The results for the Background Check verification process will be sent to the
assigned email account(s) currently listed for the respective agency with Barada. If
the agency designee(s) needs to be updated or for questions please contact the State
Personnel Department Talent Acquisition Division, [email protected] or 1-855-SPD-
INHR #2.
Click the Return to Previous Page link.
16.
End of Procedure.
Offer Letter This section details instructions for creating and sending offer letters via PeopleSoft Talent
Manager. The offer letter process is performed by Human Resources. Specific offer letter
templates have already been created for your agency/facility; however, if any changes are
necessary contact the Talent Acquisition Division.
Create/Send Offer Letter
In this section you will learn how to create and send an automated offer letter via PeopleSoft
Talent Manager.
View Offer Letter FAQ's:
https://hr85.gmis.in.gov/LMS_SPD/UPK/eTalent/FAQS/OfferLetter.docx
(https://hr85.gmis.in.gov/LMS_SPD/UPK/eTalent/FAQS/OfferLetter.docx)
Page 61
Procedure
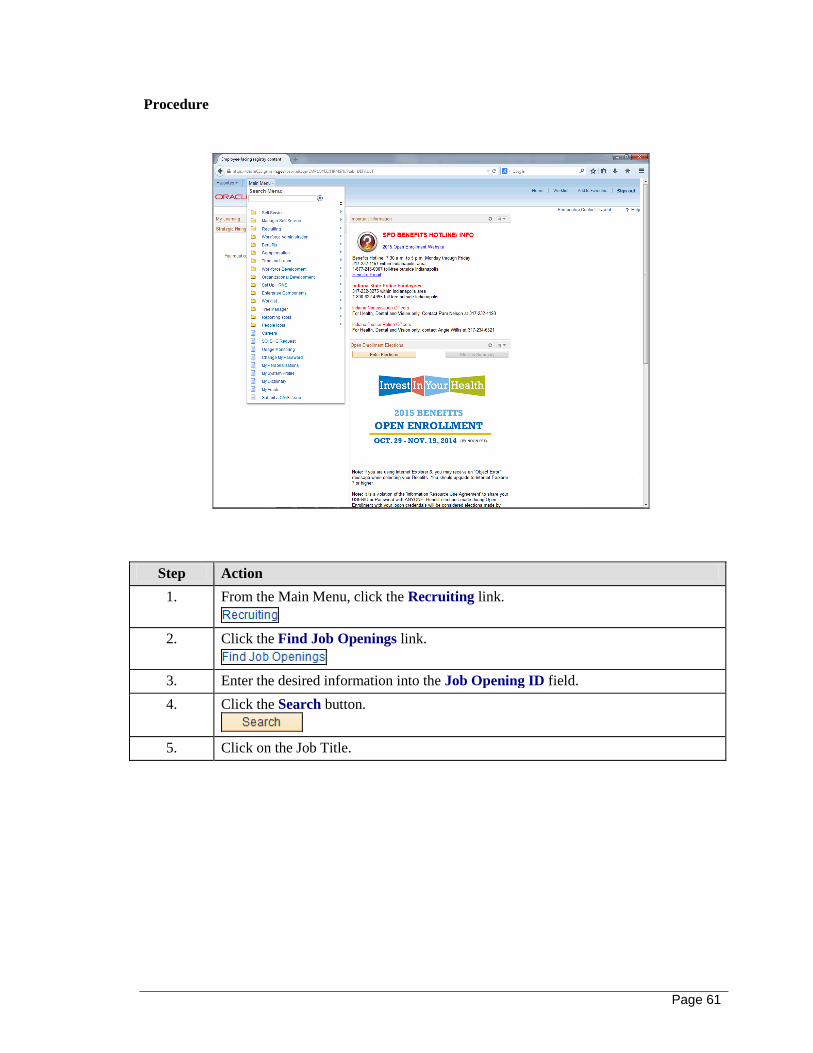
Step Action
1. From the Main Menu, click the Recruiting link.
2. Click the Find Job Openings link.
3. Enter the desired information into the Job Opening ID field.
4. Click the Search button.
5. Click on the Job Title.
Page 62
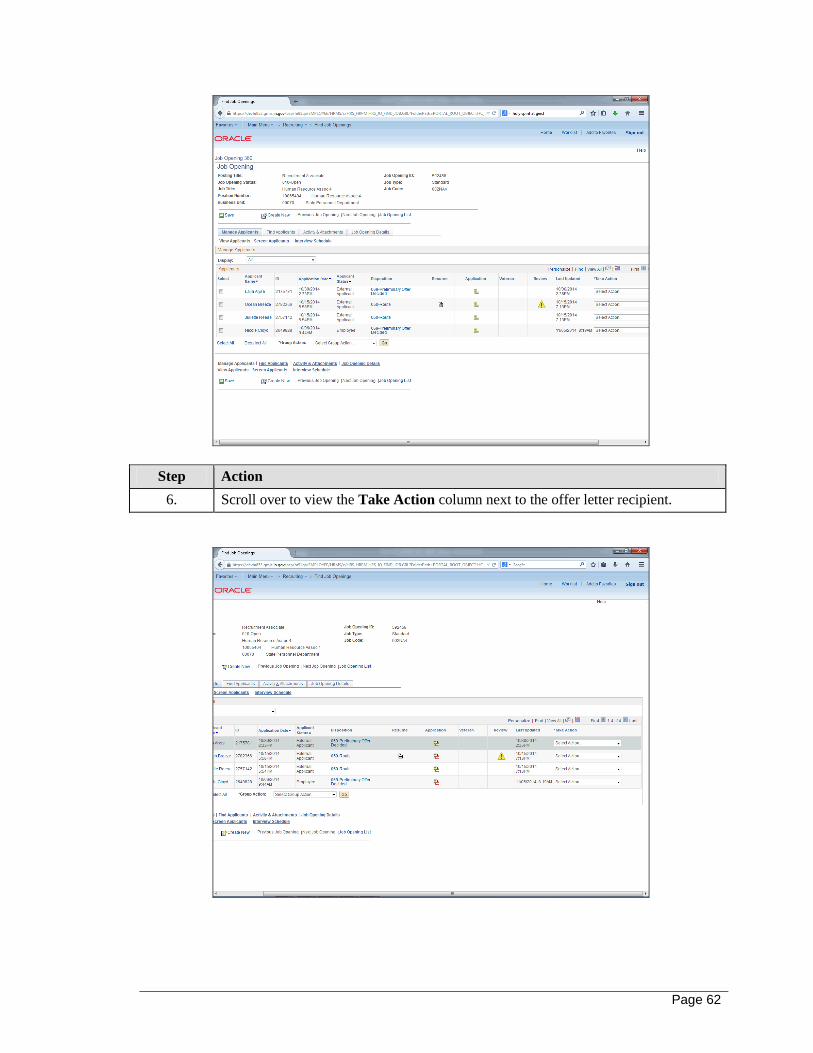
Step Action
6. Scroll over to view the Take Action column next to the offer letter recipient.
Page 63
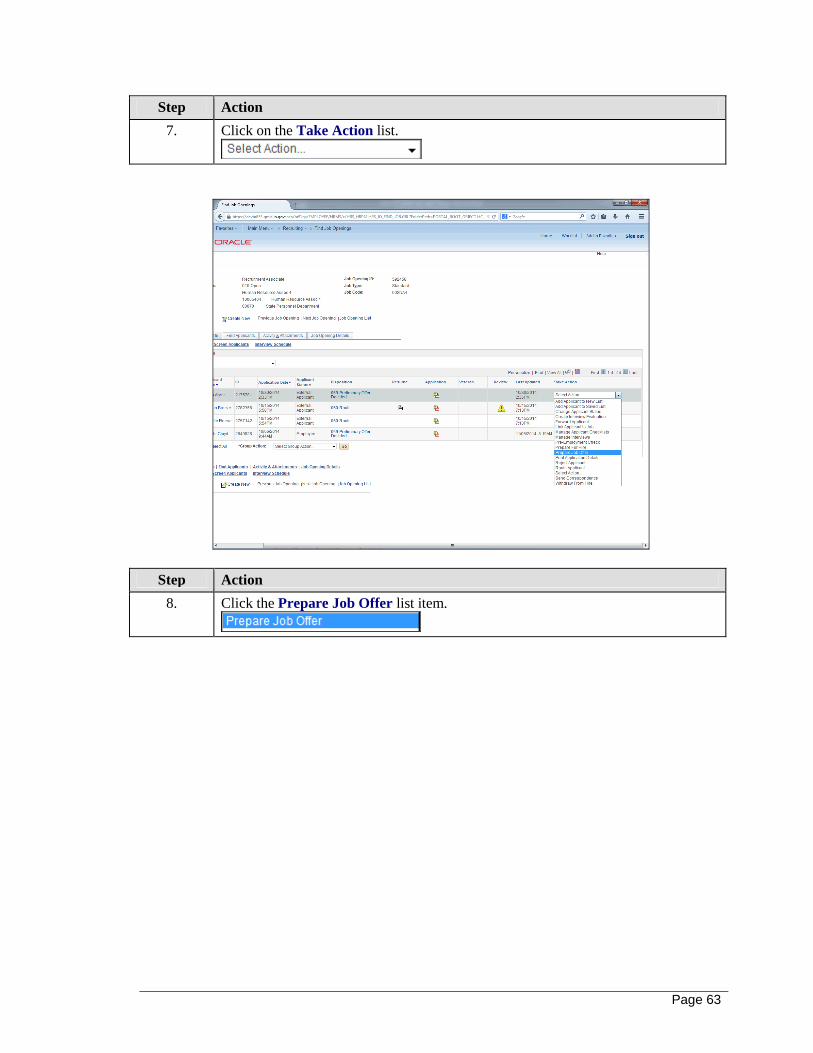
Step Action
7. Click on the Take Action list.
Step Action
8. Click the Prepare Job Offer list item.
Page 64
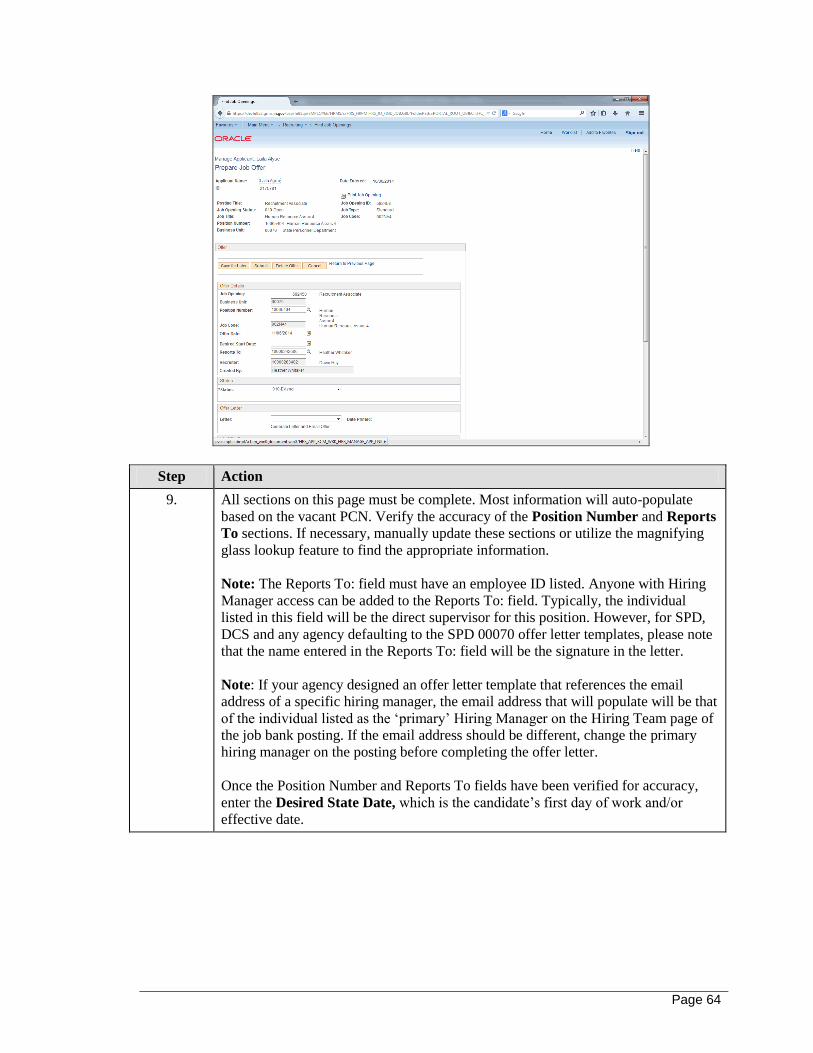
Step Action
9. All sections on this page must be complete. Most information will auto-populate
based on the vacant PCN. Verify the accuracy of the Position Number and Reports
To sections. If necessary, manually update these sections or utilize the magnifying
glass lookup feature to find the appropriate information.
Note: The Reports To: field must have an employee ID listed. Anyone with Hiring
Manager access can be added to the Reports To: field. Typically, the individual
listed in this field will be the direct supervisor for this position. However, for SPD,
DCS and any agency defaulting to the SPD 00070 offer letter templates, please note
that the name entered in the Reports To: field will be the signature in the letter.
Note: If your agency designed an offer letter template that references the email
address of a specific hiring manager, the email address that will populate will be that
of the individual listed as the ‘primary’ Hiring Manager on the Hiring Team page of
the job bank posting. If the email address should be different, change the primary
hiring manager on the posting before completing the offer letter.
Once the Position Number and Reports To fields have been verified for accuracy,
enter the Desired State Date, which is the candidate’s first day of work and/or
effective date.

Page 65
Step Action
10. The Offer Date is the creation date of the offer letter, which will auto-populate.
The *Status box should remain 010-Extend.
Scroll down to view additional information.
Page 66
Step Action
11. Select the appropriate letter for the type of offer being extended (i.e. New Hire,
Promotion, Transfer, PT/Intermittent, etc). The number of offer letter templates
will vary by agency. The templates were designed by each agency/facility and can
be updated as needed by the Talent Acquisition division.
Examples:
New Hires at IGC = IGC_Offer_Letter
Intermittent/PT = INT_PT
Promotion = Promo
Transfer = Trans or Transfer
External New Hire = External_Hire
Job Reclassification = Job_Reclass
Lateral Transfer = Lateral_Transfer
Transfer Same $ = Transfer_Same_Sal
Voluntary Demotion = Vol_Demotion
Click the Letter drop down list.
12. Select the frequency of pay under Component drop down list.
13. Enter the bi-weekly or hourly compensation offered in *Offer Amount box.
Note: The frequency of pay does not pull into the letter, only the offer amount.
14. Click the Submit button.
Note: You can also click ‘Save for Later’ if you aren’t ready to complete the
transaction at this point. Directions to complete a draft are detailed later in the
training.
15. Once submitted, click on the Generate Letter and Email Offer link under Offer
Letter.
16. You will be directed to a new page where you will build the content of the email that
will be sent to the candidate. From this page, you can preview the offer letter
created, add/delete attachments, and enter the email subject and text.
Email addresses that pre-populate are ‘Display’ only.
Enter email Subject and Message text as this information does not pre-populate.
Click in the *Subject field to enter a subject line for the offer letter. Next you will
want to add content into the Message field. The email text should incorporate
information that could not be included in the design of the offer letter such as
Onboarding room location, 2nd day instructions, etc.

Page 67
Step Action
17. If changes are necessary to the offer letter, you must cancel the transaction and
Prepare Job Offer again with updated information. It is not recommended to
make/save the changes and then send the manually updated letter within Outlook as
there would be no PeopleSoft record of this transaction.
Click the .rtf link in the attachment section to review the Offer Letter created.
18. If appropriate, you can also add and delete attachments. Examples of appropriate
attachments: campus map, parking facilities, finger printing directions, 2nd day
directions, etc.
19. Click the Preview button to review the email content.
20. Click the Return button.
21. Click the Send button once complete. This will initiate the automated email
including the offer letter, all attachments, and email text to the candidate and
recipients listed in the CC and BCC lines. The email you receive serves as a
confirmation that the offer letter was sent successfully.
22. If necessary, you can review the offer letter history, access a copy of a sent letter,
edit an offer letter ‘saved for later’ in draft status, or delete a saved/draft offer letter
from the Manage Applicants page of the posting.
Click the Return to Previous Page link.
23. To view the offer letter that was created/sent: Click the candidate’s disposition (i.e. Applied, Route, Preliminary Offer Decided).
For this example, click the 069-Preliminary Offer Decided link next to Laila
Alyse.
24. Click on the Letter icon in the Disposition History section.
25. Click the OK button to view the word document.
Page 68
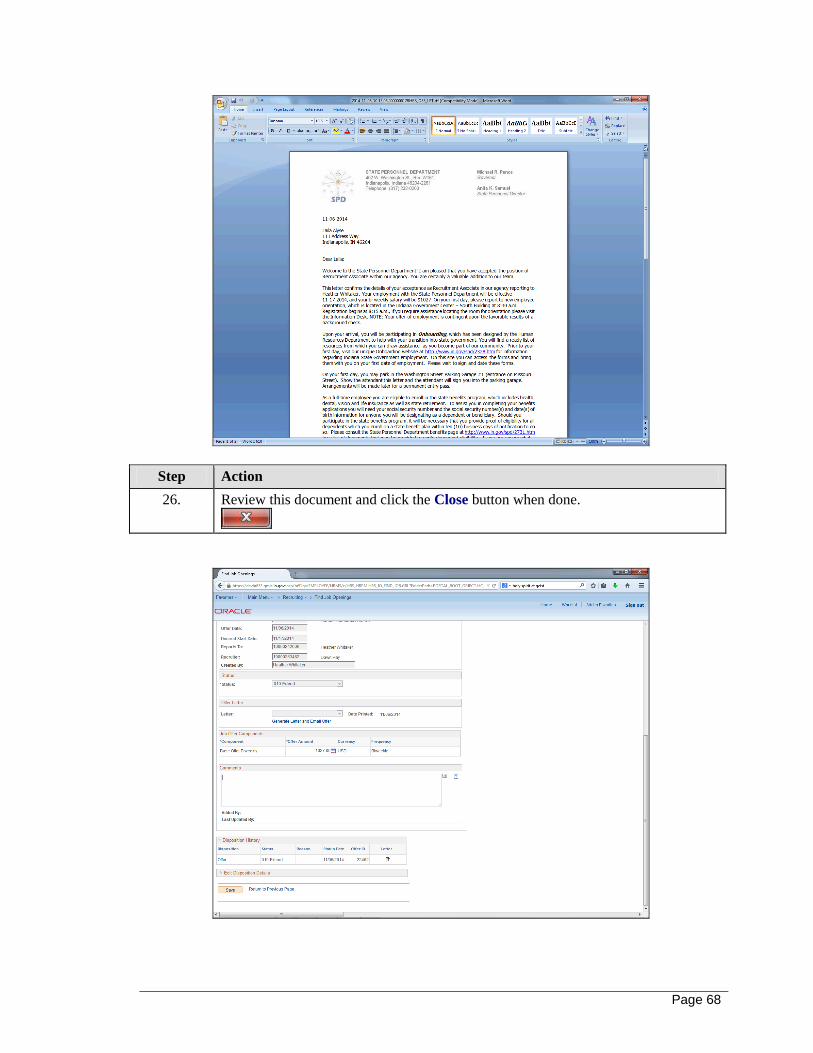
Step Action
26. Review this document and click the Close button when done.

Page 69
Step Action
27. Click the Return to Previous Page link.
28. To complete an offer letter that you Saved for Later:
Click the candidate’s disposition (i.e. Applied, Route, Preliminary Offer Decided).
For this example, click the 050-Route link next to the selected candidate's name.
29. Click the Offer link in the Disposition History section.
30. This will bring up the Offer details page for you to verify information, make any
changes and then finalize the process as described.
Click the Return to Previous Page link.
31. To Delete an offer: Click the candidate’s disposition (i.e. Applied, Route, Preliminary Offer Decided,
Offer).
For this example, click the 050-Route link next to the selected candidate's name.
Step Action
32. Scroll to the Disposition History section.
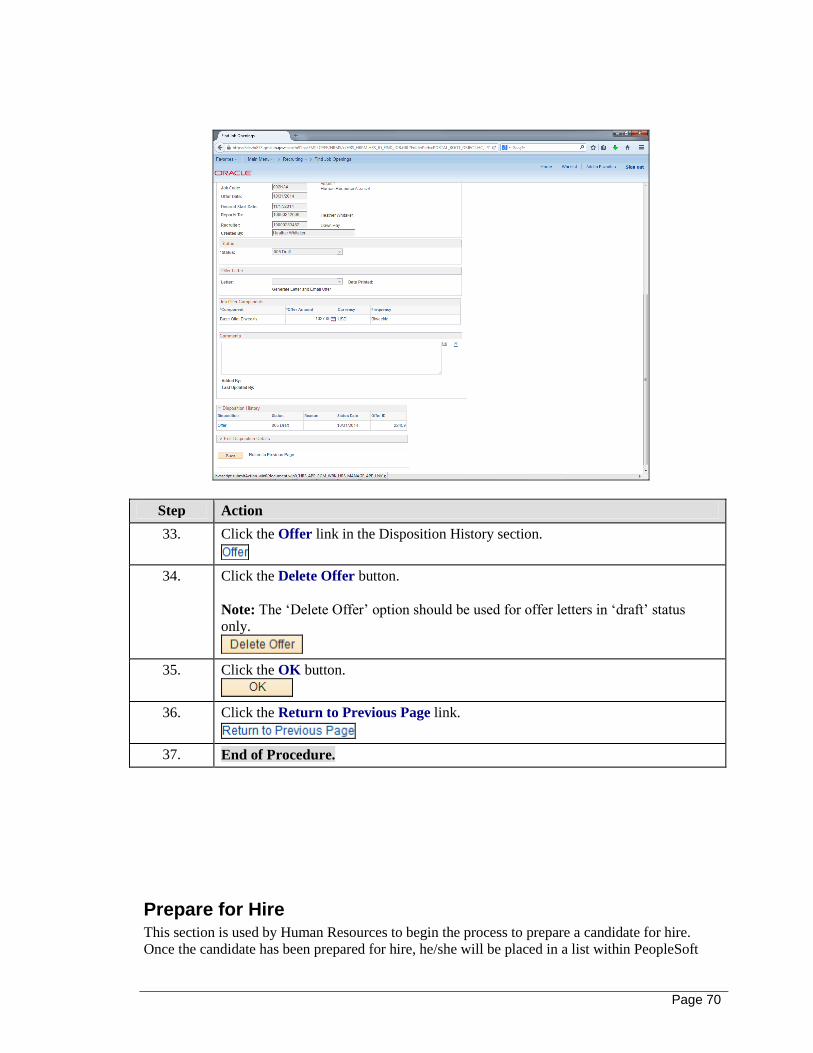
Page 70
Step Action
33. Click the Offer link in the Disposition History section.
34. Click the Delete Offer button.
Note: The ‘Delete Offer’ option should be used for offer letters in ‘draft’ status
only.
35. Click the OK button.
36. Click the Return to Previous Page link.
37. End of Procedure.
Prepare for Hire This section is used by Human Resources to begin the process to prepare a candidate for hire.
Once the candidate has been prepared for hire, he/she will be placed in a list within PeopleSoft
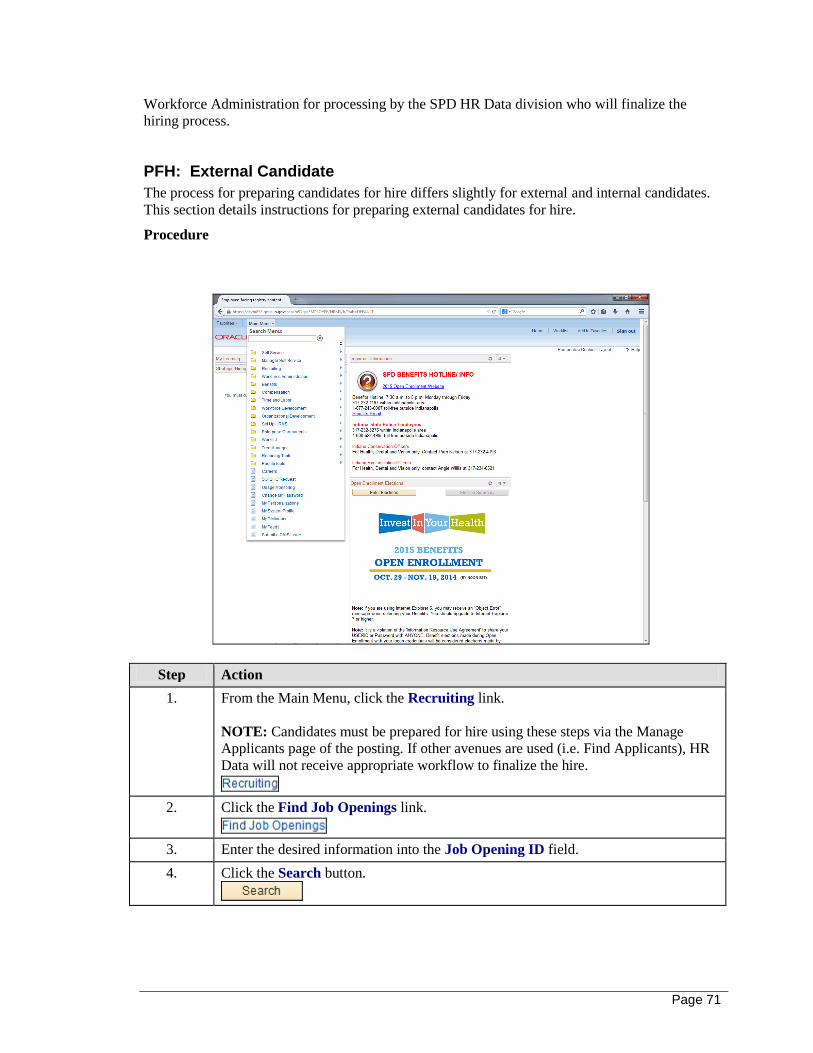
Page 71
Workforce Administration for processing by the SPD HR Data division who will finalize the
hiring process.
PFH: External Candidate
The process for preparing candidates for hire differs slightly for external and internal candidates.
This section details instructions for preparing external candidates for hire.
Procedure
Step Action
1. From the Main Menu, click the Recruiting link.
NOTE: Candidates must be prepared for hire using these steps via the Manage
Applicants page of the posting. If other avenues are used (i.e. Find Applicants), HR
Data will not receive appropriate workflow to finalize the hire.
2. Click the Find Job Openings link.
3. Enter the desired information into the Job Opening ID field.
4. Click the Search button.

Page 72
Step Action
5. Click the Job Title link.
6. Click on the Disposition for the selected candidate.
For this example, click the 069-Preliminary Offer Decided link.
NOTE: If the Disposition isn’t hyperlinked, click on the applicant’s name, find the
appropriate Job Opening and then click the Disposition.
Step Action
7. Scroll down to view the Disposition Details.
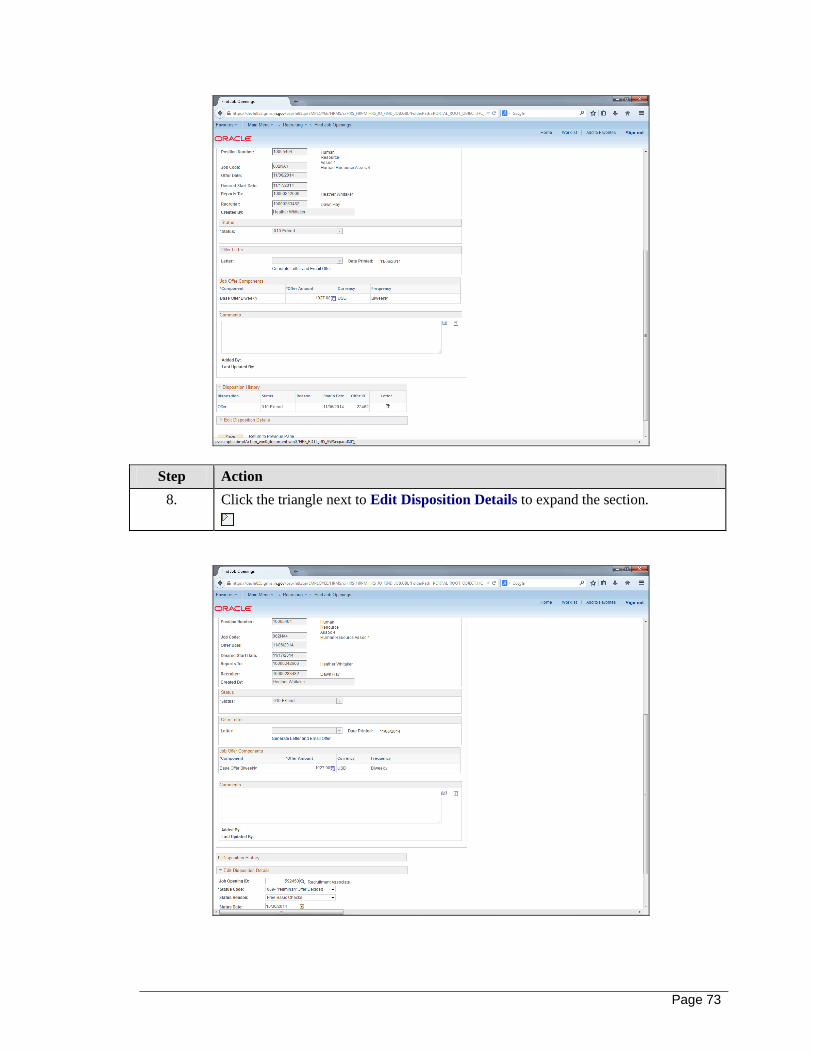
Page 73
Step Action
8. Click the triangle next to Edit Disposition Details to expand the section.
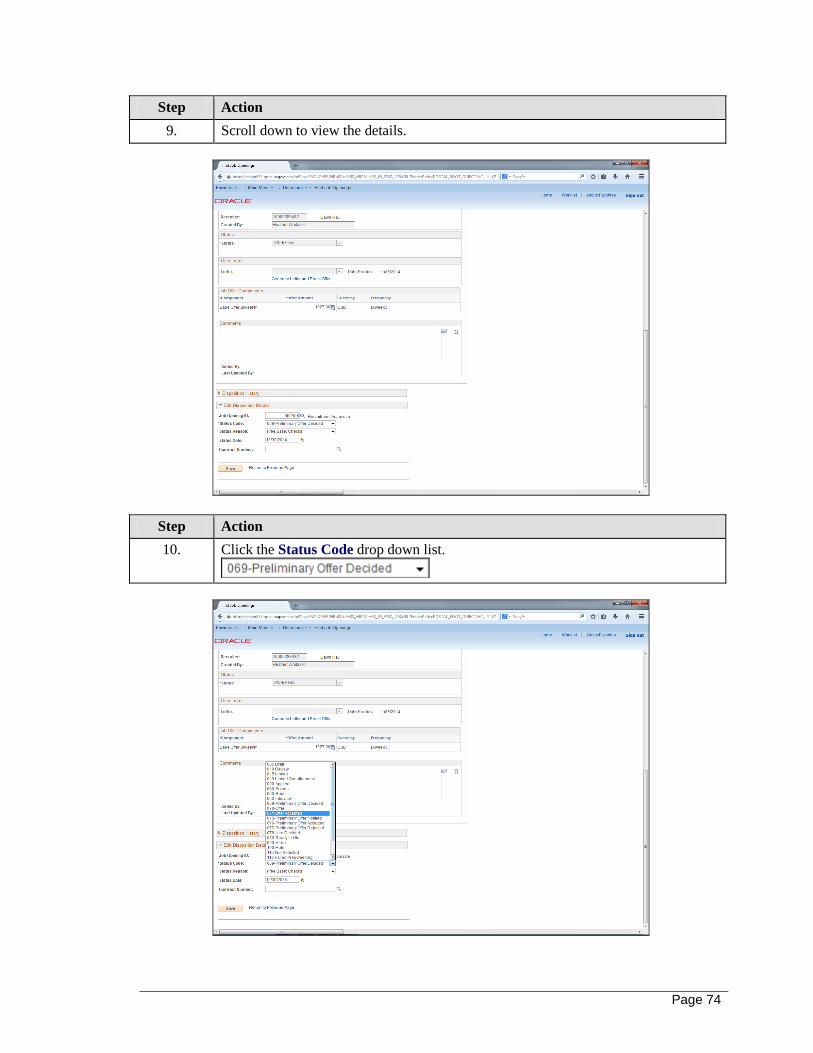
Page 74
Step Action
9. Scroll down to view the details.
Step Action
10. Click the Status Code drop down list.
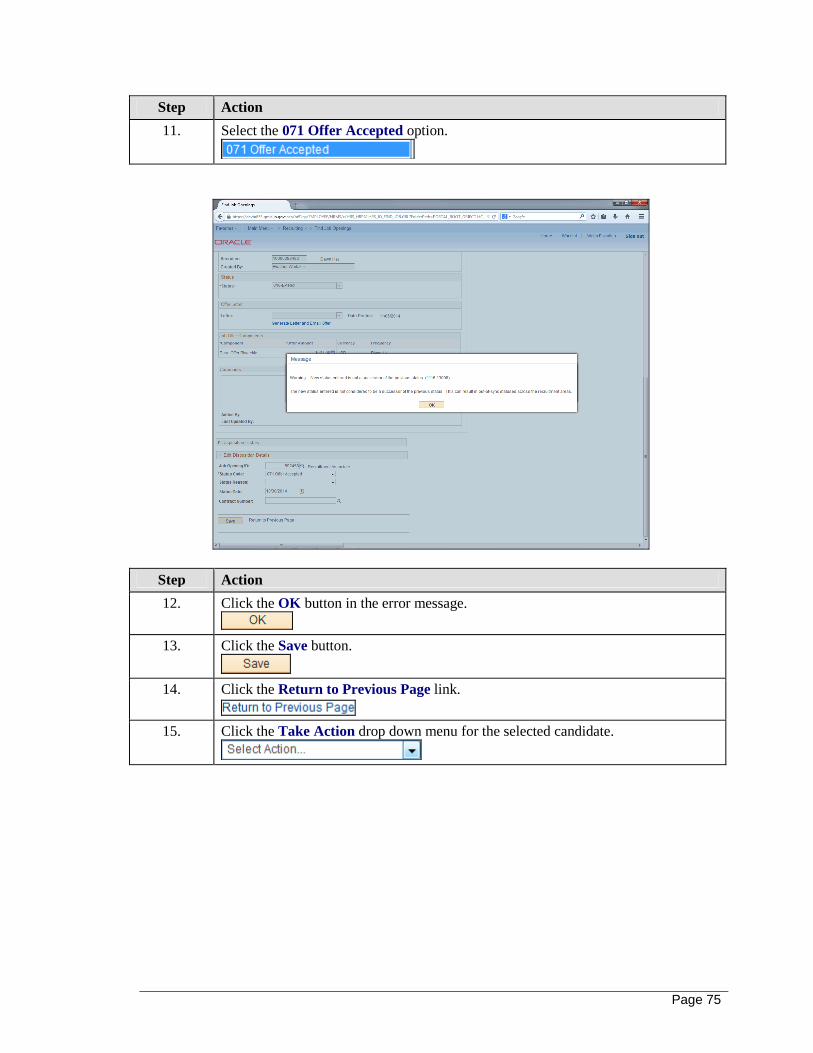
Page 75
Step Action
11. Select the 071 Offer Accepted option.
Step Action
12. Click the OK button in the error message.
13. Click the Save button.
14. Click the Return to Previous Page link.
15. Click the Take Action drop down menu for the selected candidate.
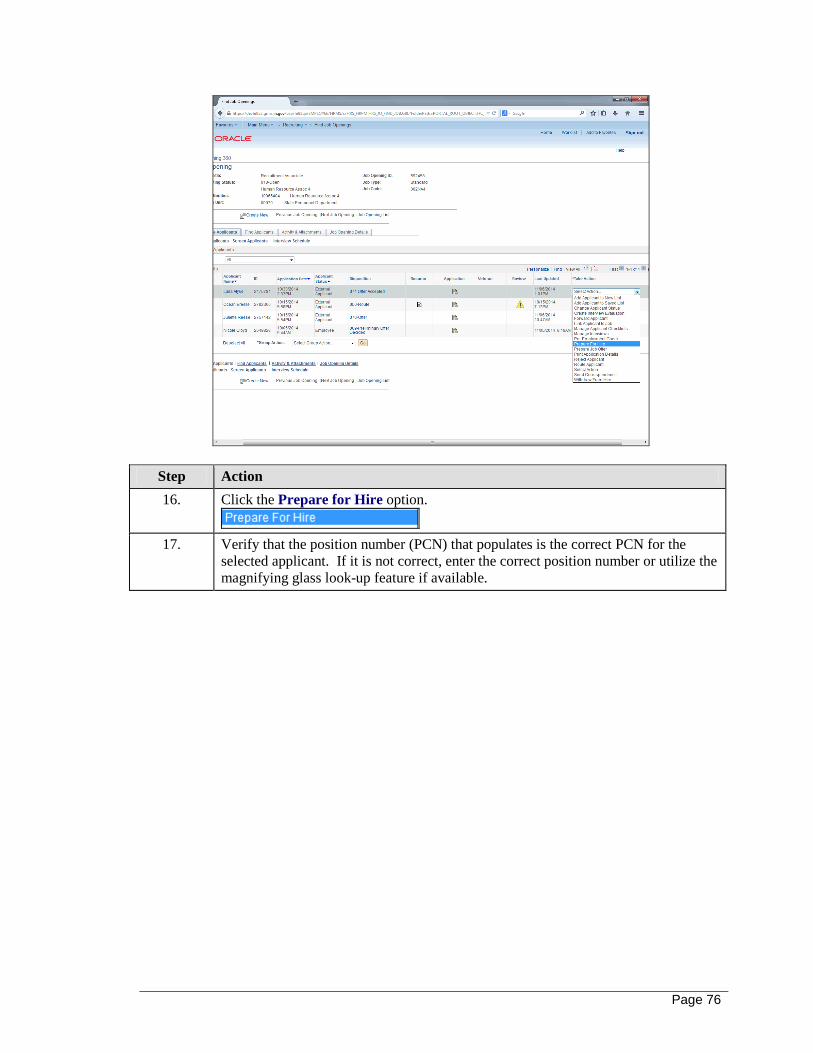
Page 76
Step Action
16. Click the Prepare for Hire option.
17. Verify that the position number (PCN) that populates is the correct PCN for the
selected applicant. If it is not correct, enter the correct position number or utilize the
magnifying glass look-up feature if available.

Page 77
Step Action
18. Enter the bi-weekly salary or hourly rate (whichever applies for the position).
19. Enter the Start Date into the Start Date field or select it from the calendar.
20. Click the drop down box for Type of Hire.

Page 78
Step Action
21. Choose Hire.
NOTE: If the candidate you are preparing for hire is a former employee, select
Rehire instead of Hire.
Step Action
22. Click the Verify Employee ID link.
23. Click the OK button in the pop-up message box.
NOTE: If the candidate you are preparing for hire is a former employee, click the
Carry ID button and then click Return.
24. If any additional comments are necessary for HR Data to review prior to finalizing
the hire, you can list them here. Examples include: requests for additional PPAF
recipients (i.e. payroll), underfill notes with job code, etc.
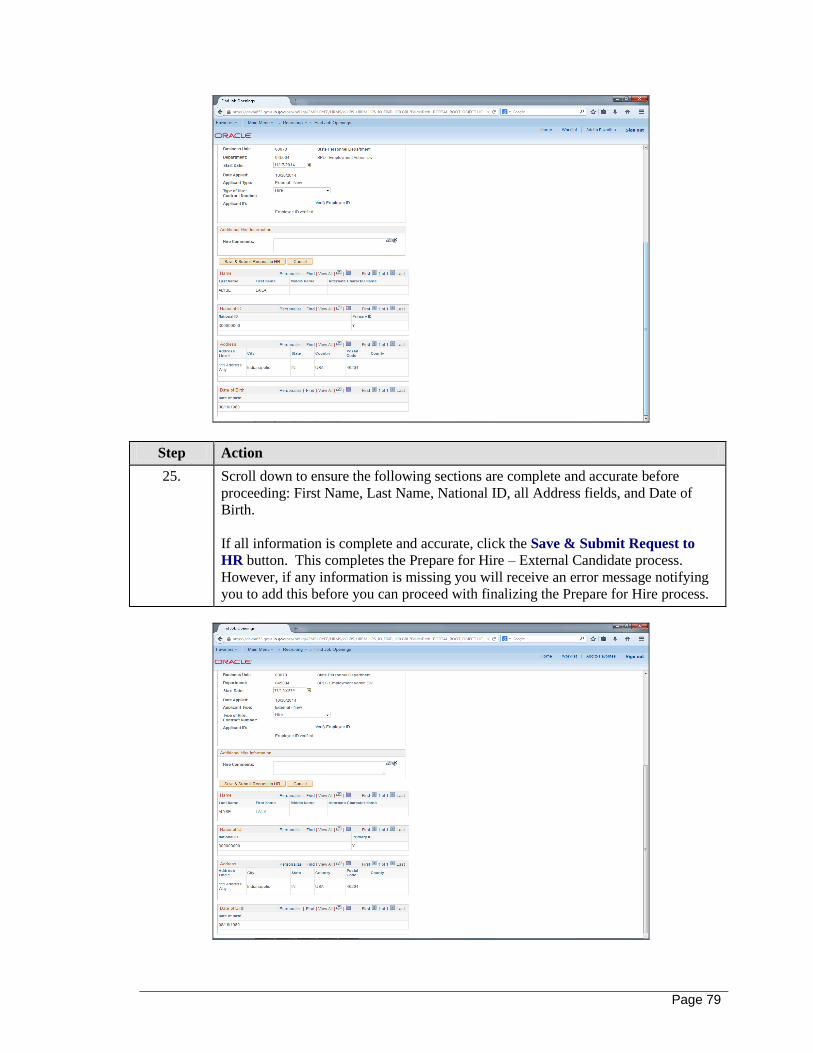
Page 79
Step Action
25. Scroll down to ensure the following sections are complete and accurate before
proceeding: First Name, Last Name, National ID, all Address fields, and Date of
Birth.
If all information is complete and accurate, click the Save & Submit Request to
HR button. This completes the Prepare for Hire – External Candidate process.
However, if any information is missing you will receive an error message notifying
you to add this before you can proceed with finalizing the Prepare for Hire process.

Page 80
Step Action
26. The following steps provide instruction for updating these sections if necessary.
Click the Save & Submit Request to HR button to review the error message.
27. In this example, the county is missing from the Address section.
Review the error message and then click the OK button.
28. Click the Cancel button.
29. From the Manage Applicants page, click on the applicant’s name.
For this example, click the Laila Alyse link.
30. Click the Applicant Data tab.
31. If the Date of Birth or National ID (social security number) was missing, click the
Eligibility & Identity link and enter information in the appropriate sections. Then
click the Save icon.
If the first name, last name or any part of the address was missing click the Contact
link and enter the information in the appropriate sections. The County is missing
from our example.
Click the Contact link.
32. Select the appropriate County from the County drop down list.

Page 81
Step Action
33. For this example, select Marion county.
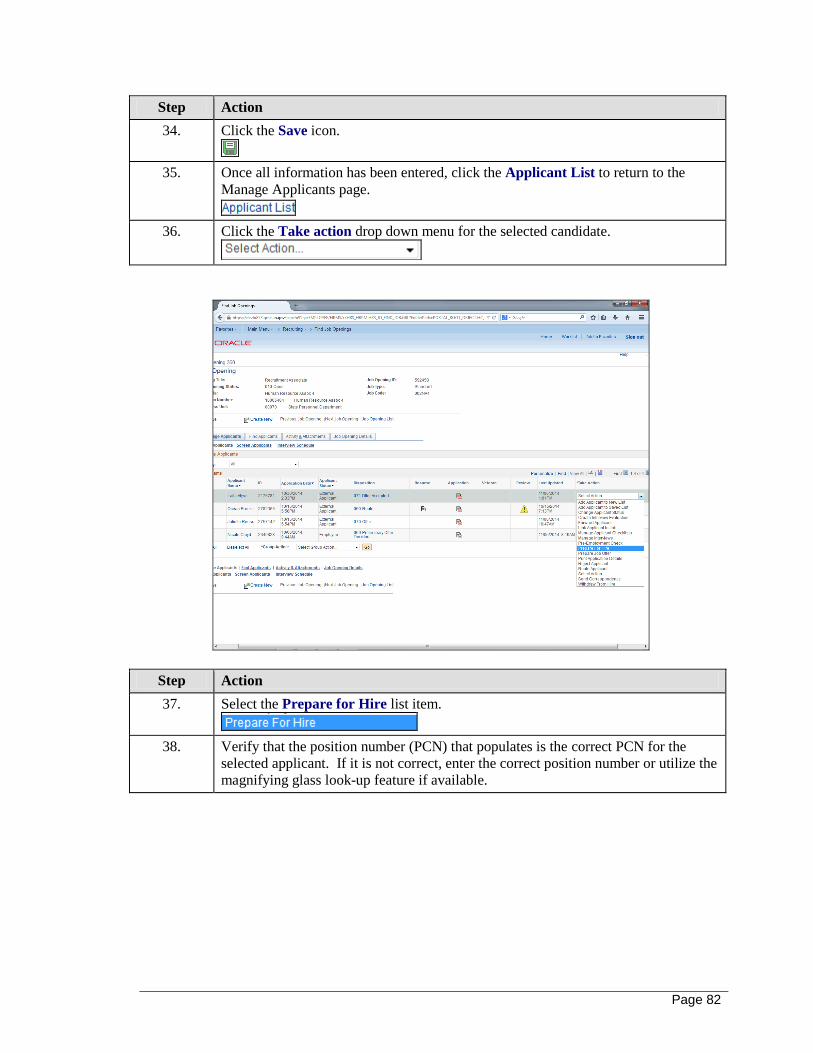
Page 82
Step Action
34. Click the Save icon.
35. Once all information has been entered, click the Applicant List to return to the
Manage Applicants page.
36. Click the Take action drop down menu for the selected candidate.
Step Action
37. Select the Prepare for Hire list item.
38. Verify that the position number (PCN) that populates is the correct PCN for the
selected applicant. If it is not correct, enter the correct position number or utilize the
magnifying glass look-up feature if available.

Page 83
Step Action
39. Enter the bi-weekly salary or hourly rate (whichever applies for the position).
40. Enter the Start Date into the Start Date field or select it from the calendar.
41. Click the Type of Hire drop down list.
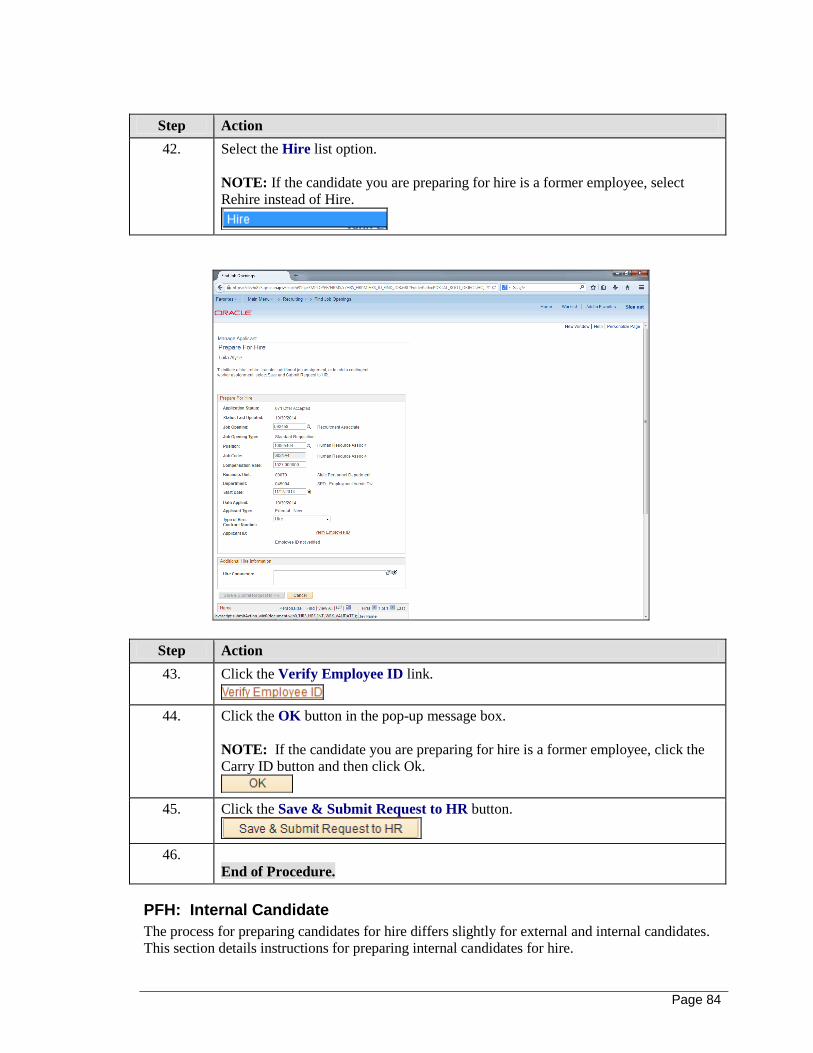
Page 84
Step Action
42. Select the Hire list option.
NOTE: If the candidate you are preparing for hire is a former employee, select
Rehire instead of Hire.
Step Action
43. Click the Verify Employee ID link.
44. Click the OK button in the pop-up message box.
NOTE: If the candidate you are preparing for hire is a former employee, click the
Carry ID button and then click Ok.
45. Click the Save & Submit Request to HR button.
46.
End of Procedure.
PFH: Internal Candidate
The process for preparing candidates for hire differs slightly for external and internal candidates.
This section details instructions for preparing internal candidates for hire.
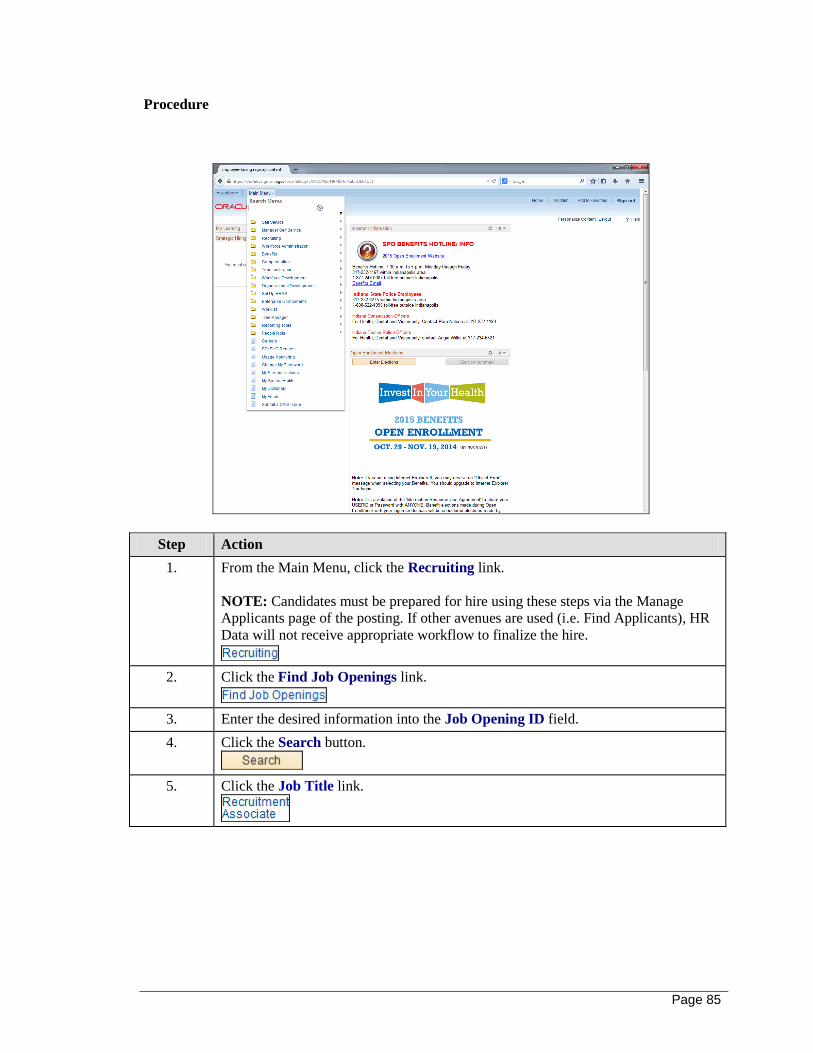
Page 85
Procedure
Step Action
1. From the Main Menu, click the Recruiting link.
NOTE: Candidates must be prepared for hire using these steps via the Manage
Applicants page of the posting. If other avenues are used (i.e. Find Applicants), HR
Data will not receive appropriate workflow to finalize the hire.
2. Click the Find Job Openings link.
3. Enter the desired information into the Job Opening ID field.
4. Click the Search button.
5. Click the Job Title link.
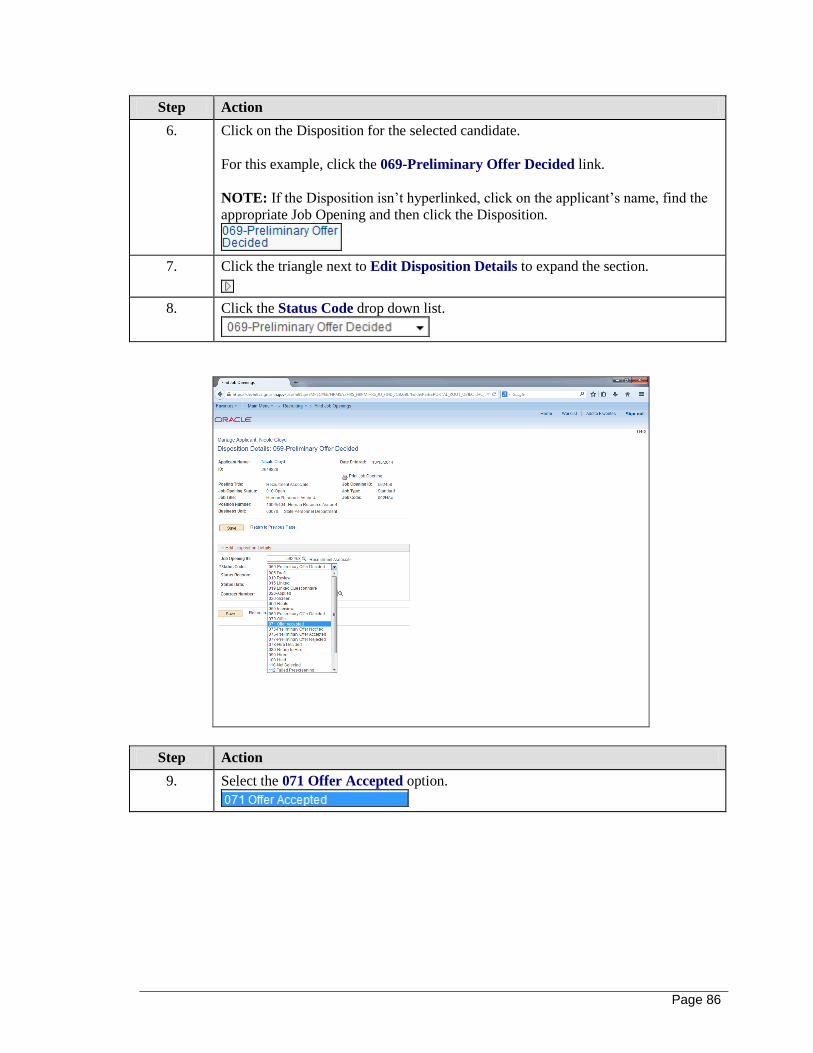
Page 86
Step Action
6. Click on the Disposition for the selected candidate.
For this example, click the 069-Preliminary Offer Decided link.
NOTE: If the Disposition isn’t hyperlinked, click on the applicant’s name, find the
appropriate Job Opening and then click the Disposition.
7. Click the triangle next to Edit Disposition Details to expand the section.
8. Click the Status Code drop down list.
Step Action
9. Select the 071 Offer Accepted option.
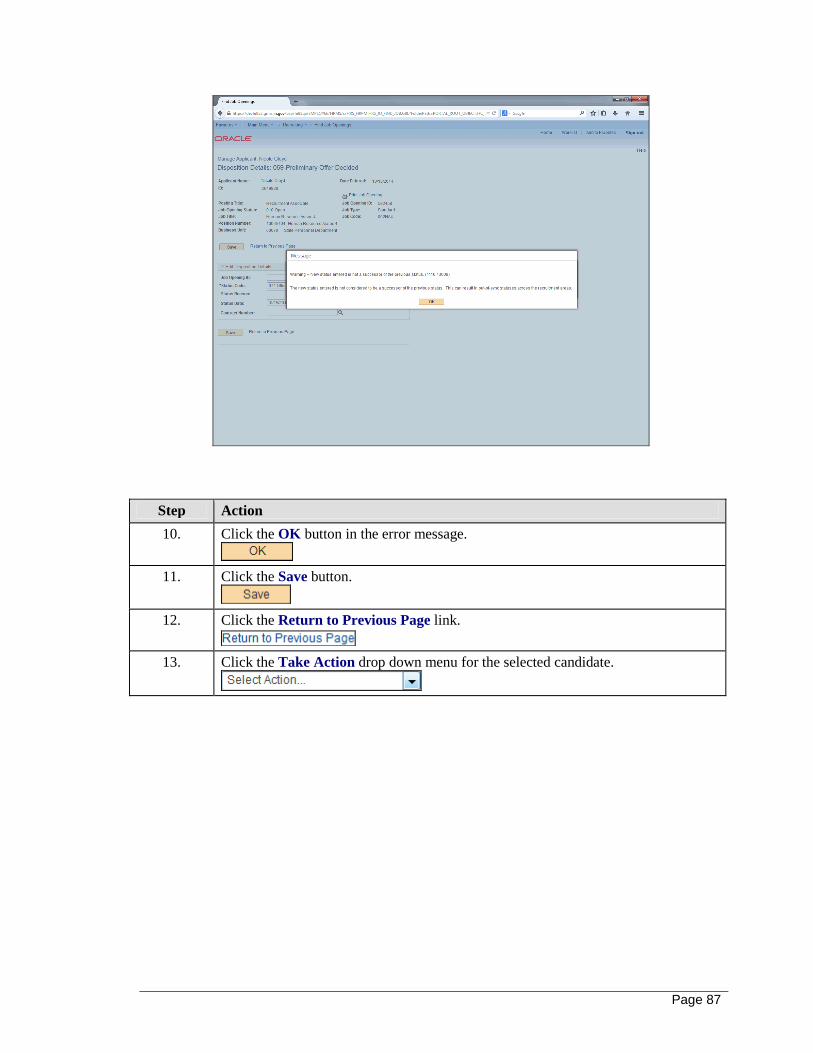
Page 87
Step Action
10. Click the OK button in the error message.
11. Click the Save button.
12. Click the Return to Previous Page link.
13. Click the Take Action drop down menu for the selected candidate.
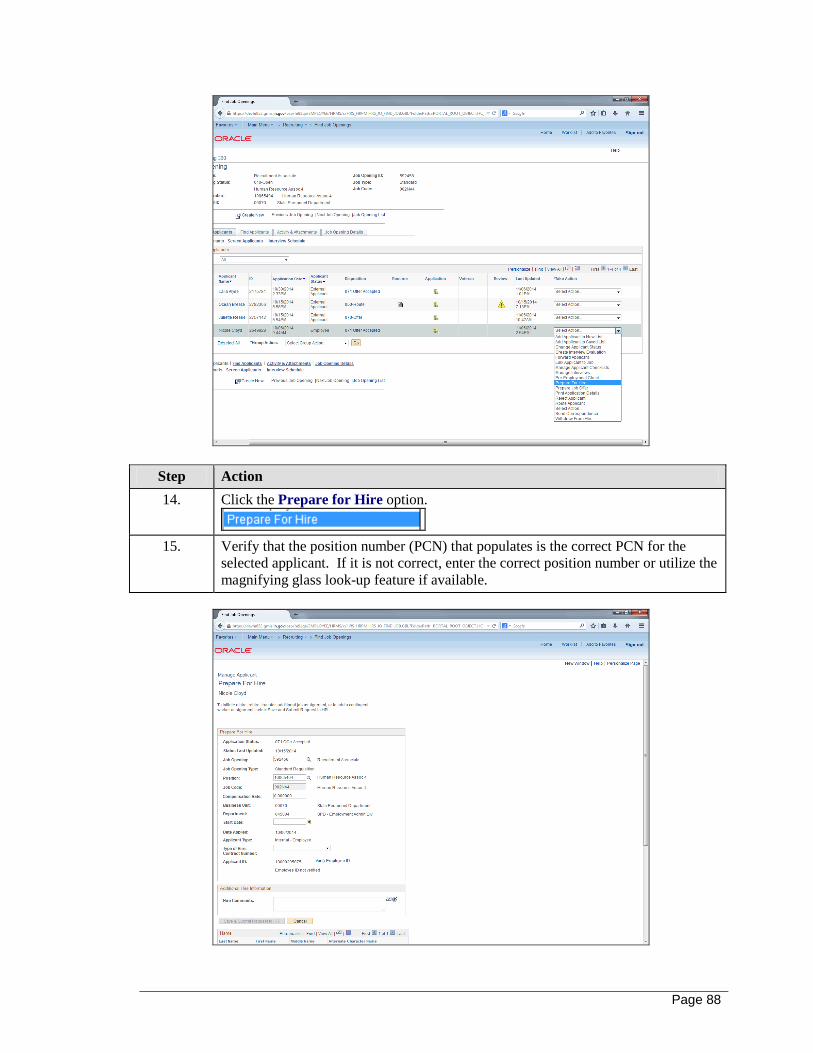
Page 88
Step Action
14. Click the Prepare for Hire option.
15. Verify that the position number (PCN) that populates is the correct PCN for the
selected applicant. If it is not correct, enter the correct position number or utilize the
magnifying glass look-up feature if available.
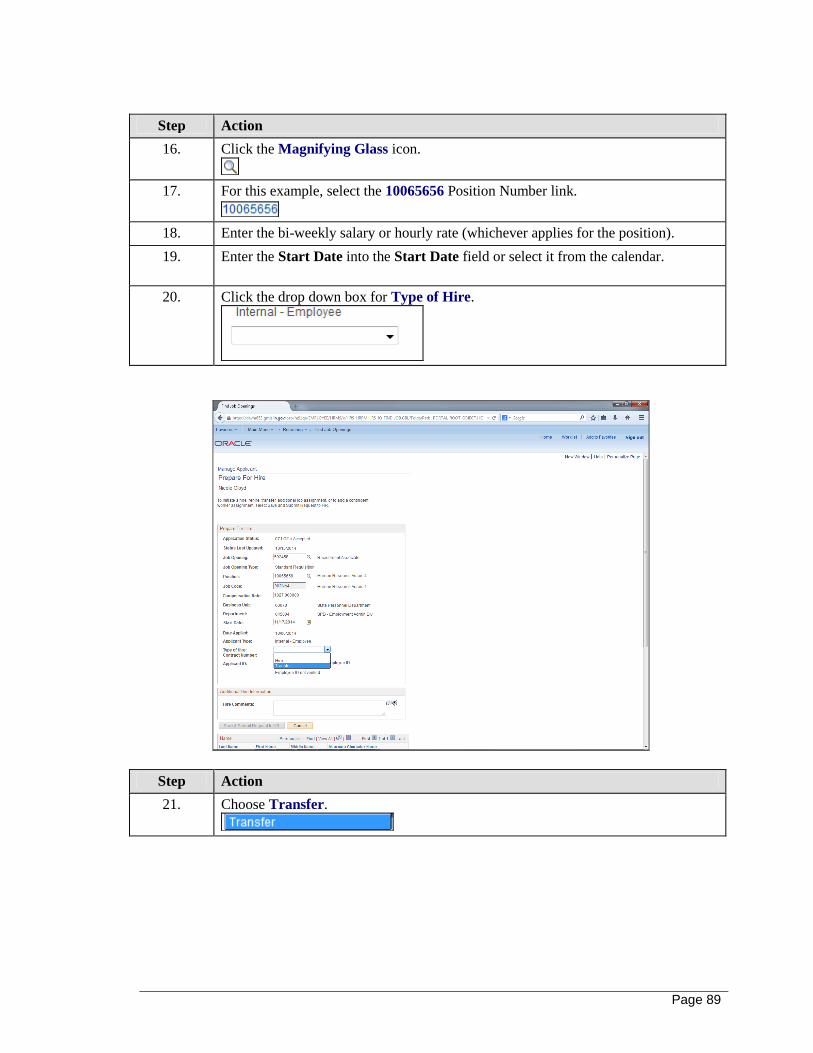
Page 89
Step Action
16. Click the Magnifying Glass icon.
17. For this example, select the 10065656 Position Number link.
18. Enter the bi-weekly salary or hourly rate (whichever applies for the position).
19. Enter the Start Date into the Start Date field or select it from the calendar.
20. Click the drop down box for Type of Hire.
Step Action
21. Choose Transfer.
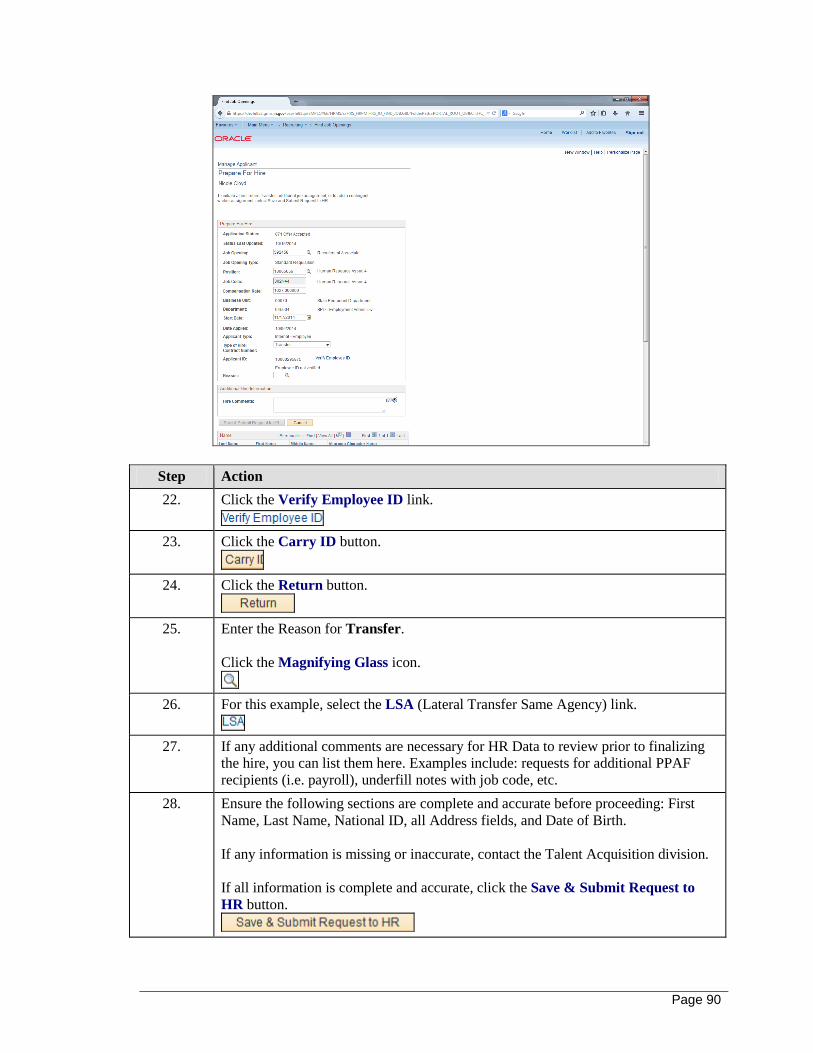
Page 90
Step Action
22. Click the Verify Employee ID link.
23. Click the Carry ID button.
24. Click the Return button.
25. Enter the Reason for Transfer.
Click the Magnifying Glass icon.
26. For this example, select the LSA (Lateral Transfer Same Agency) link.
27. If any additional comments are necessary for HR Data to review prior to finalizing
the hire, you can list them here. Examples include: requests for additional PPAF
recipients (i.e. payroll), underfill notes with job code, etc.
28. Ensure the following sections are complete and accurate before proceeding: First
Name, Last Name, National ID, all Address fields, and Date of Birth.
If any information is missing or inaccurate, contact the Talent Acquisition division.
If all information is complete and accurate, click the Save & Submit Request to
HR button.

Page 91
PFH: Withdraw from Ready to Hire
Once a candidate has been prepared for hire, he/she can be withdrawn from hire should this be
necessary due to error of any kind assuming the candidate still has the disposition of 080-Ready
to Hire. If the candidate has the disposition of 090-Hired, you must contact HR Data. This section
details instructions for withdrawing a candidate from 080-Ready to Hire.
Procedure
Step Action
1. From the Main Menu, click the Recruiting link.
2. Click the Find Job Openings link.
3. Enter the desired information into the Job Opening ID field.
4. Click the Search button.
5. Click the Job Title link.
6. Find the candidate that needs to be withdrawn from 080-Ready to Hire and click
the Take Action drop down list.
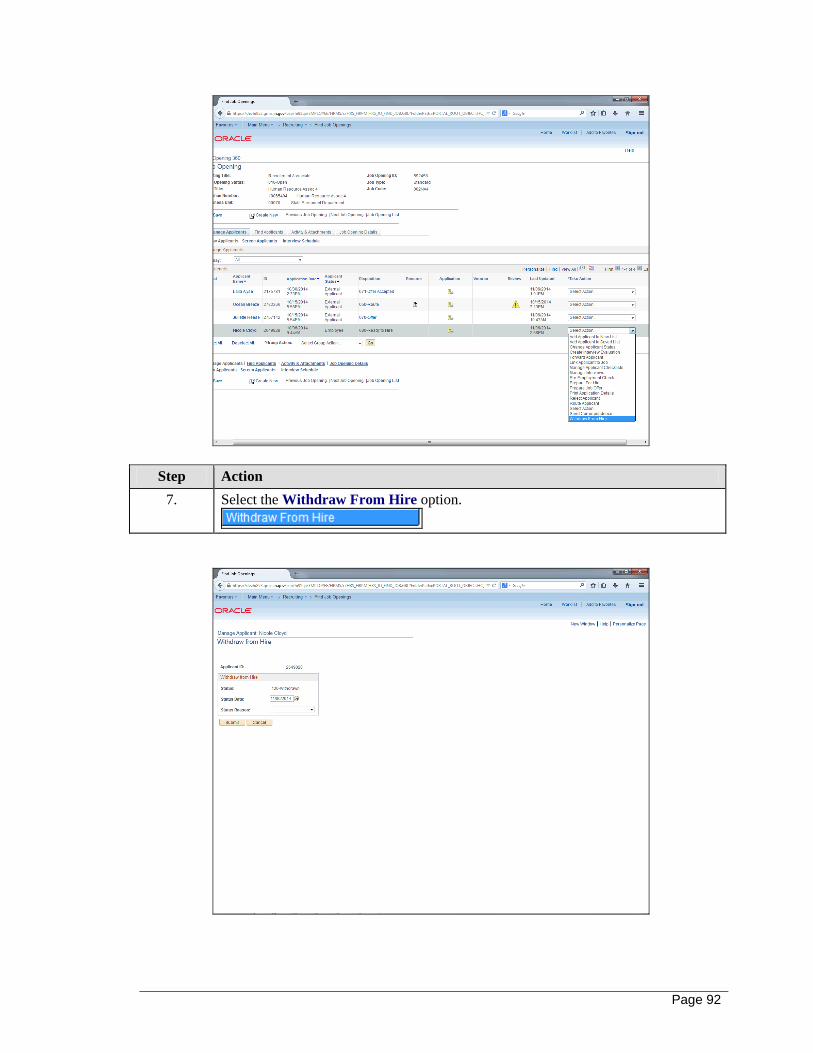
Page 92
Step Action
7. Select the Withdraw From Hire option.
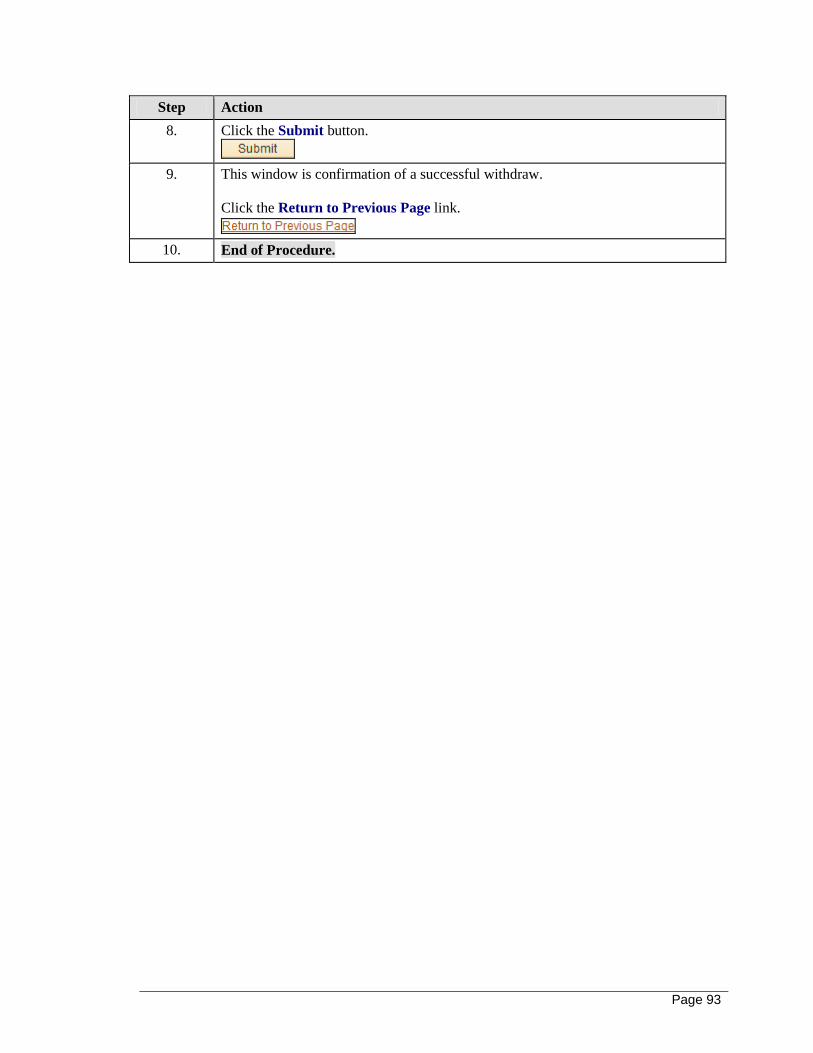
Page 93
Step Action
8. Click the Submit button.
9. This window is confirmation of a successful withdraw.
Click the Return to Previous Page link.
10. End of Procedure.
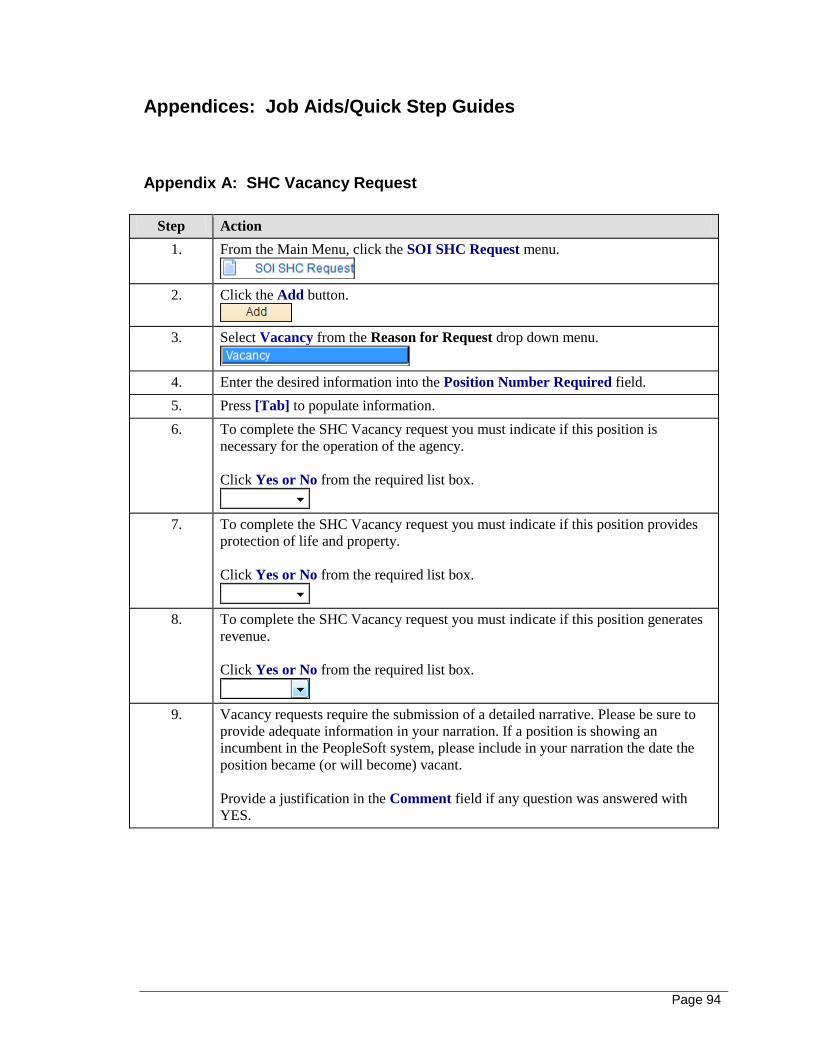
Page 94
Appendices: Job Aids/Quick Step Guides
Appendix A: SHC Vacancy Request
Step Action
1. From the Main Menu, click the SOI SHC Request menu.
2. Click the Add button.
3. Select Vacancy from the Reason for Request drop down menu.
4. Enter the desired information into the Position Number Required field.
5. Press [Tab] to populate information.
6. To complete the SHC Vacancy request you must indicate if this position is
necessary for the operation of the agency.
Click Yes or No from the required list box.
7. To complete the SHC Vacancy request you must indicate if this position provides
protection of life and property.
Click Yes or No from the required list box.
8. To complete the SHC Vacancy request you must indicate if this position generates
revenue.
Click Yes or No from the required list box.
9. Vacancy requests require the submission of a detailed narrative. Please be sure to
provide adequate information in your narration. If a position is showing an
incumbent in the PeopleSoft system, please include in your narration the date the
position became (or will become) vacant.
Provide a justification in the Comment field if any question was answered with
YES.
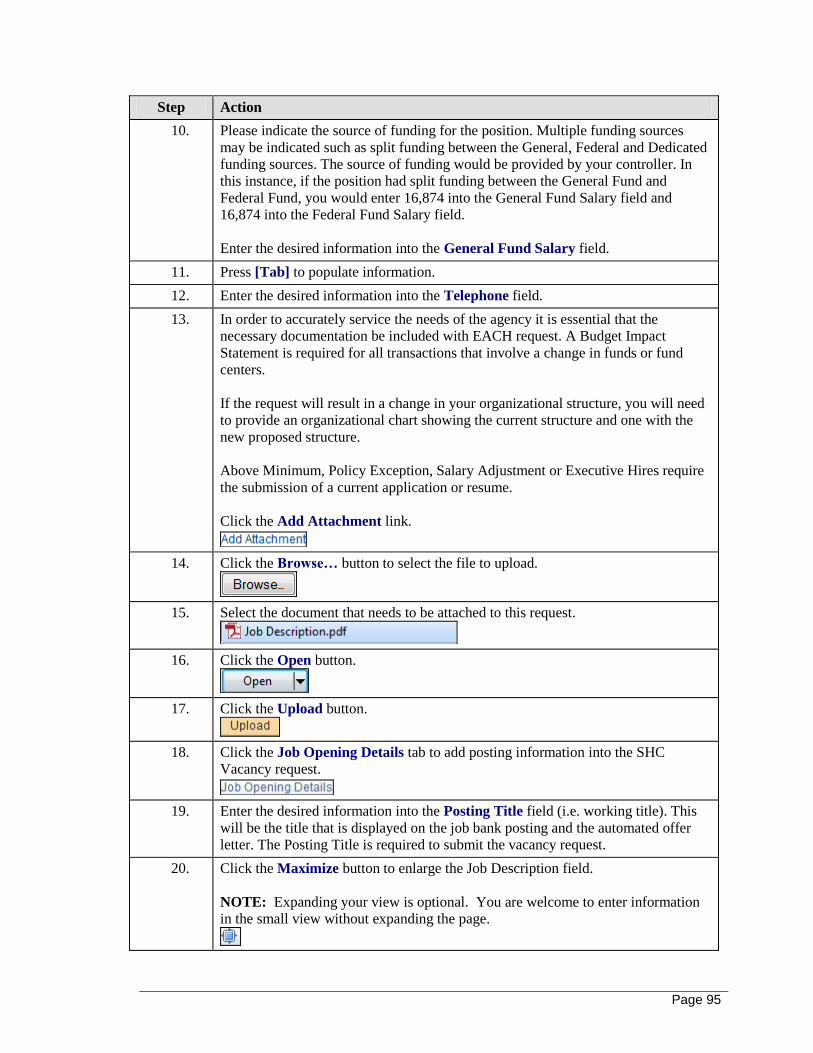
Page 95
Step Action
10. Please indicate the source of funding for the position. Multiple funding sources
may be indicated such as split funding between the General, Federal and Dedicated
funding sources. The source of funding would be provided by your controller. In
this instance, if the position had split funding between the General Fund and
Federal Fund, you would enter 16,874 into the General Fund Salary field and
16,874 into the Federal Fund Salary field.
Enter the desired information into the General Fund Salary field.
11. Press [Tab] to populate information.
12. Enter the desired information into the Telephone field.
13. In order to accurately service the needs of the agency it is essential that the
necessary documentation be included with EACH request. A Budget Impact
Statement is required for all transactions that involve a change in funds or fund
centers.
If the request will result in a change in your organizational structure, you will need
to provide an organizational chart showing the current structure and one with the
new proposed structure.
Above Minimum, Policy Exception, Salary Adjustment or Executive Hires require
the submission of a current application or resume.
Click the Add Attachment link.
14. Click the Browse… button to select the file to upload.
15. Select the document that needs to be attached to this request.
16. Click the Open button.
17. Click the Upload button.
18. Click the Job Opening Details tab to add posting information into the SHC
Vacancy request.
19. Enter the desired information into the Posting Title field (i.e. working title). This
will be the title that is displayed on the job bank posting and the automated offer
letter. The Posting Title is required to submit the vacancy request.
20. Click the Maximize button to enlarge the Job Description field.
NOTE: Expanding your view is optional. You are welcome to enter information
in the small view without expanding the page.

Page 96
Step Action
21. Enter the Job Description (i.e. Purpose of Position/Summary) for the posting.
NOTE: Job descriptions should be an At-A-Glance view of the job. Please be as
brief as possible.
22. After you have entered the job description you can select the Minimize button to
return to the Job Opening Details main page.
23. Click the Maximize button to enlarge the Responsibilities field.
NOTE: This section is optional if it is an agency practice to list the essential duties
in the posting.
24. Enter the Responsibilities (i.e. Essential Duties) for the posting.
25. After you have entered the responsibilities you can select the Minimize button to
return to the Job Opening Details main page.
26. Click the Maximize button to enlarge the Preferred Experience field.
27. Review the auto-populated information in the Preferred Experience section and edit
if necessary.
NOTE: A Preferred Experience statement will not auto-populate for any job code
that does not have a standard statement stored in PeopleSoft (i.e. EXBB, formerly
non-merit job codes, etc). If you know what the manager would like to list as the
Preferred Experience statement, list it. If not, it can be listed when the job opening
is created. Contact the Talent Acquisition division with questions.
Click in the Preferred Experience text box and add any additional information.
28. After you have reviewed and/or edited the information in this section, click the
Minimize Screen button.
29. NOTE: Standard statements populate into the Benefits section (for full-time
regular positions only) and the Equal Employment Opportunity section. To add
additional information to either of these sections, repeat the steps listed above.
30. Click the Add Recruiters link.
Enter the name of the agency recruiter or use the lookup feature to search for this
person. To add more than one Recruiter, repeat these steps.
NOTE: The Recruiter field is required to submit the vacancy request.
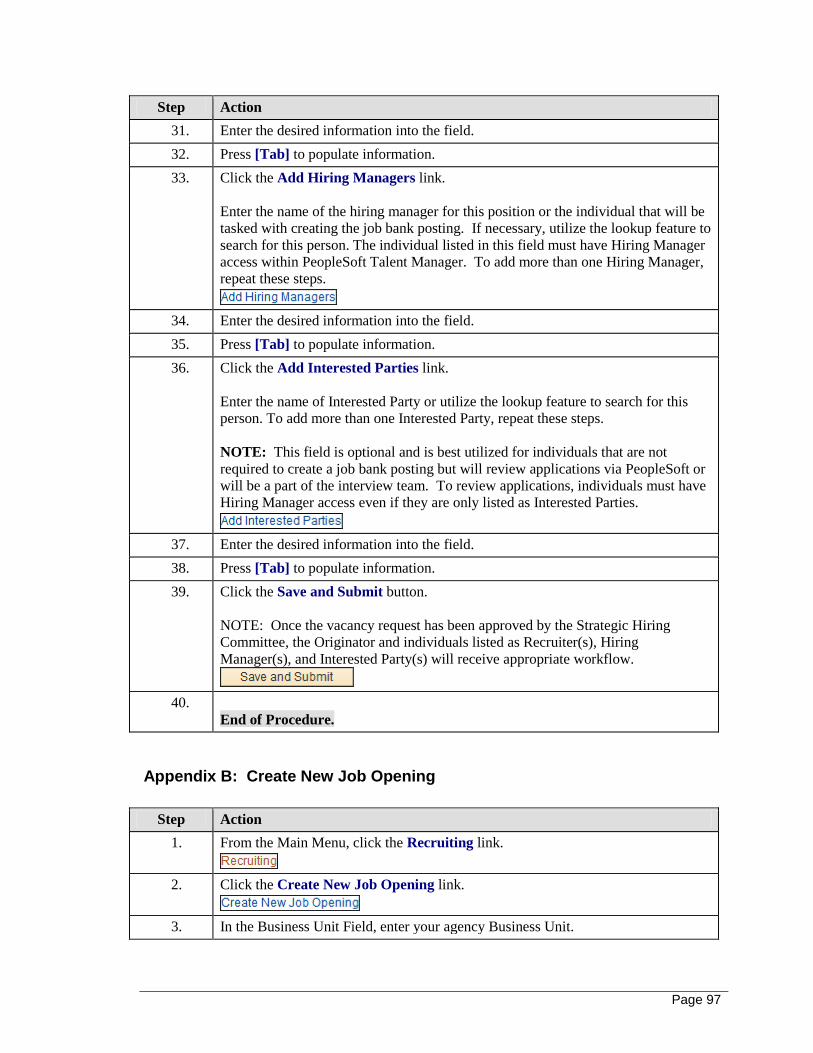
Page 97
Step Action
31. Enter the desired information into the field.
32. Press [Tab] to populate information.
33. Click the Add Hiring Managers link.
Enter the name of the hiring manager for this position or the individual that will be
tasked with creating the job bank posting. If necessary, utilize the lookup feature to
search for this person. The individual listed in this field must have Hiring Manager
access within PeopleSoft Talent Manager. To add more than one Hiring Manager,
repeat these steps.
34. Enter the desired information into the field.
35. Press [Tab] to populate information.
36. Click the Add Interested Parties link.
Enter the name of Interested Party or utilize the lookup feature to search for this
person. To add more than one Interested Party, repeat these steps.
NOTE: This field is optional and is best utilized for individuals that are not
required to create a job bank posting but will review applications via PeopleSoft or
will be a part of the interview team. To review applications, individuals must have
Hiring Manager access even if they are only listed as Interested Parties.
37. Enter the desired information into the field.
38. Press [Tab] to populate information.
39. Click the Save and Submit button.
NOTE: Once the vacancy request has been approved by the Strategic Hiring
Committee, the Originator and individuals listed as Recruiter(s), Hiring
Manager(s), and Interested Party(s) will receive appropriate workflow.
40.
End of Procedure.
Appendix B: Create New Job Opening
Step Action
1. From the Main Menu, click the Recruiting link.
2. Click the Create New Job Opening link.
3. In the Business Unit Field, enter your agency Business Unit.
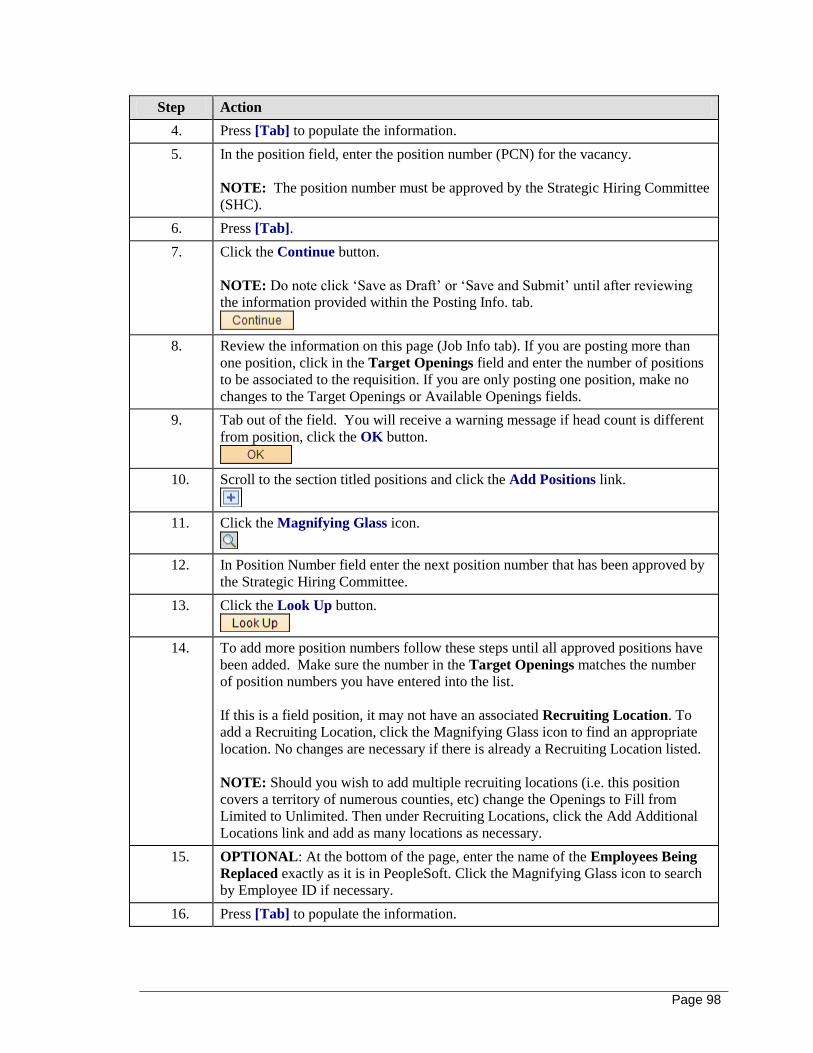
Page 98
Step Action
4. Press [Tab] to populate the information.
5. In the position field, enter the position number (PCN) for the vacancy.
NOTE: The position number must be approved by the Strategic Hiring Committee
(SHC).
6. Press [Tab].
7. Click the Continue button.
NOTE: Do note click ‘Save as Draft’ or ‘Save and Submit’ until after reviewing
the information provided within the Posting Info. tab.
8. Review the information on this page (Job Info tab). If you are posting more than
one position, click in the Target Openings field and enter the number of positions
to be associated to the requisition. If you are only posting one position, make no
changes to the Target Openings or Available Openings fields.
9. Tab out of the field. You will receive a warning message if head count is different
from position, click the OK button.
10. Scroll to the section titled positions and click the Add Positions link.
11. Click the Magnifying Glass icon.
12. In Position Number field enter the next position number that has been approved by
the Strategic Hiring Committee.
13. Click the Look Up button.
14. To add more position numbers follow these steps until all approved positions have
been added. Make sure the number in the Target Openings matches the number
of position numbers you have entered into the list.
If this is a field position, it may not have an associated Recruiting Location. To
add a Recruiting Location, click the Magnifying Glass icon to find an appropriate
location. No changes are necessary if there is already a Recruiting Location listed.
NOTE: Should you wish to add multiple recruiting locations (i.e. this position
covers a territory of numerous counties, etc) change the Openings to Fill from
Limited to Unlimited. Then under Recruiting Locations, click the Add Additional
Locations link and add as many locations as necessary.
15. OPTIONAL: At the bottom of the page, enter the name of the Employees Being
Replaced exactly as it is in PeopleSoft. Click the Magnifying Glass icon to search
by Employee ID if necessary.
16. Press [Tab] to populate the information.

Page 99
Step Action
17. Click the Next Step link.
18. Review the information on the Min Requirements page; however, make no
changes. Click the Next Step link.
19. At this time we are not using the competencies page. Click the Next Step link.
20. Click the link with the vacancy’s posting title found in the blue Job Postings
section. This Posting Title was entered when the vacancy request was submitted to
the Strategic Hiring Committee.
Click the Human Resources Generalist 2 - Benefits link.
NOTE: You must click the link before clicking 'Save as Draft' or 'Save and
Submit'. Otherwise, the posting information added during the vacancy request
process will not populate.
21. Review the information listed in the sections on this page: Posting Title, Equal
Employment Opportunity, Benefits, Preferred Experience, Responsibilities (if
listed), and Job Description. Edit as necessary; however, all full-time postings
should include each of these sections with the exception of Responsibilities. If no
Responsibilities are listed/ needed to be listed for this posting, you can remove this
blank section by clicking the trash can icon in the top right corner of the
Responsibilities section.
NOTE: All sections will default with a view of Internal and External meaning any
applicant can apply. Should you wish the posting to be viewed by only internal
State employees, change all sections to Internal Only. External Only is not
recommended. Internal applicants should always be given the opportunity to apply
to all positions.
NOTE: If nothing pre-populates on this page, this means that the position was
submitted to the Strategic Hiring Committee as something other than as a Vacancy
Request (i.e. reclassification, etc) or you’ve already clicked the ‘Save as Draft’ or
‘Save and Submit’ button. If your vacancy was submitted as something other than
as a Vacancy Request, you will need to build your posting from scratch. Contact
your recruiter for a quick step guide. If you had already clicked the ‘Save as Draft’
or ‘Save and Submit’ buttons, you will need to start over from step 1 of this Create
New Job Opening process.
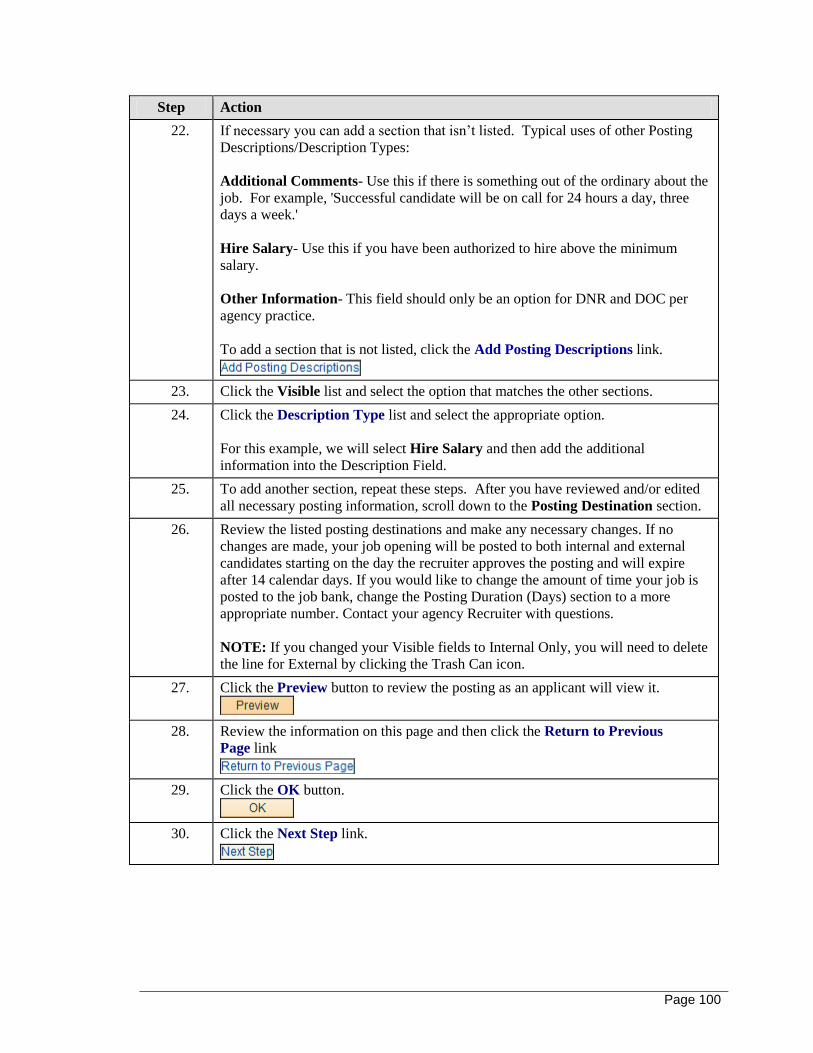
Page 100
Step Action
22. If necessary you can add a section that isn’t listed. Typical uses of other Posting
Descriptions/Description Types:
Additional Comments- Use this if there is something out of the ordinary about the
job. For example, 'Successful candidate will be on call for 24 hours a day, three
days a week.'
Hire Salary- Use this if you have been authorized to hire above the minimum
salary.
Other Information- This field should only be an option for DNR and DOC per
agency practice.
To add a section that is not listed, click the Add Posting Descriptions link.
23. Click the Visible list and select the option that matches the other sections.
24. Click the Description Type list and select the appropriate option.
For this example, we will select Hire Salary and then add the additional
information into the Description Field.
25. To add another section, repeat these steps. After you have reviewed and/or edited
all necessary posting information, scroll down to the Posting Destination section.
26. Review the listed posting destinations and make any necessary changes. If no
changes are made, your job opening will be posted to both internal and external
candidates starting on the day the recruiter approves the posting and will expire
after 14 calendar days. If you would like to change the amount of time your job is
posted to the job bank, change the Posting Duration (Days) section to a more
appropriate number. Contact your agency Recruiter with questions.
NOTE: If you changed your Visible fields to Internal Only, you will need to delete
the line for External by clicking the Trash Can icon.
27. Click the Preview button to review the posting as an applicant will view it.
28. Review the information on this page and then click the Return to Previous
Page link
29. Click the OK button.
30. Click the Next Step link.
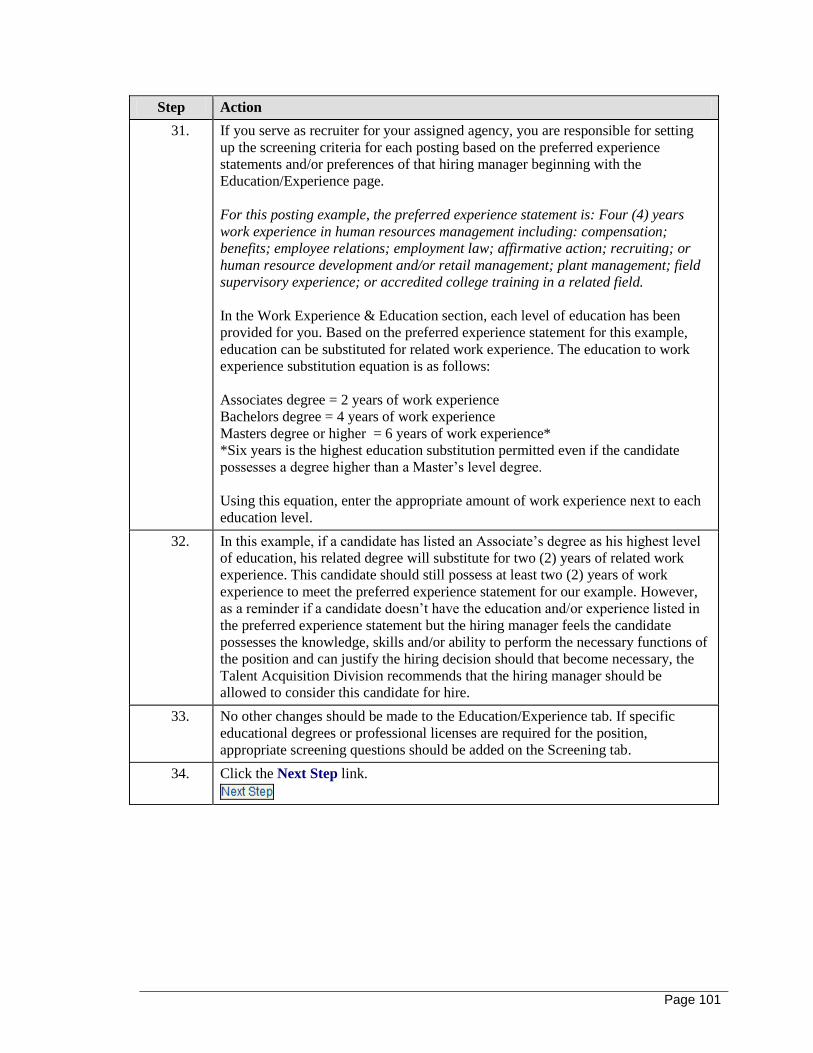
Page 101
Step Action
31. If you serve as recruiter for your assigned agency, you are responsible for setting
up the screening criteria for each posting based on the preferred experience
statements and/or preferences of that hiring manager beginning with the
Education/Experience page.
For this posting example, the preferred experience statement is: Four (4) years
work experience in human resources management including: compensation;
benefits; employee relations; employment law; affirmative action; recruiting; or
human resource development and/or retail management; plant management; field
supervisory experience; or accredited college training in a related field.
In the Work Experience & Education section, each level of education has been
provided for you. Based on the preferred experience statement for this example,
education can be substituted for related work experience. The education to work
experience substitution equation is as follows:
Associates degree = 2 years of work experience
Bachelors degree = 4 years of work experience
Masters degree or higher = 6 years of work experience*
*Six years is the highest education substitution permitted even if the candidate
possesses a degree higher than a Master’s level degree.
Using this equation, enter the appropriate amount of work experience next to each
education level.
32. In this example, if a candidate has listed an Associate’s degree as his highest level
of education, his related degree will substitute for two (2) years of related work
experience. This candidate should still possess at least two (2) years of work
experience to meet the preferred experience statement for our example. However,
as a reminder if a candidate doesn’t have the education and/or experience listed in
the preferred experience statement but the hiring manager feels the candidate
possesses the knowledge, skills and/or ability to perform the necessary functions of
the position and can justify the hiring decision should that become necessary, the
Talent Acquisition Division recommends that the hiring manager should be
allowed to consider this candidate for hire.
33. No other changes should be made to the Education/Experience tab. If specific
educational degrees or professional licenses are required for the position,
appropriate screening questions should be added on the Screening tab.
34. Click the Next Step link.
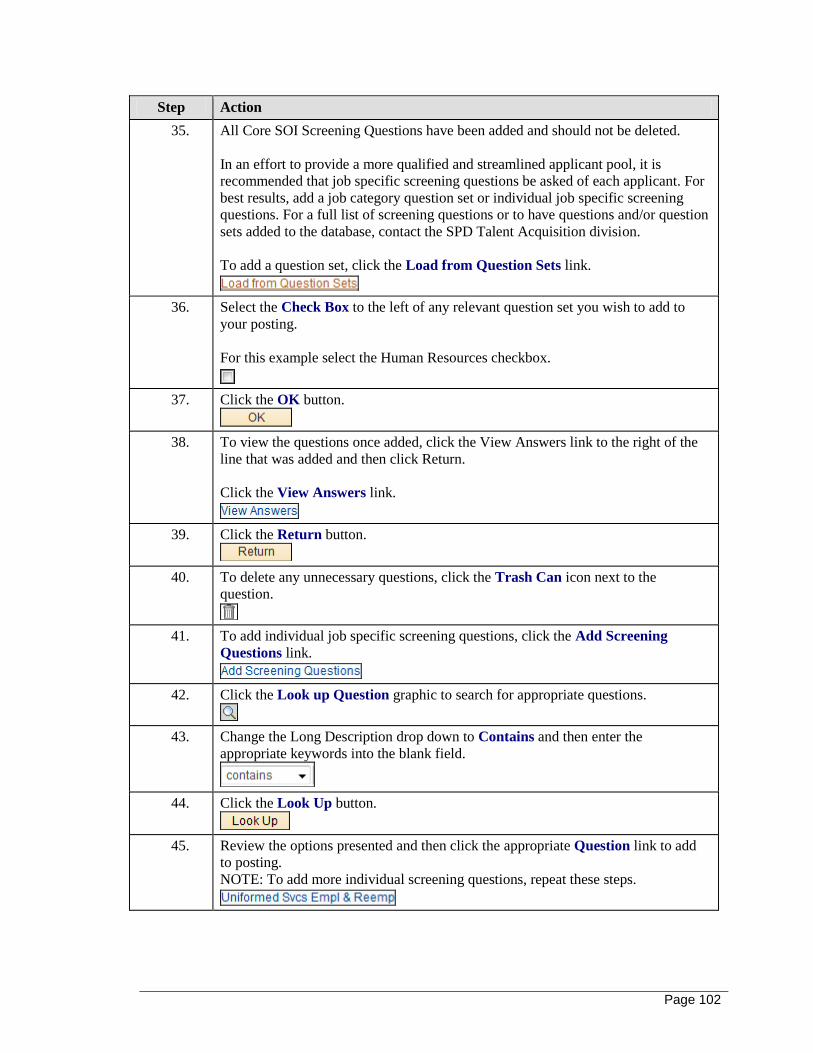
Page 102
Step Action
35. All Core SOI Screening Questions have been added and should not be deleted.
In an effort to provide a more qualified and streamlined applicant pool, it is
recommended that job specific screening questions be asked of each applicant. For
best results, add a job category question set or individual job specific screening
questions. For a full list of screening questions or to have questions and/or question
sets added to the database, contact the SPD Talent Acquisition division.
To add a question set, click the Load from Question Sets link.
36. Select the Check Box to the left of any relevant question set you wish to add to
your posting.
For this example select the Human Resources checkbox.
37. Click the OK button.
38. To view the questions once added, click the View Answers link to the right of the
line that was added and then click Return.
Click the View Answers link.
39. Click the Return button.
40. To delete any unnecessary questions, click the Trash Can icon next to the
question.
41. To add individual job specific screening questions, click the Add Screening
Questions link.
42. Click the Look up Question graphic to search for appropriate questions.
43. Change the Long Description drop down to Contains and then enter the
appropriate keywords into the blank field.
44. Click the Look Up button.
45. Review the options presented and then click the appropriate Question link to add
to posting.
NOTE: To add more individual screening questions, repeat these steps.
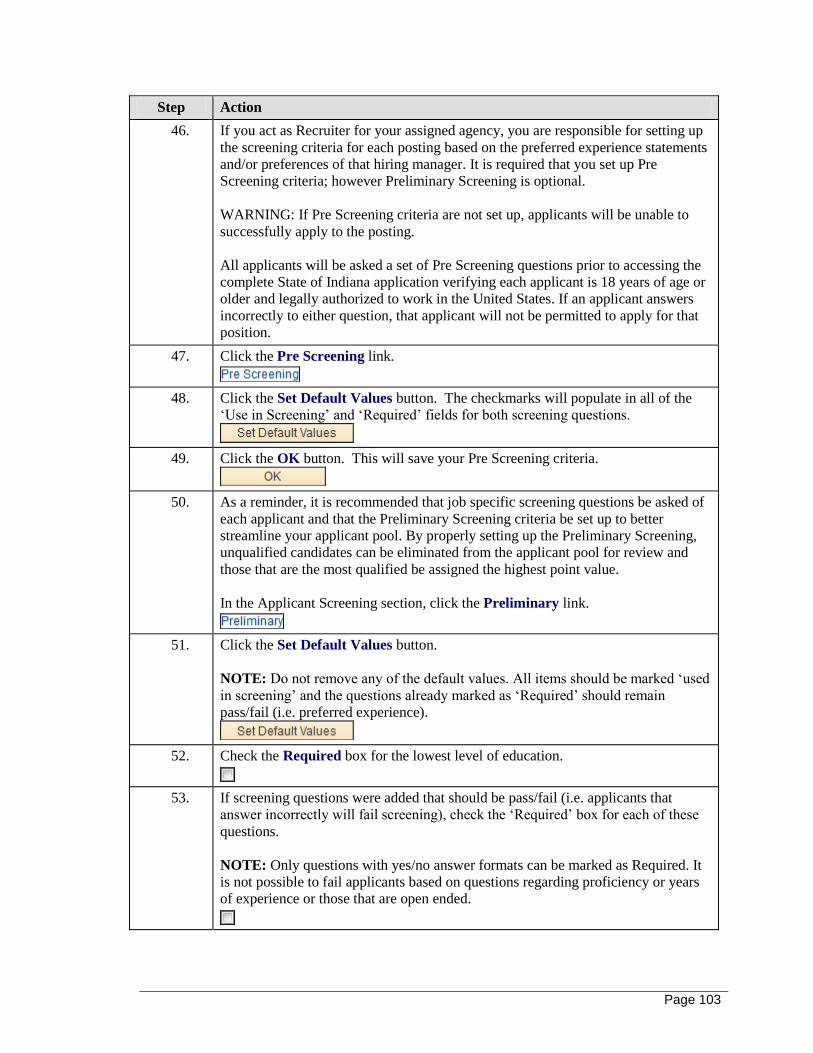
Page 103
Step Action
46. If you act as Recruiter for your assigned agency, you are responsible for setting up
the screening criteria for each posting based on the preferred experience statements
and/or preferences of that hiring manager. It is required that you set up Pre
Screening criteria; however Preliminary Screening is optional.
WARNING: If Pre Screening criteria are not set up, applicants will be unable to
successfully apply to the posting.
All applicants will be asked a set of Pre Screening questions prior to accessing the
complete State of Indiana application verifying each applicant is 18 years of age or
older and legally authorized to work in the United States. If an applicant answers
incorrectly to either question, that applicant will not be permitted to apply for that
position.
47. Click the Pre Screening link.
48. Click the Set Default Values button. The checkmarks will populate in all of the
‘Use in Screening’ and ‘Required’ fields for both screening questions.
49. Click the OK button. This will save your Pre Screening criteria.
50. As a reminder, it is recommended that job specific screening questions be asked of
each applicant and that the Preliminary Screening criteria be set up to better
streamline your applicant pool. By properly setting up the Preliminary Screening,
unqualified candidates can be eliminated from the applicant pool for review and
those that are the most qualified be assigned the highest point value.
In the Applicant Screening section, click the Preliminary link.
51. Click the Set Default Values button.
NOTE: Do not remove any of the default values. All items should be marked ‘used
in screening’ and the questions already marked as ‘Required’ should remain
pass/fail (i.e. preferred experience).
52. Check the Required box for the lowest level of education.
53. If screening questions were added that should be pass/fail (i.e. applicants that
answer incorrectly will fail screening), check the ‘Required’ box for each of these
questions.
NOTE: Only questions with yes/no answer formats can be marked as Required. It
is not possible to fail applicants based on questions regarding proficiency or years
of experience or those that are open ended.

Page 104
Step Action
54. If necessary, adjust the defaulted point values for any question. Those that answer
the questions you find most important correctly or with the best/highest option (i.e.
Expert proficiency or 10+ years of experience) will receive the highest screening
point value.
NOTE: A candidate’s point value cannot exceed 1000 points or screening will not
run properly. Pay close attention to the amount of screening questions added and
the points you are assigning to each.
To adjust the point values for any question, click the Edit Details link.
55. Adjust the point value appropriately.
Enter the desired information into the field.
56. Click the OK button.
57. Click the OK button .This will save your Preliminary screening criteria.
NOTE: At this time, we do not use Final Screening so the setup of this is
unnecessary.
58. Click the Next Step link.
59. Review the individuals listed on the Hiring Team page and make any necessary
changes.
Note: To add another Hiring Manager or Interested Party, click the Add Hiring
Manager (or Interested Parties) link and enter the appropriate name in the field or
use the Magnifying Glass icon to search. Individuals listed in the Hiring Manager
field must have appropriate access in PeopleSoft. Individuals listed as Interested
Party must have Hiring Manager access to be permitted to review posting or
application information.
60. Click the Save & Submit button. Make note of the Job Opening ID at the top of
the page.
NOTE: Once you click Save & Submit, the individual listed as Recruiter will
receive workflow to review the posting and approve. Individuals listed as Hiring
Manager(s) and Interested Party(s) will receive workflow once the posting has been
approved and is posted to the job bank.
61.
End of Procedure.
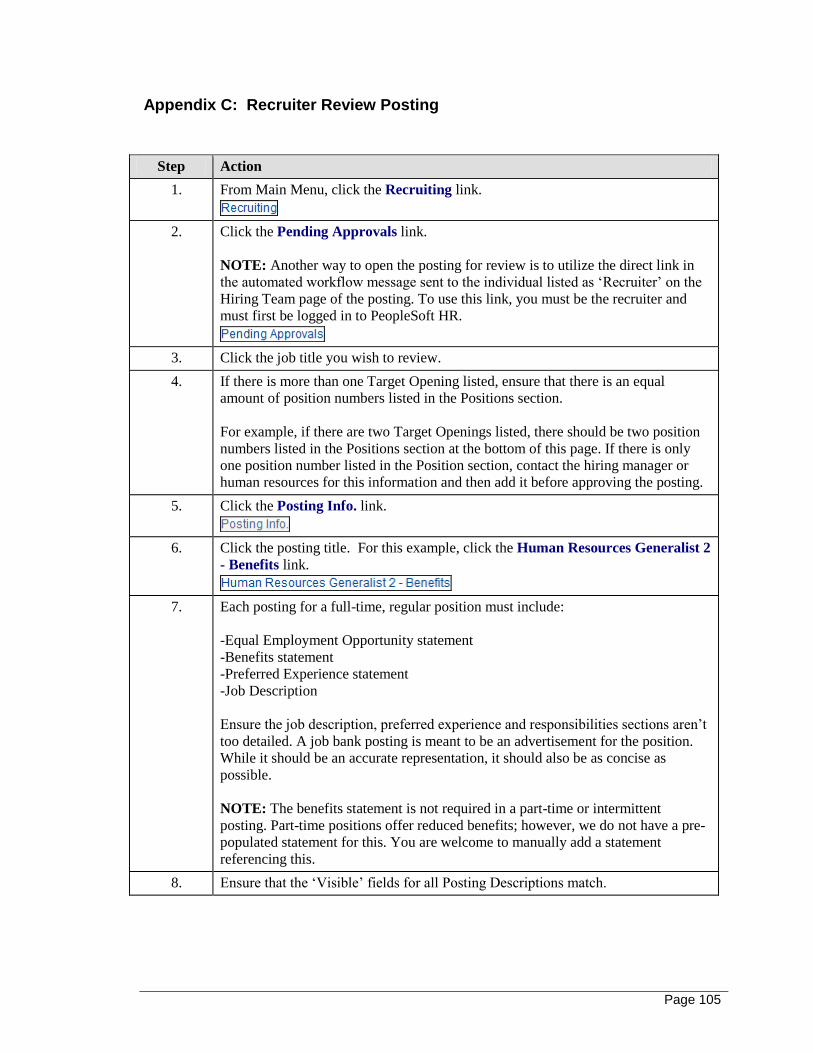
Page 105
Appendix C: Recruiter Review Posting
Step Action
1. From Main Menu, click the Recruiting link.
2. Click the Pending Approvals link.
NOTE: Another way to open the posting for review is to utilize the direct link in
the automated workflow message sent to the individual listed as ‘Recruiter’ on the
Hiring Team page of the posting. To use this link, you must be the recruiter and
must first be logged in to PeopleSoft HR.
3. Click the job title you wish to review.
4. If there is more than one Target Opening listed, ensure that there is an equal
amount of position numbers listed in the Positions section.
For example, if there are two Target Openings listed, there should be two position
numbers listed in the Positions section at the bottom of this page. If there is only
one position number listed in the Position section, contact the hiring manager or
human resources for this information and then add it before approving the posting.
5. Click the Posting Info. link.
6. Click the posting title. For this example, click the Human Resources Generalist 2
- Benefits link.
7. Each posting for a full-time, regular position must include:
-Equal Employment Opportunity statement
-Benefits statement
-Preferred Experience statement
-Job Description
Ensure the job description, preferred experience and responsibilities sections aren’t
too detailed. A job bank posting is meant to be an advertisement for the position.
While it should be an accurate representation, it should also be as concise as
possible.
NOTE: The benefits statement is not required in a part-time or intermittent
posting. Part-time positions offer reduced benefits; however, we do not have a pre-
populated statement for this. You are welcome to manually add a statement
referencing this.
8. Ensure that the ‘Visible’ fields for all Posting Descriptions match.

Page 106
Step Action
9. The Preferred Experience statement should be a close match to the standard
preferred experience statement for that classification. Preferred experience
statements can be edited based on hiring managers preference; however, please
keep in mind that we still need to ensure consistent and fair hiring for all positions.
Adding knowledge, skills and abilities to the Preferred Experience section is
acceptable and recommended.
10. Ensure there are no misspellings or grammatical errors. To check for spelling
errors, click the spell-check icon.
11. Ensure that the Posting Destinations are appropriate for the position. Positions that
are more difficult to fill should be on the job bank for at least 14 days. For positions
that aren’t as difficult to fill, such as Clerical or Administrative Assistants, it is
recommended that you change the Posting Duration (Days) to 3 or 5 days.
12. Click the Preview button for a final review of posting information appearance.
13. Click the Return to Previous Page link.
14. Click the OK button to get back to the main page.
15. Click the Education/Experience tab.
16. As the agency/facility recruiter, you are responsible for setting up the screening
criteria for each posting based on the preferred experience statements and/or
preferences of that hiring manager beginning with the Education/Experience page.
For this posting example, the preferred experience statement is: Four (4) years
work experience in human resources management including: compensation;
benefits; employee relations; employment law; affirmative action; recruiting; or
human resource development and/or retail management; plant management; field
supervisory experience; or accredited college training in a related field.
In the Work Experience & Education section, each level of education has been
provided for you. Based on the preferred experience statement for this example,
education can be substituted for related work experience. The education to work
experience substitution equation is as follows:
Associates degree = 2 years of work experience
Bachelors degree = 4 years of work experience
Masters degree or higher = 6 years of work experience*
*Six years is the highest education substitution permitted even if the candidate
possesses a degree higher than a Master’s level degree.
Using this equation, enter the appropriate amount of work experience next to each
education level.
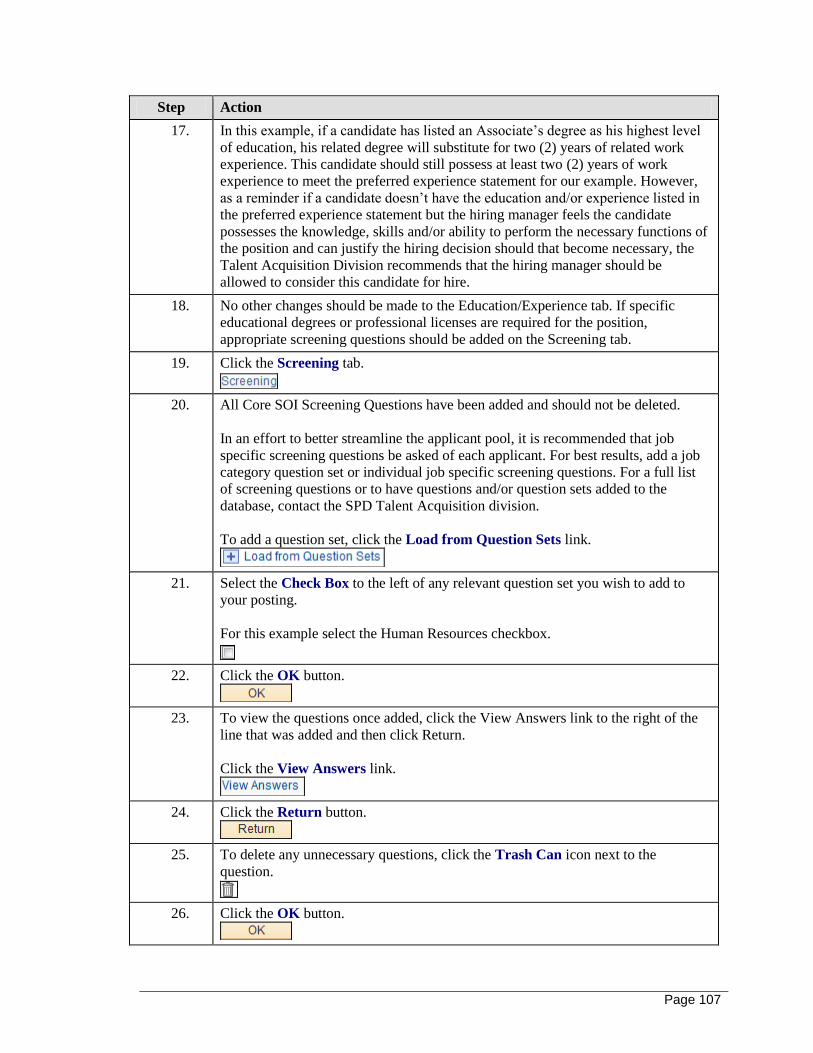
Page 107
Step Action
17. In this example, if a candidate has listed an Associate’s degree as his highest level
of education, his related degree will substitute for two (2) years of related work
experience. This candidate should still possess at least two (2) years of work
experience to meet the preferred experience statement for our example. However,
as a reminder if a candidate doesn’t have the education and/or experience listed in
the preferred experience statement but the hiring manager feels the candidate
possesses the knowledge, skills and/or ability to perform the necessary functions of
the position and can justify the hiring decision should that become necessary, the
Talent Acquisition Division recommends that the hiring manager should be
allowed to consider this candidate for hire.
18. No other changes should be made to the Education/Experience tab. If specific
educational degrees or professional licenses are required for the position,
appropriate screening questions should be added on the Screening tab.
19. Click the Screening tab.
20. All Core SOI Screening Questions have been added and should not be deleted.
In an effort to better streamline the applicant pool, it is recommended that job
specific screening questions be asked of each applicant. For best results, add a job
category question set or individual job specific screening questions. For a full list
of screening questions or to have questions and/or question sets added to the
database, contact the SPD Talent Acquisition division.
To add a question set, click the Load from Question Sets link.
21. Select the Check Box to the left of any relevant question set you wish to add to
your posting.
For this example select the Human Resources checkbox.
22. Click the OK button.
23. To view the questions once added, click the View Answers link to the right of the
line that was added and then click Return.
Click the View Answers link.
24. Click the Return button.
25. To delete any unnecessary questions, click the Trash Can icon next to the
question.
26. Click the OK button.
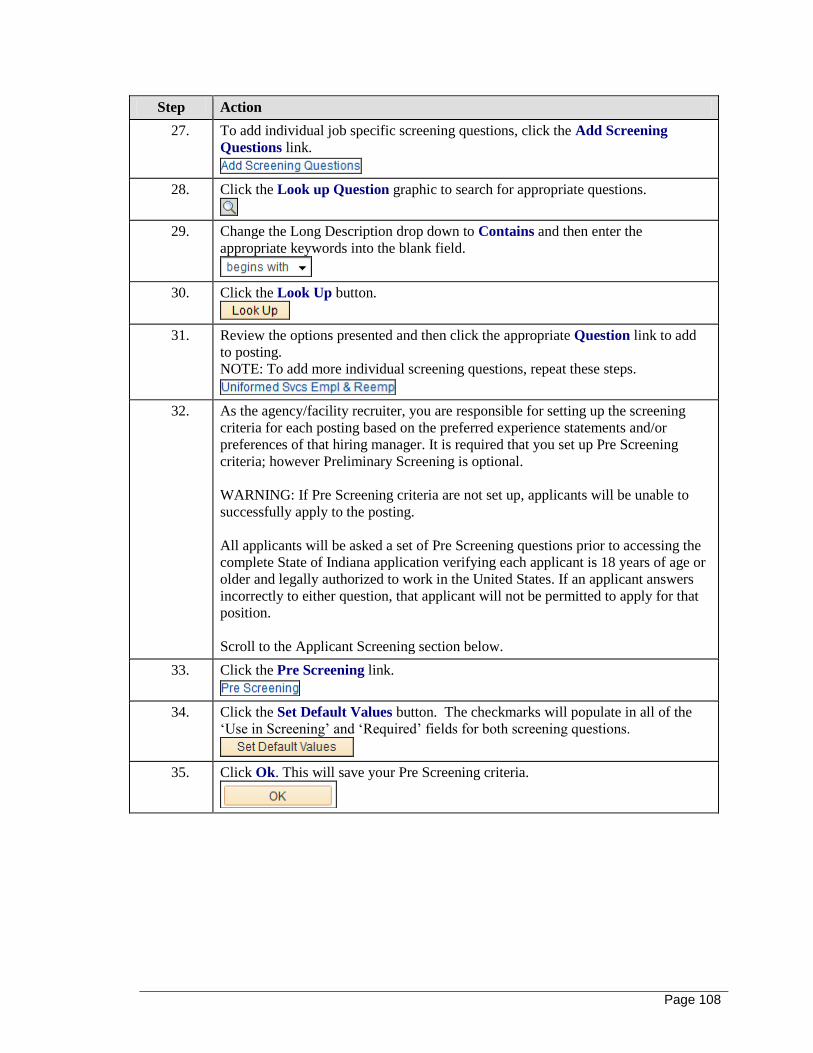
Page 108
Step Action
27. To add individual job specific screening questions, click the Add Screening
Questions link.
28. Click the Look up Question graphic to search for appropriate questions.
29. Change the Long Description drop down to Contains and then enter the
appropriate keywords into the blank field.
30. Click the Look Up button.
31. Review the options presented and then click the appropriate Question link to add
to posting.
NOTE: To add more individual screening questions, repeat these steps.
32. As the agency/facility recruiter, you are responsible for setting up the screening
criteria for each posting based on the preferred experience statements and/or
preferences of that hiring manager. It is required that you set up Pre Screening
criteria; however Preliminary Screening is optional.
WARNING: If Pre Screening criteria are not set up, applicants will be unable to
successfully apply to the posting.
All applicants will be asked a set of Pre Screening questions prior to accessing the
complete State of Indiana application verifying each applicant is 18 years of age or
older and legally authorized to work in the United States. If an applicant answers
incorrectly to either question, that applicant will not be permitted to apply for that
position.
Scroll to the Applicant Screening section below.
33. Click the Pre Screening link.
34. Click the Set Default Values button. The checkmarks will populate in all of the
‘Use in Screening’ and ‘Required’ fields for both screening questions.
35. Click Ok. This will save your Pre Screening criteria.
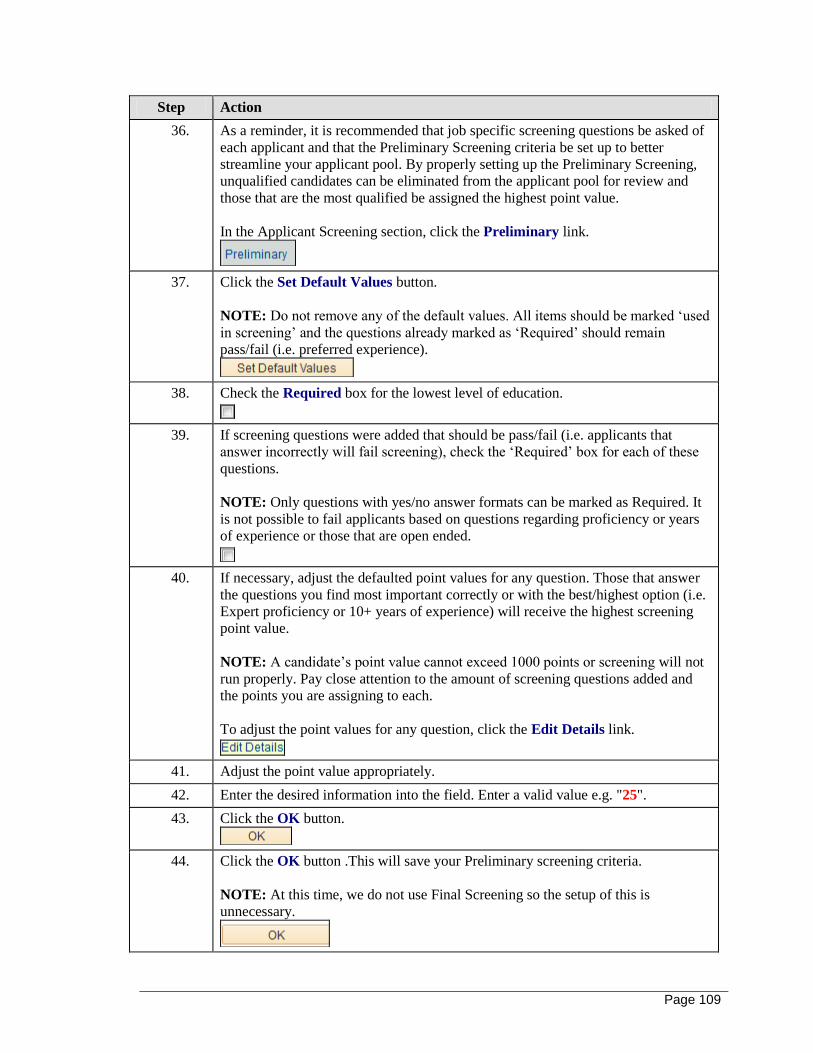
Page 109
Step Action
36. As a reminder, it is recommended that job specific screening questions be asked of
each applicant and that the Preliminary Screening criteria be set up to better
streamline your applicant pool. By properly setting up the Preliminary Screening,
unqualified candidates can be eliminated from the applicant pool for review and
those that are the most qualified be assigned the highest point value.
In the Applicant Screening section, click the Preliminary link.
37. Click the Set Default Values button.
NOTE: Do not remove any of the default values. All items should be marked ‘used
in screening’ and the questions already marked as ‘Required’ should remain
pass/fail (i.e. preferred experience).
38. Check the Required box for the lowest level of education.
39. If screening questions were added that should be pass/fail (i.e. applicants that
answer incorrectly will fail screening), check the ‘Required’ box for each of these
questions.
NOTE: Only questions with yes/no answer formats can be marked as Required. It
is not possible to fail applicants based on questions regarding proficiency or years
of experience or those that are open ended.
40. If necessary, adjust the defaulted point values for any question. Those that answer
the questions you find most important correctly or with the best/highest option (i.e.
Expert proficiency or 10+ years of experience) will receive the highest screening
point value.
NOTE: A candidate’s point value cannot exceed 1000 points or screening will not
run properly. Pay close attention to the amount of screening questions added and
the points you are assigning to each.
To adjust the point values for any question, click the Edit Details link.
41. Adjust the point value appropriately.
42. Enter the desired information into the field. Enter a valid value e.g. "25".
43. Click the OK button.
44. Click the OK button .This will save your Preliminary screening criteria.
NOTE: At this time, we do not use Final Screening so the setup of this is
unnecessary.

Page 110
Step Action
45. Click the Hiring Team tab.
46. Ensure there are appropriate individuals listed in the Recruiter field and Hiring
Manager field. Make any necessary changes as appropriate and then click
the Approvals tab.
47. Once you’ve reviewed all posting information, click the Approve button or the
Deny button as appropriate. Workflow will be sent to the hiring manager either
way.
48. End of Procedure.
Appendix D: Screen/Route Applicants
Step Action
1. From Main Menu, click the Recruiting link.
2. Click the Find Job Openings link.
3. Enter the desired information into the Job Opening ID field.
4. Click the Search button.
5. Click the Job Title link.
6. Click the Screen Applicants link.
7. Click the View Screening Results link.
8. In an effort to provide hiring managers with the most qualified and streamlined
applicant pool for review, it is recommended to route the top 25 applicants based
on screening points. The points are derived from the screening criterion that was set
by the recruiter and how the applicants answered each screening question. If
necessary, sort the applicant list by points by clicking the Points Column Header
which will put all applicants in order from highest point value to lowest point
value.
Click the Points Column Header to sort.

Page 111
Step Action
9. Then select the top 25 applicants, if applicable, that passed screening by placing a
check in the box to the left of each name.
Click the Checkbox option next to the applicant's name.
10. Click the Route Applicant link.
11. Insert the name of the hiring manager into the ‘Route To’ field.
NOTE: You can route to multiple hiring managers by clicking the ‘plus’ sign and
then inserting the additional name.
12. Click the Submit button. This will generate two (2) sets of automated workflow
messages via email to the hiring team.
13. This is an example of one of the automated workflow messages which contains the
list of routed applicants and a PDF attachment. The attachment contains the
employment applications of each candidate routed by the Recruiter. Open the
attachment to review the applications.
Double-click the PDF Document attachment in the email.
14. This is an example of the other automated workflow message which contains a
spreadsheet listing all candidates that successfully submitted their application,
whether they passed or failed screening, and their associated screening points. This
email also details instructions regarding reviewing applications based on preferred
experience and veterans’ preference.
Double-click the Excel File attachment in the email.
15. Click the Open button.
16. For your convenience, this spreadsheet contains the names of the applicants that
passed screening, their associated screening points based on how they answered the
screening questions, whether they are an internal state employee or an external
applicant as well as their email address. You are welcome to sort and format this
list if necessary.
NOTE: An ‘X’ in the Review field means that the applicant indicated that they
have been arrested or convicted of a crime that hasn't been expunged or sealed by a
court. You can view the information they listed in the conviction section via their
application or from the Manage Applicants page of the posting.
17. End of Procedure.
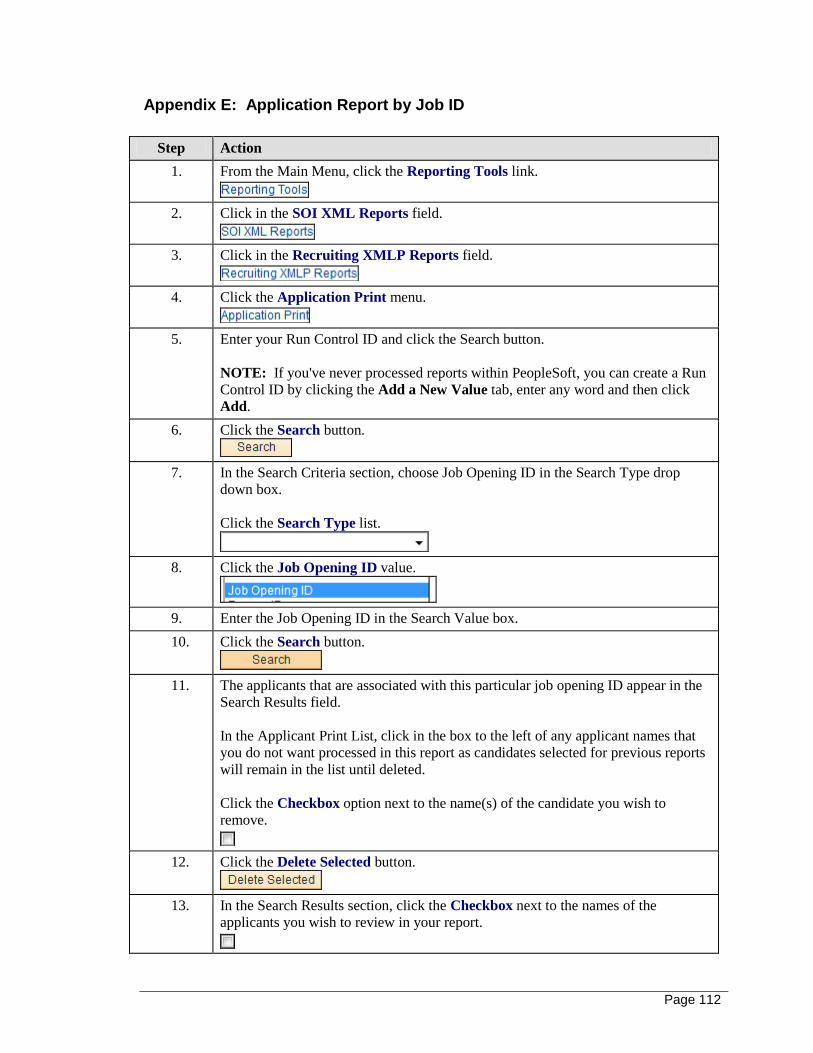
Page 112
Appendix E: Application Report by Job ID
Step Action
1. From the Main Menu, click the Reporting Tools link.
2. Click in the SOI XML Reports field.
3. Click in the Recruiting XMLP Reports field.
4. Click the Application Print menu.
5. Enter your Run Control ID and click the Search button.
NOTE: If you've never processed reports within PeopleSoft, you can create a Run
Control ID by clicking the Add a New Value tab, enter any word and then click
Add.
6. Click the Search button.
7. In the Search Criteria section, choose Job Opening ID in the Search Type drop
down box.
Click the Search Type list.
8. Click the Job Opening ID value.
9. Enter the Job Opening ID in the Search Value box.
10. Click the Search button.
11. The applicants that are associated with this particular job opening ID appear in the
Search Results field.
In the Applicant Print List, click in the box to the left of any applicant names that
you do not want processed in this report as candidates selected for previous reports
will remain in the list until deleted.
Click the Checkbox option next to the name(s) of the candidate you wish to
remove.
12. Click the Delete Selected button.
13. In the Search Results section, click the Checkbox next to the names of the
applicants you wish to review in your report.
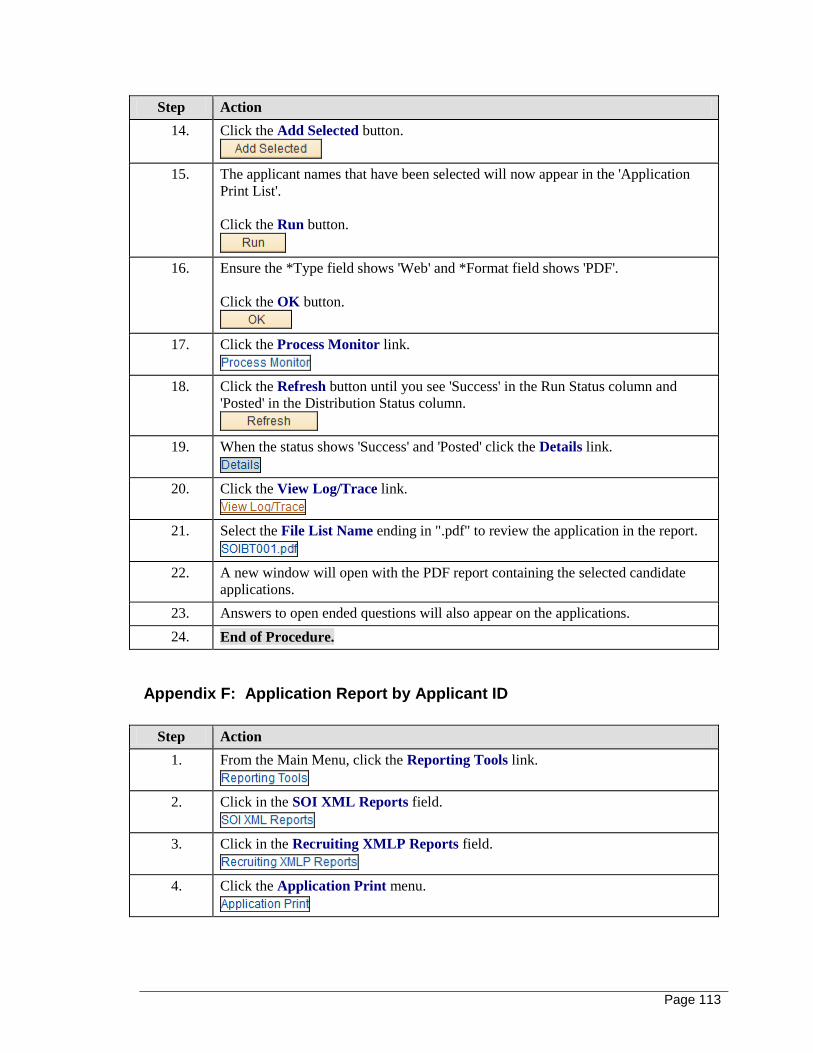
Page 113
Step Action
14. Click the Add Selected button.
15. The applicant names that have been selected will now appear in the 'Application
Print List'.
Click the Run button.
16. Ensure the *Type field shows 'Web' and *Format field shows 'PDF'.
Click the OK button.
17. Click the Process Monitor link.
18. Click the Refresh button until you see 'Success' in the Run Status column and
'Posted' in the Distribution Status column.
19. When the status shows 'Success' and 'Posted' click the Details link.
20. Click the View Log/Trace link.
21. Select the File List Name ending in ".pdf" to review the application in the report.
22. A new window will open with the PDF report containing the selected candidate
applications.
23. Answers to open ended questions will also appear on the applications.
24. End of Procedure.
Appendix F: Application Report by Applicant ID
Step Action
1. From the Main Menu, click the Reporting Tools link.
2. Click in the SOI XML Reports field.
3. Click in the Recruiting XMLP Reports field.
4. Click the Application Print menu.
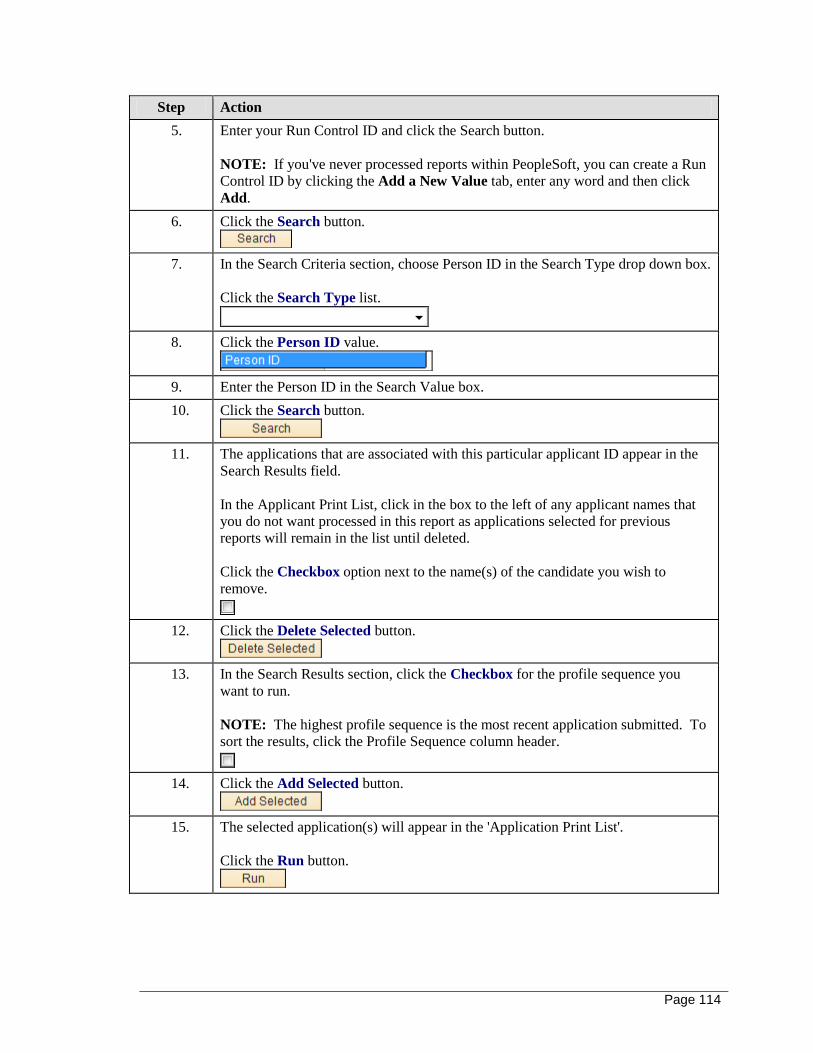
Page 114
Step Action
5. Enter your Run Control ID and click the Search button.
NOTE: If you've never processed reports within PeopleSoft, you can create a Run
Control ID by clicking the Add a New Value tab, enter any word and then click
Add.
6. Click the Search button.
7. In the Search Criteria section, choose Person ID in the Search Type drop down box.
Click the Search Type list.
8. Click the Person ID value.
9. Enter the Person ID in the Search Value box.
10. Click the Search button.
11. The applications that are associated with this particular applicant ID appear in the
Search Results field.
In the Applicant Print List, click in the box to the left of any applicant names that
you do not want processed in this report as applications selected for previous
reports will remain in the list until deleted.
Click the Checkbox option next to the name(s) of the candidate you wish to
remove.
12. Click the Delete Selected button.
13. In the Search Results section, click the Checkbox for the profile sequence you
want to run.
NOTE: The highest profile sequence is the most recent application submitted. To
sort the results, click the Profile Sequence column header.
14. Click the Add Selected button.
15. The selected application(s) will appear in the 'Application Print List'.
Click the Run button.
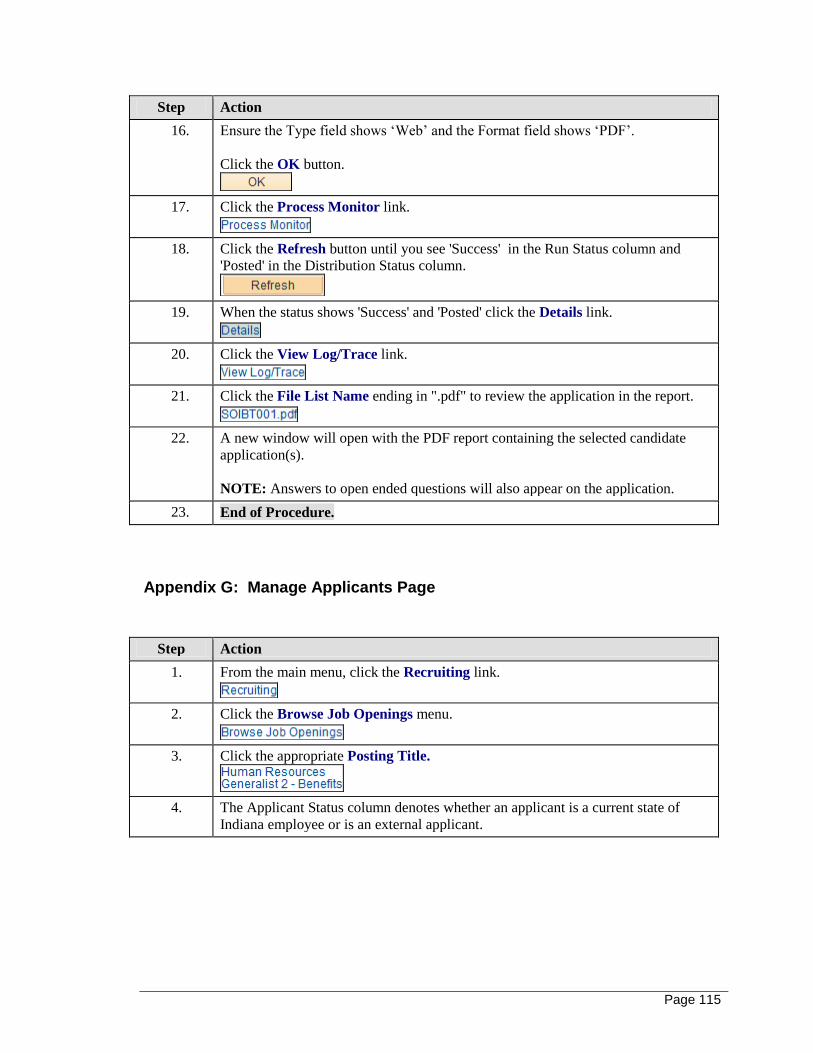
Page 115
Step Action
16. Ensure the Type field shows ‘Web’ and the Format field shows ‘PDF’.
Click the OK button.
17. Click the Process Monitor link.
18. Click the Refresh button until you see 'Success' in the Run Status column and
'Posted' in the Distribution Status column.
19. When the status shows 'Success' and 'Posted' click the Details link.
20. Click the View Log/Trace link.
21. Click the File List Name ending in ".pdf" to review the application in the report.
22. A new window will open with the PDF report containing the selected candidate
application(s).
NOTE: Answers to open ended questions will also appear on the application.
23. End of Procedure.
Appendix G: Manage Applicants Page
Step Action
1. From the main menu, click the Recruiting link.
2. Click the Browse Job Openings menu.
3. Click the appropriate Posting Title.
4. The Applicant Status column denotes whether an applicant is a current state of
Indiana employee or is an external applicant.
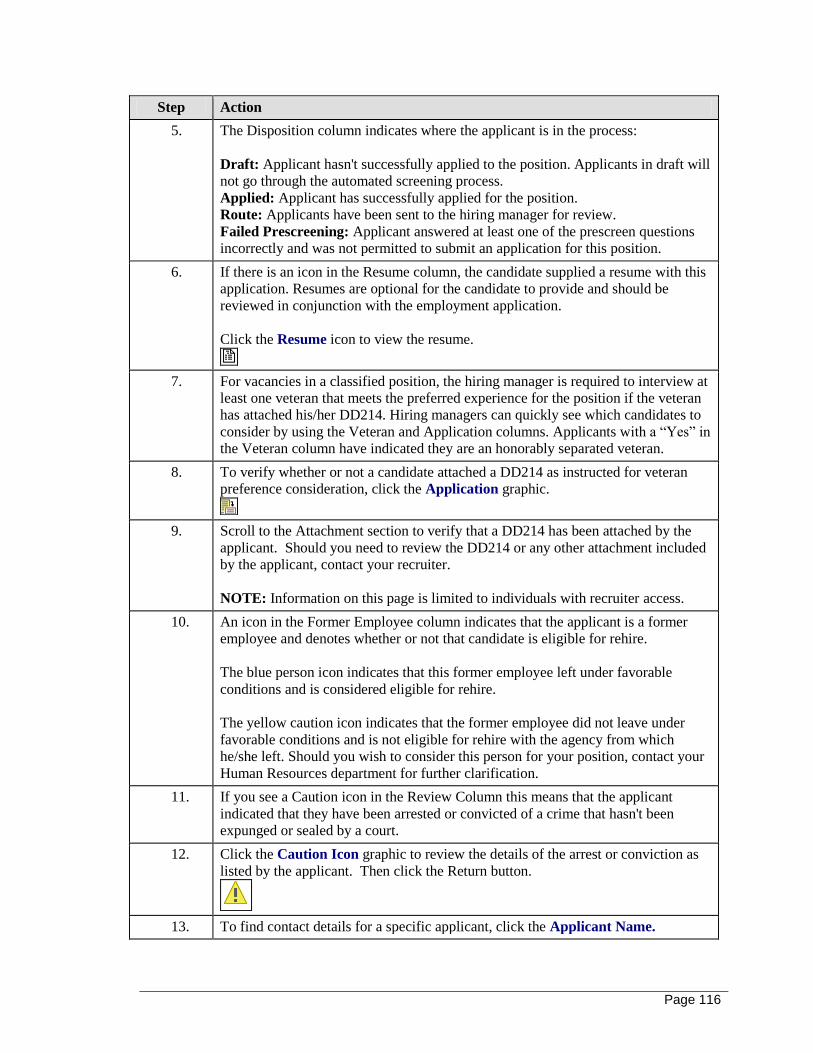
Page 116
Step Action
5. The Disposition column indicates where the applicant is in the process:
Draft: Applicant hasn't successfully applied to the position. Applicants in draft will
not go through the automated screening process.
Applied: Applicant has successfully applied for the position.
Route: Applicants have been sent to the hiring manager for review.
Failed Prescreening: Applicant answered at least one of the prescreen questions
incorrectly and was not permitted to submit an application for this position.
6. If there is an icon in the Resume column, the candidate supplied a resume with this
application. Resumes are optional for the candidate to provide and should be
reviewed in conjunction with the employment application.
Click the Resume icon to view the resume.
7. For vacancies in a classified position, the hiring manager is required to interview at
least one veteran that meets the preferred experience for the position if the veteran
has attached his/her DD214. Hiring managers can quickly see which candidates to
consider by using the Veteran and Application columns. Applicants with a “Yes” in
the Veteran column have indicated they are an honorably separated veteran.
8. To verify whether or not a candidate attached a DD214 as instructed for veteran
preference consideration, click the Application graphic.
9. Scroll to the Attachment section to verify that a DD214 has been attached by the
applicant. Should you need to review the DD214 or any other attachment included
by the applicant, contact your recruiter.
NOTE: Information on this page is limited to individuals with recruiter access.
10. An icon in the Former Employee column indicates that the applicant is a former
employee and denotes whether or not that candidate is eligible for rehire.
The blue person icon indicates that this former employee left under favorable
conditions and is considered eligible for rehire.
The yellow caution icon indicates that the former employee did not leave under
favorable conditions and is not eligible for rehire with the agency from which
he/she left. Should you wish to consider this person for your position, contact your
Human Resources department for further clarification.
11. If you see a Caution icon in the Review Column this means that the applicant
indicated that they have been arrested or convicted of a crime that hasn't been
expunged or sealed by a court.
12. Click the Caution Icon graphic to review the details of the arrest or conviction as
listed by the applicant. Then click the Return button.
13. To find contact details for a specific applicant, click the Applicant Name.
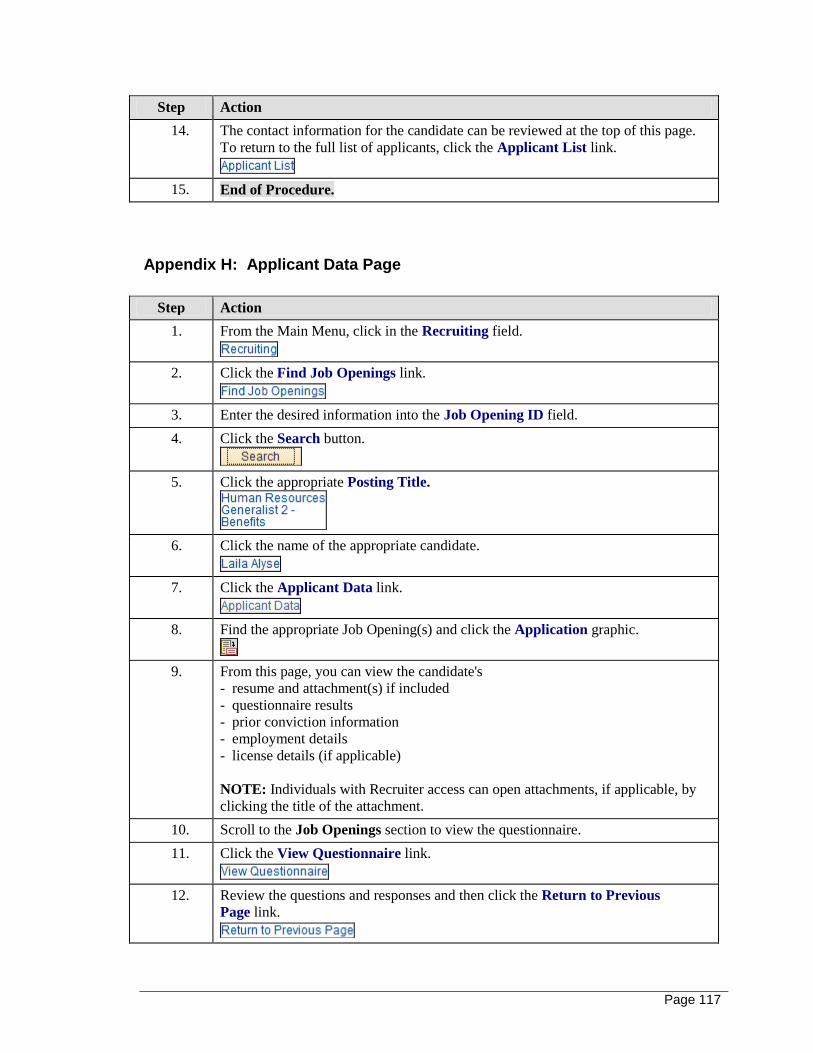
Page 117
Step Action
14. The contact information for the candidate can be reviewed at the top of this page.
To return to the full list of applicants, click the Applicant List link.
15. End of Procedure.
Appendix H: Applicant Data Page
Step Action
1. From the Main Menu, click in the Recruiting field.
2. Click the Find Job Openings link.
3. Enter the desired information into the Job Opening ID field.
4. Click the Search button.
5. Click the appropriate Posting Title.
6. Click the name of the appropriate candidate.
7. Click the Applicant Data link.
8. Find the appropriate Job Opening(s) and click the Application graphic.
9. From this page, you can view the candidate's
- resume and attachment(s) if included
- questionnaire results
- prior conviction information
- employment details
- license details (if applicable)
NOTE: Individuals with Recruiter access can open attachments, if applicable, by
clicking the title of the attachment.
10. Scroll to the Job Openings section to view the questionnaire.
11. Click the View Questionnaire link.
12. Review the questions and responses and then click the Return to Previous
Page link.

Page 118
Step Action
13. Scroll down to the Prior Conviction Information section to review any applicable
information listed there.
14. Scroll down to the Work Experience section to review information.
15. Click the Edit Employment History for any employer listed to review the
employment details listed by the candidate.
16. Click the Cancel button to return.
17. Scroll to the Highest Education Level to review this information.
If applicable, scroll to the Degrees section and
click the Degree link to review the detail listed by the applicant.
18. Click the Cancel button to return.
19. If applicable, scroll to the Licenses and Certifications section.
20. Click the Licenses and Certifications link to review the detail provided by the
candidate and click the cancel button to return.
21. Once you've reviewed the detail in each section as necessary, scroll to the bottom
of the page to return to Applicant Data.
22. Click the Return to Previous Page link.
23. End of Procedure.
Appendix I: Manage Interview Schedule
Step Action
1. From the Main Menu, click the Recruiting link.
2. Click the Browse Job Openings list item.
3. Locate the appropriate Job Opening and click the title.
4. Click the Checkbox next to each applicant you plan to interview.
NOTE: Applicants should be notified of an interview via phone conversation.
The steps in this module are simply confirming in PeopleSoft what has already
been confirmed via phone with each candidate.
5. Click the drop down box for Group Action.

Page 119
Step Action
6. Click the Manage Interviews list item.
7. Click the Go button.
8. Click the Expand section button. This is located next to the applicant's name.
9. Click the Expand section button next to Interview 1.
10. Click the Interview Type drop down menu.
11. Click the Inhouse 1 list item.
12. Enter the desired information into the Date field.
13. Enter the desired information into the Start Time field.
14. Tab out of the field. Press [Tab].
15. Enter the desired information into the End Time field.
16. Tab out of the field. Press [Tab].
17. The employee ID of the Recruiter defaults in this field. Click the Trash Can icon
to delete this person.
18. Click the OK button.
19. Enter your Employee ID number into the Interviewer ID field.
NOTE: To add another interviewer, click the Add Interviewer link and enter the
Employee ID number of the additional interviewer. Complete these steps for each
additional member of the interview team.
20. If you added more than one applicant to this process, scroll to the next candidate's
name and repeat the steps above with appropriate interview information.
21. Once all information has been added for each candidate, click the Submit button.
22.
End of Procedure.
Appendix J: Create Interview Evaluation
Step Action
1. From the Main Menu, click the Recruiting link.
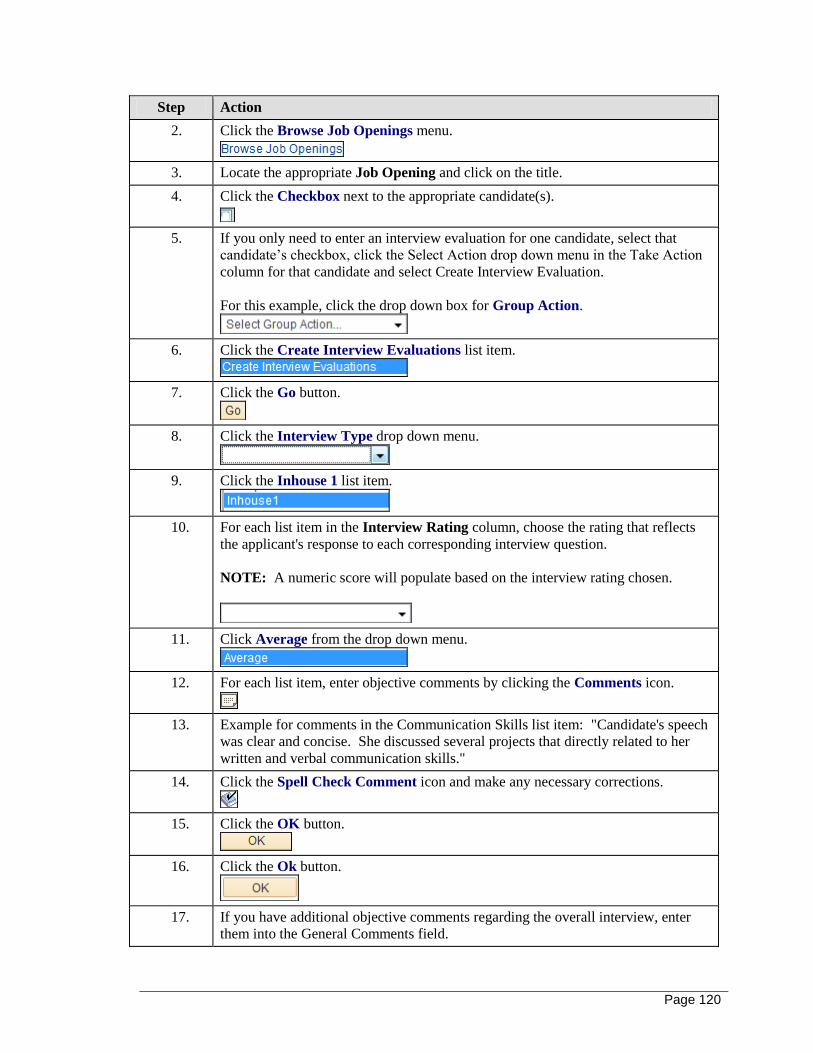
Page 120
Step Action
2. Click the Browse Job Openings menu.
3. Locate the appropriate Job Opening and click on the title.
4. Click the Checkbox next to the appropriate candidate(s).
5. If you only need to enter an interview evaluation for one candidate, select that
candidate’s checkbox, click the Select Action drop down menu in the Take Action
column for that candidate and select Create Interview Evaluation.
For this example, click the drop down box for Group Action.
6. Click the Create Interview Evaluations list item.
7. Click the Go button.
8. Click the Interview Type drop down menu.
9. Click the Inhouse 1 list item.
10. For each list item in the Interview Rating column, choose the rating that reflects
the applicant's response to each corresponding interview question.
NOTE: A numeric score will populate based on the interview rating chosen.
11. Click Average from the drop down menu.
12. For each list item, enter objective comments by clicking the Comments icon.
13. Example for comments in the Communication Skills list item: "Candidate's speech
was clear and concise. She discussed several projects that directly related to her
written and verbal communication skills."
14. Click the Spell Check Comment icon and make any necessary corrections.
15. Click the OK button.
16. Click the Ok button.
17. If you have additional objective comments regarding the overall interview, enter
them into the General Comments field.
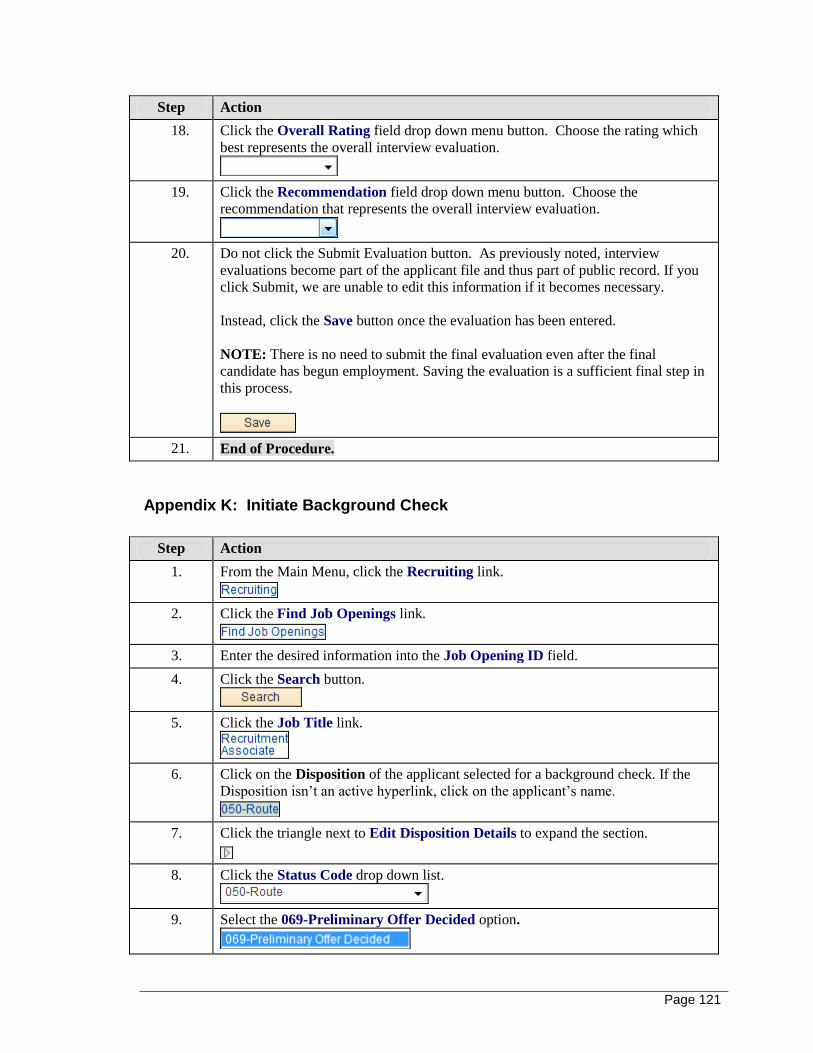
Page 121
Step Action
18. Click the Overall Rating field drop down menu button. Choose the rating which
best represents the overall interview evaluation.
19. Click the Recommendation field drop down menu button. Choose the
recommendation that represents the overall interview evaluation.
20. Do not click the Submit Evaluation button. As previously noted, interview
evaluations become part of the applicant file and thus part of public record. If you
click Submit, we are unable to edit this information if it becomes necessary.
Instead, click the Save button once the evaluation has been entered.
NOTE: There is no need to submit the final evaluation even after the final
candidate has begun employment. Saving the evaluation is a sufficient final step in
this process.
21. End of Procedure.
Appendix K: Initiate Background Check
Step Action
1. From the Main Menu, click the Recruiting link.
2. Click the Find Job Openings link.
3. Enter the desired information into the Job Opening ID field.
4. Click the Search button.
5. Click the Job Title link.
6. Click on the Disposition of the applicant selected for a background check. If the
Disposition isn’t an active hyperlink, click on the applicant’s name.
7. Click the triangle next to Edit Disposition Details to expand the section.
8. Click the Status Code drop down list.
9. Select the 069-Preliminary Offer Decided option.
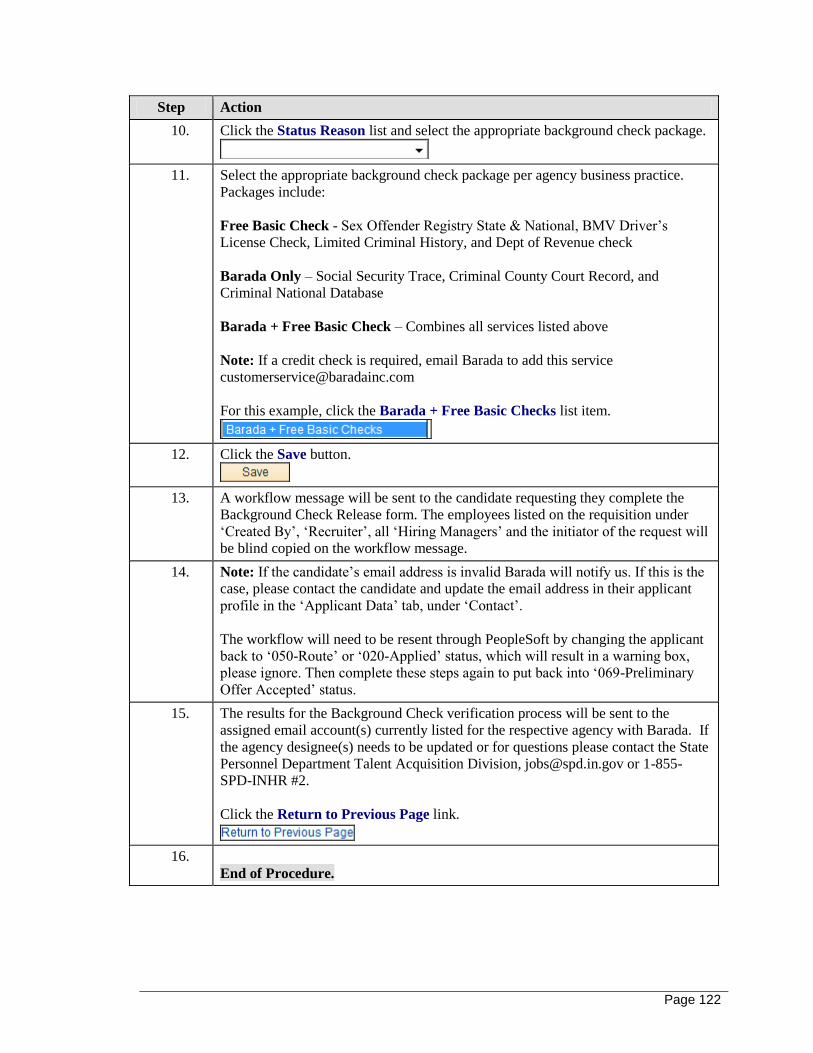
Page 122
Step Action
10. Click the Status Reason list and select the appropriate background check package.
11. Select the appropriate background check package per agency business practice.
Packages include:
Free Basic Check - Sex Offender Registry State & National, BMV Driver’s
License Check, Limited Criminal History, and Dept of Revenue check
Barada Only – Social Security Trace, Criminal County Court Record, and
Criminal National Database
Barada + Free Basic Check – Combines all services listed above
Note: If a credit check is required, email Barada to add this service
For this example, click the Barada + Free Basic Checks list item.
12. Click the Save button.
13. A workflow message will be sent to the candidate requesting they complete the
Background Check Release form. The employees listed on the requisition under
‘Created By’, ‘Recruiter’, all ‘Hiring Managers’ and the initiator of the request will
be blind copied on the workflow message.
14. Note: If the candidate’s email address is invalid Barada will notify us. If this is the
case, please contact the candidate and update the email address in their applicant
profile in the ‘Applicant Data’ tab, under ‘Contact’.
The workflow will need to be resent through PeopleSoft by changing the applicant
back to ‘050-Route’ or ‘020-Applied’ status, which will result in a warning box,
please ignore. Then complete these steps again to put back into ‘069-Preliminary
Offer Accepted’ status.
15. The results for the Background Check verification process will be sent to the
assigned email account(s) currently listed for the respective agency with Barada. If
the agency designee(s) needs to be updated or for questions please contact the State
Personnel Department Talent Acquisition Division, [email protected] or 1-855-
SPD-INHR #2.
Click the Return to Previous Page link.
16.
End of Procedure.
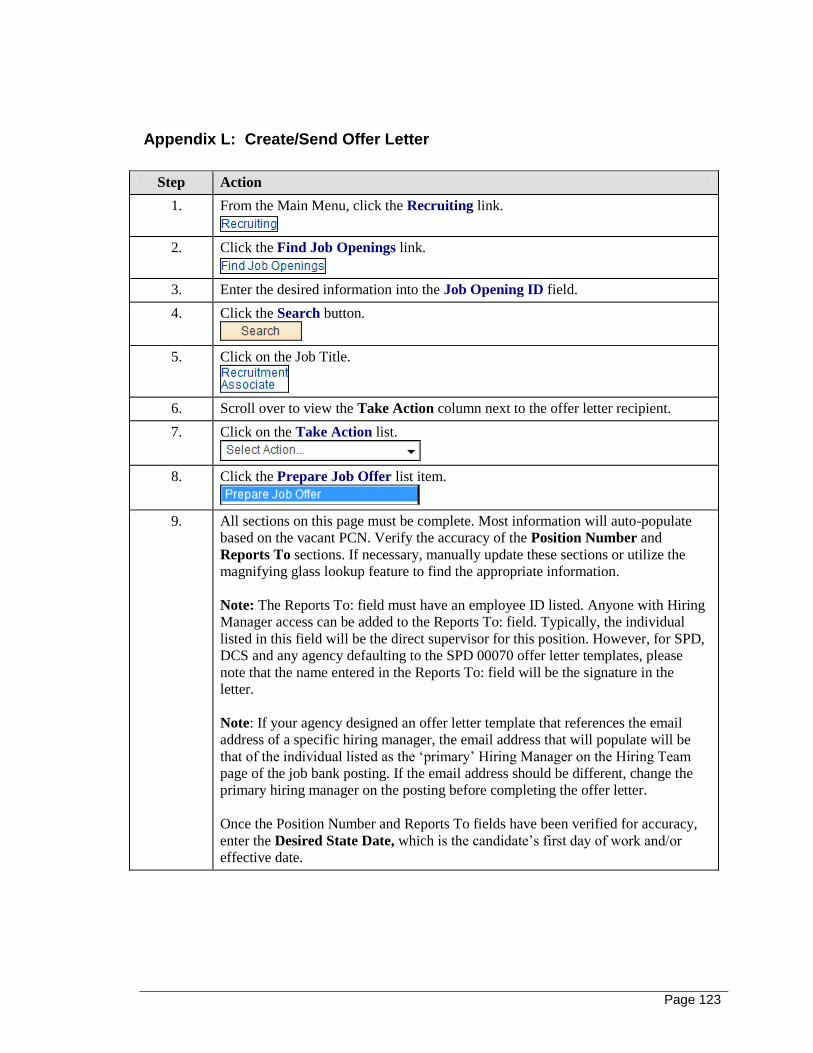
Page 123
Appendix L: Create/Send Offer Letter
Step Action
1. From the Main Menu, click the Recruiting link.
2. Click the Find Job Openings link.
3. Enter the desired information into the Job Opening ID field.
4. Click the Search button.
5. Click on the Job Title.
6. Scroll over to view the Take Action column next to the offer letter recipient.
7. Click on the Take Action list.
8. Click the Prepare Job Offer list item.
9. All sections on this page must be complete. Most information will auto-populate
based on the vacant PCN. Verify the accuracy of the Position Number and
Reports To sections. If necessary, manually update these sections or utilize the
magnifying glass lookup feature to find the appropriate information.
Note: The Reports To: field must have an employee ID listed. Anyone with Hiring
Manager access can be added to the Reports To: field. Typically, the individual
listed in this field will be the direct supervisor for this position. However, for SPD,
DCS and any agency defaulting to the SPD 00070 offer letter templates, please
note that the name entered in the Reports To: field will be the signature in the
letter.
Note: If your agency designed an offer letter template that references the email
address of a specific hiring manager, the email address that will populate will be
that of the individual listed as the ‘primary’ Hiring Manager on the Hiring Team
page of the job bank posting. If the email address should be different, change the
primary hiring manager on the posting before completing the offer letter.
Once the Position Number and Reports To fields have been verified for accuracy,
enter the Desired State Date, which is the candidate’s first day of work and/or
effective date.
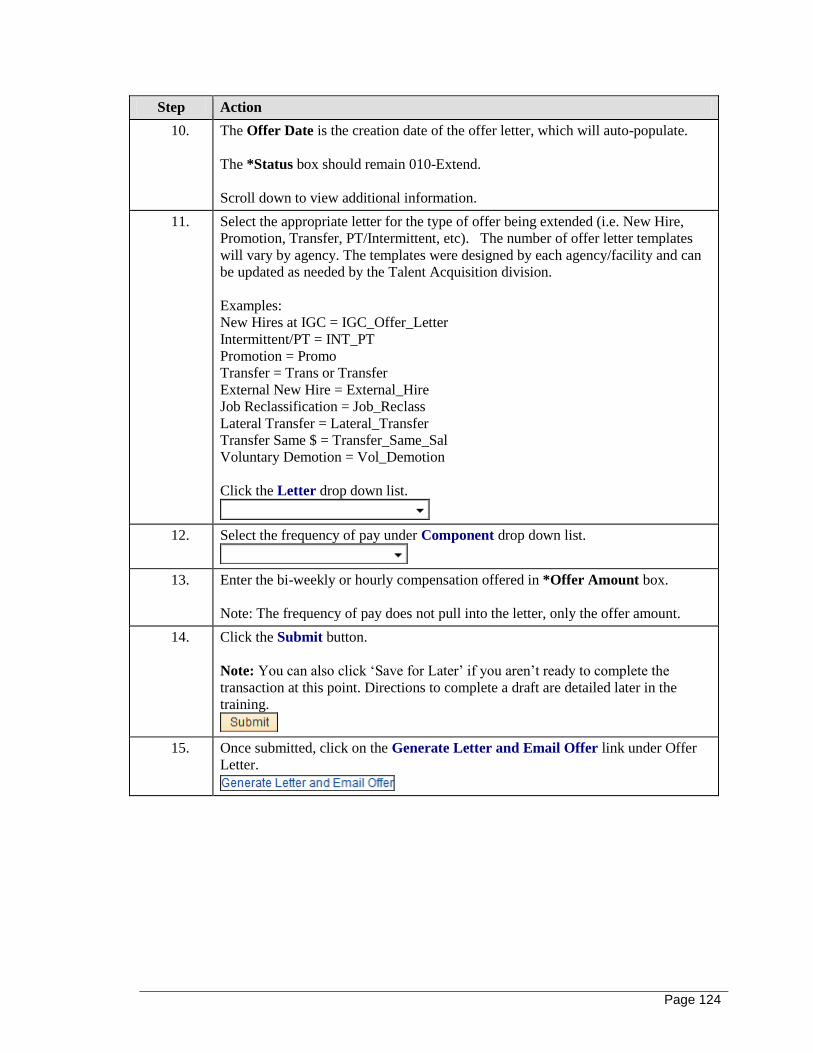
Page 124
Step Action
10. The Offer Date is the creation date of the offer letter, which will auto-populate.
The *Status box should remain 010-Extend.
Scroll down to view additional information.
11. Select the appropriate letter for the type of offer being extended (i.e. New Hire,
Promotion, Transfer, PT/Intermittent, etc). The number of offer letter templates
will vary by agency. The templates were designed by each agency/facility and can
be updated as needed by the Talent Acquisition division.
Examples:
New Hires at IGC = IGC_Offer_Letter
Intermittent/PT = INT_PT
Promotion = Promo
Transfer = Trans or Transfer
External New Hire = External_Hire
Job Reclassification = Job_Reclass
Lateral Transfer = Lateral_Transfer
Transfer Same $ = Transfer_Same_Sal
Voluntary Demotion = Vol_Demotion
Click the Letter drop down list.
12. Select the frequency of pay under Component drop down list.
13. Enter the bi-weekly or hourly compensation offered in *Offer Amount box.
Note: The frequency of pay does not pull into the letter, only the offer amount.
14. Click the Submit button.
Note: You can also click ‘Save for Later’ if you aren’t ready to complete the
transaction at this point. Directions to complete a draft are detailed later in the
training.
15. Once submitted, click on the Generate Letter and Email Offer link under Offer
Letter.
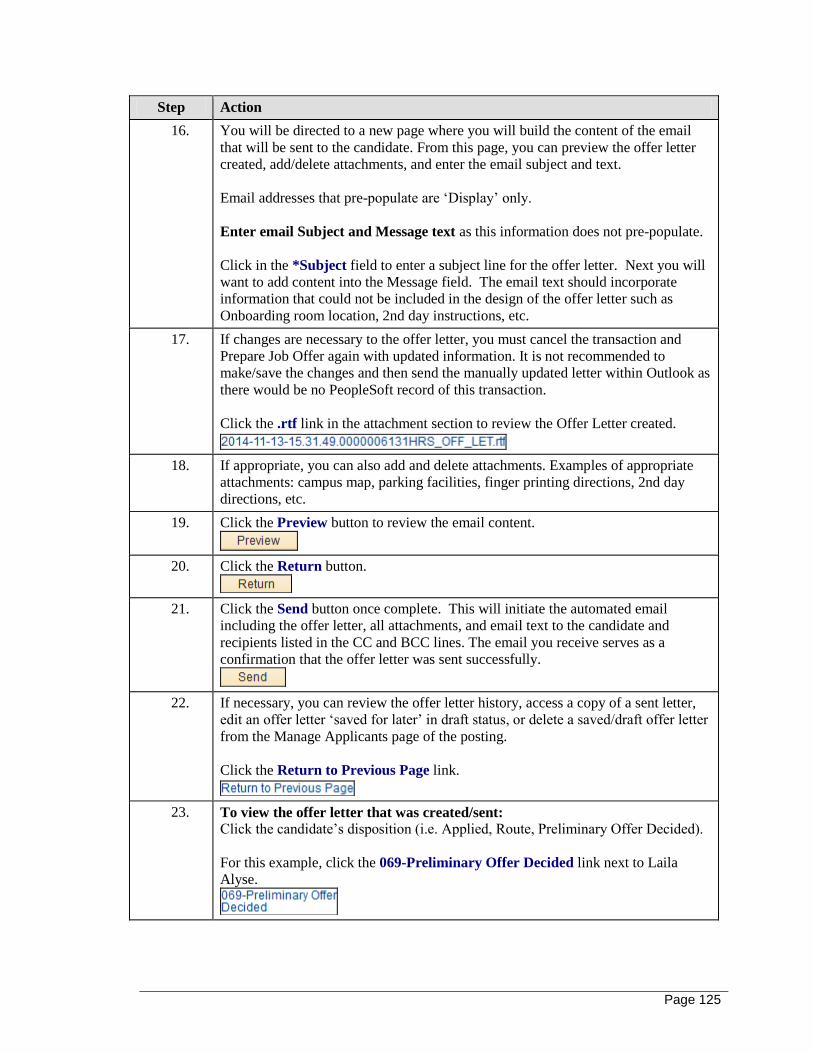
Page 125
Step Action
16. You will be directed to a new page where you will build the content of the email
that will be sent to the candidate. From this page, you can preview the offer letter
created, add/delete attachments, and enter the email subject and text.
Email addresses that pre-populate are ‘Display’ only.
Enter email Subject and Message text as this information does not pre-populate.
Click in the *Subject field to enter a subject line for the offer letter. Next you will
want to add content into the Message field. The email text should incorporate
information that could not be included in the design of the offer letter such as
Onboarding room location, 2nd day instructions, etc.
17. If changes are necessary to the offer letter, you must cancel the transaction and
Prepare Job Offer again with updated information. It is not recommended to
make/save the changes and then send the manually updated letter within Outlook as
there would be no PeopleSoft record of this transaction.
Click the .rtf link in the attachment section to review the Offer Letter created.
18. If appropriate, you can also add and delete attachments. Examples of appropriate
attachments: campus map, parking facilities, finger printing directions, 2nd day
directions, etc.
19. Click the Preview button to review the email content.
20. Click the Return button.
21. Click the Send button once complete. This will initiate the automated email
including the offer letter, all attachments, and email text to the candidate and
recipients listed in the CC and BCC lines. The email you receive serves as a
confirmation that the offer letter was sent successfully.
22. If necessary, you can review the offer letter history, access a copy of a sent letter,
edit an offer letter ‘saved for later’ in draft status, or delete a saved/draft offer letter
from the Manage Applicants page of the posting.
Click the Return to Previous Page link.
23. To view the offer letter that was created/sent: Click the candidate’s disposition (i.e. Applied, Route, Preliminary Offer Decided).
For this example, click the 069-Preliminary Offer Decided link next to Laila
Alyse.

Page 126
Step Action
24. Click on the Letter icon in the Disposition History section.
25. Click the OK button to view the word document.
26. Review this document and click the Close button when done.
27. Click the Return to Previous Page link.
28. To complete an offer letter that you Saved for Later:
Click the candidate’s disposition (i.e. Applied, Route, Preliminary Offer Decided).
For this example, click the 050-Route link next to the selected candidate's name.
29. Click the Offer link in the Disposition History section.
30. This will bring up the Offer details page for you to verify information, make any
changes and then finalize the process as described.
Click the Return to Previous Page link.
31. To Delete an offer: Click the candidate’s disposition (i.e. Applied, Route, Preliminary Offer Decided,
Offer).
For this example, click the 050-Route link next to the selected candidate's name.
32. Scroll to the Disposition History section.
33. Click the Offer link in the Disposition History section.
34. Click the Delete Offer button.
Note: The ‘Delete Offer’ option should be used for offer letters in ‘draft’ status
only.
35. Click the OK button.
36. Click the Return to Previous Page link.
37. End of Procedure.

Page 127
Appendix M: PFH: External Candidate
Step Action
1. From the Main Menu, click the Recruiting link.
NOTE: Candidates must be prepared for hire using these steps via the Manage
Applicants page of the posting. If other avenues are used (i.e. Find Applicants), HR
Data will not receive appropriate workflow to finalize the hire.
2. Click the Find Job Openings link.
3. Enter the desired information into the Job Opening ID field.
4. Click the Search button.
5. Click the Job Title link.
6. Click on the Disposition for the selected candidate.
For this example, click the 069-Preliminary Offer Decided link.
NOTE: If the Disposition isn’t hyperlinked, click on the applicant’s name, find the
appropriate Job Opening and then click the Disposition.
7. Scroll down to view the Disposition Details.
8. Click the triangle next to Edit Disposition Details to expand the section.
9. Scroll down to view the details.
10. Click the Status Code drop down list.
11. Select the 071 Offer Accepted option.
12. Click the OK button in the error message.
13. Click the Save button.
14. Click the Return to Previous Page link.
15. Click the Take Action drop down menu for the selected candidate.
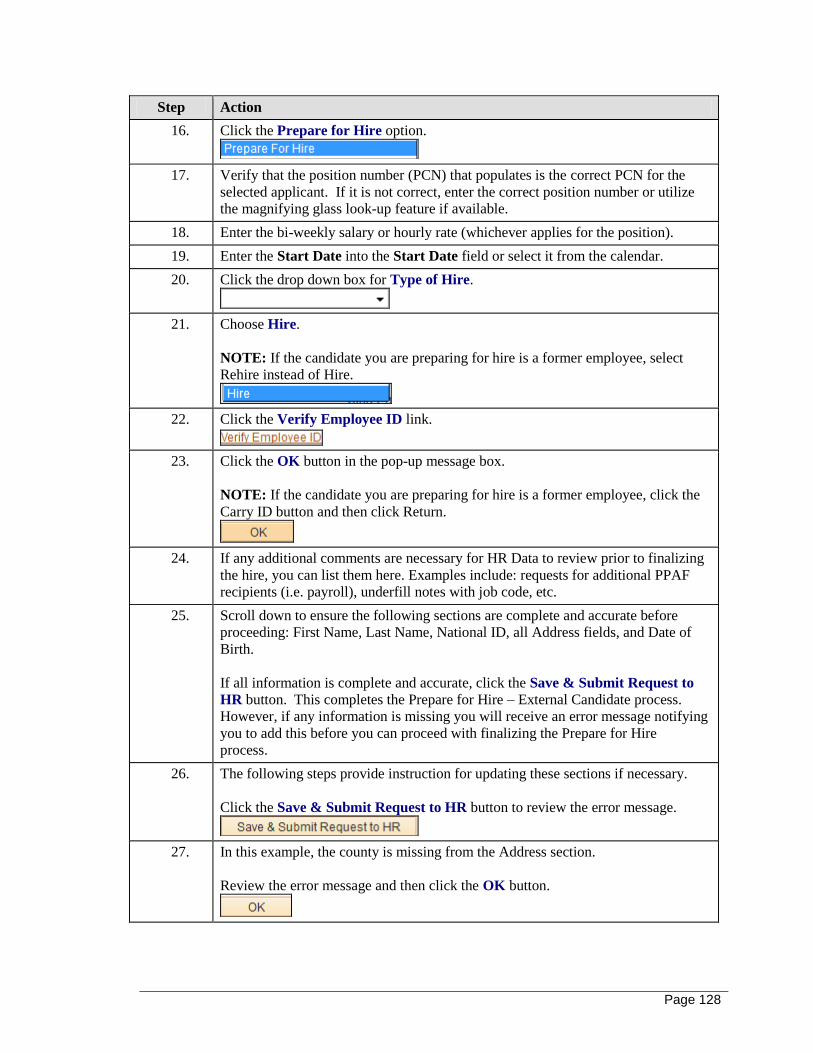
Page 128
Step Action
16. Click the Prepare for Hire option.
17. Verify that the position number (PCN) that populates is the correct PCN for the
selected applicant. If it is not correct, enter the correct position number or utilize
the magnifying glass look-up feature if available.
18. Enter the bi-weekly salary or hourly rate (whichever applies for the position).
19. Enter the Start Date into the Start Date field or select it from the calendar.
20. Click the drop down box for Type of Hire.
21. Choose Hire.
NOTE: If the candidate you are preparing for hire is a former employee, select
Rehire instead of Hire.
22. Click the Verify Employee ID link.
23. Click the OK button in the pop-up message box.
NOTE: If the candidate you are preparing for hire is a former employee, click the
Carry ID button and then click Return.
24. If any additional comments are necessary for HR Data to review prior to finalizing
the hire, you can list them here. Examples include: requests for additional PPAF
recipients (i.e. payroll), underfill notes with job code, etc.
25. Scroll down to ensure the following sections are complete and accurate before
proceeding: First Name, Last Name, National ID, all Address fields, and Date of
Birth.
If all information is complete and accurate, click the Save & Submit Request to
HR button. This completes the Prepare for Hire – External Candidate process.
However, if any information is missing you will receive an error message notifying
you to add this before you can proceed with finalizing the Prepare for Hire
process.
26. The following steps provide instruction for updating these sections if necessary.
Click the Save & Submit Request to HR button to review the error message.
27. In this example, the county is missing from the Address section.
Review the error message and then click the OK button.
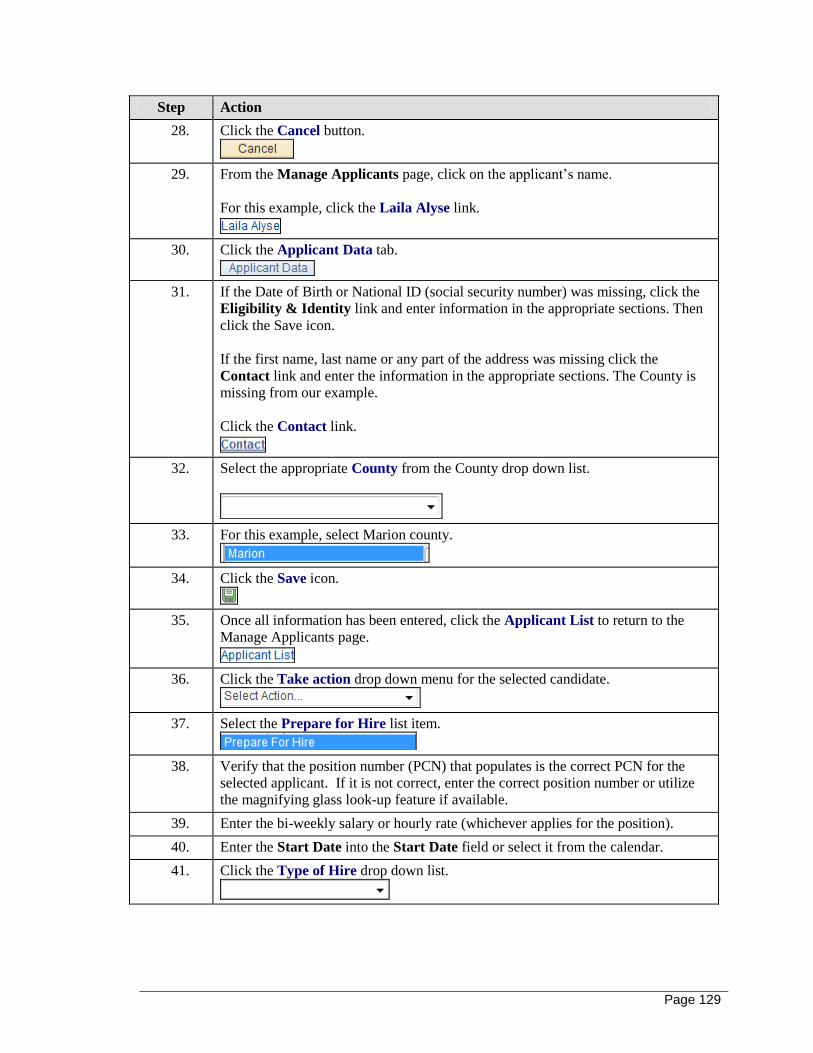
Page 129
Step Action
28. Click the Cancel button.
29. From the Manage Applicants page, click on the applicant’s name.
For this example, click the Laila Alyse link.
30. Click the Applicant Data tab.
31. If the Date of Birth or National ID (social security number) was missing, click the
Eligibility & Identity link and enter information in the appropriate sections. Then
click the Save icon.
If the first name, last name or any part of the address was missing click the
Contact link and enter the information in the appropriate sections. The County is
missing from our example.
Click the Contact link.
32. Select the appropriate County from the County drop down list.
33. For this example, select Marion county.
34. Click the Save icon.
35. Once all information has been entered, click the Applicant List to return to the
Manage Applicants page.
36. Click the Take action drop down menu for the selected candidate.
37. Select the Prepare for Hire list item.
38. Verify that the position number (PCN) that populates is the correct PCN for the
selected applicant. If it is not correct, enter the correct position number or utilize
the magnifying glass look-up feature if available.
39. Enter the bi-weekly salary or hourly rate (whichever applies for the position).
40. Enter the Start Date into the Start Date field or select it from the calendar.
41. Click the Type of Hire drop down list.

Page 130
Step Action
42. Select the Hire list option.
NOTE: If the candidate you are preparing for hire is a former employee, select
Rehire instead of Hire.
43. Click the Verify Employee ID link.
44. Click the OK button in the pop-up message box.
NOTE: If the candidate you are preparing for hire is a former employee, click the
Carry ID button and then click Ok.
45. Click the Save & Submit Request to HR button.
46. End of Procedure.
Appendix N: PFH: Internal Candidate
Step Action
1. From the Main Menu, click the Recruiting link.
NOTE: Candidates must be prepared for hire using these steps via the Manage
Applicants page of the posting. If other avenues are used (i.e. Find Applicants), HR
Data will not receive appropriate workflow to finalize the hire.
2. Click the Find Job Openings link.
3. Enter the desired information into the Job Opening ID field.
4. Click the Search button.
5. Click the Job Title link.
6. Click on the Disposition for the selected candidate.
For this example, click the 069-Preliminary Offer Decided link.
NOTE: If the Disposition isn’t hyperlinked, click on the applicant’s name, find the
appropriate Job Opening and then click the Disposition.
7. Click the triangle next to Edit Disposition Details to expand the section.
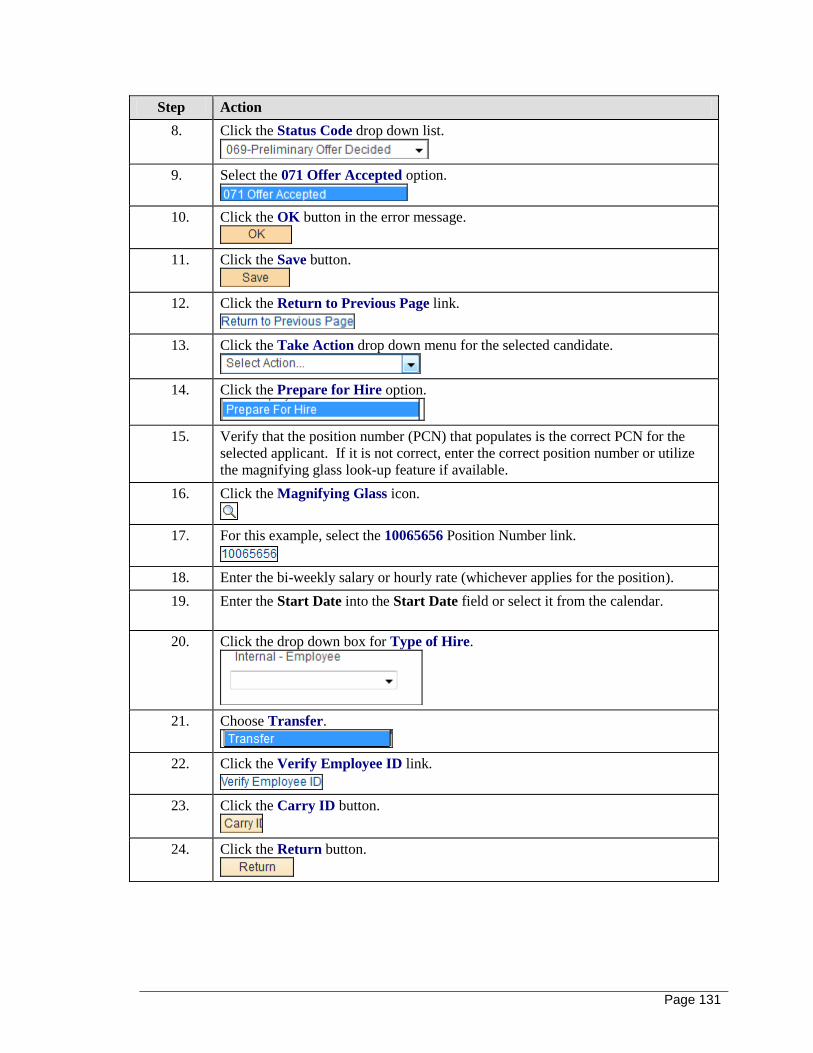
Page 131
Step Action
8. Click the Status Code drop down list.
9. Select the 071 Offer Accepted option.
10. Click the OK button in the error message.
11. Click the Save button.
12. Click the Return to Previous Page link.
13. Click the Take Action drop down menu for the selected candidate.
14. Click the Prepare for Hire option.
15. Verify that the position number (PCN) that populates is the correct PCN for the
selected applicant. If it is not correct, enter the correct position number or utilize
the magnifying glass look-up feature if available.
16. Click the Magnifying Glass icon.
17. For this example, select the 10065656 Position Number link.
18. Enter the bi-weekly salary or hourly rate (whichever applies for the position).
19. Enter the Start Date into the Start Date field or select it from the calendar.
20. Click the drop down box for Type of Hire.
21. Choose Transfer.
22. Click the Verify Employee ID link.
23. Click the Carry ID button.
24. Click the Return button.
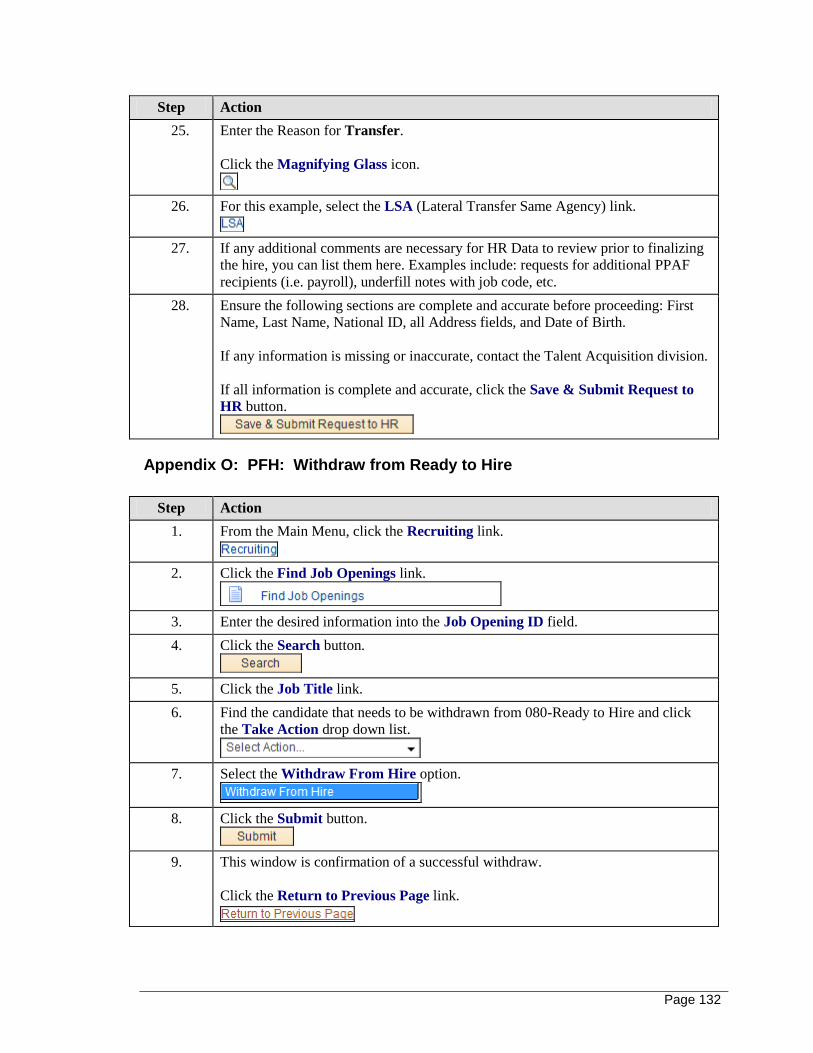
Page 132
Step Action
25. Enter the Reason for Transfer.
Click the Magnifying Glass icon.
26. For this example, select the LSA (Lateral Transfer Same Agency) link.
27. If any additional comments are necessary for HR Data to review prior to finalizing
the hire, you can list them here. Examples include: requests for additional PPAF
recipients (i.e. payroll), underfill notes with job code, etc.
28. Ensure the following sections are complete and accurate before proceeding: First
Name, Last Name, National ID, all Address fields, and Date of Birth.
If any information is missing or inaccurate, contact the Talent Acquisition division.
If all information is complete and accurate, click the Save & Submit Request to
HR button.
Appendix O: PFH: Withdraw from Ready to Hire
Step Action
1. From the Main Menu, click the Recruiting link.
2. Click the Find Job Openings link.
3. Enter the desired information into the Job Opening ID field.
4. Click the Search button.
5. Click the Job Title link.
6. Find the candidate that needs to be withdrawn from 080-Ready to Hire and click
the Take Action drop down list.
7. Select the Withdraw From Hire option.
8. Click the Submit button.
9. This window is confirmation of a successful withdraw.
Click the Return to Previous Page link.