Embed Size (px)
Citation preview

2014 CatWest-‐ www.consoletrainer.com 1
QUICK START GUIDE TO HOG 4
Expanded Edition
TOPIC PAGE
SETUP................................. 2 PATCHING.......................... 5 PROGRAMMER................. 9 PALETTES........................... 12 VIEWS................................. 14 RECORDING CUES............. 15 PLAYBACK.......................... 18 MODIFYING CUES............. 19 PAGES................................. 21 EFFFECTS............................ 23 TIMING............................... 25 BACKUPS............................ 26 SOFTWARE......................... 28
Cat West Updated Aug 2014

2014 CatWest-‐ www.consoletrainer.com 2
SETUP
Launching a Showfile
1. From the Wholehog Start window, select LAUNCH NEW SHOW. 2. Enter a name for your showfile in the SHOW NAME box (pressing the SET key will bring up an onscreen keyboard), click NEXT (on screen) 3. Click FINISH.
Connecting DMX Processor 8000s
-‐ If connecting one DP to your console, connect it via a CROSSOVER Cat-‐5 Ethernet cable. -‐ If you are connecting multiple DPs, then connect the console and all DPs to a network switch using patch (non-‐crossover) cables. Once your DP is connected and the show is launched, the console will check the DP's software version. If they do not match, the console will prompt you to upgrade the DP to match the desk. Simply follow the prompts on the console and the console will upgrade the DP.
Connecting External Monitors and Calibrating Touchscreens
1. Connect the monitor to the DVI adaptor on your console. If you are using a Touchscreen with a USB cable, be sure to connect that as well. 2. Press the SETUP key and select CONTROL PANEL from the main toolbar (bottom of the right monitor) 3. In the DISPLAYS tab of the Control Panel, select the type of monitor you’re using and pick a resolution from the drop down below. 4. Click APPLY

2014 CatWest-‐ www.consoletrainer.com 3
5. If the monitor is a touchscreen, press CALIBRATE TOUCHSCREENS and follow the prompts to calibrate all monitors including the external.
Opening Individual Windows
-‐ Hold OPEN and press the key corresponding to the desired Directory window (Example: OPEN + GROUP, OPEN + LIST, etc) -‐ Hold OPEN and select a window from the Open Toolbar (bottom of the right monitor) -‐ Double tap the key corresponding to a Directory or Window (Example: BEAM BEAM, CHOOSE CHOOSE, etc) -‐ Press SETUP and select a window from the Setup Toolbar (bottom of the right monitor) -‐ Touch a View in the Views Toolbar (top of the left monitor)
Manipulating Windows
1. Select the window you wish to move, resize, etc. (you can simply touch it to select it) 2. Touch the corresponding option in the Windows Toolbar (top of the right monitor)
The Windows Toolbar
2014 CatWest-‐ www.consoletrainer.com 4
Connecting Wings
1. Connect the Wing(s) to the console using the USB cable, and connect power. 2. Press the SETUP key and select CONTROL PANEL from the main toolbar (bottom of the right monitor). 3. Select the WINGS tabs on the left side of the CONTROL PANEL 4. Touch any Playback bar's dropdown menu and select your Wing via the Wing's ID number. 5. Once selected, click the button with the lightbulb to ping your Wing. This will cause the Wing's LEDs to flash letting you know it has been configured correctly. 6. Clicking the button to the right of the lightbulb will display a "Playback Bar," which will show the contents of what has been recorded to that Wing on any given page.
Tip: If you are using a mini wing and would like to drag the Playback bar to an external monitor, click on the 2 vertical bars at the left side of the playback bar. This will undock the bar and you can then drag it to the external monitor. Drag and drop it to the bottom of the external monitor and it will re-‐ dock itself.
The Playback Bar
2014 CatWest-‐ www.consoletrainer.com 5
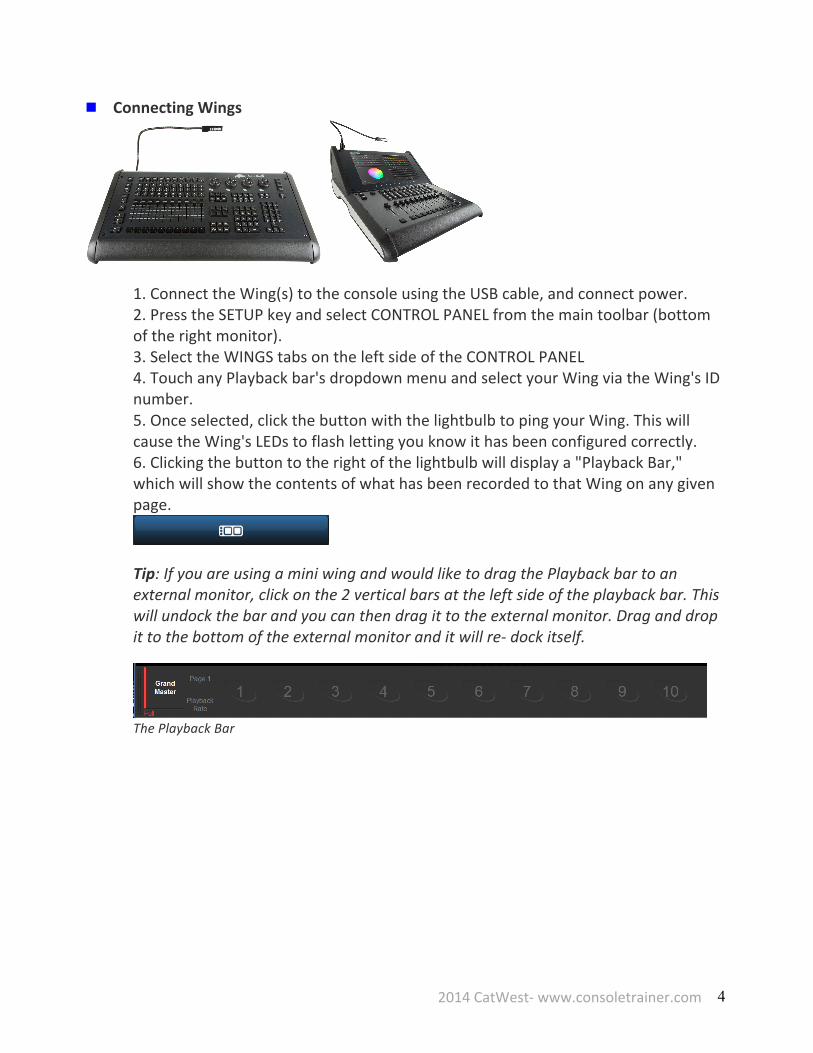
Connecting Widgets
1. Connect the Widget or Superwidget to the console (Roadhog Full Boar, Hog iPC or Hog3PC on your computer) and connect power. 2. Press the SETUP key and select NETWORK from the main toolbar (bottom of the right monitor). 3. In the Network window, click on the Net # of the DMX Processor you are patched to. The cell will get a red box around it.
4. Click the SETTINGS button at the bottom of the window 5. In the pop-‐up window, select DMX WIDGETS 6. Click on the drop-‐down for the universe where you would like to assign your Widget and select your Widget's ID. 7. Click OK.
Note: You will, of course, need to patch any or all fixtures in order to open Settings window.
PATCHING
Adding the Fixtures
1. Open the Fixture Window by holding the OPEN key and pressing the FIXTURE key. (or press SETUP and select PATCH from your Main Toolbar). 2. Click FIXTURE SCHEDULE from the top of the Fixture Window. 3. In the pop-‐up, scroll down to find the manufacturer of the fixture(s) you want to add. Click on the manufacturer's name to expand the list of their fixtures. You can also use the SEARCH function to find your fixture.

2014 CatWest-‐ www.consoletrainer.com 6
4. Locate and highlight (click) the name of the fixture you are trying to add. 5. Press the SET key and enter the quantity of fixtures you have of that type. 6. Repeat this process to add any/all of your other fixtures and then click OK.
The Fixture Schedule Window
Changing the User Numbers
The User Numbers are how you will select your fixtures in the programmer, so you want to make them unique. This number does not affect or utilize the address of the fixtures
1. In the Fixture Window, the second column (labeled "Num") represents the User Numbers.

2014 CatWest-‐ www.consoletrainer.com 7
2. Click on any User Number cell, hit the SET key and type in a new User Number, followed by ENTER. 3. To change a group of User Numbers, click on the first User Number's cell and drag down to the last cell.
Press SET and key in the first User Number, followed by ENTER. The console will label the group sequentially.
Patching an Individual Fixture
1. Key in the User Number of the fixture you want to patch, and then press the @ key. 2. In the pop-‐up window, select the DP that you'd like to patch to from the left side window. 3. Click on the column of the universe that you'd like to patch to. 4. Key in the start address of your fixture, followed by the ENTER key.
Note: Alternatively, you can choose to key all the information in via the command line. 1. Key in the User Number of the fixture you want to patch, and then press the @ key. 2. Key in the Net # of the DP you wish to patch to, followed by the / (slash) key. 3. Key in the Universe you wish to patch to, followed by the / (slash) key. 4. Key in the start address of your fixture, followed by ENTER.

2014 CatWest-‐ www.consoletrainer.com 8
Example: To patch Fixture #1 at DP#2, Universe 1, Address 300, you could type: 1 @ 2 / 1 / 300 ENTER.
Patching a Range of Fixtures. This is used when your fixtures are addressed sequentially.
1. Key in the User Number range you wish to patch using the THRU key (Example: 1 THRU 10), followed by the @ key. 2. In the pop-‐up window, select the DP that you'd like to patch to from the left side window. 3. Click on the column of the universe you'd like to patch to. 4. Key in the start address of the first fixture in your range, followed by ENTER.
Note: Alternatively, you can choose to key all the information in via the command line. 1. Key in the User Number range you want to patch using the THRU key (Example: 1 THRU 10), and then press the @ key. 2. Key in the Net # of the DP you wish to patch to, followed by the / (slash) key. 3. Key in the Universe you wish to patch to, followed by the / (slash) key. 4. Key in the start address of your the first fixture in your range, followed by ENTER.
Patching Fixtures with Multiple Patch Points
1. Key in the User Number of the fixture you want to patch, and then press the @ key. 2. In the pop-‐up window, locate the drop-‐down menu for PATCH POINTS, and select FIXTURE.
3. Select the DP that you'd like to patch the mechanical portion of your fixture to from the left side window. 4. Click on the column of the universe that you'd like to patch to. 5. Key in the start address of the mechanical portion of your fixture (the address set in the fixture's menu), followed by the ENTER key. 6. Press @ again. 7. In the pop-‐up window, locate the drop-‐down menu for PATCH POINTS, and select INTENSITY 8. Select the DP that you'd like to patch to from the left side window.

2014 CatWest-‐ www.consoletrainer.com 9
9. Click on the column of the universe that you'd like to patch to. 10. Key in the address of the dimmer where the fixture's lamp is plugged in, followed by the ENTER key.
Unpatching Fixtures
1. Key in the User Number(s) of the fixture(s) you wish to unpatch, followed by ENTER 2. Press the UNPATCH button at the top of the Fixture Window.
To unpatch an entire universe:
1. Click VIEW BY DP from the top of the Fixture Window. 2. Click on the Universe you wish to unpatch (it will be a light blue color) 3. Press UNPATCH UNIVERSE from the top of the window.
Unpatch and Clone options in the View By DP Window
To unpatch an entire DP:
1. Click VIEW BY DP from the top of the Fixture Window. 2. Select the DP you wish to unpatch from the Drop Down Menu. 3. Click UNPATCH DP from the top of the window.
PROGRAMMER WINDOW
Selecting the Fixtures
1. Open the Programmer window by pressing the PROGRAMMER View in the Views toolbar (top of your left monitor) Or -‐ Use the Programmer softkey in the Windows Toolbar at the top of the right monitor 2. Key in the User Number(s) of the fixture(s) you wish to select, followed by ENTER Note: Keep in mind that you can use the THRU, + (plus), and -‐ (minus) keys to make your selection

2014 CatWest-‐ www.consoletrainer.com 10
Additionally: If you have Groups created in the Group Directory, you can select any Group to put those fixtures in the Programmer.
In the Programmer, the Active Fixture Selection will be what is modified when you edit. The Active FIxture Selection are the fixtures listed in dark blue in the Programmer. Not all fixtures in the Programmer need to be Actively Selected at any time. However, if you do wish to quickly select all fixtures currently in the Programmer and make them the Active Selection, you can:
-‐ Press the SELECT softkey on the main toolbar (bottom of the right monitor), then select ALL from the new toolbar or -‐ Hold the BACK and NEXT keys simultaneously.
The Actively Selected Fixtures
Modifying Intensity
1. Select the fixture(s) you wish to work with 2. Press the @ key and then type in an intensity value followed by ENTER
Note: When taking fixtures to FULL, you need only select the fixture(s) and then press the FULL key Note: When keying in intensities other than FULL, keying in 1 digit will assume a 0 after the digit.
Example: 1 @ 5 ENTER will take fixture #1 to 50%
Other Methods for controlling Intensity after a fixture selection: -‐ Turn the Intensity encoder wheel -‐ Choose an Intensity Palette from the Intensity Directory -‐ Use the vertically mounted I-‐Wheel

2014 CatWest-‐ www.consoletrainer.com 11
Modifying Other Attributes on the Encoder Wheels
1. Select the fixture(s) you wish to work with 2. Press any "Kind" key (INTENSITY, POSITION, COLOUR, BEAM) to locate your desired attributes. Some parameters may require you to press the same Kind key multiple times in order to access the attribute due to the amount of parameters. 3. Spin the wheel until you achieve the desired value.
An Encoder Wheelset
Using Palettes
1. Select the fixture(s) you wish to work with 2. Open any Directory window or press the Palettes View (top of the left monitor) 3. Touch any Palette item that is not dark grey (a dark grey palette indicates unavailability for the fixtures currently selected)
Using the Slotted Toolbar
1. Select the fixture(s) you wish to work with 2. Touch any item on the Slotted Toolbar (the horizontal row at the bottom of the right monitor: above the encoder wheelsets) 3. From the second pop-‐up bar, select any value (gobos, slotted colours, etc).
The Slotted Toolbar
In Place Editing
1. In the Programmer window, you can click on any attribute cell. 2. Press the SET key 3. Key in a new value, or select a value from the drop-‐down list, followed by ENTER.

2014 CatWest-‐ www.consoletrainer.com 12
To Remove all Fixtures from the Programmer Press the CLEAR key Note: After pressing CLEAR, if you hold PIG and press CLEAR, the just cleared values will be restored. Alternatively, you can hit UNDO.
To Remove Selected Fixtures from the Programmer
1. Select the fixtures you wish to remove (they will show as dark blue in the Programmer window when actively selected). 2. Press KNOCKOUT from your main toolbar (bottom of your right monitor)
To Remove Attribute Kind (IPCB) Information
1. Select the fixtures. 2. Press the key corresponding to the Kind (Intensity, Position, Colour, Beam, Effects) and press KNOCKOUT on your main toolbar.
Note: Alternatively, you can hold the BACKSPACE (<-‐-‐) key and press the Kind key of the attribute you wish to remove.
To Remove a Single Attribute
1. Select the fixtures. 2. Locate the attribute's encoder wheel (example: pan, tilt, gobo, cyan, etc) 3. Hold the BACKSPACE (<-‐-‐) key and turn the wheel.
PALETTES
Auto Palettes
1. Open the Fixture window by holding the OPEN key and pressing the FIXTURE key. 2. At the top of the Fixture window, press AUTO PALETTES 3. In the Pop-‐Up window, click GENERATE
Recording Groups
1. Select the fixtures that you wish to store in the Group by keying in their User Numbers. 2. This will put those fixtures into the Programmer.

2014 CatWest-‐ www.consoletrainer.com 13
3. Ensure that the fixtures you want stored are Actively Selected (these are the fixtures listed in dark blue in the Programmer window) 4. Press the RECORD key and touch any empty box in the Group Directory window. 5. Press the SET key and enter a name, followed by ENTER 6. Clear the Programmer by pressing the CLEAR key.
Hint: I always recommend testing objects immediately after creation. For Groups, simply touch the Group you just created and confirm that the correct fixtures have been sent to the Programmer window. If you realize you made a mistake, you can use my favorite button: UNDO (available on the main toolbar at the bottom of the right monitor) to move backwards in your work and recreate the information correctly (hopefully) the second time.
Recording Palettes
1. Select the fixture(s) you wish to work with in the Programmer window. 2. Modify their attributes to create the look you wish to store. 3. Press the RECORD key 4. Touch (or select) any empty Palette (Intensity, Position, Colour, Beam) Directory box to store to. 5. Press the SET key and enter a name followed by the ENTER key. 6. Clear the Programmer by pressing the CLEAR key.
Overriding Palette Defaults.
1. Select the fixture(s) you wish to work with in the Programmer window. 2. Modify their attributes to create the look you wish to store. 3. Press the RECORD key 4. From the Record toolbar (in the popup at the bottom of your right monitor), click the mask(s) (Intensity, Position, Color, etc.) for the KIND(s) you wish to store.
5. Touch (select) any empty palette box in the desired directory (Intensity, Position, Colour or Beam) 6. Press SET and enter a name followed by ENTER 7. Clear the Programmer by pressing the CLEAR key.

2014 CatWest-‐ www.consoletrainer.com 14
Example: If you wanted to store Position, Colour and Beam information into the Position Directory, you would create the look in your Programmer and
1. Press RECORD 2. Select POSITION, COLOR and BEAM from the Record toolbar (bottom of the right monitor) 3. Touch (select) any empty Palette in the Position Directory 4. Press SET and enter a name followed by ENTER 5. Clear the Programmer by pressing the CLEAR key.
To Copy Palettes
1. Select the palette you wish to copy 2. Press the COPY key 3. Select any empty palette in the same directory window
To Move Palettes
1. Select the palette(s) you wish to move 2. Press the MOVE key 3. Select any empty palette in the same directory window
To Delete Palettes
1. Select the palette(s) you wish to delete 2. Press the DELETE key 3. If you are prompted to confirm the deletion, you can touch OK or press ENTER
VIEWS
Recording Views
1. Open the windows you'd like to store in your view, arranging them to your liking. 2. Hold the RECORD key and touch the desired View location in your Views Toolbar (Top of your left monitor). 3. Press the SET key and enter a name, followed by ENTER.
The Views Toolbar
Note: Views will also store the options you have selected in each window (for example: Guard, Sources, Compact, etc) along with any scroll positions.

2014 CatWest-‐ www.consoletrainer.com 15
Recalling Views From the Views Toolbar (top of the left monitor)
-‐ Press the View you'd like to open. -‐ If the view is not listed in the bank of 10 views on your toolbar, use the NEXT (>>) button (on screen) to cycle through banks of Views. HINT: Hold the PIG key while pressing the NEXT button on screen to cycle backwards through views -‐ Alternatively, hold the OPEN key and press the VIEW button on screen in the Views toolbar to open the Views Directory and select a View.
Recalling Views From Cuelist Macros
1. Touch any Macros cell in the Cuelist window, and press SET. 2. Select RV from the drop-‐down list and key in the number of the View you would like triggered, followed by ENTER 3. Play back the cue with the macro and the view will be opened.
Note: Comment Macros can also be placed on Scenes, Page Changes, and as a Startup on showload.
OPEN Shortcuts
-‐ Hold the OPEN key and press any number between 0 and 9 to open that View by number. These numbers correspond to the page of views at the top of your left monitor. Note that holding OPEN and pressing the 0 key will open View 10.
RECORDING CUES
Recording Cues to a Master
1. Create the desired look in your Programmer 2. Press RECORD 3. Press CHOOSE on the master you wish to record to

2014 CatWest-‐ www.consoletrainer.com 16
HINT: If the Master you wish to record to is already chosen, you can simply press ENTER after pressing RECORD
Follow the same procedure to add subsequent Cues to the same Cuelist
Inserting a cue within a cuelist
Assuming your Master is chosen...
1. Create the desired look in your Programmer 2. Press RECORD Cue # (Example: RECORD 1.5) ENTER
HINT: Sometimes you don't want the values from the Cue you are inserting to Track into the following cue. To avoid this: Assuming your Master is chosen... 1. Create the desired look in your Programmer 2. Press RECORD 3. De-‐select FORWARD from the Record toolbar (bottom of the right monitor)
The Record Toolbar
4. Type in the number of the cue you would like to store, followed by ENTER
Note: To record to any list (regardless of whether the Master is chosen or not), use the LIST key in your syntax. Example: RECORD LIST # CUE # ENTER
To Delete Cues on the Chosen Master
1. Press CUE, type in the # of the cue you wish to remove 2. Press DELETE 3. If prompted to confirm, press OK or hit ENTER Note: you can select a range of cues to delete (Example: CUE 1 THRU 10 DELETE ENTER)
To Delete Cues not on the Chosen Master or Cues in Virtual Cuelists
1. Press LIST followed by the # of the Cuelist containing your cue 2. Press CUE, type in the # of the cue you wish to remove 3. Press DELETE 4. If prompted to confirm, press OK or hit ENTER
Note: you can select a range of cues to delete (Example: LIST 9 CUE 1 THRU 10 DELETE ENTER)

2014 CatWest-‐ www.consoletrainer.com 17
To Delete a Cuelist
1. Press LIST followed by the # of the List you wish to remove 2. Press DELETE 3. If prompted to confirm, press OK or hit ENTER
To Copy Cues on the Chosen Master
1. Press CUE, type in the # of the cue you wish to copy 2. Press COPY 3. Press CUE followed by the destination cue, then ENTER Note: you can select a range of cues to copy (Example: CUE 1 THRU 10 COPY CUE 11 ENTER)
To Copy Cues not on the Chosen Master or between Cuelists
1. Press LIST followed by the # of the Cuelist containing your source cue 2. Press CUE, type in the # of the cue you wish to copy 3. Press COPY 4. Press LIST followed by the number of the destination Cuelist 5. Press CUE followed by the destination cue, then ENTER Note: you can select a range of cues to copy (Example: LIST 9 CUE 1 THRU 10 COPY LIST 42 CUE 1 ENTER)
To Copy a Cuelist
1. Press LIST followed by the # of the List you wish to copy 2. Press COPY 3. Press the CHOOSE key of the destination Master or Select an empty cell in the Cuelist Directory

2014 CatWest-‐ www.consoletrainer.com 18
PLAYBACK
Playing Back Cues on a Master
A Cuelist does not have to be on the Chosen Master in order to be played.
To trigger a Cue: -‐ Press the GO (Play) key on the Master or -‐ If the Cuelist's Master is Chosen, you can use the larger GO (Play) in the Main Playback (Ensure that the Master's Fader is up)
To Pause a Cue During a Crossfade: -‐ Press the HALT (Pause) key on the Master or -‐ If the Cuelist's Master is Chosen, you can use the larger HALT (Pause) in the Main Playback
To skip between Cues: 1. Press the CHOOSE key above the Master containing your Cuelist 2. Press the SKIP FORWARD or SKIP BACKWARD keys in the Main Playback
To jump to a Cue: 1. Press the CHOOSE key above the Master containing your Cuelist 2. Press the GOTO key 3. Key in the number of the Cue you wish to jump to 4. Press ENTER
Controlling Intensity of Playback: -‐ Move the Master's Fader to proportionately affect the Intensity output of the cuelist. -‐ The Flash key at the bottom of the Master can be used to "bump" the Intensity to 100%

2014 CatWest-‐ www.consoletrainer.com 19
Playing Virtual Cuelists
1. Open the Cuelist Directory by holding the OPEN key and pressing LIST 2. Ensure that the GUARD button in the Directory is off. 3. Touch (select) the List you wish to trigger.
Note: Alternatively, you can type the list you wish to trigger, followed by ENTER. (Example: LIST 12 ENTER)
To Release a Cuelist on a Master
1. Press the CHOOSE key on the Master containing your Cuelist 2. Press the RELEASE key
To Release a Virtual Cuelist
1. Press and hold on the List item in the Cuelist Directory 2. Press RELEASE
To Release all Playback (all Cuelists and Scenes on all Pages)
1. Hold the PIG key 2. Press RELEASE
MODIFYING CUES
Editing Existing Cues in Playback:
If the Cue is currently live in playback: Using UPDATE
1. Make the necessary edits in the Programmer 2. Press UPDATE 3. In the Auto-‐Update pop-‐up window, ensure that the Cue you wish to update is selected. 4. Press OK or ENTER Note: If your edits could override a Palette used in the Cue, you will also have the option to Update the Palette.

2014 CatWest-‐ www.consoletrainer.com 20
Whether the Cue is in playback or not:
Using RECORD
1. CHOOSE the Master containing the Cue you are editing 2. Make the necessary edits in the Programmer 3. Press RECORD followed by the number of the Cue you are modifying 4. From the pop-‐up, select MERGE or REPLACE depending on your needs.
Note: If the Cue is not on the Chosen Master, then amend your syntax after RECORD with the List and Cue number you are modifying Example: RECORD LIST 1 CUE 2, then choose MERGE or REPLACE
Using MERGE
1. CHOOSE the Master containing the Cue you are editing 2. Make the necessary edits in the Programmer 3. Press MERGE followed by the number of the Cue you are modifying, followed by ENTER Note: If the Cue is on not on the Chosen Master, then amend your syntax after MERGE with the List and Cue number you are modifying Example: MERGE LIST 1 CUE 2 ENTER
Note on RECORD and MERGE: If you do not want your edits to track forward into subsequent cues, you can deselect the FORWARD button on the Record toolbar (bottom of the right monitor) after pressing RECORD or MERGE.
Opening Cues into their own Editor Window:
1. Key in the LIST #, CUE # of the Cue you wish to edit (Example: LIST 2 CUE 1) 2. Press OPEN 3. Make the necessary changes in the Editor window 4. Press UPDATE Notes: If the Cue is on the currently Chosen Master, you can bypass the LIST # by default, the Preference for opened cues is to load in BLIND. You can deselect the BLIND key or change this default in the Preferences window if you wish to override this.

2014 CatWest-‐ www.consoletrainer.com 21
View Cue
1. Open the Cuelist window by pressing CHOOSE CHOOSE on the Master containing your List. Or -‐ Touch the CUELIST View (top of the left monitor) -‐ Hold OPEN and press the CHOOSE key on the Master containing your List. 2. In the Cuelist window, select VIEW CUE
3. In the VIEW CUE window, press the EDIT button 4. Make the necessary changes and then press UPDATE Note: Editing in VIEW CUE is treated in the same was as any Cue Editor window: By default, the Preference is to go BLIND. You can deselect the BLIND key or change this default in the Preferences window if you wish to override this.
PAGES
Creating a New Page
Press PAGE # (the number of the page you wish to create) followed by ENTER. Or: 1. Hold OPEN and press PAGE to open the Page Directory 2. Deselect the Guard button in the Page Directory window 3. Touch any empty cell in the Directory 4. Press Set 5. Enter a name for your new Page, followed by Enter. Note: You can then record new Cuelists to your new page as you would any page.
Moving or Copying Existing Cuelists to your New Page
1. Select the List you wish to move/copy from the List Directory, (or key in in LIST #) 2. Press MOVE or COPY 3. Press CHOOSE on the destination Master

2014 CatWest-‐ www.consoletrainer.com 22
Ways To Change Pages
-‐ Use the NEXT PAGE key to cycle forward to the following page -‐ Use the BACK PAGE to cycle backwards through Pages -‐ Key in PAGE, followed by the number of the Page, followed by ENTER (PAGE 6 ENTER) -‐ Select a Page from the Page Directory (ensure Guard is off) -‐ Use the CP Macro in a Cuelist or as a Startup Macro
To Holdover Cuelists between Page Changes
-‐ Hold the CHOOSE key on the Master containing your Cuelist while changing Pages or -‐ Use an option for Page Changes in the Preferences window: HOLDOVER IF ACTIVE will keep all active Cuelists live during a Page change LEAVE IN BACKGROUND will keep all active Cuelists live during a Page change, but the Playback Bar will reflect the Lists stored on the destination Page.
Page Change Options in the Preferences Window
Note: Templated Lists that appear on every Page will be held over automatically.
Template Pages
1. Hold OPEN and press PAGE to open the Page Directory 2. Activate the Page you wish to set as Template by -‐ Deselecting GUARD and then touch (select) the Page in the Directory or -‐ Key in PAGE # (the desired Page's number) ENTER 3. In the Page Directory, press SET CURRENT PAGE AS TEMPLATE
2014 CatWest-‐ www.consoletrainer.com 23
EFFECTS
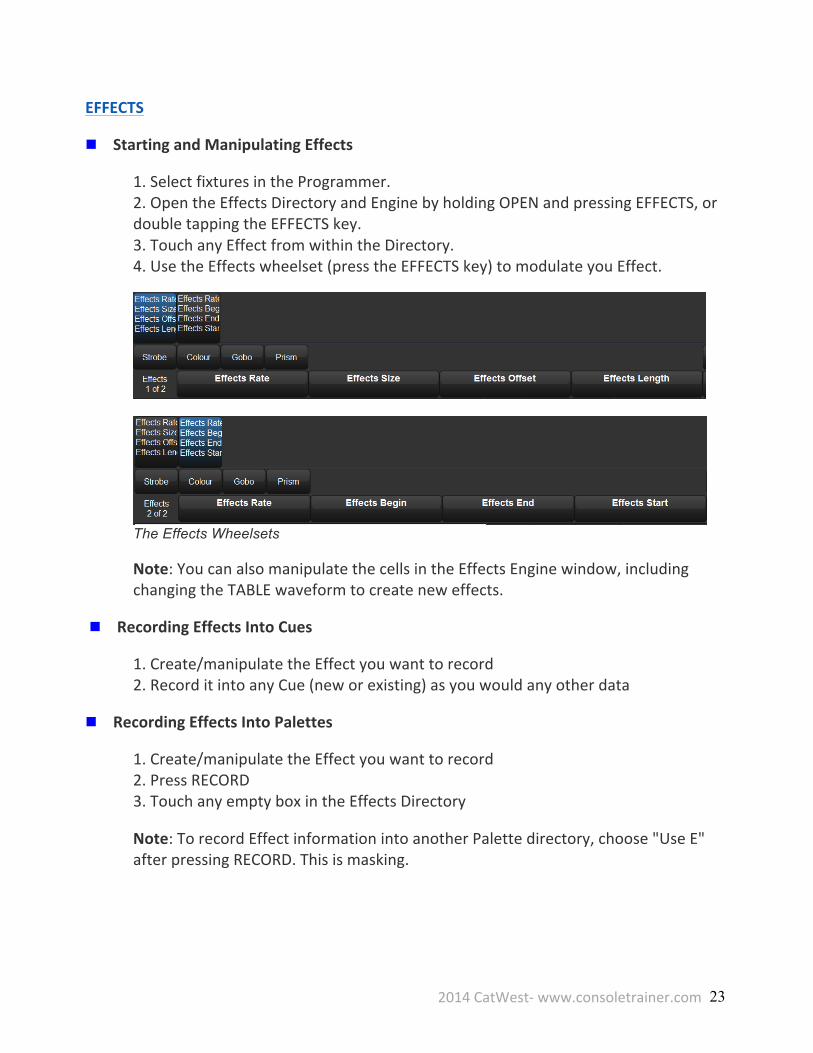
Starting and Manipulating Effects
1. Select fixtures in the Programmer. 2. Open the Effects Directory and Engine by holding OPEN and pressing EFFECTS, or double tapping the EFFECTS key. 3. Touch any Effect from within the Directory. 4. Use the Effects wheelset (press the EFFECTS key) to modulate you Effect.
The Effects Wheelsets
Note: You can also manipulate the cells in the Effects Engine window, including changing the TABLE waveform to create new effects.
Recording Effects Into Cues
1. Create/manipulate the Effect you want to record 2. Record it into any Cue (new or existing) as you would any other data
Recording Effects Into Palettes
1. Create/manipulate the Effect you want to record 2. Press RECORD 3. Touch any empty box in the Effects Directory
Note: To record Effect information into another Palette directory, choose "Use E" after pressing RECORD. This is masking.

2014 CatWest-‐ www.consoletrainer.com 24
Releasing Effects from the Programmer
-‐From the Effects Engine
1. Select the fixture(s) whose Effect you wish to stop 2. Locate the TABLE cells for the parameters running Effects in the Effects Engine 3. Click the cell and press SET 4. Select OFF from the drop-‐down list, followed by ENTER
The Table Column in the Effects Engine
-‐ Using Knockout 1. Select the fixture(s) whose Effect you wish to stop 2. Press the EFFECT key 3. Press KNOCKOUT on the main toolbar (bottom of the right monitor)
Making an "Effect-‐Off" Palette
1. Take your lights to their default parameters: Release all Playback (PIG + RELEASE) and clear the Programmer and all Editor windows. 2. Select all fixtures in your rig. 3. Press TOUCH (main toolbar: bottom of the right monitor) -‐ This will put the default OFF value for Effects in the Effects Directory 4. Press RECORD 5. Touch any empty box in the Effects Directory and give it a name.
Note: You may want to make multiple "Effects-‐Off" Palettes that are more specific. Example: Record an "Effects-‐Off" Palette that only affects Colour Effects.

2014 CatWest-‐ www.consoletrainer.com 25
TIMING
Setting Default Fade and Delay Information
1. Press the SETUP key 2. Select PREFERENCES from the Setup Toolbar (bottom of the right monitor) 3. Select TIMING from the menu on the left hand side of the Preferences Window. 4. Click the cell(s) under Fade or Delay that you wish to change (the cell will get a red box around it) 5. Hit the SET key 6. Type in a new Fade or Delay time, followed by ENTER
Note: This will not affect the Cues that have already been written.
Editing Timing in the Cuelist Window
1. Open the Cuelist Window (Double tap the CHOOSE key of your list's Master or use the Cuelist View). 2. Click the cue's cell(s) under Fade or Delay that you wish to change (the cell will get a red box around it) 3. Hit the SET key 4. Type in a new Fade or Delay time, followed by ENTER
The Fade/Delay cells in the Cuelist window
Note: This works well only with single Fade/Delay cues. For multi-‐part cues, you may want to edit using View Cue.
Editing Timing in the Programmer
In each scenario, you must first have attributes in the Programmer.
In Place Editing of Timing 1. Open the Programmer window 2. At the top of the Programmer window, click the FADE (or DELAY) button. 3. Click on the timing cell(s) you want wish to change. 4. Press SET

2014 CatWest-‐ www.consoletrainer.com 26
5. Enter a new time, followed by ENTER
Using the Encoder Wheels 1. Select the fixture(s) whose timing you wish to change 2. Hit the TIME key 3. Use the encoder wheels to affect FADE IN/OUT, DELAY IN/OUT timing.
Using Keystrokes 1. Select the fixture(s) whose timing you wish to change. 2. Press the TIME key 3. Type in a new Fade time in seconds. 4. Press ENTER
Note: to affect Delay timing, press the TIME key twice. Example: TIME TIME 2 ENTER.
BACKUPS
Organizing Showfiles on the Console
1. Press SETUP 2. Select SHOWS from your Setup Toolbar (bottom of the right monitor) 3. In the Shows Window, click FILE BROWSER from the left hand side.
-‐This window is designed to feel like the file browser on your personal computer. You can create and reorganize new folders... or rename or delete items (right click on the item to do this)
-‐You can reorganize where data is stored by dragging and dropping the item into the desired folder. Note: You cannot move, delete or rename the showfile that you are currently logged into (of course!)

2014 CatWest-‐ www.consoletrainer.com 27
Burning CDs
1. In the Shows window, click CD BURNING from the left hand side. 2. Select the file(s) you wish to burn by dragging them to the right panel (Alternatively, click the file and click ADD TO CD). 3. Click BURN 4. In the pop-‐up window, click START BURN.
Showfile vs. a Backup File
A Showfile is the expanded file that you log into on the console. This large file cannot be saved to any external media, like a Backup file can. A Showfile is constantly being written over every time you add information in your showfile. (In other words... you record a cue: that cue is saved to the Showfile you are logged into on the hard drive)
A Backup file is a compressed copy of your Showfile (think of it like zipping a folder on your PC). A Backup file can be saved to external media and loaded on to another console.
Making Manual Backups
1. Press SETUP 2. Select SHOWS from your Setup Toolbar (bottom of the right monitor) 3. From the CURRENT SHOW tab, click BACKUP 4. Select the location to store you Backup to (it can be the HDD, a zip disk or thumbdrive depending on the console). 5. You also can rename the Backup in this window if you wish. 6. Click OK. The console will prompt you when the Backup is complete. You can click OK again.
Quick Backup
1. Press SETUP 2. Press BACKUP from the Setup Toolbar (bottom of the right monitor)

2014 CatWest-‐ www.consoletrainer.com 28
SOFTWARE
Software Upgrade Vs. Full Install
A Software Upgrade will upgrade the Wholehog OS without reformatting your hard drive or erasing your showfiles. The Full Install will reformat the console's HDD (hard drive) reinstalling the complete OS(s) and erasing your showfiles. Yes, your externally saved Backup showfiles can be loaded back in to the console after this Install is complete. Full Installs are not always required, but sometimes are the only way to update certain drivers.
Upgrading consoles
Software Upgrade Instructions
1. Save the Hog4 software (fpspkg) to a thumb drive. 2. Insert media into console. 3. From the Start screen, click SOFTWARE 4. Select your external media from the pop-‐up window 5. Select the location of the Upgrade file, and click OK.
Full Install Instructions You can perform a full install from a CD or Thumbdrive
Creating an ISO on a CD 1. Download the .ISO file from High End’s website. 2. Download “DeepBurner” (free) 3. Use the ISO option in DeepBurner to properly extract the files.
Creating a bootable thumbdrive NOTE: Thumbdrives are not natively bootable. These instructions are taken directly from HES’s Hog4 manual and this is the program they recommend: 1. Download the .ISO file from High End’s website. 2. Download and install Linux Live's "USB Stick Maker" to your Windows PC. ( http://www.linuxliveusb.com/ ) 3. Insert a USB flash drive into on of your Windows computer's USB slots and start Linux Live's USB Stick Maker (USB flash drive must be at least 2GB) 4. In step 1 of Linux Live USB Creator select the USB flash drive you inserted into your computer 5. In step 2 of Linux Live USB Creator click on ISO/IMG/ZIP and select the Hog 4OS

2014 CatWest-‐ www.consoletrainer.com 29
full restore .ISO file that you downloaded from the Hog 4OS support page online 6. Skip step 3 of the Linux Live USB Creator and look at step 4. Select "Format the key in Fat32" 7. Click on the lightning bolt in step 5 of the Linux Live USB creator. 8. A dialogue box will pop up warning you that your USB flash drive contents will be erased. Click okay. 9. When Linux Live USB Creator is finished it will alert you. Remove your USB flash drive.
Performing a full install from CD or thumbrive 1. Ensure that ALL of your showfiles are backed up externally. Running the full install WILL erase all showfile on your hard drive. 2. Connect a USB keyboard to your console if you are using a RoadHog or FullBoar. 3. Connect your ISO thumbdrive, or insert your ISO CD into the console and restart the console. 4. The Restore menu will appear, press ENTER on your keyboard. Install will take a few minutes.