Embed Size (px)
Citation preview
1
Quick Reference Guide to New WebFLIS
Note: “Enable Editing” in this document for hyperlinks to work
1. What’s New to WebFLIS:
Access is now role based through the Account Management and Provisioning System
(AMPS). Click here to access AMPS.
Queries are presented in new tab based format (Figure 3).
Additional query functionality includes Bill of Materials (BOM) (Table 3).
Additional Data Views include Class of Supply and Weapon System (Figure 6).
All users must sign-in to the WebFLIS application once every 35 days or the account will be
locked due to inactivity.
Accounts disabled due to inactivity will need to be unlocked by the DLA Enterprise Help
Desk (EHD).
New “grey out” functionality; as a user enters data into a field, all fields that cannot be used
in combination with the entered data will grey out.
Please note that there are known issues when trying to access WebFLIS using Mozilla
Firefox. At this time users who have Firefox as their primary internet browser will need to
contact the help desk when accessing the application for the first time.
2. WebFLIS Access:
Access to the WebFLIS application is role based and each user must register through the Account
Management and Provisioning System (AMPS). Click here to access AMPS. This release of
WebFLIS will have three roles as explained in Table 1.
To prevent your account from being disabled you must sign-in every 35 days. If you have been granted
one of the AMPS roles in Table 1 and are unable to get into WebFLIS or receive the message shown in
Figure 1, please contact the Enterprise Help Desk per the contact information listed below.
For all WebFLIS access issues, contact:
DLA Enterprise Help Desk at 1-855-352-0001, or
Email: Enterprise Help Desk Website: Enterprise Help Desk Portal
For all non-access issues with the WebFLIS application, contact:
DLA Customer Interaction Center at 1-877-DLA-CALL (352-2255), or
Email: DLA Customer Interaction Center
2
Figure 1 - Landing Page Message
Table 1 - WebFLIS Roles
Role Role Name in AMPS Who Can Apply Role Description & Available
Tabs
Basic WebFLIS Prod –
Basic User FPDW-
WF002
Users with External
Certificate Authority
(ECA), or Common Access
Cards (CAC)
Restricted end-user access to
WebFLIS queries. No Weapon
System or proprietary data. Tab
displayed: Queries.
Standard WebFLIS Prod –
Standard User
FPDW-WF001
Users with Common
Access Cards (CAC)
Unrestricted end-user access to
all WebFLIS queries and data. No
access to statistics reports. Tabs
displayed: Queries and Bill of
Materials.
System
Management
Office
(SMO)
WebFLIS Prod –
System Management
Office User FPDW-
WF006
Users working within the
WebFLIS System
Management Office
WebFLIS Standard User, plus
access to statistic reports. Tabs
displayed: Queries, Bill of
Materials, and Reports.
3. WebFLIS Home Page
The new Home Page has a similar look and feel to current WebFLIS, however a few key items have
changed. Users may obtain information that was previously available in Public WebFLIS via PUB LOG
FLIS Search through the DLA Logistics Information Service FOIA electronic reading room.
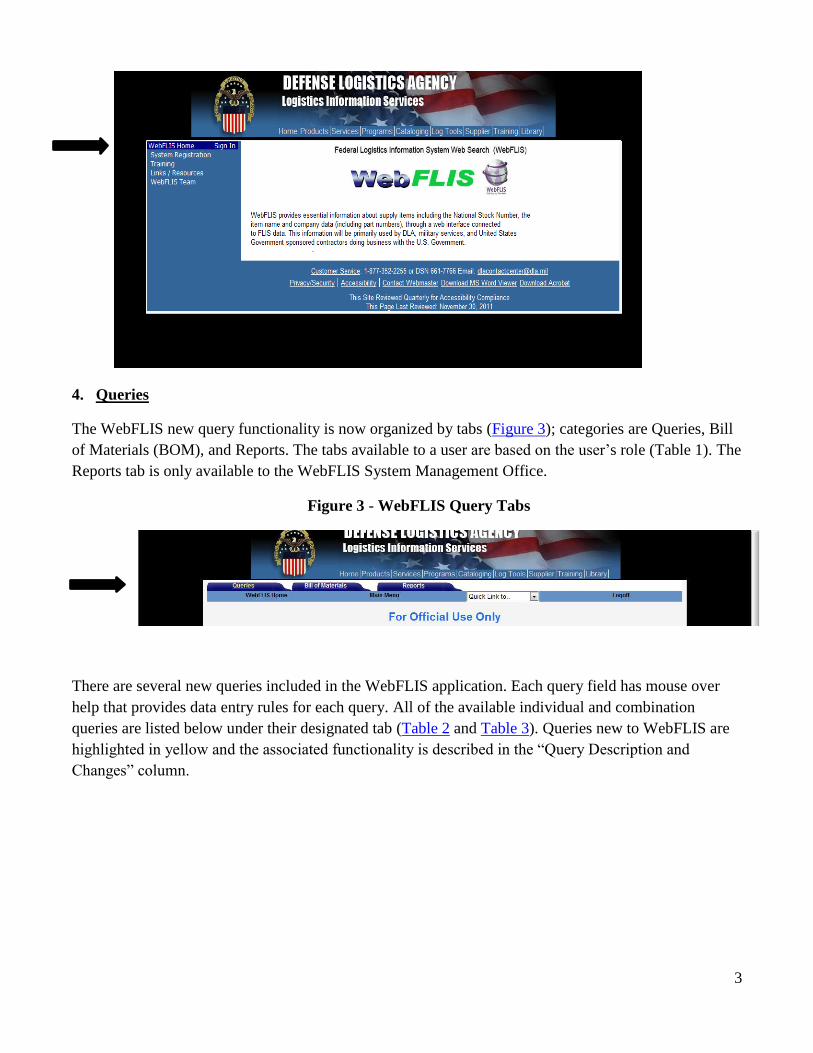
To sign-in to WebFLIS, the user will need to go to the home page, hover the mouse over “WebFLIS
Home”, and select “Sign-In” as shown below in Figure 2.
Figure 2 - WebFLIS Sign-In
3
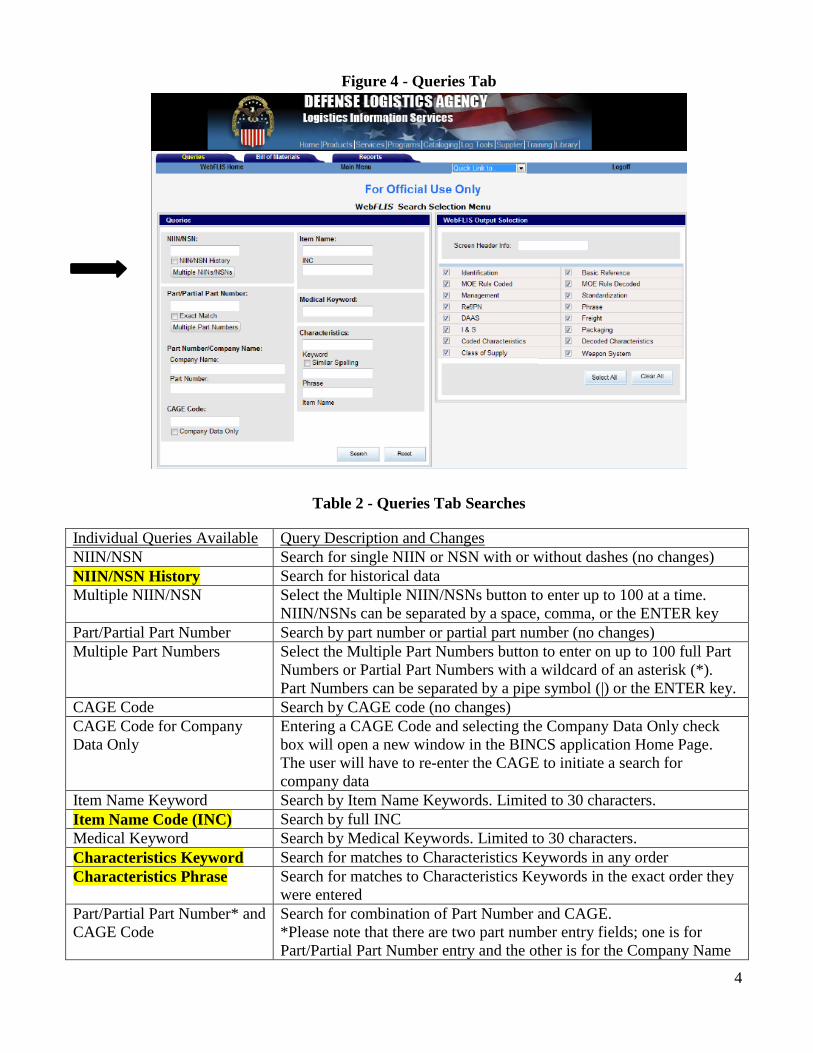
4. Queries
The WebFLIS new query functionality is now organized by tabs (Figure 3); categories are Queries, Bill
of Materials (BOM), and Reports. The tabs available to a user are based on the user’s role (Table 1). The
Reports tab is only available to the WebFLIS System Management Office.
Figure 3 - WebFLIS Query Tabs
There are several new queries included in the WebFLIS application. Each query field has mouse over
help that provides data entry rules for each query. All of the available individual and combination
queries are listed below under their designated tab (Table 2 and Table 3). Queries new to WebFLIS are
highlighted in yellow and the associated functionality is described in the “Query Description and
Changes” column.
4
Figure 4 - Queries Tab
Table 2 - Queries Tab Searches
Individual Queries Available Query Description and Changes
NIIN/NSN Search for single NIIN or NSN with or without dashes (no changes)
NIIN/NSN History Search for historical data
Multiple NIIN/NSN Select the Multiple NIIN/NSNs button to enter up to 100 at a time.
NIIN/NSNs can be separated by a space, comma, or the ENTER key
Part/Partial Part Number Search by part number or partial part number (no changes)
Multiple Part Numbers Select the Multiple Part Numbers button to enter on up to 100 full Part
Numbers or Partial Part Numbers with a wildcard of an asterisk (*).
Part Numbers can be separated by a pipe symbol (|) or the ENTER key.
CAGE Code Search by CAGE code (no changes)
CAGE Code for Company
Data Only
Entering a CAGE Code and selecting the Company Data Only check
box will open a new window in the BINCS application Home Page.
The user will have to re-enter the CAGE to initiate a search for
company data
Item Name Keyword Search by Item Name Keywords. Limited to 30 characters.
Item Name Code (INC) Search by full INC
Medical Keyword Search by Medical Keywords. Limited to 30 characters.
Characteristics Keyword Search for matches to Characteristics Keywords in any order
Characteristics Phrase Search for matches to Characteristics Keywords in the exact order they
were entered
Part/Partial Part Number* and
CAGE Code
Search for combination of Part Number and CAGE.
*Please note that there are two part number entry fields; one is for
Part/Partial Part Number entry and the other is for the Company Name
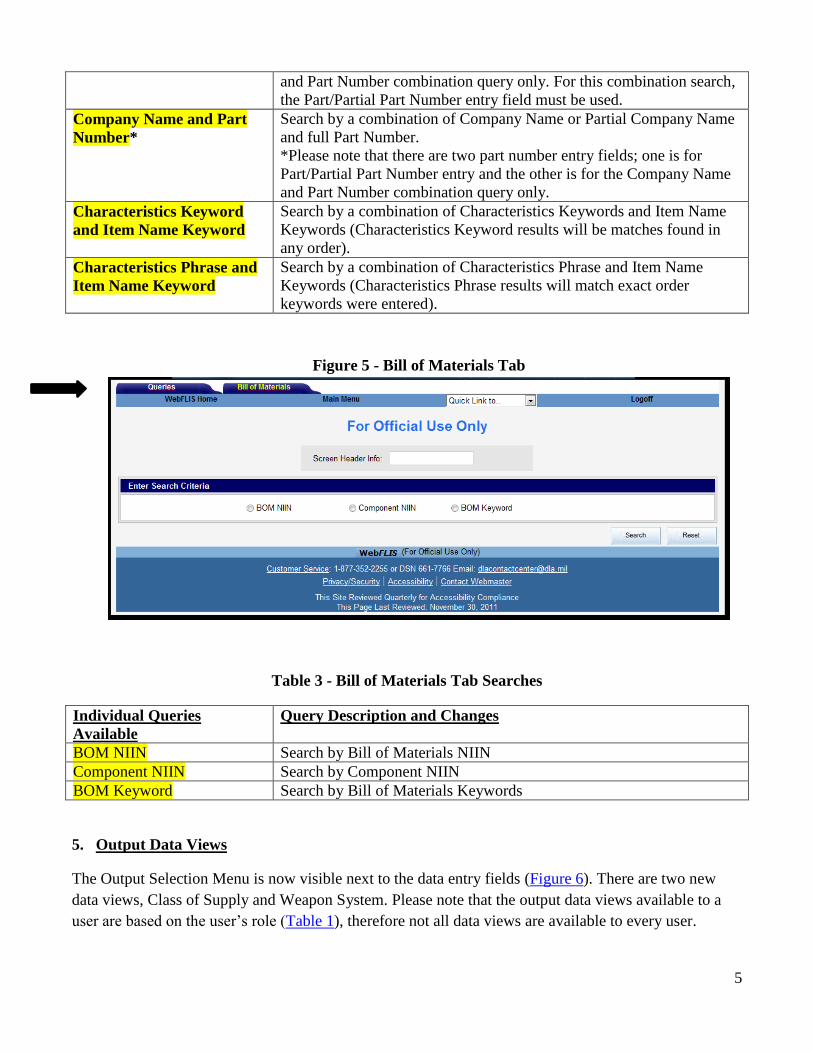
5
and Part Number combination query only. For this combination search,
the Part/Partial Part Number entry field must be used.
Company Name and Part
Number*
Search by a combination of Company Name or Partial Company Name
and full Part Number.
*Please note that there are two part number entry fields; one is for
Part/Partial Part Number entry and the other is for the Company Name
and Part Number combination query only.
Characteristics Keyword
and Item Name Keyword
Search by a combination of Characteristics Keywords and Item Name
Keywords (Characteristics Keyword results will be matches found in
any order).
Characteristics Phrase and
Item Name Keyword
Search by a combination of Characteristics Phrase and Item Name
Keywords (Characteristics Phrase results will match exact order
keywords were entered).
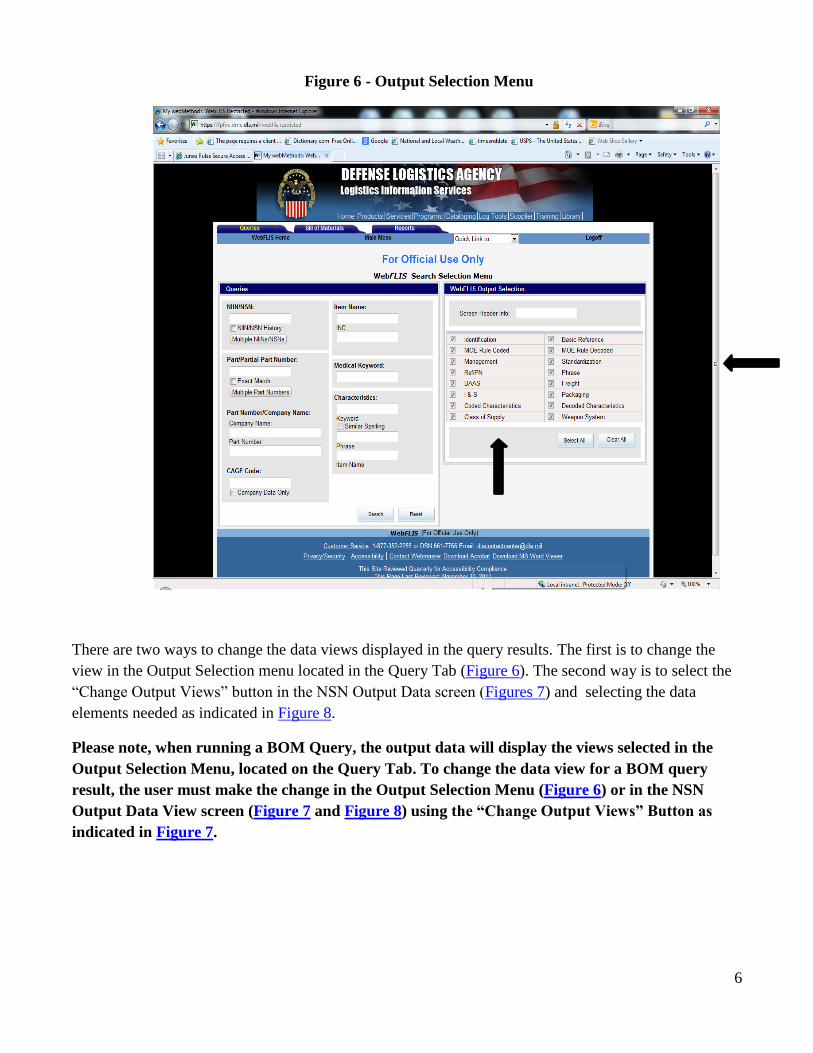
Figure 5 - Bill of Materials Tab
Table 3 - Bill of Materials Tab Searches
Individual Queries
Available
Query Description and Changes
BOM NIIN Search by Bill of Materials NIIN
Component NIIN Search by Component NIIN
BOM Keyword Search by Bill of Materials Keywords
5. Output Data Views
The Output Selection Menu is now visible next to the data entry fields (Figure 6). There are two new
data views, Class of Supply and Weapon System. Please note that the output data views available to a
user are based on the user’s role (Table 1), therefore not all data views are available to every user.
6
Figure 6 - Output Selection Menu
There are two ways to change the data views displayed in the query results. The first is to change the
view in the Output Selection menu located in the Query Tab (Figure 6). The second way is to select the
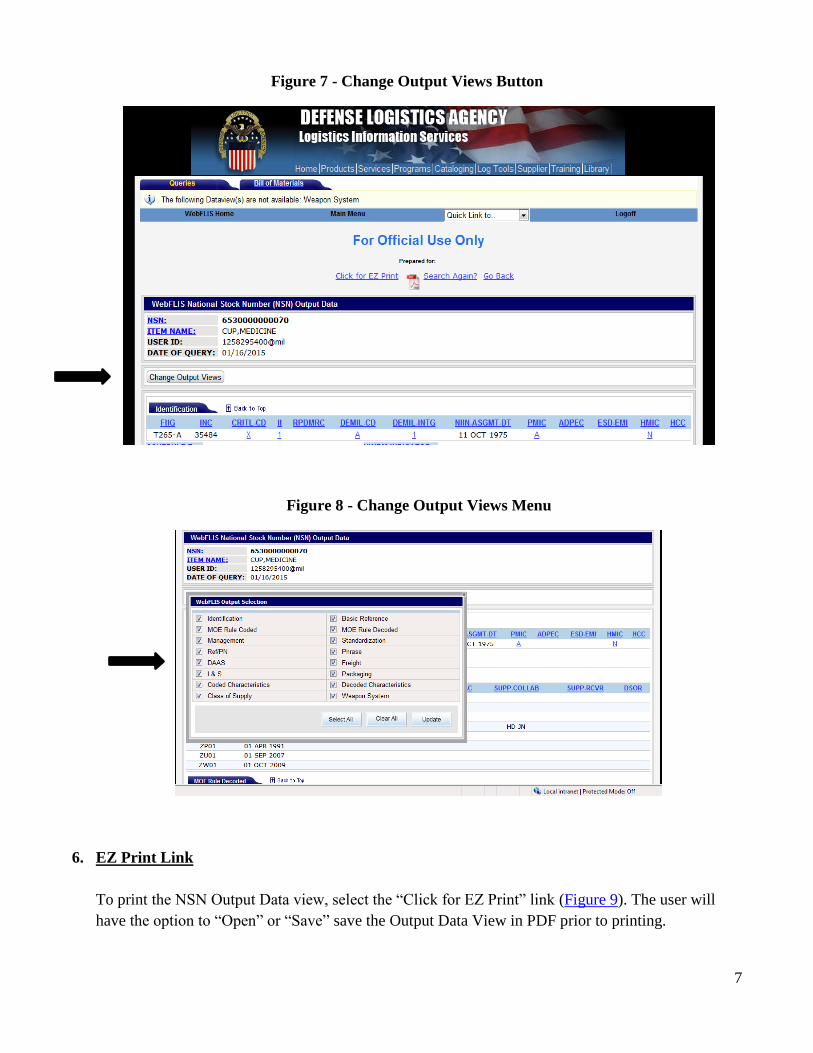
“Change Output Views” button in the NSN Output Data screen (Figures 7) and selecting the data
elements needed as indicated in Figure 8.
Please note, when running a BOM Query, the output data will display the views selected in the
Output Selection Menu, located on the Query Tab. To change the data view for a BOM query
result, the user must make the change in the Output Selection Menu (Figure 6) or in the NSN
Output Data View screen (Figure 7 and Figure 8) using the “Change Output Views” Button as
indicated in Figure 7.
7
Figure 7 - Change Output Views Button
Figure 8 - Change Output Views Menu
6. EZ Print Link
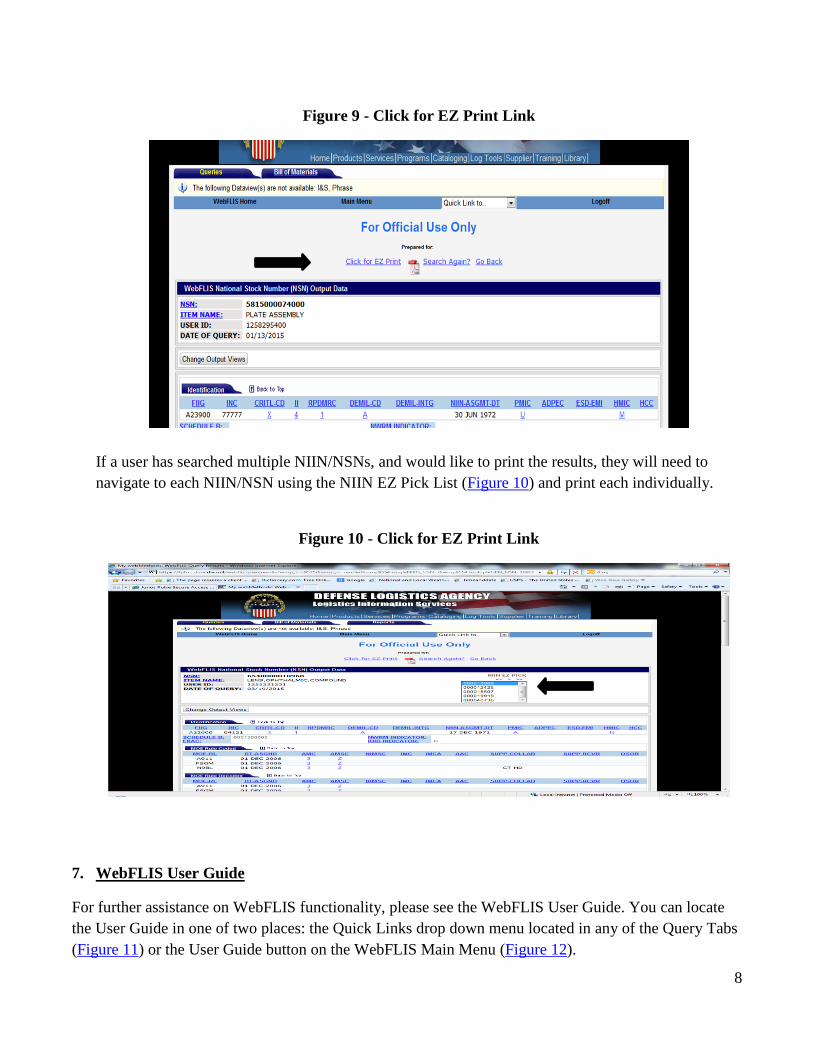
To print the NSN Output Data view, select the “Click for EZ Print” link (Figure 9). The user will
have the option to “Open” or “Save” save the Output Data View in PDF prior to printing.
8
Figure 9 - Click for EZ Print Link
If a user has searched multiple NIIN/NSNs, and would like to print the results, they will need to
navigate to each NIIN/NSN using the NIIN EZ Pick List (Figure 10) and print each individually.
Figure 10 - Click for EZ Print Link
7. WebFLIS User Guide
For further assistance on WebFLIS functionality, please see the WebFLIS User Guide. You can locate
the User Guide in one of two places: the Quick Links drop down menu located in any of the Query Tabs
(Figure 11) or the User Guide button on the WebFLIS Main Menu (Figure 12).

9
Figure 11 - Quick Links Menu
Figure 12 - User Guide Button – Main Menu


![Hinweis - AWINSN 15:07 NSN 15:15 NSN 21-06 NSN 21:11 NSN 21:18 NSN 21:29 NSN 03:19 NSN 03:23 . 0 0 0 moom mooCMmT-iTÑl CS] CS] 0 CM Co w o? 0 m CM m CM I 0 U") ¥ 0 00 N W 0](https://img.pdfslide.net/doc/110x75/60ae9e5ff18aba7fd01f75f9/hinweis-awi-nsn-1507-nsn-1515-nsn-21-06-nsn-2111-nsn-2118-nsn-2129-nsn-0319.jpg)