Embed Size (px)
Citation preview
1
Power On/OffPower On/Off: Press and hold the POWER key.
Power Off: During operation, tap the top, right corner of thestatus bar and select Power Off.
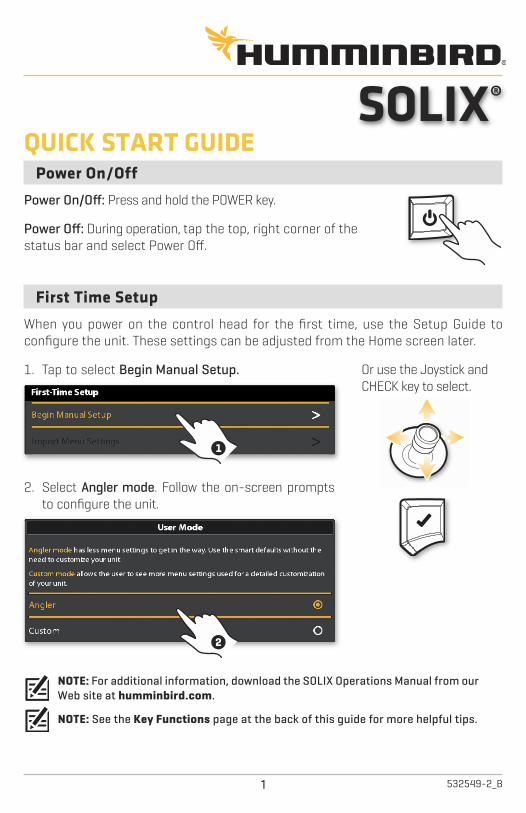
First Time SetupWhen you power on the control head for the first time, use the Setup Guide toconfigure the unit. These settings can be adjusted from the Home screen later.
NOTE: For additional information, download the SOLIX Operations Manual from ourWeb site at humminbird.com.
NOTE: See the Key Functions page at the back of this guide for more helpful tips.
Or use the Joystick andCHECK key to select.
1. Tap to select Begin Manual Setup.
1
2. Select Angler mode. Follow the on-screen promptsto configure the unit.
2
532549-2_B
SOLIX®QUICK START GUIDE
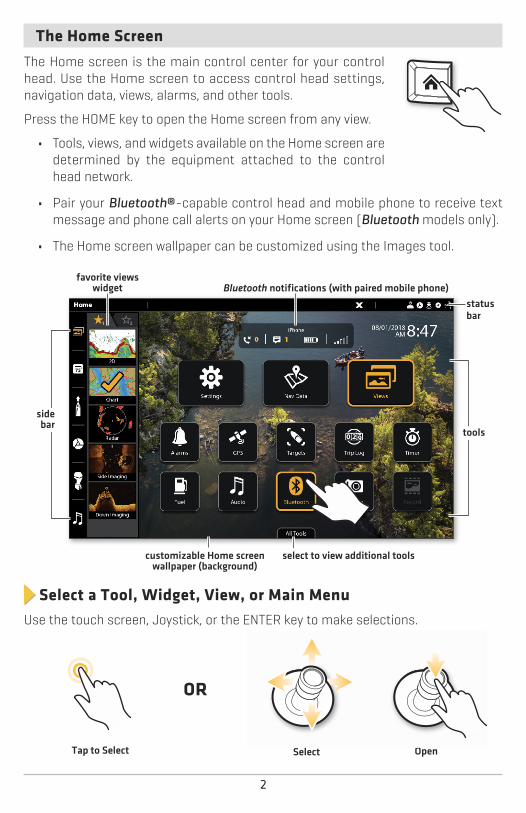
The Home ScreenThe Home screen is the main control center for your controlhead. Use the Home screen to access control head settings,navigation data, views, alarms, and other tools.
Press the HOME key to open the Home screen from any view.
• Tools, views, and widgets available on the Home screen aredetermined by the equipment attached to the controlhead network.
• Pair your Bluetooth®-capable control head and mobile phone to receive textmessage and phone call alerts on your Home screen (Bluetooth models only).
• The Home screen wallpaper can be customized using the Images tool.
Select a Tool, Widget, View, or Main MenuUse the touch screen, Joystick, or the ENTER key to make selections.
Tap to Select Select Open
OR
statusbar
tools
sidebar
select to view additional toolscustomizable Home screenwallpaper (background)
Bluetooth notifications (with paired mobile phone)favorite views
widget
2
3
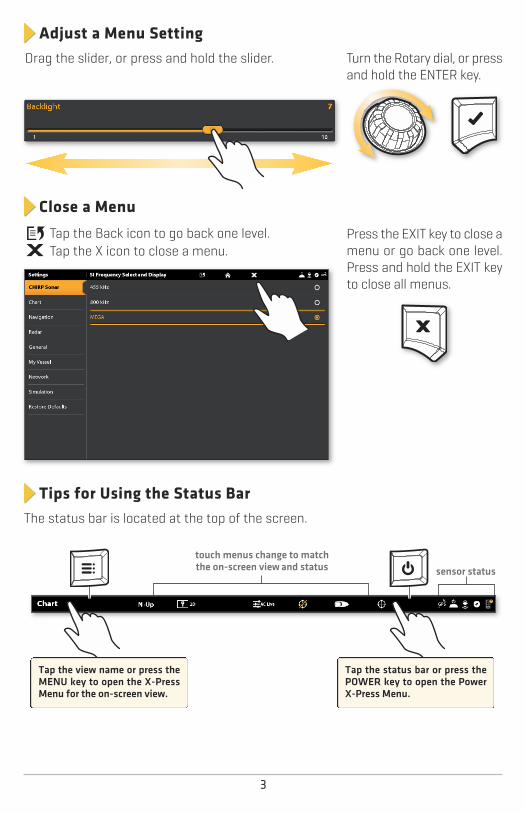
Adjust a Menu Setting
Close a Menu
Tips for Using the Status BarThe status bar is located at the top of the screen.
Turn the Rotary dial, or pressand hold the ENTER key.
Drag the slider, or press and hold the slider.
Press the EXIT key to close amenu or go back one level.Press and hold the EXIT keyto close all menus.
Tap the Back icon to go back one level.Tap the X icon to close a menu.
touch menus change to matchthe on-screen view and status sensor status
Tap the view name or press the MENU key to open the X-Press Menu for the on-screen view.
Tap the status bar or press thePOWER key to open the PowerX-Press Menu.

4
Display a View from the Views ToolUse the touch screen or the Joystick to open a view from the Views tool.
Display a View from the Favorite Views Widget1. Tap the Favorite Views widget in the side bar, or press the Rotary dial.2. Tap a view, or turn the Rotary dial and press the ENTER key.
Use the Views tool (below) orFavorite Views widget to displaya view from the Home screen.
tap to close the Favorite Views widget
1
2
1
5
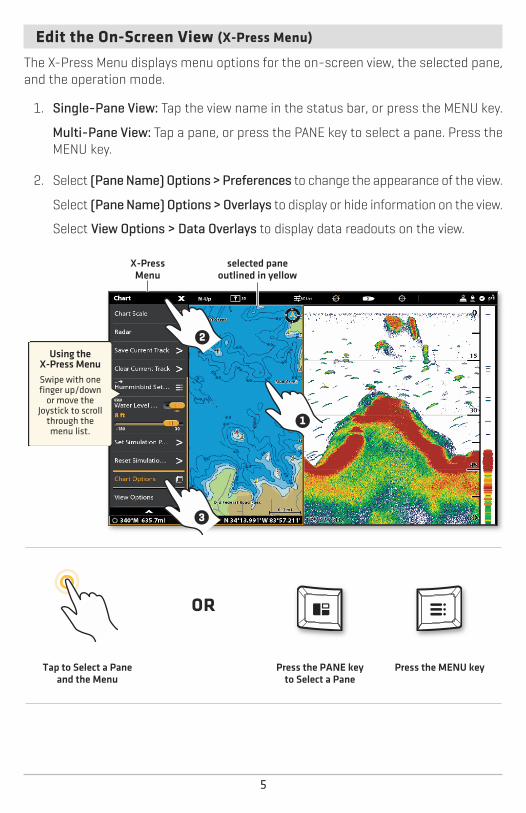
Edit the On-Screen View (X-Press Menu)
The X-Press Menu displays menu options for the on-screen view, the selected pane,and the operation mode.
1. Single-Pane View: Tap the view name in the status bar, or press the MENU key.
Multi-Pane View: Tap a pane, or press the PANE key to select a pane. Press theMENU key.
2. Select (Pane Name) Options > Preferences to change the appearance of the view.
Select (Pane Name) Options > Overlays to display or hide information on the view.
Select View Options > Data Overlays to display data readouts on the view.
Press the PANE keyto Select a Pane
Tap to Select a Pane and the Menu
Press the MENU key
OR
3
selected paneoutlined in yellow
X-PressMenu
2
1
Using theX-Press Menu Swipe with onefinger up/downor move the
Joystick to scrollthrough themenu list.
6
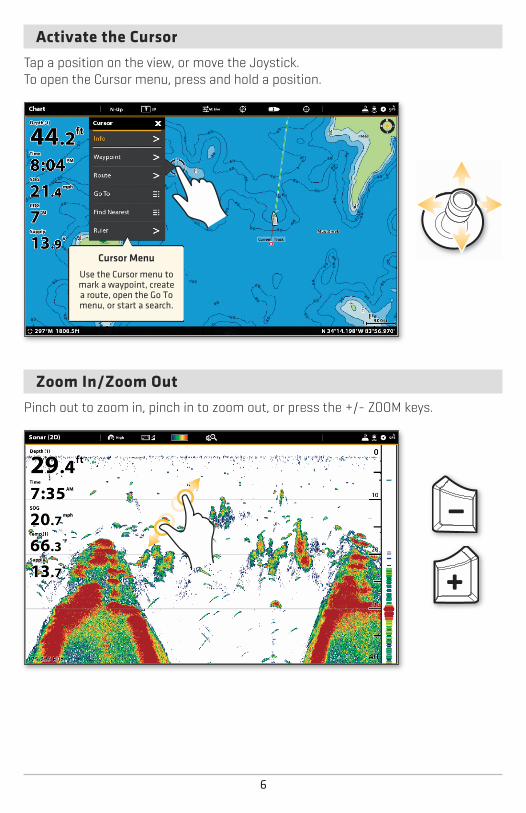
Activate the CursorTap a position on the view, or move the Joystick. To open the Cursor menu, press and hold a position.
Zoom In/Zoom OutPinch out to zoom in, pinch in to zoom out, or press the +/- ZOOM keys.
Cursor MenuUse the Cursor menu tomark a waypoint, createa route, open the Go Tomenu, or start a search.
7
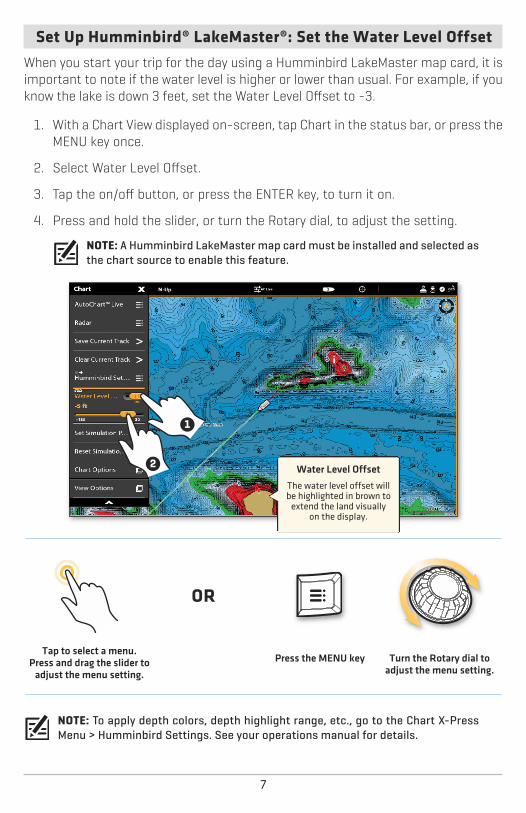
Set Up Humminbird® LakeMaster®: Set the Water Level OffsetWhen you start your trip for the day using a Humminbird LakeMaster map card, it isimportant to note if the water level is higher or lower than usual. For example, if youknow the lake is down 3 feet, set the Water Level Offset to -3.
1. With a Chart View displayed on-screen, tap Chart in the status bar, or press theMENU key once.
2. Select Water Level Offset.
3. Tap the on/off button, or press the ENTER key, to turn it on.
4. Press and hold the slider, or turn the Rotary dial, to adjust the setting.
NOTE: A Humminbird LakeMaster map card must be installed and selected asthe chart source to enable this feature.
NOTE: To apply depth colors, depth highlight range, etc., go to the Chart X-PressMenu > Humminbird Settings. See your operations manual for details.
Tap to select a menu. Press and drag the slider to
adjust the menu setting.Press the MENU key Turn the Rotary dial to
adjust the menu setting.
OR
1
2 Water Level OffsetThe water level offset willbe highlighted in brown toextend the land visually
on the display.

8
Mark WaypointsOpen the Mark Menu and select Waypoint, or press the MARK key twice.
If the cursor is not active, the waypoint will be marked at the boat position. If thecursor is active, the waypoint will be marked at the cursor position.
Activate Man Overboard (MOB) NavigationAs soon as you know you have a man overboard, press and hold the MARK/MAN OVERBOARD key. See your operations manual for details.
NOTE: To end navigation, press the GO TO key and select Cancel Navigation.
Man OverboardNavigation
Man Overboard navigationmarks the approximatepoint where the person
went overboard and startscontinuous navigation
toward the ManOverboard waypoint.
9
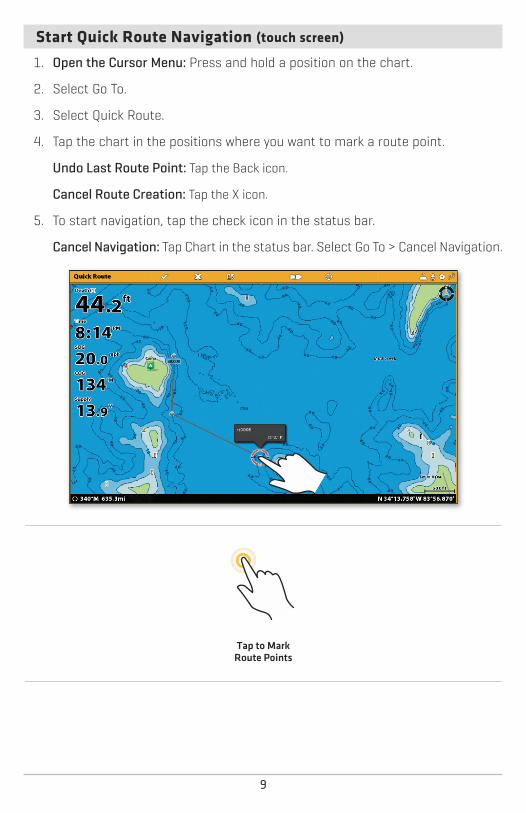
Start Quick Route Navigation (touch screen)1. Open the Cursor Menu: Press and hold a position on the chart.
2. Select Go To.
3. Select Quick Route.
4. Tap the chart in the positions where you want to mark a route point.
Undo Last Route Point: Tap the Back icon.
Cancel Route Creation: Tap the X icon.
5. To start navigation, tap the check icon in the status bar.
Cancel Navigation: Tap Chart in the status bar. Select Go To > Cancel Navigation.
Tap to Mark Route Points
10
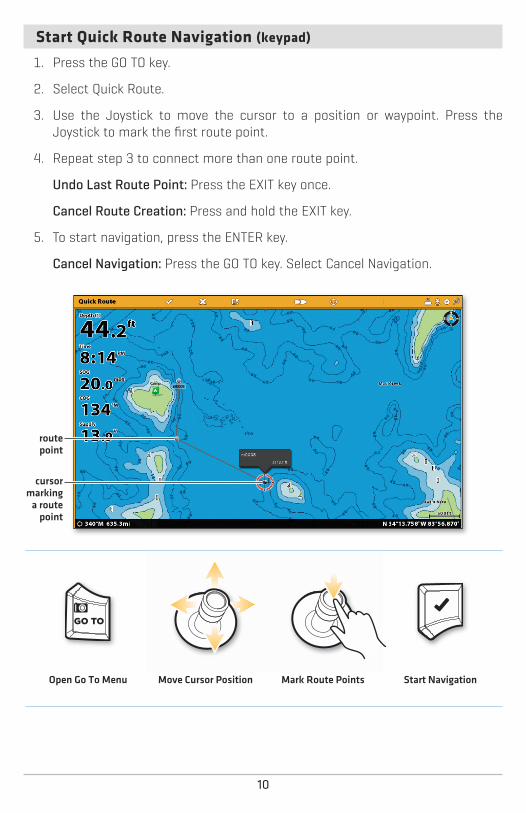
Start Quick Route Navigation (keypad)1. Press the GO TO key.
2. Select Quick Route.
3. Use the Joystick to move the cursor to a position or waypoint. Press theJoystick to mark the first route point.
4. Repeat step 3 to connect more than one route point.
Undo Last Route Point: Press the EXIT key once.
Cancel Route Creation: Press and hold the EXIT key.
5. To start navigation, press the ENTER key.
Cancel Navigation: Press the GO TO key. Select Cancel Navigation.
Mark Route PointsMove Cursor PositionOpen Go To Menu Start Navigation
cursormarking
a routepoint
routepoint

11
Pair a Phone with the Control Head Use the following instructions to pair a mobile phone to the control head usingBluetooth wireless technology. (Available with Bluetooth supported Humminbirdproducts and mobile devices only. Wifi or data connection required.)
Enable Bluetooth on the Phone
1. Open the Settings menu on your phone.
2. Select Bluetooth.
3. Select On.
Pair the Phone with the Control Head
1. Press the HOME key.
2. Select the Bluetooth tool.
3. Select Connect Phone.
4. Under Device List, select your phone name.
It may take a moment for your phone name to appear in the menu.
5. Follow the on-screen prompts to complete the pairing process.
6. Check your phone. When prompted, tap Pair on your phone.
7. In your phone Settings menu, turn on Show Notifications.
8. Turn Connection On/Off: Under Phone, select your phone name and tap theon/off button.
Forget Device: To remove the paired device, select Forget Device.
Change the Phone Bluetooth Notification Settings
1. Under the Phone Bluetooth menu, select Settings.
2. Select Text Message Alerts or Phone Call Alerts.
Tap to select an alert format. To turn off notifications, select off.
3. Turn Sounds On/Off: Select Sounds. Select on or off.
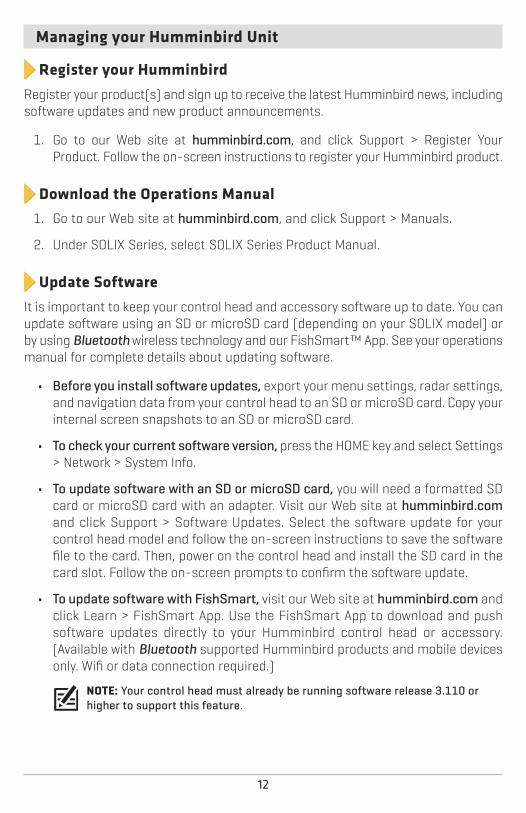
Managing your Humminbird Unit
Register your HumminbirdRegister your product(s) and sign up to receive the latest Humminbird news, includingsoftware updates and new product announcements.
1. Go to our Web site at humminbird.com, and click Support > Register YourProduct. Follow the on-screen instructions to register your Humminbird product.
Download the Operations Manual1. Go to our Web site at humminbird.com, and click Support > Manuals.
2. Under SOLIX Series, select SOLIX Series Product Manual.
Update SoftwareIt is important to keep your control head and accessory software up to date. You canupdate software using an SD or microSD card (depending on your SOLIX model) orby using Bluetooth wireless technology and our FishSmart™ App. See your operationsmanual for complete details about updating software.
• Before you install software updates, export your menu settings, radar settings,and navigation data from your control head to an SD or microSD card. Copy yourinternal screen snapshots to an SD or microSD card.
• To check your current software version, press the HOME key and select Settings> Network > System Info.
• To update software with an SD or microSD card, you will need a formatted SDcard or microSD card with an adapter. Visit our Web site at humminbird.comand click Support > Software Updates. Select the software update for yourcontrol head model and follow the on-screen instructions to save the softwarefile to the card. Then, power on the control head and install the SD card in thecard slot. Follow the on-screen prompts to confirm the software update.
• To update software with FishSmart, visit our Web site at humminbird.com andclick Learn > FishSmart App. Use the FishSmart App to download and pushsoftware updates directly to your Humminbird control head or accessory.(Available with Bluetooth supported Humminbird products and mobile devicesonly. Wifi or data connection required.)
NOTE: Your control head must already be running software release 3.110 orhigher to support this feature.
12
13
© 2019 Johnson Outdoors Marine Electronics, Inc. All rights reserved.
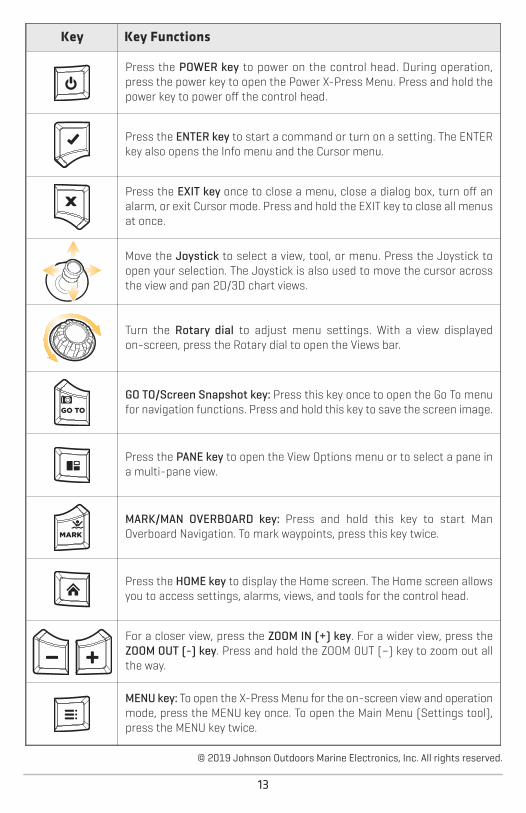
Key Key Functions
Press the POWER key to power on the control head. During operation,press the power key to open the Power X-Press Menu. Press and hold thepower key to power off the control head.
Press the ENTER key to start a command or turn on a setting. The ENTERkey also opens the Info menu and the Cursor menu.
Press the EXIT key once to close a menu, close a dialog box, turn off analarm, or exit Cursor mode. Press and hold the EXIT key to close all menusat once.
Move the Joystick to select a view, tool, or menu. Press the Joystick toopen your selection. The Joystick is also used to move the cursor acrossthe view and pan 2D/3D chart views.
Turn the Rotary dial to adjust menu settings. With a view displayed on-screen, press the Rotary dial to open the Views bar.
GO TO/Screen Snapshot key: Press this key once to open the Go To menufor navigation functions. Press and hold this key to save the screen image.
Press the PANE key to open the View Options menu or to select a pane ina multi-pane view.
MARK/MAN OVERBOARD key: Press and hold this key to start ManOverboard Navigation. To mark waypoints, press this key twice.
Press the HOME key to display the Home screen. The Home screen allowsyou to access settings, alarms, views, and tools for the control head.
For a closer view, press the ZOOM IN (+) key. For a wider view, press theZOOM OUT (-) key. Press and hold the ZOOM OUT (–) key to zoom out all the way.
MENU key: To open the X-Press Menu for the on-screen view and operationmode, press the MENU key once. To open the Main Menu (Settings tool),press the MENU key twice.

Notes
14

15
Notes

16
Contact Humminbird Technical Support
Contact Humminbird Technical Support in any of the following ways:
Toll Free: (800) 633-1468International: (334) 687-6613E-mail: [email protected]
Shipping: HumminbirdService Department678 Humminbird LaneEufaula, AL 36027 USA
Our Web site, humminbird.com, offers in-depth information about allthings Humminbird, along with technical support, product manuals,software updates, and a robust FAQ section.
For more great content, visit:
Facebook.com/HumminbirdElectronics
Twitter.com (@humminbirdfish)
Instagram.com/humminbirdfishing
YouTube.com/humminbirdtv


![20|20 GEN 3—DELTAFORCE HOME SCREEN …...955840_01 Quick Reference Guide 2/21/2020 20|20 GEN 3—DELTAFORCE HOME SCREEN CONTROL [2020.0.X SOFTWARE] On the Home Screen , the Down](https://img.pdfslide.net/doc/110x75/5f0ad15e7e708231d42d7db2/2020-gen-3adeltaforce-home-screen-95584001-quick-reference-guide-2212020.jpg)