Embed Size (px)
Citation preview
QVR ProOpened Surveillance Platform System
David Tsao
QVR Pro
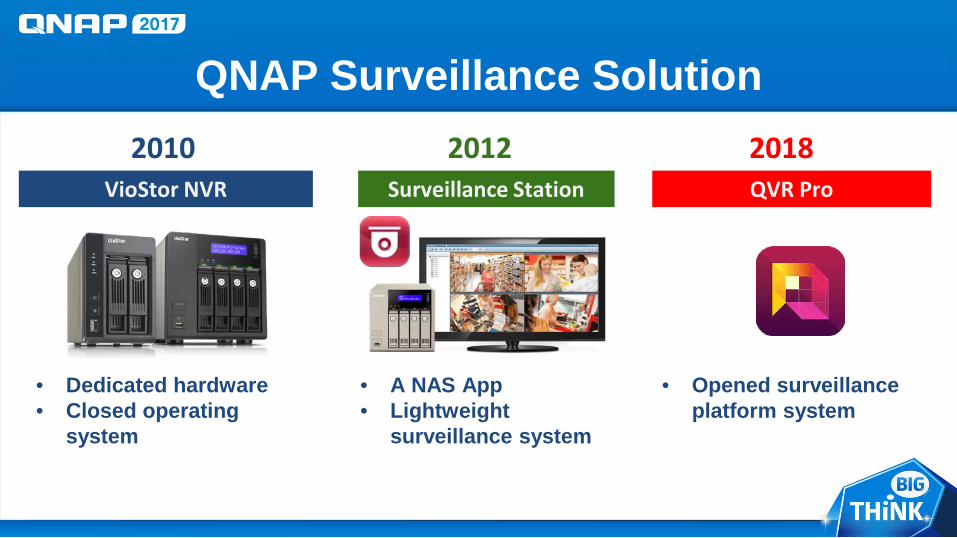
2010Surveillance Station
2012VioStor NVR
2018
• Dedicated hardware• Closed operating
system
• A NAS App• Lightweight
surveillance system
• Opened surveillance platform system
QNAP Surveillance Solution
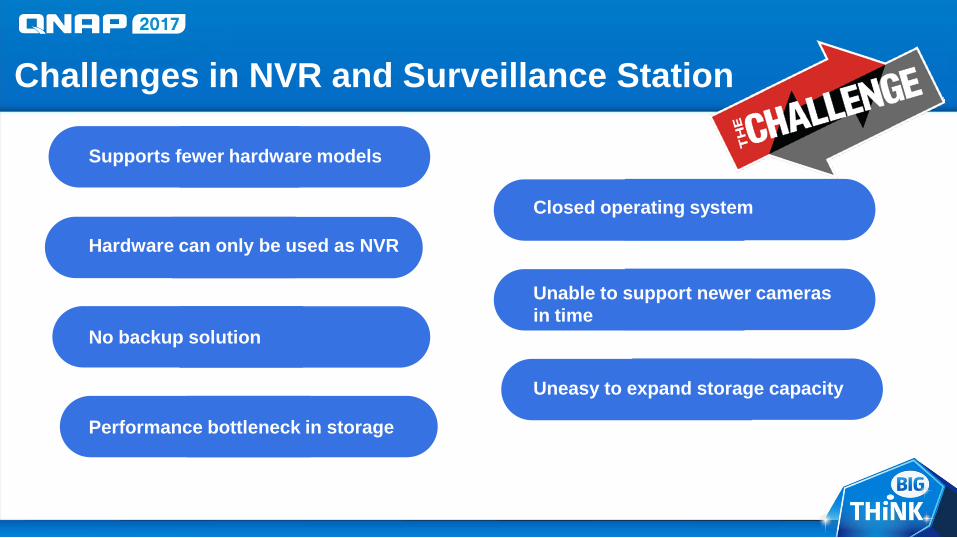
Challenges in NVR and Surveillance Station
Supports fewer hardware models
Closed operating system
Performance bottleneck in storage
No backup solution
Unable to support newer cameras in time
Uneasy to expand storage capacity
Hardware can only be used as NVR
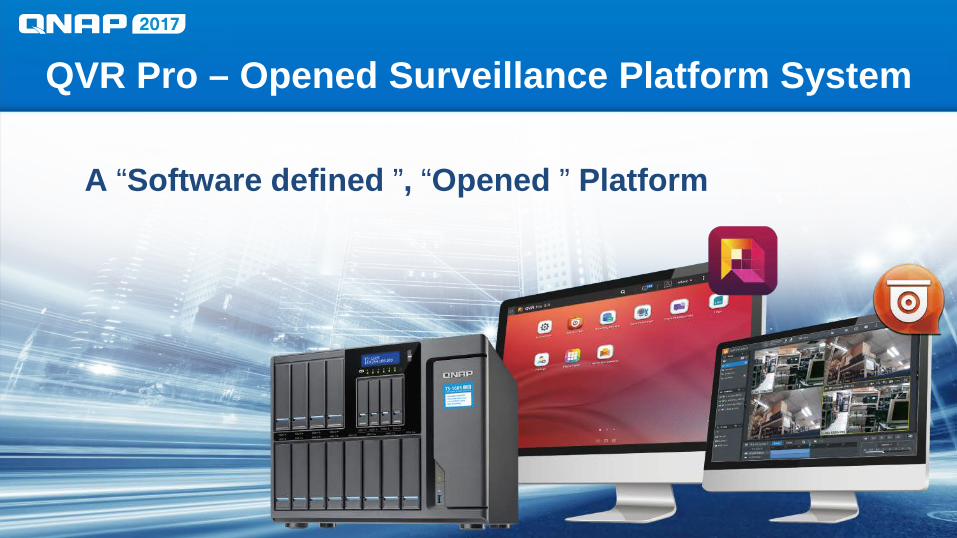
QVR Pro – Opened Surveillance Platform System
A “Software defined ”, “Opened ” Platform
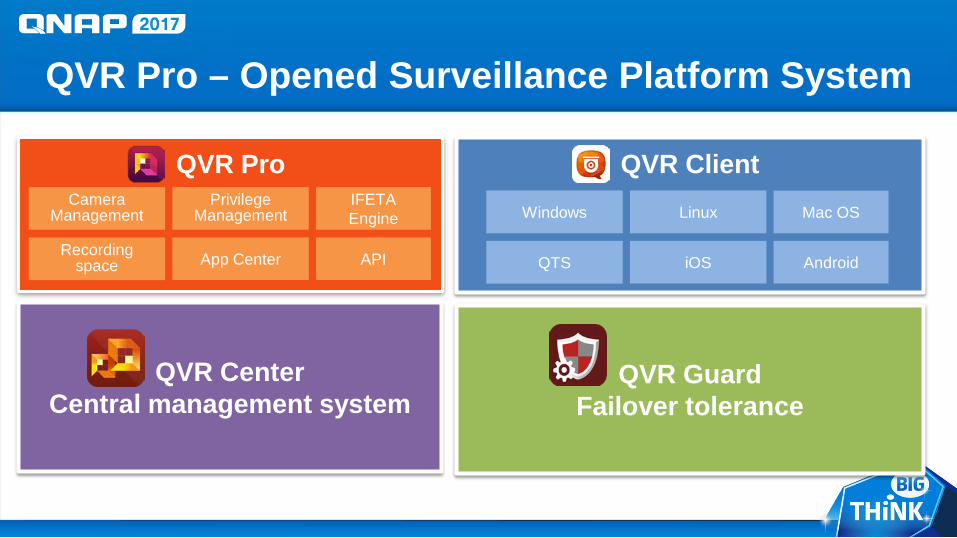
QVR Pro – Opened Surveillance Platform System
QVR CenterCentral management system
QVR Client
QVR GuardFailover tolerance
QVR Pro
Recording space
Privilege Management
Camera Management
IFETA Engine
APIApp Center QTS
LinuxWindows Mac OS
AndroidiOS
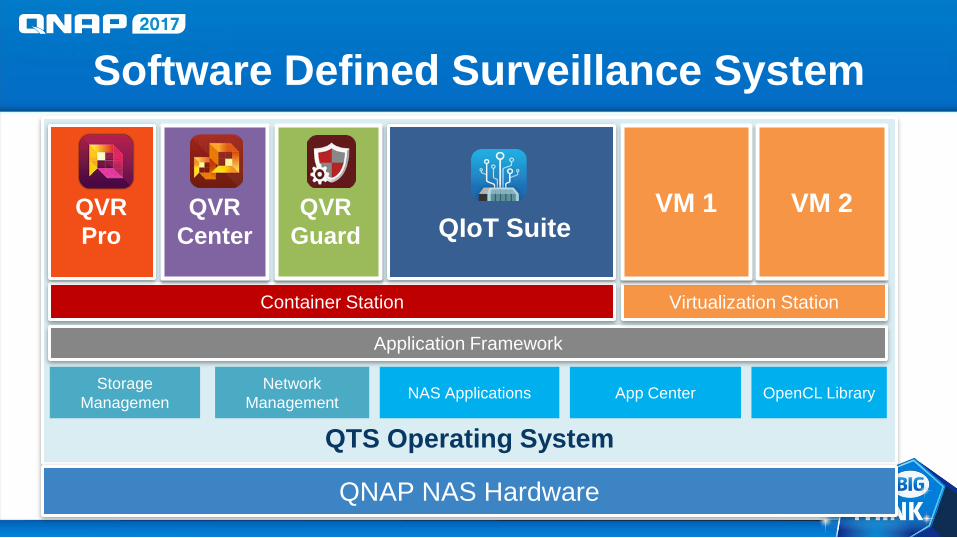
QTS Operating System
Container Station
Application Framework
QNAP NAS Hardware
Storage Managemen
Network Management NAS Applications App Center OpenCL Library
Virtualization Station
VM 1 VM 2
Software Defined Surveillance System
QIoT SuiteQVR
GuardQVR
CenterQVR Pro
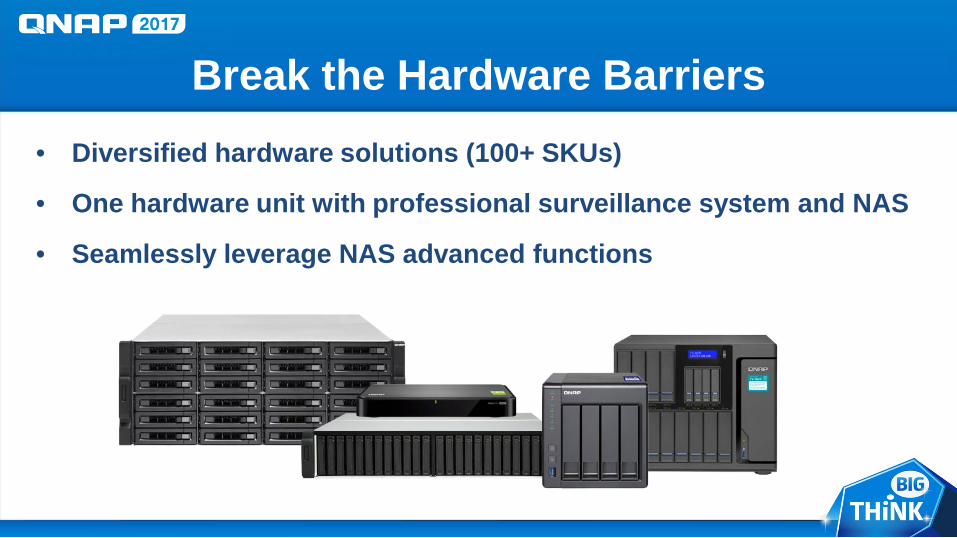
Break the Hardware Barriers• Diversified hardware solutions (100+ SKUs)
• One hardware unit with professional surveillance system and NAS
• Seamlessly leverage NAS advanced functions
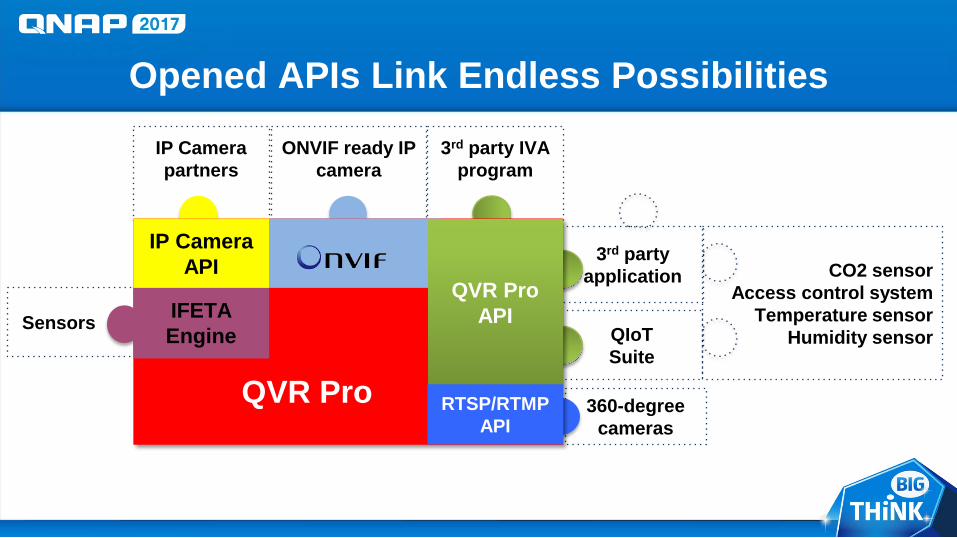
3rd party application
QIoTSuite
360-degree cameras
Sensors
ONVIF ready IP camera
IP Camera partners
3rd party IVA program
Opened APIs Link Endless Possibilities
QVR Pro
QVR Pro APIIFETA
Engine
IP Camera API CO2 sensor
Access control systemTemperature sensor
Humidity sensor
RTSP/RTMPAPI
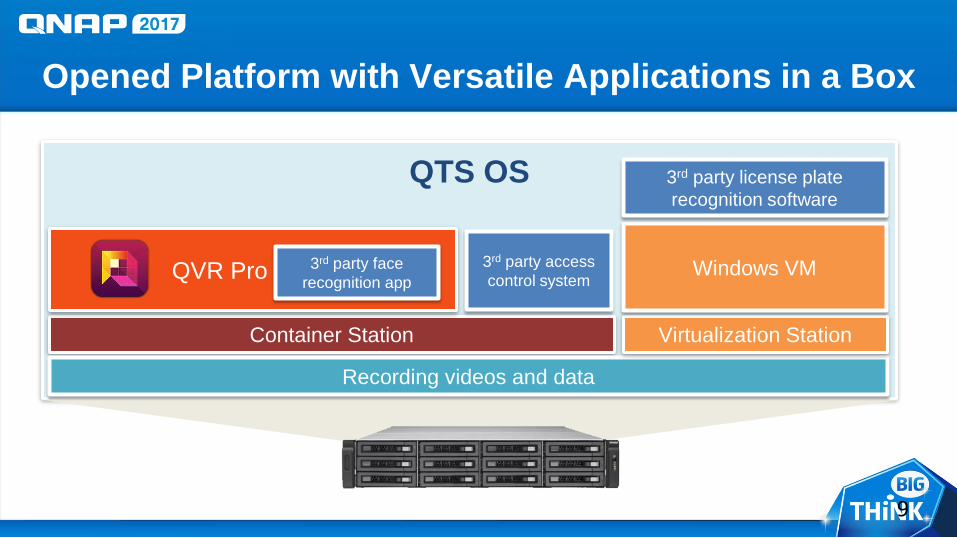
Opened Platform with Versatile Applications in a Box
9
QTS OS
Container Station
QVR Pro
Recording videos and data
Virtualization Station
Windows VM
3rd party license plate recognition software
3rd party access control system
3rd party facerecognition app
Live DemoStep-by-step installation of QVR Pro
David Tsao
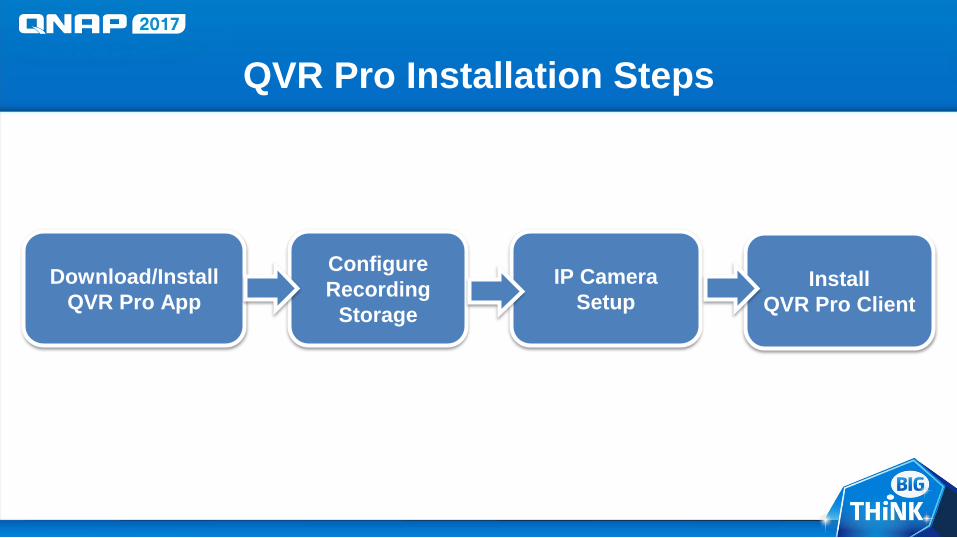
QVR Pro Installation Steps
Download/InstallQVR Pro App
Configure Recording
Storage
IP Camera Setup
Install QVR Pro Client
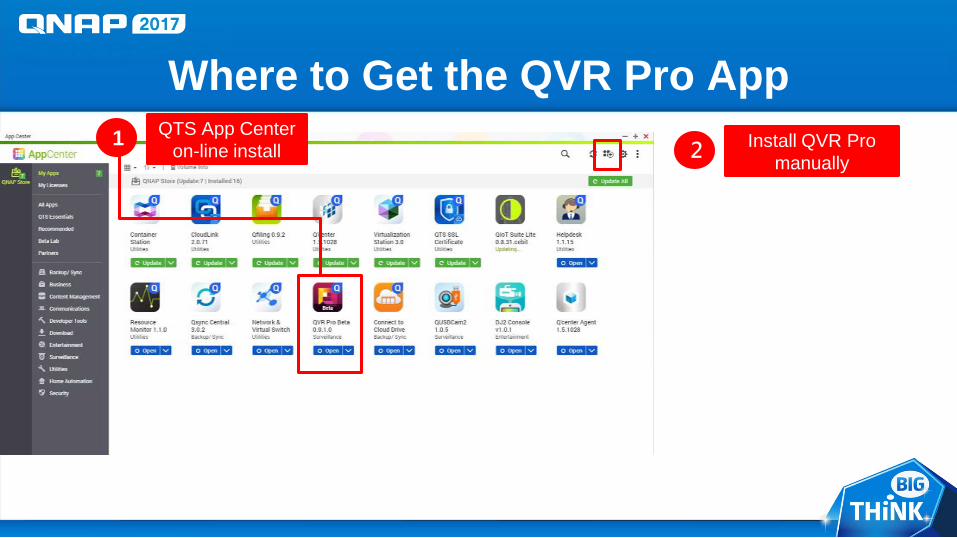
Where to Get the QVR Pro AppQTS App Center
on-line install1 Install QVR Pro manually2
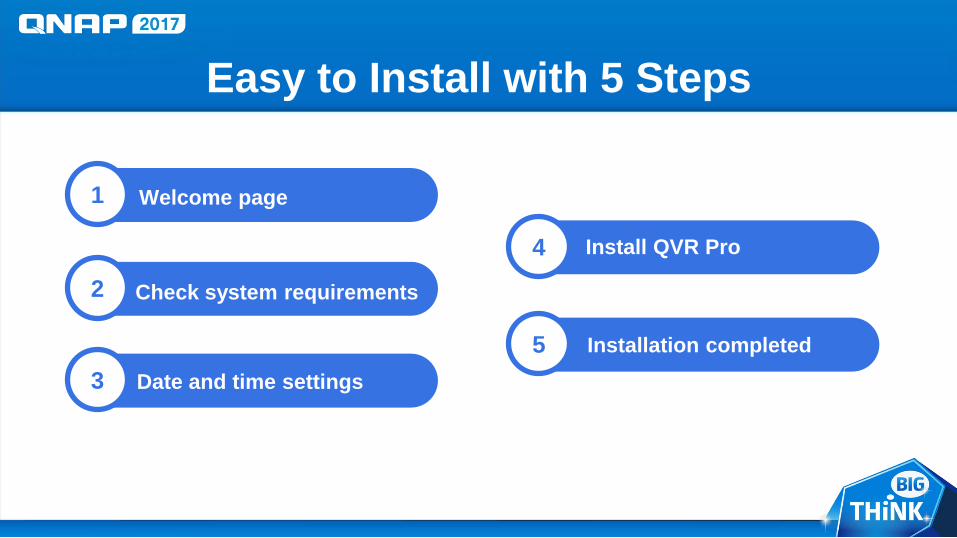
Easy to Install with 5 Steps
1 Welcome page
2
3 Date and time settings
Check system requirements
4
5
Install QVR Pro
Installation completed
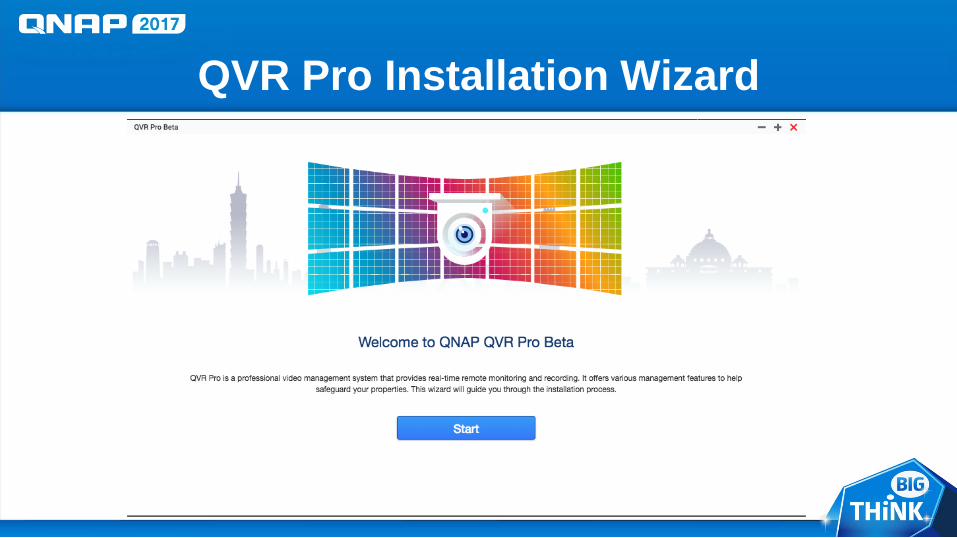
QVR Pro Installation Wizard
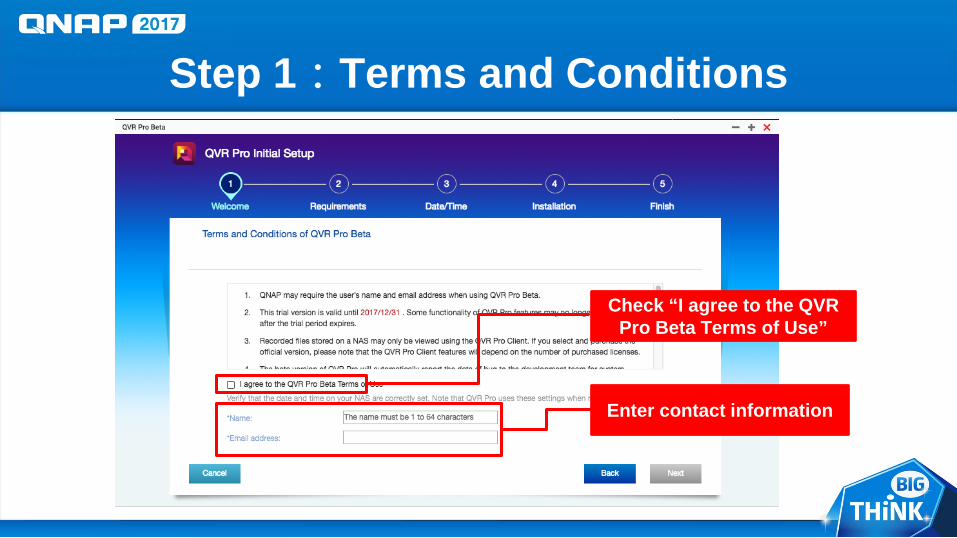
Step 1:Terms and Conditions
Check “I agree to the QVR Pro Beta Terms of Use”
Enter contact information
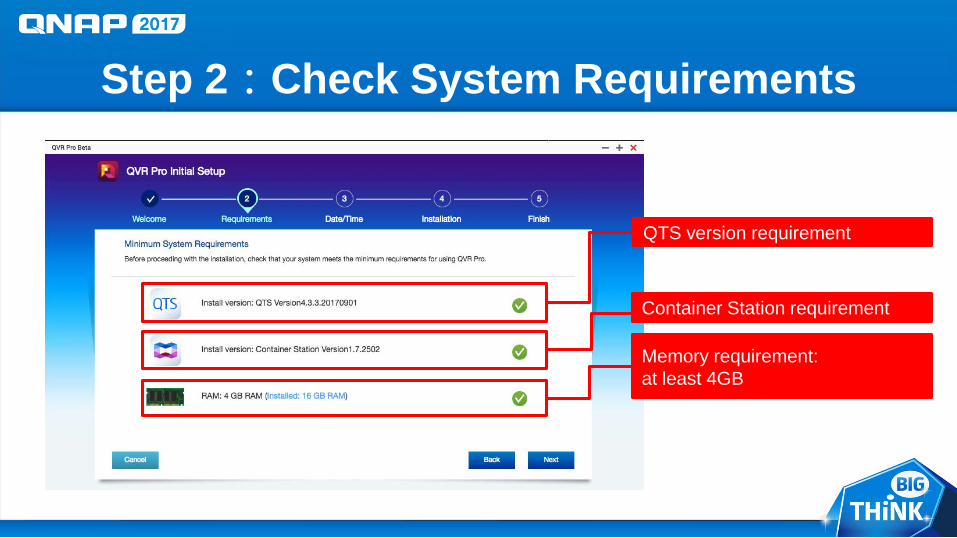
Step 2:Check System Requirements
QTS version requirement
Container Station requirement
Memory requirement: at least 4GB
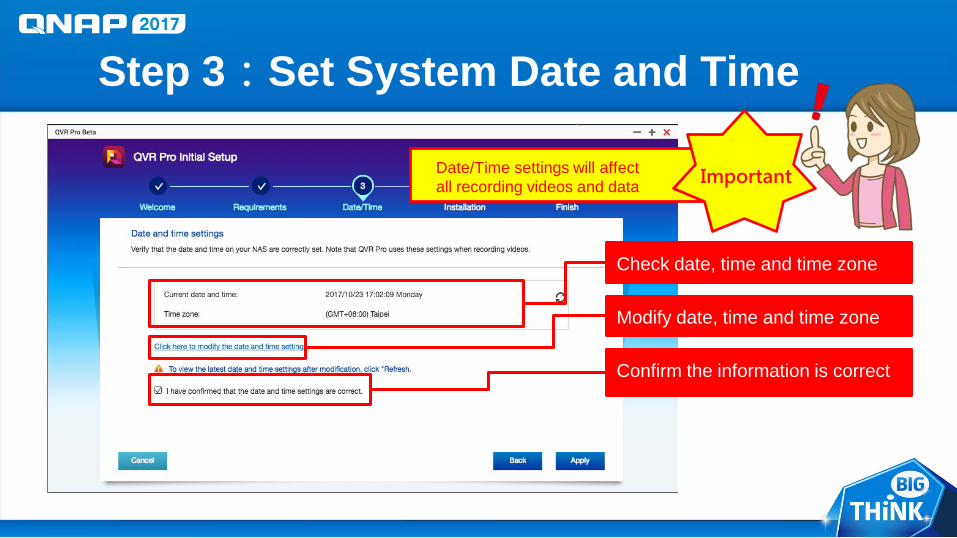
Step 3:Set System Date and Time
Date/Time settings will affect all recording videos and data
Modify date, time and time zone
Check date, time and time zone
Confirm the information is correct
Important
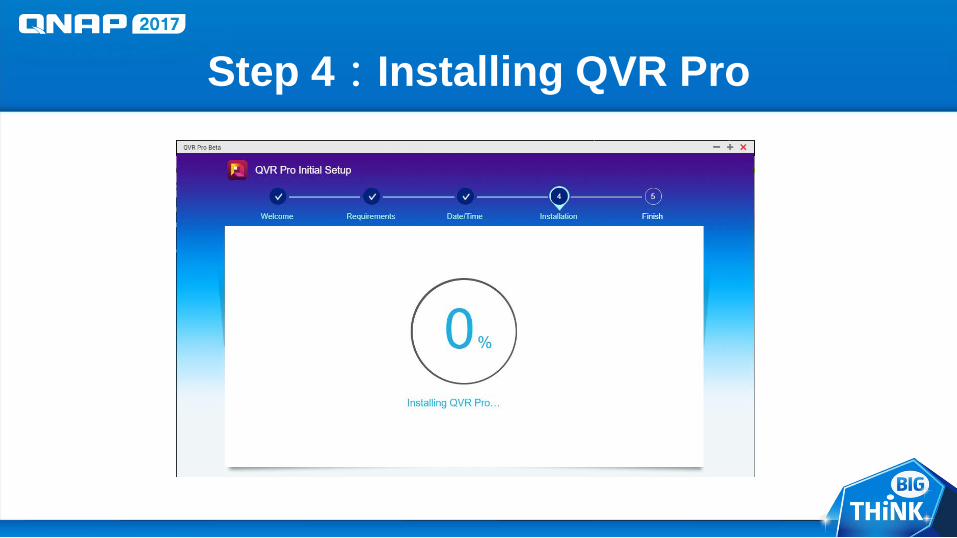
Step 4:Installing QVR Pro

Step 5:Installation Completed
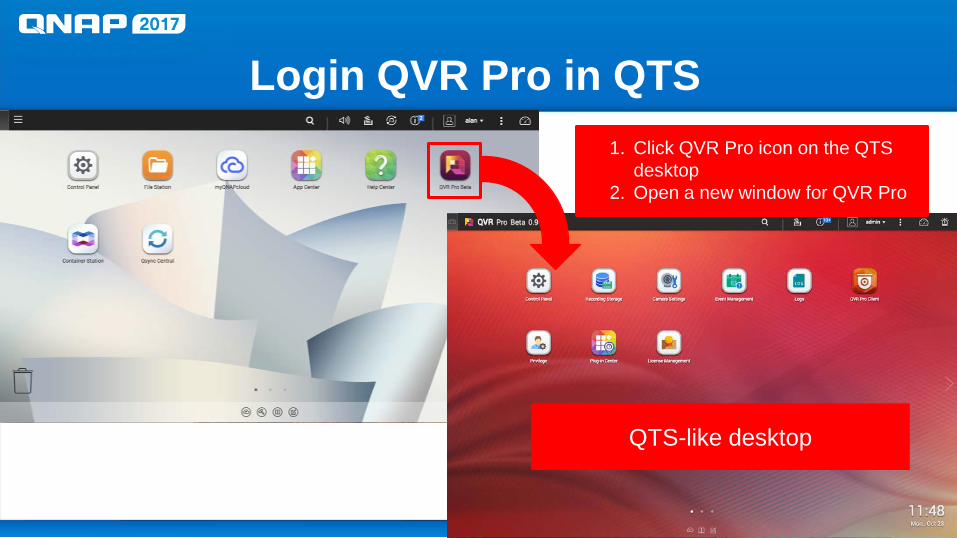
Login QVR Pro in QTS1. Click QVR Pro icon on the QTS
desktop2. Open a new window for QVR Pro
QTS-like desktop
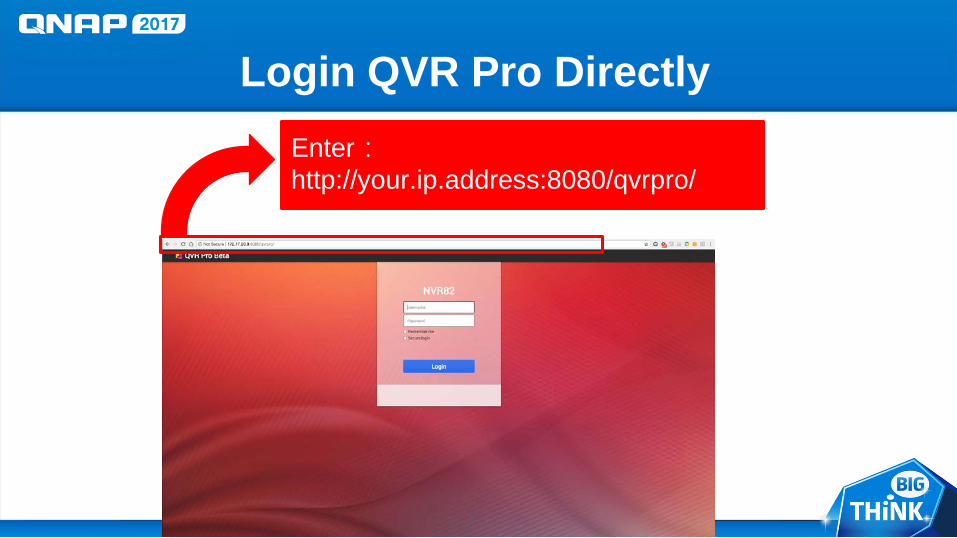
Login QVR Pro DirectlyEnter:http://your.ip.address:8080/qvrpro/
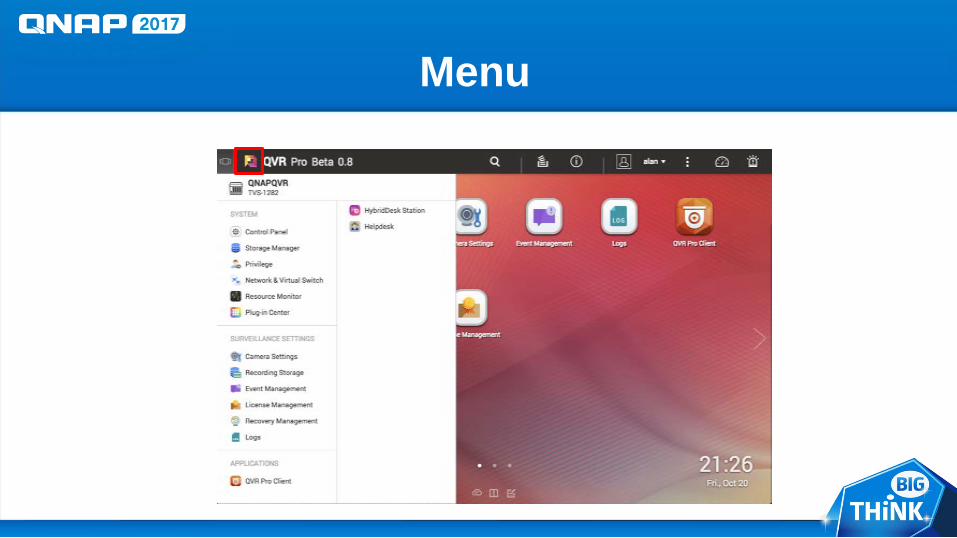
Menu
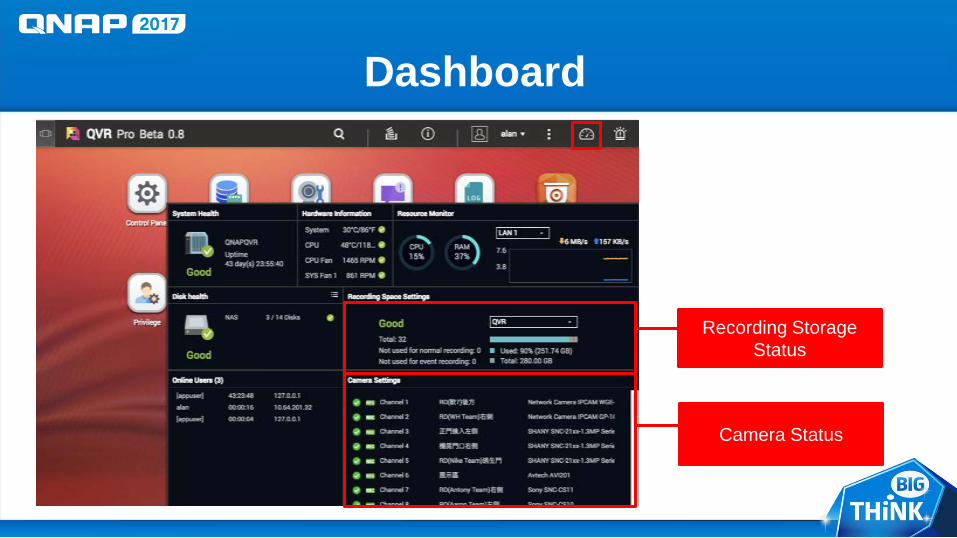
Dashboard
Camera Status
Recording Storage Status
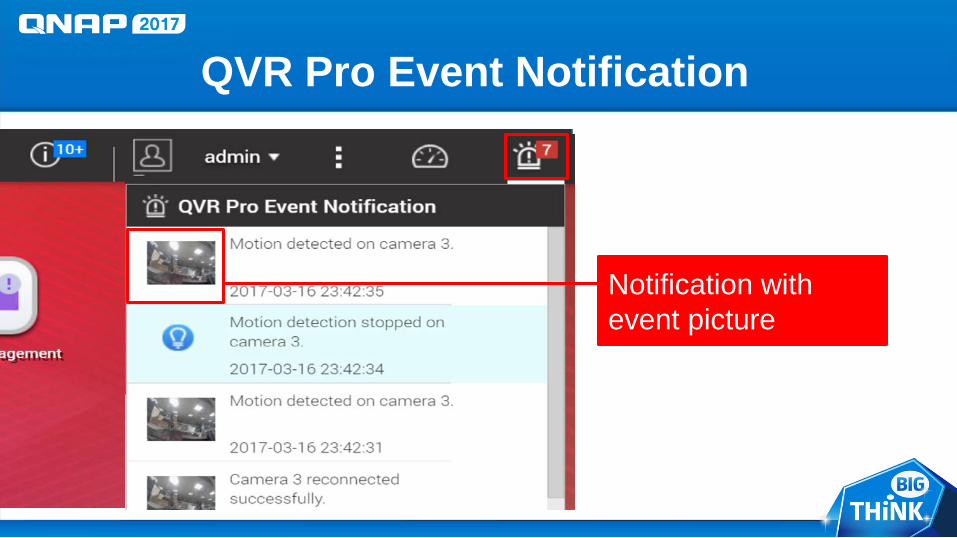
QVR Pro Event Notification
Notification with event picture
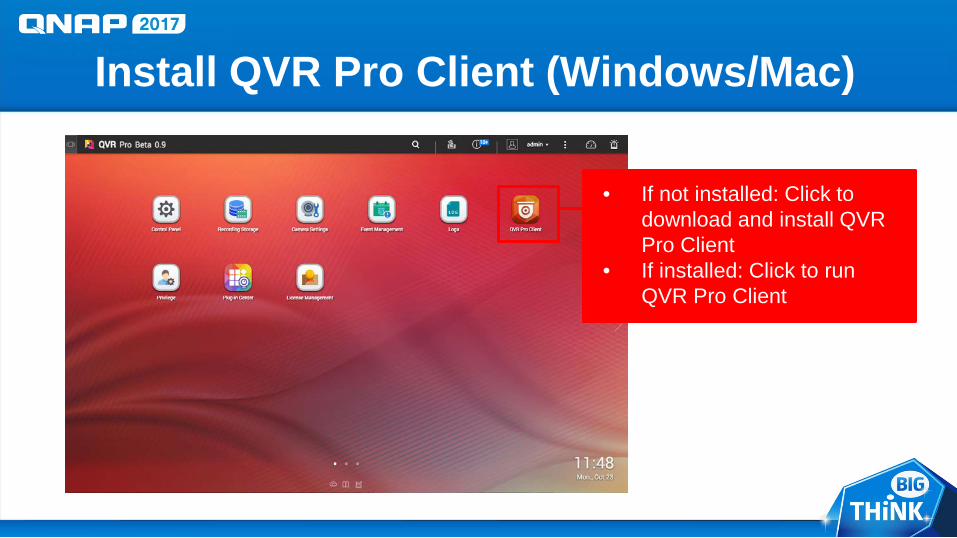
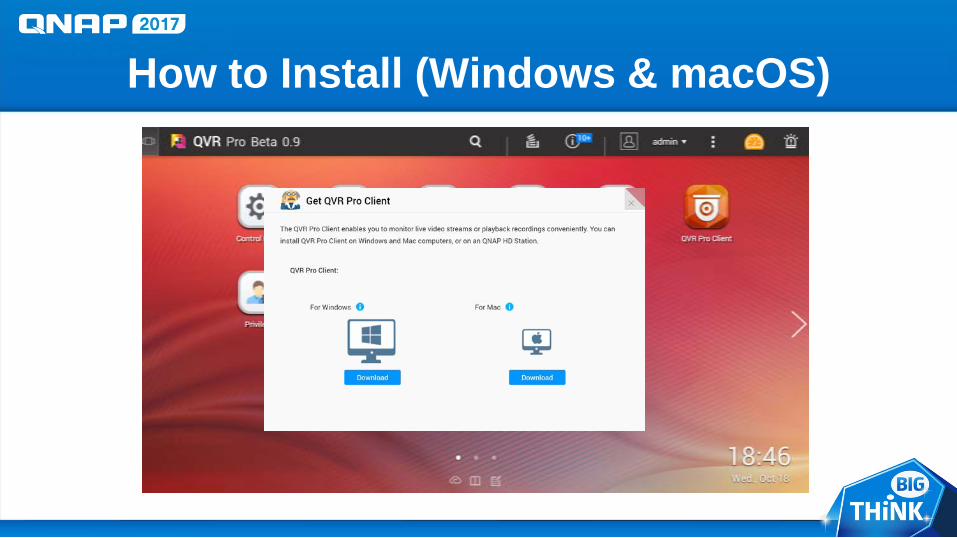
Install QVR Pro Client (Windows/Mac)
• If not installed: Click to download and install QVR Pro Client
• If installed: Click to run QVR Pro Client
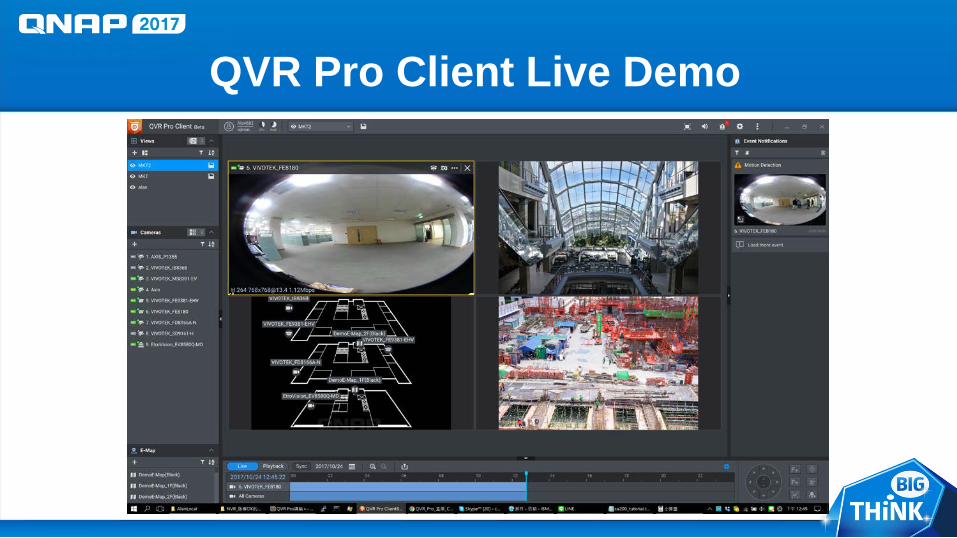
QVR Pro Client Live Demo
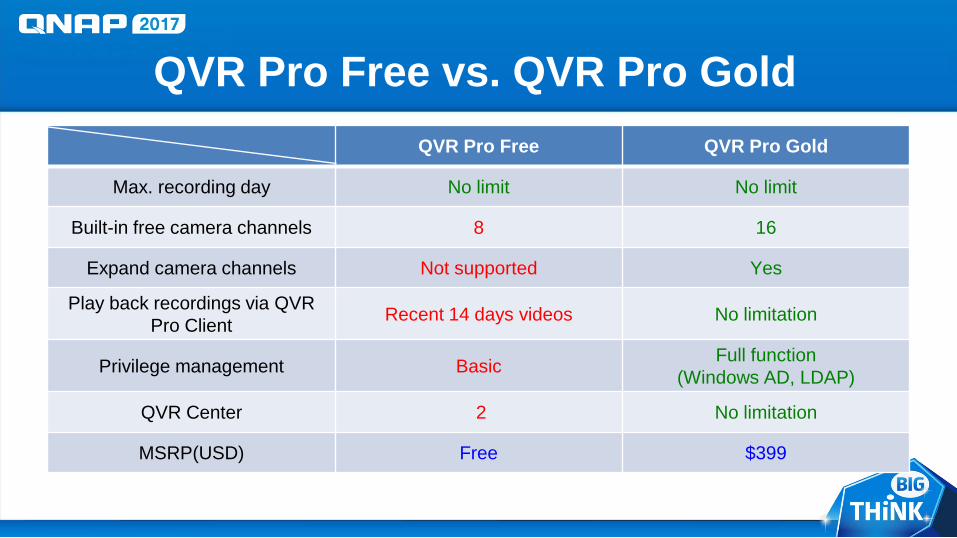
QVR Pro Free vs. QVR Pro GoldQVR Pro Free QVR Pro Gold
Max. recording day No limit No limit
Built-in free camera channels 8 16
Expand camera channels Not supported Yes
Play back recordings via QVR Pro Client Recent 14 days videos No limitation
Privilege management Basic Full function (Windows AD, LDAP)
QVR Center 2 No limitation
MSRP(USD) Free $399

Thank you
QVR ProCamera Settings
Angela Liu
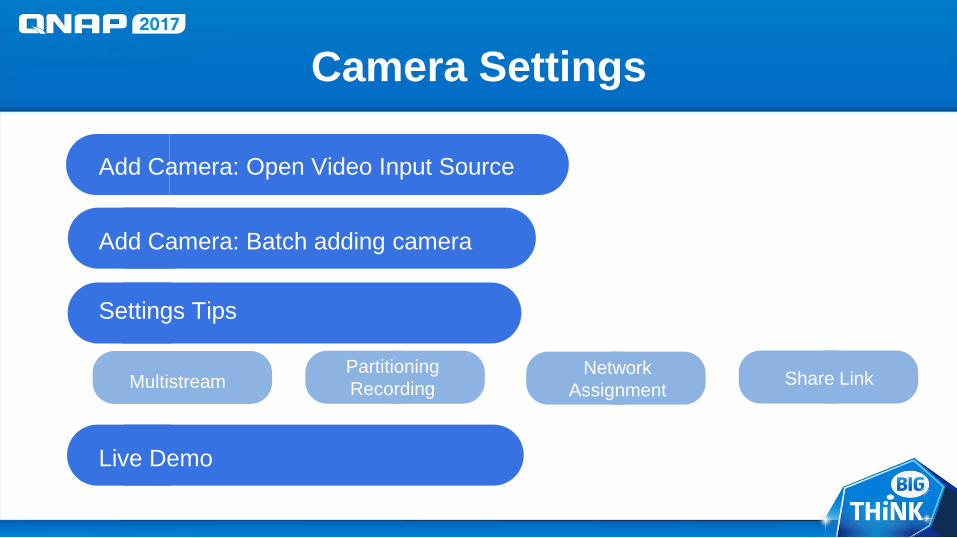
Camera Settings
Add Camera: Open Video Input Source
Add Camera: Batch adding camera
Settings Tips
Multistream Share LinkNetwork Assignment
Live Demo
Partitioning Recording
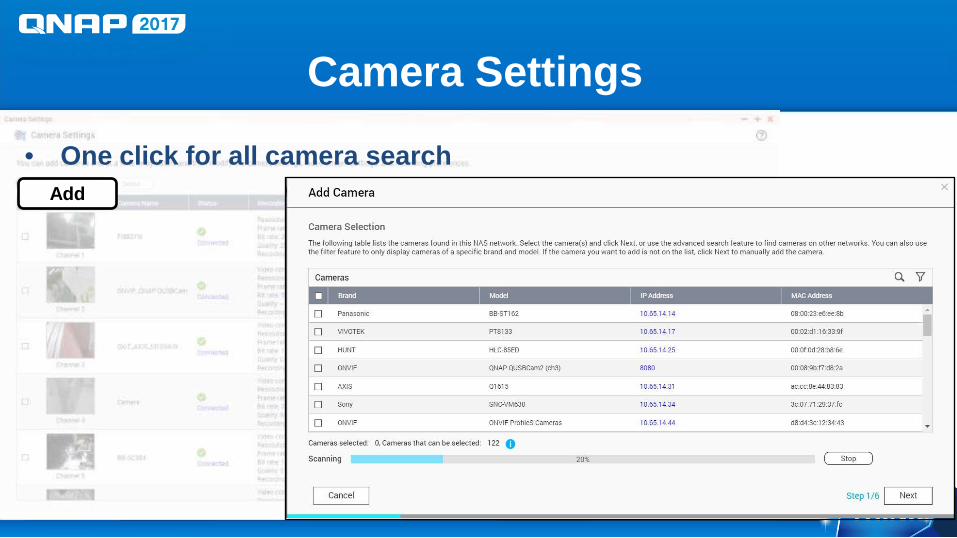
Camera Settings
Add
• One click for all camera search
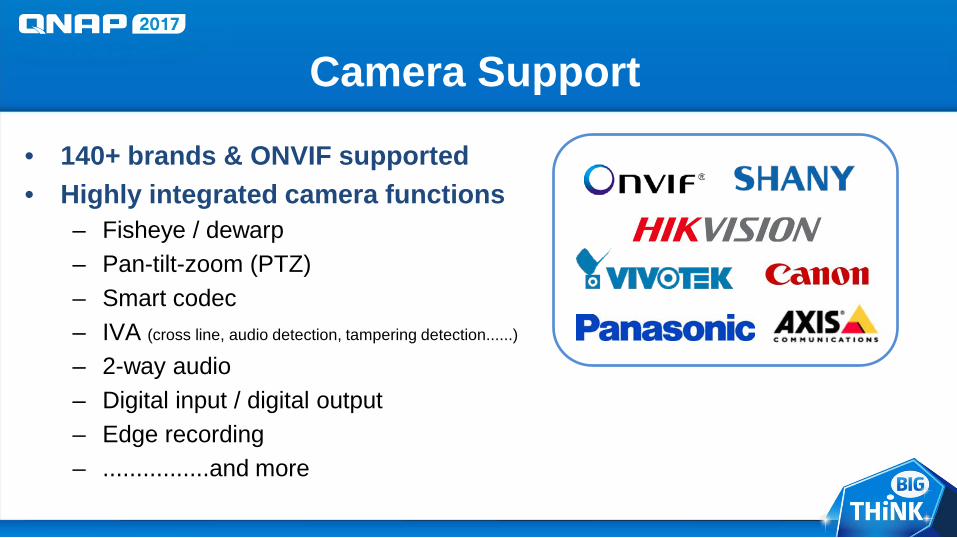
Camera Support
• 140+ brands & ONVIF supported• Highly integrated camera functions
– Fisheye / dewarp– Pan-tilt-zoom (PTZ) – Smart codec– IVA (cross line, audio detection, tampering detection......)
– 2-way audio– Digital input / digital output– Edge recording– ................and more
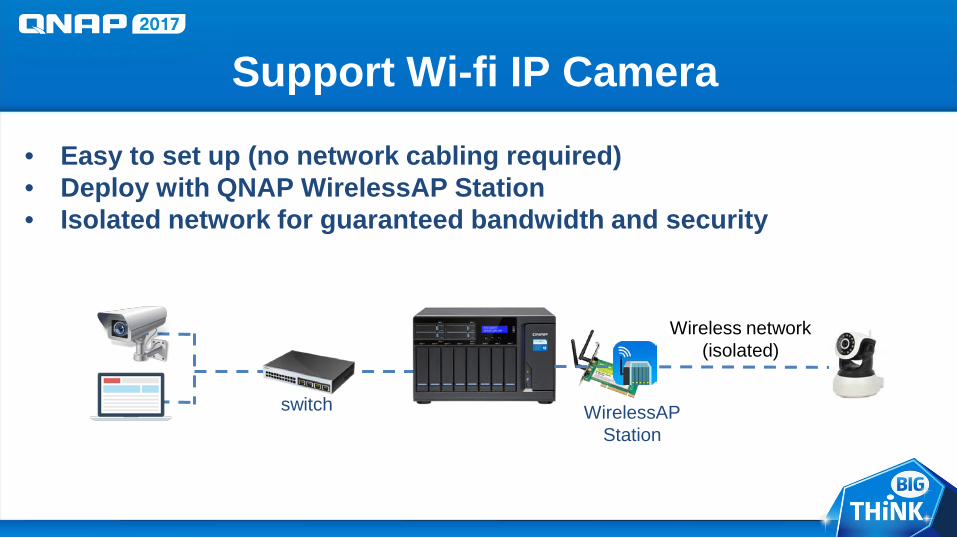
Support Wi-fi IP Camera
WirelessAPStation
Wireless network (isolated)
switch
• Easy to set up (no network cabling required)• Deploy with QNAP WirelessAP Station• Isolated network for guaranteed bandwidth and security
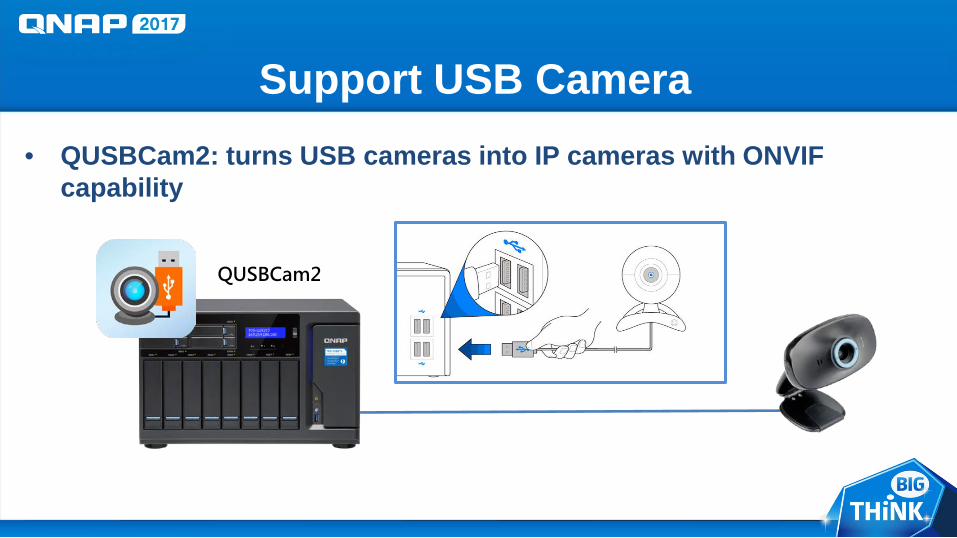
Support USB Camera
QUSBCam2
• QUSBCam2: turns USB cameras into IP cameras with ONVIF capability
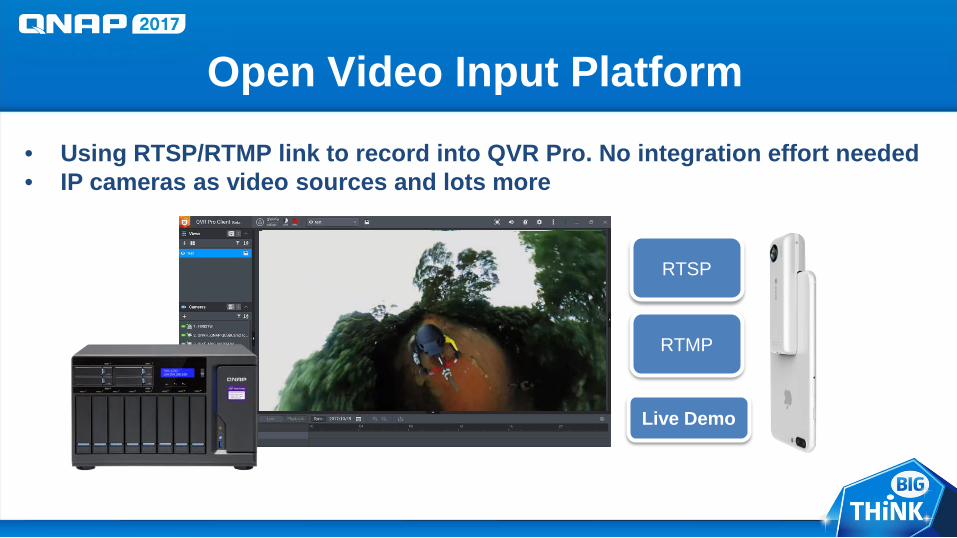
• Using RTSP/RTMP link to record into QVR Pro. No integration effort needed • IP cameras as video sources and lots more
Open Video Input Platform
RTSP
RTMP
Live Demo
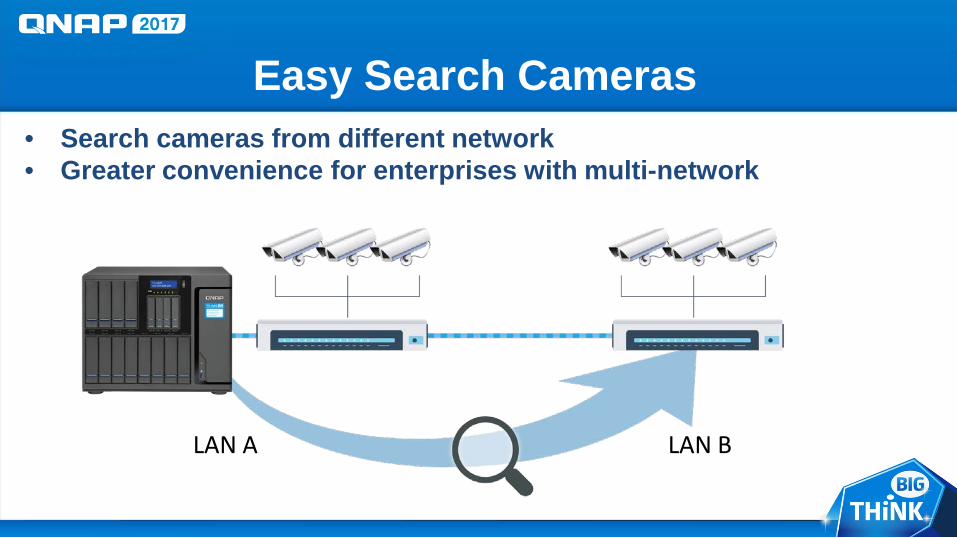
Easy Search Cameras• Search cameras from different network• Greater convenience for enterprises with multi-network
LAN A LAN B
M3004
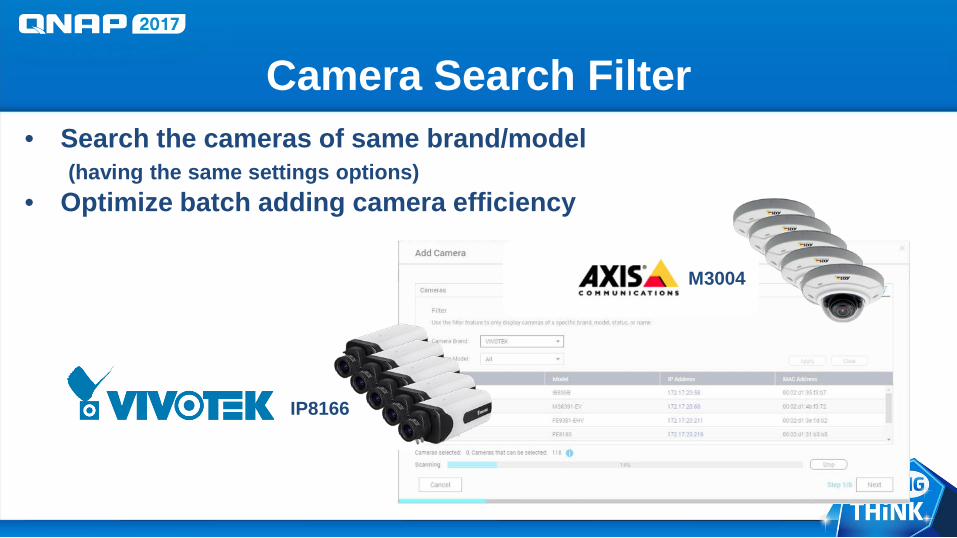
Camera Search Filter
IP8166
• Search the cameras of same brand/model (having the same settings options)
• Optimize batch adding camera efficiency
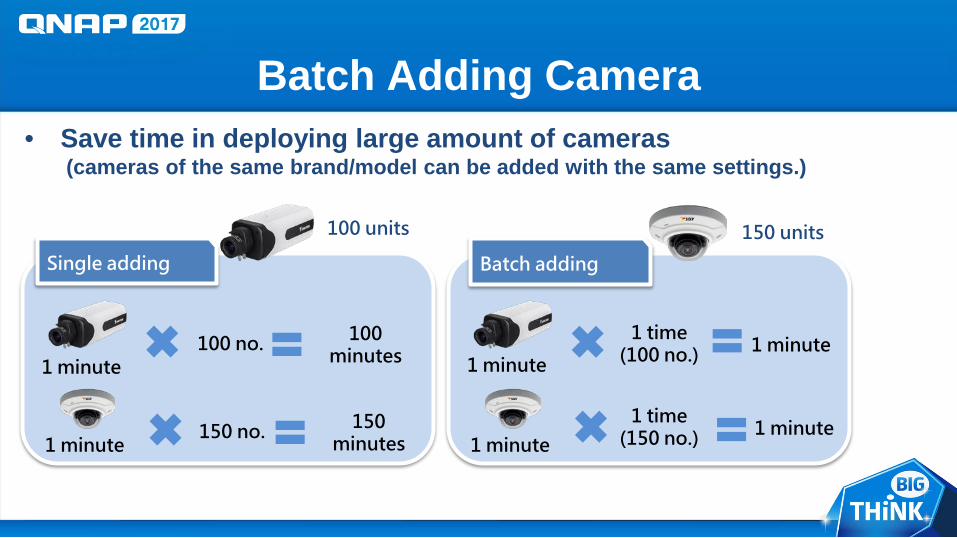
Batch Adding Camera
1 minute100 no. 100
minutes
1 minute150 no. 150
minutes
1 minute
1 time(100 no.) 1 minute
1 minute
1 time(150 no.) 1 minute
Single adding Batch adding
100 units 150 units
• Save time in deploying large amount of cameras(cameras of the same brand/model can be added with the same settings.)
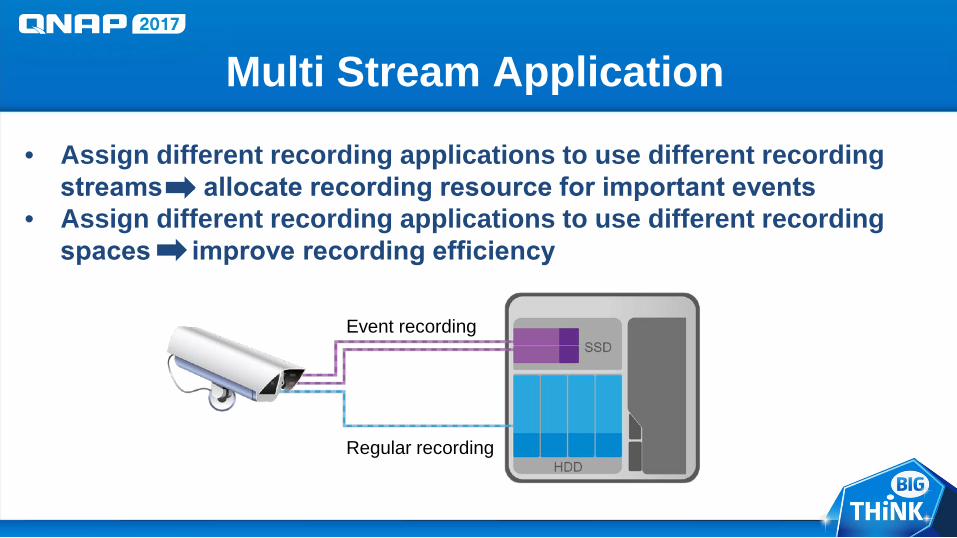
Multi Stream Application
• Assign different recording applications to use different recording streams → allocate recording resource for important events
• Assign different recording applications to use different recording spaces → improve recording efficiency
Event recording
Regular recording
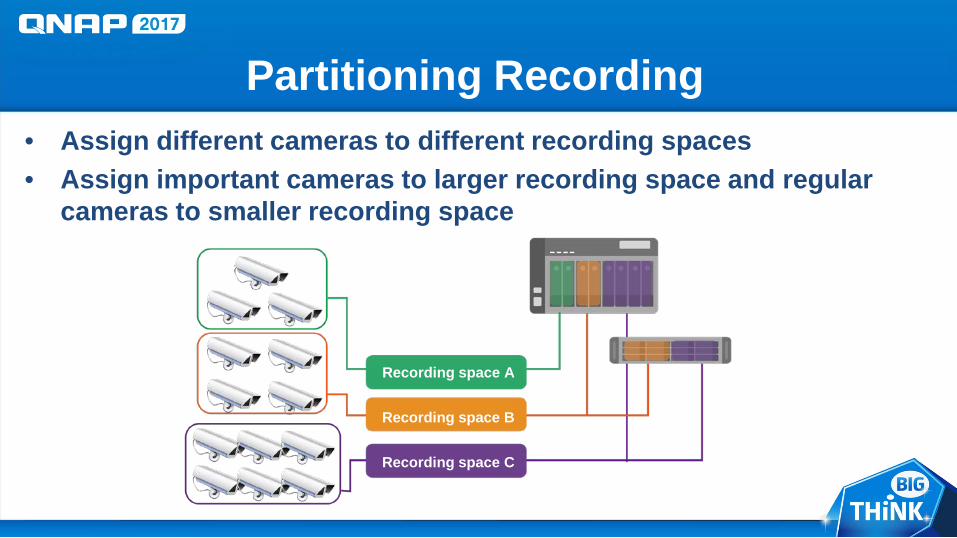
Partitioning Recording• Assign different cameras to different recording spaces• Assign important cameras to larger recording space and regular
cameras to smaller recording space
Recording space A
Recording space B
Recording space C
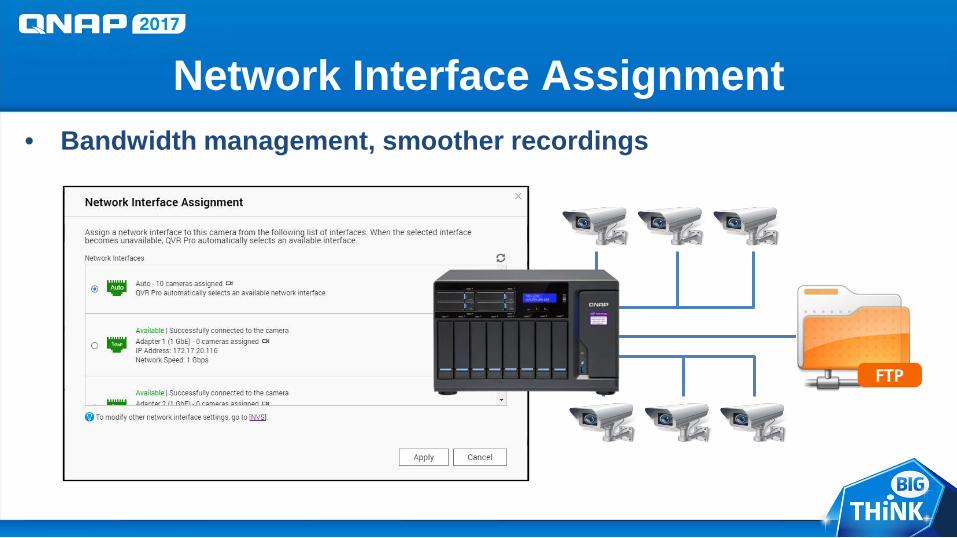
• Bandwidth management, smoother recordings
Network Interface Assignment
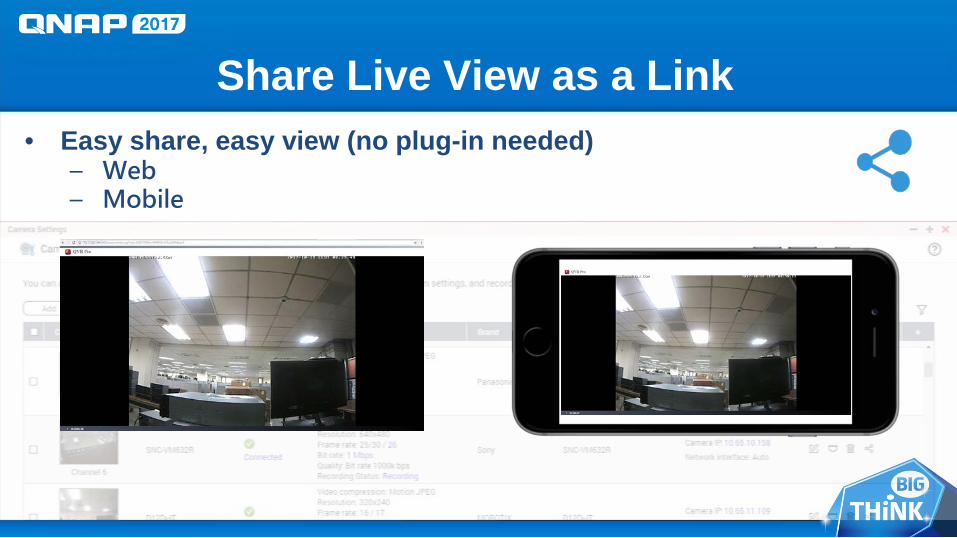
• Easy share, easy view (no plug-in needed)– Web– Mobile
Share Live View as a Link

Thank youLIVE DEMO

Thank you

Brand-new QVR Pro Client
Alan Kuo
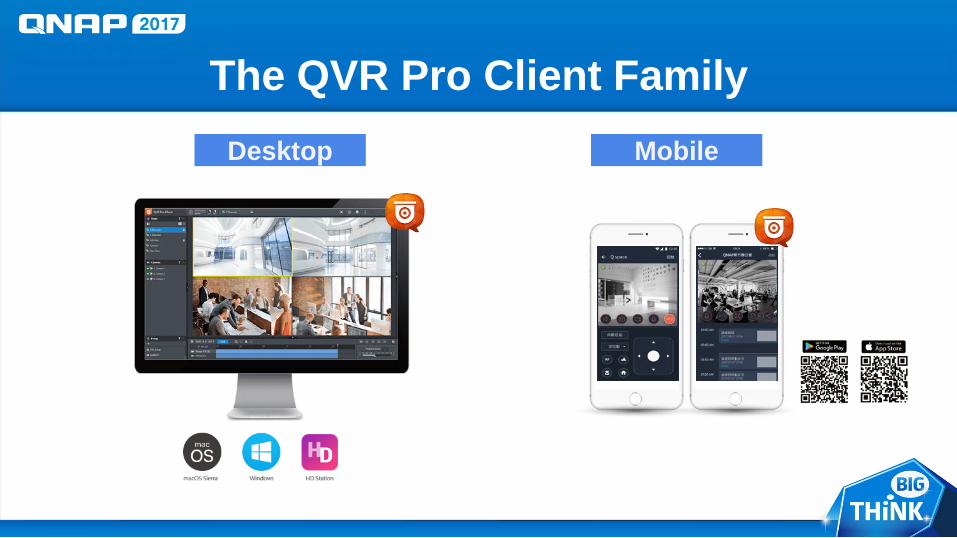
The QVR Pro Client FamilyDesktop Mobile
How to Install (Windows & macOS)
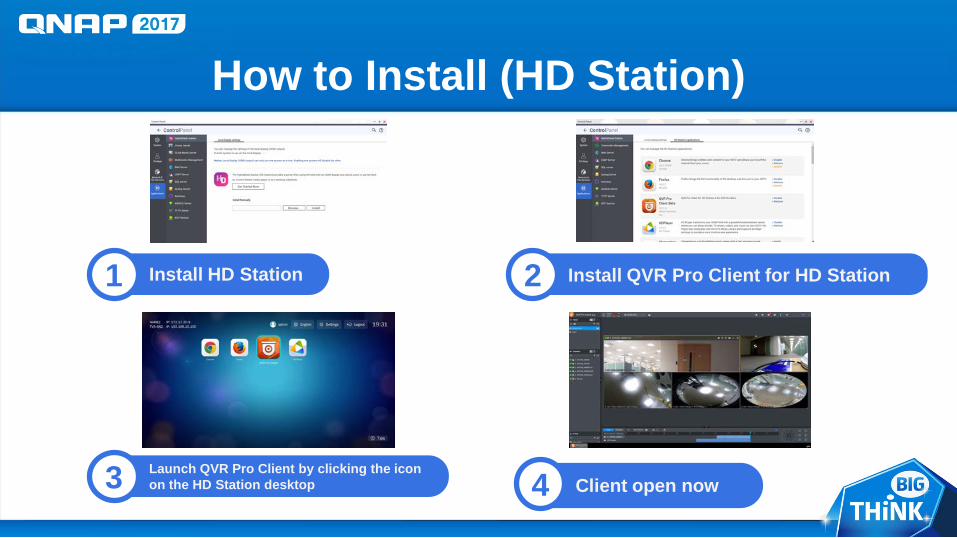
How to Install (HD Station)
1 Install HD Station 2 Install QVR Pro Client for HD Station
3 Launch QVR Pro Client by clicking the icon on the HD Station desktop 4 Client open now
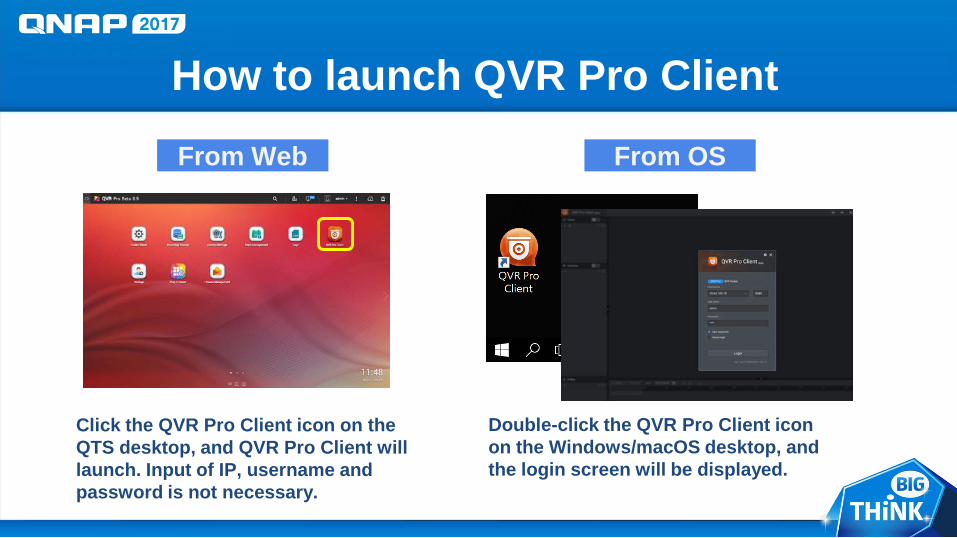
How to launch QVR Pro Client
From Web From OS
Click the QVR Pro Client icon on the QTS desktop, and QVR Pro Client will launch. Input of IP, username and password is not necessary.
Double-click the QVR Pro Client icon on the Windows/macOS desktop, and the login screen will be displayed.
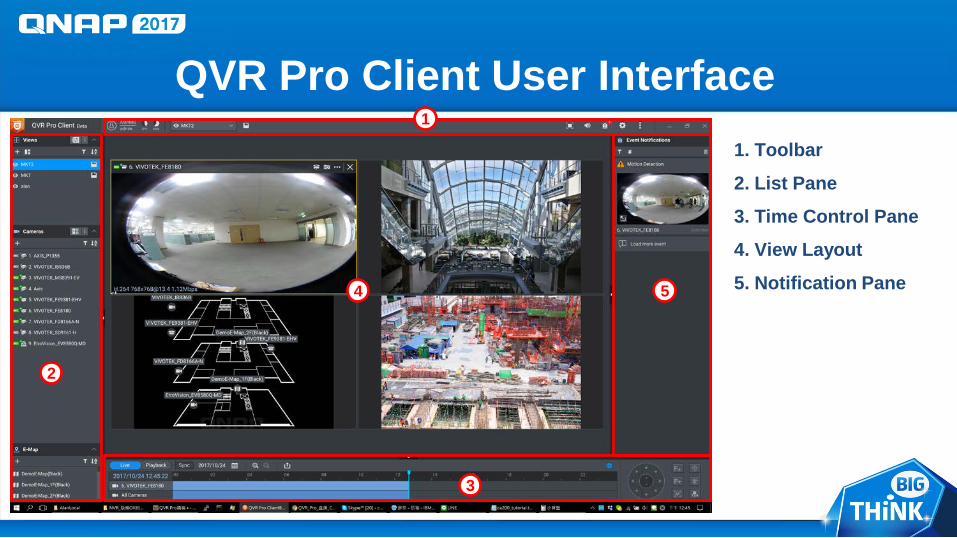
QVR Pro Client User Interface1. Toolbar
2. List Pane
3. Time Control Pane
4. View Layout
5. Notification Pane
1
2
3
54
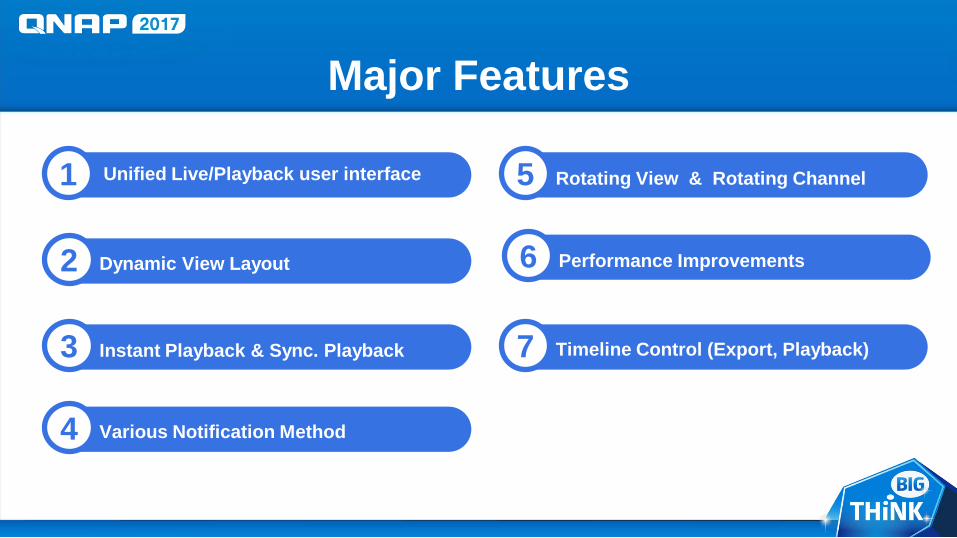
Major Features
1 Unified Live/Playback user interface
2 Dynamic View Layout
3 Instant Playback & Sync. Playback
5 Rotating View & Rotating Channel
6 Performance Improvements
4 Various Notification Method
7 Timeline Control (Export, Playback)
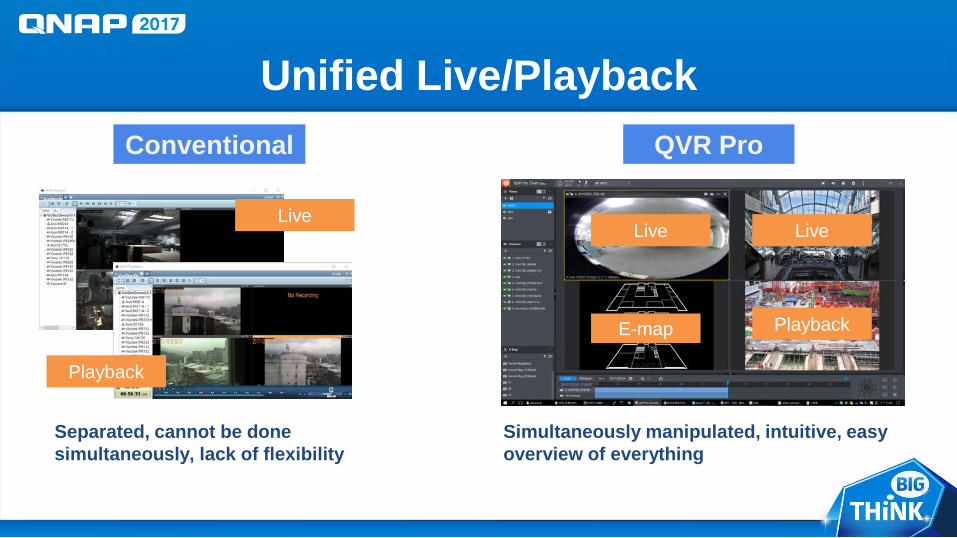
Unified Live/PlaybackConventional QVR Pro
Live
Playback
Live
PlaybackE-map
Separated, cannot be done simultaneously, lack of flexibility
Simultaneously manipulated, intuitive, easy overview of everything
Live
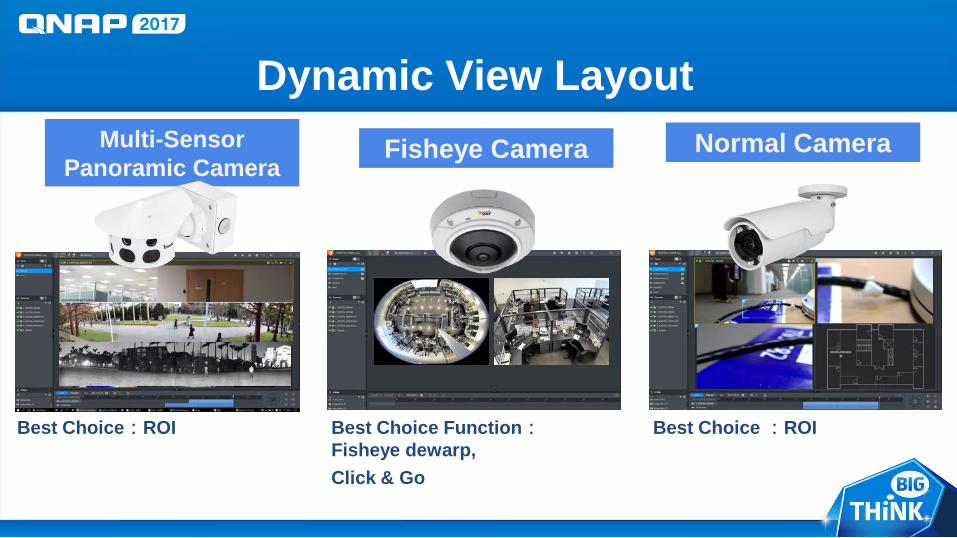
Dynamic View Layout
Best Choice:ROI Best Choice Function:Fisheye dewarp, Click & Go
Best Choice :ROI
Multi-Sensor Panoramic Camera
Fisheye Camera Normal Camera
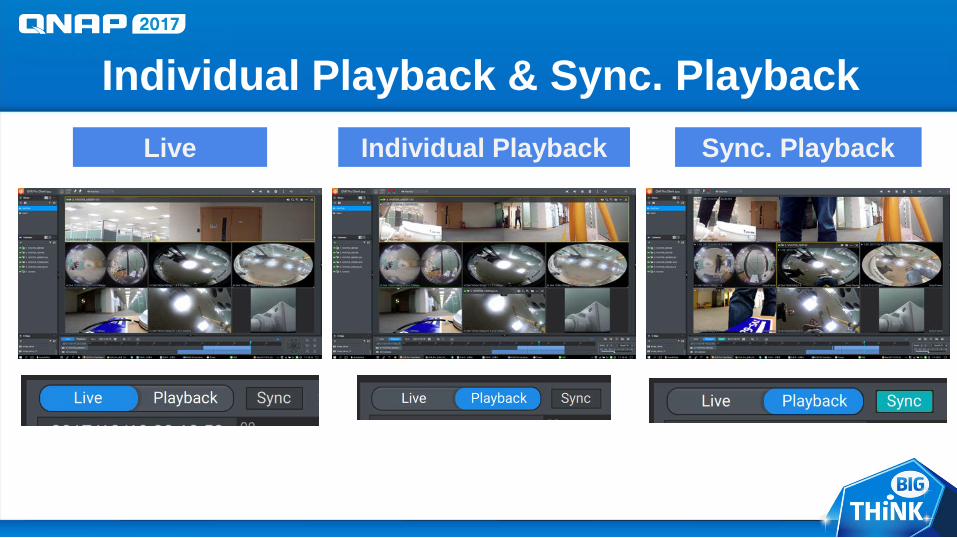
Individual Playback & Sync. PlaybackLive Individual Playback Sync. Playback
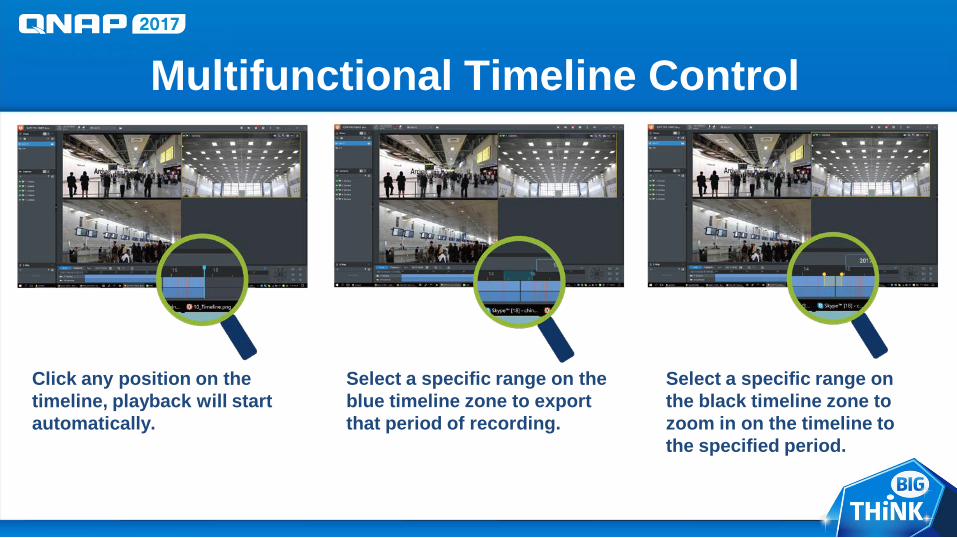
Multifunctional Timeline Control
Select a specific range on the blue timeline zone to export that period of recording.
Select a specific range on the black timeline zone to zoom in on the timeline to the specified period.
Click any position on the timeline, playback will start automatically.
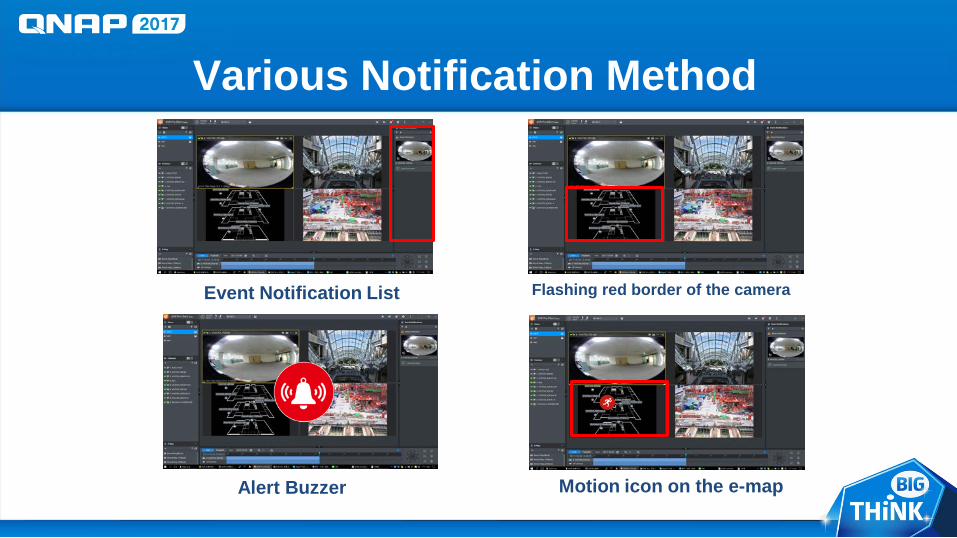
Various Notification Method
Event Notification List Flashing red border of the camera
Motion icon on the e-mapAlert Buzzer
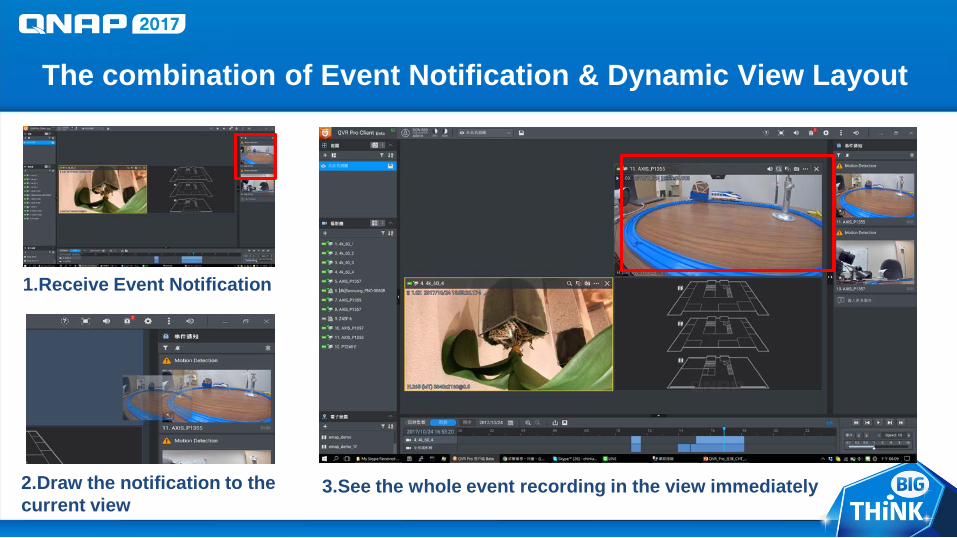
The combination of Event Notification & Dynamic View Layout
1.Receive Event Notification
2.Draw the notification to the current view
3.See the whole event recording in the view immediately
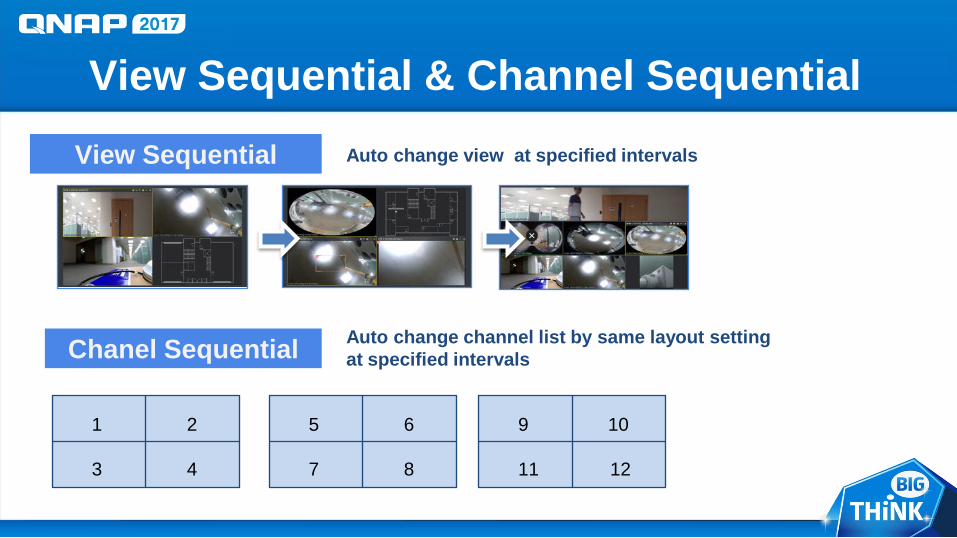
View Sequential & Channel SequentialView Sequential
Chanel Sequential
5 6
7 8
Auto change view at specified intervals
Auto change channel list by same layout setting at specified intervals
1 2
3 4
9 10
11 12
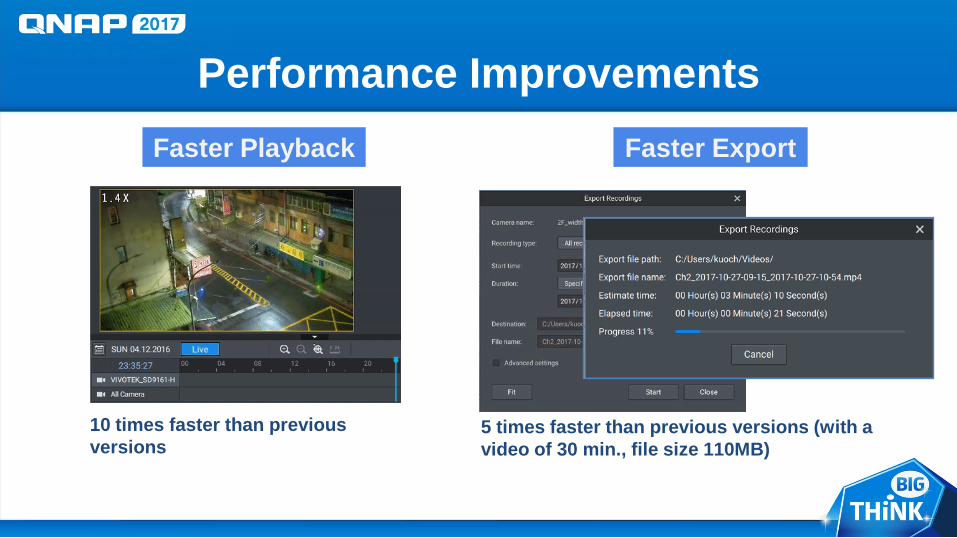
Performance Improvements
10 times faster than previous versions
Faster Playback Faster Export
5 times faster than previous versions (with a video of 30 min., file size 110MB)
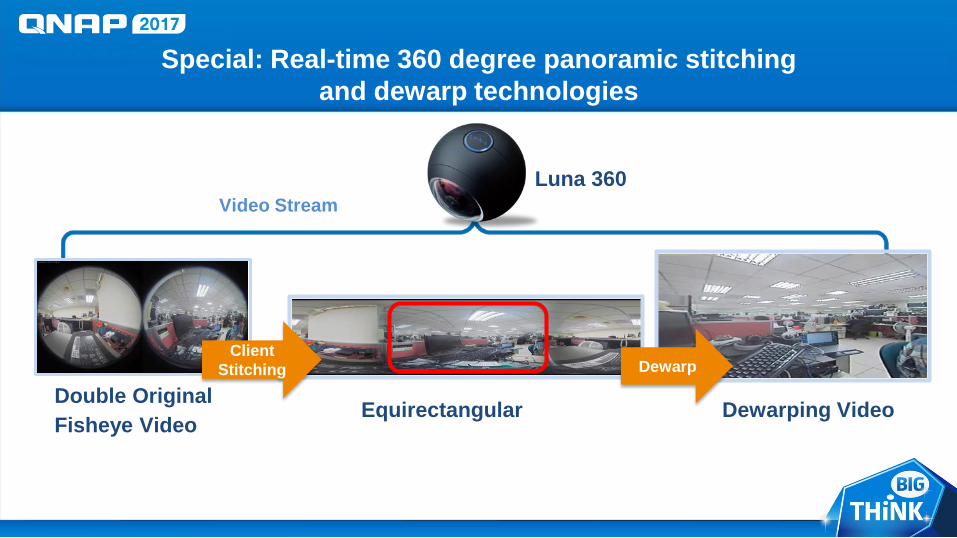
Special: Real-time 360 degree panoramic stitching and dewarp technologies
Luna 360
Double Original Fisheye Video
Video Stream
Equirectangular
DewarpClient
Stitching
Dewarping Video
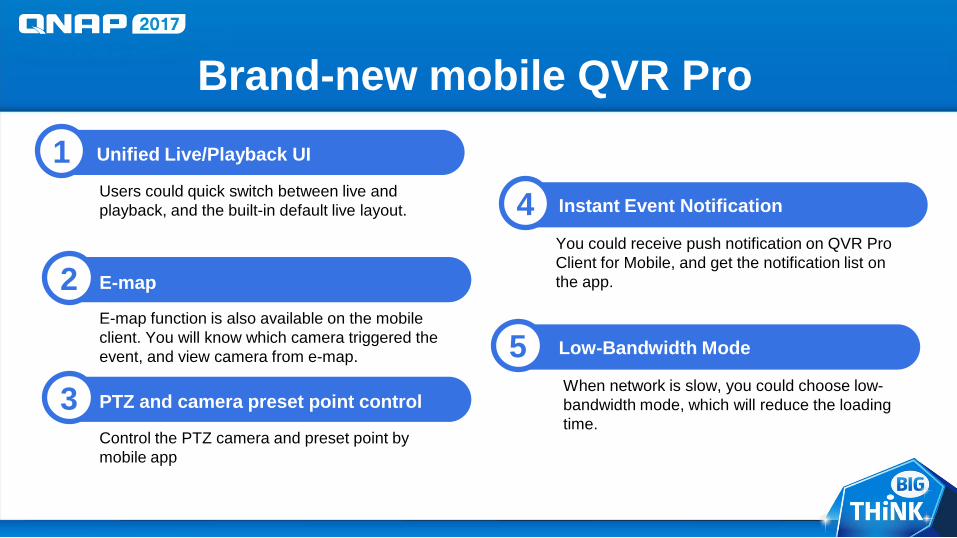
Brand-new mobile QVR Pro1 Unified Live/Playback UI
Users could quick switch between live and playback, and the built-in default live layout.
2 E-map
E-map function is also available on the mobile client. You will know which camera triggered the event, and view camera from e-map.
3 PTZ and camera preset point control
Control the PTZ camera and preset point by mobile app
4 Instant Event Notification
You could receive push notification on QVR Pro Client for Mobile, and get the notification list on the app.
5 Low-Bandwidth Mode
When network is slow, you could choose low-bandwidth mode, which will reduce the loading time.
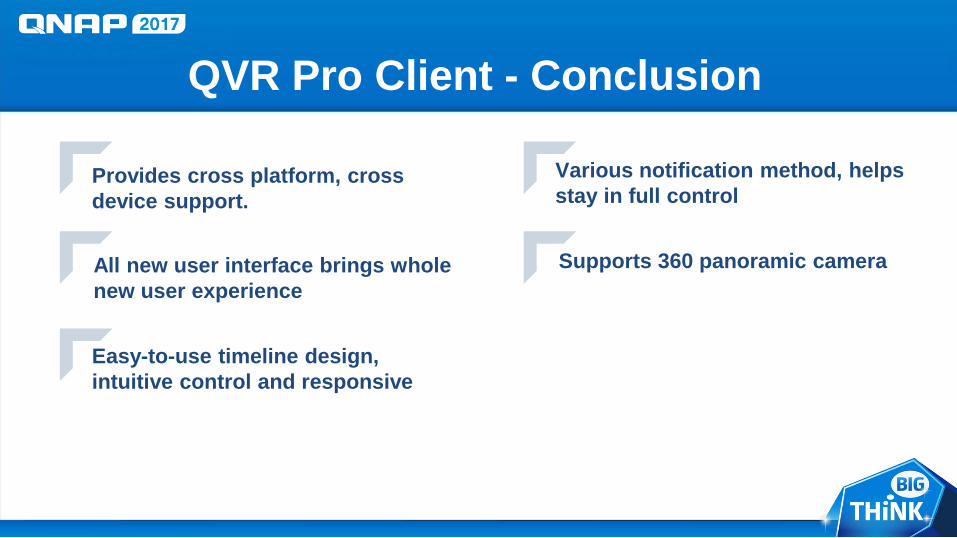
QVR Pro Client - Conclusion
Provides cross platform, cross device support.
Easy-to-use timeline design, intuitive control and responsive
All new user interface brings whole new user experience
Various notification method, helps stay in full control
Supports 360 panoramic camera

Thank you
Planning Storage Space for Recording & Recording Setting
Alan Kuo
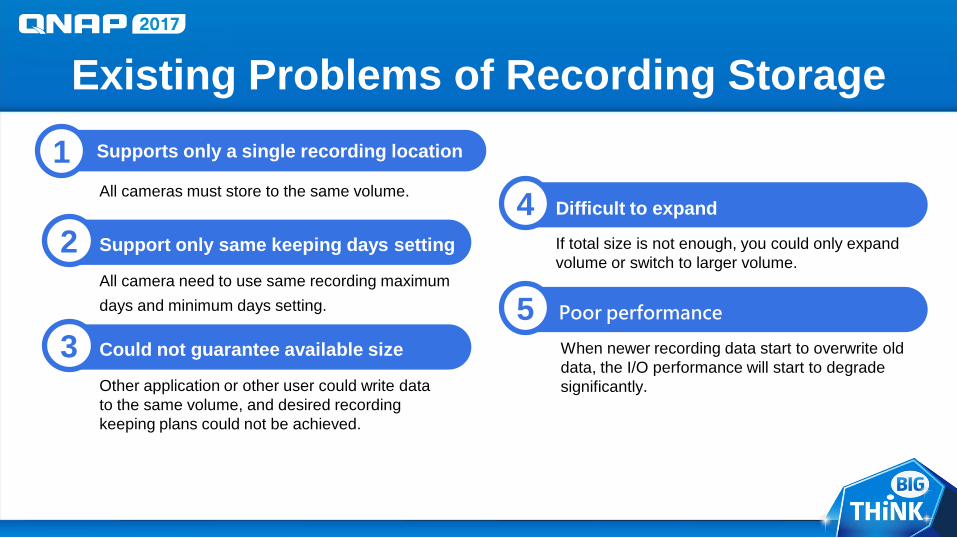
Existing Problems of Recording Storage
空間保證
1 Supports only a single recording location
All cameras must store to the same volume.
2 Support only same keeping days setting
All camera need to use same recording maximumdays and minimum days setting.
3 Could not guarantee available size
Other application or other user could write data to the same volume, and desired recording keeping plans could not be achieved.
4 Difficult to expand
If total size is not enough, you could only expand volume or switch to larger volume.
5 Poor performance
When newer recording data start to overwrite old data, the I/O performance will start to degrade significantly.
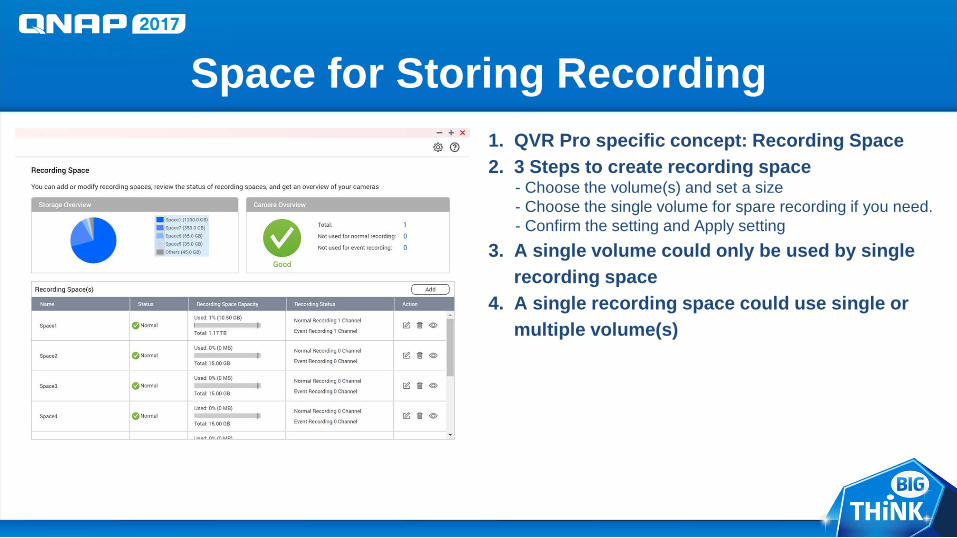
Space for Storing Recording1. QVR Pro specific concept: Recording Space2. 3 Steps to create recording space
- Choose the volume(s) and set a size- Choose the single volume for spare recording if you need.- Confirm the setting and Apply setting
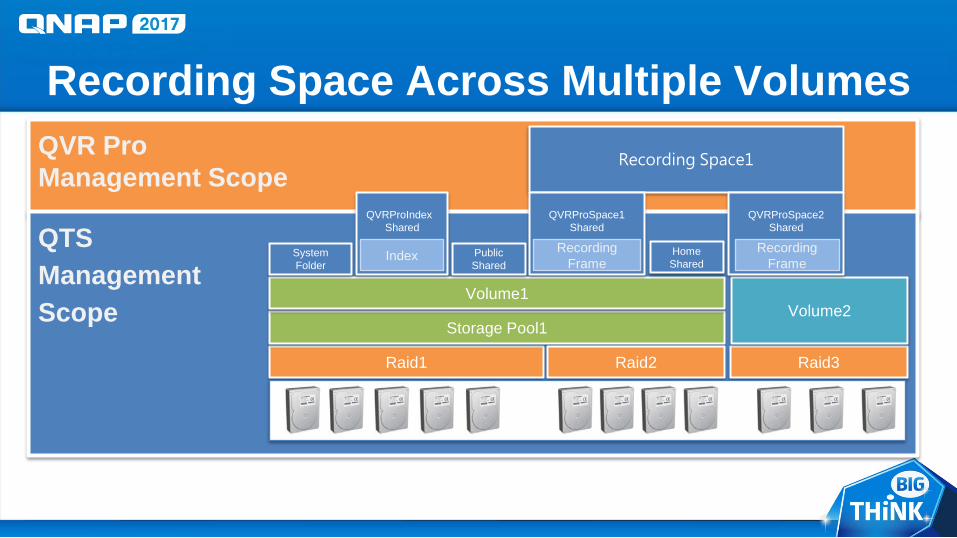
3. A single volume could only be used by singlerecording space
4. A single recording space could use single or multiple volume(s)
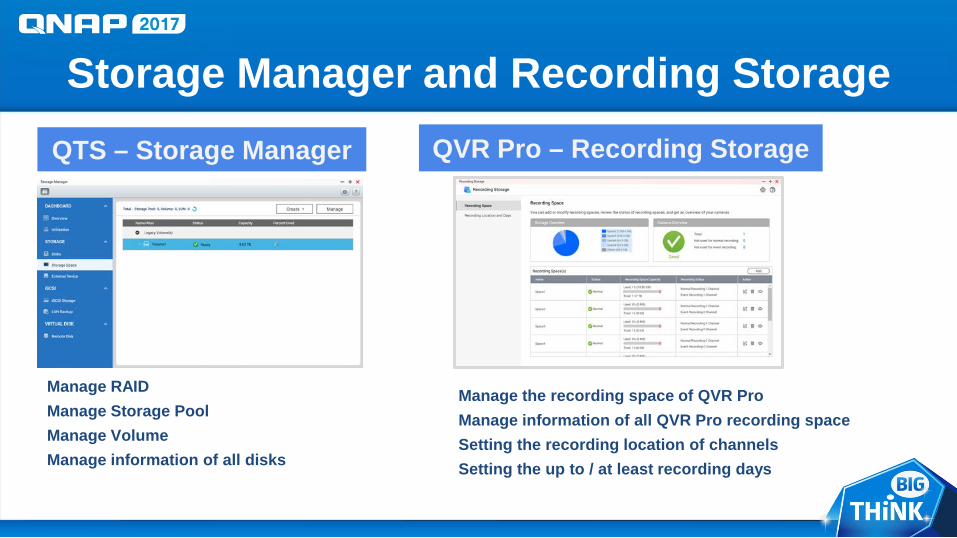
Storage Manager and Recording Storage
Manage RAIDManage Storage PoolManage VolumeManage information of all disks
Manage the recording space of QVR ProManage information of all QVR Pro recording spaceSetting the recording location of channelsSetting the up to / at least recording days
QTS – Storage Manager QVR Pro – Recording Storage
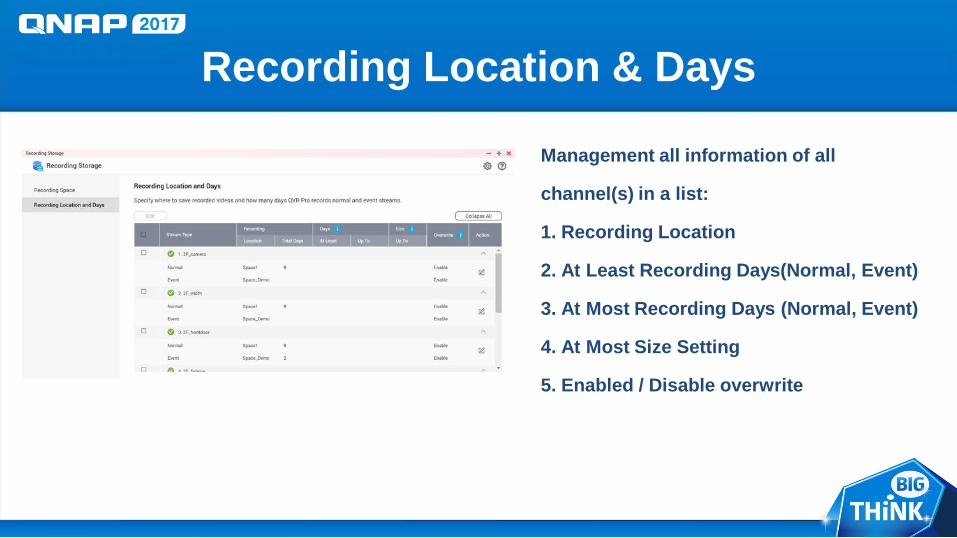
Recording Location & Days
Management all information of all
channel(s) in a list:
1. Recording Location
2. At Least Recording Days(Normal, Event)
3. At Most Recording Days (Normal, Event)
4. At Most Size Setting
5. Enabled / Disable overwrite
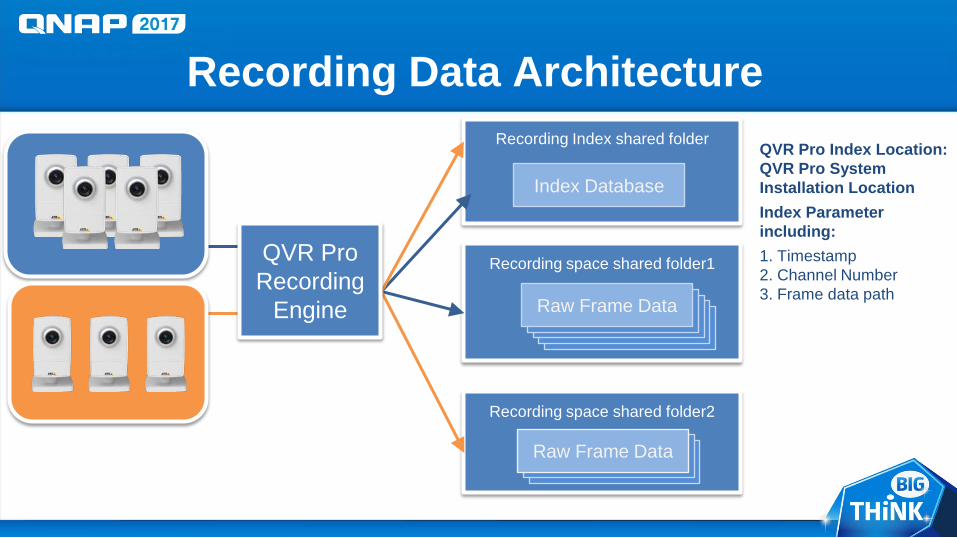
Recording space shared folder1
Recording Index shared folder
Recording Data Architecture
Index Database
RAW Frame FileRAW Frame FileRAW Frame FileRAW Frame FileRaw Frame Data
QVR Pro Index Location: QVR Pro System Installation LocationIndex Parameter including:1. Timestamp2. Channel Number3. Frame data path
Recording space shared folder2
RAW Frame FileRAW Frame FileRaw Frame Data
QVR ProRecording
Engine
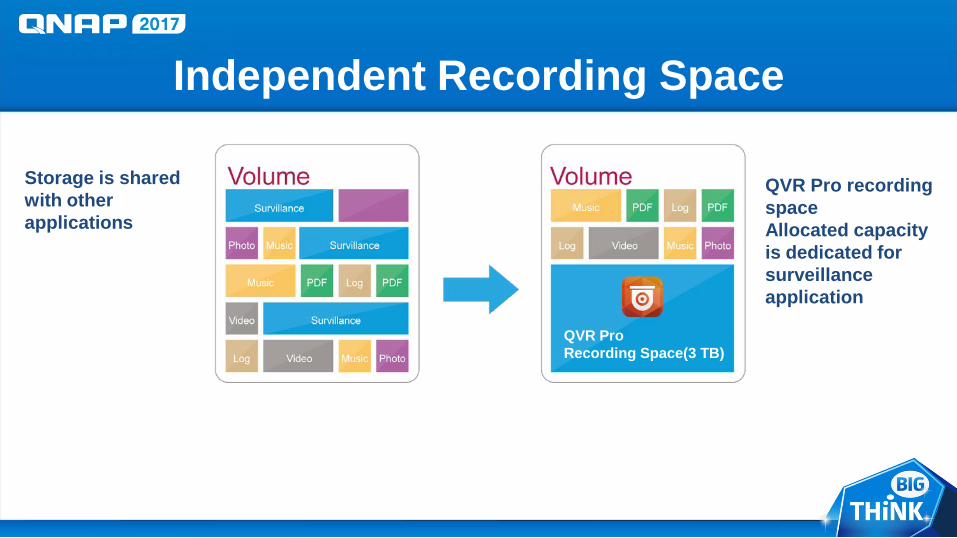
Independent Recording Space
Storage is shared with other applications
QVR Pro recording spaceAllocated capacity is dedicated for surveillance application
QVR ProRecording Space(3 TB)
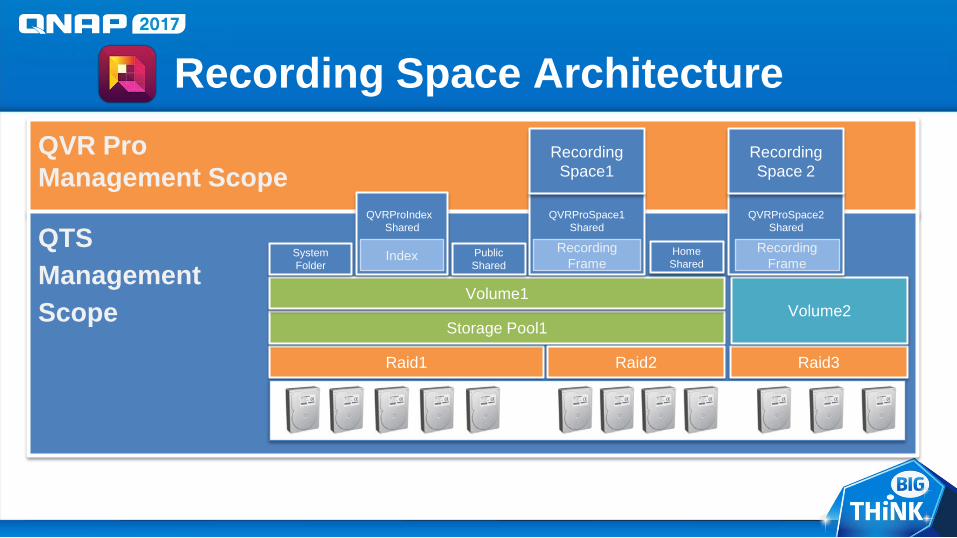
Recording Space ArchitectureQVR Pro Management Scope
QTS Management Scope
Raid1
Storage Pool1
Raid2
Volume1
Raid3
Volume2
QVRProIndexShared
SystemFolder
PublicShared
HomeShared
Index
QVRProSpace1Shared
RecordingFrame
QVRProSpace2Shared
RecordingFrame
Recording Space1
Recording Space 2
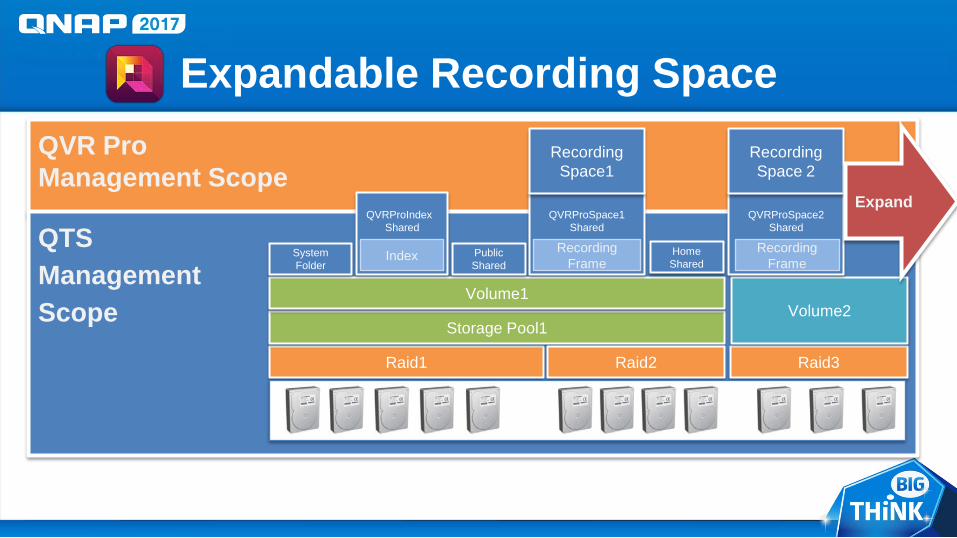
Expandable Recording SpaceQVR Pro Management Scope
QTS Management Scope
Raid1
Storage Pool1
Raid2
Volume1
Raid3
Volume2
QVRProIndexShared
SystemFolder
PublicShared
HomeShared
Index
QVRProSpace1Shared
RecordingFrame
QVRProSpace2Shared
RecordingFrame
Recording Space1
Recording Space 2
Expand
QVR Pro Management Scope
Recording Space Across Multiple VolumesRecording Space1
QTS Management Scope
Raid1
Storage Pool1
Raid2
Volume1
Raid3
Volume2
QVRProIndexShared
SystemFolder
PublicShared
HomeShared
Index
QVRProSpace1Shared
RecordingFrame
QVRProSpace2Shared
RecordingFrame
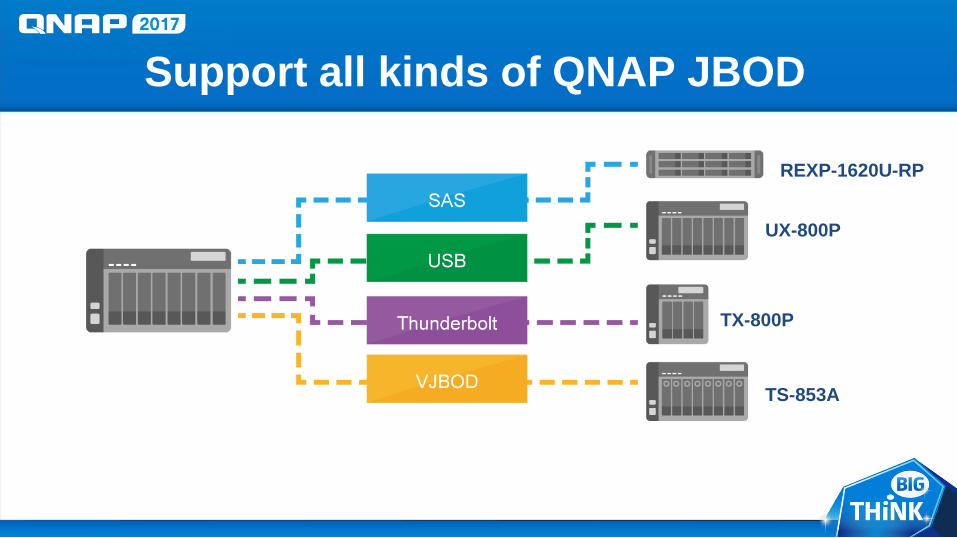
Support all kinds of QNAP JBOD
REXP-1620U-RP
UX-800P
TX-800P
TS-853A
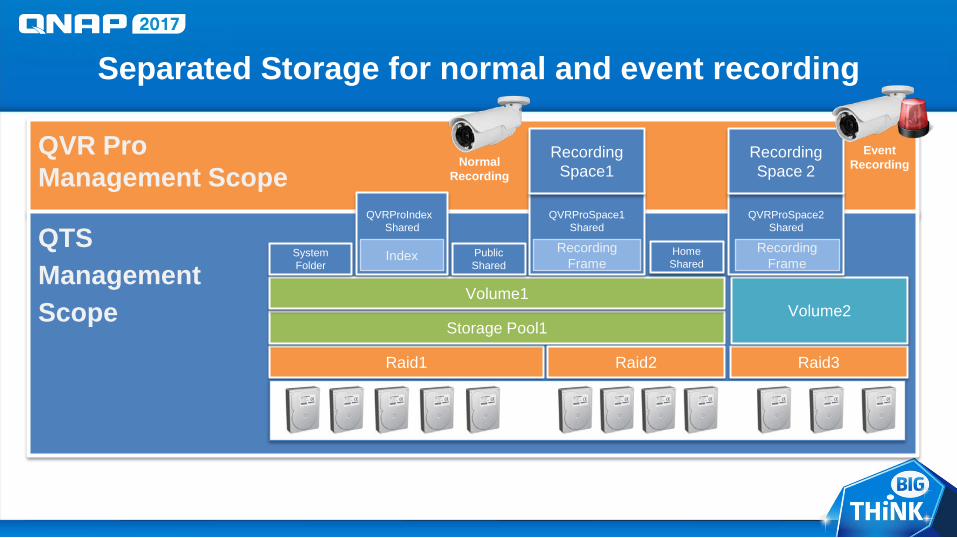
Separated Storage for normal and event recording
QVR Pro Management Scope
QTS Management Scope
Raid1
Storage Pool1
Raid2
Volume1
Raid3
Volume2
QVRProIndexShared
SystemFolder
PublicShared
HomeShared
Index
QVRProSpace1Shared
RecordingFrame
QVRProSpace2Shared
RecordingFrame
Recording Space1
Recording Space 2
Normal Recording
Event Recording
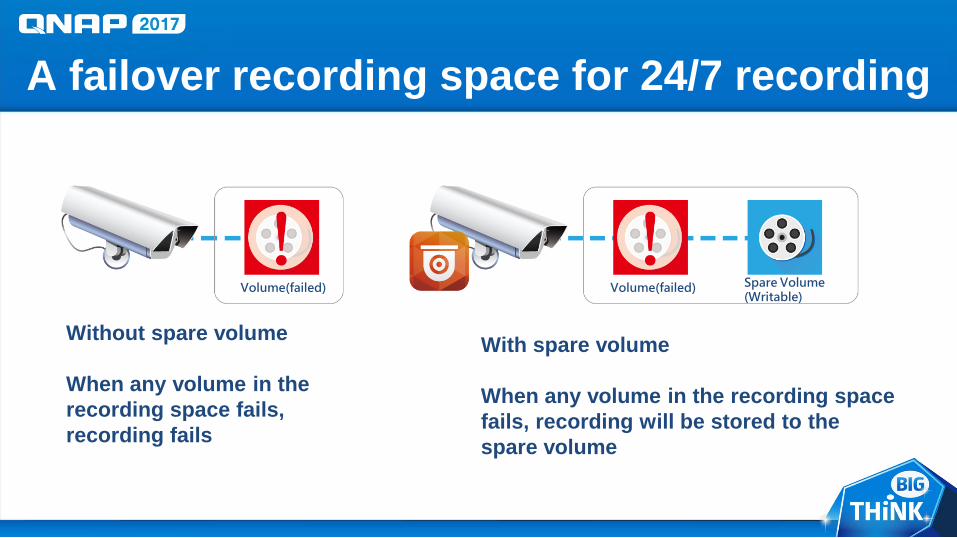
A failover recording space for 24/7 recording
Without spare volume
When any volume in the recording space fails, recording fails
With spare volume
When any volume in the recording space fails, recording will be stored to the spare volume
Volume(failed) Spare Volume (Writable)
Volume(failed)
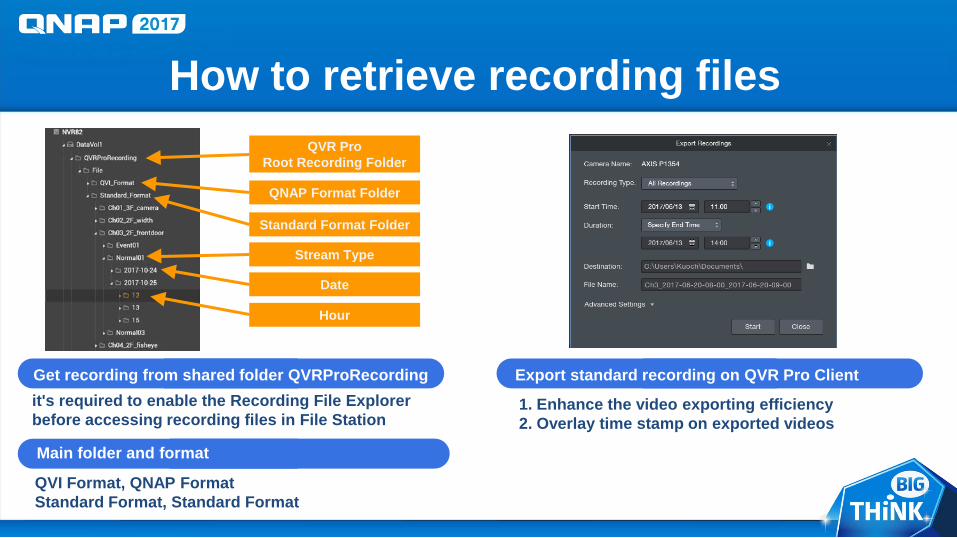
How to retrieve recording files
Get recording from shared folder QVRProRecording Export standard recording on QVR Pro Clientit's required to enable the Recording File Explorer before accessing recording files in File Station
1. Enhance the video exporting efficiency2. Overlay time stamp on exported videos
QVI Format, QNAP FormatStandard Format, Standard Format
Main folder and format
QVR ProRoot Recording Folder
QNAP Format Folder
Standard Format Folder
Stream Type
Date
Hour
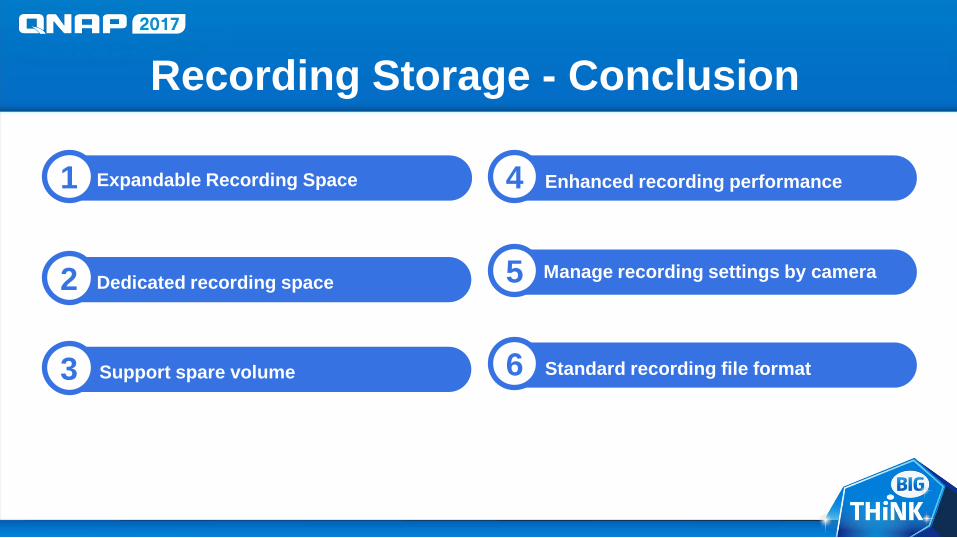
Recording Storage - Conclusion
1 Expandable Recording Space
2 Dedicated recording space
3 Support spare volume
4 Enhanced recording performance
5 Manage recording settings by camera
6 Standard recording file format

Thank you


![VioStor QVR 5 - QNAPeu1.qnap.com/Surveillance/presentation/[QNAP]Presentation_QVR 5.1.0_ENG... · 01/07/2015 · Vmobile 3.1 Live view, playback and event notifications Brand new](https://img.pdfslide.net/doc/110x75/5e7c1134cb122944bf248bb2/viostor-qvr-5-qnappresentationqvr-510eng-01072015-vmobile-31-live.jpg)