Embed Size (px)
Citation preview
RA TRAINING GUIDE
Copying
Printing
Scanning
Troubleshooting Tips
Digital Storefront Online Ordering Process
DON’T GET CAUGHT IN JAM!
TTrryy tthheessee hheellppffuull ttiippss ttoo aavvooiidd ppaappeerr mmiissffeeeeddss::
oo LLooaadd aa ffuullll rreeaamm ooff ppaappeerr o When paper sits out, it is exposed to moisture in the
air and tends to curl. This damp, curled paper can increase the number of misfeeds you experience. Load a full ream of paper whenever possible to avoid this inconvenience
oo SSoommeettiimmeess nneeww ppaappeerr ccaann hheellpp o If paper sits in your paper drawers for too long, it
too is exposed to moisture in the air. If you’re experiencing misfeeds, try loading fresh paper
oo FFaann yyoouurr ppaappeerr bbeeffoorree llooaaddiinngg o Fanning your paper before loading helps to separate
the pages, which can help to reduce the number of misfeeds you experience
oo DDoonn’’tt TTuurrnn tthhaatt DDiiaall!! o Each paper drawer has a dial that tells that machine
what size paper is loaded. It’s easy to accidentally knock that dial when loading paper. If your machine is jamming, check the dial to make sure that it is aligned with the appropriate size paper.
TROUBLESHOOTING
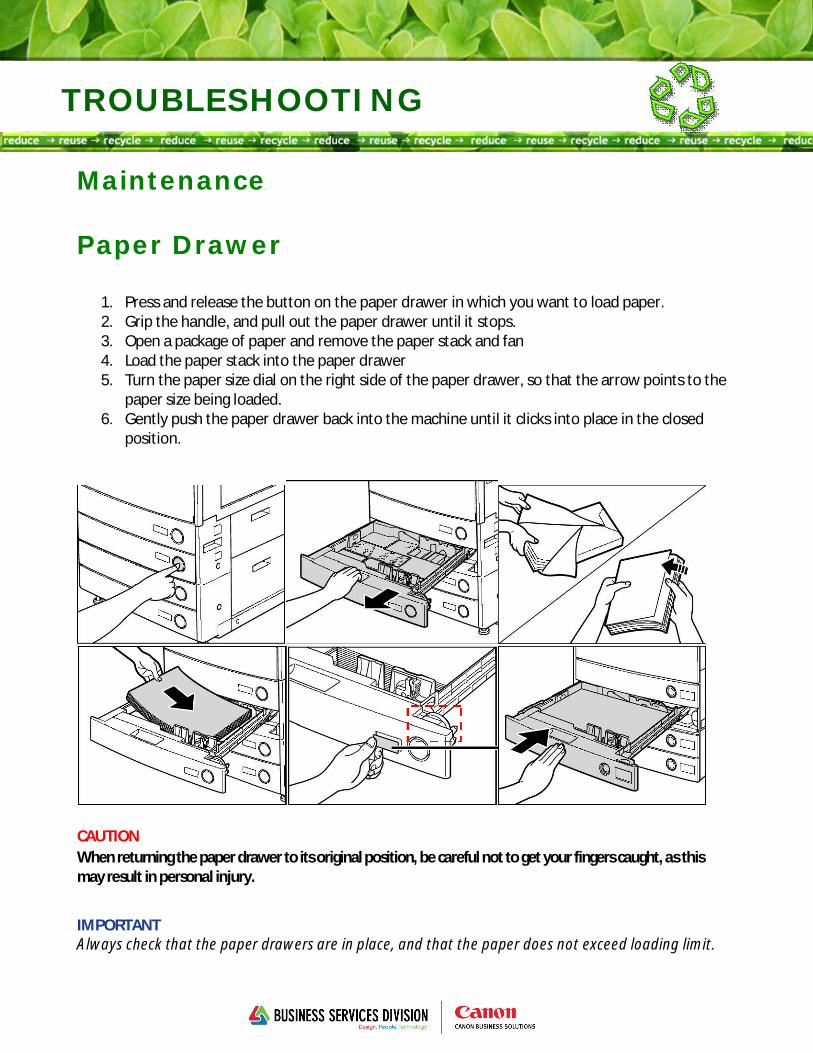
Maintenance Paper Drawer
1. Press and release the button on the paper drawer in which you want to load paper. 2. Grip the handle, and pull out the paper drawer until it stops. 3. Open a package of paper and remove the paper stack and fan 4. Load the paper stack into the paper drawer 5. Turn the paper size dial on the right side of the paper drawer, so that the arrow points to the
paper size being loaded. 6. Gently push the paper drawer back into the machine until it clicks into place in the closed
position.
CAUTION When returning the paper drawer to its original position, be careful not to get your fingers caught, as this may result in personal injury.
IMPORTANT Always check that the paper drawers are in place, and that the paper does not exceed loading limit.
TROUBLESHOOTING
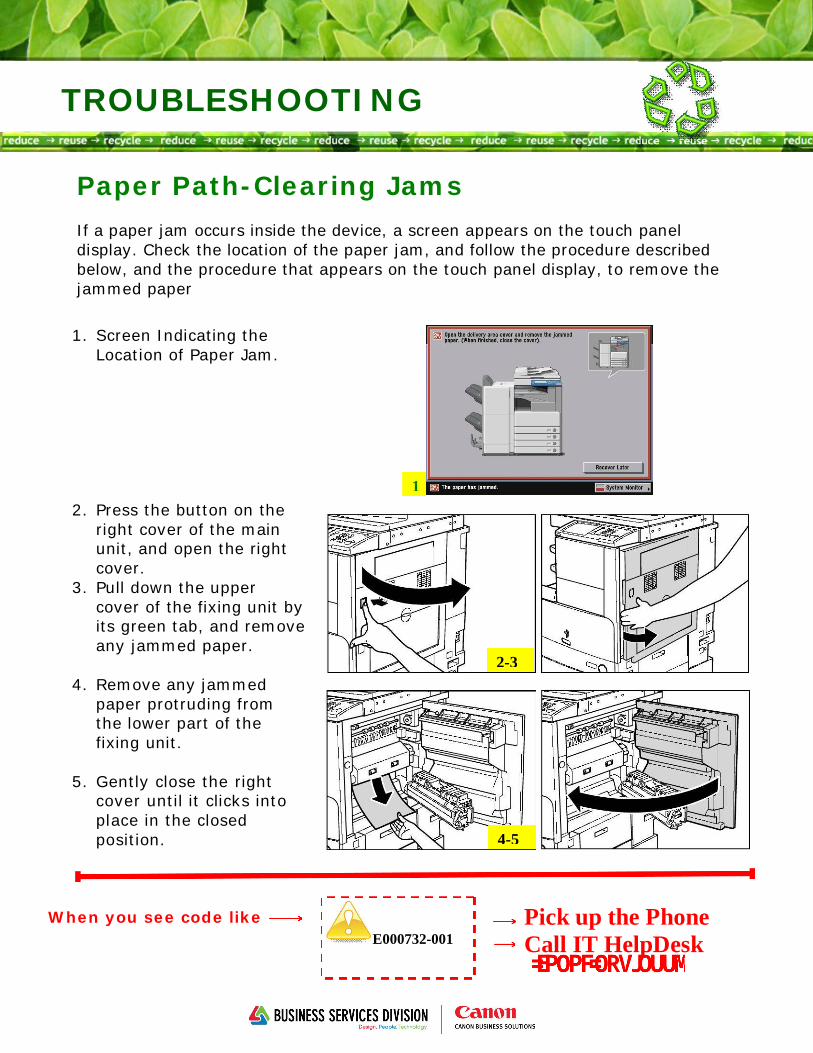
Paper Path-Clearing Jams If a paper jam occurs inside the device, a screen appears on the touch panel display. Check the location of the paper jam, and follow the procedure described below, and the procedure that appears on the touch panel display, to remove the jammed paper .
.
1. Screen Indicating the Location of Paper Jam.
2. Press the button on the
right cover of the main unit, and open the right cover.
3. Pull down the upper cover of the fixing unit by its green tab, and remove any jammed paper.
4. Remove any jammed
paper protruding from the lower part of the fixing unit.
5. Gently close the right
cover until it clicks into place in the closed position.
When you see code like
E000732-001
1
2-3
4-5
Pick up the Phone Call IT HelpDesk
SCAN IF YOU CAN
SCAN AND SEND... From the MFD scan and email your documents rather than making copy sets for distribution! You’ll save paper, money and storage space! To enable this function select the SEND button on control panel.
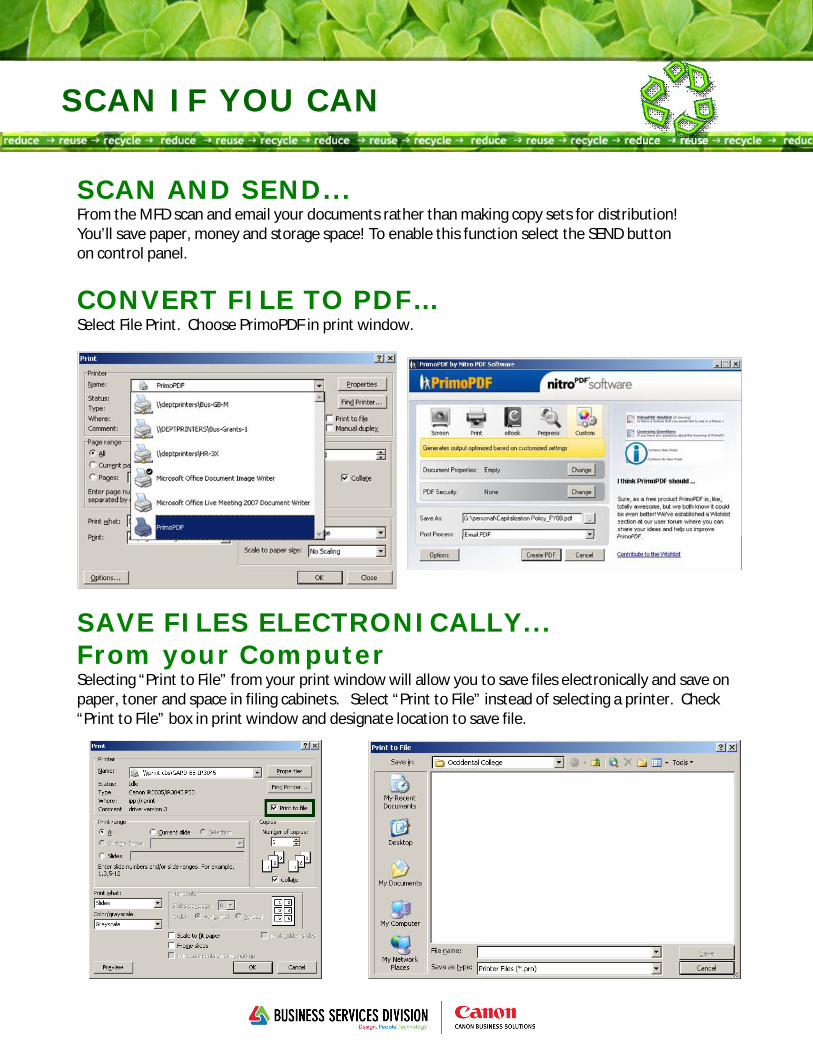
CONVERT FILE TO PDF… Select File Print. Choose PrimoPDF in print window.
SAVE FILES ELECTRONICALLY... From your Computer Selecting “Print to File” from your print window will allow you to save files electronically and save on paper, toner and space in filing cabinets. Select “Print to File” instead of selecting a printer. Check “Print to File” box in print window and designate location to save file.
PRINTING TIPS
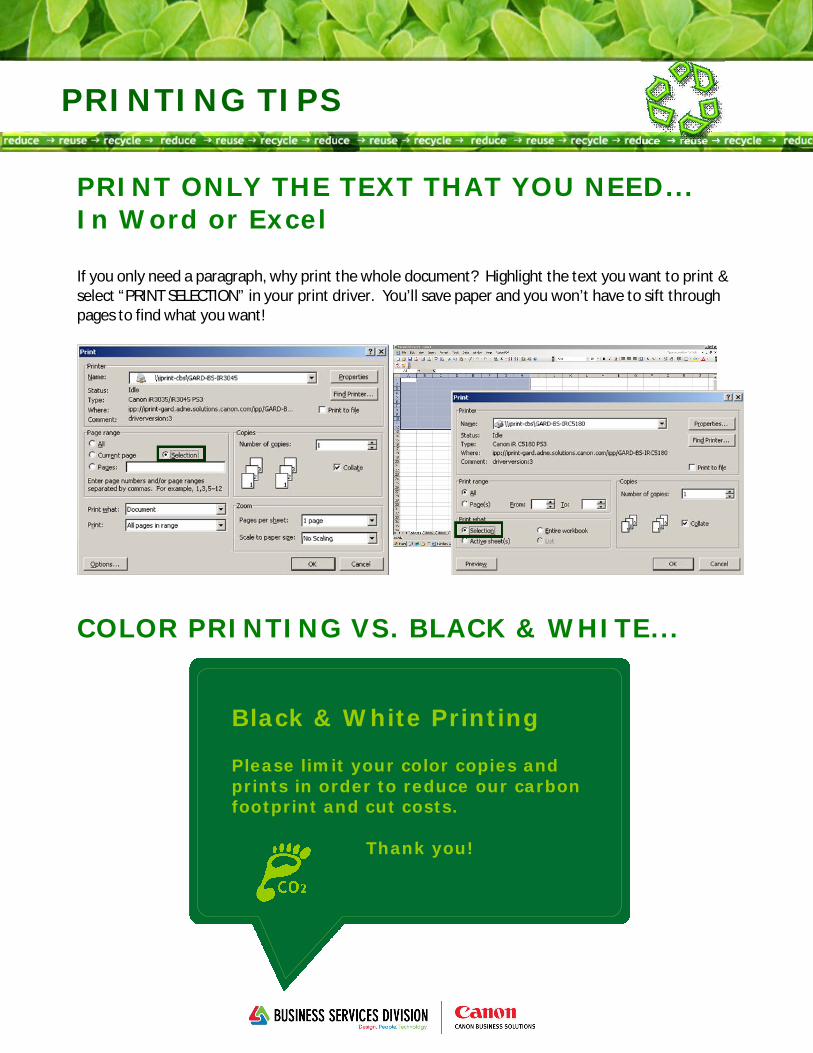
PRINT ONLY THE TEXT THAT YOU NEED... In Word or Excel If you only need a paragraph, why print the whole document? Highlight the text you want to print & select “PRINT SELECTION” in your print driver. You’ll save paper and you won’t have to sift through pages to find what you want!
COLOR PRINTING VS. BLACK & WHITE...
Black & White Printing
Please limit your color copies and prints in order to reduce our carbon footprint and cut costs.
Thank you!
COPYING & PRINTING
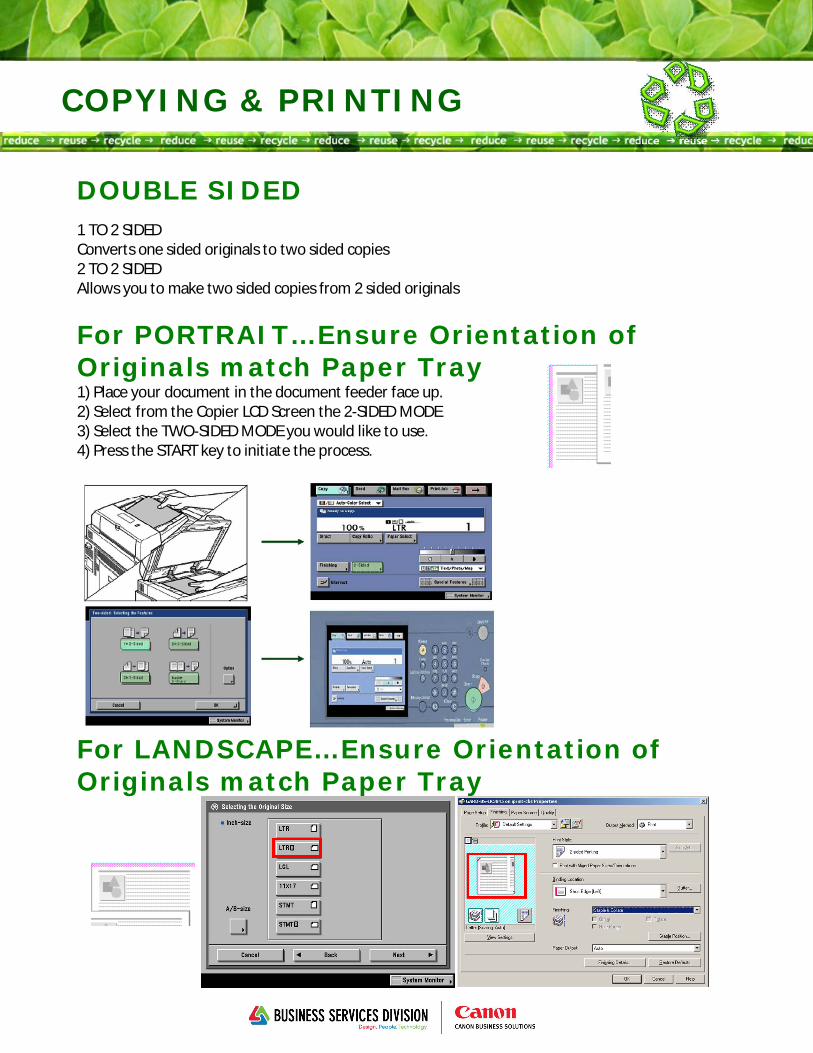
DOUBLE SIDED 1 TO 2 SIDED Converts one sided originals to two sided copies 2 TO 2 SIDED Allows you to make two sided copies from 2 sided originals
For PORTRAIT…Ensure Orientation of Originals match Paper Tray 1) Place your document in the document feeder face up. 2) Select from the Copier LCD Screen the 2-SIDED MODE 3) Select the TWO-SIDED MODE you would like to use. 4) Press the START key to initiate the process.
For LANDSCAPE…Ensure Orientation of Originals match Paper Tray
SECURE PRINT
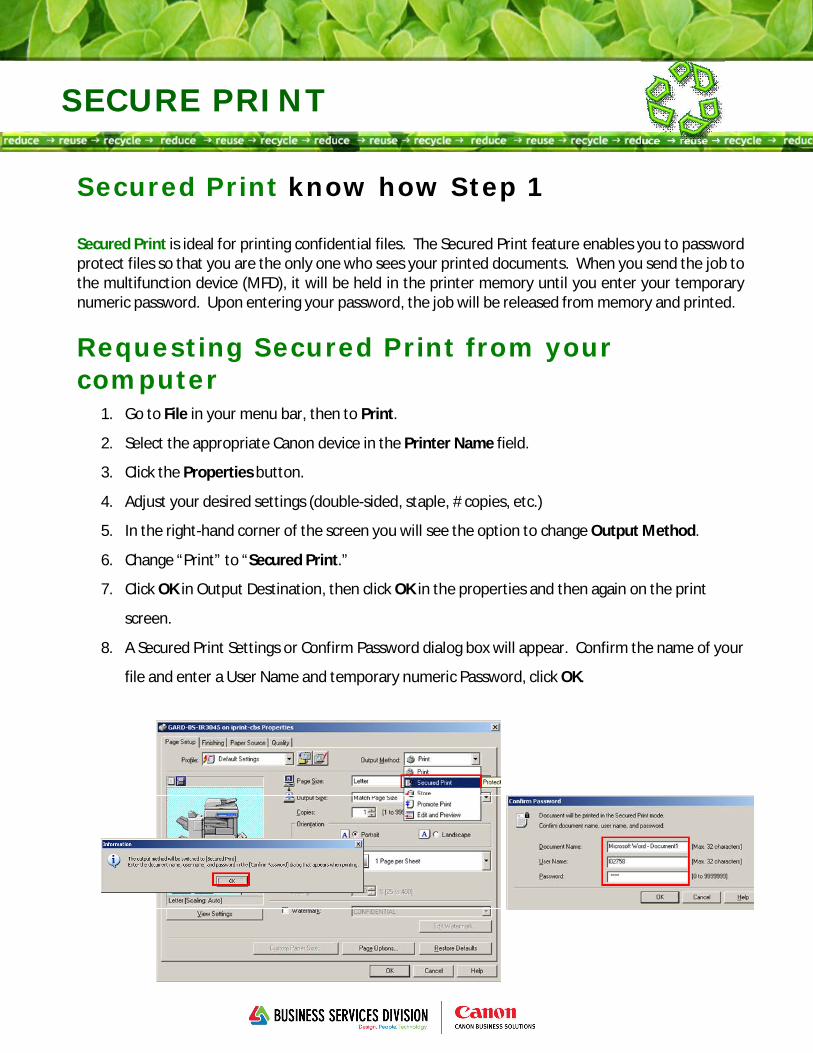
Secured Print know how Step 1 Secured Print is ideal for printing confidential files. The Secured Print feature enables you to password protect files so that you are the only one who sees your printed documents. When you send the job to the multifunction device (MFD), it will be held in the printer memory until you enter your temporary numeric password. Upon entering your password, the job will be released from memory and printed.
Requesting Secured Print from your computer
1. Go to File in your menu bar, then to Print.
2. Select the appropriate Canon device in the Printer Name field.
3. Click the Properties button.
4. Adjust your desired settings (double-sided, staple, # copies, etc.)
5. In the right-hand corner of the screen you will see the option to change Output Method.
6. Change “Print” to “Secured Print.”
7. Click OK in Output Destination, then click OK in the properties and then again on the print
screen.
8. A Secured Print Settings or Confirm Password dialog box will appear. Confirm the name of your
file and enter a User Name and temporary numeric Password, click OK.
SECURE PRINT continued
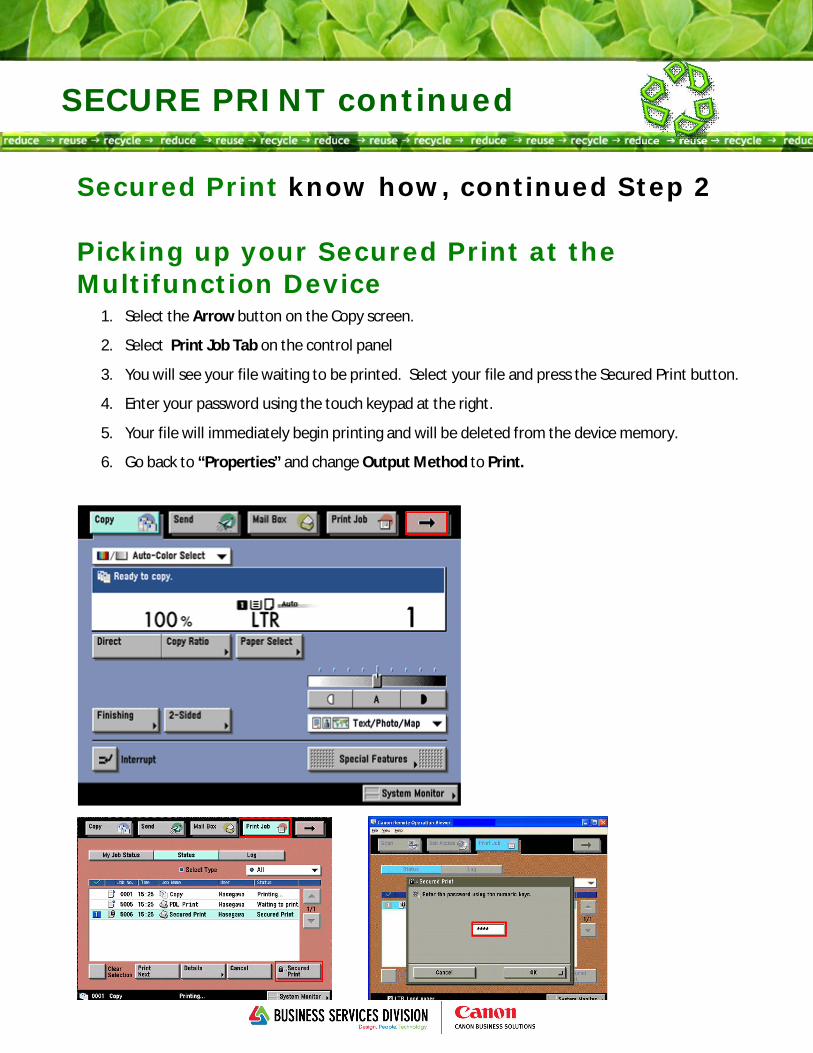
Secured Print know how, continued Step 2 Picking up your Secured Print at the Multifunction Device
1. Select the Arrow button on the Copy screen.
2. Select Print Job Tab on the control panel
3. You will see your file waiting to be printed. Select your file and press the Secured Print button.
4. Enter your password using the touch keypad at the right.
5. Your file will immediately begin printing and will be deleted from the device memory.
6. Go back to “Properties” and change Output Method to Print.
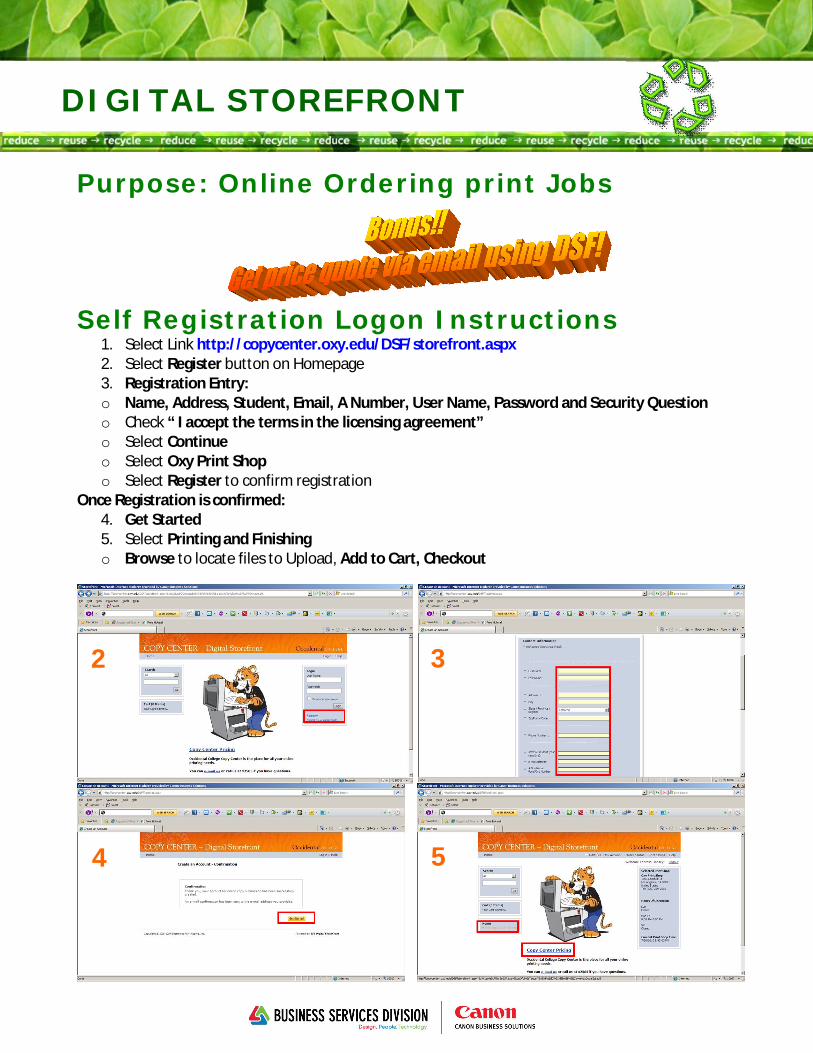
DIGITAL STOREFRONT
Purpose: Online Ordering print Jobs
Self Registration Logon Instructions
1. Select Link http://copycenter.oxy.edu/DSF/storefront.aspx 2. Select Register button on Homepage 3. Registration Entry: o Name, Address, Student, Email, A Number, User Name, Password and Security Question o Check “ I accept the terms in the licensing agreement” o Select Continue o Select Oxy Print Shop o Select Register to confirm registration
Once Registration is confirmed: 4. Get Started 5. Select Printing and Finishing o Browse to locate files to Upload, Add to Cart, Checkout
2 3
4 5
7/2010
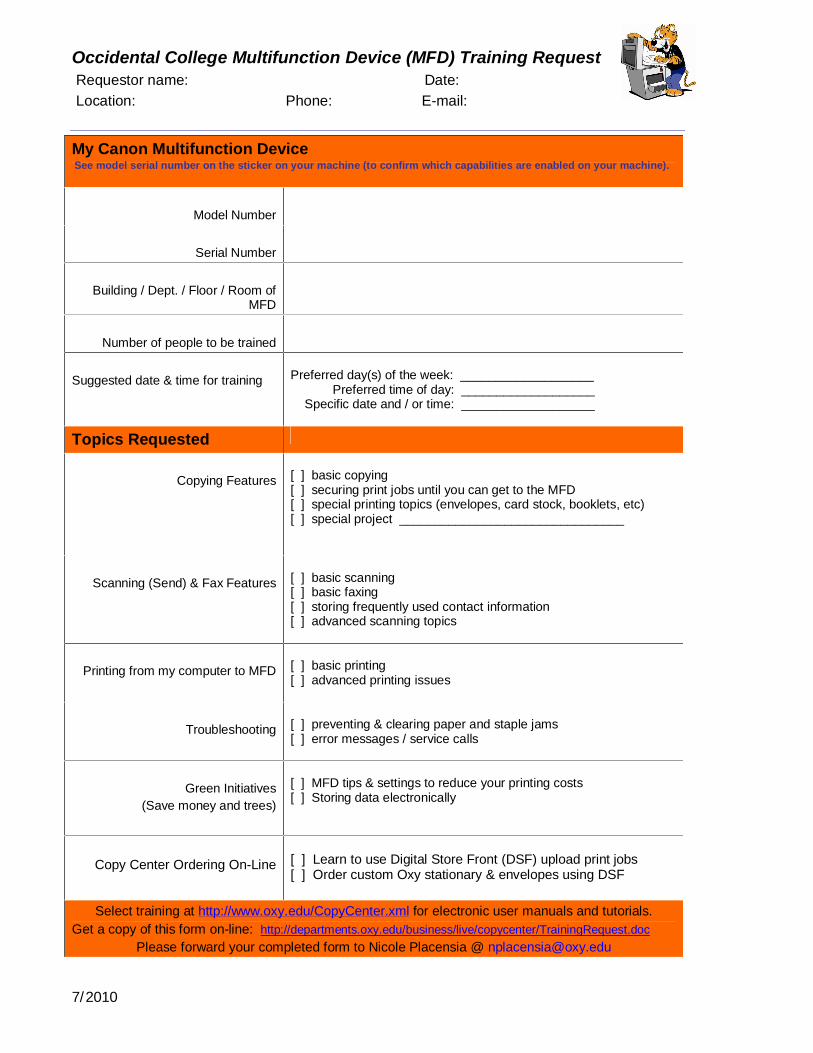
Occidental College Multifunction Device (MFD) Training Request Requestor name: Date: Location: Phone: E-mail:
My Canon Multifunction Device See model serial number on the sticker on your machine (to confirm which capabilities are enabled on your machine).
Model Number
Serial Number
Building / Dept. / Floor / Room of
MFD
Number of people to be trained
Suggested date & time for training
Preferred day(s) of the week: ___________________ Preferred time of day: ___________________ Specific date and / or time: ___________________
Topics Requested
Copying Features
[ ] basic copying [ ] securing print jobs until you can get to the MFD [ ] special printing topics (envelopes, card stock, booklets, etc) [ ] special project ________________________________
Scanning (Send) & Fax Features
[ ] basic scanning [ ] basic faxing [ ] storing frequently used contact information [ ] advanced scanning topics
Printing from my computer to MFD
[ ] basic printing [ ] advanced printing issues
Troubleshooting
[ ] preventing & clearing paper and staple jams [ ] error messages / service calls
Green Initiatives
(Save money and trees)
[ ] MFD tips & settings to reduce your printing costs [ ] Storing data electronically
Copy Center Ordering On-Line
[ ] Learn to use Digital Store Front (DSF) upload print jobs [ ] Order custom Oxy stationary & envelopes using DSF
Select training at http://www.oxy.edu/CopyCenter.xml for electronic user manuals and tutorials. Get a copy of this form on-line: http://departments.oxy.edu/business/live/copycenter/TrainingRequest.doc
Please forward your completed form to Nicole Placensia @ [email protected]
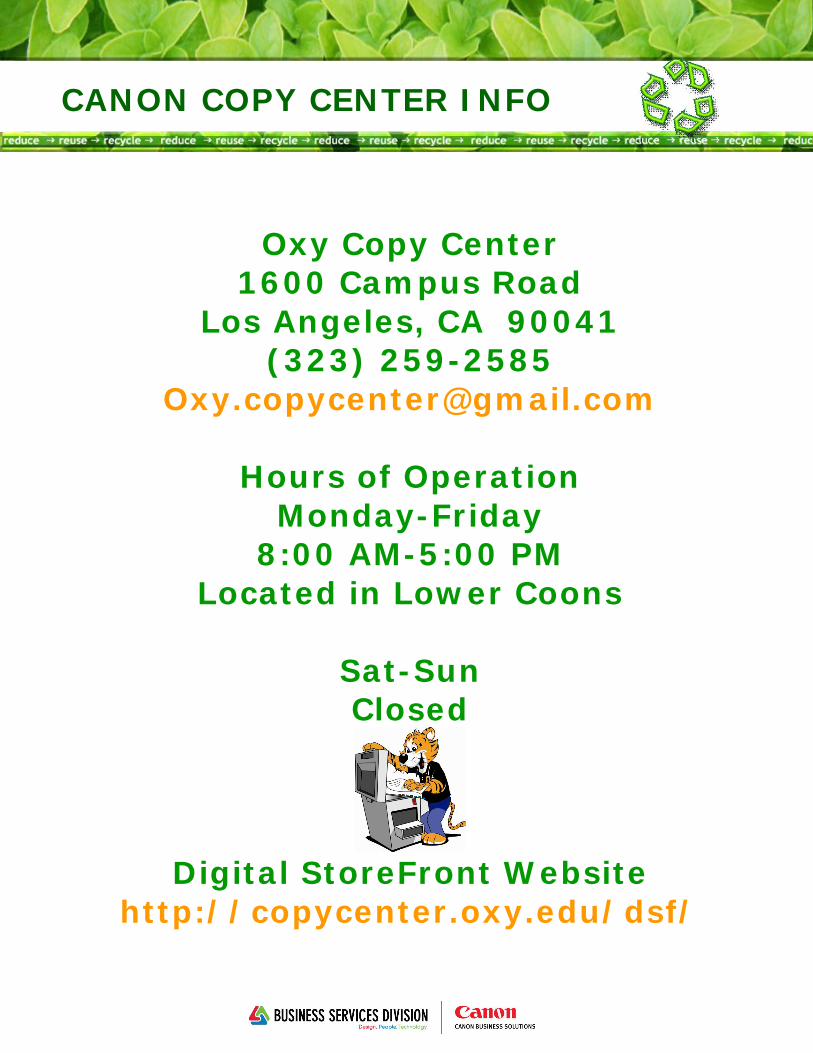
CANON COPY CENTER INFO
Oxy Copy Center
1600 Campus Road Los Angeles, CA 90041
(323) 259-2585 [email protected]
Hours of Operation
Monday-Friday 8:00 AM-5:00 PM
Located in Lower Coons
Sat-Sun Closed
Digital StoreFront Website
http://copycenter.oxy.edu/dsf/


![Computational methods to study jammed systems · Computational methods to study jammed systems ... static packings of granular materi-als [6], and quiescent foams [7] ... SFK/UKS](https://img.pdfslide.net/doc/110x75/5c80028b09d3f293438c4556/computational-methods-to-study-jammed-systems-computational-methods-to-study.jpg)