Embed Size (px)
Citation preview

Rally Installation Guide Rally On-Premises release 2015.2
[email protected] www.rallydev.com
Version 2015.2
2
Table of Contents Overview .................................................................................................................................................... 3
Server requirements .................................................................................................................... 3
Browser requirements ................................................................................................................ 3
Access help and WSAPI ............................................................................................................... 4
Time zone ......................................................................................................................................... 5
Architectural overview …………………………………………………………………………………5 Install Rally ................................................................................................................................................ 7
Rally Control Panel .............................................................................................................................. 10
Rally Monitoring Service ................................................................................................................... 11
System diagram ........................................................................................................................... 11
Server requirements ................................................................................................................. 12
Browser requirements ............................................................................................................. 12
Installation and configuration ............................................................................................... 13
Install Rally On-Premises Monitoring VM ........................................................................ 13
Configure your network information ................................................................................. 14
Configure Rally On-Premises for monitoring from the Control Panel ................... 15
Documentation ............................................................................................................................ 16
Snapshot ........................................................................................................................................ 16
Support ........................................................................................................................................... 16
Upgrade to a new version of Rally ................................................................................................. 16
Boot a new version in parallel with old version (recommended)........................... 17
Shutdown the old version, then boot up the new version .......................................... 17
Troubleshooting tips .......................................................................................................................... 17

Rally On-Premises Administrator Guide
3 ©2015 Rally Software Development Corp.
Overview
Your Rally subscription for Agile Software Lifecycle Management can be
deployed on your company's own premises. In this case, Rally is installed on
your own server within your company’s IT infrastructure.
Rally uses VMware® software to create a self-contained environment that
includes its own virtual hardware, operating system, application servers,
application software, and database management system. Once installed, Rally is
accessible through your local intranet or virtual private network (VPN).
The Rally On-Premises Administration Guide includes the following topics:
Install Rally
Rally Monitoring Service
Upgrade Rally
Troubleshooting tips
Server requirements
On-Premises base requirements:
VMWare platform with 64-bit support, including ESX 3.5.x and ESX
4.0 (vSphere)
64-bit capable processors with hardware virtualization (Intel® VT-d,
AMD AMD-V)
See the complete checklist for 64-bit guest support
At least 8.0 GB of RAM for Rally’s use (or at least 8 GB RAM for a
server dedicated to Rally)
o Rally recommends 8–12 GB of RAM for improved performance
for subscriptions that may serve a higher volume of requests
150 GB of disk space for Rally’s VMware image
A DVD-ROM drive or network access to a server with a DVD-ROM
drive (if you received the VMware image on a DVD disk)
Two CPUs
Browser requirements
Rally is committed to making our software easily accessible. You can access
the Rally Application or Control Panel wherever you have a connection to your
On-Premises server through a PC, Linux, or Macintosh computer.
4
However, it is neither possible nor practical for us to support every operating
system and browser combination that is available. To take advantage of the
newest Rally features, we recommend that you use one of the following fully
supported browsers:
Firefox
Chrome
Safari
Internet Explorer*
We support the two latest versions of each of these browsers. We do not
recommend using development, test, or beta versions of these web browsers.
Versions that are not publicly released may not work properly with the Rally
application. We recommend using the latest production-level versions of these
browsers. In particular, we strongly suggest using Chrome or Firefox.
Regardless of the browser you choose, you must enable cookies and JavaScript.
Note: Internet Explorer – Currently, we support Internet Explorer 9, 10, and 11. Rally no longer supports Internet Explorer 6, 7, or 8.
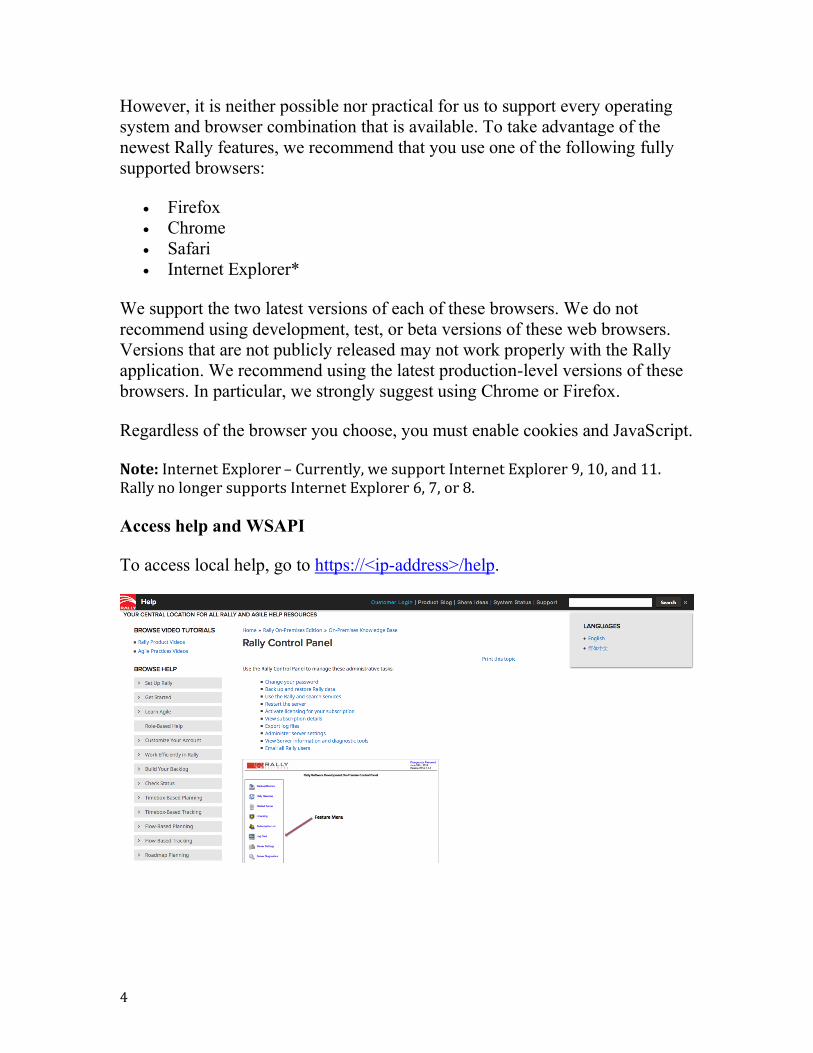
Access help and WSAPI
To access local help, go to https://<ip-address>/help.
Rally On-Premises Administrator Guide
5 ©2015 Rally Software Development Corp.
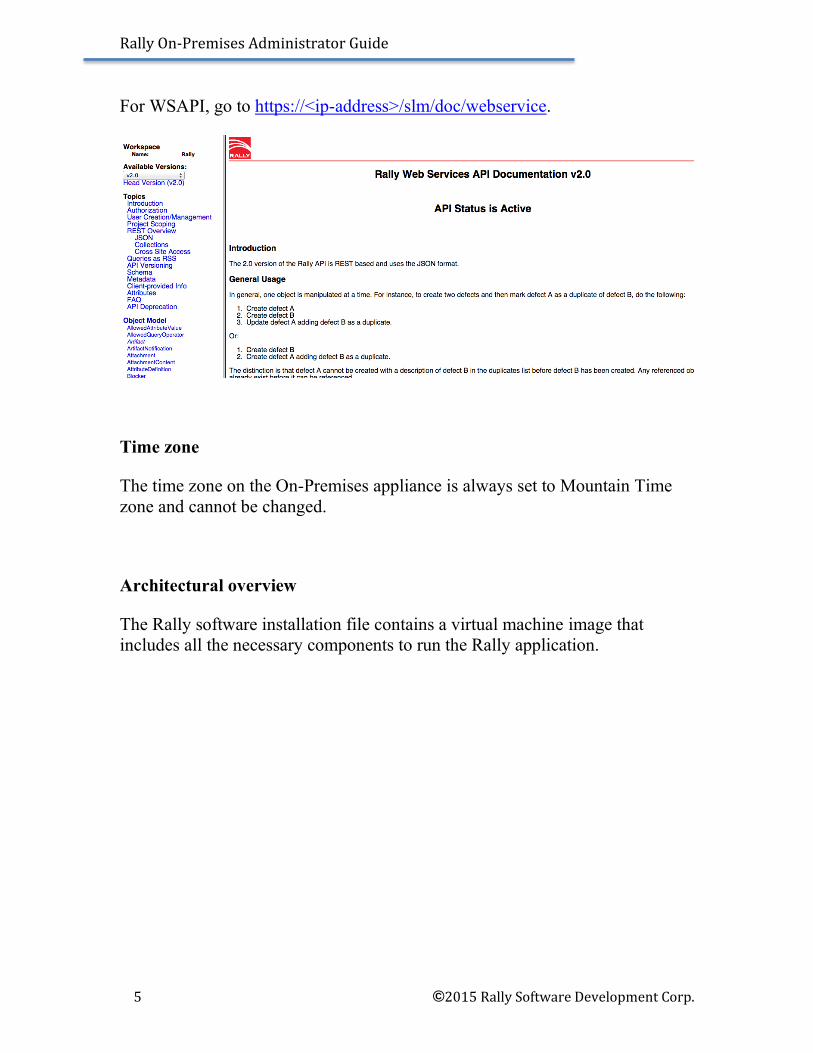
For WSAPI, go to https://<ip-address>/slm/doc/webservice.
Time zone
The time zone on the On-Premises appliance is always set to Mountain Time
zone and cannot be changed.
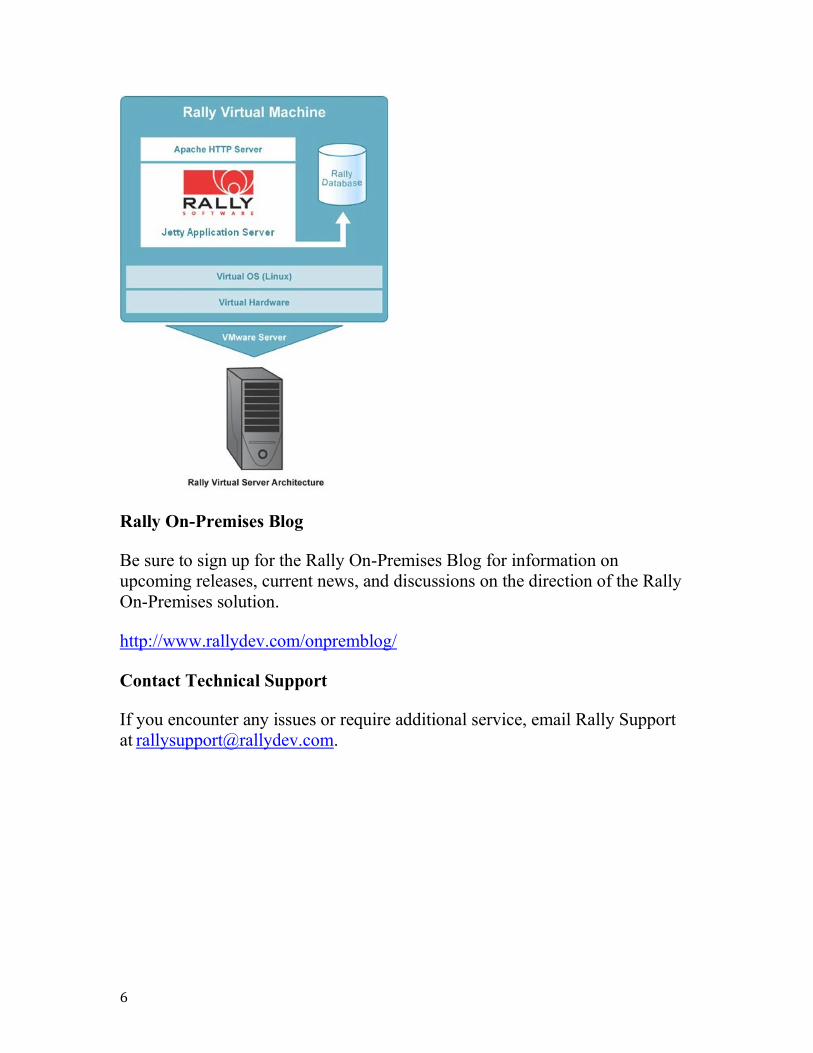
Architectural overview
The Rally software installation file contains a virtual machine image that
includes all the necessary components to run the Rally application.
6
Rally On-Premises Blog
Be sure to sign up for the Rally On-Premises Blog for information on
upcoming releases, current news, and discussions on the direction of the Rally
On-Premises solution.
http://www.rallydev.com/onpremblog/
Contact Technical Support
If you encounter any issues or require additional service, email Rally Support
Rally On-Premises Administrator Guide
7 ©2015 Rally Software Development Corp.
Install Rally
These instructions will guide you through the process of installing the Rally
virtual machine and the Rally On-Premises application:
1. Ensure that VMware Server software is properly installed on your
machine. Download the free version of the VMware ESX server.
2. Extract the Rally software to a location that can be accessed from the
VMware Client Console:
a. Insert the Rally software DVD in the DVD-ROM drive.
b. Copy the Rally On-Premises [Version].zip from the DVD to a
directory on your server.
c. Unzip the Rally On-Premises [Version].zip.
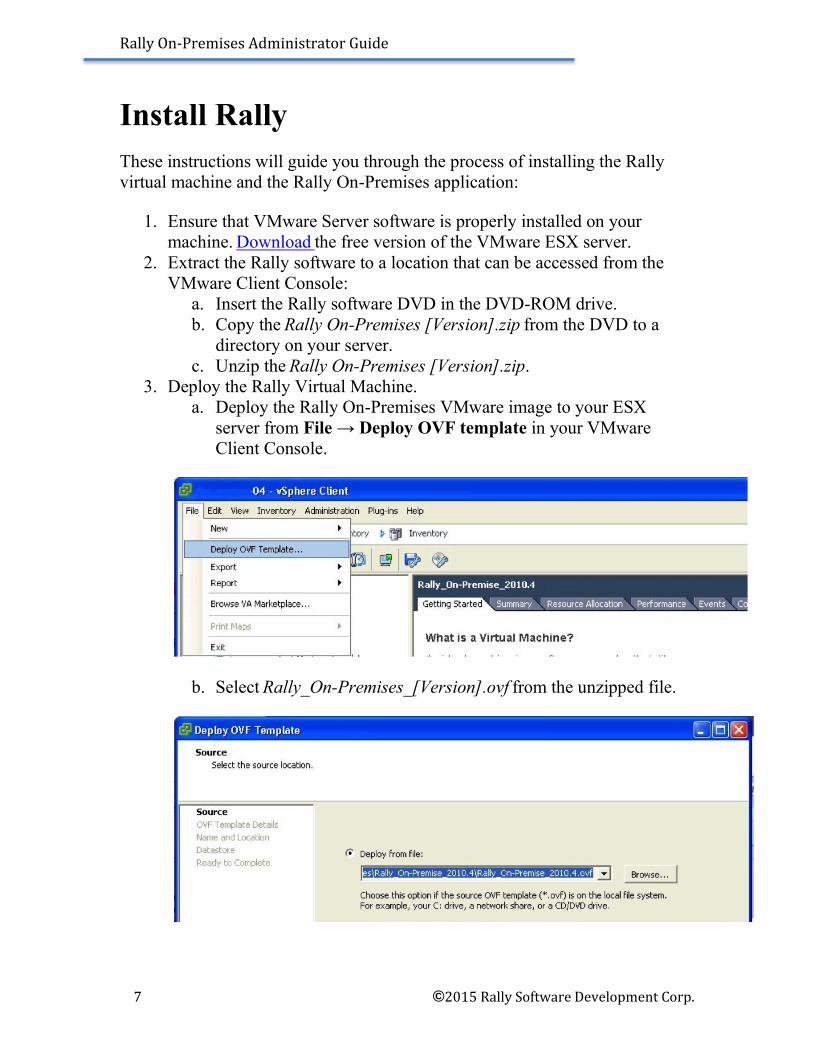
3. Deploy the Rally Virtual Machine.
a. Deploy the Rally On-Premises VMware image to your ESX
server from File → Deploy OVF template in your VMware
Client Console.
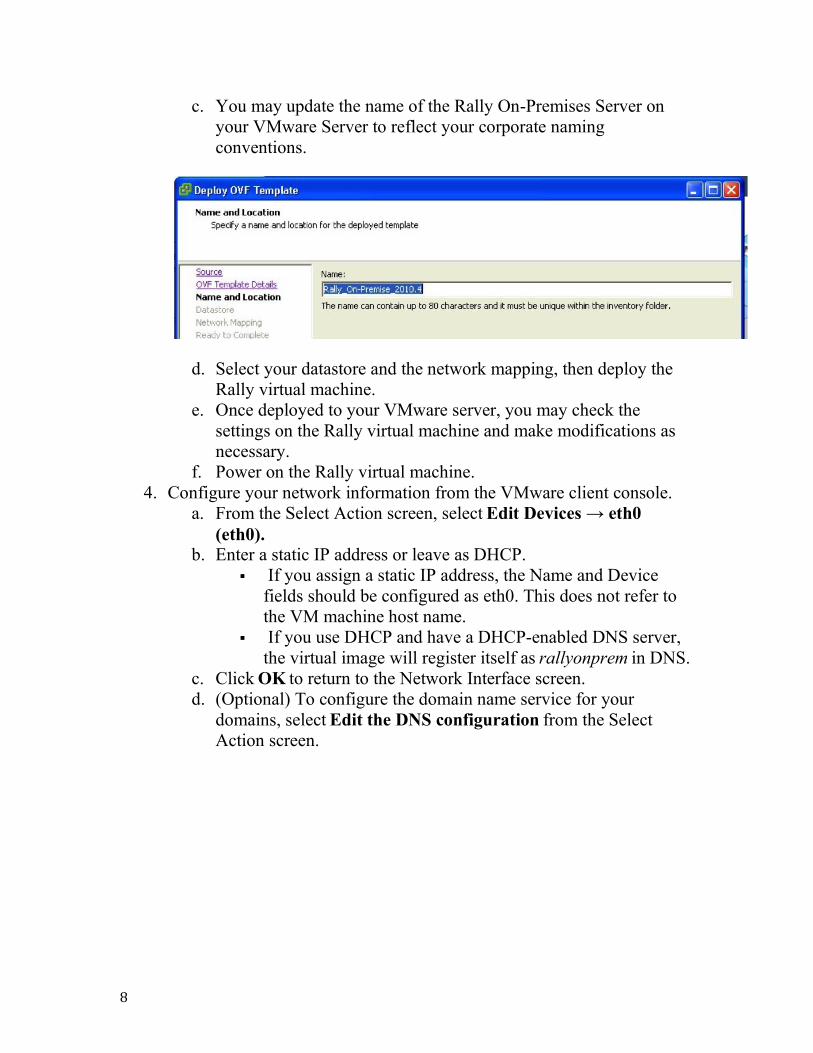
b. Select Rally_On-Premises_[Version].ovf from the unzipped file.
8
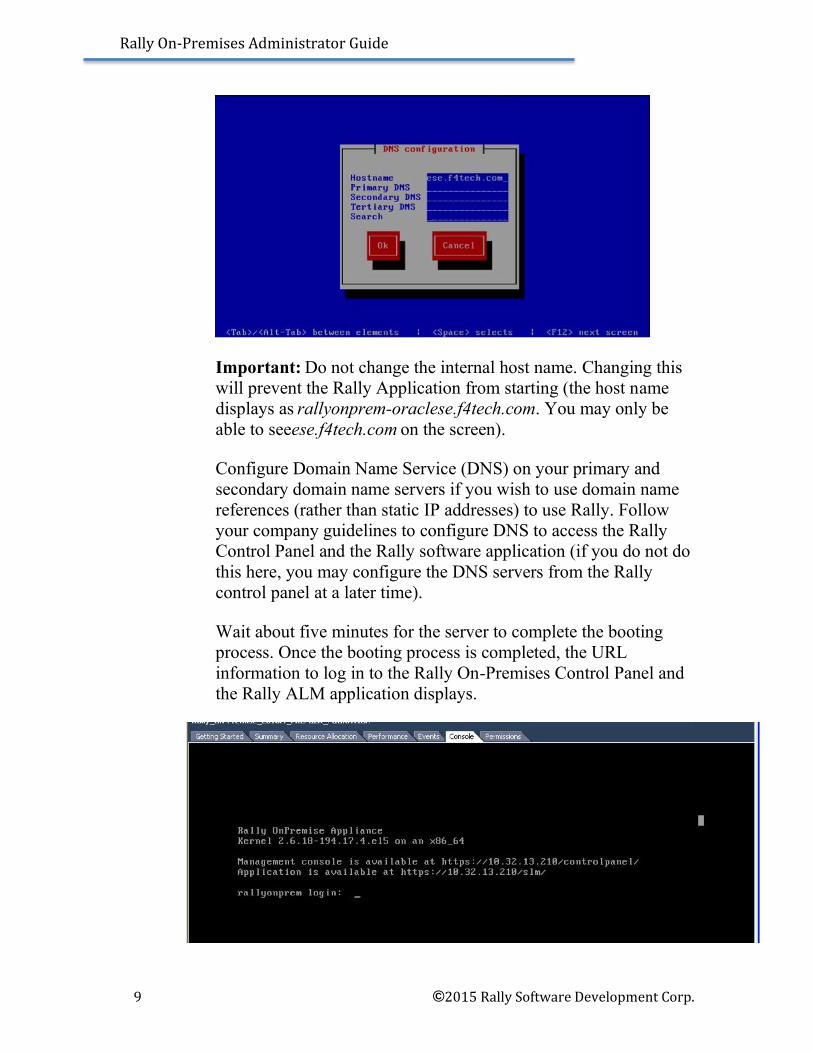
c. You may update the name of the Rally On-Premises Server on
your VMware Server to reflect your corporate naming
conventions.
d. Select your datastore and the network mapping, then deploy the
Rally virtual machine.
e. Once deployed to your VMware server, you may check the
settings on the Rally virtual machine and make modifications as
necessary.
f. Power on the Rally virtual machine.
4. Configure your network information from the VMware client console.
a. From the Select Action screen, select Edit Devices → eth0
(eth0). b. Enter a static IP address or leave as DHCP.
If you assign a static IP address, the Name and Device
fields should be configured as eth0. This does not refer to
the VM machine host name.
If you use DHCP and have a DHCP-enabled DNS server,
the virtual image will register itself as rallyonprem in DNS.
c. Click OK to return to the Network Interface screen.
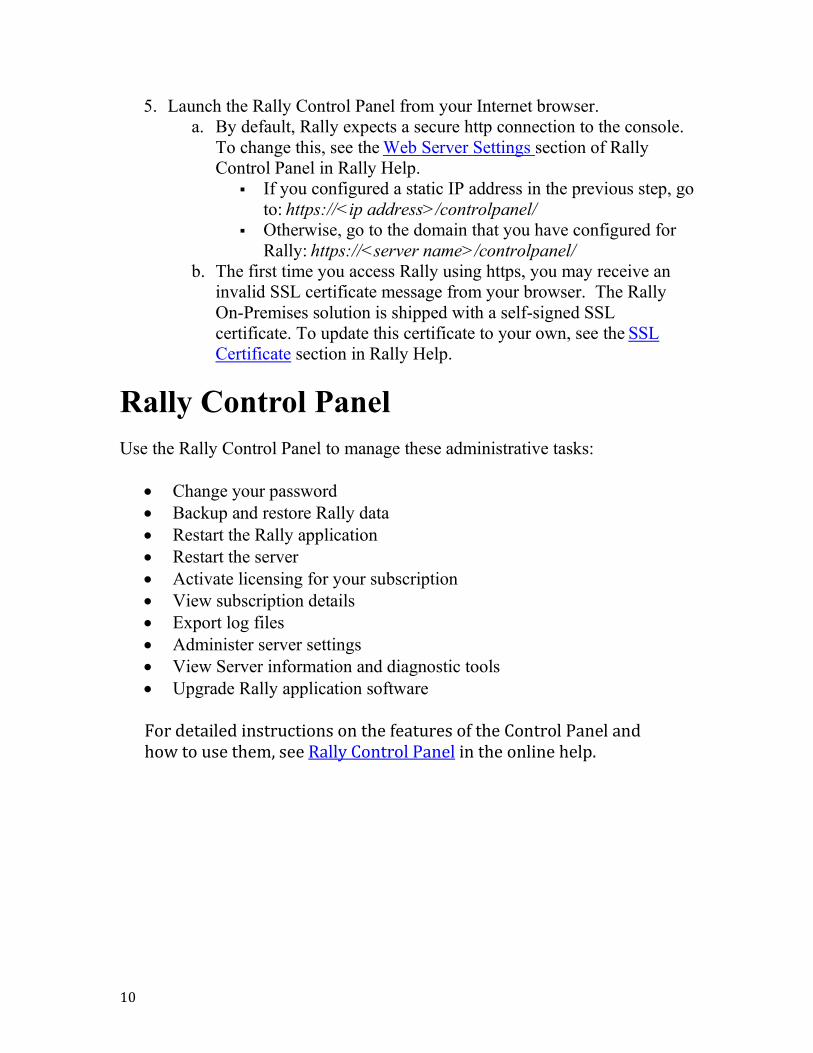
d. (Optional) To configure the domain name service for your
domains, select Edit the DNS configuration from the Select
Action screen.
Rally On-Premises Administrator Guide
9 ©2015 Rally Software Development Corp.
Important: Do not change the internal host name. Changing this
will prevent the Rally Application from starting (the host name
displays as rallyonprem-oraclese.f4tech.com. You may only be
able to seeese.f4tech.com on the screen).
Configure Domain Name Service (DNS) on your primary and
secondary domain name servers if you wish to use domain name
references (rather than static IP addresses) to use Rally. Follow
your company guidelines to configure DNS to access the Rally
Control Panel and the Rally software application (if you do not do
this here, you may configure the DNS servers from the Rally
control panel at a later time).
Wait about five minutes for the server to complete the booting
process. Once the booting process is completed, the URL
information to log in to the Rally On-Premises Control Panel and
the Rally ALM application displays.
10
5. Launch the Rally Control Panel from your Internet browser.
a. By default, Rally expects a secure http connection to the console.
To change this, see the Web Server Settings section of Rally
Control Panel in Rally Help.
If you configured a static IP address in the previous step, go
to: https://<ip address>/controlpanel/
Otherwise, go to the domain that you have configured for
Rally: https://<server name>/controlpanel/
b. The first time you access Rally using https, you may receive an
invalid SSL certificate message from your browser. The Rally
On-Premises solution is shipped with a self-signed SSL
certificate. To update this certificate to your own, see the SSL
Certificate section in Rally Help.
Rally Control Panel
Use the Rally Control Panel to manage these administrative tasks:
Change your password
Backup and restore Rally data
Restart the Rally application
Restart the server
Activate licensing for your subscription
View subscription details
Export log files
Administer server settings
View Server information and diagnostic tools
Upgrade Rally application software For detailed instructions on the features of the Control Panel and how to use them, see Rally Control Panel in the online help.

Rally On-Premises Administrator Guide
11 ©2015 Rally Software Development Corp.
Rally Monitoring Service
The Rally Monitoring Service monitors and visually displays the performance
metrics of Rally On-Premises. The service is designed for administrators that
manage On-Premises and is deployed from your VMware infrastructure.
Performance data, such as CPU load or Java Virtual Machine memory usage,
flows from Rally On-Premises to the Rally Monitoring appliance to be
displayed. No Rally project data is transmitted off of Rally.
Note: The Rally Monitoring Service is enabled through a license key, obtained
by contacting Rally Support.
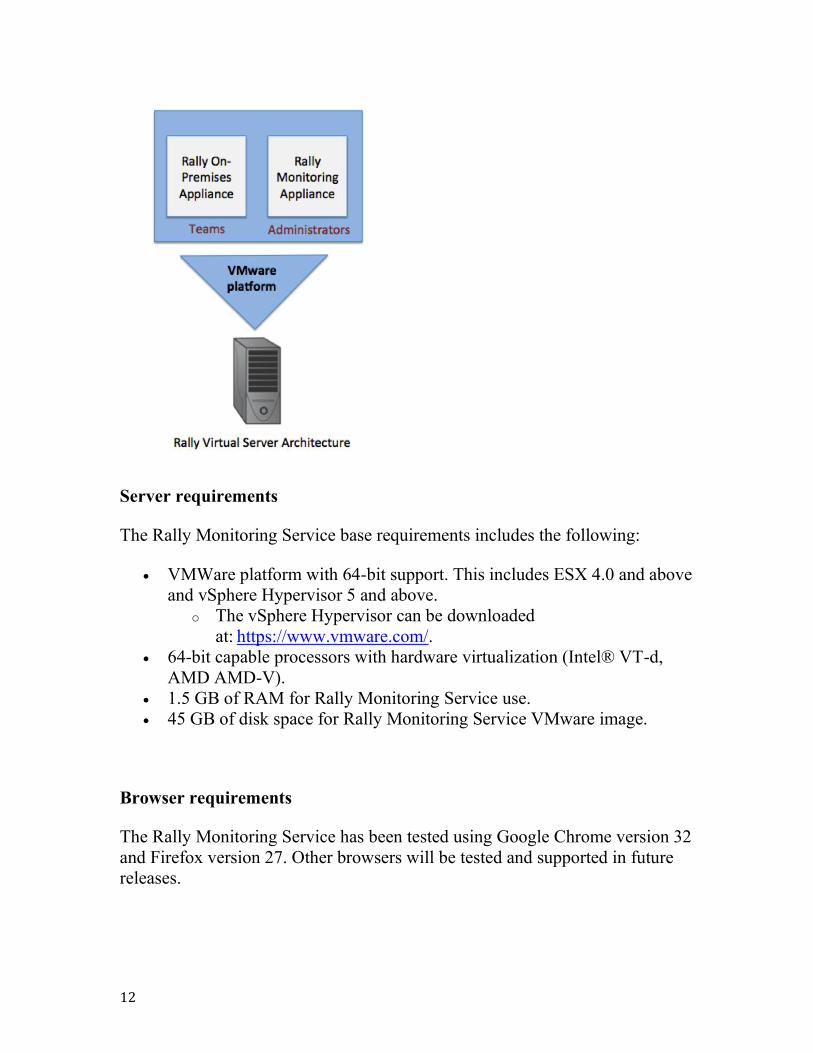
System diagram
Rally On-Premises and the Rally Monitoring Service are both supported by the
VMware platform. Rally’s virtual server architecture supports both the Rally
On-Premises appliance for teams and the Rally Monitoring Service for
administrators.
12
Server requirements
The Rally Monitoring Service base requirements includes the following:
VMWare platform with 64-bit support. This includes ESX 4.0 and above
and vSphere Hypervisor 5 and above.
o The vSphere Hypervisor can be downloaded
at: https://www.vmware.com/.
64-bit capable processors with hardware virtualization (Intel® VT-d,
AMD AMD-V).
1.5 GB of RAM for Rally Monitoring Service use.
45 GB of disk space for Rally Monitoring Service VMware image.
Browser requirements
The Rally Monitoring Service has been tested using Google Chrome version 32
and Firefox version 27. Other browsers will be tested and supported in future
releases.

Rally On-Premises Administrator Guide
13 ©2015 Rally Software Development Corp.
Installation and configuration
Prerequisites
Before you can start using Rally’s Monitoring Service, you will need the
following:
Rally On-Premises 2014.3 installed and running.
IP address of Rally On-Premises.
Ability to deploy an instance of Rally Monitoring Service in a network
segment accessible by Rally On-Premises.
The Rally Monitoring Service listens on the following interfaces:
o TCP port 80/HTTP – Web interface to Rally Monitoring Service
o UDP port 8649/ganglia – Receives statistics from Rally On-
Premises
o TCP port 22/SSH – Management interface (Rally internal use
only)
Rally On-Premises sends statistics to Rally Monitoring Service on the
following interface:
o UDP port 8649/ganglia
Install Rally On-Premises Monitoring VM
Contact Rally Support to obtain the Rally Monitoring VM zip file.
1. Extract the software to a location that can be accessed from the VMware
client console.
2. Unzip the file.
3. Deploy the Rally Monitoring VM to your ESX server from
File → Deploy OVF Template in the console.
4. Select Rally Monitoring VM Service from the unzipped file.
You may update the name of the Rally On-Premises server on your
VMware Server to reflect your corporate naming conventions.
5. Select your Datastore and the Network Mapping, then select
Deploy the Rally Virtual Machine.
6. Power on the Rally virtual machine.
Note: Once deployed to your VMware server, you may check the settings on
the Rally virtual machine and make modifications as necessary.
14
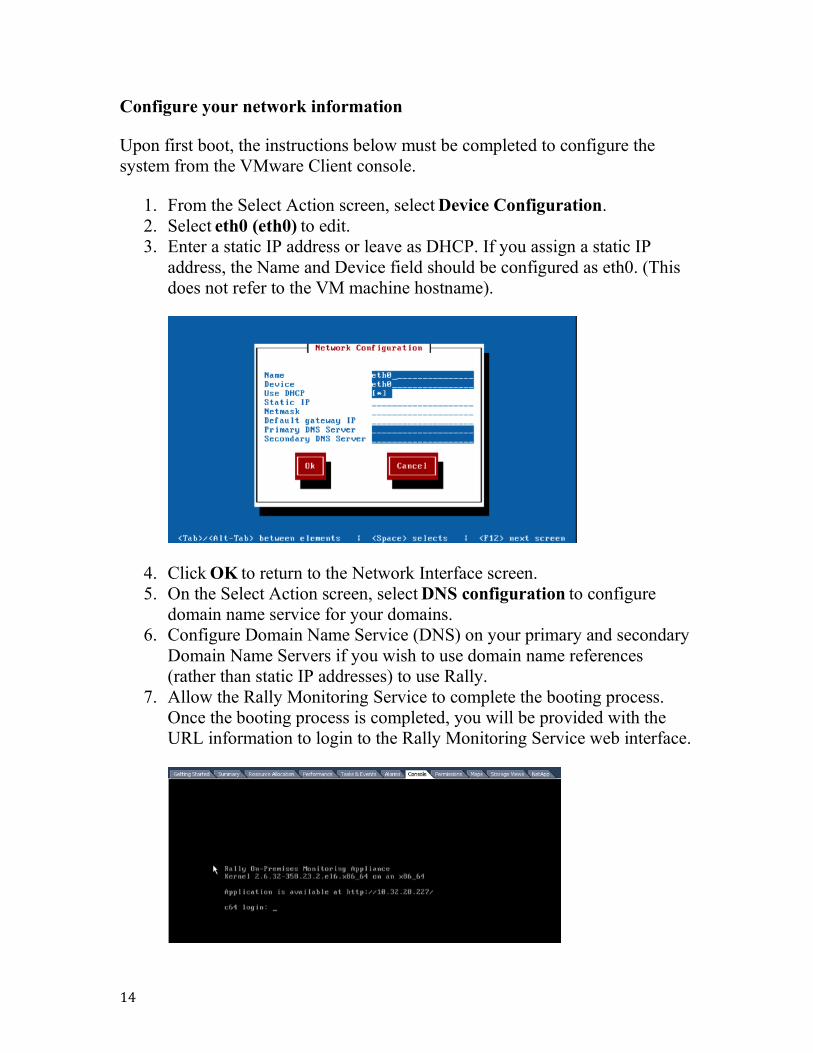
Configure your network information
Upon first boot, the instructions below must be completed to configure the
system from the VMware Client console.
1. From the Select Action screen, select Device Configuration.
2. Select eth0 (eth0) to edit.
3. Enter a static IP address or leave as DHCP. If you assign a static IP
address, the Name and Device field should be configured as eth0. (This
does not refer to the VM machine hostname).
4. Click OK to return to the Network Interface screen.
5. On the Select Action screen, select DNS configuration to configure
domain name service for your domains.
6. Configure Domain Name Service (DNS) on your primary and secondary
Domain Name Servers if you wish to use domain name references
(rather than static IP addresses) to use Rally.
7. Allow the Rally Monitoring Service to complete the booting process.
Once the booting process is completed, you will be provided with the
URL information to login to the Rally Monitoring Service web interface.
Rally On-Premises Administrator Guide
15 ©2015 Rally Software Development Corp.
8. Access the Rally Monitoring Service user interface by entering the URL
in your browser.
Next, you will need to configure the On-Premises Control Panel for
monitoring.
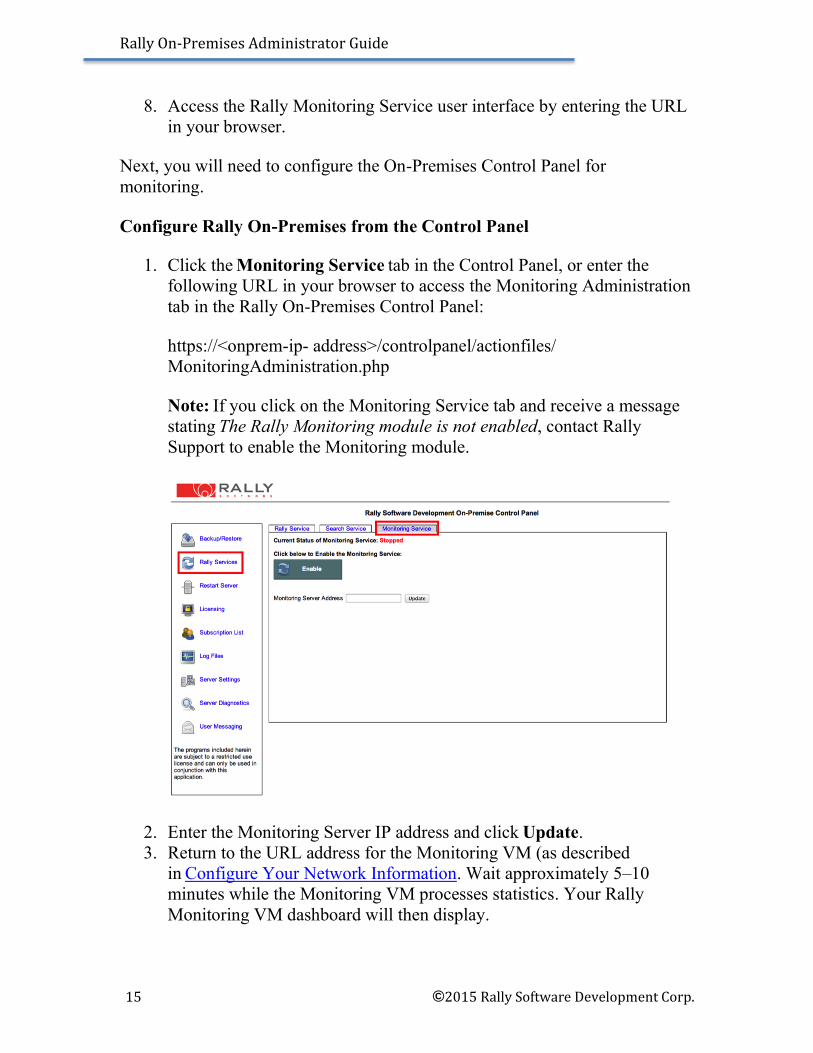
Configure Rally On-Premises from the Control Panel
1. Click the Monitoring Service tab in the Control Panel, or enter the
following URL in your browser to access the Monitoring Administration
tab in the Rally On-Premises Control Panel:
https://<onprem-ip- address>/controlpanel/actionfiles/
MonitoringAdministration.php
Note: If you click on the Monitoring Service tab and receive a message
stating The Rally Monitoring module is not enabled, contact Rally
Support to enable the Monitoring module.
2. Enter the Monitoring Server IP address and click Update.
3. Return to the URL address for the Monitoring VM (as described
in Configure Your Network Information. Wait approximately 5–10
minutes while the Monitoring VM processes statistics. Your Rally
Monitoring VM dashboard will then display.

16
Documentation
The Documentation link, located in the upper-right of the Monitoring Service
application, displays a page that provides information about specific statistic
entries.
Snapshot
The content of the snapshot includes just the Rally Monitoring Service graphs
bundled into an archive. Note that no Rally project data is included in the
snapshot.
To create a snapshot, click the Snapshot icon, located in the upper-right corner
of the Rally Monitoring Service user interface:
Support
To assist in assessing the performance of Rally On-Premises, the Rally
Monitoring Service can export a snapshot in a format that can be sent to Rally
Support. You will need to be a member of the Rally Success Community in
order to submit a case to Support. Note that the attachment size is limited to
5MB.
Upgrade to a new version of Rally
Rally On-Premises Administrator Guide
17 ©2015 Rally Software Development Corp.
Rally releases updated software builds for On-Premises customers
approximately quarterly during the year. Access information about the releases
and other important news by subscribing to the Rally On-Premises blog. You
may deploy each release at your convenience. Rally Technical Support will
provide support for the currently released build of the Rally application, Most
upgrades need to be done with a Rally VMware machine due to changes to the
Rally VMware image:
Boot a new version in parallel with old version (recommended)
1. Follow the installation instructions to install the new version of Rally on
your VMware server.
2. When prompted for the IP address, enter a new IP for this new instance.
3. Follow the instructions to configure Rally and import the license key.
4. Restart the new Rally installation so changes will take effect.
5. Back up the old instance of Rally from the old instance of the Control
Panel.
6. From the Control Panel of the new instance, Import (Restore) the file you
exported above into the new version of Rally.
7. Verify all is working as expected with the new instance.
8. Schedule the backups and configure email.
9. Update your DNS settings (or advise users of the new IP) to point to the
new IP address being used by the new instance of Rally.
10. Shut down the old instance on the VMware server.
Shutdown the old version, then boot up the new version
1. Backup (Export) the old instance of Rally.
2. Shut down the old instance of Rally.
3. Install the new version of Rally on your VMware server.
4. When prompted for the IP address, use the same IP as the old instance of
Rally or set up the new IP information.
5. Set up Rally and import the license key.
The license key will be a new one that has been sent or, if still valid, the
previous license can be imported.
6. Import (Restore) the file you exported into the new version of Rally.
7. Confirm that the new instance is working and looks correct.
Troubleshooting tips

18
If you are experiencing issues, check these symptoms and try the recommended
actions in the order in which they are described below:
Symptom Recommended Actions
Rally stops responding.
1. Ping the server to verify that it is still available
on the network.
2. Restart Rally from the control panel.
3. Restart the server.
You are locked out of the Rally
control panel.
1. Set up a WebEx session.
2. Call Rally Support so that they may log in and
reset your password.