Embed Size (px)
Citation preview

RSI November 2017 R Swift v3.docx 1
Rapid Sequence Intubation (RSI) SCGH ED, Author Dr R Swift, November 2017
**The first aim of airway management is to maintain oxygenation** This document is a learning aid. It is derived from many sources that have not been referenced and is intended as an education document for staff at SCGH ED. It is recommended trainees research their own approach to RSI and this document may be a useful template to annotate, amend and rearrange.
1. Preparation
Assess the Airway Many patients may need RSI without commonly used airway assessment methods because the patient is non-cooperative, unconscious, has trismus, has C spine immobilisation, or urgency mandates immediate intubation. In a time critical situation, assessment is done in tandem with active airway management (i.e. airway manoeuvres and adjuncts) and pragmatically may be limited to the following; Look - Facial and neck swelling, scars or asymmetry - Mouth opening, prominent anterior dentition, dentures and oropharyngeal swelling or abnormalities - Receding chin - Short neck - Neck immobility - Obesity
Feel - Head and neck movement during positioning for management of airway and intubation - Tracheal position (i.e. palpable?, midline?) Listen - Stridor - Dysphonia - Wheeze
If there are gross signs to suggest difficult intubation and intubation can be safely delayed, then seeking the most skilled operator or operator with advanced intubation skills may be possible. Otherwise, if immediate RSI is required then plan for failed intubation. NOTE: ‘Traditional’ methods of airway assessment have relatively poor sensitivity and poor specificity. Patients with no evidence of risk for difficult intubation can still be difficult; EVERY patient has a potentially difficult airway until intubated!
Positioning Head up (i.e. torso) minimum 30o while pre-oxygenating if possible
When intubating lay flat on their back – may delay lying flat till the point you are ready to insert laryngoscopy
Top of the head level with head end of the bed
Body in the centre of the bed
Trolley at belt height or patient head at the level of the lower sternum of the Airway Doctor
If spinal precautions are required, have a plan for collar removal and inline manual immobilisation.
RSI November 2017 R Swift v3.docx 2
Positioning (cont) Ear canal level with sternal notch – neck flexion of 35° and face plane parallel to the ceiling. Usually need
to place pillow or padding under head to achieve this. May need to place pillow under head and shoulders, but never just between shoulders alone (this extends the neck, which is the opposite of what is required.) NOTE: This is the minimum standard for positioning in terms of elevating the head. The view may be further improved by elevating the head even higher above the level of the sternal notch.
RAMP obese patients Obese patients will usually require substantial padding to elevate their head high enough to achieve ear canal the same level as the sternal notch. The head of the stretcher can also be elevated. Hypotensive patients may need simultaneous elevation of legs for venous return
Example of commercial pillow to assist achieving the Ramped position.

RSI November 2017 R Swift v3.docx 3
Positioning (cont) For obese patients and those on spinal precautions, it is reasonable to use Reverse Trendelenburg to
achieve adequate position.
Monitoring ECG
NIBP – non-drip arm! (ensure BP recorded just before start of intubation and ≤ 3 minutely during)
± IBP (if patient’s BP unstable may delay RSI, if safe to do so, to insert arterial line)
Oximetry – non-NIBP arm! Finger, Forehead or ear probe
EtCO2 – Note: Philips monitors use side-stream gas sampling that does not require airway filter.
FeO2 (Fraction of expired Oxygen) is a routinely monitored in Anaesthetics and is a measure of adequacy of pre-oxygenation (de-nitrogenation) but is not yet a standard in ED.
Slave Monitor
Computer on Wheels (COW) with Philips IntelliVue XDS Application
It is recommended that the COW in T1 and T2 are used as slave monitors so the intubating doctor can see the monitored vital signs
These COWs have a network cable that link them to the main Philips monitor in each cubicle
To bring up the monitor screen, go to the Windows applications start menu and select the Philips folder and then the IntelliVue XDS Application folder
Open the XDS application

RSI November 2017 R Swift v3.docx 4
Exhaled Breath
Room Air can be entrained here
This one-way valve prevents entrainment of room air at the expiratory port
Oxygen
Keep an airtight seal
Connect to O2 ≥ 15 Lpm
Equipment
Oxygen – Variable Performance Devices The Non-rebreathing Mask (NRM), Bag-Valve-Mask (BVM) and Nasal Prongs (NP) should be considered ‘variable performance’ devices for spontaneously breathing patients because the FiO2 delivered will vary according to the patient’s minute volume. The hyperventilating patient may have a Peak Inspiratory Flow rate of > 150 Lpm. To deliver this gas flow, these devices must entrain room air or else the patient feels suffocated (i.e. high negative inspiratory pressures). To overcome this, use high or very high flows of oxygen, e.g. 30 – 40 Lpm.
Non-rebreather Mask (NRM) [+ Nasal Prongs (NP)] – O2 30+ Lpm (High flow wall meter). For patients breathing spontaneously and not requiring ventilatory or airway pressure support
Bag-Valve-Mask (BVM) (+ NP) BVM - O2 20+ Lpm (Wall meter fully open);
ensure expiratory port valve or PEEP valve Attach CO2 monitor (Note: Philips monitors do not need airway filter for CO2 monitor) Airtight seal Slow inflation if manual ventilation required to prevent gastric insufflation 10-12 bpm (higher if hypercapnia or severe acidaemia) One handed vs two handed
Valve allows oxygen to enter the mask and prevents exhaled air entering the reservoir.
The reservoir should be full on expiration and partially collapse during inspiration
Valve on either side of the mask prevents entry of room air
Airtight fit between the mask and the patients face
Set oxygen flow at 12-15 l/m or fully open for severe hypoxia or preoxygenation
Mayo BVM

RSI November 2017 R Swift v3.docx 5
Equipment (cont)
The blue ‘Resus EZY™’ BVM, introduced in February 2017, is very similar to the Mayo BVM with 2 main differences;
There is no pop-off valve / pressure relief plug (not particularly important in our current practice)
The Expiratory Flow Diverter valve is built into the pale blue expiratory port. Unlike the Mayo, it doesn’t need a separate valve. The PEEP valve can be optionally attached to this port.
Description: Blue transparent 2.6 litre self-inflating bag with oxygen reservoir and oxygen inlet; patient can be ventilated on oxygen or room air (i.e. doesn’t rely on oxygen flow for ventilation); inlet valve to allow entrainment of room air to prevent high negative airway pressures during high inspiratory gas flows (spontaneously breathing patient); inspiratory and expiratory valves to allow fresh gas flow from the bag and prevent rebreathing of exhaled gas (spontaneously breathing patient); standard 15 mm airway connectors for mask or ETT; option of attaching a PEEP valve.
Resus EZY BVM (Adult)
The Oxylog ventilator default PEEP is set at 5 cm H
2O
Rotate out for lower PEEP and in for higher
Rotate the cap until the desired PEEP number is in line with the base of the cap
Mayo BVM

RSI November 2017 R Swift v3.docx 6
Equipment (cont.) Oxygen (cont.)
Bag-Valve-Mask (BVM) (cont.)
Open the airway – manual maneuver
Insert pharyngeal airway
Place the mask on the patient’s face o Bridge of the nose first o Securing a tight seal below the lower lip o Maintain the mask position with thumb and index finger of one hand, use the third, forth and fifth
fingers to hook under the mandible, displacing it anteriorly to maintain a patent airway o A two-hand two-person approach may be required (picture below)
Nasal Prongs (NP) – ALL PATIENTS SHOULD HAVE NP O2 preferably set to 15 Lpm or highest tolerated until sedated and then increase to 15 Lpm.
Oxylog 3000 – Can be used to ventilate patient, freeing a set of hands
Mask
ETCO2 Flexible Catheter Mount Filter
Circuit

RSI November 2017 R Swift v3.docx 7
Equipment (cont.) Oxygen (cont.)
Oxylog 3000 (cont.) Like BiPAP, this is a Fixed Performance device. It will deliver a reliable set FiO2 regardless of variation of patient ventilation. Because it is attached to O2 at high pressure (from wall or cylinder) it can deliver very high flow rates, matching the patient’s Peak Inspiratory Flow rate. 1. Apnoeic patient – May be ventilated with settings used for intubated patient (i.e. SIMV.)
This gives a set Minute Volume but allows pressure to vary (PEEP usually set at 5 cmH2O.)
Set the Frequency for 12 – 16 bpm, VT for 500 mL and O2 [%] for 100.
2. Spontaneously breathing patient – Use PCV+ PS (aka PC BIPAP, BIPAP ASB on other Oxylog setting gives pressure support. models)
This gives set pressure support to ventilation but Minute Volume will vary.
Freq = 12 – 16 bpm
Pmax 30 – 40 cmH2O
O2(%) = 100
(VT NOT USED WITH THIS SETTING)
Tinsp = 1 - 1.5 seconds – don’t usually need to adjust
Pinsp = Pressure of mandatory breath (may or may not be triggered by patient). Leave at same level as PEEP for CPAP or > PEEP for BiPAP (CPAP usually adequate for patents with no respiratory failure)
PEEP= Usually leave at 5 cmH2O
PS = pressure support for non-mandatory spontaneous breaths. Can be the same as Pinsp
NIV = ON – This setting compensates for air leaks in the circuit
Trigger and Ramp – don’t adjust
1. SIMV is the standard setting for intubated patients – can use for mask ventilation of apnoeic patients
CPAP can be used for NIV but BiPAP machine better for this
2. PVC (aka PC BIPAP, BIPAP ASB) for mask preoxygenation of spontaneously breathing patients prior to intubation

RSI November 2017 R Swift v3.docx 8
Equipment (cont.) Oxygen (cont.)
BiPAP - also a Fixed Performance device. Philips Respironics V60 Ventilator
The settings can be the same as normally used in NIV for patients with respiratory failure, using S/T mode (set Rate at 12 – 16.)
If used for preoxygenation in patients who do not have respiratory failure, can use CPAP (i.e. IPAP = EPAP).
Otherwise, use BiPAP – This is the strategy in Delayed Sequence Intubation for patients who are hypoxaemic.
Advantages over Oxylog
Nurses more familiar with use of BiPAP machine in NIV
Better ventilator than Oxylog Disadvantage
Uses BiPAP machine airway circuit in addition to Oxylog circuit once patient intubated
Oropharyngeal Airway (OPA) – Guedel (Size = angle of the mouth to tragus)
Nasopharyngeal Airway (NPA) (Size = tip of nose to tragus)
Suction – 2 x Yankour catheters under mattress, both turned on (one inevitably falls on floor)
Laryngoscope (light working?);
Direct laryngoscope Large curved (Macintosh 4) or small curved (Macintosh 3) blade – old axiom; “easier to
intubate someone with a blade too big and a tube too small” 2 handles (back-up)
Laryngoscope (cont);
C-MacTM video-laryngoscope
Paediatric straight blade
D blade in Difficult Airway Trolley
Standard blade large (4) or small (3)

RSI November 2017 R Swift v3.docx 9
Equipment (cont.)
Laryngoscope (light working?);
C-Mac – NOTE a good view on video laryngoscopy does not equate with easy intubation
Magill’s forceps
ETT – 7.0 for smaller female and 8.0 for larger male. Test cuff and back-up ETT one size smaller
Standard 15 mm connector
Pilot Balloon
“Murphy’s Eye” side port If end occluded allows ventilation
Spring loaded one way valve
Transparent “Magill Curve” PVC tube
High volume, low pressure cuff
Suggested vocal cords marker
Depth markers in cm to indicate position at teeth
Internal diameter in mm Left facing bevel tip Improves view
Easier to put through cords
Less likely to occlude
Radio-opaque blue line
Portex Soft Seal® Cuff Endotracheal Tube
Can use standard C-mac blade for either direct or video laryngoscopy
D blade can only be used for video laryngoscopy, is useful for anterior larynx

RSI November 2017 R Swift v3.docx 10
Equipment (cont.) ± Stylet – straight to beginning of cuff, then 30 degree bend
Syringe – 10mls attached to ETT before and during intubation
Airway filter – used on ventilator circuit but not required on BVM when using the Philips EtCO2 monitor
Cotton tape ties
NGT
Difficult Airway Trolley;
Laryngeal Mask – size 3 or 4 (see later)
Silastic Intubation Catheter (aka “Bougie” or “Gum Elastic Bougie”). We use Cook Medical FrovaTM Intubating Introducer – blue, pliable, silastic, radiopaque, 70 cm long, 14 French (4.67 mm external diameter), 3 mm internal diameter lumen, blunt end, 30o angled tip (“coudé”), distal side-port, and graduations in cm from the tip. Can attach oxygen tubing to the proximal end or use 15 mm Rapi-Fit Adapter that allows attachment of BVM. (see later – Cricothyroidotomy).
Surgical Airway Equipment (see later)
Oxylog 3000TM with Circuit and airway filter attached. Ventilation is powered by Oxygen pressure (it will no ventilate if O2 supply fails!) and requires electrical power for monitoring and servo settings.
Circuit and airway filter attached and ventilator running
Ventilator settings;

RSI November 2017 R Swift v3.docx 11
Equipment (cont.) Oxylog 3000 (cont.)
FiO2 100% initially then reduce to maintain SaO2 ~ 95% (prolonged high FiO2 is toxic to the lungs)
BiPAP settings
IPAP 12, EPAP 6 mmHg
Frequency 12 bpm
IV x 2 & Fluids (± IO)
Free flowing drip running to demonstrate patency (avoid injecting intubating drugs into tissue) – non NIBP arm!!
Consider IV fluid bolus for RSI for hypovolaemic patients
2nd IV access in situ (in case of failure of 1st line)
Collar – leave on till intubation, then have manual inline immobilisation and loosen collar. Can abandon immobilisation if unable to intubate i.e. airway takes priority over C spine.
Drugs (doses based on Lean Body Weight)
ALLERGIES?
Pre-treat (titrate);
Fentanyl 1 – 2 mcg/kg titrate in 25 – 50 mcg increments
Ketamine 0.25 – 0.5 mg/kg titrated in 20 mg increments
Midazolam 0.5 – 1 mg increments
Metoclopramide 10 mg
RSI (bolus push);
± Fentanyl 1 mcg/kg bolus
Suxamethonium 1.5 – 2 mg/kg There is currently no high level evidence that Suxamethonium is inferior to Roc for intubation
(when not contraindicated) Contraindications to Sux;
Malignant Hyperthermia History
Strokes with hemiparesis > 72 hours old
ICU Stay > 2 weeks
Burns/trauma > 72 hours old
NMJ Disease
Myopathies/Muscular Dystrophies
Pre-existing hyperkalaemia or Strong suspicion
Guillain-Barre
Penetrating eye injury of acute glaucoma
Rocuronium 1.2 mg/kg

RSI November 2017 R Swift v3.docx 12
Drugs (cont) Post RSI;
Vecuronium 0.1 mg/kg
Pressor;
Metaraminol 0.5 – 1 mg bolus
Adrenalin Infusion (6mg/100ml) start at 1 ml/hr, up to 20 ml/hr
Bradycardia – Atropine 600 mcg bolus
Reverse paralysis – Sugammadex 16mg/kg (100mg/ml ≈ 12 mls for adult 70 – 80 kg)
Bronchospasm – Salbutamol MDI and ETT adapter
The MDI adapter is placed between the ETT and BVM or ventilator (on the patient side of an airway filter if present)
A puff is given at the beginning of inspiration and inspiration held for 2 – 3 seconds
Ventilate normally for 20 -30 seconds and repeat until adequate dose given
Team Roles PPE – Gown, gloves, gag and goggles
Roles – allocation of roles will vary with staffing levels; one person may have multiple roles
Team Leader and Scribe
Airway Doctor and Nurse
IV / Drugs Doctor and Nurse
Laryngeal manipulation
In-line cervical immobilisation

RSI November 2017 R Swift v3.docx 13
Plan Delayed RSI (see later);
Ketamine 0.25 – 1.5 mg/kg IV titrated increments
BiPAP
Intubation Plan (i.e. “Can’t Intubate, Can’t Oxygenate” for all intubations, explicit description for each step)
Plan A Initial intubate strategy (Limit time – 60 seconds)
Optimise patient position (ear vs sternal notch, ramp)
Pre-oxygenate (aka de-nitrogenation)
Apnoeic oxygenation
Direct Laryngoscopy and blade size choice
Stylet
Intubation catheter (aka “Bougie” e.g. Cook Medical Frova Introducer found on difficult intubation trolley)
External laryngeal pressure (BURP)
Direct Laryngoscopy vs Video Laryngoscopy
IF HYPOXIC – Rescue oxygenation and ventilation prior to further attempts to intubate
Plan B Alternative intubation strategy
Video laryngoscopy (if not primary method) e.g.;
C-mac
Glidescope
King Vision
Intubation catheter (if not primary method)
Further neck flexion and head elevation (face parallel to the ceiling)
Abandon cervical immobilisation
Change operator
Plan C Can’t Intubate; Rescue oxygenation and ventilation
CALL FOR HELP
BVM – one operator (one hand on mask)/two operator (two hands on mask)
Oxylog or BiPAP to ventilate the patient while holding mask
Extreme head elevation (face parallel to the ceiling)
Exaggerated jaw thrust
NPA/OPA
LM /intubating LM (aka Supra-Glottic Airway [SGA]or Supraglottic Airway Device [SAD])
Consider reversing paralysis (Sugammadex 16 mg/kg for Rocuronium or Vecuronium)
Prepare equipment for surgical airway if not already done
Plan D Can’t Intubate / Can’t Oxygenate (CICO) - aka Can’t Intubate / Can’t Ventilate
Surgical Airway - Cricothyrotomy (aka Infra-Glottic Airway)
If bradycardia should occur, administration of adrenaline or atropine may forestall cardiac standstill
NOTE: Patients can still have good outcomes despite prolonged (> 30 minutes) hypoxia (SaO2 < 50%)
Hypotension and Hypovolaemia
Replace acute intravascular loss as quickly as practical prior to intubation
Consider giving a rapid bolus of IV fluids with intubation drugs
Ketamine is the analgesic or sedative drug least likely to cause hypotension
Metaraminol is the commonly used pressor agent for urgent management of hypotension (after replacement of intravascular volume deficit) during intubation
Opiates, Propofol and Thiopentone should be used with extreme caution in hypotensive patients or patients with hypovolemia who are dependent upon sympathetic drive
Beware PEEP can reduce cardiac return and worsen hypotension via increased intrathoracic pressure
Consider insertion of arterial cannula for Invasive BP monitoring if safe to delay intubation

RSI November 2017 R Swift v3.docx 14
Plan (cont) Brain Injury and Raised Intracranial Pressure
Prevent or minimise hypoxaemia and hypotension
Ketamine is an acceptable analgesic and sedative agent
Succinylcholine is an acceptable muscle relaxant for intubation
Fentanyl, if BP stable, may be of value
Opiates, Propofol and Thiopentone should be used with extreme caution in hypotensive patients or patients with hypovolemia who are dependent upon sympathetic drive
Severe Acidosis
Maintain hyperventilation throughout intubation (high respiratory rate) to keep PaCO2 low. Although ventilating after administration of intubating drugs has a risk of gastric insufflation, allowing the pH to fall caries a greater risk
Asthma
Benefit of BiPAP in acute asthma is variable and unpredictable with DSI is an acceptable strategy
Keep patient in most comfortable position for breathing for as long as practical before intubation – usually sitting upright or sitting forward (tripod position)
Ketamine is believed to have the greatest bronchodilation effect followed by Propofol
Don’t not use barbiturates
Persistent Hypoxaemia
Too much oxygen is never enough! – may be a lung problem rather than a ventilation problem and so, DSI may not resolve hypoxaemia, e.g. shunting
Particular attention to; maximising ventilation e.g. torso up, increase delivered oxygen – turn up the flow meters, apnoeic oxygenation, be quick! – progress through intubation plan quickly with rescue ventilation
2. Procedure 1. Preoxygenate SaO2 99-100% = best, ≥ 95% = OK, 91-94% = high risk, ≤ 90% hypoxaemic = critical risk
WHAT IS GOING TO BE THE SAFE APNOEIC TIME? – How long can the patient remain apnoeic before they desaturate. The answer may be zero.
Preoxygenate for as long as possible, preferably > 5 minutes – START AS SOON AS POSSIBLE
High FiO2;
Spontaneously breathing and adequate airway –> NRM O2 30+ Lpm (high flow meter) + NP 15 Lpm
Requires airway/ventilation support –> BVM 02 20+ Lpm (normal meter fully open / high flow meter) + NP 15 Lpm
Sitting up at ≥ 30o +/- legs elevated if hypotensive
Consider PEEP (BVM or BiPAP)
2. Delayed Sequence Intubation Indication – Hypoxaemia or respiratory failure prior to intubation (unable to achieve SaO2 ≥ 90%)
– Agitated (e.g. delirium) or otherwise uncooperative with preoxygenation
Ketamine IV 20mg boluses up to 1.5 mg/kg for agitation
Continue preoxygenation as above
If still hypoxic then apply BiPAP (this is the exception to the rule of not applying BiPAP to patients with reduced conscious state)
Aim for SaO2 ≥ 95% or highest achievable prior to intubation
Occasionally, BiPAP improves the condition of the patient with respiratory failure (e.g. reduces PaCO2 and improves conscious state) to the point they no longer require intubation

RSI November 2017 R Swift v3.docx 15
3. Intubation NIBP stat cycle
Team Leader (or Airway Doctor if limited team)
checks each member ready
calls out vitals – PR, BP, SaO2
tells Drug Doctor to give all agreed drugs (rapid IV push)
Manual in-line immobilisation of cervical spine and loosen collar if neck not cleared
Drugs Doctor calls out when drugs given (IV push + IV fluid bolus) – this is effectively the start of intubation
Apnoeic Oxygenation – Leave all oxygen delivery on (high flow) until laryngoscopy
Leave NP on at 15 Lpm until after intubation
May require ongoing BVM ventilation for hypoxia or severe acidosis, at risk of insufflating the stomach
Some operators test efficacy of BVM at this point, even in a well oxygenated patient, if there is concern about ventilating for failed intubation; it runs the risk of insufflating the stomach. Identifying difficult BVM ventilation may prompt active preparation for CICO
INTUBATION (as per Dr Richard Levitan, airwaycam.com) – these are steps to consider when learning intubation skills. Experienced operators have sufficient motor memory to do this subconsciously, so these steps may not be apparent watching them;
Cricoid Pressure – No longer advocated except as part of manipulation to improve view 1. Insert the laryngoscope – the goal is to get the laryngoscope blade onto the tongue
Lay patient flat with head elevated as described previously for intubation position
Ensure Yankour sucker is at hand (remember; 2 suckers because one always hits the floor)
Laryngoscope in left hand
Remove dentures
Insert laryngoscope to the right of the midline of the tongue Some operators put right hand on the top of the head and push down to help open the mouth – this is only for insertion of the laryngoscope. This manoeuvre extends the head too much for intubation; remember that the face needs to be parallel to the ceiling.
Alternatively, open mouth with scissor grip right hand

RSI November 2017 R Swift v3.docx 16
Uvula
Intubation (cont.) Levitan suggests starting with a light grip to insert the blade then a firmer grip to lift the tongue
2. View the epiglottis (‘epiglottoscopy’) – the goal is visualise the epiglottis
Slowly advance the laryngoscope around the curve of the tongue towards the vallecula at the base of the tongue (beginners mistake is usually to initially insert blade too far in)
The epiglottis should become visible just below the tongue on the posterior pharynx but may be obscured by secretions, blood or debris. Occasionally, the blade has gone too far and needs to be withdrawn a little.
When the tip of the laryngoscopy is in the vallecula at the base of the tongue the epiglottis usually lifts of the pharyngeal wall
May see the Uvula initially at the back of the palate, at the bottom of the POV and towards the midline – this is useful because it usually identifies the midline and the epiglottis should be above it in this POV.
Pull along long axis of laryngoscope to elevate tongue and epiglottis

RSI November 2017 R Swift v3.docx 17
Intubation (cont.) 3. Laryngoscopy – the gaol is to visualise the vocal cords
Lift the tongue by lifting the laryngoscopy along the long axis of the handle (don’t lever the handle backwards and forwards!). This lifts the epiglottis revealing the glottis
If the epiglottis is obscuring the view of the glottis then either advancing the blade a little further or manipulating the larynx externally, Backwards – Upwards – Rightwards - Pressure (BURP), may improve the view
!! The reason BURP is required in this illustration may be because the head is too low and extended (tilted back).
Firstly, change the position lift the head so the face is parallel to the ceiling and the external auditory meatus is level with the sternal notch
An assisting may improve view through the lips by retracting the corner of the mouth to the side
Manipulation of the larynx (BURP) may improve view

RSI November 2017 R Swift v3.docx 18
Intubation (cont.) 4. Insert the ETT
NOTE for video laryngoscopy, have the larynx at the top of the screen so you can see the path of the ETT from the bottom of the screen
Don’t obscure the view of the larynx with the ETT; Insert at the right corner of the mouth Go below the line of sight, behind the maxilla Come up from below the line of sight
‘Hold-up’ of the ETT at the arytenoids
Rotate the tube anticlockwise 90o to change the orientation of the bevel
Adjust the curve of the stylet – straight-to-cuff, 30 degree bend at the proximal cuff
Use an intubating catheter (‘bougie’)
Use a smaller tube
Using the ‘Bougie’
For Grade 3 and 4 views, increase the anterior curve or the distal catheter
The proximal catheter needs lubricant to allow railroading of the ETT
Avoid getting lubricant on the distal half of the bougie when preparing for the ETT
ETT may be railroaded before or after the insertion of the catheter into the trachea
Advance the catheter with the tip pointing anteriorly
In restricted views, the idea is to have the tip of the catheter move along the posterior surface of the epiglottis, through the cords and into the trachea
Confirmation of correct position may be indicated by seeing the tip pass through the cords, feeling the tip bump over tracheal rings or fingers externally on the larynx feeling the catheter bump over tracheal rings
If there is resistance to the catheter tip passing through the cords, rotate the catheter clockwise or anticlockwise
Keep the laryngoscope held in position while passing the ETT
The operator or the assistant may advance the ETT into the trachea while the other holds the catheter firmly in position
If there is resistance to ETT advancement then rotate the tube 90o anticlockwise (places the bevel facing posteriorly) and try again
Some operators use the ‘grips’ below to allow accurate control over the rotation of the tip;
ETT 22cm at the teeth female, 24cm male
Attach BVM and ventilate while ETT cuff being inflated until there is no air leak
‘Shake Grip’ The ‘Kiwi Grip’ The ‘D Grip’ D Grip - Proximal end of catheter through Murphy Eye of ETT

RSI November 2017 R Swift v3.docx 19
Intubation (cont.) Confirmation of Tracheal Intubation
Seeing ETT pass through cords Capnography consistent with tracheal intubation (‘Gold Standard’) Chest rises with ventilation Auscultate both axillae Tube misting, Maintains SaO2 Chest x-ray
Secure ETT with cotton ribbon tie
Connect ventilator circuit (with airway filter) CORMACK-LEHANE CLASSIFICATION Grade 1: Full view of glottis Grade 2: Partial view of glottis Grade 3: Only epiglottis seen, none of glottis seen Grade 4: Neither glottis nor epiglottis seen
3. Post Intubation Continue monitor ECG, BP, SpO2 and Capnography
Head and torso up 30o
Eye care – ointment and tape lids shut
Oropharyngeal and airway suction via ETT as needed
ETT cuff pressure 20 – 30 cm H2O
Long acting Paralysis – Vecuronium 0.1 mg/kg
Sedation (and analgesia) infusion
Morphine 100 mg/Midazolam 50 mg 100 ml start at 5 ml/hr
Propofol 0.5 mg/kg bolus then 20 mcg/kg/min (= 50 mg/kg/hr = 5mls/kg/hr )
Ketamine 1 - 2 mg/kg bolus then 0.5 mg/kg/hr
Ventilator – titrate RR to EtCO2 and O2 to FiO2 (Don’t just leave at 100%). Lower VT better for lungs
OG/NGT
CXR – ETT & OG/NGT position, lung inflation, pneumothorax
ABG & other Ix according to presentation
IV fluids
IDC
Art Line
CVC
Temperature management

RSI November 2017 R Swift v3.docx 20
Disposition
Other clinically indicated medication, e.g.;
Antibiotics
Anticonvulsants
Tetanus prophylaxis
Activated Charcoal
DVT prophylaxis
Family / NOK
Documentation – procedures, drugs, infusions, fluid orders, clinical notes
Peri/Post Intubation Deterioration Hypoxia; Pre-existing respiratory failure, displaced/obstructed/mal-positioned (e.g. bronchial,
oesophagus) ETT, bronchospasm, pneumothorax/haemothorax, pulmonary oedema, PE, shock, ventilator failure
If on ventilator, place patient back on BVM ventilation with high flow O2 and get ventilator and circuit checked or changed (ventilator or connection failure?)
EtCO2 irregular, abdominal movement (diaphragm), chewing on tube – not fully paralysed
Check length of ETT at teeth – accidental extubation, intubation of bronchus
Perform laryngoscopy (rule out oesophageal ETT placement)
Check chest expansion
Auscultate the axillae for absent breath sound or wheeze – bronchospasm, bronchial ETT, pneumothorax
Feel pressure on bag during inspiration – low (leak), high (obstruction, auto-PEEP)
Treat shock
Peripheral cyanosis or poor perfusion vs central cyanosis - ABG
Ultrasound the chest (pneumothorax/heart)
Get a CXR If the patient becomes hypoxic on intubation and there is doubt about the placement of the ETT, it may be safer to immediately pull the ETT out and BVM ventilate the patient.
Hypotension; Hypovolaemia/shock, acidosis, RSI drug induced vasodilation and myocardial depression, auto-PEEP (gradual increase of pressure with each breath because of inadequate expiration), inadequate muscle relaxation (raised intrathoracic pressure), anaphylaxis, bradycardia, tension pneumothorax. Note: PPV and CPAP raise intrathoracic pressure and reduce venous return to the heart.
Check airway pressures not high from auto-PEEP – disconnect ventilator circuit from ETT and release airway pressure, adjust PEEP and ventilator settings
Ventilate with BVM
Hyperventilate if acidotic
Treat hypovolaemia and shock – IV fluids and pressors
ECG – myocardial ischaemia
Urticaria and other signs of anaphylaxis – adrenaline
Bradycardia – atropine
CXR/US re pneumothorax
Raised EtCO2 – hypoventilation (low respiratory rate), fever, malignant hyperthermia
Low EtCO2 – oesophageal intubation, over ventilated, reduced cardiac output (PE, hypovolaemia, cardiogenic shock), accidental extubation, air leak, hypothermia
RSI November 2017 R Swift v3.docx 21
High Airway Pressure; Excessive PEEP on ventilator, auto-PEEP – inadequate exhalation, airway circuit obstruction, migration of ETT into bronchus, aspiration, ETT/tracheal/bronchial obstruction, pneumothorax/haemothorax, lobar/lung collapse, pulmonary oedema, inadequate muscle relaxation, opiate/suxamethonium induced chest wall rigidity, malignant hyperthermia, obesity, external restriction of chest wall, gastric dilation, abdominal distention
Disconnect and allow full exhalation
Increase I:E ratio and reduce ventilation rate (permissive hypercapnia)
If on ventilator, place patient back on BVM ventilation with high flow O2
If the cause is still not clear measure inspiratory pause pressure (approximates to alveolar pressure). If both airway and alveolar pressure are high the problem is due to poor compliance. If only the airway pressure is high the problem is one of high resistance
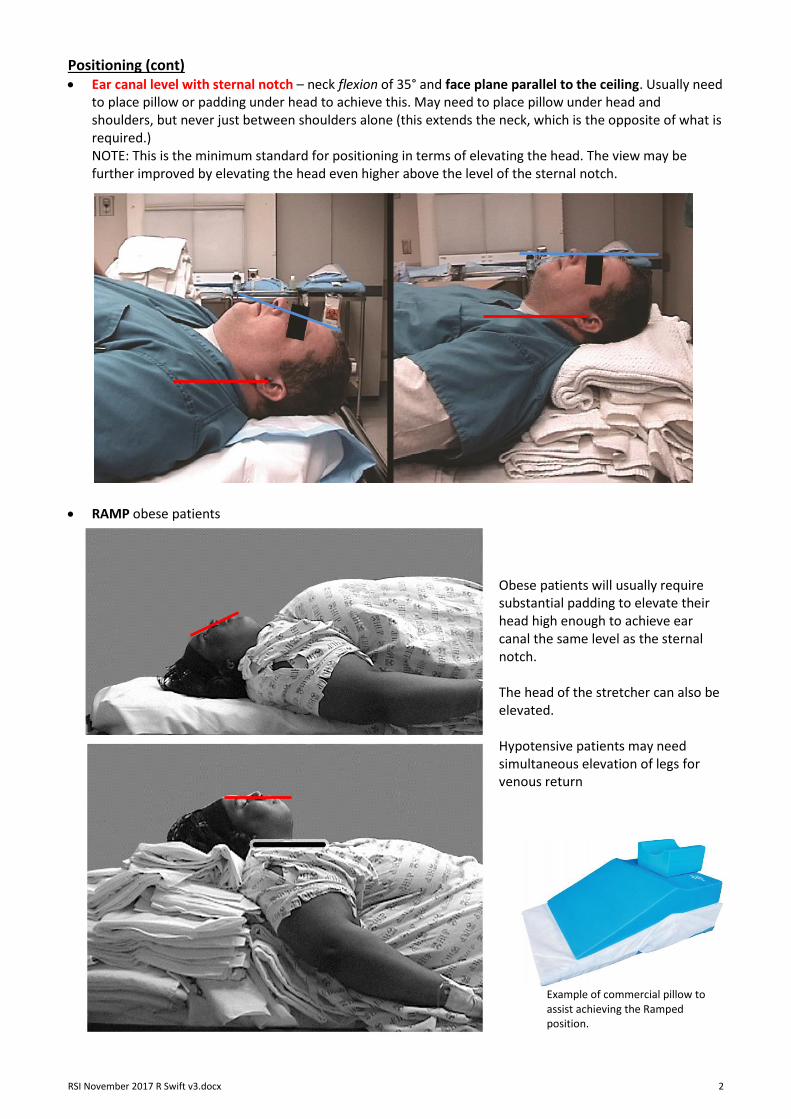
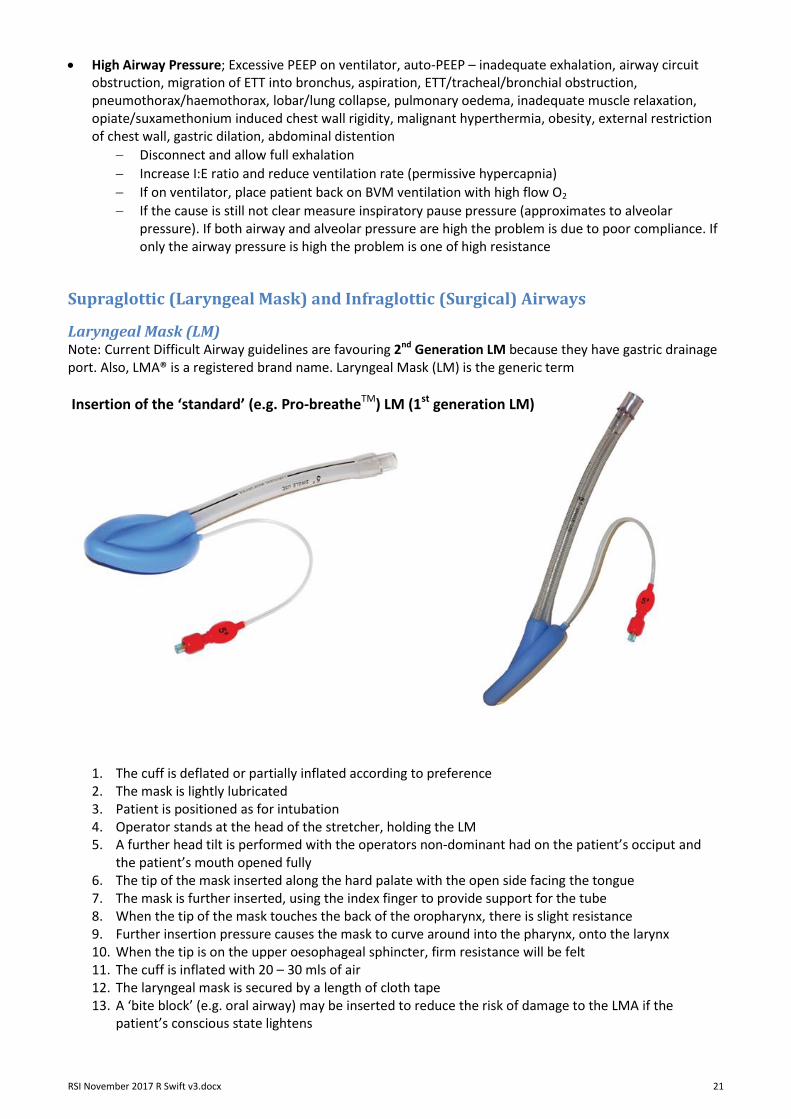
Supraglottic (Laryngeal Mask) and Infraglottic (Surgical) Airways
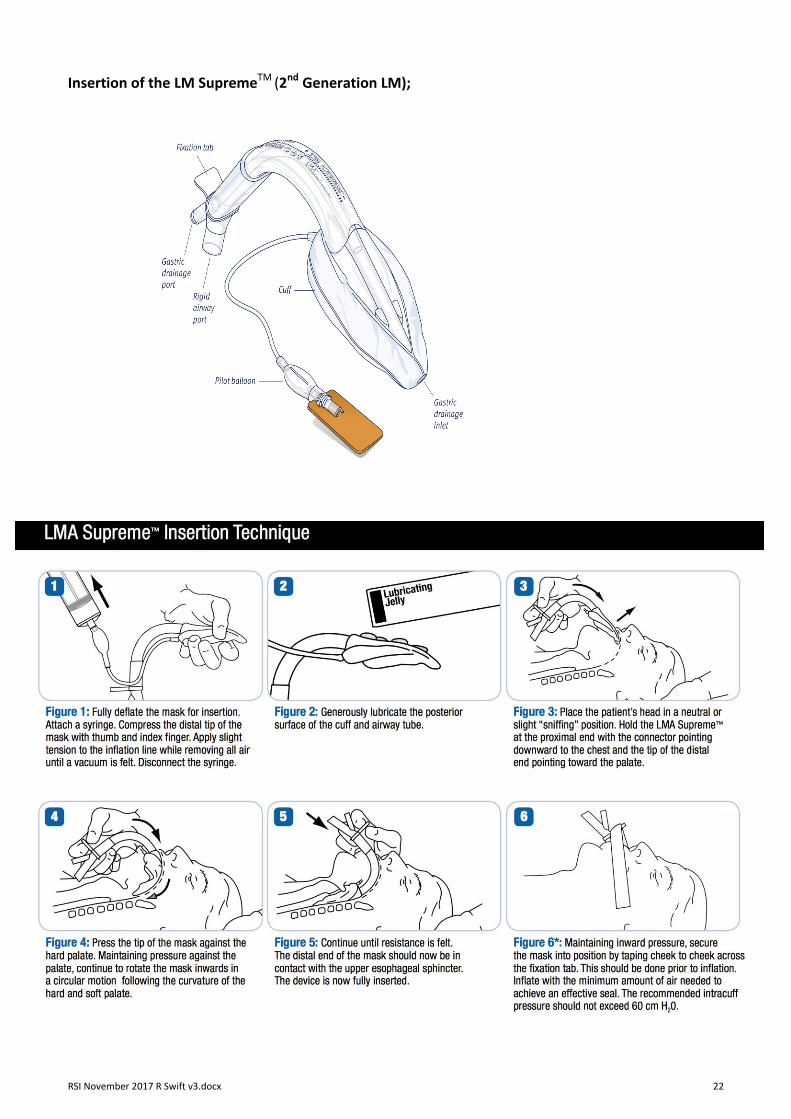
Laryngeal Mask (LM) Note: Current Difficult Airway guidelines are favouring 2nd Generation LM because they have gastric drainage port. Also, LMA® is a registered brand name. Laryngeal Mask (LM) is the generic term
Insertion of the ‘standard’ (e.g. Pro-breatheTM) LM (1st generation LM)
1. The cuff is deflated or partially inflated according to preference 2. The mask is lightly lubricated 3. Patient is positioned as for intubation 4. Operator stands at the head of the stretcher, holding the LM 5. A further head tilt is performed with the operators non-dominant had on the patient’s occiput and
the patient’s mouth opened fully 6. The tip of the mask inserted along the hard palate with the open side facing the tongue 7. The mask is further inserted, using the index finger to provide support for the tube 8. When the tip of the mask touches the back of the oropharynx, there is slight resistance 9. Further insertion pressure causes the mask to curve around into the pharynx, onto the larynx 10. When the tip is on the upper oesophageal sphincter, firm resistance will be felt 11. The cuff is inflated with 20 – 30 mls of air 12. The laryngeal mask is secured by a length of cloth tape 13. A ‘bite block’ (e.g. oral airway) may be inserted to reduce the risk of damage to the LMA if the
patient’s conscious state lightens
RSI November 2017 R Swift v3.docx 22
Insertion of the LM SupremeTM (2nd Generation LM);

RSI November 2017 R Swift v3.docx 23
Surgical Airway (Infraglottic)
The laryngeal handshake – to identify the cricothyroid membrane; A. The dominate hand index finger and thumb grasp the top of the larynx (the greater cornu of the hyoid
bone) and roll it from side to side. The bony and cartilaginous cage of the larynx is a cone, which connects to the trachea.
B. Then with the middle finger and thumb slide down over the thyroid laminae. C. Middle finger and thumb come rest on the cricoid cartilage, with the index finger palpating the
cricothyroid membrane D. The index finger is placed over the cricothyroid membrane
Then exchange hands; Lift the middle finger and thumb of the dominate hand, momentarily leaving the index
finger to keep the position of the cricothyroid membrane, and place the index finger and the thumb of the
non-dominate hand on the larynx to mark the right level. This frees the dominate hand to perform the
procedure.
A B C D

RSI November 2017 R Swift v3.docx 24
Surgical Cricothyroidotomy A. Cricothyroid membrane palpable – Scalpel Bougie Technique;
Equipment; Scalpel size 10, Cook Frova Intubating Introducer, 15 ml Rapi-fit connector, 6.0 ETT and a 5 or 10ml syringe.
1. Continue attempts at rescue oxygenation via upper airway (assistant). Description below is for Right handed operators; Left handed operators can swap sides 2. Right handed operator come from the patient’s left side of the bed 3. Use the Laryngeal Handshake to identify the cricoid membrane with the left index finger 4. (Can use trachea if easily palpable) 5. Stabilise the airway with your left hand (see laryngeal handshake above) 6. Hold the scalpel in your right hand, and wrist and forearm on the patient’s sternum to steady the hand 7. make a transverse stab incision through the skin and cricothyroid membrane with the cutting edge of the
blade facing towards you This is a vascular area and THERE WILL BE BLEEDING that may obscure the view. Holding the skin taught across the neck will help reduce this.
8. Keep the scalpel perpendicular to the skin and turn it through 90° so that the sharp edge points caudally (towards the feet)
9. Swap hands – keeping the scalpel steady, grasp it with your left hand. 10. Maintain gentle traction, pulling the scalpel towards you (laterally) with the left hand, keeping the scalpel
handle vertical to the skin (not slanted). 11. Pick the bougie up with your right hand. 12. Hold the bougie parallel to the floor, with the tip pointing toward you and upper end away, at a right
angle to the trachea 13. Slide the coudé tip of the bougie down the side of the scalpel blade into the trachea. 14. Rotate and align the bougie with the patient’s trachea 15. Advance with gentle two finger pressure, up to 10–15 cm, often feeling a pop on entering the airway and
should always feel the tip passing over tracheal rings. 16. Remove the scalpel 17. Reoxygenate via bougie with BVM and 15 mm Rapi-Fit. 18. Stabilize trachea and tension skin with left hand. 19. Railroad a lubricated size 6.0mmcuffed tracheal tube over the bougie. 20. Rotate continuously the tube over the bougie as it is advanced. Avoid excessive advancement and
endobronchial intubation. 21. Remove the bougie. 22. Inflate the cuff and confirm ventilation with capnography. 23. Secure the tube

RSI November 2017 R Swift v3.docx 25
Surgical Cricothyroidotomy (cont.)
Make a transverse stab incision through the skin and cricothyroid membrane with the cutting edge of the blade facing towards you
Turn it through 90° so that the sharp edge points caudally (towards the feet). Swap hands – keeping the scalpel steady. Maintain gentle traction, pulling the scalpel towards you
Slide the coudé tip of the bougie down the side of the scalpel blade into the trachea
Advance with gentle two finger pressure, up to 10–15 cm

RSI November 2017 R Swift v3.docx 26
Surgical Cricothyroidotomy (cont.)
Railroad a lubricated size 6.0mmcuffed tracheal tube over the bougie
Rotate continuously the tube over the bougie as it is advanced. Avoid excessive advancement and endobronchial intubation. Remove the bougie

RSI November 2017 R Swift v3.docx 27
Surgical Cricothyroidotomy (cont.) B. Cricothyroid membrane NOT palpable – Scalpel Finger Technique;
Equipment; Scalpel size 10, Cook Frova Intubating Introducer, 15 ml Rapi-fit connector, 6.0 ETT and a 5 or 10ml syringe.
1. Continue attempts at rescue oxygenation via upper airway (assistant) Description below is for Right handed operators; Left handed operators can swap sides 2. Right handed operator come from the patient’s left side of the bed 3. Attempt to identify the laryngeal anatomy using a laryngeal handshake. 4. Tension skin using the left hand. 5. Make an 8–10 cm midline vertical skin incision, caudal to cephalad (foot to head). 6. Use blunt dissection with fingers of both hands to separate tissues and identify and stabilize the larynx
with left hand. 7. Hold the scalpel in your right hand, make a transverse stab incision through the cricothyroid membrane
with the cutting edge of the blade facing towards you
8. Continue from Point 7. Scalpel Bougie Technique
Alternative Surgical Cricothyroidotomy (according to Richard Levitan – Doesn’t use Bougie) Similar to Surgical Cricothyroidotomy outlined above but he doesn’t advocate using a bougie, i.e.; 1. Continue attempts at rescue oxygenation via upper airway (assistant). 2. Right handed operator come from the patient’s left side of the bed (reverse if left handed) 3. Use the Laryngeal Handshake to identify the cricoid membrane with the left index finger 4. (Can use trachea if easily palpable) 5. Stabilise the airway with your left hand (see laryngeal handshake above) 6. Hold the scalpel in your right hand, and wrist and forearm on the patient’s sternum to steady the hand 7. If cricothyroid membrane identified;
Make a TRANSVERSE stab incision through the skin and cricothyroid membrane with the cutting edge of the blade facing towards you
Place the index finger of the non-dominate hand in the hole created to identify the passage
Grasp the ETT and lift the finger to allow passage Cricothyroid membrane not identified;
Make a LONGITUDINAL 5 – 6 cm incision through the skin with the scalpel and use the index finger of the either hand to blunt dissect down to identify the cricothyroid membrane (or trachea)
Make a transverse incision through the membrane of trachea.
Place the index finger of the non-dominate hand in the hole created to identify the passage
Grasp the ETT and lift the finger to allow passage
RSI November 2017 R Swift v3.docx 28
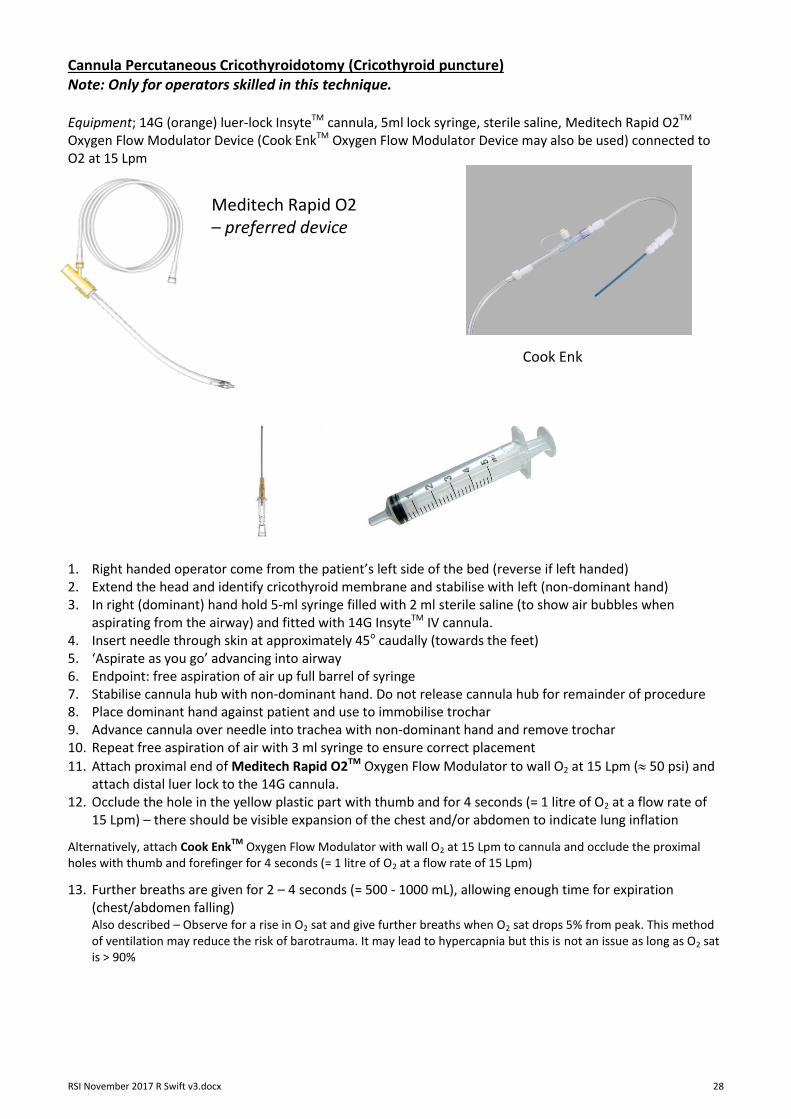
Cannula Percutaneous Cricothyroidotomy (Cricothyroid puncture) Note: Only for operators skilled in this technique. Equipment; 14G (orange) luer-lock InsyteTM cannula, 5ml lock syringe, sterile saline, Meditech Rapid O2TM Oxygen Flow Modulator Device (Cook EnkTM Oxygen Flow Modulator Device may also be used) connected to O2 at 15 Lpm 1. Right handed operator come from the patient’s left side of the bed (reverse if left handed) 2. Extend the head and identify cricothyroid membrane and stabilise with left (non-dominant hand) 3. In right (dominant) hand hold 5-ml syringe filled with 2 ml sterile saline (to show air bubbles when
aspirating from the airway) and fitted with 14G InsyteTM IV cannula. 4. Insert needle through skin at approximately 45o caudally (towards the feet) 5. ‘Aspirate as you go’ advancing into airway 6. Endpoint: free aspiration of air up full barrel of syringe 7. Stabilise cannula hub with non-dominant hand. Do not release cannula hub for remainder of procedure 8. Place dominant hand against patient and use to immobilise trochar 9. Advance cannula over needle into trachea with non-dominant hand and remove trochar 10. Repeat free aspiration of air with 3 ml syringe to ensure correct placement
11. Attach proximal end of Meditech Rapid O2TM Oxygen Flow Modulator to wall O2 at 15 Lpm ( 50 psi) and attach distal luer lock to the 14G cannula.
12. Occlude the hole in the yellow plastic part with thumb and for 4 seconds (= 1 litre of O2 at a flow rate of 15 Lpm) – there should be visible expansion of the chest and/or abdomen to indicate lung inflation
Alternatively, attach Cook EnkTM
Oxygen Flow Modulator with wall O2 at 15 Lpm to cannula and occlude the proximal holes with thumb and forefinger for 4 seconds (= 1 litre of O2 at a flow rate of 15 Lpm)
13. Further breaths are given for 2 – 4 seconds (= 500 - 1000 mL), allowing enough time for expiration (chest/abdomen falling) Also described – Observe for a rise in O2 sat and give further breaths when O2 sat drops 5% from peak. This method of ventilation may reduce the risk of barotrauma. It may lead to hypercapnia but this is not an issue as long as O2 sat is > 90%
Meditech Rapid O2 – preferred device
Cook Enk

RSI November 2017 R Swift v3.docx 29
Cook/Melker size 5.0 seldinger airway (Seldinger Percutaneous Cricothyroidotomy) This technique is commonly used in ICU to convert an ETT to tracheostomy. It is more time consuming but may be preferred by operators who are skilled at this technique. 1. Right handed operator come from the patient’s left side of the bed (reverse if left handed) 2. Extend the neck 3. Use the Laryngeal Handshake to identify the cricoid membrane with the left index finger 4. Stabilise the airway with your left hand 5. Insert the needle with syringe attached at 45o to the skin over the cricoid membrane 6. Advance needle while aspirating until air is drawn into syringe 7. Holding the needle firmly, remove the syringe and advance the wire through needle 5 – 10cms into the
trachea 8. Remove the needle 9. Reoxygenate via cannula with jet ventilation 10. Make a stab incision caudally with a scalpel where the needle enters the skin 11. Ensure the dilator is fully and completely seated inside the Melker 5.0 cuffed airway 12. Grip airway assembly device preventing the dilator moving back when it is advanced 13. Advance the Melker airway ⁄ dilator assembly device over the wire 14. Using moderate force and a slight screwing motion, through the skin into the trachea 15. Remove the wire and introducer 16. Inflate cuff 17. Attach self-inflating bag or circuit and ventilate 18. Secure the airway

RSI November 2017 R Swift v3.docx 30
Intubating Doctor Checklist
Preparation
PPE
Pre-Oxygenate NRM / BVM (CO2 monitor attached) NP 4 → 15 Lpm
Assess for difficult airway
Oral Airway / Nasal Airway
Delayed Sequence Intubation
Manual C-Spine immobilisation
Laryngeal manipulation
Position Patient (Ear canal = sternal notch)
Yankour suckers (x 2)
Which Laryngoscope and Blade size
ETT size Stylet Silastic Bougie
LMA size (Plan C)
Ventilator Settings
Plan A – Initial intubation strategy
Plan B – Alternative intubation strategy
Plan C – Rescue oxygenation and ventilation plan
Plan D – Can’t intubate / Can’t ventilate plan
Intubation Drugs o Sedation o Analgesia o Muscle Relaxant o Pressor o Atropine
Post-intubation Drugs o As above + others as clinically indicated
Intubation Intubation begins with drugs being given
Follow Plan – call out when Plan B, C or D needed
View – Cormack-Lehane Classification
Check ETT position
Maintain grip on ETT till secured
Connect to ventilator
Post-intubation Review vitals
Review Ventilator settings and airway pressure
NGT
Patient’s thorax up at 300
Post-intubation drugs
CXR
Disposition plan
Document procedure Specific Clinical Issues
Acidaemia
Bronchospasm
CAL
Hypoxaemia
Hypotension
Obesity