Embed Size (px)
Citation preview

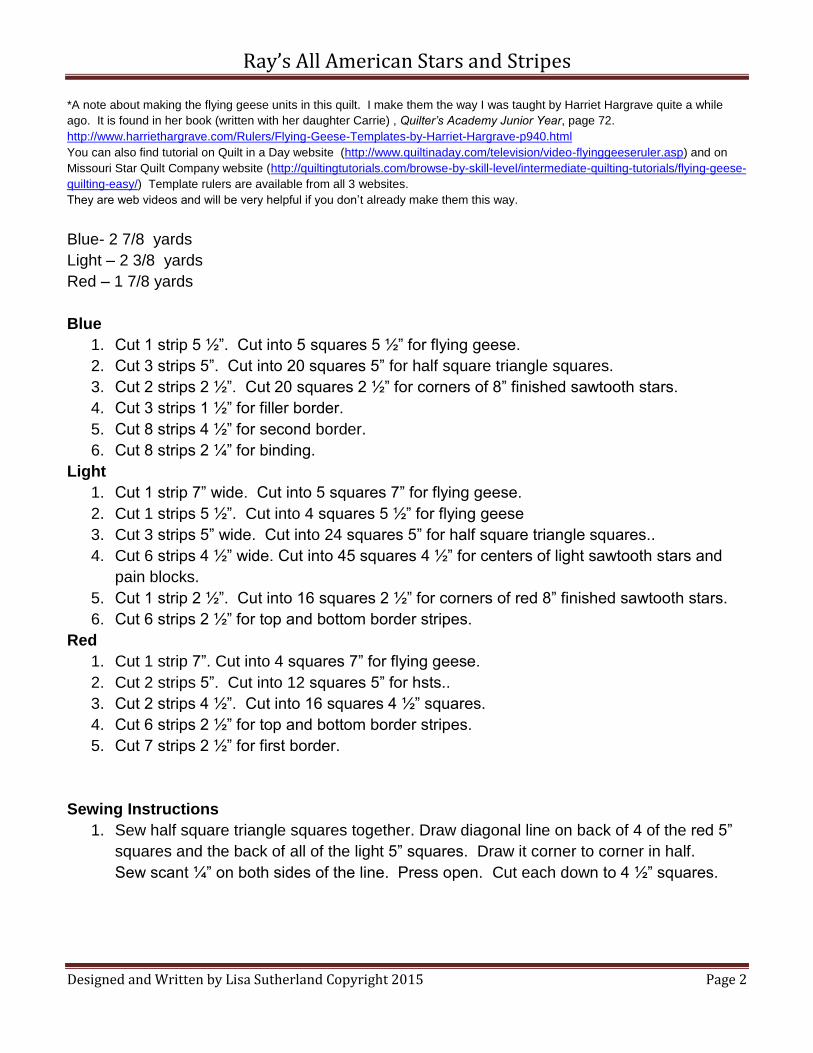
Ray’s All American Stars and Stripes
Designed and Written by Lisa Sutherland Copyright 2015 Page 1
Finishes 60” x 80”
Ray’s All American Stars and Stripes
Designed and Written by Lisa Sutherland Copyright 2015 Page 2
*A note about making the flying geese units in this quilt. I make them the way I was taught by Harriet Hargrave quite a while
ago. It is found in her book (written with her daughter Carrie) , Quilter’s Academy Junior Year, page 72.
http://www.harriethargrave.com/Rulers/Flying-Geese-Templates-by-Harriet-Hargrave-p940.html
You can also find tutorial on Quilt in a Day website (http://www.quiltinaday.com/television/video-flyinggeeseruler.asp) and on
Missouri Star Quilt Company website (http://quiltingtutorials.com/browse-by-skill-level/intermediate-quilting-tutorials/flying-geese-
quilting-easy/) Template rulers are available from all 3 websites.
They are web videos and will be very helpful if you don’t already make them this way.
Blue- 2 7/8 yards
Light – 2 3/8 yards
Red – 1 7/8 yards
Blue
1. Cut 1 strip 5 ½”. Cut into 5 squares 5 ½” for flying geese.
2. Cut 3 strips 5”. Cut into 20 squares 5” for half square triangle squares.
3. Cut 2 strips 2 ½”. Cut 20 squares 2 ½” for corners of 8” finished sawtooth stars.
4. Cut 3 strips 1 ½” for filler border.
5. Cut 8 strips 4 ½” for second border.
6. Cut 8 strips 2 ¼” for binding.
Light
1. Cut 1 strip 7” wide. Cut into 5 squares 7” for flying geese.
2. Cut 1 strips 5 ½”. Cut into 4 squares 5 ½” for flying geese
3. Cut 3 strips 5” wide. Cut into 24 squares 5” for half square triangle squares..
4. Cut 6 strips 4 ½” wide. Cut into 45 squares 4 ½” for centers of light sawtooth stars and
pain blocks.
5. Cut 1 strip 2 ½”. Cut into 16 squares 2 ½” for corners of red 8” finished sawtooth stars.
6. Cut 6 strips 2 ½” for top and bottom border stripes.
Red
1. Cut 1 strip 7”. Cut into 4 squares 7” for flying geese.
2. Cut 2 strips 5”. Cut into 12 squares 5” for hsts..
3. Cut 2 strips 4 ½”. Cut into 16 squares 4 ½” squares.
4. Cut 6 strips 2 ½” for top and bottom border stripes.
5. Cut 7 strips 2 ½” for first border.
Sewing Instructions
1. Sew half square triangle squares together. Draw diagonal line on back of 4 of the red 5”
squares and the back of all of the light 5” squares. Draw it corner to corner in half.
Sew scant ¼” on both sides of the line. Press open. Cut each down to 4 ½” squares.

Ray’s All American Stars and Stripes
Designed and Written by Lisa Sutherland Copyright 2015 Page 3
a. 16 blue 5” squares with 16 light 5” squares. Will make 32 hsts.
Make 32
b. 4 blue 5” with 4 red 5” squares. These are the marked red 5” squares. Will make 8
hsts.
Make 8
c. 8 red 5” squares with 8 light 5” squares. Will make 16 hsts.
Do not forget to cut down to 4 ½” squares.
2. Make flying geese units.
Need 16
Need 20
a. Mark back of (4) 5 ½” light and (5) 5 ½” blue squares diagonally in half corner to
corner.
b. Place the 5 ½” light squares right sides together with red 7” squares. Place smaller
square in center with ¾” all the way around of 7” square showing. Sew on both sides
of line with scant ¼” seam allowance.
c. Place 5 ½” blue squares right sides together with 7” light squares. Place smaller
square in center with ¾” all the way around of 7” light square showing. Sew on both
sides of marked line with scant ¼” seam allowance.
d. After sewn, cut apart on marked line. Press to larger side.
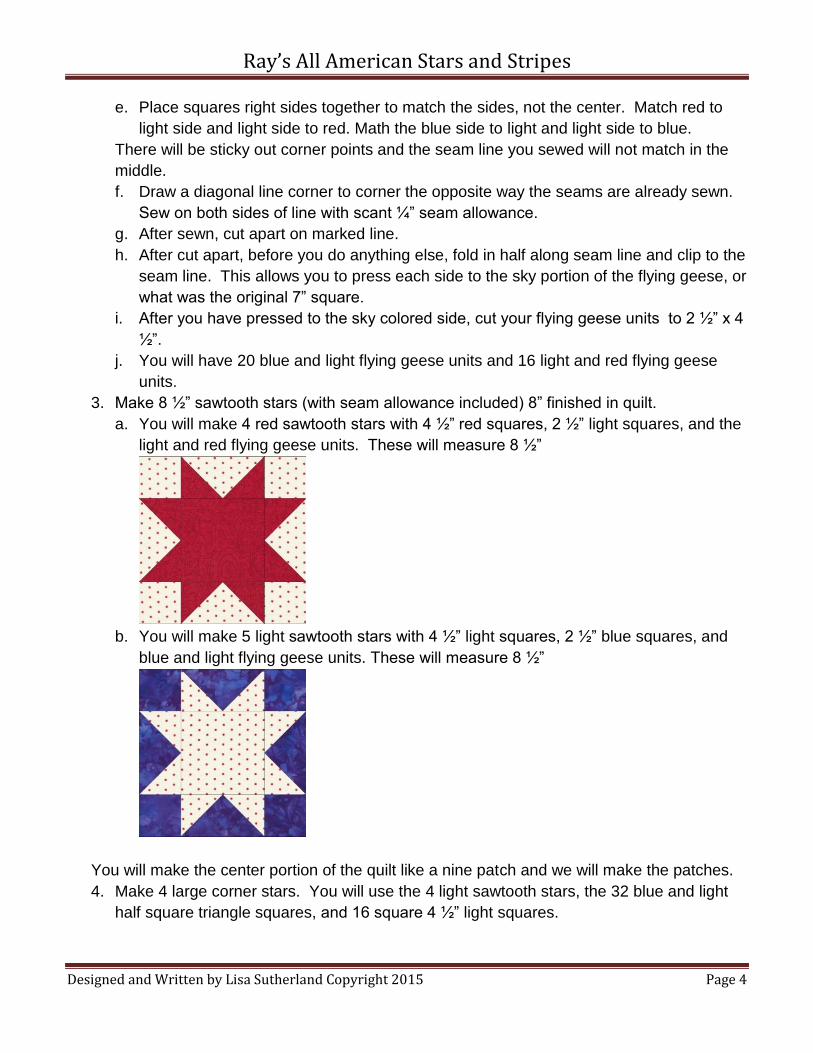
Ray’s All American Stars and Stripes
Designed and Written by Lisa Sutherland Copyright 2015 Page 4
e. Place squares right sides together to match the sides, not the center. Match red to
light side and light side to red. Math the blue side to light and light side to blue.
There will be sticky out corner points and the seam line you sewed will not match in the
middle.
f. Draw a diagonal line corner to corner the opposite way the seams are already sewn.
Sew on both sides of line with scant ¼” seam allowance.
g. After sewn, cut apart on marked line.
h. After cut apart, before you do anything else, fold in half along seam line and clip to the
seam line. This allows you to press each side to the sky portion of the flying geese, or
what was the original 7” square.
i. After you have pressed to the sky colored side, cut your flying geese units to 2 ½” x 4
½”.
j. You will have 20 blue and light flying geese units and 16 light and red flying geese
units.
3. Make 8 ½” sawtooth stars (with seam allowance included) 8” finished in quilt.
a. You will make 4 red sawtooth stars with 4 ½” red squares, 2 ½” light squares, and the
light and red flying geese units. These will measure 8 ½”
b. You will make 5 light sawtooth stars with 4 ½” light squares, 2 ½” blue squares, and
blue and light flying geese units. These will measure 8 ½”
You will make the center portion of the quilt like a nine patch and we will make the patches.
4. Make 4 large corner stars. You will use the 4 light sawtooth stars, the 32 blue and light
half square triangle squares, and 16 square 4 ½” light squares.
Ray’s All American Stars and Stripes
Designed and Written by Lisa Sutherland Copyright 2015 Page 5
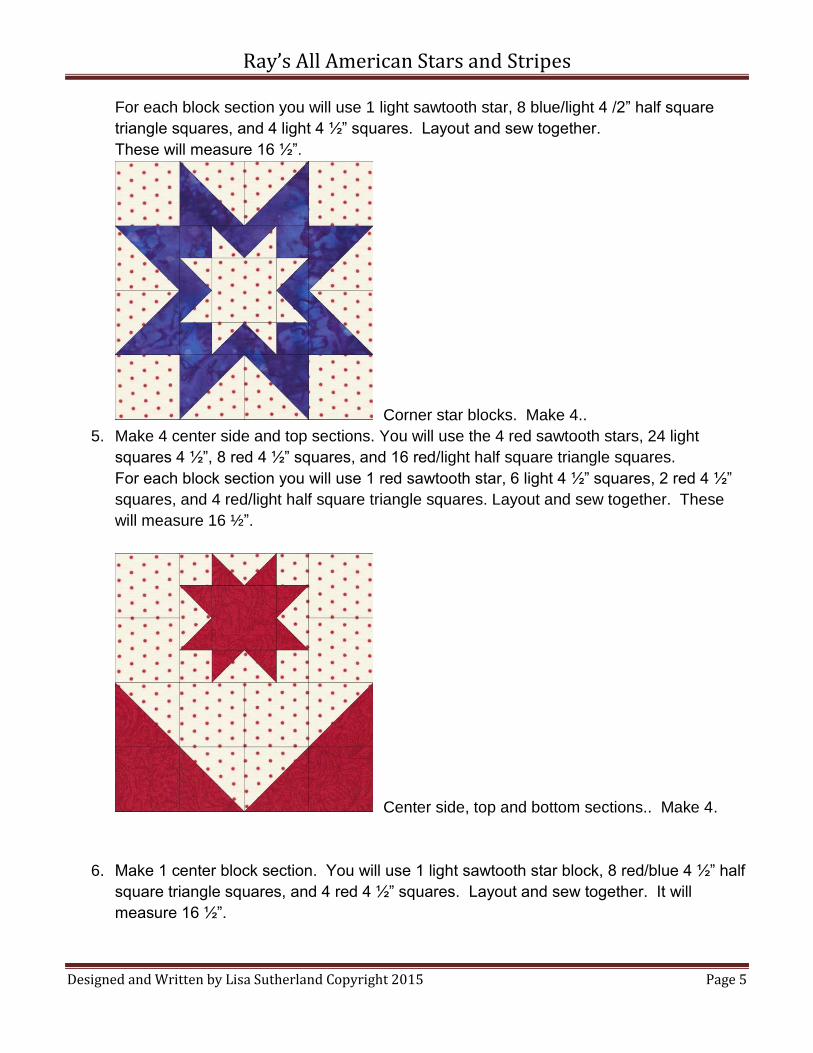
For each block section you will use 1 light sawtooth star, 8 blue/light 4 /2” half square
triangle squares, and 4 light 4 ½” squares. Layout and sew together.
These will measure 16 ½”.
Corner star blocks. Make 4..
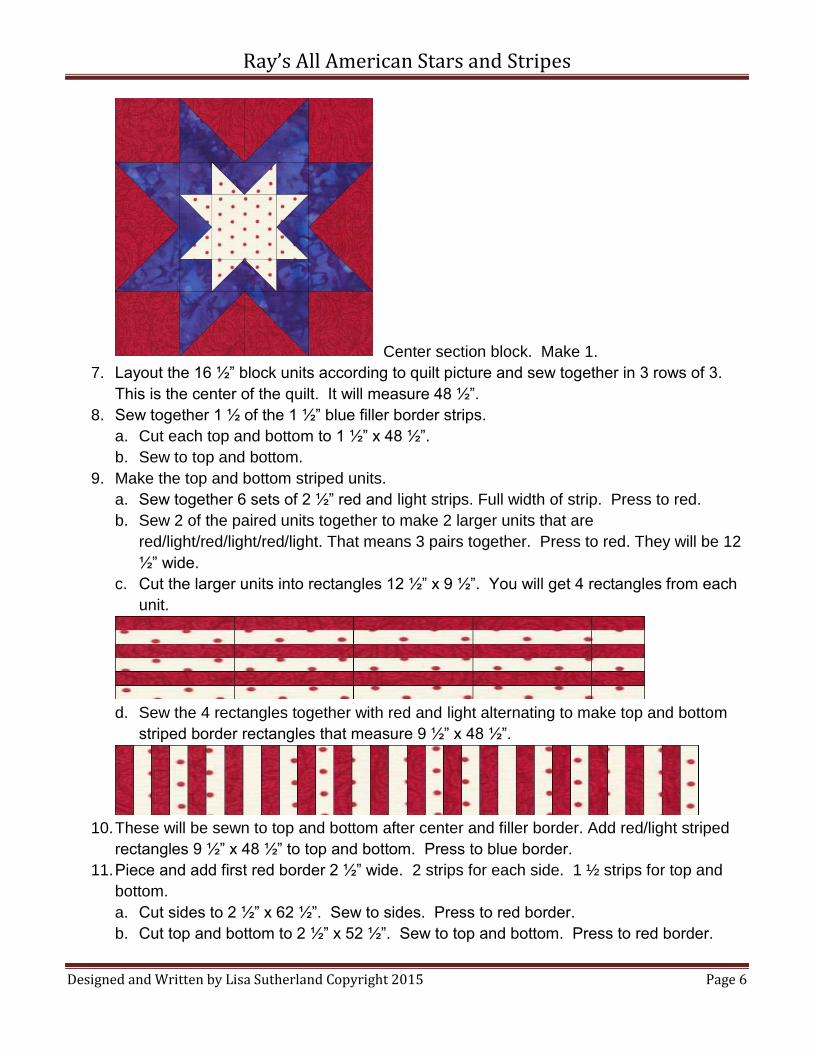
5. Make 4 center side and top sections. You will use the 4 red sawtooth stars, 24 light
squares 4 ½”, 8 red 4 ½” squares, and 16 red/light half square triangle squares.
For each block section you will use 1 red sawtooth star, 6 light 4 ½” squares, 2 red 4 ½”
squares, and 4 red/light half square triangle squares. Layout and sew together. These
will measure 16 ½”.
Center side, top and bottom sections.. Make 4.
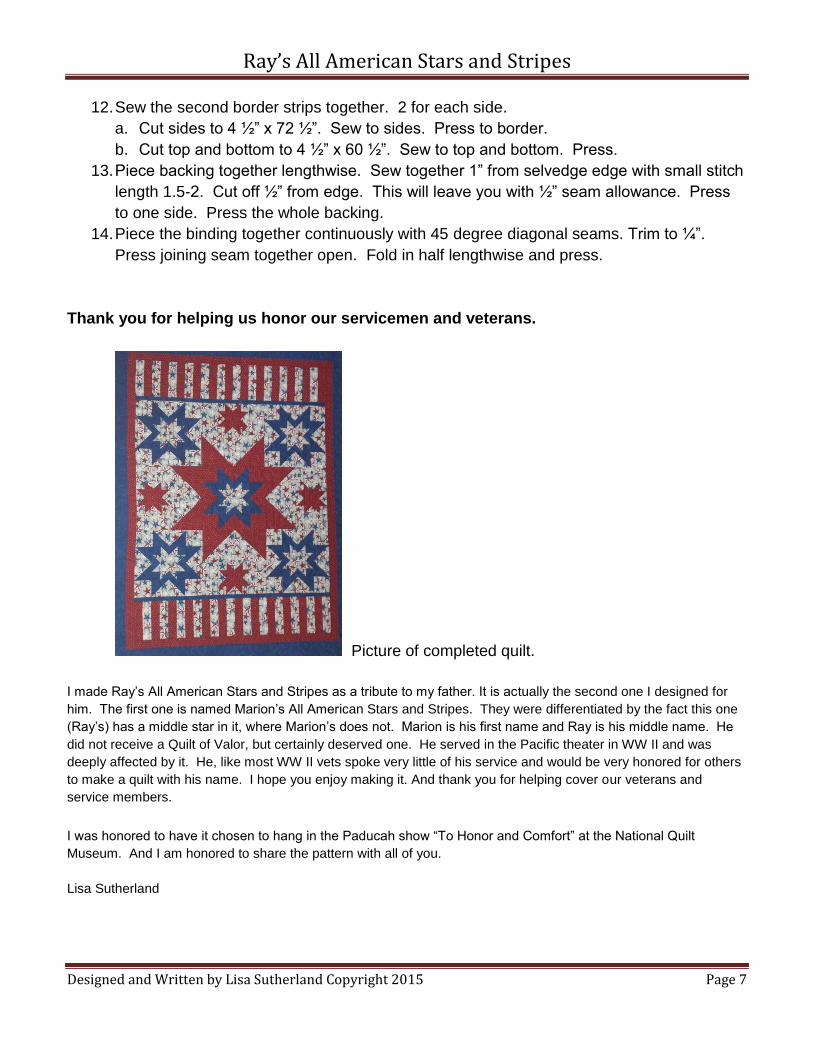
6. Make 1 center block section. You will use 1 light sawtooth star block, 8 red/blue 4 ½” half
square triangle squares, and 4 red 4 ½” squares. Layout and sew together. It will
measure 16 ½”.
Ray’s All American Stars and Stripes
Designed and Written by Lisa Sutherland Copyright 2015 Page 6
Center section block. Make 1.
7. Layout the 16 ½” block units according to quilt picture and sew together in 3 rows of 3.
This is the center of the quilt. It will measure 48 ½”.
8. Sew together 1 ½ of the 1 ½” blue filler border strips.
a. Cut each top and bottom to 1 ½” x 48 ½”.
b. Sew to top and bottom.
9. Make the top and bottom striped units.
a. Sew together 6 sets of 2 ½” red and light strips. Full width of strip. Press to red.
b. Sew 2 of the paired units together to make 2 larger units that are
red/light/red/light/red/light. That means 3 pairs together. Press to red. They will be 12
½” wide.
c. Cut the larger units into rectangles 12 ½” x 9 ½”. You will get 4 rectangles from each
unit.
d. Sew the 4 rectangles together with red and light alternating to make top and bottom
striped border rectangles that measure 9 ½” x 48 ½”.
10. These will be sewn to top and bottom after center and filler border. Add red/light striped
rectangles 9 ½” x 48 ½” to top and bottom. Press to blue border.
11. Piece and add first red border 2 ½” wide. 2 strips for each side. 1 ½ strips for top and
bottom.
a. Cut sides to 2 ½” x 62 ½”. Sew to sides. Press to red border.
b. Cut top and bottom to 2 ½” x 52 ½”. Sew to top and bottom. Press to red border.
Ray’s All American Stars and Stripes
Designed and Written by Lisa Sutherland Copyright 2015 Page 7
12. Sew the second border strips together. 2 for each side.
a. Cut sides to 4 ½” x 72 ½”. Sew to sides. Press to border.
b. Cut top and bottom to 4 ½” x 60 ½”. Sew to top and bottom. Press.
13. Piece backing together lengthwise. Sew together 1” from selvedge edge with small stitch
length 1.5-2. Cut off ½” from edge. This will leave you with ½” seam allowance. Press
to one side. Press the whole backing.
14. Piece the binding together continuously with 45 degree diagonal seams. Trim to ¼”.
Press joining seam together open. Fold in half lengthwise and press.
Thank you for helping us honor our servicemen and veterans.
Picture of completed quilt.
I made Ray’s All American Stars and Stripes as a tribute to my father. It is actually the second one I designed for
him. The first one is named Marion’s All American Stars and Stripes. They were differentiated by the fact this one
(Ray’s) has a middle star in it, where Marion’s does not. Marion is his first name and Ray is his middle name. He
did not receive a Quilt of Valor, but certainly deserved one. He served in the Pacific theater in WW II and was
deeply affected by it. He, like most WW II vets spoke very little of his service and would be very honored for others
to make a quilt with his name. I hope you enjoy making it. And thank you for helping cover our veterans and
service members.
I was honored to have it chosen to hang in the Paducah show “To Honor and Comfort” at the National Quilt
Museum. And I am honored to share the pattern with all of you.
Lisa Sutherland