Embed Size (px)
Citation preview
Real Heavy Haulage Transport Management PlanTransportation of Steel Frames
St Marys to Glendenning
1. Movement Details
Dimensions of Steel Frame Width: 6.1 metres Length: 19.0 metres Height: 3.5 metres
Dimensions of Combination Width: 6.1 metres Length: 25.0 metres Height: 5.0 metres Axle spacing: 2.5 metres
Proposed Commencement Date & Times
4 x 6.1 metre wide steel frames to be transported commencing Sunday 21 July 2013 until Sunday 4 August 2013.
Movements to begin at midnight (12:00 am) and end by 2:00 am
Proposed Schedule of movements Date Movement Driver Name Time
Sunday 21 July 2013 Steel Frame 1 Ralph Movements depart St Marys at 12.00 am and
reach Glendenning by 2:00 am
Wednesday 24 July 2013 Steel Frame 2 Sam Sunday 28 July 2013 Steel Frame 3 Ralph
Sunday 4 August 2013 Steel Frame 4 Tom
Proposed Route
St Marys to Glendenning viaLee Holm Road, Power Street, Wordoo Street, Forrester Road, Glossop Street, Great Western Highway, Westlink M7, Woodstock Avenue, Glendenning Road
Distance of movement: 14 kilometres No railway level crossing on proposed route.
1
2. Emergency Contacts & Plans
Police/Fire/Ambulance, PH: 000 Transport Management Centre (TMC), (PH) 131 700 Standby truck and trailer in Sydney, PH: (02) 6669 2154 XYZ Heavy Towing Sydney, PH: (02) 7775 5641 LCD Cranes Sydney, PH: (02) 5452 1213 Westlink M7 Traffic Operations Room, PH: (02) 02 9834 9220 Site Contact – Jim Alpha: PH: (02) 9875 5679
Where a tow is required, the trailer will be unhooked from the prime mover and a standby truck will be called. TMC will be notified in such an event. Police are to direct and manage traffic as appropriate.
If police decide that the movement should be suspended as a result of time or potential traffic impacts the trailer with the load will be moved to a safe parking location and the TMC will be notified.
In the event of any emergency situation encountered while travelling on the M7, the load will be moved to the left lane and shoulder. Contact will be made with the M7 Traffic Operations Room to advise so that the necessary warnings can be made.
In the event of bad weather such as heavy rain a decision will be made by the company by the afternoon of the movement date. All relevant parties will be notified at this time and a suitable alternative date for the movement will be set if required. This will require further consultation with relevant parties.
Where bad weather is encountered along the way the movement is to proceed to the nearest and safest area suitable that can accommodate the load. A decision will be made by the police and the company as to whether the movement is to proceed any further. In the event of any delay encountered the TMC and/or the M7 Traffic Operations Room will be contacted.
3. Communication Protocol
A pre departure meeting will be held 15 minutes prior to the commencement of the movement.
In the event of an emergency situation such as a truck breakdown, flat tyre etc the load will be moved to the left lane and shoulder to ensure minimal traffic impacts, police are to direct and manage traffic as appropriate. Pilots accompanying the movement must follow the directions of police at all times. In such instances the TMC will be promptly advised so that the necessary warnings can be made.
Communication between parties involved in the movement will occur on a UHF channel chosen on the day. All parties will be informed of this channel in the pre departure meeting held before the movement along with all procedures outlined in this document.
All communications between pilot vehicles and/or police and other heavy vehicles will occur on UHF Channel 40 unless otherwise specified.
2
4. Contact with Road Managers/Other Authorities/Public
Real Heavy Haulage has contacted Penrith City Council, Blacktown City Council, TMC and the Westlink M7 in order to ensure smooth and safe access to the road network for this movement.
A letter drop will be conducted one week in advance of the movement date to all businesses and residents in the vicinity of Lee Holm Road, Power Street and Wordoo Avenue informing them of the upcoming movement and requesting that vehicles do not park on these streets on the dates of the movements so that there is sufficient clearance for the load. The movement is also being conducted at night to ensure that there are minimal disruptions to the road network, other road users and local businesses.
The TMC has been contacted to ensure that Road Occupancy License (ROL) holders are aware of the movement and timings for each section of this movement have been provided in this TMP to assist with planning and traffic coordination.
As Real Heavy Haulage intends to use the Westlink M7 prior contact is required in order to coordinate entry and exit on and off the motorway. Real Heavy Haulage will provide the Traffic Operations Room with 10-15 minutes warning prior to entry onto the motorway. This will provide sufficient time for Variable Speed Limit Signs (VSLS) and Variable Message Signs (VMS) to be changed, warning other road users of the approaching oversize movement. Once the load has exited off the motorway, Real Heavy Haulage will once again contact the Traffic Operations Room advising that travel on the M7 is complete. A copy of this TMP has also been provided to Westlink M7.
Blacktown City Council has also been contacted regarding this movement and a letter box drop advising all residents and businesses on Woodstock Avenue and Glendenning Road of this movement will occur one week prior to the movement dates. Penrith City Council has also been contacted regarding this movement and a letter box drop advising all residents and businesses on Lee Holm Road, Power Street and Wordoo Avenue one week prior to the movement dates will be carried out.
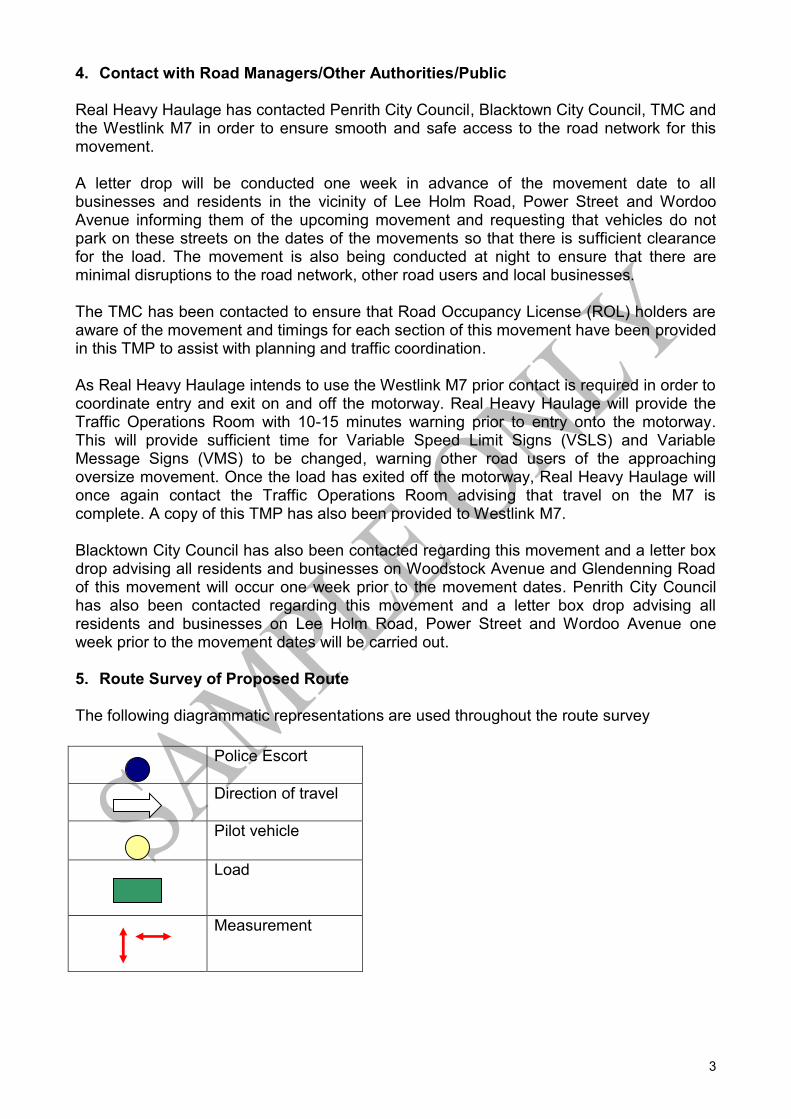
5. Route Survey of Proposed Route
The following diagrammatic representations are used throughout the route survey
Police Escort
Direction of travel
Pilot vehicle
Load
Measurement
3
8.0m
8.0m
8.0m
1
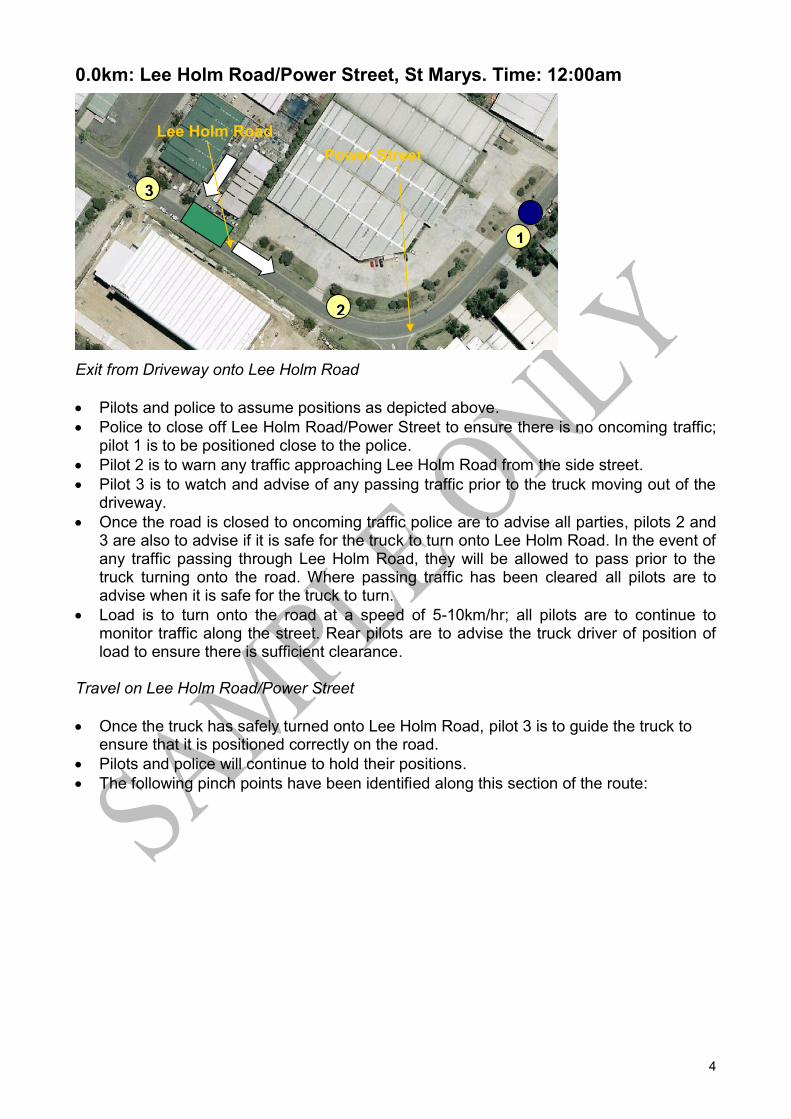
0.0km: Lee Holm Road/Power Street, St Marys. Time: 12:00am
1
1
1
1
1
2
3
Power Street Lee Holm Road
Exit from Driveway onto Lee Holm Road
Pilots and police to assume positions as depicted above. Police to close off Lee Holm Road/Power Street to ensure there is no oncoming traffic;
pilot 1 is to be positioned close to the police. Pilot 2 is to warn any traffic approaching Lee Holm Road from the side street. Pilot 3 is to watch and advise of any passing traffic prior to the truck moving out of the
driveway. Once the road is closed to oncoming traffic police are to advise all parties, pilots 2 and
3 are also to advise if it is safe for the truck to turn onto Lee Holm Road. In the event of any traffic passing through Lee Holm Road, they will be allowed to pass prior to the truck turning onto the road. Where passing traffic has been cleared all pilots are to advise when it is safe for the truck to turn.
Load is to turn onto the road at a speed of 5-10km/hr; all pilots are to continue to monitor traffic along the street. Rear pilots are to advise the truck driver of position of load to ensure there is sufficient clearance.
Travel on Lee Holm Road/Power Street
Once the truck has safely turned onto Lee Holm Road, pilot 3 is to guide the truck to ensure that it is positioned correctly on the road.
Pilots and police will continue to hold their positions. The following pinch points have been identified along this section of the route:
4
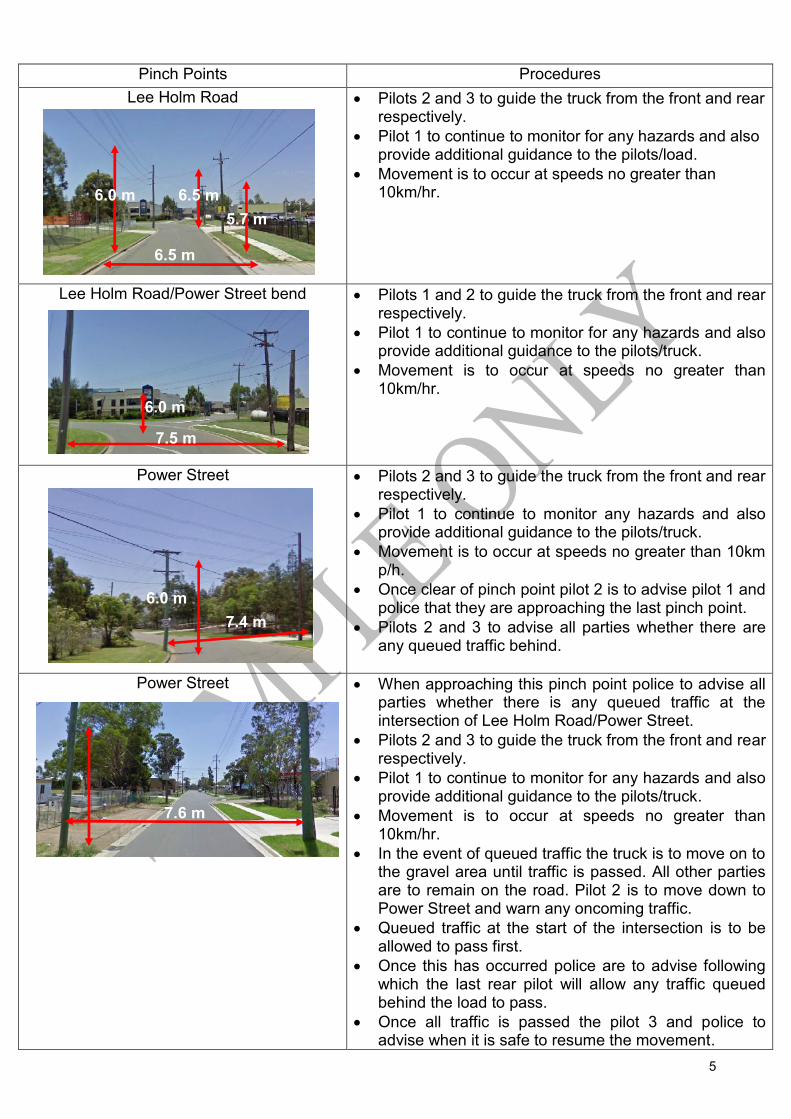
Pinch Points Procedures Lee Holm Road
6.5 m 6.0 m
6.5 m
5.7 m
Pilots 2 and 3 to guide the truck from the front and rear respectively. Pilot 1 to continue to monitor for any hazards and also provide additional guidance to the pilots/load. Movement is to occur at speeds no greater than 10km/hr.
Lee Holm Road/Power Street bend
7.5 m
6.0 m
Pilots 1 and 2 to guide the truck from the front and rear respectively. Pilot 1 to continue to monitor for any hazards and also provide additional guidance to the pilots/truck. Movement is to occur at speeds no greater than 10km/hr.
Power Street
7.4 m 6.0 m
Pilots 2 and 3 to guide the truck from the front and rear respectively. Pilot 1 to continue to monitor any hazards and also provide additional guidance to the pilots/truck. Movement is to occur at speeds no greater than 10km p/h. Once clear of pinch point pilot 2 is to advise pilot 1 and police that they are approaching the last pinch point. Pilots 2 and 3 to advise all parties whether there are any queued traffic behind.
Power Street
7.6 m
When approaching this pinch point police to advise all parties whether there is any queued traffic at the intersection of Lee Holm Road/Power Street. Pilots 2 and 3 to guide the truck from the front and rear respectively. Pilot 1 to continue to monitor for any hazards and also provide additional guidance to the pilots/truck. Movement is to occur at speeds no greater than 10km/hr. In the event of queued traffic the truck is to move on to the gravel area until traffic is passed. All other parties are to remain on the road. Pilot 2 is to move down to Power Street and warn any oncoming traffic. Queued traffic at the start of the intersection is to be allowed to pass first. Once this has occurred police are to advise following which the last rear pilot will allow any traffic queued behind the load to pass. Once all traffic is passed the pilot 3 and police to advise when it is safe to resume the movement.
5
8.0m
8.0m
8.0m
Power Street
Wordoo Street
Forrester Road
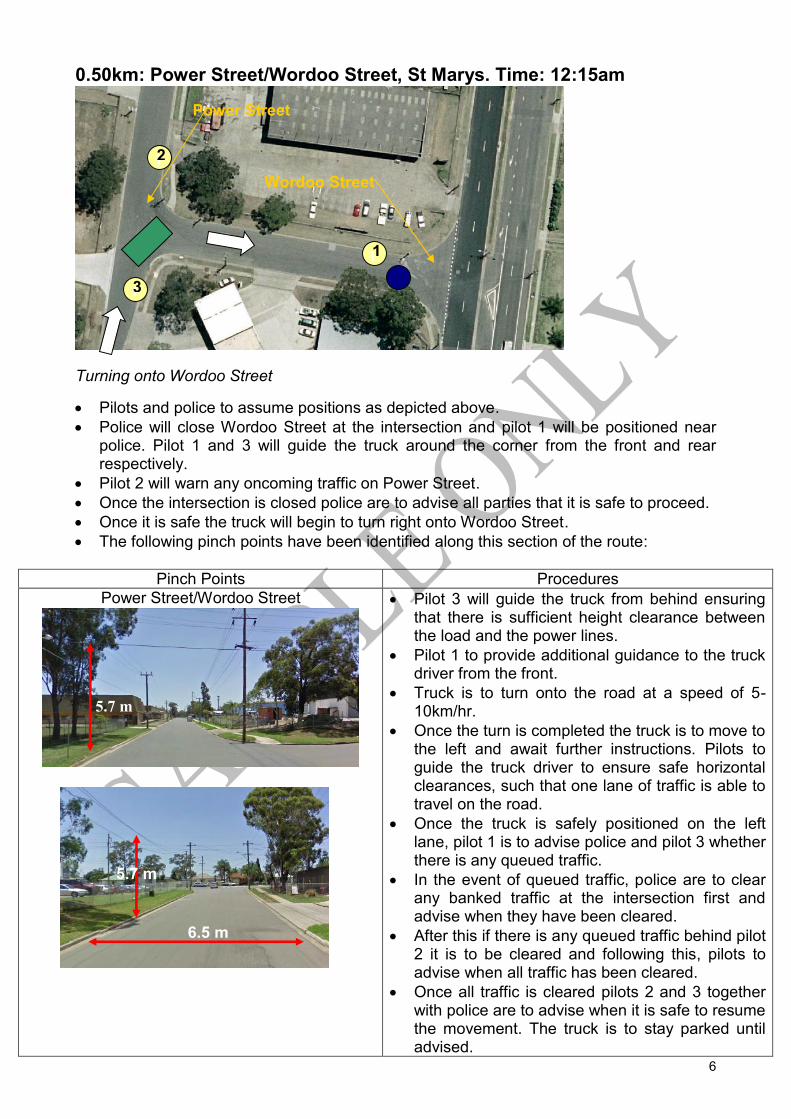
0.50km: Power Street/Wordoo Street, St Marys. Time: 12:15am
5.7 m
1
1
1
1
2
3
Wordoo Street
Power Street
Turning onto Wordoo Street
Pilots and police to assume positions as depicted above. Police will close Wordoo Street at the intersection and pilot 1 will be positioned near
police. Pilot 1 and 3 will guide the truck around the corner from the front and rear respectively.
Pilot 2 will warn any oncoming traffic on Power Street. Once the intersection is closed police are to advise all parties that it is safe to proceed. Once it is safe the truck will begin to turn right onto Wordoo Street. The following pinch points have been identified along this section of the route:
Pinch Points Procedures Power Street/Wordoo Street Pilot 3 will guide the truck from behind ensuring
that there is sufficient height clearance between the load and the power lines.
Pilot 1 to provide additional guidance to the truck driver from the front.
Truck is to turn onto the road at a speed of 5-10km/hr.
Once the turn is completed the truck is to move to the left and await further instructions. Pilots to guide the truck driver to ensure safe horizontal clearances, such that one lane of traffic is able to travel on the road.
Once the truck is safely positioned on the left lane, pilot 1 is to advise police and pilot 3 whether there is any queued traffic.
In the event of queued traffic, police are to clear any banked traffic at the intersection first and advise when they have been cleared.
After this if there is any queued traffic behind pilot 2 it is to be cleared and following this, pilots to advise when all traffic has been cleared.
Once all traffic is cleared pilots 2 and 3 together with police are to advise when it is safe to resume the movement. The truck is to stay parked until advised.
5.7 m
6.5 m
6
8.0m
8.0m
8.0m
1
2
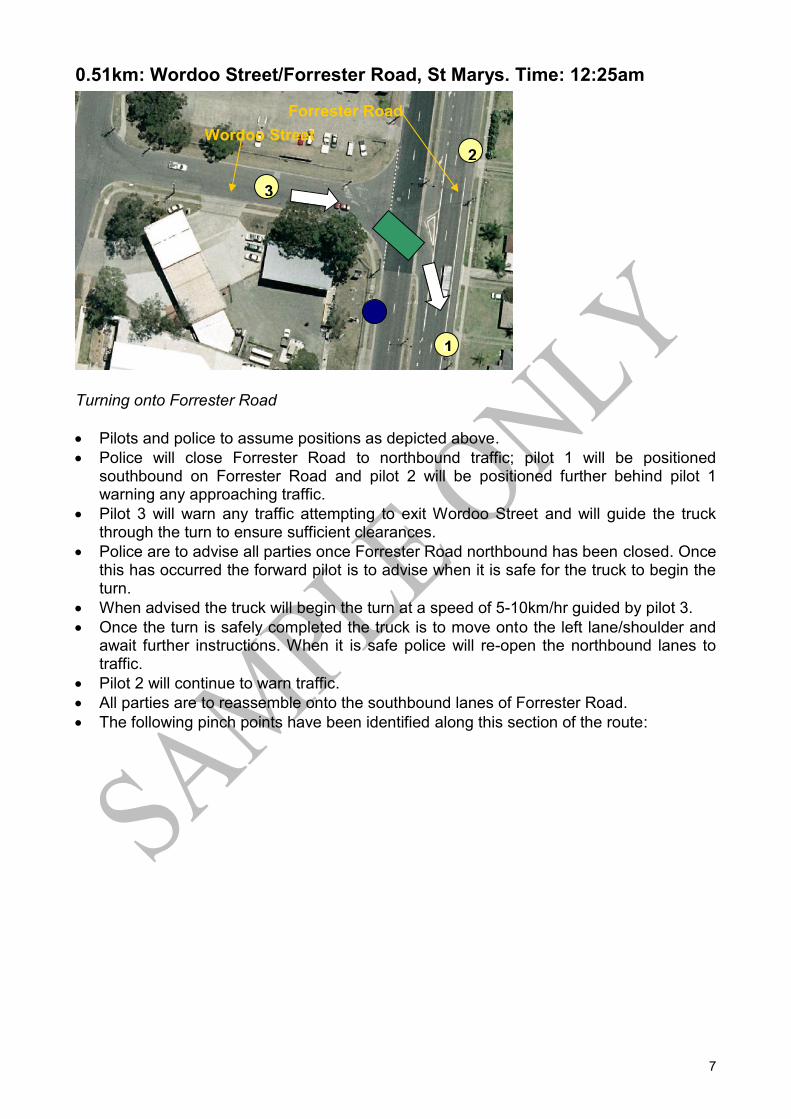
0.51km: Wordoo Street/Forrester Road, St Marys. Time: 12:25am
1
1
1
Wordoo Street Forrester Road
1
2
3
Turning onto Forrester Road
Pilots and police to assume positions as depicted above. Police will close Forrester Road to northbound traffic; pilot 1 will be positioned
southbound on Forrester Road and pilot 2 will be positioned further behind pilot 1 warning any approaching traffic.
Pilot 3 will warn any traffic attempting to exit Wordoo Street and will guide the truck through the turn to ensure sufficient clearances.
Police are to advise all parties once Forrester Road northbound has been closed. Once this has occurred the forward pilot is to advise when it is safe for the truck to begin the turn.
When advised the truck will begin the turn at a speed of 5-10km/hr guided by pilot 3. Once the turn is safely completed the truck is to move onto the left lane/shoulder and
await further instructions. When it is safe police will re-open the northbound lanes to traffic.
Pilot 2 will continue to warn traffic. All parties are to reassemble onto the southbound lanes of Forrester Road. The following pinch points have been identified along this section of the route:
7
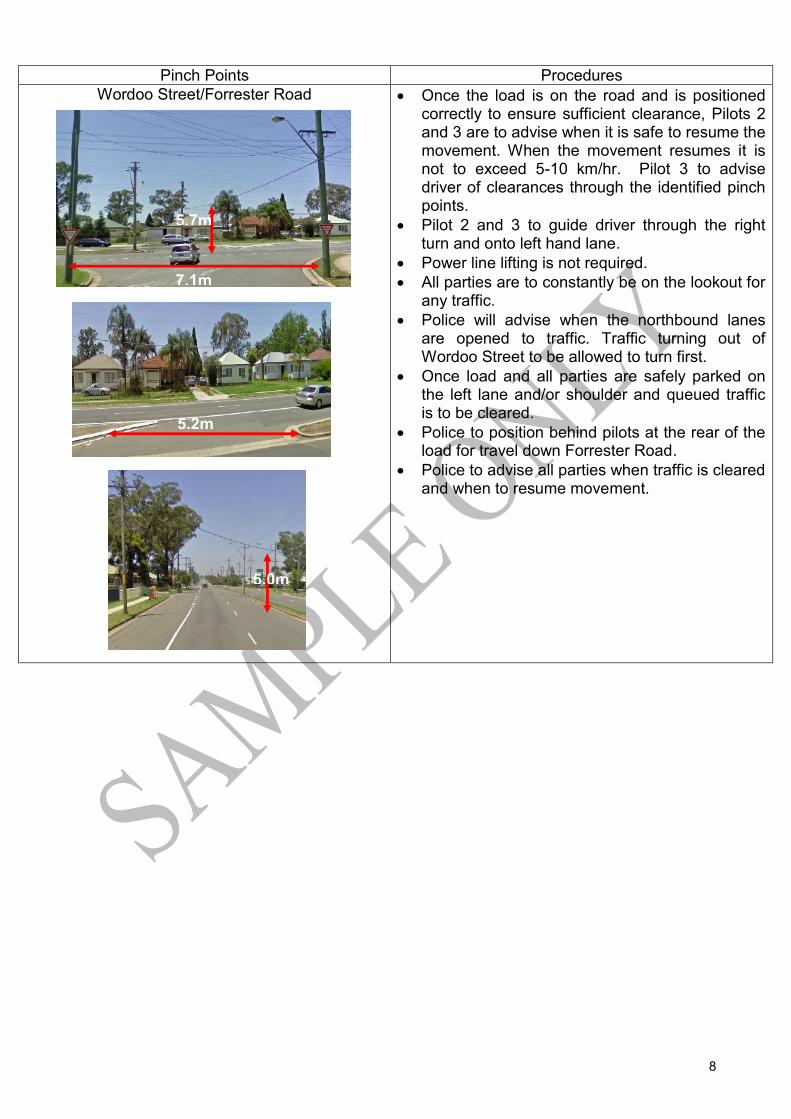
Pinch Points Procedures Wordoo Street/Forrester Road Once the load is on the road and is positioned
correctly to ensure sufficient clearance, Pilots 2 and 3 are to advise when it is safe to resume the movement. When the movement resumes it is not to exceed 5-10 km/hr. Pilot 3 to advise driver of clearances through the identified pinch points.
Pilot 2 and 3 to guide driver through the right turn and onto left hand lane.
Power line lifting is not required. All parties are to constantly be on the lookout for
any traffic. Police will advise when the northbound lanes
are opened to traffic. Traffic turning out of Wordoo Street to be allowed to turn first.
Once load and all parties are safely parked on the left lane and/or shoulder and queued traffic is to be cleared.
Police to position behind pilots at the rear of the load for travel down Forrester Road.
Police to advise all parties when traffic is cleared and when to resume movement.
5.7m
7.1m
5.2m
5.0m
8

8.0m
8.0m
8.0m
Forrester Road1
23
0.51km: Forrester Road, St Marys. Time: 12:35am
Travel on Forrester Road
Pilots and police to assume positions as depicted above. Pilots to watch for traffic entering from side streets and police to manage any queued
traffic. Forrester Road is a two laned road with a shoulder. Lane width is 7.0 metres. Speedzone is 60km/hr. Travel speed on this road will be 40 – 50km/hr. Police to advise all parties of any queued traffic. In the event of a queue of up to 5 vehicles, police is to advise all parties of the need to
clear traffic. Where there is less than 5 vehicles, these vehicles will be allowed to pass prior to the left turn onto Glossop Street.
Pilots 2 and 3 to guide the load into the shoulder ensuring sufficient clearances and to advise police when complete.
Police to allow any queued traffic to pass and when all traffic has passed to advise all parties to safely resume the movement.
Pilots 2 and 3 to guide the load back onto the lanes and movement to continue to the traffic light at the intersection of Glossop and Forrester Road.
11
1 Forrester Road
12
3
9
8.0m
8.0m
8.0m
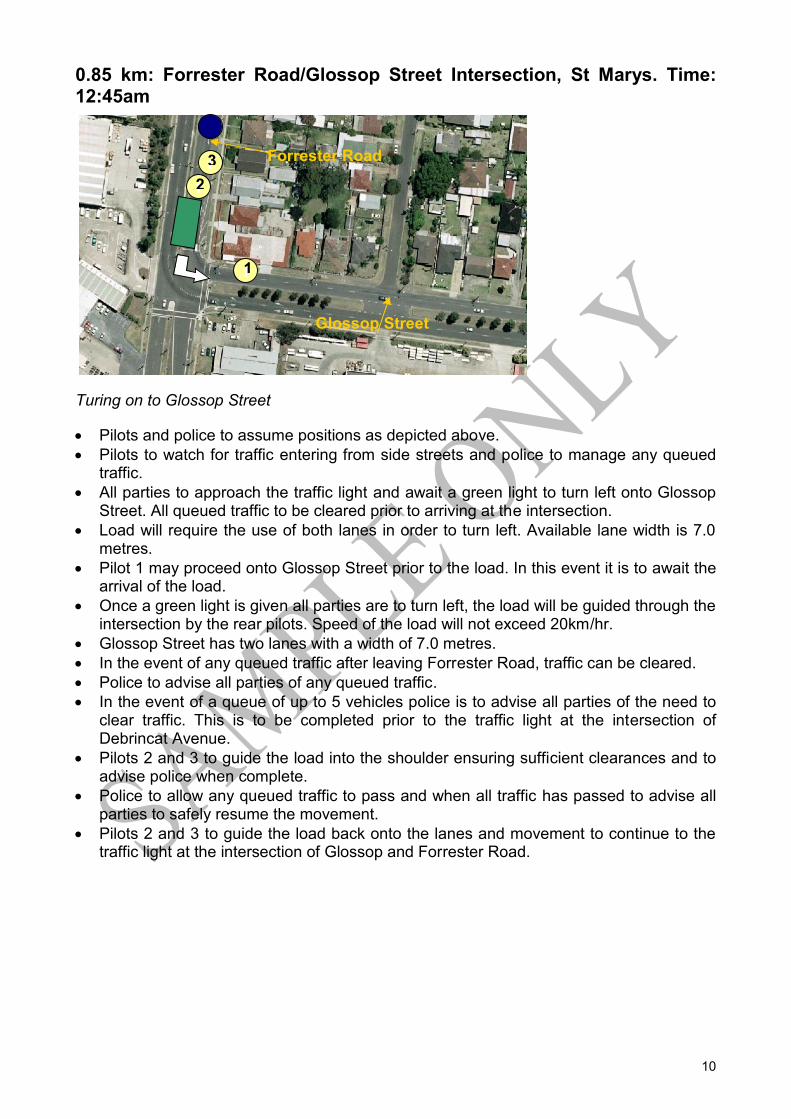
0.85 km: Forrester Road/Glossop Street Intersection, St Marys. Time: 12:45am
Turing on to Glossop Street
Pilots and police to assume positions as depicted above. Pilots to watch for traffic entering from side streets and police to manage any queued
traffic. All parties to approach the traffic light and await a green light to turn left onto Glossop
Street. All queued traffic to be cleared prior to arriving at the intersection. Load will require the use of both lanes in order to turn left. Available lane width is 7.0
metres. Pilot 1 may proceed onto Glossop Street prior to the load. In this event it is to await the
arrival of the load. Once a green light is given all parties are to turn left, the load will be guided through the
intersection by the rear pilots. Speed of the load will not exceed 20km/hr. Glossop Street has two lanes with a width of 7.0 metres. In the event of any queued traffic after leaving Forrester Road, traffic can be cleared. Police to advise all parties of any queued traffic. In the event of a queue of up to 5 vehicles police is to advise all parties of the need to
clear traffic. This is to be completed prior to the traffic light at the intersection of Debrincat Avenue.
Pilots 2 and 3 to guide the load into the shoulder ensuring sufficient clearances and to advise police when complete.
Police to allow any queued traffic to pass and when all traffic has passed to advise all parties to safely resume the movement.
Pilots 2 and 3 to guide the load back onto the lanes and movement to continue to the traffic light at the intersection of Glossop and Forrester Road.
1 1
1
Forrester Road
Glossop Street
1
2 3
10
8.0m
8.0m
Avenue
8.0m
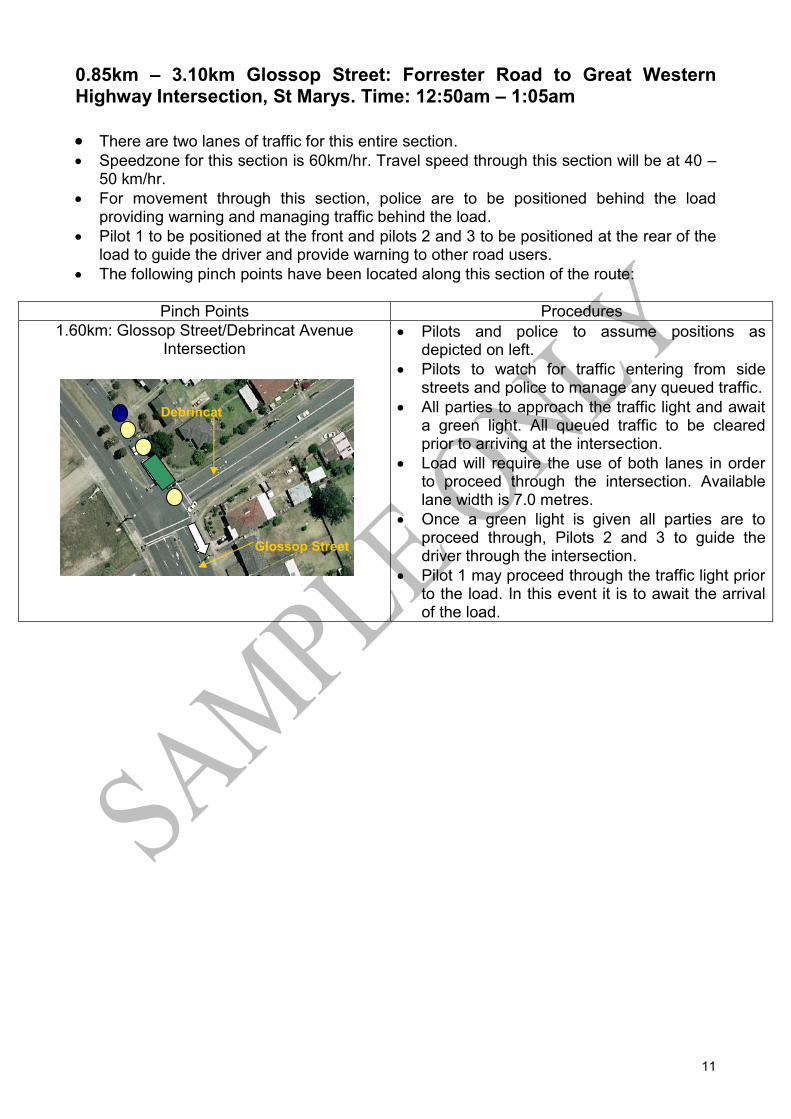
0.85km – 3.10km Glossop Street: Forrester Road to Great Western Highway Intersection, St Marys. Time: 12:50am – 1:05am
There are two lanes of traffic for this entire section. Speedzone for this section is 60km/hr. Travel speed through this section will be at 40 –
50 km/hr. For movement through this section, police are to be positioned behind the load
providing warning and managing traffic behind the load. Pilot 1 to be positioned at the front and pilots 2 and 3 to be positioned at the rear of the
load to guide the driver and provide warning to other road users. The following pinch points have been located along this section of the route:
Pinch Points Procedures 1.60km: Glossop Street/Debrincat Avenue
Intersection Pilots and police to assume positions as
depicted on left. Pilots to watch for traffic entering from side
streets and police to manage any queued traffic. All parties to approach the traffic light and await
a green light. All queued traffic to be cleared prior to arriving at the intersection.
Load will require the use of both lanes in order to proceed through the intersection. Available lane width is 7.0 metres.
Once a green light is given all parties are to proceed through, Pilots 2 and 3 to guide the driver through the intersection.
Pilot 1 may proceed through the traffic light prior to the load. In this event it is to await the arrival of the load.
1 1
Debrincat
Glossop Street
1
11
8.0m
8.0m
8.0m
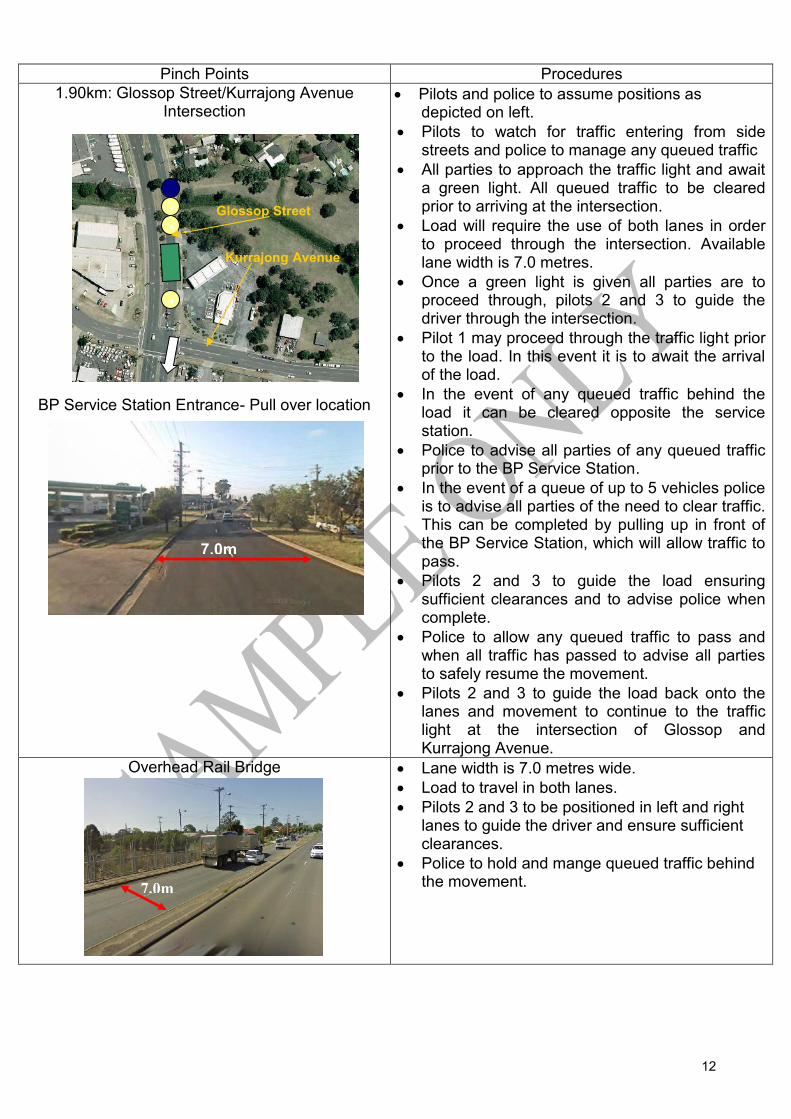
Pinch Points Procedures 1.90km: Glossop Street/Kurrajong Avenue
Intersection
BP Service Station Entrance- Pull over location
1
1 1 Glossop Street
Kurrajong Avenue
7.0m
Pilots and police to assume positions as depicted on left. Pilots to watch for traffic entering from side streets and police to manage any queued traffic All parties to approach the traffic light and await a green light. All queued traffic to be cleared prior to arriving at the intersection. Load will require the use of both lanes in order to proceed through the intersection. Available lane width is 7.0 metres. Once a green light is given all parties are to proceed through, pilots 2 and 3 to guide the driver through the intersection. Pilot 1 may proceed through the traffic light prior to the load. In this event it is to await the arrival of the load. In the event of any queued traffic behind the load it can be cleared opposite the service station. Police to advise all parties of any queued traffic prior to the BP Service Station. In the event of a queue of up to 5 vehicles police is to advise all parties of the need to clear traffic. This can be completed by pulling up in front of the BP Service Station, which will allow traffic to pass. Pilots 2 and 3 to guide the load ensuring sufficient clearances and to advise police when complete. Police to allow any queued traffic to pass and when all traffic has passed to advise all parties to safely resume the movement. Pilots 2 and 3 to guide the load back onto the lanes and movement to continue to the traffic light at the intersection of Glossop and Kurrajong Avenue.
Overhead Rail Bridge
7.0m
Lane width is 7.0 metres wide. Load to travel in both lanes. Pilots 2 and 3 to be positioned in left and right lanes to guide the driver and ensure sufficient clearances. Police to hold and mange queued traffic behind the movement.
12
8.0m
8.0m
8.0m
8.0m
8.0m
8.0m
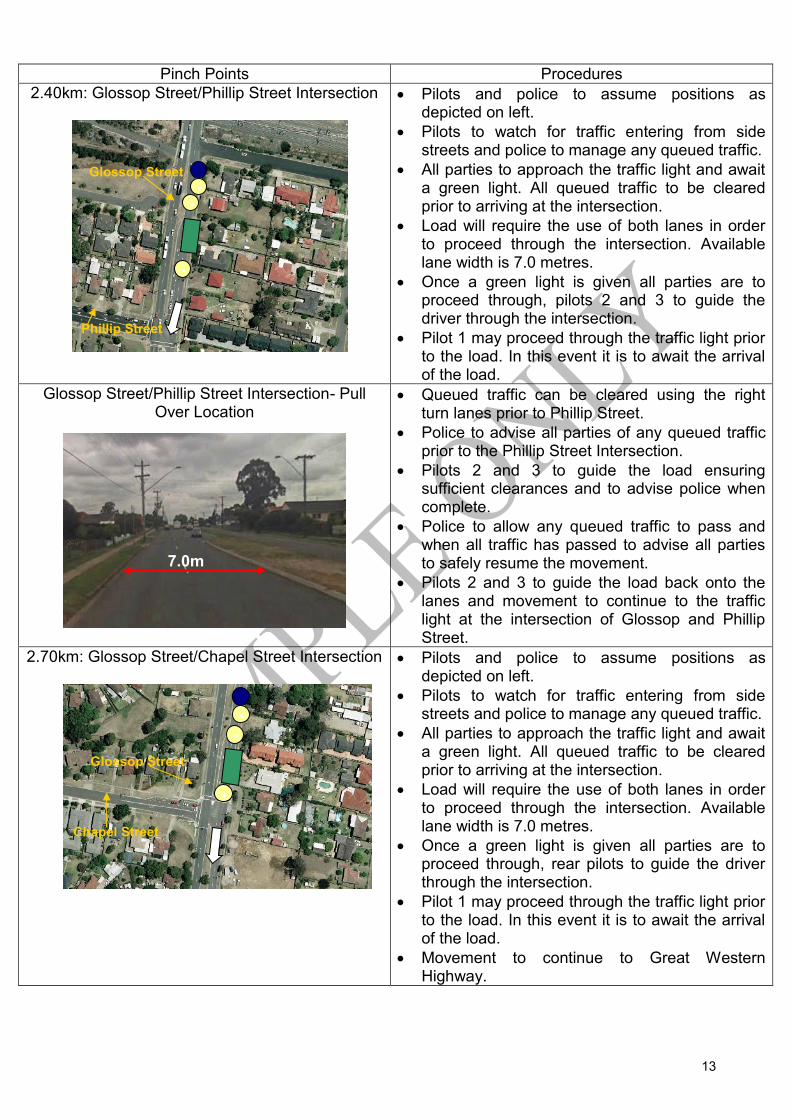
Pinch Points Procedures 2.40km: Glossop Street/Phillip Street Intersection
1
1 1
Phillip Street
Glossop Street
Pilots and police to assume positions as depicted on left. Pilots to watch for traffic entering from side streets and police to manage any queued traffic. All parties to approach the traffic light and await a green light. All queued traffic to be cleared prior to arriving at the intersection. Load will require the use of both lanes in order to proceed through the intersection. Available lane width is 7.0 metres. Once a green light is given all parties are to proceed through, pilots 2 and 3 to guide the driver through the intersection. Pilot 1 may proceed through the traffic light prior to the load. In this event it is to await the arrival of the load.
7.0m
Glossop Street/Phillip Street Intersection- Pull Over Location
Queued traffic can be cleared using the right turn lanes prior to Phillip Street. Police to advise all parties of any queued traffic prior to the Phillip Street Intersection. Pilots 2 and 3 to guide the load ensuring sufficient clearances and to advise police when complete. Police to allow any queued traffic to pass and when all traffic has passed to advise all parties to safely resume the movement. Pilots 2 and 3 to guide the load back onto the lanes and movement to continue to the traffic light at the intersection of Glossop and Phillip Street.
2.70km: Glossop Street/Chapel Street Intersection
1
1 1
Glossop Street
Chapel Street
Pilots and police to assume positions as depicted on left. Pilots to watch for traffic entering from side streets and police to manage any queued traffic. All parties to approach the traffic light and await a green light. All queued traffic to be cleared prior to arriving at the intersection. Load will require the use of both lanes in order to proceed through the intersection. Available lane width is 7.0 metres. Once a green light is given all parties are to proceed through, rear pilots to guide the driver through the intersection. Pilot 1 may proceed through the traffic light prior to the load. In this event it is to await the arrival of the load. Movement to continue to Great Western Highway.
13
8.0m
8.0m
8.0m
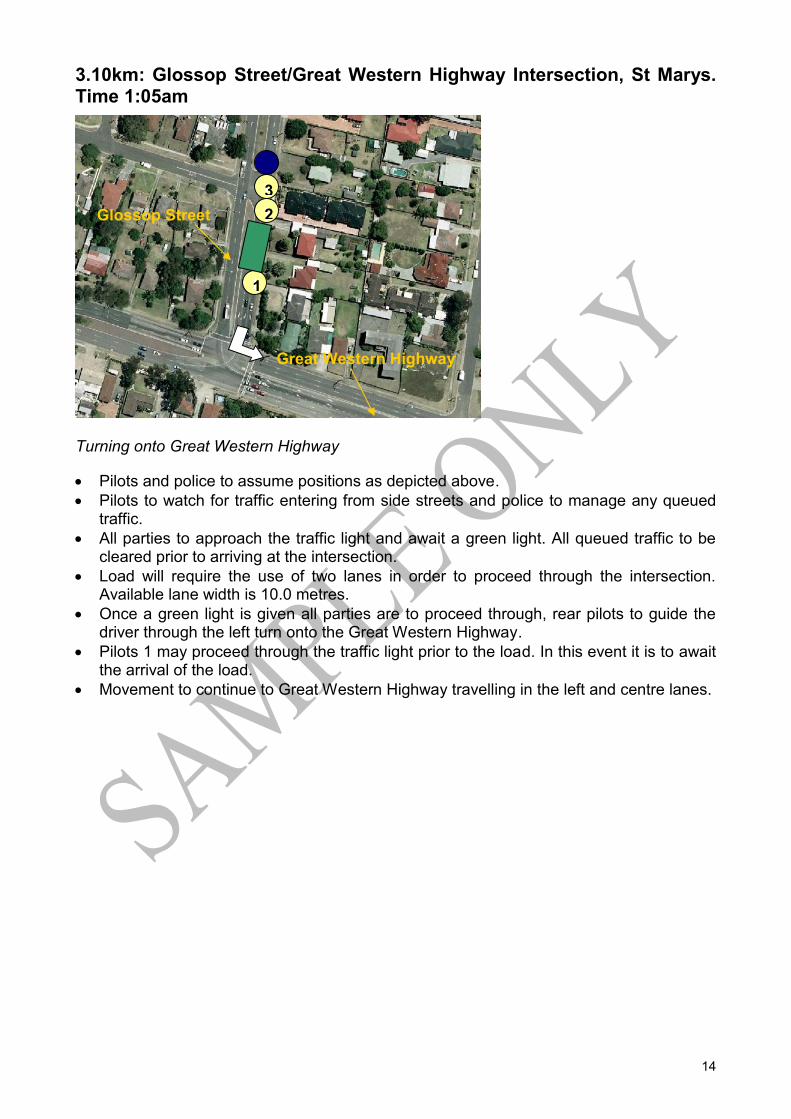
3.10km: Glossop Street/Great Western Highway Intersection, St Marys. Time 1:05am
1
1 1
Glossop Street
Great Western Highway
1
2 3
Turning onto Great Western Highway
Pilots and police to assume positions as depicted above. Pilots to watch for traffic entering from side streets and police to manage any queued
traffic. All parties to approach the traffic light and await a green light. All queued traffic to be
cleared prior to arriving at the intersection. Load will require the use of two lanes in order to proceed through the intersection.
Available lane width is 10.0 metres. Once a green light is given all parties are to proceed through, rear pilots to guide the
driver through the left turn onto the Great Western Highway. Pilots 1 may proceed through the traffic light prior to the load. In this event it is to await
the arrival of the load. Movement to continue to Great Western Highway travelling in the left and centre lanes.
14
8.0m
8.0m
8.0m
m
m
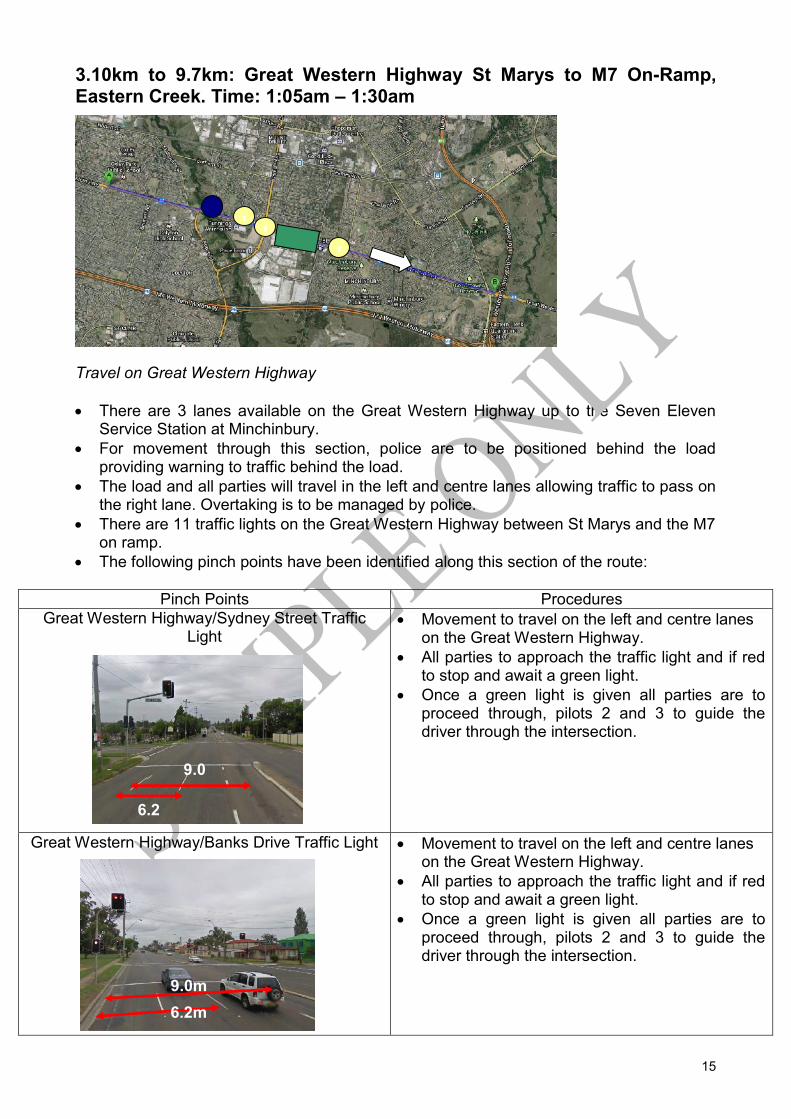
3.10km to 9.7km: Great Western Highway St Marys to M7 On-Ramp, Eastern Creek. Time: 1:05am – 1:30am
Travel on Great Western Highway
There are 3 lanes available on the Great Western Highway up to the Seven Eleven Service Station at Minchinbury.
For movement through this section, police to be positioned behind the load providing warning to traffic behind the load.
The load and all parties will travel in the left and centre lanes allowing traffic to pass on the right lane. Overtaking is to be managed by police.
There are 11 traffic lights on the Great Western Highway between St Marys and the M7 on ramp.
are
1 1
1
The following pinch points have been identified along this section of the route:
15
Pinch Points Procedures Great Western Highway/Sydney Street Traffic
Light Movement to travel on the left and centre lanes
on the Great Western Highway. All parties to approach the traffic light and if red
to stop and await a green light. Once a green light is given all parties are to
proceed through, pilots 2 and 3 to guide the driver through the intersection.
Great Western Highway/Banks Drive Traffic Light Movement to travel on the left and centre lanes on the Great Western Highway.
All parties to approach the traffic light and if red to stop and await a green light.
Once a green light is given all parties are to proceed through, pilots 2 and 3 to guide the driver through the intersection.
9.0
6.2
9.0m 6.2m
m
m
m
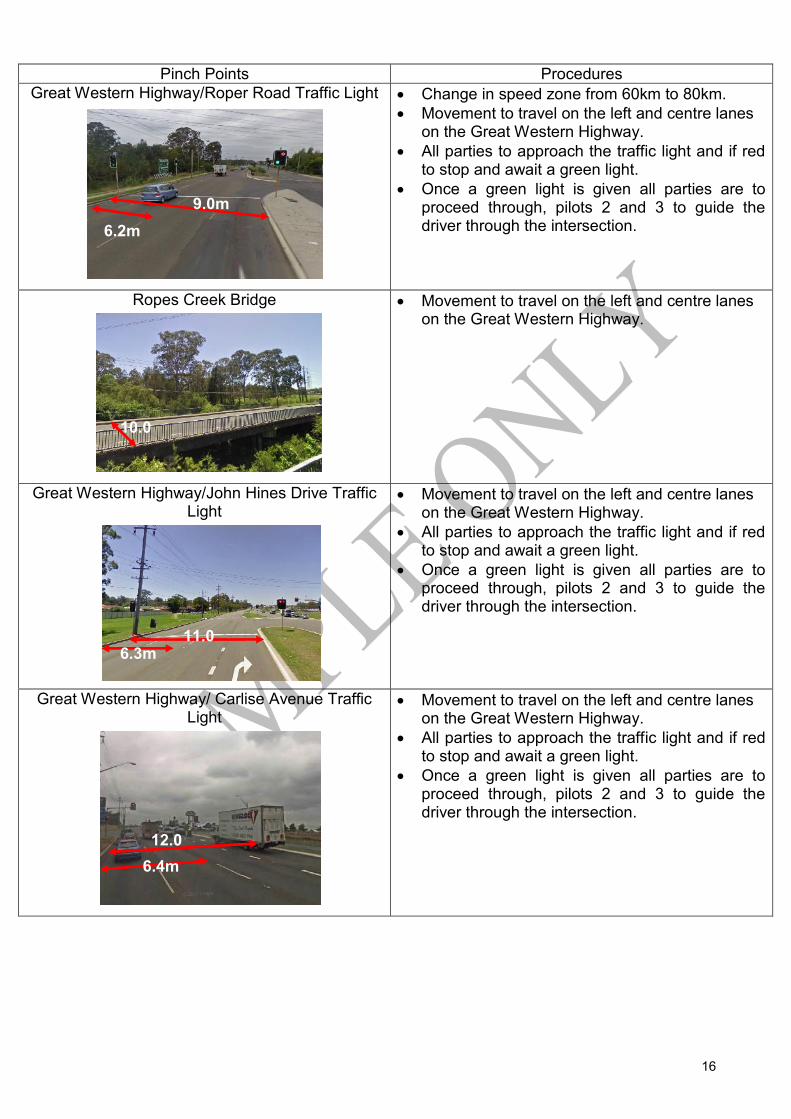
Pinch Points Procedures Great Western Highway/Roper Road Traffic Light
9.0m 6.2m
Change in speed zone from 60km to 80km. Movement to travel on the left and centre lanes on the Great Western Highway. All parties to approach the traffic light and if red to stop and await a green light. Once a green light is given all parties are to proceed through, pilots 2 and 3 to guide the driver through the intersection.
Ropes Creek Bridge
10.0
Movement to travel on the left and centre lanes on the Great Western Highway.
Great Western Highway/John Hines Drive Traffic Light
11.0 6.3m
Movement to travel on the left and centre lanes on the Great Western Highway. All parties to approach the traffic light and if red to stop and await a green light. Once a green light is given all parties are to proceed through, pilots 2 and 3 to guide the driver through the intersection.
Great Western Highway/ Carlise Avenue Traffic Light
12.0 6.4m
Movement to travel on the left and centre lanes on the Great Western Highway. All parties to approach the traffic light and if red to stop and await a green light. Once a green light is given all parties are to proceed through, pilots 2 and 3 to guide the driver through the intersection.
16
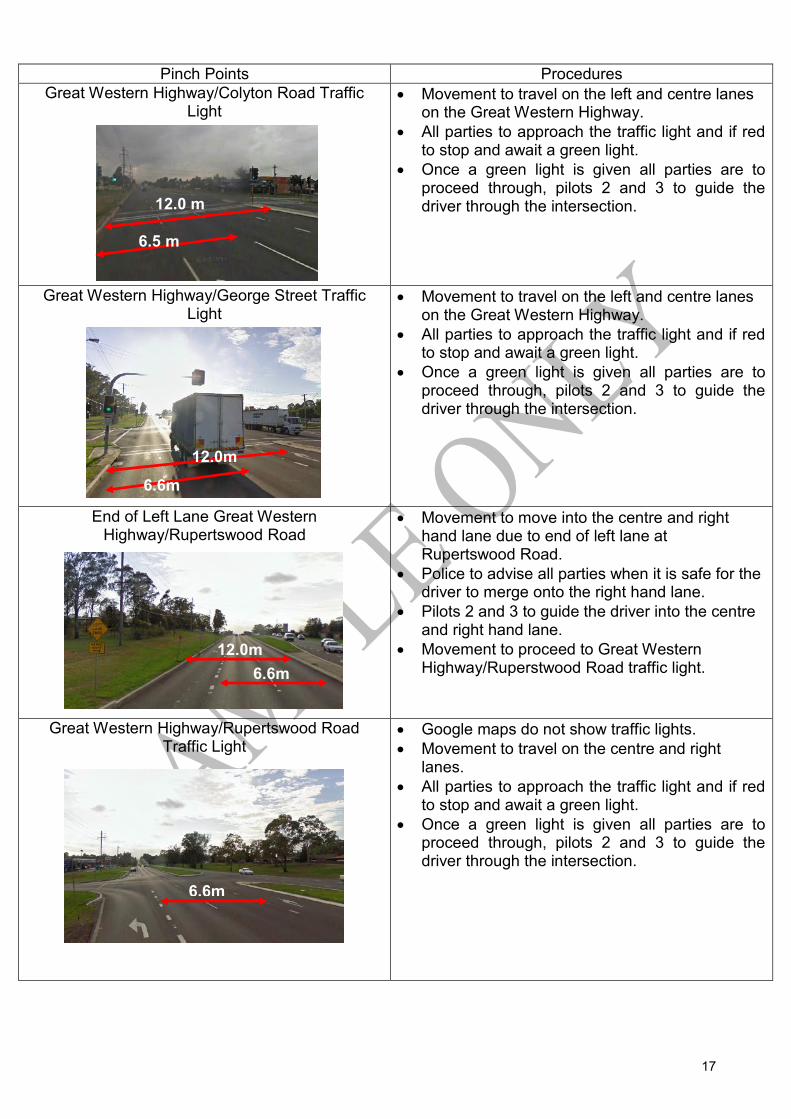
Pinch Points Procedures Great Western Highway/Colyton Road Traffic
Light
12.0 m
6.5 m
Movement to travel on the left and centre lanes on the Great Western Highway. All parties to approach the traffic light and if red to stop and await a green light. Once a green light is given all parties are to proceed through, pilots 2 and 3 to guide the driver through the intersection.
Great Western Highway/George Street Traffic Light
12.0m
6.6m
Movement to travel on the left and centre lanes on the Great Western Highway. All parties to approach the traffic light and if red to stop and await a green light. Once a green light is given all parties are to proceed through, pilots 2 and 3 to guide the driver through the intersection.
End of Left Lane Great Western Highway/Rupertswood Road
12.0m 6.6m
Movement to move into the centre and right hand lane due to end of left lane at Rupertswood Road. Police to advise all parties when it is safe for the driver to merge onto the right hand lane. Pilots 2 and 3 to guide the driver into the centre and right hand lane. Movement to proceed to Great Western Highway/Ruperstwood Road traffic light.
Great Western Highway/Rupertswood Road Traffic Light
6.6m
Google maps do not show traffic lights. Movement to travel on the centre and right lanes. All parties to approach the traffic light and if red to stop and await a green light. Once a green light is given all parties are to proceed through, pilots 2 and 3 to guide the driver through the intersection.
17
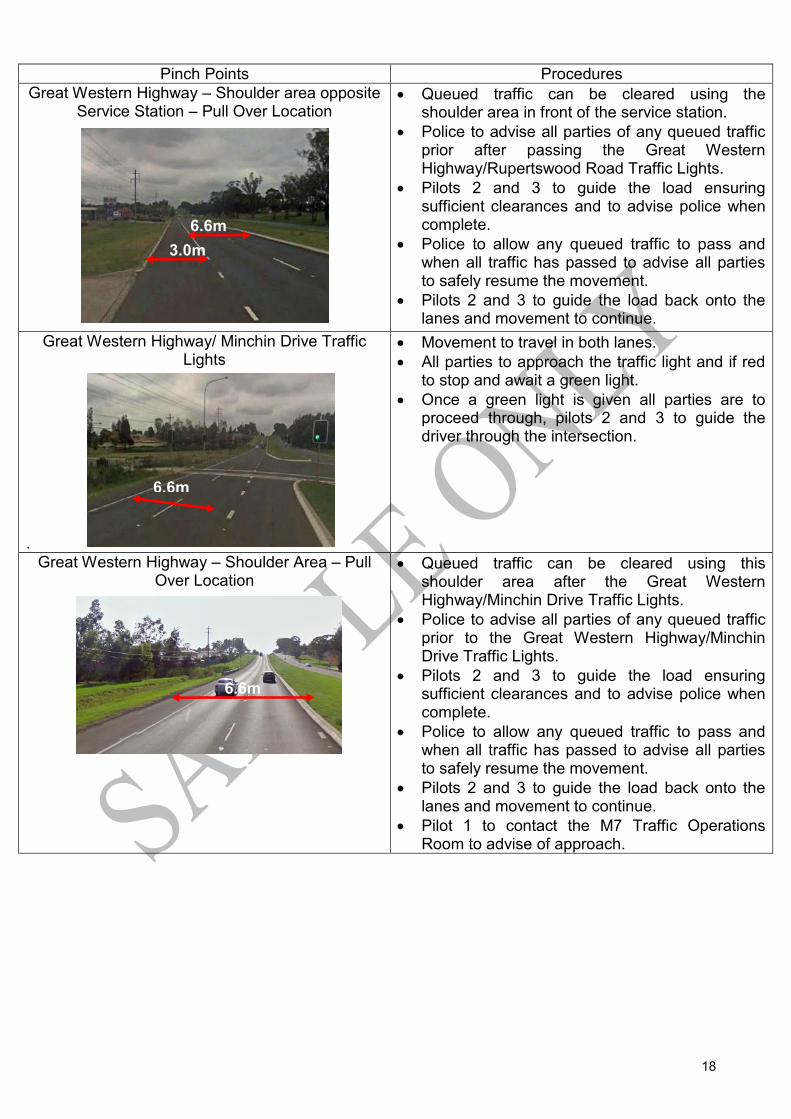
Pinch Points Procedures Great Western Highway – Shoulder area opposite
Service Station – Pull Over Location
3.0m 6.6m
Queued traffic can be cleared using the shoulder area in front of the service station. Police to advise all parties of any queued traffic prior after passing the Great Western Highway/Rupertswood Road Traffic Lights. Pilots 2 and 3 to guide the load ensuring sufficient clearances and to advise police when complete. Police to allow any queued traffic to pass and when all traffic has passed to advise all parties to safely resume the movement. Pilots 2 and 3 to guide the load back onto the lanes and movement to continue.
Great Western Highway/ Minchin Drive Traffic Lights
.
6.6m
Movement to travel in both lanes. All parties to approach the traffic light and if red to stop and await a green light. Once a green light is given all parties are to proceed through, pilots 2 and 3 to guide the driver through the intersection.
Great Western Highway – Shoulder Area – Pull Over Location
6.6m
Queued traffic can be cleared using this shoulder area after the Great Western Highway/Minchin Drive Traffic Lights. Police to advise all parties of any queued traffic prior to the Great Western Highway/Minchin Drive Traffic Lights. Pilots 2 and 3 to guide the load ensuring sufficient clearances and to advise police when complete. Police to allow any queued traffic to pass and when all traffic has passed to advise all parties to safely resume the movement. Pilots 2 and 3 to guide the load back onto the lanes and movement to continue. Pilot 1 to contact the M7 Traffic Operations Room to advise of approach.
18

Pinch Points Procedures Great Western Highway/Minchinbury Street Traffic
Lights
6.6m
Movement to travel in both lanes. All parties to approach the traffic lights and if red to stop and await a green light. Once a green light is given all parties are to proceed through, pilots 2 and 3 to guide the driver through the intersection.
Great Western Highway/Cawarra Street – Pull Over Location
6.6m
Queued traffic can be cleared using this shoulder area after the Great Western Highway/Minchin Drive Traffic Lights. Police to advise all parties of any queued traffic prior to Cawarra Street. Pilots 2 and 3 to guide the load ensuring sufficient clearances and to advise police when complete. Police to allow any queued traffic to pass and when all traffic has passed to advise all parties to safely resume the movement. Pilots 2 and 3 to guide the load back onto the lanes and movement to continue
Left Lane - Great Western Highway/Wallgrove Road
6.6m
Movement to move into the left and centre lanes. Police to advise all parties when it is safe for the driver to merge into the left hand lane. Pilots 2 and 3 to guide the driver into the left and right centre lane. Movement to proceed to Great Western Highway/Wallgrove Road traffic light.
Great Western Highway/Wallgrove Road Traffic Light
6.6m
Movement to travel in left and centre lanes All parties to approach the traffic light and if red to stop and await a green light. Once a green light is given all parties are to proceed through, pilots 2 and 3 to guide the driver through the intersection.
19
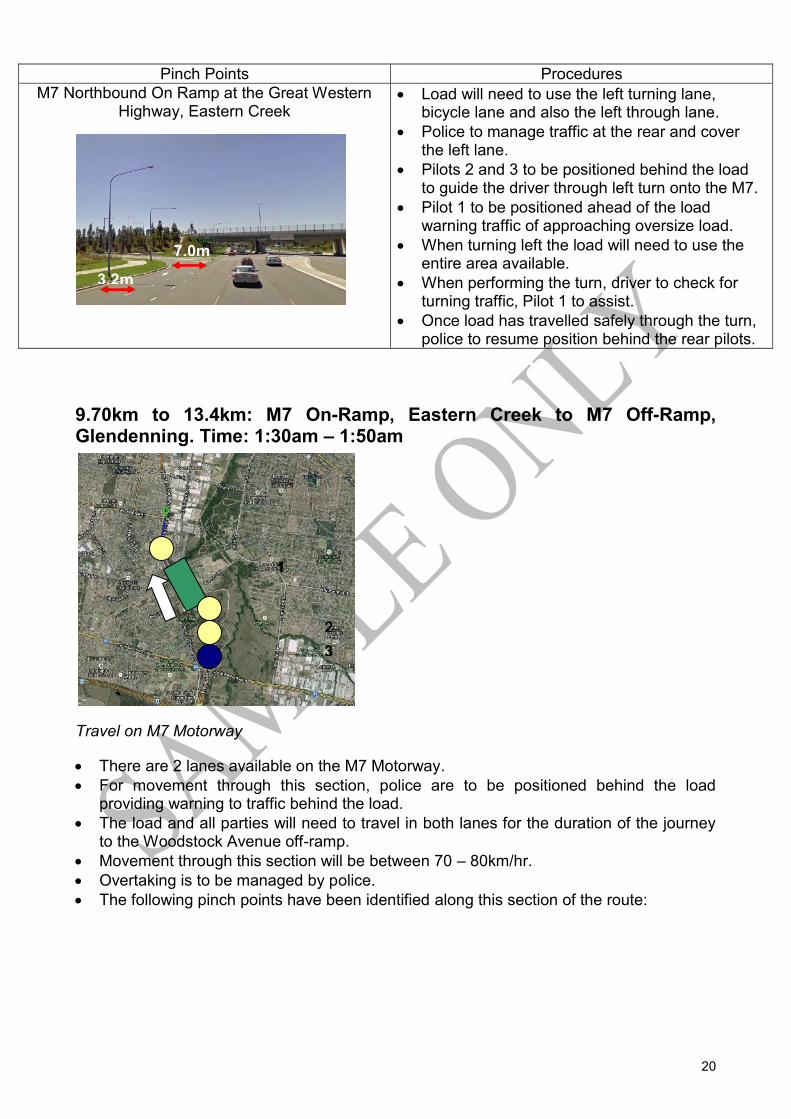
Pinch Points Procedures M7 Northbound On Ramp at the Great Western
Highway, Eastern Creek
9.70km to 13.4km: M7 On-Ramp, Eastern Off-Ramp, Glendenning. Time: 1:30am – 1:50am
Travel on M7 Motorway
There are 2 lanes available on the M7 Motorway. For movement through this section, police are to be positioned behind the load
providing warning to traffic behind the load. The load and all parties will need to travel in both lanes for the duration of the journey
to the Woodstock Avenue off-ramp. Movement through this section will be between 70 – 80km/hr.
When performing the turn, driver to check for turning traffic, Pilot 1 to assist.
Once load has travelled safely through the turn, police to resume position behind the rear pilots.
Creek to M7
1
2 3
3.2m
7.0m
Overtaking is to be managed by police. The following pinch points have been identified along this section of the route:
Load will need to use the left turning lane, bicycle lane and also the left through lane.
Police to manage traffic at the rear and cover the left lane.
Pilots 2 and 3 to be positioned behind the load to guide the driver through left turn onto the M7.
Pilot 1 to be positioned ahead of the load warning traffic of approaching oversize load.
When turning left the load will need to use the entire area available.
20
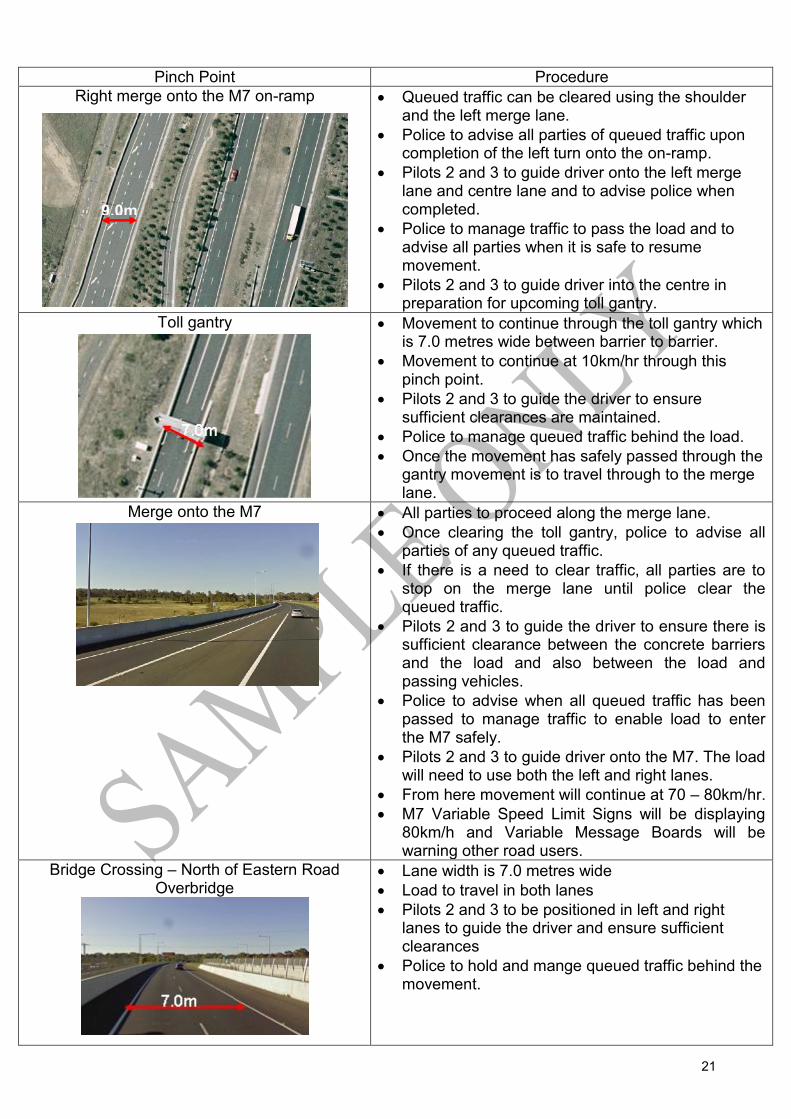
Pinch Point Procedure Right merge onto the M7 on-ramp
9.0m
Queued traffic can be cleared using the shoulder and the left merge lane. Police to advise all parties of queued traffic upon completion of the left turn onto the on-ramp. Pilots 2 and 3 to guide driver onto the left merge lane and centre lane and to advise police when completed. Police to manage traffic to pass the load and to advise all parties when it is safe to resume movement. Pilots 2 and 3 to guide driver into the centre in preparation for upcoming toll gantry.
Toll gantry
Movement to continue through the toll gantry which is 7.0 metres wide between barrier to barrier. Movement to continue at 10km/hr through this pinch point. Pilots 2 and 3 to guide the driver to ensure sufficient clearances are maintained. Police to manage queued traffic behind the load. Once the movement has safely passed through the gantry movement is to travel through to the merge lane.
Merge onto the M7
All parties to proceed along the merge lane. Once clearing the toll gantry, police to advise all parties of any queued traffic. If there is a need to clear traffic, all parties are to stop on the merge lane until police clear the queued traffic. Pilots 2 and 3 to guide the driver to ensure there is sufficient clearance between the concrete barriers and the load and also between the load and passing vehicles. Police to advise when all queued traffic has been passed to manage traffic to enable load to enter the M7 safely. Pilots 2 and 3 to guide driver onto the M7. The load will need to use both the left and right lanes. From here movement will continue at 70 – 80km/hr. M7 Variable Speed Limit Signs will be displaying 80km/h and Variable Message Boards will be warning other road users.
Bridge Crossing – North of Eastern Road Overbridge
Lane width is 7.0 metres wide Load to travel in both lanes Pilots 2 and 3 to be positioned in left and right lanes to guide the driver and ensure sufficient clearances Police to hold and mange queued traffic behind the movement.
21
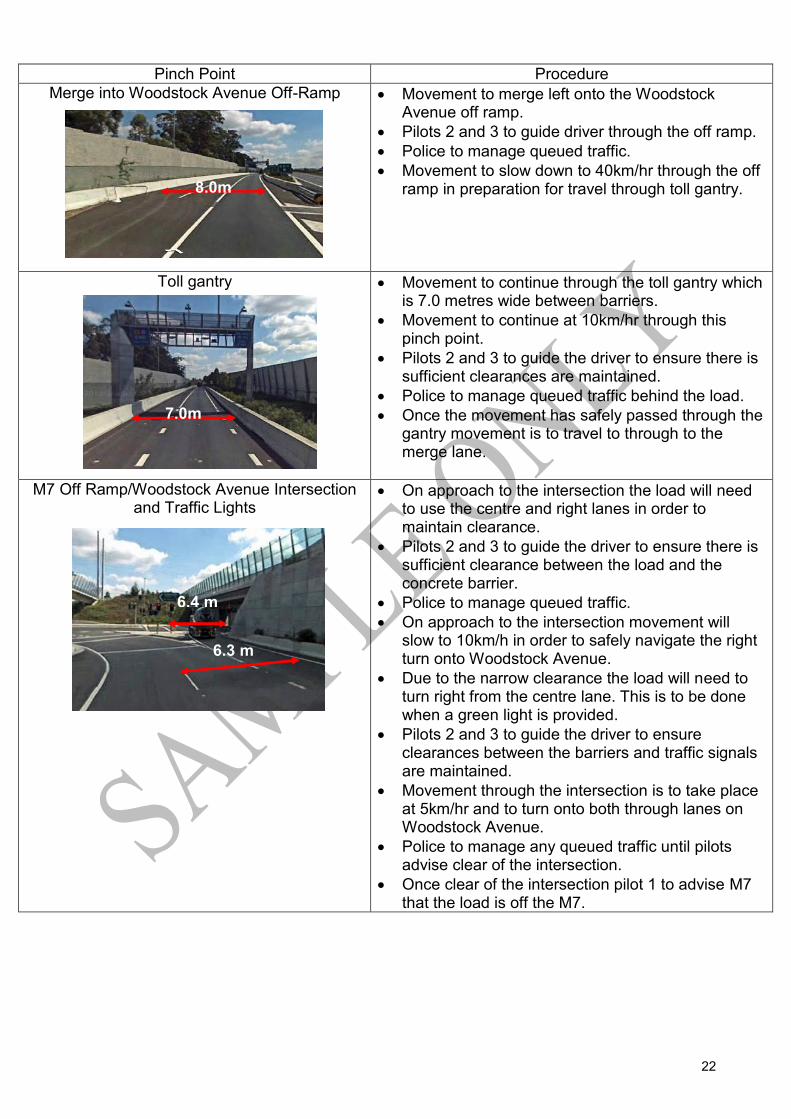
Pinch Point Procedure Merge into Woodstock Avenue Off-Ramp
8.0m
Movement to merge left onto the Woodstock Avenue off ramp. Pilots 2 and 3 to guide driver through the off ramp. Police to manage queued traffic. Movement to slow down to 40km/hr through the off ramp in preparation for travel through toll gantry.
Toll gantry
7.0m
Movement to continue through the toll gantry which is 7.0 metres wide between barriers. Movement to continue at 10km/hr through this pinch point. Pilots 2 and 3 to guide the driver to ensure there is sufficient clearances are maintained. Police to manage queued traffic behind the load. Once the movement has safely passed through the gantry movement is to travel to through to the merge lane.
M7 Off Ramp/Woodstock Avenue Intersection and Traffic Lights
6.3 m
6.4 m
On approach to the intersection the load will need to use the centre and right lanes in order to maintain clearance. Pilots 2 and 3 to guide the driver to ensure there is sufficient clearance between the load and the concrete barrier. Police to manage queued traffic. On approach to the intersection movement will slow to 10km/h in order to safely navigate the right turn onto Woodstock Avenue. Due to the narrow clearance the load will need to turn right from the centre lane. This is to be done when a green light is provided. Pilots 2 and 3 to guide the driver to ensure clearances between the barriers and traffic signals are maintained. Movement through the intersection is to take place at 5km/hr and to turn onto both through lanes on Woodstock Avenue. Police to manage any queued traffic until pilots advise clear of the intersection. Once clear of the intersection pilot 1 to advise M7 that the load is off the M7.
22
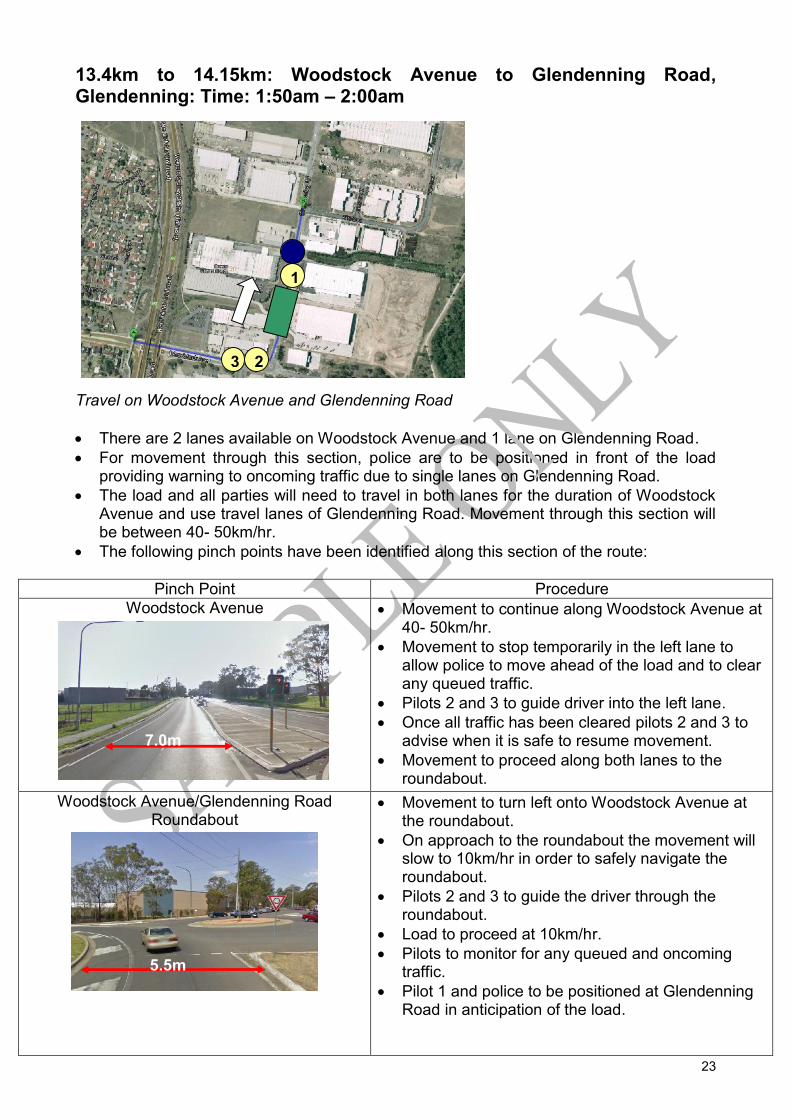
13.4km to 14.15km: Woodstock Avenue to Glendenning Road, Glendenning: Time: 1:50am – 2:00am
Travel on Woodstock Avenue and Glendenning Road
There are 2 lanes available on Woodstock Avenue and 1 lane on Glendenning Road. For movement through this section, police are to be positioned in front of the load
providing warning to oncoming traffic due to single lanes on Glendenning Road. The load and all parties will need to travel in both lanes for the duration of Woodstock
Avenue and use travel lanes of Glendenning Road. Movement through this section will be between 40- 50km/hr.
1
23
The following pinch points have been identified along this section of the route:
Pinch Point Procedure Woodstock Avenue
7.0m
Movement to continue along Woodstock Avenue at 40- 50km/hr. Movement to stop temporarily in the left lane to allow police to move ahead of the load and to clear any queued traffic. Pilots 2 and 3 to guide driver into the left lane. Once all traffic has been cleared pilots 2 and 3 to advise when it is safe to resume movement. Movement to proceed along both lanes to the roundabout.
Woodstock Avenue/Glendenning Road Roundabout
5.5m
Movement to turn left onto Woodstock Avenue at the roundabout. On approach to the roundabout the movement will slow to 10km/hr in order to safely navigate the roundabout. Pilots 2 and 3 to guide the driver through the roundabout. Load to proceed at 10km/hr. Pilots to monitor for any queued and oncoming traffic. Pilot 1 and police to be positioned at Glendenning Road in anticipation of the load.
23
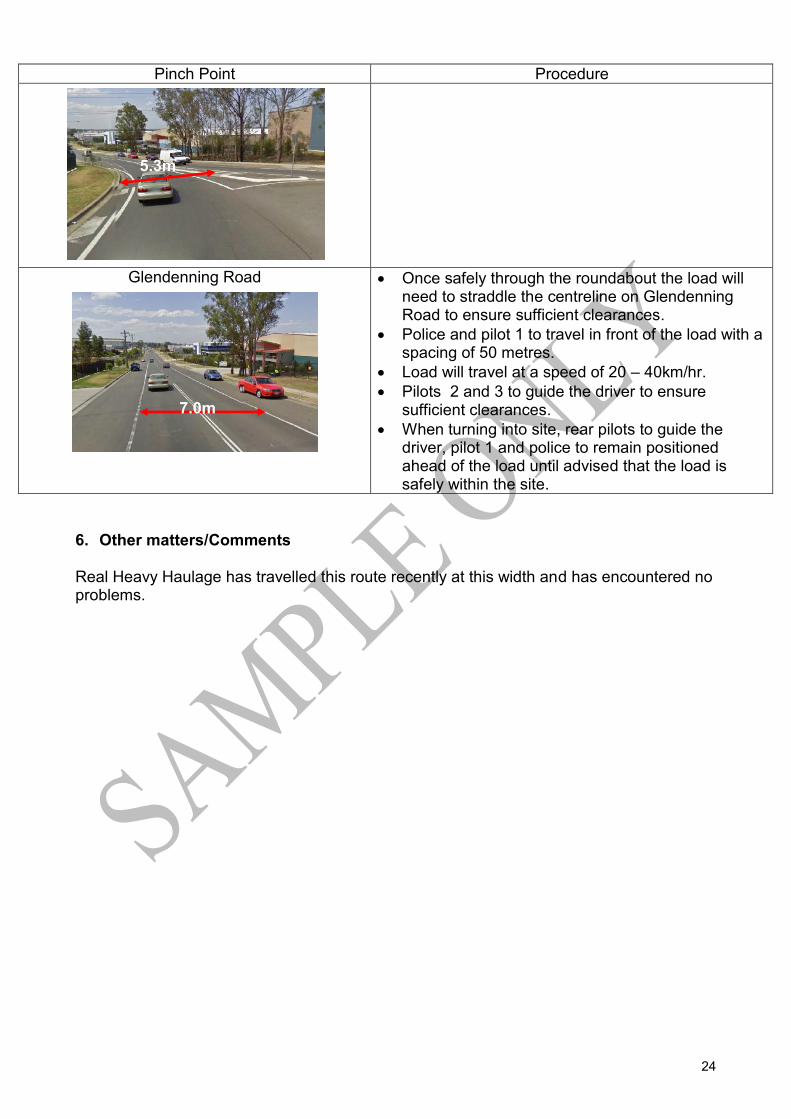
Pinch Point Procedure
5.3m
Glendenning Road
7.0m
Once safely through the roundabout the load will need to straddle the centreline on Glendenning Road to ensure sufficient clearances. Police and pilot 1 to travel in front of the load with a spacing of 50 metres. Load will travel at a speed of 20 – 40km/hr. Pilots 2 and 3 to guide the driver to ensure sufficient clearances. When turning into site, rear pilots to guide the driver, pilot 1 and police to remain positioned ahead of the load until advised that the load is safely within the site.
6. Other matters/Comments
Real Heavy Haulage has travelled this route recently at this width and has encountered no problems.
24