Embed Size (px)
Citation preview

Page �
User’s ManualRechargeable Wireless Long Range Laser Mouse

Page �
Regulatory ComplianceThis device complies with Part 15 of the FCC Rules. Operation is subject to the following two conditions: (1) This device may not cause harmful interference, and (2) This device must accept any interference received, including interference that may cause undesired operation.
FCC CertificationThis equipment has been tested and found to comply with the limits for a Class B digital device, pursuant to Part 15 of the FCC rules. These limits are designed to provide reasonable protection against harmful interference when the equipment is operated in a residential installation. This equipment generates, uses and can radiate radio frequency energy and, if not installed and used in accordance with the instructions, may cause harmful interference to radio communications. However, there is no guarantee that interference will not occur in a particular installation. If this equipment does cause harmful interference to radio or television reception, which can be determined by turning the equipment off and on, the user is encouraged to try to correct the interference by one or more of the following measures:
Reorient or relocate the receiving antenna.Increase the separation between the equipment and receiver.
••
Page �
Consult the dealer or an experienced radio/TV technician for help.
Notice: Any changes or modifications not expressly approved by the party responsible for compliance could void the user’s authority to operate the equipment. Extension cables are not recommended, if used, they must be shielded in order to comply with the emission limits.
IC CertificationThis Class B digital apparatus complies with Canadian ICES-003 specification. Operation is subject to the following two conditions: (1) this device may not cause interference, and (2) this device must accept any interference, including interference that may cause undesired operation of the device.
•
Page �
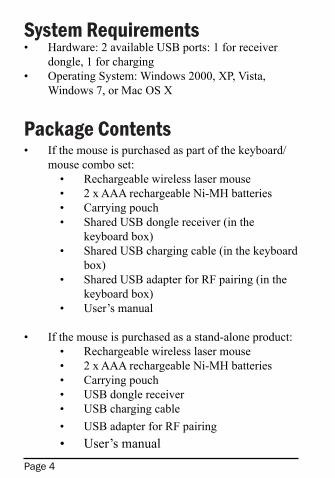
System Requirements Hardware: 2 available USB ports: 1 for receiver dongle, 1 for chargingOperating System: Windows 2000, XP, Vista, Windows 7, or Mac OS X
Package ContentsIf the mouse is purchased as part of the keyboard/mouse combo set:
Rechargeable wireless laser mouse2 x AAA rechargeable Ni-MH batteriesCarrying pouchShared USB dongle receiver (in the keyboard box)Shared USB charging cable (in the keyboard box)Shared USB adapter for RF pairing (in the keyboard box)User’s manual
If the mouse is purchased as a stand-alone product:Rechargeable wireless laser mouse2 x AAA rechargeable Ni-MH batteriesCarrying pouchUSB dongle receiverUSB charging cableUSB adapter for RF pairingUser’s manual
•
•
•
••••
•
•
•
••••••••
Page �
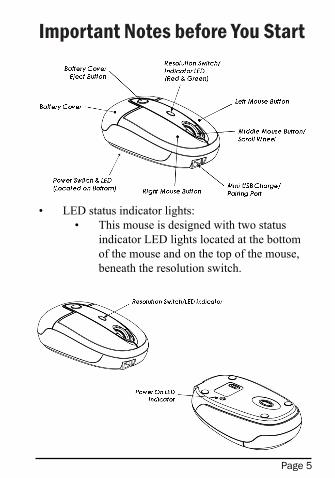
Important Notes before You Start
LED status indicator lights:This mouse is designed with two status indicator LED lights located at the bottom of the mouse and on the top of the mouse, beneath the resolution switch.
••
Page �
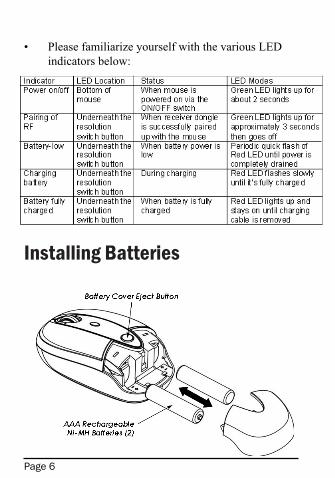
Please familiarize yourself with the various LED indicators below:
Installing Batteries
•
Page �
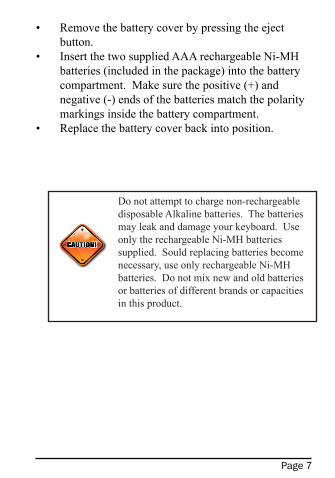
Remove the battery cover by pressing the eject button.Insert the two supplied AAA rechargeable Ni-MH batteries (included in the package) into the battery compartment. Make sure the positive (+) and negative (-) ends of the batteries match the polarity markings inside the battery compartment.Replace the battery cover back into position.
•
•
•
Do not attempt to charge non-rechargeable disposable Alkaline batteries. The batteries may leak and damage your keyboard. Use only the rechargeable Ni-MH batteries supplied. Sould replacing batteries become necessary, use only rechargeable Ni-MH batteries. Do not mix new and old batteries or batteries of different brands or capacities in this product.
Page �
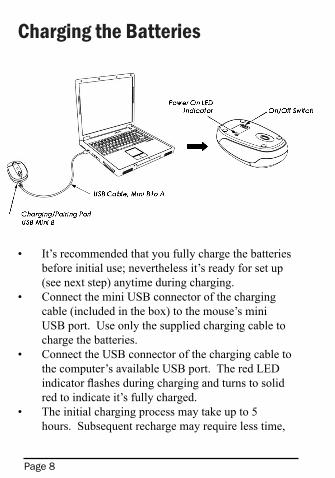
Charging the Batteries
It’s recommended that you fully charge the batteries before initial use; nevertheless it’s ready for set up (see next step) anytime during charging.Connect the mini USB connector of the charging cable (included in the box) to the mouse’s mini USB port. Use only the supplied charging cable to charge the batteries.Connect the USB connector of the charging cable to the computer’s available USB port. The red LED indicator flashes during charging and turns to solid red to indicate it’s fully charged.The initial charging process may take up to 5 hours. Subsequent recharge may require less time,
•
•
•
•
Page �
normally between 3 and 5 hours depending on the level of residual power in the batteries.The mouse is operational during charging; you may continue to use the mouse while charging via the USB charging cable.When the batteries are fully charged the LED turns to solid red. Remove the charging cable from the mouse and the computer. Repeat the above steps to recharge the batteries when the LED flashes quickly and the cursor movements are irregular indicating low power.
Pairing the Mouse to the Receiver Dongle
Your mouse is pre-paired with the receiver dongle at our factory for your convenience, and it’s now ready to work. First, turn on the mouse power by moving
•
•
•
Make sure the computer’s power manage-ment is set to disable hibernation mode while the product is being charged. (Go to Control Panel, Power Options, select “Hibernate” from the tabs and uncheck the box marked “Enable Hibernation.)
Page �0
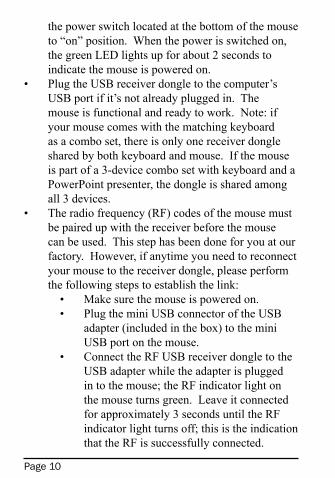
the power switch located at the bottom of the mouse to “on” position. When the power is switched on, the green LED lights up for about 2 seconds to indicate the mouse is powered on.Plug the USB receiver dongle to the computer’s USB port if it’s not already plugged in. The mouse is functional and ready to work. Note: if your mouse comes with the matching keyboard as a combo set, there is only one receiver dongle shared by both keyboard and mouse. If the mouse is part of a 3-device combo set with keyboard and a PowerPoint presenter, the dongle is shared among all 3 devices.The radio frequency (RF) codes of the mouse must be paired up with the receiver before the mouse can be used. This step has been done for you at our factory. However, if anytime you need to reconnect your mouse to the receiver dongle, please perform the following steps to establish the link:
Make sure the mouse is powered on.Plug the mini USB connector of the USB adapter (included in the box) to the mini USB port on the mouse.Connect the RF USB receiver dongle to the USB adapter while the adapter is plugged in to the mouse; the RF indicator light on the mouse turns green. Leave it connected for approximately 3 seconds until the RF indicator light turns off; this is the indication that the RF is successfully connected.
•
•
••
•
Page ��
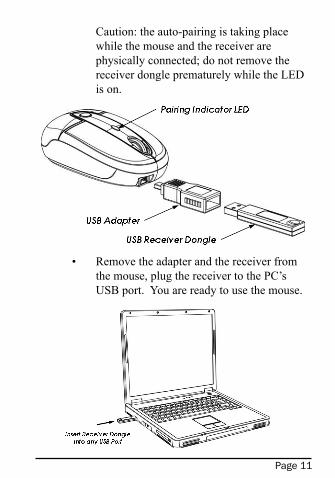
Caution: the auto-pairing is taking place while the mouse and the receiver are physically connected; do not remove the receiver dongle prematurely while the LED is on.
Remove the adapter and the receiver from the mouse, plug the receiver to the PC’s USB port. You are ready to use the mouse.
•
Page ��
Operating Tips & Trouble ShootingTurn the power switch to “on” position before plugging in the receiver dongle to perform pairing.When traveling with the mouse, remember to turn off the power to preserve battery life.This mouse comes with a resolution switch button for productivity enhancement. Press the button to toggle between the 3 different resolutions:
800-cpi: the default resolution1200-cpi2100-cpi
To preserve power this mouse is designed with a sleep mode. After 2 hours of inactivity it goes to sleep. To wake it up simply press the right- or left-click on the mouse.This mouse is designed with the latest laser tracking technology. Laser light is invisible to human eye therefore you cannot see the light from the laser slot at the bottom of the mouse. Do not stare at/or into the laser slot as the laser beam may be harmful to the eye.If the cursor movement becomes sluggish, or non-responsive, check the battery-low indicator. Recharge the batteries if necessary.Metal surface and other extreme conditions may cause interference and hinder the performance of RF devices. Switch to a non-metal surface, use a mouse pad, or repositioning the computer may improve the condition.
•
•
•
•••
•
•
•
•
Page ��
Warranty: SMK-LINK Electronics warrants to the original end-user purchaser of the Product (“you”) that the Product, excluding batteries, will be free from defects in materials or workmanship under normal use and service for one-year from date of purchase. Dated invoice or sales receipt is necessary to accompany the Product returned for warranty service consideration. Any Product repaired or replaced under the terms of the warranty is covered for the remainder of the original warranty period or ninety (90) days from the date of service or return shipping, whichever is longer. If the Product becomes defective in materials or workmanship during the warranty period, SMK-LINK Electronics will, at its option, either repair or replace it with a more current or upgraded model if the originally purchased model is not available. This warranty does not cover products which have been subjected to misuse, accident, physical damage, improper installation, abnormal operation or handling, neglect, inundation or fire, or when product regulatory label has been removed, altered or rendered illegible; nor does it cover accessory and consumable items. In no case shall SMK-LINK Electronics be liable for any indirect special, incidental, or consequential damages based upon breach of warranty, breach of contract, negligence, strict tort or any other legal theory. Such damages include, but are not limited to, loss of profits, loss of savings or revenues, inability to use the product or any associated equipment, cost of capital, cost of any substitute equipment, facilities or services, claims by third parties other than you, and injury to property. SMK-LINK Electronics’s total liability for damages for any cause related to, or arising out of, the use or inability to use the product, shall not exceed the original price paid for the product even if SMK-LINK Electronics has been informed of such possibility. If your Product requires warranty service, you must first contact
Page ��
SMK-LINK Electronics Product Support to receive an RMA Number. The contact information can be found on SMK-LINK Electronics website: http://www.smklink.com/support/contactsupport.html.
This warranty does not affect your statutory right and you may also have other rights which vary from state to state. Unless modified in writing, signed by both you and SMK-LINK Electronics, this warranty is understood to be the complete and exclusive agreement between the parties, superseding all prior agreements, oral or written, and all other communications between the parties relating to the subject matter of this warranty.
Product SupportSMK-Link Electronics Corporation3601-B Calle Tecate, Camarillo, CA 93012TEL: (888) 696-3500 FAX: (805) 987-6665
All trademarks and registered trademarks mentioned in this document are the property of their respective owners.
Features and specifications are subject to change without notice.
© 2010 SMK-Link Electronics, Inc.