Embed Size (px)
Citation preview
RECORDING WITH
CAMTASIA 9 Griffith College
GRIFFITH COLLEGE
South Circular Road
1
Table of Contents
1.0 Preparation .............................................................................................................................. 2
1.1 Surroundings ........................................................................................................................ 2
1.2 Lighting ................................................................................................................................. 2
2.0 Pre-recording .......................................................................................................................... 3
2.1 Audio and Equipment Check – DO NOT SKIP THESE STEPS! .......................................... 3
2.1.1 Power Point Sound Check .......................................................................................... 3
2.1.2 Voice Narration Check ............................................................................................... 5
2.1.3 ‘Record the Screen’ Sound and Camera Check ................................................... 5
2.2 Copyright Message – IGNORE THIS STEP IF WORKING WITH POWERPOINT ................. 6
3.0 Post Recording ........................................................................................................................ 9
3.1 Saving and Setting up a Directory ................................................................................... 9
3.2 Processing and Managing Files ........................................................................................ 9
3.2.1 Raw Files ........................................................................................................................ 9
3.2.2 Project Files .................................................................................................................. 10
3.3 Sound and Audio Tuning. ................................................................................................ 12
3.4 Rendering .......................................................................................................................... 15
4.0 Post Production ....................................................................... Error! Bookmark not defined.
4.1 Saving/Archiving Your Files ................................................ Error! Bookmark not defined.
4.2 Saving to Moodle ............................................................................................................. 18
4.1.1 Drag and Drop ........................................................................................................... 18
4.1.2 Add an activity or Resource ..................................................................................... 19
2
Recording with Camtasia
1.0 Preparation
1. Switch off any mobile phones or any devices that could make noise.
2. For desktop notifications you can mute the desktop by:
a) Right clicking on the volume icon located on the right hand side of the
taskbar,
b) Left click on the volume button to mute the speakers, (This will not interfere
with your headphone mic).
3. Have some water within reach to help clear your throat in case of coughing, dry
throat, etc.
1.1 Surroundings
1. Clear the space around your desk top to minimise distractions.
2. Don’t have anything too close behind you in the video as that can distract those
watching it.
3. Make sure the view from the camera is unobstructed.
4. Ensure the background is free from clutter.
1.2 Lighting
1. Use lighting as it helps improve the visual quality of the recording.
2. Test the position of the lighting in a test recording to reduce the need to adjust
the light throughout the video.
3. Test your position relative to both the camera and the lighting.
4. If you record in the same room each time, leave a post-it or a mark where the
optimal positions are for both yourself and your lighting.
3
5. Do not use too much lighting as that can wash you out of the video.
2.0 Pre-recording
2.1 Audio and Equipment Check – DO NOT SKIP THESE STEPS!
1. Keep the microphone between 1 and 2 inches from your mouth.
2. Do not alter the microphone position during recording.
3. Conduct a sound check in Camtasia Studio.
4. Speak in a clear and distinct tone of voice.
5. Practice in the room you will be recording the video in to get a more accurate
sound.
6. Do not back yourself up against a wall in a small room as this can alter the
acoustics and generate interference.
7. Do not record with your back flush against a wall.
8. Allow about 2 feet behind you.
9. Close windows and doors leading from the room to minimize noise in the
background.
Tip – Never panic! Leave silent spaces throughout the recording according to your
needs. This will ensure that any coughs, sneezes, adjustments, repeats, or mere loss of
train of thought, can be easily identified upon completion of the recording.
2.1.1 Power Point Sound Check
Tip – Sound is paramount and is of the upmost importance during recording. Be sure to
do a quick preview of your slides before the actual recording to ensure good quality
sound.
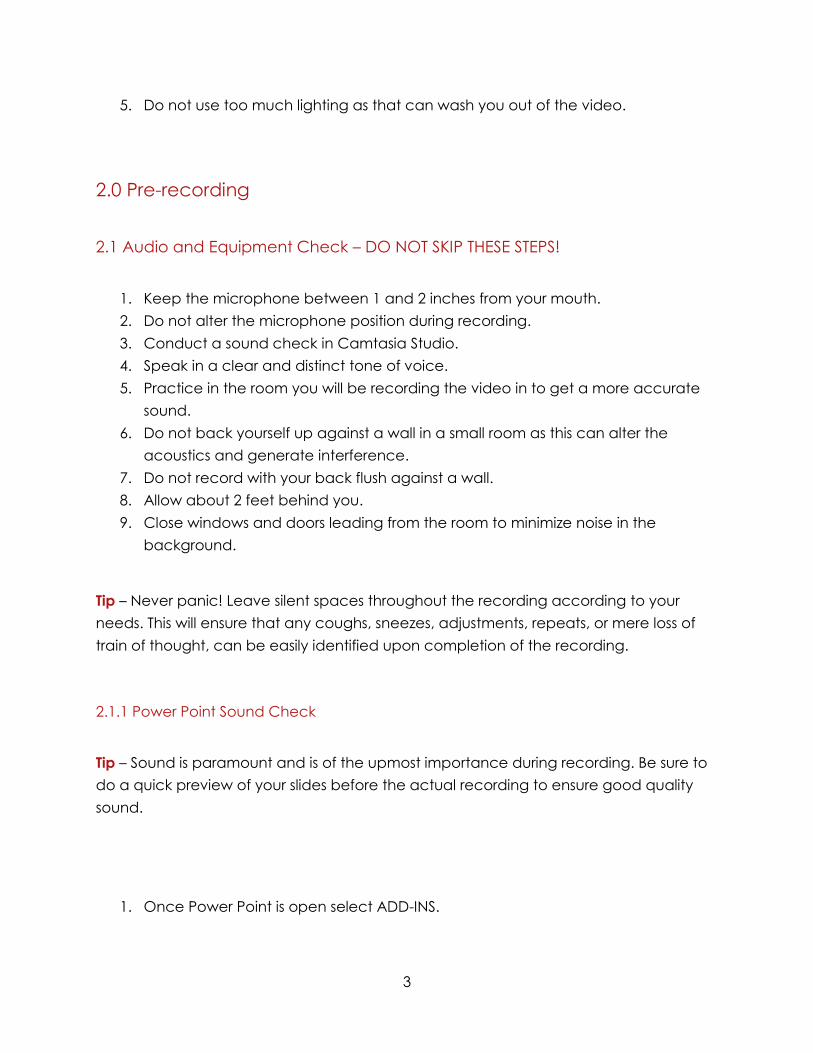
1. Once Power Point is open select ADD-INS.
4
FIGURE 1. POWER POINT ADD-INS
2. Select Camtasia Studio Add-Ins.
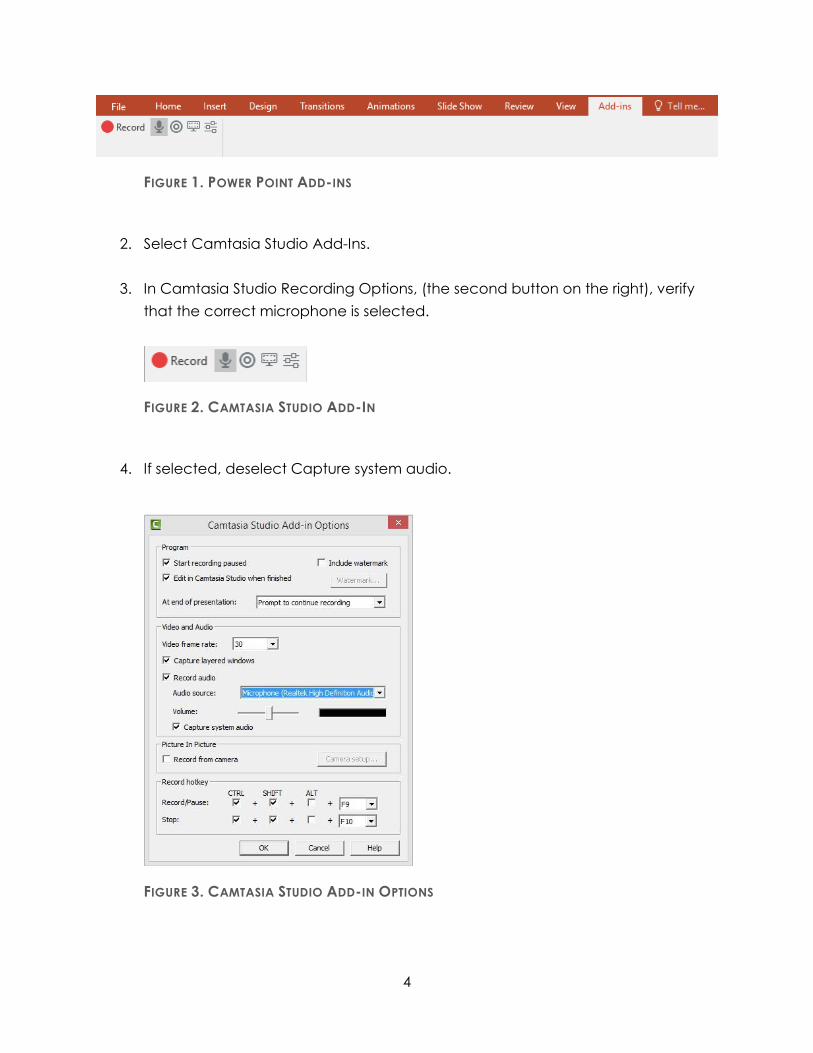
3. In Camtasia Studio Recording Options, (the second button on the right), verify
that the correct microphone is selected.
FIGURE 2. CAMTASIA STUDIO ADD-IN
4. If selected, deselect Capture system audio.
FIGURE 3. CAMTASIA STUDIO ADD-IN OPTIONS
5
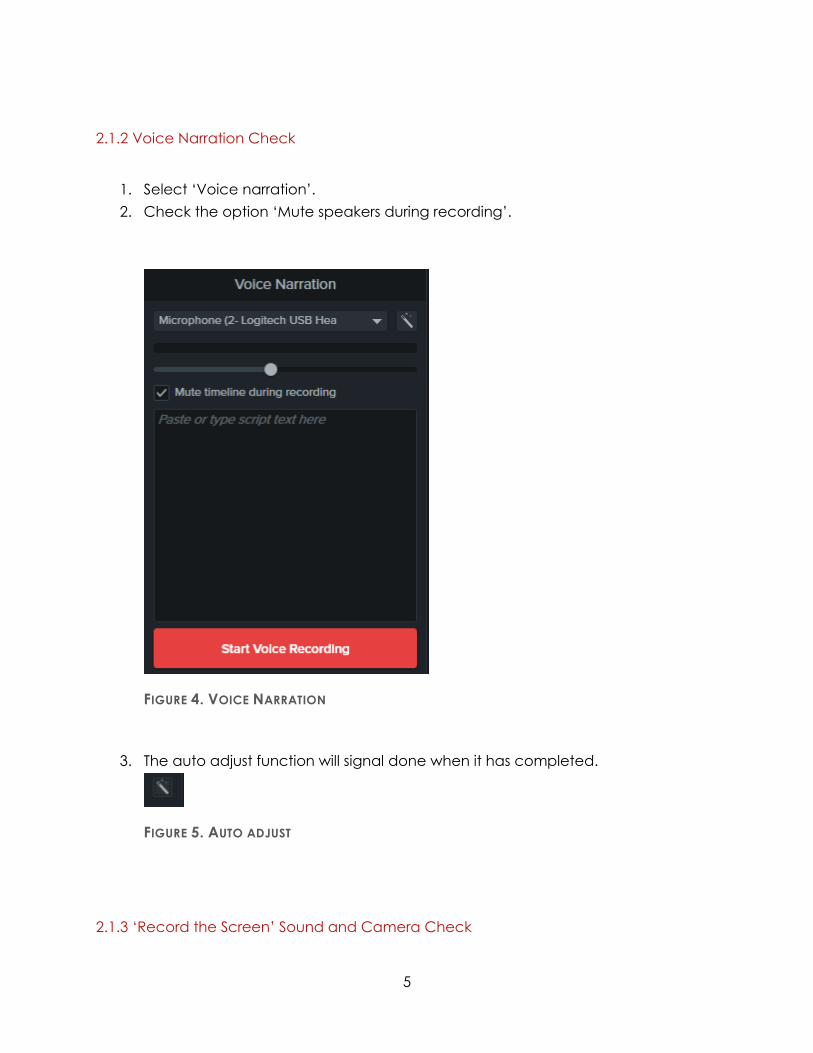
2.1.2 Voice Narration Check
1. Select ‘Voice narration’.
2. Check the option ‘Mute speakers during recording’.
FIGURE 4. VOICE NARRATION
3. The auto adjust function will signal done when it has completed.
FIGURE 5. AUTO ADJUST
2.1.3 ‘Record the Screen’ Sound and Camera Check
6
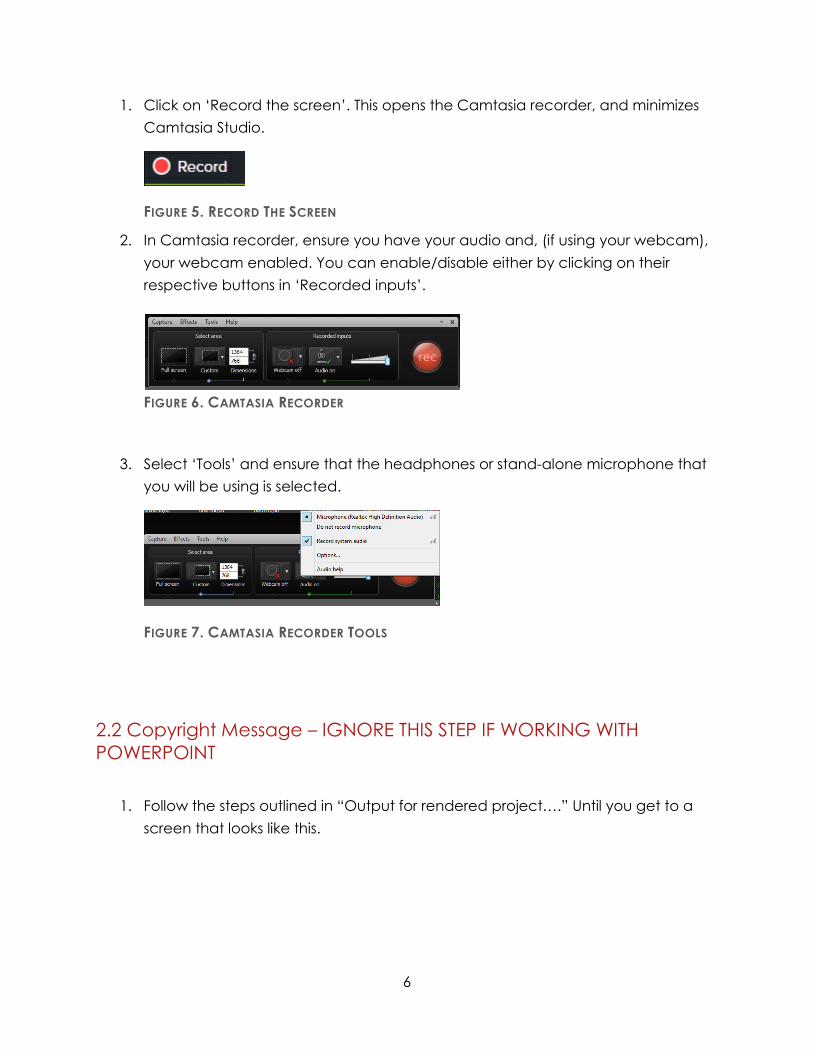
1. Click on ‘Record the screen’. This opens the Camtasia recorder, and minimizes
Camtasia Studio.
FIGURE 5. RECORD THE SCREEN
2. In Camtasia recorder, ensure you have your audio and, (if using your webcam),
your webcam enabled. You can enable/disable either by clicking on their
respective buttons in ‘Recorded inputs’.
FIGURE 6. CAMTASIA RECORDER
3. Select ‘Tools’ and ensure that the headphones or stand-alone microphone that
you will be using is selected.
FIGURE 7. CAMTASIA RECORDER TOOLS
2.2 Copyright Message – IGNORE THIS STEP IF WORKING WITH
POWERPOINT
1. Follow the steps outlined in “Output for rendered project….” Until you get to a
screen that looks like this.
7
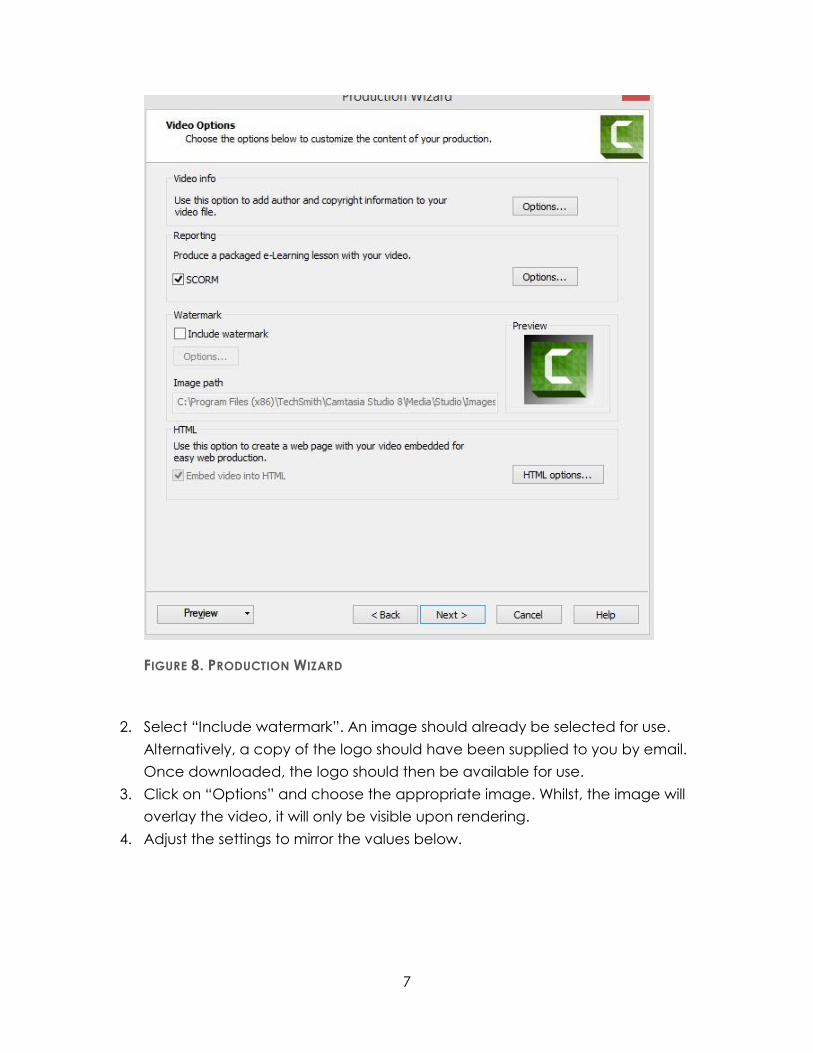
FIGURE 8. PRODUCTION WIZARD
2. Select “Include watermark”. An image should already be selected for use.
Alternatively, a copy of the logo should have been supplied to you by email.
Once downloaded, the logo should then be available for use.
3. Click on “Options” and choose the appropriate image. Whilst, the image will
overlay the video, it will only be visible upon rendering.
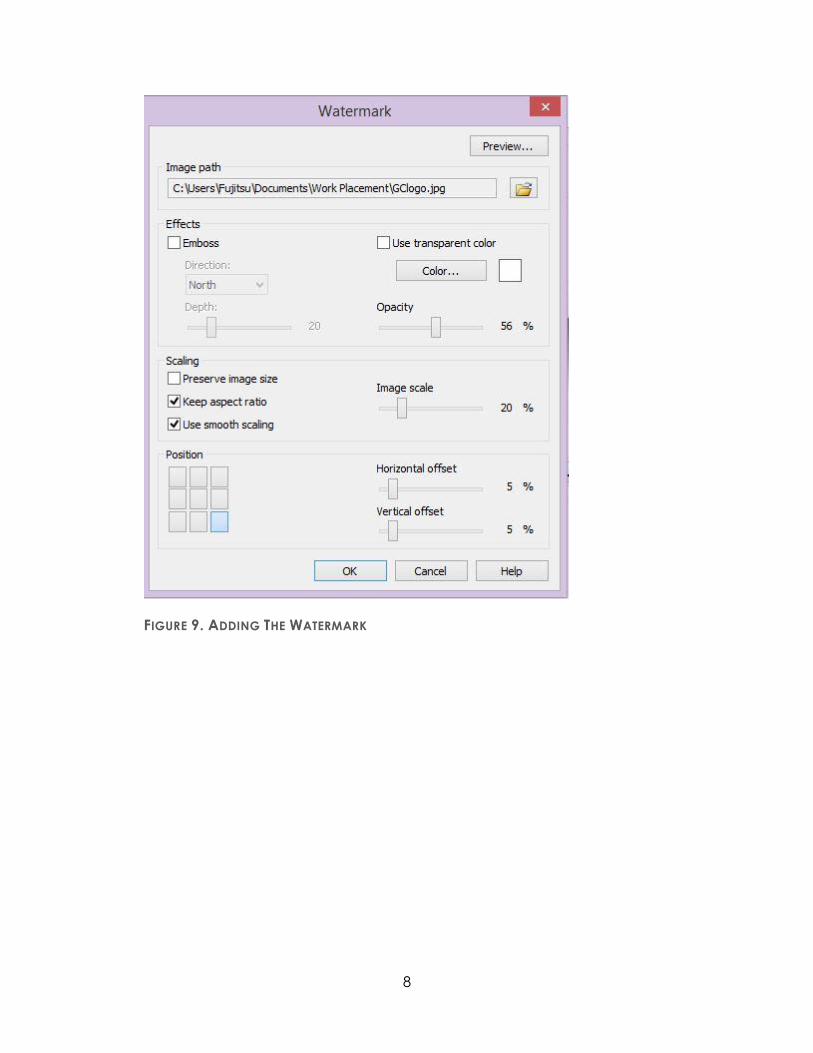
4. Adjust the settings to mirror the values below.
8
FIGURE 9. ADDING THE WATERMARK
9
3.0 Post Recording
3.1 Saving and Setting up a Directory
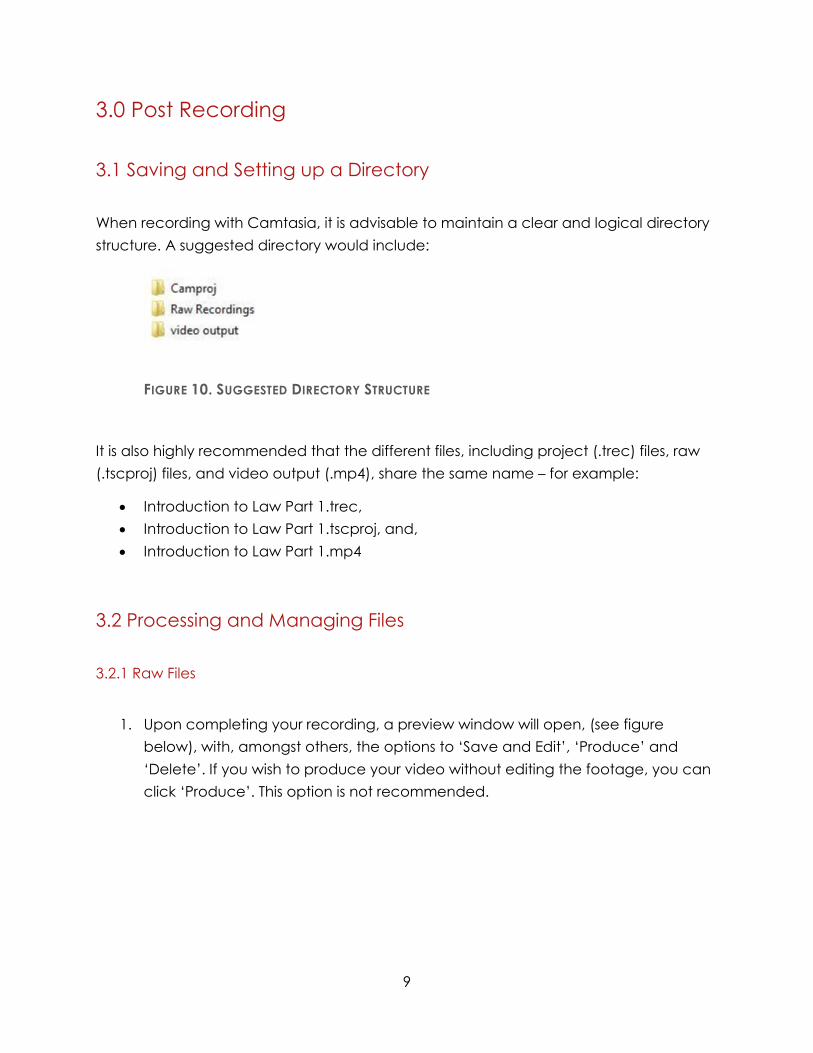
When recording with Camtasia, it is advisable to maintain a clear and logical directory
structure. A suggested directory would include:
FIGURE 10. SUGGESTED DIRECTORY STRUCTURE
It is also highly recommended that the different files, including project (.trec) files, raw
(.tscproj) files, and video output (.mp4), share the same name – for example:
Introduction to Law Part 1.trec,
Introduction to Law Part 1.tscproj, and,
Introduction to Law Part 1.mp4
3.2 Processing and Managing Files
3.2.1 Raw Files
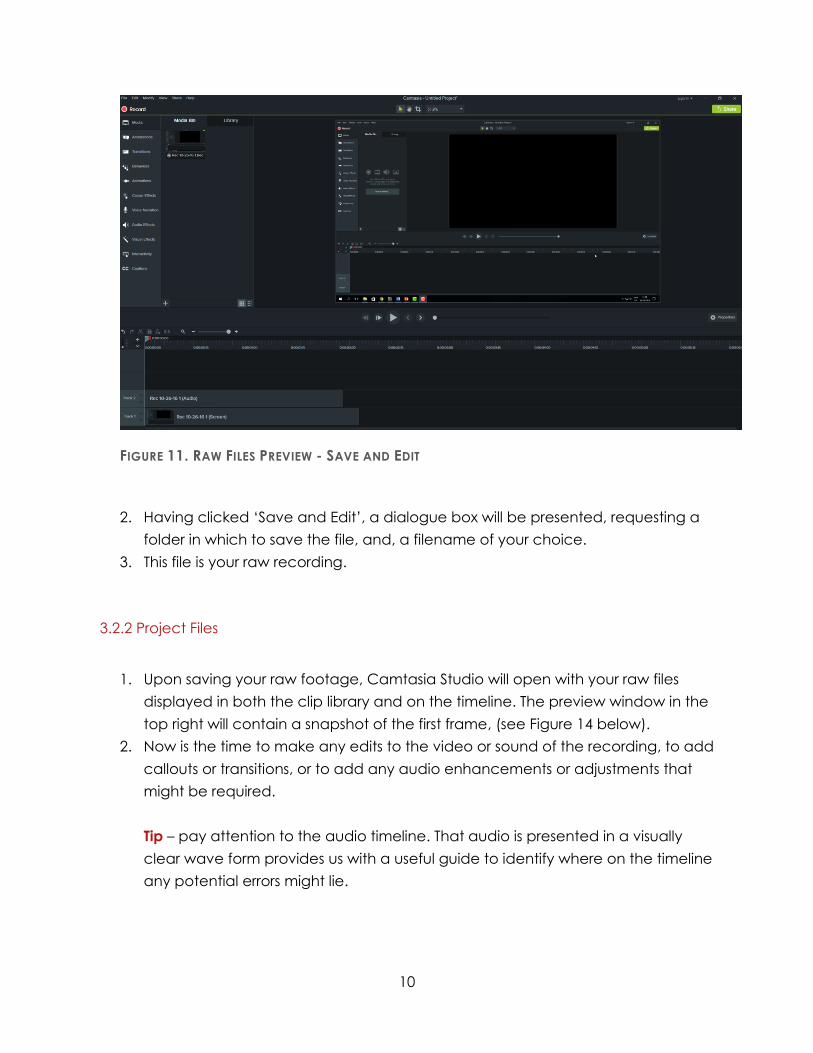
1. Upon completing your recording, a preview window will open, (see figure
below), with, amongst others, the options to ‘Save and Edit’, ‘Produce’ and
‘Delete’. If you wish to produce your video without editing the footage, you can
click ‘Produce’. This option is not recommended.
10
FIGURE 11. RAW FILES PREVIEW - SAVE AND EDIT
2. Having clicked ‘Save and Edit’, a dialogue box will be presented, requesting a
folder in which to save the file, and, a filename of your choice.
3. This file is your raw recording.
3.2.2 Project Files
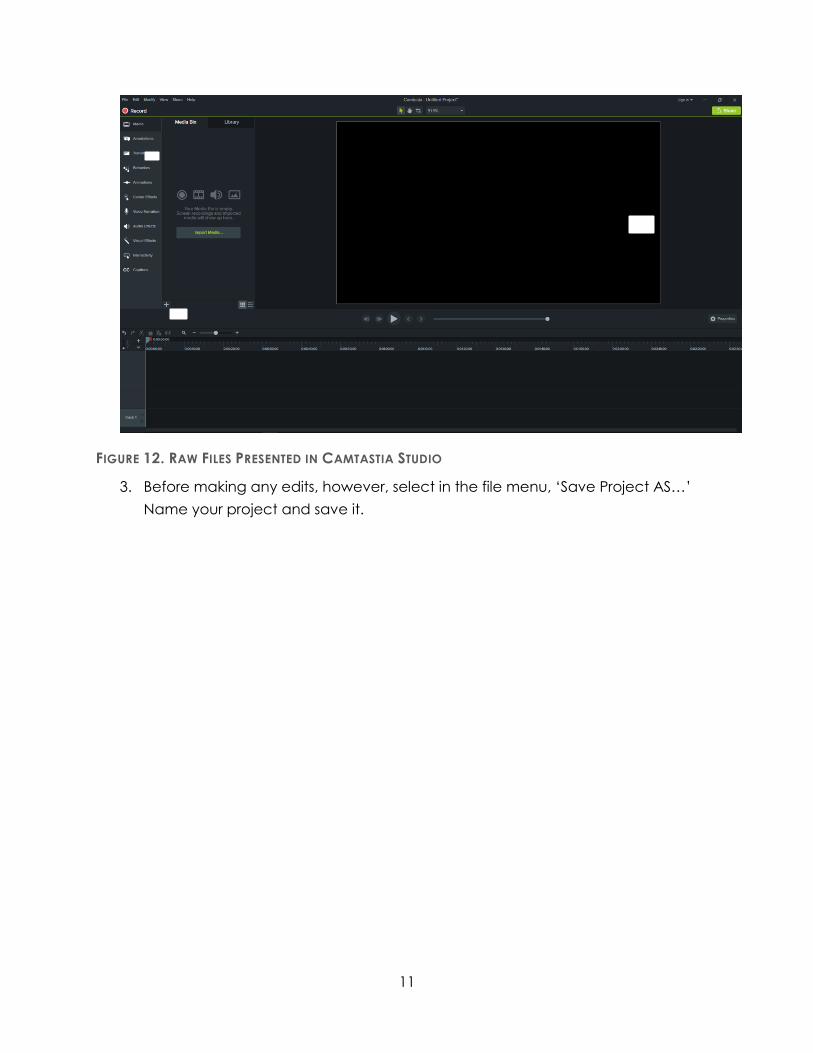
1. Upon saving your raw footage, Camtasia Studio will open with your raw files
displayed in both the clip library and on the timeline. The preview window in the
top right will contain a snapshot of the first frame, (see Figure 14 below).
2. Now is the time to make any edits to the video or sound of the recording, to add
callouts or transitions, or to add any audio enhancements or adjustments that
might be required.
Tip – pay attention to the audio timeline. That audio is presented in a visually
clear wave form provides us with a useful guide to identify where on the timeline
any potential errors might lie.
11
FIGURE 12. RAW FILES PRESENTED IN CAMTASTIA STUDIO
3. Before making any edits, however, select in the file menu, ‘Save Project AS…’
Name your project and save it.

12
3.3 Sound and Audio Tuning.
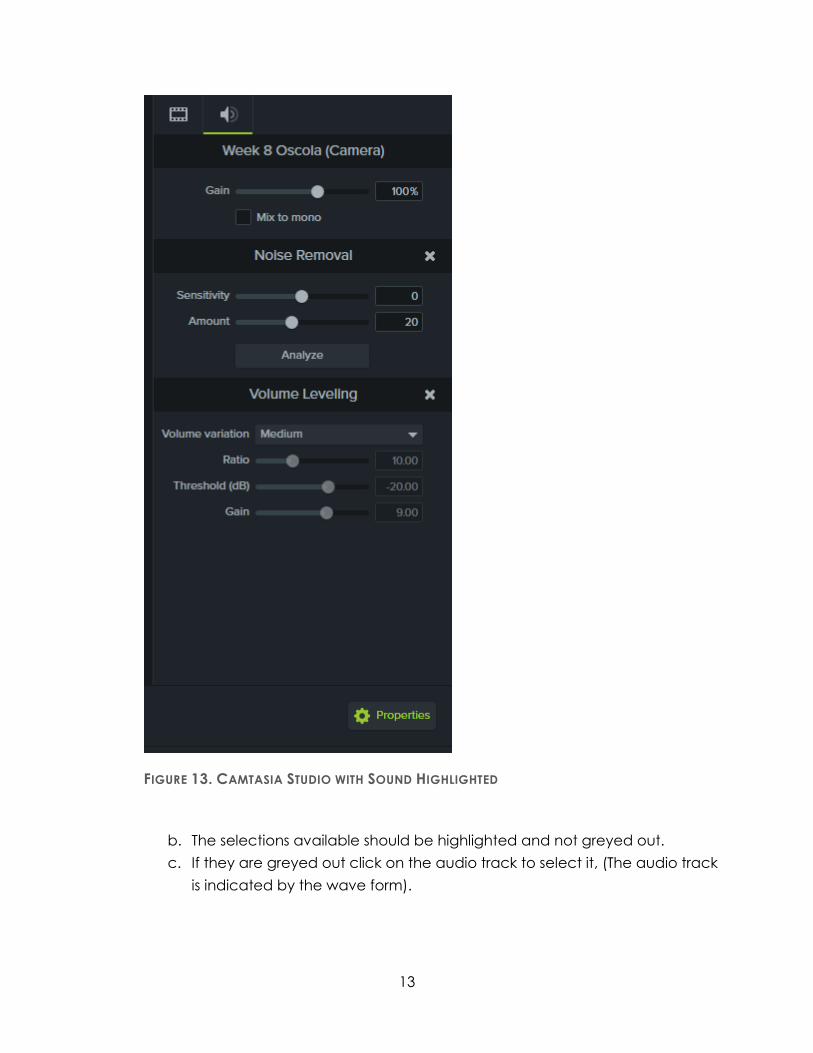
1. To edit your audio:
a. Click on the audio effects option.
13
FIGURE 13. CAMTASIA STUDIO WITH SOUND HIGHLIGHTED
b. The selections available should be highlighted and not greyed out.
c. If they are greyed out click on the audio track to select it, (The audio track
is indicated by the wave form).
14
d. Volume can be raised or lowered either by using the ‘Volume leveling’
button, or by hovering over the top of the green strip, and when an
up/down arrow appears clicking and dragging.
e. Filtering out background noise is done by selecting Noise Removal.
f. Avoid ‘Enable volume leveling’ if possible. Volume leveling lowers the
quality of your audio whilst simultaneously raising the level of background
noise.
2. If the room where you are recording is quite noisy, you may wish to train
Camtasia to screen out the background noise. Doing this requires that before
you begin speaking, you should pause for 10 seconds or so, so that a clear
segment exists on your timeline. Now that you have this segment:
a. Place the playhead at the beginning of your timeline, (the playhead is the
grey button with the red and green fringes that sits on the timeline). You
can do this by clicking on the timeline or dragging the playhead along
the timeline until it is at the beginning.
b. Click on the red portion of the playhead and drag it along the timeline
until the point where you are just about to speak. As you do so, a blue
field will cover the timeline and tracks indicating the portion of the tracks
being selected.
c. With the relevant portion of the track selected, click ‘Manual noise
training on selection’.
d. Once that has completed, you can test the audio by dragging the red
marker back to the playhead, thus closing the selection, and pressing
play in the preview window.
e. If satisfied with the results, repeat step ii, and click on the ‘cut’ icon above
the timeline, (as represented by a scissors). This will remove the portion of
clear audio from your recording.
Tip – If relevant, make notes on sound. Keep these notes close at hand for future
reference.
15
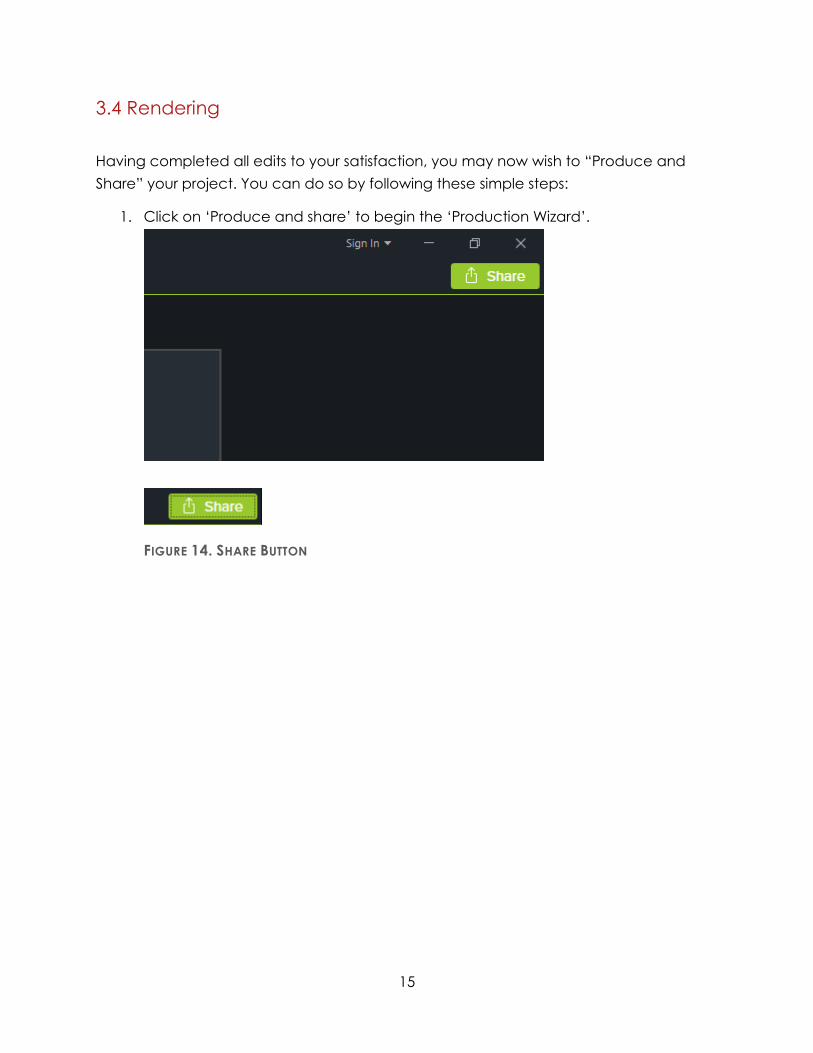
3.4 Rendering
Having completed all edits to your satisfaction, you may now wish to “Produce and
Share” your project. You can do so by following these simple steps:
1. Click on ‘Produce and share’ to begin the ‘Production Wizard’.
FIGURE 14. SHARE BUTTON

16
FIGURE 15. PRODUCTION WIZARD (SHOWING CUSTOM PRODUCTION SETTINGS)
2. From the drop down menu select ‘Custom production settings’ and click ‘new
custom production’.
3. As all production settings have been pre-determined you can proceed to again
click next, until the ‘Production Wizard’ asks for file referencing information (see
Figure 18).
17
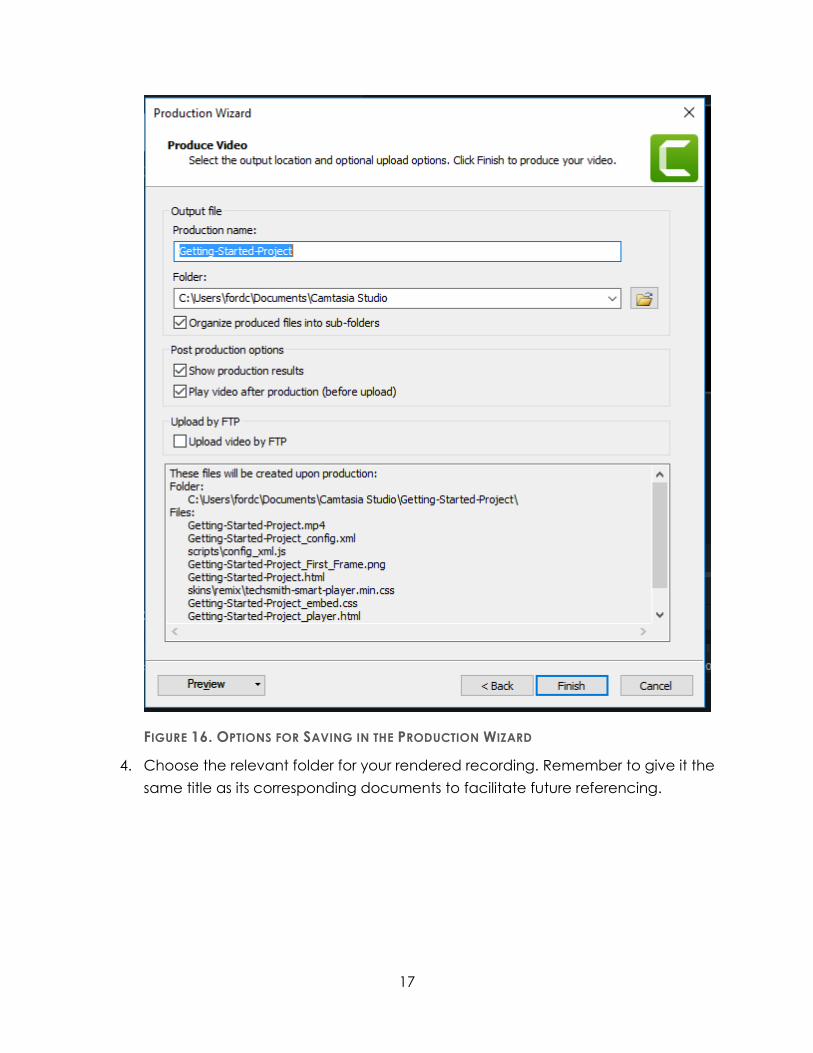
FIGURE 16. OPTIONS FOR SAVING IN THE PRODUCTION WIZARD
4. Choose the relevant folder for your rendered recording. Remember to give it the
same title as its corresponding documents to facilitate future referencing.
18
4.1 Saving to Moodle
To present a video in Moodle:
1. Select the course in which you wish to present the video.
2. Locate the ‘Turn Editing On’ button in the top right corner of the page, and
select it.
3. Scroll down to where you wish to place the recording.
4. At this point, a file can be uploaded by selecting one of two options: ‘drag and
drop’, or; ‘Add an activity or Resource’.
4.1.1 Drag and Drop
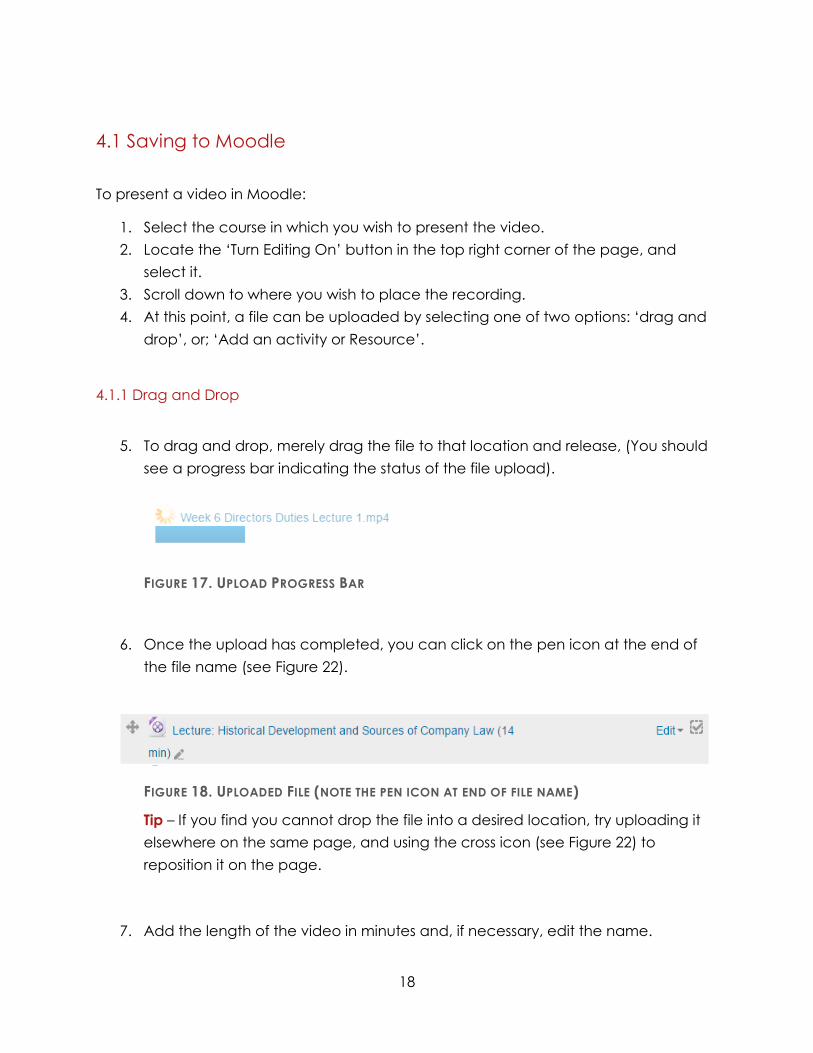
5. To drag and drop, merely drag the file to that location and release, (You should
see a progress bar indicating the status of the file upload).
FIGURE 17. UPLOAD PROGRESS BAR
6. Once the upload has completed, you can click on the pen icon at the end of
the file name (see Figure 22).
FIGURE 18. UPLOADED FILE (NOTE THE PEN ICON AT END OF FILE NAME)
Tip – If you find you cannot drop the file into a desired location, try uploading it
elsewhere on the same page, and using the cross icon (see Figure 22) to
reposition it on the page.
7. Add the length of the video in minutes and, if necessary, edit the name.
19
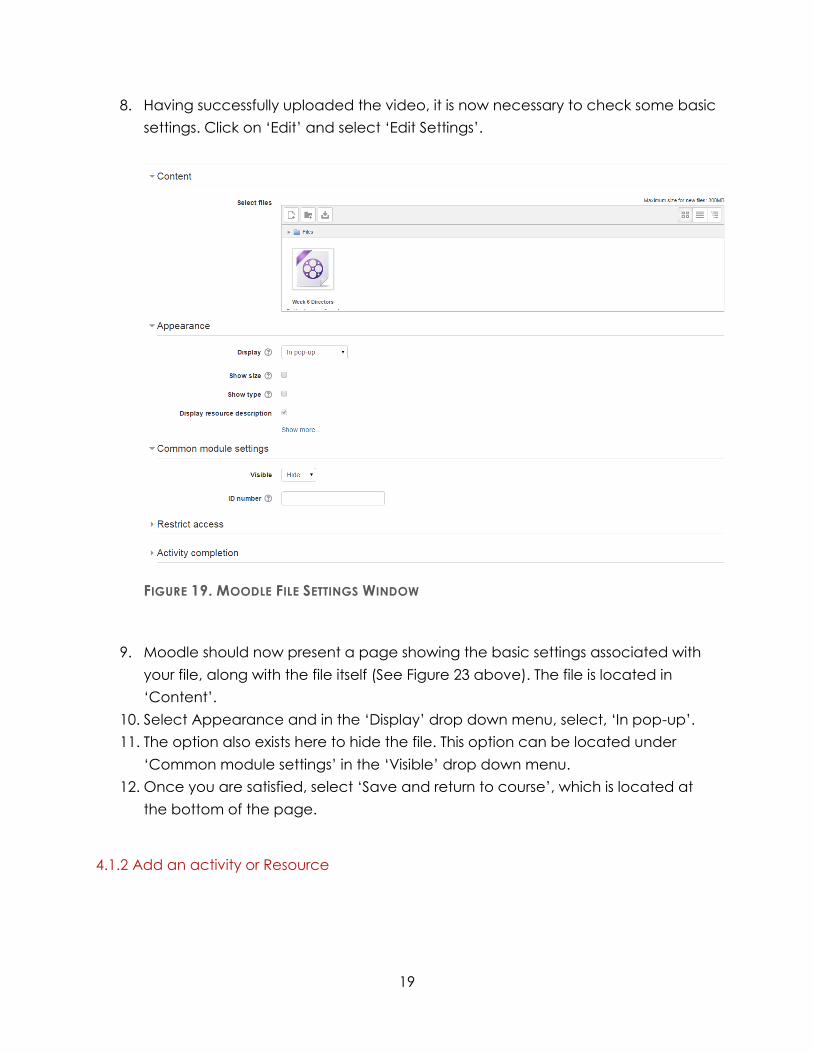
8. Having successfully uploaded the video, it is now necessary to check some basic
settings. Click on ‘Edit’ and select ‘Edit Settings’.
FIGURE 19. MOODLE FILE SETTINGS WINDOW
9. Moodle should now present a page showing the basic settings associated with
your file, along with the file itself (See Figure 23 above). The file is located in
‘Content’.
10. Select Appearance and in the ‘Display’ drop down menu, select, ‘In pop-up’.
11. The option also exists here to hide the file. This option can be located under
‘Common module settings’ in the ‘Visible’ drop down menu.
12. Once you are satisfied, select ‘Save and return to course’, which is located at
the bottom of the page.
4.1.2 Add an activity or Resource
20
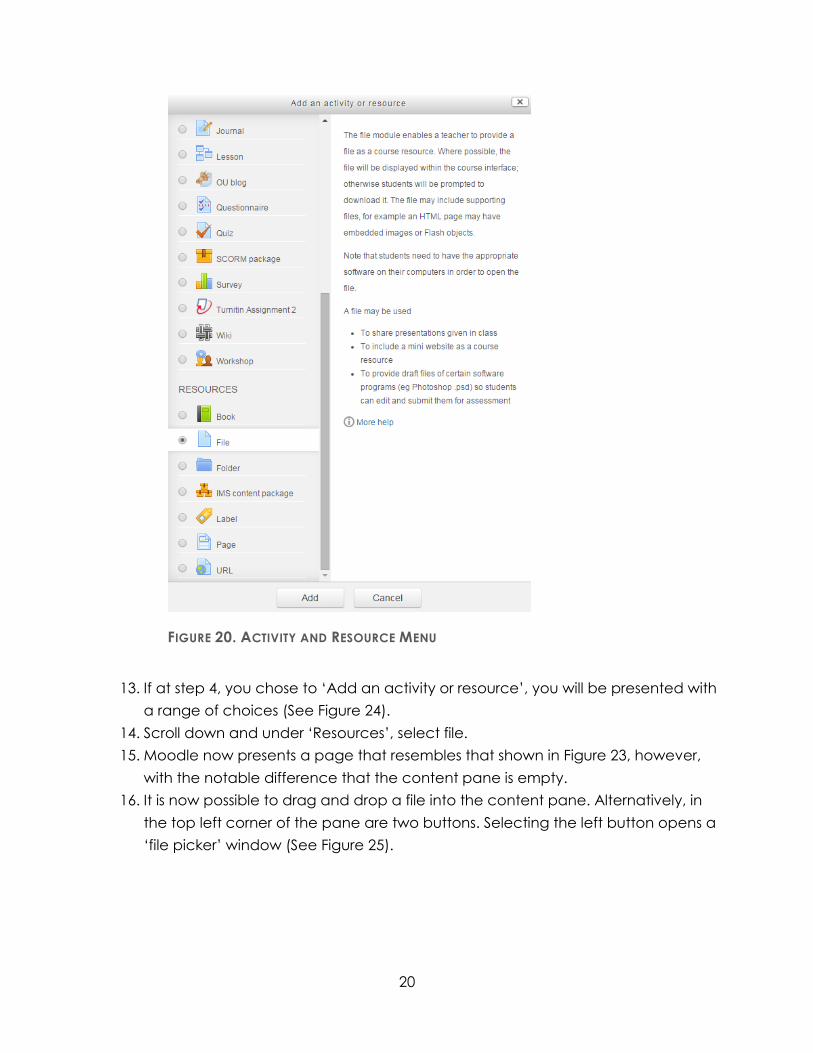
FIGURE 20. ACTIVITY AND RESOURCE MENU
13. If at step 4, you chose to ‘Add an activity or resource’, you will be presented with
a range of choices (See Figure 24).
14. Scroll down and under ‘Resources’, select file.
15. Moodle now presents a page that resembles that shown in Figure 23, however,
with the notable difference that the content pane is empty.
16. It is now possible to drag and drop a file into the content pane. Alternatively, in
the top left corner of the pane are two buttons. Selecting the left button opens a
‘file picker’ window (See Figure 25).
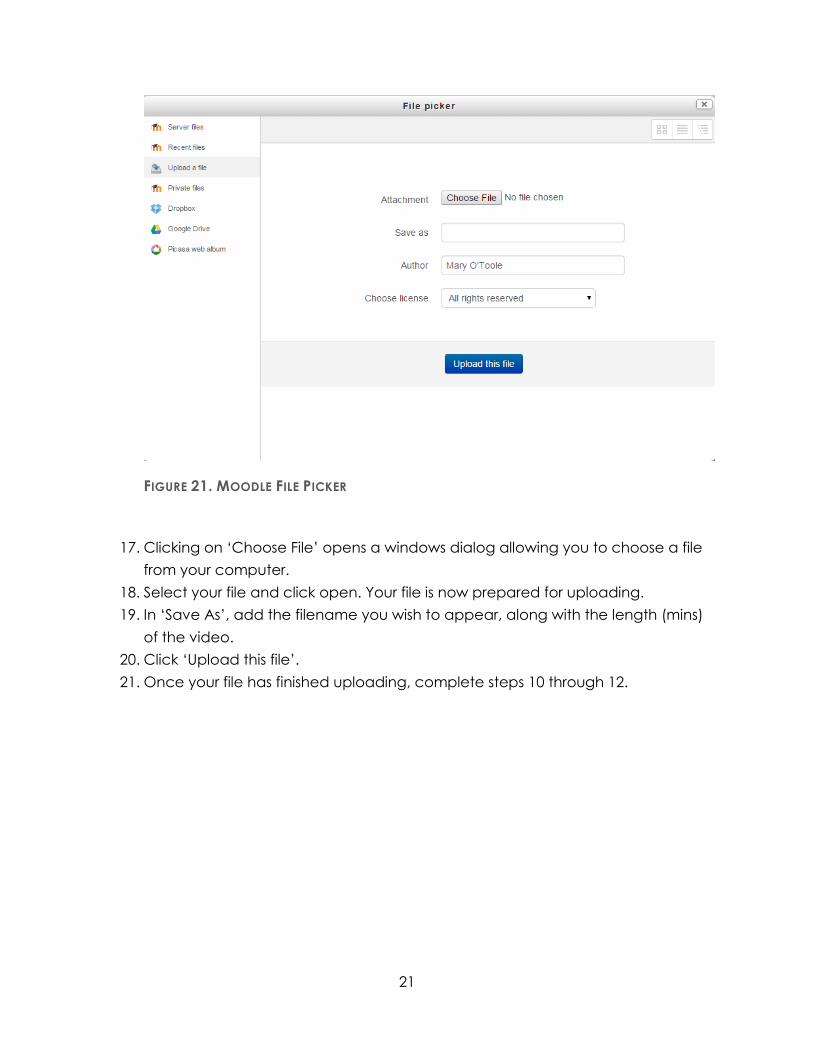
21
FIGURE 21. MOODLE FILE PICKER
17. Clicking on ‘Choose File’ opens a windows dialog allowing you to choose a file
from your computer.
18. Select your file and click open. Your file is now prepared for uploading.
19. In ‘Save As’, add the filename you wish to appear, along with the length (mins)
of the video.
20. Click ‘Upload this file’.
21. Once your file has finished uploading, complete steps 10 through 12.