Embed Size (px)
Citation preview

RENASYS TOUCH - Quick Reference Guide RENASYS TOUCH - Quick Reference Guide 1
RENASYS TOUCH Quick Reference Guide (refer to the User Manual for full details on RENASYS TOUCH)

RENASYS TOUCH - Quick Reference Guide2
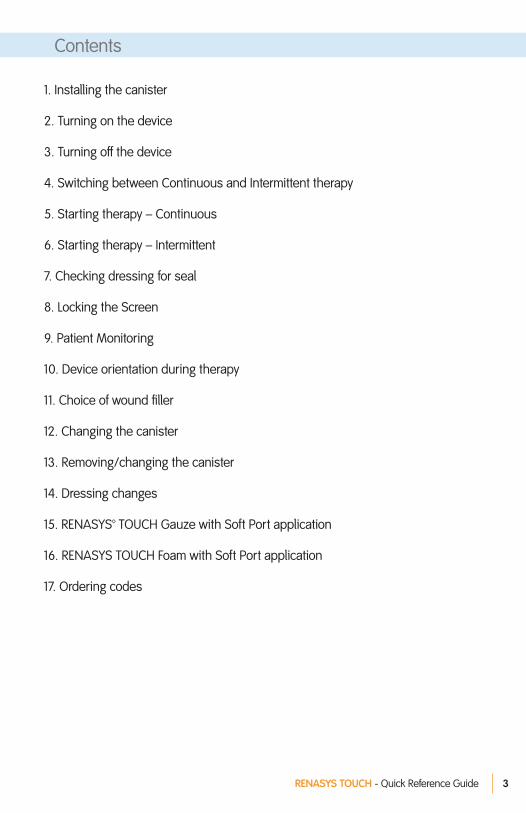
Contents
1. Installing the canister
2. Turning on the device
3. Turning off the device
4. Switching between Continuous and Intermittent therapy
5. Starting therapy – Continuous
6. Starting therapy – Intermittent
7. Checking dressing for seal
8. Locking the Screen
9. Patient Monitoring
10. Device orientation during therapy
11. Choice of wound filler
12. Changing the canister
13. Removing/changing the canister
14. Dressing changes
15. RENASYS™ TOUCH Gauze with Soft Port application
16. RENASYS TOUCH Foam with Soft Port application
17. Ordering codes
RENASYS TOUCH - Quick Reference Guide 3

RENASYS TOUCH - Quick Reference Guide4
2. Turning on the device
- Remove paper tape around the canister tubing to release tubing to the full length- Open both of the orange clips- Align the canister so that the volume marks are facing forward- Push the canister gently over the inlet port of the device- Engage both orange clips (clips will click when they are properly engaged)
- Press and hold the power button for 2 seconds. The touch screen will light up and initiate start up as demonstrated below:
1. Installing the canister
Smith & Nephew screen
Status indicator flashes yellow then green
Audible alarm sounds
Welcome screen
Home screendisplays uponcompletion
RENASYS TOUCH - Quick Reference Guide RENASYS TOUCH - Quick Reference Guide 5
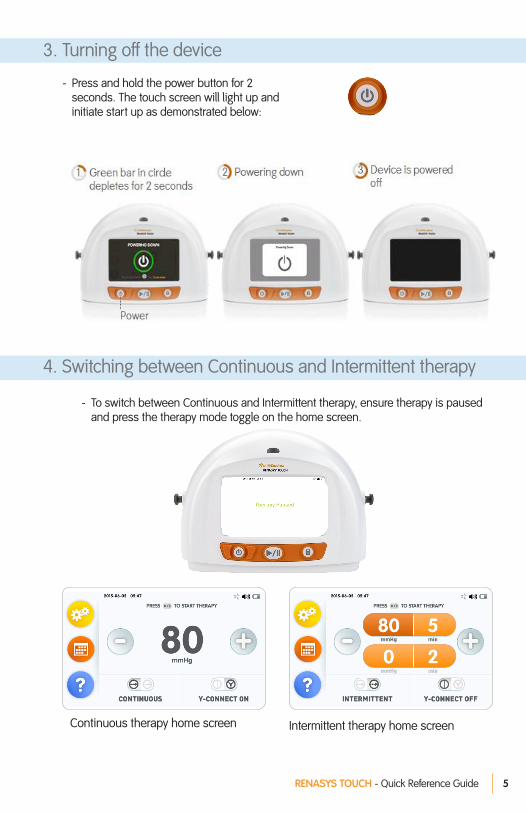
3. Turning off the device
- Press and hold the power button for 2 seconds. The touch screen will light up and initiate start up as demonstrated below:
4. Switching between Continuous and Intermittent therapy
- To switch between Continuous and Intermittent therapy, ensure therapy is paused and press the therapy mode toggle on the home screen.
Continuous therapy home screen Intermittent therapy home screen
RENASYS TOUCH - Quick Reference Guide6
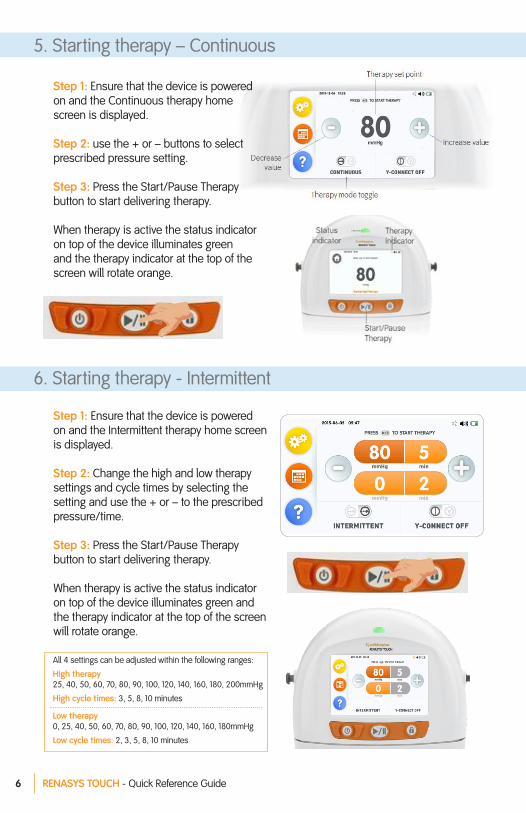
6. Starting therapy - Intermittent
Step 1: Ensure that the device is powered on and the Intermittent therapy home screen is displayed.
Step 2: Change the high and low therapy settings and cycle times by selecting the setting and use the + or – to the prescribed pressure/time.
Step 3: Press the Start/Pause Therapy button to start delivering therapy.
When therapy is active the status indicator
on top of the device illuminates green and the therapy indicator at the top of the screen will rotate orange.
All 4 settings can be adjusted within the following ranges:
High therapy 25, 40, 50, 60, 70, 80, 90, 100, 120, 140, 160, 180, 200mmHg
High cycle times: 3, 5, 8, 10 minutes
Low therapy 0, 25, 40, 50, 60, 70, 80, 90, 100, 120, 140, 160, 180mmHg
Low cycle times: 2, 3, 5, 8, 10 minutes
5. Starting therapy – Continuous
Step 1: Ensure that the device is powered on and the Continuous therapy home screen is displayed.
Step 2: use the + or – buttons to select prescribed pressure setting.
Step 3: Press the Start/Pause Therapy button to start delivering therapy.
When therapy is active the status indicator on top of the device illuminates green and the therapy indicator at the top of the screen will rotate orange.
RENASYS TOUCH - Quick Reference Guide RENASYS TOUCH - Quick Reference Guide 7
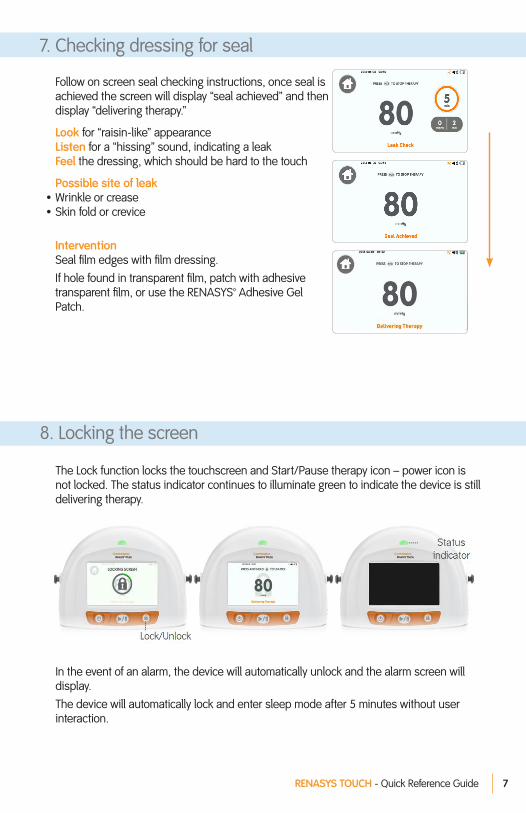
Follow on screen seal checking instructions, once seal is achieved the screen will display “seal achieved” and then display “delivering therapy.”
Look for “raisin-like” appearance Listen for a “hissing” sound, indicating a leak Feel the dressing, which should be hard to the touch
Possible site of leak• Wrinkle or crease• Skin fold or crevice
Intervention Seal film edges with film dressing. If hole found in transparent film, patch with adhesive
transparent film, or use the RENASYS™ Adhesive Gel Patch.
8. Locking the screen
The Lock function locks the touchscreen and Start/Pause therapy icon – power icon is not locked. The status indicator continues to illuminate green to indicate the device is still delivering therapy.
In the event of an alarm, the device will automatically unlock and the alarm screen will display. The device will automatically lock and enter sleep mode after 5 minutes without user interaction.
7. Checking dressing for seal
RENASYS TOUCH - Quick Reference Guide8
The RENASYS™ TOUCH Negative Pressure Wound Tharapy (NPWT) devices are NOT designed to directly detect bleeding or pooling of fluid under the dressing. These conditions may only be detected by frequent monitoring.
Carefully monitor the patient, device and dressing frequently to determine if there are any signs of:
- Bleeding- Exudate accumulation (pooling)- Infection- Maceration- Loss of Negative Pressure Wound Therapy
The frequency of monitoring should be determined by the clinician according to the individual characteristics of the patient and wound.
Precaution: The use of negative pressure presents a risk of tissue ingrowth into the foam/gauze. Tissue ingrowth may be reduced by lowering therapy pressure, using a wound contact layer or by increasing the frequency of dressing changes.
WARNING Carefully monitor patients for signs of bleeding, which may lead to interruption
in therapy and hemodynamic instability. If such symptoms are observed, immediately discontinue therapy, take appropriate measures to control bleeding, and contact treating clinician.
NPWT may be impacted by various conditions related to system configuration, set up and individual characteristics of the patient and wound.
Fluid removal and NPWT vacuum at the wound bed may be impacted by:
- Alignment of the port to the opening of the drape- Bridging technique- Choice of dressing configuration (choice of wound filler)- Exudate volume, viscosity and consistency- Full canister- Incorrect device orientation
Exudate accumulation within the wound could lead to maceration and infection or unrecognized bleeding.
Monitor the wound for signs of infection and ensure all wound filler is removed at each dressing change.
Skins grafts should be closely monitored to ensure NPWT is being delivered.
9. Patient monitoring

RENASYS TOUCH - Quick Reference Guide RENASYS TOUCH - Quick Reference Guide 9
10. Device orientation during therapy
11. Choice of wound filler
The device is designed to operate in an upright position. Operation in the upright position optimizes canister volume and alarm functionality.
Operating the device in a face-down position could result in damage to the device and inadvertent changes to therapy settings. Operating the device in a inverted position could impact filter occlusion resulting in a blockage alarm and requiring a change of canister.
The choice of wound filler will be influenced by the amount and consistency of wound exudate.
Use of gauze as a filler in wounds that are in a weight bearing location or have moderate to heavy drainage may challenge the transfer of fluid and vacuum. Foam is recommended in these wounds.
RENASYS™ foam and gauze filler may be combined within the same wound when tunnelling or undermining is present. Gauze may be used in the areas of undermining or tunnelling, with foam placed in the remainder of the wound cavity.
300mL canisters only 300mL canisters only 300mL or 800mL canisters with carry strap
RENASYS TOUCH - Quick Reference Guide10
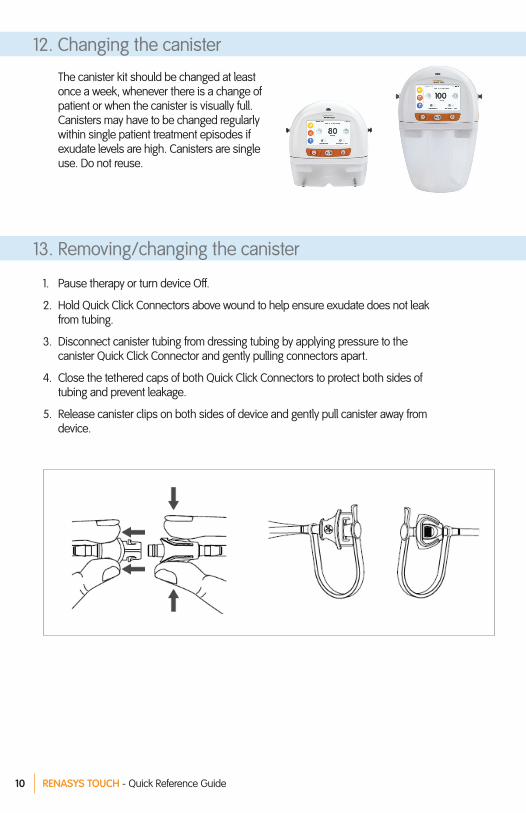
12. Changing the canister
The canister kit should be changed at least once a week, whenever there is a change of patient or when the canister is visually full. Canisters may have to be changed regularly within single patient treatment episodes if exudate levels are high. Canisters are single use. Do not reuse.
13. Removing/changing the canister
1. Pause therapy or turn device Off.
2. Hold Quick Click Connectors above wound to help ensure exudate does not leak from tubing.
3. Disconnect canister tubing from dressing tubing by applying pressure to the canister Quick Click Connector and gently pulling connectors apart.
4. Close the tethered caps of both Quick Click Connectors to protect both sides of tubing and prevent leakage.
5. Release canister clips on both sides of device and gently pull canister away from device.

RENASYS TOUCH - Quick Reference Guide RENASYS TOUCH - Quick Reference Guide 11
1. Foam dressings should be changed every 48 to 72 hours after initial application of therapy. If no leak is present and the patient is comfortable, dressing changes should occur no less than 3 times per week.
2. Gauze dressings should be changed 48 hours after initial application of therapy. If no leak is present and patient is comfortable, dressing changes should occur 2–3 times per week.
3. In event of heavy drainage, drainage with sediment, or when blood is present, regular monitoring and more frequent dressing changes may be required.
4. When dressing a wound involving difficult to seal anatomy or exposure to external moisture, frequent inspection of dressing is recommended to ensure a seal is maintained. Ensure wound dressing is fully compressed and firm to the touch.
5. Ensure all wound filler material placed in wound has been removed before redressing wound. If foam dressing adheres to wound, apply normal saline into wound dressing and let it set for 15-30 minutes before gently removing foam. Appropriately discard used wound dressings observing your institution’s protocol for medical waste handling.
6. As with all adhesive products, apply and remove dressing carefully from sensitive or fragile skin to avoid skin stripping, especially after frequent dressing changes. Use of skin sealant may assist with protection of periwound skin.
7. Check dressing regularly. Monitor patient for any signs of local or systemic infection. Infected wounds may require more frequent dressing changes. If there are any signs of systemic infection or advancing infection at wounded area, contact treating clinician immediately.
14. Dressing changes

RENASYS TOUCH - Quick Reference Guide12
15. RENASYS™ TOUCH Gauze with Soft Port application
If desired, a non-adherant dresing may be applied. Trim a single layer of non-adherant gauze and lay across the wound bed.
3
Debride any devitalized or necrotic eschar tissue. Cleanse the wound bed and pat dry as per local protocol.
Unfold remaining saline-moistened gauze and loosely fill the entire wound cavity. Avoid over packing the wound. Caution: If multiple pieces of gauze are needed to fill the wound cavity, count and record how many pieces are present to ensure all wound filler pieces are removed at a dressing change.
While holding the Transparent Film, expose one side of the adhesive backing by removing a single panel and apply over the wound. Cover the gauze with Transparent Film, removing adhesive panels to seal, then the top stabilization panel.Recommendations: The film should extend at least 5cm beyond the wound margin and be securely anchored to the periwound to maintain a good seal. Overlap the edges of the Transparent Film by a minimum of 7.5cm when using multiple pieces of Transparent Film.
If desired, protect the periwound from exposure to moisture and adhesive through the use of a skin sealant. Allow the skin sealant to dry fully prior to placement of the Transparent Film.
2
6
1
5
Apply a layer of saline-moistened antimicrobial gauze to the wound bed.
4
Precaution: The use of negative pressure presents a risk of tissue ingrowth into the foam/gauze. Tissue ingrowth may be reduced by lowering therapy pressure, using a wound contact layer or by increasing the frequency of dressing changes.
RENASYS TOUCH - Quick Reference Guide RENASYS TOUCH - Quick Reference Guide 13
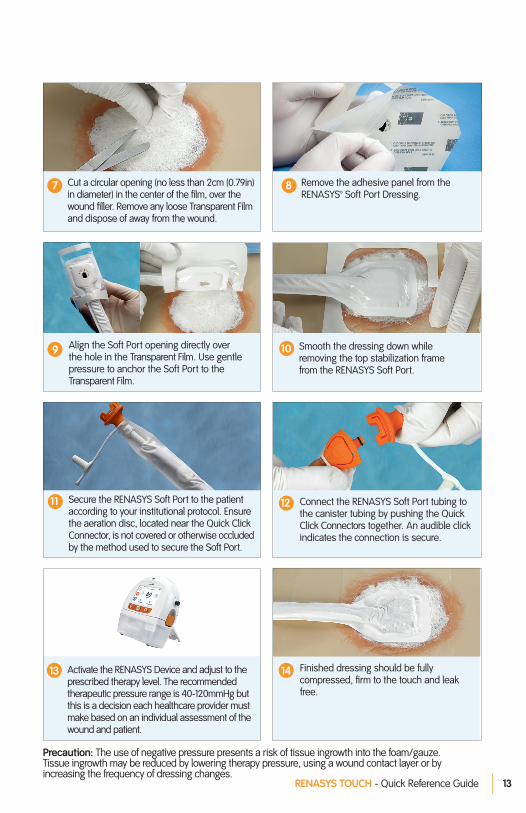
Align the Soft Port opening directly over the hole in the Transparent Film. Use gentle pressure to anchor the Soft Port to the Transparent Film.
9
Cut a circular opening (no less than 2cm (0.79in) in diameter) in the center of the film, over the wound filler. Remove any loose Transparent Film and dispose of away from the wound.
Remove the adhesive panel from the RENASYS™ Soft Port Dressing.
87
Smooth the dressing down while removing the top stabilization frame from the RENASYS Soft Port.
10
13 14Activate the RENASYS Device and adjust to the prescribed therapy level. The recommended therapeutic pressure range is 40-120mmHg but this is a decision each healthcare provider must make based on an individual assessment of the wound and patient.
Finished dressing should be fully compressed, firm to the touch and leak free.
Secure the RENASYS Soft Port to the patient according to your institutional protocol. Ensure the aeration disc, located near the Quick Click Connector, is not covered or otherwise occluded by the method used to secure the Soft Port.
11 12 Connect the RENASYS Soft Port tubing to the canister tubing by pushing the Quick Click Connectors together. An audible click indicates the connection is secure.
Precaution: The use of negative pressure presents a risk of tissue ingrowth into the foam/gauze. Tissue ingrowth may be reduced by lowering therapy pressure, using a wound contact layer or by increasing the frequency of dressing changes.

RENASYS TOUCH - Quick Reference Guide14
If desired, a non-adherant dressing may be applied. Trim a single layer of non-adherant gauze and lay across the wound bed.
3
Debride any devitalised or necrotic eschar tissue. Cleanse the wound bed and pat dry as per local protocol.
If desired, protect the periwound from exposure to moisture and adhesive through the use of a skin sealant. Allow the skin sealant to dry fully prior to placement of the Transparent Film.
2
6
1
5
Cut the foam dressing to fit the size and shape of the wound and place the cut foam into the wound. Do not cut the foam directly over the wound bed, after cutting brush the sides to dislodge any small fragments of foam.
4
Avoid over packing. Foam should completely fill the wound cavity. It may be necessary to stack multiple pieces of foam in deep wounds.
Caution: If multiple pieces of wound filler are needed to fill the wound cavity, count and record how many pieces are present to ensure all wound filler pieces are removed at a dressing change.
16. RENASYS™ TOUCH Foam with Soft Port application
While holding the Transparent Film, expose one side of the adhesive backing by removing a single panel and apply over the wound. Cover the foam with Transparent Film, removing adhesive panels seal, then the top stabilization panel. Recommendations: The film should extend at least 5cm beyond the wound margin and be securely anchored to the periwound to maintain a good seal. Overlap the edges of the Transparent Film by a minimum of 7.5cm when using multiple pieces of Transparent Film.
Precaution: The use of negative pressure presents a risk of tissue ingrowth into the foam/gauze. Tissue ingrowth may be reduced by lowering therapy pressure, using a wound contact layer or by increasing the frequency of dressing changes.
RENASYS TOUCH - Quick Reference Guide RENASYS TOUCH - Quick Reference Guide 15
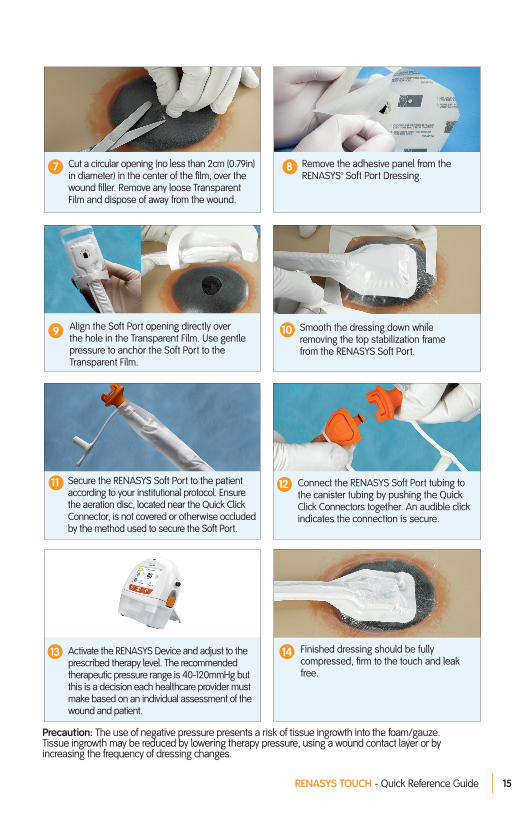
Align the Soft Port opening directly over the hole in the Transparent Film. Use gentle pressure to anchor the Soft Port to the Transparent Film.
9
Cut a circular opening (no less than 2cm (0.79in) in diameter) in the center of the film, over the wound filler. Remove any loose Transparent Film and dispose of away from the wound.
Remove the adhesive panel from the RENASYS™ Soft Port Dressing.
87
Smooth the dressing down while removing the top stabilization frame from the RENASYS Soft Port.
10
13 14Activate the RENASYS Device and adjust to the prescribed therapy level. The recommended therapeutic pressure range is 40-120mmHg but this is a decision each healthcare provider must make based on an individual assessment of the wound and patient.
Finished dressing should be fully compressed, firm to the touch and leak free.
Secure the RENASYS Soft Port to the patient according to your institutional protocol. Ensure the aeration disc, located near the Quick Click Connector, is not covered or otherwise occluded by the method used to secure the Soft Port.
11 12 Connect the RENASYS Soft Port tubing to the canister tubing by pushing the Quick Click Connectors together. An audible click indicates the connection is secure.
Precaution: The use of negative pressure presents a risk of tissue ingrowth into the foam/gauze. Tissue ingrowth may be reduced by lowering therapy pressure, using a wound contact layer or by increasing the frequency of dressing changes.
RENASYS TOUCH - Quick Reference Guide16
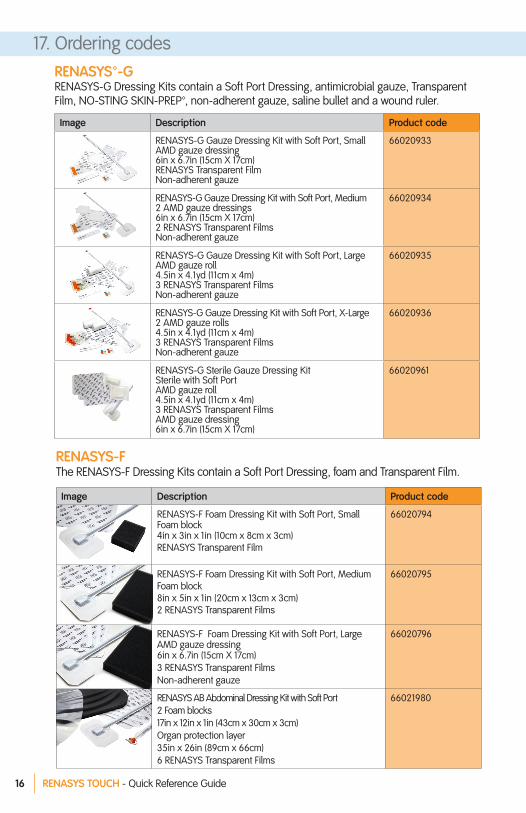
Image Description Product code
RENASYS-G Gauze Dressing Kit with Soft Port, Small AMD gauze dressing 6in x 6.7in (15cm X 17cm)RENASYS Transparent Film Non-adherent gauze
66020933
RENASYS-G Gauze Dressing Kit with Soft Port, Medium2 AMD gauze dressings 6in x 6.7in (15cm X 17cm)2 RENASYS Transparent Films Non-adherent gauze
66020934
RENASYS-G Gauze Dressing Kit with Soft Port, LargeAMD gauze roll 4.5in x 4.1yd (11cm x 4m)3 RENASYS Transparent Films Non-adherent gauze
66020935
RENASYS-G Gauze Dressing Kit with Soft Port, X-Large2 AMD gauze rolls 4.5in x 4.1yd (11cm x 4m)3 RENASYS Transparent Films Non-adherent gauze
66020936
RENASYS-G Sterile Gauze Dressing KitSterile with Soft Port AMD gauze roll 4.5in x 4.1yd (11cm x 4m) 3 RENASYS Transparent Films AMD gauze dressing 6in x 6.7in (15cm X 17cm)
66020961
17. Ordering codesRENASYS™-GRENASYS-G Dressing Kits contain a Soft Port Dressing, antimicrobial gauze, Transparent Film, NO-STING SKIN-PREP™, non-adherent gauze, saline bullet and a wound ruler.
RENASYS-FThe RENASYS-F Dressing Kits contain a Soft Port Dressing, foam and Transparent Film.
Image Description Product code
RENASYS-F Foam Dressing Kit with Soft Port, SmallFoam block4in x 3in x 1in (10cm x 8cm x 3cm) RENASYS Transparent Film
66020794
RENASYS-F Foam Dressing Kit with Soft Port, MediumFoam block 8in x 5in x 1in (20cm x 13cm x 3cm)2 RENASYS Transparent Films
66020795
RENASYS-F Foam Dressing Kit with Soft Port, Large AMD gauze dressing 6in x 6.7in (15cm X 17cm)3 RENASYS Transparent FilmsNon-adherent gauze
66020796
RENASYS AB Abdominal Dressing Kit with Soft Port2 Foam blocks 17in x 12in x 1in (43cm x 30cm x 3cm)Organ protection layer 35in x 26in (89cm x 66cm)6 RENASYS Transparent Films
66021980
RENASYS TOUCH - Quick Reference Guide RENASYS TOUCH - Quick Reference Guide 17
Image Description Product code
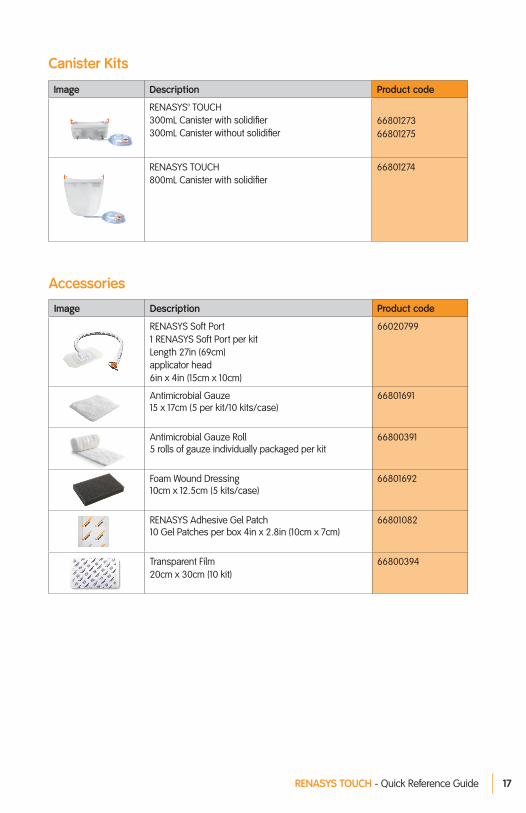
RENASYS Soft Port 1 RENASYS Soft Port per kit Length 27in (69cm)applicator head 6in x 4in (15cm x 10cm)
66020799
Antimicrobial Gauze15 x 17cm (5 per kit/10 kits/case)
66801691
Antimicrobial Gauze Roll 5 rolls of gauze individually packaged per kit
66800391
Foam Wound Dressing 10cm x 12.5cm (5 kits/case)
66801692
RENASYS Adhesive Gel Patch 10 Gel Patches per box 4in x 2.8in (10cm x 7cm)
66801082
Transparent Film 20cm x 30cm (10 kit)
66800394
Canister Kits
Image Description Product code
RENASYS™ TOUCH 300mL Canister with solidifier 300mL Canister without solidifier
66801273 66801275
RENASYS TOUCH 800mL Canister with solidifier
66801274
Accessories

RENASYS TOUCH - Quick Reference Guide18
Notes

RENASYS TOUCH - Quick Reference Guide RENASYS TOUCH - Quick Reference Guide 19
Notes
Supporting healthcare professionals for over 150 years
RNPE-36-0816-UE
Customer Care Center 1-800-876-1261 T 727-392-1261 F 727-392-6914
Smith & Nephew, Inc. Fort Worth, TX USA
©2016 Smith & Nephew, Inc. All rights reserved. ™Trademark of Smith & Nephew.
QUESTIONS?CALL NPWT CLINICAL AND PRODUCT SUPPORT LINE,VIA CUSTOMER CARE AT 1-800-876-1261
www.smith-nephew.com www.renasys-npwt.com
For detailed product information, concerning the indications for use, contraindications, effects, precautions and warnings, please consult the product’s Instructions for Use (IFU) prior to use.