Embed Size (px)
Citation preview
Replacing Foam Flotation Blocks 1960 - 1986 Sunfish
A compilation of suggestions and techniques from the members of Sunfish_Sailor
http://groups.yahoo.com/group/sunfish_sailor Introduction Opening the hull in the manner outlined here is a drastic measure for a dire situation. Before considering this approach it is highly recommended that you take less intrusive steps to dry the inner hull, repair the hull, or secure loose foam blocks. Flotation blocks that have come loose can be re-attached through strategically placed inspection ports. Hulls so waterlogged they weigh in excess of 200 lbs. have been returned to normal weight by judicious ventilation. If, after exhausting all other options, you determine the flotation blocks have totally lost their structural and buoyant characteristics then it is reasonable to consider this procedure. Nearly all other repairs can be accomplished by less perilous means. This is an involved repair beyond the scope of most other DIY repairs. It is considered a last chance at salvage. The procedure can, and often does, lead to additional maintenance items requiring even more time and more money. As of this writing, base material costs are running $200 + and for most people occupy at least a week of long evenings. Of course your mileage may vary. To replace totally deteriorated blocks the deck is separated from the hull in select areas and new blocks fit into place. The procedure is not as easy as it may sound. If you get in over your head the result could very well be a pile of scrap for the trash heap. This guide assumes you are familiar with fiberglass or laminating epoxy techniques and possess all the necessary tools and skills. If not and you still want to proceed, there are resources listed in the appendix to help you. If you are positive you want to move forward then read on, assemble your shopping list, and organize your tools. This guide will attempt to steer you through the rough spots.
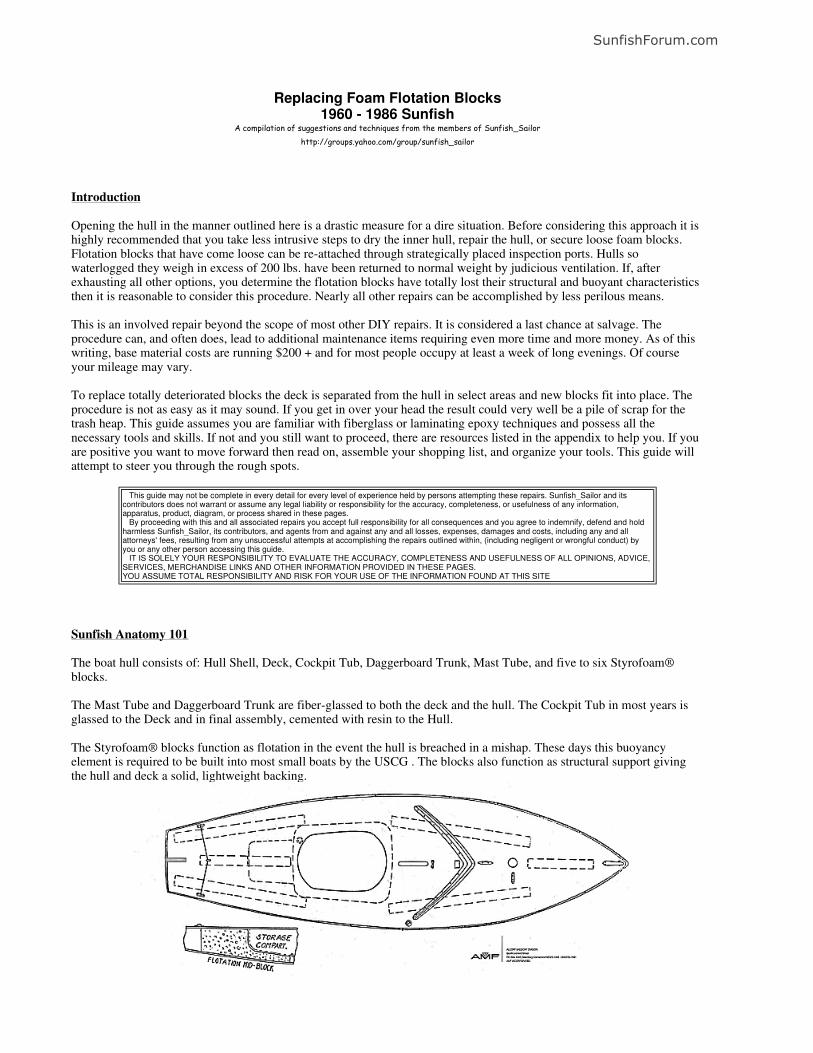
Sunfish Anatomy 101 The boat hull consists of: Hull Shell, Deck, Cockpit Tub, Daggerboard Trunk, Mast Tube, and five to six Styrofoam® blocks. The Mast Tube and Daggerboard Trunk are fiber-glassed to both the deck and the hull. The Cockpit Tub in most years is glassed to the Deck and in final assembly, cemented with resin to the Hull. The Styrofoam® blocks function as flotation in the event the hull is breached in a mishap. These days this buoyancy element is required to be built into most small boats by the USCG . The blocks also function as structural support giving the hull and deck a solid, lightweight backing.
This guide may not be complete in every detail for every level of experience held by persons attempting these repairs. Sunfish_Sailor and its contributors does not warrant or assume any legal liability or responsibility for the accuracy, completeness, or usefulness of any information, apparatus, product, diagram, or process shared in these pages. By proceeding with this and all associated repairs you accept full responsibility for all consequences and you agree to indemnify, defend and hold harmless Sunfish_Sailor, its contributors, and agents from and against any and all losses, expenses, damages and costs, including any and all attorneys' fees, resulting from any unsuccessful attempts at accomplishing the repairs outlined within, (including negligent or wrongful conduct) by you or any other person accessing this guide. IT IS SOLELY YOUR RESPONSIBILITY TO EVALUATE THE ACCURACY, COMPLETENESS AND USEFULNESS OF ALL OPINIONS, ADVICE, SERVICES, MERCHANDISE LINKS AND OTHER INFORMATION PROVIDED IN THESE PAGES. YOU ASSUME TOTAL RESPONSIBILITY AND RISK FOR YOUR USE OF THE INFORMATION FOUND AT THIS SITE
SunfishForum.com

Overview - The Deck piece and the Hull Shell come together at the ½" flange that is covered by the aluminum rub rail. In production the two pieces are bonded together with fiberglass resin and clamped so they create one solid piece. This joint is covered with an aluminum channel to protect it. The job at hand is to remove the aluminum trim, cleanly separate the joint and gain access to the inner hull, replace the foam flotation, and close up the seam in a manner that maintains alignment, deck crown, provides emergency buoyancy, and, at least in part, restores hull stiffness.
Flange Cross-section
The rivets do not hold the hull together, they only attach the aluminum channel.
Additional Tools In addition to the general tools, fiberglass/epoxy materials, containers, and the like you will need the following: · About 50 small spring clamps (industrial strength clothes pins)
· Wood strips such as screen molding (aprox. 1/2" x 3/16") cut into 6" pieces. Twice the length of the hull perimeter section being worked on. (read further and measure your boat to calculate how much will be needed) A large box of hobby type "tongue depressor" sticks may suffice. · A Helper Hardware Removal and Initial Layout - Block up the hull so it sits solidly while you work on it. Sometimes the trailer will do nicely, otherwise saw horses with added 2x4 cradling arms or plywood cradle cut-outs are suggested. However you support the hull it is important there isn't pressure in the mid-sections. Distortion here would cause the new blocks to fit improperly. Keep support at the chine and keel to avoid this. (arrows)
If you want to re-seal your deck hardware during this repair remove those pieces: Backing for the dagger-board pad eye, Mainsheet block or Hook, and Forward hiking strap plate are more easily reached from the outside or through an inspection port so it doesn't matter if the deck is open. [pre '72] Remove the long carriage bolt that connects the upper bronze rudder attachment plate to the lower one. If you
SunfishForum.com

aren't removing any other deck hardware you will still need to remove the upper plate. The Mast tube and dagger-board trunk are fiber-glassed to both the deck and the hull. You do not want to cut or break these loose! To avoid disturbing the tube and trunk draw a mark at the edge of the deck on a line about even with the forward tip of the Splash Guard and another line 6" behind the Cockpit tub. For '72 and later boats with the added cockpit storage move this line just beyond the back edge of the storage area. Between these marks is the NO CUT ZONE. You will leave the flange undisturbed in this area.
Add an inspection port - Because the forward blocks extend back as far as the cockpit installing an inspection port just behind the Splash Guard is recommended in order to reach the rear most portions. Either a 5" or 6" port should work fine. Following the instructions that come with the port locate, position, and cut the hole for the port. Don't install the port ring at this time. Tape the edge of the hole with Masking Tape to protect your arm from fiberglass splinters and leave it for now. Removing the aluminum rub rail - Drill out the aluminum rivets holding the aluminum rub rail that covers the area your are going to take apart. Due to overlaps this may very well be all the trim. Use an oversize (1/4") drill bit to just remove the head material. Don't use a smaller bit and drill clean through the rivet, rail or flange. Notice these rivets do not go all the way through the bottom of the rub rail.
The aluminum channel is fairly soft and easily bent. If it gets distorted it is very difficult to straighten. New channel is available at roughly $3.50 a foot so if you are careful you can save yourself a costly replacement. That said, gently remove the aluminum rail so it maintains it's shape and store it where it won't be disturbed for the duration of the job. Splitting the Deck from the Hull Shell - Look at the edge of the flange you just uncovered - it's about 1/4" thick and you may be able to see the layers that make up the fiberglass sandwich. Select a mid-point in the section you choose to start with. Pick a halfway point in the sandwich of fiberglass. Work a utility knife blade in between the layers firmly pushing it straight in about an inch so it completely penetrates the flange.
SunfishForum.com

Once the knife blade has been worked into the joint, slowly start working the blade horizontally. Once a slit is opened for a couple of inches you can insert a 2" putty knife blade to help take pressure off the knife blade. Keep moving the putty knife a little ways behind the utility knife as you open up the slit. If the split starts to drift off center - STOP, move an inch or so past the off-center drift and start a new, centered slice aimed back toward the original cut. Work back toward the part already separated until they meet. You may now have a loose piece of fiberglass where the knife strayed. You will re-attach or fill this later. Continue separating in the original direction. Pick out the old rivet shanks as you go along. Once the deck is separated from the hull it can be gently curled upward to reveal the inner hull. As you lift you may need to use a putty knife to separate the foam blocks from the deck. Be careful in lifting the deck. Maintain a smooth curve where it is bending. Don't crease the deck !! The aft deck is easy since it lifts symmetrically. The foredeck needs to be carefully rolled up one side at a time because of the Mast Tube.
This is a very close approximation of the actual amount of access you will get.
Removing the old blocks - Unique Tools - Nylon Brush w/Stiff Bristles The old blocks were set in an expanding foam. Use a putty knife to separate the blocks from the hull. You may have to cut or break out the foam where it is still attached in the deepest recess, but try and preserve the blocks in one piece if possible. Scrape out all the old bedding foam from the deck and hull. A stiff nylon brush works well to scrub off remaining bits. Don't be so vigorous in cleaning off the old foam that you cut or otherwise damage the hull and deck fiberglass. A wipe with acetone will do a final cleaning of the areas. Inspection - All the deck hardware is/was screwed to wood backing blocks. These blocks have been fiber-glassed to the under-side of the deck or inside the hull. Check these for secure attachment and rot, repair or replace as needed. If you replace blocks use an equal quality wood for replacement. Pressure treated pine is not recommended. In a year or so the pressure treatment will evaporate leaving behind nothing more than a piece of low grade pine that will rot quickly. Lumber yard scraps of a good hardwood or Mahogany are suitable alternatives to the original.
SunfishForum.com

If all the backing blocks are in good shape and you removed the hardware you can fill the holes with epoxy and re-drill them when the deck is back in place. This is a way to renew a tight fit for your hardware. Check the inner hull for damage - old repairs done poorly, cracks in the fiberglass, holes, etc. You have an opportunity here to do very nice internal overlays of any damaged areas. Save the external filling and cosmetics until you have completed your foam block replacement and the deck is re-attached. In the present state it's not a good idea to be twisting or turning the hull to reach external repairs. [pre '72] If you are upgrading to the new style rudder this is the point where you want to install the new gudgeon kit. Fitting the New Foam Blocks -
Size your new foam blocks to fit. Most Styrofoam for this sort of application come in large blocks known as "billets". You will probably be cutting the individual pieces from a 10" x 20" x 96" billet. If your old blocks came out in one piece they will make good templates.
Cutting foam can be a challenge. Naturally, the coarser the tool the rougher the cut. The Japanese Saw cuts smoothly and because it cuts on the draw stroke not the push stroke gives better control. A hand-held wire saw works, but tends to leave a bowed or domed cut. A coping saw with 12 - 18 tpi blade works well for finish cuts. It's slow going, but leaves relatively clean, straight cuts. Practice on some of the excess block material before attacking your actual block.
You want to begin by cutting the blocks oversize by a couple of inches. Note that the deck is curved (crowned) in most years and the hull is sloped and curved where the blocks fit. You want your new blocks to follow these slopes and curves as closely as possible. This may require many trial & error fittings until it's right. The attachment foam will take up some slack, but it's best not to have much more than 1/4" gap at the top and 1/4" at the bottom. Check the fit by temporarily setting the blocks in the hull and clamping down the deck. It is important to pay attention here to the alignment of the hull and deck flanges. They need to align as closely as possible to insure you retain the original deck crown.
Coast Guard recommended minimum flotation for safety is 2 LB Density, 95-98% closed cell, Urethane or
Styrofoam Marine Flotation Foam tested in accordance with U.S. Coast Guard Regulation # 33 CFR 183.114 .
SunfishForum.com
You may be tempted to make the forward port and starboard blocks into a two-piece set for ease of installation. Let me point out that these blocks provide support for the span of hull subject to the most pounding and flex. They provide added stiffness for the area where it's needed most. A joint in the blocks here is not recommended. A note about foam - as of early 2006 Styrofoam has been found on the Internet ranging in price from $98 for a 10x20x96 billet to $90 for a 7x20x48 billet. It is definitely worth shopping around. If you have a local Styrofoam producer or outlet it will save a few dollars shipping to check with them first. You pay "oversize" freight fees on a 96" billet. An alternative to billets would be to mold your own blocks. This is not necessarily a cost savings, but a way to form blocks when billets prove difficult to obtain. To make a mold build an open top plywood box about 2" wider, longer, and taller than the largest flotation block. Line the mold with plastic sheet or cut-open trash can liners. Calculate the square foot space of the mold and fill with the appropriate amount of 2-part expanding foam. Once the foam has set up, remove the block from the mold, and trim to size. Attaching New Blocks to the Hull - Unique Tools - Hot Glue Aft section Place the center block in position. I'll leave it to you to devise a method to temporarily hold the block in place on the hull. This might involve using hot glued wood blocks, cardboard, foam scraps, along with duct tape or masking tape. The setup needs to keep the foam mix from running into the skeg of the hull and be secure enough to hold the block in place while the foam expands and pushes on the block. Attaching a temporary block or rib on the deck piece to keep the block from tipping can also be helpful. Read The Instructions for your 2-part expanding foam. Know how to mix it, spread it, and how long it takes to set. Some foam reacts immediately upon mixing, some brands give you a few seconds delay. Practice with a little of the mix to see how your brand behaves. Attaching The Block What you are going to do next is time dependent on the 2-part expanding foam: You need to have everything ready to: · Mix up enough 2-part expanding foam to set one block, · Pour the mix over the hull attachment area AND the top part of the block that will fit under the deck beyond the Deck/Hull separation. · Set the block in position in the foam mix, · Close the deck over the block, · Clamp the deck to the hull so the expanding foam doesn't push it up, · Wait for the foam to cure. Once one block is set and the foam is cured move to the next block and go again. When all the aft foam blocks are satisfactorily set in the hull remove all the temporary holding materials. Forward Section Working "under the hood" is a little more difficult here because you have to carefully roll up the deck first from one side and then the other so you don't crack the Mast Tube. Both top and bottom portions of the blocks that fit into the area beyond the deck/hull separation need to be secured at one
SunfishForum.com

time. Be sure you know how you are going to get your foam mix all the way back to the inner reaches. This might take two people with two cups of mix working in unison. One under the hood and one reaching through the porthole. Attach the Port and Starboard blocks first then finish with the Bow block. Attaching the Blocks to the Aft Deck - Temporarily close and clamp the aft deck. Be sure the new blocks aren't creating any unwanted bulges. Shape the foam blocks if needed.
Clean up the Deck flange area and Hull flange area by smoothing ragged spots with a shaper rasp as needed. Don't worry about broken out bits from the separation process or split rivet holes at this point. The re-attachment process will automatically fill these. This procedure is actually used later, but it's easier to do now. What you are going to do next is again time dependant on the 2-part expanding foam. You need to have everything ready to: · Mix up enough 2-part expanding foam to set all 3 blocks, · Pour the mix along the top of the blocks, · Close the deck over the blocks, · Align and clamp the deck to the hull so the expanding foam doesn't push it up, · Wait for the foam to cure. If the deck and hull are not aligned after the foam cures you will need to separate the deck from the blocks, clean up the deck, and do it again. Attaching the Blocks to the Fore Deck - This is essentially the same process as the aft deck except it will be done in two steps. First the Port & Starboard blocks and last the Bow block. Temporarily close and clamp the aft deck. Be sure the new blocks aren't creating any unwanted bulges. Shape the foam blocks if needed. Clean up the Deck flange area and Hull flange area by smoothing ragged spots with a shaper rasp as needed. Step One - Port & Starboard blocks Get everything ready to: · Mix up enough 2-part expanding foam to set both blocks, · Pour the mix along the top of the blocks,
SunfishForum.com

· Close the deck over the blocks, · Align and clamp the deck to the hull so the expanding foam doesn't push it up, · Wait for the foam to cure. Step Two - Bow block Align and clamp the deck to the hull from a point even with the mast tube back to the No Cut Zone. This will help you keep the bow aligned in this last pour. Get everything ready to: · Mix up enough 2-part expanding foam to set the block, · Pour the mix along the top of the block, · Close the deck over the block, · Align and clamp the deck to the hull so the expanding foam doesn't push it up, · Wait for the foam to cure. If the deck and hull are not aligned after the foam cures you will need to separate the deck from the blocks, clean up the deck, and do it again. Re-Sealing the Deck to the Hull - Next you are going to lay wetted fiberglass mat on the flange and clamp the deck to the hull. This re-attachment step is best done by a two person team due to the time constraint of the curing resin. You can use either fiberglass resin or laminating epoxy (West Systems, System Three, or Raka) for this step. Epoxy has a slower cure rate allowing more time to complete the task. This procedure is analogous to handling wet toilet paper without tearing or bunching it up. If you think you need or want some practice, stop work and do it now. Never use your boat for practice!! It doesn't matter if you start at the forward or aft end, but do one end completely before moving on to the other. Cut the fiberglass mat into 12" x 2" strips. Enough strips to double or triple cover the flange area of the entire end you going to work on in alternating layers.
· Tear off narrow (6") sheets of waxed paper to cover the same distance. · Have all your clamps at the ready. · Have your molding sticks or tongue depressors ready, · Prep the deck and hull flange by lightly wiping with acetone. · Prop open the hull/deck separation just far enough to allow you to lay in your fiberglass mat, but not so far that you pull loose the freshly attached foam blocks. 1 ½ " - 2" should be enough. It's going to get tricky where the hull and deck come together at the No Cut Zone and where the blocks are nearest the gunwales. !! Mix a practice batch of resin so you absolutely know the resin kick time for your immediate working temperature and humidity. Working quickly..... with your helper.... · Mix your resin. It doesn't hurt to add a small amount of milled fibers to the mix, but not so much as to noticeably thicken the resin.
SunfishForum.com

· Wet the mat strips and layer them in an overlapping manner around the hull flange. Be sure to tuck the ends in with your putty knife where the deck and hull are still attached. · Bring the deck flange in contact with the hull flange. Start at the No Cut Zone and work toward bow or stern - · Working from opposite sides, you and your helper align the two flanges, · Wrap the waxed paper over the flange, · Spring clamp a wood strip on the top and bottom of the flange · Clip on two more clamps evenly spaced so each stick has three clamps. The sticks help to evenly distribute the clamp pressure. · Keep going this way until you meet at the bow or stern. Your time is limited by the "kick" time of your fiberglass or epoxy resin.
Repeat the above steps for the remaining section. Finishing off the Hull-to-Deck attachment - Once the resin has kicked and had some extra set time, remove the clamps, wood strips, and waxed paper. Trim back any ooze with a utility knife and smooth the edge with a rasp or shaper. Resin that has run over onto the deck or outer hull may just peel up or come loose with help from a putty knife or razor blade. Any rivet holes and chips in the flange that did not fill completely in the re-attachment process should be filled at this point with a slightly thickened mix of resin and milled glass fiber. Finish installing the inspection port. Attach all the deck hardware using a little marine silicone sealer (not adhesive) around each screw. Let the boat set overnight so all the resin and sealant set up properly. Finishing Up - Unique Tools - Vacuum Cleaner, Dish Soap, Spray Bottle, Drill Stop, Pop-Rivet Tool, Pop-Rivets Leak Test the hull - Fix any leaks. - (see the appendix for a link to Leak Test instructions) Re-attach aluminum rub rail - (see the appendix for a link to a Sunfish/Laser factory guide) Note: the rub rail can be used as a template for re-drilling rivet holes. Keep in mind you are only going to drill ¾ of the way through the flange, NOT all the way through. Make a drill stop from a piece of brass tube (Hobby store) or you can wrap tape around the drill bit. This kinda works, but tends to slip with use and is messy to get off the bit.
SunfishForum.com

Appendix Fiberglass Repair Guides - Fiberglass Repair and Construction Handbook by Jack Wiley, McGraw-Hill Professional, ISBN: 0830627790. Recommended Reading: Chapters 1 - 4, invest in the recommended tools, and do all the practice steps along the way using a practice piece before ever coming near your boat. Fibre Glast Developments online information center http://www.fibreglast.com/contentpages-Free+Technical+Brochures-23.html Fiberglass Supplies - Fiberglass Supply 314 West Depot P. O. Box 345 Bingen, Washington 98605-0345 Telephone: (509) 493-3464 e-mail: [email protected] www.fiberglasssupply.com Merton's Fiberglass & Marine Supply 314 Rocus Street o Springfield, MA 01104 (800) 333-0314 [email protected] Fibre-Glast 95 Mosier Pkwy Brookville, OH 45309 800-330-6368 o Fax: 937-833-6555 Epoxy Supplies - West System Inc. 102 Patterson Ave. P.O. Box 665 Bay City, MI 48707-0665 http://www.westsystem.com/ System Three Resins, Inc. 3500 West Valley Highway North Suite 105 Auburn, WA 98001 800.333.5514 [email protected] Two Part Pour Foam - Fiberglass Supply 314 West Depot P. O. Box 345 Bingen, Washington 98605-0345 (509) 493-3464 [email protected] www.fiberglasssupply.com AeroMarine Polyurethane Pour Foam John Greer & Associates 4401 Twain Ave. #26 San Diego, CA 92120 Toll-free (877) 342-8860 http://www.jgreer.com
SunfishForum.com

Urethane Pour Foam Merton's Fiberglass & Marine Supply 314 Rocus Street o Springfield, MA 01104 (800) 333-0314 [email protected] American Micro Industries, Inc. 440 Ramsey Avenue, Chambersburg, PA 17201 800-558-2058 [email protected] U.S. Composites, Inc. 5101 Georgia Avenue West Palm Beach, FL 33405 561-588-1001 mailto:[email protected] Foam Block Resources - Flotation Services Seattle, WA George Johnston 425-453-1139 Dow Styrofoam and Dura-Float Foam http://flotationservices.com American Micro Industries, Inc. 440 Ramsey Avenue, Chambersburg, PA 17201 800-558-2058 [email protected] Drew Foam, Inc. 144 Industrial Drive Monticello, AR 71655 Toll Free: 800-643-1206 http://www.drewfoam.com/floatation.html Dock Builders Supply 6202 Powell Road Gibsonton, FL 33534 800.677.4710 [email protected] Aluminum Trim Attachment Guide - Downloads from Sunfish_Sailor FILES - Sunfish_Sailor Leak Test - Wind Line Sails How To Files - How to Perform a Leak Test Sunfish_Sailor Group Files - Sunfish_Sailor Fixing Loose Blocks without opening the deck Wind Line Sails How To Files - How to Secure Loose Blocks Installing an Inspection Port -
SunfishForum.com

Wind Line Sails How To Files - How to Install an Inspection Port Source for a New Boat Wind Line Sails - www.windline.net Vanguard - www.teamvanguard.com
This information has been compiled in support of Sunfish owners and enthusiasts. Additional resources, information, and updates are always welcome. Please contact: Sunfish Sailor
This site is neither affiliated with, nor endorsed by Wind line Sails or Vanguard Sailboats.
Wind line Sails is the trade name of Wind line Sails International, 15121 W Clover Ln., Libertyville, IL 60048 www.windline.net Sunfish® the Sunfish Logo and Vanguard® are registered trademarks of Vanguard Sailboats, 300 Highpoint Ave, Portsmouth, RI, www.teamvanguard.com
Styrofoam®, a trademark of The Dow Chemical Company Other product and company names mentioned in the Site may be the trademarks of their respective owners.
2006 - 2007 Sunfish_Sailor
SunfishForum.com