Embed Size (px)
Citation preview

REPOX User Manual
Version Date of sending Name
0.1 20.07.2010 Gilberto Pedrosa First draft
0.2 20.03.2012 Lizbeth Cuba Add content
0.3 27.04.2012 João Edmundo Revision

REPOX User Manual
Table of Contents
1 Installation ...................................................................................................................... 4
1.1 System Requirements ............................................................................................. 4
1.1.1 Operating System ............................................................................................ 4
1.1.2 Java 6 .............................................................................................................. 4
1.1.3 Application server ............................................................................................. 4
2 Login .............................................................................................................................. 9
3 Homepage .....................................................................................................................10
4 Data Provider.................................................................................................................11
4.1 Create a Data Provider ...........................................................................................11
4.2 Edit a Data Provider ...............................................................................................11
4.2.1 Manage Data Provider button ..........................................................................12
4.3 Remove a Data Provider ........................................................................................13
4.3.1 Manage Data Provider button ..........................................................................14
5 Data Set ........................................................................................................................15
5.1 Create a Data Set ..................................................................................................16
5.1.1 Create Data Set from Folder ...........................................................................17
5.1.2 Create Data Set from OAI-PMH ......................................................................19
5.1.3 Create Data Set from Z39.50 ..........................................................................21
5.2 Edit a Data Set .......................................................................................................22
5.3 Move a Data Set ....................................................................................................23
5.4 Ingest Now a Data Set ...........................................................................................25
5.5 Ingest Sample of a Data Set ...................................................................................25
5.6 Refresh or Auto Refresh .........................................................................................26
5.7 Empty a Data Set ...................................................................................................27
5.8 Remove a Data Set ................................................................................................28
5.9 Schedule Ingest .....................................................................................................29
5.10 View Info ................................................................................................................31
5.11 Export a Now..........................................................................................................32
5.12 Schedule Export .....................................................................................................34
6 Statistics ........................................................................................................................36
7 Schema Mapper ............................................................................................................38
7.1 Add Transformation ................................................................................................38
7.2 Visual Schema Mapper View Schema Map Transformation ...................................39
REPOX User Manual
7.3 Edit Transformation ................................................................................................39
7.4 Remove Transformation .........................................................................................40
8 OAI-PMH Tests .............................................................................................................41
9 Harvesting .....................................................................................................................42
9.1 Schedule Task (Calendar) ......................................................................................42
9.2 Scheduled Task (List) .............................................................................................43
9.3 Running Task .........................................................................................................43
9.4 Edit and Delete Tasks ............................................................................................44
10 Administration ............................................................................................................47
10.1 Configuration Settings ............................................................................................47
10.2 User Management ..................................................................................................48
10.3 External Services Manger ......................................................................................49
10.3.1 Add External Service .......................................................................................49
10.4 Rest Services .........................................................................................................50
11 Send Feedback..........................................................................................................52
12 Help ...........................................................................................................................53
13 RSS Feed-REPOX ....................................................................................................54
14 Languages .................................................................................................................55
15 Search for a specific Data Provider or Data Set .........................................................56
REPOX User Manual
1 Installation
1.1 System Requirements
1.1.1 Operating System
REPOX was successfully tested in the following operating systems: Windows XP, Windows
Vista, Windows 7, Linux (Ubuntu) and Mac OS X 10.5.8.
No other operating systems supporting the Java Virtual Machine were tested.
1.1.2 Java 6
REPOX is written in Java and assumes the Java 6 (or higher) virtual machine to run properly.
The URL to download the most recent version of Java is:
http://java.sun.com/javase/downloads/index.jsp. It may be required to have administrative
rights in Windows or root permission in Linux to install it.
1.1.3 Application server
REPOX runs as a web application within a J2EE servlet container.
REPOX was tested on Apache Tomcat 6.x and Jetty 6.1.11. However, it might also run
properly on others J2EE servlet containers, since they were not identified other
dependencies.
1.2 Procedure
1.2.1 Java 6
The first thing to do to install REPOX is to get Java 6 or higher, for the Libraries that don't
have it yet. The URL to retrieve it is: http://java.sun.com/javase/downloads/index.jsp. It may
be required to have administrative rights in Windows or root permission in Linux.
1.2.2 Windows XP
First check that you are using an account with administrative permissions. To install REPOX,
click twice on the file install.jar. If it doesn't work, open a command prompt and change
directory to the one that has the installer and execute:
java -jar install.jar
1.2.3 Windows Vista
In Windows Vista it is necessary to execute the installer with special administrative
permissions. So, a command prompt window with administrator rights is needed. To create
one you need to:
Go to Start > All Programs > Accessories > then right-click on "Command
Prompt" and select "Run as administrator".
REPOX User Manual
Then change directory to the one that has the installer and execute:
java -jar install.jar
1.2.4 Linux and MAC OS X
To install REPOX in Linux and MAC OS X you need to use root or be a sudoer. Open a
terminal and change the directory to the one that has the installer. If you are logged with root
execute:
java -jar install.jar
If you are logged with a used which has sudoer permission execute:
sudo java -jar install.jar
REPOX User Manual
2 Jetty Server
2.1 Windows XP/Vista
Running Jetty
Open a new terminal, change directory to the jetty installation path (see the documentation
index) and execute:
java -jar start.jar etc/jetty.xml
Stopping Jetty
Close the command prompt where jetty was launched
Starting Jetty as a service
First check that you are using an account with administrative permissions. In Windows Vista
it is necessary to execute the installer with special administrative permissions. So, a
command prompt window with administrator rights is needed. To create one you need to:
Go to Start > All Programs > Accessories > then right-click on "Command
Prompt" and select "Run as administrator".
Open a command prompt, change directory to the jetty installation path (see the
documentation index) and execute:
bin\Jetty-Service.exe --start bin\jetty-service.conf
Stopping Jetty as a service
First check that you are using an account with administrative permissions. In Windows Vista
it is necessary to execute the installer with special administrative permissions. So, a
command prompt window with administrator rights is needed. To create one you need to:
Go to Start > All Programs > Accessories > then right-click on "Command
Prompt" and select "Run as administrator".
Open a command prompt, change directory to the jetty installation path (see the
documentation index) and execute: bin\Jetty-Service.exe --stop bin\jetty-service.conf
Installing Jetty as a service
First check that you are using an account with administrative permissions. In Windows Vista
it is necessary to execute the installer with special administrative permissions. So, a
command prompt window with administrator rights is needed. To create one you need to:
Go to Start > All Programs > Accessories > then right-click on "Command
Prompt" and select "Run as administrator".
Open a command prompt, change directory to the jetty installation path (see the
documentation index) and execute:
REPOX User Manual
bin\Jetty-Service.exe --install bin\jetty-service.conf
Removing Jetty service
First check that you are using an account with administrative permissions. In Windows Vista
it is necessary to execute the installer with special administrative permissions. So, a
command prompt window with administrator rights is needed. To create one you need to:
Go to Start > All Programs > Accessories > then right-click on "Command
Prompt" and select "Run as administrator".
Open a command prompt, change directory to the jetty installation path (see the
documentation index) and execute:
bin\Jetty-Service.exe --remove bin\jetty-service.conf
2.2 Linux
Running Jetty
Open a new terminal, change directory to the jetty installation path (see the documentation
index) and execute:
java -jar start.jar etc/jetty.xml
Stopping Jetty
Kill the process running it (Ctrl+C) in the terminal where it was launched
Starting Jetty as a service (tested on Ubuntu)
Open a terminal and run with root permissions:
/etc/init.d/jetty.sh start
Stopping Jetty as a service (tested on Ubuntu)
Open a terminal and run with root permissions:
/etc/init.d/jetty.sh stop
Installing Jetty as a service (tested on Ubuntu)
Open a terminal, change directory to the jetty installation path (see the documentation index)
and run with root permissions:
bash bin/installService.sh bin
Removing Jetty service (tested on Ubuntu)
Open a terminal, change directory to the jetty installation path (see the documentation index)
and run with root permissions:
bash bin/uninstallservice.sh

REPOX User Manual
REPOX User Manual
3 Login
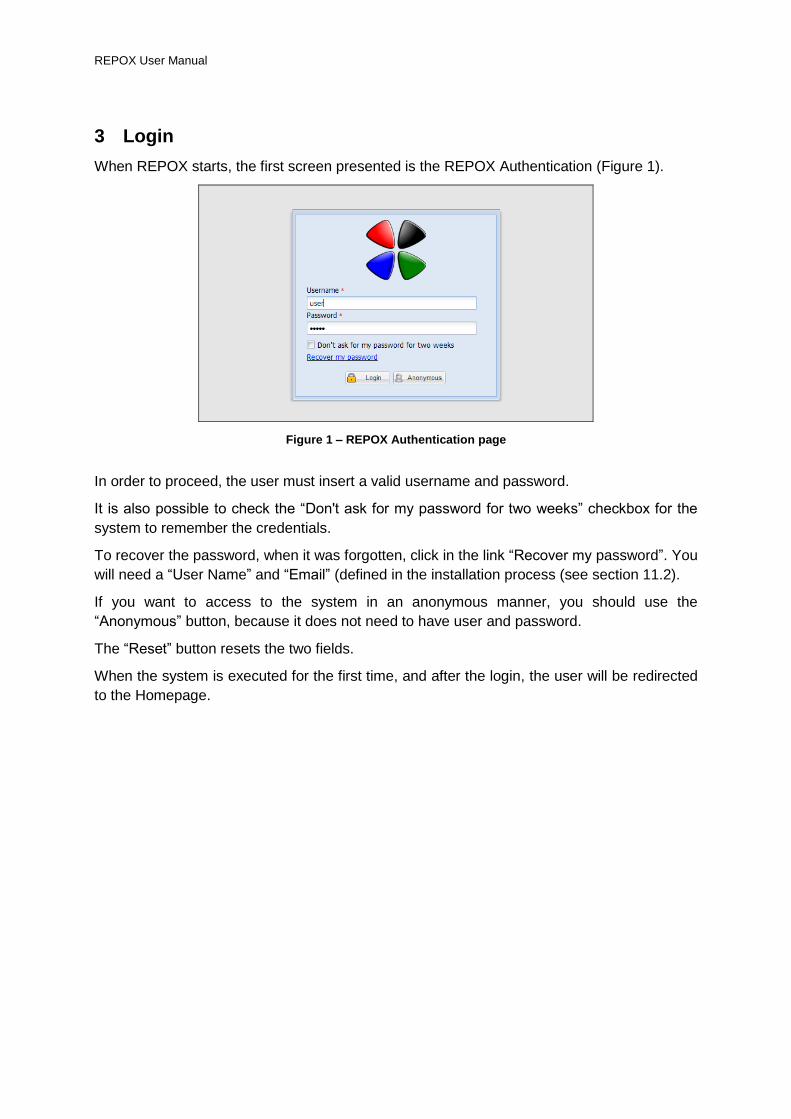
When REPOX starts, the first screen presented is the REPOX Authentication (Figure 1).
Figure 1 – REPOX Authentication page
In order to proceed, the user must insert a valid username and password.
It is also possible to check the “Don't ask for my password for two weeks” checkbox for the
system to remember the credentials.
To recover the password, when it was forgotten, click in the link “Recover my password”. You
will need a “User Name” and “Email” (defined in the installation process (see section 11.2).
If you want to access to the system in an anonymous manner, you should use the
“Anonymous” button, because it does not need to have user and password.
The “Reset” button resets the two fields.
When the system is executed for the first time, and after the login, the user will be redirected
to the Homepage.
REPOX User Manual
4 Homepage
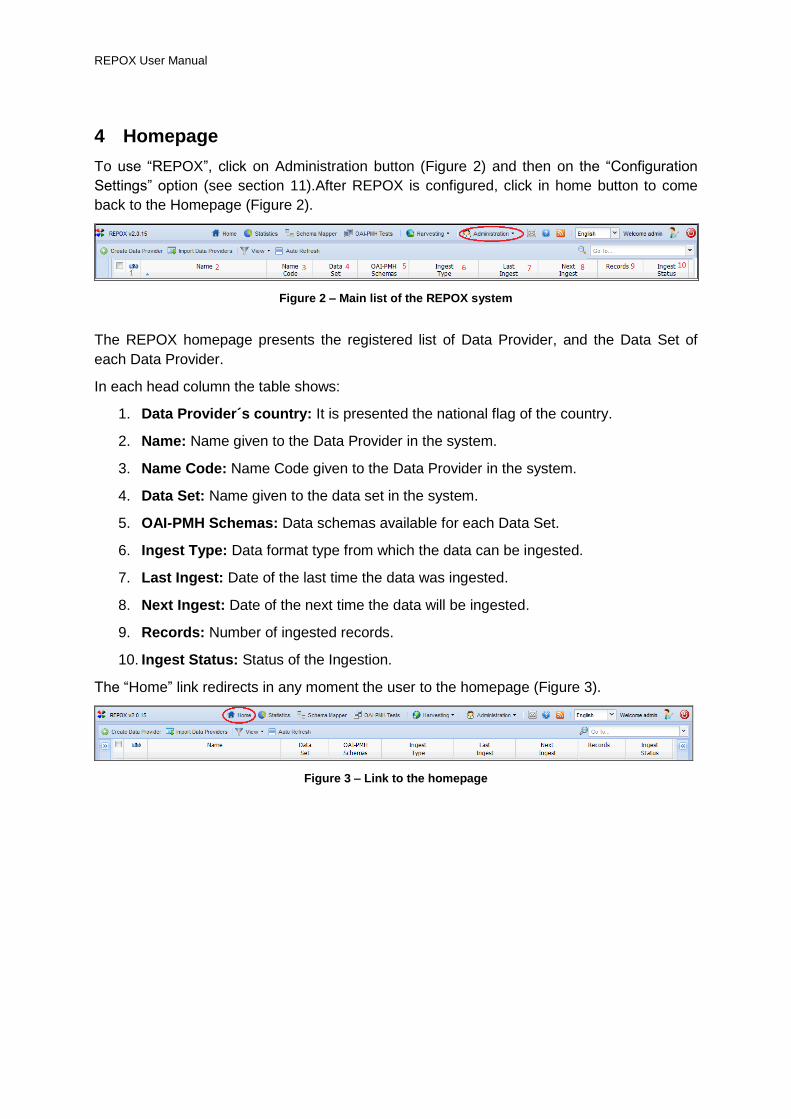
To use “REPOX”, click on Administration button (Figure 2) and then on the “Configuration
Settings” option (see section 11).After REPOX is configured, click in home button to come
back to the Homepage (Figure 2).
Figure 2 – Main list of the REPOX system
The REPOX homepage presents the registered list of Data Provider, and the Data Set of
each Data Provider.
In each head column the table shows:
1. Data Provider´s country: It is presented the national flag of the country.
2. Name: Name given to the Data Provider in the system.
3. Name Code: Name Code given to the Data Provider in the system.
4. Data Set: Name given to the data set in the system.
5. OAI-PMH Schemas: Data schemas available for each Data Set.
6. Ingest Type: Data format type from which the data can be ingested.
7. Last Ingest: Date of the last time the data was ingested.
8. Next Ingest: Date of the next time the data will be ingested.
9. Records: Number of ingested records.
10. Ingest Status: Status of the Ingestion.
The “Home” link redirects in any moment the user to the homepage (Figure 3).
Figure 3 – Link to the homepage
REPOX User Manual
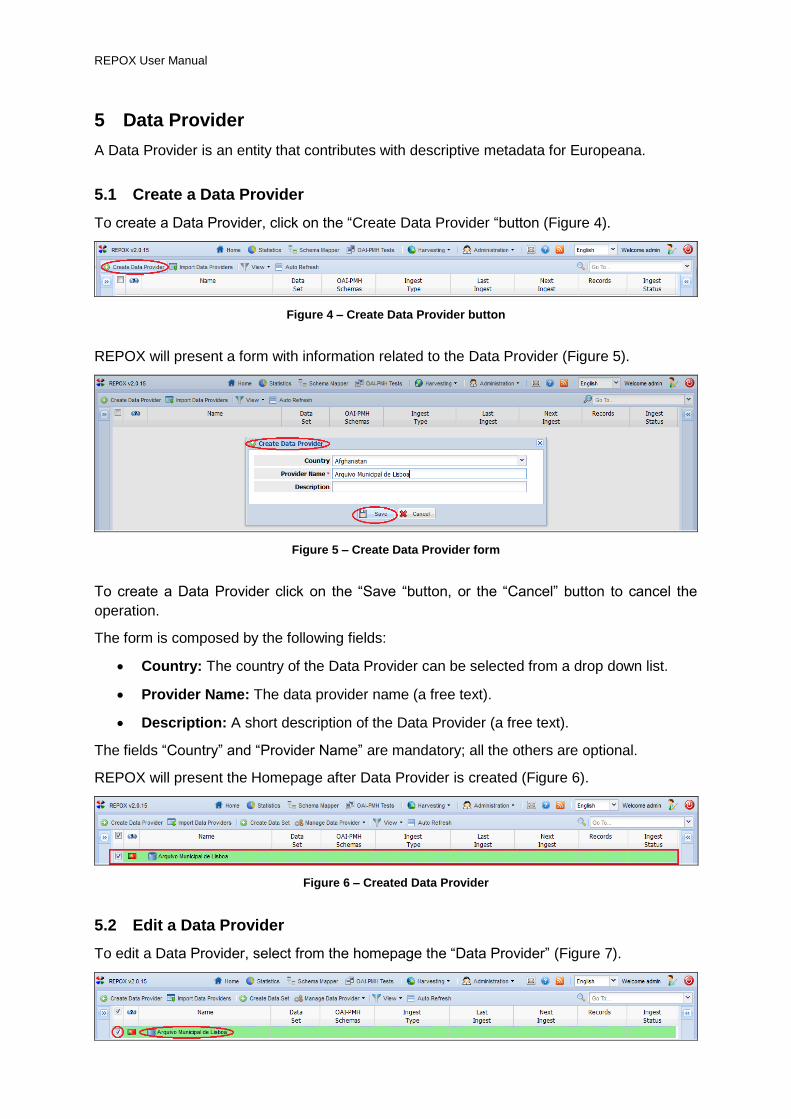
5 Data Provider
A Data Provider is an entity that contributes with descriptive metadata for Europeana.
5.1 Create a Data Provider
To create a Data Provider, click on the “Create Data Provider “button (Figure 4).
Figure 4 – Create Data Provider button
REPOX will present a form with information related to the Data Provider (Figure 5).
Figure 5 – Create Data Provider form
To create a Data Provider click on the “Save “button, or the “Cancel” button to cancel the
operation.
The form is composed by the following fields:
Country: The country of the Data Provider can be selected from a drop down list.
Provider Name: The data provider name (a free text).
Description: A short description of the Data Provider (a free text).
The fields “Country” and “Provider Name” are mandatory; all the others are optional.
REPOX will present the Homepage after Data Provider is created (Figure 6).
Figure 6 – Created Data Provider
5.2 Edit a Data Provider
To edit a Data Provider, select from the homepage the “Data Provider” (Figure 7).
REPOX User Manual
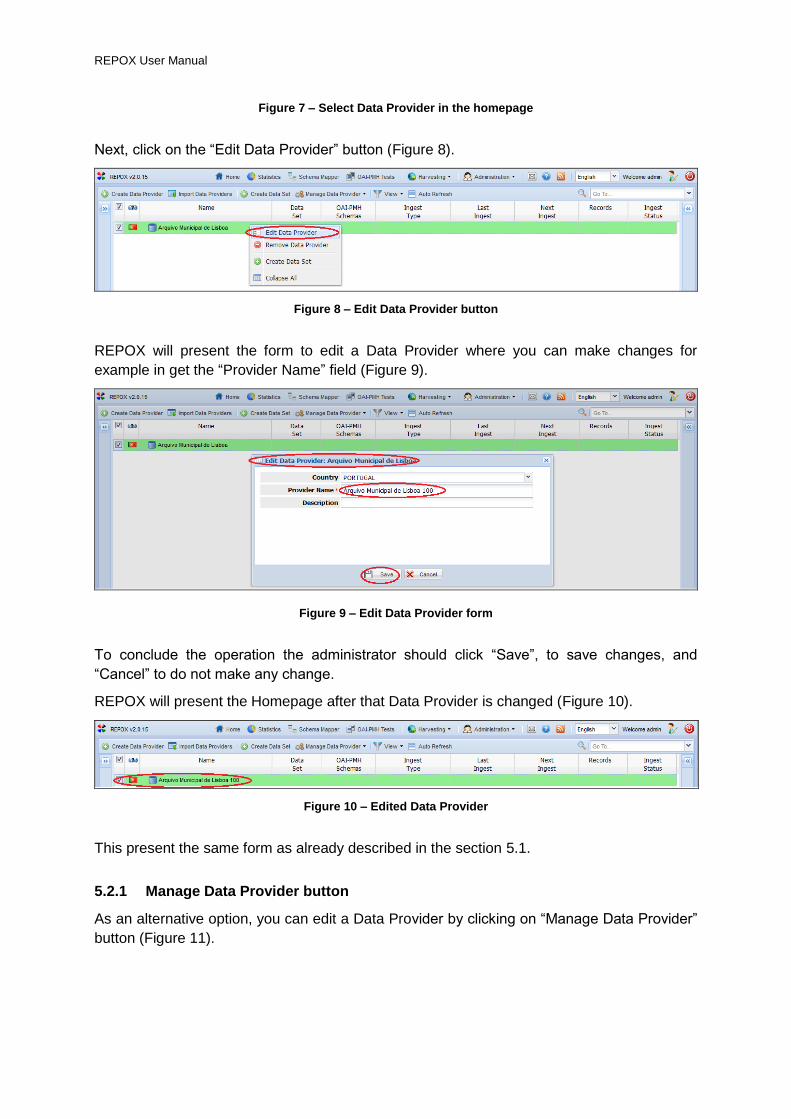
Figure 7 – Select Data Provider in the homepage
Next, click on the “Edit Data Provider” button (Figure 8).
Figure 8 – Edit Data Provider button
REPOX will present the form to edit a Data Provider where you can make changes for
example in get the “Provider Name” field (Figure 9).
Figure 9 – Edit Data Provider form
To conclude the operation the administrator should click “Save”, to save changes, and
“Cancel” to do not make any change.
REPOX will present the Homepage after that Data Provider is changed (Figure 10).
Figure 10 – Edited Data Provider
This present the same form as already described in the section 5.1.
5.2.1 Manage Data Provider button
As an alternative option, you can edit a Data Provider by clicking on “Manage Data Provider”
button (Figure 11).
REPOX User Manual
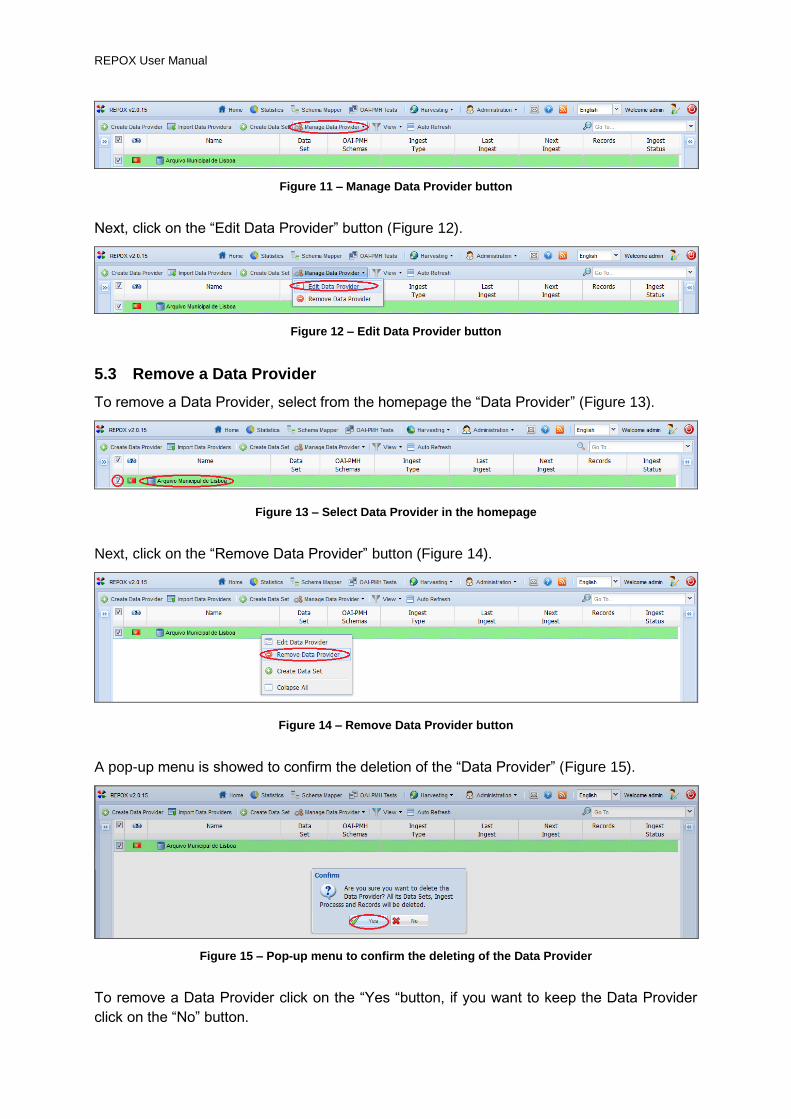
Figure 11 – Manage Data Provider button
Next, click on the “Edit Data Provider” button (Figure 12).
Figure 12 – Edit Data Provider button
5.3 Remove a Data Provider
To remove a Data Provider, select from the homepage the “Data Provider” (Figure 13).
Figure 13 – Select Data Provider in the homepage
Next, click on the “Remove Data Provider” button (Figure 14).
Figure 14 – Remove Data Provider button
A pop-up menu is showed to confirm the deletion of the “Data Provider” (Figure 15).
Figure 15 – Pop-up menu to confirm the deleting of the Data Provider
To remove a Data Provider click on the “Yes “button, if you want to keep the Data Provider
click on the “No” button.
REPOX User Manual
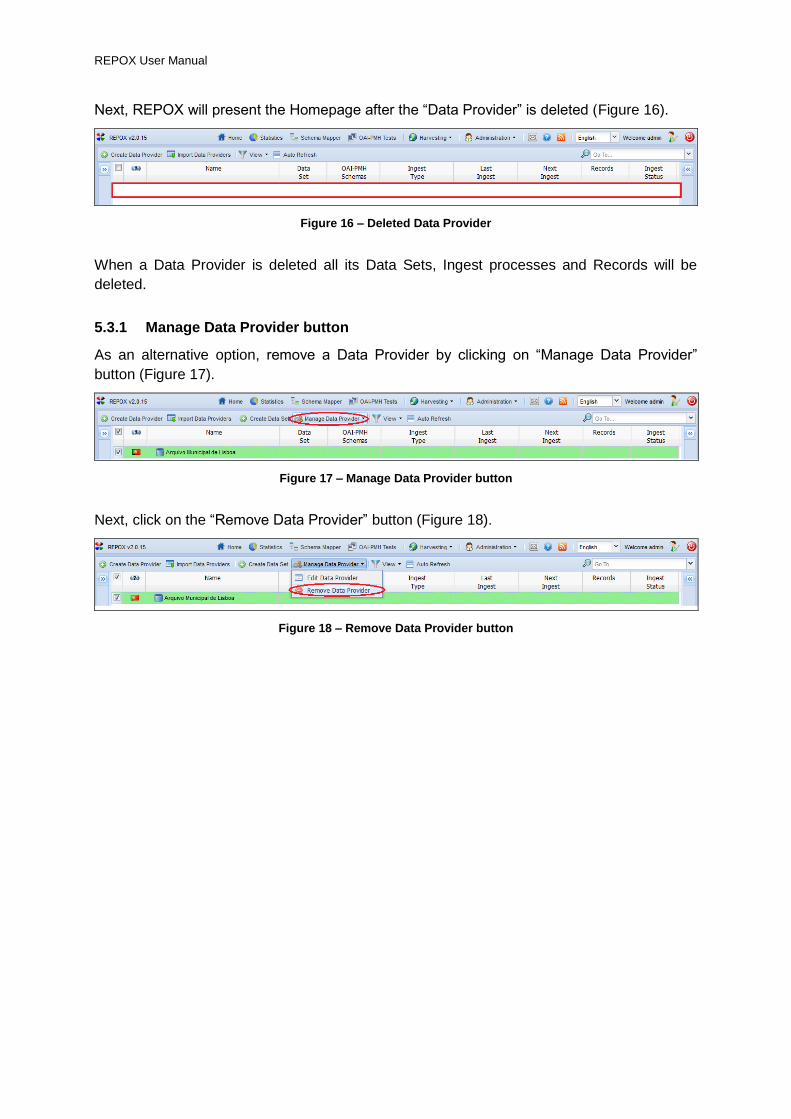
Next, REPOX will present the Homepage after the “Data Provider” is deleted (Figure 16).
Figure 16 – Deleted Data Provider
When a Data Provider is deleted all its Data Sets, Ingest processes and Records will be
deleted.
5.3.1 Manage Data Provider button
As an alternative option, remove a Data Provider by clicking on “Manage Data Provider”
button (Figure 17).
Figure 17 – Manage Data Provider button
Next, click on the “Remove Data Provider” button (Figure 18).
Figure 18 – Remove Data Provider button
REPOX User Manual
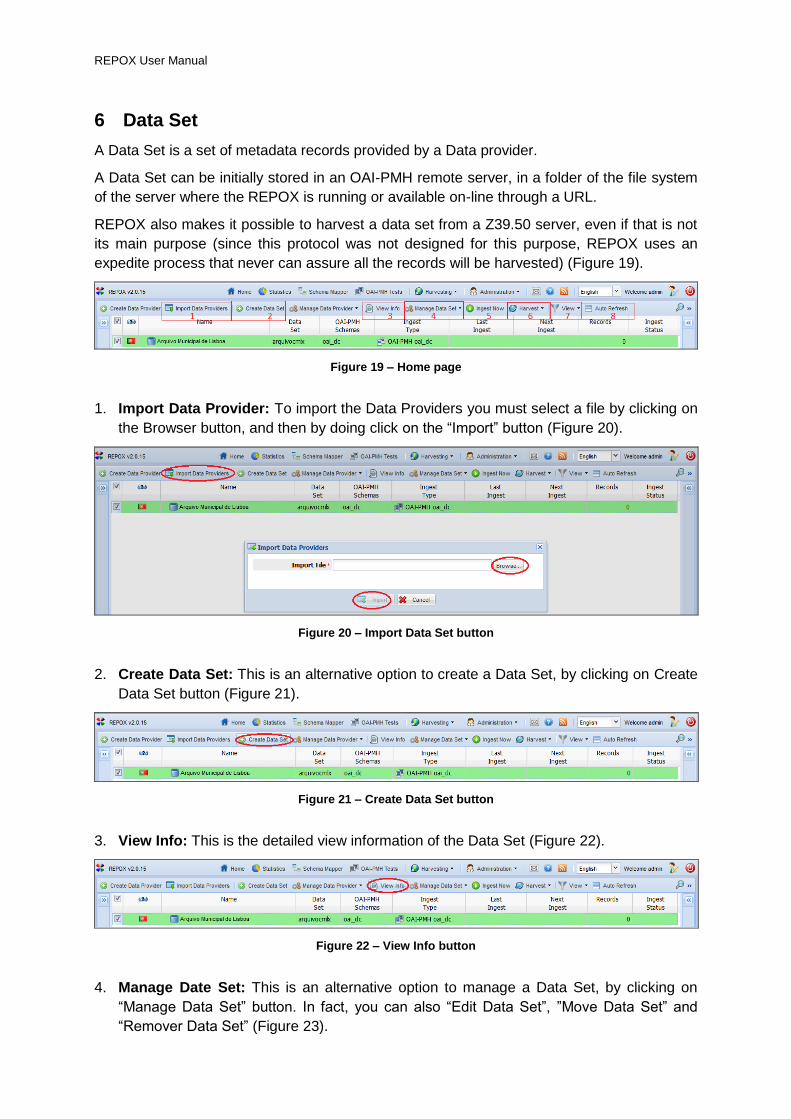
6 Data Set
A Data Set is a set of metadata records provided by a Data provider.
A Data Set can be initially stored in an OAI-PMH remote server, in a folder of the file system
of the server where the REPOX is running or available on-line through a URL.
REPOX also makes it possible to harvest a data set from a Z39.50 server, even if that is not
its main purpose (since this protocol was not designed for this purpose, REPOX uses an
expedite process that never can assure all the records will be harvested) (Figure 19).
Figure 19 – Home page
1. Import Data Provider: To import the Data Providers you must select a file by clicking on
the Browser button, and then by doing click on the “Import” button (Figure 20).
Figure 20 – Import Data Set button
2. Create Data Set: This is an alternative option to create a Data Set, by clicking on Create
Data Set button (Figure 21).
Figure 21 – Create Data Set button
3. View Info: This is the detailed view information of the Data Set (Figure 22).
Figure 22 – View Info button
4. Manage Date Set: This is an alternative option to manage a Data Set, by clicking on
“Manage Data Set” button. In fact, you can also “Edit Data Set”, ”Move Data Set” and
“Remover Data Set” (Figure 23).
REPOX User Manual
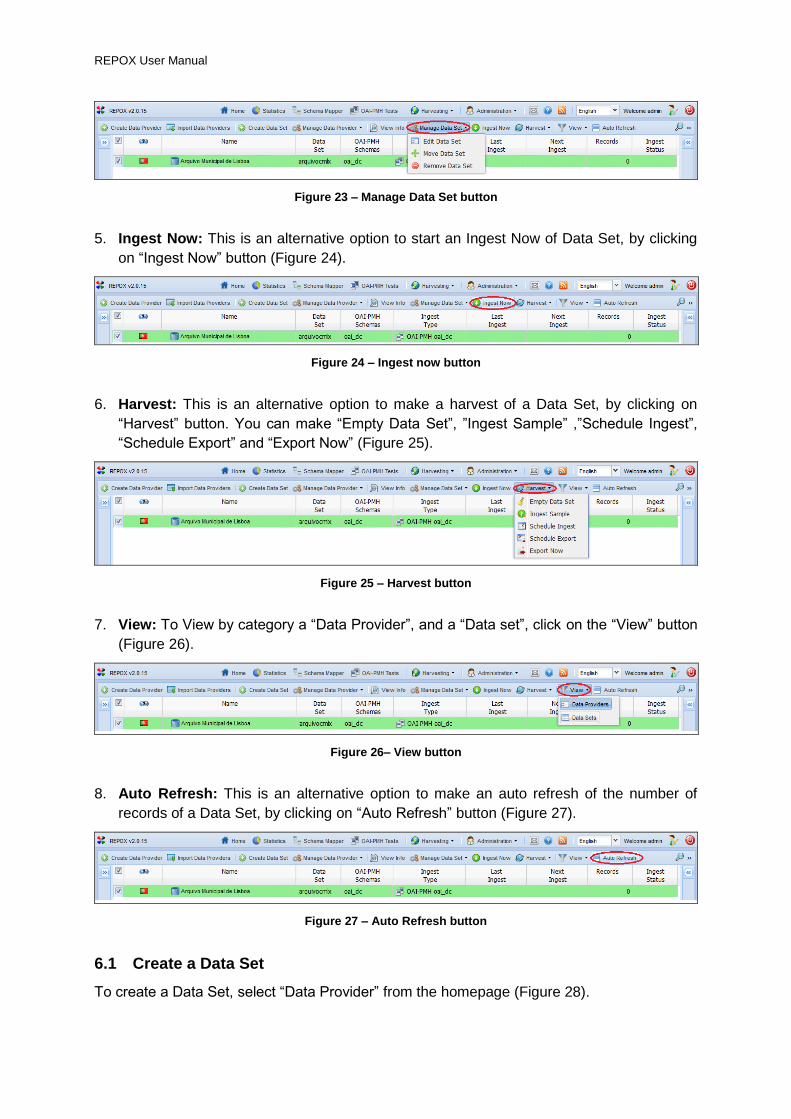
Figure 23 – Manage Data Set button
5. Ingest Now: This is an alternative option to start an Ingest Now of Data Set, by clicking
on “Ingest Now” button (Figure 24).
Figure 24 – Ingest now button
6. Harvest: This is an alternative option to make a harvest of a Data Set, by clicking on
“Harvest” button. You can make “Empty Data Set”, ”Ingest Sample” ,”Schedule Ingest”,
“Schedule Export” and “Export Now” (Figure 25).
Figure 25 – Harvest button
7. View: To View by category a “Data Provider”, and a “Data set”, click on the “View” button
(Figure 26).
Figure 26– View button
8. Auto Refresh: This is an alternative option to make an auto refresh of the number of
records of a Data Set, by clicking on “Auto Refresh” button (Figure 27).
Figure 27 – Auto Refresh button
6.1 Create a Data Set
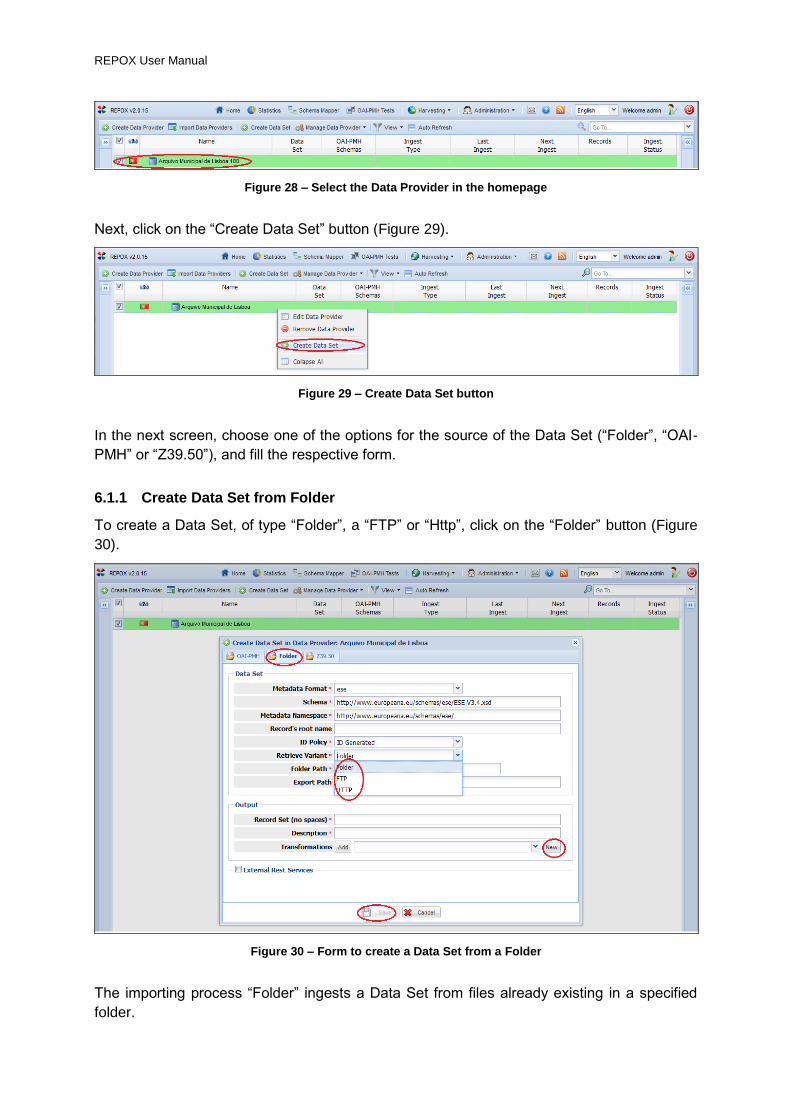
To create a Data Set, select “Data Provider” from the homepage (Figure 28).
REPOX User Manual
Figure 28 – Select the Data Provider in the homepage
Next, click on the “Create Data Set” button (Figure 29).
Figure 29 – Create Data Set button
In the next screen, choose one of the options for the source of the Data Set (“Folder”, “OAI-
PMH” or “Z39.50”), and fill the respective form.
6.1.1 Create Data Set from Folder
To create a Data Set, of type “Folder”, a “FTP” or “Http”, click on the “Folder” button (Figure
30).
Figure 30 – Form to create a Data Set from a Folder
The importing process “Folder” ingests a Data Set from files already existing in a specified
folder.
REPOX User Manual
The file formats that REPOX recognise for this purpose are ISO2709 and XML. Each Data
Set is expected to be in a file with one of these formats, which can also be compressed
according to the ZIP format.
For the ISO2709 format is possible to select the variant that is used (standard; variant from
Albania; variant from Ukraine) and also the character encoding of the file.
The (Figure 30) shows the form to create a new Data Set for this importing process:
Metadata Format: The format of the input metadata (ESE, ISO2709, MarcXchange,
TEL-AP, OAI_DC, other).
Schema: The XML Schema describing the format.
Metadata Namespace: The XML Namespace URI.
Record´s root name: The XML element name (the tag name) that holds the record in
the file. This field is optional, as it only applies to XML files, and not to ISO2709.
ID policy: Defines how the record identifiers are assigned (to apply only for data sets
in XML files). When importing records from a XML file, it can happen that the records
already have an element that is a unique identifier or not. For those cases it is
possible to indicate the element to use as identifier, or to ask REPOX to generate and
assign it. The options are:
o ID generated – In this case it is assumed that the records to import do not have a
unique identifier. A unique identifier is generated by REPOX and assigned to each
record.
o ID extracted – In this case it is assumed that the records to import already have an
element with a unique identifier that can be extracted from the record using an
XPath expression (ex: /record/id). This is a common scenario, as many
bibliographic and other metadata descriptive formats have elements for the
identifier. When this option is choose, new fields appear in the form, as shown on
o Creating a Data Set using ID Extracted (Figure 31). In this case it is necessary to
fill the “Identifier XPath” field with the XPath that points to the ID. It is also
necessary to add all the namespaces that appear in the XPath, indicating their
prefix and respective URI.
Retrieve Variant: There are three types: Folder, FTP and HTTP.
Folder Path: The folder path that contains the files, or a URL to a specific file. If an
URL is given, REPOX will download the file to a local folder.
Export Path: The path where the records will be downloaded.
Record Set: The name of the record set. A set is an optional construct for grouping
items for the purpose of selective harvesting. Repositories may organize items into
sets.
Description: A description of the Data Set.
Transformation: A schema of transformation that can be used to transform the
original data set from its initial format to a new one, to be exposed trough the OAI-
PMH REPOX server. The transformation rules must be stored in an XSLT file.
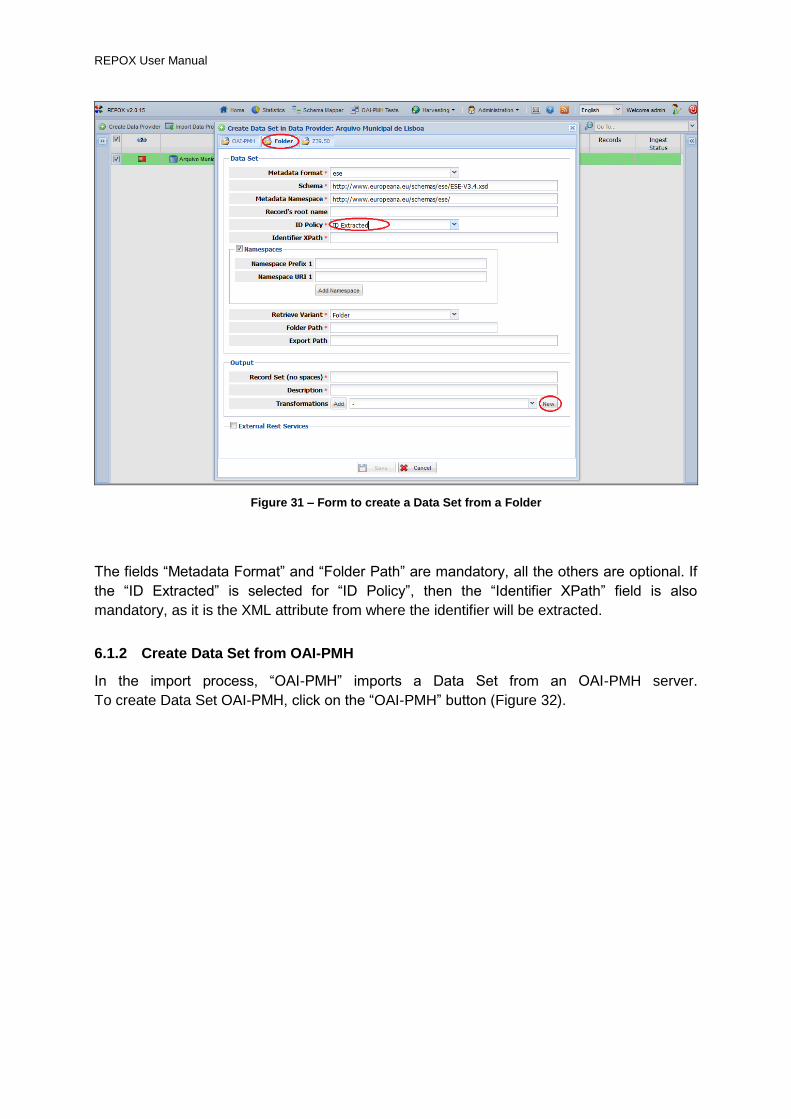
To add a new transformation (see section 8) click on the “New” button (Figure 31).
REPOX User Manual
Figure 31 – Form to create a Data Set from a Folder
The fields “Metadata Format” and “Folder Path” are mandatory, all the others are optional. If
the “ID Extracted” is selected for “ID Policy”, then the “Identifier XPath” field is also
mandatory, as it is the XML attribute from where the identifier will be extracted.
6.1.2 Create Data Set from OAI-PMH
In the import process, “OAI-PMH” imports a Data Set from an OAI-PMH server.
To create Data Set OAI-PMH, click on the “OAI-PMH” button (Figure 32).
REPOX User Manual
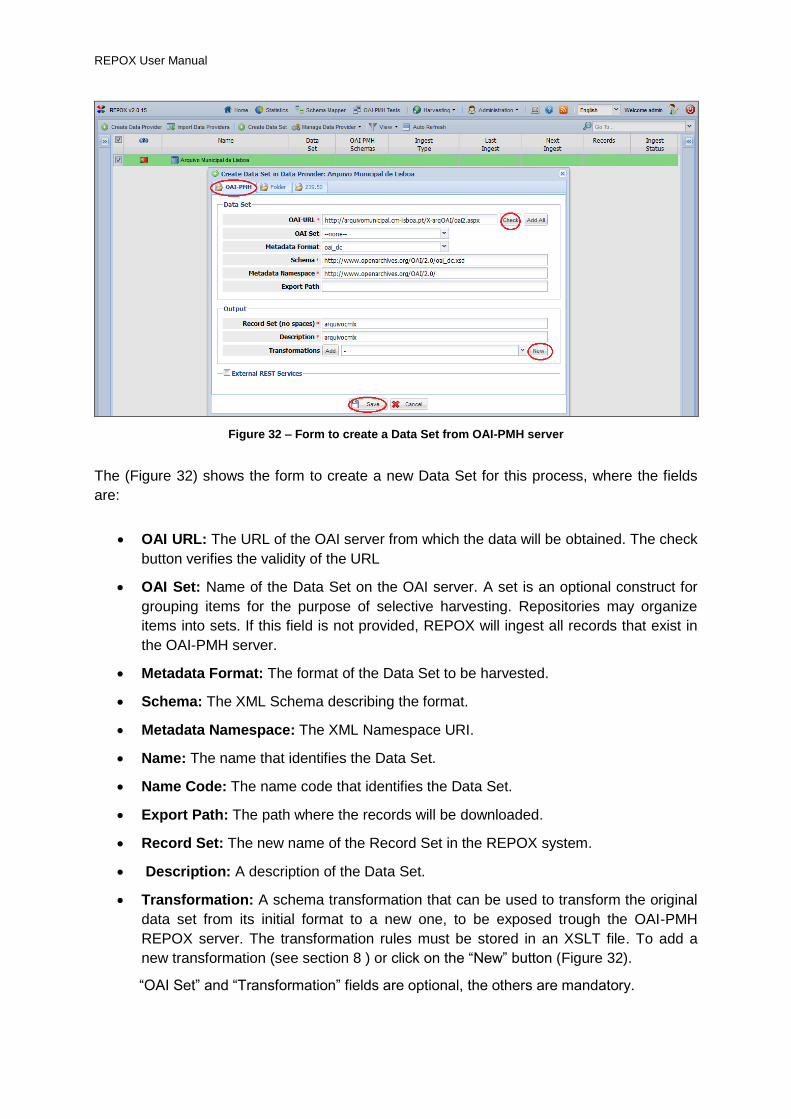
Figure 32 – Form to create a Data Set from OAI-PMH server
The (Figure 32) shows the form to create a new Data Set for this process, where the fields
are:
OAI URL: The URL of the OAI server from which the data will be obtained. The check
button verifies the validity of the URL
OAI Set: Name of the Data Set on the OAI server. A set is an optional construct for
grouping items for the purpose of selective harvesting. Repositories may organize
items into sets. If this field is not provided, REPOX will ingest all records that exist in
the OAI-PMH server.
Metadata Format: The format of the Data Set to be harvested.
Schema: The XML Schema describing the format.
Metadata Namespace: The XML Namespace URI.
Name: The name that identifies the Data Set.
Name Code: The name code that identifies the Data Set.
Export Path: The path where the records will be downloaded.
Record Set: The new name of the Record Set in the REPOX system.
Description: A description of the Data Set.
Transformation: A schema transformation that can be used to transform the original
data set from its initial format to a new one, to be exposed trough the OAI-PMH
REPOX server. The transformation rules must be stored in an XSLT file. To add a
new transformation (see section 8 ) or click on the “New” button (Figure 32).
“OAI Set” and “Transformation” fields are optional, the others are mandatory.

REPOX User Manual
6.1.3 Create Data Set from Z39.50
To create a Data Set Z3950, click on the “Z39.50” button (Figure 33).
Figure 33 – Form to create a Data Set from Z39.50 server
The (Figure 33) shows the importing process for Z39.50. The form to create a new Data Set
for this process comprises the following fields:
Address: Address of the Z39.50 server
Port: Service port
Database: Name of the database that contains the records in the remote system
User: Username to access the Z39.50 service
Password: Password for the username
Charter Encoding: The character encoding set of the data (for example UTF-8 or
ISO 8859-1)
Record Syntax: The original syntax of the records. It can be UNIMARC or MARC21.
Harvest Method: The harvest method, which can be Timestamp, File (one Id per
line) or Id Sequence.
Earliest Date: REPOX will harvest the records from the Z39.50 server, until it
reaches the records with the date specified on this field.
ID policy: Defines how the record identifiers are assigned. The options are:
REPOX User Manual
o ID generated – In this case it is assumed that the records to import do not have a
unique identifier. A unique identifier is generated by REPOX and assigned to each
record.
o ID extracted - The imported records have a unique identifier, to be extracted from
the Record using an XPath expression (ex: /record/id). This is a common scenario,
as bibliographic metadata formats have tags for the identifier.
Schema: The XML Schema describing the format.
Metadata Namespace: The XML Namespace URI.
Name: name of the Data Set.
Name Code: The name code that identifies the data set.
Export Path: The path is where the records will be downloaded.
Record Set: The new name of the record set on the REPOX system.
Description: A description of the Data Set.
Transformation: A schema transformation that can be used to transform the original
data set from its initial format to a new one, to be exposed trough the OAI-PMH
REPOX server. The transformation rules must be stored in an XSLT file. To add a
new transformation (see section 8), click on the “New” button (Figure 33).
The “User” and “Password” fields are optional, all the others are mandatory.
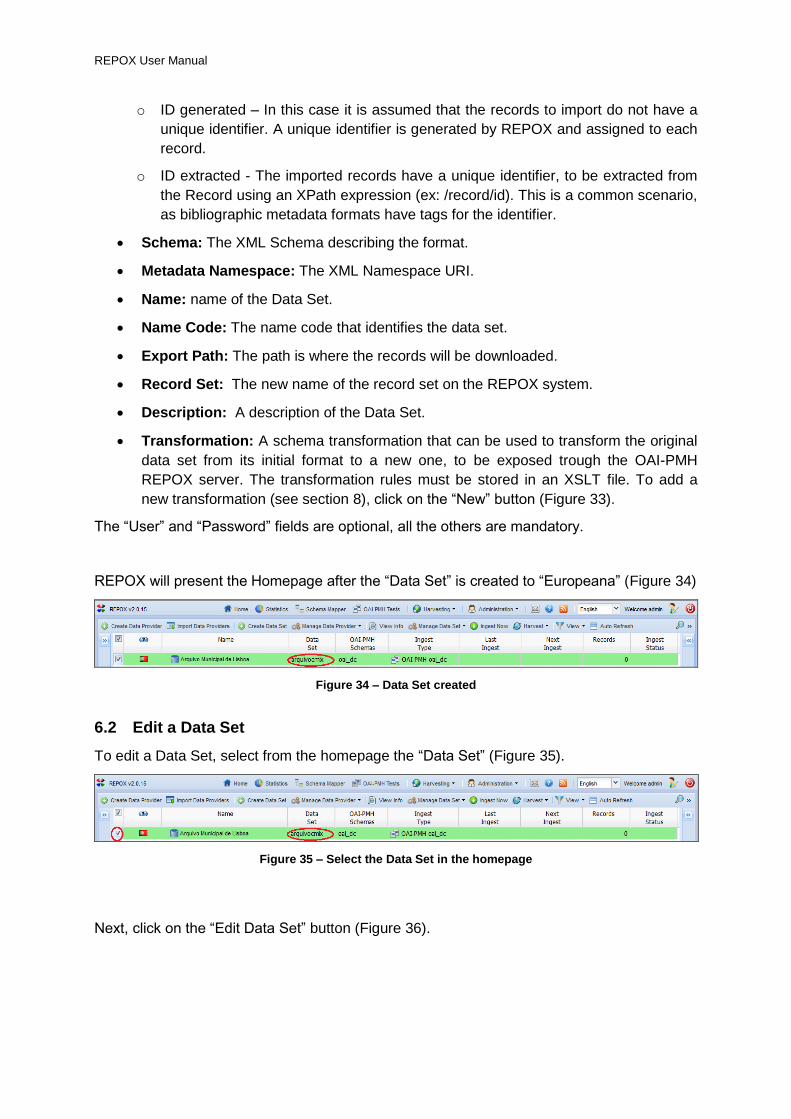
REPOX will present the Homepage after the “Data Set” is created to “Europeana” (Figure 34)
Figure 34 – Data Set created
6.2 Edit a Data Set
To edit a Data Set, select from the homepage the “Data Set” (Figure 35).
Figure 35 – Select the Data Set in the homepage
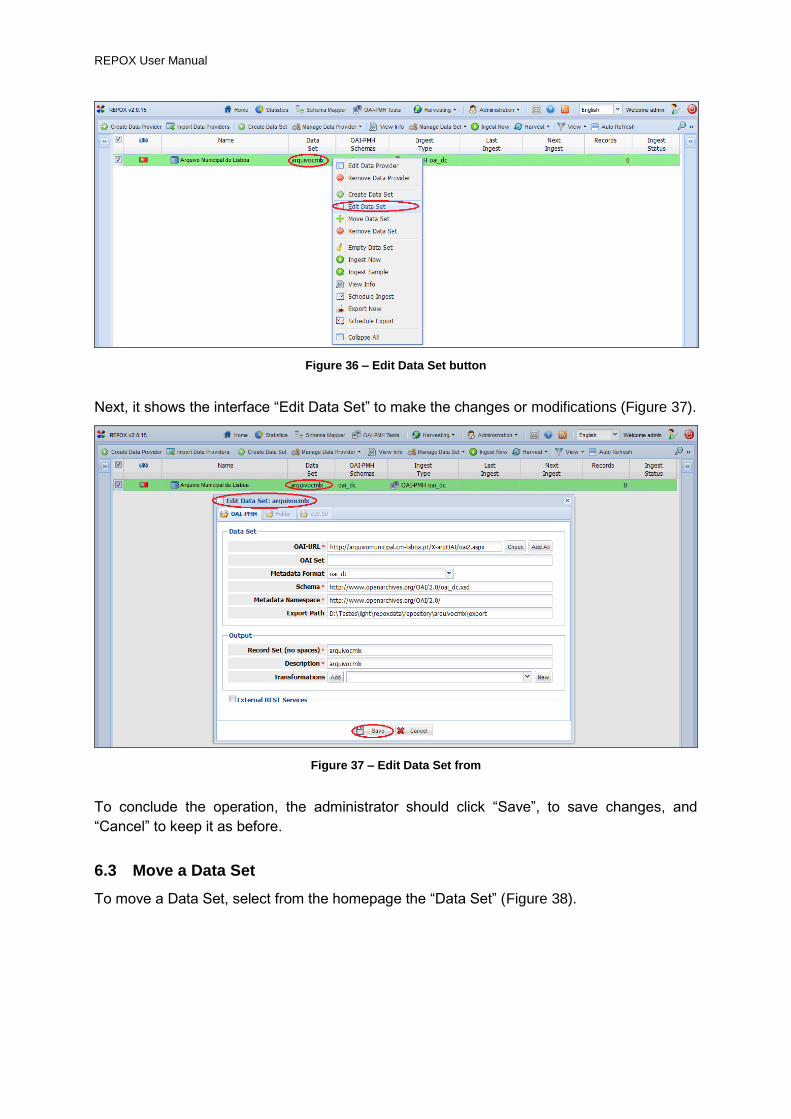
Next, click on the “Edit Data Set” button (Figure 36).
REPOX User Manual
Figure 36 – Edit Data Set button
Next, it shows the interface “Edit Data Set” to make the changes or modifications (Figure 37).
Figure 37 – Edit Data Set from
To conclude the operation, the administrator should click “Save”, to save changes, and
“Cancel” to keep it as before.
6.3 Move a Data Set
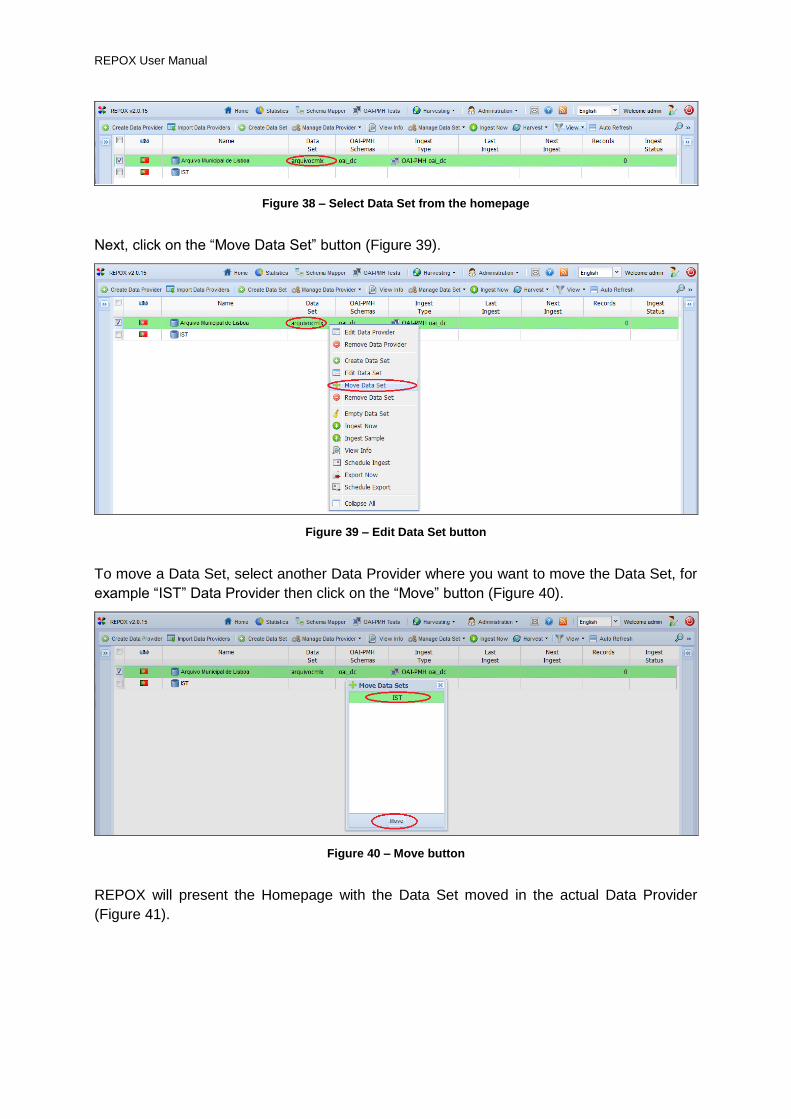
To move a Data Set, select from the homepage the “Data Set” (Figure 38).
REPOX User Manual
Figure 38 – Select Data Set from the homepage
Next, click on the “Move Data Set” button (Figure 39).
Figure 39 – Edit Data Set button
To move a Data Set, select another Data Provider where you want to move the Data Set, for
example “IST” Data Provider then click on the “Move” button (Figure 40).
Figure 40 – Move button
REPOX will present the Homepage with the Data Set moved in the actual Data Provider
(Figure 41).
REPOX User Manual
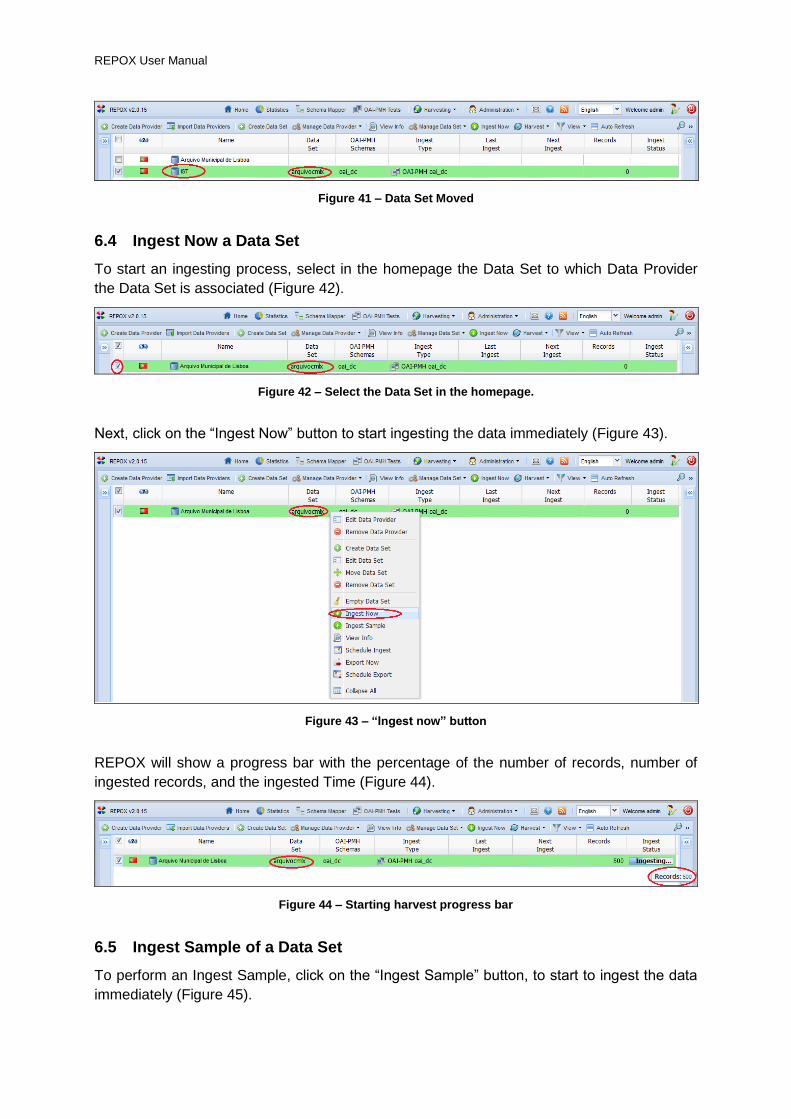
Figure 41 – Data Set Moved
6.4 Ingest Now a Data Set
To start an ingesting process, select in the homepage the Data Set to which Data Provider
the Data Set is associated (Figure 42).
Figure 42 – Select the Data Set in the homepage.
Next, click on the “Ingest Now” button to start ingesting the data immediately (Figure 43).
Figure 43 – “Ingest now” button
REPOX will show a progress bar with the percentage of the number of records, number of
ingested records, and the ingested Time (Figure 44).
Figure 44 – Starting harvest progress bar
6.5 Ingest Sample of a Data Set
To perform an Ingest Sample, click on the “Ingest Sample” button, to start to ingest the data
immediately (Figure 45).

REPOX User Manual
Figure 45 – Ingest Sample button
The number records of an “Ingest Sample” are fixed in “Configuration Settings”, (see Section
11.1).The following example shows 1000 fixed records of an ingest sample (Figure 46).
Figure 46 – Ingest Sample ok
6.6 Refresh or Auto Refresh
To update the numbers of records of the Data Set, click on the “Refresh” button (Figure 47).
Figure 47 – Refresh number of records button
Optionally, click on the “Auto refresh” button to update, automatically, all the “Data Set”. It will
stop refreshing when all the "Data Set" have completed their ingest process (Figure 48).

REPOX User Manual
Figure 48 – AutoRefresh number of records button
During the ingestion process, the ingest status will display an icon showing activity. At the
end of the ingestion process, the icon will change according to the result of process.
There are three different possibilities:
Successful (the ingest process has successfully completed (Figure 49).
Error (an error occurred during the ingest process).
Deleted (the user can delete the ingest process).
Warning (the ingest process has successfully completed, but the system could
not send an email to the administrator).
Figure 49 – Ingest Now ok
6.7 Empty a Data Set
To empty a Data Set, select from the homepage a “Data Set” (Figure 50)
Figure 50 – Select the Data Set in the homepage.
Next, click on the “Empty Data Set” button (Figure 51).
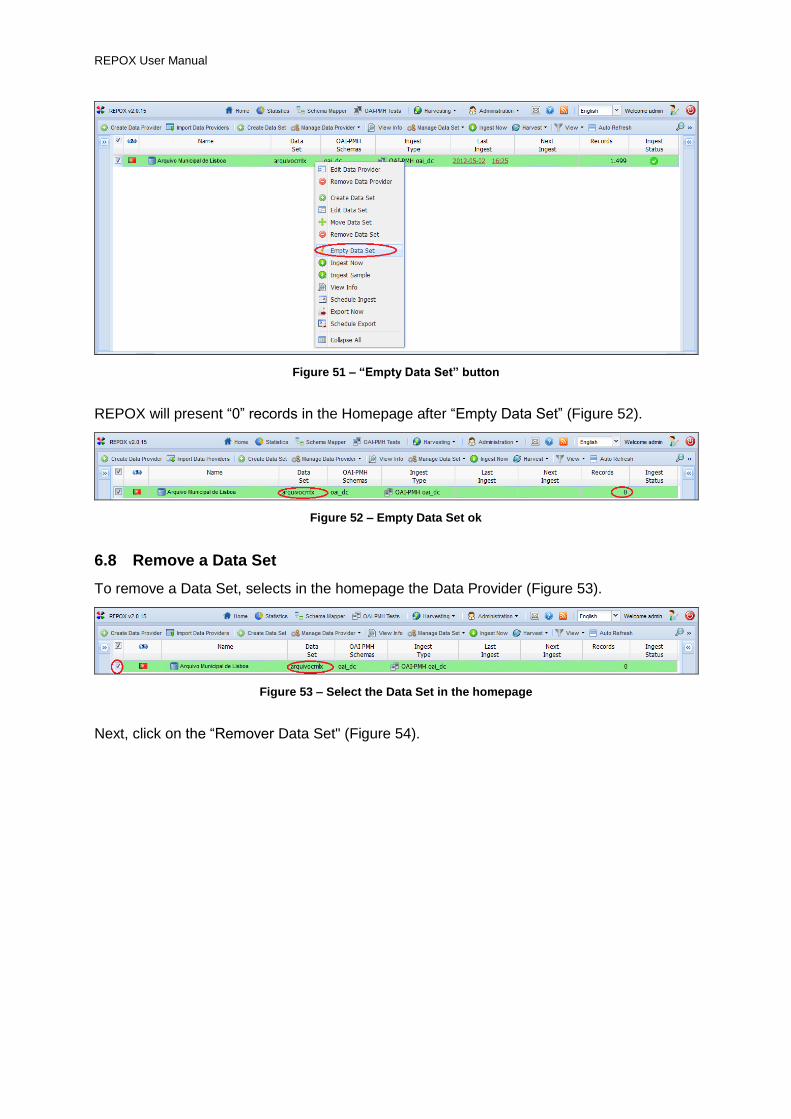
REPOX User Manual
Figure 51 – “Empty Data Set” button
REPOX will present “0” records in the Homepage after “Empty Data Set” (Figure 52).
Figure 52 – Empty Data Set ok
6.8 Remove a Data Set
To remove a Data Set, selects in the homepage the Data Provider (Figure 53).
Figure 53 – Select the Data Set in the homepage
Next, click on the “Remover Data Set" (Figure 54).

REPOX User Manual
Figure 54 – Remover Data Set button
A pop-up menu is showed to confirm the deletion of the Data Set (Figure 55).
Figure 55 – Pop-up menu to confirm the deleting of the Data Set
To conclude the operation the administrator should select “Yes”. When a Data Set is deleted
all related ingest processes and Records will be deleted.
6.9 Schedule Ingest
To schedule Ingest task for a Data Set, select from the homepage the Data Set (Figure 56)
Figure 56 – Select Data Set from the homepage
Next, click on the “Schedule Ingest” button as (Figure 57).

REPOX User Manual
Figure 57 – Schedule Ingest button
REPOX will show a window with a calendar (Figure 58).
Figure 58 – Window to program the task
Next, select from the calendar the day, hour and the minutes from the two drop down lists.
Choose also Incremental or Full Ingest. If Full Ingest is chosen, REPOX will get all the
records that exist in the source. If Incremental Ingest is chosen, REPOX will get only the new
or modified records since the last ingest.
Set also the frequency of the process, which can be once, daily, weekly or monthly. If
monthly is chosen a number of months can be set to apply between two runs.
Finally, click on the “Schedule” button to save the schedule task.
REPOX will show the scheduled Ingest task for a Data Set (Figure 59).
REPOX User Manual
Figure 59 – Schedule Ingest OK
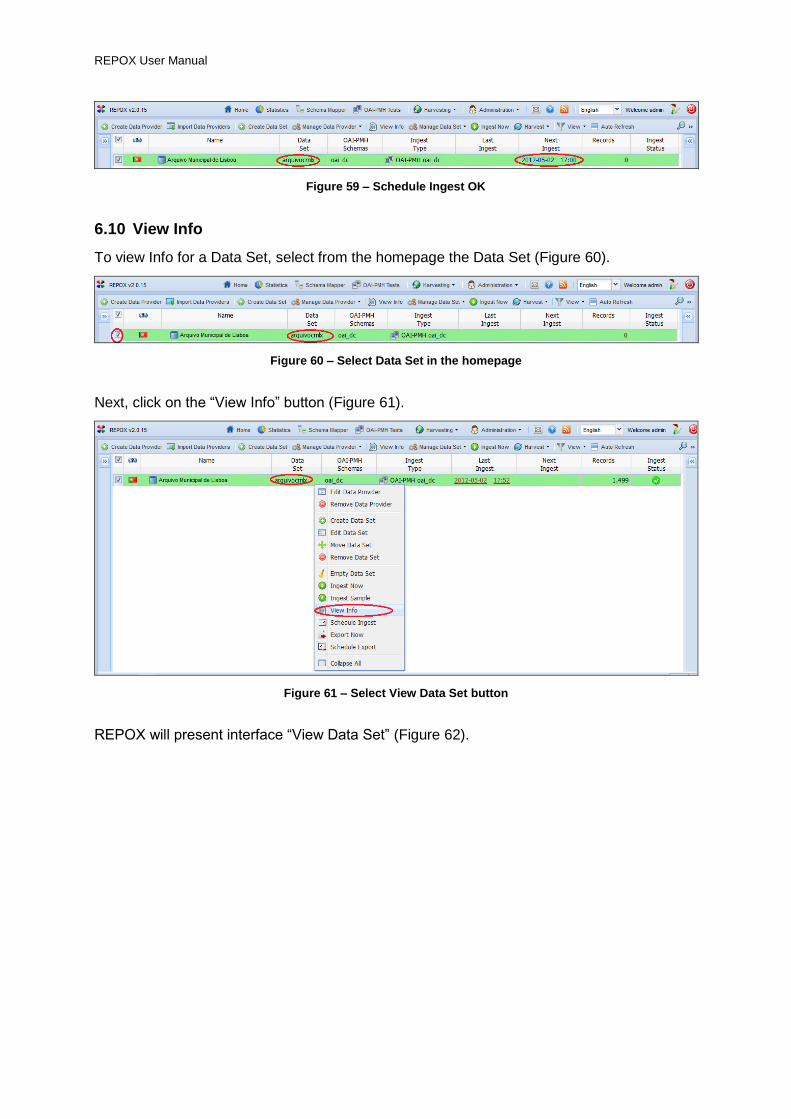
6.10 View Info
To view Info for a Data Set, select from the homepage the Data Set (Figure 60).
Figure 60 – Select Data Set in the homepage
Next, click on the “View Info” button (Figure 61).
Figure 61 – Select View Data Set button
REPOX will present interface “View Data Set” (Figure 62).
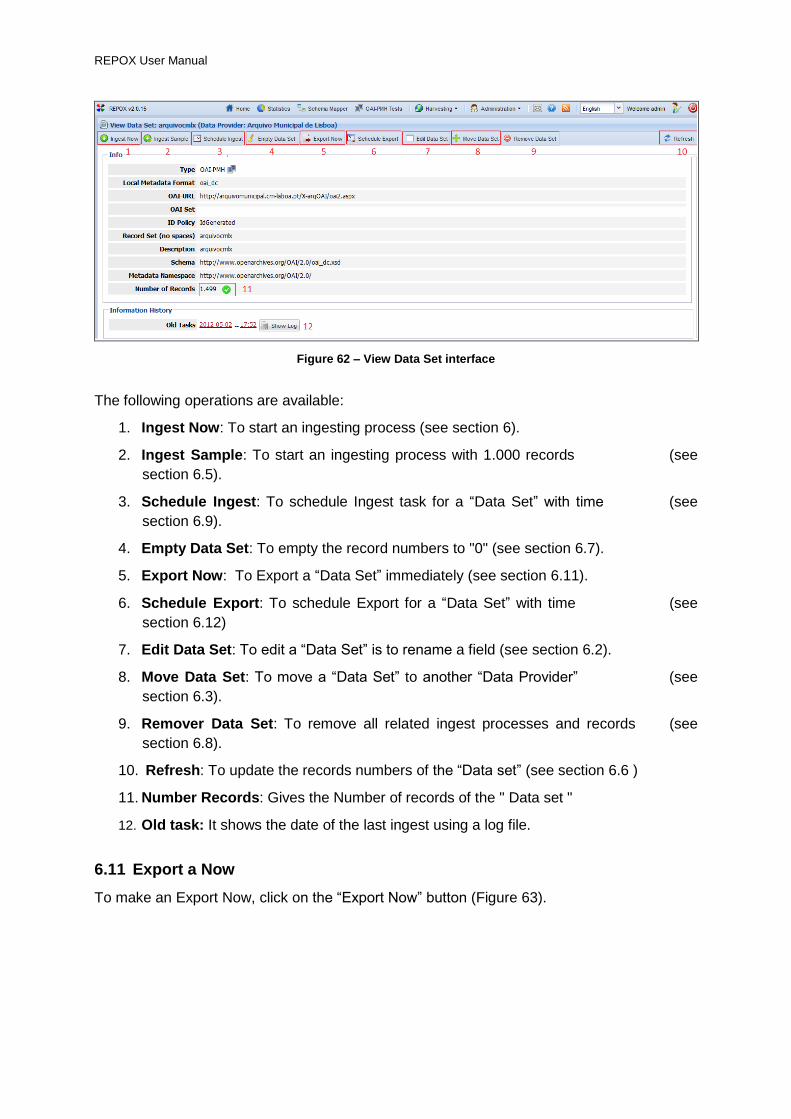
REPOX User Manual
Figure 62 – View Data Set interface
The following operations are available:
1. Ingest Now: To start an ingesting process (see section 6).
2. Ingest Sample: To start an ingesting process with 1.000 records (see
section 6.5).
3. Schedule Ingest: To schedule Ingest task for a “Data Set” with time (see
section 6.9).
4. Empty Data Set: To empty the record numbers to "0" (see section 6.7).
5. Export Now: To Export a “Data Set” immediately (see section 6.11).
6. Schedule Export: To schedule Export for a “Data Set” with time (see
section 6.12)
7. Edit Data Set: To edit a “Data Set” is to rename a field (see section 6.2).
8. Move Data Set: To move a “Data Set” to another “Data Provider” (see
section 6.3).
9. Remover Data Set: To remove all related ingest processes and records (see
section 6.8).
10. Refresh: To update the records numbers of the “Data set” (see section 6.6 )
11. Number Records: Gives the Number of records of the " Data set "
12. Old task: It shows the date of the last ingest using a log file.
6.11 Export a Now
To make an Export Now, click on the “Export Now” button (Figure 63).

REPOX User Manual
Figure 63 – Export Now button
Next, fill in the fields interface “Export Now” (Figure 64).
Figure 64 – Export Now Form
The form has the following fields:
Records per File: The numbers of records to export 1, 10, 100, 1000, All
Full Path: This is Path where the Export of the records was make
Export Format: Type of format of the Data Set (Figure 64).
Set the number of records that each file will contain using “Records per File” drop down list. It
is possible to export the records immediately, clicking on the “Export Now” button. In this
case the result will be stored in a compressed ZIP file and the pathname presented to the
user.
REPOX allows the user to export all the records from a Data Set to a compressed ZIP file
(Figure 65).
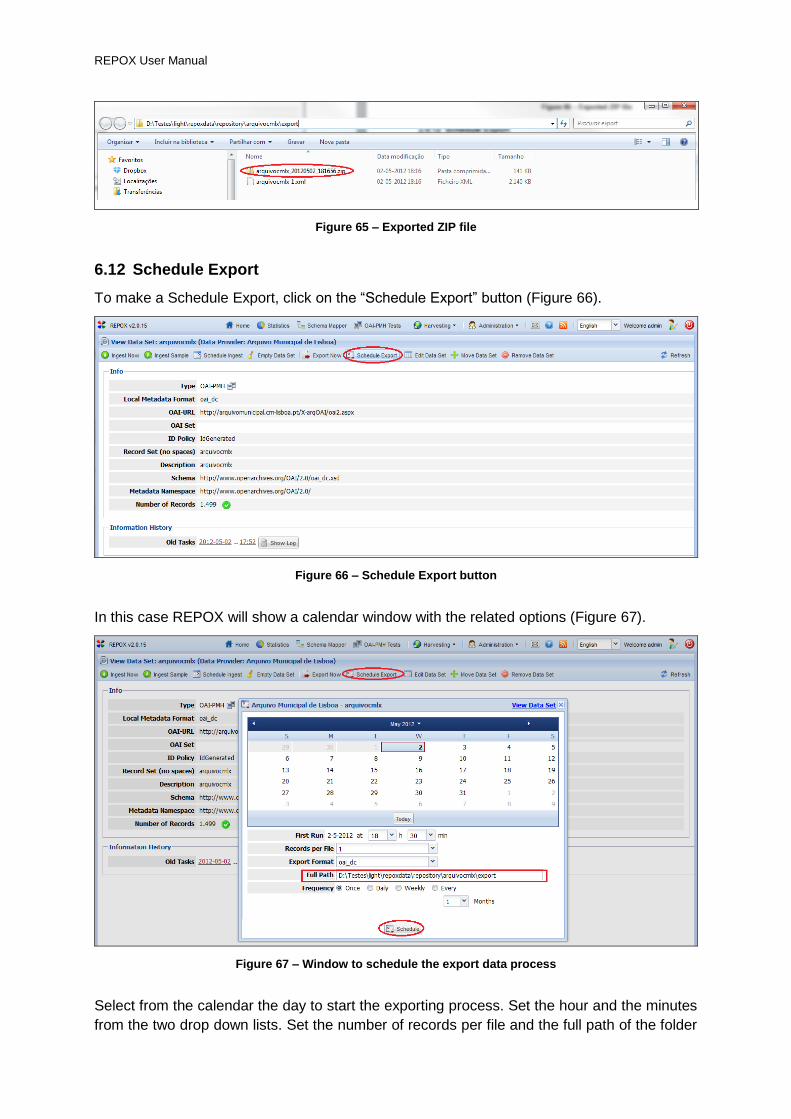
REPOX User Manual
Figure 65 – Exported ZIP file
6.12 Schedule Export
To make a Schedule Export, click on the “Schedule Export” button (Figure 66).
Figure 66 – Schedule Export button
In this case REPOX will show a calendar window with the related options (Figure 67).
Figure 67 – Window to schedule the export data process
Select from the calendar the day to start the exporting process. Set the hour and the minutes
from the two drop down lists. Set the number of records per file and the full path of the folder

REPOX User Manual
that will contain the records. Set the frequency of the process, which can be once, daily,
weekly or monthly. If monthly is chosen the number interval months can be set. Finally, click
on the “Schedule” button to save the task.
The result of an export will be stored in a compressed ZIP file and the pathname presented
to the user.

REPOX User Manual
7 Statistics
To view statistics of the current REPOX installation click on the “Statistics” button on the top
menu in the homepage, as showed in (Figure 68).
Figure 68 – Statistics button
REPOX will show a table presenting statistics (Figure 69)
Figure 69 – Statistics interface
The table has several rows showing the data contained on the current REPOX installation:
Data Providers: Indicates the total number of Data Providers.
Data Sets: Indicates the total number of Data Sets.
Type: Indicates the number of Data Sets of each import type (OAI-PHM, Folder or
Z39.50).
Metadata Format: Indicates the number of Data Sets by metadata format.
ID Policy: Indicates the total number of Data Sets by the ID Policy. The policy can be
ID Extracted or ID Generated.
Records: Indicates the total number of harvested records.
Averages: Indicates the average number of records by Data Provider and the
average number of records by Data Set.

REPOX User Manual
Countries: Indicates the total number of records per country (according to their Data
Providers).
REPOX User Manual
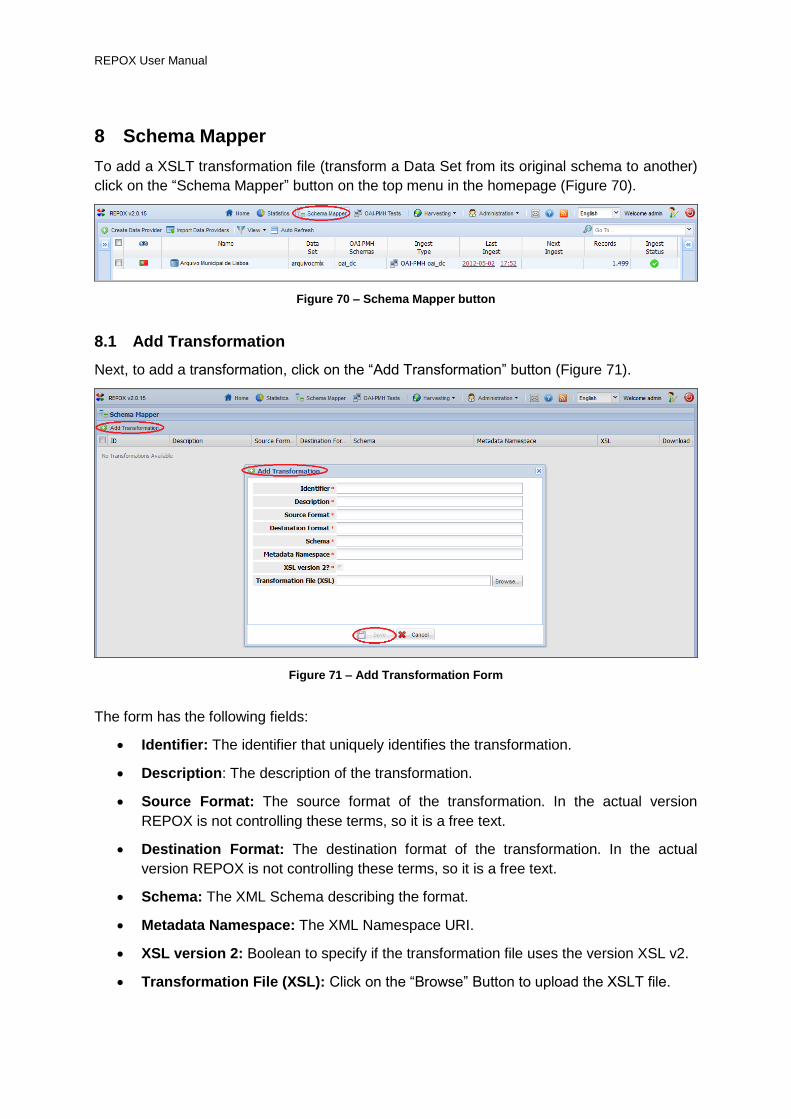
8 Schema Mapper
To add a XSLT transformation file (transform a Data Set from its original schema to another)
click on the “Schema Mapper” button on the top menu in the homepage (Figure 70).
Figure 70 – Schema Mapper button
8.1 Add Transformation
Next, to add a transformation, click on the “Add Transformation” button (Figure 71).
Figure 71 – Add Transformation Form
The form has the following fields:
Identifier: The identifier that uniquely identifies the transformation.
Description: The description of the transformation.
Source Format: The source format of the transformation. In the actual version
REPOX is not controlling these terms, so it is a free text.
Destination Format: The destination format of the transformation. In the actual
version REPOX is not controlling these terms, so it is a free text.
Schema: The XML Schema describing the format.
Metadata Namespace: The XML Namespace URI.
XSL version 2: Boolean to specify if the transformation file uses the version XSL v2.
Transformation File (XSL): Click on the “Browse” Button to upload the XSLT file.
REPOX User Manual
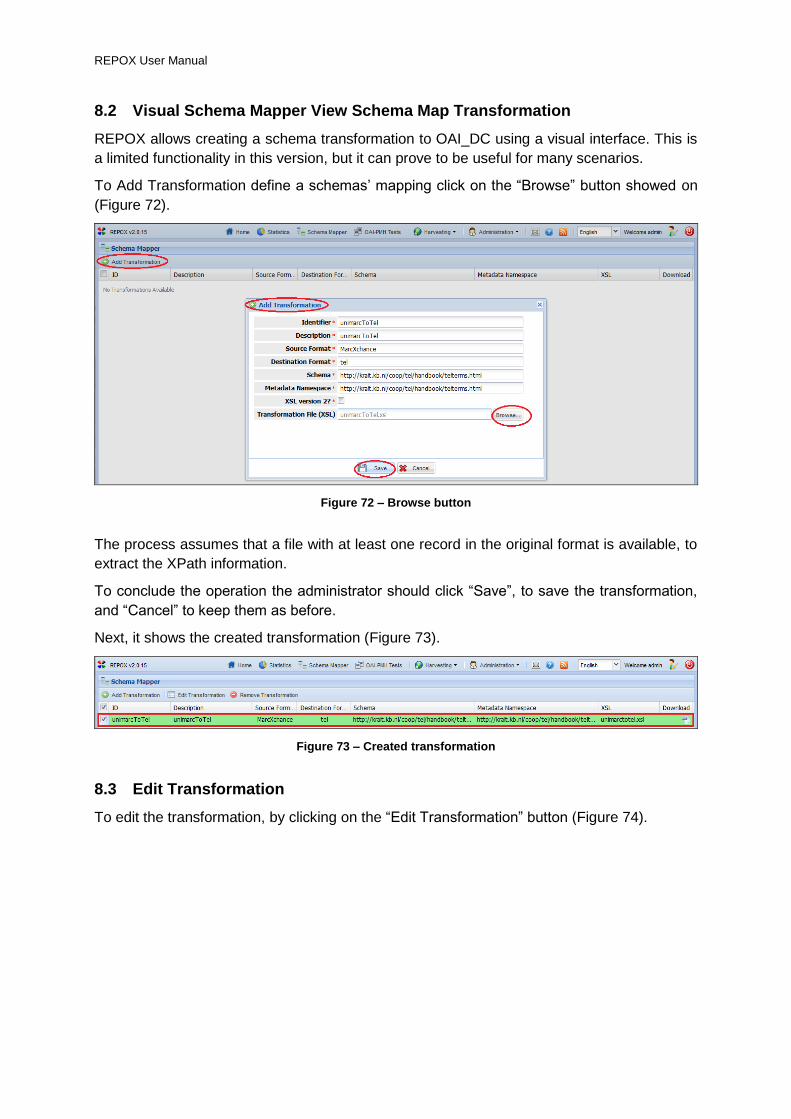
8.2 Visual Schema Mapper View Schema Map Transformation
REPOX allows creating a schema transformation to OAI_DC using a visual interface. This is
a limited functionality in this version, but it can prove to be useful for many scenarios.
To Add Transformation define a schemas’ mapping click on the “Browse” button showed on
(Figure 72).
Figure 72 – Browse button
The process assumes that a file with at least one record in the original format is available, to
extract the XPath information.
To conclude the operation the administrator should click “Save”, to save the transformation,
and “Cancel” to keep them as before.
Next, it shows the created transformation (Figure 73).
Figure 73 – Created transformation
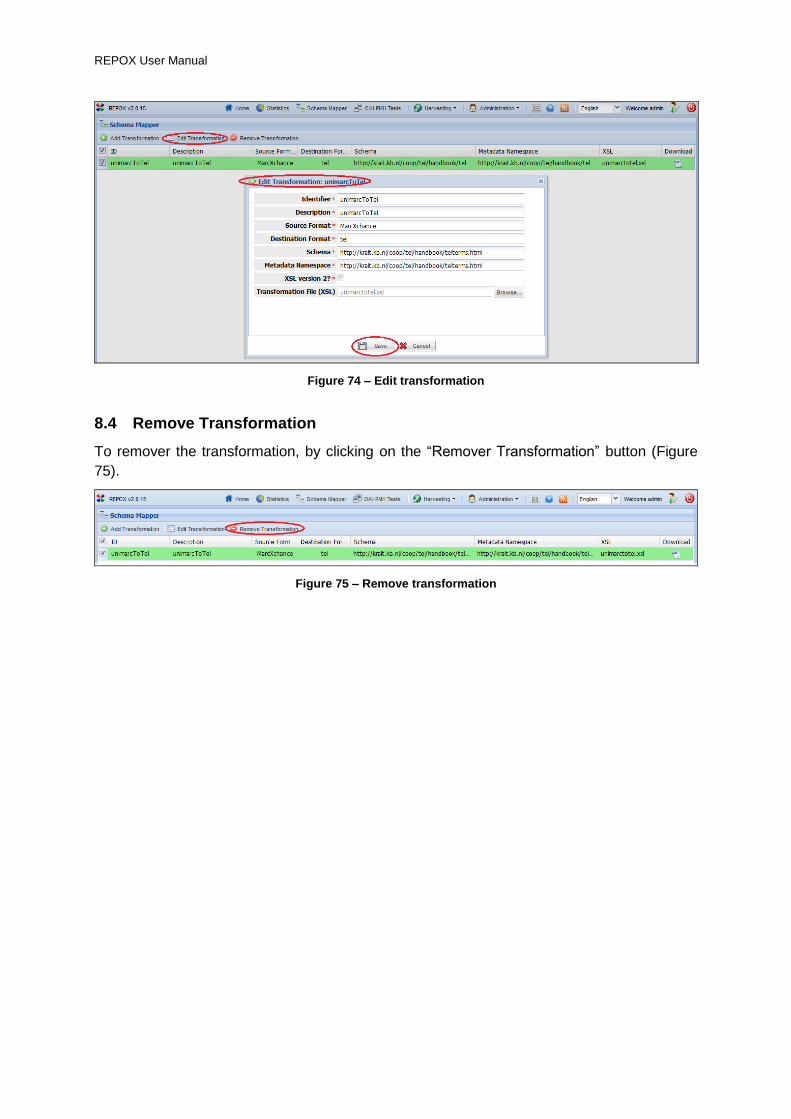
8.3 Edit Transformation
To edit the transformation, by clicking on the “Edit Transformation” button (Figure 74).
REPOX User Manual
Figure 74 – Edit transformation
8.4 Remove Transformation
To remover the transformation, by clicking on the “Remover Transformation” button (Figure
75).
Figure 75 – Remove transformation
REPOX User Manual
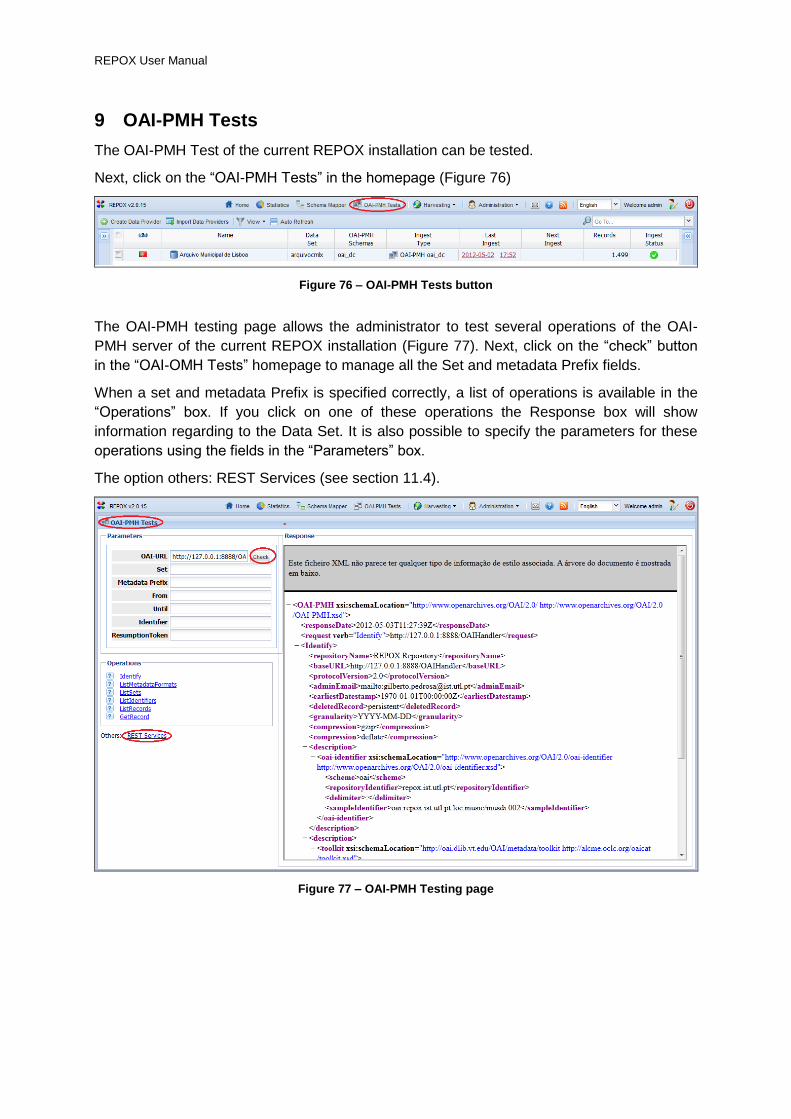
9 OAI-PMH Tests
The OAI-PMH Test of the current REPOX installation can be tested.
Next, click on the “OAI-PMH Tests” in the homepage (Figure 76)
Figure 76 – OAI-PMH Tests button
The OAI-PMH testing page allows the administrator to test several operations of the OAI-
PMH server of the current REPOX installation (Figure 77). Next, click on the “check” button
in the “OAI-OMH Tests” homepage to manage all the Set and metadata Prefix fields.
When a set and metadata Prefix is specified correctly, a list of operations is available in the
“Operations” box. If you click on one of these operations the Response box will show
information regarding to the Data Set. It is also possible to specify the parameters for these
operations using the fields in the “Parameters” box.
The option others: REST Services (see section 11.4).
Figure 77 – OAI-PMH Testing page

REPOX User Manual
10 Harvesting
10.1 Schedule Task (Calendar)
The list of scheduled tasks could be consulted by click on “Harvesting” button on the top
menu in the homepage (Figure 78).
Figure 78 – Harvesting button
Next, click on the “Scheduled Task (Calendar)” button (Figure 79).
Figure 79 – Schedule Tasks (Calendar) button
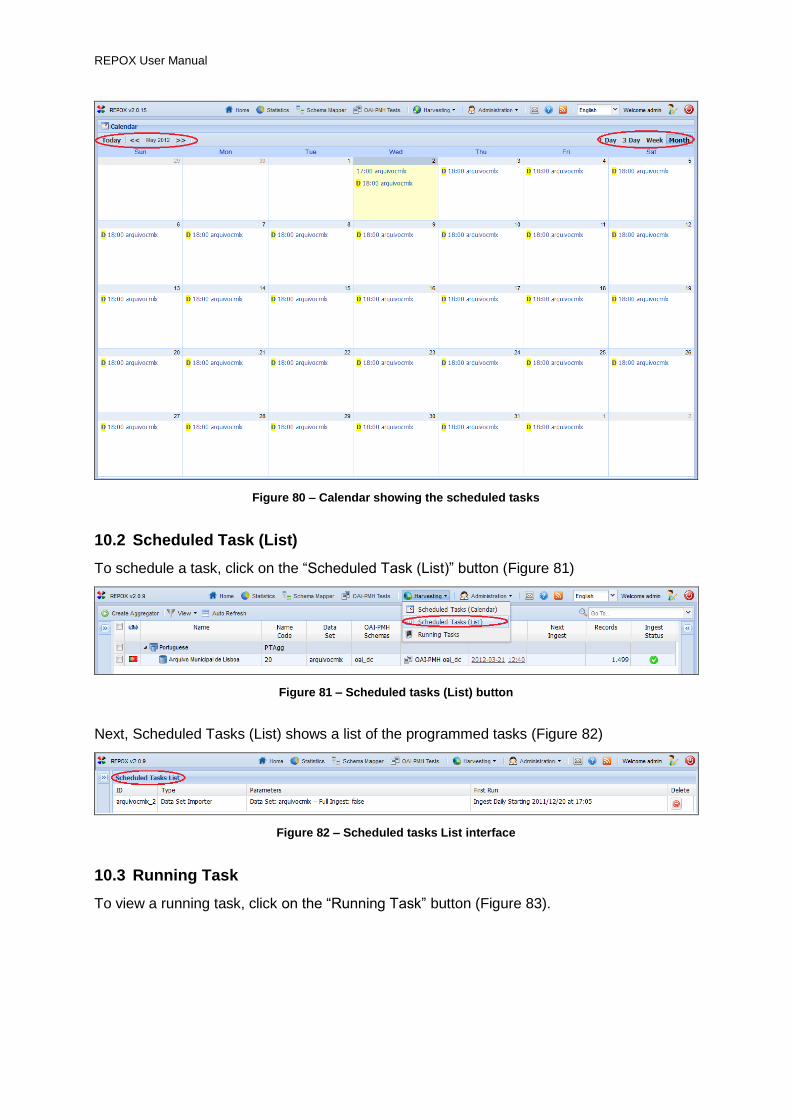
REPOX will then present a calendar showing all the programmed tasks. Navigate through
Scheduled Tasks can be viewed by day, every 3 days, weeks and months by click on the
buttons in the top of the calendar (Figure 80).
Next, click on the arrows on the top of the calendar, bounding the month and year.
Scheduled Tasks (Calendar) shows all the programmed tasks (Figure 80).
REPOX User Manual
Figure 80 – Calendar showing the scheduled tasks
10.2 Scheduled Task (List)
To schedule a task, click on the “Scheduled Task (List)” button (Figure 81)
Figure 81 – Scheduled tasks (List) button
Next, Scheduled Tasks (List) shows a list of the programmed tasks (Figure 82)
Figure 82 – Scheduled tasks List interface
10.3 Running Task
To view a running task, click on the “Running Task” button (Figure 83).

REPOX User Manual
Figure 83 – Running Task button
Next, the interface “Running Tasks (List)” shows a list of the programmed tasks at that
moment (Figure 84).
Figure 84 – Scheduled tasks list
10.4 Edit and Delete Tasks
To edit or delete a task, click on the link “Date Schedule”, from the homepage (Figure 85).
Figure 85 – Date Schedule link
Next, click on the link of the programmed tasks (Figure 86).
Figure 86 – Edit or Delete a task
Next, click on a task, a window with the task scheduling information is presented (Figure 87).

REPOX User Manual
Figure 87 – Window to edit or delete a task
In the Scheduled Tasks window you can change the date, time, ingest type and ingest
frequency and click on the “Schedule” button to save the task information.
Click on the “Delete” button, if you want to delete the task. A pop-up menu appears in this
case (Figure 88).

REPOX User Manual
Figure 88 – Pop-up menu to confirm the deleting of the Task
Click on the “Yes” button to confirm the task deletion or on “No” button to cancel the deletion
operation.

REPOX User Manual
11 Administration
After authentication, REPOX presents the homepage (Figure 89).
Here, in the “Administration” button, the administrator must set up the folder used by
REPOX to store the data.
11.1 Configuration Settings
The configuration Settings can be changed at any time by doing click on the “Administration”
button (Figure 89).
Figure 89 – Administration button
Next, click on the “Configuration Settings” button (Figure 90).
Figure 90 – Configuration Settings button
Then, fill the “Administration” form (Figure 91).
Figure 91 – Configurations Settings Form
The form consists on the following fields:
Repository Folder: Where the XML record files will be stored.

REPOX User Manual
Configuration Files Folder: Where the configuration XML will be stored.
OAI-PMH Requests Folder: Folder for the temporary OAI-PMH requests.
FTP Requests Folder: Folder for the temporary FTP requests.
HTTP Requests Folder: Folder for the temporary HTTP requests.
Derby Database Folder: Where to store the Derby database. This database will be
used to store the information about the harvested metadata records.
Sample Records: It is a fixed number of records configured in the Administration.
Base URN: URN prefix of this REPOX instance (the syntax is “urn:[instance
identifier]:”).
Administrator Email: Email to notify the administrator when ingestion processes are
concluded.
SMTP server: For “Administrator Email”
SMTP Port: SMTP outgoing mail port
REPOX Default Email Sender: This is an default email sender of REPOX
Administrator Email Password: This is the password of the Administrator
After editing the form, click on “Save” to save change settings.
11.2 User Management
To manage the User, click on the “User Manager” button, from the homepage (Figure 92).
Figure 92 – User Management button
To add a User, click on the “Add User” button (Figure 93).
Figure 93 – Add User button
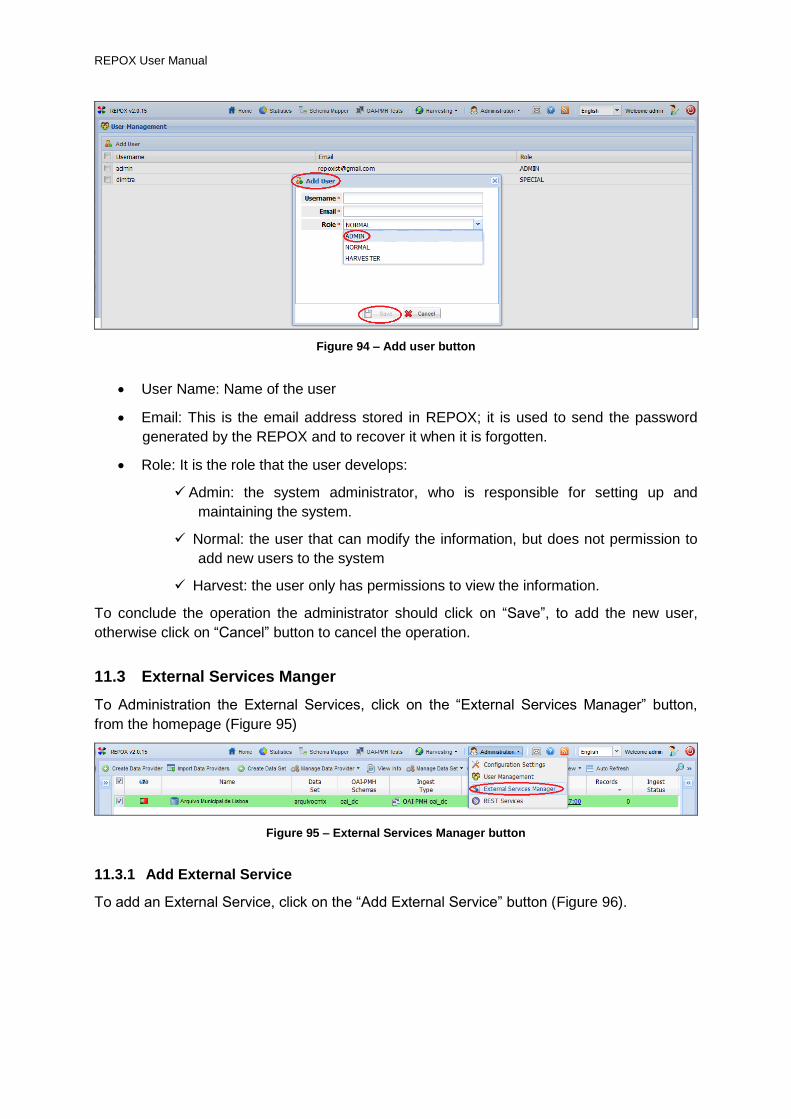
Next, fill the field "Username”,” Email” and “Role”. As it can be noticed in (Figure 94), all of
them are mandatory.
REPOX User Manual
Figure 94 – Add user button
User Name: Name of the user
Email: This is the email address stored in REPOX; it is used to send the password
generated by the REPOX and to recover it when it is forgotten.
Role: It is the role that the user develops:
Admin: the system administrator, who is responsible for setting up and
maintaining the system.
Normal: the user that can modify the information, but does not permission to
add new users to the system
Harvest: the user only has permissions to view the information.
To conclude the operation the administrator should click on “Save”, to add the new user,
otherwise click on “Cancel” button to cancel the operation.
11.3 External Services Manger
To Administration the External Services, click on the “External Services Manager” button,
from the homepage (Figure 95)
Figure 95 – External Services Manager button
11.3.1 Add External Service
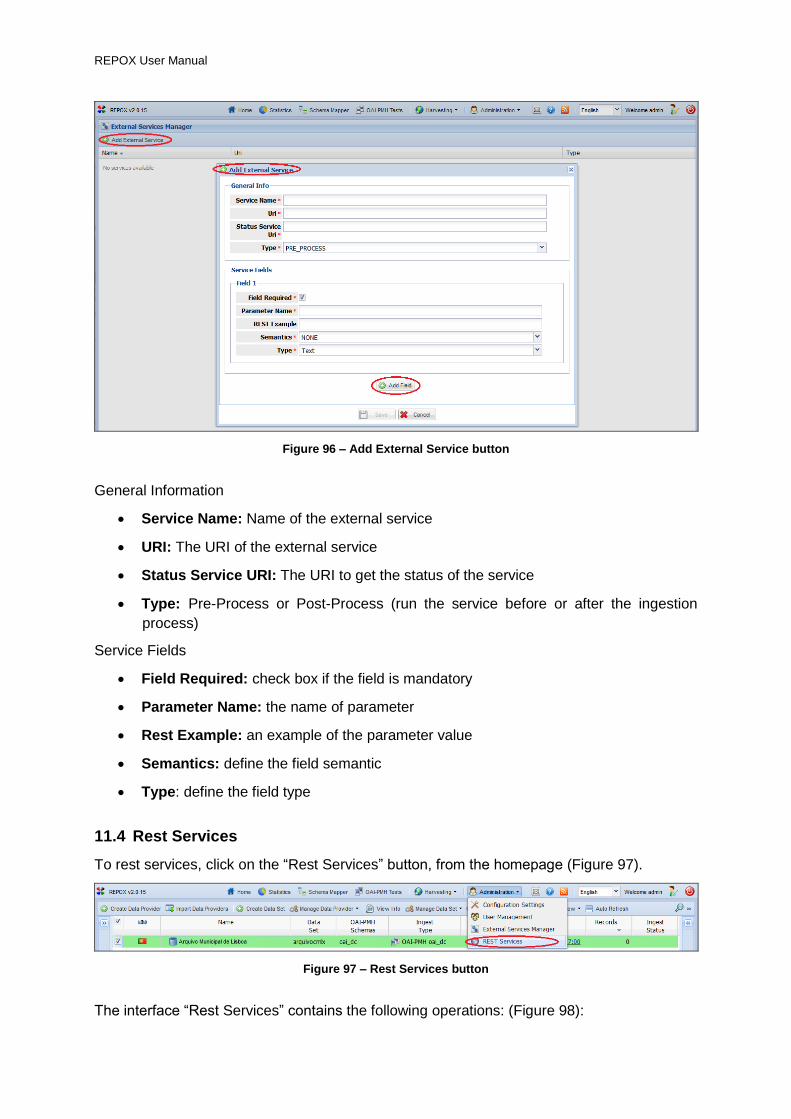
To add an External Service, click on the “Add External Service” button (Figure 96).
REPOX User Manual
Figure 96 – Add External Service button
General Information
Service Name: Name of the external service
URI: The URI of the external service
Status Service URI: The URI to get the status of the service
Type: Pre-Process or Post-Process (run the service before or after the ingestion
process)
Service Fields
Field Required: check box if the field is mandatory
Parameter Name: the name of parameter
Rest Example: an example of the parameter value
Semantics: define the field semantic
Type: define the field type
11.4 Rest Services
To rest services, click on the “Rest Services” button, from the homepage (Figure 97).
Figure 97 – Rest Services button
The interface “Rest Services” contains the following operations: (Figure 98):

REPOX User Manual
REST Operations box.
Common Retrieval Operations box.
Modification Operation box.
Response box.
Figure 98 – Rest Records Operations form
Modification Operations
Operation: the type of operation
Data Source ID: the data source identifier
Record ID: the record identifier
Record XML: the XML content
REPOX User Manual
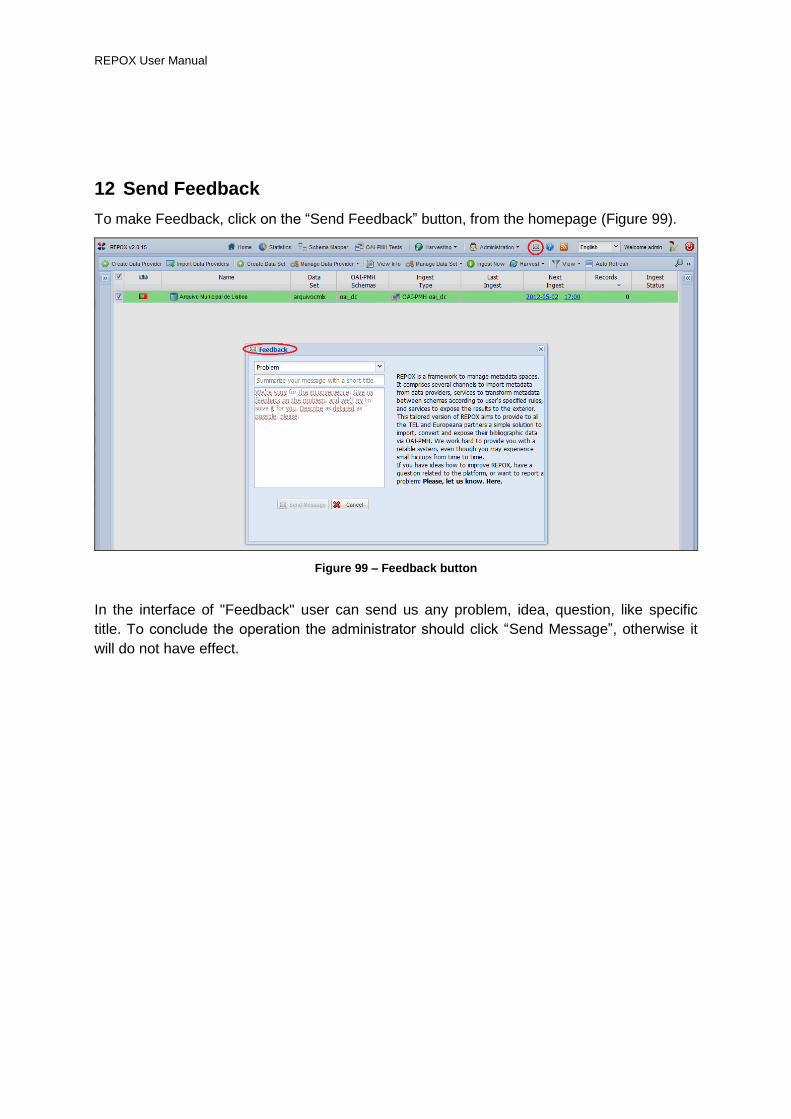
12 Send Feedback
To make Feedback, click on the “Send Feedback” button, from the homepage (Figure 99).
Figure 99 – Feedback button
In the interface of "Feedback" user can send us any problem, idea, question, like specific
title. To conclude the operation the administrator should click “Send Message”, otherwise it
will do not have effect.

REPOX User Manual
13 Help
To know more about of REPOX, click on the “Help” button, and it will show the Website of
REPOX where the Documentation can be found (Figure 100).
Figure 100 – Help button
REPOX User Manual
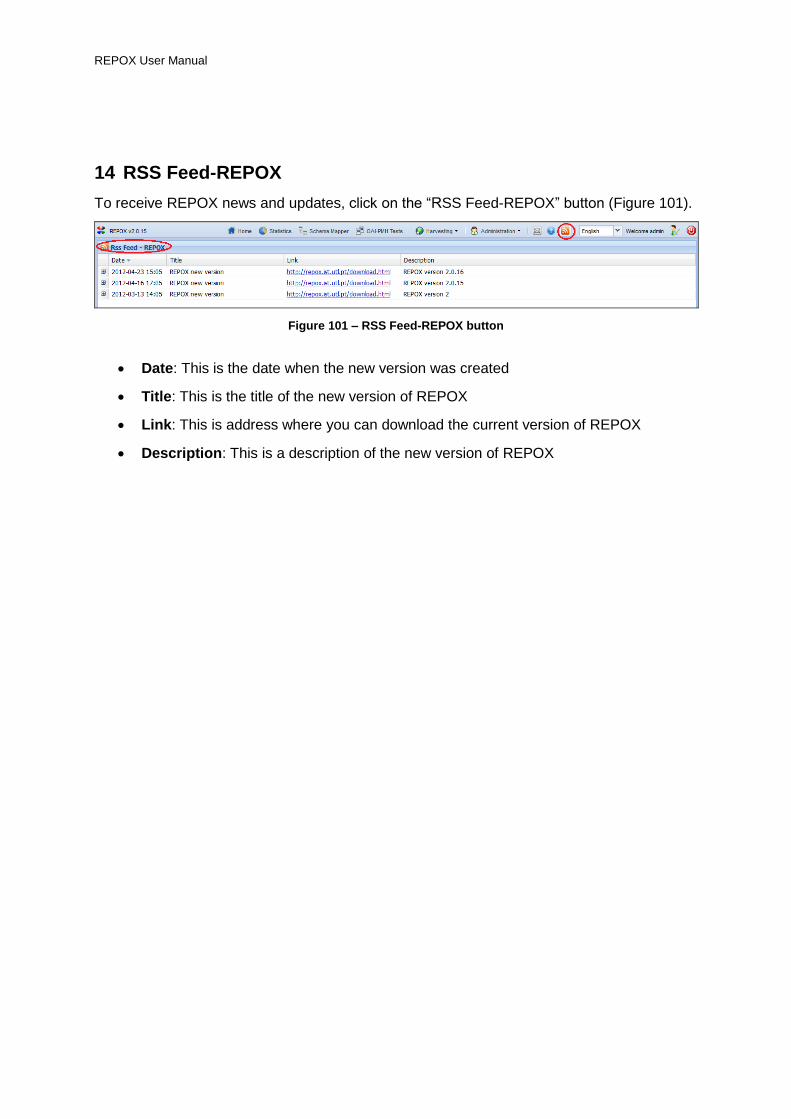
14 RSS Feed-REPOX
To receive REPOX news and updates, click on the “RSS Feed-REPOX” button (Figure 101).
Figure 101 – RSS Feed-REPOX button
Date: This is the date when the new version was created
Title: This is the title of the new version of REPOX
Link: This is address where you can download the current version of REPOX
Description: This is a description of the new version of REPOX
REPOX User Manual
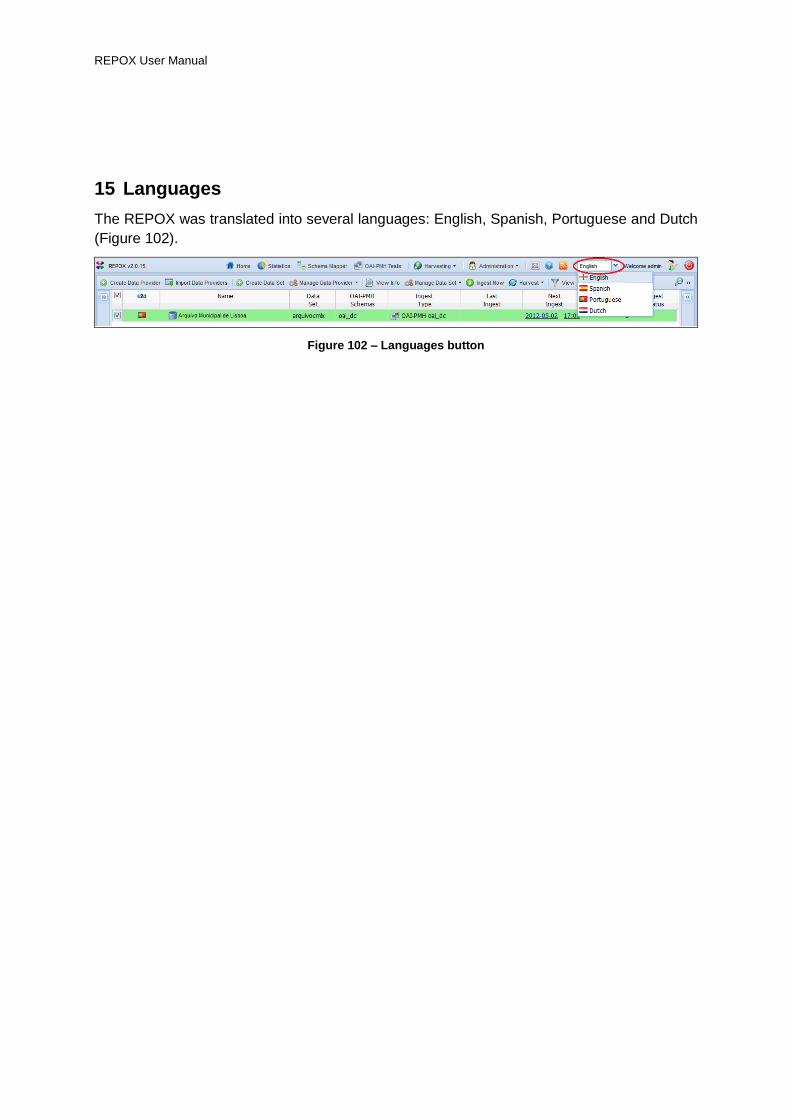
15 Languages
The REPOX was translated into several languages: English, Spanish, Portuguese and Dutch
(Figure 102).
Figure 102 – Languages button

REPOX User Manual
16 Search for a specific Data Provider or Data Set
The “Go to” field on the top menu of the homepage allows the administrator to search for a
specific Data Provider or Data Set.
Simply type the name to search for and press the return button. If it is found, REPOX
presents the page showing the information of that entity (Figure 103).
Figure 103 – Go to field


![LYRVAT y PCGE 20.07.2010 JDV [Modo de compatibilidad] · PDF file... Y EL PLAN CONTABLE GENERAL EMPRESARIAL (PCGE ... Registro de Inventario Permanente ... 2 LIBRO DE INVENTARIOS Y](https://img.pdfslide.net/doc/110x75/5a795cb17f8b9ad3658d13b7/lyrvat-y-pcge-20072010-jdv-modo-de-compatibilidad-y-el-plan-contable-general.jpg)