Embed Size (px)
Citation preview

RF Receiving Process Release 8.6.3 (Eterm)

Legal Notices © 2008 Activant Solutions Inc. All rights reserved. Unauthorized reproduction is a violation of applicable laws. Activant and the Activant logo are registered trademarks and/or registered service marks of Activant Solutions Inc. in the United States and other countries. Activant Eclipse is a trademark and/or service mark of Activant Solutions Inc. All other trademarks or service marks are the property of their respective owners and should be treated as such.
Activant® Eclipse™ 8.6.3 (Eterm) Online Help System
This online help system, as well as the software described in it, is provided under license and may be used only in accordance with the terms of the license. The content provided is for informational use only and is subject to change without notice. Activant Solutions Inc. assumes no responsibility or liability for any errors or inaccuracies that may be included in this documentation.
Publication Date: March 20, 2008

iii
Table of Contents RF Warehouse Management Overview.......................................................................................... 1
RF Receiving Process Overview .................................................................................................... 2
RF Receive Verify Overview.......................................................................................................... 3
Receiving Product Using RF .......................................................................................................... 4
Receiving Lot Control Product Using RF....................................................................................... 8
Receiving Nonstock Items Using RF.............................................................................................. 9
Viewing Tagged Items During RF Receiving .............................................................................. 12
Creating Vendor Backorders During RF Receiving ..................................................................... 14
Receiving Overshipments Using RF............................................................................................. 16
Splitting Orders During RF Receiving ......................................................................................... 17
Trouble Shooting in RF Receiving ............................................................................................... 19
Bar Code Issues......................................................................................................................... 19
Receiving Kits........................................................................................................................... 19
Product Not Ordered ................................................................................................................. 19
Receiving Product Using RF Workflow....................................................................................... 21
Receiving Product without Bar Codes in RF Workflow .............................................................. 22
Receiving Lot Controlled Product Using RF Workflow .............................................................. 23
Receiving Nonstock Product Using RF Workflow....................................................................... 24
Editing Quantity During RF Receiving Workflow....................................................................... 25
RF Put Away Overview................................................................................................................ 26
Using RF System-Directed Put Away .......................................................................................... 27
Blank Setting............................................................................................................................. 27
Most Recent Put Away Location Setting.................................................................................. 27
Empty Location Setting ............................................................................................................ 27
Putting Away Product Process.................................................................................................. 27
Using RF User-Directed Put Away............................................................................................... 30
Using RF Immediate Put Away .................................................................................................... 33
Entering Serial Numbers During RF Processes ............................................................................ 35
Handling Shortages During RF Put Away.................................................................................... 38
Splitting Put Away Quantities Between Locations Using RF ...................................................... 39
Selecting Totes for RF Put Away Workflow................................................................................ 41

RF Receiving Process
iv
Using RF System-Directed Put Away Workflow......................................................................... 42
Using RF User-Directed Put Away Workflow ............................................................................. 43
Using RF Immediate Put Away Workflow................................................................................... 44
Entering Serial Numbers from RF Workflow............................................................................... 45
RF Receive and Put Away Reports Overview.............................................................................. 46
Running the Open Locations Report............................................................................................. 47
What the Report Shows ............................................................................................................ 48
Running the Locations Changed on Putaway Report ................................................................... 50
What the Report Shows ............................................................................................................ 51
Running the Put Away Tote Activity Report................................................................................ 52
What the Report Shows ............................................................................................................ 53
Index ............................................................................................................................................. 55

© 2008 Activant Solutions Inc. All rights reserved. 1
RF Warehouse Management Overview Use the Eclipse Radio Frequency (RF) Warehouse Management companion product to control and automate your entire warehouse's functions in real-time.
The RF Warehouse Management system uses radio frequency data communications that provide real-time access and integration to the system. RF data communications transmit between RF guns and workstation terminals, allowing up-to-the-minute information transmission of the following:
• Receiving and put away
• Picking
• Staging and closing orders
• Inventory replenishment
• Product movement
• Physical inventory
• Cycle counting
By using the RF Warehouse Management system, your warehouse gains real-time control over inventory. This real-time data transmission gives warehouse management the ability to:
• Make timely, well-informed decisions.
• Increase sales while lowering inventory levels.
• Reduce inventory variances to less than 0.01%.
• Reduce the number of lost sales and returns.
• Decrease your distribution cycle time.
• Improve service levels.
• Eliminate facility shutdown during physical inventory.
• Minimize personnel requirements and reduce your payroll.
• Improve warehouse space management.
• Cycle count discrepancies immediately.
See Also:
Manual Warehouse Management Overview
RF Receiving Process Rel. 8.6.3 (Eterm)
2 © 2008 Activant Solutions Inc. All rights reserved.
RF Receiving Process Overview The RF Warehouse Management system optimizes your warehouse's receiving and put away processes. During RF receiving, the system:
• Updates all locations for the product and all associated quantities. The system tracks all inventory movement, so you do not waste time looking for products.
• Updates a product's Product Activity Log. Use this log to monitor the date, user, and quantity added to or subtracted from a location.
• Ensures inventory accuracy by verifying each item through bar code labels.
• Ensures inventory accuracy by making receivers verify quantities during both receive verify and receive put away. The system immediately sends all quantity discrepancies to the Warehouse In Process Status Queue. Monitor this queue in order to view and handle warehouse activities and issues.
Through the use of RF guns, do the following to receive verify product:
• Record and assign each item a bar code as it is received at the dock.
• Verify products from purchase orders (P/Os).
• Immediately locate items tagged to orders into the packing or staging location.
• Immediately notify the Purchasing department of over-shipments or shipping errors.
Put away products using system-directed, user-directed, or immediate put away. During put away, you can also do the following as needed:
• Assign serial numbers to serialized product.
• Handle quantity shortages.
• Split a product's quantity among multiple locations if it cannot be located into a single location.
See Also: RF Receive Verify Overview
RF Put Away Overview
RF Receive and Put Away Reports Overview
RF Warehouse Management Overview

Rel. 8.6.3 (Eterm) RF Warehouse Management
© 2008 Activant Solutions Inc. All rights reserved. 3
RF Receive Verify Overview Receive verify is the fist step in receiving product into inventory. Using your RF gun, you can receive:
• Product on single purchase orders (P/Os).
• Product from multiple P/Os simultaneously.
In addition, use nonstock receiving to locate nonstock items into pre-defined nonstock locations or to immediately cross dock nonstock items. Also view all items tagged to orders so you can locate these items into the correct location.
During receive verification, if you come across quantity variances, handle the overages or shortages right away. The system notifies the purchasing agent of the quantity variance, as well as places the variance in the Warehouse In Process Status Queue for warehouse resolution.
Every item that you receive must have a valid, scannable bar code label. If a product arrives at the dock without a bar code label or with a manufacturer's bar code label that is not cross-referenced in the system, use your RF gun to either:
• Generate a new bar code label.
• Cross-reference the existing manufacturer's bar code with the system.
Also, for lot-controlled product, assign lot numbers during receive verifying.
See Also:
Receiving Lot Control Product Using RF
Receiving P/Os with ASN Documents Using RF
Trouble Shooting in RF Receiving
RF Receiving Process Overview

RF Receiving Process Rel. 8.6.3 (Eterm)
4 © 2008 Activant Solutions Inc. All rights reserved.
Receiving Product Using RF When you receive purchase orders (P/Os), scan each item to verify quantities. Both the received item quantities and purchase order quantities should match.
1. Scan the product's bar code.
2. Select the purchase order to which the product belongs.
3. Assign the product to a receiving generation.
4. Verify or enter the quantity received.
5. Scan or enter a lot number for lot controlled product.
6. Scan the tote in which you place the item for put away or put away the item without using a tote.
Use your RF gun for this entire process. The RF gun communicates to the system through overhead RF data receivers. Your system is constantly updated during receiving, providing you with real-time inventory data.
To receive product using RF:
1. From the Whse Mgt > RF Applications menu, select Recv Verify to display the Recv Verify screen.
2. Scan the product bar code label which the system displays in the Product field.
Note: If the item does not have a bar code to scan, then enter the P/O number. The system displays the Unverified Label Printing screen, where you can print bar code labels or cross-reference the manufacturer's bar code.
• If the product is not on an in-process P/O, the system displays the Open P/Os Line screen. This screen displays a list of purchase orders not yet received. The screen also displays the product, along with the total quantity of that item for each P/O.
• If the product is on an in-process P/O, the system assumes you are receiving that P/O and directs you to scan a tote (proceed to step 5).
• If the product is on a transfer that has not shipped, the system displays the following warning: "Selected transfer not shipped from shipping branch."
3. Select the purchase order. Use the vendor's packing slip to find the P/O number.
A screen displays showing the product, quantity ordered, and the number of total items on the purchase order.
Rel. 8.6.3 (Eterm) RF Warehouse Management
© 2008 Activant Solutions Inc. All rights reserved. 5
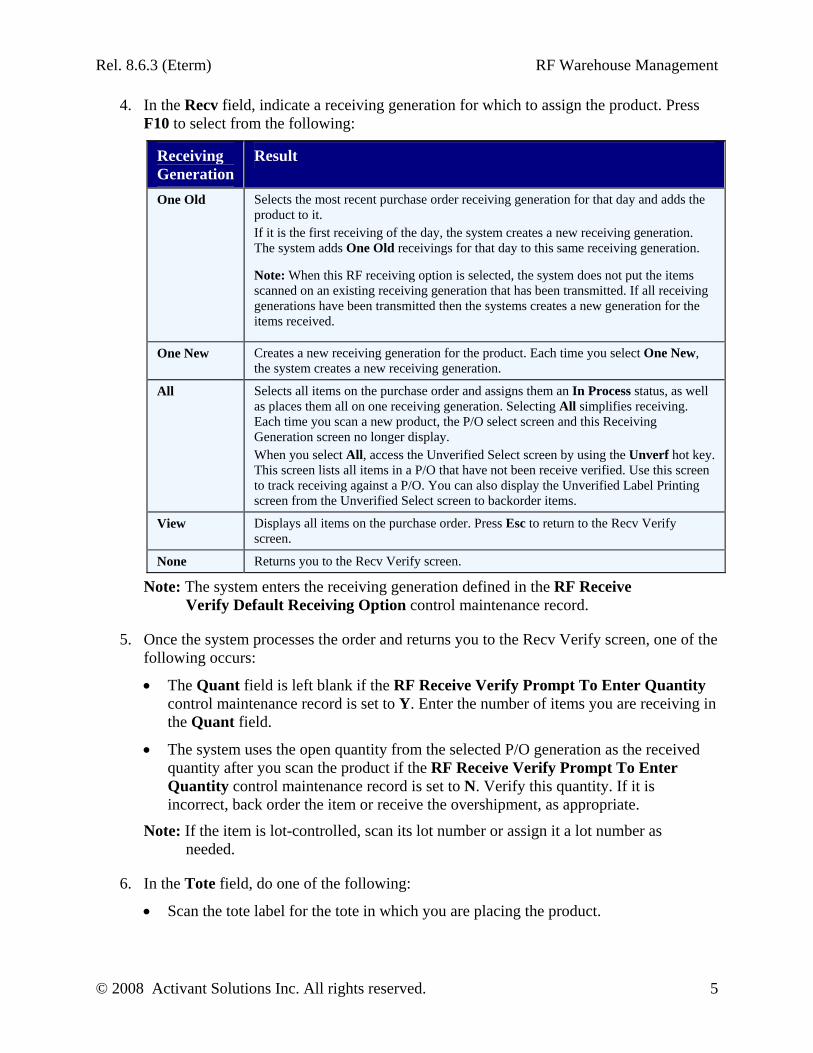
4. In the Recv field, indicate a receiving generation for which to assign the product. Press F10 to select from the following:
Receiving Generation
Result
One Old Selects the most recent purchase order receiving generation for that day and adds the product to it. If it is the first receiving of the day, the system creates a new receiving generation. The system adds One Old receivings for that day to this same receiving generation.
Note: When this RF receiving option is selected, the system does not put the items scanned on an existing receiving generation that has been transmitted. If all receiving generations have been transmitted then the systems creates a new generation for the items received.
One New Creates a new receiving generation for the product. Each time you select One New, the system creates a new receiving generation.
All Selects all items on the purchase order and assigns them an In Process status, as well as places them all on one receiving generation. Selecting All simplifies receiving. Each time you scan a new product, the P/O select screen and this Receiving Generation screen no longer display. When you select All, access the Unverified Select screen by using the Unverf hot key. This screen lists all items in a P/O that have not been receive verified. Use this screen to track receiving against a P/O. You can also display the Unverified Label Printing screen from the Unverified Select screen to backorder items.
View Displays all items on the purchase order. Press Esc to return to the Recv Verify screen.
None Returns you to the Recv Verify screen.
Note: The system enters the receiving generation defined in the RF Receive Verify Default Receiving Option control maintenance record.
5. Once the system processes the order and returns you to the Recv Verify screen, one of the following occurs:
• The Quant field is left blank if the RF Receive Verify Prompt To Enter Quantity control maintenance record is set to Y. Enter the number of items you are receiving in the Quant field.
• The system uses the open quantity from the selected P/O generation as the received quantity after you scan the product if the RF Receive Verify Prompt To Enter Quantity control maintenance record is set to N. Verify this quantity. If it is incorrect, back order the item or receive the overshipment, as appropriate.
Note: If the item is lot-controlled, scan its lot number or assign it a lot number as needed.
6. In the Tote field, do one of the following:
• Scan the tote label for the tote in which you are placing the product.
RF Receiving Process Rel. 8.6.3 (Eterm)
6 © 2008 Activant Solutions Inc. All rights reserved.
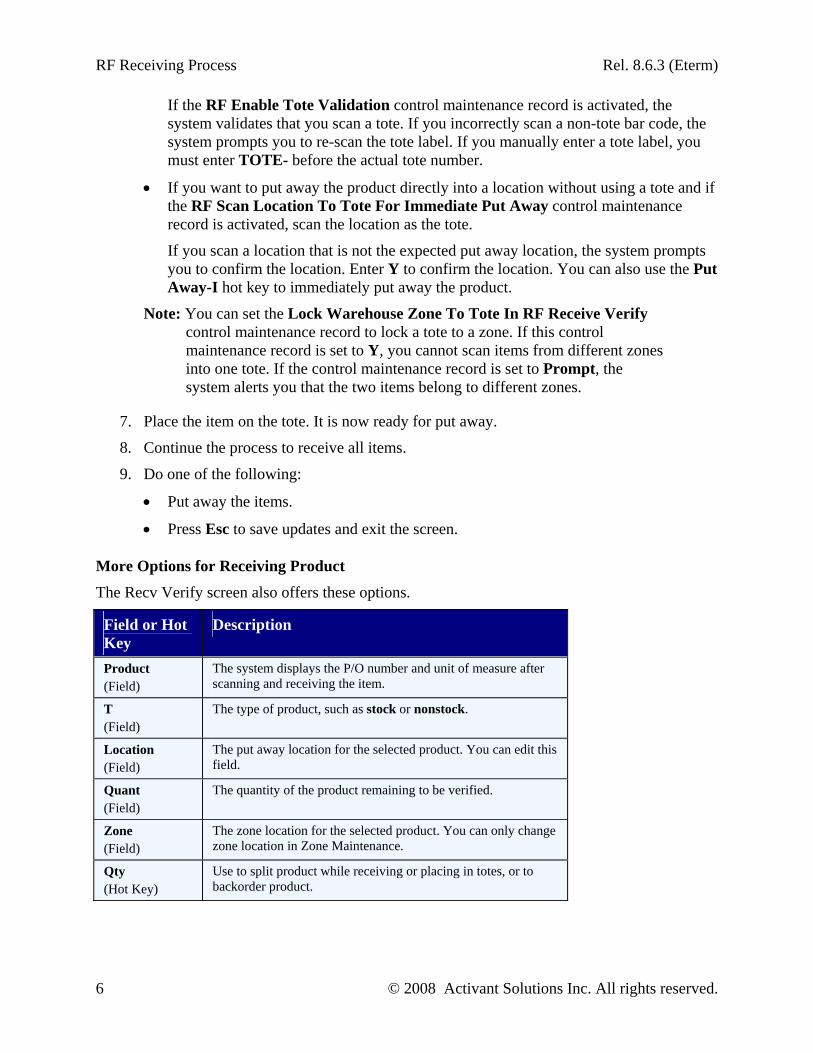
If the RF Enable Tote Validation control maintenance record is activated, the system validates that you scan a tote. If you incorrectly scan a non-tote bar code, the system prompts you to re-scan the tote label. If you manually enter a tote label, you must enter TOTE- before the actual tote number.
• If you want to put away the product directly into a location without using a tote and if the RF Scan Location To Tote For Immediate Put Away control maintenance record is activated, scan the location as the tote.
If you scan a location that is not the expected put away location, the system prompts you to confirm the location. Enter Y to confirm the location. You can also use the Put Away-I hot key to immediately put away the product.
Note: You can set the Lock Warehouse Zone To Tote In RF Receive Verify control maintenance record to lock a tote to a zone. If this control maintenance record is set to Y, you cannot scan items from different zones into one tote. If the control maintenance record is set to Prompt, the system alerts you that the two items belong to different zones.
7. Place the item on the tote. It is now ready for put away.
8. Continue the process to receive all items.
9. Do one of the following:
• Put away the items.
• Press Esc to save updates and exit the screen.
More Options for Receiving Product
The Recv Verify screen also offers these options.
Field or Hot Key
Description
Product (Field)
The system displays the P/O number and unit of measure after scanning and receiving the item.
T (Field)
The type of product, such as stock or nonstock.
Location (Field)
The put away location for the selected product. You can edit this field.
Quant (Field)
The quantity of the product remaining to be verified.
Zone (Field)
The zone location for the selected product. You can only change zone location in Zone Maintenance.
Qty (Hot Key)
Use to split product while receiving or placing in totes, or to backorder product.

Rel. 8.6.3 (Eterm) RF Warehouse Management
© 2008 Activant Solutions Inc. All rights reserved. 7
See Also:
Receiving Lot Control Product Using RF
Receiving Nonstock Items Using RF
Viewing Tagged Items During RF Receiving
Creating Vendor Backorders During RF Receiving
Receiving Overshipments Using RF
RF Receive Verify Overview
RF Lot Control Guidelines

RF Receiving Process Rel. 8.6.3 (Eterm)
8 © 2008 Activant Solutions Inc. All rights reserved.
Receiving Lot Control Product Using RF If the product you are receiving is lot controlled, ensure it has a lot number and label.
You can assign or scan lot numbers to product during either the receive verify or receive put away process. To assign or scan lot numbers during the receive verify process, the RF Receive Verify Suggest Location Based On Lot Entered control maintenance record must be set to Y for the branch in which you are receiving. If this control maintenance record is set to Y, the system also suggests a put away location based on the lot number. If this control maintenance record is set to N, you are prompted to scan the lot number during put away and the system does not direct you to a put away location based on the lot number.
To receive verify lot controlled product:
1. From the Whse Mgt > RF Applications menu, select Recv Verify to display the Recv Verify screen.
2. After verifying the quantity for the product you are receiving, do one of the following in the Lot field:
• If the product has a lot label attached to it, scan the label.
• If the product does not have a lot label attached to it, enter a lot number or press F10 to select a number.
3. Print lot labels and place them on the items in one of the following ways, as needed:
• Print labels from the Tote/Lot Label Printing screen for generic lot numbers.
• Print labels from the Product Lot Barcode Labels screen for pre-defined lot numbers.
• If the system prompts you to enter labels, enter the number of lot labels to print. The system prints the lot labels. Place the lot labels on the item.
Note: For the branch in which you are receive verifying lot controlled items, the Prompt To Print Lot Barcode Labels In RF Receive Verify control maintenance record must be set to Y for the system to prompt you to print lot labels.
4. Continue receiving the product.
See Also: Receiving Product Using RF
RF Lot Control Guidelines
RF Receive Verify Overview

Rel. 8.6.3 (Eterm) RF Warehouse Management
© 2008 Activant Solutions Inc. All rights reserved. 9
Receiving Nonstock Items Using RF When you receive nonstock product on individual purchase orders (P/O), you can set up the system to:
• Alert you that the product you are receiving is a nonstock product.
• Alert you that the product fills a sales order within the plenty date or a transfer order at a child branch so you can immediately cross dock the product.
• Display the quantity of the product that needs to be staged for the order.
• Display the staging location.
The system determines whether an item is nonstock within the receiving branch using the following logic:
1. In Product Maintenance:
• If the item's status is nonstock, then the system treats the item as nonstock in RF receiving.
• If the item's status is stock, then the system looks to the data in Primary Inventory Maintenance.
2. In Primary Inventory Maintenance:
• If the item is nonstock for the receiving branch, then the system treats the item as nonstock in RF receiving.
• If the item is stock for the receiving branch, then the system treats the item as stock in RF receiving. The system also treats the item as stock for the receiving branch if the branch has met the minimum number of hits for the item.
• If the item has not been defined as stock or nonstock for the receiving branch, then the system looks to the item's stock status in the central warehouse scheme.
3. In the central warehouse scheme:
• If the type defined is Top Down for the item, then the item will be treated as nonstock for the receiving branch.
• If the type defined is Bottom Up for the item, then the item will be treated as stock for the receiving branch. The system also treats the item as stock if the Network has met the minimum number of hits for the item.
You must perform the following set up for the system to direct you in receiving nonstock product:
• In Product Maintenance, define all nonstock and stock products.
• In Primary Inventory Maintenance, define whether stock items within a receiving branch are stock or nonstock.

RF Receiving Process Rel. 8.6.3 (Eterm)
10 © 2008 Activant Solutions Inc. All rights reserved.
• In Procurement Group Maintenance, set up procurement groups needed for nonstock branch transfer products.
• In Product Maintenance, assign procurement groups to all of your nonstock product involved in branch transfers.
• Define staging locations for each branch in both the RF W/H Area To Store Hot Nonstock Items control maintenance record and the RF W/H Area To Store Hot Nonstock Transfer Items control maintenance record.
To receive nonstock product using the RF system:
1. From the Whse Mgt > RF Applications menu, select Recv Verify to display the Recv Verify screen.
2. Scan the product you are receiving. The system displays the following:
Top Right Corner Location Quant NS – The product is a nonstock item, but cannot fill an order.
Blank, unless a nonstock location is defined in the system. If a nonstock location is defined in the system, then that location displays.
Depending on your settings in the RF Receive Verify Prompt To Enter Quantity control maintenance record, either the expected quantity or blank.
NSS – The product is a nonstock item that can fill a sales order within the plenty date.
The staging location defined for nonstock sales orders.
The quantity that can fill the sales order.
NST – The product is a nonstock item that can fill a transfer order at a child branch.
The staging location plus the branch to where the product is being transferred.
The quantity that can fill the transfer order. The system displays quantities for the parent branch before the child branch. This display ensures that the parent branch's order is filled first.
3. Do one of the following to receive the item and place it in the needed location:
• NS – Receive the product as you would a stock product.
• NSS or NST – Scan the product either into a tote or directly into the displayed staging location.
Note: In order to place an item directly into a location without scanning a tote, the RF Scan Location To Tote For Immediate Put Away control maintenance record must be activated and the RF Enable Tote Validation control maintenance record must be de-activated. If the RF Enable Tote Validation control maintenance record is activated, you cannot scan the product directly into the staging location. Instead you must scan a tote and use it to stage the product.
4. Place the displayed quantity into the tote or staging location.
Rel. 8.6.3 (Eterm) RF Warehouse Management
© 2008 Activant Solutions Inc. All rights reserved. 11
5. If you placed the product into a tote, use the PutAwy hot key to locate the product into the staging location.
6. If quantity remains for the nonstock product, receive it as needed, or press Esc to save updates and exit the screen.
See Also:
Receiving Product Using RF
Viewing Tagged Items During RF Receiving
RF Receive Verify Overview

RF Receiving Process Rel. 8.6.3 (Eterm)
12 © 2008 Activant Solutions Inc. All rights reserved.
Viewing Tagged Items During RF Receiving When you receive items using RF receive verify, the system identifies items that are tagged to sales orders. In addition, from the Receive Verify screen, access the Tag Viewing screen to view information about these tagged items. By being able to identify tagged items during receiving, you can ensure that these items are located correctly.
For example:
You receive a box of procured plumbing supplies. When you scan the product barcode, the system identifies the product as tagged to a sales order. Access the Tag Viewing screen to view the sales order to which the product is tagged, the sales order's status, and any special shipping instructions. Place the product in the correct tagged-items location so that it does not get mixed in with other received product.
In addition to viewing information for the tagged item and its sales order, use the Tag Viewing screen to print a label for the tagged item. Use these labels to identify the item and mark it as tagged.
If a label format is defined in the control maintenance record, you only need to indicate how many labels to print. If a label format is not defined, you will need to select a label format.
To view a tagged item's information during the receive verify process:
1. From the Whse Mgt > RF Applications menu, select Recv Verify to display the Recv Verify screen.
2. Scan the product bar code label of the item you are receiving.
If the item is tagged to a sales order, T displays in the T field and the Location field is blank.
3. Press Alt-Q to display the RF Inqs screen.
4. Select Tag Viewing to display the Tag Viewing screen.
5. View the following information for the sales order and tagged item:
Field Description Header Displays the following:
• Sales order ID to which the item is tagged. • Orders status assignment, such as Call When Complete. • Ship date. • Customer who placed the order.
Desc Displays the tagged item's internal ID and description.
Shipping Inst Displays any special shipping instructions for the sales order.
Note: The information displayed on the Tag Viewing screen is view-only.
6. After you have viewed all information for the sales order and its tagged item, either:

Rel. 8.6.3 (Eterm) RF Warehouse Management
© 2008 Activant Solutions Inc. All rights reserved. 13
• Press Esc to return to the Recv Verify screen, and continue receiving.
• Print a label for the tagged item.
To print labels for a tagged item:
1. Display the Tag Viewing screen with the item for which you are printing labels displayed.
2. Use the Print Label hot key.
• If a label format has been defined in the RF Tag Viewing User Defined Label control maintenance record, the system prompts you to enter the number of labels to print. Enter that number. The system prints the labels and returns you to the Recv Verify screen.
• If a label format has not been defined in the RF Tag Viewing User Defined Label control maintenance record, the system displays the RF Label Printing screen, which you use to select and print labels for the item. Select the label format on which to print, define the quantity of labels to print, and print the labels. The system returns you to the Recv Verify screen.
See Also:
Receiving Product Using RF
Receiving Nonstock Items Using RF
RF Receive Verify Overview

RF Receiving Process Rel. 8.6.3 (Eterm)
14 © 2008 Activant Solutions Inc. All rights reserved.
Creating Vendor Backorders During RF Receiving If you have items listed on the purchase order (P/O) that you did not receive from the vendor, place these items on backorder using the Unverified Label Printing screen or the Receive Verify screen.
The Unverified Label Printing screen lists all items in the P/O. Use this screen to place items on the P/O on backorder. When you place items on backorder, the system removes these items from this screen, as well as from the Unverified Select screen so that the receive verify process for this P/O is complete.
Note: You cannot backorder items that are on orders in a closed accounting period.
Using the Receive Verify screen is an alternate way to create vendor backorders. You can place only single items on backorder using this screen.
Note: You must be assigned the RF.RECV.VERF.BO.QTY authorization key in order to backorder items during the receiving process. If you are not assigned this authorization key but have been given the password to override the warning, you may enter the password at the warning prompt to continue backordering.
Note: If the RF Use B/O Days On B/O'd Receipt control maintenance record is set to Y, the system calculates the expected receive date for a backorder using the setting in the B/O Days field on the Vendor Maintenance screen. If the B/O Days field is left unpopulated for the vendor, the system calculates the expected receive date for a backorder using the setting for the Default B/O Days For Purchase Orders control maintenance record. If the RF Use B/O Days On B/O'd Receipt control maintenance record is set to N, then the system does not set an expected receive date for the P/O and instead sends the backorder to the Review P/O Backorders Queue.
To create a vendor backorder on the Unverified Label Printing screen:
1. From the Whse Mgt > RF Applications menu, select Recv Verify to display the Recv Verify screen.
2. Use the Unverf hot key to display the Unverified Select screen.
3. On the Unverified Select screen, select the P/O you want to place on backorder and press Enter. The Unverified Label Printing screen displays with each item in the P/O's order generation listed.
4. On the Unverified Label Printing screen, do one of the following:
• Select the item you want to place on backorder with the cursor and use the Back hot key. In the displayed prompt, enter the quantity you are actually receiving. Press Enter and then press Esc. The system places the remaining quantity on backorder by creating an open generation on the P/O.

Rel. 8.6.3 (Eterm) RF Warehouse Management
© 2008 Activant Solutions Inc. All rights reserved. 15
Note: The unit of measure to which the system defaults for the prompt is each (ea), but this unit of measure adjusts to the actual product you place on backorder.
• Use the Back All hot key to place all items on the screen on backorder. Enter Y in the backorder confirmation prompt to place all items on backorder.
Note: If the item's order is in a closed accounting period, the system alerts you that you cannot backorder the item.
5. Press Esc to save updates and exit the screen.
To create a vendor backorder on the Recv Verify screen:
1. From the Whse Mgt > RF Applications menu, select Receive Verify to display the Recv Verify screen.
2. In the Product field, enter the product to place on backorder.
3. Use the Qty hot key to display the New Quantity in ea prompt.
4. Enter the quantity of items you are receiving.
5. In the Split/Bckord/Tote prompt, enter B to select backorder.
The system places the remaining quantity for the product on backorder by creating an open generation on the P/O.
Note: If you are not assigned the RF.RECV.VERF.BO.QTY authorization key, the system displays the message "User Not Authorized To Backorder". You can not backorder the product if you receive this message.
6. Press Esc to save updates and exit the screen.
See Also:
Receiving Product Using RF
Receiving Nonstock Items Using RF
RF Receive Verify Overview

RF Receiving Process Rel. 8.6.3 (Eterm)
16 © 2008 Activant Solutions Inc. All rights reserved.
Receiving Overshipments Using RF When you receive overshipments, the system ties the purchase order (P/O) number and the item number together. It then sends a job queue through the message system to inform the P/O's originator of the increased quantity.
Overstock product is not available for orders until the purchasing agent resolves the issue.
To receive overshipped quantities using RF:
1. From the Whse Mgt > RF Applications menu, select Recv Verify to display the Recv Verify screen.
2. Scan the product.
3. Use the Qty hot key to display the New Quantity in ea prompt.
4. Enter the quantity that you have received. The system displays an overshipment prompt.
5. At this prompt, enter Y to receive the excess quantity.
The system creates a separate line for the overshipped quantity of the product and assigns it the status defined in the RF Overstock Type control maintenance record. It then sends the job queue to the P/O's originator.
6. Continue the receiving process for the excess items.
7. Either put away the items or press Esc to save updates and exit the screen.
See Also:
Receiving Product Using RF
RF Receive Verify Overview
Rel. 8.6.3 (Eterm) RF Warehouse Management
© 2008 Activant Solutions Inc. All rights reserved. 17
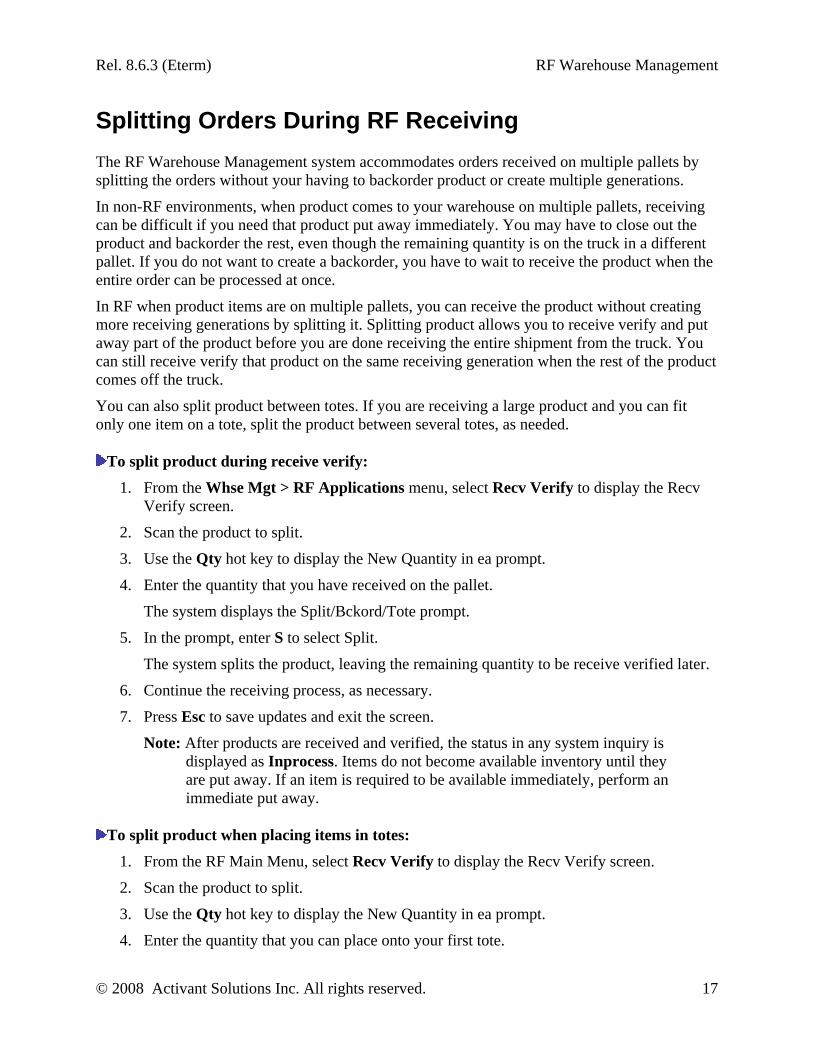
Splitting Orders During RF Receiving The RF Warehouse Management system accommodates orders received on multiple pallets by splitting the orders without your having to backorder product or create multiple generations.
In non-RF environments, when product comes to your warehouse on multiple pallets, receiving can be difficult if you need that product put away immediately. You may have to close out the product and backorder the rest, even though the remaining quantity is on the truck in a different pallet. If you do not want to create a backorder, you have to wait to receive the product when the entire order can be processed at once.
In RF when product items are on multiple pallets, you can receive the product without creating more receiving generations by splitting it. Splitting product allows you to receive verify and put away part of the product before you are done receiving the entire shipment from the truck. You can still receive verify that product on the same receiving generation when the rest of the product comes off the truck.
You can also split product between totes. If you are receiving a large product and you can fit only one item on a tote, split the product between several totes, as needed.
To split product during receive verify:
1. From the Whse Mgt > RF Applications menu, select Recv Verify to display the Recv Verify screen.
2. Scan the product to split.
3. Use the Qty hot key to display the New Quantity in ea prompt.
4. Enter the quantity that you have received on the pallet.
The system displays the Split/Bckord/Tote prompt.
5. In the prompt, enter S to select Split.
The system splits the product, leaving the remaining quantity to be receive verified later.
6. Continue the receiving process, as necessary.
7. Press Esc to save updates and exit the screen.
Note: After products are received and verified, the status in any system inquiry is displayed as Inprocess. Items do not become available inventory until they are put away. If an item is required to be available immediately, perform an immediate put away.
To split product when placing items in totes:
1. From the RF Main Menu, select Recv Verify to display the Recv Verify screen.
2. Scan the product to split.
3. Use the Qty hot key to display the New Quantity in ea prompt.
4. Enter the quantity that you can place onto your first tote.
RF Receiving Process Rel. 8.6.3 (Eterm)
18 © 2008 Activant Solutions Inc. All rights reserved.
The system displays the Split/Bckord/Tote prompt.
5. In the prompt, enter T to select Tote Full.
6. Scan the tote in which you are placing product.
7. Press Enter twice to accept the item quantity for the product that you are placing in the scanned tote and to accept the scanned tote.
8. Receive the remaining product into a new tote or split the remaining quantity between additional totes, as needed.
9. Press Esc to save updates and exit the screen.
See Also:
Receiving Product Using RF
RF Receive Verify Overview
Rel. 8.6.3 (Eterm) RF Warehouse Management
© 2008 Activant Solutions Inc. All rights reserved. 19
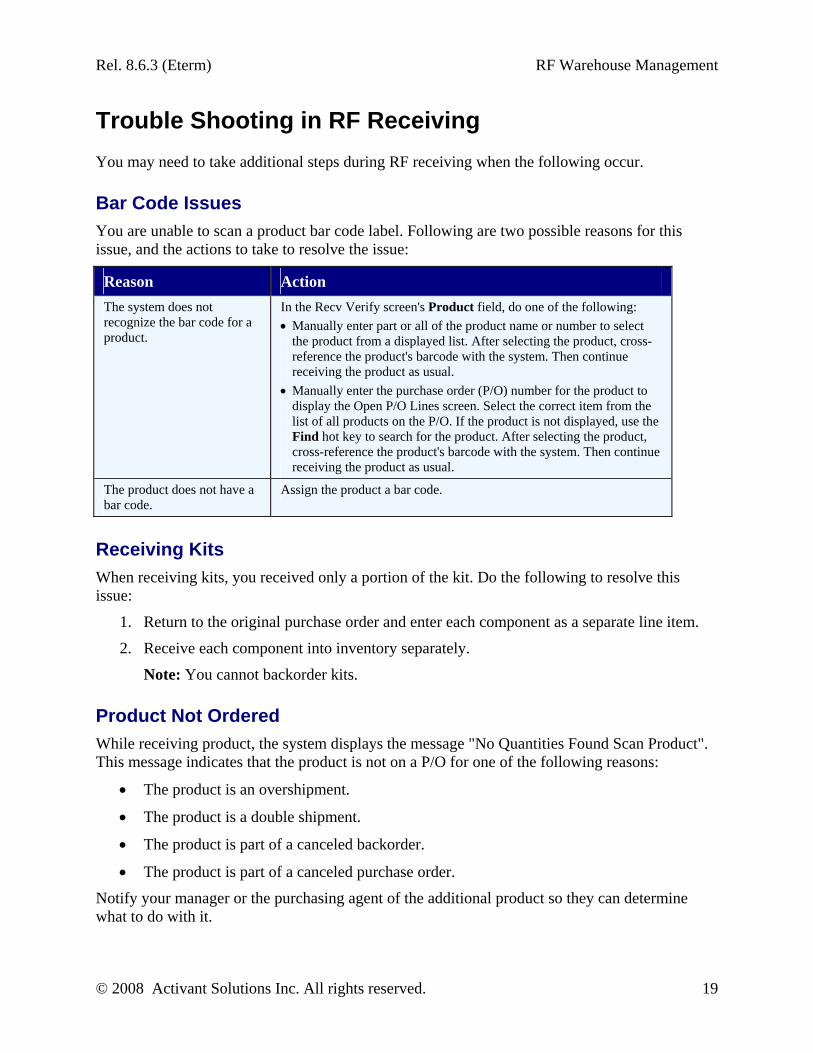
Trouble Shooting in RF Receiving You may need to take additional steps during RF receiving when the following occur.
Bar Code Issues You are unable to scan a product bar code label. Following are two possible reasons for this issue, and the actions to take to resolve the issue:
Reason Action The system does not recognize the bar code for a product.
In the Recv Verify screen's Product field, do one of the following: • Manually enter part or all of the product name or number to select
the product from a displayed list. After selecting the product, cross-reference the product's barcode with the system. Then continue receiving the product as usual.
• Manually enter the purchase order (P/O) number for the product to display the Open P/O Lines screen. Select the correct item from the list of all products on the P/O. If the product is not displayed, use the Find hot key to search for the product. After selecting the product, cross-reference the product's barcode with the system. Then continue receiving the product as usual.
The product does not have a bar code.
Assign the product a bar code.
Receiving Kits When receiving kits, you received only a portion of the kit. Do the following to resolve this issue:
1. Return to the original purchase order and enter each component as a separate line item.
2. Receive each component into inventory separately.
Note: You cannot backorder kits.
Product Not Ordered While receiving product, the system displays the message "No Quantities Found Scan Product". This message indicates that the product is not on a P/O for one of the following reasons:
• The product is an overshipment.
• The product is a double shipment.
• The product is part of a canceled backorder.
• The product is part of a canceled purchase order.
Notify your manager or the purchasing agent of the additional product so they can determine what to do with it.

RF Receiving Process Rel. 8.6.3 (Eterm)
20 © 2008 Activant Solutions Inc. All rights reserved.
See Also:
Receiving Product Using RF
Receiving Nonstock Items Using RF
Receiving P/Os with ASN Documents Using RF
RF Bar Code Labeling Overview
RF Receive Verify Overview

Rel. 8.6.3 (Eterm) RF Warehouse Management
© 2008 Activant Solutions Inc. All rights reserved. 21
Receiving Product Using RF Workflow

RF Receiving Process Rel. 8.6.3 (Eterm)
22 © 2008 Activant Solutions Inc. All rights reserved.
Receiving Product without Bar Codes in RF Workflow

Rel. 8.6.3 (Eterm) RF Warehouse Management
© 2008 Activant Solutions Inc. All rights reserved. 23
Receiving Lot Controlled Product Using RF Workflow

RF Receiving Process Rel. 8.6.3 (Eterm)
24 © 2008 Activant Solutions Inc. All rights reserved.
Receiving Nonstock Product Using RF Workflow
Rel. 8.6.3 (Eterm) RF Warehouse Management
© 2008 Activant Solutions Inc. All rights reserved. 25
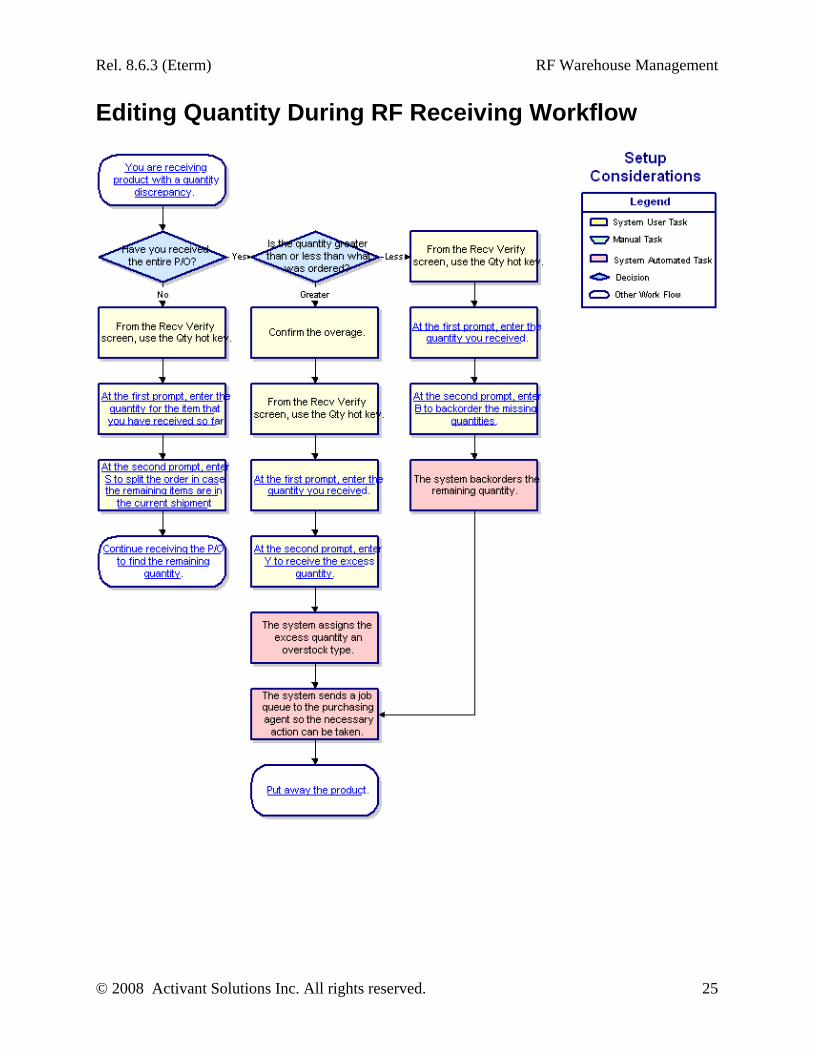
Editing Quantity During RF Receiving Workflow

RF Receiving Process Rel. 8.6.3 (Eterm)
26 © 2008 Activant Solutions Inc. All rights reserved.
RF Put Away Overview After you complete the receive verify process, put away products to update their availability, location, and quantity.
There are three ways to put away product:
• System-directed put away – The system directs you to put away items as defined in the RF Put Away Method control maintenance record.
• User-directed put away – You determine the put away sequence.
• Immediate put away – You put away the item immediately upon receiving it without having to place it on or scan a tote.
For system-directed and user-directed put away, use a tote to put away the items to maximize efficiency. The system uses totes to lead you in the most efficient put away path.
Note: A tote could be a hand cart, pallet, or box you use to transport products to their warehouse location. It is a temporary location used to track and direct products that are in process.
During the put away process, the system verifies quantities. Handle any put away variances in the following ways:
• Overages – Place as much product into stock locations as possible, and then place the remaining product into overstock locations.
• Shortages – Backorder quantity if you are authorized. If you are not authorized, the system sends the put away task to the Warehouse In Process Status Queue. An authorized user can then handle the backordering.
In addition, assign serial numbers to serialized product upon locating it.
See Also:
Using RF System-Directed Put Away
Using RF User-Directed Put Away
Using RF Immediate Put Away
Entering Serial Numbers During RF Processes
Handling Shortages During RF Put Away
Splitting Put Away Quantities Between Locations Using RF
RF Location Maintenance Overview
RF Receiving Process Overview

Rel. 8.6.3 (Eterm) RF Warehouse Management
© 2008 Activant Solutions Inc. All rights reserved. 27
Using RF System-Directed Put Away Use directed put away to put away product in one of the following three sequences, as defined in the RF Put Away Method control maintenance record:
• Blank
• Most Recent Put Away Location
• Empty Location
Note: The Empty Location setting applies only to limited users who have set up warehouse locations in a location database. For more information, contact Eclipse Advanced Technical Support.
After setting a put away sequence, begin the put away process.
Blank Setting
Most Recent Put Away Location Setting The system directs you to put away product in the youngest location holding the product. If the youngest location is not available to hold the product, then the system directs you to the following locations respectively as they are available:
• Another location containing the product.
• A blank location.
This method is useful if your warehouse uses the first in first out (FIFO) logic for controlling inventory.
Empty Location Setting The system directs you to put away product in an empty location which holds the product. If there are not any empty locations available to hold the product, then the system directs you to a blank location.
This method is useful if your warehouse is large. The system direction to empty locations saves users from having to search for such locations.
Note: The Empty Location setting applies only to limited users who have set up warehouse locations in a location database. For more information, contact Eclipse Advanced Technical Support.
Putting Away Product Process After you receive product, scan the tote holding the received items into the Directed Put Away screen and follow the system's directions to put away all items.

RF Receiving Process Rel. 8.6.3 (Eterm)
28 © 2008 Activant Solutions Inc. All rights reserved.
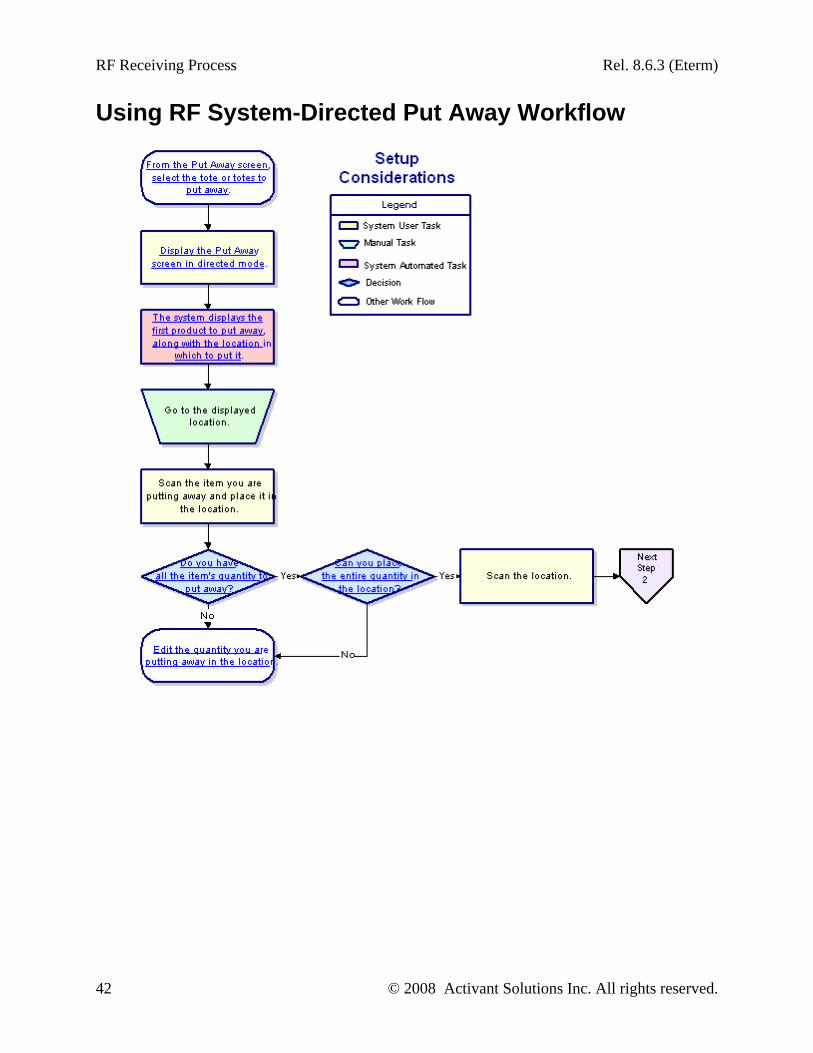
To use RF directed put away:
1. Display the Directed Put Away screen by doing one of the following:
• From the Recv Verify screen, after scanning in the product bar code and tote, use the PutAwy hot key.
• From the Whse Mgt > RF Applications menu, select Recv Put Away.
2. In the Br field, edit the branch number to which the product belongs, if necessary.
3. Select the tote or totes that you want to put away by doing one of the following:
• Use the Select hot key to display the Putaway Select screen. Place the cursor next to each tote you want to put away and press Enter. After selecting all totes to put away, press Esc to return to the Put Away screen.
• Scan the tote you want to put away. Use the Add hot key to scan additional totes to put away simultaneously. Use this hot key to consolidate totes for the put away process.
The system displays the first item to put away and the put away location in directed mode.
Note: If the tote you are putting away contains product that is being moved using the RF Move Product functionality, the put away mode defaults to non-directed and the Dirct hot key is disabled. After you put away the product being moved, the put away mode switches back to directed and the Dirct hot key is re-enabled. If the Put Away screen does not return to directed mode, use the Dirct hot key to access directed mode.
4. Physically move to the product location.
5. Scan the item.
The system displays the expected put away quantity based on the amount verified into the tote, as well as the current quantity of product at the location. The product ID displays in the top right corner of the screen.
Note: If the actual quantity in the tote is different from the quantity received, use the Qty hot key to handle the overage or shortage, as needed.
6. Physically put the item in its location.
7. Scan the location.
Note: If you scan a location that is not the expected put away location, the system prompts you to confirm the location. Enter Y to confirm the location.
8. At the prompt to verify put away quantity, enter the quantity you are putting away.
Note: This prompt displays only if the RF Verify Put-Away Qty control maintenance record is activated.

Rel. 8.6.3 (Eterm) RF Warehouse Management
© 2008 Activant Solutions Inc. All rights reserved. 29
If the message "INCORRECT QTY!! Abort to Chng or Verify Putaway Qty" displays, do one of the following:
• If you entered the incorrect quantity, re-enter the correct quantity.
• If you are putting away a different quantity, press F12 and use the Qty hot key to change the quantity you are putting away. Then handle the overage or shortage, as needed.
9. If the product you are putting away is serial number-tracked, enter the serial number for the product on the displayed Serial Number Entry screen.
Note: If the Store Serial Numbers By Location control maintenance record is set to Y, the system stores serial numbers by location, which becomes the assigned location for such serialized products. This location assignment directs you to put away product in the assigned location. During picking, the system directs you to pick product based upon the assigned location for the serial numbers using FIFO logic.
10. In the Lot field, for all lot controlled products, scan or enter the lot number for the product.
Note: To print lot labels, use either the Tote/Lot Label Printing screen or the Product Lot Barcode Labels screen.
The system displays the next item to put away.
11. Repeat this process until you have put away all items on the selected totes.
12. Press Esc to save updates and exit the screen.
See Also:
Entering Serial Numbers During RF Processes
Handling Shortages During RF Put Away
Splitting Put Away Quantities Between Locations Using RF
Using RF User-Directed Put Away
RF Receiving Process Rel. 8.6.3 (Eterm)
30 © 2008 Activant Solutions Inc. All rights reserved.
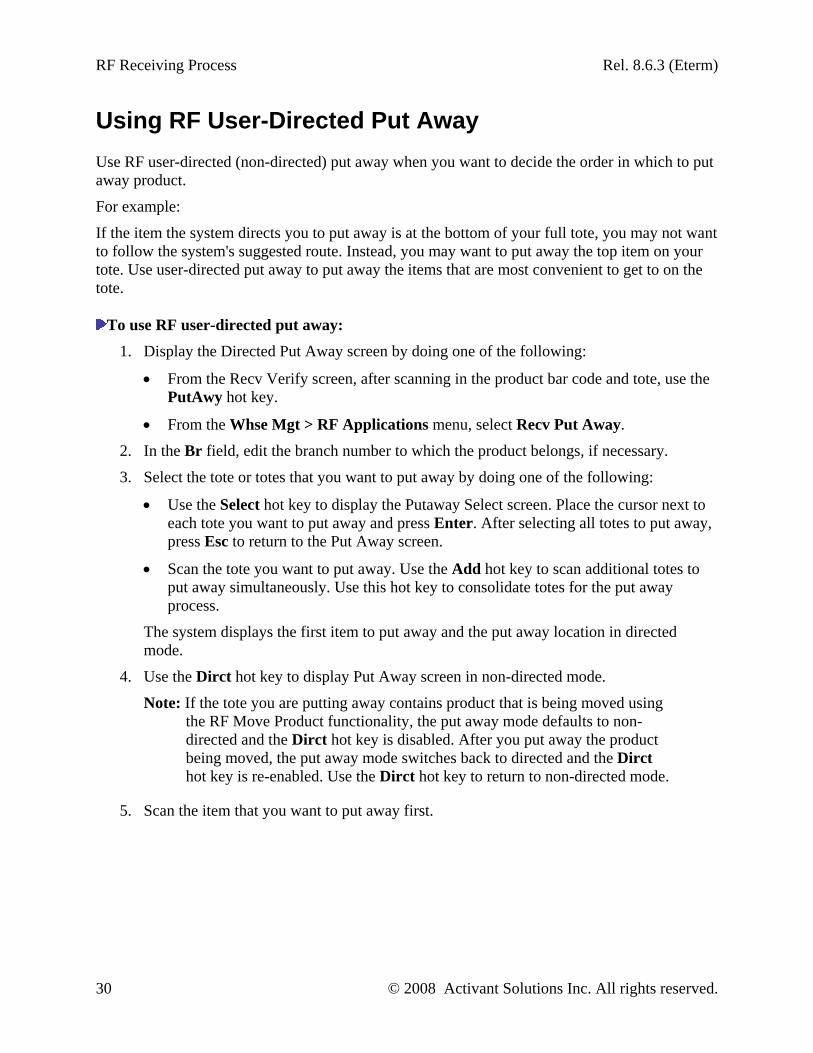
Using RF User-Directed Put Away Use RF user-directed (non-directed) put away when you want to decide the order in which to put away product.
For example:
If the item the system directs you to put away is at the bottom of your full tote, you may not want to follow the system's suggested route. Instead, you may want to put away the top item on your tote. Use user-directed put away to put away the items that are most convenient to get to on the tote.
To use RF user-directed put away: 1. Display the Directed Put Away screen by doing one of the following:
• From the Recv Verify screen, after scanning in the product bar code and tote, use the PutAwy hot key.
• From the Whse Mgt > RF Applications menu, select Recv Put Away.
2. In the Br field, edit the branch number to which the product belongs, if necessary.
3. Select the tote or totes that you want to put away by doing one of the following:
• Use the Select hot key to display the Putaway Select screen. Place the cursor next to each tote you want to put away and press Enter. After selecting all totes to put away, press Esc to return to the Put Away screen.
• Scan the tote you want to put away. Use the Add hot key to scan additional totes to put away simultaneously. Use this hot key to consolidate totes for the put away process.
The system displays the first item to put away and the put away location in directed mode.
4. Use the Dirct hot key to display Put Away screen in non-directed mode.
Note: If the tote you are putting away contains product that is being moved using the RF Move Product functionality, the put away mode defaults to non-directed and the Dirct hot key is disabled. After you put away the product being moved, the put away mode switches back to directed and the Dirct hot key is re-enabled. Use the Dirct hot key to return to non-directed mode.
5. Scan the item that you want to put away first.
Rel. 8.6.3 (Eterm) RF Warehouse Management
© 2008 Activant Solutions Inc. All rights reserved. 31
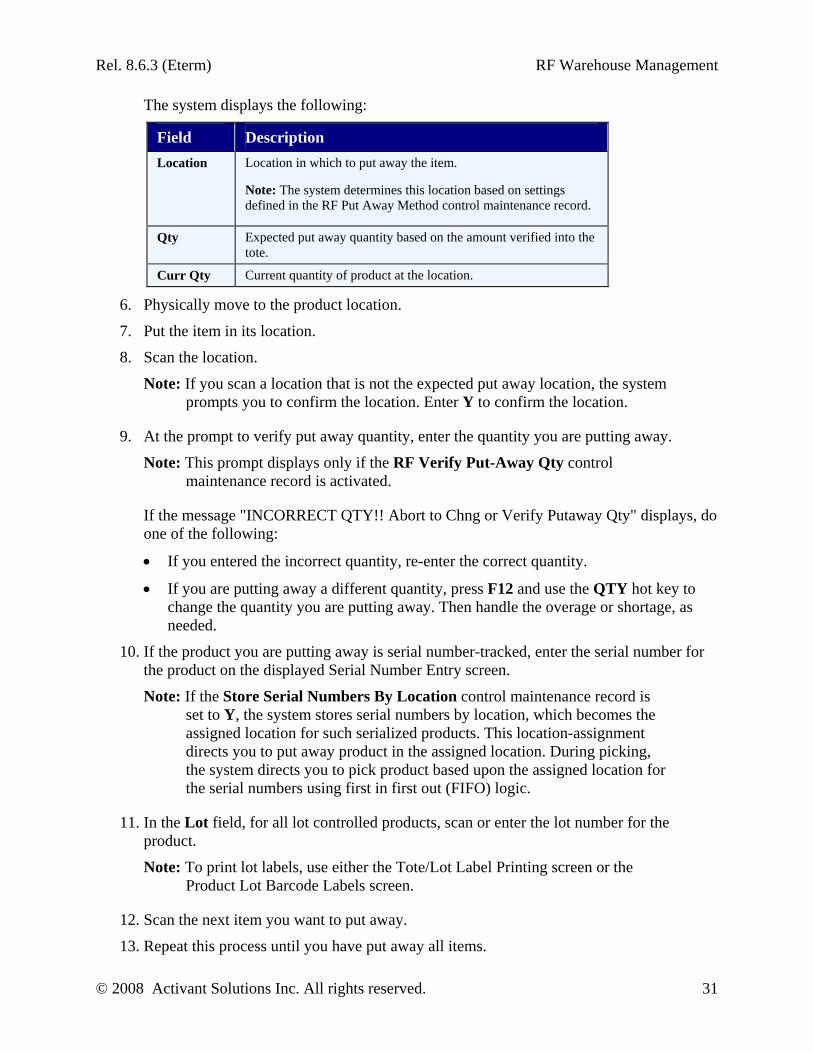
The system displays the following:
Field Description Location Location in which to put away the item.
Note: The system determines this location based on settings defined in the RF Put Away Method control maintenance record.
Qty Expected put away quantity based on the amount verified into the tote.
Curr Qty Current quantity of product at the location.
6. Physically move to the product location.
7. Put the item in its location.
8. Scan the location.
Note: If you scan a location that is not the expected put away location, the system prompts you to confirm the location. Enter Y to confirm the location.
9. At the prompt to verify put away quantity, enter the quantity you are putting away.
Note: This prompt displays only if the RF Verify Put-Away Qty control maintenance record is activated.
If the message "INCORRECT QTY!! Abort to Chng or Verify Putaway Qty" displays, do one of the following:
• If you entered the incorrect quantity, re-enter the correct quantity.
• If you are putting away a different quantity, press F12 and use the QTY hot key to change the quantity you are putting away. Then handle the overage or shortage, as needed.
10. If the product you are putting away is serial number-tracked, enter the serial number for the product on the displayed Serial Number Entry screen.
Note: If the Store Serial Numbers By Location control maintenance record is set to Y, the system stores serial numbers by location, which becomes the assigned location for such serialized products. This location-assignment directs you to put away product in the assigned location. During picking, the system directs you to pick product based upon the assigned location for the serial numbers using first in first out (FIFO) logic.
11. In the Lot field, for all lot controlled products, scan or enter the lot number for the product.
Note: To print lot labels, use either the Tote/Lot Label Printing screen or the Product Lot Barcode Labels screen.
12. Scan the next item you want to put away.
13. Repeat this process until you have put away all items.

RF Receiving Process Rel. 8.6.3 (Eterm)
32 © 2008 Activant Solutions Inc. All rights reserved.
14. Press Esc to save updates and exit the screen.
See Also:
Entering Serial Numbers During RF Processes
Handling Shortages During RF Put Away
Splitting Put Away Quantities Between Locations Using RF
Using RF System-Directed Put Away
Rel. 8.6.3 (Eterm) RF Warehouse Management
© 2008 Activant Solutions Inc. All rights reserved. 33
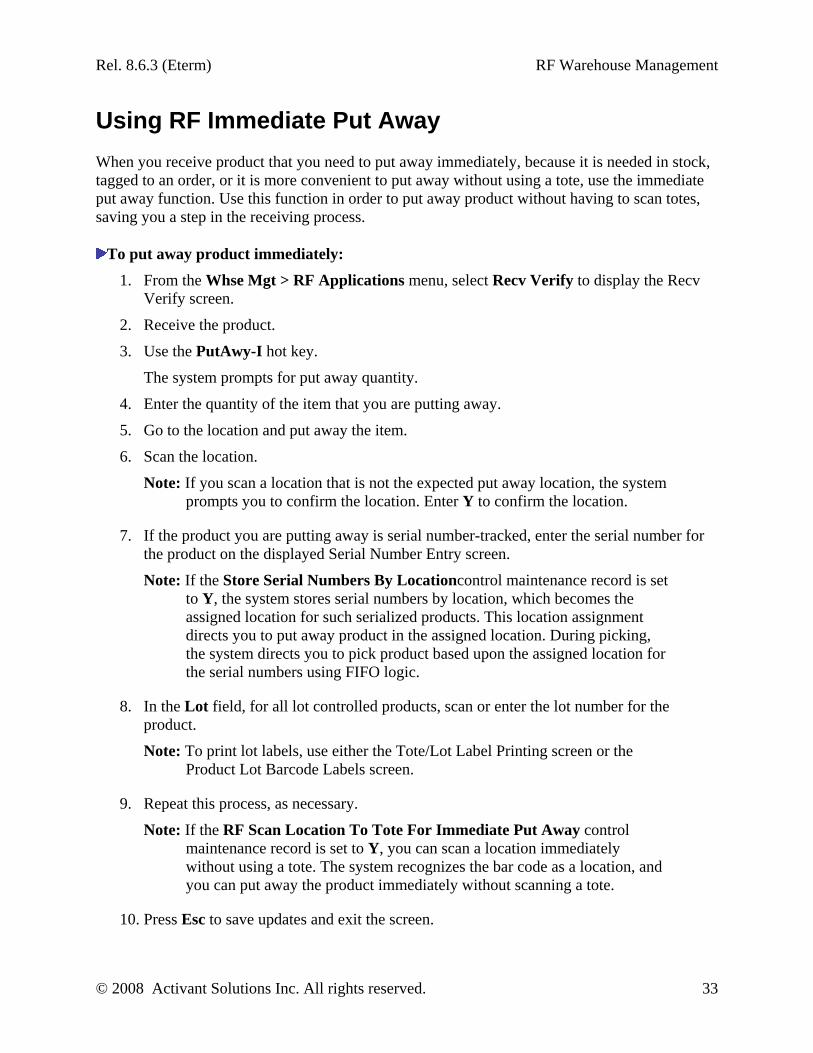
Using RF Immediate Put Away When you receive product that you need to put away immediately, because it is needed in stock, tagged to an order, or it is more convenient to put away without using a tote, use the immediate put away function. Use this function in order to put away product without having to scan totes, saving you a step in the receiving process.
To put away product immediately:
1. From the Whse Mgt > RF Applications menu, select Recv Verify to display the Recv Verify screen.
2. Receive the product.
3. Use the PutAwy-I hot key.
The system prompts for put away quantity.
4. Enter the quantity of the item that you are putting away.
5. Go to the location and put away the item.
6. Scan the location.
Note: If you scan a location that is not the expected put away location, the system prompts you to confirm the location. Enter Y to confirm the location.
7. If the product you are putting away is serial number-tracked, enter the serial number for the product on the displayed Serial Number Entry screen.
Note: If the Store Serial Numbers By Locationcontrol maintenance record is set to Y, the system stores serial numbers by location, which becomes the assigned location for such serialized products. This location assignment directs you to put away product in the assigned location. During picking, the system directs you to pick product based upon the assigned location for the serial numbers using FIFO logic.
8. In the Lot field, for all lot controlled products, scan or enter the lot number for the product.
Note: To print lot labels, use either the Tote/Lot Label Printing screen or the Product Lot Barcode Labels screen.
9. Repeat this process, as necessary.
Note: If the RF Scan Location To Tote For Immediate Put Away control maintenance record is set to Y, you can scan a location immediately without using a tote. The system recognizes the bar code as a location, and you can put away the product immediately without scanning a tote.
10. Press Esc to save updates and exit the screen.

RF Receiving Process Rel. 8.6.3 (Eterm)
34 © 2008 Activant Solutions Inc. All rights reserved.
See Also:
Entering Serial Numbers During RF Processes
RF Put Away Overview

Rel. 8.6.3 (Eterm) RF Warehouse Management
© 2008 Activant Solutions Inc. All rights reserved. 35
Entering Serial Numbers During RF Processes In the RF Warehouse Management system, when you receive or pick a product that is serial number-tracked, you must enter serial numbers for the items during the process.
Use the Serial Number Entry screen or Serial Number Range screen in RF Warehouse Management to enter a list of open serial numbers for each item. On the Serial Number Entry screen, you must enter each item's serial number individually. On the Serial Number Range screen, you can enter a range of serial numbers to apply to a group of items so that you do not have to enter each serial number separately.
To enter serial numbers for individual items during an RF process: 1. Depending on the task you are working on, display one of the following:
• From the Whse Mgt > RF Applications menu, select Recv Put Away to display the Directed Put Away screen.
• From the Whse Mgt > RF Applications menu, select Picking to display the Pick In Process screen.
2. Begin putting away or picking the product.
If the product you are handling is serial number-tracked, the Serial Number Entry screen displays, with the product description, purchase order ID, quantity received, and put away or pick location.
3. To enter serial numbers for the product you are handling, do one of the following for each item:
• If the item has a serial number bar code, scan it.
• For each item that does not have a serial number bar code, enter a serial number for the item. You can use a combination of alphanumeric characters, such as ABC123.
The system warns you if you are about to enter a serial number already in use. At the continue prompt, enter N to assign a different serial number.
4. Press Esc to save updates and return to the Directed Put Away or Pick In Process screen, as applicable.
To enter serial numbers for a group of items during an RF process:
1. Depending on the task you are working on, display one of the following:
• From the Whse Mgt > RF Applications menu, select Recv Put Away to display the Directed Put Away screen.
• From the Whse Mgt > RF Applications menu, select Picking to display the Pick In Process screen.
2. Begin putting away or pickingg the product.

RF Receiving Process Rel. 8.6.3 (Eterm)
36 © 2008 Activant Solutions Inc. All rights reserved.
If the product you are handling is serial number-tracked, the Serial Number Entry screen displays, with the product description, purchase order ID, quantity received, and put away or pick location.
Note: If serial numbers are already entered, the system displays the numbers for you.
3. Use the Range hot key to display the Serial Number Range screen.
4. In the Starting Number field, enter the beginning serial number for the items.
• If the first item has a serial number bar code, scan it.
• For each group of items that does not have serial number bar codes, manually enter the serial number. You can use a combination of alphanumeric characters, such as ABC123.
The system warns you if you are about to enter a serial number already in use. At the continue prompt, enter N to assign a different serial number.
5. In the Ending Number field, enter the last serial number for the items.
• If the last item has a serial number bar code, scan it.
• For each group of items that does not have serial number bar codes, manually enter the serial number. You can use a combination of alphanumeric characters, such as ABC123.
If you leave this field blank, the system assigns the ending number based on the number of items you are handling.
6. In the Increase By field, enter the increment you want the system to increase the serial number by.
For example:
If you have 5 items to enter serial numbers for, enter ABC123 for the starting number and ABC127 for the ending number. Enter 1 for the increment. The assigned serial numbers are then:
• ABC123
• ABC124
• ABC125
• ABC126
• ABC127
7. Press Esc to save updates and return to the Serial Number Entry screen.

Rel. 8.6.3 (Eterm) RF Warehouse Management
© 2008 Activant Solutions Inc. All rights reserved. 37
More Options for Entering Serial Numbers from RF
The Serial Number Entry screen also offers these options.
Hot Key Function Range Displays the Serial Number Range screen. Use to enter a range of serial numbers to
apply to a group of items so that you do not have to enter each serial number separately.
History Displays the Serial Number History screen, which lists all transactions associated with the selected serial number.
Labels Displays the Serial Label Print screen. Use this screen to print selected serial number labels.
To print labels for selected serial numbers: 1. Place the cursor on each serial number for which you want to print a label
and press Enter. The system places an asterisk (*) by the selected serial numbers.
2. Use the Labels hot key to display the Serial Label Print screen. 3. To the left of each serial number, enter the quantity of labels to print for
each serial number. The default is 1. 4. Press Esc to print labels for the selected serial numbers.
To print labels for all displayed serial numbers: 1. Use the Labels hot key to display the Serial Label Print screen. 2. To the left of each serial number, enter the quantity of labels to print for
each serial number. The default is 1. 3. Use the Print All hot key to print labels for all displayed serial numbers.
See Also: RF Put Away Overview
Picking Non-Manifest Orders Using RF

RF Receiving Process Rel. 8.6.3 (Eterm)
38 © 2008 Activant Solutions Inc. All rights reserved.
Handling Shortages During RF Put Away If the Receiving Put Away screen displays more items to put away than are in the tote, create a backorder. Backordering during put away is a way to re-verify product counts and ensure inventory accuracy.
For example:
During receive verify of an individual purchase order (P/O), the full quantity of a product was mistakenly received even though only half of the quantity was physically received. During put away correct that mistake by backordering the product when you put it away.
You only backorder during put away as a re-verification of product count. Before you backorder during put away, make sure that the product was not misplaced on another tote or in the receiving area.
Note: You must be assigned the RF.RECV.PUTAWAY.BO.QTY authorization key in order to backorder items during the put away process. If you are not authorized, the system displays the message "User Not Authorized To Backorder." If you receive this message but have been given the password to override the warning, you may enter the password at the warning prompt to continue backordering. If you do not have an override password, you cannot backorder the product. Notify your warehouse manager.
To create a backorder during put away:
1. From the Whse Mgt > RF Applications menu, select Recv Put Away to display the Directed Put Away screen.
2. In the Br field, edit the branch to which the product you are backordering belongs, as necessary.
3. Scan in the product you are backordering.
4. Use the Qty hot key to display the New Quantity in ea prompt.
5. Enter the quantity of items received.
The Split/Bckord prompt displays.
6. Enter B to select backorder. The system places the remaining quantity for the product on backorder (creates an open generation on the P/O).
7. Press Esc to save updates and exit the screen.
See Also:
RF Put Away Overview
Splitting Put Away Quantities Between Locations Using RF

Rel. 8.6.3 (Eterm) RF Warehouse Management
© 2008 Activant Solutions Inc. All rights reserved. 39
Splitting Put Away Quantities Between Locations Using RF If the location for which you are putting away product cannot hold all of the items, split the product quantity among multiple locations.
For example:
If you receive an overshipment and cannot put away all of the product into its primary location, split the quantity to put away. Locate as much of the product as possible into the primary location. Then locate the remaining quantity into the secondary or floating locations.
To split put away quantities between locations:
1. From the Whse Mgt > RF Applications menu, select Recv Put Away to display the Directed Put Away screen.
2. In the Br field, edit the branch to which the product you are splitting belongs, as necessary.
3. Scan in the product you are splitting.
4. Use the Qty hot key to display the New Quantity in ea prompt.
5. Enter the quantity of items that you need to put away at the primary location.
The Split/Bckord prompt displays.
6. Enter S to select split.
7. Put the indicated quantity in its primary location.
8. Go to and scan the location where you want to place the excess quantity.
Note: If the selected location has never been used for the product and it is a primary location for another product, and if the RF Putaway Primary Location Override Warning control maintenance record is set to Y, the system warns you that the selected location is primary for another product. If you are assigned the RF.PUTAWAY.OVRD.LOC authorization key, press Enter to override this message and continue to put away the product in the selected location. If you are not assigned the RF.PUTAWAY.OVRD.LOC authorization key, you must either select another location in which to put away the product or enter the authorization password and override the message.
9. At the location prompt, verify that the location is correct and enter Y.
Note: Use the Locations Changed On Putaway Report to monitor product put away in locations other than the expected location.
10. Put away the rest of the product into the overflow location or split again if necessary.
11. Press Esc to save updates and exit the screen.

RF Receiving Process Rel. 8.6.3 (Eterm)
40 © 2008 Activant Solutions Inc. All rights reserved.
See Also:
Handling Shortages During RF Put Away
RF Put Away Overview

Rel. 8.6.3 (Eterm) RF Warehouse Management
© 2008 Activant Solutions Inc. All rights reserved. 41
Selecting Totes for RF Put Away Workflow
RF Receiving Process Rel. 8.6.3 (Eterm)
42 © 2008 Activant Solutions Inc. All rights reserved.
Using RF System-Directed Put Away Workflow

Rel. 8.6.3 (Eterm) RF Warehouse Management
© 2008 Activant Solutions Inc. All rights reserved. 43
Using RF User-Directed Put Away Workflow
.

RF Receiving Process Rel. 8.6.3 (Eterm)
44 © 2008 Activant Solutions Inc. All rights reserved.
Using RF Immediate Put Away Workflow

Rel. 8.6.3 (Eterm) RF Warehouse Management
© 2008 Activant Solutions Inc. All rights reserved. 45
Entering Serial Numbers from RF Workflow

RF Receiving Process Rel. 8.6.3 (Eterm)
46 © 2008 Activant Solutions Inc. All rights reserved.
RF Receive and Put Away Reports Overview The RF Warehouse Management system's receive and put away reports provide information for the receiving process in your warehouse. Use the receive and put away reports to access the following information:
• Open Locations Report – Use when you have limited space in your warehouse and need to find locations in which to put away new product.
• Locations Changed on Putaway Report – Use to monitor product put away in locations other than the expected location.
• Put Away Tote Activity Report – Use to find product that was misplaced during the put away process.
See Also: RF Productivity Reports Overview
RF Picking Reports Overview
RF Receiving Process Overview

Rel. 8.6.3 (Eterm) RF Warehouse Management
© 2008 Activant Solutions Inc. All rights reserved. 47
Running the Open Locations Report Use the Open Locations Report when you have limited space in your warehouse and need to find locations in which to put away new product. You can view the report, and then determine:
• Locations which have product assigned but are not currently holding any actual inventory.
• Several locations holding the same product, which you can consolidate to make room for the new product.
• Locations that have not yet been assigned to product.
Note: Locations holding product with in-process records are not included in the generated report.
For a description of the report, see What the Report Shows at the end of the topic.
To run the Open Location Report: 1. From the Whse Mgt > Reports menu, select Open Locations Report to display the
Open Locations Report screen.
2. In the Br/Tr/All field, enter the branch or territory for which you want to run the report. Enter All to run the report for all branches and territories.
3. In the Select By field, press F10 and select from the following options to determine the locations for which to run the report:
Option Description Zone Runs the report for the indicated warehouse zone or zones.
Enter a single zone, or use the Multi hot key to enter multiple zone.
Range Runs the report for the indicated location ranges. Enter the starting and ending locations for the range.
Pick Group Runs the report for the indicated pick group or groups. Enter a single pick group, or use the Multi hot key to enter multiple pick groups.
4. In the Stock Types field, press F10 and select the stock type for which to run the report. Use the Multi hot key to enter multiple stock types for which to run the report.
5. In the Location Status field, press F10 and select the location status for which to run the report. Use the Multi hot key to enter multiple location statuses for which to run the report.
6. In the On Hand <= field, enter a quantity that, if less than or equal to a location's amount, includes that location in the report.
For example, if you enter 5 in this field, then any location with five or less items is included in the report.

RF Receiving Process Rel. 8.6.3 (Eterm)
48 © 2008 Activant Solutions Inc. All rights reserved.
Note: The system uses the lowest unit of measure when searching for the entered quantity.
Note: You can enter negative quantities in this field to run the report for locations with negative on-hand quantities.
7. In the Sort By field, press F10 and select the sorting method to use on the report results:
• By Location By Product By Location Status – The results are sorted by location first, then by product, then by location status.
• By Location By Location Status – The results are sorted by location first and then by location status.
• By Ascending On Hand By Location – The results are sorted in ascending on-hand quantity first and then by location.
8. In the Detail/Summary field, indicate if you want to run a detailed or a summary report.
9. Set options, if needed, and generate the report.
What the Report Shows The Open Locations Report shows the following information:
Field/Column Description Branches The branches or territories for which the report was run.
Warehouse Zone The warehouse zone or zones for which the report was run if Zone was defined in the Select By field.
For Locations The location range for which the report was run if Range was defined in the Select By field.
Pick Group The pick group or groups for which the report was run if Pick Group was defined in the Select By field.
Stock Types The stock types for which the report was run.
Location Statuses The location statuses for which the report was run.
Sorted By The sort by method defined for the report.
Location The locations that met all defined criteria for the report.
Note: Locations holding product with in-process records are not included in the generated report.
Product Description * The product in the corresponding location.
Location Status The location status for the corresponding location.
Stock Type The stock type for the corresponding location.
On-Hand The on-hand quantity in the location.
Note: This quantity does not include quantity tied to in-process records.
* This data displays in detail mode only.

Rel. 8.6.3 (Eterm) RF Warehouse Management
© 2008 Activant Solutions Inc. All rights reserved. 49
See Also:
RF Receive and Put Away Reports Overview

RF Receiving Process Rel. 8.6.3 (Eterm)
50 © 2008 Activant Solutions Inc. All rights reserved.
Running the Locations Changed on Putaway Report Use the Locations Changed on Putaway Report to monitor product put away in locations other than the expected location. You can run this report for:
• Zones
• Location ranges
• Users
• Pick groups
For a description of the report, see What the Report Shows at the end of the topic.
To run the Locations Changed on Putaway Report:
1. From the Whse Mgt > RF Reports menu, select Changed Location on Putaway Report to display the Locations Changed on Putaway Report screen.
2. In the Branch/Tr field, enter the branch or territory for which you want to run the report.
3. In the Start Date field, enter the starting date for the period on which to report.
4. In the End Date field, enter the ending date for the period on which to report.
5. In the Sort By field, press F10 and select one of the following ways to sort the report:
• Location – Sorts by put away locations.
• Product – Sorts by product ID for products that were put away.
• User – Sorts by user ID of users who put away product.
• Date/Time – Sorts by the date and time that the product was put away, in ascending order.
6. In the User field, enter the user ID for which you want to run the report. Use the Multi hot key to enter multiple users or leave this field blank to run the report for all users.
7. In the Select By field, press F10 and select one of the following options:
Option Description Locations Warehouse locations.
In the Starting Loc and Ending Loc fields, enter the location range for which to run the report.
Zones Warehouse zones. In the Zones field, enter the zone for which to run the report. To enter multiple zones, use the Multi hot key.
Pick Groups Pick groups. In the Pick Groups field, enter the pick group for which to run the report. To enter multiple pick groups, use the Multi hot key.

Rel. 8.6.3 (Eterm) RF Warehouse Management
© 2008 Activant Solutions Inc. All rights reserved. 51
8. Set options, if needed, and generate the report.
What the Report Shows The Locations Changed on Putaway Report shows the following information:
Field/Column Description Select by The select by option defined for the report.
Starting Location If Locations was defined as the select by option, then the defined starting location on which the report was run.
Ending Location If Locations was defined as the select by option, then the defined ending location on which the report was run.
Zones If Zones was defined as the select by option, then the defined zone on which the report was run. Multi displays if the report was run for multiple zones.
Pick Groups If Pick Groups was defined as the select by option, then the defined pick group on which the report was run. Multi displays if the report was run for multiple pick groups.
Branch The branch or territory for which the report was run.
Sorted By The sort by option defined for the report.
User The user who put away the product.
Product The product put away.
Expected Location The expected put away location.
Location Qty The quantity of product in the expected location.
Putaway Location The actual put away location.
Putaway Qty The put away quantity for the product.
Date The date on which the user put away the product.
Time The time at which the user put away the product.
See Also:
RF Receive and Put Away Reports Overview

RF Receiving Process Rel. 8.6.3 (Eterm)
52 © 2008 Activant Solutions Inc. All rights reserved.
Running the Put Away Tote Activity Report Use the Put Away Tote Activity Report to find product that was misplaced during the put away process.
The Put Away Tote Activity Report displays for the selected date and time period:
• All locations a selected tote or all totes visited during put away.
• A selected user's or group of users' put away activity.
• A selected product or group of products that were put away.
For a description of the report, see What the Report Shows at the end of the topic.
To run the Put Away Tote Activity Report:
1. From the Whse Mgt > RF Reports menu, select Putaway Tote Activity Report to display the Putaway Tote Activity Report screen.
2. In the Branch field, enter the branch for which you want to run the report.
3. In the Start Date field, enter the starting date for the period on which to report.
4. In the Start Time field, enter the starting time for the period on which to report.
5. In the End Date field, enter the ending date for the period on which to report.
6. In the End Time field, enter the ending time for the period on which to report.
Note: Leave the Start Time and End Time fields blank to run the report for the entirety of the dates indicated.
7. In the Sort By field, press F10 and select a following method to use in sorting the report data:
• Location by Product – Lists the data by location first and then by product.
• Product by Location – Lists the data by product first and then by location.
• Ascending Date by Time – Lists the order in which product was put away by ascending date and time.
• Descending Date by Time – Lists the order in which product was put away by descending date and time.
8. In the Tote field, enter the tote for which to run the report. Use the Multi hot key to list multiple totes for which to run the report.
9. In the User field, enter the user ID on whom to run the report. Use the Multi hot key to list multiple users on whom to run the report.
10. In the Product field, enter the product ID for which to run the report. Use the Multi hot key to list multiple products for which to run the report.

Rel. 8.6.3 (Eterm) RF Warehouse Management
© 2008 Activant Solutions Inc. All rights reserved. 53
Note: If you do not enter a value into the Tote, User, or Product fields, the system runs the report for all totes, users, and products.
11. In the Include Other Products in Totes field, enter Y or N to indicate if you want the report to include all products in the selected totes.
12. Set options, if needed, and generate the report.
What the Report Shows The Put Away Tote Activity Report shows the following information:
Field/Column Description Tote The tote for which the report was run.
• Multi displays if the report was run for multiple totes. • This field is blank if a tote was not defined.
User The user for whom the report was run. • Multi displays if the report was run for multiple users. • This field is blank if a user was not defined.
Product The product for which the report was run. • Multi displays if the report was run for multiple products. • This field is blank if a product was not defined.
Include Other Products in Totes
Whether the report includes all products in the tote or totes.
Branch The branch for which the report was run.
Sorted by The sort by option defined for the report.
Tote The tote used to put away the product.
User The user who put away the product.
Location The location holding the product.
Product The product placed in the location.
Qty The quantity of product put away in the location.
Date The date on which the product was put away.
Time The time at which the product was put away.
Tag The order to which the product is tagged if it is tagged to an order.
See Also:
RF Receive and Put Away Reports Overview


© 2008 Activant Solutions Inc. All rights reserved. 55
Index B backorders
RF.......................................................... 14
I immediate put away, RF
about...................................................... 35
workflow............................................... 46
L Locations Changed on Putaway Report.... 52
lot controlled products, RF
put away................................................ 29
receiving.................................................. 8
receiving workflow ............................... 25
M manifest picking, RF
workflows
entering serial numbers ..................... 47
N non-manifest picking, RF
workflows
entering serial numbers ..................... 47
O Open Locations Report ............................. 49
P picking, RF
entering serial numbers ......................... 37
manifests
workflows
entering serial numbers ................. 47
non-manifests
workflows
entering serial numbers ................. 47
Put Away Tote Activity Report ................ 54
put away, RF
about...................................................... 28
entering serial numbers ......................... 37
handling shortages ................................ 40
immediate put away .............................. 35
lot controlled product................ 29, 32, 35
multiple put away locations .................. 41
selecting totes........................................ 29
system-directed put away...................... 29
user-directed put away .......................... 32
workflows
entering serial numbers ..................... 47
immediate put away .......................... 46
selecting totes for put away............... 43
user-directed put away ...................... 45
R receive verify, RF
about........................................................ 3
creating backorders ............................... 14
lot controlled product.............................. 8
nonstock items ........................................ 9
overshipments ....................................... 16
product without bar codes....................... 4
purchase orders ....................................... 4
splitting orders ...................................... 17
tagged items .......................................... 12
trouble shooting .................................... 19

RF Receiving Process Rel. 8.6.3 (Eterm)
56 © 2008 Activant Solutions Inc. All rights reserved.
workflows
editing quantity received................... 27
receiving lot controlled products ...... 25
receiving nonstock products ............. 26
receiving products............................. 21
receiving products without bar codes 22
receiving reports, RF
about...................................................... 48
Locations Changed on Putaway............ 52
Open Locations ..................................... 49
Put Away Tote Activity ........................ 54
receiving, RF
about........................................................ 2
put away
about.................................................. 28
entering serial numbers ..................... 37
handling shortages ............................ 40
immediate put away .......................... 35
lot controlled product............ 29, 32, 35
multiple put away locations .............. 41
selecting totes.................................... 29
system-directed put away.................. 29
user-directed put away ...................... 32
workflows
entering serial numbers ................. 47
immediate put away ...................... 46
selecting totes for put away........... 43
user-directed put away .................. 45
reports
about.................................................. 48
Locations Changed on Putaway........ 52
Open Locations ................................. 49
Put Away Tote Activity .................... 54
verify
about.................................................... 3
creating backorders ........................... 14
lot controlled product.......................... 8
nonstock items .................................... 9
overshipments ................................... 16
product without bar codes................... 4
purchase orders ................................... 4
splitting orders .................................. 17
tagged items ...................................... 12
trouble shooting ................................ 19
workflows
editing quantity received............... 27
receiving lot controlled products .. 25
receiving nonstock products ......... 26
receiving products......................... 21
receiving products without bar codes................................................... 22
reports, RF
about receiving reports.......................... 48
Locations Changed on Putaway............ 52
Open Locations ..................................... 49
Put Away Tote Activity ........................ 54
RF warehouse management
about........................................................ 1
manifest picking workflows
entering serial numbers ..................... 47
non-manifest picking workflows
entering serial numbers ..................... 47
put away workflows
entering serial numbers ..................... 47
immediate put away .......................... 46
selecting totes for put away............... 43
Index
© 2008 Activant Solutions Inc. All rights reserved. 57
user-directed put away ...................... 45
receive verify workflows
editing quantity received................... 27
receiving lot controlled products ...... 25
receiving nonstock products ............. 26
receiving products............................. 21
receiving products without bar codes 22
receiving processes ................................. 2
receiving reports
about.................................................. 48
Locations Changed on Putaway........ 52
Open Locations ................................. 49
Put Away Tote Activity .................... 54
S serial numbers
entering in RF
about.................................................. 37
workflow........................................... 47