Embed Size (px)
Citation preview

RFA & RVT Geometry Exchange Add-On for ARCHICAD 21
RFA & RVT Geometry Exchange Add-On for ARCHICAD 21
Version 1.0 [email protected] | www.bim6x.com 2
Copyright This document is copyright © BIM6x. 2017 All rights reserved worldwide. Revit is a trademarked name of Autodesk. You may not copy, reproduce, publish, sell, rent, transmit or distribute, or otherwise use any of the contents of this document without prior written permission from BIM6x. Any trademarks, service marks, product names, corporate names or named features are assumed to be the property of their respective owners, and are used only for reference, without intent to infringe. There is no implied endorsement if one of these terms have been used within this document.
Disclaimer Use at your own risk. Not intended for actual construction. BIM6x will accept no liability for any problems encountered as a result of using this manual and/or all files.
Document Revisions Author: Link Ellis Version Release Date 1.0 06/09/2017

RFA & RVT Geometry Exchange Add-On for ARCHICAD 21
Version 1.0 [email protected] | www.bim6x.com 3
TABLE OF CONTENTS
INTRODUCTION ............................................................................................................................................................................. 4
IMPORT RFA AS GDL OBJECT.......................................................................................................................................................... 5
HOTLINK RVT 3D GEOMETRY ......................................................................................................................................................... 7
Match Stories of Multi-Story Hotlink ............................................................................................................................................... 12
EXPORT AS RVT 3D GEOMETRY .................................................................................................................................................... 13

RFA & RVT Geometry Exchange Add-On for ARCHICAD 21
Version 1.0 [email protected] | www.bim6x.com 4
INTRODUCTION Use the RFA & RVT Geometry Exchange Add-on to import and export 3D models via native Revit file formats: .RVT and .RFA.
The RFA & RVT Geometry Exchange Add-On has three functions:
• Import RFA as GDL Object • Hotlink RVT 3D Geometry • Export as RVT 3D Geometry
The RFA & RVT Geometry Exchange Add-On is an extension to ARCHICAD 21.
System requirements are the same as for ARCHICAD 21.
Each Add-On function is described below. Please see the FAQ section for expectations, limitations and general information.

RFA & RVT Geometry Exchange Add-On for ARCHICAD 21
Version 1.0 [email protected] | www.bim6x.com 5
IMPORT RFA AS GDL OBJECT
This command imports a Revit Family (RFA) object (mostly manufacturer content) and generates a GDL Object, Door or Window having the same precise geometry and all parameters.
The resulting object will lose its editable parametric capabilities. The Add-On uses the ODA Teigha BIM Engine, and imports RFA file versions 2011-2018.
1. Use File > Libraries and Objects > Import RFA as GDL Object. 2. Browse for an RFA file to import, then click Open. 3. In the appearing Import RFA as GDL Object dialog, customize the import options:
• Select 3D View to Define Import Geometry: Choose a Revit 3D view (if there is more than one) from which to import the RFA object. ARCHICAD will create a GDL Object based on the content of the selected view.
• Import as Library Part Type: Based on the Revit Family Category and Host Object Category, the Library Part type will automatically select the best match: Object, Door or Window. You may override the type here.
• Segmentation of Curved Geometry: Use the slider to set the level of geometric detail (polygon segmentation) at one of three levels. The more polygons, the larger the resulting object. It is recommended to keep this setting in the middle. If the object is too large, use Fewer Polygons. If the result is too segmented and rough, then use More Polygons. To check the Polygon count, download and install the Polycount add-on which is part of the Goodies package available at http://www.graphisoft.com/downloads/goodies/index.html
4. Click Import. • The imported family object is converted to a GDL Object, Door or Window in the ARCHICAD project from which
you issued the Import command.

RFA & RVT Geometry Exchange Add-On for ARCHICAD 21
Version 1.0 [email protected] | www.bim6x.com 6
• The generated GDL Object, Door or Window is placed into the project’s Embedded Library. It will become the default Object, Door or Window. Use the Object, Door or Window tool to choose and place it into the project.
Notes:
• Imported as Object – the following parameters are created: o Edge Snapping, on or off. o Rotation Angle (x axis), to rotate the object 0/90/180/270 degrees or a custom angle around the x axis. o 2D Representation: Projection Line Pen on Floor Plan. o Parts Visibility by Category, to control the visibility of parts of the Object as defined by its RFA Categories o Parameters: data as defined in the RFA file. This data is locked as read only, as it has no effect on the
object geometry. • Imported as Door or Window – the following parameters are created:
o Edge Snapping, on or off. o Stretch Thickness. When on: enables you to modify the Thickness of the Door/Window (will stretch the
geometry). o 2D Representation: Projection Line Pen on Floor Plan, Wall Contour Lines: can be turned on or off and set
line type and pen; Wall End Lines can be turned on or off and set line type and pen. o Parts Visibility by Category, to control the visibility of parts of the Door/Window based on their Revit
Category. This option is visible only if there are multiple Categories defined in the RFA. o Parameters: data as defined in the RFA file. This data is locked as read only, as it has no effect on the
object geometry. • The ‘Host Object’ will be automatically filtered out during Import. • Once imported; the Object, Door or Window will then become the default library part in its relevant tool settings,
allowing for quick placement after import.
RFA & RVT Geometry Exchange Add-On for ARCHICAD 21
Version 1.0 [email protected] | www.bim6x.com 7
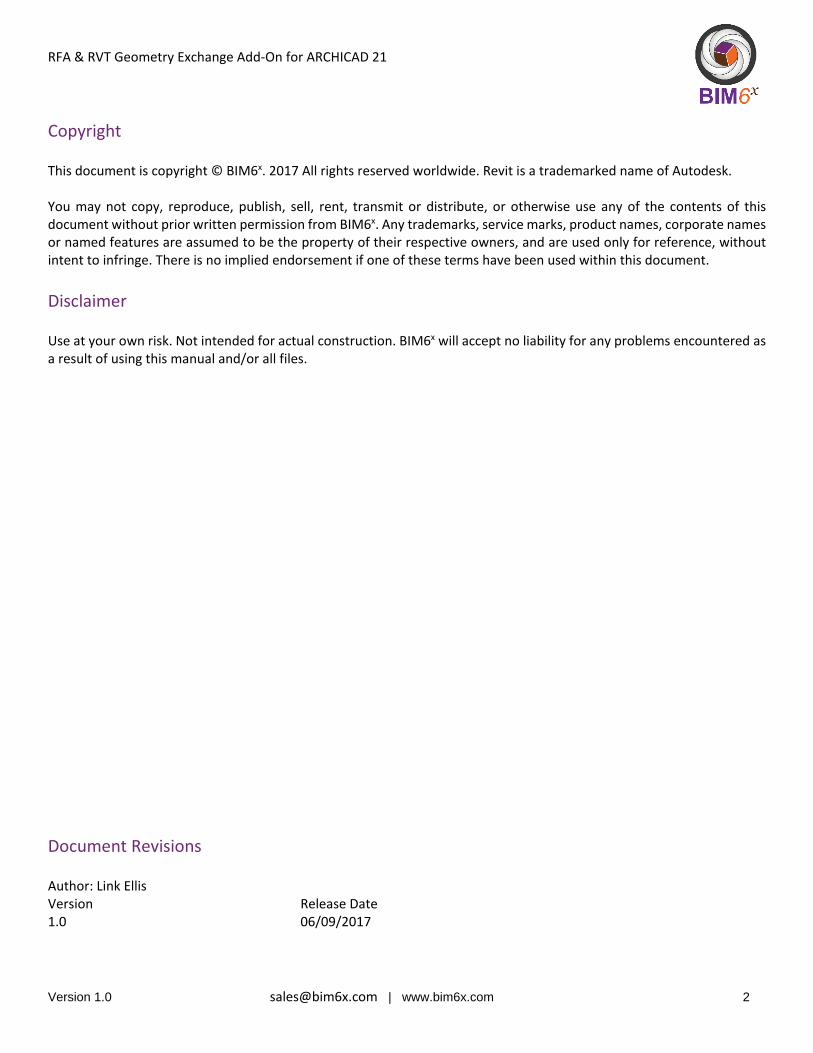
HOTLINK RVT 3D GEOMETRY Use this workflow to import 3D model elements from Revit RVT files, placing them as a Hotlink in ARCHICAD. The resulting GDL objects use the precise geometries and properties, including true colors, of the imported elements.
By hotlinking, you place an RVT file directly into the currently open Project as protected reference content. You can place this hotlink as many times as needed. Thus, in a project using repeated building blocks/parts, you do not need to request a huge file based on the entire Revit project - a smaller RVT file that contains just the required module is enough.
The Add-On uses the ODA Teigha BIM Engine, and imports RVT file versions 2011-2018.
1. Use File > External Content > Place Hotlink. 2. In the appearing Place Hotlink dialog box, click Select Module.
RFA & RVT Geometry Exchange Add-On for ARCHICAD 21
Version 1.0 [email protected] | www.bim6x.com 8
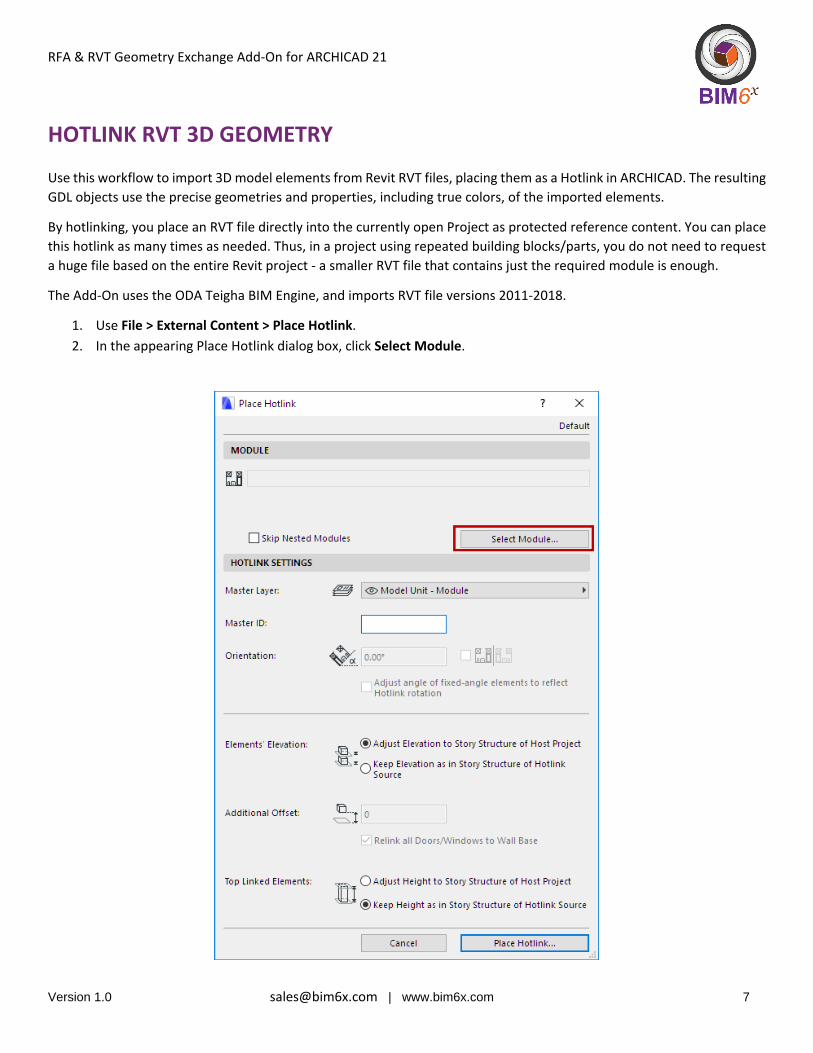
3. From the New Module pop-up button, click From File.
4. The New Hotlink Module dialog appears: browse for an RVT type file.
RFA & RVT Geometry Exchange Add-On for ARCHICAD 21
Version 1.0 [email protected] | www.bim6x.com 9
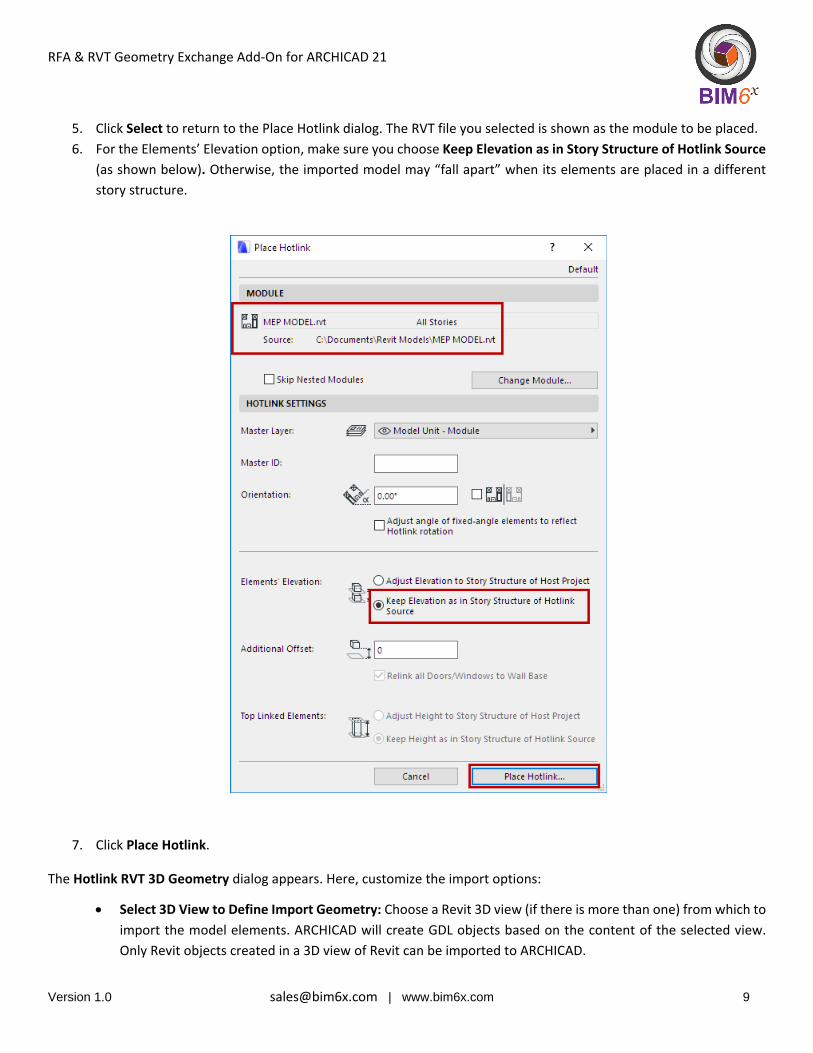
5. Click Select to return to the Place Hotlink dialog. The RVT file you selected is shown as the module to be placed. 6. For the Elements’ Elevation option, make sure you choose Keep Elevation as in Story Structure of Hotlink Source
(as shown below). Otherwise, the imported model may “fall apart” when its elements are placed in a different story structure.
7. Click Place Hotlink.
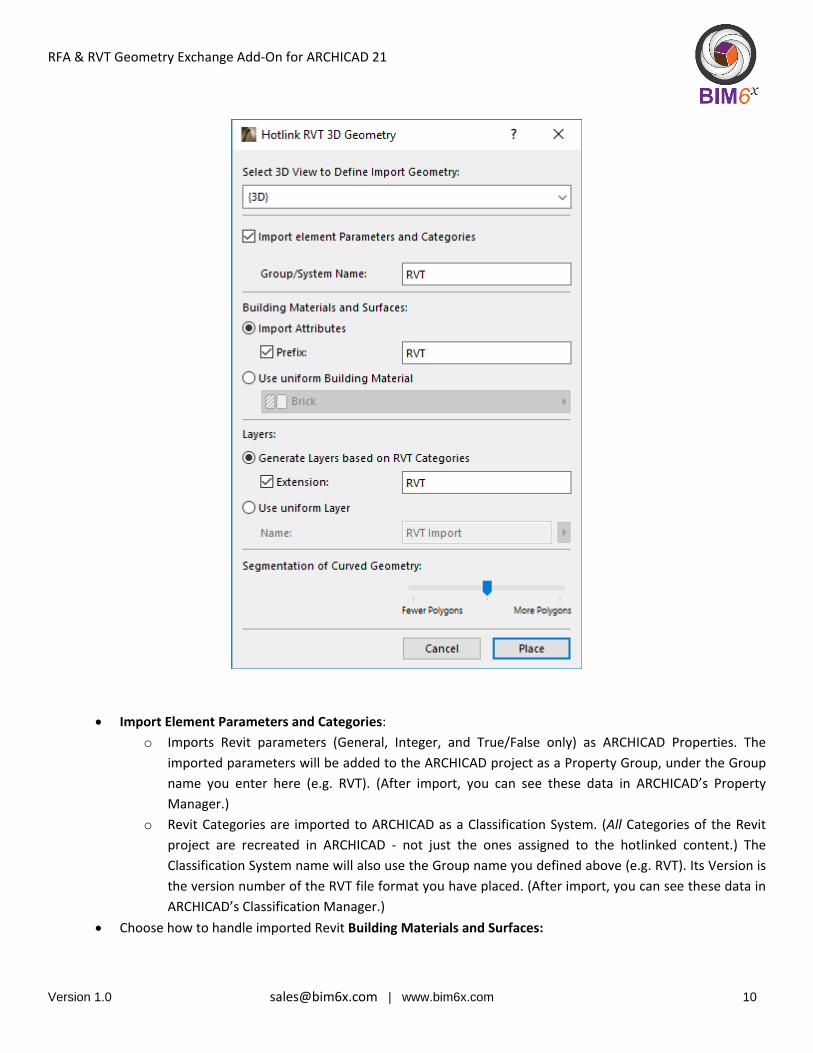
The Hotlink RVT 3D Geometry dialog appears. Here, customize the import options:
• Select 3D View to Define Import Geometry: Choose a Revit 3D view (if there is more than one) from which to import the model elements. ARCHICAD will create GDL objects based on the content of the selected view. Only Revit objects created in a 3D view of Revit can be imported to ARCHICAD.
RFA & RVT Geometry Exchange Add-On for ARCHICAD 21
Version 1.0 [email protected] | www.bim6x.com 10
• Import Element Parameters and Categories: o Imports Revit parameters (General, Integer, and True/False only) as ARCHICAD Properties. The
imported parameters will be added to the ARCHICAD project as a Property Group, under the Group name you enter here (e.g. RVT). (After import, you can see these data in ARCHICAD’s Property Manager.)
o Revit Categories are imported to ARCHICAD as a Classification System. (All Categories of the Revit project are recreated in ARCHICAD - not just the ones assigned to the hotlinked content.) The Classification System name will also use the Group name you defined above (e.g. RVT). Its Version is the version number of the RVT file format you have placed. (After import, you can see these data in ARCHICAD’s Classification Manager.)
• Choose how to handle imported Revit Building Materials and Surfaces:

RFA & RVT Geometry Exchange Add-On for ARCHICAD 21
Version 1.0 [email protected] | www.bim6x.com 11
o Import Attributes: Adds each Revit surface and material to the ARCHICAD project as Surface and Building Material attributes, with an optional prefix to distinguish them.
o Use uniform Building Material: Converts all Revit surfaces and materials to a single Building Material in ARCHICAD. In this case, click the pop-up to choose a Building Material from the ARCHICAD project. All generated Library Parts will use the selected Building Material. (Choose this if you want to avoid increasing the number of ARCHICAD project Attributes.)
• Choose how to handle imported RVT Categories: o Generate Layers based on RVT Categories: Places Objects onto ARCHICAD Layers that correspond to
Revit Categories. Use an optional extension to distinguish these Layers. o Use uniform Layer: Places all imported Objects onto a single ARCHICAD Layer. Enter a Layer name in
the field. (If such a Layer already exists in the project, that Layer will be used; otherwise, a new Layer is created.)
• Segmentation of Curved Geometry: Use the slider to set the level of geometric detail (polygon segmentation) at one of three levels. The more polygons, the larger the resulting object. It is recommended to keep this setting in the middle. If the object is too large, use Fewer Polygons. If the result is too segmented and rough, then use More Polygons.
8. Click Place. 9. If the Hotlink Module contains multiple stories, see also the next section: Match Stories of Multi-Story Hotlink. 10. The Paste Options dialog appears: choose where to locate the Hotlink on the Floor Plan, and then click Paste.
• Elements of the imported Revit 3D view are converted to GDL Objects in the ARCHICAD project. • The objects are placed into the project’s Embedded Library.
Notes:
• When you update the RVT-based module, the Hotlink RVT 3D Geometry dialog will come up each time. Make sure you double-check the options, which show the last-used settings by default.
• To view the RVT model file on its own, hotlink the file into an empty ARCHICAD project.
RFA & RVT Geometry Exchange Add-On for ARCHICAD 21
Version 1.0 [email protected] | www.bim6x.com 12
For general information on managing Hotlinks in ARCHICAD, see “Managing Hotlinks” in ARCHICAD Help.
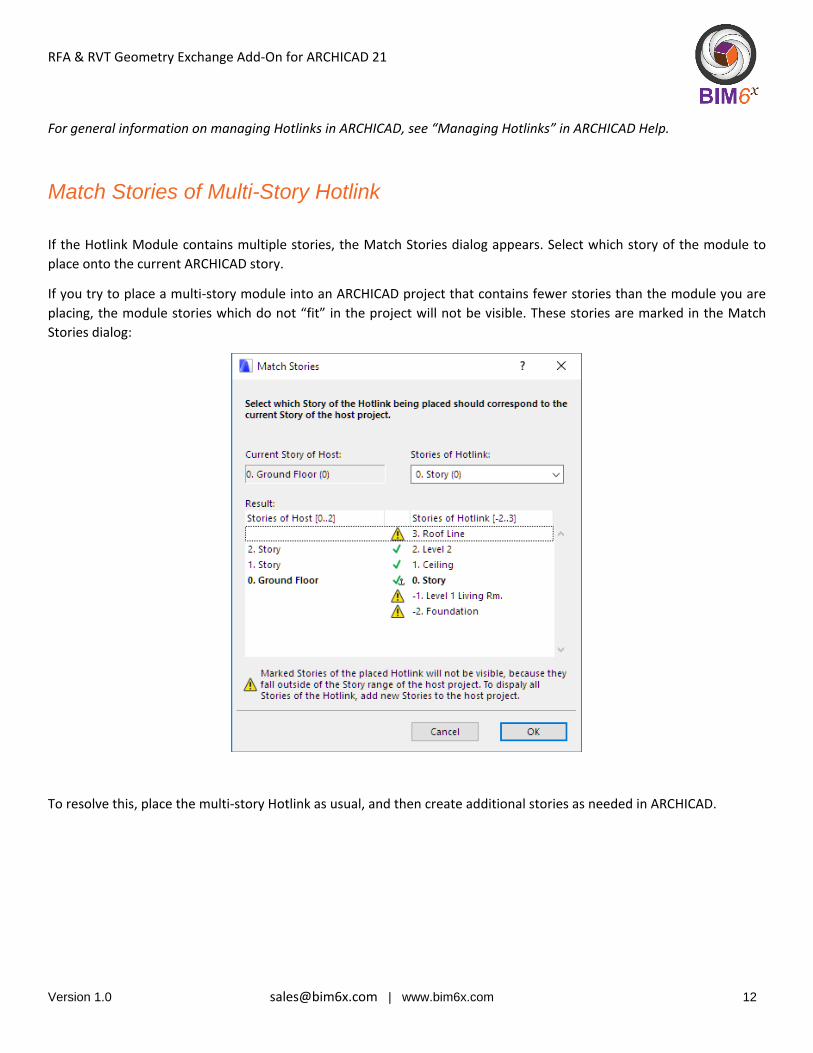
Match Stories of Multi-Story Hotlink
If the Hotlink Module contains multiple stories, the Match Stories dialog appears. Select which story of the module to place onto the current ARCHICAD story.
If you try to place a multi-story module into an ARCHICAD project that contains fewer stories than the module you are placing, the module stories which do not “fit” in the project will not be visible. These stories are marked in the Match Stories dialog:
To resolve this, place the multi-story Hotlink as usual, and then create additional stories as needed in ARCHICAD.
RFA & RVT Geometry Exchange Add-On for ARCHICAD 21
Version 1.0 [email protected] | www.bim6x.com 13
EXPORT AS RVT 3D GEOMETRY
This command exports ARCHICAD 3D model content to Revit, generating RVT objects with precise geometries (including true colors) and properties.
The Add-On uses the ODA Teigha BIM Engine, and generates an RVT file version 2017.
• In ARCHICAD, open the 3D window containing the view to export. The View Settings, including Partial Structure Display, affect the content of the exported object. Graphic Overrides are ignored.
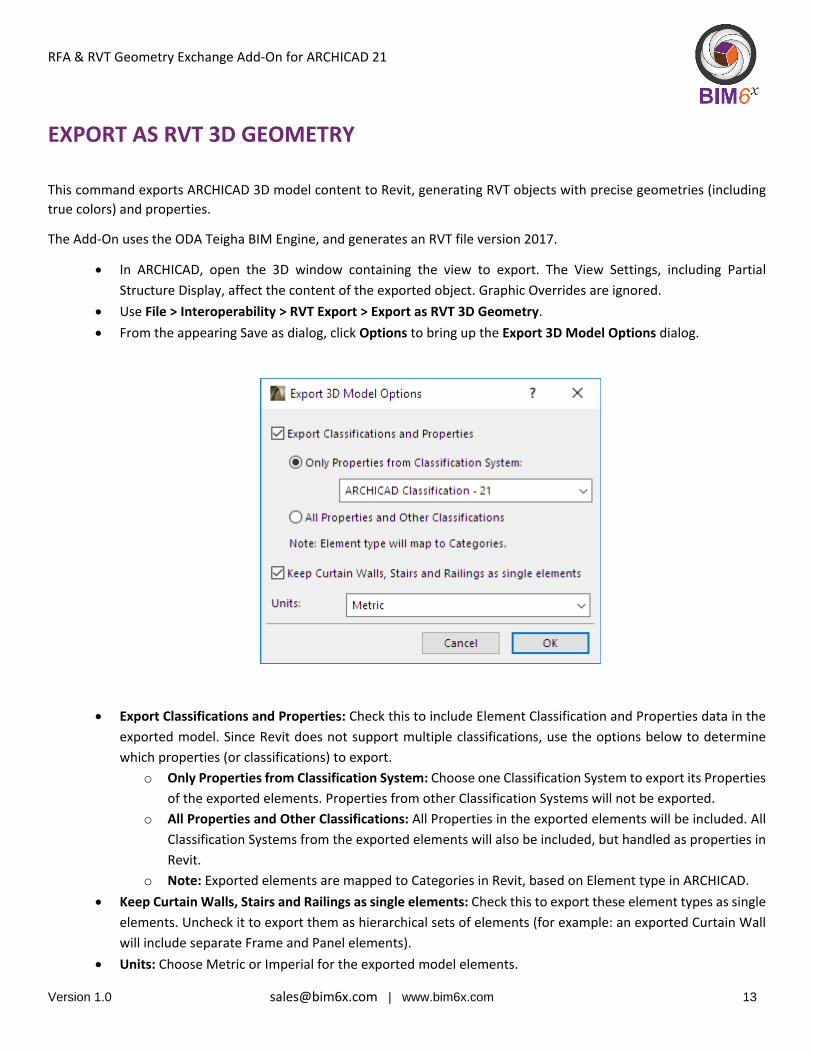
• Use File > Interoperability > RVT Export > Export as RVT 3D Geometry. • From the appearing Save as dialog, click Options to bring up the Export 3D Model Options dialog.
• Export Classifications and Properties: Check this to include Element Classification and Properties data in the exported model. Since Revit does not support multiple classifications, use the options below to determine which properties (or classifications) to export.
o Only Properties from Classification System: Choose one Classification System to export its Properties of the exported elements. Properties from other Classification Systems will not be exported.
o All Properties and Other Classifications: All Properties in the exported elements will be included. All Classification Systems from the exported elements will also be included, but handled as properties in Revit.
o Note: Exported elements are mapped to Categories in Revit, based on Element type in ARCHICAD. • Keep Curtain Walls, Stairs and Railings as single elements: Check this to export these element types as single
elements. Uncheck it to export them as hierarchical sets of elements (for example: an exported Curtain Wall will include separate Frame and Panel elements).
• Units: Choose Metric or Imperial for the exported model elements.
RFA & RVT Geometry Exchange Add-On for ARCHICAD 21
Version 1.0 [email protected] | www.bim6x.com 14
Notes:
• 2D data such as Drawings and Layouts are not exported. • ARCHICAD Project and Story data are not exported. • Interference Checking (collision detection) in Revit can be applied to the exported RVT file. • ARCHICAD Zones are exported with their 3D representation only; therefore Revit Rooms are not generated from
them automatically. • The elements are exported as so-called Revit DirectShape (interoperability) elements. They can be used as
reference model elements. Therefore, an exported ARCHICAD Wall is not a Wall with full native functionality; it is just a referenced Wall element.
• Exported geometries are frozen and locked; they cannot be modified. • The DirectShape elements do not contain materials in Revit, they have only colors (including transparency);
therefore, only ARCHICAD Surfaces are exported (Building Materials are not).