Embed Size (px)
Citation preview

Sun Java™ System
RFID SoftwareInstallation Guide
2004Q3
Sun Microsystems, Inc.4150 Network CircleSanta Clara, CA 95054U.S.A.
Part No: 817-7895-10

Copyright © 2004 Sun Microsystems, Inc., 4150 Network Circle, Santa Clara, California 95054, U.S.A. All rights reserved.Sun Microsystems, Inc. has intellectual property rights relating to technology embodied in the product that is described in this document. In particular, and without limitation, these intellectual property rights may include one or more of the U.S. patents listed at http://www.sun.com/patents and one or more additional patents or pending patent applications in the U.S. and in other countries.U.S. Government Rights - Commercial software. Government users are subject to the Sun Microsystems, Inc. standard license agreement and applicable provisions of the FAR and its supplements. Use is subject to license terms. This distribution may include materials developed by third parties. This distribution may include materials developed by third parties. Parts of the product may be derived from Berkeley BSD systems, licensed from the University of California. UNIX is a registered trademark in the U.S. and in other countries, exclusively licensed through X/Open Company, Ltd.Sun, Sun Microsystems, the Sun logo, Java, Jini, Solaris, and the Java Coffee Cup logo are trademarks or registered trademarks of Sun Microsystems, Inc. in the U.S. and other countries.All SPARC trademarks are used under license and are trademarks or registered trademarks of SPARC International, Inc. in the U.S. and other countries. Products bearing SPARC trademarks are based upon architecture developed by Sun Microsystems, Inc. Products covered by and information contained in this service manual are controlled by U.S. Export Control laws and may be subject to the export or import laws in other countries. Nuclear, missile, chemical biological weapons or nuclear maritime end uses or end users, whether direct or indirect, are strictly prohibited. Export or reexport to countries subject to U.S. embargo or to entities identified on U.S. export exclusion lists, including, but not limited to, the denied persons and specially designated nationals lists is strictly prohibited.DOCUMENTATION IS PROVIDED "AS IS" AND ALL EXPRESS OR IMPLIED CONDITIONS, REPRESENTATIONS AND WARRANTIES, INCLUDING ANY IMPLIED WARRANTY OF MERCHANTABILITY, FITNESS FOR A PARTICULAR PURPOSE OR NON-INFRINGEMENT, ARE DISCLAIMED, EXCEPT TO THE EXTENT THAT SUCH DISCLAIMERS ARE HELD TO BE LEGALLY INVALID._______________________________________________________________________________________________________________Copyright © 2004 Sun Microsystems, Inc., 4150 Network Circle, Santa Clara, California 95054, Etats-Unis. Tous droits réservés.Sun Microsystems, Inc. détient les droits de propriété intellectuels relatifs à la technologie incorporée dans le produit qui est décrit dans ce document. En particulier, et ce sans limitation, ces droits de propriété intellectuelle peuvent inclure un ou plus des brevets américains listés à l’adresse http://www.sun.com/patents et un ou les brevets supplémentaires ou les applications de brevet en attente aux Etats - Unis et dans les autres pays.L’utilisation est soumise aux termes de la Licence.Cette distribution peut comprendre des composants développés par des tierces parties.Cette distribution peut comprendre des composants développés par des tierces parties. Des parties de ce produit pourront être dérivées des systèmes Berkeley BSD licenciés par l’Université de Californie. UNIX est une marque déposée aux Etats-Unis et dans d’autres pays et licenciée exclusivement par X/Open Company, Ltd.Sun, Sun Microsystems, le logo Sun, Java, Jini, Solaris, et le logo Java Coffee Cup sont des marques de fabrique ou des marques déposées de Sun Microsystems, Inc. aux Etats-Unis et dans d’autres pays.Toutes les marques SPARC sont utilisées sous licence et sont des marques de fabrique ou des marques déposées de SPARC International, Inc. aux Etats-Unis et dans d’autres pays. Les produits portant les marques SPARC sont basés sur une architecture développée par Sun Microsystems, Inc. Les produits qui font l’objet de ce manuel d’entretien et les informations qu’il contient sont regis par la legislation americaine en matiere de controle des exportations et peuvent etre soumis au droit d’autres pays dans le domaine des exportations et importations. Les utilisations finales, ou utilisateurs finaux, pour des armes nucleaires, des missiles, des armes biologiques et chimiques ou du nucleaire maritime, directement ou indirectement, sont strictement interdites. Les exportations ou reexportations vers des pays sous embargo des Etats-Unis, ou vers des entites figurant sur les listes d’exclusion d’exportation americaines, y compris, mais de maniere non exclusive, la liste de personnes qui font objet d’un ordre de ne pas participer, d’une facon directe ou indirecte, aux exportations des produits ou des services qui sont regi par la legislation americaine en matiere de controle des exportations et la liste de ressortissants specifiquement designes, sont rigoureusement interdites.LA DOCUMENTATION EST FOURNIE "EN L’ETAT" ET TOUTES AUTRES CONDITIONS, DECLARATIONS ET GARANTIES EXPRESSES OU TACITES SONT FORMELLEMENT EXCLUES, DANS LA MESURE AUTORISEE PAR LA LOI APPLICABLE, Y COMPRIS NOTAMMENT TOUTE GARANTIE IMPLICITE RELATIVE A LA QUALITE MARCHANDE, A L’APTITUDE A UNE UTILISATION PARTICULIERE OU A L’ABSENCE DE CONTREFACON.

Contents 3
Contents
About This Guide . . . . . . . . . . . . . . . . . . . . . . . . . . . . . . . . . . . . . . . . . . . . . . . . . . . . . . . . . . . . . . . 7
What’s In This Guide . . . . . . . . . . . . . . . . . . . . . . . . . . . . . . . . . . . . . . . . . . . . . . . . . . . . . . . . . . . . . . . . . . . . 7Who Should Use This Guide . . . . . . . . . . . . . . . . . . . . . . . . . . . . . . . . . . . . . . . . . . . . . . . . . . . . . . . . . . . . . . 7How This Guide is Organized . . . . . . . . . . . . . . . . . . . . . . . . . . . . . . . . . . . . . . . . . . . . . . . . . . . . . . . . . . . . 8
Chapter 1: Installation Requirements . . . . . . . . . . . . . . . . . . . . . . . . . . . . . . . . . . . . . . . . . . . . . . . . . . . . 8Chapter 2: Preparing for Installation . . . . . . . . . . . . . . . . . . . . . . . . . . . . . . . . . . . . . . . . . . . . . . . . . . . . 8Chapter 3: Installing RFID Event Manager . . . . . . . . . . . . . . . . . . . . . . . . . . . . . . . . . . . . . . . . . . . . . . . 8Chapter 4: Installing the Application Server . . . . . . . . . . . . . . . . . . . . . . . . . . . . . . . . . . . . . . . . . . . . . . 8Chapter 5: Installing the Information Server . . . . . . . . . . . . . . . . . . . . . . . . . . . . . . . . . . . . . . . . . . . . . . 9Chapter 6: Additional Steps . . . . . . . . . . . . . . . . . . . . . . . . . . . . . . . . . . . . . . . . . . . . . . . . . . . . . . . . . . . . 9Chapter 7: Using the RFID Application . . . . . . . . . . . . . . . . . . . . . . . . . . . . . . . . . . . . . . . . . . . . . . . . . . 9Appendix A: RFID Tag Reader Considerations . . . . . . . . . . . . . . . . . . . . . . . . . . . . . . . . . . . . . . . . . . 10Appendix B: Verifying the Information Server Installation . . . . . . . . . . . . . . . . . . . . . . . . . . . . . . . . 10Appendix C: PMLReader . . . . . . . . . . . . . . . . . . . . . . . . . . . . . . . . . . . . . . . . . . . . . . . . . . . . . . . . . . . . . 10Appendix D: RFID Configuration Files . . . . . . . . . . . . . . . . . . . . . . . . . . . . . . . . . . . . . . . . . . . . . . . . . 10
Documentation Conventions . . . . . . . . . . . . . . . . . . . . . . . . . . . . . . . . . . . . . . . . . . . . . . . . . . . . . . . . . . . . 10General Conventions . . . . . . . . . . . . . . . . . . . . . . . . . . . . . . . . . . . . . . . . . . . . . . . . . . . . . . . . . . . . . . . . . 11Conventions Referring to Directories on Solaris Platforms . . . . . . . . . . . . . . . . . . . . . . . . . . . . . . . . 12Conventions Referring to Directories on Linux Platforms . . . . . . . . . . . . . . . . . . . . . . . . . . . . . . . . . 12
Related Documentation . . . . . . . . . . . . . . . . . . . . . . . . . . . . . . . . . . . . . . . . . . . . . . . . . . . . . . . . . . . . . . . . . 13Contacting Sun Technical Support . . . . . . . . . . . . . . . . . . . . . . . . . . . . . . . . . . . . . . . . . . . . . . . . . . . . . . . . 13Related Third-party Web Site References . . . . . . . . . . . . . . . . . . . . . . . . . . . . . . . . . . . . . . . . . . . . . . . . . . 14Sun Welcomes Your Comments . . . . . . . . . . . . . . . . . . . . . . . . . . . . . . . . . . . . . . . . . . . . . . . . . . . . . . . . . . 14
Give Us Feedback . . . . . . . . . . . . . . . . . . . . . . . . . . . . . . . . . . . . . . . . . . . . . . . . . . . . . . . . . . . . . . . . . . . 14
Chapter 1 Installation Requirements . . . . . . . . . . . . . . . . . . . . . . . . . . . . . . . . . . . . . . . . . . . . . 15Computer Hardware Requirements . . . . . . . . . . . . . . . . . . . . . . . . . . . . . . . . . . . . . . . . . . . . . . . . . . . . . . 15

4 Sun Java System RFID Software • Installation Guide
Software Requirements . . . . . . . . . . . . . . . . . . . . . . . . . . . . . . . . . . . . . . . . . . . . . . . . . . . . . . . . . . . . . . . . . 16Supported Operating and Desktop Systems . . . . . . . . . . . . . . . . . . . . . . . . . . . . . . . . . . . . . . . . . . . . . . . . 16RFID Reader Requirements . . . . . . . . . . . . . . . . . . . . . . . . . . . . . . . . . . . . . . . . . . . . . . . . . . . . . . . . . . . . . . 16
Chapter 2 Preparing For Installation . . . . . . . . . . . . . . . . . . . . . . . . . . . . . . . . . . . . . . . . . . . . . 19Getting Started . . . . . . . . . . . . . . . . . . . . . . . . . . . . . . . . . . . . . . . . . . . . . . . . . . . . . . . . . . . . . . . . . . . . . . . . . 19RFID Reader Installation . . . . . . . . . . . . . . . . . . . . . . . . . . . . . . . . . . . . . . . . . . . . . . . . . . . . . . . . . . . . . . . . 20
Configure the Reader . . . . . . . . . . . . . . . . . . . . . . . . . . . . . . . . . . . . . . . . . . . . . . . . . . . . . . . . . . . . . . . . 20PMLReader Emulator . . . . . . . . . . . . . . . . . . . . . . . . . . . . . . . . . . . . . . . . . . . . . . . . . . . . . . . . . . . . . . . . . . . 20
Chapter 3 Installing RFID Event Manager . . . . . . . . . . . . . . . . . . . . . . . . . . . . . . . . . . . . . . . . 21Before You Begin . . . . . . . . . . . . . . . . . . . . . . . . . . . . . . . . . . . . . . . . . . . . . . . . . . . . . . . . . . . . . . . . . . . . . . . 21Install the Event Manager . . . . . . . . . . . . . . . . . . . . . . . . . . . . . . . . . . . . . . . . . . . . . . . . . . . . . . . . . . . . . . . 22Start the Event Manager . . . . . . . . . . . . . . . . . . . . . . . . . . . . . . . . . . . . . . . . . . . . . . . . . . . . . . . . . . . . . . . . . 33
Chapter 4 Installing the Application Server . . . . . . . . . . . . . . . . . . . . . . . . . . . . . . . . . . . . . . . 35Preparing To Install . . . . . . . . . . . . . . . . . . . . . . . . . . . . . . . . . . . . . . . . . . . . . . . . . . . . . . . . . . . . . . . . . . . . 35Application Server Installation . . . . . . . . . . . . . . . . . . . . . . . . . . . . . . . . . . . . . . . . . . . . . . . . . . . . . . . . . . . 36Start the Application Server . . . . . . . . . . . . . . . . . . . . . . . . . . . . . . . . . . . . . . . . . . . . . . . . . . . . . . . . . . . . . 36
Chapter 5 Installing the Information Server . . . . . . . . . . . . . . . . . . . . . . . . . . . . . . . . . . . . . . . 37Starting the Application Server . . . . . . . . . . . . . . . . . . . . . . . . . . . . . . . . . . . . . . . . . . . . . . . . . . . . . . . . . . . 37Oracle Database Installation . . . . . . . . . . . . . . . . . . . . . . . . . . . . . . . . . . . . . . . . . . . . . . . . . . . . . . . . . . . . . 39
Oracle Pre-Installation Setup . . . . . . . . . . . . . . . . . . . . . . . . . . . . . . . . . . . . . . . . . . . . . . . . . . . . . . . . . . 39Oracle Installer Wizard . . . . . . . . . . . . . . . . . . . . . . . . . . . . . . . . . . . . . . . . . . . . . . . . . . . . . . . . . . . . . . . 39JDBC Driver Installation . . . . . . . . . . . . . . . . . . . . . . . . . . . . . . . . . . . . . . . . . . . . . . . . . . . . . . . . . . . . . . 40
Information Server Installation . . . . . . . . . . . . . . . . . . . . . . . . . . . . . . . . . . . . . . . . . . . . . . . . . . . . . . . . . . . 42To Install the RFID Information Server . . . . . . . . . . . . . . . . . . . . . . . . . . . . . . . . . . . . . . . . . . . . . . . . . 42
Post-Installation Steps . . . . . . . . . . . . . . . . . . . . . . . . . . . . . . . . . . . . . . . . . . . . . . . . . . . . . . . . . . . . . . . . . . 53Updating the server.policy File . . . . . . . . . . . . . . . . . . . . . . . . . . . . . . . . . . . . . . . . . . . . . . . . . . . . . . . . 53Populating the Database . . . . . . . . . . . . . . . . . . . . . . . . . . . . . . . . . . . . . . . . . . . . . . . . . . . . . . . . . . . . . . 55
To run the scripts . . . . . . . . . . . . . . . . . . . . . . . . . . . . . . . . . . . . . . . . . . . . . . . . . . . . . . . . . . . . . . . . . 55Installation Verification . . . . . . . . . . . . . . . . . . . . . . . . . . . . . . . . . . . . . . . . . . . . . . . . . . . . . . . . . . . . . . 55
Chapter 6 Additional Steps . . . . . . . . . . . . . . . . . . . . . . . . . . . . . . . . . . . . . . . . . . . . . . . . . . . . 59Enable/Disable RFID Tag Readers . . . . . . . . . . . . . . . . . . . . . . . . . . . . . . . . . . . . . . . . . . . . . . . . . . . . . . . 59
Alien Technology Reader . . . . . . . . . . . . . . . . . . . . . . . . . . . . . . . . . . . . . . . . . . . . . . . . . . . . . . . . . . . . . 60Tyco ThingMagic Reader . . . . . . . . . . . . . . . . . . . . . . . . . . . . . . . . . . . . . . . . . . . . . . . . . . . . . . . . . . . . . 60
Start/Stop Scripts . . . . . . . . . . . . . . . . . . . . . . . . . . . . . . . . . . . . . . . . . . . . . . . . . . . . . . . . . . . . . . . . . . . . . . 61Single Host . . . . . . . . . . . . . . . . . . . . . . . . . . . . . . . . . . . . . . . . . . . . . . . . . . . . . . . . . . . . . . . . . . . . . . . . . 61Multiple Hosts . . . . . . . . . . . . . . . . . . . . . . . . . . . . . . . . . . . . . . . . . . . . . . . . . . . . . . . . . . . . . . . . . . . . . . 61

Contents 5
Uninstalling Sun Java System RFID Software . . . . . . . . . . . . . . . . . . . . . . . . . . . . . . . . . . . . . . . . . . . . . . 62Uninstalling the Event Manager . . . . . . . . . . . . . . . . . . . . . . . . . . . . . . . . . . . . . . . . . . . . . . . . . . . . . . . 62Uninstalling the Information Server . . . . . . . . . . . . . . . . . . . . . . . . . . . . . . . . . . . . . . . . . . . . . . . . . . . . 62
Log Files . . . . . . . . . . . . . . . . . . . . . . . . . . . . . . . . . . . . . . . . . . . . . . . . . . . . . . . . . . . . . . . . . . . . . . . . . . . . . . 63Adjusting Log Levels . . . . . . . . . . . . . . . . . . . . . . . . . . . . . . . . . . . . . . . . . . . . . . . . . . . . . . . . . . . . . . . . 63A Few Examples . . . . . . . . . . . . . . . . . . . . . . . . . . . . . . . . . . . . . . . . . . . . . . . . . . . . . . . . . . . . . . . . . . . . 64
Troubleshooting Procedures . . . . . . . . . . . . . . . . . . . . . . . . . . . . . . . . . . . . . . . . . . . . . . . . . . . . . . . . . . . . . 66Device not found:SocketException in the Jini.Rfid.log . . . . . . . . . . . . . . . . . . . . . . . . . . . . . . . . . . . . 66Conflict with Group ID of another Demokit Instance within the same subnet. . . . . . . . . . . . . . . . 66
Chapter 7 Using the RFID Application . . . . . . . . . . . . . . . . . . . . . . . . . . . . . . . . . . . . . . . . . . . . 67Reading Tags . . . . . . . . . . . . . . . . . . . . . . . . . . . . . . . . . . . . . . . . . . . . . . . . . . . . . . . . . . . . . . . . . . . . . . . . . . 67EPC Vu-Meter Window . . . . . . . . . . . . . . . . . . . . . . . . . . . . . . . . . . . . . . . . . . . . . . . . . . . . . . . . . . . . . . . . . 68
Appendix A RFID Tag Reader Considerations . . . . . . . . . . . . . . . . . . . . . . . . . . . . . . . . . . . . . 71Reader Port Connectors . . . . . . . . . . . . . . . . . . . . . . . . . . . . . . . . . . . . . . . . . . . . . . . . . . . . . . . . . . . . . . . . . 71Configuring the Reader . . . . . . . . . . . . . . . . . . . . . . . . . . . . . . . . . . . . . . . . . . . . . . . . . . . . . . . . . . . . . . . . . 72
To Configure the Reader . . . . . . . . . . . . . . . . . . . . . . . . . . . . . . . . . . . . . . . . . . . . . . . . . . . . . . . . . . . . . 72
Appendix B Verifying the Information Server Installation . . . . . . . . . . . . . . . . . . . . . . . . . . . . 77Admin Server Screens . . . . . . . . . . . . . . . . . . . . . . . . . . . . . . . . . . . . . . . . . . . . . . . . . . . . . . . . . . . . . . . . . . 77
Appendix C PMLReader . . . . . . . . . . . . . . . . . . . . . . . . . . . . . . . . . . . . . . . . . . . . . . . . . . . . . . . . 85
Appendix D RFID Configuration Files . . . . . . . . . . . . . . . . . . . . . . . . . . . . . . . . . . . . . . . . . . . . 89System Files . . . . . . . . . . . . . . . . . . . . . . . . . . . . . . . . . . . . . . . . . . . . . . . . . . . . . . . . . . . . . . . . . . . . . . . . . . . 89
License File . . . . . . . . . . . . . . . . . . . . . . . . . . . . . . . . . . . . . . . . . . . . . . . . . . . . . . . . . . . . . . . . . . . . . . . . . 89Property Files . . . . . . . . . . . . . . . . . . . . . . . . . . . . . . . . . . . . . . . . . . . . . . . . . . . . . . . . . . . . . . . . . . . . . . . 90Application-Private Configuration Files . . . . . . . . . . . . . . . . . . . . . . . . . . . . . . . . . . . . . . . . . . . . . . . . 90
Log Files . . . . . . . . . . . . . . . . . . . . . . . . . . . . . . . . . . . . . . . . . . . . . . . . . . . . . . . . . . . . . . . . . . . . . . . . . . . . . . 90XML File Description . . . . . . . . . . . . . . . . . . . . . . . . . . . . . . . . . . . . . . . . . . . . . . . . . . . . . . . . . . . . . . . . . . . 90

6 Sun Java System RFID Software • Installation Guide

7
About This Guide
What’s In This GuideThis guide describes how to install and set up Sun JavaTM System RFID Software which consists of Event Manager and Information Server modules. It is intended for Professional Services staff in the corporate enterprise who are involved in promoting RFID applications to a broader audience through the EPCGlobal network.
This preface addresses the following topics:
• Who Should Use This Guide
• How This Guide is Organized
• Documentation Conventions
• Related Documentation
• Contacting Sun Technical Support
• Related Third-party Web Site References
• Sun Welcomes Your Comments
Who Should Use This GuideThe intended audience for this guide is the person who installs and configures Sun Java System RFID software and the Application Server subsystems and components.
This guide assumes you are familiar with the following topics:
• Java programming and concepts

How This Guide is Organized
8 Sun Java System RFID Software • Installation Guide
• Client/server programming model
• Installation of enterprise-level software products
• Familiarity in managing large enterprise systems.
How This Guide is OrganizedThis guide is divided into eight chapters plus four appendices.
Chapter 1: Installation RequirementsThis chapter describes the items needed to support successful installation.
Chapter 2: Preparing for InstallationThis chapter summarizes the installation steps to guide the process in advance. The following topics are included:
• Getting Started
• RFID Reader Installation
• PMLReader Emulator
Chapter 3: Installing RFID Event ManagerThis chapter describes in detail the steps required to install the Sun Java System RFID Event Manager. The following topics are included:
• Before You Begin
• Install the Event Manager
• Start the Event Manager
Chapter 4: Installing the Application ServerThis chapter briefly outlines the installation of the Sun ONE Application Server 7 Standard Edition. The following topics are included:

How This Guide is Organized
About This Guide 9
• Application Server Installation
• Start the Application Server
Chapter 5: Installing the Information ServerThis chapter describes in detail the installation of the Sun Java System RFID Information Server. The following topics are included:
• Starting the Application Server
• Oracle Database Installation
• Before You Begin
• Information Server Installation
• Post Installation Steps
Chapter 6: Additional StepsThis chapter outlines several requirements that do not otherwise fit neatly into other topics. The following topics are included:
• Enable/Disable RFID Tag Readers
• Start/Stop Scripts
• Uninstalling the Product
• Log Files
• Troubleshooting
Chapter 7: Using the RFID ApplicationThis chapter describes how to use most of the basic features and functions of the Sun Java System RFID Software. The followiing topics are included:
• Reading Tags
• EPC Vu-Meter Window

Documentation Conventions
10 Sun Java System RFID Software • Installation Guide
Appendix A: RFID Tag Reader ConsiderationsThis appendix provides an example for illustrative purposes of the installation and configuration of an RFID Reader device on the EPC network. The followiing topics are included:
• Reader Port Connectors
• Configuring the Reader
Appendix B: Verifying the Information Server InstallationThis appendix provides information for verifying the installation of the Information Server.
Appendix C: PMLReaderThe PMLReader is a software program that generates emulated RFID events. By default, the Event Manager is configured at installation time to listen for RFID events from the PMLReader simulator. This appendix provides information on this program.
Appendix D: RFID Configuration FilesThis appendix provides information regarding the several classes of configuration files which may require user access. The following files are discussed in this appendix::
• System Files
• Log Files
• XML File Description
Documentation ConventionsThis section describes the types of conventions used throughout this guide:

Documentation Conventions
About This Guide 11
• General Conventions
• Conventions Referring to Directories
General ConventionsThe following general conventions are used in this guide:
• File and directory paths are given in UNIX® format (with forward slashes separating directory names). For Windows versions, the directory paths are the same, except that backslashes are used to separate directories.
• URLs are given in the format:
http://server.domain/path/file.html
• In these URLs, server is the server name where applications are run; domain is your Internet domain name; path is the server s directory structure; and file is an individual filename. Italic items in URLs are placeholders.
• Font conventions include:
❍ The monospace font is used for sample code and code listings, API and language elements (such as function names and class names), file names, pathnames, directory names, and HTML tags.
❍ Italic type is used for code variables.
❍ Italic type is also used for book titles, emphasis, variables and placeholders, and words used in the literal sense.
❍ Bold type is used as either a paragraph lead-in or to indicate words used in the literal sense.
• Installation root directories for most platforms are indicated by install_dir in this document. Exceptions are noted in Conventions Referring to Directories below.
By default, the location of install_dir on most Solaris-based platforms is:
/opt/SUNWrfid and /opt/SUNWrfidis
By default, the location of install_dir on most Linux-based platforms is:
/opt/sun/rfidem and /opt/sun/rfidis
• UNIX-specific descriptions throughout this manual apply to the Linux operating system as well, except where Linux is specifically mentioned.

Documentation Conventions
12 Sun Java System RFID Software • Installation Guide
Conventions Referring to Directories on Solaris PlatformsWhen using the Solaris package-based installation, the RFID Software files are spread across several root directories. This guide uses the following document conventions to correspond to the various default installation directories provided:
• install_dir refers to /opt/SUNWrfid and /opt/SUNWrfidis, which contains the static portion of the application server installation image. All utilities, executables, and libraries that make up the application server reside in this location.
• install_config_dir refers to /etc/opt/SUNWrfid for location of configuration files for the Event Manager and /etc/opt/SUNWrfidis for the Information Server.
• install_log_dir refers to /var/opt/SUNWrfid for log files and Rio items for the Event Manager and /etc/opt/SUNWrfidis for log files for the Information Server.
• appsvr_install_dir refers to /opt/SUNWappserver7, which contains the the Sun Java System Application Server 7 installation image.
• appsvr_log_dir refers to /var/opt/SUNWappserver7 for log files for the Sun Java System Application Server 7.
Conventions Referring to Directories on Linux PlatformsWhen using the Linux RPM-based installation, the RFID Software files are spread across several root directories. This guide uses the following document conventions to correspond to the various default installation directories provided:
• install_dir refers to /opt/sun/rfidem and /opt/sun/rfidis, which contains the static portion of the application server installation image. All utilities, executables, and libraries that make up the application server reside in this location.
• install_config_dir refers to /etc/opt/sun/rfidem for location of configuration files for the Event Manager and /etc/opt/sun/rfidis for the Information Server.

Related Documentation
About This Guide 13
• install_log_dir refers to /var/opt/sun/rfidem for log files and Rio items for the Event Manager and /etc/opt/sun/rfidis for log files for the Information Server.
• appsvr_install_dir refers to /opt/sun/appserver7, which contains the the Sun Java System Application Server 7 installation image
• appsvr_log_dir refers to /var/opt/sun/appserver7 for log files for the Sun Java System Application Server 7.
Related DocumentationThe following table lists the tasks and concepts that are described in the Sun JavaTM System RFID Software manuals and Release Notes. If you are trying to accomplish a specific task or learn more about a specific concept, refer to the appropriate manual.
For information about See the following
Late-breaking information about the software and the documentation
Release Notes
Installing Sun JavaTM System RFID Software and its various components.
Installation Guide
The following administration topics:
• RFID System overview
• Event Manager configuration
• Distributed RFID Event Manager environment
• Sun Java System Application Server administration tasks
• Sun Java System RFID Information Server configuration tasks
• RFID System / JMS Service
Administration Guide
Sun JavaTM System RFID Software Information Server (IS), including architecture, database tables, API, and the PML Utilities.
Developer’s Guide

Contacting Sun Technical Support
14 Sun Java System RFID Software • Installation Guide
Contacting Sun Technical SupportTo report a bug, submit a comment, or ask a question, send us an email at:
Related Third-party Web Site ReferencesSun is not responsible for the availability of third-party web sites mentioned in this document. Sun does not endorse and is not responsible or liable for any content, advertizing, products, or other materials that are available on or through such sites or resources. Sun will not be responsible or liable for any actual or alleged damage or loss caused or alleged to be caused by or in connection with use of or reliance on any such content goods or services that are available on or through such sites or resources.
Sun Welcomes Your CommentsSun is interested in improving its documentation and welcomes your comments and suggestions.
To share your comments, go to http://dosc.sun.com and click Send Comments. In the online form, provide the document title and part number. The part number is a seven-digit or nine-digit number that can be found on the title page of the book or at the top of the document.
Give Us FeedbackIf you have general feedback on the documentation, please use the following URL:
http://www.sun.com/hwdocs/feedback

15
Chapter 1
Installation Requirements
This chapter describes the items needed to properly deploy the Sun Java System RFID Software suite. Both hardware and software requirements are included, as well as the appropriate RFID reader items. Note that Sun hardware must be acquired prior to installation, and software must be downloaded to a target host before beginning installation at the “Getting Started” section in the next chapter.
The following sections are included in this chapter:
• Computer Hardware Requirements
• Software Requirements
• Supported Operating and Desktop Systems
• RFID Reader Requirements
Computer Hardware RequirementsChoose the following hardware configurations to install the Sun Java System RFID Software suite.
.
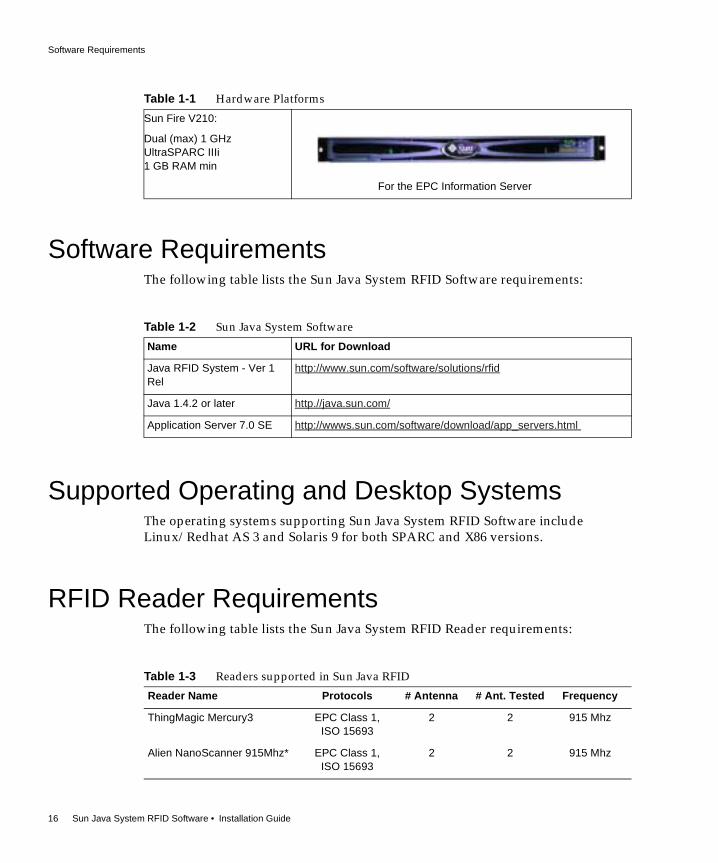
Table 1-1 Hardware Platforms
Sun Fire V60:
Single 3.06 GHz Intel Xeon512 MB RAM min (1 GB best)
For the RFID Event Manager
Software Requirements
16 Sun Java System RFID Software • Installation Guide
Software RequirementsThe following table lists the Sun Java System RFID Software requirements:
Supported Operating and Desktop SystemsThe operating systems supporting Sun Java System RFID Software include Linux/Redhat AS 3 and Solaris 9 for both SPARC and X86 versions.
RFID Reader RequirementsThe following table lists the Sun Java System RFID Reader requirements:
Sun Fire V210:
Dual (max) 1 GHz UltraSPARC IIIi 1 GB RAM min
For the EPC Information Server
Table 1-2 Sun Java System Software
Name URL for Download
Java RFID System - Ver 1 Rel
http://www.sun.com/software/solutions/rfid
Java 1.4.2 or later http.//java.sun.com/
Application Server 7.0 SE http://wwws.sun.com/software/download/app_servers.html
Table 1-3 Readers supported in Sun Java RFID
Reader Name Protocols # Antenna # Ant. Tested Frequency
ThingMagic Mercury3 EPC Class 1, ISO 15693
2 2 915 Mhz
Alien NanoScanner 915Mhz* EPC Class 1, ISO 15693
2 2 915 Mhz
Table 1-1 Hardware Platforms

RFID Reader Requirements
Chapter 1 Installation Requirements 17
The Mercury3 Agile Reader is typical for application, and uses RFID to read data stored on RFID tags and labels. It operates as a SQL (Structured Query Language) server, providing tag data in response to requests from another application. A separate software application may be used to direct its operation and provide a user interface.
The reader supports UHF (ultra high frequency) and HF (high frequency) antennas which are available separately. The reader provides 2 UHF and 2 HF antenna ports and transfers data to a computer through an Ethernet port.
*Note: Alien readers are reverse threaded.
Matrics RDR-001 EPC Class 0 4 4 915 Mhz
Table 1-3 Readers supported in Sun Java RFID
Reader Name Protocols # Antenna # Ant. Tested Frequency

RFID Reader Requirements
18 Sun Java System RFID Software • Installation Guide

19
Chapter 2
Preparing For Installation
This chapter provides information to follow to prepare for installing Sun Java System RFID Software. The following sections are included in this chapter:
• Getting Started
• RFID Reader Installation
• PMLReader Emulator
Getting StartedOutlined here are the general steps involved in the installation of the Sun Java System RFID Software suite.
1. After logging into your computer, extract the downloaded software suite to your system from http://wwws.sun.com/software/solutions/rfid.
2. Connect and configure a reader to the network (see Appendix A, which uses the ThingMagic model as an example).
3. Install the Java RFID System Event Manager software (see “Install the Event Manager” on page 23) either from a Console terminal or using the wizard (described here).
4. Install the Sun Java System Application Server v.7 on a Sun Fire V210 machine (see “Application Server Installation” in Chapter 4, “Installing the Application Server” on page 35) and start it when installation is successful.
5. Install the Oracle database and the JDBC driver on the target host machine (see “Oracle Database Installation” in Chapter 5, “Installing the Information Server” on page 37).

RFID Reader Installation
20 Sun Java System RFID Software • Installation Guide
6. Install the Information Server software (see “Information Server Installation” in Chapter 5, “Installing the Information Server” on page 37) and re-start the Application Server when installed.
RFID Reader InstallationConsult documentation provided by the vendor with your specific reader model for detailed connection requirements. Appendix A, “RFID Tag Reader Considerations” in this document provides "typical" information for a reader set-up. But it is illustrative only, and represents the ThingMagic model cited earlier in this document.
Configure the ReaderRefer to the example set-up provided in Appendix A for an illustration of a "typical" reader installation and configuration. But consult documentation provided by the vendor with your specific reader model for detailed configuration requirements.
PMLReader EmulatorNote that a software reader emulator is installed as part of the Control Station package. You can use this software reader emulator (referred to as PMLReader from now on) for testing until you have access to an RFID reader. Refer to Appendix B for details about how to configure and launch PMLReader.

21
Chapter 3
Installing RFID Event Manager
This chapter describes how to install the Sun Java System RFID Software Event Manager. The following sectins are included in this chapter:
• Before You Begin
• Install the Event Manager
• Start the Event Manager
Before You BeginBefore you can install the Event Manager component of Sun Java System RFID Software, begin by finding it on the CD provided with your software package. Open a terminal window on a Sun V60 machine where you have ROOT access privilege, and log in as root.
You should find a directory listing on the CD typically like this:
# ls -al
-rw-r--r-- 1 root bin 5255 Jun 23 18:54 COPYRIGHT-rw-r--r-- 1 root bin 18470 Jun 23 18:54 LICENSEdrwxr-xr-x 2 root bin 512 Jun 23 18:53 LICENSEREADME/-rw-r--r-- 1 root bin 3456 Jun 24 18:46 READMEdrwxr-xr-x 3 root bin 512 Jun 21 15:00 docs/drwxr-xr-x 2 root bin 512 Jun 24 09:35 sparc/drwxr-xr-x 2 root bin 512 Jun 24 09:35 x86/drwxr-xr-x 2 root bin 512 Jun 24 09:35 linux/
cd to /sparc, /x86 or /linux and find the setup paths for the two components, /rfidem and /rfidis.

Install the Event Manager
22 Sun Java System RFID Software • Installation Guide
Install the Event ManagerYou install the RFID Event Manager software using the installation wizard provided with the software package.
To Open the Wizard and Start the InstallationPerform the folllowing steps to start the installation wizard:
1. Change directory or cd to the /cdrom/cdrom0/{sparc,x86,linux}/rfidem location.
2. Run the ./setup executable file from this location to open the installation wizard window as shown in Figure 3-1 on page 22.
Figure 3-1 Event Manager Install Wizard

Install the Event Manager
Chapter 3 Installing RFID Event Manager 23
3. Click on Next to present the software license dialog.
Figure 3-2 Software License Dialog
4. Click the Yes (Accept License) button to view the Select Type of Installation screen.

Install the Event Manager
24 Sun Java System RFID Software • Installation Guide
Figure 3-3 Select Installation Type Dialog
5. Select “Typical” and click on Next to present the next dialog.

Install the Event Manager
Chapter 3 Installing RFID Event Manager 25
Figure 3-4 Select Installation Directory (Linux)
6. If the default directory is acceptable click on Next to present the next screen.
If prompted to “Create a Directory”, click Yes.
7. On Linux, if a version of the Sun Java System Message Queue that is older than version 3.5 is detected to be installed on the system, you will be prompted with the following dialog which will allow you to choose whether or not you would like to upgrade to the latest version of the Sun Java System Message Queue (recommended). If you choose not to upgrade your system, you may encounter unsupported Message Queue interfaces
Figure 3-5 Sun Java System Message Queue Update (Linux)

Install the Event Manager
26 Sun Java System RFID Software • Installation Guide

Install the Event Manager
Chapter 3 Installing RFID Event Manager 27
Figure 3-6 IP Address for Control Station
8. Note the IP address your host has reported, which is the address at which the control station is to be installed. You can accept this default only if you are installing control station and execution agent software on the same host. Otherwise you need to specify the specific remote host location where control station is to be installed, as is the case for a distributed installation.
Click on Next to present the Startup Script screen.

Install the Event Manager
28 Sun Java System RFID Software • Installation Guide
Figure 3-7 Startup Script Dialog
9. For this example you leave the default no active, and the event manager will start automatically whenever the system restarts. (The startup script is generally reserved for troubleshooting.) By clicking on Next the installation process completes all preliminary setup and presents the next dialog panel.

Install the Event Manager
Chapter 3 Installing RFID Event Manager 29
Figure 3-8 Ready to Install Screen (Linux)
NOTE
This dialog (Figure 3-8) appears when the Type of Installation you have selected is Typical, reference Figure 3-3 on page 24. If you selected Custom you will first be presented with a dialog/screen where you can select the components you want to install. The Ready to Install Screen for a custom installation is obviously a little different from the one shown above in this case. (See Figure 3-9 on page 30 for an illustration of a typical Select Components dialog, from an earlier release.)

Install the Event Manager
30 Sun Java System RFID Software • Installation Guide
Figure 3-9 Component Selection Dialog
This panel lists all the components that the wizard is to install at this host location. The control station contains components necessary to run the provisioner, lookup service, and webster.
NOTE
In configuring a distributed installation, you need at least one control station on one machine, and multiple agents on other machines. The Execution Agent Components check-box would be unchecked in such an instance. The execution agents are installed on one or more different machines but must refer to the IP address of the control station from their respective locations.
The Common Files item is grayed out, as it is required by at least one of the event manager components. Finally, the documentation contains all the instructions needed to run and configure the event manager.

Install the Event Manager
Chapter 3 Installing RFID Event Manager 31
A progress meter appears after you click Install Now on the Ready to Install panel, Figure 3-8 on page 29.
Figure 3-10 Installing...Progress Meter Panel
Click on the Stop button if you need to abort the installation for any reason. When the installation process concludes the wizard reports a final status summary panel, see Figure 3-11 on page 32.

Install the Event Manager
32 Sun Java System RFID Software • Installation Guide
Figure 3-11 Final Event Manager Install Screen
The Installation Summary screen reports the successful status as “Installed”. You can optionally click on the Details... button for additional information that might be useful, see Figure 3-12 on page 33.

Start the Event Manager
Chapter 3 Installing RFID Event Manager 33
Figure 3-12 Installation Summary Details (Solaris)
Start the Event ManagerThe installation process includes providing certain script files designed to run or stop various software components. For the "Typical" installation, script files named "station", "agent", "startall" and "stopall" are installed. (An additional script to report software status is also included.)
Once these files are located in the installation directory, cd to /install_dir/bin to run the script to start applications. To start both the Control Station and the Execution Agent on the same host, type the following when you start the Sun Java System RFID Software Suite application:
# startall
To terminate both the Control Station and the Execution Agent:
# stopall

Start the Event Manager
34 Sun Java System RFID Software • Installation Guide

35
Chapter 4
Installing the Application Server
This chapter provides information for installing the Sun Java System Application Server 7, Standard Edition. The following sections are included here:
• Preparing To Install
• Application Server Installation
• Start the Application Server
Preparing To InstallBefore you can proceed with the installation of the RFID Information Server component, you must make certain that the Sun Java System Application Server 7, Standard Edition is installed. If not, navigate a browser to http://www.sun.com/software/download/app_servers.html and download Sun Java System Application Server 7, Standard Edition Update 3.
The Sun Java System Application Server installation components are described briefly in the following sections in Sun Java Application Server 7, Standard Edition Installation Guide (817-5601app7.pdf):
• Sun Java System Application Server
• Administration Client
• Sun Java System Message Queue
• PointBase
• Sample Applications
• Java 2 Software Development Kit (J2SE)

Application Server Installation
36 Sun Java System RFID Software • Installation Guide
Application Server Installation Please see the Sun ONE Application Server 7 Installation Guide available at http://docs.sun.com/db/doc/817-5601-10 for specific details on installing the Sun Java System Application Server.
Start the Application ServerTo use the graphical Administration interface or to use many of the commands in the command-line interface, you must have a running Admin Server. Follow the instructions in the Sun ONE Application Administrator’s Guide available at http://docs.sun.com/db/doc/817-5445/ to start the Sun Java System Application Server.

37
Chapter 5
Installing the Information Server
The RFID/EPC Information Server can be installed once the Sun Java System Application Server 7 has been successfully installed and is running on the host machine. But first verify that an operational installation of Oracle 8 database software has been successfully completed.
The following sections are included in this chapter:
• Initial Requirements
• Starting the Application Server
• Oracle Database Installation
• Information Server Installation
• Post-Installation Steps
Initial RequirementsThe general steps involved in the installation of Information Server software are prerequisite and are as follows:
• Sun Java System Application Server 7 is installed and RUNNING
• Oracle 8.1.7 is installed and properly licensed with a developer account
• The Oracle 8.1.7 Thin Driver (for JDBC support) is installed

Starting the Application Server
38 Sun Java System RFID Software • Installation Guide
Starting the Application ServerInstallation of the Sun Java System Application Server 7 software is described in preceding Chapter 5, with more detailed instructions available at the Sun website for downloading the software.
To Start the Application Server1. In a terminal window cd to /appsvr_install_dir/bin.
2. As root, run ./asadmin start-appserv
To verify that the application server is running, navigate a browser to http://<hostname>:<http_port> and you should see a window similar to the one shown below:

Oracle Database Installation
Chapter 5 Installing the Information Server 39
Figure 5-1 Admin Server Window (Solaris)
Oracle Database InstallationThe RFID Information Server utilizes a relational database to maintain all the product information reported back to the user. The database supported in this first release is the Oracle 8.1.7. Before you can proceed with installation of the Information Server component, you must make certain that you have an Oracle8i database installed.
Make a note of the following information from your database installation:

Oracle Database Installation
40 Sun Java System RFID Software • Installation Guide
• Database username and password
• Oracle SID
• IP address of the database server
Oracle Pre-Installation SetupThis task would be used to set up Groups and Users for Oracle installation and management, if it has not already been done before.
To create Groups and Users:1. Log in as root
2. # groupadd dba
3. # groupadd oinstall
4. # useradd -g oinstall -G dba -d / -s /usr/bin/sh oracle
5. # passwd oracle
New Password: <password>
Re-enter new Password: <password>
Oracle Installer WizardIf you are installing the database using the wizard, you need to switch user in the same terminal window as above and set environment variables and file mode creation mask using scripts if provided. After that the GUI-based installer can be run.
To do this setup:1. # su - oracle
2. % . /ora-vars
3. % umask 022
4. % xhost +
5. % cd /ora-instl/<install-dir>
6. % ./runInstaller

Oracle Database Installation
Chapter 5 Installing the Information Server 41
For detailed instructions regarding the installation of Oracle Database software, please refer to their website, see Figure 5-2 on page 42.
JDBC Driver InstallationThe RFID Information Server is deployed to the Sun Java System Application Server running on Solaris 9 Sparc, X86, or Linux. The application server communicates with the Oracle database through JDBC to handle additions, deletions and insertions of rows for the EPC tags identified.
To acquire the Oracle JDBC driver software, navigate a browser to
http://otn.oracle.com/software/tech/java/sqlj_jdbc/index.html
which should present a window that appears typically as shown in Figure 5-2 on page 42.
You may need to create a developer account in order to acquire proper licensing etc for this installation. Instructions for downloading and installing the sofware should be available at this website as well, see the “Services” frame to the side of the window in Figure 5-2.
It is necessary to download the Oracle8i 8.1.7 driver to a designated directory in the Sun Java System Application Server 7 installation path. On your target host machine you need to install the file in pathname
/appsvr_log_dir/domains/domain1/server1/lib.
(Alternatively, with access you can get the needed driver file from a Sun website at http://autoid.sfbay/download/software/jdbc/. The file name is classes12.jar. )

Information Server Installation
42 Sun Java System RFID Software • Installation Guide
Figure 5-2 Oracle Web Page for Driver Downloads etc
Information Server InstallationBefore you can install the Information Server component of Sun Java System RFID Software, begin by finding it on the CD provided with your software package. Open a terminal window and log in as root.

Information Server Installation
Chapter 5 Installing the Information Server 43
You should find a directory listing on the CD typically like this:
# ls -al
-rw-r--r-- 1 root bin 5255 Jun 23 18:54 COPYRIGHT-rw-r--r-- 1 root bin 18470 Jun 23 18:54 LICENSEdrwxr-xr-x 2 root bin 512 Jun 23 18:53 LICENSEREADME/-rw-r--r-- 1 root bin 3456 Jun 24 18:46 READMEdrwxr-xr-x 3 root bin 512 Jun 21 15:00 docs/drwxr-xr-x 2 root bin 512 Jun 24 09:35 sparc/drwxr-xr-x 2 root bin 512 Jun 24 09:35 x86/drwxr-xr-x 2 root bin 512 Jun 24 09:35 linux/
cd to /sparc, /x86, or /linux (depending on your platform) and find the setup paths for the two components, /rfidem and /rfidis. The setup for Information Server is found in /rfidis/.
To Install the RFID Information ServerTo Install the RFID Information Server, perform the following steps on the target host machine:
1. Login as root if you have not already done so.
Note: Make sure the application server is running.
2. On the computer, cd to the /rfidis directory. Start the RFID Information Server Install Wizard by running the ./setup executable from this location. You will be presented with a window that looks like this:
Information Server Installation
44 Sun Java System RFID Software • Installation Guide
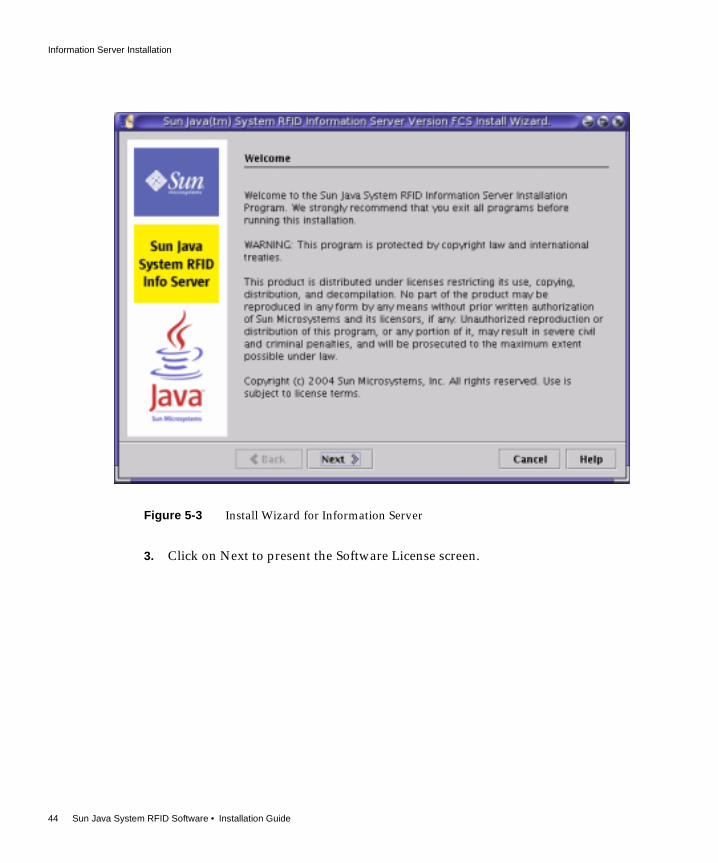
Figure 5-3 Install Wizard for Information Server
3. Click on Next to present the Software License screen.

Information Server Installation
Chapter 5 Installing the Information Server 45
Figure 5-4 Software License Screen
4. Click Yes (Accept License) to present the next dialog screen.

Information Server Installation
46 Sun Java System RFID Software • Installation Guide
Figure 5-5 Select Type of Installation
5. Click on Next to present the next dialog screen.

Information Server Installation
Chapter 5 Installing the Information Server 47
Figure 5-6 Select Installation Directory (Linux)
6. Click on Next to present the next dialog screen.

Information Server Installation
48 Sun Java System RFID Software • Installation Guide
Figure 5-7 Application Server Status (Linux)
7. Click on Next button to present the next dialog screen (which may report an error if Application Server was not started properly, see Figure 5-8).
If you plan to use a different application server, you should Browse for the pathname to provide for the selected server and enter it in the field provided in Figure 5-7. Or enter a pathname manually of no application server appears in the scroll list.
.

Information Server Installation
Chapter 5 Installing the Information Server 49
Figure 5-8 Application Error Report
Figure 5-9 Application Server User Name and Password Dialog
Here you can enter the admin password from the application server install, reference Figure 5-5 on page 40.
8. Click on Next to present the next dialog screen.

Information Server Installation
50 Sun Java System RFID Software • Installation Guide
Figure 5-10 Database User Name and Password Dialog
The Database Configuration dialog is where you now enter a DATABASE User, Password and JDBC URL. Use the information gathered from the database install to fill in the values.
Note that the default JDBC URL is jdbc:oracle:thin:@<ip_address>:1521:<oracle sid>. Replace the <ip_address> and <oracle_sid> placeholders with the ip address of the database server and the Oracle SID.
9. Click on Next to present the next dialog screen.

Information Server Installation
Chapter 5 Installing the Information Server 51
Figure 5-11 Ready to Install Screen (Linux)
10. Click Install Now and the installation process should begin.

Information Server Installation
52 Sun Java System RFID Software • Installation Guide
Figure 5-12 Information Server Install Progress
When the process is completed a final status screen is presented:

Information Server Installation
Chapter 5 Installing the Information Server 53
Figure 5-13 Installation Summary Screen
11. Click Details if you wish to examine the installation log record, see Figure 5-14 on page 54. Otherwise click Close and this phase of the Sun Java System RFID Information Server software installation is completed.

Post-Installation Steps
54 Sun Java System RFID Software • Installation Guide
Figure 5-14 Installation Log Details (Solaris)
Post-Installation StepsSeveral actions are required before actual usage of the Sun Java System RFID software commences, as outlined here.
Updating the server.policy File1. In a terminal window, cd to /install_dir/policy/ and find and copy the file
named server.policy.
This file needs to replace the file of the same name that is located in the Application Server’s Configuration directory at (e.g.)
/appsvr_log_dir/domains/domain1/server1/config/ where you can paste it.
You will now need to restart the application server:
2. Navigate a browser to http://<hostname>:<http_port> and you should see the admin browser window similar to the one shown below:

Post-Installation Steps
Chapter 5 Installing the Information Server 55
Figure 5-15 Admin Server Window (Solaris)
3. Click on Apply Changes before restarting the application server.
4. To restart the server click on the Stop button.
5. Start the application server by clicking on the Start button when the screen refreshes.

Post-Installation Steps
56 Sun Java System RFID Software • Installation Guide
Populating the DatabaseThe Oracle SQL scripts to set up database tables and populate them are located in /install_dir/lib/sql. The files of interest are oracle_create_table.sql and oracle_populate.sql. (Or file oracle_rfidis_setup runs all scripts automatically.)
To run the scripts1. In a terminal window cd to /install_dir/lib/sql
2. ftp the scripts to the /tmp directory of the database server
3. Login to the database server as the Oracle Unix user
4. cd to /tmp
5. Run sqlplus using the connect string <DB_USER>/<DB_PASSWD>@<ORACLE_SID>
6. At the prompt run the following SQL commands
i.@oracle_create_table
ii.@oracle_populate
iii.commit;
iv.exit
You should now be ready to use the application
Installation VerificationWhen the Information Server installation has been successfully completed you should be able to confirm it with presentation of the EPCIS Index page in your browser window. (See also Appendix B, “Verifying the Information Server Installation”.)
1. Navigate to the URL
http://<host>:4848/
2. Login as the admin user at the login screen:

Post-Installation Steps
Chapter 5 Installing the Information Server 57
Figure 5-16 admin user login
3. Click OK to be presented with the following Screen:
Figure 5-17 Admin Server Sreen (Solaris)

Post-Installation Steps
58 Sun Java System RFID Software • Installation Guide
4. Click on Apply Changes and then Restart the configuration.
1. Navigate to the URL
http://<host>:4848/epcis/index.html
Where <host> specifies your application server’s location. You should now see a page similar to the one shown here.
Figure 5-18 Information Server Index Page

59
Chapter 6
Additional Steps
This chapter outlines several additional script-supported procedures for the Sun Java System RFID Software installation and configuration, such as: configuring different readers for use in EPC network, Event Manager startup on multiple hosts, and uninstallation of RFID software.
These procedures are described in the following sections:
• Enable/Disable RFID Tag Readers
• Start/Stop Scripts
• Uninstalling Sun Java System RFID Software
• Log Files
• Troubleshooting Procedures
Enable/Disable RFID Tag ReadersThe RfidConfig.xml file furnished with the software package contains entries for the various readers supported to date. You can modify this file to provide changes in network address or other properties as described here.
To modify the IP Address, Gateway, and netmask etc for a given reader, change directory to /install_config_dir and follow the instructions in the examples provided below to edit the xml file content.
This section describes the following readers:
• Alien Technology Reader
• Tyco ThingMagic Reader

Enable/Disable RFID Tag Readers
60 Sun Java System RFID Software • Installation Guide
Alien Technology ReaderIf using an Alien reader to run the demonstration, you enable it by opening the RfidConfig.xml file and deleting the line "<!- -". Then scroll down and delete the line "- ->". This is to uncomment the Alien reader configuration and expose the code to execution. Then place the respective "<! - -" and "- ->" before and after the other reader configurations in order to hide their configuration from the Sun Java System RFID Software application. Modify the IP address of the respective reader by changing its default value to the one assigned by the network administrator. A sample of such entries in xml code would look like this:
<ems:name>AlienReader</ems:name> <ems:classname>com.sun.autoid.adapter.alien.NanoScannerAdapter</ems:classname>
<ems:properties>
<ems:property>hostname</ems:property>
<ems:value>192.168.2.20</ems:value>
</ems:properties>
Tyco ThingMagic ReaderIf using a ThingMagic reader to run the demonstration, you enable it by opening the RfidConfig.xml file and deleting the line "<!- -". Then scroll down and delete the line "- ->". This is to uncomment the ThingMagic reader configuration and expose the code to execution. Then place the respective "<! - -" and "- ->" before and after the other reader configurations in order to hide their configuration from the Sun Java System RFID Software application. Modify the IP address of the respective reader by changing its default value to the one assigned by the network administrator. A sample of such entries in xml code would look like this:
<ems:name>ThingMagicReader</ems:name> <ems:classname>com.sun.autoid.adapter.adapter.Mercury3Adapter</ems:classname>
<ems:properties>
<ems:property>ipaddr</ems:property>
<ems:value>192.168.2.20</ems:value>
</ems:properties>

Start/Stop Scripts
Chapter 6 Additional Steps 61
Start/Stop ScriptsThe installation process includes providing certain script files designed to run or stop various software components. For the "Typical" installation of Event Manager, script files named "station", "agent", "start_all" and "stop_all" are installed. (An additional script to report software status is also included.)
Single Host Once these files are located in the /install_dir installation directory, cd to /install_dir/bin to run the scripts to start/stop applications. To start both the Control Station and the Execution Agent on the same host, type the following when you start the Sun Java System RFID Software Suite application:
# ./startall
To terminate both the Control Station and the Execution Agent:
# ./stopall
Multiple HostsIf only the "Control Station Components" are to be installed on a separate machine as part of a “Custom” installation, the scripts "station", "start_all" and "stop_all" are installed. Such a configuration ensues when the Agent components are located on a different host. To start the Control Station in this instance, type the following:
# station start
To terminate the Control Station:
# station stop
To show the status of the Control Station:
# station status
To show the version of the Control Station:
# station version
Similarly, on hosts where the "Execution Agent Components" were installed without the Control Station, you will find the script "agent" installed. To start the Execution Agent, type the following:
# agent start
To terminate the execution agent:

Uninstalling Sun Java System RFID Software
62 Sun Java System RFID Software • Installation Guide
# agent stop
To show the status of the execution agent:
# agent status
Uninstalling Sun Java System RFID SoftwareThis section describes the procedures required for uninstalling the Sun Java System RFID Software. The following topics are included here:
• Uninstalling the Event Manager
• Uninstalling the Information Server
Uninstalling the Event ManagerTo uninstall the RFID Event Manager, go to the installation directory and run the uninstall script. This should bring up a series of dialogs that query the user regarding various options, see Appendix E. A full uninstall will remove all the components installed in the system (control station, execution agent, common files, and documentation). If you opt for a partial uninstall, you should retain the Common Files item, which is shared by Control Station and Execution Agent. The command to invoke the uninstall process is as shown:
# cd /install_dir/
# ./uninstall
Should the uninstall process fail to properly remove the components, the user can invoke "prodreg" and manually uninstall the Event Manager packages registered to the system.
Uninstalling the Information ServerTo uninstall the RFID Information Server, make sure that the application server is first running. This is because the uninstall wizard will perform some administrative functions that clean up the application server from all the JMS, JDBC, and ear applications registered to the application.
Go to the installation repository of the RFID Information Server and run the uninstall script:
# cd /install_dir/

Log Files
Chapter 6 Additional Steps 63
# ./uninstall
The uninstall wizard should appear to query the user on removing all of the RFID Information Server components installed in the system, see Appendix E. Should the uninstall wizard be unavailable, the user has the following additional removal options:
• Run the scripts in /install_dir/lib directory to manually remove the jdbc resources, jms resources, and undeploy the ear application.
• On Solaris, run the prodreg Solaris application to manually remove the SUNWrfidis packages from the system.
• On Linux, run the “rpm -e “ command to manually remove the rfidis rpms.
Log FilesThe Control Station and Execution Agent log files are located in /install_log_dir/logs. By default, only Severe problems, Warnings, configuration options and Information messages are logged.
Adjusting Log LevelsYou can change the logs to a more granular setting for debugging by changing the LogLevel property of the component of interest in /install_config_dir/RfidConfig.xml. Please be aware that setting the LogLevel to a more granular level should only be done for debugging, since it will significantly increase the amount of information logged and the size of the log files. The valid values for LogLevel are defined in the Java Logging Level definition at: http://java.sun.com/j2se/1.4.2/docs/api/
There are several other places in the /install_config_dir/system path at which you can set various logging levels:
• logging-station.properties file (see topic below) and logging-agent.properties file.
• Opstring (Rfid.xml)
The logging-[station, agent].properties file has the lowest precedence order. Values in this file will be over ridden by any values of "Finer" logging levels set in Rfid.xml and RfidConfig.xml.

Log Files
64 Sun Java System RFID Software • Installation Guide
If no log levels are set in either Rfid.xml or RfidConfig.xml, then the values in logging-[station, agent].properties file will be used.
NOTE
Only values of FINER logging level in RfidConfig.xml and/or Rfid.xml will override values in logging-[station, agent].properties.
Logging values in Rfid.xml apply to the Rio Service Logging level. These values are mutually exclusive of the RfidConfig.xml values.
Logging values in RfidConfig.xml apply to the individual Adapter code logging levels. You can specify different log level values for each Adapter.
A Few ExamplesConsiderin this example the logging[station,agent].properties log level - which takes precedence because no higher level is defined elsewhere.
logging-station.properties ....level= FINE ...
RfidConfig.xml properties <ems:name>PMLReader</ems:name>
<ems:classname>com.sun.autoid.adapter.pml.PMLAdapter</ems:classname> <ems:properties> <ems:property>LogLevel</ems:property> <ems:value>INFO</ems:value> </ems:properties>
...
In this case, because the log level specified in RfidConfig.xml is not Finer than the log level in the logging-station.properties file, then a log level of FINE will be used.
But notice the difference in this example, where RfidConfig.xml values take precedence:

Log Files
Chapter 6 Additional Steps 65
logging-station.properties ....level= INFO ...
RfidConfig.xml properties <ems:name>PMLReader</ems:name>
<ems:classname>com.sun.autoid.adapter.pml.PMLAdapter</ems:classname> <ems:properties> <ems:property>LogLevel</ems:property> <ems:value>FINE</ems:value> </ems:properties>
...
In this case the PMLReader Adapter will have a logging level of Fine.
Sample Policy FileControl Station Log Policy File:
(/install_config_dir/system/logging-station.properties)
Agent Log Policy File:
(/install_config_dir/system/logging-agent.properties)
# Default global logging level.
.level= CONFIG
# default file output is in user’s home directory.java.util.logging.FileHandler.pattern = /install_log_dir/logs/station_%g.logjava.util.logging.FileHandler.limit = 51200000java.util.logging.FileHandler.count = 10java.util.logging.FileHandler.formatter = java.util.logging.SimpleFormatter
# Limit the message that are printed on the console to OFFjava.util.logging.ConsoleHandler.level = OFFjava.util.logging.ConsoleHandler.formatter = java.util.logging.SimpleFormatter
The policy file shows the location where all the logs will be stored (/install_log_dir/logs), the size of the file, and the number of times the log file is generated. All the logs generated by default will be CONFIG level.

Troubleshooting Procedures
66 Sun Java System RFID Software • Installation Guide
Troubleshooting ProceduresThis section describes troubleshooting procedures.
Device Not Found:SocketException in the Jini.Rfid.logSolution:netstat -rShould be an entry for multicast224.0.0.0 <gateway> UG 0 0 0 eth0If it’s not then addroute add -net 224.0.0.0 netmask 240.0.0.0 dev eth0
Conflict with Group ID of Another Demokit Instance Within the Same Subnet.Perform the following steps:
1. Modify the following files:
/install_config_dir/Rfid.xml and /install_config_dir/infrastructure.xml
2. Change the Group "AutoID" to a different AutoID group name.
<?xml version="1.0" encoding="ISO-8859-1" standalone="no"?><!DOCTYPE opstring SYSTEM "java://com/sun/rio/dtd/rio_opstring.dtd" [<!ENTITY Local.IP "10.6.165.65" ><!ENTITY Local.Port "9000" ><!ENTITY CodeServerURL "http://&Local.IP;:&Local.Port;/" ><!ENTITY Group "AutoID" >
/install_config_dir/system/env.station and /install_config_dir/system/env.agent
3. Change LUSGROUP=AutoID to a different group name.
If [ "$LUSGROUP" = "" ]thenLUSGROUP=AutoIDexport LUSGROUP

Troubleshooting Procedures
Chapter 6 Additional Steps 67
fi

67
Chapter 7
Using the RFID Application
This chapter describes how to use most of the basic features and functions of the Sun Java System RFID Software. The ideal usage would entail reading physical RFID tags using an operational tag reader, but an emulator is also provided in the software package to allow virtual demonstration of RFID application capabilities. The installation and configuration of physical readers is described in an appendix to this document. A separate appendix also covers the PMLReader simulator packaged with the RFID Event Manager software.
The reader device only detects and captures a signal reflected from an RFID tag, provided the signal represents an Auto-ID standard EPC (Electronic Product Code). The Sun Java System RFID Event Manager is used to gather RFID events from the readers, filter out redundant events, and post relevant events to higher level software for further processing. The Sun Java System RFID Information Server is used as a repository for Track and Trace information, containment information, as well as provide basic EPC to product information mapping.
The following topics are described in this chapter:
• Reading Tags
• EPC Vu-Meter Window
Reading TagsOnce the RFID System has been properly installed, the user can obtain a Tag such as the I-Tag (shown below) and wave it above the antenna (about 1-3 feet high) for the reader to pick up the signal.

EPC Vu-Meter Window
68 Sun Java System RFID Software • Installation Guide
Figure 7-1 Typical RFID Tag
Initially, the Sun Java System RFID software will detect and store any Auto-ID standard Electronic Product Code (EPC), but not associate it with a particular product. The Sun Java System RFID software includes a directory service which features a large catalog of standardized EPC codes cross-referenced to their corresponding product identities. The software provides means to associate a raw code entry with its specific product.
EPC Vu-Meter WindowThe Sun Java System RFID Software Event Manager provides a GUI tool to help track the EPC tag events discovered by the system.The GUI tool is provided in the RFID software for determining relative signal strength of EPC tag reads. This tool gauges the signal strength of the reader’s detection of EPC tag codes, which can vary depending on how fast a count is being generated per EPC. Any given stationary reader can be detecting numerous tags concurrently, while (for example) a pallet of items is moving past the reader’s antennae. A color scheme is provided to indicate signal strength, which can vary with proximity.

EPC Vu-Meter Window
Chapter 7 Using the RFID Application 69
Figure 7-2 EPC GUI Viewer “Vu-Meter”
Red indicates a weak read, yellow shows that the reader is picking it up, but is fairly unreliable, and green represents a strong read.

EPC Vu-Meter Window
70 Sun Java System RFID Software • Installation Guide

71
Appendix A
RFID Tag Reader Considerations
This appendix provides an example for illustrative purposes of the installation and configuration of an RFID Reader device on the EPC network. The Mercury3 model device by ThingMagic/Tyco Industries is the model used for this illustration. The procedures are considered somewhat typical in general, but please be sure to consult your vendor’s documentation for specific details on your particular unit.
The following sections are included here:
• Reader Port Connectors
• Configuring the Reader
Reader Port ConnectorsIllustrated below is the connector panel on the ThingMagic RFID Reader.
Figure A-1 Reader Connector Panel

Configuring the Reader
72 RFID Software 2004Q3 • Installation Guide
It is equipped with the following pertinent connectors:
A - Category-V network cable port.
B - RS-232C Serial Port
C - UHF (Ultra High Frequency) ports to connect to antennas
D - Power Input
Connections are self-explanatory, with items A, C and D representing the “mandatory” interfaces. Plug in the ThingMagic Mercury3 reader power adapter into a power outlet, and also connect the two antennas that came with the package into the UHF ports. Plug a category 5 network cable into the reader, with the other end connecting to the same network on which the host computer is active.
Configuring the ReaderPlug a category 5 network cable into the reader and configure the IP address by going to:
http://10.0.0.101/ (for example) Net mask: 255.0.0.0 Gateway: 10.0.0.1
NOTE: You must know the IP address and subnet mask settings for the network environment in which the installed reader is to run.
To Configure the Reader1. Exit any reader applications that are running on the network.
2. Verify that the reader is operational. The green power/heartbeat LED should be blinking.
3. Start a Java-enabled web browser from any network-enabled PC.
4. Browse to http://10.0.0.101/ (example) (use the correct IP address).
5. Click the Network link in the navigation menu (on reader’s browser-based interface). The Network Settings page appears as shown below in Figure A-2 on page 73.

Configuring the Reader
Appendix A RFID Tag Reader Considerations 73
Figure A-2 Reader Network Settings
6. Enter the required network settings in the IP address, subnet mask, and gateway fields. for example:
IP Address: 192.168.2.20 Subnet Mask: 255.255.255.0 Gateway: 192.168.2.1
7. Click the Save button to store the configuration settings.
8. Click on the Restart link in the window on .Figure A-2.
The Startup Settings page with a Restart button appears as shown below in Figure A-3 on page 74.

Configuring the Reader
74 RFID Software 2004Q3 • Installation Guide
Note: To modify the configured IP Address, Gateway, and subnet mask for this reader in the RFID software, follow the instructions outlined at “Enable/Disable RFID Tag Readers” on page 67 in Chapter 7, “Additional Steps”.
Figure A-3 Reader Startup Settings
9. Verify that the settings shown are correct. Then, click the Restart System button.
Once the system restarts, the reader is ready to receive commands from the network. Use the Query page of the browser-based interface to verify antenna operation.
10. Close the browser window and start the reader application on the network.
The following graphic illustrates the configured ThingMagic Reader.

Configuring the Reader
Appendix A RFID Tag Reader Considerations 75
Figure A-4 Fully Configured Reader

Configuring the Reader
76 RFID Software 2004Q3 • Installation Guide

77
Appendix B
Verifying the Information ServerInstallation
When you have the Sun Java System Application Server and RFID Information Server software properly installed you can browse as Administrator for settings and configuration parameters. Your browsing should present screens that appear typically per those that follow. (The Application Server 7’s Admin Server should have an URL typically per http://<your_machine>:<port> where port is typically 4848.)
Admin Server ScreensWhen you navigate to the location where the Admin Server is stored you are prompted for a login:
Figure B-1 Admin Server Login Prompt

Admin Server Screens
78 Sun Java System RFID Software • Installation Guide
Use the login created previously at step 5 of RFID Information Server installation topic (Chapter 6, “Installing the Information Server”) to view the Administration screens that follow. When your login concludes and you open the “Admin Server” link you are presented with this Screen.
Figure B-2 Admin Server Screen (Solaris)
Details about the Admin Server configuration are displayed on the Control tab, which also includes a Stop button and Apply Changes button.
In the navigation bar if you open the Applications item and click on the Enterprise Apps link, you are presented with this screen.

Admin Server Screens
Appendix B Verifying the Information Server Installation 79
Figure B-3 Enterprise Apps Screen (Solaris)
The Status (Enabled here) and Location of the Information Server instance is reported on this screen, which also features controls to Deploy/Undeploy and Enable/Disable the virtual server(s) shown.
In the navigation bar if you open the JDBC item and click on the JDBC Resources link, you are presented with this screen.

Admin Server Screens
80 Sun Java System RFID Software • Installation Guide
Figure B-4 JDBC Resources Screen
The Status and Pool-Name for any current JNDI items is reported on this screen, and controls to add new items or delete existing items are also provided.
In the navigation bar if you open the JDBC item and click on the Connection Pools link, you are presented with this screen.

Admin Server Screens
Appendix B Verifying the Information Server Installation 81
Figure B-5 JDBC Connection Pools Screen
The Datasource Classname for any current Pool-Name items is reported on this screen, and controls to add new items or delete existing items are also provided.
In the navigation bar if you open the JMS item and click on the Connection Factories link, you are presented with this screen.

Admin Server Screens
82 Sun Java System RFID Software • Installation Guide
Figure B-6 JMS Connection Factories Screen
The Status and Type for any current Connection Factory items is reported on this screen, and controls to add new items or delete existing items are also provided.
In the navigation bar if you open the JMS item and click on the Destination Resources link, you are presented with this screen.

Admin Server Screens
Appendix B Verifying the Information Server Installation 83
Figure B-7 JMS Destination Resources Screen
The Status and Type for any currently definedTopic or Queue destination items is reported on this screen, and controls to add new items or delete existing items are also provided.
And finally, in the navigation bar if you open the JMS item and click on the Service link, you are presented with this last screen.

Admin Server Screens
84 Sun Java System RFID Software • Installation Guide
Figure B-8 JMS Service Screen

85
Appendix C
PMLReader
The PMLReader is a software program that generates emulated RFID events. By default, the Event Manager is configured at installation time to listen for RFID events from the PMLReader simulator. The simulator is installed as part of the Control Station Components. Change directory to /install_dir/bin and type PMLReader. You will see the following output as a result:
$ cd /install_dir/bin$ PMLReader
PMLReader: Using property file: //etc/opt/SUNWrfid/system/Simulators.propertiesPMLReader: Creating new Reader (port=9011, readerepc=urn:epc:tag:gid-96:1.255.1, epc=urn:epc:tag:gid-96:1.1.100, tagSetSize=10, generator=com.sun.autoid.simulator.StaticEPCGenerator, minCycleTime=9000, maxCycleTime=11000)PMLReader: Waiting for readers to completeReader: urn:epc:tag:gid-96:1.1.100 - Connected from: /127.0.0.1:35408Processing command: ’Reset’Sending newlineProcessing command: ’Set Auto Mode 250’Sending newline
The Reader EPC Viewer will show the EPCs on its GUI incrementing in unison, as the PMLReader generates the RFID events. The PMLReader by default emulates the continous detection of 10 RFID tags, starting with value urn:epc:id:gid:1.1.101 through urn:epc:id:gid:1.1.110. Please refer to the Sun Java System RFID Software Configuration Guide for details on how to configure the PMLReader.

86 Sun Java System RFID Software • Installation Guide
To stop the generation of EPC events, simply interrupt the PMLReader program by issuing a <CTRL-C> keyboard sequence.
Please note that the PMLReader is intended for use as a debugging and demostration tool only. If you do not plan to use the PMLReader, you will want to remove the PMLReaderAdapter from the Event Manager configuration file: /install_config_dir/RfidConfig.xml.
You need to be aware that no authentication is performed between the PMLReader and the PMLReaderAdapter in the Event Manager. Therefore leaving the PMLReaderAdapter enabled during live deployments constitutes a security risk.
To disable, either comment out (using XML comment delimiters <!-- and -->) or remove the PMLReader adapter lines from the configuration file:
<!--<ems:adapter> <ems:name>PMLReader</ems:name> <ems:classname>com.sun.autoid.adapter.pml.PMLAdapter
</ems:classname> <ems:properties> <ems:property>LogLevel</ems:property> <ems:value>ALL</ems:value> </ems:properties> <ems:properties> <ems:property>hostname</ems:property> <ems:value>localhost</ems:value> </ems:properties> <ems:properties> <ems:property>port</ems:property> <ems:value>9011</ems:value> </ems:properties>
<ems:properties> <ems:property>readerepc</ems:property> <ems:value>urn:epc:tag:gid-96:1.255.1</ems:value>
</ems:properties> <ems:properties> <ems:property>autoread</ems:property> <ems:value>true</ems:value> </ems:properties> <ems:properties> <ems:property>timeout</ems:property> <ems:value>20000</ems:value> </ems:properties>

Appendix C PMLReader 87
<ems:outputs> <ems:output>DemokitSmoother</ems:output> <ems:output>EpcGuiLogger</ems:output> </ems:outputs></ems:adapter>-->

88 Sun Java System RFID Software • Installation Guide

89
Appendix D
RFID Configuration Files
There are several classes of configuration files which may require user access, as follows:
• System Files
• Log Files
• XML File Description
All the user configurable files are located in /install_config_dir.
System Files /install_config_dir/system contains the following types of files:
• license file
• Property files
• Application-Private Configuration files
License FileThis notifies the application what type of license the user has agreed to in terms of the software’s utilization. There are two types: Permanent and Evaluation. The evaluation license lasts 60 days.

Log Files
90 Sun Java System RFID Software • Installation Guide
Property FilesThese files include the logger files and the PMLReader/simulator. The user can modify these files according to their requirements on logging (INFO, SEVERE, WARNING, etc). Also they can modify the PMLReader (see Appendix C, “PMLReader”) through the Simulator.properties file. This tells the reader what kind of tags are present and how often it publicizes the information.
Application-Private Configuration FilesThese files configure the webster, lookup service, cybernodes, opstring, and the provisioner. Please refer to the configuration guide for more information on these files.
Log FilesAll Event Manager log files ( see Chapter 7, “Additional Steps”) are stored under /install_log_dir/logs. All agent events are logged in /install_log_dir/logs/agent_[0-9].log, while the control station logs are recorded under /install_log_dir/logs/station_[0-9].log. Each log file that is generated is cycled every 50 mb. There is also a maximum of 10 logs alloted. This is to prevent the application from over-flowing the file system. These settings can be changed by modifying /install_config_dir/system/logging-[system, agent].properties.
There are numerous places in which to set various logging levels:
• logging-station.properties and logging-agent.properties files.
• Opstring (Rfid.xml in /install_config_dir/system)
• RfidConfig.xml in /install_config_dir/system

XML File Description
Appendix D RFID Configuration Files 91
XML File DescriptionThe end user has the ability to configure the semantics of each Execution Agent by editing the XML configuration file for each Execution Agent. The user configures adapters, filters, and loggers properties through an XML configuration file. The adapters, filters, and loggers are tied to one another by use of a special <output> tag in the configuration file. By default, the system ships configured to execute with one Execution Agent. The default configuration file is: /install_config_dir/RfidConfig.xml.
A sample file is as shown below.
<?xml version="1.0" encoding="ISO-8859-1" standalone="no"?><ems:EventManagement xmlns:ems="urn:sun:ems:config:1.0:0.01" xmlns:xsi="http://www.w3.org/2001/XMLSchema-instance" xsi:schemaLocation="urn:sun:ems:config:1.0:0.01 http://localhost:52493/EventManagement.xsd"><ems:adapter> <ems:name>PMLReader</ems:name>
<ems:name>PMLReader</ems:name> <ems:classname>com.sun.autoid.adapter.pml.PMLAdapter
</ems:classname> <ems:properties> <ems:property>LogLevel</ems:property> <ems:value>ALL</ems:value> </ems:properties> <ems:properties> <ems:property>hostname</ems:property> <ems:value>localhost</ems:value> </ems:properties> <ems:properties> <ems:property>port</ems:property> <ems:value>9011</ems:value> </ems:properties> <ems:properties> <ems:property>readerepc</ems:property> <ems:value>urn:epc:tag:gid-96:1.255.1</ems:value> </ems:properties> <ems:properties> <ems:property>autoread</ems:property> <ems:value>true</ems:value>

XML File Description
92 Sun Java System RFID Software • Installation Guide
</ems:properties> <ems:properties> <ems:property>timeout</ems:property> <ems:value>20000</ems:value> </ems:properties>
<ems:outputs> <ems:output>Smoother</ems:output> <ems:output>AntennaGuiLogger</ems:output> </ems:outputs></ems:adapter><ems:filter>
<ems:name>Smoother</ems:name> <ems:classname>com.sun.autoid.filter.Smoothing
</ems:classname> <ems:properties> <ems:property>LogLevel</ems:property> <ems:value>ALL</ems:value> </ems:properties> <ems:properties> <ems:property>MaxCycles</ems:property> <ems:value>1</ems:value> </ems:properties> <ems:properties><ems:property>MaxPersistTime</ems:property> <ems:value>1000</ems:value> </ems:properties> <ems:outputs> <ems:output>Delta</ems:output> </ems:outputs></ems:filter>
<ems:filter> <ems:name>Delta</ems:name> <ems:classname>com.sun.autoid.filter.Delta</ems:classname> <ems:properties> <ems:property>LogLevel</ems:property> <ems:value>ALL</ems:value> </ems:properties> <ems:outputs> <ems:output>ProductGuiLogger</ems:output> </ems:outputs>

XML File Description
Appendix D RFID Configuration Files 93
</ems:filter>
<ems:logger> <ems:name>AntennaGuiLogger</ems:name> <ems:classname>com.sun.autoid.logger.epcui.viewer.GuiLogger
</ems:classname> <ems:properties> <ems:property>LogLevel</ems:property> <ems:value>ALL</ems:value> </ems:properties> <ems:properties> <ems:property>Title</ems:property> <ems:value>Reader EPC Viewer</ems:value> </ems:properties></ems:logger>
<ems:logger> <ems:name>ProductGuiLogger</ems:name> <ems:classname>com.sun.autoid.logger.epcui.detailviewer.gui.
DemoKitGuiLogger</ems:classname> <ems:properties> <ems:property>LogLevel</ems:property> <ems:value>ALL</ems:value> </ems:properties></ems:logger>
</ems:EventManagement>

XML File Description
94 Sun Java System RFID Software • Installation Guide