Embed Size (px)
Citation preview
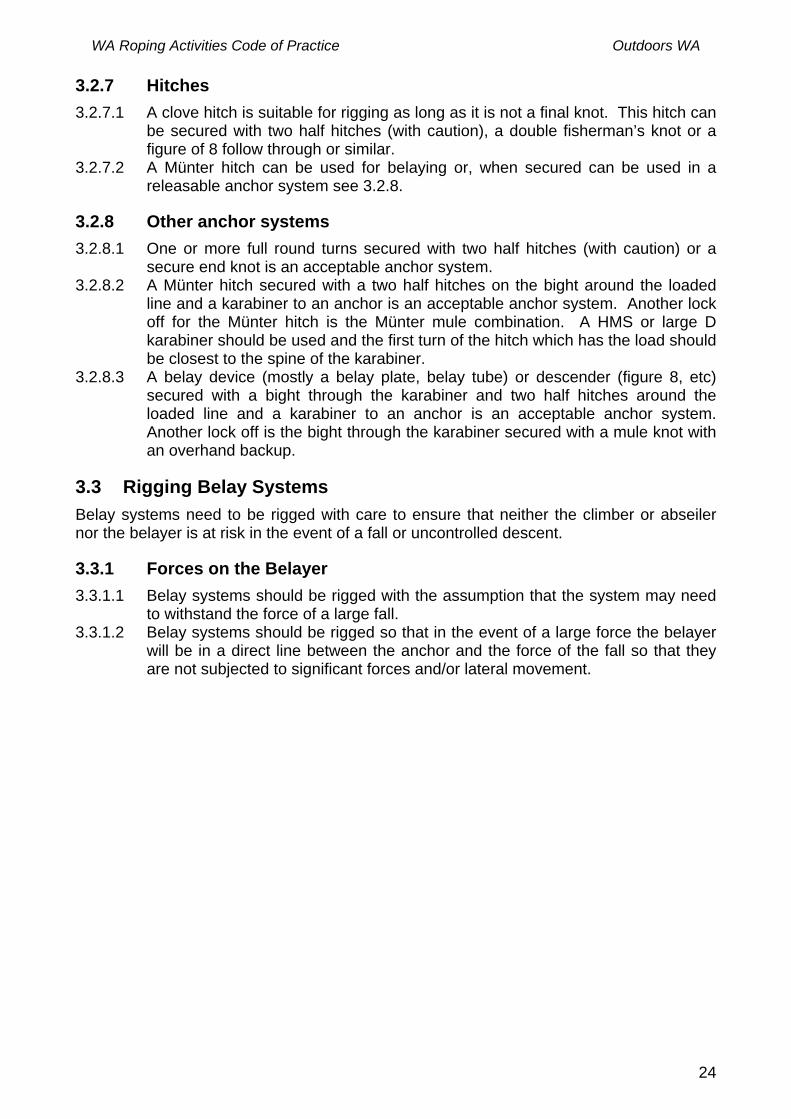
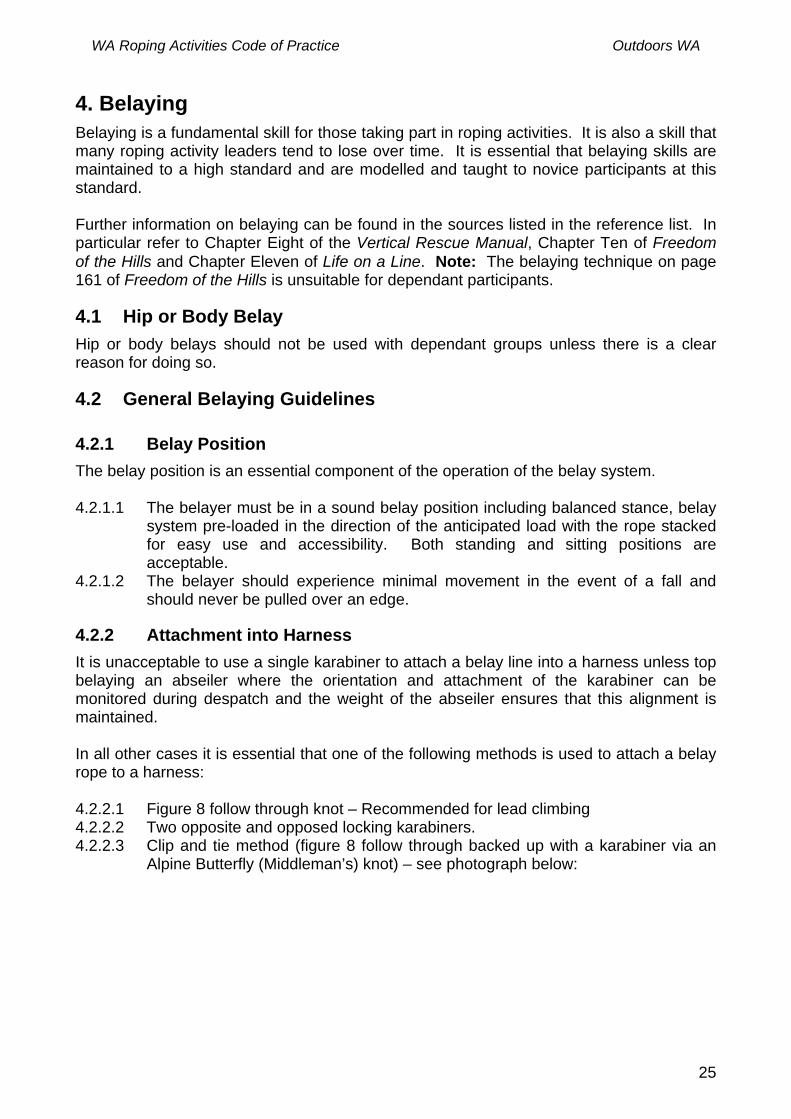
Outdoors WA WA Roping Activities Code of Practice
WA Roping Activities Code of Practice Outdoors WA
Table of Contents Status of Document .............................................................................................................6 Acknowledgements..............................................................................................................6 Feedback, Review and Appeals ..........................................................................................6 Background..........................................................................................................................6 Relevant Legislation.............................................................................................................7 Related policies, procedures and guidelines........................................................................7 Disclaimer ............................................................................................................................7 Purpose ...............................................................................................................................8 Scope...................................................................................................................................8 Who should use this code of practice? ................................................................................8 Language used in document................................................................................................8 Glossary...............................................................................................................................9 Assumptions and Definitions..............................................................................................11 References ........................................................................................................................13 Links to Other Resources ..................................................................................................13 Relationship to Adventure Activity Standards ....................................................................14 1. Occupational Health and Safety .................................................................................15
1.1 Personal Protection Equipment (PPE).................................................................15 1.1.1 All Roping Activities ......................................................................................15 1.1.2 Canyoning Specific PPE...............................................................................16 1.1.3 Caving Specific PPE.....................................................................................16 1.1.4 Challenge Ropes Course Specific PPE........................................................16
1.2 Edge Protection ...................................................................................................16 1.2.1 All Roping Activities ......................................................................................16
1.3 Activity Specific Issues ........................................................................................16 2. Roping Equipment Overview ......................................................................................17
2.1 Australian and International Standards................................................................17 2.1.1 Australian Standards ....................................................................................17 2.1.2 International Standards ................................................................................17
2.2 Ropes ..................................................................................................................18 2.2.1 International Standards ................................................................................18 2.2.2 Rope Use Variations ....................................................................................18 2.2.3 Retirement date............................................................................................18 2.2.4 Minimum size ...............................................................................................18 2.2.5 Exposure to contaminants ............................................................................18 2.2.6 Maintenance and Inspections.......................................................................18
2.3 Tapes and Slings.................................................................................................19 2.3.1 Retirement date............................................................................................19 2.3.2 Minimum rated strength................................................................................19 2.3.3 Carrying of Tape Slings................................................................................19 2.3.4 Joining of Tape to Rope ...............................................................................19 2.3.5 Exposure to contaminants ............................................................................19 2.3.6 Maintenance and Inspections.......................................................................20
2.4 Hardware in General ...........................................................................................20 2.4.1 Maintenance and Inspections.......................................................................20
2.5 Karabiners and Maillions .....................................................................................20 2.5.1 Minimum rated strength................................................................................20
2
WA Roping Activities Code of Practice Outdoors WA
2.5.2 Karabiner Types ...........................................................................................20 2.6 Belay Devices......................................................................................................20
2.6.1 Belay Device Types......................................................................................20 3. Rigging .......................................................................................................................21
3.1 Anchor Systems ..................................................................................................21 3.1.1 Anchor Systems – Artificial Surfaces............................................................21 3.1.2 Issues Relating to Natural Anchors ..............................................................21 3.1.3 Issues Relating to Artificial Anchors .............................................................21 3.1.4 Single versus Multiple Anchor Points ...........................................................21 3.1.5 Features of Multiple Point Anchor Systems..................................................21 3.1.6 Tube Tape in Anchor Systems .....................................................................22
3.2 Knots, Hitches and Bends ...................................................................................22 3.2.1 Tails on Knots...............................................................................................22 3.2.2 Setting and Dressing Knots ..........................................................................22 3.2.3 End Knots.....................................................................................................22 3.2.4 Mid-Rope Knots............................................................................................23 3.2.5 Joining Bends...............................................................................................23 3.2.6 Joining Bends for Double Rope Abseiling – Multi Pitch Climbing .................23 3.2.7 Hitches .........................................................................................................24 3.2.8 Other anchor systems ..................................................................................24
3.3 Rigging Belay Systems........................................................................................24 3.3.1 Forces on the Belayer ..................................................................................24
4. Belaying......................................................................................................................25 4.1 Hip or Body Belay................................................................................................25 4.2 General Belaying Guidelines ...............................................................................25
4.2.1 Belay Position...............................................................................................25 4.2.2 Attachment into Harness ..............................................................................25 4.2.3 Recommendations .......................................................................................26
4.3 Top Line Belaying................................................................................................26 4.3.1 Top Line Belaying – From the Bottom of the Pitch .......................................26 4.3.2 Top Anchor Point..........................................................................................26 4.3.3 Bottom Anchor Point ....................................................................................27 4.3.4 Top Line Belaying – From the Top of the Pitch ............................................27
5. Generic Communications ...........................................................................................28 5.1 Rocks and Other Falling Objects .........................................................................28
5.1.1 Consistency for all Roping Activities.............................................................28 5.1.2 Training of Novices.......................................................................................28
5.2 Thrown Ropes and Other Software .....................................................................28 5.2.1 Consistency for all Roping Activities.............................................................28
6. Suspension Trauma (Harness Hang Syndrome) ........................................................29 7. Abseiling Specific Issues ............................................................................................30
7.1 Guidelines and Recommendations......................................................................30 7.1.1 Non Mechanical Methods .............................................................................30 7.1.2 Backup Systems for Abseiling ......................................................................30 7.1.3 Bottom Brake Belaying.................................................................................30 7.1.4 Top Rope Belaying.......................................................................................30 7.1.5 Comparison of Top Line Belaying and Bottom Braking ................................31 7.1.6 Self Belay Systems ......................................................................................31 7.1.7 Single versus Double Brake .........................................................................31 7.1.8 Rigging of Figure 8 Descender.....................................................................32 7.1.9 Dispatch Checking .......................................................................................33
7.2 Dangerous Orientation of Figure of 8 Descender ................................................34
3

WA Roping Activities Code of Practice Outdoors WA
7.3 Body and Hand Positioning .................................................................................34 7.4 Instruction and Coaching.....................................................................................34 7.5 Multi-pitch Abseiling.............................................................................................34 7.6 Abseiling on Karst................................................................................................35 7.7 Routine Emergencies ..........................................................................................35
8. Alternative Descent Methods......................................................................................36 8.1 Forward Abseiling................................................................................................36
8.1.1 Definition ......................................................................................................36 8.1.2 Risk Assessment..........................................................................................36 8.1.3 Risk Management ........................................................................................37 8.1.4 Endorsement ................................................................................................37 8.1.5 Further Research .........................................................................................37
8.2 Inversion Abseiling ..............................................................................................38 8.2.1 Definition ......................................................................................................38 8.2.2 Risk Assessment..........................................................................................38 8.2.3 Risk Management ........................................................................................39 8.2.4 Endorsement ................................................................................................39 8.2.5 Further Research .........................................................................................39
8.3 Trust Abseiling.....................................................................................................40 8.3.1 Definition ......................................................................................................40 8.3.2 Risk Assessment..........................................................................................40 8.3.3 Risk Management ........................................................................................40 8.3.4 Endorsement ................................................................................................41 8.3.5 Further Research .........................................................................................41
8.4 Star Jumps ..........................................................................................................42 8.4.1 Definition ......................................................................................................42 8.4.2 Risk Assessment..........................................................................................42 8.4.3 Endorsement ................................................................................................43 8.4.4 Further Research .........................................................................................43
8.5 Angel Jumps........................................................................................................44 8.5.1 Definition – Forward Exit or Slack Line / Slack Rope Australian Rappelling.44 8.5.2 Definition – Angel Jumps or Angel Diving.....................................................44 8.5.3 Risk Assessment..........................................................................................44 8.5.4 Endorsement ................................................................................................45 8.5.5 Further Research .........................................................................................45
9. Rock Climbing Specific Issues....................................................................................46 9.1 Top Line versus Lead Climbing ...........................................................................46 9.2 Communications..................................................................................................46 9.3 Dispatch checking ...............................................................................................46 9.4 Artificial Protection...............................................................................................46 9.5 Multi-Pitch Climbing.............................................................................................46 9.6 Routine Emergencies ..........................................................................................46
10. Canyoning Specific Issues ......................................................................................47 10.1 Roping Equipment issues in Canyons .................................................................47 10.2 Vertical versus Horizontal Travel – Edge protection ............................................47 10.3 Dispatch checking ...............................................................................................47 10.4 Artificial Protection...............................................................................................47 10.5 Communications..................................................................................................47 10.6 Retrieval of Roping Equipment ............................................................................47 10.7 Routine Emergencies ..........................................................................................47
11. Caving Specific Issues ............................................................................................48 11.1 Roping Equipment issues in Caves .....................................................................48
4
WA Roping Activities Code of Practice Outdoors WA
11.2 Vertical versus Horizontal Travel – Edge protection ............................................48 11.3 Communications..................................................................................................48 11.4 Dispatch checking ...............................................................................................48 11.5 Single Pitch..........................................................................................................48 11.6 Multi-Pitch............................................................................................................48 11.7 Rebelays versus Deviations ................................................................................48 11.8 Retrieval of Roping Equipment ............................................................................48 11.9 Routine Emergencies ..........................................................................................48
12. Artificial Climbing Specific Issues............................................................................49 12.1 Standards ............................................................................................................49
12.1.1 International Standards ................................................................................49 12.1.2 Australian Standards ....................................................................................49
12.2 Dispatch checking ...............................................................................................49 12.3 Communications..................................................................................................49 12.4 Routine Emergencies ..........................................................................................49
13. Challenge Ropes Courses Specific Issues .............................................................50 13.1 Roping Equipment – Elements and Belay Systems.............................................50 13.2 Dispatch checking ...............................................................................................50 13.3 Self Belay Issues .................................................................................................50 13.4 Communications..................................................................................................50 13.5 Routine Emergencies ..........................................................................................50
14. Ascending Activities ................................................................................................51 14.1 Prusiking..............................................................................................................51 14.2 Dispatch checking ...............................................................................................51 14.3 Top Line Belay Issues .........................................................................................51 14.4 Self Belay Issues .................................................................................................51 14.5 Communications..................................................................................................51 14.6 Routine Emergencies ..........................................................................................51
15. Other Roping Activities............................................................................................52 15.1 Tyrolean Traverse ...............................................................................................52 15.2 Flying Fox............................................................................................................52
16. Mechanical Advantage Hauling Systems ................................................................53 16.1 Usage – Routine Emergencies ............................................................................53 16.2 Rigging Specifics .................................................................................................53 16.3 Operation.............................................................................................................53
17. Generic Safety Briefings .........................................................................................54 17.1 Abseiling Specific Safety Briefings ......................................................................54 17.2 Rock Climbing Specific Safety Briefings..............................................................56 17.3 Artificial Surface Specific Safety Briefings ...........................................................56 17.4 Challenge Ropes Course Specific Safety Briefings .............................................56 17.5 Vertical Caving Specific Safety Briefings.............................................................56 17.6 Vertical Canyoning Specific Safety Briefings .......................................................56
5

WA Roping Activities Code of Practice Outdoors WA
Status of Document Date Description Version 15th Feb 2008 Draft document released for public comment – included results
of online survey and forum.
29th Feb 2008 Draft Version 1.0 Released to Outdoors WA 1.0 March 2008 Version 1.0 Released by Outdoors WA 1.0 This document is currently being managed by Outdoors WA.
Acknowledgements The WA Roping Activity Code of Practice initiative was supported by the Department of Sport and Recreation (DSR). The funding for this Code of Practice came from the DSR through the efforts of the Executive Officer of Outdoors WA. The initial impetus for this Code of Practise came from the Roping Activity Sub-Committee (RAS) of the Registration and Accreditation Panel (RAP) of Outdoors WA. The recommendations of the Minister’s Taskforce on Adventure Tourism included the fast tracking of a process to implement the Adventure Activity Standards into Western Australia, which in turn lead to the expansion of the Abseiling Code of Practise into the WA Roping Activity Code of Practice.
Feedback, Review and Appeals The WA Roping Activity Code of Practice is designed to be a ‘living’ Code with feedback, requests for review and/or appeal against aspects of the Code considered to be healthy part of the development process, one that will ensure the currency and relevancy of the contents of the Code. Feedback, requests for review and/or appeals will be managed by the Industry Standards Panel. Details and proformas are available at www.outdoorswa.org/Industry Quality Framework/Industry Standards Panel. A formal review will be conducted six months after the release of the draft code.
Background One of the initial issues that raised interest in this Code of Practice was the WorkSafe Significant Injury Summary 16/2004 – ‘Fall injures abseil instructor’. This summary includes the recommendation:
“Work carried out at heights should be in accordance with the Western Australian Code of Practice Prevention of Falls at Workplaces’ and the Australian New Zealand Standard, AS/NZS 1891 series ‘Industrial Fall-Arrest Systems and Devices’.
The recreational roping community has always resisted regulation based on the industrial guidelines used in industrial fall arrest systems. When queried, WorkSafe defended their recommendation by saying that there was no Code of Practice or other written guidelines existed that was not industrial-based. This lead to the first efforts of the RAS to attempt to obtain funding to create a non-industrial Code of Practice for roping activities.
6
WA Roping Activities Code of Practice Outdoors WA
Relevant Legislation Occupational Safety and Health Act 1984 Occupational Safety and Health Regulations 1996
Roping activity leaders who are employed (or self employed) to instruct or guide groups are required by law to follow the act and regulations.
Related policies, procedures and guidelines Association for Experiential Education (USA) – Manual of Accreditation Standards for
Adventure Programs Adventure Activities Licensing Authority (UK) – Collective Interpretation 6.06 - Combined
Water / Rock Activities Commission for Occupational Safety and Health – Code of Practice – Prevention of Falls
at Workplaces (2004) Department of Education and Training – Outdoor Education and Recreation Activities 2006 Recreation South Australia – “Recreational Services (Limitation of Liability) Act 2002” Rock
Climbing in a Natural Environment - Safety Code of Practice (Version 4) Western Australian Adventure Activity Standards – Abseiling (Draft) Western Australian Adventure Activity Standards – Rock Climbing (Draft) Western Australian Adventure Activity Standards – Canyoning (Draft) Western Australian Adventure Activity Standards – Artificial Climbing (Draft) Western Australian Adventure Activity Standards – Challenge Ropes Courses (Draft)
Disclaimer <To be included in future revisions>
7

WA Roping Activities Code of Practice Outdoors WA
Purpose The purpose of the Roping Activity Code of Practice is to provide practical advice on how to minimise risks associated with recreational roping activities.
Scope The code of practice applies to all locations where recreational roping activities are likely to occur. This is based on the understanding that there are inherent risks in roping activities and that these must be appropriately managed to prevent incidents from occurring. All workplaces are covered by the Occupational Safety and Health Act (1984) and this document attempts to benchmark minimal acceptable standards for achieving compliance as well as assisting in the definition of acceptable practice for the industry.
Who should use this code of practice? All people who have responsibility for the safety and health of dependant participants taking part in roping activities in the workplace should use this code of practice. These roping activities include abseiling, indoor climbing, rock climbing, challenge ropes courses, vertical canyoning, vertical caving, etc. The code is primarily for commercial, educational and not-for-profit groups to inform them of their responsibilities to those taking part in recreational roping activities. This code should also be a guide to recreational roping participants who undertake roping activities as a leisure activity.
Language used in document The language used in this document deliberately uses the terms “recommended”, “should”, “must” and “it is essential” to differentiate between the degree of consideration that should be ascribed to what follows those terms. We have also deliberately avoided using the term “best practice” although we would commend all in the industry to ascribe to that principle. Alistair MacArthur of Odyssey Consultants quite rightly identifies the problem of moving goalposts and the lack of clear definition with regard to defining best practice – “Best practice is what, I believe, we should aim for. However, as I said in the summary of my paper on the subject, best practice is a ‘moving target’ not entirely suitable for the average outdoor education program”. The range of variables we deal with in the outdoors, applied to the conduct of any activity we run, could mean that best practice could vary in the way we run the same activity – consider the age and experience of participants, level of maturity, activity to be undertaken, skills and experience of the supervisory team, location, weather etc. There are many ways of performing a task in the provision and supervision of outdoor activities and a number of terms to describe them. Two often used terms, “common” and “accepted”, are often misinterpreted as being “acceptable”.
8
WA Roping Activities Code of Practice Outdoors WA
Glossary ABSEILING Descending a rope using a friction device (also known as rappelling). AUSTRALIAN RAPPEL Another term for forward abseiling. An Australian Rappel with a slack rope is another term for ANGEL JUMPS BELAYING The controlling of a safety rope attached to a person wearing a harness as a back up in the case of primary system failure or participant fall. Belaying may be done from above or below, depending on the nature of the activity and or the environment. BOTTOM BELAYING (BRAKING) The controlling of the descent of an abseiler by the belayer applying tension to the descent rope thus increasing the friction through the descent device. BOULDERING This involves rock climbing where adequate safety can be implemented by ‘spotting’ rather than requiring additional systems of harness, belay, ropes etc. In bouldering or traversing for any climbing activity, a participant will be belayed if any part of their body is more than 2.4 metres from the ground. CANYONING Traditionally involves the ascent and descent of a steep watercourse and often involves swimming, bouldering and clambering over obstacles. Sometimes involves technical rope work such as abseiling and rock climbing. CLIMBING The process of ascending and traversing cliffs, boulders, buildings, walls, ladders, challenge elements on ropes courses and mountains. It usually involves following certain routes on a face that require the use of handholds as well as footholds, while ensuring that specialised equipment is used to establish a safety system or backup. While most climbing is in an upward direction, down climbing and traversing are also included within this term. COMPETENCIES The minimum knowledge and skills required to perform tasks such as tying knots, apply first aid, etc. COW’S TAILS A pair of lanyards attached to a harness with karabiners on each lanyard for attaching to anchor systems. DYNAMIC ROPE A rope that is designed to stretch and absorb force when subjected to an impact force in climbing falls. Generally used for climbing and for top-line belaying.
9
WA Roping Activities Code of Practice Outdoors WA
LEAD CLIMBING Ascending a face, trailing a rope that is clipped to protection placed by the climber on the climbing face or clipped to fixed protection. LEAD RACK An assortment of removable artificial protection specifically designed to protect a lead climber where no fixed protection exists. LOW STRETCH KERNMANTLE ROPE A rope with minimal stretch used for abseiling, hauling and rescue purposes. These ropes typically have low elongation during normal working procedures with the ability to absorb force generated by a (limited) fall. PLB A Personal Locator Beacon (PLB) is a distress beacon for land-based use. They are small, portable units that are designed to be carried in a pocket or backpack. These work in a similar way to an EPIRB (Emergency Position Indicating Radio Beacon). SPOTTING The process in which one or more individuals are in a position to “catch” a participant in the case of a fall. It does not mean to literally catch a falling body, rather spotters should be directed to be in a position to quickly support the upper part of the participant’s body (specifically the head) in order to minimise potential impact force. SCRAMBLING A category of climbing that does not entail the use of any ropes on the ascent or descent. A general rule for scrambles is that hands need be used only for balance, not to support any of the climber's weight. STATIC ROPE See definition for Low Stretch Kernmantle Rope. TOP-ROPE CLIMBING Where a climber is belayed from a system that has the belay rope directed through anchors and specialist equipment placed at the top of the climb or abseil pitch. Any fall should be quickly arrested without a significant shock load. The belayer may stand at the bottom of the pitch with the belay line directed through anchors above the climber (sometimes called top-rope climbing with bottom belay, as found in climbing wall situations) OR the belayer may be a part of the anchor system above the climber and be directly in line between the climber and the anchor (sometimes called top rope climbing with top belay). WILDERNESS FIRST AID In the case where a group is in an isolated or remote area, a member of the group should have advanced first aid qualifications. Remote or isolated areas may include any location where outside assistance might be more than one hour away. Examples of advanced first aid qualifications are the Wilderness First Aid qualifications by the Wilderness Medicine Institute and the Remote Area First Aid by St John Ambulance Australia.
10

WA Roping Activities Code of Practice Outdoors WA
11
Assumptions and Definitions This Code of Practice makes the following assumptions and definitions: MAXIMUM FALL DISTANCE This is the distance widely accepted as being the maximum distance a person should be able to fall where adequate safety can be implemented by ‘spotting’ rather than requiring belaying. The distance is measured from the feet of a person standing on the edge to the surface where that person would land should they fall. In Western Australia this distance is two metres. This distance is defined in the Code of Practice – Prevention of Falls at Workplaces, the Adventure Activity Standards and is endorsed by Outdoors WA. Specifically for bouldering or traversing for any climbing activity, a participant will be belayed if any part of their body is more than 2.4 metres from the ground. This should allow the possibility of more effective spotting or protection of climbers who can adopt awkward lateral or inverted positions during these activities. SIGNIFICANT FALL RISK This is where a person could fall more than the maximum fall distance onto a rigid surface. If the surface landed on is water, there must be no underwater hazards and the fall distance needs to be:
• Less than ten metres AND • The water depth needs to be the greater of:
o Two metres OR o Half the fall distance
for there to be no significant fall risk. The steepness and slipperiness of the face is a subjective assessment on a site-by-site and day-by-day basis. UNPROTECTED EDGE This is an unguarded edge with a significant fall risk. Any person within two metres of this edge must be protected by an adequate belay system. The minimum two metre edge distance applies to a clean edge on firm rock; without rubble, or downward slope or adverse environmental conditions. BUSHWALKING / SCRAMBLING / CLIMBING Differentiation between bushwalking, scrambling and climbing is subjective. The Yosemite Decimal System (YDS) attempts to categorise terrain according to the techniques and equipment required to ascend/descend that terrain. The Ewbank system attempts to grade the technical difficult of a climb starting with walking up a steep hill as Grade 1. Both the YDS and the Ewbank systems relate to climbers whereas our definition is for novice, dependant group members with little or no exposure to climbing. The risk associated with each definition is dependant on:
• Height above the ground – any movement where the person is less than the maximum fall distance above the ground has low risk regardless of the technical difficulty of the climb.
• Landing surface – any movement where the person is over deep water without underwater hazards has low risk regardless of the technical difficulty of the climb.
WA Roping Activities Code of Practice Outdoors WA
Version 1.0 Released March 2008 Page 12 of 56
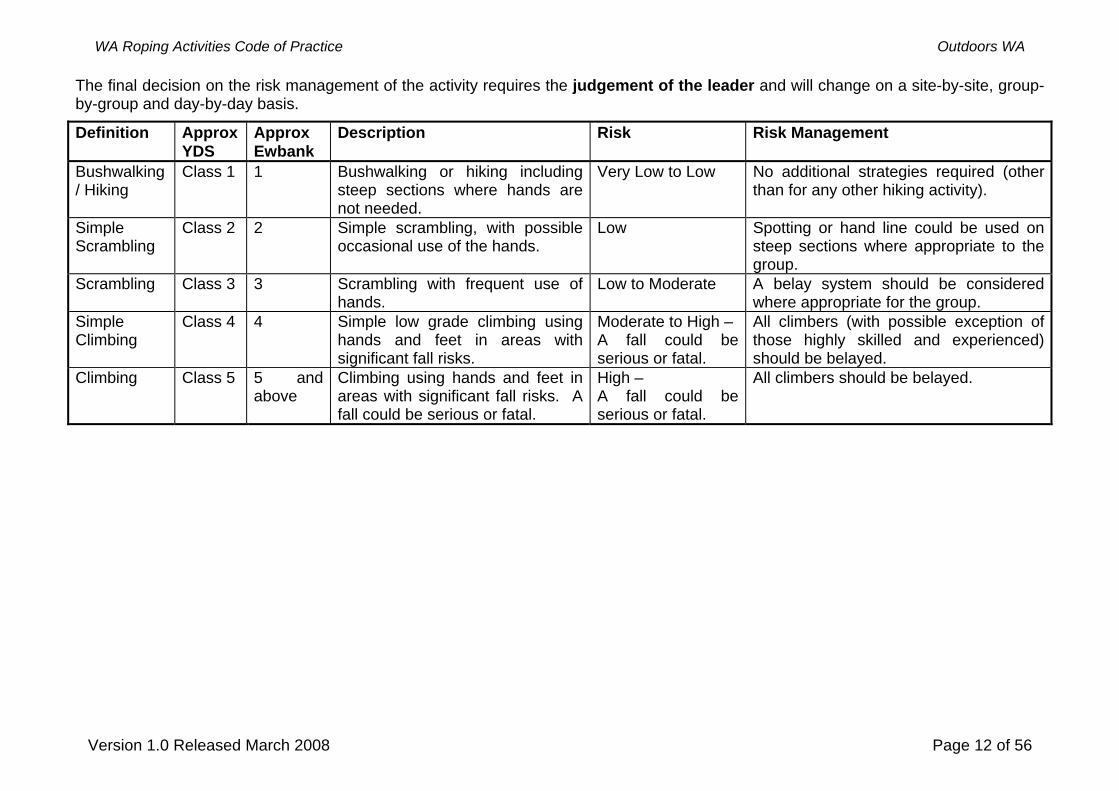
The final decision on the risk management of the activity requires the judgement of the leader and will change on a site-by-site, group-by-group and day-by-day basis.
Definition ApproxYDS
Approx Ewbank
Description Risk Risk Management
Bushwalking / Hiking
Class 1 1 Bushwalking or hiking including steep sections where hands are not needed.
Very Low to Low No additional strategies required (other than for any other hiking activity).
Simple Scrambling
Class 2 2 Simple scrambling, with possible occasional use of the hands.
Low Spotting or hand line could be used on steep sections where appropriate to the group.
Scrambling Class 3 3 Scrambling with frequent use of hands.
Low to Moderate A belay system should be considered where appropriate for the group.
Simple Climbing
Class 4 4 Simple low grade climbing using hands and feet in areas with significant fall risks.
Moderate to High – A fall could be serious or fatal.
All climbers (with possible exception of those highly skilled and experienced) should be belayed.
Climbing Class 5 5 and above
Climbing using hands and feet in areas with significant fall risks. A fall could be serious or fatal.
High – A fall could be serious or fatal.
All climbers should be belayed.

WA Roping Activities Code of Practice Outdoors WA
Version 1.0 Released March 2008 Page 13 of 56
References The following books provide additional information on roping activities. Emergency Management Australia. Manual 11 – Vertical Rescue. Published 1995, last updated 2001 (Amendment One) - Please note: There are errors in Manual 11 – Vertical Rescue Manual : Amendment One, the most serious in Chapters 7 to 10. The manual is currently under review. Fasulo, D.J. (1996), Self-Rescue (How to rock climb series). (Referred to as “Self Rescue” in the rest of this document) Lyon Equipment Limited for the Health and Safety Executive. (2001) Industrial rope access – Investigation into items of personal protective equipment Merchant, Dr Dave. (2007 e-Book), Life on a Line (Second Edition). The Underground Rope Rescue Manual (Referred to as “Life on a Line” in the rest of this document) New Zealand Mountain Safety Council Inc. Mountain Safety Manual 32 (2002), Abseiling Handbook. Peter, L. (2004), Rock Climbing, Essential Skills and Techniques. The Essential Handbook of the Mountaineering Instructor and Single Pitch Award Schemes. (Referred to as “Rock Climbing Manual” in the rest of this document) The Mountaineers (2003). Mountaineering, The Freedom of the Hills, Edition 7. (Referred to as “Freedom of the Hills” in the rest of this document) The National Outdoor Leadership School. (2000), NOLS Climbing Instructor Notebook. Warild, A. (1998), Vertical, A Technical Manual for Cavers. Work Cover New South Wales (2002). Health and Safety for Artificial Climbing Structures and Operations. For Designers, Manufactures, Suppliers, Operators and Users
Links to Other Resources Department of Education Tasmania - Rock Climbing and Abseiling: Climbing on Natural Surfaces Web Page - http://www.education.tas.gov.au/school/educators/health/outdoors/land/natural Department of Education and Early Childhood Development Victoria Safety Guidelines for Education Outdoors – Activities Web Page - http://www.education.vic.gov.au/management/schooloperations/edoutdoors/actabseilingactivity.htm UIAA – See Safety Web Page http://www.theuiaa.org/act_safety.html The British Mountaineering Council – See Safety and Skills Web Page http://www.thebmc.co.uk/FeaturesSummary.aspx?category=8
WA Roping Activities Code of Practice Outdoors WA
Version 1.0 Released March 2008 Page 14 of 56
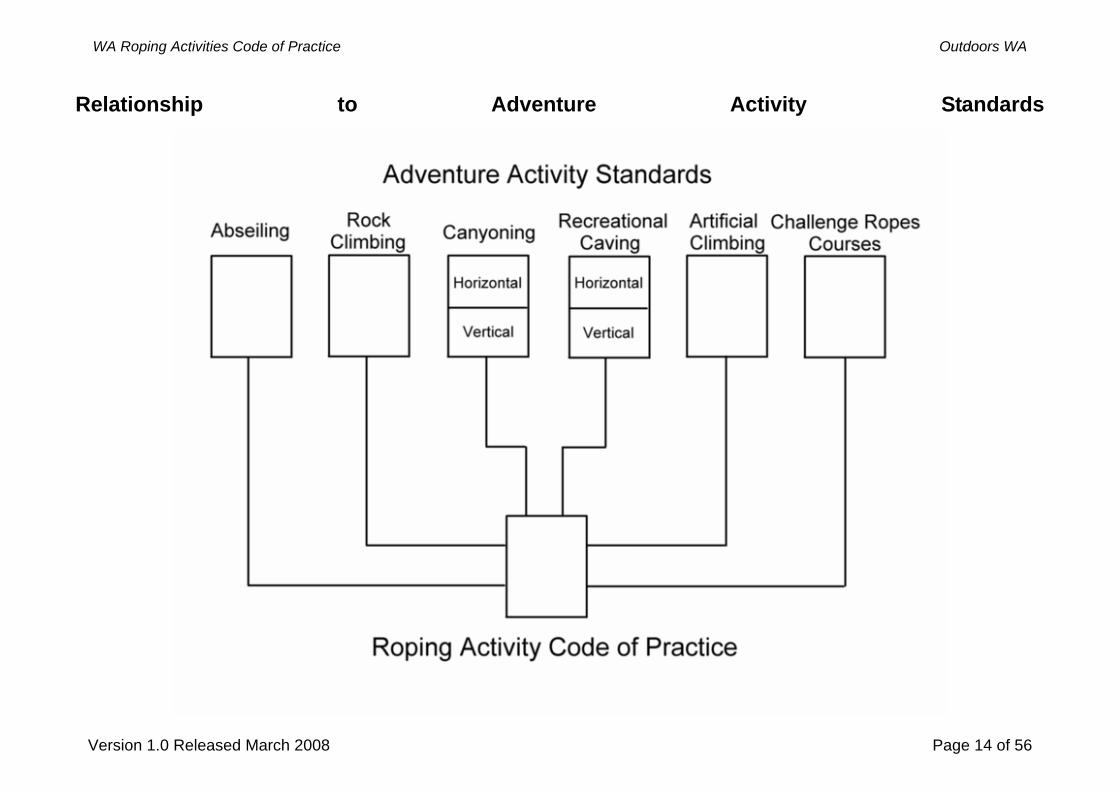
Relationship to Adventure Activity Standards
WA Roping Activities Code of Practice Outdoors WA
1. Occupational Health and Safety
1.1 Personal Protection Equipment (PPE) It is envisioned that this section will eventually be removed and incorporated into the various Western Australian Adventure Activity Standards that involved roping activities.
1.1.1 All Roping Activities The following equipment is considered essential for participants taking part in any roping activities to have on their person. For artificial climbing refer to the Western Australian Adventure Activity Standards – Artificial Climbing. 1.1.1.1 Sit harness of a commercially manufactured type, preferably which complies
with a recognised climbing harness standard, such as EN 12277 Mountaineering equipment, harnesses, safety requirements and test methods and is used in such a way that fully accounts for the manufacturer’s specifications. (Exception applies for improvised harnesses which can be used (with care) on multi-day expeditions involving bushwalking, canoeing, etc)
1.1.1.2 Helmet specially manufactured for roping activities which complies with a recognised helmet standard, such as EN 12277 Mountaineering equipment, harnesses, safety requirements and test methods and is used in such a way that fully accounts for manufacturer’s specifications.
1.1.1.3 Figure 8 or other descender / belay device (optional for climbing activities and challenge ropes courses).
1.1.1.4 Locking karabiner (optional for climbing activities and challenge ropes courses). 1.1.1.5 A pair of gloves – leather gloves are strongly recommended for abseiling /
belaying (optional for climbing activities and challenge ropes courses). 1.1.1.6 Sturdy, enclosed footwear such as shoes or walking boots (or climbing shoes). 1.1.1.7 Appropriate clothing, protecting the body from rope burn and the environment. The following additional equipment is considered essential for roping activity leaders and guides to have on their person: 1.1.1.8 Six locking karabiners with at least one being capable of being used with an
Italian (or Münter) Hitch. 1.1.1.9 At least two Prusik cords, lengths of tape or mechanical ascenders / rope grabs. 1.1.1.10 A tape sling used in such a way that fully accounts for the manufacturer’s
specifications. 1.1.1.11 Whistle. 1.1.1.12 Knife (suitable for cutting rope) – preferably on a lanyard. Some roping activity leaders use a pair of cow’s tails as a self belay system (often on challenge ropes courses). 1.1.1.13 Cow’s tails must be energy absorbing (dynamic rope, energy absorbing lanyard,
etc). Static slings, tapes or low stretch kernmantle ropes are not acceptable.
Version 1.0 Released March 2008 Page 15 of 56

WA Roping Activities Code of Practice Outdoors WA
1.1.2 Canyoning Specific PPE 1.1.2.1 Leather gloves often become slippery when wet and different materials should
be considered. <To be completed in later revisions>
1.1.3 Caving Specific PPE 1.1.3.1 It is essential for roping activity leaders and participants to have a working torch
(preferably a head torch) while taking part in roping activities in low light environments.
<To be completed in later revisions>
1.1.4 Challenge Ropes Course Specific PPE <To be completed in later revisions>
1.2 Edge Protection All participants in roping activities must be secured if within two metres of an unprotected edge. This distance is to be increased if conditions are windy or wet or if there is loose or downward-sloping rock or uneven ground. Refer to Assumptions and Definitions – Unprotected Edge.
1.2.1 All Roping Activities 1.2.1.1 Fall Restraint - Participants are restrained from reaching a position where a fall
is possible - A single piece of tube tape is acceptable as a means of edge protection where there is no chance of the tape coming in contact with moving rope, etc.
1.2.1.2 Fall Arrest - Participants may sustain a limited fall - In this situation and in all other situations where moving rope, etc can compromise the lanyard, tape is not to be used.
1.2.1.3 Edge protection should be rigged to length (or enable adjustment) so that it is not possible to fall off the unprotected edge (even if the fall is a short distance).
1.2.1.4 Some edge protection requires the person be able to adjust their position over an edge.
1.3 Activity Specific Issues Refer to Backup Systems for Abseiling Section 7.1.2 Refer to Forces on the Belayer Section 3.3.1
16

WA Roping Activities Code of Practice Outdoors WA
2. Roping Equipment Overview
2.1 Australian and International Standards
2.1.1 Australian Standards 2.1.1.1 There are no Australian standards that relate to formal recreational roping
activities. 2.1.1.2 The only Australian standard which relates to roping equipment for formal
recreational roping activities is a fixed artificial climbing wall standard which is in draft form under Australian Standards Committee SF-047 Artificial Climbing Structures and largely based on the European standard for same.
2.1.2 International Standards 2.1.2.1 The closest we currently have to world standards for recreational roping
activities are the respected and mandatory standards developed and enforced by the European Union. Products that are certified as meeting these standards carry the European Conformity or CE mark. There are European Standards (acronym EN for the French European Norm) for nearly all equipment used in recreational roping activities.
2.1.2.2 The European Union appoints and authorises a list of reputable certifying authorities to certify products to certain European standards. These authorities have a 4 or 6 digit ID code. This code must appear on any product that is certified, adjacent to the number of the standard it is certified to meet. For example Edelrid climbing ropes will carry the code EN892 for the European Standard for dynamic mountaineering rope, plus the code CE 0123 to show that they are certified as conforming to the European Standards by the certifying authority TUV Product Service in Munich.
17
WA Roping Activities Code of Practice Outdoors WA
2.2 Ropes Further information on ropes can be found in the sources listed in the reference list. In particular refer to Chapter Three of the Vertical Rescue Manual, Chapter Nine of Freedom of the Hills and Chapter Three of Life on a Line.
2.2.1 International Standards 2.2.1.1 Dynamic Ropes: All ropes used in roping activities must be manufactured by
organisations that are certified to meet the appropriate standard EN 892 Dynamic mountaineering ropes when: • They are used for lead climbing systems • They are used for top rope systems where there is a chance the fall factor
under any circumstances could be 0.3 or more 2.2.1.2 Low Stretch Kernmantle Ropes: All ropes used in roping activities must be
manufactured by organisations that are certified to meet appropriate standards such as EN1891 Low stretch kernmantle ropes when: • The fall factor will not under any circumstances meet or exceed 0.3
2.2.2 Rope Use Variations 2.2.2.1 Single, twin or half ropes may be used depending on the individual
organisation’s policies and procedures, however they must be manufactured by organisations that are certified to meet the appropriate standard EN 892 Dynamic mountaineering ropes
2.2.3 Retirement date 2.2.3.1 All ropes must be retired according to the manufacturer’s specification. Where
the maximum age of a rope is not clearly defined then it should be retired after 5 years.
2.2.3.2 Some manufacturers define a shelf and a service life for their products. For example Edelrid define the maximum life on most of their synthetic products as 10 years shelf and 6 years service.
2.2.4 Minimum size 2.2.4.1 Single ropes should be a minimum of 10mm. 2.2.4.2 Double ropes used in climbing should be a minimum of 8mm.
2.2.5 Exposure to contaminants For a detailed description of the effect of various chemicals on different rope types see section 8e in Chapter 8 of Life on a Line. 2.2.5.1 Any chemical contamination of roping equipment should be avoided at all costs. 2.2.5.2 All ropes regardless of type can be affected by certain chemicals, some of which
can be in a gas form. Retire any ropes that may have been affected by contaminants.
2.2.6 Maintenance and Inspections 2.2.6.1 All ropes should be checked regularly for damage and stored in a way that fully
accounts for manufacturer’s specification.
18
WA Roping Activities Code of Practice Outdoors WA
2.3 Tapes and Slings All tapes and slings used in roping activities must be manufactured specifically for roping activities and preferably by organisations that are certified to meet the appropriate EN standard EN 566 Slings and EN 565 Tapes. The equipment must be used in such a way that fully accounts for the manufacturer’s specifications. Further information on tape, webbing, runners and slings can be found in the sources listed in the reference list. In particular refer to Chapter Three of the Vertical Rescue Manual, Chapter Nine of Freedom of the Hills, Chapter Eight of Life on a Line and Chapter 6 of Rock Climbing.
2.3.1 Retirement date 2.3.1.1 All tapes and slings must be retired according to the manufacturer’s
specification. Where the maximum age of a tape or sling is not clearly defined then it should be retired after 5 years.
2.3.1.2 Some manufacturers define a shelf and a service life for their products. For example Edelrid define the maximum life on most of their synthetic products as 10 years shelf and 6 years service.
2.3.2 Minimum rated strength 2.3.2.1 Tapes and slings used in rigging where they form a primary link in the system
should be rated to at least 22kn. Where they are a secondary link (such as one leg of a multi-point anchor system) they should be rated to at least 15kn. See 3.1.6
2.3.3 Carrying of Tape Slings 2.3.3.1 Tape slings should never be carried in a loop around the neck due to the risk of
strangulation in the event of a snag. Tape slings can be carried diagonally around the neck and under one arm. When abseiling the sling should be on the opposite side to the braking hand to reduce the risk of catching the braking hand in the sling.
2.3.3.2 Tape slings can be joined using a karabiner, maillon, etc or by using a version of the reef knot. Care needs to be taken to avoid the join becoming a larks head which is less safe. This often just requires correct dressing and setting.
2.3.4 Joining of Tape to Rope 2.3.4.1 Tape slings can be joined to rope using a karabiner, maillon, ring or other
suitable piece of hardware. 2.3.4.2 It is unacceptable for rope to be joined directly into a tape sling due to the risk of
the rope cutting through the tape sling. A rated metal connector must be used.
2.3.5 Exposure to contaminants For a detailed description of the effect of various chemicals on different material types see section 8e in Chapter 8 of Life on a Line. 2.3.5.1 Any chemical contamination of roping equipment should be avoided at all costs. 2.3.5.2 All tapes, slings, webbing and runners regardless of type can be affected by
certain chemicals, some of which can be in a gas form. Retire any tapes, slings, webbing and runners that may have been affected by contaminants.
19
WA Roping Activities Code of Practice Outdoors WA
2.3.6 Maintenance and Inspections 2.3.6.1 All tapes and slings should be checked regularly for damage and stored in such
a way that fully accounts for the manufacturer’s specification.
2.4 Hardware in General All hardware used in roping activities must be manufactured specifically for roping activities and preferably by organisations that are certified to meet the appropriate EN standard and must be used in such a way that fully accounts for the manufacturer’s specifications.
2.4.1 Maintenance and Inspections 2.4.1.1 All hardware should be checked regularly for damage and stored in such a way
that fully accounts for the manufacturer’s specification.
2.5 Karabiners and Maillions Further information on karabiners and maillions can be found in the sources listed in the reference list. In particular refer to Chapter Five of the Vertical Rescue Manual, Chapter Nine of Freedom of the Hills, Chapter Eight of Life on a Line and Chapter Six of Rock Climbing Manual.
2.5.1 Minimum rated strength 2.5.1.1 Hardware used in rigging should be rated to at least 22kn
2.5.2 Karabiner Types 2.5.2.1 Karabiners used in roping activities with dependant groups should be locking
karabiners. The exception is for groups taking part in lead climbing activities. 2.5.2.2 A pair of snap link karabiners used opposite and opposed can be considered
equivalent to one locking karabiner where the situation allows no other option.
2.6 Belay Devices Further information on belay devices can be found in the sources listed in the reference list. In particular refer to Chapter Five of the Vertical Rescue Manual, Chapter Ten of Freedom of the Hills, Chapter Eleven of Life on a Line and Chapter Six of Rock Climbing Manual. Please note that some of the information on belay devices in Chapter 10 of Freedom of the Hills does not apply to dependant groups.
2.6.1 Belay Device Types 2.6.1.1 Belay devices vary according to the application. It is essential that belayers are
trained and experienced in the use of the chosen belay device. This includes knowing how to lock off the belay device.
2.6.1.2 A number of belay devices such as the Petzl Gri Gri and the Edelrid Eddy are perceived to be ‘self locking’ or ‘auto locking’. The manufacturers of these devices do not describe them as such and there have been a number of injuries and near misses by inexperienced belayers using these devices.
2.6.1.3 Care should be taken to maintain the configuration of descender and karabiner if using figure of eight descenders for belaying where it is possible for the descender to lever the gate of the karabiner open. See section 7.2. This is not an issue if the rope is used through the small end of the device.
20
WA Roping Activities Code of Practice Outdoors WA
3. Rigging
3.1 Anchor Systems When rigging attempt to minimise the effects of rope stretch and make provision where necessary to protect the ropes and the anchor points from significant rub points producing wear and damage.
3.1.1 Anchor Systems – Artificial Surfaces Anchor systems for all climbing on artificial surfaces should adhere to Work Cover New South Wales (2002) - Health and Safety for Artificial Climbing Structures and Operations. (To be replaced by Australian Standard SF-047 Artificial Climbing Structures when complete).
3.1.2 Issues Relating to Natural Anchors 3.1.2.1 While trees can be excellent anchors, care must be taken to ensure the tree is
alive, large, has a good root system and is of a species that is known to be strong. Fire damage, termites, rot and ring barking can compromise a tree’s integrity as an anchor.
3.1.2.2 While boulders can be excellent anchors, care must be taken to ensure that the boulder is large, well seated, solidly balanced and made of a rock that is dense and well bedded.
3.1.3 Issues Relating to Artificial Anchors 3.1.3.1 Metal anchors are highly susceptible to corrosion especially at sites near the
ocean. All metal anchors that are not tested and tagged should be treated with suspicion.
3.1.3.2 The quality of artificial anchors may vary greatly, be conservative with anchors that you do not have prior knowledge and experience of.
3.1.4 Single versus Multiple Anchor Points 3.1.4.1 It is acceptable to rig anchor systems for roping activities using only one anchor
point when the anchor is of such good quality that there can be no doubt regarding its integrity. Examples include:
• Very large, healthy trees with excellent root systems • Very large boulders of dense rock with a secure placement • Very large building structures such as structural girders • Large motor vehicles appropriately placed and secured • Specifically manufactured and tested anchors in artificial environments
3.1.4.2 For all other anchors it is essential that a minimum of two independent anchors
are used to rig anchor systems for roping activities.
3.1.5 Features of Multiple Point Anchor Systems 3.1.5.1 It is essential that the lines on multiple point anchors systems are equalised and
the angles between each anchor leg does not exceed 90 degrees. 3.1.5.2 The following passage is from Freedom of the Hills page 172 in a condensed
form:
21
WA Roping Activities Code of Practice Outdoors WA
A simple yet highly effective set of principles to follow when evaluating anchor systems goes by the acronym SRENE. This means that any anchor system should be solid, redundant, equalised and have no extension (no shock loading on a second anchor in the event the first anchor fails).
3.1.6 Tube Tape in Anchor Systems 3.1.6.1 A length of tube tape (25mm or less) is not acceptable as a primary link in an
anchor system; however, it may be acceptable as one of the links in a multi-point anchor system.
3.1.6.2 Tube tape is highly susceptible to being cut by moving rope or chafing and should be used with great care whenever this possibility exists.
3.2 Knots, Hitches and Bends A hitch is a type of knot that must be wrapped around an object for it to function. A bend is a knot that joins two or more ropes together. Further details on the tying of the following knots, hitches and bends, their application and their rated strengths can be found in the sources listed in the reference list. In particular refer to Chapter Four of the Vertical Rescue Manual, Chapter Nine of Freedom of the Hills, Chapter Four of Life on a Line and Chapter Six of Rock Climbing Manual.
3.2.1 Tails on Knots 3.2.1.1 Knots in rope need to have a tail that is at least seven times the diameter of the
rope. 3.2.1.2 Knots in tape need to have a tail at least 100mm long.
3.2.2 Setting and Dressing Knots All knots are stronger when dressed (keeping the separate strands of the knot parallel and free of twists) and set (compacted by pulling on each end of the rope). Some roping referenced illustrate incorrectly set and dressed knots.
3.2.3 End Knots The following knots are suitable to be used as end knots in rope; knots that can be tied to form an anchor or into an anchor or attached to an anchor using a karabiner: 3.2.3.1 Figure 8 on the bight 3.2.3.2 Figure 9 on the bight 3.2.3.3 Figure 10 on the bight 3.2.3.4 Figure 8 follow through (Rewoven Figure 8) 3.2.3.5 Double Figure 8 on the bight 3.2.3.6 Bowline with a secured tail The following knots are also suitable end knots in rope, however they need to be used with care: 3.2.3.7 The double headed figure 8 on the bight (rabbit ears, lapin, etc) must not be
used when only one of the loops (ears) is loaded or secured.
22
WA Roping Activities Code of Practice Outdoors WA
The following knots are suitable to be used as end knots in tape: 3.2.3.8 Water knot on the bight (Tape knot, Overhand knot) 3.2.3.9 Testing has shown that a tape knot, however well tied, can gradually slip and
release under a series of small, cyclic loads. Tape knots need to have longer tails see 3.2.1
3.2.4 Mid-Rope Knots The following knots are to be used when a three-way load is required: 3.2.4.1 Alpine Butterfly (Middleman’s Knot) 3.2.4.2 In-line (Directional) Figure of 8 on the bight This knot creates a loop that can be loaded in one direction only, but is approximately as strong in that direction as a normal Figure 8 knot. The knot must be loaded in parallel to the load on the rope both entering and leaving the knot, not against the ‘lie’ at an angle to the load.
3.2.5 Joining Bends The following bends are to be used to join rope: 3.2.5.1 Double Fisherman’s Bend 3.2.5.2 Double Sheet Bend on the Bight into a Captive Loop with a secured tail. 3.2.5.3 Figure 8 Bend (Rethreaded Figure 8) 3.2.5.4 Reef Knot between two Double Fisherman’s Bends The following bends are to be used to join tape: 3.2.5.5 Rethreaded Water Bend (Tape knot, Overhand knot)
3.2.6 Joining Bends for Double Rope Abseiling – Multi Pitch Climbing 3.2.6.1 In multi-pitch abseiling and climbing activities there may be a need to join two
ropes together to abseil on a double rope. On some pitches a double fisherman’s or figure 8 bend (rethreaded figure 8) can be bulky enough to jam while trying to retrieve the rope. In these exceptional circumstances an abnormally loaded overhand bend (double overhand) is often used as is presents a lower profile to the rock and tends to jam less. While there has been some informal testing of this bend, it needs to be clear that a great deal of care needs to be taken when using this bend. Ensure that the tails are sufficiently long (at least 60cm) and where possible the knot should be backed up with another overhand bend just above the first bend to reduce the risk of the knot unrolling.
3.2.6.2 There have been at least two deaths while abseiling on a double rope which was joined with an abnormally loaded figure 8 knot (double figure of 8). This knot unrolls easily and should never be used under any circumstances.
23
WA Roping Activities Code of Practice Outdoors WA
3.2.7 Hitches 3.2.7.1 A clove hitch is suitable for rigging as long as it is not a final knot. This hitch can
be secured with two half hitches (with caution), a double fisherman’s knot or a figure of 8 follow through or similar.
3.2.7.2 A Münter hitch can be used for belaying or, when secured can be used in a releasable anchor system see 3.2.8.
3.2.8 Other anchor systems 3.2.8.1 One or more full round turns secured with two half hitches (with caution) or a
secure end knot is an acceptable anchor system. 3.2.8.2 A Münter hitch secured with a two half hitches on the bight around the loaded
line and a karabiner to an anchor is an acceptable anchor system. Another lock off for the Münter hitch is the Münter mule combination. A HMS or large D karabiner should be used and the first turn of the hitch which has the load should be closest to the spine of the karabiner.
3.2.8.3 A belay device (mostly a belay plate, belay tube) or descender (figure 8, etc) secured with a bight through the karabiner and two half hitches around the loaded line and a karabiner to an anchor is an acceptable anchor system. Another lock off is the bight through the karabiner secured with a mule knot with an overhand backup.
3.3 Rigging Belay Systems Belay systems need to be rigged with care to ensure that neither the climber or abseiler nor the belayer is at risk in the event of a fall or uncontrolled descent.
3.3.1 Forces on the Belayer 3.3.1.1 Belay systems should be rigged with the assumption that the system may need
to withstand the force of a large fall. 3.3.1.2 Belay systems should be rigged so that in the event of a large force the belayer
will be in a direct line between the anchor and the force of the fall so that they are not subjected to significant forces and/or lateral movement.
24
WA Roping Activities Code of Practice Outdoors WA
4. Belaying Belaying is a fundamental skill for those taking part in roping activities. It is also a skill that many roping activity leaders tend to lose over time. It is essential that belaying skills are maintained to a high standard and are modelled and taught to novice participants at this standard. Further information on belaying can be found in the sources listed in the reference list. In particular refer to Chapter Eight of the Vertical Rescue Manual, Chapter Ten of Freedom of the Hills and Chapter Eleven of Life on a Line. Note: The belaying technique on page 161 of Freedom of the Hills is unsuitable for dependant participants.
4.1 Hip or Body Belay Hip or body belays should not be used with dependant groups unless there is a clear reason for doing so.
4.2 General Belaying Guidelines
4.2.1 Belay Position The belay position is an essential component of the operation of the belay system. 4.2.1.1 The belayer must be in a sound belay position including balanced stance, belay
system pre-loaded in the direction of the anticipated load with the rope stacked for easy use and accessibility. Both standing and sitting positions are acceptable.
4.2.1.2 The belayer should experience minimal movement in the event of a fall and should never be pulled over an edge.
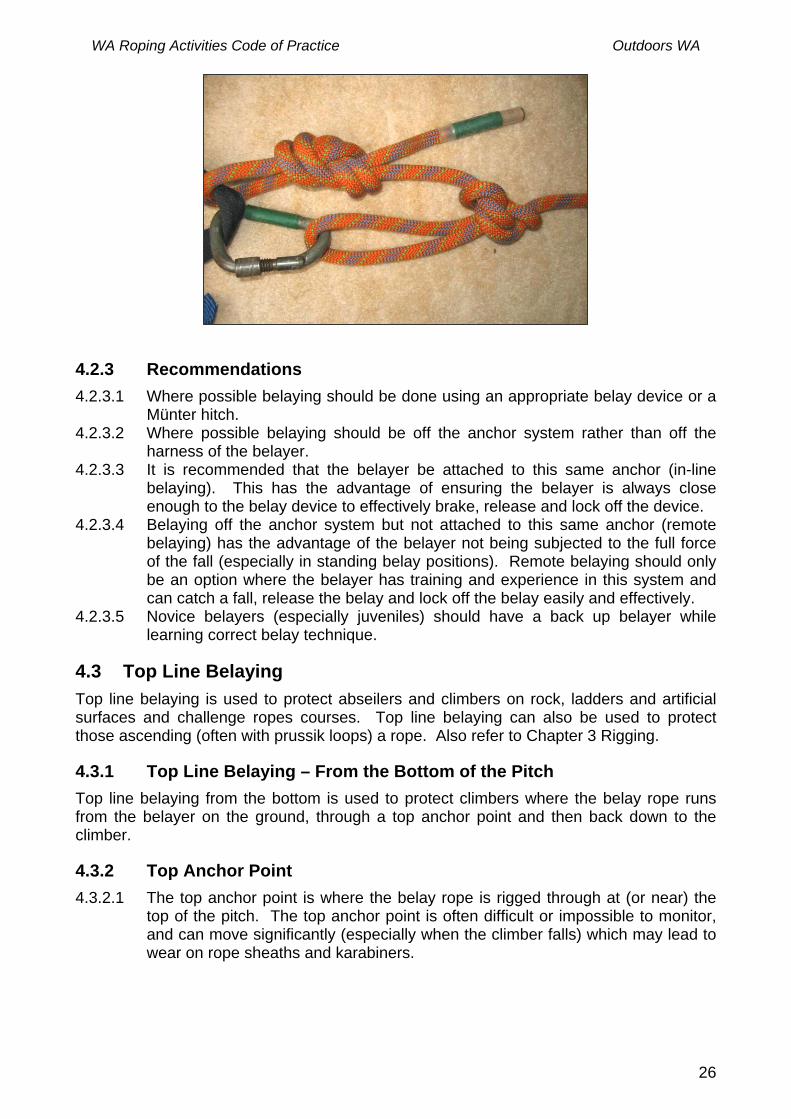
4.2.2 Attachment into Harness It is unacceptable to use a single karabiner to attach a belay line into a harness unless top belaying an abseiler where the orientation and attachment of the karabiner can be monitored during despatch and the weight of the abseiler ensures that this alignment is maintained. In all other cases it is essential that one of the following methods is used to attach a belay rope to a harness: 4.2.2.1 Figure 8 follow through knot – Recommended for lead climbing 4.2.2.2 Two opposite and opposed locking karabiners. 4.2.2.3 Clip and tie method (figure 8 follow through backed up with a karabiner via an
Alpine Butterfly (Middleman’s) knot) – see photograph below:
25
WA Roping Activities Code of Practice Outdoors WA
4.2.3 Recommendations 4.2.3.1 Where possible belaying should be done using an appropriate belay device or a
Münter hitch. 4.2.3.2 Where possible belaying should be off the anchor system rather than off the
harness of the belayer. 4.2.3.3 It is recommended that the belayer be attached to this same anchor (in-line
belaying). This has the advantage of ensuring the belayer is always close enough to the belay device to effectively brake, release and lock off the device.
4.2.3.4 Belaying off the anchor system but not attached to this same anchor (remote belaying) has the advantage of the belayer not being subjected to the full force of the fall (especially in standing belay positions). Remote belaying should only be an option where the belayer has training and experience in this system and can catch a fall, release the belay and lock off the belay easily and effectively.
4.2.3.5 Novice belayers (especially juveniles) should have a back up belayer while learning correct belay technique.
4.3 Top Line Belaying Top line belaying is used to protect abseilers and climbers on rock, ladders and artificial surfaces and challenge ropes courses. Top line belaying can also be used to protect those ascending (often with prussik loops) a rope. Also refer to Chapter 3 Rigging.
4.3.1 Top Line Belaying – From the Bottom of the Pitch Top line belaying from the bottom is used to protect climbers where the belay rope runs from the belayer on the ground, through a top anchor point and then back down to the climber.
4.3.2 Top Anchor Point 4.3.2.1 The top anchor point is where the belay rope is rigged through at (or near) the
top of the pitch. The top anchor point is often difficult or impossible to monitor, and can move significantly (especially when the climber falls) which may lead to wear on rope sheaths and karabiners.
26
WA Roping Activities Code of Practice Outdoors WA
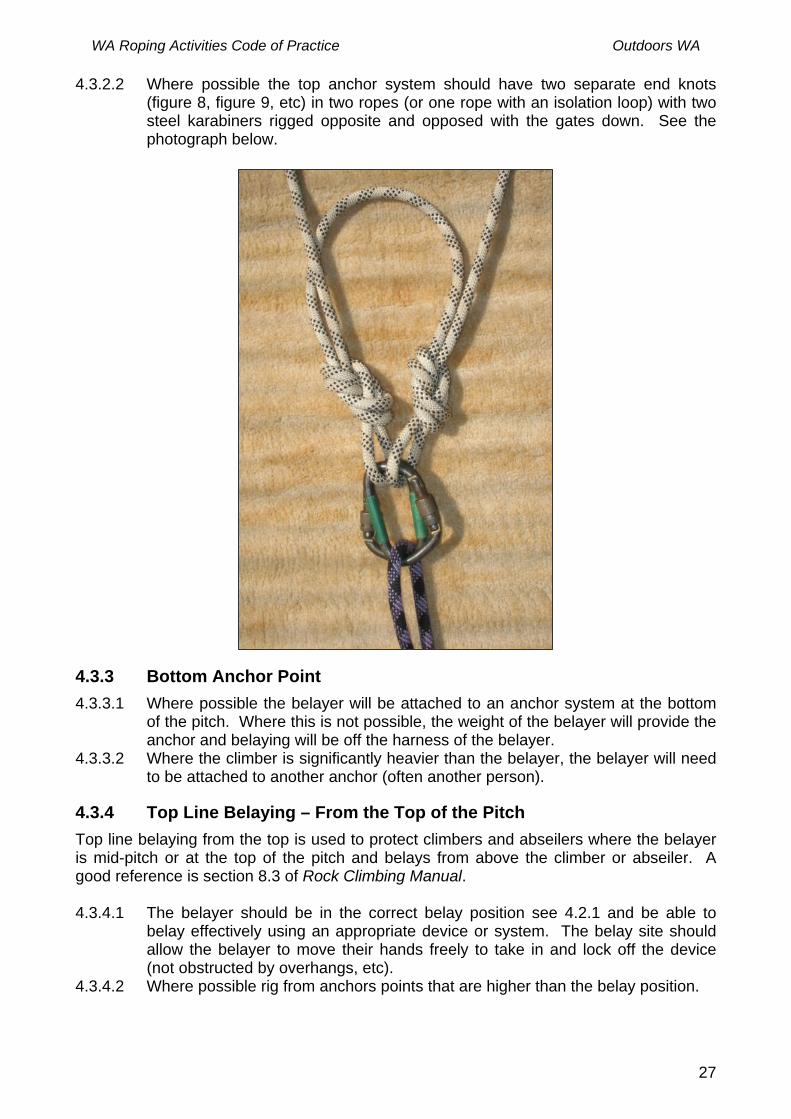
4.3.2.2 Where possible the top anchor system should have two separate end knots (figure 8, figure 9, etc) in two ropes (or one rope with an isolation loop) with two steel karabiners rigged opposite and opposed with the gates down. See the photograph below.
4.3.3 Bottom Anchor Point 4.3.3.1 Where possible the belayer will be attached to an anchor system at the bottom
of the pitch. Where this is not possible, the weight of the belayer will provide the anchor and belaying will be off the harness of the belayer.
4.3.3.2 Where the climber is significantly heavier than the belayer, the belayer will need to be attached to another anchor (often another person).
4.3.4 Top Line Belaying – From the Top of the Pitch Top line belaying from the top is used to protect climbers and abseilers where the belayer is mid-pitch or at the top of the pitch and belays from above the climber or abseiler. A good reference is section 8.3 of Rock Climbing Manual. 4.3.4.1 The belayer should be in the correct belay position see 4.2.1 and be able to
belay effectively using an appropriate device or system. The belay site should allow the belayer to move their hands freely to take in and lock off the device (not obstructed by overhangs, etc).
4.3.4.2 Where possible rig from anchors points that are higher than the belay position.
27

WA Roping Activities Code of Practice Outdoors WA
5. Generic Communications There are some communications that are common throughout roping activities in Western Australia. Whatever communications are used, it is important that all in the group understand the call, that different calls may not be confused, and that the appropriate actions on hearing a call are clear. Communications commonly take the form of voice, hand or whistle signals.
5.1 Rocks and Other Falling Objects Falling rocks are a real risk to participants in roping activities, particularly on natural surfaces. Other real risks include falling hardware, helmets, water bottles, etc.
5.1.1 Consistency for all Roping Activities The generic call for any falling objects is “Below!”. As a general rule the louder the call and the more often it is repeated the higher the risk the falling object is to those at the bottom of the pitch.
5.1.2 Training of Novices It is recommended that as part of the Safety Brief all novice participants on roping activities practice the call of “Below!” in an effort to reinforce the importance of the call and to encourage them to provide a loud call when it is required.
5.2 Thrown Ropes and Other Software It is generally understood that a falling rope, sling, piece of webbing, etc is not as serious a risk to participants as a rock, helmet, water bottle or piece of hardware. However, care must be taken to ensure that the area below is clear, or that people at the bottom are adequately warned if a rope is to be thrown or lowered to the base of a cliff. It is good practice to give anyone below you at least three seconds to react to your call before you throw the rope.
5.2.1 Consistency for all Roping Activities The generic call for any falling ropes or other software is “Rope Below!”.
28
WA Roping Activities Code of Practice Outdoors WA
6. Suspension Trauma (Harness Hang Syndrome) There has been considerable research done on suspension trauma which is also known as harness hang syndrome. Copies of some of this research and articles are available on the Outdoors WA web site. To quote:
The problems of being upright and motionless are well known and understood in the medical field, where it is known as orthostatic syndrome or orthostatic shock. It is not, however, generally realised by persons using personal fall protection equipment that in certain circumstances the same problems can apply when suspended in a harness. This condition is known as suspension trauma and has potentially fatal consequences. Suspension trauma, which is also known as harness induced pathology, appears to occur particularly in those subjects who are immobile while suspended in a harness, and can result in loss of consciousness and death Paul Seddon Harness suspension: review and evaluation of existing information UK Health and Safety Executive
Fatalities in the field tend to be climbers who have fallen and are mostly uninjured but end up hanging in an overhang situation or cavers ascending ropes and becoming exhausted and unable to continue. To quote:
From their test data, which appeared in a mountaineering magazine, the researchers concluded that vertical suspension can cause loss of consciousness without prior trauma or blood loss, and that an unconscious climber who remains in the vertical position is in danger of brain damage and eventual death within 4 to 6 minutes of fainting. Test Programme to Evaluate Human Response to Prolonged
Motionless Suspension in Three Types of All Protection Harnesses Harry G. Armstrong Aerospace Medical Research Laboratory Wright-Patterson Air Force Base, Ohio 45433-6573
These and other reports on this issue are detailed, however, in summary there are real risks of injury or death just from hanging suspended in a harness. The risks are much greater if the person is unconscious. The time a person can hang in a harness without injury varies on the type of harness; full body harnesses are better, sit harnesses are worse and single waist straps the worst of all. In summary however, someone stuck hanging immobile in a harness - any harness with any vertical system - is a dire medical emergency.
29

WA Roping Activities Code of Practice Outdoors WA
7. Abseiling Specific Issues Further information on abseiling / rappelling can be found in the sources listed in the reference list. In particular refer to Chapter Nine of the Vertical Rescue Manual, Chapter Eleven of Freedom of the Hills, Chapter Five of Self-Rescue and Chapter Eight of Rock Climbing Manual. Please note that some of the information on abseiling / rappelling in these references relates to recreational rock climbing and does not always apply to dependant groups.
7.1 Guidelines and Recommendations
7.1.1 Non Mechanical Methods Traditional abseil methods that do not use harnesses and hardware include the Dulferitz, Geneva, arm rappel, etc. 7.1.1.1 Non mechanical methods of abseiling should not be used for dependant groups.
7.1.2 Backup Systems for Abseiling Abseilers should always have a back up in place when abseiling. Further details on backup systems for abseiling can be found in Chapter 5 of Self-Rescue, Chapter 11 of Freedom of the Hills and Chapter 8 of Rock Climbing Manual. Backup systems include: 7.1.2.1 A self braking descending device such as a Petzl Stop that locks when the
abseiler takes their hand off the device. 7.1.2.2 Bottom brake belaying which is also referred to as a “fireman’s belay” or “belay
by partner below”. 7.1.2.3 Top line belaying where the belay rope is tied into the harness or attached into
the harness using a karabiner. 7.1.2.4 Self-belay where a prussik loop or rope grab is attached to the harness and then
either above or below the descender. This system is not for novice abseilers, it should only be used by roping activity leaders or those who have been trained in self belay.
7.1.3 Bottom Brake Belaying Bottom brake belaying is commonly used in Western Australia as a back up for abseiling. 7.1.3.1 Novice bottom brake belayers need to be taught to stand in a safe and stable
position, look at the abseiler, keep both hands high while grasping the rope loosely and to be ready to pull down strongly in the event that the abseiler requires braking. The rope cannot be held too tight as the abseiler will have difficulty in descending nor so loose that an effective brake cannot quickly be applied. Bottom brake belayers need to remain vigilant and apply the brake instantly in the event of the abseiler losing control of their descent.
7.1.3.2 Novice bottom brake belayers need to know what to do in the event of falling objects which includes knowing the escape route, never taking their hands off the rope and moving to avoid the falling object.
7.1.4 Top Rope Belaying Tope rope belaying is becoming more commonly used in Western Australia as a back up for abseiling.
30
WA Roping Activities Code of Practice Outdoors WA
7.1.4.1 It is essential that top line belay karabiners are not attached to the top of the
descender; it must be attached directly into the harness. A single karabiner is considered acceptable as there should be enough load on the karabiner to keep it aligned and not side loaded.
7.1.4.2 Top rope belayers need to be in a loaded anchor system using a suitable belay device. The belay rope should not be kept too tight as to restrict the descent of the abseiler nor should the belayer ‘feed’ the rope through the belay device as excessive slack can be introduced into the belay system; the weight of the abseiler should pull the belay rope through the belay device.
7.1.4.3 Top line belayers need to be vigilant and apply the brake instantly in the event of the abseiler losing control of their descent. This is especially important near the bottom of a long pitch.
7.1.5 Comparison of Top Line Belaying and Bottom Braking Top line belaying and bottom brake belaying are both safe and effective belay methods for abseiling when done correctly and in some cases one method may be superior to the other. 7.1.5.1 Bottom brake belaying should be avoided where possible when there is a
significantly increased risk (mostly rock fall) to the bottom brake belayer. 7.1.5.2 Bottom brake belaying should also be avoided when the bottom brake belayer
does not have a clear view of the abseiler while they are on the pitch. 7.1.5.3 Top line belay systems are less effective when belaying an abseiler near the
bottom of a long pitch.
7.1.6 Self Belay Systems Self belay systems are used by experienced abseilers to provide a safety backup in the event of them losing control of their descent. 7.1.6.1 Self belay systems rely on the ‘dead mans’ safety where the belay will engage
when the abseiler lets go completely of the rope, particularly in the event of the abseiler losing consciousness.
7.1.6.2 The disadvantage of this system is that if the abseiler panics rather than losing consciousness the natural reaction is to grab the rope harder which may prevent the belay system from engaging. There have been a number of incidents in Western Australia where novice abseilers have had uncontrolled descents on self belay systems.
7.1.6.3 Novices being trained to use self belay systems should have another belay system (bottom brake or top line) in place and should practice letting go to engage the self belay system.
7.1.7 Single versus Double Brake Single and double brake systems are both safe and effective methods for backwards abseiling when done correctly.
31

WA Roping Activities Code of Practice Outdoors WA
7.1.7.1 A single brake refers to using the braking hand behind the body as the only
brake. The other hand normally holds the rope lightly above the descender for balance.
7.1.7.2 A double brake refers to also using the front hand to brake by putting the thumb through the karabiner and holding the rope. This is only possible if the descender is attached close to or directly into the harness.
7.1.7.3 Double brake systems are often taught to novices to increase their confidence in their ability to stop themselves or to large abseilers who may lack the strength to stop themselves. The disadvantage is that novice abseilers can have difficulty in coordinating both brakes so that they can descend the pitch smoothly or that they develop poor braking habits by using the top / front hand as the primary brake hand.
7.1.7.4 Single brake systems have the advantage of simplicity and ease of coordinating the braking on the descender. Single brake systems also teach the novice to use the lower / rear brake hand as the primary brake which is consistent with the use of most commonly used belay devices. The disadvantage is that novice abseilers can let go of the rope with the braking hand (when falling sideways for example) and start an uncontrolled descent.
7.1.8 Rigging of Figure 8 Descender Figure 8 descenders are the most commonly used descenders for dependant groups in Western Australia. The preferred rigging methods (for right handed abseilers) are: 7.1.8.1 For a single rope in normal use:
32
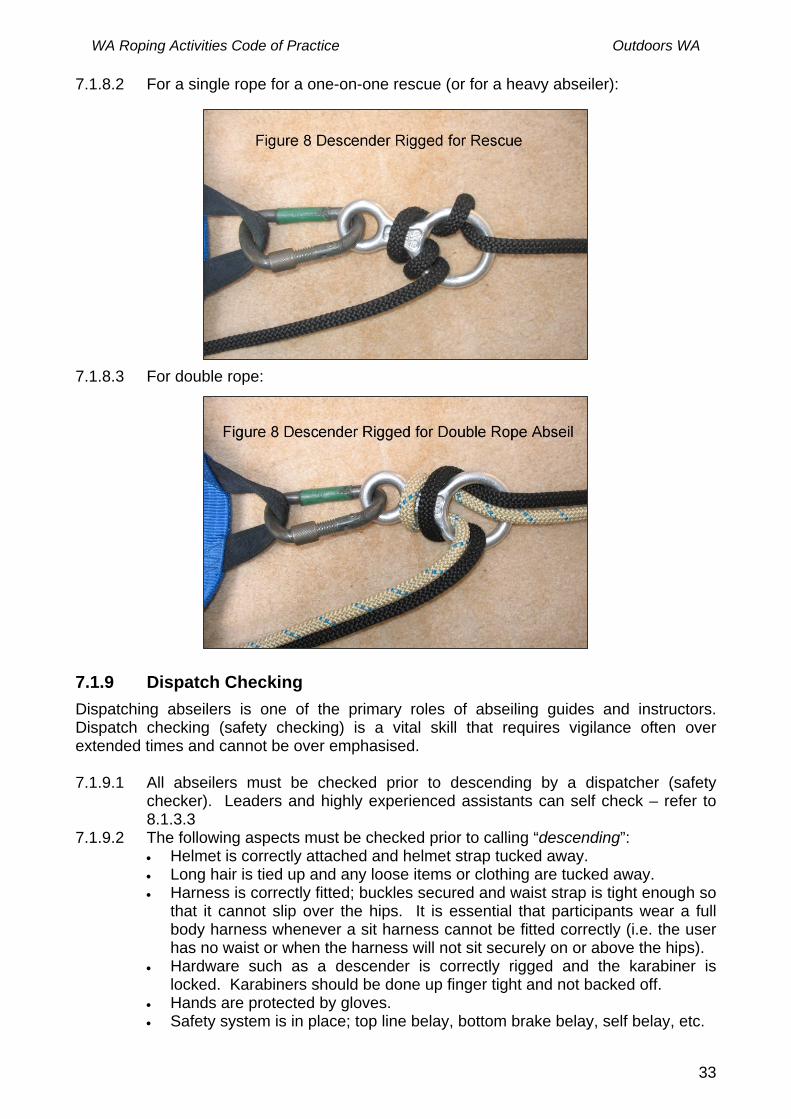
WA Roping Activities Code of Practice Outdoors WA
7.1.8.2 For a single rope for a one-on-one rescue (or for a heavy abseiler):
7.1.8.3 For double rope:
7.1.9 Dispatch Checking Dispatching abseilers is one of the primary roles of abseiling guides and instructors. Dispatch checking (safety checking) is a vital skill that requires vigilance often over extended times and cannot be over emphasised. 7.1.9.1 All abseilers must be checked prior to descending by a dispatcher (safety
checker). Leaders and highly experienced assistants can self check – refer to 8.1.3.3
7.1.9.2 The following aspects must be checked prior to calling “descending”: • Helmet is correctly attached and helmet strap tucked away. • Long hair is tied up and any loose items or clothing are tucked away. • Harness is correctly fitted; buckles secured and waist strap is tight enough so
that it cannot slip over the hips. It is essential that participants wear a full body harness whenever a sit harness cannot be fitted correctly (i.e. the user has no waist or when the harness will not sit securely on or above the hips).
• Hardware such as a descender is correctly rigged and the karabiner is locked. Karabiners should be done up finger tight and not backed off.
• Hands are protected by gloves. • Safety system is in place; top line belay, bottom brake belay, self belay, etc.
33
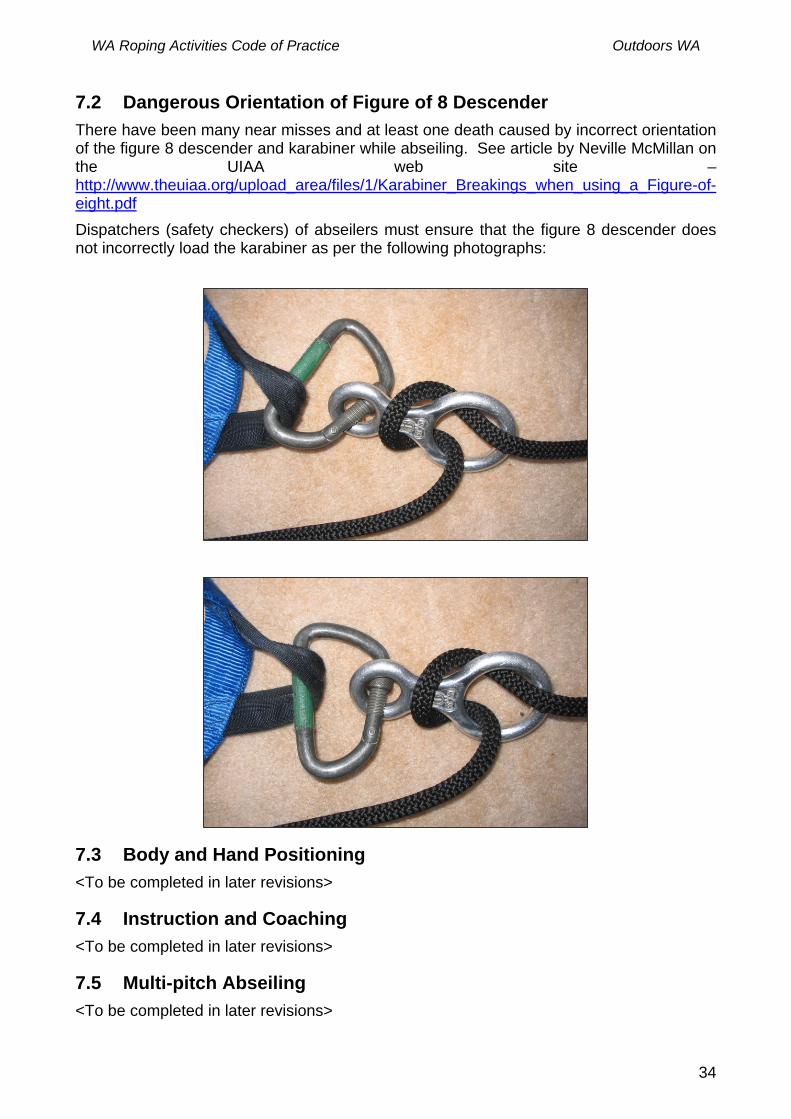
WA Roping Activities Code of Practice Outdoors WA
7.2 Dangerous Orientation of Figure of 8 Descender There have been many near misses and at least one death caused by incorrect orientation of the figure 8 descender and karabiner while abseiling. See article by Neville McMillan on the UIAA web site – http://www.theuiaa.org/upload_area/files/1/Karabiner_Breakings_when_using_a_Figure-of-eight.pdf Dispatchers (safety checkers) of abseilers must ensure that the figure 8 descender does not incorrectly load the karabiner as per the following photographs:
7.3 Body and Hand Positioning <To be completed in later revisions>
7.4 Instruction and Coaching <To be completed in later revisions>
7.5 Multi-pitch Abseiling <To be completed in later revisions>
34
WA Roping Activities Code of Practice Outdoors WA
7.6 Abseiling on Karst <To be completed in later revisions>
7.7 Routine Emergencies <To be completed in later revisions>
35
WA Roping Activities Code of Practice Outdoors WA
8. Alternative Descent Methods There are a number of alternative descent methods that have been used in Western Australia. Research has shown that these methods are not wides used elsewhere in the world with dependant groups. All alternative descent methods must have the speed of the descent of the abseiler appropriately managed.
8.1 Forward Abseiling (Also known as Front/Forward Rundowns, Karabiner Rundowns, Australian Rappelling)
8.1.1 Definition 8.1.1.1 The abseiler is attached to the rope via a descender and karabiner that is
attached to the rear of the harness and the abseiler descends the pitch facing towards the ground. Braking is done with the hands at the front of the body. Some instructors teach braking by moving the rope across the chest or abdomen.
8.1.1.2 Belaying by top rope or bottom brake belay is effective for this activity.
8.1.2 Risk Assessment 8.1.2.1 Belaying by top rope or bottom brake belay is effective for this activity. 8.1.2.2 Normal Activity: A standard sit harness shares the load between the waist and
the legs when abseiling backwards. The same harness when used for forward abseiling has the entire load on the waist strap (waist belt or body belt), especially in overhang situations. This in turn places pressure on the abdomen and/or lower ribs.
8.1.2.3 For many people taking part in forward abseiling this is not a concern, however for some people taking part in forward abseiling this can lead to some discomfit and for a small percentage this pressure results in nausea and vomiting.
8.1.2.4 As the attachment is at the rear of the harness there is more chance that the abseiler will rig the descender incorrectly. With formal groups an experienced dispatcher (safety checker) will check and fix the rig. In the case of experienced forward abseilers who do not have an experienced dispatcher to check them, there have been a number of injuries and possibly one death from incorrect rigging. Some possible scenarios: • The karabiner may inadvertently be attached to the wrong part of the harness
leading to the failure of the attachment. • The karabiner gate may be inadvertently be side loaded leading to the failure
of the karabiner. 8.1.2.5 Routine Emergency: The tests done on suspension trauma where the victims
were motionless clearly show that victims suspended in waist belt / body belt harnesses with rear attachments end up facing forward and down in the ‘jack knife’ position.
8.1.2.6 A study conducted for OSHA at Wright-Patterson Air Force Base (1986) found that participants were able to suspend in a ‘jack-knife’ position for an average of 1 minute and 38 seconds. Subjects reported abdominal pressure and breathing difficulty. In comparison, the mean suspension time in a full body harness was 30 minutes and 7 seconds.
36

WA Roping Activities Code of Practice Outdoors WA
The critical issue is that in the event of a forward abseiler who becomes ‘stuck’ on a rope (due to clothing jam, etc) or becoming unconscious on a rope (due to trauma or medical event) the rescuers have a very short time in which to get this victim to the ground. This time could be as short at 2 minutes.
8.1.3 Risk Management 8.1.3.1 As with all roping activities, it is essential that participants wear a full body
harness whenever a sit harness cannot be fitted correctly (i.e. the user has no waist or when the harness will not sit securely on or above the hips).
8.1.3.2 It is essential that the manufacturer of the harness endorses forward abseiling using their equipment.
8.1.3.3 It is essential that all abseilers taking part in forward abseiling have their attachment system checked by a competent person other than the abseiler before descending.
8.1.3.4 It is essential that all abseilers are competent in traditional backward abseiling. 8.1.3.5 It is essential that abseilers have both hands on the free end of the rope to brake
with. 8.1.3.6 It is essential that forward abseiling take place on faces with slopes on angles
where at least half of the participant's weight it taken by their feet. Angles up to 70 to 75 degrees meet this guideline.
8.1.3.7 It is essential that roping activity leaders have the skills and experience in leading groups taking part in forward abseiling and are able to arrest the descent of the abseiler.
8.1.3.8 It is essential that roping activity leaders are fluent in handling routine emergencies while forward abseiling such as hair and clothing jams and an abseiler falling unconscious mid pitch.
8.1.4 Endorsement Outdoors WA endorses Forward Abseiling as an appropriate alternative descent as long as the above risk management strategies are followed.
8.1.5 Further Research Further research on alternative harness types, suspension trauma issues and rescue methods is required.
37
WA Roping Activities Code of Practice Outdoors WA
8.2 Inversion Abseiling (Also known as Spear Abseiling, Crucifix Abseiling)
8.2.1 Definition 8.2.1.1 This activity requires an overhanging rope pitch. 8.2.1.2 At the start the abseiler is attached to the rope via a descender and karabiner
that is attached to the front of the harness and the abseiler descends the pitch backwards towards the ground. Braking is done with the hands at the side and back of the body as per backward abseiling.
8.2.1.3 Inversion / Spear: When the abseiler is hanging completely free of the wall, the
abseiler asks for the belayer to put the brake on. When the abseiler is secured by the belay he/she takes their hands off the rope, swings their legs up and clamps the rope between their feet. The abseiler is then upside down and vertical with braking done using both hands either above the head or at chest level.
8.2.1.4 Crucifix: Same set up as above however the abseiler has both hands off the
rope and out to the side (inverted crucifix position) and all braking is done be the belayer.
8.2.1.5 Inversions sometimes inadvertently occur with novice abseilers. This is often demonstrated during formal instruction and safety briefs and the recovery from these inversions might be taught to these groups. These demonstrations and recoveries are not included in the definition of this activity.
8.2.1.6 Belaying is usually done by bottom brake belay, however top rope belay also works with some rope stretch when the abseiler takes their hands off the brake. Before the abseiler reaches the ground he/she needs to roll back to the normal position to land on their feet.
8.2.2 Risk Assessment 8.2.2.1 Normal Activity: A standard sit harness when correctly fitted will not slide down
over the hips in an inversion. If the harness is not correctly fitted, however, there is a risk that the abseiler could slide out of the harness.
8.2.2.2 In the case of crucifix abseiling, the belayer / bottom brake person has the complete control of the abseiler’s descent. An inexperienced brake person may not have the skills to brake the abseiler safely.
8.2.2.3 There is a risk of injury to the abseiler from contact with the wall if the abseiler starts the invert too soon or the site is not sufficiently overhanging.
8.2.2.4 There is a greater risk of rope burn on the inside of the leg of the abseiler. 8.2.2.5 There is a greater risk of falling objects when the abseiler inverts. 8.2.2.6 There is a risk of the abseiler hitting the ground head first. 8.2.2.7 Routine Emergency: There does not appear to be significantly greater risk
associated with a routine emergency during this activity. Hair or clothing jams would be dealt with in the same way as backward abseiling. In the case of a bottom brake belay system in the event of an abseiler with a jam of their pants leg they would be unable to stand in a leg prussik to free the jam.
38
WA Roping Activities Code of Practice Outdoors WA
8.2.3 Risk Management 8.2.3.1 As with all roping activities, it is essential that participants wear a full body
harness whenever a sit harness cannot be fitted correctly (i.e. the user has no waist or when the harness will not sit securely on or above the hips). This is especially important for this activity.
8.2.3.2 It is essential that this activity takes place at sites with large overhangs and a clear view of the abseiler from the top and bottom of the pitch.
8.2.3.3 It is essential that belayers are properly trained and experienced in controlling the descent of abseilers.
8.2.3.4 It is essential that roping activity leaders have the skills and experience in leading groups taking part in inversion abseiling and are able to arrest the descent of the abseiler.
8.2.3.5 It is essential that roping activity leaders are fluent in handling routine emergencies while inversion abseiling such as hair and clothing jams and an abseiler falling unconscious mid pitch.
8.2.3.6 It is recommended that all abseilers are competent in traditional backward abseiling.
8.2.3.7 It is recommended that participants taking part in inversion abseiling wear full body harnesses or have chest harnesses worn with a sit harness.
8.2.4 Endorsement Outdoors WA endorses Inversion Abseiling as an appropriate alternative descent as long as the above risk management strategies are followed.
8.2.5 Further Research Further research on alternative harness types, suspension trauma issues and rescue methods is required.
39
WA Roping Activities Code of Practice Outdoors WA
8.3 Trust Abseiling
8.3.1 Definition 8.3.1.1 This activity normally requires an overhanging pitch. 8.3.1.2 At the start the abseiler is attached to the rope via a descender and karabiner
that is attached to the front of the harness and the abseiler descends the pitch backwards towards the ground. Braking is done with the hands at the side and back of the body as per backward abseiling. When the abseiler is hanging completely free of the wall, the abseiler asks for the belayer to put the brake on. When the abseiler is secured by the belay he/she takes their hands off the rope, leans back and holds their arms wide. They then hand over the control of their descent to the belayer, often using a countdown. The belayer then controls the abseiler’s descent to the ground. Mostly this descent is relatively slow; however, it can be done with a quick release of the brake leading to a short, fast acceleration before slowing down well before the ground.
8.3.1.3 Usually the bottom brake belayer is an experienced and preferably qualified guide or instructor. In the event of other participants braking an abseiler this is usually done under direct (hands on) supervision of a qualified and experienced guide or instructor.
8.3.1.4 Belaying is usually done by bottom brake belay, however top rope belay also works with some rope stretch when the abseiler takes their hands off the brake.
8.3.1.5 This is also a rescue technique that may be done on vertical and angled slopes which enables the rescuer to have both hands free while the descent is controlled by a belayer.
8.3.2 Risk Assessment 8.3.2.1 Normal Activity: In the case of trust abseiling, the belayer / bottom brake
person has the complete control of the abseiler’s descent. An inexperienced brake person may not have the skills and experience to brake the abseiler safely. This is especially true if the activity is run with fast starts and/or large abseilers where there is a real risk of the bottom brake person being unable to stop the descent of the abseiler.
8.3.2.2 There is a risk of injury to the abseiler from contact with the wall if the abseiler starts the invert too soon or the site is not sufficiently overhanging.
8.3.2.3 There is additional stress put on the sheath of low stretch kernmantle ropes that are used in fast descents with heavy abseilers. Sheaths on these ropes can be damaged very quickly.
8.3.2.4 Routine Emergency: There do not appear to be significantly greater risks
associated with a routine emergency during this activity.
8.3.3 Risk Management 8.3.3.1 As with all roping activities, it is essential that participants wear a full body
harness whenever a sit harness cannot be fitted correctly (i.e. the user has no waist or when the harness will not sit securely on or above the hips).
8.3.3.2 It is essential that this activity takes place at sites with a clear view of the abseiler from the top and bottom of the pitch.
8.3.3.3 It is essential that bottom brake belayers have passed a formal assessment of their belaying skills in controlling the descent of abseilers. There may be
40
WA Roping Activities Code of Practice Outdoors WA
situations where a bottom brake belayer needs to have a minimum strength and/or weight.
8.3.3.4 It is essential that the rope sheath is checked regularly during the conduct of this activity.
8.3.3.5 It is recommended that all abseilers are competent in traditional backward abseiling.
8.3.4 Endorsement Outdoors WA endorses Trust Abseiling as an appropriate alternative descent as long as the above risk management strategies are followed.
8.3.5 Further Research Further research on alternative harness types, suspension trauma issues and rescue methods is required.
41
WA Roping Activities Code of Practice Outdoors WA
8.4 Star Jumps
8.4.1 Definition 8.4.1.1 This activity requires a large overhanging pitch with a clearly defined lip. At the
start the abseiler is attached to the rope via a descender and karabiner that is attached to the rear of the harness and the abseiler descends the pitch facing towards the ground. Braking is done with the hands at the front of the body. Some instructors teach braking by moving the rope across the chest or abdomen. Some instructors teach holding the rope diagonal across the body pushing the rope between the legs.
8.4.1.2 Bottom brake belayers are highly experienced and are often qualified guides or instructors. When the abseiler reaches the lip of the overhang, the abseiler asks for the bottom brake belayer to put the brake on. When the abseiler is secured by the belay he/she takes their hands off the rope, and holds their arms wide. They then hand over the control of their descent to the belayer, often using a countdown. The belayer then releases the brake and controls the abseiler’s descent to the ground. This is mostly done with a quick release of the brake leading to a short, fast acceleration before slowing down well before the ground.
8.4.1.3 Belaying is usually done by bottom brake belay. It may be possible to run this activity with a top rope belay.
8.4.2 Risk Assessment 8.4.2.1 There have been a number of serious injuries to both abseilers and bottom
brake belayers while running this activity. 8.4.2.2 Normal Activity: See the risk assessment in the Forward Abseiling section
which also applies to Star Jumps. 8.4.2.3 In the case of star jumps, the belayer / bottom brake person has the complete
control of the abseiler’s descent. An inexperienced brake person may not have the skills and experience to brake the abseiler safely. This is especially true if the activity is run with fast starts and/or large abseilers where there is a real risk of the bottom brake person being unable to stop the descent of the abseiler.
8.4.2.4 There is a risk of injury to the abseiler from contact with the wall if the abseiler starts the star jump too soon or the site is not sufficiently overhanging.
8.4.2.5 There is additional stress put on the sheath of low stretch kernmantle ropes that are used in fast descents with heavy abseilers. Sheaths on these ropes can be damaged very quickly.
42

WA Roping Activities Code of Practice Outdoors WA
8.4.2.6 Routine Emergency: See the risk assessment in the Forward Abseiling section which also applies to Star Jumps.
8.4.2.7 In addition, in the event of a clothing jam there may be a sudden deceleration experienced by the abseiler which could lead to additional pressure on the abdomen and lower ribs.
8.4.3 Endorsement Outdoors WA currently does not currently endorse Star Jump Abseiling as an appropriate alternative descent.
8.4.4 Further Research Further research on alternative harness types, suspension trauma issues and rescue methods is required.
43
WA Roping Activities Code of Practice Outdoors WA
8.5 Angel Jumps (Also known as Angel Diving, Slack Rope Australian Rappelling, Forward Exit)
8.5.1 Definition – Forward Exit or Slack Line / Slack Rope Australian Rappelling
8.5.1.1 This activity requires a large overhanging pitch. 8.5.1.2 The abseiler pulls some slack rope through the descender and then attaches it
to the front of the harness with a karabiner. The abseiler then jumps off the edge of the overhang and free falls until the rope becomes tight and the descender takes up. Braking is done with the hands at the side and behind the body as per backward abseiling.
8.5.2 Definition – Angel Jumps or Angel Diving 8.5.2.1 This activity requires a large overhanging pitch. 8.5.2.2 The abseiler pulls some slack rope through the descender and then attaches it
to the rear of the harness with a karabiner. The abseiler then jumps off the edge of the overhang and free falls until the rope becomes tight and the descender takes up. Braking is then done with the hands at the front of the body and in some cases by moving the rope across the chest or abdomen.
8.5.2.3 Belaying is challenging. Often people doing Forward Exits and Angel Jumps do
not have a back up. 8.5.2.4 Bottom brake belaying requires high levels of skill and quick reflexes. The
belayer needs to gather in the rope as it is falling toward them and then apply the brake quickly if needed. Depending on the height of the pitch and the amount of slack line it may be impossible to bottom brake belay effectively.
8.5.2.5 Belaying with a top line is the safest. The belayer need to pull through more slack rope than is in the abseil line and try to avoid shock loading abseiler when the belay rope takes up.
8.5.3 Risk Assessment 8.5.3.1 There have been a number of serious injuries to abseilers running this activity.
This is a high risk activity. 8.5.3.2 Normal Activity: See the risk assessment in the Forward Abseiling and Star
Jump section which also applies to Angel Jumps. 8.5.3.3 Falls from height can generate considerable forces. These forces are difficult to
quantify in this activity as much of the force is taken up by the rope sliding through the descender, however there is still likely to be significant force transferred to the anchor system through the low stretch kernmantle abseil rope. The safe working load for 11mm low stretch kernmantle rope is 1/8 of 3000kg which is 375kg. It is likely that the safe working load of the rope and the hardware will be exceeded on large slack line abseils.
8.5.3.4 When taking part in slack line abseiling it is difficult or impossible to ensure that the descender and the karabiner are in the correct position when the rope becomes tight. In the event of the karabiner becoming side loaded there is a high chance of karabiner failure.
44

WA Roping Activities Code of Practice Outdoors WA
There are documented cases of karabiners failing: “… the load required to produce the failure is only slightly above the typical climber’s static weight, and well within his dynamic weight.” See article by Neville McMillan – Karabiner Breakings Using FOE).
8.5.3.5 There is also the risk of the rope through the figure 8 descender becoming a larks foot hitch and jamming the rope. This means that the shock load of the falling abseiler will be transferred to a low stretch kernmantle rope which will almost certainly result in injury or death to the abseiler.
8.5.3.6 In addition, the belayer / bottom brake person has to be highly skilled and experienced in controlling the descent of the abseiler. Bottom brake belayers may well not be able to apply an effective brake in the time required. Top line belayers need to be trained to avoid braking the abseiler with too much force.
8.5.3.7 This activity must be performed in an overhang situation to avoid injury to the abseiler from contact with the wall. There must be sufficient slack rope to avoid hitting any part of the overhanging roof but not excessive slack rope where the forces generated will cause the equipment to fail.
8.5.3.8 Routine Emergency: See the risk assessment in the Forward Abseiling and
Star Jump section which also applies to Angel Jumps. 8.5.3.9 In the case of a hair jam the abseiler is likely to be seriously injured due to the
speed of the abseil. The hair is likely to be torn out or the abseiler’s head damaged as it was forced into the descender. In the case of a clothing jam there it is likely that there will be a sudden deceleration which is likely to cause injury, especially when jumping forwards.
8.5.3.10 In the case of an unconscious abseiler there is a real risk that the bottom brake belayer would be unable to brake the abseiler effectively in time to prevent them hitting the ground. A top line belay may catch the abseiler if the belayer has time to apply the brake.
8.5.4 Endorsement Outdoors WA currently does not currently endorse Angel Jump Abseiling as an appropriate alternative descent.
8.5.5 Further Research Further research on alternative harness types, suspension trauma issues and rescue methods is required.
45

WA Roping Activities Code of Practice Outdoors WA
9. Rock Climbing Specific Issues <To be completed in later revisions>
9.1 Top Line versus Lead Climbing <To be completed in later revisions>
9.2 Communications <To be completed in later revisions>
9.3 Dispatch checking <To be completed in later revisions>
9.4 Artificial Protection <To be completed in later revisions>
9.5 Multi-Pitch Climbing <To be completed in later revisions>
9.6 Routine Emergencies <To be completed in later revisions>
46
WA Roping Activities Code of Practice Outdoors WA
10. Canyoning Specific Issues <To be completed in later revisions>
10.1 Roping Equipment issues in Canyons <To be completed in later revisions>
10.2 Vertical versus Horizontal Travel – Edge protection <To be completed in later revisions>
10.3 Dispatch checking <To be completed in later revisions>
10.4 Artificial Protection <To be completed in later revisions>
10.5 Communications <To be completed in later revisions>
10.6 Retrieval of Roping Equipment <To be completed in later revisions>
10.7 Routine Emergencies <To be completed in later revisions>
47
WA Roping Activities Code of Practice Outdoors WA
11. Caving Specific Issues <To be completed in later revisions>
11.1 Roping Equipment issues in Caves <To be completed in later revisions>
11.2 Vertical versus Horizontal Travel – Edge protection <To be completed in later revisions>
11.3 Communications <To be completed in later revisions>
11.4 Dispatch checking <To be completed in later revisions>
11.5 Single Pitch <To be completed in later revisions>
11.6 Multi-Pitch <To be completed in later revisions>
11.7 Rebelays versus Deviations <To be completed in later revisions>
11.8 Retrieval of Roping Equipment <To be completed in later revisions>
11.9 Routine Emergencies <To be completed in later revisions>
48
WA Roping Activities Code of Practice Outdoors WA
12. Artificial Climbing Specific Issues
12.1 Standards
12.1.1 International Standards 12.1.1.1 EN12572:1998 Artificial Climbing Structures – Protection points, stability
requirements and test methods is the standard to apply to artificial climbing structures.
12.1.2 Australian Standards See 3.1.1
12.2 Dispatch checking <To be completed in later revisions>
12.3 Communications <To be completed in later revisions>
12.4 Routine Emergencies <To be completed in later revisions>
49
WA Roping Activities Code of Practice Outdoors WA
13. Challenge Ropes Courses Specific Issues <To be completed in later revisions>
13.1 Roping Equipment – Elements and Belay Systems <To be completed in later revisions>
13.2 Dispatch checking <To be completed in later revisions>
13.3 Self Belay Issues <To be completed in later revisions>
13.4 Communications <To be completed in later revisions>
13.5 Routine Emergencies
50

WA Roping Activities Code of Practice Outdoors WA
14. Ascending Activities <To be completed in later revisions>
14.1 Prusiking <To be completed in later revisions>
14.2 Dispatch checking <To be completed in later revisions>
14.3 Top Line Belay Issues <To be completed in later revisions>
14.4 Self Belay Issues <To be completed in later revisions>
14.5 Communications <To be completed in later revisions>
14.6 Routine Emergencies <To be completed in later revisions>
51
WA Roping Activities Code of Practice Outdoors WA
15. Other Roping Activities <To be completed in later revisions>
15.1 Tyrolean Traverse <To be completed in later revisions>
15.2 Flying Fox <To be completed in later revisions>
52

WA Roping Activities Code of Practice Outdoors WA
16. Mechanical Advantage Hauling Systems All roping activity leaders must be proficient in mechanical advantage hauling systems appropriate to the roping activity and site. In the case of climbing wall or high ropes course leaders this may only require the ability to raise a participant a short distance so that they might then be lowered. Roping activity leaders who lead multi-pitch abseiling or climbing on natural surfaces will require a greater level of skill than those who lead single pitch roping activities on natural surfaces or activities on artificial surfaces and structures.
16.1 Usage – Routine Emergencies Roping activity leaders should be able to differentiate between a 2:1, 3:1 and 4:1 mechanical advantage. The appropriate mechanical advantage for the particular emergency and rescue strategy should be chosen.
16.2 Rigging Specifics Roping activity leaders should be able to fluently rig simple mechanical advantage hauling systems using basic anchors with the facility to raise, reset, reverse and lower. Suggested rigging time is 12 minutes or less.
16.3 Operation Roping activity leaders should be able to fluently operate mechanical advantage hauling systems including raising, resetting, reversing and lowering.
53
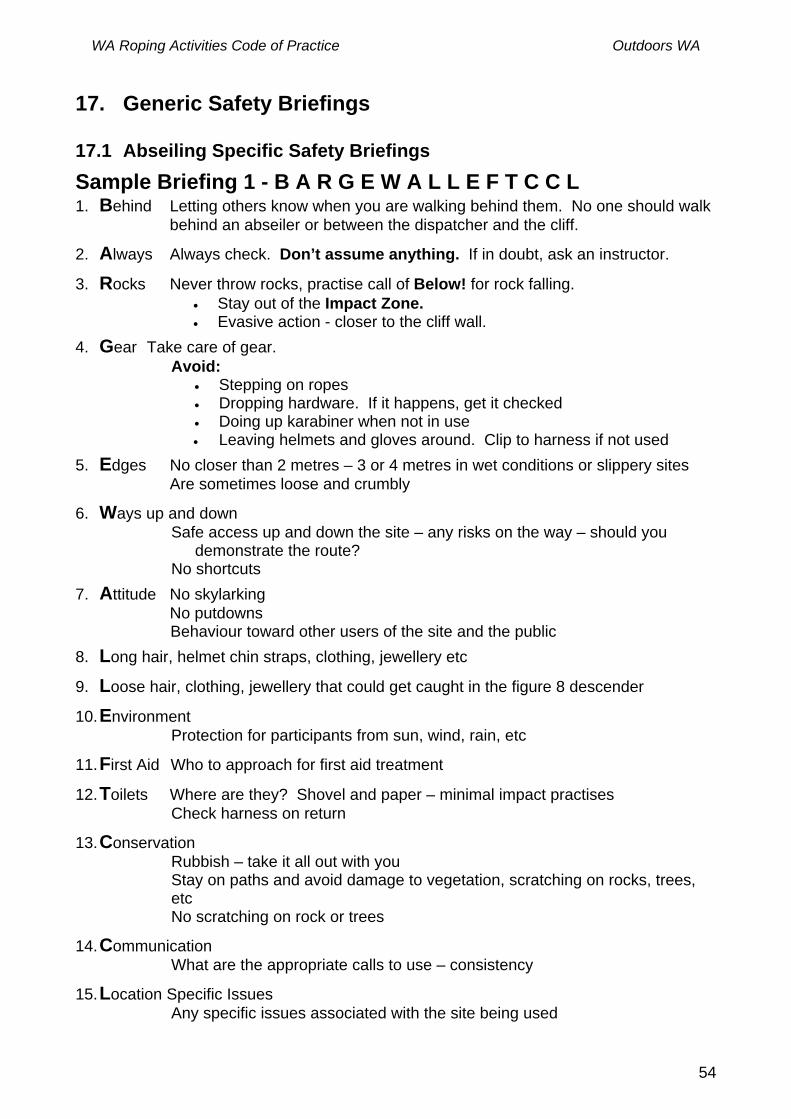
WA Roping Activities Code of Practice Outdoors WA
17. Generic Safety Briefings
17.1 Abseiling Specific Safety Briefings Sample Briefing 1 - B A R G E W A L L E F T C C L 1. Behind Letting others know when you are walking behind them. No one should walk
behind an abseiler or between the dispatcher and the cliff.
2. Always Always check. Don’t assume anything. If in doubt, ask an instructor.
3. Rocks Never throw rocks, practise call of Below! for rock falling. • Stay out of the Impact Zone. • Evasive action - closer to the cliff wall.
4. Gear Take care of gear. Avoid:
• Stepping on ropes • Dropping hardware. If it happens, get it checked • Doing up karabiner when not in use • Leaving helmets and gloves around. Clip to harness if not used
5. Edges No closer than 2 metres – 3 or 4 metres in wet conditions or slippery sites Are sometimes loose and crumbly
6. Ways up and down Safe access up and down the site – any risks on the way – should you
demonstrate the route? No shortcuts
7. Attitude No skylarking No putdowns Behaviour toward other users of the site and the public
8. Long hair, helmet chin straps, clothing, jewellery etc
9. Loose hair, clothing, jewellery that could get caught in the figure 8 descender
10. Environment Protection for participants from sun, wind, rain, etc
11. First Aid Who to approach for first aid treatment
12. Toilets Where are they? Shovel and paper – minimal impact practises Check harness on return
13. Conservation Rubbish – take it all out with you Stay on paths and avoid damage to vegetation, scratching on rocks, trees, etc No scratching on rock or trees
14. Communication What are the appropriate calls to use – consistency
15. Location Specific Issues Any specific issues associated with the site being used
54
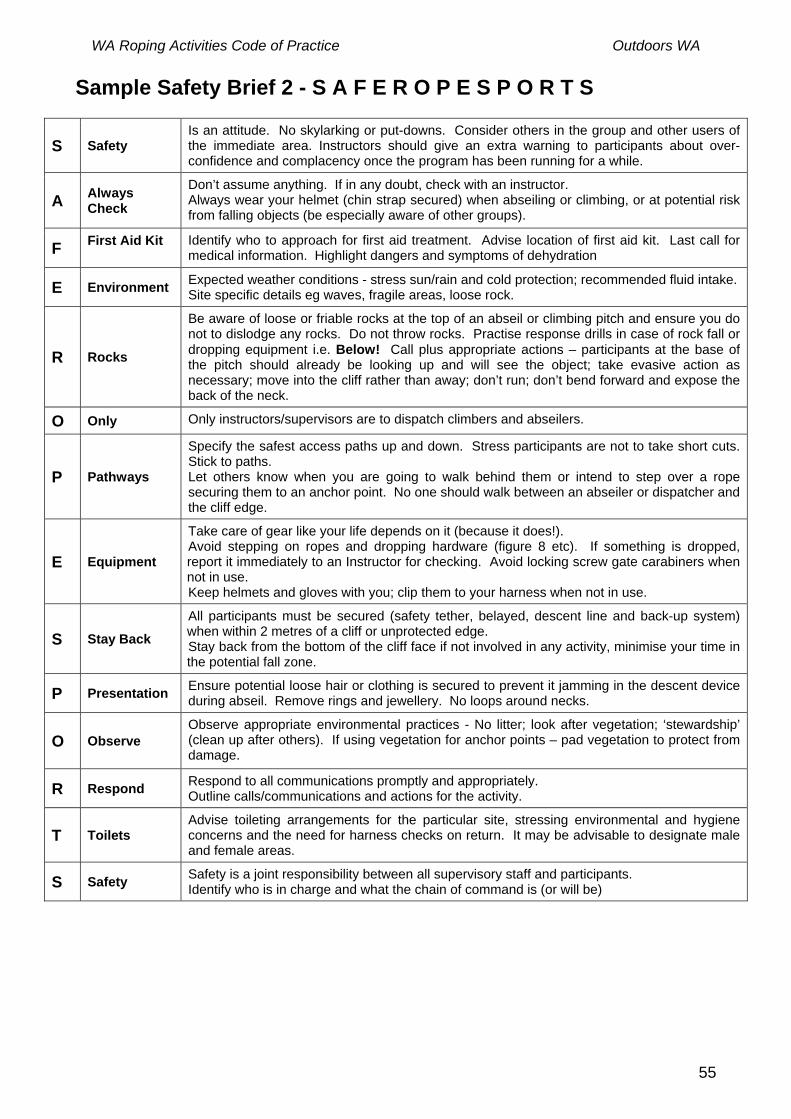
WA Roping Activities Code of Practice Outdoors WA
Sample Safety Brief 2 - S A F E R O P E S P O R T S
S Safety Is an attitude. No skylarking or put-downs. Consider others in the group and other users of the immediate area. Instructors should give an extra warning to participants about over-confidence and complacency once the program has been running for a while.
A Always Check
Don’t assume anything. If in any doubt, check with an instructor. Always wear your helmet (chin strap secured) when abseiling or climbing, or at potential risk from falling objects (be especially aware of other groups).
F First Aid Kit
Identify who to approach for first aid treatment. Advise location of first aid kit. Last call for medical information. Highlight dangers and symptoms of dehydration
E Environment Expected weather conditions - stress sun/rain and cold protection; recommended fluid intake. Site specific details eg waves, fragile areas, loose rock.
R Rocks
Be aware of loose or friable rocks at the top of an abseil or climbing pitch and ensure you do not to dislodge any rocks. Do not throw rocks. Practise response drills in case of rock fall or dropping equipment i.e. Below! Call plus appropriate actions – participants at the base of the pitch should already be looking up and will see the object; take evasive action as necessary; move into the cliff rather than away; don’t run; don’t bend forward and expose the back of the neck.
O Only Only instructors/supervisors are to dispatch climbers and abseilers.
P Pathways
Specify the safest access paths up and down. Stress participants are not to take short cuts. Stick to paths. Let others know when you are going to walk behind them or intend to step over a rope securing them to an anchor point. No one should walk between an abseiler or dispatcher and the cliff edge.
E Equipment
Take care of gear like your life depends on it (because it does!). Avoid stepping on ropes and dropping hardware (figure 8 etc). If something is dropped, report it immediately to an Instructor for checking. Avoid locking screw gate carabiners when not in use. Keep helmets and gloves with you; clip them to your harness when not in use.
S Stay Back
All participants must be secured (safety tether, belayed, descent line and back-up system) when within 2 metres of a cliff or unprotected edge. Stay back from the bottom of the cliff face if not involved in any activity, minimise your time in the potential fall zone.
P Presentation Ensure potential loose hair or clothing is secured to prevent it jamming in the descent device during abseil. Remove rings and jewellery. No loops around necks.
O Observe Observe appropriate environmental practices - No litter; look after vegetation; ‘stewardship’ (clean up after others). If using vegetation for anchor points – pad vegetation to protect from damage.
R Respond Respond to all communications promptly and appropriately. Outline calls/communications and actions for the activity.
T Toilets Advise toileting arrangements for the particular site, stressing environmental and hygiene concerns and the need for harness checks on return. It may be advisable to designate male and female areas.
S Safety Safety is a joint responsibility between all supervisory staff and participants. Identify who is in charge and what the chain of command is (or will be)
55
WA Roping Activities Code of Practice Outdoors WA
17.2 Rock Climbing Specific Safety Briefings <To be completed in later revisions>
17.3 Artificial Surface Specific Safety Briefings <To be completed in later revisions>
17.4 Challenge Ropes Course Specific Safety Briefings <To be completed in later revisions>
17.5 Vertical Caving Specific Safety Briefings <To be completed in later revisions>
17.6 Vertical Canyoning Specific Safety Briefings <To be completed in later revisions>
56