Embed Size (px)
Citation preview

1
4-H Western Heritage Project
Rules for 4-H Western Action Shooting
Revised December 2015
Purpose and Goals
4-H Western Action Shooting is part of a larger and comprehensive study of the Old West within the 4-H
Western Heritage Project. The purpose of this project is to provide an avenue for 4-H members and adult
leaders to experience the lifestyles and cultures of the Old West from the period of 1860- 1900 through a
participatory living history approach to learning.
The Western Action Shooting portion of this project is arguably the fastest paced, most exciting, and
spectator friendly project in 4-H shooting sports. Shooters dressed in Old West garb compete against the
clock by firing at steel or cardboard targets at various distances with period firearms such as single action
revolvers, lever action rifles, and double barreled shotguns. Scoring is based on accuracy and the time
that elapses between the initial buzzer and the last shot. Each missed target is penalized by the addition of
five seconds to a competitor’s time. During a shoot, 4-H participants travel through a series of stages in a
posse (group of shooters) along with an adult range officer. Stages consist of a series of targets set up at
distances appropriate for revolvers, rifles, and shotguns. The props of the stage may be as elaborate as a
façade of a building, like the front door of the sheriff’s office, the window of the church, or just outside
the door of the jailhouse, or as simple as engaging targets over a table near a campfire and bedroll.
The goals of this project are:
1. Learning and applying the fundamentals of the safe firearm handling.
2. Place 4-H life-skill development over competition.
3. Provide an enjoyable and action oriented shooting sports activity that will attract and retain 4-H
members throughout their teen years.
4. Create a safe and inclusive environment of learning for all 4-H participants regardless of race,
gender, culture, or socio-economic background.
5. Promote a positive image of the 4-H Western Heritage Project, and 4-H in general, to the public
at large.
6. Teach in a participatory living history style through the use of historically accurate firearms,
clothing, and accessories while participating in the 4-H Western Heritage Project.
7. Preserve and gain an appreciation for the heritage of the American frontier within the time period
of 1860-1900.
8. Instill in 4-H members an investigative interest in frontier history leading to personal research and
increased knowledge of the Old West, their family heritage, and American history in general.
9. Recognize the accomplishments and importance of both men and women from a diversity of
cultures and races that contributed to American frontier history.
10. Promote the 4-H Western Heritage Project and historical study to 4-H programs across the state
and country.

2
Project Requirements
In order to participate in the 4-H Western Heritage Project, 4-H members must meet the following
criteria:
1. Nine (9) years of age by October 1st of the current 4-H year - Small bore rifle only (.22 Rimfire).
(Turning age 10 between October 1 and September 30 of the current 4-H year).
2. Eleven (11) years of age by October 1st of the current 4-H year - Long Gun and Sidearm (.22
Rimfire rifle, .22 Rimfire pistol, .410 shotgun recommended).
(Turning 12 between October 1 and September 30 of the current 4-H year).
3. Have taken Hunters Education or had at least one (1) year of 4-H shooting sports range
experience or have taken an equivalent firearms educational course and/or pass the safe firearm
assessment test administered by a trained 4-H Western Heritage Project instructor. (see appendix)
4. Demonstrate the ability to safely handle firearms throughout the course of the project in the
judgment of the 4-H instructor and fellow 4-H members and parents.
5. Have written permission from a parent or legal guardian to participate in this project in
compliance with the Gun Control Act of 1968 and the Youth Handgun Safety Act of 1994. (see
appendix)
Spirit of the Game
The 4-H Western Heritage Project is guided by a philosophy referred to as “The Spirit of the Game.”
Much like all 4-H events, “The Spirit of the Game” requires that members fully participate in what the
project asks. This includes clothing, equipment, and ethical standards identified or implied in the rules.
Participants should not look for ways to create an advantage out of what is or is not stated as a rule or
shooting procedure. In 4-H, we would call “The Spirit of the Game” nothing more than good
sportsmanship. Regardless of the title, a desire to immerse oneself in the project enhances the enjoyment
of all. As stated in the Code of the West, members who adhere to high principles don’t need lengthy
rulebooks. Reputations last longer than the memory of competitive scores.
Creating Your Alias (Old West Name)
The 4-H Western Heritage Project does not require every member to take on an alias, but it does add a
unique element to the game. If you choose to create a name to represent a character from the Old West, it
must be appropriate to 4-H and repeatable to a wide audience. You can use historic names like Wild Bill
or the Sundance Kid or you can use your imagination. Be careful with names that could be considered
racially or ethnically offensive. Your 4-H leader, County 4-H Shooting Sports Committee, or County
Extension Agent has the final say on the approval or refusal of your alias.
Firearm, Clothing, and Equipment Guidelines
In an attempt to promote participation among all youth and adult volunteer leaders by eliminating
financial barriers, the rules relating to acceptable firearms, clothing, and other equipment are not nearly as
restrictive as other Western Action Shooting organizations. The use of historically accurate firearms and
attire is strongly encouraged, but not at the cost of buying a complete set of period clothing or an antique
or reproduction revolver, rifle, and shotgun. As 4-H members progress in this project, their goal should
be to accumulate these items a little at a time while learning more about the Old West era through
participation and personal research.
3
Firearms, Calibers, and Ammunition
It is recommended that .22s be used for the first few workshops while training 4-H members in safety and
technique. Due to cost effectiveness, please note that counties may choose to use .22 Rimfire rifles
and sidearms throughout this project. For safety, any firearm to be used in the 4-H Western Heritage
Project or any shooting sports activity should be checked by a qualified gunsmith before shooting. It is
recommended that county 4-H programs purchase all of their guns in the same caliber (i.e. two .45
revolvers and a .45 rifle). This eliminates the chance of placing the wrong caliber cartridge in a gun and
helps ensure that the firearms used are in good working order.
Rifles – Any lever action, pump action, or single shot rifle chambered in a handgun cartridge is allowed.
Some common cartridges are listed below. Bolt action and semiautomatic rifles are not allowed. While it
is permitted to use firearms that have had “action jobs” for smoother operation, “short stroke”
modifications on lever action rifles are prohibited. This rule also applies to rifles with short stoke actions
installed in the factory which are prohibited. Rifles are required to operate identically to those
manufactured between 1860 and 1900. Acceptable rifle sights are aperture (peep) or open sighted. No
scopes are allowed.
For historical purposes, reproductions of the 1860 Henry Rifle, Winchester models 1866, 1873, and 1892,
Spencer Rifles, Marlin Models 1894 and 1895, and Colt Lighting Models (pump action) are
recommended. Originals in safe operating condition are certainly acceptable. Reproductions of these
models are available and easily located through several distributors in the U.S. and from many local gun
shops.
Sidearms – Any revolver in safe operating condition, including double action revolvers capable of
performing as single actions, in a traditional handgun chambering is allowed (see caliber and ammunition
section below). Semiautomatic pistols are not allowed. Open sights are required on all revolvers. No
telescopic scopes, laser or other types of electronic sight is allowed.
Historic reproductions of the Colt Conversion Models (cap and ball firearms modified to fire metallic
cartridges), Colt 1872 Open Top Models, 1873 Colt Single Action Army styles, Colt Bisley, 1875
Remington, Smith and Wesson American, and the Smith and Wesson Russian are recommended. Again,
originals are welcome if safe and reproductions of these models are available and readily located through
several distributors in the U.S. and from many local gun shops.
Important Notice to 4-H Leaders: In compliance with the Gun Control Act of 1968 and the Youth
Handgun Safety Act of 1994, all 4-H members under the age of 18 must provide a signed permission
form from their parent or legal guardian in order to handle and fire a sidearm. An example of this form is
provided in the appendix of this document. Remember that only 4-H trained instructors can serve as
supervisors in 4-H shooting sports.
Shotguns – Any shotgun used in the 4-H Western Heritage Project must be in safe operating condition.
Break open (single barrel or double barrel) shotguns without the use of automatic ejectors are allowed.
Period correct lever action and pump actions shotguns may also be used, but cannot be loaded with any
more than two shells at a time. Bolt action or semiautomatic shotguns are not allowed. Due to chamber
irregularities and the high pressure generated by smokeless powder, it is not recommended to use modern
ammunition in antique shotguns.
Reproductions of the Colt 1878 Exposed Hammer Side by Side/Double Barrel Shotgun, the Colt 1883
Internal Hammer Side by Side/Double Barrel Shotgun, the Winchester 1887 Lever Action Shotgun, and
the Winchester 1897 Pump Action Shotgun are recommended. With the popularity of Western Action
Shooting, there are several sources on the market for these firearms.
4
Black Powder Firearms - Black powder “cap and ball” percussion revolvers are acceptable, but only
under the supervision of an instructor trained in the 4-H Muzzle Loading discipline as well as the 4-H
Western Heritage Project discipline.
Calibers and Ammunition – Most handgun calibers, from .22 Rimfire to .45 Colt, capable of firing a
lead or lead alloy bullet at velocities under 1000 feet per second for revolvers and 1300 feet per second
for rifles are permitted. These velocities replicate the black powder rounds used from 1860-1900. The 4-
H shooting sports program does not allow the use of reloaded ammunition at any national event
and does not recommend reloaded ammunition at any level. It is highly recommended that only
factory loaded ammunition be used. Factory loaded ammunition marketed as “cowboy ammunition” is
available in either smokeless or black powder and will meet the velocity requirements stated above.
Typical cartridges of the cowboy era include .22 Rimfire, .32-20 WCF, .32 S&W Short, .32 S&W Long,
.38 Short Colt, .38 Long Colt, .38-40 WCF, .44-40 WCF, .44 S&W American, .44 S&W Russian, .45
Colt, and the .45 S&W. Modern calibers such as the .357 magnum, .38 Special, and .44 magnum may be
used if factory loaded to acceptable velocities and lead bullets. The use of .22 Rimfire ammunition
throughout the project is by far the most economical option when compared to centerfire cartridges.
Acceptable shotgun gauges include 12, 16, 20, 28 and .410 bore with #7 ½ shot or smaller pellet size.
Only 2 ½ inch .410 bore shotshells are allowed. Three inch .410 bore shotshells are prohibited.
All bullets must be made of lead or soft cast lead alloy. Because of a high chance of ricochet and the
damage inflicted on steel targets, no bullets made of copper, copper jacketed, or similar makeup are
allowed. Cap and ball revolver shooters may use round balls or conical bullets of a make similar to those
of the cowboy era. Shotgun rounds must be low velocity and loaded with lead shot only with pellet size
no larger than #7 ½. Low velocity, light shotgun loads are more than sufficient to knock down shotgun
targets. The recoil generated by heavy shotgun loads will needlessly punish the shoulder of young
shooters, cause target damage, and increase the risk of ricochet.
Shooters may be held responsible for damage caused to a target by too "hot" a load.
Clothing and Equipment
Young men’s clothing may consist of jeans, or other cotton, wool, canvas, or buckskin pants of western
styling, and a button down long sleeved shirt. Pullover “long john” type shirts with long sleeves are
acceptable. Jackets, coats, or dusters of canvas, leather, or denim are permitted as are vests. Ladies
clothing can include long pants as above, a skirt, or a dress. Low front tops and bare shoulders are not
recommended for ladies for safety reasons. Shorts, T-shirts, tank tops, or ski or sports clothing are not
allowed.
Western style boots, either laced or slip-on, are encouraged although hunting or work style boots are
acceptable. Tennis shoes and sandals are prohibited.
A western style hat including cowboy hats, bowlers, civil war style caps, and sombreros are encouraged.
These hats can be made of straw, palm leave, felt, or wool. Otherwise, shooters can participate hatless.
The use of baseball caps is not allowed.
Holsters may be worn, but no firearm or any facsimile of a firearm may be carried in the holster on or off
the shooting range. Holsters and cartridge belts must be made of leather. Nylon or plastic belts and
holsters are not allowed nor is the use of Velcro. Every attempt should be made to use ammo boxes, carry
bags, and other equipment that would be typical of the era of 1860-1900, although plastic or nylon
equipment is allowed.
5
Rules of the Range
Divisions - Class divisions for the 4-H Western Heritage Project are as follows:
Junior - 9-11 Years Old - .22 Rimfire Rifle Only (No Pistols)*
Intermediate – 11-13 Years Old -.22 Rimfire Rifle, .22 Rimfire Pistols, and Shotgun (.410 bore
recommended)*
Senior Rimfire – 14-19 Years Old – .22 Rimfire Rifle, .22 Rimfire Pistols, any period correct
Shotgun
Senior Central Fire – 14-19 Years Old – Central Fire Rifle, Central Fire Pistols, any period
correct Shotgun
*Note: 11 year olds must indicate during registration if shooting Intermediate or Junior. The choice must
comply with your state policy.
Individual programs my wish to divide members into black powder cartridge shooters, smokeless powder
shooters, percussion (cap and ball) shooters under the guidance of a certified black powder instructor, or
other divisions of their choice as long as the general 4-H rules are followed in each case. However,
shooters cannot mix central fire and Rimfire firearms in competition.
Range Safety Rules and Regulations (Adapted from the National Congress of Old West Shootists
and the Single Action Shooting Society)
General Safety Rules
All participants must attend a safety meeting before shooting in any event.
Treat and respect every firearm as if it were loaded.
Always keep the muzzle of any firearm pointed in a safe direction.
All firearms will be placed on the loading table under supervision of a 4-H leader. This includes both
club guns and privately owned firearms. No 4-H member or spectator will be allowed to wear firearms.
No loaded firearms except at the firing line or loading table.
All long guns will have actions open at all times except on the firing line or when in a case.
No fanning or twirling a firearm at any time.
No fast draw competition. No quick-draw at any time.
Shooters are responsible for the safe condition of their firearms. County 4-H Western Heritage Project
leaders who have a concern, or are alerted to a concern by others present, may request to inspect any
firearm at any time. If the firearm is considered unsafe by the 4-H range officer and/or a committee of 4-
H Western Heritage Project leaders, it may not be used in the project until repairs are made. This
decision is final.
Eye and ear protection is required for all competitors and spectators. Safety glasses with side shields are
recommended. Ear muff-style hearing protectors are allowed, as are modern-designed shooting glasses.
No alcohol is allowed. No illegal controlled substances at any time. No smoking at any time.
6
Interpersonal Conflicts WILL NOT be tolerated. Good sportsmanship is expected at all times.
Remember to think safety first and always! Shooters and spectators are encouraged to speak up if they
witness anyone handling a firearm improperly, but they must also remain courteous. If someone points
out that a shooter is handling a firearm carelessly, the shooter should be grateful, not upset. It's better to
be corrected than have someone get hurt.
Remember the Spirit of the Game!
Preparing to Shoot
All firearms will be staged with the trigger over a surface when staged horizontal. Triggers resting
off the surface are prohibited. The 4-H shooter is not allowed to carry firearms from place to place
during a stage or have a revolver in their holster. This rule will prevent mishaps that may occur when a
revolver is drawn from the holster or while re-holstering the revolver.
No one other than the shooter and Range Officer are allowed in the 10 foot wide Safety Zone directly
behind the firing line once the shooter is prepared to begin. The Loading Table Inspector is required to
move behind the safety zone line as soon as their job is done and the guns are staged. The Unloading
Table Inspector may enter the safety zone at the instruction of the Range Officer when the stage is
completed. If the range is bermed on both sides of the stage and the loading and unloading tables can be
positioned behind the safety zone and separated from the audience, loading and unloading may be done
while a shooter is actively engaging a stage. This facilitates a faster flow of shooters through the stage,
but is dictated by the layout of the shooting range.
All loading and unloading shall be conducted only in the designated areas such as the loading or
unloading table and only when the designated area is manned by a 4-H leader.
When shooters or adult leaders are carrying firearms to the loading or unloading table, rifle muzzles must
be held in a vertical position with muzzles above the head. Revolvers must be carried by grasping around
the cylinder and pointing the muzzle in a safe direction. Revolvers may not be carried by the grip or with
a finger in the trigger guard.
Dry firing is never allowed and results in a stage disqualification. Dry firing is defined as the act of
cocking the hammer or working the action and pulling the trigger as if to cause the gun to fire normally.
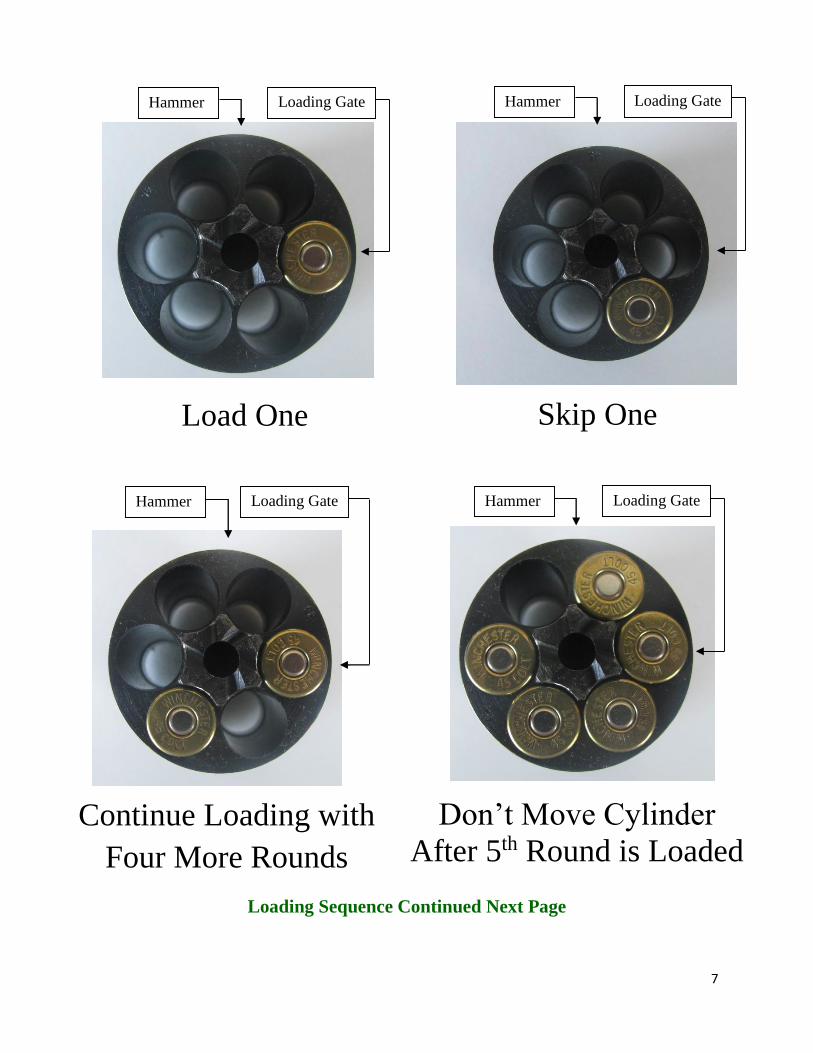
Revolvers are always loaded with the hammer down on an empty chamber. To accomplish this, the
shooter will follow the following loading sequence:
With revolver lying on the loading table, the shooter will open the loading gate of the revolver and then
place the hammer at the half cock position. The shooter will then load one round in the nearest chamber,
then rotate the cylinder past the next chamber leaving it empty, and then load a round in the next 4
chambers. Once the last round is loaded, the shooter will not move the cylinder. Next the shooter will
pull the hammer all the way back, hold it with their thumb, pull the trigger to release the hammer, and
then, with their thumb, place the hammer all the way down. This procedure will ensure that the hammer
is resting on the empty chamber that was skipped during the loading process. It also provides any empty
chamber for the hammer to fall on if it slips off the thumb of the shooter. The loading table supervisor
will make certain this procedure is done correctly before the shooter is allowed to begin the stage.
See Diagrams on Following Pages
7
Hammer Loading Gate
Load One
Hammer Loading Gate
Continue Loading with
Four More Rounds
Loading Sequence Continued Next Page
Hammer Loading Gate
Skip One
Loading Gate Hammer
Don’t Move Cylinder
After 5th Round is Loaded

8
Confirmation that the hammer of a revolver is laying on an empty chamber is easily accomplished by
visually inspecting the back of the cylinder from the side of the gun. A quick glance will reveal whether
or not a cartridge case is under the hammer. Remember that the muzzle must remain pointed down range
at all times.
When using a .22 revolver with a recessed chamber it is often difficult for the loading table supervisor to
see the position of the empty chamber. Designating the first chamber loaded by painting an orange line
on the cylinder, or marking it in some way, is required and greatly assists the loading table supervisor in
ensuring a properly loaded .22 revolver. Take particular care with .22 revolvers that have more than six
chambers.
Rifle loading will be done in the following sequence:
With the rifle lying on the table with the action open and empty, the shooter will close the lever of the
rifle and carefully lay the hammer down on the empty chamber. At this point the rifle can be loaded
through the loading gate with the appropriate number of rounds. For .22 Rimfire rifles, lay the firearm on
the table with the action open and empty and the muzzle in a safe direction. Close the lever of the rifle
and carefully lay the hammer down on the empty chamber. Unscrew the magazine tube rod and remove it
from the magazine. Ten rounds can then be fed through the cartridge shaped opening. Once all rounds
are in the magazine, replace the tube rod and secure the screw end. The use of a ten round loading block
Loading Gate Hammer
Cock Hammer and Let
Down Easy on Empty
Chamber
9
is helpful to ensure that the correct number of rounds are loaded. The rifle is then staged with the
chamber remaining empty.
Preparing to Shoot Continued:
Fingers are not allowed in the trigger guards unless the shooter is on the firing line in the act of
shooting. Shooters failing to observe this rule may be disqualified from competition. All staged guns shall have their barrels pointed safely down range. All long guns staged horizontally shall
be staged lying flat. If staged vertically, all long guns must be placed in a rack with a barrel notch to
eliminate any chance of the gun falling over.
Rifles may be staged down range from the shooter with the magazine loaded, action closed, hammer
down, and chamber empty.
Guns are never staged with their muzzles on the ground.
Revolvers must be staged on a flat, skid resistant surface at least 9 inches wide and 1 foot long such as a
window sill or table. The skid resistant surface may be buckskin, a wool blanket, or other traditional style
item. In the absence of this, carpet samples may be used.
Shotguns are always staged open with magazine and chambers empty and are loaded on the clock unless
the stage begins with the shotgun in the shooter’s hands. (Muzzle loading shotguns may be charged but
not capped.) All empty shells must be ejected before grounding/restaging the firearm.
Shotguns with exposed hammers will be staged with hammers down, actions open and empty, and
safeties on if so equipped. All other shotguns, including internal hammered double barreled, will be
staged with actions open and empty with safeties on. Shooters will load shotguns when preparing to fire,
close the breach, and then cock the hammers or disengage the safety.
No more than two rounds may be loaded into shotguns at any time. (Applies to pump or lever action
shotguns)
It is recommended that each stage be under the supervision of four (4) non-shooters which must include at
least one 4-H trained adult. Their roles are Range Officer/Timer, Loading Area Supervisor, Unloading
Area Supervisor, and Hit and Miss Recorder. These non-shooters, excluding the 4-H trained adult, may
be youth waiting their turn or having just completed their turn. For the sake of time, it is appropriate for
the other members of the posse at the stage to pick up empty brass after the shooter has completed the
stage, the firearms are made safe, and the Range Officer instructs them to do so.
Shooters may not start a stage with ammunition in hand. The shotgun will be loaded from a bucket, a box
of ammo, or a loading block placed at the shotgun’s location in the scenario or ammunition may be
positioned on a table or flat surface by the shooter. No ammunition is carried on the shooters person.
De-cocking a revolver, rifle, or external hammer shotgun may not be done with a live round under the
hammer. De-cocking may not be done to avoid a penalty if cocked at the wrong time or position. The
penalty for de-cocking is a Stage Disqualification. If the hammer is in the cocked position when a cease
fire is called, the lever of the rifle must be opened or the action of a shotgun must be opened. The range
officer will assist in making a cocked revolver safe by taking it from the hand of the shooter while
positioning their thumb between the hammer and the frame of the pistol.
Senior shooters will load, stage, and unload his/her own firearms while under supervision, except for
those physically challenged or inexperienced who may request assistance. Junior rifle and Intermediate
pistols will be loaded by the loading table supervisor. Any misloaded firearm by the loading table

10
supervisor will constitute a reshoot. To save time, the range officer may stage a firearm, but the shooter is
allowed to reposition the firearm.
If no starting position is given the shooter shall stand fully erect with firearms staged, hands at the side
not touching any firearm.
Refusal to follow the range officer’s direction regarding safety or procedural rules will be grounds for
expulsion from the 4-H Western Heritage Project.
In the Course of Shooting
Revolvers will be shot with a two-handed grip only with neither hand in front of the cylinder. This grip
allows a shooter to cock the revolver with their weak hand wrapped around their strong hand which, in
turn, is holding the gun. Unlike a one-handed grip style, the two-hand grip style does not require the hand
to be opened, the thumb on the strong hand moved to cock the hammer, and the grip weakened from shot
to shot. Using the two-handed grip greatly reduces the chance that the gun might slip and pivot the barrel
in an unsafe direction. Obviously the two-handed grip rule does not allow 4-H shooters, under any
circumstance, to fire two revolvers at the same time.
A dropped loaded or unloaded firearm ends the stage for a shooter as a stage disqualification or a match
disqualification at the discretion of the range officer and/or the project leaders. The responsibility of
recovering a firearm that falls on the ground lies with the adult range officer/timer or an adult posse leader
only. This individual will recover the gun, examine it, clear it, and take it to the unloading table.
Ammunition dropped by a shooter in the course of reloading any firearm (most likely a shotgun) during a
stage or “ejected” from any firearm is considered “dead” and may not be recovered until the shooter
completes the course of fire. The round must be replaced from the source as required by stage
description. If the round is never fired, it is counted as a missed shot.
A shooter shall not cock any revolver until the firearm is pointed safely down range and is actively
engaged in shooting a stage.
If a competitor has a firearm malfunction that cannot be cleared on the line, the shooter may not leave the
berm/stage until the firearm has been cleared at the unloading table. A Match Disqualification will be
awarded to the shooter if they leave the berm unless under the direct supervision of a Match Official.
Changing location with a firearm during a stage, loaded or unloaded, is prohibited at all times. There is
absolutely no running or walking with a loaded or unloaded firearm during the live shooting phase of the
stage. Shooting position adjustment is permitted. All shooting with a particular firearm must be
completed and the firearm re-staged before the competitor moves to the next part of the stage. Once the
firearm is cocked, one foot must remain in place on the ground until the firearm is made safe.
Participating 4-H members may not change location during a stage while in possession of any firearm.
Revolvers are to be re-staged with hammer down on a spent case or empty chamber at the conclusion of
the shooting string. A shooting string is defined as shots from one type of firearm prior to the next type
of firearm being engaged.
Long guns will be re-staged with the action open and empty with the barrel(s) pointed safely down range.
All knockdown shotgun targets must be reengaged until down.
All knockdown targets (shotgun, rifle, or revolver) must fall over to be considered a hit. Special
consideration is allowed for 4-H members using .22 caliber ammunition at the discretion of the range
officer/project leaders.
11
Once a revolver is cocked, the round under the hammer must be expended in order for it to be returned to
a safe condition except in the case of a cease fire. Once a rifle is cocked, either the round under the
hammer must be expended or the action opened in order for the rifle to be returned to a safe condition.
No cocked or loaded firearm is allowed to leave the shooters hand except for a malfunction. This also
means from one hand to the other. Shotgun shells may be removed, if necessary, without penalty in order
to return the firearm to a safe condition.
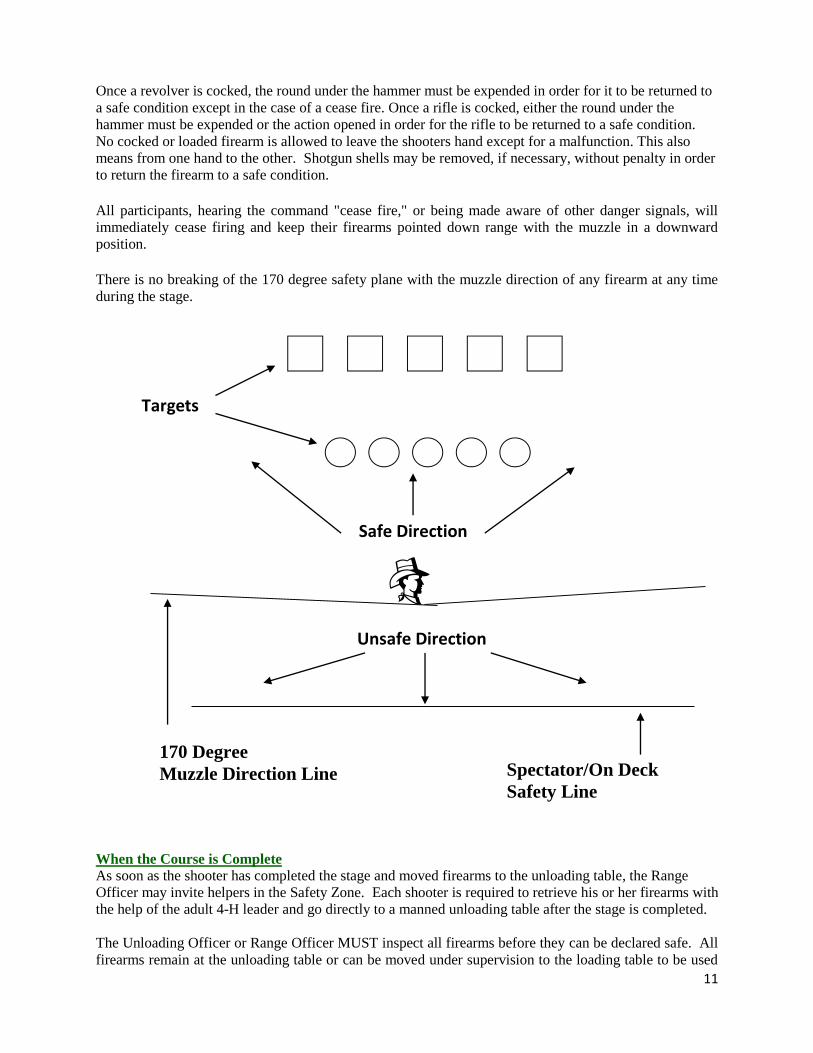
All participants, hearing the command "cease fire," or being made aware of other danger signals, will
immediately cease firing and keep their firearms pointed down range with the muzzle in a downward
position.
There is no breaking of the 170 degree safety plane with the muzzle direction of any firearm at any time
during the stage.
When the Course is Complete
As soon as the shooter has completed the stage and moved firearms to the unloading table, the Range
Officer may invite helpers in the Safety Zone. Each shooter is required to retrieve his or her firearms with
the help of the adult 4-H leader and go directly to a manned unloading table after the stage is completed.
The Unloading Officer or Range Officer MUST inspect all firearms before they can be declared safe. All
firearms remain at the unloading table or can be moved under supervision to the loading table to be used
170 Degree
Muzzle Direction Line
Targets
Safe Direction
Unsafe Direction
Spectator/On Deck
Safety Line

12
by the next shooter. All rifles and pump or lever action shotguns must have their action cycled for the
inspecting official. Shotguns may remain open and empty at the staging location once inspected by the
Range Officer, but only if the next shooter is using the same shotgun. All revolvers, whether used or not
in the stage, must also be inspected. Those recovering brass may begin once the Range Officer declares
the range safe.
Cease Fire Procedure Whenever the command “cease fire” is given, all shooters will immediately place their firearms down in
a safe position; actions open, chambers clear, and/or hammer down on an empty chamber or spend case.
The Range Officer or another adult will assist when necessary.
If a revolver is cocked when the “cease fire” is called the shooter will keep their finger out of the trigger
guard, keep the muzzle in a safe direction, and allow the Range Officer to assist them by placing his or
her thumb between the hammer and the frame and taking the pistol to the unloading table.
Scoring and Timing 4-H Western Heritage Shooting is a timed event and is scored in seconds beginning at the sound of the
first beep from the range officer’s hand-held timer and ending at the sound of the last shot. A five (5)
second penalty is added to the shooter’s time for each missed shot during any given stage. A ten (10)
second penalty is added for unintentional mistakes termed “procedurals” and minor safety violations. The
recorded elapsed time, plus penalties, of each stage are added together for a final score. Final scores are
used to rank competitors from the quickest time to the longest time.
Misses – a miss is defined as the failure of the shooter to strike the intended target with a bullet or pellet
from the appropriate type of firearm or not knocking over a knockdown target. Examples of this would
be simply missing a rifle target while engaging with a rifle or failing to hit a knockdown target with
enough force to knock it down. (At times, .22s may not have enough force to knock down some
knockdown targets. Special considerations are allowed). A missed shotgun knockdown target must be
reengaged until down. There is no miss penalty if a shotgun target remains standing. The penalty is the
time required to reload the shotgun and reengage the missed target. Each miss results in a five (5) second
penalty.
Procedural Penalty – a procedural is a mistake that occurs when a competitor fails to complete the stage
the way it was designed. Examples of procedurals would include firing at a pistol target with a rifle, not
following the course pattern as the range officer described (firing a sweep in an improper sequence), or
failure to complete any portion of the stage. Procedurals result in a ten (10) second penalty and only one
(1) can be assessed per stage.
Failure to place guns or ammunition at the designated position(s) is the fault of the competitor and scored
as a procedural unless the competitor is able to correct the situation, unassisted, before the timer starts.
Once the timer starts, no guns can be re-staged. Remember, the 4-H program does not allow members to
change locations with a firearm in hand.
Minor Safety Violation – A safety violation is considered minor when the incident does not put anyone
in direct or immediate danger. Examples of minor safety violations include the failure to leave a rifle
action open at the end of its use during a stage, the failure to restage a sidearm at the end of a shooting
string, or a live round in a gun discovered at the unloading table. Minor Safety Violations result in a ten
(10) second penalty per occurrence at each stage. A Range Officer may issue a warning in the place of a
10 second penalty at their discretion as long as this decision is consistent.
Major Safety Violation – A safety violation is considered major when the incident endangers any person
at the event. Major Safety Violations include an accidental discharge that impacts anywhere other than
downrange, breaking the 170 degree safety rule, allowing the muzzle of the firearm to sweep anyone in
13
the audience or on the range, dropping a gun, or any other occurrence that has the potential for personal
injury. The penalty for a Major Safety Violation is disqualification from the stage or match at the
discretion of the 4-H range officer present at that stage. With proper training and practice, major safety
violations will be rare or nonexistent in the 4-H Western Heritage Project. It is the responsibility of the
adult range officer to shadow the 4-H member during the course of fire in order to be in the
physical position to prevent any safety violations.
Intentional Procedural – An Intentional Procedural occurs when a competitor purposely or intentionally
disregards the stage instructions in order to obtain a competitive advantage. This may occur when a
competitor feels they could take a penalty and still shoot a faster time than if they followed the proper
procedure. This is considered a violation of the Spirit of the Game and 30 seconds is added to a
competitor’s time in addition to other penalties.
Appeals – If the competitor believes a ruling is in error, the 4-H member alone may politely appeal the
decision to the group of trained 4-H shooting sports leaders present. Appeals must be made before the
posse leaves the stage. The group’s decision will be based solely on the rules pertaining to the safety
violation and is final regardless of the size of the group.
Reshoots - Reshoots may be awarded for ammunition or firearm malfunctions if the problem is out of the
control of the shooter. This rule is in place because most 4-H programs share firearms and ammunition
among many shooters. Therefore, equipment becomes extremely fouled and cartridges are often provided
to the shooter. If there is a range failure (failure of props, timer, or a loading table supervisor or the range
officer’s mistake) beyond the competitor’s control, a reshoot may also be granted. On a reshoot, the
competitor starts over clean, carrying only accrued safety and procedural penalties forward.
Role of the Range Officer The role of the Range Officer is to safely assist the shooter through the course of fire. Advising proper
procedure and constraining the shooter from unsafe acts is expected when appropriate to minimize
procedural and safety penalties whenever possible. It is also the responsibility of the Range Officer to
count the rounds expended by the shooter. If the shooter does not empty their firearm (usually 5 shots in
each revolver and 10 in the rifle) the range officer will order the shooter to fire their remaining rounds
down range. This eliminates a gun with live rounds being carried to the unloading table. Often times, the
Range Office takes on the responsibility of carrying the timer as he/she shadows the 4-H shooter. The
Range Officer serving as the Timer is the most practical way to run a stage.
It is expected that the Range Officer will be the responsible party for observing and resolving all safety
related matters occurring in the loading, unloading, and firing line areas. However, any shooter who
observes a safety infraction not seen by the Range Officer(s) should call the infraction to the Range
Officer’s attention, at which time the matter will be resolved.
Role of the Loading Table Supervisor The Loading Table Supervisor’s role is to make certain that the revolvers are loaded with the appropriate
number of rounds (usually 5) and that the hammer is resting on an empty chamber before the revolvers
are staged and that the rifle magazine is also loaded appropriately with the hammer resting on an empty
chamber. Junior rifles and Intermediate pistols are loaded by the Loading Table Supervisor. The Loading
Table Supervisor also makes certain that the caliber correct ammunition is loaded into each firearm.
Using a single caliber throughout the project great reduces this risk. It is the responsibility of the Loading
Table Supervisor that all muzzles remain pointed in a safe direction throughout the loading process.
14
Unloading Table Supervisor The Unloading Table Supervisor’s role is to require the shooter to safely make safe each firearm while
keeping the muzzles pointed in a safe direction. This includes observing the shooter work the action of a
rifle and inspecting the chamber to be sure it is empty, asking the shooter to unload the revolvers and spin
the cylinders to be certain the revolver is empty, and similarly inspecting the chamber or chambers of the
shotgun. If a loaded round makes its way to the unloading table, the Unloading Table Supervisor is
required to notify the Range Officer immediately. It is the shooter’s and Range Officer’s responsibility to
make certain that all loaded rounds are expended during the stage. Once each firearm is declared safe by
the Unloading Table Supervisor, the firearms may be safely carried back to the loading table or other
designated area with the muzzles always pointed in a safe direction.
Setting Up the Stage
4-H Western Action Shooting is intended to be a safe and enjoyable learning experience. It is not a
precision shooting competition. For this reason, large targets at reasonable distances are used to facilitate
success. Small targets and long distances can frustrate and discourage newer shooters. Everyone wants
to hit their targets. Shooters who accumulate too many misses begin to perceive the targets as too
difficult to hit. Often times discouraged youth will drop out of the project due to a feeling of failure or
embarrassment. Don’t take the fun out of 4-H Western Action Shooting. It only defeats the purpose.
No target in the 4-H program will be in the human form or readily perceived as a human form. Metal,
cardboard, or paper targets at least 16 inches by 16 inches should be used. Reactive targets such as falling
plates can enhance shooter feedback and spectator appeal. There are no “official” rules, but the following
distance guidelines may help you get started:
Revolver Targets – 7 to 10 yards
Shotgun Targets – 8 to 16 yards
Rifle Targets – 13 to 50 yards

15
Stage Designs
Typical Target Placement
Shotgun
Target
7-10 Yards
Revolver Targets
Rifle Targets
13-50 Yards
8-16 Yards
Loading Table Unloading Table
170 Degree Muzzle Direction Line
10 Ft Safety Zone
Rope or Ribbon—No Spectators,
Brass Pickers, or On Deck Shooters
Beyond this Line Until Guns are
Unloaded and Announced Safe
Access Point Exit Point
16
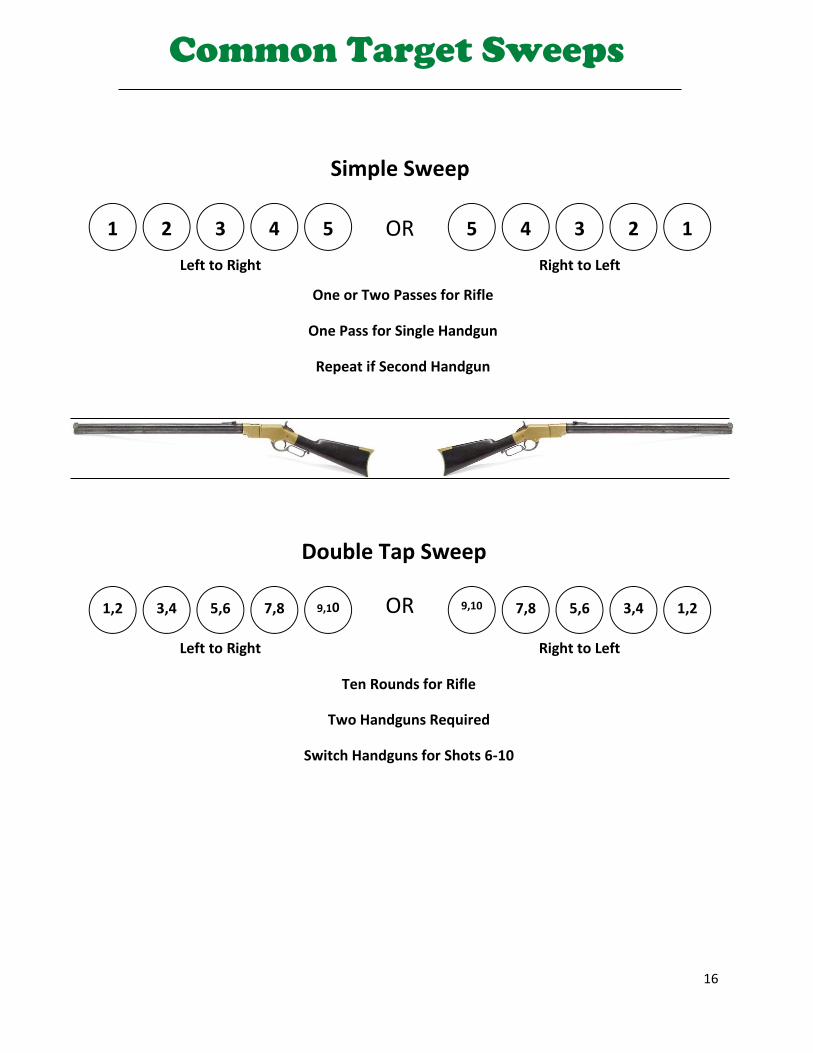
Common Target Sweeps
1,2 3,4 5,6 7,8 9,10 9,10 7,8 5,6 3,4 1,2
Double Tap Sweep
OR
Ten Rounds for Rifle
Two Handguns Required
Switch Handguns for Shots 6-10
Left to Right Right to Left
1 2 3 4 5 5
4 3 2 1
Simple Sweep
OR
One or Two Passes for Rifle
One Pass for Single Handgun
Repeat if Second Handgun
Left to Right Right to Left
17
1,10 2,9 3,8 4,7 5,6 5,6 4,7 3,8 2,9 1,10
Pendulum Sweep
OR
Left to Right then Right to Left Right to Left then Left to Right
Ten Rounds for Rifle
Two Handguns Required
Switch Handguns for Shots 6-10
Desperado Sweep
OR
Left to Right in Above Sequence Right to Left in Above Sequence
Ten Rounds for Rifle
Two Handguns Required
Switch Handguns for Shots 6-10
1 2,3 4,5 6,7
8,9 10 10 8,9 4,5 6,7
2,3 1

18
1,2 3,6 4,7 5,8 9/10 9,10 5,8 4,7 3,6 1,2
Rattler Sweep
OR
Left to Right Right to Left
Ten Rounds for Rifle
Two Handguns Required
Switch Handguns for Shots 6-10

19
Scenario Examples
170 Degree Muzzle Direction Line
R = Rifle Targets
P = Pistol Targets
S = Shotgun Targets
Pos = Position of Shooter
Fleecester Attorney at Law
S2
S1
Unloading Table Loading Table
Pos 3 Pos 1 Pos 2
Ammo Count: 10 Rifle, 10 Pistol, 2 Shotgun
Rifle loaded with ten rounds staged at position 1
2 pistols loaded with five rounds each staged at
position 2. Shotgun open and empty staged at position
3.
Procedure: Start at position 1 with rifle in hand and
pointed safely down range. At the buzzer, rack a
round in the chamber and put one round on all
rifle/pistol targets in an alternate pattern. Stage rifle
open and empty at position 1. Move to position 2.
With pistols, put one round on all pistol/rifle targets in
an alternate pattern and changing pistols midway.
Restage pistols and move to position 3. Pick up
shotgun and knock down S1 and S2 in any order.
Repeat if necessary. Both must fall. Move to
unloading table.
R2
P2
R4
P4
R6
P6
R8
P8
R10
P10
10 ft Safety Zone Line
R1
P1
R3
P3
R5
P5
R7
P7
R9
P9
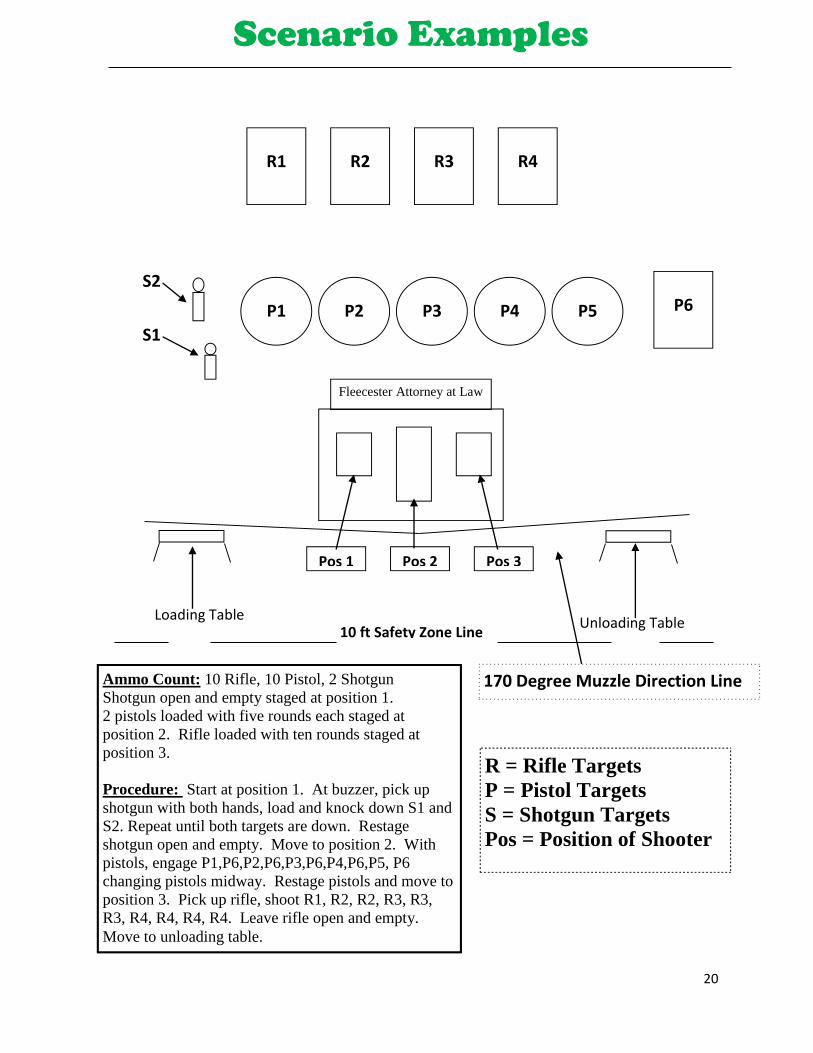
20
170 Degree Muzzle Direction Line
Scenario Examples
R = Rifle Targets
P = Pistol Targets
S = Shotgun Targets
Pos = Position of Shooter
Fleecester Attorney at Law
S2
S1
Unloading Table Loading Table
Pos 1 Pos 2 Pos 3
Ammo Count: 10 Rifle, 10 Pistol, 2 Shotgun
Shotgun open and empty staged at position 1.
2 pistols loaded with five rounds each staged at
position 2. Rifle loaded with ten rounds staged at
position 3.
Procedure: Start at position 1. At buzzer, pick up
shotgun with both hands, load and knock down S1 and
S2. Repeat until both targets are down. Restage
shotgun open and empty. Move to position 2. With
pistols, engage P1,P6,P2,P6,P3,P6,P4,P6,P5, P6
changing pistols midway. Restage pistols and move to
position 3. Pick up rifle, shoot R1, R2, R2, R3, R3,
R3, R4, R4, R4, R4. Leave rifle open and empty.
Move to unloading table.
P6
R1 R2 R3 R4
10 ft Safety Zone Line
P1 P2 P3 P4 P5
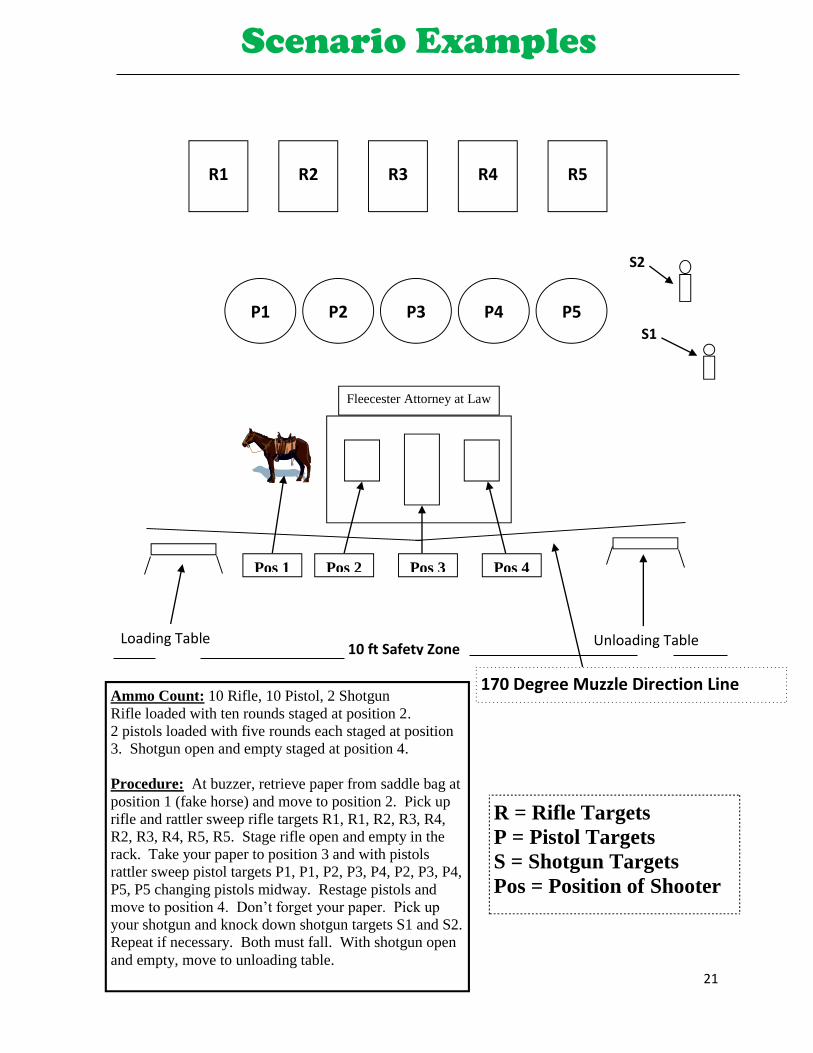
21
170 Degree Muzzle Direction Line
Scenario Examples
R = Rifle Targets
P = Pistol Targets
S = Shotgun Targets
Pos = Position of Shooter
Fleecester Attorney at Law
S2
S1
Unloading Table Loading Table
Pos 2 Pos 3 Pos 4
Ammo Count: 10 Rifle, 10 Pistol, 2 Shotgun
Rifle loaded with ten rounds staged at position 2.
2 pistols loaded with five rounds each staged at position
3. Shotgun open and empty staged at position 4.
Procedure: At buzzer, retrieve paper from saddle bag at
position 1 (fake horse) and move to position 2. Pick up
rifle and rattler sweep rifle targets R1, R1, R2, R3, R4,
R2, R3, R4, R5, R5. Stage rifle open and empty in the
rack. Take your paper to position 3 and with pistols
rattler sweep pistol targets P1, P1, P2, P3, P4, P2, P3, P4,
P5, P5 changing pistols midway. Restage pistols and
move to position 4. Don’t forget your paper. Pick up
your shotgun and knock down shotgun targets S1 and S2.
Repeat if necessary. Both must fall. With shotgun open
and empty, move to unloading table.
Pos 1
R1 R2 R3 R4 R5
P1 P2 P3 P4 P5
10 ft Safety Zone
22
MEETING BY MEETING
LESSON PLANS

23
Meeting 1 – Orientation The first meeting of your new county project should be designed to introduce 4-H Western Action Shooting and the
Montana 4-H Western Heritage Project to potential members and their parents. Your audience will be curious, but
may very likely not know the first thing about western action shooting. Your job is to present the project as a safe
learning experience while maintaining the level of enthusiasm shown by the 4-H members.
What you need:
1. Indoor Space
2. Table
3. Computer, Projector, and Screen
4. Chairs arranged theater style
5. Sample firearms are optional (check with the hosting facility concerning firearm policy)
6. Old West clothing is optional, but encouraged
Sample Agenda:
Welcome and Introductions
Introduce yourself and any co-leaders
Talk about your experience in Western Action Shooting even if it’s limited.
Ask the 4-Hers to introduce themselves and relate their shooting sports experience.
Invite 4-H members and parents to ask questions throughout the meeting.
What is 4-H Western Action Shooting – The basics
Using Old West Style firearms
Dressing Old West clothing
Shooting under time
Penalties for misses
Discuss in no great detail at this point
Show a video or internet clip of shooters in action
Present the “Introduction to 4-H Western Action Shooting” slide show. (Provided on CD)
Review clothing requirement and expectations
Let parents and members know that most can participate with clothes they already have at home. Dress in
Old West clothing as a demonstration if available.
Firearms
Showcase any firearms you may have brought with you
If you have firearms available for use in the first few lessons, ask members not to bring their own.
Provide a quick overview of what the schedule and topics will be for the year (Feel free to adjust schedule to meet
your county program)
Pistol History and Training – Pistol Shooting Begins
Rifle History and Training – Rifle Shooting Begins
Shotgun History and Training – Shotgun Shooting Begins
Holster History (all guns are staged and holster use is not allowed) and Shooting a Course
More course shooting
Clothing History and more shooting
Shooting Under Time (If ready)
Hat History – More shooting under time
Boot History – More shooting under time
Set the date and time of next meeting
24
Meeting 2 – Pistol This meeting has two primary purposes; presenting the history of the Old West sidearms and learning to shoot single
action revolvers. Instructors may split this workshop into two meetings by presenting the history CD at one and
shooting at the second. Counties may also choose to present all of the history lessons at separate meetings during
the winter and move permanently to the range as weather permits. Decide what’s best for your program.
What you need: History Presentation
1. Indoor Space
2. Table and chairs arranged theater style
3. Computer, Projector, and Screen
4. Sample firearms as available. (At least one cap and ball revolver and one cartridge revolver is best.)
What you need: Pistol Training
1. Single Action Revolvers (Preferably .22 rimfire, but any light factory load will suffice)
2. Bermed shooting area
3. Bench rest or table
4. Chair
5. Sandbags
6. Paper plates for targets
Sample Agenda:
Practice the proper loading procedure so that the hammer of the revolver rests on an empty chamber
Pull the hammer to the half cock position
Open loading gate
Use empty brass cases for practice. Load one, skip one, and then load four. Once the fifth round is
chambered, do not move the cylinder or a live round will be under the hammer when cocked.
Cock hammer to full cock. Using thumb, set the hammer down easy. If a slip occurs, the hammer should
fall on the empty chamber. If not done properly, the hammer will fall on a spent case. Make sure the 4-H
member realizes that if live rounds were inserted and the proper loading sequence was not followed, a slip
could discharge a cartridge. A visual inspection from the side of the cylinder will verify that the empty
chamber is under the hammer. DON’T FORGET TO KEEP THE MUZZLE POINTED IN A SAFE DIRECTION.
Unload using the ejector rod.
Repeat using spent cases until all 4-H members have had a turn loading and unloading the revolver and are
comfortable with the procedure.
Practice sight alignment and sight picture using sandbags.
Explain the proper sight alignment using a diagram or model
Demonstrate the two-handed grip and how to cock the hammer with the weak thumb.
Talk about trigger control.
Load live ammo using the proper loading sequence of loading one, skipping one, and loading four.
Set the hammer down easy on the empty chamber.
Use the sandbags for a rest. Make sure that no one has their hand in front of the cylinder and that the
cylinder is above the rest. Otherwise the hand and sandbag will catch the blast of the round fired. The
trigger guard or the hands around the grip can be rested on the sandbag.
Fire at the paper plates five times, then, when the range is safe, go inspect the targets.
Practice with the sandbags until the 4-H members are consistently hitting the paper plate.
Each 4-H member must eject any spent cartridge cases after finishing a shot string. It is the 4-H leader’s
responsibility to ensure this is done.
Practice firing while standing.
Use the table or bench as a loading station, but have each 4-H member fire at a paper plate while standing.
Once the range is safe, inspect the targets.
Reinforce sight picture and trigger control for improved accuracy.
Practice the same sequence as time allows - do not proceed with further lessons until all shooters are ready.
25
Meeting 3 – Rifles Much like the pistol lesson, this meeting has two primary purposes; presenting the history of the Old West rifles and
learning to shoot lever action guns. Instructors may split this workshop into two meetings by presenting the history
CD at one and shooting at the second. Counties may also choose to present all of the history lessons at separate
meetings during the winter and move permanently to the range as weather permits. Again, decide what’s best for
your program.
What you need: History Presentation
1. Indoor Space
2. Table and chairs arranged theater style
3. Computer, Projector, and Screen
4. Sample firearm(s) as available
What you need: Rifle Training
1. Lever Action Rifle(s) (Preferably .22 rimfire, but any light factory load will do)
2. Bermed shooting area
3. Bench rest or table
4. Chair
5. Sandbags
6. Paper plates for targets
Sample Agenda:
Practice sight alignment and sight picture.
Explain the proper sight alignment using a diagram or model
Talk about trigger control.
Practice the proper loading procedure so that the magazine is loaded but the chamber is empty.
Rifles should be open and empty when laid on the table or bench.
Close the lever and set the hammer down easy.
If using a .22, have the 4-H member load five rounds from the front of the tubular magazine. If using a
larger caliber, the shooter will load five rounds through the loading gate.
There will not be a live round in the chamber if the action has not been worked.
Using the sandbags for a rest, instruct the 4-H member to work the lever of the rifle to load the first round.
Fire five rounds into a paper plate target.
When the range is safe, go inspect the targets.
Practice with the sandbags until the 4-H members are consistently hitting the paper plate.
Always leave the rifle open and empty after a shot string is fired. It is the 4-H leader’s responsibility to
ensure this is done.
Practice firing while standing.
Use the table or bench as a loading station, but have each 4-H member fire at a paper plate while standing.
Once the range is safe, inspect the targets.
Reinforce sight picture and trigger control for improved accuracy.
Practice the same sequence as time allows.
26
Meeting 4 – Shotguns Again, this meeting has two primary purposes; presenting the history of the Old West shotguns and learning to
safely handle and shoot them. Instructors may split this workshop into two meetings by presenting the history CD at
one and shooting at the second. Counties may also choose to present all of the history lessons at separate meetings
during the winter and move permanently to the range as weather permits. Again, decide what’s best for your
program.
What you need: History Presentation
1. Indoor Space
2. Table and chairs arranged theater style
3. Computer, Projector, and Screen
4. Sample firearm(s) as available
What you need: Shotgun Training
1. Double barrel or pump shotgun
2. Very light factory loads in any gauge of your choice
3. Bermed shooting area
4. Bench rest or table
5. A knock down target or two (could be a steel cowboy shotgun target or a piece of wood)
Sample Agenda:
Practice sighting down the barrel.
Explain the proper sight alignment.
Discuss mounting the shotgun to the shooter’s shoulder paying special attention to getting the butt of the
shotgun tight against the shooter’s shoulder.
Practice the proper loading procedure.
Shotguns should be open and empty when laid on the table or bench.
Load two rounds. (When using a pump shotgun, only two rounds are allowed at a time)
Ask the 4-H member to fire at the knock down target from a standing position. (Use two knock down
targets if possible). This may involve pulling back the hammers on a “mule” ear shotgun or becoming
familiar with a safety mechanism.
When the first two rounds are fired, instruct the 4-H member to load and fire two more.
If using a pump action shotgun, the instructor may demonstrate loading and firing one round at a time after
the first two rounds are fired. This procedure is usually quicker than loading two rounds at a time.
If the target has not been knocked down, the shooter may continue until the target is down.
Once completed, shotguns must be open, empty and laid on the table or bench.
It is the 4-H leader’s responsibility to ensure this is done.
Continue practicing
Use the table or bench as a loading station and have each 4-H member fire at the knock down target(s) until
he or she is comfortable with the loading and firing sequence.
Practice the same sequence as time allows.
27
Meeting 5 – Holsters and Staging the Firearms Even though holstered guns are not allowed in 4-H Western Action Shooting, Old West holster history is an
interesting topic. Youth will find that many, if not most, of the holsters featured in their favorite western movies or
TV shows were not invented until the early 1920s. Rifle scabbards are also covered in this lesson. Use the CD
presentation provided. At the range, this meeting will be the first time 4-H members shoot staged guns in cowboy
shooting scenario. Have someone present at the loading and unloading table to declare the guns safe. A trained
leader is required to shadow the shooters throughout the course. This leader must be close enough to prevent the
shooter from turning toward the audience. Shooters must become accustomed to being shadowed when they shoot –
the adult groups conduct their events the same way. Eventually the leader will also be carrying a timer and must be
close enough to the shooter to register each shot.
What you need: Holster Presentation
1. Indoor Space
2. Table and chairs arranged theater style
3. Computer, Projector, and Screen
4. Sample holster(s) as available
What you need: Full Stage Training
1. Rifle, Shotgun, and Revolver
2. Appropriate ammo
3. Bermed shooting area
4. Loading and unloading table
5. Tables or boxes to stage the guns
6. Steel or paper targets for rifle, shotgun, and pistols
Sample Agenda:
Fully explain the stage.
Make the stage simple. Avoid complicated sweeps and long range targets.
Fully explain the stage and what’s expected.
Demonstrate the stage by walking through it and using your finger.
Stage the guns.
Ask the first 4-H member to proceed to the loading table with guns open and empty.
Have the 4-Her load the guns as practiced in earlier meetings.
Escort the 4-H member to the prearranged place to stage each firearm. The Loading Table Supervisor or
another adult leader may help the shooter stage the guns correctly.
Getting the first shooter on the line.
Place the first shooter at the starting point and ask for any questions.
Stress that time is not an emphasis at this point. Each 4-H member should shoot the course calmly and
safely. Focus on procedure.
Make sure the range is clear and give the order to start.
Shadow the shooter throughout the course.
Do not allow any steps to be taken with a gun in hand. The shooter will pick up each gun where it is
staged, fire it down range until empty, and leave the shotgun and rifle restaged open and empty. Pistols are
restaged pointing down range. If they shooter does not empty the gun, instruct them to shoot until empty.
Never leave a live round in a restaged gun.
Procedural mistakes will happen. The shooter may engage the pistol targets with the rifle or vice versa. It
doesn’t matter. The purpose is to allow 4-H members the experience to understand and feel comfortable
with the set up and to shoot safely. Address and correct all safety violations immediately.
Unload.
Once the course has been shot, instruct the 4-H member to move to the unloading table.
Since no holsters are used, there will be too many guns for one person to carry. Help out.
When unloaded and each gun is declared safe, move to loading table open and empty and pick up brass.

28
Meeting 6 – Clothing and Practice Looking the part is as much fun as shooting. Well almost. Go over period dress using the CD presentation that is
provided. Cover shirts, pants, bandanas, and other clothing pieces. At the range, continue practicing stages and
setups. Start simple, but when the shooters are ready, throw in a new sweep or stage sequence.
What you need: Clothing Presentation
1. Indoor Space
2. Table and chairs arranged theater style
3. Computer, Projector, and Screen
4. Sample clothing as available
What you need: Full Stage Training
1. Rifle, Shotgun, and Revolver
2. Appropriate ammo
3. Bermed shooting area
4. Loading and unloading table
5. Tables or boxes to stage the guns
6. Steel or paper targets for rifle, shotgun, and pistols
Sample Agenda (Identical to Meeting 5):
Fully explain the stage.
Make the stage simple. Avoid complicated sweeps and long range targets.
Fully explain the stage and what’s expected.
Demonstrate the stage by walking through it and using your finger.
Stage the guns.
Ask the first 4-H member to proceed to the loading table with guns open and empty.
Have the 4-Her load the guns as practiced in earlier meetings.
Escort the 4-H member to the prearranged place for each firearm. The Loading Table Supervisor or
another adult leader may help the shooter stage the guns correctly.
Getting the first shooter on the line.
Place the first shooter at the starting point and ask for any questions.
Stress that time is not an emphasis at this point. Each 4-H member should shoot the course calmly and
safely. Focus on procedure.
Make sure the range is clear and give the order to start.
Shadow the shooter throughout the course.
Do not allow any steps to be taken with a gun in hand. The shooter will pick up each gun where it is
staged, fire it down range until empty, and leave the shotgun and rifle restaged open and empty. Pistols are
restaged pointing down range. If they shooter does not empty the gun, instruct them to shoot until empty.
Never leave a live round in a restaged gun.
Procedural mistakes will happen. The shooter may engage the pistol targets with the rifle or vice versa. It
doesn’t matter. The purpose is to allow 4-H members the experience to understand and feel comfortable
with the set up and to shoot safely. All safety violations must be addressed seriously and corrected
immediately.
Unload.
Once the course has been shot, instruct the 4-H member to move to the unloading table.
Since no holsters are used, there will be too many guns for one person to carry. Help out.
When unloaded and each gun is declared safe, move to loading table open and empty.
Give the order to pick up brass once the guns have been declared safe.

29
Meeting 7 – Hats, Boots, and Practice Use the presentation on CD to provide an overview of period hats and boots. Encourage the 4-H members to
investigate historical figures in the time period they are most interested in and to start putting together the
appropriate pieces. At the range, continue practicing stages and setups. Challenge the shooters as they master the
easier courses of fire. Keep it different and fun. Throw in new target are staging ideas.
What you need: Hats and Boots Presentation
1. Indoor Space
2. Table and chairs arranged theater style
3. Computer, Projector, and Screen
4. Sample hats and boots as available
What you need: Full Stage Training
1. Rifle, Shotgun, and Revolver
2. Appropriate ammo
3. Bermed shooting area
4. Loading and unloading table
5. Tables or boxes to stage the guns
6. Steel or paper targets for rifle, shotgun, and pistols
Sample Agenda:
Fully explain the stage.
Start simple. Once warmed up, get creative.
Fully explain the stage and what’s expected.
Demonstrate the stage by walking through it and using your finger.
Stage the guns.
Ask the first 4-H member to proceed to the loading table with guns open and empty.
Have the 4-Her load the guns as practiced in earlier meetings.
Escort the 4-H member to the prearranged place for each firearm. The Loading Table Supervisor or
another adult leader may help the shooter stage the guns correctly.
Getting the first shooter on the line.
Place the first shooter at the starting point and ask for any questions.
Stress that time is not an emphasis. But if the shooters are ready to step things up, allow them to shoot as
quickly as they can accurately and safely. Each 4-H member should still shoot the course calmly and
safely.
Make sure the range is clear and give the order to start.
Shadow the shooter throughout the course.
Do not allow any steps to be taken with a gun in hand. The shooter will pick up each gun where it is
staged, fire it down range until empty, and leave the shotgun and rifle restaged open and empty. Pistols are
restaged pointing down range. If they shooter does not empty the gun, instruct them to shoot until empty.
Never leave a live round in a restaged gun.
As the courses increase in challenge, procedural mistakes will happen more often. Laugh about procedural
mistakes – adult shooters make mistakes all the time. Address all safety violations very seriously.
Unload.
Once the course has been shot, instruct the 4-H member to move to the unloading table.
Since no holsters are used, there will be too many guns for one person to carry. Help out.
When unloaded and each gun is declared safe, move to loading table open and empty.
Give the order to pick up brass once the guns have been declared safe.
30
Meeting 8 – Continue to have Fun – Introduce the Timer if Ready Continue to present a history lesson as each time you meet. Topics could include saddles, chuck wagons, Old West
ammo, famous people, or anything you feel comfortable with. Do not, however, glamorize gun fights and
gunfighters. Gunfighters are certainly part of the Old West, but seldom the heroes seen in the movies. Keep
shooting and have fun. Only use a timer device if the 4-H members are ready. Shooting under time causes most
shooters to make more errors. If you see this happening, discontinue the use of the timer and proceed much like
earlier meetings.
What you need: Course Training
1. Rifle, Shotgun, and Revolver
2. Appropriate ammo
3. Bermed shooting area
4. Loading and unloading table
5. Tables or boxes to stage the guns
6. Steel or paper targets for rifle, shotgun, and pistols
Sample Agenda:
Fully explain the stage.
Start simple. Once warmed up, get creative.
Fully explain the stage and what’s expected.
Demonstrate the stage by walking through it and using your finger.
Stage the guns.
Ask the first 4-H member to proceed to the loading table with guns open and empty.
Have the 4-Her load the guns as practiced in earlier meetings.
Escort the 4-H member to the prearranged place for each firearm. The Loading Table Supervisor or
another adult leader may help the shooter stage the guns correctly.
Getting the first shooter on the line.
Place the first shooter at the starting point and ask for any questions.
Stress that time is not an emphasis. But if the shooters are ready to step things up, allow them to shoot as
quickly as they can accurately and safely. Each 4-H member should always shoot the course calmly and
safely.
Make sure the range is clear and give the order to start.
Shadow the shooter throughout the course. If using the timer, remember to keep it above the shooting
shoulder of the 4-H member.
Do not allow any steps to be taken with a gun in hand. The shooter will pick up each gun where it is
staged, fire it down range until empty, and leave the shotgun and rifle restaged open and empty. Pistols are
restaged pointing down range. If they shooter does not empty the gun, instruct them to shoot until empty.
Never leave a live round in a restaged gun.
As the courses increase in challenge, procedural mistakes will happen more often. Laugh about procedural
mistakes – adult shooters make mistakes all the time. Address all safety violations very seriously.
Unload.
Once the course has been shot, instruct the 4-H member to move to the unloading table.
Since no holsters are used, there will be too many guns for one person to carry. Help out.
When unloaded and each gun is declared safe, move to loading table open and empty.
Give the order to pick up brass once the guns have been declared safe.

31
Meeting 9 and Beyond Keep shooting and have fun. Shoot under time as appropriate. Work on technique and any other tips that will help
the shooter improve their time score. Gauge the shooters progress and, if appropriate, plan a mini tournament at the
end of the year. Give out awards for the best shooters, most improved, best dressed, most helpful, fewest mistakes,
etc. Make sure everyone gets recognized for something they have accomplished.
What you need: Course Training
1. Rifle, Shotgun, and Revolver
2. Appropriate ammo
3. Bermed shooting area
4. Loading and unloading table
5. Tables or boxes to stage the guns
6. Steel or paper targets for rifle, shotgun, and pistols
Sample Agenda:
Fully explain the stage.
Start simple. Once warmed up, get creative.
Fully explain the stage and what’s expected.
Demonstrate the stage by walking through it and using your finger.
Stage the guns.
Ask the first 4-H member to proceed to the loading table with guns open and empty.
Have the 4-Her load the guns as practiced in earlier meetings.
Escort the 4-H member to the prearranged place for each firearm. The Loading Table Supervisor or
another adult leader may help the shooter stage the guns correctly.
Getting the first shooter on the line.
Place the first shooter at the starting point and ask for any questions.
Stress that time is not an emphasis. But if the shooters are ready to step things up, allow them to shoot as
quickly as they can accurately and safely. Each 4-H member should always shoot the course calmly and
safely.
Make sure the range is clear and give the order to start.
Shadow the shooter throughout the course. If using the timer, remember to keep it above the shooting
shoulder of the 4-H member.
Do not allow any steps to be taken with a gun in hand. The shooter will pick up each gun where it is
staged, fire it down range until empty, and leave the shotgun and rifle restaged open and empty. Pistols are
restaged pointing down range. If they shooter does not empty the gun, instruct them to shoot until empty.
Never leave a live round in a restaged gun.
As the courses increase in challenge, procedural mistakes will happen more often. Laugh about procedural
mistakes – adult shooters make mistakes all the time. Address all safety violations very seriously.
Unload.
Once the course has been shot, instruct the 4-H member to move to the unloading table.
Since no holsters are used, there will be too many guns for one person to carry. Help out.
When unloaded and each gun is declared safe, move to loading table open and empty.
Give the order to pick up brass once the guns have been declared safe

32
APPENDIX
33
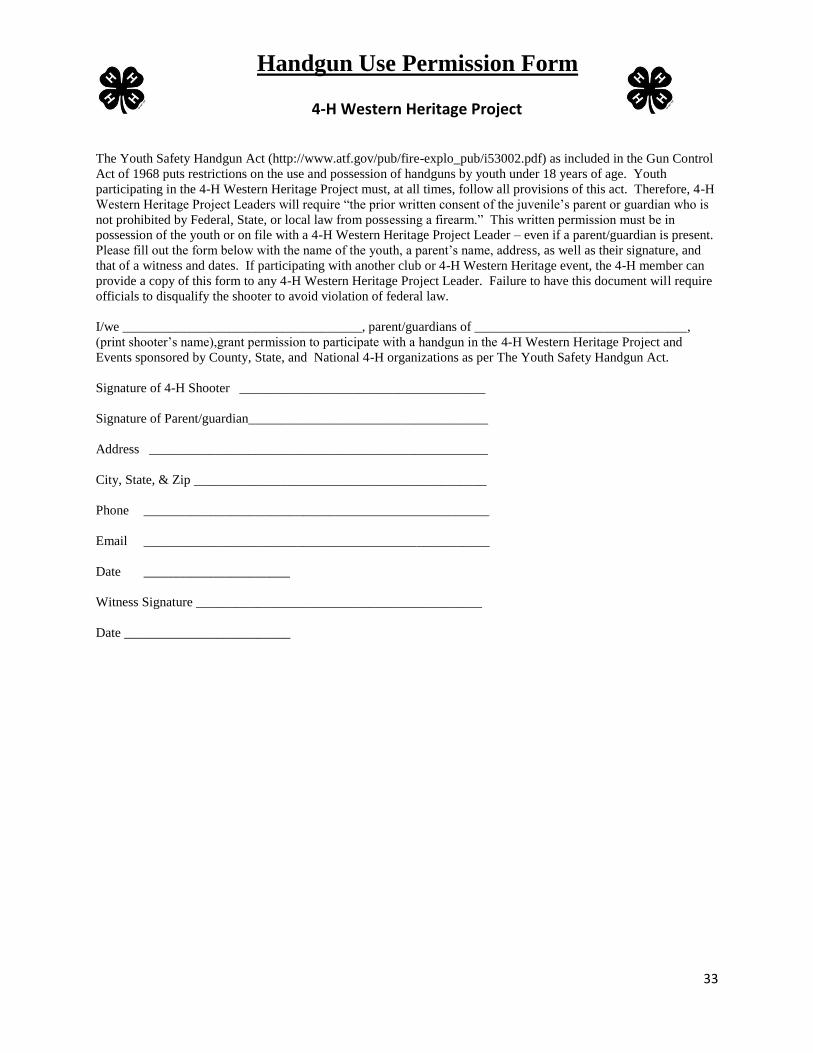
4-H Western Heritage Project
The Youth Safety Handgun Act (http://www.atf.gov/pub/fire-explo_pub/i53002.pdf) as included in the Gun Control
Act of 1968 puts restrictions on the use and possession of handguns by youth under 18 years of age. Youth
participating in the 4-H Western Heritage Project must, at all times, follow all provisions of this act. Therefore, 4-H
Western Heritage Project Leaders will require “the prior written consent of the juvenile’s parent or guardian who is
not prohibited by Federal, State, or local law from possessing a firearm.” This written permission must be in
possession of the youth or on file with a 4-H Western Heritage Project Leader – even if a parent/guardian is present.
Please fill out the form below with the name of the youth, a parent’s name, address, as well as their signature, and
that of a witness and dates. If participating with another club or 4-H Western Heritage event, the 4-H member can
provide a copy of this form to any 4-H Western Heritage Project Leader. Failure to have this document will require
officials to disqualify the shooter to avoid violation of federal law.
I/we ____________________________________, parent/guardians of ________________________________,
(print shooter’s name),grant permission to participate with a handgun in the 4-H Western Heritage Project and
Events sponsored by County, State, and National 4-H organizations as per The Youth Safety Handgun Act.
Signature of 4-H Shooter _____________________________________
Signature of Parent/guardian____________________________________
Address ___________________________________________________
City, State, & Zip ____________________________________________
Phone ____________________________________________________
Email ____________________________________________________
Date ______________________
Witness Signature ___________________________________________
Date _________________________
Handgun Use Permission Form
34
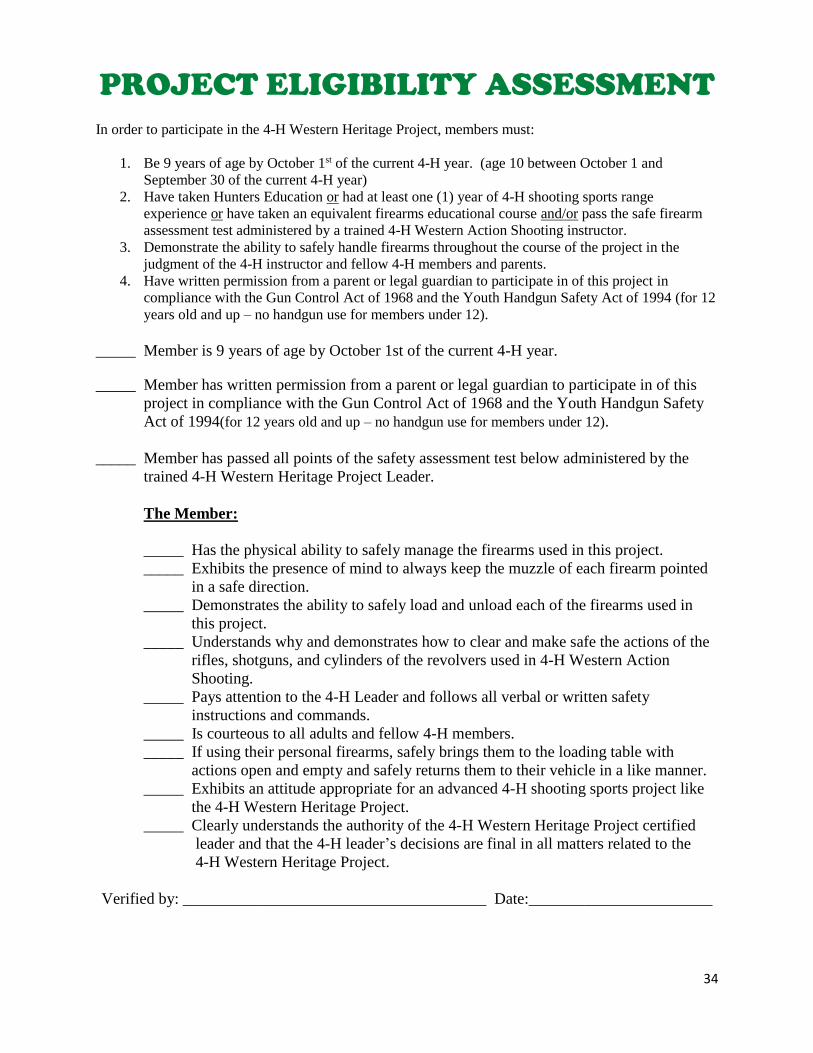
PROJECT ELIGIBILITY ASSESSMENT
In order to participate in the 4-H Western Heritage Project, members must:
1. Be 9 years of age by October 1st of the current 4-H year. (age 10 between October 1 and
September 30 of the current 4-H year)
2. Have taken Hunters Education or had at least one (1) year of 4-H shooting sports range
experience or have taken an equivalent firearms educational course and/or pass the safe firearm
assessment test administered by a trained 4-H Western Action Shooting instructor.
3. Demonstrate the ability to safely handle firearms throughout the course of the project in the
judgment of the 4-H instructor and fellow 4-H members and parents.
4. Have written permission from a parent or legal guardian to participate in of this project in
compliance with the Gun Control Act of 1968 and the Youth Handgun Safety Act of 1994 (for 12
years old and up – no handgun use for members under 12).
_____ Member is 9 years of age by October 1st of the current 4-H year.
_____ Member has written permission from a parent or legal guardian to participate in of this
project in compliance with the Gun Control Act of 1968 and the Youth Handgun Safety
Act of 1994(for 12 years old and up – no handgun use for members under 12).
_____ Member has passed all points of the safety assessment test below administered by the
trained 4-H Western Heritage Project Leader.
The Member:
_____ Has the physical ability to safely manage the firearms used in this project.
_____ Exhibits the presence of mind to always keep the muzzle of each firearm pointed
in a safe direction.
_____ Demonstrates the ability to safely load and unload each of the firearms used in
this project.
_____ Understands why and demonstrates how to clear and make safe the actions of the
rifles, shotguns, and cylinders of the revolvers used in 4-H Western Action
Shooting.
_____ Pays attention to the 4-H Leader and follows all verbal or written safety
instructions and commands.
_____ Is courteous to all adults and fellow 4-H members.
_____ If using their personal firearms, safely brings them to the loading table with
actions open and empty and safely returns them to their vehicle in a like manner.
_____ Exhibits an attitude appropriate for an advanced 4-H shooting sports project like
the 4-H Western Heritage Project.
_____ Clearly understands the authority of the 4-H Western Heritage Project certified
leader and that the 4-H leader’s decisions are final in all matters related to the
4-H Western Heritage Project.
Verified by: ______________________________________ Date:_______________________
35
Working with your local Adult Western Action Shooting Club
Across the country, Western Action Shooting is one of the fastest growing
shooting sports. In or near many communities, the National Congress of Old West
Shootists (NCOWS) or the Single Action Shooting Society (SASS) has an adult
club of cowboy shooters already established. Nearly all of them are active each
month in their local shoots. Nearly all of the also have some sort of shooting range
already established. These men and women can be a wonderful asset for your
young 4-H members.
In working with NCOWS or SASS clubs, keep the following in mind:
Approach the club at their officer meetings and make your intentions well
known up front. These are good people; deal straight with them.
Offer to participate in their club’s service projects. Most of them will
“adopt” your 4-H project and see young shooters as the life blood of their
sport. These service projects are good opportunities to work side-by-side
with the club members and show them you are serious about helping out -
not simply taking advantage of them. Most of them are good-natured,
charitable, and well intentioned folks. It can be easy to wear them out.
Make sure your 4-H club is doing its part.
Many times, these cowboys and cowgirls offer to let you shoot their guns
and ammunition. This is very generous, but remember that reloaded
ammunition, particularly that offered by someone with unknown credentials,
can put a 4-H leader in an awkward position liability-wise.
As you continue your relationship, keep the NCOWS or SASS Club
leadership informed on how your project is doing. There are slight
differences, such as no holsters, that the adult club members must be made
aware of.
Make sure that the 4-H members express gratitude for the NCOWS or SASS
cowboys, club, leaders, and range on a regular basis. This gratitude will
help ensure the future of the relationship.
Many of the cowboys and cowgirls welcome the opportunity to come to
your indoor meetings to discuss the history of the period, authentic clothing,
and certainly Old West firearms. Make sure you communicate effectively
what the project is about and exactly what you need them to cover.
Following these suggestions may help ensure a longtime, beneficial relationship
with a group that has a lot to offer your program.