Embed Size (px)
Citation preview
SA-SAMS
Guideline for using Physical Resources and Infrastructure
Register Module
September 2009
Education Management Systems (EMS)
Department of Education
Private Bag X895
0001 PRETORIA

CONTENT
1. INTRODUCTION .................................................................................. 3 2. PHYSICAL RESOURCE AND SCHOOL INFRASTRUCTURE REGISTER ............ 3 3. LEARNER SUPPORT MATERIALS ............................................................ 5 3.1 Maintain General LSM Master List ...................................................... 5 3.1.1 Adding Resources to the Main Inventory Master List............................. 6 3.2 Issue & Maintain LSM School Stock .................................................... 9 3.2.1 Adding Stock to the Resources .......................................................... 9 3.2.2 To View the Current LSM Stock ....................................................... 11 3.2.3 To Issue Books Out Of Stock to the Educators ................................... 12 3.2.4 Remove LSM Item ......................................................................... 13 3.2.5 Return Items Received From Educators Back Into Stock ..................... 14 3.3 Educator LSM Loan Details .............................................................. 15 3.4 Detailed LSM Inventory List ............................................................ 17 3.5 LSM Inventory Summary per Grade ................................................. 18 3.6 Blank LSM Issue Form .................................................................... 19 3.7 Print LSM Stock Write Offs .............................................................. 19 4. FIXED ASSETS .................................................................................. 21 4.1 Maintain Master List of Assets ......................................................... 21 4.2 Maintain Venue List........................................................................ 23 4.2.1 Allocate Stock Items (Fixed Assets) To Venues .................................. 24 4.3 Issue and Maintain Fixed Assets ...................................................... 25 4.4 Detail Fixed Assets ........................................................................ 27 4.5 Summary Fixed Assets ................................................................... 28 4.6 Print Fixed Asset Stock Registers ..................................................... 28 4.7 Print Fixed Assets Stock Write Off .................................................... 28 5. PHYSICAL INFRASTRUCTURE .............................................................. 28
Guidelines For Using the Physical Resource and School Infrastructure Register Manual Page 3 of 31
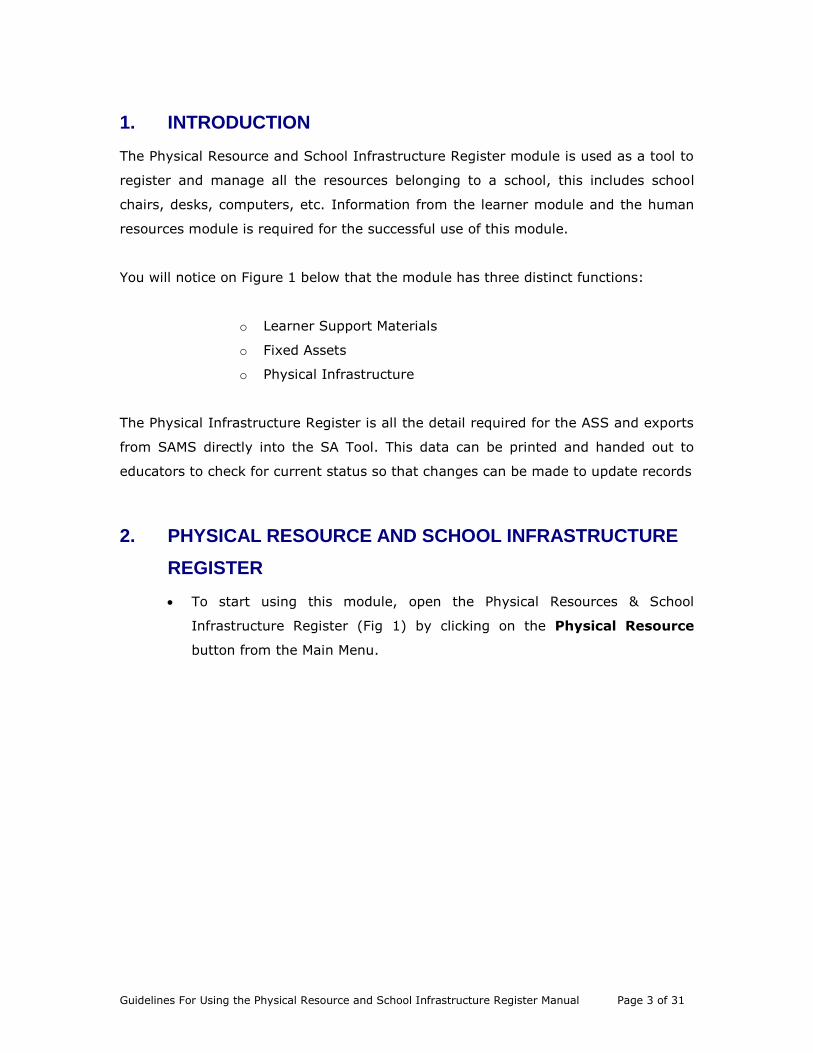
1. INTRODUCTION
The Physical Resource and School Infrastructure Register module is used as a tool to
register and manage all the resources belonging to a school, this includes school
chairs, desks, computers, etc. Information from the learner module and the human
resources module is required for the successful use of this module.
You will notice on Figure 1 below that the module has three distinct functions:
o Learner Support Materials
o Fixed Assets
o Physical Infrastructure
The Physical Infrastructure Register is all the detail required for the ASS and exports
from SAMS directly into the SA Tool. This data can be printed and handed out to
educators to check for current status so that changes can be made to update records
2. PHYSICAL RESOURCE AND SCHOOL INFRASTRUCTURE
REGISTER
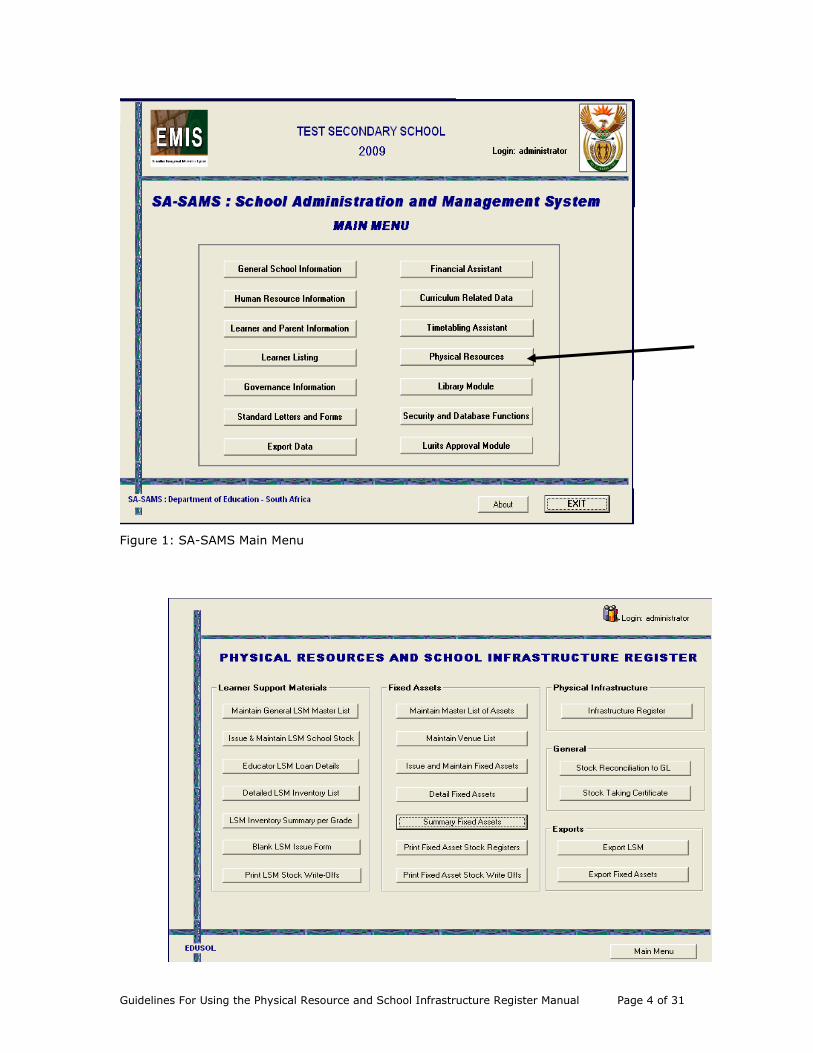
To start using this module, open the Physical Resources & School
Infrastructure Register (Fig 1) by clicking on the Physical Resource
button from the Main Menu.
Guidelines For Using the Physical Resource and School Infrastructure Register Manual Page 4 of 31
Figure 1: SA-SAMS Main Menu
Guidelines For Using the Physical Resource and School Infrastructure Register Manual Page 5 of 31
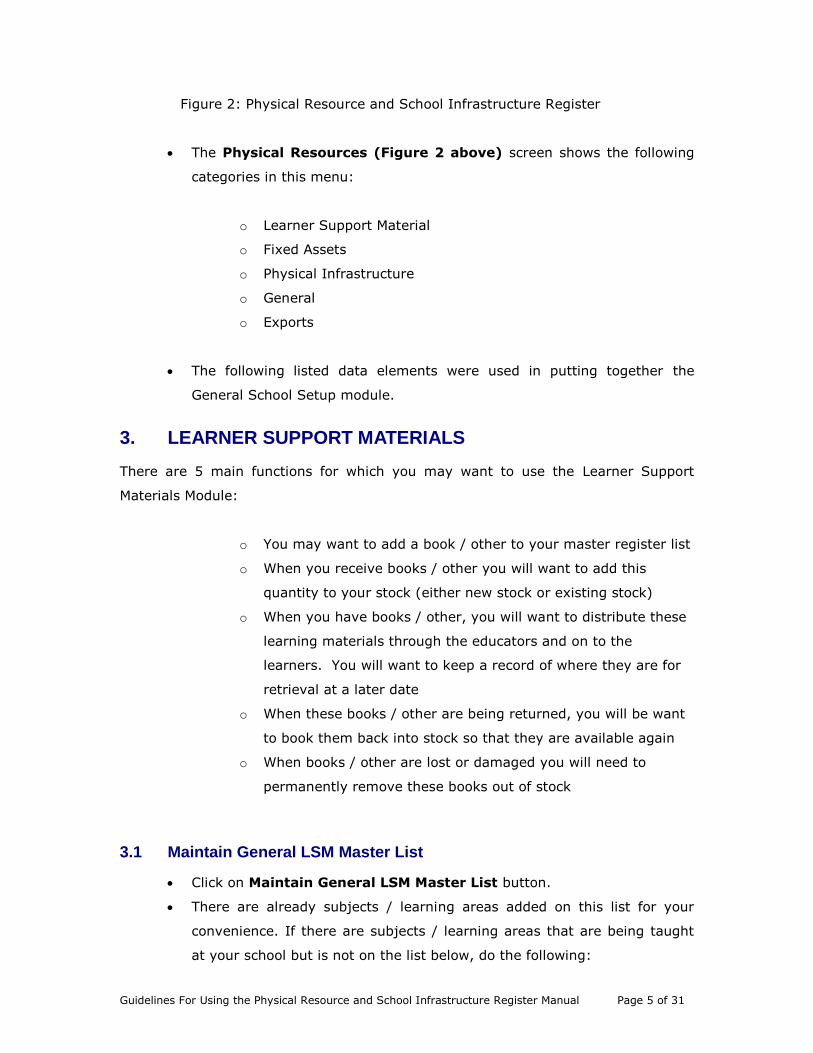
Figure 2: Physical Resource and School Infrastructure Register
The Physical Resources (Figure 2 above) screen shows the following
categories in this menu:
o Learner Support Material
o Fixed Assets
o Physical Infrastructure
o General
o Exports
The following listed data elements were used in putting together the
General School Setup module.
3. LEARNER SUPPORT MATERIALS
There are 5 main functions for which you may want to use the Learner Support
Materials Module:
o You may want to add a book / other to your master register list
o When you receive books / other you will want to add this
quantity to your stock (either new stock or existing stock)
o When you have books / other, you will want to distribute these
learning materials through the educators and on to the
learners. You will want to keep a record of where they are for
retrieval at a later date
o When these books / other are being returned, you will be want
to book them back into stock so that they are available again
o When books / other are lost or damaged you will need to
permanently remove these books out of stock
3.1 Maintain General LSM Master List
Click on Maintain General LSM Master List button.
There are already subjects / learning areas added on this list for your
convenience. If there are subjects / learning areas that are being taught
at your school but is not on the list below, do the following:
Guidelines For Using the Physical Resource and School Infrastructure Register Manual Page 6 of 31
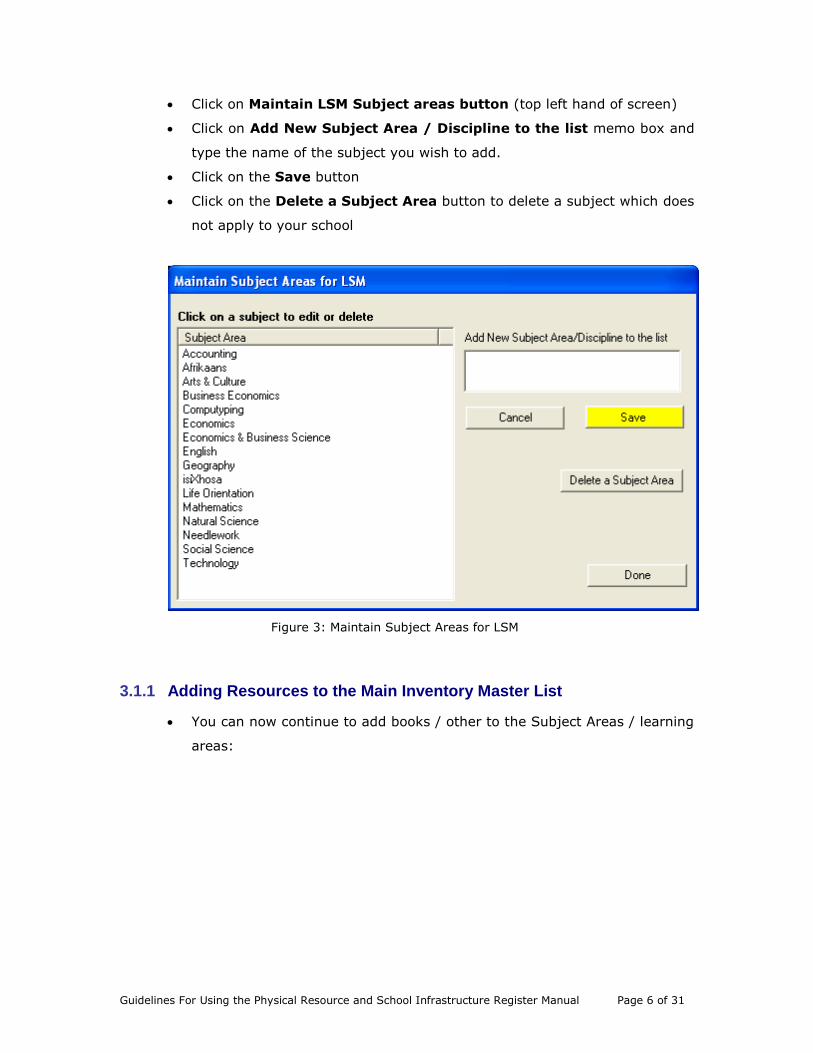
Click on Maintain LSM Subject areas button (top left hand of screen)
Click on Add New Subject Area / Discipline to the list memo box and
type the name of the subject you wish to add.
Click on the Save button
Click on the Delete a Subject Area button to delete a subject which does
not apply to your school
Figure 3: Maintain Subject Areas for LSM
3.1.1 Adding Resources to the Main Inventory Master List
You can now continue to add books / other to the Subject Areas / learning
areas:
Guidelines For Using the Physical Resource and School Infrastructure Register Manual Page 7 of 31
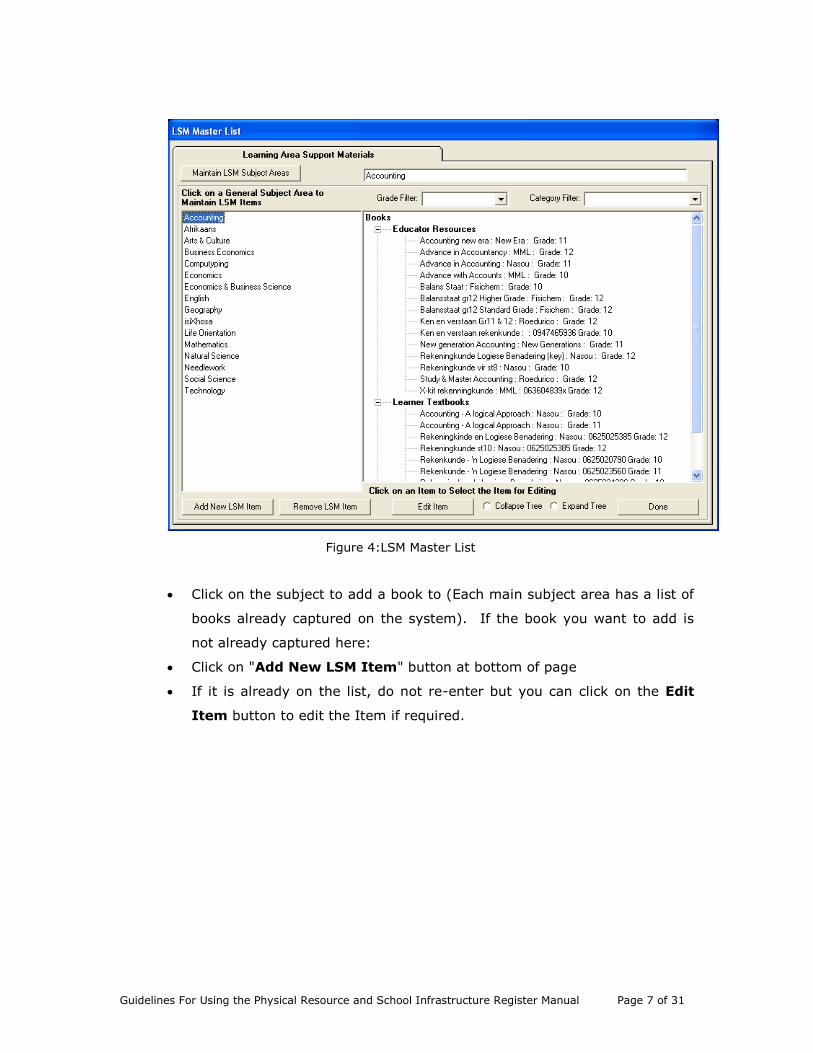
Figure 4:LSM Master List
Click on the subject to add a book to (Each main subject area has a list of
books already captured on the system). If the book you want to add is
not already captured here:
Click on "Add New LSM Item" button at bottom of page
If it is already on the list, do not re-enter but you can click on the Edit
Item button to edit the Item if required.

Guidelines For Using the Physical Resource and School Infrastructure Register Manual Page 8 of 31
Figure 5: Add New LSM / Maintain Support Materials
It jumps to the next page and will show Subject: (this is the one you have
chosen on previous page)
Select type of item to add – Book / Other (other learning support
material)
o Title of Book –enter details
o Year Published – enter year
o Publisher – enter details
o Author/s – enter details
o ISBN –enter details (e.g. 0 623 00980 3)
Select Category of Support Material (there are 6 categories)
o E.g. Learner Textbook
o Language of item (optional) – enter
o Grade relevance - Grade to Grade – enter details
Or if it is other for Item (if equipment is to be registered as part of LSM)
o Item description - enter
o Manufacturer - enter
o Year manufactured – enter
Guidelines For Using the Physical Resource and School Infrastructure Register Manual Page 9 of 31
Click on the Save button.
Click on the Ok button.
Click on the Done button.
To continue adding items to this subject, click on Next Item button
To add items to new subject, go back to LSM Master List (fig 1) and select
the subject before adding the item.
3.2 Issue & Maintain LSM School Stock
Now that you have the Subject / Learning Areas and items / resources under each
subject / learning area captured you are now ready to stock to these resources.
3.2.1 Adding Stock to the Resources
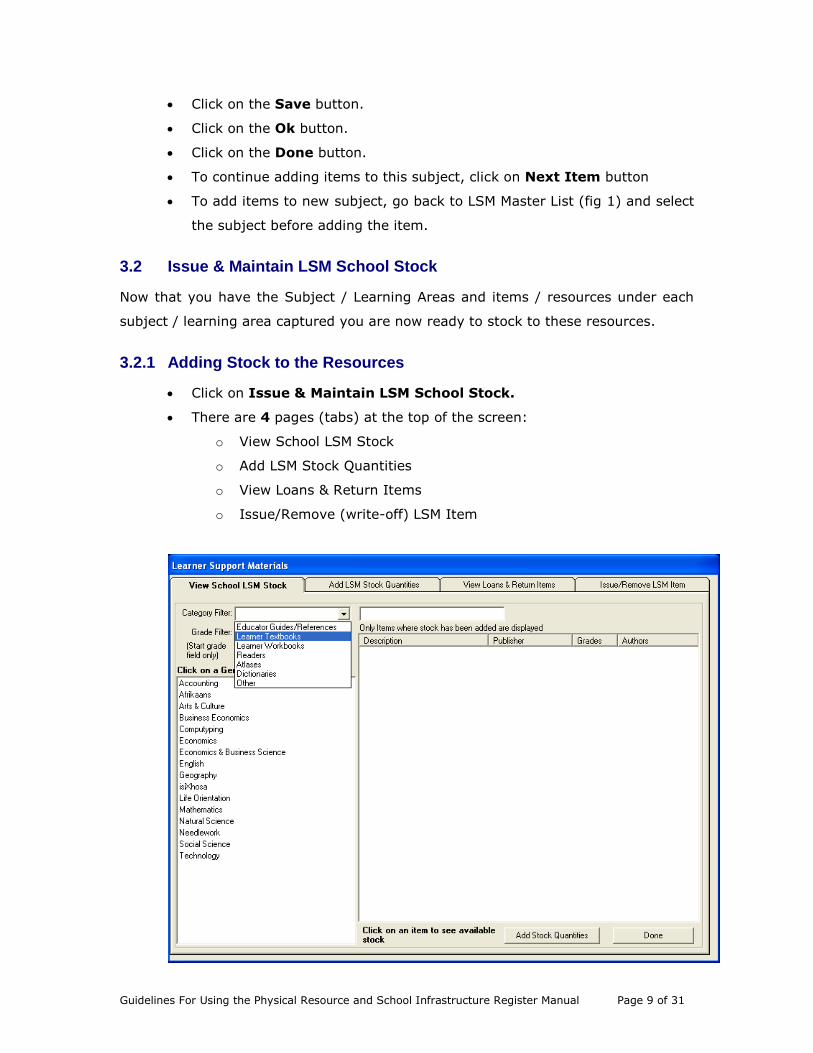
Click on Issue & Maintain LSM School Stock.
There are 4 pages (tabs) at the top of the screen:
o View School LSM Stock
o Add LSM Stock Quantities
o View Loans & Return Items
o Issue/Remove (write-off) LSM Item

Guidelines For Using the Physical Resource and School Infrastructure Register Manual Page 10 of 31
Figure 6: View School LSM Stock
Select the Category Filter (7 selections)
Select the Grade
Click on the Subject Area: e.g. Afrikaans
At the bottom of the page click on tab Add Stock Quantities or click on the
second tab ‘Add LSM Stock Quantities’
This takes you to the next page (see fig 7 below)
Select Subject Area: enter details (e.g. Afrikaans)
Select Grade
Select LSM Category – dropdown box – (e.g. learner textbooks)
Click on Ok
Select item to be added from the Select item to add drop down list
Click on drop down box Or Add Stock Item to Master List e.g. Afrikaans
Ons Taal (this will only show if you have already added it to the master
list)
Select Stock Register: e.g. 750/002 Textbooks and LSM
Select Date: enter
Click on Add New Quantity:
Go to cell Quantity Added and enter amount of stock received e.g. 100
Item cost: enter e.g. R50
Press Tab button – it automatically calculates the amount of total
purchase of this item e.g. R5000
Click on Save Stock Data button.
Click on Ok, and Done buttons
o If a mistake has been made it can be removed by
Entering Line number to be removed
Click on Remove Line button

Guidelines For Using the Physical Resource and School Infrastructure Register Manual Page 11 of 31
Figure 7: Add LSM Stock Quantities
3.2.2 To View the Current LSM Stock
Once you have added stock to a resource it is advisable to go back and
check that it has been correctly entered. This can also be done at any time
to check stock records.
To do this go back to View School LSM Stock (1st tab)
Choose the category filter – learner textbooks
Click on Subject – e.g. Afrikaans
Click on Resource – e.g. Afrikaans Ons Taal
A small screen on the top right hand corner of the screen will highlight
Stock: quantity/ On Loan : quantity / Available : quantity (see fig 7
below)

Guidelines For Using the Physical Resource and School Infrastructure Register Manual Page 12 of 31
Figure 8: View Stock Quantity
3.2.3 To Issue Books Out Of Stock to the Educators
Go to View School LSM Stock (tab 1)
Choose the Category Filter – e.g. Learner Textbooks
Select the Grade – e.g. Grade 8
Click on the General Subject Area – e.g. Afrikaans
Click on the resource in the right hand screen – e.g. Afrikaans Ons Taal
Now go to Issue / Remove Maintain LSM School Stock (Tab 4)
(see fig 8 below)
Stock Item will show – e.g. Afrikaans Ons Taal
Click on Issue Stock
It will show – Total Stock
It will show – Quantity Available for Issue
Issued to – select the educator
Quantity issued – enter amount issued
Date issued: select the date issued to educator
Guidelines For Using the Physical Resource and School Infrastructure Register Manual Page 13 of 31
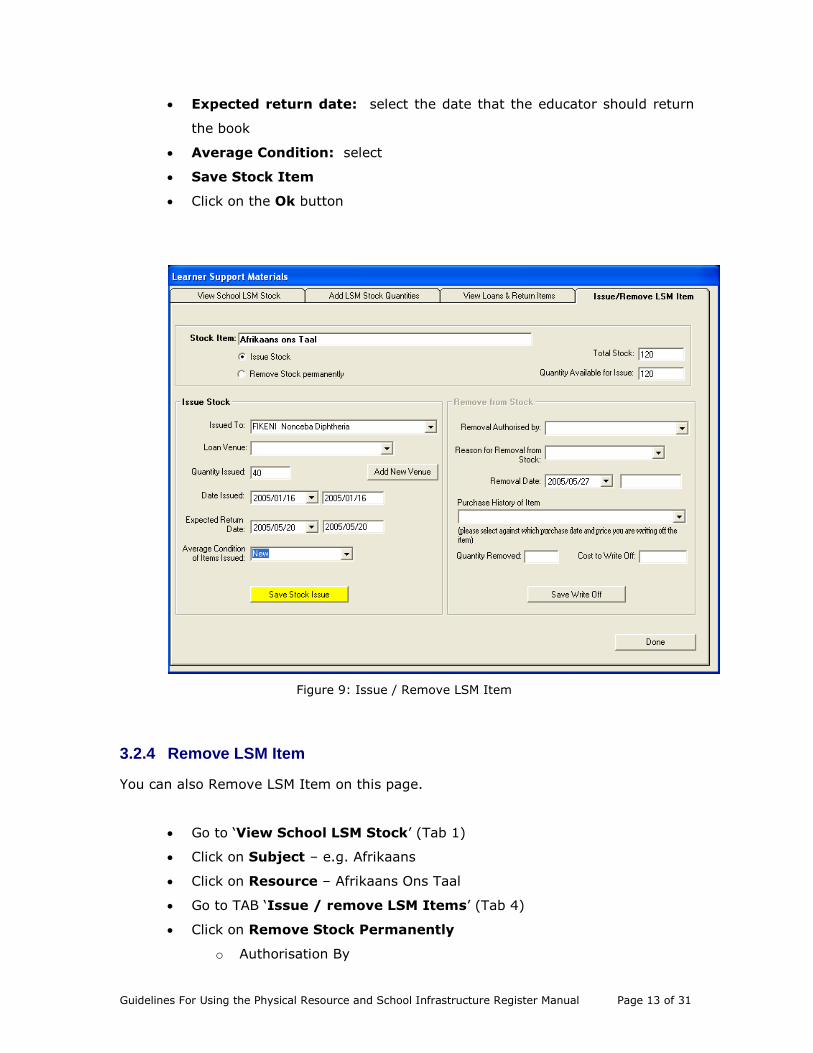
Expected return date: select the date that the educator should return
the book
Average Condition: select
Save Stock Item
Click on the Ok button
Figure 9: Issue / Remove LSM Item
3.2.4 Remove LSM Item
You can also Remove LSM Item on this page.
Go to ‘View School LSM Stock’ (Tab 1)
Click on Subject – e.g. Afrikaans
Click on Resource – Afrikaans Ons Taal
Go to TAB ‘Issue / remove LSM Items’ (Tab 4)
Click on Remove Stock Permanently
o Authorisation By

Guidelines For Using the Physical Resource and School Infrastructure Register Manual Page 14 of 31
o Reason for Removal
o Removal Date
o Purchase History of Item
o Quantity Removed
o Cost to Write Off – cost of purchase
o Save Write Off
3.2.5 Return Items Received From Educators Back Into Stock
As soon as an educator brings back resources they should be entered immediately
back into the stock records.
Click on TAB ‘View School LSM Stock’ (Tab 1)
Click on Subject Area – e.g. Afrikaans
Click on Resource on right hand screen – Afrikaans Ons Taal
Click on TAB ‘View Loans and Return Items’ (tab 3)
Items to be returned: resource ‘Afrikaans Ons Taal’
Tick in the applicable educator box
Date of write-off: select date
Number of items being returned: e.g. 40
(if there are still 5 books outstanding as they have been lost by learners
but you have to log it as all books as having been returned and then go to
‘remove LSM’ tab to remove it from stock)

Guidelines For Using the Physical Resource and School Infrastructure Register Manual Page 15 of 31
Figure 10: View Loans and Return Items
3.3 Educator LSM Loan Details
To start Educator LSM Loan Details sub module, click on the Educator
LSM Loan Details button from the Physical Resources main menu on
Figure 2 above.
Printouts
All Educators
Select Educator

Guidelines For Using the Physical Resource and School Infrastructure Register Manual Page 16 of 31
Figure 11: Educator LSM Loan Details
Figure 12: Outstanding Items Report
Or:

Guidelines For Using the Physical Resource and School Infrastructure Register Manual Page 17 of 31
Figure 13: Loan History
3.4 Detailed LSM Inventory List
To start Detailed LSM Inventory List sub module, click on the Detailed
LSM Inventory List button from the Physical Resources main menu on
Figure 2 above.
Printouts available:
Inventory List Per Grade
Inventory List per Subject

Guidelines For Using the Physical Resource and School Infrastructure Register Manual Page 18 of 31
Figure 14: Detail Inventory List
3.5 LSM Inventory Summary per Grade
To start LSM Inventory Summary Per Grade sub module, click on the LSM
Inventory Summary Per Grade button from the Physical Resources
main menu on Figure 2 above.
Figure 15: LSM Inventory Summary Per Grade print out

Guidelines For Using the Physical Resource and School Infrastructure Register Manual Page 19 of 31
3.6 Blank LSM Issue Form
To print Blank LSM Issue Form sub module, click on the Blank LSM Issue
Form button from the Physical Resources main menu on Figure 2 above.
Figure 16: Print Reports
3.7 Print LSM Stock Write Offs
To print Blank LSM Issue Form sub module, click on the Blank LSM
Issue Form button from the Physical Resources main menu on Figure
2 above.
Guidelines For Using the Physical Resource and School Infrastructure Register Manual Page 20 of 31
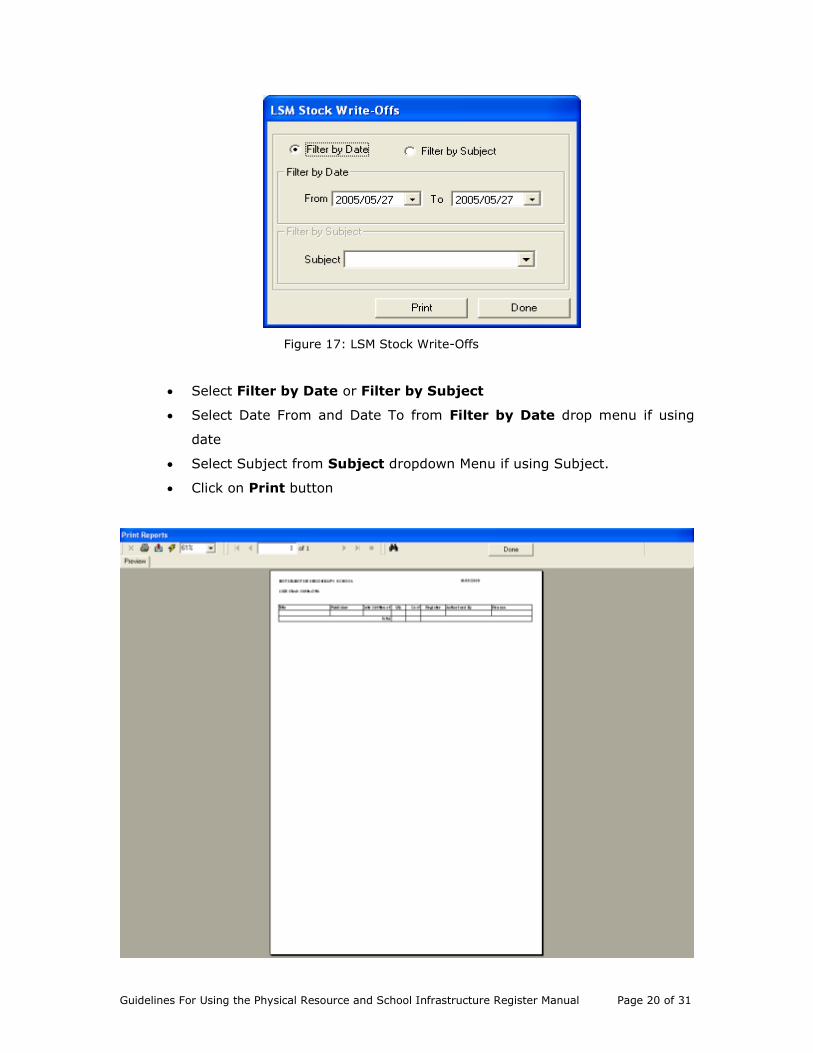
Figure 17: LSM Stock Write-Offs
Select Filter by Date or Filter by Subject
Select Date From and Date To from Filter by Date drop menu if using
date
Select Subject from Subject dropdown Menu if using Subject.
Click on Print button

Guidelines For Using the Physical Resource and School Infrastructure Register Manual Page 21 of 31
Figure 18: LSM Stock Write-Offs print out
4. FIXED ASSETS
In this section there are 5 main functions for which you may want to use the Fixed
Assets Module
You may want to add some equipment or fixed asset to your master
register list
When you receive assets you will want to add this quantity to your stock
(either new stock or existing stock)
When you have assets, you will want to distribute these assets through
the school. You will want to keep a record of where they are retrieval at a
later date
When these assets are being returned, you will be want to book them
back into for stock so that they are available again
When assets are lost or damaged you will need to permanently remove
these books out of stock
In this way we are going to process some purchases and allocate them to
a specific venue.
4.1 Maintain Master List of Assets
To start the Maintain Master List Assets sub menu Click on the button
‘Maintain Fixed Assets Items’ button from the Physical Resources main
menu no Figure 2 above.
Guidelines For Using the Physical Resource and School Infrastructure Register Manual Page 22 of 31
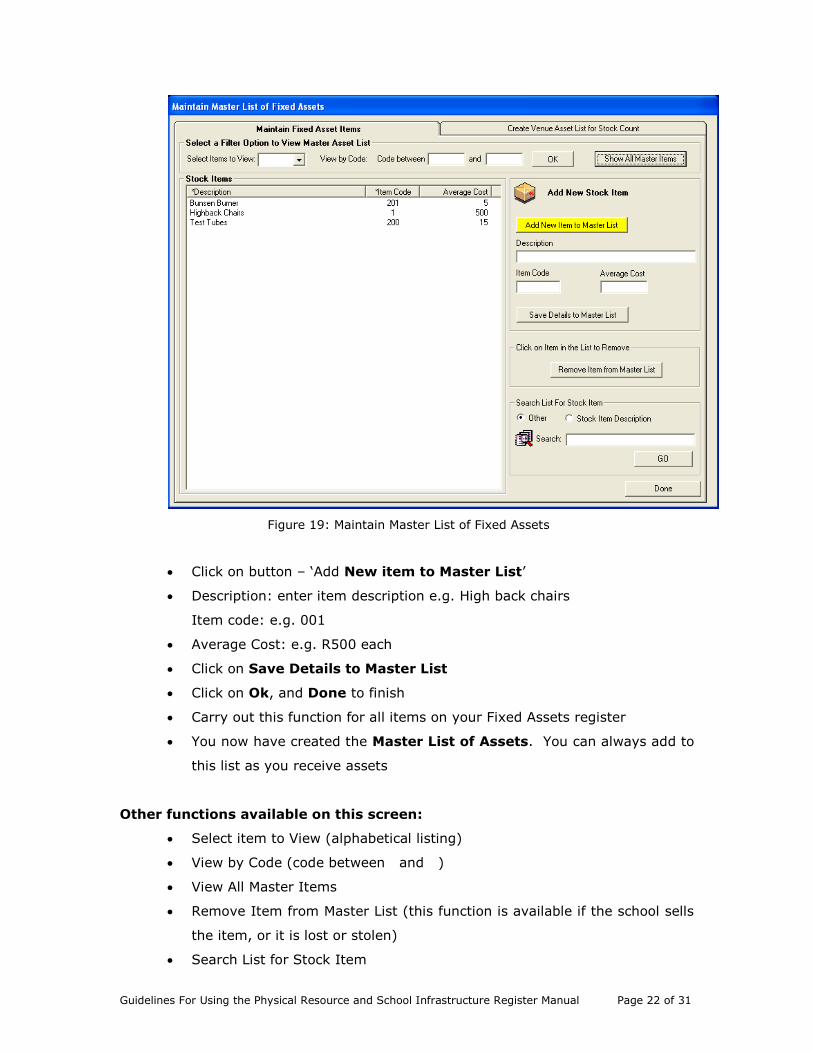
Figure 19: Maintain Master List of Fixed Assets
Click on button – ‘Add New item to Master List’
Description: enter item description e.g. High back chairs
Item code: e.g. 001
Average Cost: e.g. R500 each
Click on Save Details to Master List
Click on Ok, and Done to finish
Carry out this function for all items on your Fixed Assets register
You now have created the Master List of Assets. You can always add to
this list as you receive assets
Other functions available on this screen:
Select item to View (alphabetical listing)
View by Code (code between and )
View All Master Items
Remove Item from Master List (this function is available if the school sells
the item, or it is lost or stolen)
Search List for Stock Item

Guidelines For Using the Physical Resource and School Infrastructure Register Manual Page 23 of 31
4.2 Maintain Venue List
Go to ‘Maintain Venue List’
Figure 20: Maintain Venue List
Click on ‘Add New Venue’
There are 11 categories of venues in the drop box to choose from (please
identify them first in order to decide which rooms fall under which
Category:
o Enter Description e.g. Grade 1 class
o Enter Category e.g. Classroom
o Enter Room number e.g. Room 1
Click on Save Venue, and Ok
You now do this for every room in your school
Guidelines For Using the Physical Resource and School Infrastructure Register Manual Page 24 of 31
Note: You have now created all the venues in your school so that you can go on to
the next step and log where the assets are going to be registered at.
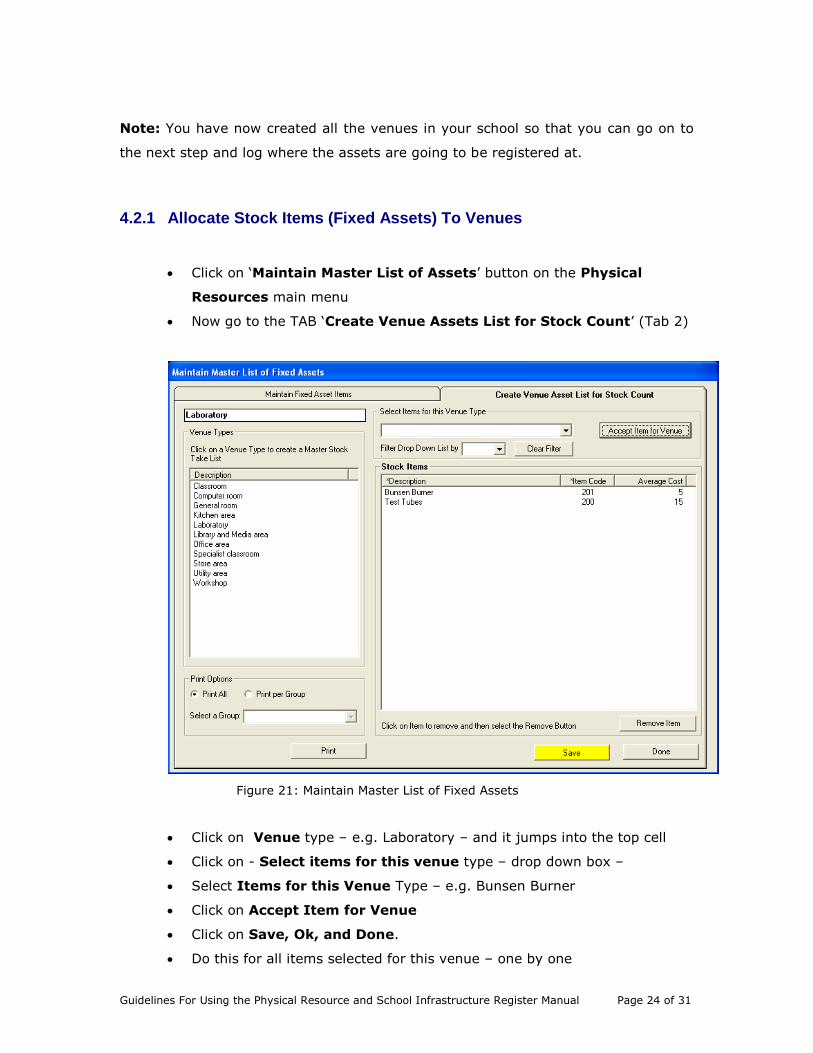
4.2.1 Allocate Stock Items (Fixed Assets) To Venues
Click on ‘Maintain Master List of Assets’ button on the Physical
Resources main menu
Now go to the TAB ‘Create Venue Assets List for Stock Count’ (Tab 2)
Figure 21: Maintain Master List of Fixed Assets
Click on Venue type – e.g. Laboratory – and it jumps into the top cell
Click on - Select items for this venue type – drop down box –
Select Items for this Venue Type – e.g. Bunsen Burner
Click on Accept Item for Venue
Click on Save, Ok, and Done.
Do this for all items selected for this venue – one by one

Guidelines For Using the Physical Resource and School Infrastructure Register Manual Page 25 of 31
Do this for all venues – one by one
You have now allocated types of assets to specific rooms in your schools
so that you know where they should be found at any stage
Other functions available on this screen:
o Remove item.
o Print Options:
o Print all
o Print per Group – select a Group
o Print
4.3 Issue and Maintain Fixed Assets
Click on ‘Issue and Maintain Fixed Assets’ button from the Physical
Resources main menu
Click on TAB – ‘Add stock to Venues’ (Tab 1)

Guidelines For Using the Physical Resource and School Infrastructure Register Manual Page 26 of 31
Figure 22: Maintain Inventory Stock per Venue
Click on ‘Select a venue to Maintain Stock Quantities’
Drop down box: select e.g. Principals office
Select Asset Register: e.g. 600/001 Furniture & Fittings
Date of Purchase: e.g. 16/01/2005
Add Fixed Asset to grid: select item e.g. high back chair
Stock code – it is automatically populated after having highlighted high
back chairs(This Information pops automatically into the first line of the
grid) Tab across to Quantity added: e.g.1
TAB across – this populates the Total Amount
Click on Save To Venue and Done buttons.
Note: This adds the quantity of any item and the total value to the venue where
they should be found. This should be done for every item and quantity of every item
that you have allocated in the school.
If you have made a mistake and entered an item twice or entered
incorrectly then go to the bottom of the page. Enter in the line number
which you would like to delete and Press – ‘Remove Line’ and on Save To
Venue button.
WRITE OFF STOCK ITEMS
Click on ‘Issue and Maintain Fixed Assets button from the Physical
Resources main menu on Figure 2 above
Click on TAB ‘Write off Stock Items’ Tab 2
‘Select Venue for write off’: choose
Click on item to be written off: select
Note: This populates the right hand side of the screen Number of items to be
discarded: enter quantity Reason for write off: 3 Options: Broken, Stolen or Lost
Select date, Write off stock, and Ok
You will see the stock written off under screen on Figure 22
Guidelines For Using the Physical Resource and School Infrastructure Register Manual Page 27 of 31
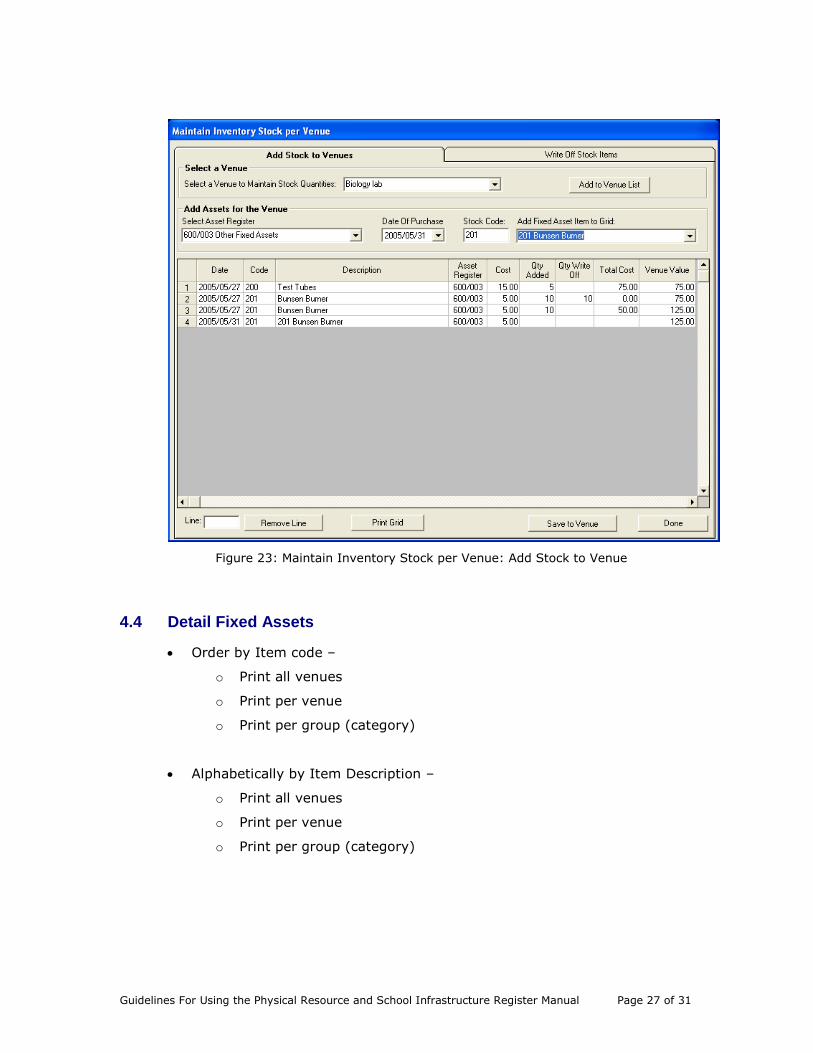
Figure 23: Maintain Inventory Stock per Venue: Add Stock to Venue
4.4 Detail Fixed Assets
Order by Item code –
o Print all venues
o Print per venue
o Print per group (category)
Alphabetically by Item Description –
o Print all venues
o Print per venue
o Print per group (category)

Guidelines For Using the Physical Resource and School Infrastructure Register Manual Page 28 of 31
Figure 24: Detail Fixed Assets
4.5 Summary Fixed Assets
This will give you a summary total of number of pieces (Assets) in each
venue
4.6 Print Fixed Asset Stock Registers
Print all or Print per register (per account number)
4.7 Print Fixed Assets Stock Write Off
Filter per date – (from … to … )
Filter per stock item – (Code between … and … )
Filter per register: (Choose account)
5. PHYSICAL INFRASTRUCTURE
Select the Infrastructure Register from the Physical Resources
Submenu. (Figure 2).

Guidelines For Using the Physical Resource and School Infrastructure Register Manual Page 29 of 31
Figure 25: Maintain Infrastructure Details
You will see that there are two parts to the register. Both parts must be
filled in.
To fill in the register use the example given. Enter the correct data for
your school, using the codes and your own data to fill in the text blocks.
When each page is complete, press Next Page to continue. When all 4
pages are completed, press the yellow Save button to save your data.
Press Done to complete the task.

Guidelines For Using the Physical Resource and School Infrastructure Register Manual Page 30 of 31
Figure 26: Part 1 School Register of Infrastructure
Guidelines For Using the Physical Resource and School Infrastructure Register Manual Page 31 of 31
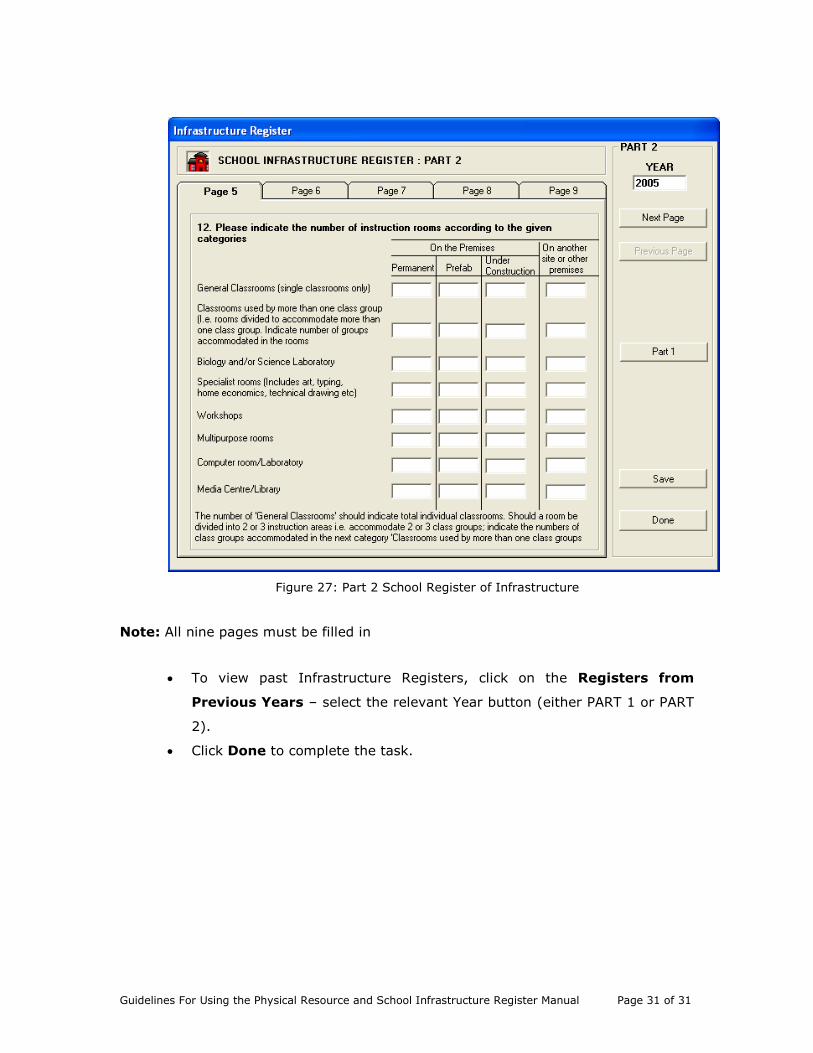
Figure 27: Part 2 School Register of Infrastructure
Note: All nine pages must be filled in
To view past Infrastructure Registers, click on the Registers from
Previous Years – select the relevant Year button (either PART 1 or PART
2).
Click Done to complete the task.