Embed Size (px)
Citation preview

sáêíì~ `
jÉÇáÅ~ä=aáëÅ=
mìÄäáëÜÉê
rëÉêÛë=j~åì~ä
∆
Codonics® Catalog Number VC-MNLUApril 17, 2018Version 5.2.0
Codonics, Inc.17991 Englewood DriveMiddleburg Heights, OH 44130 USA440.243.1198 Phone440.243.1334 FaxEmail [email protected]
Copyright © 2006 – 2018 by Codonics, Inc. All rights reserved,
worldwide. Printed in the U.S.A. Part Number 905-057-102.
No part of this document may be copied or reproduced in any form by
any means without prior written consent of Codonics, Inc.,
17991 Englewood Dr., Middleburg Heights, Ohio 44130 U.S.A.
Although every effort has been made to ensure the accuracy of this
document, Codonics, Inc. assumes no responsibility for any errors that
may appear. Codonics, Inc. makes no commitment to update nor to keep
current the information contained in this document.
Virtua Patents: www.codonics.com/ip/patents
Primera Patents: www.primera.com/patents
Codonics, the Codonics logo, “We bring the future into focus”, Horizon,
and Virtua are registered trademarks of Codonics, Inc.
Microsoft and Windows are registered trademarks of Microsoft
Corporation. Intel Pentium is a registered trademark of Intel
Corporation or its subsidiaries in the United States and other countries.
Nero is a registered trademark of Nero AG and its subsidiaries.
All other registered and unregistered trademarks are the property of their
respective owners.
European Authorized Representative:
CEpartner4U
Esdoornlaan 13,
3951DB Maarn
The Netherlands
www.cepartner4u.com

��������
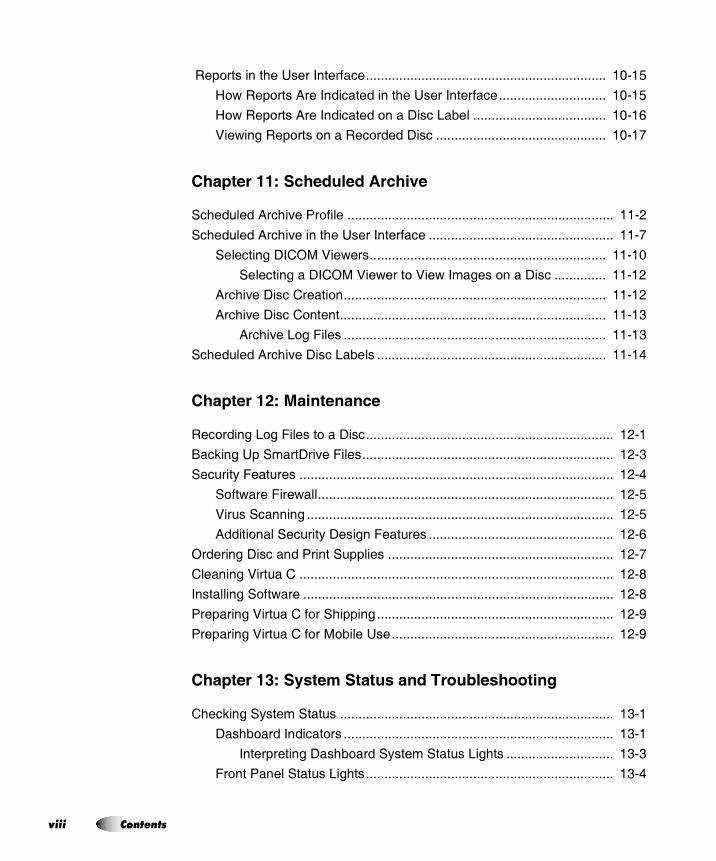
`çåíÉåíë�������
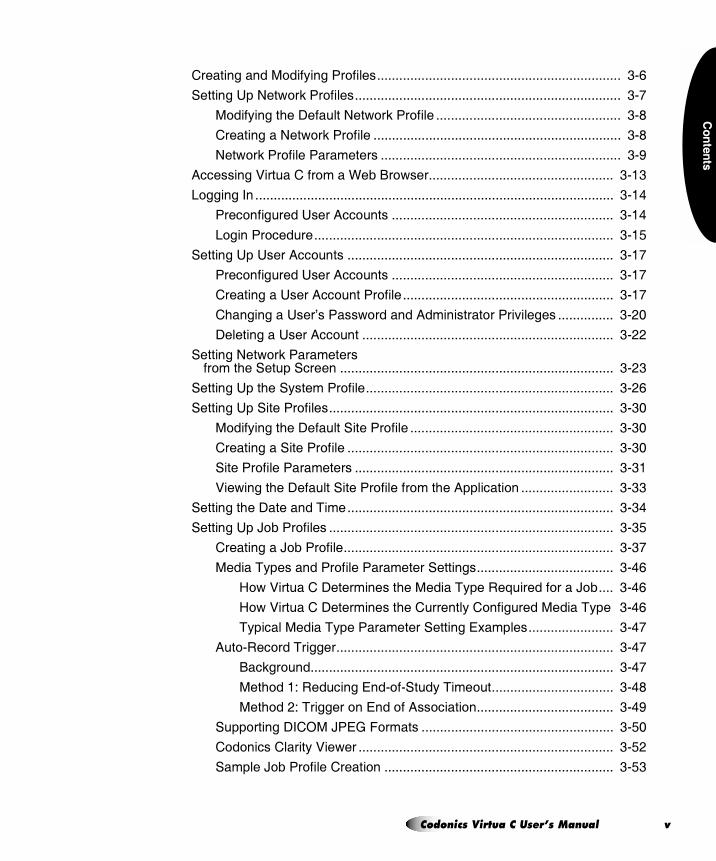
����������������� �������� ����������������������������������������������������������������� ��
�������������������������������������������������������������������������������������������������������� ��
������������� ������������������������������������������������������������������������������������� ��
������������ ��������������������������������������������������������������������������������������� ���
��������������������������������������������������������������������������������������������� ���
����������������������� �������� ���������������������������������������������������� ���
!����������"��� ������������������������������������������������������������������������������������� ����
!����"������������ ������������������������������������������������������������������������������������� ���
�������������������������������������������������������������������������������������������� ��
��"������������#�����������"��������������������������������������������������� ��
$������������������������������������������������������������������������������������������������� ���
%������&��"���'��� ����������������������������������������������������������������������������� ����
��������������������������������������������������������������������������������������������������� ���
%������� ���"���������������������������������������������������������������������������� ���
��������"� �������������������������������������������������������������������������������������������� ��
������������(�������������(%�������(���������"���������� ����� ���
)�%������� ���������������������������������������������������������������������������������������� ����
!�����������*���� ��'���"#����������"���%���"�+���������������� ����
!�����������*���������������������������"� ���������������������������������� �����
,�����"�*��������)��"����������")������������������# �������� ����
�����#!��"������� ����������������������������������������������������������������������������� �����
!�&"�������-)����� ��������������������������������������������������������������������������� �����
��"�����!��"���������������������������������������������������������������������������������� ����
)�������������� ��"���������� ����������������������������������������������������� ���
��������!��"������� �������������������������������������������������������������������������� ����
!�&"��������-)�������� ����������������������������������������������������������������������� ����
�����!��"������� ����������������������������������������������������������������������������� �����
`çÇçåáÅë=sáêíì~=`=rëÉêÛë=j~åì~ä ááá=

áî
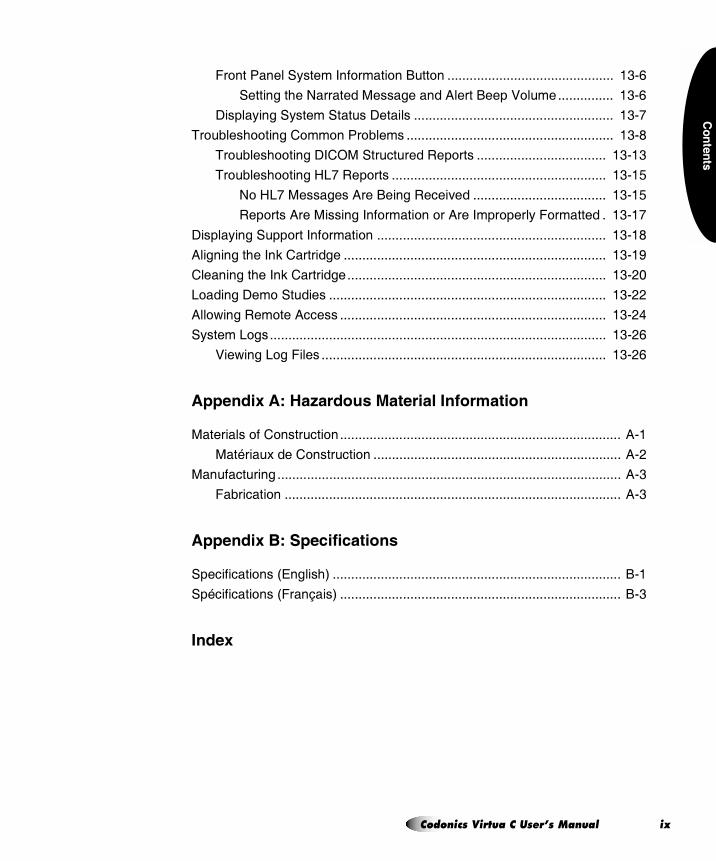
!�&"����������&����������������� ������������������������������������������������
������"�$���������"�������$��.�� �������������������������������������������� �����
��$����������������"�$����� ��������������������������������������������������������� �����
����"�����!������������������������������������������������������������������������� �����
%�������*�'��������� ���������������������������������������������������������������������������� ����
������������*/�����-����������������������������������������������������������������� ����
)�������%�������*�'��������� ����������������������������������������������������� ����
����"���������������������������������������������������������������������������������������������� �����
������� �����������
���"��������������������� ������������������������������������������������������������������� 010
!����"� ������� ���������������������������������������������������������������������������������������� 012
3���.��� ������� ������������������������������������������������������������������������������ 012
+���������� ������� ��������������������������������������������������������������������������� 014
��������"�.�� �������#������������������������������������������������������������� 015
������� ��������������������
���������"��������� �%���"� ��������������������������������������������������������������� 210
� ��������������� ��������������������������������������������������������������������������������� 212
�������#���� �!���� ������������������������������������������������������������������������������������ 215
�������������*�"����� �������������� ���������������������������������������� 215
�������������*�"�����*���!����� �������������������������������������������������� 216
��������� ��������������*�"����� ����������������������������������������������������� 217
�����"�������������!�.������� �������������������������������������������������������� 218
��������� �%���"������ ������������������������������������������������������������������ 2104
!�.�����+�� �%���"���������������������������������������������������������������������������� 2109
����������� ��������:��������� �������������������������������������������������������������� 2122
������� �������������������
����������� �����.��� �������������������������������������������������������������������������������� 412
��������������������.��� �������������������������������������������������������������������� 412
����.���������������!��"����� ����������������������������������������������������������� 414
$����� ������%���������������������������������������������������������������������������������������� 41;
`çåíÉåíë
��������
����������������#���!������������������������������������������������������������������������� 416
�����������.��:!������������������������������������������������������������������������������� 417
�����#���� �%���������.��:!������ �������������������������������������������������� 418
������������.��:!������ ������������������������������������������������������������������� 418
���.��:!������!��������� ����������������������������������������������������������������� 419
<""������$����� ������������.����������������������������������������������������� 4104
��������� ������������������������������������������������������������������������������������������������� 4105
!��"������������<""����� ������������������������������������������������������������ 4105
�����!��"�������������������������������������������������������������������������������������� 410;
�����������<""����� ������������������������������������������������������������������������ 4107
!��"������������<""����� ������������������������������������������������������������ 4107
������������<""����!��������������������������������������������������������������� 4107
� ����������-�!���.������<������������!��������� ��������������� 412=
%�����������<""���� �������������������������������������������������������������������� 4122
����������.��:!�������������� �������"���� �������������������������������������������������������������������������� 4124
��������� ��#����!������������������������������������������������������������������������� 4126
������������!������������������������������������������������������������������������������������ 414=
�����#���� �%����������!������ ������������������������������������������������������� 414=
�������������!������ ������������������������������������������������������������������������ 414=
����!������!��������� ���������������������������������������������������������������������� 4140
$��.���� �%����������!����������� �<����"����� ������������������������� 4144
�������� �%���������������������������������������������������������������������������������� 4145
��������>��!������� ����������������������������������������������������������������������������� 414;
���������>��!������������������������������������������������������������������������������� 4147
������#������!������!����������������������������������������������������� 4156
3�.$����� �%���������� �������#��*�'���������>������ 4156
3�.$����� �%���������� ���������#����������������#�� 4156
�#��"��������#��!���������������)������������������������������ 4157
<���1*�"������������������������������������������������������������������������������������� 4157
��":���������������������������������������������������������������������������������������� 4157
��� ��0?*���"���)��1��1����#���������������������������������������� 4158
��� ��2?���������)����<���"������������������������������������������� 4159
����������%��+�>!), ������ ���������������������������������������������������� 41;=
������"�������#$��.�� ��������������������������������������������������������������������� 41;2
������>��!�������������� �������������������������������������������������������������� 41;4
`çÇçåáÅë=sáêíì~=`=rëÉêÛë=j~åì~ä î=
îá
�������+�� ���������������������������������������������������������������������������������������������� 41;6
� ������%�.����*�������������������������������������������������������������������������� 41;6
������� ����������������������� �
�������������#��"��%��+�3���������������������������������������������������������������� 510
����������������*�"�����%��"������������������������������������������������������������� 512
������� ��������������� �!�"����� #���
>��� ������������������������������������������������������������������������������������������������������������ ;10
�������������������������������������������������������������������������������������������� ;12
�����������������#�����������������@������%���"������ ;12
�����������������#�����������������@�����%���"�������� ;15
!��"������>�����<������� ������������������������������������������������������������������� ;1;
!��"������>������������������������������������������������������������������������������ ;16
>��+������ ���������������������������������������������������������������������������������������� ;102
+�������%��" ������ ����������������������������������������������������������������� ;105
����"����%��+�$��.��� ����������������������������������������������������������� ;10;
����"�����%��+�$��.����$��.���������%��" ���������������� ;107
%���"���%��" �������������������������������������������������������������������������������������������� ;108
������$ �%��&��������������
3�.�������<�����������*������������������������������������������������������������ 610
���:���.�� � ������������ ��������������������������������������������������������������������� 612
��������(�������(����"�������� ���� � ������������ �������������������� 612
����#����������"����� ������������������������������������������������������������������������ 614
����"����������� ��������������������������������������������������������������������������������� 615
%�����#�������#%������ ����������������������������������������������������������������������������� 61;
%���������������������# �������������������������������������������������������������������������� 616
������' �%��&��������(�!�
���:���.�� � �%��"�A���� ������������������������������������������������������������������� 712
>������������"��������������������������������������������������������������������������������� 714
`çåíÉåíë
��������
%�����#���%�������>������������� ����������������������������������������������������������� 715
%��������>���������# ����������������������������������������������������������������������������� 71;
������) �%��&�������� �!�"�
%��"�����%����� ������� ������������������������������������������������������������������������ 812
!����������������%����� ������� ������������������������������������������������������ 812
��"���%��"�����������������������"������������������������������������� 814
���������"��������������#�#�� �������������������������������������������������� 814
<������������%��"����� ���������������������������������������������������������������������� 815
����# �������"������������������������������������������������������������������������������ 816
������* �%��&�������� ���"��
��"���1*������ ������� ���������������������������������������������������������������������������� 910
����������"���������������������������������������������������������������������������������������� 910
*������������������������������������������������������������������������������������������������������� 912
����0�������2*��������������������������������������������������������������������������� 912
%��+�� ���"�����������������#$����� ������������������������������������� 917
��������� ���"���!������ ���������������������������������������������������������������������� 918
�������+ ������������
*������1*������ ������� ������������������������������������������������������������������������ 0=10
�.���� ������*�"������%��+�����"�����*������ ������������������� 0=12
3�.$����� �!��"�����*������ ������������������������������������������������������������� 0=12
��������%��+�A���#B*������������������������������������������������������������������ 0=15
��������� �A*��!!������ ����������������������������������������������������������� 0=15
��������� �A*��!������ ����������������������������������������������������������� 0=16
,�����������������������$����� ���� �%��+�AB*��!%���"� 0=18
��������!������*������ ����������������������������������������������������������������������� 0=19
)�������%��+�����"�����*������ ������������������������������������������������� 0=19
�����#���� �*�����!��������������������������������������������������������������������� 0=19
)�������3�7*������ ���������������������������������������������������������������������� 0=100
*������������������3�7*������ �������������������������������������������������� 0=102
3�7������!���������������������������������������������������������������������������� 0=102
`çÇçåáÅë=sáêíì~=`=rëÉêÛë=j~åì~ä îáá=
îáá
*��������� �����������"������������������������������������������������������������������ 0=10;
3�.*������<������"������� �����������"������������������������������ 0=10;
3�.*������<������"�������%��"����� ������������������������������������ 0=106
$��.���*���������*�"�����%��" ���������������������������������������������� 0=107
�������� �������"���,����-�
�" ������<�" ���!������ ������������������������������������������������������������������������ 0012
�" ������<�" ������ �����������"� �������������������������������������������������� 0017
����"����%��+�$��.������������������������������������������������������������������� 0010=
����"�����%��+�$��.����$��.���������%��" �������������� 00102
<�" ���%��"������������������������������������������������������������������������������� 00102
<�" ���%��"������������������������������������������������������������������������������� 00104
<�" ������ ���� ����������������������������������������������������������������������� 00104
�" ������<�" ���%��"������ �������������������������������������������������������������� 00105
�������� �.���������
*�"��������� �������%��"������������������������������������������������������������������� 0210
��":���������%���� ������������������������������������������������������������������������ 0214
��"����# ������� ������������������������������������������������������������������������������������� 0215
����.��� ���.����������������������������������������������������������������������������������� 021;
$�����"������ ����������������������������������������������������������������������������������� 021;
<�����������"����#%����� ������� �������������������������������������������������� 0216
+�������%��"���!������������ ������������������������������������������������������������� 0217
��������$����� � ������������������������������������������������������������������������������������� 0218
��������������.��� ������������������������������������������������������������������������������������ 0218
!��������$����� ����� ������ ���������������������������������������������������������������� 0219
!��������$����� ������������������������������������������������������������������������ 0219
�������� ��/��0����������1���!"��������
� �":����#���������� �������������������������������������������������������������������������� 0410
%�� ���������"����� ������������������������������������������������������������������������� 0410
������������%�� ������#������������� �� ����������������������������� 0414
����!������������� ��������������������������������������������������������������������� 0415
á `çåíÉåíë
��������
����!�����#��������������������� ��������������������������������������������� 0416
�������� �������������������<��������$�������������������� 0416
%�����#����#����������%������ ������������������������������������������������������ 0417
�������� ������������!������� �������������������������������������������������������� 0418
�������� ������%��+�����"�����*������ ����������������������������������� 04104
�������� ������3�7*������ ���������������������������������������������������������� 0410;
��3�7��������<�������*�"����� ������������������������������������ 0410;
*������<����������������������<�����������# �������� � 04107
%�����#��������������������� �������������������������������������������������������������� 04108
<�������� ���:��������� ����������������������������������������������������������������������� 04109
��������� ���:������������������������������������������������������������������������������� 0412=
�������%���������� ��������������������������������������������������������������������������� 04122
<���.���*�����<""��� ������������������������������������������������������������������������ 04125
�#��������������������������������������������������������������������������������������������������� 04126
$��.������ ���� ����������������������������������������������������������������������������� 04126
,����2�, ���3�������.�����"������0����
������������������"�������������������������������������������������������������������������������� <10
���&��������������"���� �������������������������������������������������������������������<12
������"������ ���������������������������������������������������������������������������������������������<14
����"����� ������������������������������������������������������������������������������������������� <14
,����2�4 �������������
���"���"������C)����� D ������������������������������������������������������������������������������ �10
��&"���"������C ���E���D ���������������������������������������������������������������������������� �14
����2
`çÇçåáÅë=sáêíì~=`=rëÉêÛë=j~åì~ä áñ=

ñ
`çåíÉåíë
�����
mêÉÑ~ÅÉ
_ìääÉíÉÇ=iáëíë
Bullets are used to display a list of nonprocedural items. For example:
Any system that supports DICOM Store should work with the device. Typical DICOM hosts that would connect to the device include:
5 Modality workstations
5 PACS workstations
5 Primary and secondary image acquisition systems
kìãÄÉêÉÇ=píÉéë
The 8 icon indicates the beginning of a procedure. The steps
in a procedure are numbered. For example:
1. Touch the ������� tab on the Main screen.
2. Touch each of the studies that you want to include on the disc or disc set (if more than one disc is needed to store all of the studies).
3. When you have selected the studies you want to record on the disc, touch the ���� button.
`çåîÉåíáçåë=rëÉÇ=áå=qÜáë=j~åì~ä
8���������
���������
����
`çÇçåáÅë=sáêíì~=`=rëÉêÛë=j~åì~ä ñá=
ñáá
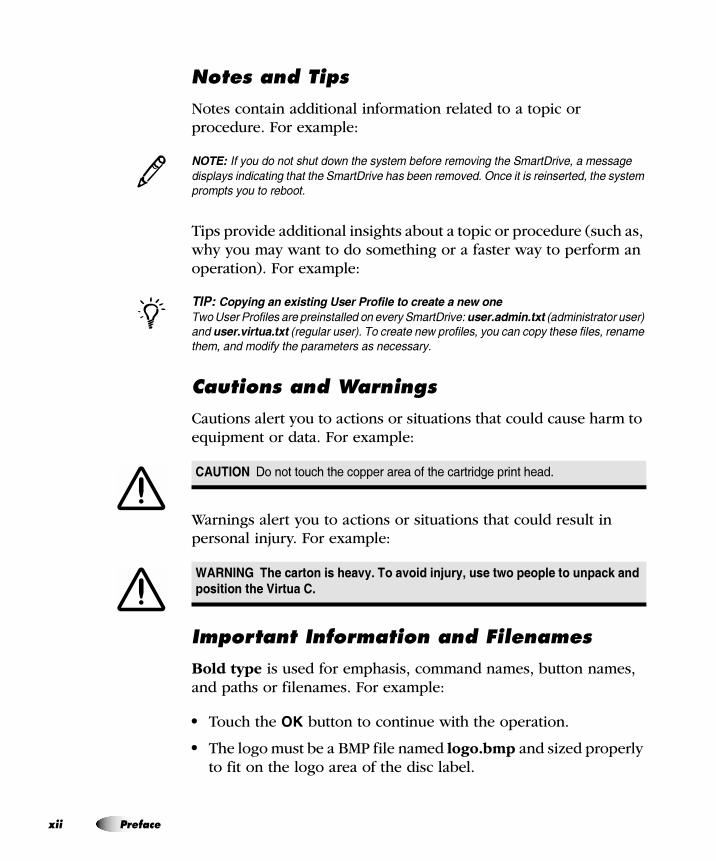
kçíÉë=~åÇ=qáéë
Notes contain additional information related to a topic or procedure. For example:
���������������������������� �� ��� ��� �� �������� ��������� ����� �� �
��������������������� ��������� ����� ��� ��� ������ ������ �� � ���� �� ��
������������� ����
Tips provide additional insights about a topic or procedure (such as, why you may want to do something or a faster way to perform an operation). For example:
���������� �� ������ ���� ������ �� ������ � ��� ���
����� �������� ��� ��� ����� ����� � ����������� �������������� !������������ �"������������������� !� ������� �"������� � �� �������� ���������������� ���� ��� ��� �
� ��������������� ������ ����� � ����
`~ìíáçåë=~åÇ=t~êåáåÖë
Cautions alert you to actions or situations that could cause harm to equipment or data. For example:
Warnings alert you to actions or situations that could result in personal injury. For example:
fãéçêí~åí=fåÑçêã~íáçå=~åÇ=cáäÉå~ãÉë
Bold type is used for emphasis, command names, button names, and paths or filenames. For example:
5 Touch the � button to continue with the operation.
5 The logo must be a BMP file named logo.bmp and sized properly to fit on the logo area of the disc label.
������� ������������������������� ����������������������
����� ��� ������ �� ������ �� ����� ������� ��� ��� ������ �� ����� ���
�������� ��� !����� ��
3
/
mêÉÑ~ÅÉ
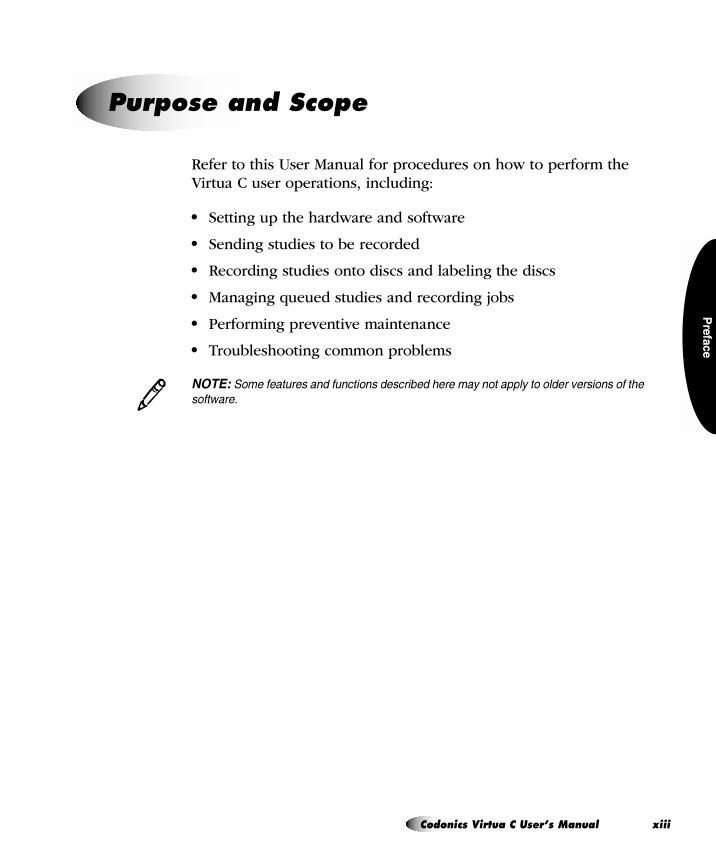
�����
Refer to this User Manual for procedures on how to perform the Virtua C user operations, including:
5 Setting up the hardware and software
5 Sending studies to be recorded
5 Recording studies onto discs and labeling the discs
5 Managing queued studies and recording jobs
5 Performing preventive maintenance
5 Troubleshooting common problems
��������� �� ��� �������������� ���� ��� � ������������������� ��� ��������� �
����� �
mìêéçëÉ=~åÇ=pÅçéÉ
3
`çÇçåáÅë=sáêíì~=`=rëÉêÛë=j~åì~ä ñááá=
ñáî
For technical assistance with Codonics Virtua C, call Codonics Technical Support at the following number:
������ ���� ������
��������� ������������������
Technical Support is available anytime. Technical Support is also available online via email and the Codonics web site:
������ � !!��"#$�%���$��$��
&�'��"�� (((�$�%���$��$��
General product information can also be requested by sending e-mail to:
������ ��)�#$�%���$��$��
Please include your postal mailing address and telephone number in the email message. Basic product information is returned via email unless otherwise requested.
mêçÇìÅí=fåÑçêã~íáçå
mêÉÑ~ÅÉ
�����
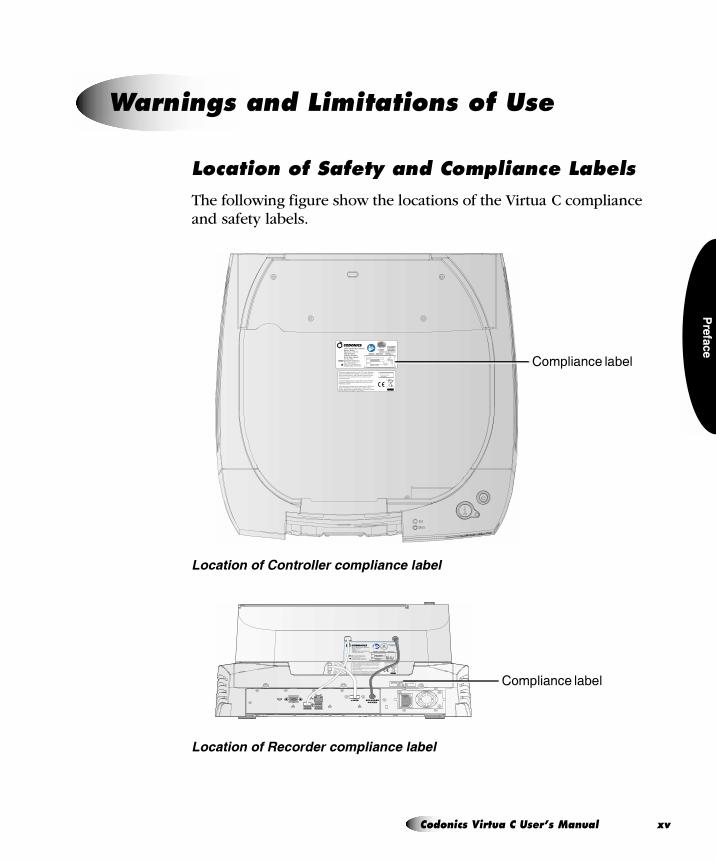
içÅ~íáçå=çÑ=p~ÑÉíó=~åÇ=`çãéäá~åÅÉ=i~ÄÉäë
The following figure show the locations of the Virtua C compliance and safety labels.
������������������ ����������� ���� �
������������ ���� ����������� ���� �
t~êåáåÖë=~åÇ=iáãáí~íáçåë=çÑ=rëÉ
This device complies with part 15 of the FCC Rules. Operation is subject to the following two conditions: 1) This device may not cause harmful interference, and 2) this device must accept any interference received, including interference that may cause undesired operation.
This Class B digital apparatus complies with Canadian ICES-003. Cet appareil numerique de la Classe B est conform a la norme NMB-003 du Canada.
This product is in conformity with the requirements of EC Council directive 93/42/EEC on the approximation of the laws of the Member States relating to medical devices. This product satisfies the Class B limits of EN 60601-1 and CISPR 11.
Windows® XP Embedded
XXXXX-XXX-XXX-XXX
XXX-XXXXX
��������"������
175VA (100 - 240 Vac)50 / 60 Hz
eSATA RECORDER POWER
This device complies with part 15 of the FCC Rules. Operation is subject to the following two conditions: 1) This device may not cause harmful interference, and 2) this device must accept any interference received, including interference that may cause undesired operation.
This Class B digital apparatus complies with Canadian ICES-003. Cet appareil numerique de la Classe B est conform a la norme NMB-003 du Canada.
This product is in conformity with the requirements of EC Council directive 93/42/EEC on the approximation of the laws of the Member States relating to medical devices. This product satisfies the Class B limits of EN 60601-1 and CISPR 11.
Windows® XP Embedded
XXXXX-XXX-XXX-XXX
XXX-XXXXX
��������"������
`çÇçåáÅë=sáêíì~=`=rëÉêÛë=j~åì~ä ñî=
ñî
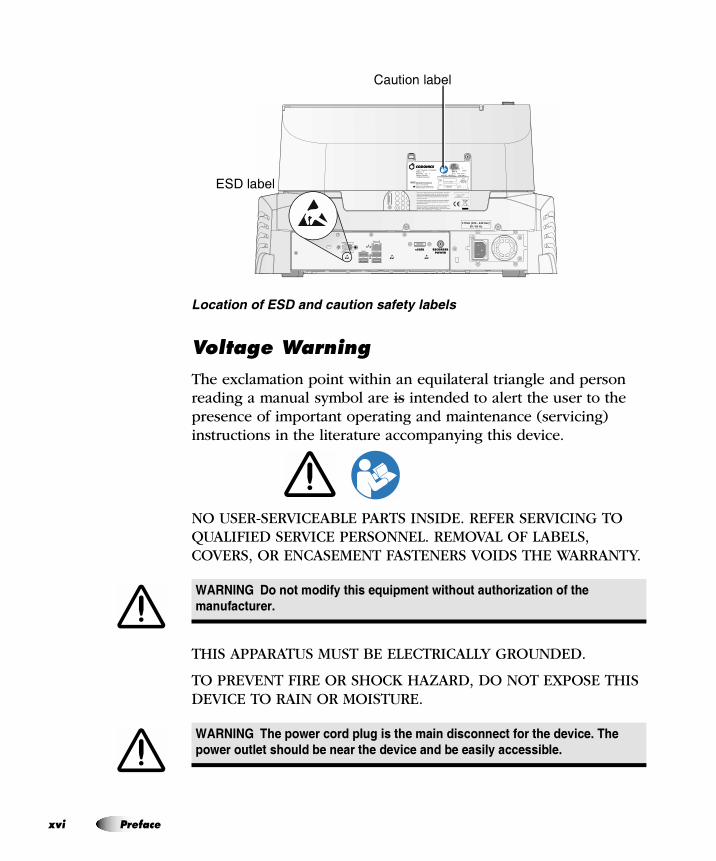
����������������������������� ������ ��
sçäí~ÖÉ=t~êåáåÖ
The exclamation point within an equilateral triangle and person reading a manual symbol are is intended to alert the user to the presence of important operating and maintenance (servicing) instructions in the literature accompanying this device.
NO USER-SERVICEABLE PARTS INSIDE. REFER SERVICING TO QUALIFIED SERVICE PERSONNEL. REMOVAL OF LABELS, COVERS, OR ENCASEMENT FASTENERS VOIDS THE WARRANTY.
THIS APPARATUS MUST BE ELECTRICALLY GROUNDED.
TO PREVENT FIRE OR SHOCK HAZARD, DO NOT EXPOSE THIS DEVICE TO RAIN OR MOISTURE.
����� "� ��� #���$� ���� �%���#��� ������� �������&����� �$ ���
#���$��������
����� ��� ����� ���� ���' �� ��� #��� ���������� $�� ��� ������� ���
����� ������ ������ (� ���� ��� ������ ��� (� ������ �������(���
175VA (100 - 240 Vac)50 / 60 Hz
eSATA RECORDER POWER
This device complies with part 15 of the FCC Rules. Operation is subject to the following two conditions: 1) This device may not cause harmful interference, and 2) this device must accept any interference received, including interference that may cause undesired operation.
This Class B digital apparatus complies with Canadian ICES-003. Cet appareil numerique de la Classe B est conform a la norme NMB-003 du Canada.
This product is in conformity with the requirements of EC Council directive 93/42/EEC on the approximation of the laws of the Member States relating to medical devices. This product satisfies the Class B limits of EN 60601-1 and CISPR 11.
Windows® XP Embedded
XXXXX-XXX-XXX-XXX
XXX-XXXXX
irtua ® Medical isc Publisher Made in .S.Patent No. ,3 5, 3Patents Pendingll Rights Reserved
A
60601-1
A / A 22 2 601 1
1257 2
������������
)�%�����
á mêÉÑ~ÅÉ
�����
EQUIPMENT IS NOT TO BE USED AS A COMPONENT OF A LIFE SUPPORT SYSTEM. Life support devices or systems are devices or systems that support or sustain life, and whose failure to perform can be reasonably expected to result in a significant injury or death to a person. A critical component is any component of a life support device or system whose failure to perform can be reasonably expected to cause the failure of the life support device or system, or to affect its safety or effectiveness.
a~åÖÉêë=°äÉÅíêáèìÉë
Le point d'exclamation dans un symbole triangle et la personne qui lit un symbole manuel visent à alerter l'utilisateur de la présence d'importantes instructions d'utilisation et de maintenance (entretien) dans la documentation qui accompagne cet appareil.
����� �#��� ��� ����� ���� ���' $��# ��� ����� ������ �� ����������
������� ����� �� ��� �������
����� �������' �����(����� ��� (� �������� ���� ���� ��� �%���#��� ��
��������� �� �� �%�������� ���������� #�� �� )*������� ����+ ,���� ���
)*������� ����+-�
����� �� ����� ��� �$ �������� ���� � ���� �%���#��� #��� ���� (�
��������� �� � ������ #��� ���� ���������� ������
����� "� ��� ����� � ������� ����� ���� ��������' !����� ��������
��#������� ���� ��� ����� ��� $���� ������
`çÇçåáÅë=sáêíì~=`=rëÉêÛë=j~åì~ä ñîáá=
ñî
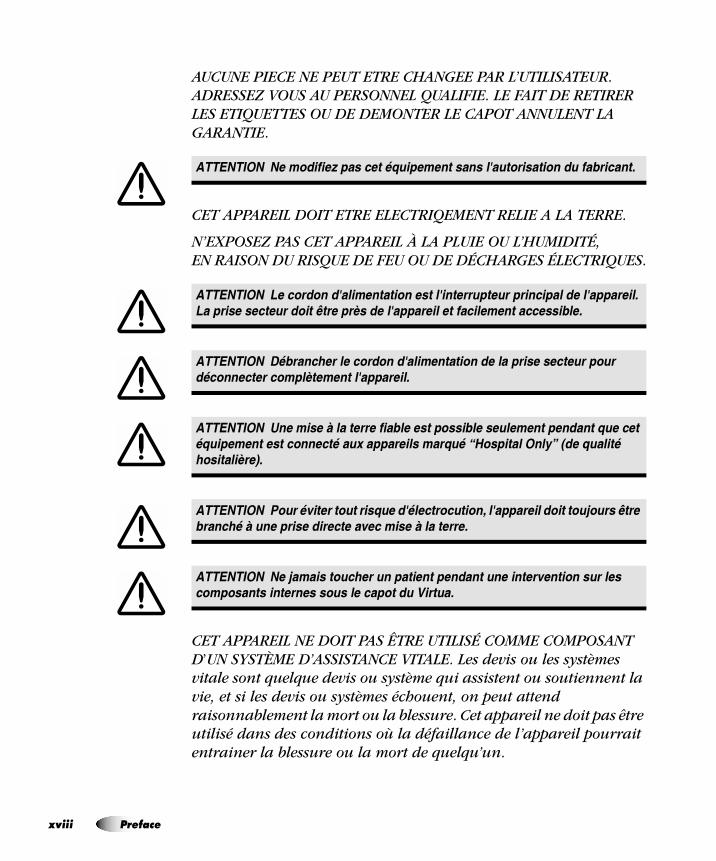
AUCUNE PIECE NE PEUT ETRE CHANGEE PAR L’UTILISATEUR. ADRESSEZ VOUS AU PERSONNEL QUALIFIE. LE FAIT DE RETIRER LES ETIQUETTES OU DE DEMONTER LE CAPOT ANNULENT LA GARANTIE.
CET APPAREIL DOIT ETRE ELECTRIQEMENT RELIE A LA TERRE.
N’EXPOSEZ PAS CET APPAREIL À LA PLUIE OU L’HUMIDITÉ,EN RAISON DU RISQUE DE FEU OU DE DÉCHARGES ÉLECTRIQUES.
CET APPAREIL NE DOIT PAS ÊTRE UTILISÉ COMME COMPOSANT D’UN SYSTÈME D’ASSISTANCE VITALE. Les devis ou les systèmes vitale sont quelque devis ou système qui assistent ou soutiennent la vie, et si les devis ou systèmes échouent, on peut attend raisonnablement la mort ou la blessure. Cet appareil ne doit pas être utilisé dans des conditions où la défaillance de l’appareil pourrait entrainer la blessure ou la mort de quelqu’un.
��������� ����� ������������������������������������������� ���������
��������� �����������������������������������������������������������������
������������������������������������������������ ��������������������
��������� ������!������������������������������������������������
��������������������������������
��������� "�������#���������� �������������������������������������������
������������������������$�����������������%&����������'(�)�����������
!���������*�
��������� +����,�����������������������������-������������������.���������
�����!��#��������������������,�������#�����������
��������� ���.��������!�������������������������������,��������������
��������������������������������/������
ááá mêÉÑ~ÅÉ
�����
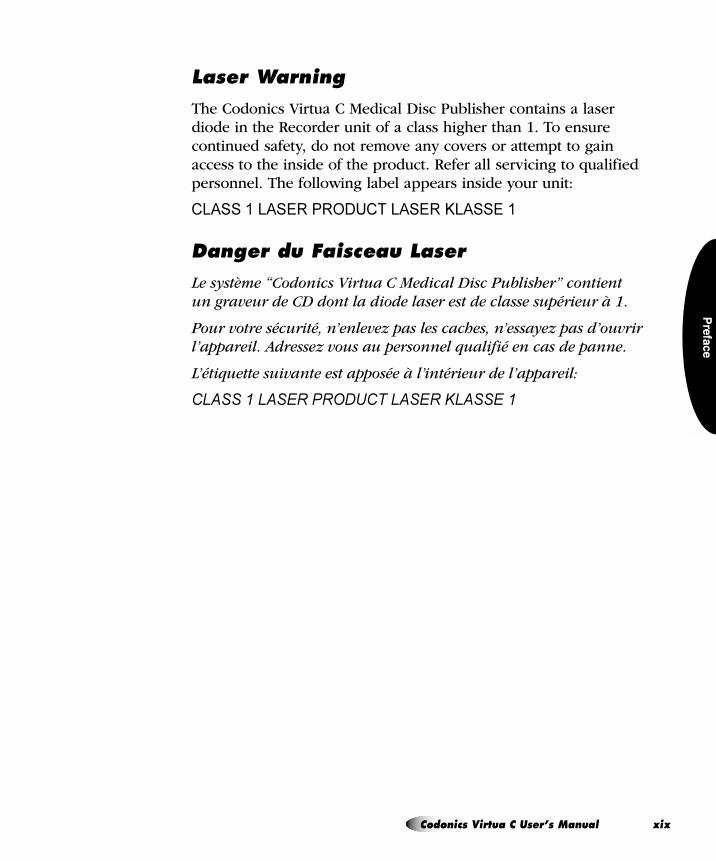
i~ëÉê=t~êåáåÖ
The Codonics Virtua C Medical Disc Publisher contains a laser diode in the Recorder unit of a class higher than 1. To ensure continued safety, do not remove any covers or attempt to gain access to the inside of the product. Refer all servicing to qualified personnel. The following label appears inside your unit:
CLASS 1 LASER PRODUCT LASER KLASSE 1
a~åÖÉê=Çì=c~áëÅÉ~ì=i~ëÉê
Le système “Codonics Virtua C Medical Disc Publisher” contientun graveur de CD dont la diode laser est de classe supérieur à 1.
Pour votre sécurité, n’enlevez pas les caches, n’essayez pas d’ouvrir l’appareil. Adressez vous au personnel qualifié en cas de panne.
L’étiquette suivante est apposée à l’intérieur de l’appareil:
CLASS 1 LASER PRODUCT LASER KLASSE 1
`çÇçåáÅë=sáêíì~=`=rëÉêÛë=j~åì~ä ñáñ=
ññ
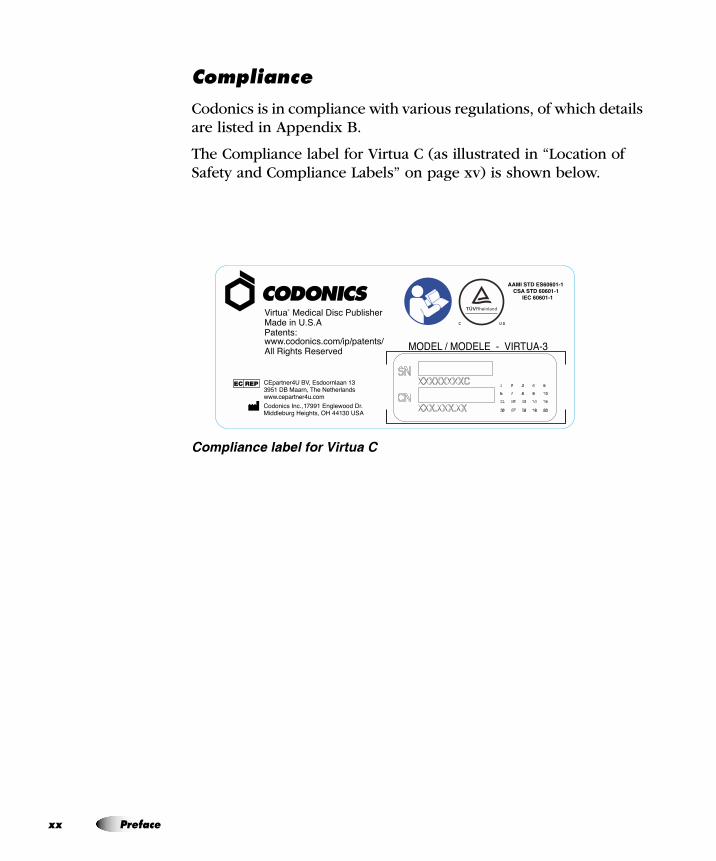
`çãéäá~åÅÉ
Codonics is in compliance with various regulations, of which details are listed in Appendix B.
The Compliance label for Virtua C (as illustrated in “Location of Safety and Compliance Labels” on page xv) is shown below.
�������� ���� �����������
mêÉÑ~ÅÉ
�����
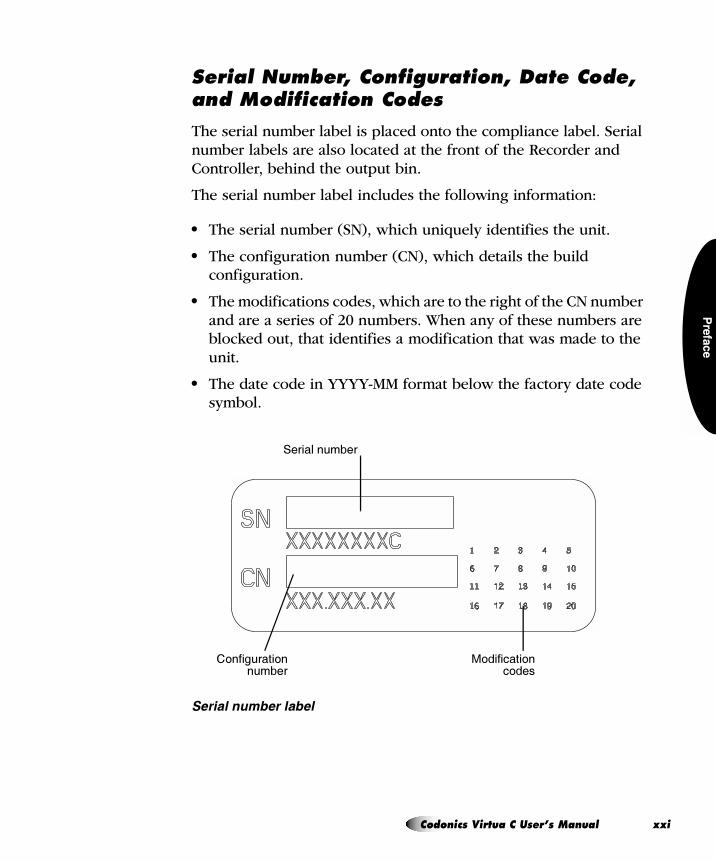
pÉêá~ä=kìãÄÉêI=`çåÑáÖìê~íáçåI=a~íÉ=`çÇÉI=~åÇ=jçÇáÑáÅ~íáçå=`çÇÉë
The serial number label is placed onto the compliance label. Serial number labels are also located at the front of the Recorder and Controller, behind the output bin.
The serial number label includes the following information:
5 The serial number (SN), which uniquely identifies the unit.
5 The configuration number (CN), which details the build configuration.
5 The modifications codes, which are to the right of the CN number and are a series of 20 numbers. When any of these numbers are blocked out, that identifies a modification that was made to the unit.
5 The date code in YYYY-MM format below the factory date code symbol.
� ��������� ����� �
�����������
� �������� �����
� �������� �� ���
`çÇçåáÅë=sáêíì~=`=rëÉêÛë=j~åì~ä ññá=

ññ
bpa=`~ìíáçå
Connections to other pieces of equipment are made at the rear of Virtua C. These connectors are marked with a precautionary ESD (electrostatic discharge) warning symbol, as shown below. Do not touch any of the pins of these connectors. When making connections to the device, it is best done while the device is plugged in but not powered on. ESD may cause erratic behavior of the device when powered on. Should this occur, power to the device may have to be cycled. It is recommended that all staff involved in making connections to the device be aware of these ESD precautions.
������� ������� �����������
mçíÉåíá~ä=Ñçê=o~Çáç=cêÉèìÉåÅó=fåíÉêÑÉêÉåÅÉ=çå=aÉîáÅÉ=léÉê~íáçå
Both portable and mobile RF communications equipment can affect medical electrical equipment, including Virtua C. Keep such RF communications equipment out of the immediate area.
áá mêÉÑ~ÅÉ

�����
mçíÉåíá~ä=Ñçê=o~Çáç=~åÇ=qÉäÉîáëáçå=fåíÉêÑÉêÉåÅÉ
Virtua C generates and uses radio frequency energy, and if not installed and used properly, that is, in strict accordance with the manufacturer’s instructions, may cause interference to radio and television reception. Do not change the Display refresh rate, which is set for 75 Hz. The device has been type tested and found to comply with Class B emission limits for a computing device in accordance with the specifications in Subpart J of Part 15 of FCC Rules, which are designed to provide reasonable protection against such interference when operating in a commercial environment. Operation of the equipment in a residential area is likely to cause interference, in which case the user, at his own expense, will be required to take whatever measures may be appropriate to correct the interference. If your device does cause interference to radio or television reception, you are encouraged to try to correct the interference by one or more of the following measures:
5 Reorient the receiving antenna
5 Relocate the device with respect to the receiver
If necessary, you should consult Codonics Technical Support or an experienced radio/television technician for additional suggestions. You may find the following booklet prepared by the Federal Communications Commission helpful: How to Identify and Resolve Radio-TV Interference Problems. This booklet is available from the U.S. Government Printing Office, Washington, D.C. 20402, Stock No. 004-000-00345-4.
This product is in conformity with the protection requirements of EC Council directive 89/336/EEC on the approximation of the laws of the Member States relating to electromagnetic compatibility. This product satisfies the Class B limits of EN55011. A declaration of conformity with the requirements of the Directive has been signed by the Director of Quality Assurance and Regulatory Affairs.
`çÇçåáÅë=sáêíì~=`=rëÉêÛë=j~åì~ä ññááá=
ññ
Le présent appareil numérique n’émet pas de bruits radio-électriques dépassant les limites applicables aux appareils numériques de la Classe B prescrites dans le Réglement sur le brouillage radioélectrique édicté par le ministére des Communications du Canada.
dìáÇ~åÅÉ=oÉÖ~êÇáåÖ=bäÉÅíêçã~ÖåÉíáÅ=bãáëëáçåë=~åÇ=fããìåáíó
Suitable Environments:
5 Virtua-C/E is intended for use in professional healthcare facility environments, including hospitals and medical clinics.
5 Virtua-C/E has not been evaluated for use near HF surgical equipment. If use near HF surgical equipment is desired, the user is responsible for verifying proper operation of the Virtua-C/E. If Virtua-C/E does not perform correctly in this environment, move the Virtua-C/E farther from the source of the electromagnetic disturbance.
5 Virtua-C/E has not been evaluated for use in emergency medical vehicles.
As a support device, Virtua-C/E does not provide essential performance.
����� ��� �$ ���� �%���#��� �������� �� �� ���� �� ���� ����� �%���#���
������ (� ������� (������ �� ����� ������ �� �#������ ���������� �$ ���� ��� ��
���������� ���� �%���#��� ��� ��� ����� �%���#��� ������ (� �(������ ��
����$� ���� ���� ��� ��������' ���#�����
����� ��� �$ ������������ ����������� ��� ��(��� ����� ���� �����
�����$��� �� �������� (� ��� #���$������� �$ ���� �%���#��� ����� ������ ��
��������� �������#�'����� �#������� �� ��������� �������#�'����� �##�����
�$ ���� �%���#��� ��� ������ �� �#������ ����������
áî mêÉÑ~ÅÉ

�����
����� .����(�� / ��##���������� �%���#��� ,��������' �����������
���� �� ������� ��(��� ��� �0������ ��������- ������ (� ���� �� ������ ����
12 �# ,34 ������- �� ��� ���� �$ ��� !�����5�67� ��� ��(���� �� ������������
���������� ��'�������� �$ ��� ���$��#���� �$ ���� �%���#��� ����� �������
������������ ��� �� ���������������������������
������������� ���� ���������
������������
���������
�� ������������
������������
�����������
�������
�����������������
��������
�� ������������
� ���������������
���� �!!!"#"$
�������
��� ������ ����� ����������
���� �!!!"#"#
� �����
������������ ����� ��������������������������
������������� ���� ���������
������� �������� ���
���� �!!!"%"$
&'()�� �����
&$()��&%()��&'()��&��()����
� �� ������������
���� �!!!"%"#
#�)*
'!��+,�"�$-.��+,
'!�/�0�������(+,
`çÇçåáÅë=sáêíì~=`=rëÉêÛë=j~åì~ä ññî=
ññ
���������������������������������
� �!����
���� �!!!"%"#
� �����
������� ��� ���� ������"�#��
���� �!!!"%"%
0��� ��1�&�$�()���!!�(+,��������� ��
���2���3�
���*�4��� ���1�&���()���!!�(+,�
�������� �����2���3�
$���
���� �!!!"%"�
5���"� "5���1�&�!-��()��&��-!�()�
5���"� "�� ��1�&�!-��()��&��-!�()��&�$-!�
()
��������������
���� �!!!"%" �
0��� ����������*�4��1
#)��!-����+,�"�'!��+,�
)������������������6����!-����+,�����
'!��+,�
'!�/�0�������(+,
% ������������������
���� �!!!"%"'�
#!�0*���!�+,� �� !�+,�
��� �����!�
���� �!!!"%"��
!/�7���!-���3�������!8��%�8��9!8���#�8��
�'!8��$$�8��$.!8�����#��8
!/�7������3����0:;�.!/�7���$�*#!�
�3��������������<���1����!8�
��� ��������!����
���� �!!!"%"��
!/�7���$�!*#!!��3���
������������ ����� �������������������������������� �����
������������� ���� ���������
îá mêÉÑ~ÅÉ
�����
p~ÑÉíó=mêÉÅ~ìíáçåë
5 Never connect this device to any outlet or power supply that has a voltage or frequency different than that specified and set on the rear of the device.
5 When servicing the device, always power it off by pressing the System power button, then unplug the device.
5 Damage to the power cord may cause fire or shock hazard. When unplugging the power cord, hold it by the plug only and remove the plug carefully.
5 If the power cord needs to be replaced, replace it only with another Codonics power cord manufactured specifically for your power configuration.
5 If the device is smoking or making unusual sounds, power off and unplug the device immediately.
5 Do not insert foreign objects of any kind into the device; doing so can constitute a safety hazard and cause extensive damage.
5 Do not place any liquid containers on the device. If, for some reason, liquid seeps into the device, power off the device and unplug the power cord from the source outlet. If used without corrective measures, the device may be damaged.
5 Do not use the device near flammable gases.
5 Connect only Codonics-approved devices.
������#���� �����$ ��������� ������ �� �������������� ������������� % �����
��������������� �� �� �������$&���
mê¨Å~ìíáçå=ÇÛbãéäçá
5 Ne jamais brancher cet appareil sur une source d’alimentation électrique dont la tension ou la fréquence diffèrent des valeurs indiquées à l’arrière de l’appareil.
3
`çÇçåáÅë=sáêíì~=`=rëÉêÛë=j~åì~ä ññîáá=

ññ
5 Quand vous vous faites de la maintenance sur l'appareil,toujours l'éteindre en appuyant sur le bouton OFF, ensuite débrancher l'appareil.
5 Un cordon d’alimentation endommagé peut être une cause d’incendie ou de décharge électrique. En déconnectant le cordon d’alimentation, tenez-le seulement par la prise et retirez la prise soigneusement.
5 Si le cordon d’alimentation doit être remplacé, utilisez un cordon d’alimentation Codonics fabriqué spécifiquement pour votre appareil.
5 Si l’appareil fume ou émet des bruits inhabituels arrêtez-le immédiatement et débranchez le câble secteur.
5 N’introduisez aucun objet étranger dans l’appareil, cela peut être une source de danger et peut causer de graves dommages.
5 Ne déposez aucun récipient à coté de l’appareil. Si pour une raison quelconque un liquide est renversé à l’intérieur, arrêtez immédiatement l’appareil et débranchez le câble secteur. Toute nouvelle utilisation de l’appareil sans intervention peut causerde graves dommages.
5 Ne pas utiliser l’appareil à coté d’une source de gaz inflammable.
5 Ne pas brancher qu'avec des appareils approuvés par Codonics.
����������' ������(����'���� ��� ������ ������������������ ���������������� ��) �
��� ���*� �� ������*� ���� ����� ���������*� �3
îááá mêÉÑ~ÅÉ
�����
içÅ~íáçå=mêÉÅ~ìíáçåë
5 The device’s operating ambient temperature range is 15–30ºC (59–86ºF), with a relative humidity of 20%–80%.
5 If the device is moved quickly from an extremely cold place to a warmer one, condensation is likely to form. Do not use the device if condensation has formed. Wait until the condensation has evaporated. You can speed up the evaporation time by moving the device to a drier location.
5 Ventilation slots and holes are provided on the sides and rear of the device. Place the device on a level, stable surface and locate it at least 4 in. (10 cm) from walls to ensure proper ventilation.
5 Do not place device in a high humidity or high dust area. Airborne dirt particles can cause interference with the operation of the device. Avoid placing the device in areas where ventilation ducts, open doors, or frequent passers-by might expose the device and media to high levels of debris.
5 Do not locate the device in hot-springs areas where hydrogen sulfide and acidic ions are likely to be generated.
5 Do not locate the device where there are oily fumes and vapors.
5 Do not locate the device in direct sunlight.
5 Do not locate device near sources of high RF energy.
5 Do not locate the device where it might be subject to jarring or vibrations, such as a table or desk in a high-traffic area. Jarring and vibrations can affect the recording and labeling of discs.
������� ���������������������������� ���������������� ���������
`çÇçåáÅë=sáêíì~=`=rëÉêÛë=j~åì~ä ññáñ=
ññ
båîáêçååÉãÉåí=ÇÉ=cçåÅíáçååÉãÉåí
5 Les conditions normales d’utilisation de l’appareil sont : une température de 15 à 30ºC et une humidité relativede 20 % à 80 %.
5 En cas de variation rapide de la température, de la condensation peut se former. Dans ce cas n’utilisez pas l’appareil, attendez que la condensation se soit évaporée. Vous pouvez accélère cette évaporation en déplacent l’appareil dans un endroit sec.
5 Les fentes de ventilation se trouvent sur les côtés et à l’arrièredu appareil. Placez l’appareil sur une surface stable et au moins 10 cm à des murs pour assurer une ventilation correcte.
5 Ne placez pas l’appareil dans une zone propre et non-humide. Des particules de poussières peuvent causer des disfonctionnements. Évitez de placer l’appareil à proximité d’une bouche de ventilation, d’une porte, ou d’un lieu très fréquenté car cela pourrait exposer l’appareil ainsi que les médias àla poussière.
5 Ne placez pas l’appareil à proximité d’une source de chaleur ou de substances acides.
5 Ne placez pas l’appareil dans une pièce où il y a des vapeurs huileuses et grasses.
5 N’exposez pas l’appareil à la lumière directe du soleil.
5 Ne placez pas l’appareil près d’une source haute fréquence.
5 Ne placez pas l’appareil dans un lieu où il pourrait être exposé à des vibrations, car cela peut nuire à l’enregistrement et à l’impression des média.
���7����� "���,��������������������������������������� ��������������
�0���������
ñ mêÉÑ~ÅÉ

�����
`äÉ~åáåÖ=mêÉÅ~ìíáçåë
5 Many plastic components are used in the device’s construction. Coat flecking and deformation is likely to occur if the device is wiped with chemical dusters, benzene, thinners, insecticides, or other solvents. Rubber and PVC materials left in contact with the device for extended times will cause damage. Never use petroleum-based solutions or abrasive cleaners.
5 To clean the device cover, first power off the device by pressing the System power button on the Controller front panel, then unplug the device. Clean the cover with a soft cloth slightly moistened with a mild soap and water solution. Allow the cover to completely dry before operating the device again.
5 To clean the Display’s touch screen, use a mild soap and water mixture. Always apply the soap and water mixture to a clean cloth or towel first and then clean the screen. Liquid applied directly to the Display could possibly leak inside the device and cause damage.
5 Do not use alcohol. The touch screen can be damaged if cleaned with alcohol.
mê¨Å~ìíáçåë=ÇÛbåíêÉíáÉå
5 Cet appareil comporte plusieurs pièces en plastique. Des taches et des déformations peuvent être provoquées par l’utilisation de chiffon imbibé de benzène, d’essences, d’insecticides, ou d’autres solvants. N’utilisez jamais solution à base de pétrole.
5 Pour nettoyer l’appareil, veuillez d’abord l’éteindre en utilisantle bouton d’arrêt vert sur panneau avant, puis l’interrupteur situé à l’arrière, et n’oubliez pas de débrancher le câble secteur. Nettoyez l’extérieur de l’appareil avec un tissu doux légèrement humidifié avec un une solution à base d’eau et de savon non corrosif. Laissez sécher avant de remettre en fonction le système.
`çÇçåáÅë=sáêíì~=`=rëÉêÛë=j~åì~ä ñññá=
ññ
5 Pour nettoyer l’écran “touch screen”, utilisez une solution à base d’eau et de savon non corrosif. Déposez toujours la solution sur un tissu propre et nettoyez ensuite l’écran. Tout liquide appliqué directement sur l’écran coulerait à l’intérieur du dispositif et pourrait l’endommager.
5 Ne pas utiliser de lingette à l'alcool. L’écran tactile pourrait être endommagé.
jÉÇá~=mêÉÅ~ìíáçåë
5 Discs with a reject icon printed on the label have failed to record properly and should be destroyed or disposed of to ensure the confidentiality of patient medical information.
5 Unwanted discs should be destroyed or disposed of to ensure the confidentiality of patient medical information.
5 Only use Codonics-recommended discs to ensure compatibility with the recording and labeling system of the device. Contact Codonics Customer Service for a current list of recommended discs and suppliers.
5 Only use Codonics-recommended ink cartridges to ensure proper operation of the device and proper labeling of the disc. Contact Codonics Customer Service for a current list of recommended ink cartridges and suppliers.
5 Never refill ink cartridges as this can cause damage to the mechanism of the device and cause improper labeling of discs.
5 Recorded discs should be stored in protective cases or sleeves when not in use to protect from scratches and contamination that can interfere with data retrieval and label legibility.
5 Do not subject recorded discs to prolonged exposure to sunlight, ultraviolet light, or extreme heat as this can interfere with data retrieval and label legibility.
ñáá mêÉÑ~ÅÉ

�����
mê¨Å~ìíáçåë=ÇÉ=j¨Çá~=Éí=`çåëçãã~ÄäÉë
5 Les CD ou DVD avec l'icône 'reject" imprimé sur l’étiquette n’ont pas été enregistrés correctement et doivent être détruits pour assurer la confidentialité des informations médicales du patient..
5 Des disques produits par erreur doivent être détruits pour assurer la confidentialité des informations médicales du patient.
5 Afin d’assurer la compatibilité de la gravure et de l’impression, n’utilisez que les CD et DVD recommandés par Codonics. Contactez le service client pour connaître la liste des fournisseurs de produits compatibles.
5 Afin d’obtenir la meilleure qualité d’impression, n’utilisez que les cartouches d’encre recommandées par Codonics. Contactez le service client pour connaître la liste des fournisseurs de produits compatibles.
5 Ne rechargez jamais les cartouches d’encre cela ne peut endommager le mécanisme et provoquer une impression incorrectes des disques.
5 Les CD-DVD enregistrés devraient être rangés dans un étui protecteur afin de les protéger des rayures et de la poussière,cela pourrait nuire à la relecture des données et endommager les données imprimées.
5 Les CD-DVD enregistrés ne doivent pas être exposées à la lumière directe du soleil ainsi qu’à tout autres sources de chaleur ou d’ultra-violet, cela pourrait nuire à la relecture des donnéeset endommager les données imprimées.
`çÇçåáÅë=sáêíì~=`=rëÉêÛë=j~åì~ä ñññááá=
ññ
`çÇçåáÅë=sáêíì~=jÉÇáÅ~ä=fã~ÖÉ=sáÉïÉê
5 The Codonics Virtua Medical Image Viewer is not intended for diagnostic use. The viewer is provided for reference use only as a post-diagnostic tool.
5 Image quality can vary greatly from system to system based on the age, quality, and resolution of the display device (monitor or LCD display), graphics card, cabling, and ambient light conditions.
iÉ=sáëì~äáëÉìê=`çÇçåáÅë=sáêíì~
5 Le visualiseur Codonics Virtua n’est pas destiné au diagnostique, il doit être utilisé comme un outil post-diagnostique.
5 La qualité des images peut varier énormément en fonction des caractéristiques du système utilisé pour la relecture du CD, comme par exemple: la résolution du moniteur, la précision de la carte graphique, et l'éclairage ambient.
jÉÇáÅ~ä=~åÇ=m~íáÉåí=fåÑçêã~íáçå
5 Virtua C log files might contain patient information. Use caution when distributing log files.
5 CD and DVD media are not intended to be used as the only method for archiving medical information. An overall strategy for archiving medical information that includes CD or DVD media must ensure that multiple copies of the information be stored at multiple locations. Media quality, handling, and storage conditions are important factors that must be considered.
ñáî mêÉÑ~ÅÉ

�����
Disposal of this product and consumables shall be in accordance with all applicable laws and regulations in effect at the locality at the time of disposal. For additional information, refer to Appendix A, Hazardous Material Information.
`çåÇáíáçåë=Éí=o≠ÖäÉë=ÇÛríáäáë~íáçå
L’utilisation de ce produit doit être conforme à toutes les lois et règlements applicables sur le lieu d’utilisation.
bìêçéÉ~å=aáëéçë~ä=oÉèìáêÉãÉåíë
Codonics imagers and electronic accessory devices are not to be discarded or recycled; rather they are to be returned to the manufacturer. Contact Codonics directly or by the link provided for the latest information concerning:
5 Identification of the country specific Importer/Distributor/Producer
5 Product return and treatment of our electronic products
Manufacturer: Codonics Incorporated17991 Englewood DriveMiddleburg Heights, OH 44130 USAPhone: +1.440.243.1198Fax: +1.440.243.1334Email: [email protected]
aáëéçë~ä=oÉèìáêÉãÉåíë
`çÇçåáÅë=sáêíì~=`=rëÉêÛë=j~åì~ä ñññî=
ññ
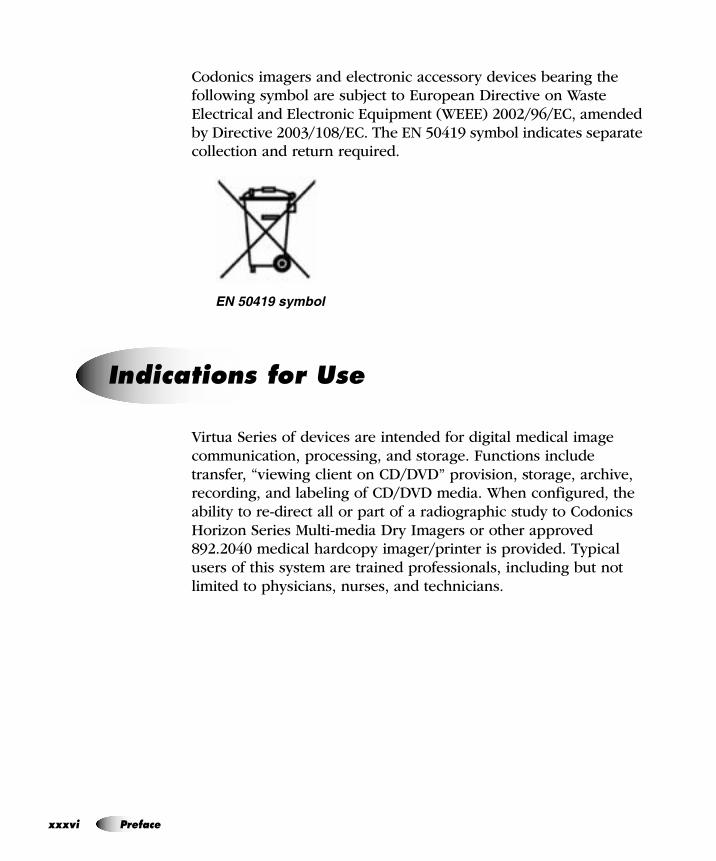
Codonics imagers and electronic accessory devices bearing the following symbol are subject to European Directive on Waste Electrical and Electronic Equipment (WEEE) 2002/96/EC, amended by Directive 2003/108/EC. The EN 50419 symbol indicates separate collection and return required.
���������������
Virtua Series of devices are intended for digital medical image communication, processing, and storage. Functions include transfer, “viewing client on CD/DVD” provision, storage, archive, recording, and labeling of CD/DVD media. When configured, the ability to re-direct all or part of a radiographic study to Codonics Horizon Series Multi-media Dry Imagers or other approved 892.2040 medical hardcopy imager/printer is provided. Typical users of this system are trained professionals, including but not limited to physicians, nurses, and technicians.
fåÇáÅ~íáçåë=Ñçê=rëÉ
ñîá mêÉÑ~ÅÉ
�����
�����
�
= NfåíêçÇìÅíáçå
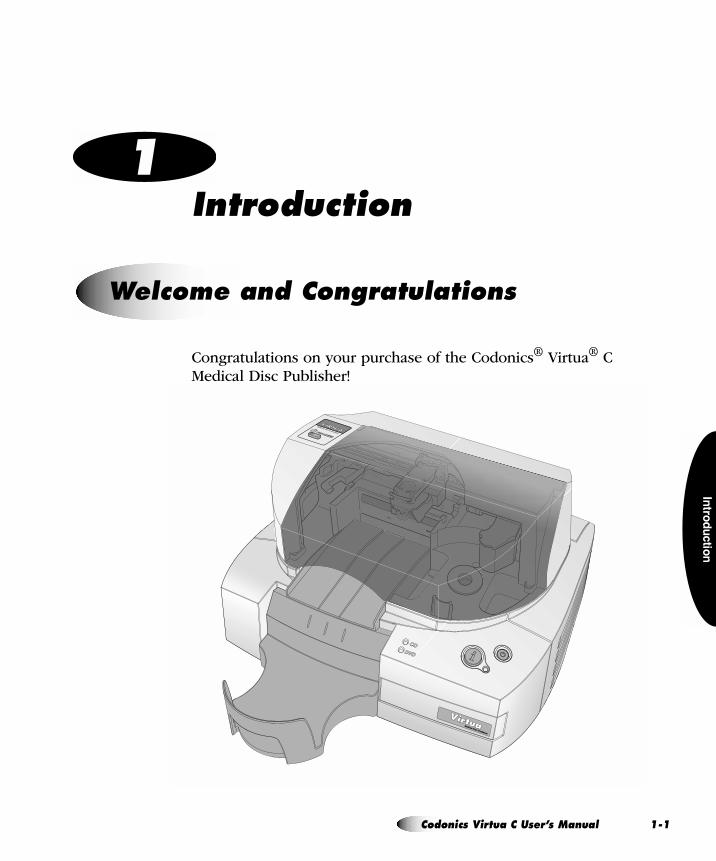
Congratulations on your purchase of the Codonics® Virtua® C Medical Disc Publisher!
tÉäÅçãÉ=~åÇ=`çåÖê~íìä~íáçåë
`çÇçåáÅë=sáêíì~=`=rëÉêÛë=j~åì~ä NJN=

NJ
We are pleased you chose Virtua C. We are confident that it will provide fast, reliable disc recording and labeling for your demanding data storage and distribution applications.
Virtua C is a complete network-based solution for recording and labeling diagnostic studies onto CD and DVD media. Virtua C integrates a CD/DVD drive, a disc label printer, and a computer into a compact design. Virtua C optimizes workflow and increases productivity by automatically creating IHE PDI-compliant discs. Virtua C uses Codonics high-quality CD/DVD media that provides reliable storage for data distribution.
e~êÇï~êÉ=cÉ~íìêÉë
5 Integrated printer automatically labels discs with patient information, study information, and the address and logo of the imaging facility.
5 Embedded computer and large-capacity hard drive allow multiple DICOM workstations to concurrently share Virtua C and spool hundreds of studies.
5 10/100/1000Mb Ethernet provides industry-standard connectivity and support for DICOM Store.
5 High-quality Codonics CD-R and DVD-R media provides reliable storage for data distribution and archiving.
5 20-disc capacity allows for 20 CD-R discs or 20 DVD-R discs.
5 Convenient media access is provided by a front-loading design that allows discs to be refilled in seconds.
5 Small footprint occupies less than two feet of desk space.
mêçÇìÅí=cÉ~íìêÉë
O fåíêçÇìÅíáçå

�����
�����
�
léÉê~íáçå~ä=cÉ~íìêÉë
5 Built-in web server allows remote web browser access to an easy-to-use interface that optimizes daily workflow activities. System configuration, operation, and status information is easily accessible from the user interface.
5 Store-to-disc functionality allows you to store DICOM studies to Virtua C directly from modality consoles, PACS systems, or viewing stations, and to receive an IHE PDI-compliant DICOM disc in minutes.
5 Auto mode provides one-step disc creation by recording one or more studies to disc for each DICOM study received.
5 Manual mode provides flexible disc creation by allowing you to select one or more studies to be recorded.
5 True multi-user support is provided by Job Profiles that allow you to tailor features including media type, labeling, operating mode, and priority.
5 Multi-site information. Multi-site support allows imaging center site information — such as address, disc label, image viewer, and other parameters — to be configured so that the same Virtua C can be used at multiple sites. For example, this is useful in mobile coach applications.
5 A Windows®-based DICOM viewer is included with Virtua C and can be included on each disc.
5 Optional third-party DICOM viewers are available, allowing you to install one or more DICOM viewers of your choice on discs.
5 The optional Patient Reports feature allows Virtua C to receive HL7 and DICOM Structured Reports from a RIS or PACS and match them to a patient’s study, allowing the recording of both the report and study together on the same disc.
`çÇçåáÅë=sáêíì~=`=rëÉêÛë=j~åì~ä NJP=

NJ
5 The optional Scheduled Archive feature provides a method of creating a set of discs that contain all studies received by Virtua C. This provides an economical way to store studies for future referral or importing into PACS systems.
5 Easy to service with Codonics exclusive Express Warranty program, which provides a replacement Virtua C if the problem cannot be solved by our Support team. Also, the SmartDrive allows all configurations settings to be quickly transferred to a replacement unit. This minimizes downtime and reconfiguration effort.
`çãéäá~åÅÉ=ïáíÜ=fåÇìëíêó=pí~åÇ~êÇë
5 Meets all industry standards including DICOM part10, IHE PDI, and audit logs for HIPAA compliance
5 Full medical device compliance including FDA and MDD CE Class I, GMP/QSR ISO13485:2003/NS-EN ISO13485:2012, IEC 60601-1 (3rd Edition) Safety and IEC 60601-1-2:2014 (4th Edition) Class B EMC/EMI for Healthcare Facilities
Q fåíêçÇìÅíáçå
������
�������
���� ���
= OpÉííáåÖ=ré=íÜÉ=e~êÇï~êÉ
When finding a suitable location for the device, use the following guidelines:
5 Place the device in a location with adequate air circulation to prevent internal heat build up. You will need at least 24 in. (61 cm) of overhead space to allow the Recorder cover to open freely.
5 Do not place the device near heat sources such as radiators or air ducts, or in a location subject to direct sunlight, excessive dust, mechanical vibration, or shock.
5 Do not block air ventilation on the sides or rear of the device.
5 Make sure that the countertop or work surface supporting the device is level, can support the weight, and will not vibrate or shake when the device is operating.
For additional location precautions, refer to “Location Precautions” on page xxix.
cáåÇáåÖ=~=içÅ~íáçå=Ñçê=íÜÉ=aÉîáÅÉ
`çÇçåáÅë=sáêíì~=`=rëÉêÛë=j~åì~ä OJN=
OJ
Virtua C is shipped in cartons that contain the following system components:
5 Controller
5 Recorder
5 Supporting documentation package (including the Virtua C Quick Reference, Warranty, and support documents)
The following items are found in the Accessory Kit box:
5 SmartDrive USB flash drive
5 Output bin
5 Eject ramp
5 Controller power cord
5 Recorder power cord
5 eSATA cable
5 USB cable
5 Ethernet cable
5 Software Installation disc
5 Software Accessories and Manuals disc
pÜáééÉÇ=`çãéçåÉåíë
O pÉííáåÖ=ré=íÜÉ=e~êÇï~êÉ
������
�������
���� ���
Inspect the cartons for damage that might have occurred during shipping. Report any damage to the shipping company.
Save the cartons and packing materials, in case you ever need to transport Virtua C later.
����� ��� �������' ������� ��� ������ �� ����� ������� ��� ��� ������ ��
����� ��� �������� ��� ��#��������
������� ������������������������������������������������� �������������
� ������������������� ���������������� �������������
`çÇçåáÅë=sáêíì~=`=rëÉêÛë=j~åì~ä OJP=
OJ
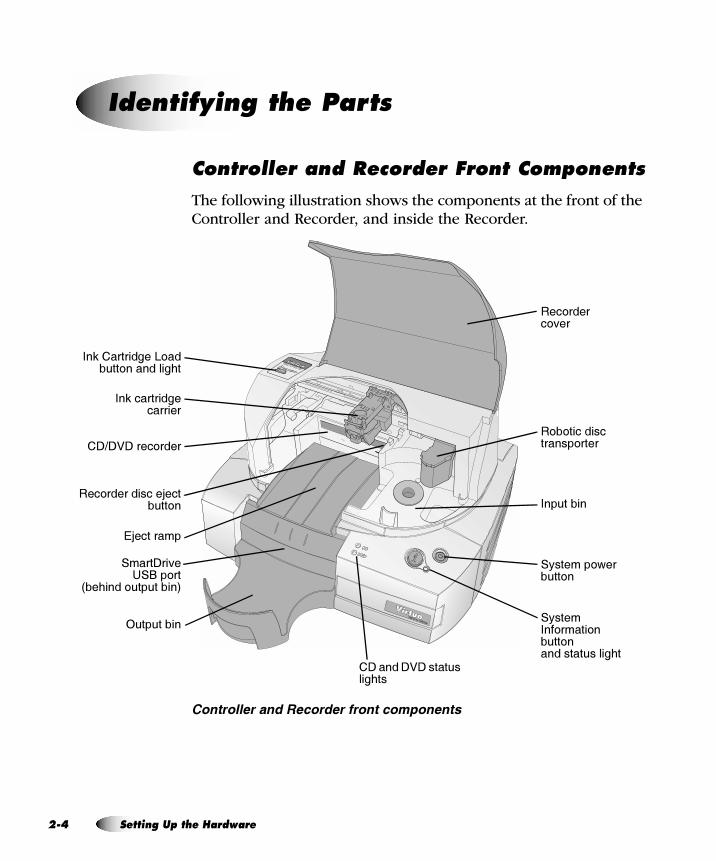
`çåíêçääÉê=~åÇ=oÉÅçêÇÉê=cêçåí=`çãéçåÉåíë
The following illustration shows the components at the front of the Controller and Recorder, and inside the Recorder.
������� ������� ���� ������������� ���
fÇÉåíáÑóáåÖ=íÜÉ=m~êíë
��� ������ =��
��(�����������������
�;*;);���� ����
��� �����������>������ �
4�������
��������
� � ��������������� ����
��(�����������5 ����� ���������<�
����;��=�7�� � ��
?��<���� �������@
�;�����;);����������<��
�3����� 6������ �
�3������� ���� ����� ����� ���������<�
�>�������
Q pÉííáåÖ=ré=íÜÉ=e~êÇï~êÉ
������
�������
���� ���
5 The cover is a durable plastic cover that protects the Recorder from dust and accidental user interference while operating.
5 The System power button powers on the device.
5 The CD status light is used to indicate the status of CD media in the input bin.
5 The DVD status light is used to indicate the status of DVD media in the input bin.
5 The System status light is used to indicate the operational status of the system.
For information about how to interpret the status lights, refer to “Interpreting Dashboard System Status Lights” on page 13-3.
5 The System Information button can be pressed to play a narrated message that explains the system status in more detail.
5 Pressing the Ink Cartridge Load button positions the ink cartridge carrier for easy ink cartridge replacement.
5 The ink cartridge carrier holds the color ink cartridge.
5 The CD/DVD recorder is automatically loaded and unloaded by the Recorder’s robotic disc transporter.
5 The Recorder disc eject button manually opens or closes the Recorder tray. In normal operation, the in/out movement of the Recorder tray is controlled automatically and this button is not used.
5 The input bin holds up to 20 blank discs for recording.
5 The output bin is where discs are placed after they have finished being recorded. The output bin can hold up to 25 discs.
5 The robotic disc transporter moves discs from the input bin, to the CD/DVD recorder, to the printer, and finally to the output bin.
5 The device’s configuration data is stored on the SmartDrive, which must be inserted in the SmartDrive USB port located behind the output bin on the Controller front panel. The SmartDrive must be installed for the device to operate.
`çÇçåáÅë=sáêíì~=`=rëÉêÛë=j~åì~ä OJR=
OJ
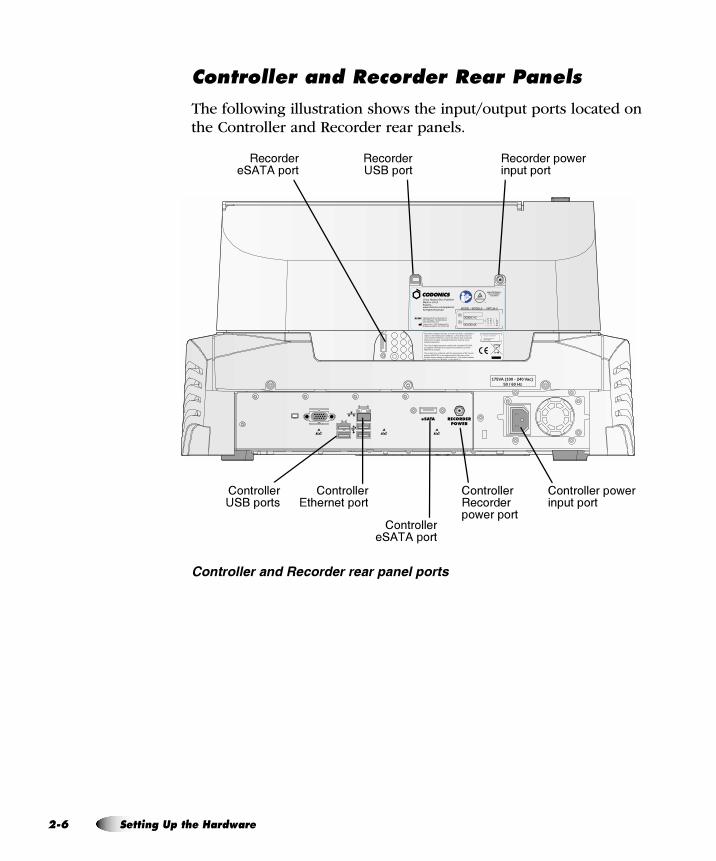
`çåíêçääÉê=~åÇ=oÉÅçêÇÉê=oÉ~ê=m~åÉäë
The following illustration shows the input/output ports located on the Controller and Recorder rear panels.
������� ������� ���� ��� ������ �������
175VA (100 - 240 Vac)50 / 60 Hz
eSATA RECORDER POWER
This device complies with part 15 of the FCC Rules. Operation is subject to the following two conditions: 1) This device may not cause harmful interference, and 2) this device must accept any interference received, including interference that may cause undesired operation.
This Class B digital apparatus complies with Canadian ICES-003. Cet appareil numerique de la Classe B est conform a la norme NMB-003 du Canada.
This product is in conformity with the requirements of EC Council directive 93/42/EEC on the approximation of the laws of the Member States relating to medical devices. This product satisfies the Class B limits of EN 60601-1 and CISPR 11.
Windows® XP Embedded
XXXXX-XXX-XXX-XXX
XXX-XXXXX
� ��� ����7���� ���
� ��� ������� ������ 6���� ��
� ��� ������ 6��������� ��
��� ������ 6��������� ��
��� ������0A0�� ��
��� ����7���� ��
� ��� ������<������� ��
� ��� ������0A0�� ��
S pÉííáåÖ=ré=íÜÉ=e~êÇï~êÉ
������
�������
���� ���
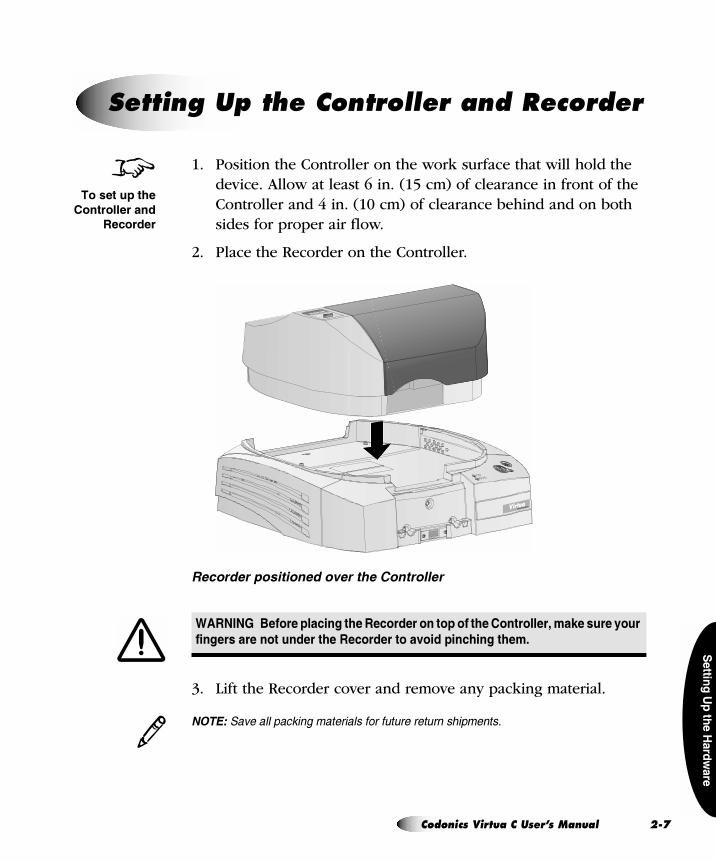
1. Position the Controller on the work surface that will hold the device. Allow at least 6 in. (15 cm) of clearance in front of the Controller and 4 in. (10 cm) of clearance behind and on both sides for proper air flow.
2. Place the Recorder on the Controller.
� ���� ���������� ��� ���! �������� �
3. Lift the Recorder cover and remove any packing material.
��������� ��������$������ ������������� �� �������� ��
pÉííáåÖ=ré=íÜÉ=`çåíêçääÉê=~åÇ=oÉÅçêÇÉê
����� 8�$��� ������' ��� ������� �� ��� �$ ��� ����������� #� � ���� ����
$��'��� ��� ��� ����� ��� ������� �� ����� �������' ���#�
8������!���
���������� ��
��������
3
`çÇçåáÅë=sáêíì~=`=rëÉêÛë=j~åì~ä OJT=
OJ
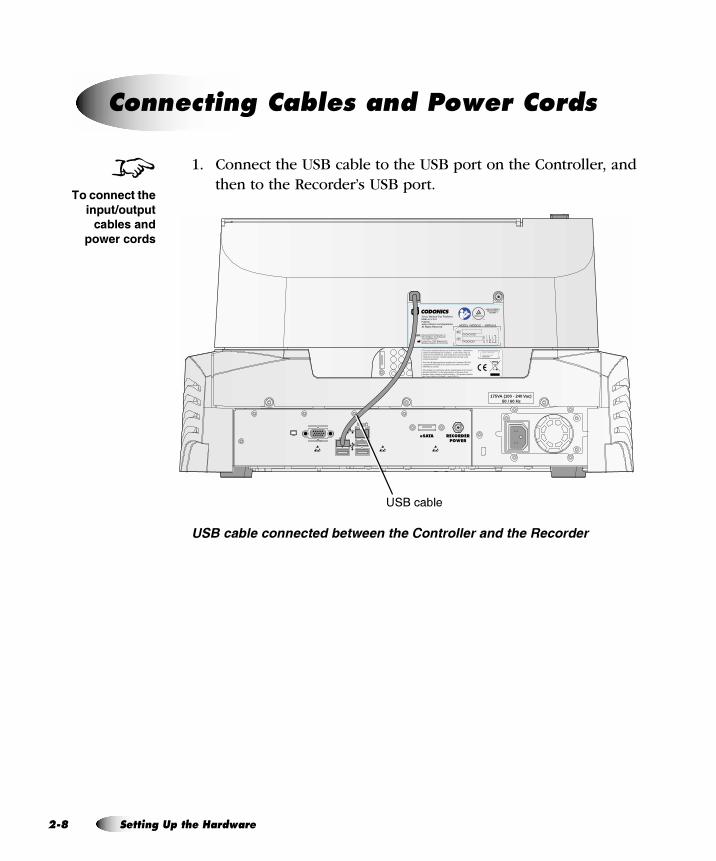
1. Connect the USB cable to the USB port on the Controller, and then to the Recorder’s USB port.
"�#����� ����� �� ��� �$ ���! �������� �������! �� ���� �
`çååÉÅíáåÖ=`~ÄäÉë=~åÇ=mçïÉê=`çêÇë
8������������
��!"�!
� &���� ��
!����������
175VA (100 - 240 Vac)50 / 60 Hz
eSATA RECORDER POWER
This device complies with part 15 of the FCC Rules. Operation is subject to the following two conditions: 1) This device may not cause harmful interference, and 2) this device must accept any interference received, including interference that may cause undesired operation.
This Class B digital apparatus complies with Canadian ICES-003. Cet appareil numerique de la Classe B est conform a la norme NMB-003 du Canada.
This product is in conformity with the requirements of EC Council directive 93/42/EEC on the approximation of the laws of the Member States relating to medical devices. This product satisfies the Class B limits of EN 60601-1 and CISPR 11.
Windows® XP Embedded
XXXXX-XXX-XXX-XXX
XXX-XXXXX
7��������
U pÉííáåÖ=ré=íÜÉ=e~êÇï~êÉ
������
�������
���� ���
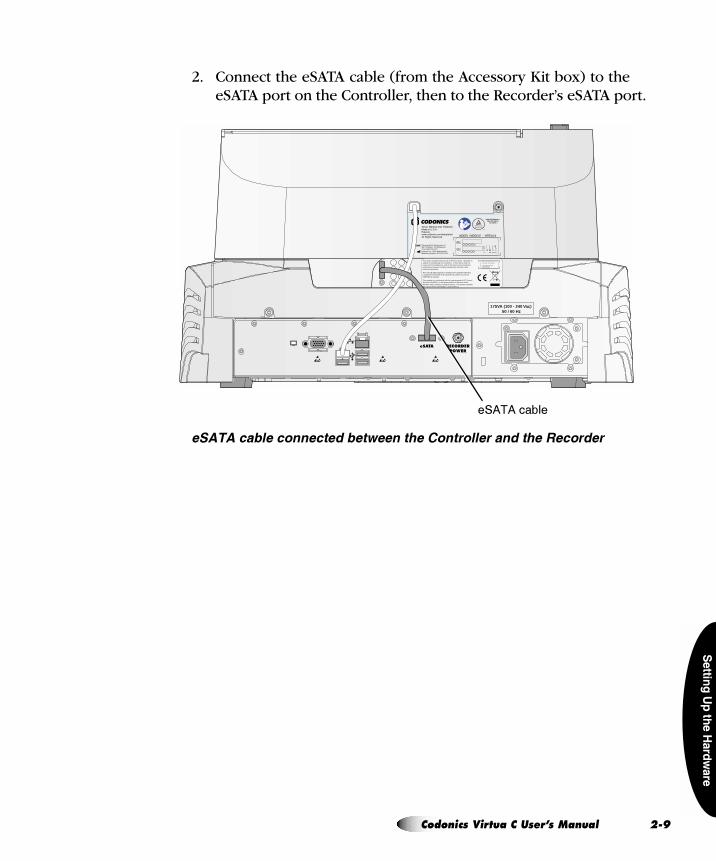
2. Connect the eSATA cable (from the Accessory Kit box) to the eSATA port on the Controller, then to the Recorder’s eSATA port.
�%&%����� ����� �� ��� �$ ���! �������� �������! �� ���� �
175VA (100 - 240 Vac)50 / 60 Hz
eSATA RECORDER POWER
This device complies with part 15 of the FCC Rules. Operation is subject to the following two conditions: 1) This device may not cause harmful interference, and 2) this device must accept any interference received, including interference that may cause undesired operation.
This Class B digital apparatus complies with Canadian ICES-003. Cet appareil numerique de la Classe B est conform a la norme NMB-003 du Canada.
This product is in conformity with the requirements of EC Council directive 93/42/EEC on the approximation of the laws of the Member States relating to medical devices. This product satisfies the Class B limits of EN 60601-1 and CISPR 11.
Windows® XP Embedded
XXXXX-XXX-XXX-XXX
XXX-XXXXX
��0A0������
`çÇçåáÅë=sáêíì~=`=rëÉêÛë=j~åì~ä OJV=
OJ
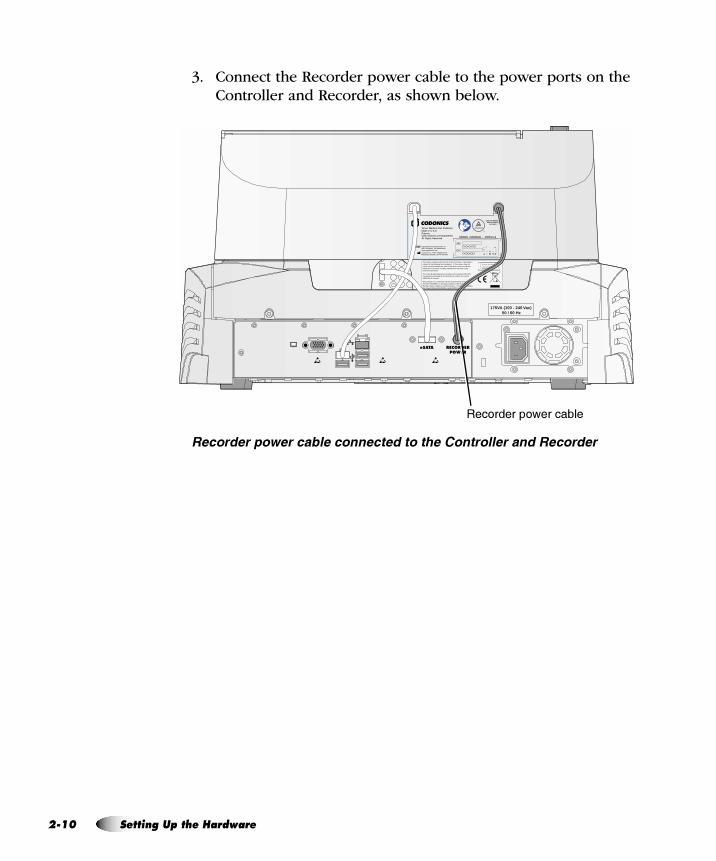
3. Connect the Recorder power cable to the power ports on the Controller and Recorder, as shown below.
� ���� ����$ ������ ����� �� ������! �������� ������� ���� �
175VA (100 - 240 Vac)50 / 60 Hz
eSATA RECORDER POWER
This device complies with part 15 of the FCC Rules. Operation is subject to the following two conditions: 1) This device may not cause harmful interference, and 2) this device must accept any interference received, including interference that may cause undesired operation.
This Class B digital apparatus complies with Canadian ICES-003. Cet appareil numerique de la Classe B est conform a la norme NMB-003 du Canada.
This product is in conformity with the requirements of EC Council directive 93/42/EEC on the approximation of the laws of the Member States relating to medical devices. This product satisfies the Class B limits of EN 60601-1 and CISPR 11.
Windows® XP Embedded
XXXXX-XXX-XXX-XXX
XXX-XXXXX
��� ������ 6��������
NM pÉííáåÖ=ré=íÜÉ=e~êÇï~êÉ
������
�������
���� ���
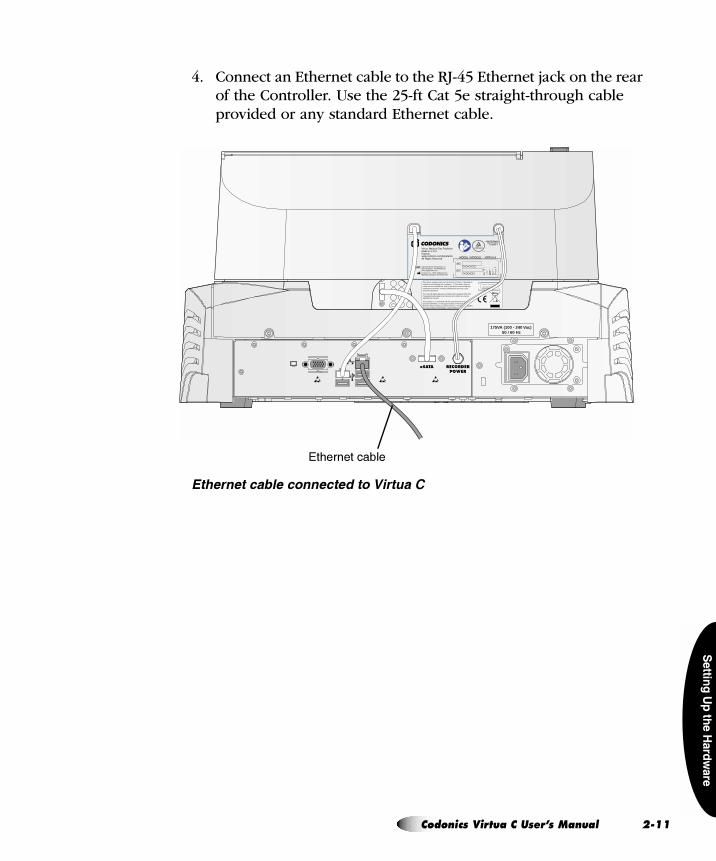
4. Connect an Ethernet cable to the RJ-45 Ethernet jack on the rear of the Controller. Use the 25-ft Cat 5e straight-through cable provided or any standard Ethernet cable.
��! �� ������ ����� �� �����������
175VA (100 - 240 Vac)50 / 60 Hz
eSATA RECORDER POWER
This device complies with part 15 of the FCC Rules. Operation is subject to the following two conditions: 1) This device may not cause harmful interference, and 2) this device must accept any interference received, including interference that may cause undesired operation.
This Class B digital apparatus complies with Canadian ICES-003. Cet appareil numerique de la Classe B est conform a la norme NMB-003 du Canada.
This product is in conformity with the requirements of EC Council directive 93/42/EEC on the approximation of the laws of the Member States relating to medical devices. This product satisfies the Class B limits of EN 60601-1 and CISPR 11.
Windows® XP Embedded
XXXXX-XXX-XXX-XXX
XXX-XXXXX
��<�����������
`çÇçåáÅë=sáêíì~=`=rëÉêÛë=j~åì~ä OJNN=
OJ
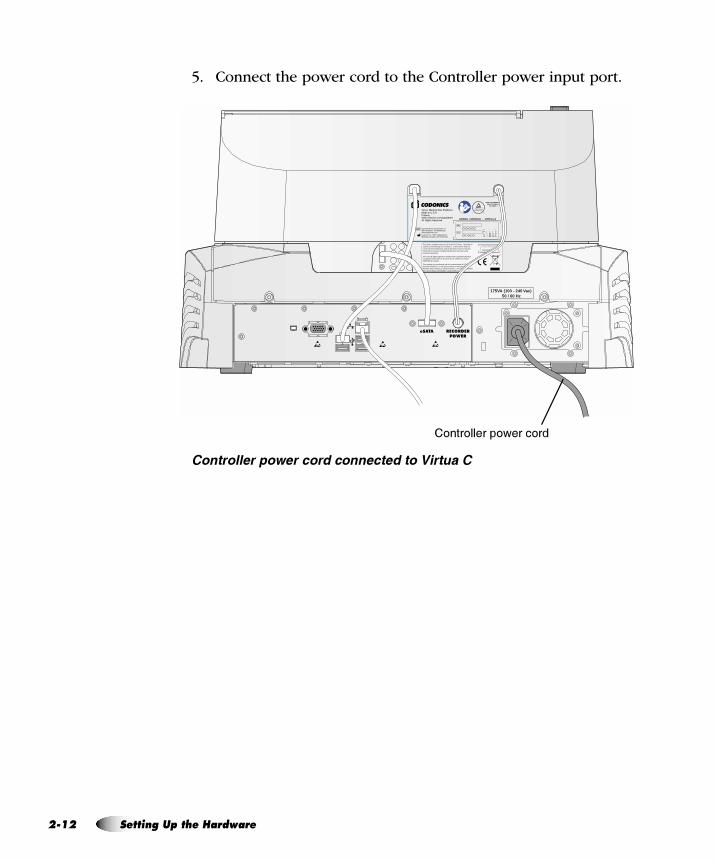
5. Connect the power cord to the Controller power input port.
������� ����$ ����������� �� �����������
175VA (100 - 240 Vac)50 / 60 Hz
eSATA RECORDER POWER
This device complies with part 15 of the FCC Rules. Operation is subject to the following two conditions: 1) This device may not cause harmful interference, and 2) this device must accept any interference received, including interference that may cause undesired operation.
This Class B digital apparatus complies with Canadian ICES-003. Cet appareil numerique de la Classe B est conform a la norme NMB-003 du Canada.
This product is in conformity with the requirements of EC Council directive 93/42/EEC on the approximation of the laws of the Member States relating to medical devices. This product satisfies the Class B limits of EN 60601-1 and CISPR 11.
Windows® XP Embedded
XXXXX-XXX-XXX-XXX
XXX-XXXXX
� ��� ������ 6���� ��
NO pÉííáåÖ=ré=íÜÉ=e~êÇï~êÉ
������
�������
���� ���
There are several tasks required to set up the device for use:
5 Specifying site-specific configuration parameters in Virtua C profiles on the SmartDrive
5 Inserting the SmartDrive in its USB port
5 Attaching the output bin
5 Installing the disc ramp
5 Loading discs into the input bin
5 Installing the color ink cartridge
1. Configure site-specific parameters in Virtua C profiles on the SmartDrive.
For more information about configuring the profiles that typically require site-specific information, refer to the following topics:
6 For general information about editing profiles, refer to “Creating and Modifying Profiles” on page 3-6.
6 To configure network settings, refer to “Setting Up Network Profiles” on page 3-7.
6 To configure site information, refer to “Setting Up Site Profiles” on page 3-30.
6 To set the media selection mode, refer to “Setting Up Job Profiles” on page 3-35 and “Media Types and Profile Parameter Settings” on page 3-46.
6 To set the locale, refer to “Setting Up the Locale Profile” on page 9-8
pÉííáåÖ=ré=íÜÉ=aÉîáÅÉ=Ñçê=rëÉ
8������!���
��'����������
`çÇçåáÅë=sáêíì~=`=rëÉêÛë=j~åì~ä OJNP=
OJ
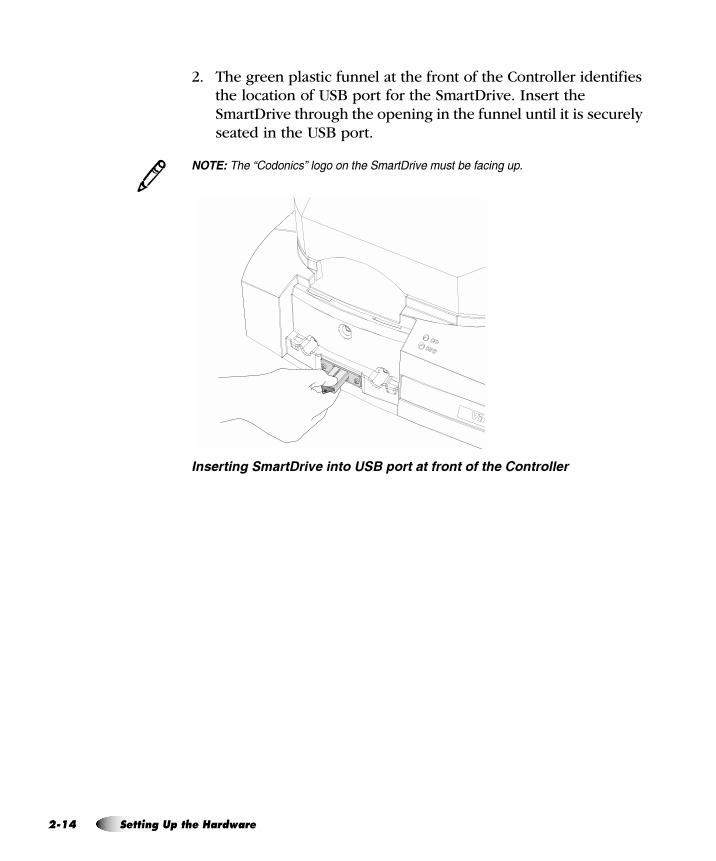
2. The green plastic funnel at the front of the Controller identifies the location of USB port for the SmartDrive. Insert the SmartDrive through the opening in the funnel until it is securely seated in the USB port.
�������� �+)������,���������� ��������� ����� �����������
'�� ����(��������� ������"�#�����������������! �������� �
3
NQ pÉííáåÖ=ré=íÜÉ=e~êÇï~êÉ
������
�������
���� ���
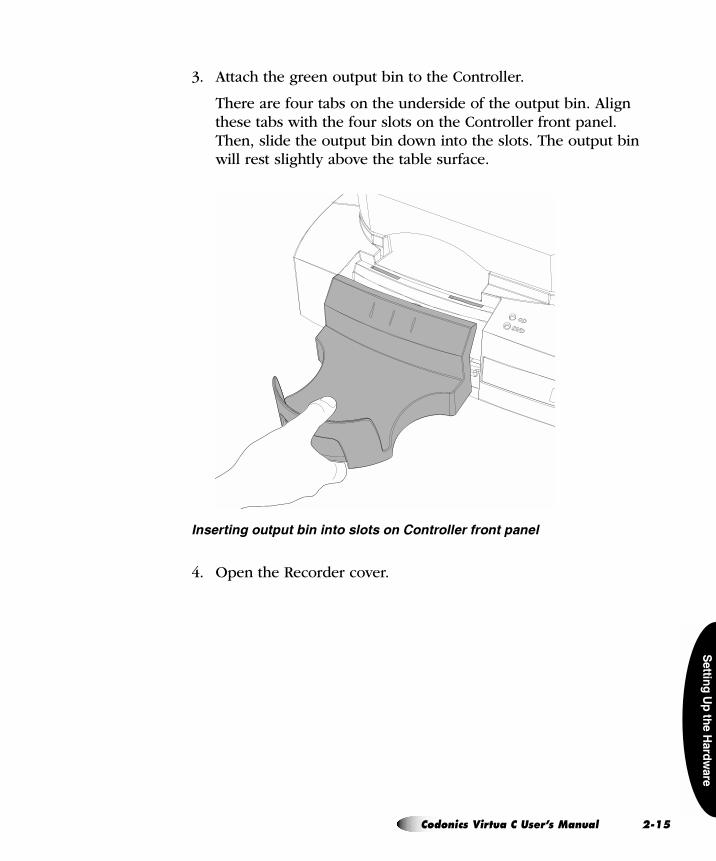
3. Attach the green output bin to the Controller.
There are four tabs on the underside of the output bin. Align these tabs with the four slots on the Controller front panel. Then, slide the output bin down into the slots. The output bin will rest slightly above the table surface.
'�� ����(��������������������������������� ���������� �
4. Open the Recorder cover.
`çÇçåáÅë=sáêíì~=`=rëÉêÛë=j~åì~ä OJNR=
OJ
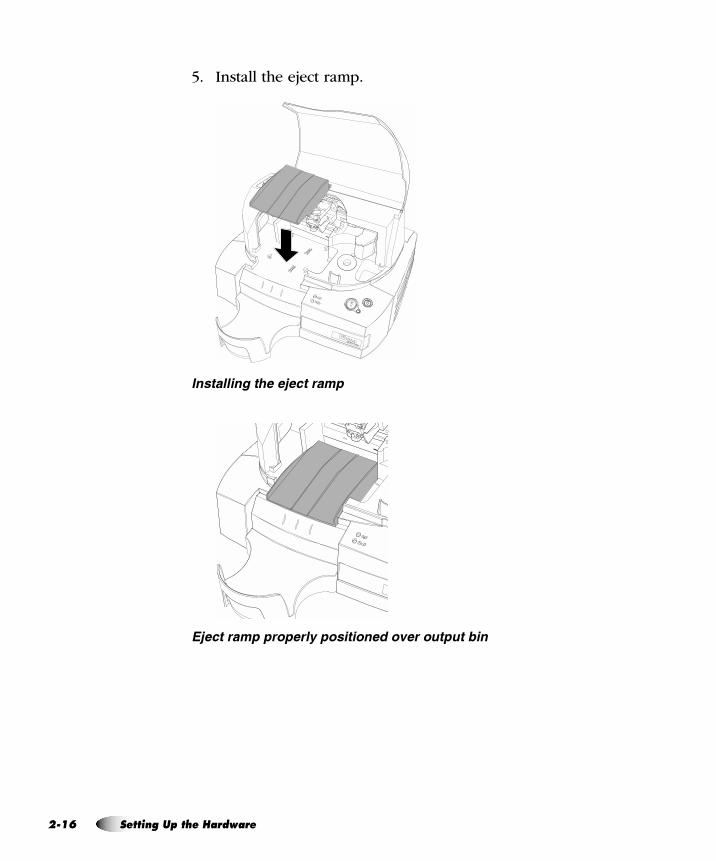
5. Install the eject ramp.
'��������(��! � ) �������
�) ������������ ������������ ��� ������������
NS pÉííáåÖ=ré=íÜÉ=e~êÇï~êÉ
������
�������
���� ���
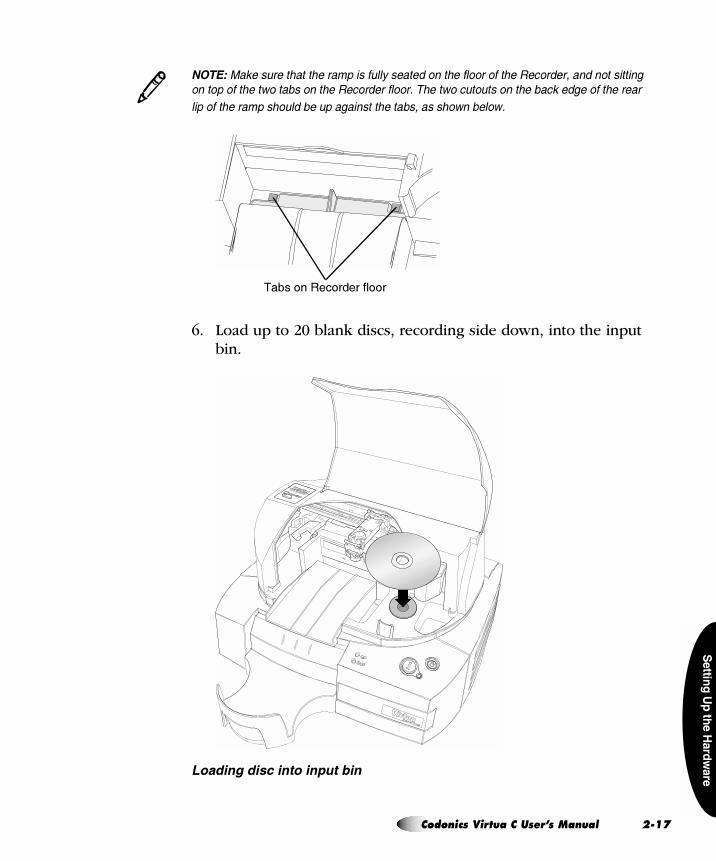
������-�$ ��� ����� �������������� � ������ ����������� �. ���� ���������������
���������� ����������� �. ���� ����������� ������������� ����$� �� ����� �� ���
�������� ������������� ����������� ������������� ����
6. Load up to 20 blank discs, recording side down, into the input bin.
������(��������������������
3
A���� ����� ������� �
`çÇçåáÅë=sáêíì~=`=rëÉêÛë=j~åì~ä OJNT=
OJ
The bin is assigned a media type — either CD or DVD — which is indicated by the CD or DVD status light on the front panel, and by the Media indicator on the Dashboard displayed on the user interface. For information about setting the media type assignment, refer to “Setting Up the System Profile” on page 3-26.
The supported media disc types are CD-R with a suggested recording speed of 48x or higher, and DVD-R with a suggested recording speed of 18x or higher.
�������� �. ���� ����� ��� ������������ ������ ����������������������� ������
������� ������ �������� �)������&� ���� �� �������)�����)�������)��� ��� ���� ����������� ��������� ���� �� ��������������� ��
3
NU pÉííáåÖ=ré=íÜÉ=e~êÇï~êÉ
������
�������
���� ���
1. Connect the power cord from the Controller to a grounded power outlet that supplies the appropriate voltage for the applicable country.
mçïÉêáåÖ=lå=íÜÉ=aÉîáÅÉ
����� ��� ����� ���� ���' �� ��� #��� ���������� $�� ��� ������� ���
����� ������ ������ (� ���� ��� ������ ��� (� ������ �������(���
����� �#��� ��� ����� ���� ���' $��# ��� ����� ������ �� ����������
������� ����� �� ��� �������
����� �������' �����(����� ��� (� �������� ���� ���� ��� �%���#��� ��
��������� �� �� �%�������� ���������� #�� �� )*������� ����+ ,���� ���
)*������� ����+-�
����� �� ����� ��� �$ ���������� ���� � ���� �%���#��� #��� ���� (�
��������� �� � ������ #��� ���� ���������� ������
������� � ���� ���������������������������������������!�����������������
����������������" ���������������������
8���!�������
�����'���
`çÇçåáÅë=sáêíì~=`=rëÉêÛë=j~åì~ä OJNV=
OJ
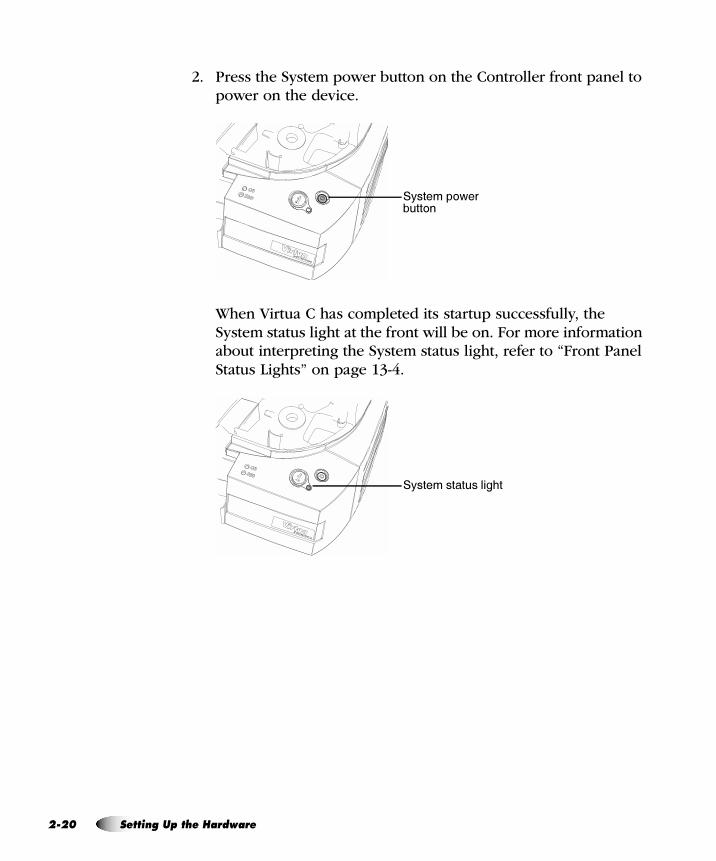
2. Press the System power button on the Controller front panel to power on the device.
When Virtua C has completed its startup successfully, the System status light at the front will be on. For more information about interpreting the System status light, refer to “Front Panel Status Lights” on page 13-4.
�3����� 6������ �
�3�������������<�
OM pÉííáåÖ=ré=íÜÉ=e~êÇï~êÉ
������
�������
���� ���
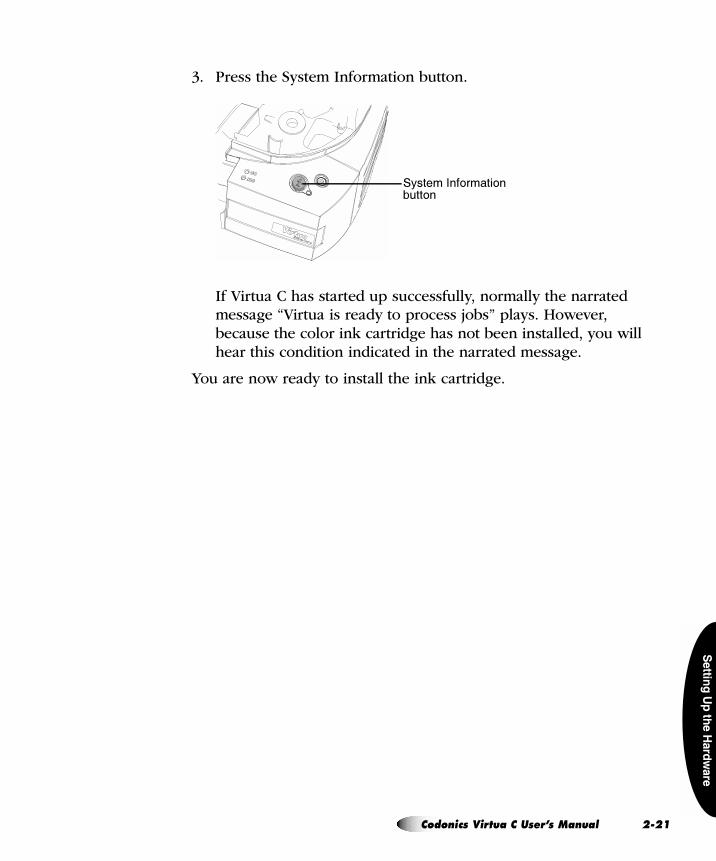
3. Press the System Information button.
If Virtua C has started up successfully, normally the narrated message “Virtua is ready to process jobs” plays. However, because the color ink cartridge has not been installed, you will hear this condition indicated in the narrated message.
You are now ready to install the ink cartridge.
�3������� ���� ����� �
`çÇçåáÅë=sáêíì~=`=rëÉêÛë=j~åì~ä OJON=

OJ
������/���� )���� ��� �������$�������� ����������������$�������� �������� �
)������&� ���� �� ����������$�������� ��� ��� ����� ���� ���������� �� ��� ��������� ����� ��������� ������)����������)�������� �� ���� �������������������������
����� ��� �� ���� �� �������������������$�������� �
������0 � ��� �������$�������� ���������������� �� ���������� �������������� ������� ����� ������������
1. Open the cover.
2. Press the Ink Cartridge Load�button.
������������ ���������
fåëí~ääáåÖ=íÜÉ=`çäçê=fåâ=`~êíêáÇÖÉ
3
3
8������ ��� �
����� ������
��(�����������5 ����� �
OO pÉííáåÖ=ré=íÜÉ=e~êÇï~êÉ
������
�������
���� ���
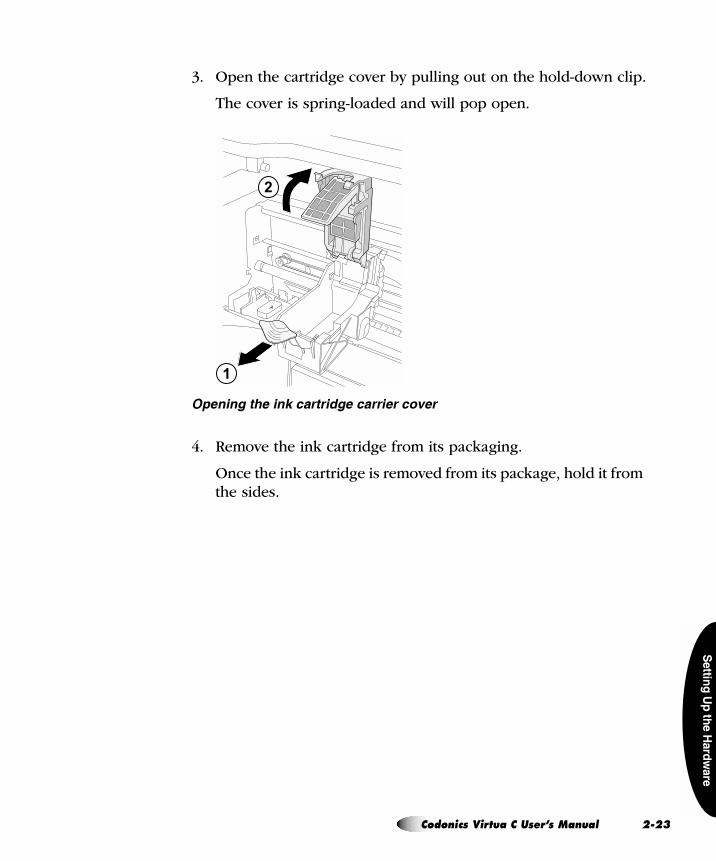
3. Open the cartridge cover by pulling out on the hold-down clip.
The cover is spring-loaded and will pop open.
*� ���(��! ���+��������( ������ ���� �
4. Remove the ink cartridge from its packaging.
Once the ink cartridge is removed from its package, hold it from the sides.
2
1
`çÇçåáÅë=sáêíì~=`=rëÉêÛë=j~åì~ä OJOP=
OJ
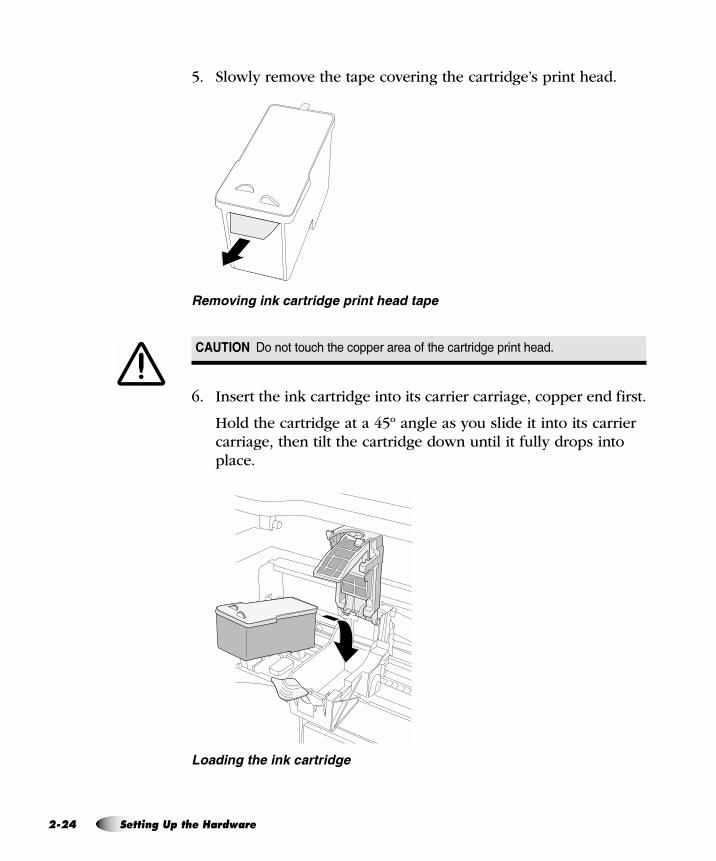
5. Slowly remove the tape covering the cartridge’s print head.
� �� ��(���+��������( �������! ������
6. Insert the ink cartridge into its carrier carriage, copper end first.
Hold the cartridge at a 45º angle as you slide it into its carrier carriage, then tilt the cartridge down until it fully drops into place.
������(��! ���+��������(
������� ������������������������� ����������������������
OQ pÉííáåÖ=ré=íÜÉ=e~êÇï~êÉ
������
�������
���� ���
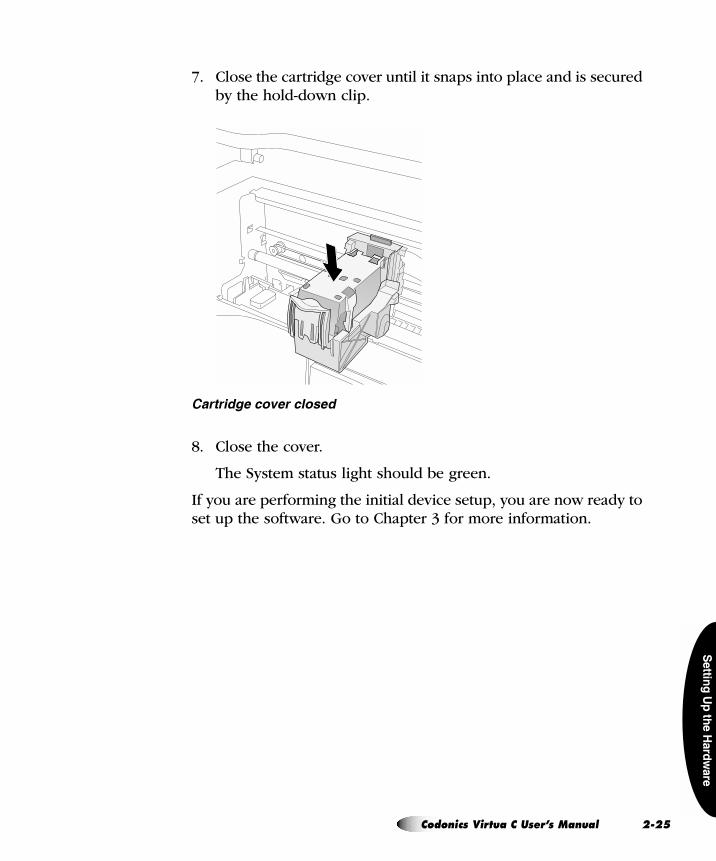
7. Close the cartridge cover until it snaps into place and is secured by the hold-down clip.
������( ��� ������ �
8. Close the cover.
The System status light should be green.
If you are performing the initial device setup, you are now ready to set up the software. Go to Chapter 3 for more information.
`çÇçåáÅë=sáêíì~=`=rëÉêÛë=j~åì~ä OJOR=

OJ
OS pÉííáåÖ=ré=íÜÉ=e~êÇï~êÉ
������
�������
������
��
= PpÉííáåÖ=ré=íÜÉ=pçÑíï~êÉ
This chapter includes information you will need to set up the Virtua C software:
5 Installing the software
5 Specifying network settings
5 Setting up the network firewall
5 Creating user accounts
5 Specifying system settings, such as the length of user inactivity before a user is automatically logged out of a session
5 Specifying the default site information, and optionally creating additional Site Profiles
5 Setting the system date and time
5 Creating Job Profiles, which control how submitted studies are processed
5 Setting up support for DICOM JPEG compressed file formats
The chapter also includes:
5 Logging in and logging out of a user session
5 Shutting down and rebooting the system
5 A description of the SmartDrive and what information is stored on it
`çÇçåáÅë=sáêíì~=`=rëÉêÛë=j~åì~ä PJN=
PJ
Additional setup tasks are covered elsewhere in this manual:
5 For information about adding and managing custom disc labels, refer to Chapter 8.
5 For information about setting the locale to ensure proper display of patient and site information, and date and time format, refer to Chapter 9.
5 For information about setting up the optional Reporting feature to support receiving DICOM Structured Reports and Health Level 7 (HL7) reports, refer to Chapter 10.
5 For information about setting up the optional Scheduled Archiving feature to support creating a set of discs that contain all studies received by Virtua C, refer to Chapter 11.
The Codonics Virtua C Medical Disc Publisher contains operating software that can be installed from Virtua C’s disc drive. Software installation requires about 45 minutes. This document describes the procedure to install Virtua C operating software.
������0 ��� ��������� *��� ������ ������������������ ������� � ����������
� ������� ������ ������� �����)�������� ���������������
_ÉÑçêÉ=fåëí~ääáåÖ=pçÑíï~êÉ
5 Verify that Virtua C is properly assembled and the hardware is working.
5 Read the Operating Software Release Notes before installing new software for more detailed information about the software and any issues you should be aware of.
fåëí~ääáåÖ=íÜÉ=pçÑíï~êÉ
3
O pÉííáåÖ=ré=íÜÉ=pçÑíï~êÉ
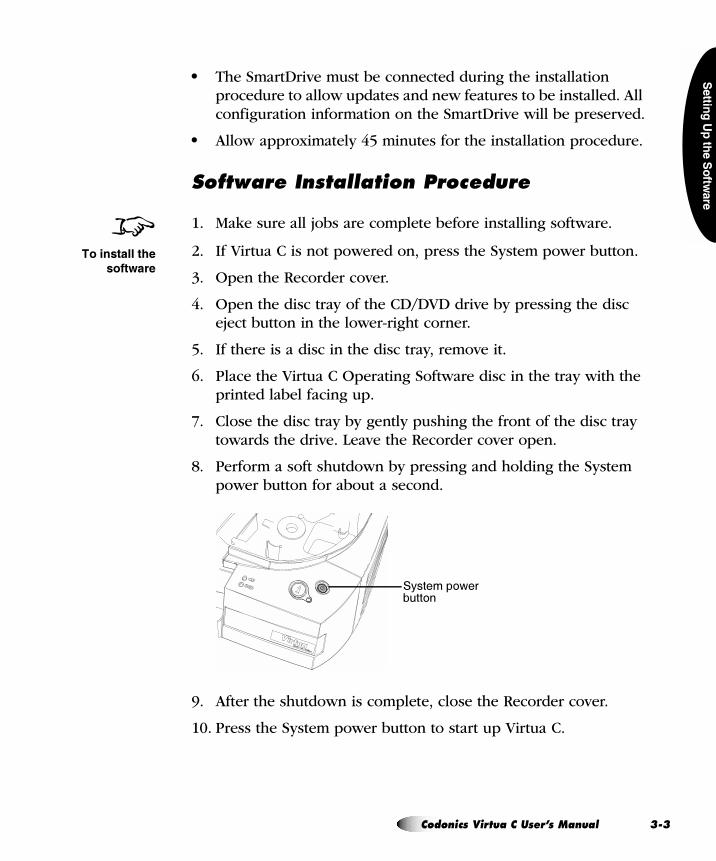
������
�������
������
��
5 The SmartDrive must be connected during the installation procedure to allow updates and new features to be installed. All configuration information on the SmartDrive will be preserved.
5 Allow approximately 45 minutes for the installation procedure.
pçÑíï~êÉ=fåëí~ää~íáçå=mêçÅÉÇìêÉ
1. Make sure all jobs are complete before installing software.
2. If Virtua C is not powered on, press the System power button.
3. Open the Recorder cover.
4. Open the disc tray of the CD/DVD drive by pressing the disc eject button in the lower-right corner.
5. If there is a disc in the disc tray, remove it.
6. Place the Virtua C Operating Software disc in the tray with the printed label facing up.
7. Close the disc tray by gently pushing the front of the disc tray towards the drive. Leave the Recorder cover open.
8. Perform a soft shutdown by pressing and holding the System power button for about a second.
9. After the shutdown is complete, close the Recorder cover.
10. Press the System power button to start up Virtua C.
8������ �����
���� ��
�3����� 6������ �
`çÇçåáÅë=sáêíì~=`=rëÉêÛë=j~åì~ä PJP=
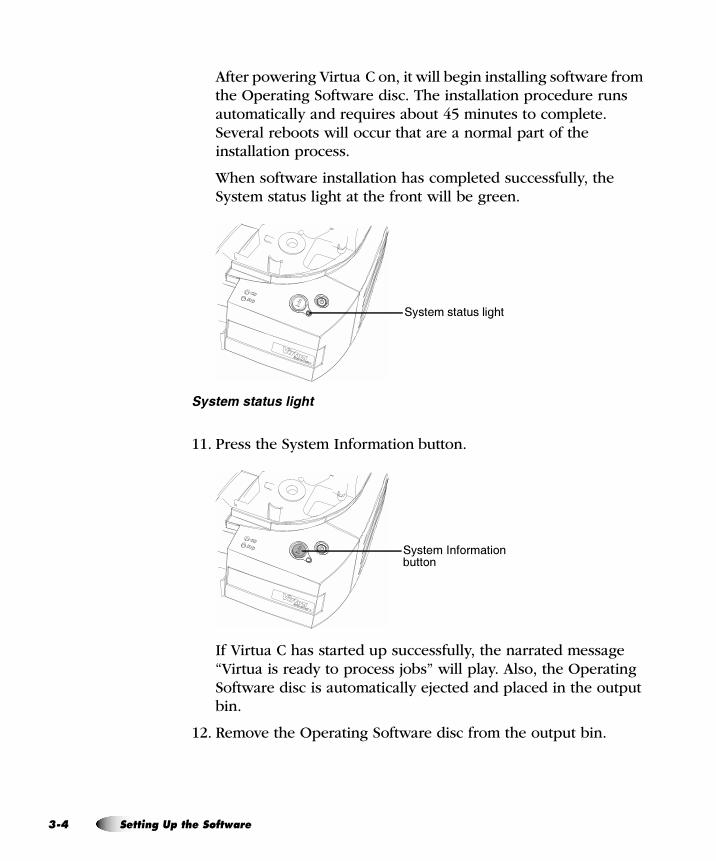
PJ
After powering Virtua C on, it will begin installing software from the Operating Software disc. The installation procedure runs automatically and requires about 45 minutes to complete. Several reboots will occur that are a normal part of the installation process.
When software installation has completed successfully, the System status light at the front will be green.
���� �����������(!�
11. Press the System Information�button.
If Virtua C has started up successfully, the narrated message “Virtua is ready to process jobs” will play. Also, the Operating Software disc is automatically ejected and placed in the output bin.
12. Remove the Operating Software disc from the output bin.
�3�������������<�
�3������� ���� ����� �
Q pÉííáåÖ=ré=íÜÉ=pçÑíï~êÉ
������
�������
������
��
���������/���� )���������������� ��������/���� )���� ���������������� ���� ���
��� �� �1������� ���������� ������ ���2������ �������������� � ����+#�� ����
/���� )��������3 ��4��� �,������� 5&65�
The SmartDrive is a USB flash drive on which is stored critical system information, including configuration data.
The SmartDrive also allows you to move a device’s configuration to another device. This feature is especially helpful when swapping devices for service purposes.
Note that a SmartDrive cannot be duplicated. That is, it cannot be used in two devices at the same time.
The SmartDrive stores the following information:
5 Software license code. This is the serial number for the Virtua C software. All keyed features are keyed off of the License Code. This code is also printed on the SmartDrive’s label.
5 Virtua C configuration. This includes all of the profile files covered in this chapter. It also includes other system profiles and DICOM viewers.
5 Disc log files. The system logs all recorded discs in these files. A disc log file is a comma-separated text file that can be imported into a spreadsheet. The file is useful for compliance with HIPAA and other regulations.
3
sáêíì~ `=pã~êíaêáîÉ
������� #��$����������������������� ��������������������" ����
$����������������������������������������������� �����������������������%����
`çÇçåáÅë=sáêíì~=`=rëÉêÛë=j~åì~ä PJR=
PJ
Profile files are used to define settings for the system configuration, user accounts, site parameters, Job Profiles (which control how incoming studies will be recorded), and printed disc labels. These files are stored on the SmartDrive in the \profiles folders:
Profile files are text files. The general procedure for modifying these files is:
1. Verify that no jobs are currently being processed and no studies are being received.
2. Log out and shut down Virtua C (refer to “Logging Out” on page 3-56 and “Shutting Down and Rebooting” on page 3-56).
Virtua C powers off at the end of the shutdown process.
���������������������������� �� ��� ��� �� �������� ��������� ����� �� �
����������� �� ���� ���� �������������������������� ��������� ����� ��� ��� ������ ������ �� � ���� �� ��������������� ����
3. Remove the SmartDrive, which is inserted in the USB port behind the green output bin.
4. Mount the SmartDrive in a USB port on a PC.
The SmartDrive will appear as a standard USB flash drive.
5. Use a text editor that does not perform character formatting (for example, Notepad) to create or open the file, and to edit the file.
6. When finished creating or modifying the file on the SmartDrive, unmount the SmartDrive from the PC, then insert it back into Virtua C.
7. Power on Virtua C by pressing the System power button.
`êÉ~íáåÖ=~åÇ=jçÇáÑóáåÖ=mêçÑáäÉë
������� " ����$�������������������������� ����������������������������
�������������������������
3
S pÉííáåÖ=ré=íÜÉ=pçÑíï~êÉ

������
�������
������
��
When starting up, Virtua C will read the updated profile files and use them for its configuration.
Subsequent topics in this chapter discuss specific profiles in detail.
Virtua C includes the following network-related features:
5 A web server, allowing web access to the user interface from a web browser
5 Support for one or more Network Profiles, to allow selection of different sets of network parameter settings
5 The standard Windows XP Embedded firewall to block unauthorized connections to network services
These features are controlled through the parameter settings in Network Profiles. The parameters include the Virtua C’s IP address, subnet mask, gateway address, and firewall settings.
Prior to attempting to access the Virtua C interface from a web browser, you must modify the default Network Profile to include your network-specific information.
Once Network Profiles are set up on the SmartDrive, a user with administrator privileges can modify network parameters and select which Network Profile to use from the browser-based user interface. For more information, refer to “Setting Network Parameters from the Setup Screen” on page 3-23.
pÉííáåÖ=ré=kÉíïçêâ=mêçÑáäÉë
`çÇçåáÅë=sáêíì~=`=rëÉêÛë=j~åì~ä PJT=
PJ
jçÇáÑóáåÖ=íÜÉ=aÉÑ~ìäí=kÉíïçêâ=mêçÑáäÉ
The default Network Profile file — network.default.txt — is preinstalled on the SmartDrive in the ��������������� folder. The default IP address in this profile is 192.168.1.202.
For general information about modifying a profile, refer to “Creating and Modifying Profiles” on page 3-6.
`êÉ~íáåÖ=~=kÉíïçêâ=mêçÑáäÉ
Additional Network Profiles can be created to support the use of the device by more than one network. For example, if the device is in a mobile unit that travels to multiple hospitals, a Network Profile can be created for each hospital. The appropriate Network Profile can then be selected from the browser-based user interface.
������2�������� �������� ����� �������� ����������� ���$� ����������������
� ����������������� ���� �� ��� ������� �� �/���� )�������� �� ��� ����������� �
������� ����� ����$������ ������� �/���� )�
Network Profiles must be stored in the ��������������� folder on the SmartDrive. The file name should be in the following format:
network.profilename.txt
Using a descriptive name for the profilename portion of the file name will help you and other administrator users identify the file. For general information about creating and modifying a profile, refer to “Creating and Modifying Profiles” on page 3-6.
3
U pÉííáåÖ=ré=íÜÉ=pçÑíï~êÉ
������
�������
������
��
kÉíïçêâ=mêçÑáäÉ=m~ê~ãÉíÉêë
The format and parameters of the Network Profile text file are defined in the following table.
���� �� ! "��#��$�%��& ���'�������%������
%����� (���� �� ��
[ networkProfile ] ����� ������������-�A<��������������� ������� ������� �<���
��������������<������-
������������������������ �������
ipAcquisitionType_ = ����������< 6��<����=����6������������������������������-
�< ��������1
B ;+��-�A<����������6������������������ �������3��3��<��
;+���?;3�����+ ���� �������� ���� � � �@����=��� ���<��
���6 �(-���������������<������������������6�3��������������
��������(��������������<�������������� ���-
B �������?�<��������@-�A<����������6�����������C���������������
��������� ���<����0������D���������-
ipAddress_ = A<����=���E������������-
A<��������������������� ���<���������:��6 �(��� �����
?������(��� �(�@�����9$-� '-�-$!$-
A<�����������������������<����0�2����� �A3��D�������������
����� �������-
gateway_ = ����������� ���<������6�3�� ���<�������6 �(�� �6<��<��<��
��=�������� �������-
A<�����������������������<����0�2����� �A3��D�������������
����� �������-
netmask_ = ��������(������������ ���<�������6 �(�� �6<��<��<��
��=�������� �������-
A<�����������������������<����0�2����� �A3��D�������������
����� �������-
port_ = A<��� ����������2������ ��� ������ ��6��<� �<���
;��4����=����-�A<���������� �����������)*+-
`çÇçåáÅë=sáêíì~=`=rëÉêÛë=j~åì~ä PJV=
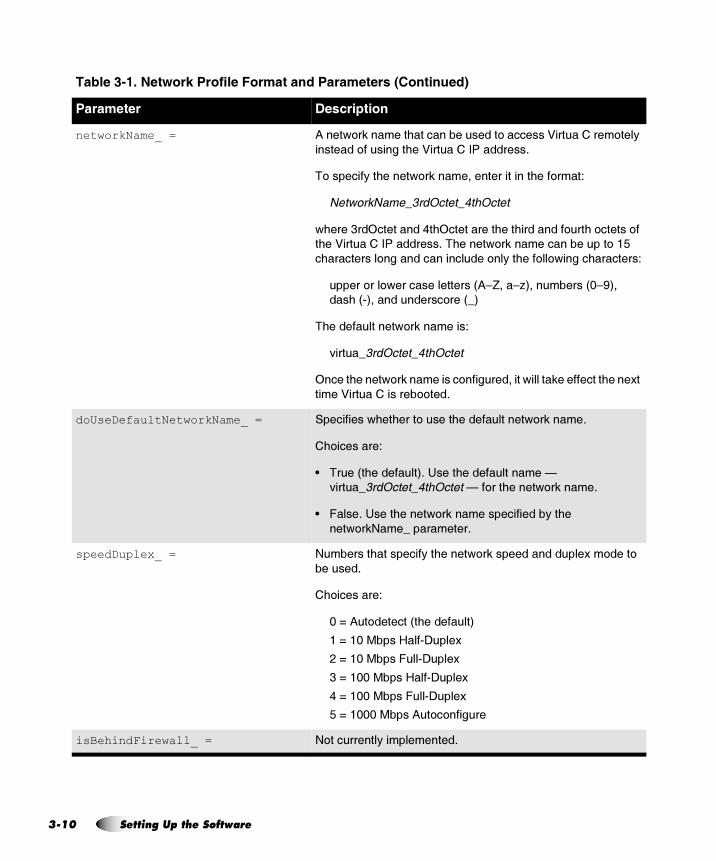
PJ
networkName_ = 0����6 �(������<��������������� ��������)���� ���� ���3�
�������� ��������<��)���� ������������-�
A �������3��<�����6 �(�������������������<��� ���1
���������D�� ����D�������
6<����#��4���������%�<4����������<���<��������� ��<� ������ ��
�<��)���� ������������-�A<�����6 �(��������������� ����
�<���������� ������������������ ��3��<��� �� 6�����<��������1
����� ��� 6����������������?0FG���F,@��������?!F9@��
���< ?"@������������ ���?D@
A<������������6 �(�������1
=����D�� ����D�������
4�����<�����6 �(��������� ������������6������(����������<����C��
����)���� �������� ���-
doUseDefaultNetworkName_ = ����������6<��<���� �����<������������6 �(����-
�< ��������1
B A���?�<��������@-�7����<�������������H�
=����D�� ����D��������H�� ���<�����6 �(����-
B �����-�7����<�����6 �(����������������3��<��
���6 �(:��D���������-
speedDuplex_ = :������<���������3��<�����6 �(���������������C� ���� �
������-
�< ��������1
!�I�0� �������?�<��������@
��I��!������+���";���C
$�I��!���������";���C
#�I��!!������+���";���C
%�I��!!���������";���C
��I��!!!������0� � ������
isBehindFirewall_ = : ���������3����������-
���� �� ! "��#��$�%��& ���'�������%������������ �����
%����� (���� �� ��
NM pÉííáåÖ=ré=íÜÉ=pçÑíï~êÉ
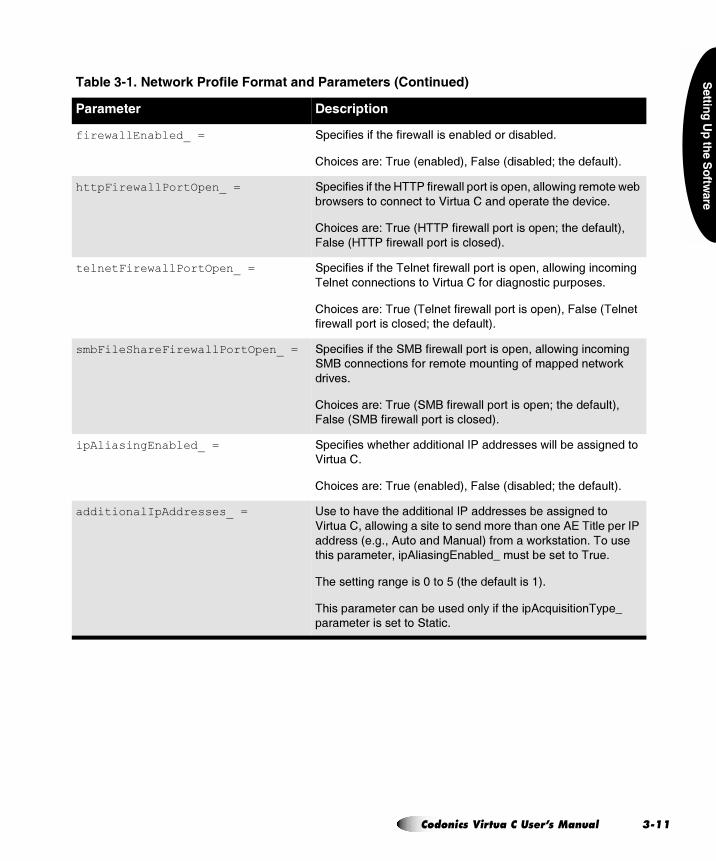
������
�������
������
��
firewallEnabled_ = ��������������<������6��������������� ����������-
�< ��������1�A���?�������@��������?��������J��<��������@-
httpFirewallPortOpen_ = ��������������<��+AA������6����� ������ �������� 6������ ���6���
�� 6������ �� ������� �)���� ������ ��������<����=���-
�< ��������1�A���?+AA������6����� ������ ���J��<��������@��
������?+AA������6����� �������� ���@-
telnetFirewallPortOpen_ = ��������������<��A����������6����� ������ �������� 6������� ����
A������� ������ ���� �)���� ��� ������� �������� ���-
�< ��������1�A���?A����������6����� ������ ���@��������?A������
����6����� �������� ���J��<��������@-
smbFileShareFirewallPortOpen_ = ��������������<����������6����� ������ �������� 6������� ����
����� ������ ���� ���� ��� ������ �����������6 �(�
���=��-
�< ��������1�A���?��������6����� ������ ���J��<��������@��
������?��������6����� �������� ���@-
ipAliasingEnabled_ = ����������6<��<��������� �����������������6����������������� �
)���� �-
�< ��������1�A���?�������@��������?��������J��<��������@-
additionalIpAddresses_ = 7���� �<�=���<�������� ������������������������������ �
)���� ������ 6������������ ������ ����<��� ���0��A������������
��������?�-�-��0� ����������@��� ���6 �(����� �-�A ����
�<���������������0��������������D������������ �A��-
A<�������������������!�� ���?�<�������������@-
A<����������������������� ��3�����<����0�2����� �A3��D�
����������������� �������-
���� �� ! "��#��$�%��& ���'�������%������������ �����
%����� (���� �� ��
`çÇçåáÅë=sáêíì~=`=rëÉêÛë=j~åì~ä PJNN=
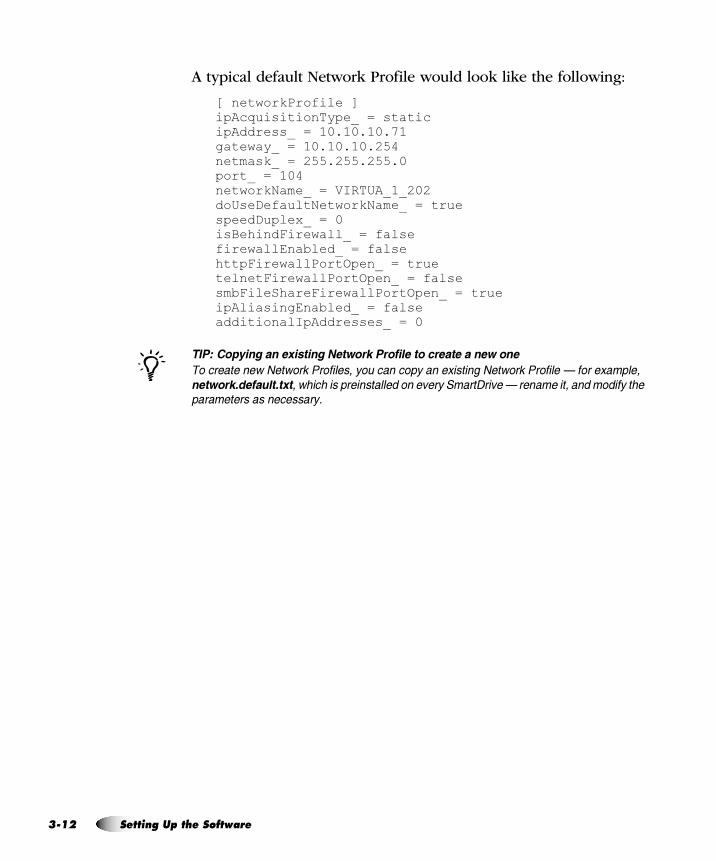
PJ
A typical default Network Profile would look like the following:
[ networkProfile ]ipAcquisitionType_ = staticipAddress_ = 10.10.10.71gateway_ = 10.10.10.254netmask_ = 255.255.255.0port_ = 104networkName_ = VIRTUA_1_202doUseDefaultNetworkName_ = truespeedDuplex_ = 0isBehindFirewall_ = falsefirewallEnabled_ = falsehttpFirewallPortOpen_ = truetelnetFirewallPortOpen_ = falsesmbFileShareFirewallPortOpen_ = trueipAliasingEnabled_ = falseadditionalIpAddresses_ = 0
���������� �� ������ ������ ������ �� ������ � ��� ���
����� � �� ��0 ���$������� ������������������ %�����0 ���$������� �7����� %���� ��
������ ������������������������ ����� ����� � ����������� �7�� ��� ���������������� ������ ����� � ����
/
NO pÉííáåÖ=ré=íÜÉ=pçÑíï~êÉ
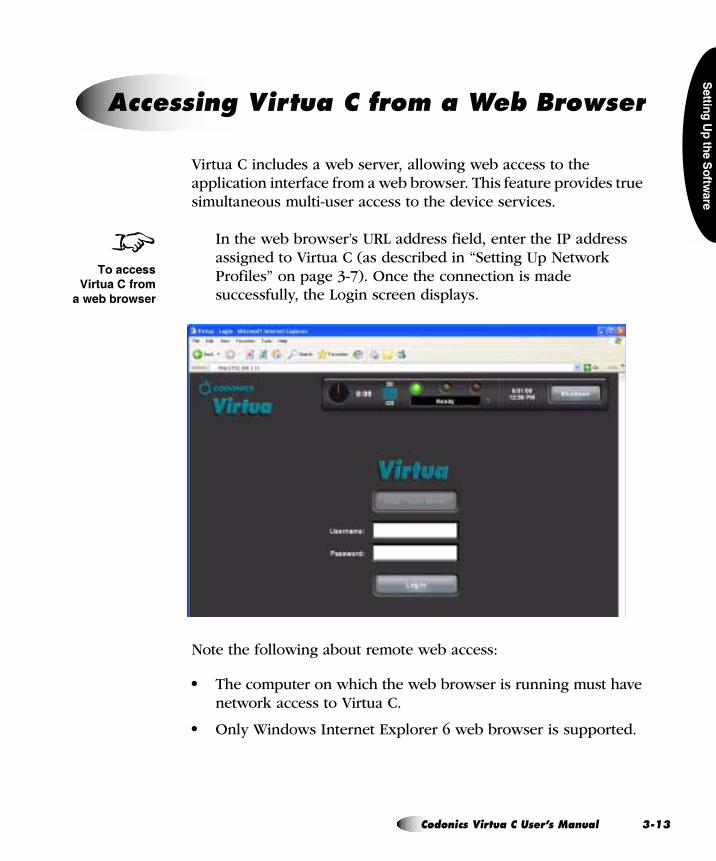
������
�������
������
��
Virtua C includes a web server, allowing web access to the application interface from a web browser. This feature provides true simultaneous multi-user access to the device services.
In the web browser’s URL address field, enter the IP address assigned to Virtua C (as described in “Setting Up Network Profiles” on page 3-7). Once the connection is made successfully, the Login screen displays.
Note the following about remote web access:
5 The computer on which the web browser is running must have network access to Virtua C.
5 Only Windows Internet Explorer 6 web browser is supported.
^ÅÅÉëëáåÖ=sáêíì~ `=Ñêçã=~=tÉÄ=_êçïëÉê
8��� �����
��� ������
���&�&������
`çÇçåáÅë=sáêíì~=`=rëÉêÛë=j~åì~ä PJNP=
PJ
mêÉÅçåÑáÖìêÉÇ=rëÉê=^ÅÅçìåíë
Two user accounts are preconfigured to allow initial access to the application:
5 admin, which provides access to both standard and administrator functions
5 virtua, which provides access to standard functions
The default password for both preconfigured user accounts is codonics.
����������� � ����������8 ����� ���� ���������������������������� �� ��������
����� �� ���������� ������� �������������2������ �������������� � ����+)����������� �9������������#���������������� � ,������� 5&:;�
içÖÖáåÖ=få
3
NQ pÉííáåÖ=ré=íÜÉ=pçÑíï~êÉ
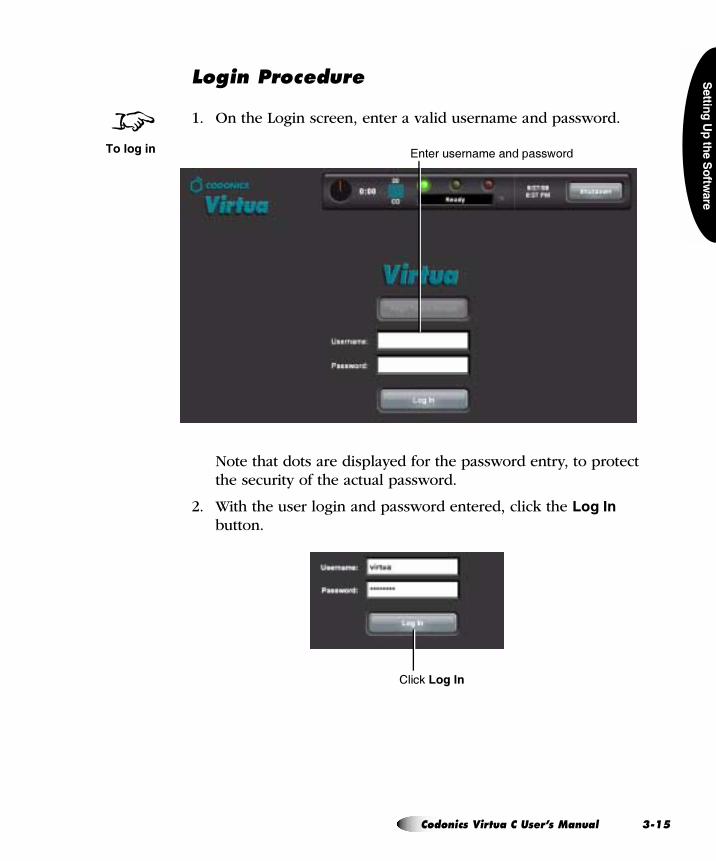
������
�������
������
��
içÖáå=mêçÅÉÇìêÉ
1. On the Login screen, enter a valid username and password.
Note that dots are displayed for the password entry, to protect the security of the actual password.
2. With the user login and password entered, click the ����� button.
8��������� ���������������������6 ��
����(�,�����
`çÇçåáÅë=sáêíì~=`=rëÉêÛë=j~åì~ä PJNR=
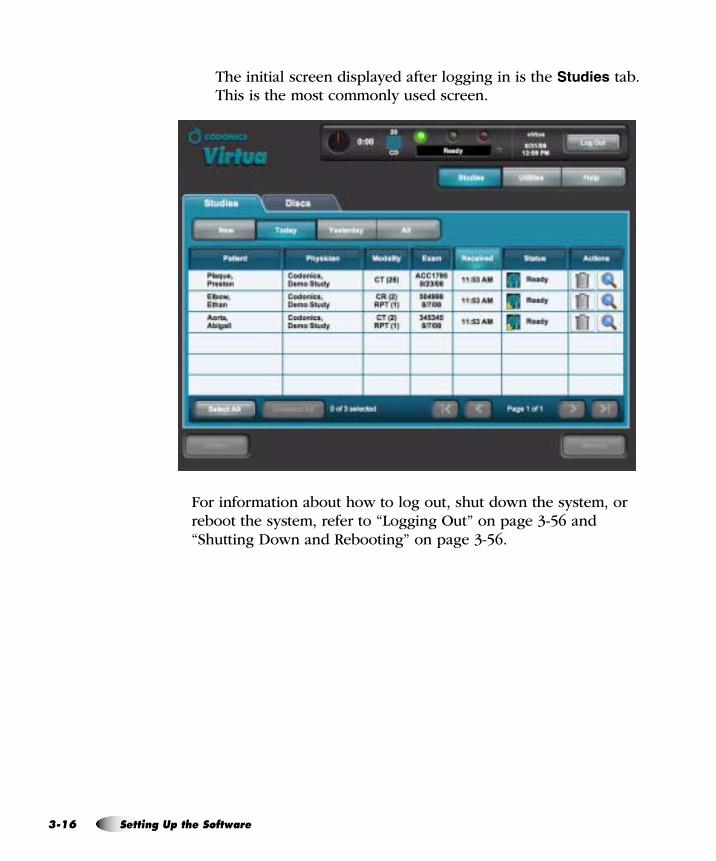
PJ
The initial screen displayed after logging in is the ������� tab. This is the most commonly used screen.
For information about how to log out, shut down the system, or reboot the system, refer to “Logging Out” on page 3-56 and “Shutting Down and Rebooting” on page 3-56.
NS pÉííáåÖ=ré=íÜÉ=pçÑíï~êÉ
������
�������
������
��
User accounts define the login names and passwords that can be used to access the application, along with whether the user has administrator privileges.
User accounts are created by adding a user account text file to the \profiles\user folder on the SmartDrive.
mêÉÅçåÑáÖìêÉÇ=rëÉê=^ÅÅçìåíë
Two preconfigured user accounts are provided that allow the system to be used without having to create additional User Profiles.
`êÉ~íáåÖ=~=rëÉê=^ÅÅçìåí=mêçÑáäÉ
For general information about creating and modifying a profile, refer to “Creating and Modifying Profiles” on page 3-6.
User account profiles are stored in the \profiles\user folder on the SmartDrive. The file name should be in the following format:
user.username.txt
Including the user’s name in the file will help you and other administrator users identify the file.
pÉííáåÖ=ré=rëÉê=^ÅÅçìåíë
��� � %��#��� %� � �����
=���� � � ���� ��������
���� � � ���� ���������� �
`çÇçåáÅë=sáêíì~=`=rëÉêÛë=j~åì~ä PJNT=
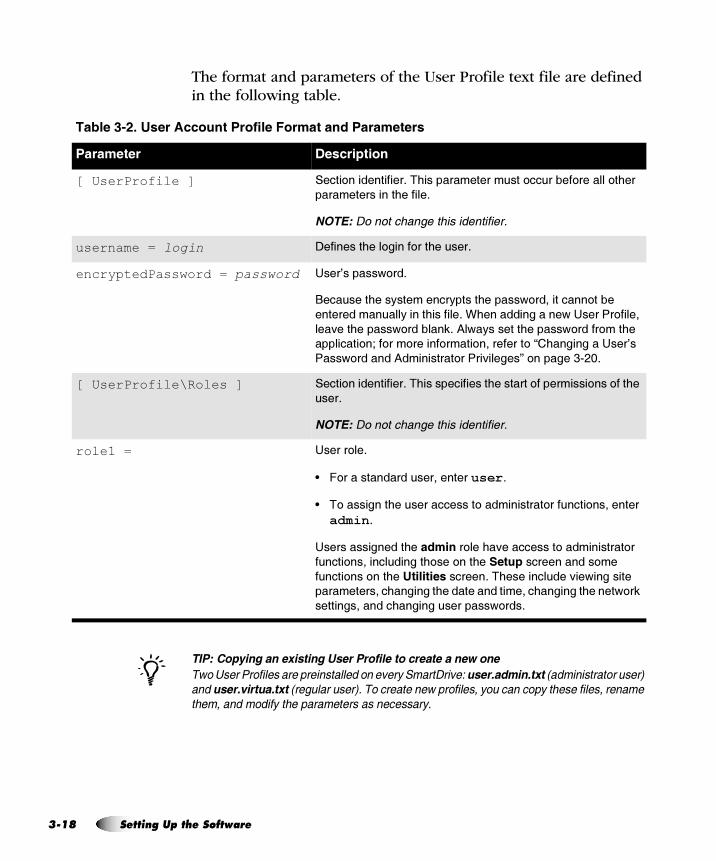
PJ
The format and parameters of the User Profile text file are defined in the following table.
���������� �� ������ ���� ������ �� ������ � ��� ���
����� �������� ��� ��� ����� ����� � ����������� �������������� !������������ �"�
������������������ !� ������� �"������� � �� �������� ���������������� ���� ��� ��� �
� ��������������� ������ ����� � ����
���� ��)! *����+�������%��& ���'�������%������
%����� (���� �� ��
[ UserProfile ] ����� ������������-�A<��������������� ������� ������� �<���
��������������<������-
������������������������ �������
username = login ;��������<��� ����� ���<�����-
encryptedPassword = password 7���E������6 ��-
��������<���3��������3�����<������6 ����������� �����
�������������3�����<�������-�K<��������������6�7������ ������
���=���<������6 �������(-�0�6�3�������<������6 ����� ��<��
��������� �J�� �� ������ ���� ���������� �L�<���������7���E��
����6 �������0��������� �����=������M� ������ #"$!-
[ UserProfile\Roles ] ����� ������������-�A<��������������<�������� ��������� ��� ���<��
���-
������������������������ �������
role1 = 7����� ��-
B � ������������������������user-
B A ���������<�������������� ����������� ������� ����������
admin-
7���������������<�� ������ ���<�=���������� ����������� ��
����� ��������������< ��� ���<��$�!������������� ��
����� ��� ���<��-�������������-�A<�����������=��6���������
������������<��������<�����������������<��������<�����6 �(�
���������������<���������������6 ���-
/
NU pÉííáåÖ=ré=íÜÉ=pçÑíï~êÉ
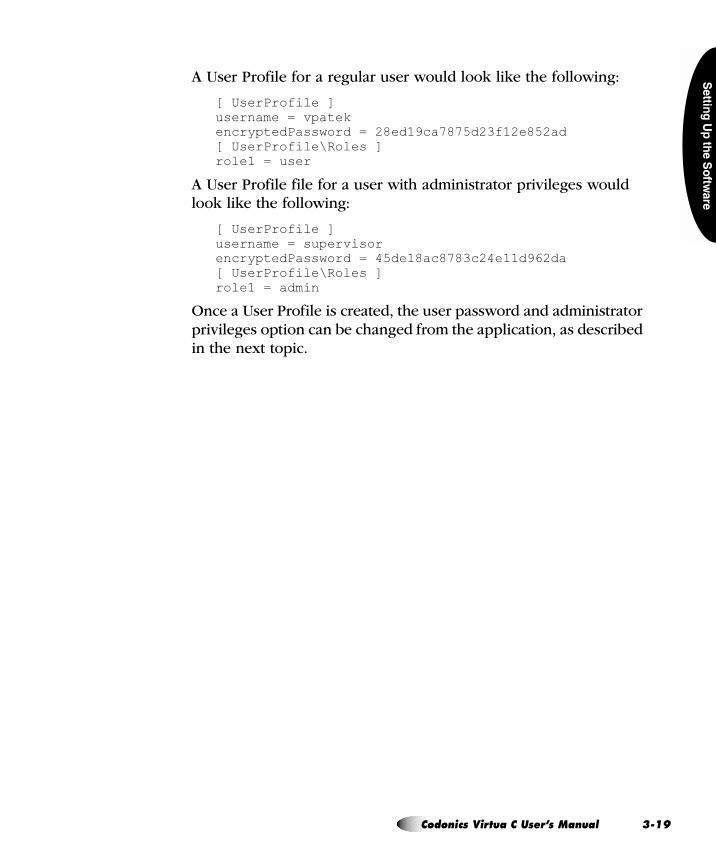
������
�������
������
��
A User Profile for a regular user would look like the following:
[ UserProfile ]username = vpatekencryptedPassword = 28ed19ca7875d23f12e852ad[ UserProfile\Roles ]role1 = user
A User Profile file for a user with administrator privileges would look like the following:
[ UserProfile ]username = supervisorencryptedPassword = 45de18ac8783c24e11d962da[ UserProfile\Roles ]role1 = admin
Once a User Profile is created, the user password and administrator privileges option can be changed from the application, as described in the next topic.
`çÇçåáÅë=sáêíì~=`=rëÉêÛë=j~åì~ä PJNV=
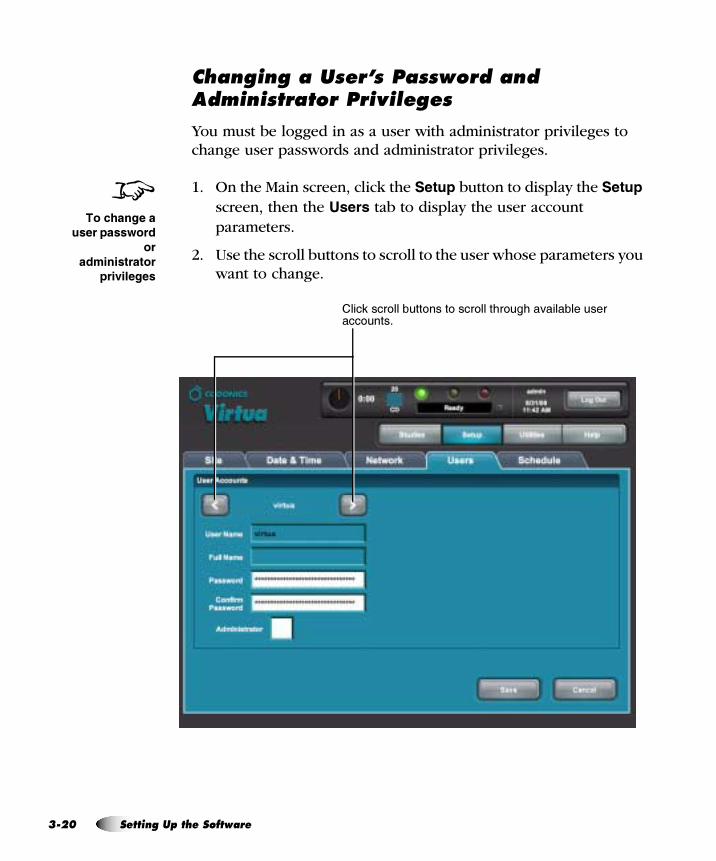
PJ
`Ü~åÖáåÖ=~=rëÉêÛë=m~ëëïçêÇ=~åÇ=^Çãáåáëíê~íçê=mêáîáäÉÖÉë
You must be logged in as a user with administrator privileges to change user passwords and administrator privileges.
1. On the Main screen, click the ����� button to display the ����� screen, then the ����� tab to display the user account parameters.
2. Use the scroll buttons to scroll to the user whose parameters you want to change.
8����� ����
����! ������
��
������� ��
!��'������
����(���� ������ ���� ���� ����<� �<��=��������������� ���-
OM pÉííáåÖ=ré=íÜÉ=pçÑíï~êÉ
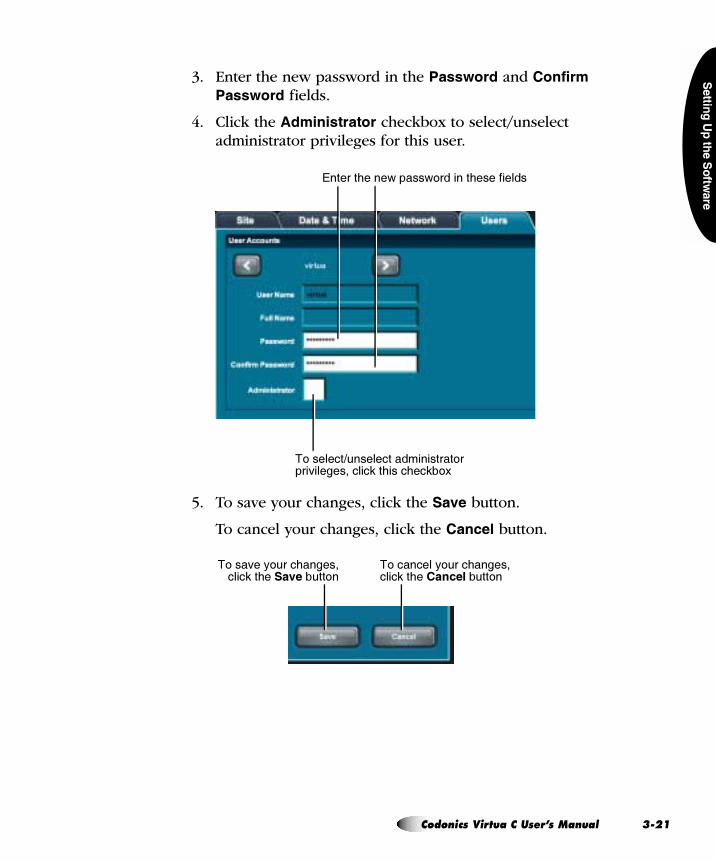
������
�������
������
��
3. Enter the new password in the ������� and �������������� fields.
4. Click the ������������ checkbox to select/unselect administrator privileges for this user.
5. To save your changes, click the ���� button.
To cancel your changes, click the ����� button.
�������<����6�����6 �������<����������
A �������*������������������ �����=������������(��<����<��(� C
A ��������3 ���<�����������(��<��� �������� �
A ���=��3 ���<����������(��<��$ '����� �
`çÇçåáÅë=sáêíì~=`=rëÉêÛë=j~åì~ä PJON=
PJ
aÉäÉíáåÖ=~=rëÉê=^ÅÅçìåí
Delete the User Profile from the SmartDrive.
For general information about accessing the User Profile file to delete it, refer to “Creating and Modifying Profiles” on page 3-6.
Note the admin and virtua user accounts are added automatically with the default password codonics if their User Profile files are not present on the SmartDrive when the system is booted.
8���������
���� ����
OO pÉííáåÖ=ré=íÜÉ=pçÑíï~êÉ
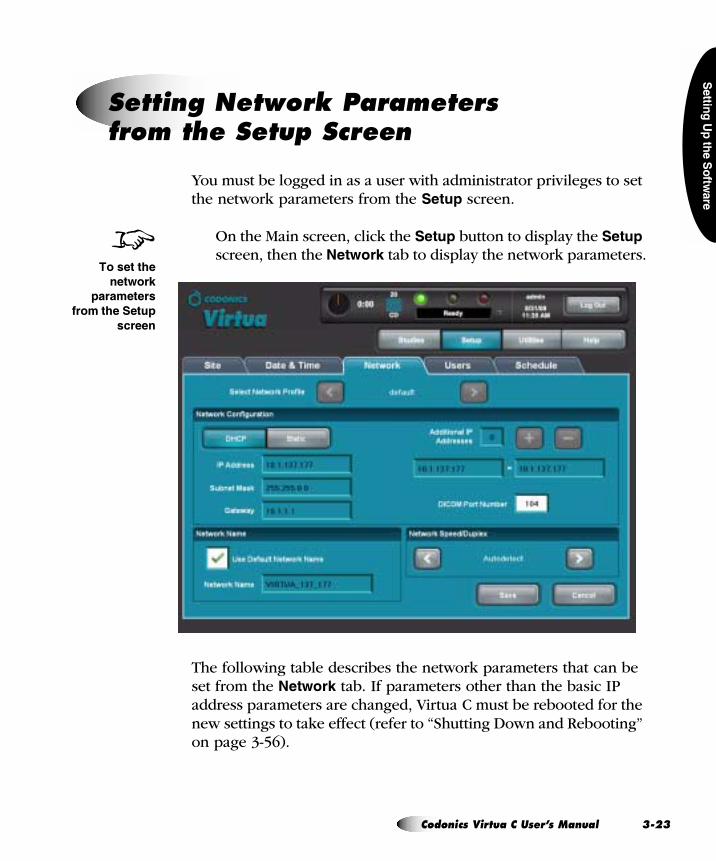
������
�������
������
��
You must be logged in as a user with administrator privileges to set the network parameters from the ����� screen.
On the Main screen, click the ����� button to display the ����� screen, then the ����� tab to display the network parameters.
The following table describes the network parameters that can be set from the ����� tab. If parameters other than the basic IP address parameters are changed, Virtua C must be rebooted for the new settings to take effect (refer to “Shutting Down and Rebooting” on page 3-56).
pÉííáåÖ=kÉíïçêâ=m~ê~ãÉíÉêëÑêçã=íÜÉ=pÉíìé=pÅêÉÉå
8��������
������
! � �����
��������$�!
������
`çÇçåáÅë=sáêíì~=`=rëÉêÛë=j~åì~ä PJOP=
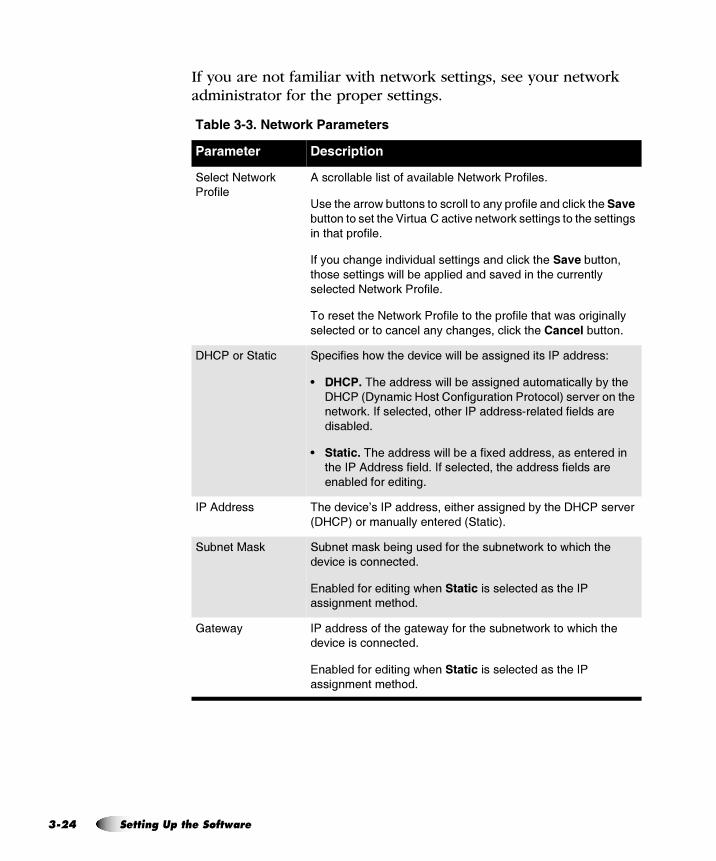
PJ
If you are not familiar with network settings, see your network administrator for the proper settings.
���� ���! "��#��$�%������
%����� (���� �� ��
�������:��6 �(�
�� ����
0���� ������������ ���=��������:��6 �(��� �����-�
7����<����� 6���� ���� ���� ���� ���3��� �������������(��<��$ '��
��� ��� ������<��)���� ������=�����6 �(����������� ��<�����������
����<����� ����-
���3 ��<���������=����������������������(��<��$ '����� ���
�< ������������6���������������������=�������<���������3�
���������:��6 �(��� ����-
A ��������<��:��6 �(��� ������ ��<���� ������<���6��� ��������3�
��������� ��� ����������3��<�����������(��<��� �������� �-
;+��� �������� ����������< 6��<����=����6������������������������������1
B ����(�A<����������6������������������ �������3��3��<��
;+���?;3�����+ ���� �������� ���� � � �@����=��� ���<��
���6 �(-�������������� �<�������������"�������������������
��������-
B $ ��(�A<����������6�����������C��������������������������
�<�����0������������-���������������<���������������������
��������� ���������-
���0������ A<����=���E�����������������<�������������3��<��;+������=���
?;+��@� �������3���������?������@-
���������( ��������(������������ ���<�������6 �(�� �6<��<��<��
��=�������� �������-
��������� ����������6<���$ �������������������<�����
������������< �-
����6�3 ����������� ���<������6�3�� ���<�������6 �(�� �6<��<��<��
��=�������� �������-
��������� ����������6<���$ �������������������<�����
������������< �-
OQ pÉííáåÖ=ré=íÜÉ=pçÑíï~êÉ
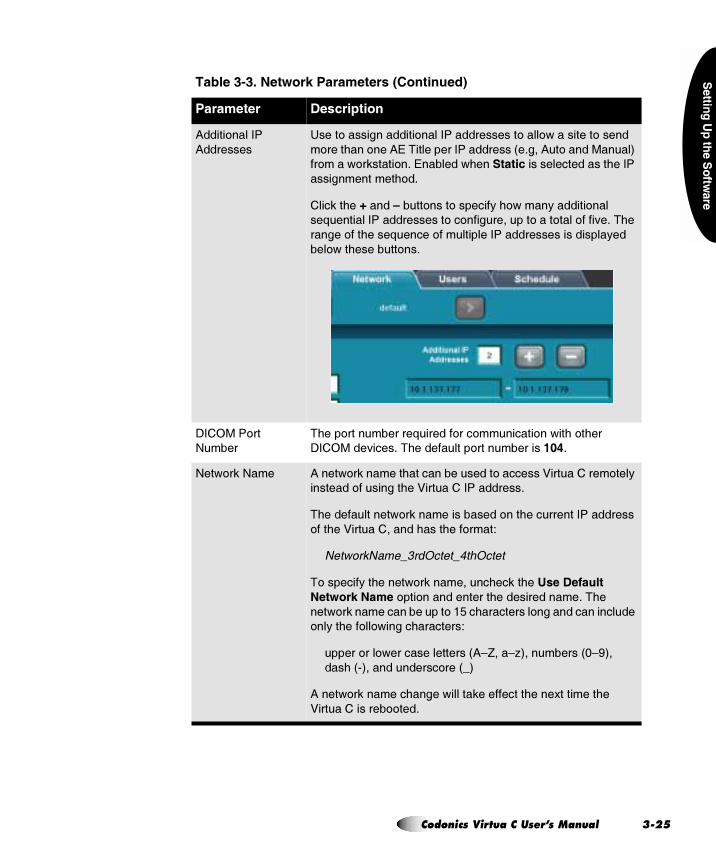
������
�������
������
��
0����� �������
0��������
7���� �������������� ������������������ ���� 6��������� ������
����<��� ���0��A��������������������?�-���0� ����������@�
�� ���6 �(����� �-���������6<���$ �������������������<�����
������������< �-
����(��<��.�����/���� ���� �������3�< 6���3������� ����
��2��������������������� �� ����������� ���� ���� ����=�-�A<��
������ ���<����2����� �������������������������������3���
��� 6��<������� ��-
;��4��� ���
:���
A<��� ����������2������ ��� ������ ��6��<� �<���
;��4����=����-�A<���������� �����������)*+-
:��6 �(�:�� 0����6 �(������<��������������� ��������)���� ���� ���3�
�������� ��������<��)���� ������������-�
A<������������6 �(�������������� ���<��������������������
���<��)���� �������<����<��� ���1
���������D�� ����D�������
A �������3��<�����6 �(��������<��(��<��-������ ��
0������0 ��� ��� �������������<�������������-�A<��
���6 �(��������������� �����<���������� ������������������
��3��<��� �� 6�����<��������1
����� ��� 6����������������?0FG���F,@��������?!F9@��
���< ?"@������������ ���?D@
0����6 �(������<�����6������(����������<����C�������<��
)���� �������� ���-
���� ���! "��#��$�%������������ �����
%����� (���� �� ��
`çÇçåáÅë=sáêíì~=`=rëÉêÛë=j~åì~ä PJOR=
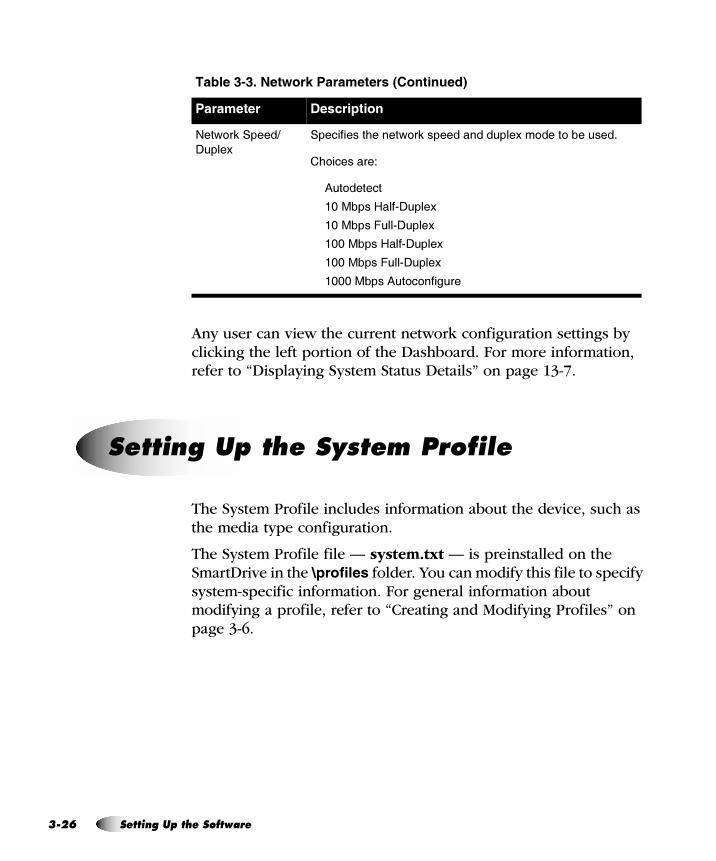
PJ
Any user can view the current network configuration settings by clicking the left portion of the Dashboard. For more information, refer to “Displaying System Status Details” on page 13-7.
The System Profile includes information about the device, such as the media type configuration.
The System Profile file — system.txt — is preinstalled on the SmartDrive in the �������� folder. You can modify this file to specify system-specific information. For general information about modifying a profile, refer to “Creating and Modifying Profiles” on page 3-6.
:��6 �(������*
;���C
�����������<�����6 �(���������������C� ���� �������-
�< ��������1
0� ������
�!������+���";���C
�!���������";���C
�!!������+���";���C
�!!���������";���C
�!!!������0� � ������
���� ���! "��#��$�%������������ �����
%����� (���� �� ��
pÉííáåÖ=ré=íÜÉ=póëíÉã=mêçÑáäÉ
OS pÉííáåÖ=ré=íÜÉ=pçÑíï~êÉ
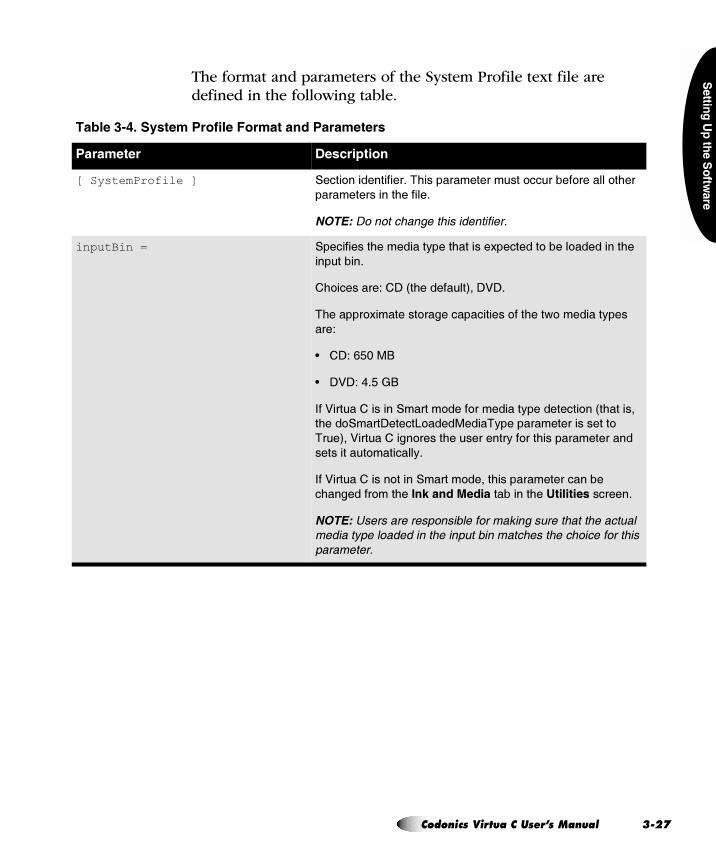
������
�������
������
��
The format and parameters of the System Profile text file are defined in the following table.
���� ��,! ������%��& ���'�������%������
%����� (���� �� ��
[ SystemProfile ] ����� ������������-�A<��������������� ������� ������� �<���
��������������<������-
������������������������ �������
inputBin = �����������<��������3����<�������C�������� ����� ���������<��
��������-
�< ��������1��;�?�<��������@��;);-�
A<������ C������� ���������������� ���<���6 �������3����
���1
B �;1� �!���
B ;);1�%-����
���)���� ������������� ���� ��������3���������� ��?�<�������
�<��� ����;�����5 ���������A3�������������������� �
A��@��)���� ����� �����<����������3�� ���<����������������
���������� �������3-
���)���� ������ ���������� �����<�������������������
�<�������� ��<������ ���%��� ���������<��-�������������-
������������������������������������������������������ ���������� ������������������������������������������
��������
`çÇçåáÅë=sáêíì~=`=rëÉêÛë=j~åì~ä PJOT=
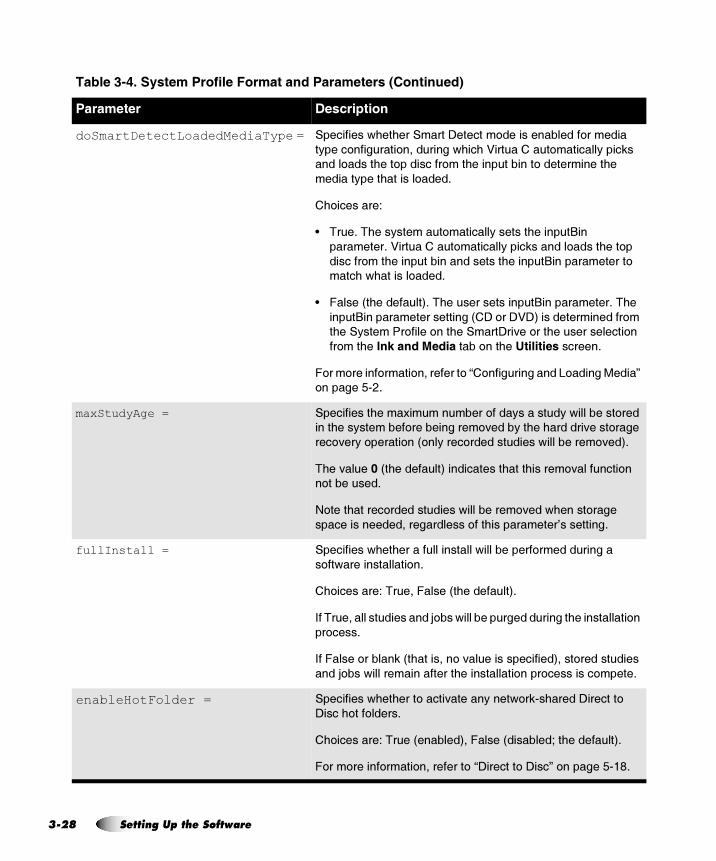
PJ
doSmartDetectLoadedMediaType = ����������6<��<��������;������ ��������������� �������
�3���� �������� ���������6<��<�)���� ���� �������3����(��
����� �����<��� ��������� ��<������������ �����������<��
������3����<������� ����-
�< ��������1
B A��-�A<���3������ �������3�������<����������
��������-�)���� ���� �������3����(������� �����<��� ��
������� ��<���������������������<�������������������� �
���<�6<������� ����-
B ������?�<��������@-�A<���������������������������-�A<��
�������������������������?�;� ��;);@���������������� �
�<���3������ ����� ���<������;��=�� ���<������������� ��
�� ��<������ ���%��� ����� ���<��-�������������-
� �� ������ ���� ���������� �L� �������������5 �����������M�
������ �"$-
maxStudyAge = �����������<���C������� ����3�������3�6��������� ����
����<���3������� ����������� =����3��<��<�������=���� �����
��� =��3� ������ ��? ��3���� ������������6��������� =��@-�
A<��=����*�?�<��������@������������<����<����� =�������� ��
� ��������-
: ����<������ ������������6��������� =���6<����� �����
���������������������������� ���<�����������E���������-
fullInstall = ����������6<��<�����������������6����������� ������������
� ��6�������������� �-
�< ��������1�A����������?�<��������@-�
���A�������������������> ���6��������������������<������������ ��
�� ����-
��������� ������(�?�<�������� �=����������������@���� �����������
����> ���6�����������������<������������ ���� ��������� ����-
enableHotFolder = ����������6<��<���� �����=������3����6 �("�<�����;������� �
;����< ��� �����-
�< ��������1�A���?�������@��������?��������J��<��������@-
� �� ������ ���� ���������� �L;������� �;���M� ������ �"�'-
���� ��,! ������%��& ���'�������%������������ �����
%����� (���� �� ��
OU pÉííáåÖ=ré=íÜÉ=pçÑíï~êÉ
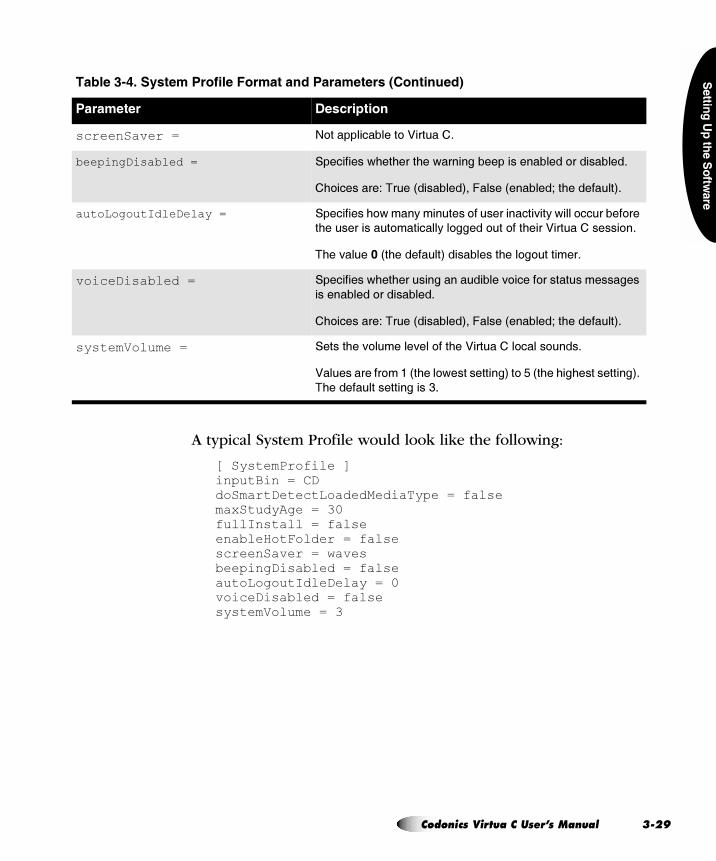
������
�������
������
��
A typical System Profile would look like the following:
[ SystemProfile ]inputBin = CDdoSmartDetectLoadedMediaType = falsemaxStudyAge = 30fullInstall = falseenableHotFolder = falsescreenSaver = wavesbeepingDisabled = falseautoLogoutIdleDelay = 0voiceDisabled = falsesystemVolume = 3
screenSaver = : �������������� �)���� �-
beepingDisabled = ����������6<��<����<��6����������������������� ����������-
�< ��������1�A���?��������@��������?�������J��<��������@-
autoLogoutIdleDelay = ����������< 6���3������� ������������=��3�6���� ������� ���
�<����������� �������3�� ����� �� ���<����)���� ������� �-�
A<��=����*�?�<��������@�����������<��� � ������-
voiceDisabled = ����������6<��<������������������= ����� ����������������
����������� ����������-
�< ��������1�A���?��������@��������?�������J��<��������@-
systemVolume = ������<��= �����=��� ���<��)���� ��� ����� ���-�
)����������� ���?�<��� 6�����������@�� ���?�<��<��<�����������@-�
A<��������������������#-
���� ��,! ������%��& ���'�������%������������ �����
%����� (���� �� ��
`çÇçåáÅë=sáêíì~=`=rëÉêÛë=j~åì~ä PJOV=
PJ
Site Profiles include information about the site, such as the site name, address, and phone number. This profile is the source of the site information that is printed on disc labels and contained in the readme.txt and index.htm files on a recorded disc.
Virtua C supports multiple Site Profiles. The Site Profile can be specified in a Job Profile, so that when a different Job Profile is selected, site information will change accordingly. For more information about Job Profiles, refer to “Setting Up Job Profiles” on page 3-35.
jçÇáÑóáåÖ=íÜÉ=aÉÑ~ìäí=páíÉ=mêçÑáäÉ
The default Site Profile file — site.default.txt — is preinstalled on the SmartDrive in the ������������� folder. You can modify this file to include your site-specific information. For general information about modifying a profile, refer to “Creating and Modifying Profiles” on page 3-6.
`êÉ~íáåÖ=~=páíÉ=mêçÑáäÉ
Additional Site Profiles can be created to support the use of the device by more than one site. For example, if the device is in a mobile unit that travels to multiple hospitals, a Site Profile can be created for each hospital. The appropriate Site Profile can then be specified in a Job Profile so that the hospital’s site information prints on the disc labels and is included in the disc’s ReadMe.txt file.
Site profiles must be stored in the ������������� folder on the SmartDrive. The file name should be in the following format:
site.profilename.txt
pÉííáåÖ=ré=páíÉ=mêçÑáäÉë
PM pÉííáåÖ=ré=íÜÉ=pçÑíï~êÉ
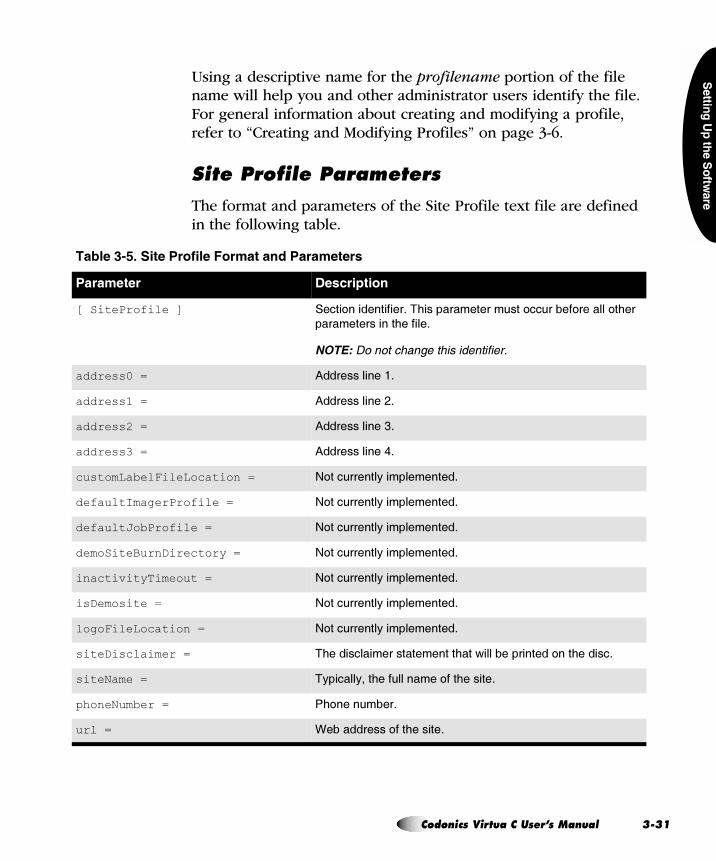
������
�������
������
��
Using a descriptive name for the profilename portion of the file name will help you and other administrator users identify the file. For general information about creating and modifying a profile, refer to “Creating and Modifying Profiles” on page 3-6.
páíÉ=mêçÑáäÉ=m~ê~ãÉíÉêë
The format and parameters of the Site Profile text file are defined in the following table.
���� ��-! � ���%��& ���'�������%������
%����� (���� �� ��
[ SiteProfile ] ����� ������������-�A<��������������� ������� ������� �<���
��������������<������-
������������������������ �������
address0 = 0�������������-
address1 = 0������������$-
address2 = 0������������#-
address3 = 0������������%-
customLabelFileLocation = : ���������3����������-
defaultImagerProfile = : ���������3����������-
defaultJobProfile = : ���������3����������-
demoSiteBurnDirectory = : ���������3����������-
inactivityTimeout = : ���������3����������-
isDemosite = : ���������3����������-
logoFileLocation = : ���������3����������-
siteDisclaimer = A<����������������������<���6��������������� ���<������-
siteName = A3������3���<���������� ���<������-
phoneNumber = �< �������-
url = K����������� ���<������-
`çÇçåáÅë=sáêíì~=`=rëÉêÛë=j~åì~ä PJPN=

PJ
A typical default Site Profile would look like the following:
[ SiteProfile ]address0 = Codonics, Inc.address1 = 17991 Englewood Driveaddress2 = Middleburg Heights, OH 44130address3 = customLabelFileLocation = defaultImagerProfile = defaultJobProfile = demoSiteBurnDirectory = inactivityTimeout = isDemoSite = logoFileLocation = siteDisclaimer = This disc contains confidential medical information. If you are not the intended recipient or an authorized user, please contact the site shown on this label.siteName = CodonicsphoneNumber = (800)444-1198url = www.codonics.com
���������� �� ������ !�� ������ �� ������ � ��� ���
����� � �� ���� ������� ������������������ %������� ������� �7����� %���� ��
��������������������������� ����� ����� � ����������� �7�� ��� ���������������� ������ ����� � ����
/
PO pÉííáåÖ=ré=íÜÉ=pçÑíï~êÉ
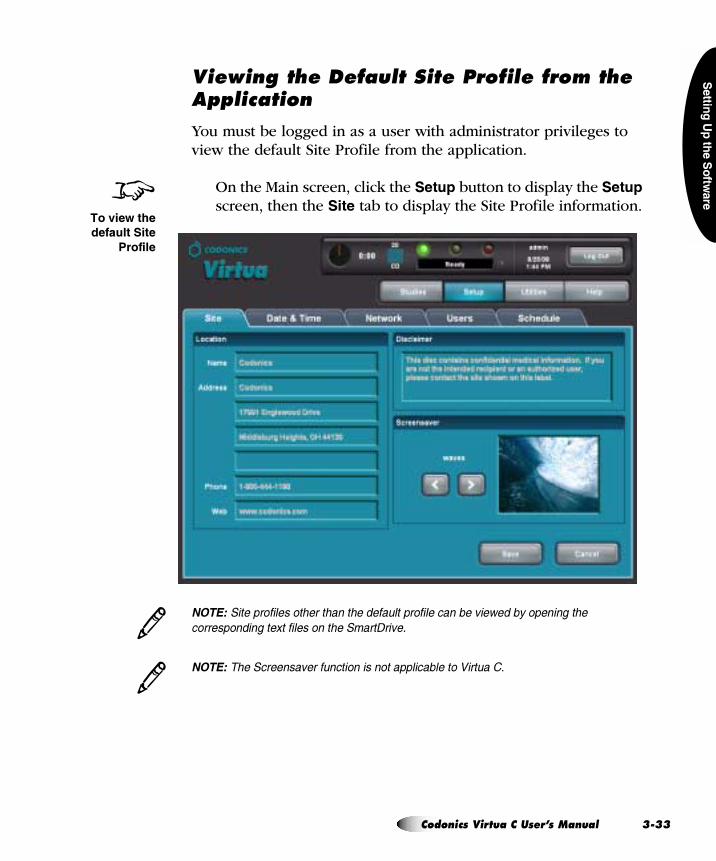
������
�������
������
��
sáÉïáåÖ=íÜÉ=aÉÑ~ìäí=páíÉ=mêçÑáäÉ=Ñêçã=íÜÉ=^ééäáÅ~íáçå
You must be logged in as a user with administrator privileges to view the default Site Profile from the application.
On the Main screen, click the ����� button to display the ����� screen, then the ���� tab to display the Site Profile information.
�������� ������� ��� ������� �� ����������� ������ ��� � ������� ������ �
���� �������� %���� ����� ��������� �
�������� ���� ��� ������������������������ ���/���� )�
8���'������
��� ��$��
�������
3
3
`çÇçåáÅë=sáêíì~=`=rëÉêÛë=j~åì~ä PJPP=
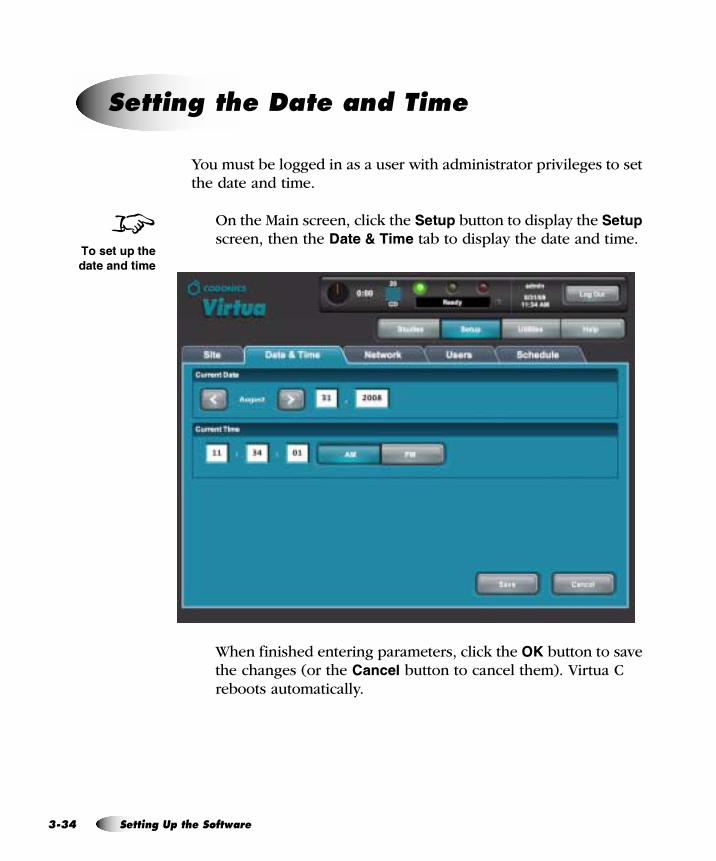
PJ
You must be logged in as a user with administrator privileges to set the date and time.
On the Main screen, click the ����� button to display the ����� screen, then the !����"�#��� tab to display the date and time.
When finished entering parameters, click the � button to save the changes (or the ����� button to cancel them). Virtua C reboots automatically.
pÉííáåÖ=íÜÉ=a~íÉ=~åÇ=qáãÉ
8������!���
� �� ������
PQ pÉííáåÖ=ré=íÜÉ=pçÑíï~êÉ
������
�������
������
��
Codonics Virtua C supports multiple Job Profiles, each of which can define a unique set of job parameters for recording studies to a disc. Parameters include the type of label to be printed, whether studies are recorded automatically without user intervention, and which DICOM viewer will be included on the disc.
When sending a study for recording from a DICOM application, the user specifies a Job Profile, which is passed to Virtua C as a Called AE Title. The Job Profile name is a parameter defined in each Job Profile file.
The following table includes the Job Profile files that are preinstalled on every SmartDrive.
pÉííáåÖ=ré=gçÄ=mêçÑáäÉë
���� ��.! %�� ��������/���%��& ���
%����� (���� �� ��
> �-������-�C� 0����3������=���6��<����������0��A������<���� ���
� �����<�����C�������N ���� ������������������<���
��������� ����-
> �-�� -�C� A<��> ������� �������3�2����� ����� �������
6��< �����������=���� �-�
> �-�� �;-�C� A<��> ������� �������3�2����� ����� ������ ����
�;��6��< �����������=���� �-
> �-�� �;�����-�C� �������� �> �-�� �;-�C�����6��<��<��� �� 6����
���������� ����,���� �������1
B ������ ���I�� � �D� �
B ����5�����I���(D��=��
B ����0� ��� ��N ��I� �0�� ����� ����
B ���4����3A�� ��I���
B �������3�� �����I��3���3
� �� ������ ���� �� ���<���������������������� �
A���� #".� ������ #"#.-
`çÇçåáÅë=sáêíì~=`=rëÉêÛë=j~åì~ä PJPR=
PJ
�������� �� �&�����8 ��<��������� �"�#������$!�������� ����
"�#�����$%$!����������� ��� �� ����� �� ���� ���� �������� ����� ���� ��� �������
��������� ���� ����������� ���� �������� �� ���� ������ ��� ������� �<��������� ����������� �� ��
> �-�� ;);-�C� A<��> ������� �������3�2����� ����� ������ ����
;);��6��< �����������=���� �-
> �-�� ;);�����-�C� �������� �> �-�� ;);-�C�����6��<��<��� �� 6����
���������� ����,���� �������1
B ������ ���I�� � �D� �
B ����5�����I���(D��=��
B ����0� ��� ��N ��I� �0�� ����� ����
B ���4����3A�� ��I���
B �������3�� �����I��3���3
� �� ������ ���� �� ���<���������������������� �
A���� #".� ������ #"#.-
> �-����-�C� A<��> �����2��������<��������������� �������
��� ���������2���������������=���� �-
���� ��.! %�� ��������/���%��& ��������� �����
%����� (���� �� ��
3
PS pÉííáåÖ=ré=íÜÉ=pçÑíï~êÉ
������
�������
������
��
`êÉ~íáåÖ=~=gçÄ=mêçÑáäÉ
For general information about creating and modifying a profile, refer to “Creating and Modifying Profiles” on page 3-6.
Job Profiles are stored in the ���������$% folder on the SmartDrive. The file name should be in the following format:
job.profilename.txt
Using a descriptive name for the profilename portion of the file name will help you and other administrator users identify the file.
The format and parameters of the Job Profile text file are defined in the following table.
���� ��0! /���%��& ���'�������%������
%����� (���� �� ��
[ JobProfile ] ����� ������������-�A<��������������� ������� ���
���� �<�����������������<������-
������������������������ �������
doAutoRecord = �< ��������1�A����������?�<��������@-
���A�����<����� �������3������ �������3�������� �
�<��N ��5����� ������� ����-�
�����������<����� �������3����������� ��<���������
������������6�> ��������2��������������=���� ��� ����
��� ����-
autoMediaSelectStyle = ;���������< 6�)���� ��<���������> ��6<���
����A3����������� �07A4-�
�< ��������1
B �3��,��?�<��������@-�)���� �����������<�������
�3���� ���<��> �������� ���<����,�� ���<��> �-
B �3�����-�)���� ������<���������3�� ��������
����������������� ���<���3��-
� �� ������ ���� ���� ��< 6��<���������������
����� �����������<��������3���� ����> ���������� �
L+ 6�)���� ��;����������<��������A3�����2�����
� ����N �M� ������ #"% -
`çÇçåáÅë=sáêíì~=`=rëÉêÛë=j~åì~ä PJPT=
PJ
doCreateJpegImages = : ���������3���� ����-
doEnableAutoRun = �< ��������1�A����������?�<��������@-
���A�����<��;��4��)��6��� ���<�������6�������
����<����� �������3�6<����<���������������������� �
��K��� 6����-
doIncludeSelfCheckProgram = ����������6<��<���� ��������������"�<��(��� ���� ��
�<������-
�< ��������1�A����������?�<��������@-
���A�����<����� ����������6��������������<��(������
���������������3��<��(��� ���-�A<���� �����������
���� ��<��(�6<��<����<�� ����������� ���������� ���<��
�����<�����������������6<��<����<������������� �3� ��
��� ��������� ��6<��<����<������������<��������
� ������� =������� ���<� �<���� ����<�������-
doVerifyDiscsAfterRecord = ����������6<��<���� ����� ��������"�����"6����������
=����3��������� ���<���������� �����-
�< ��������1�A����������?�<��������@-
���A�������������������3��<��(�6����������� ���� ���<��
������� �������3�����<��� ����� �� ���<����� ������
������ �-
)����3��������������� �����<����� �����������
�� =������<���������������������<����<�����3������
<����������� ������� ����3-
doPrintToDicomImager = : ���������3���� ����-
doLimitStudiesPerDiscToLabelCapacity = ����������6<��<����<������� ������������ ����� ��
�������6���������������3��<��� ��� �����3�
��� ���� ���<������������������ ���<������������-
�< ��������1�A����������?�<��������@-
���A�����<�����3��������3� ���<�������6��������������� �
�<���C������� ����������<������������������
���<������E���������������-�A<���� ���������<��> ��� �
������ �������� ���������������-
���� ��0! /���%��& ���'�������%������������ �����
%����� (���� �� ��
PU pÉííáåÖ=ré=íÜÉ=pçÑíï~êÉ
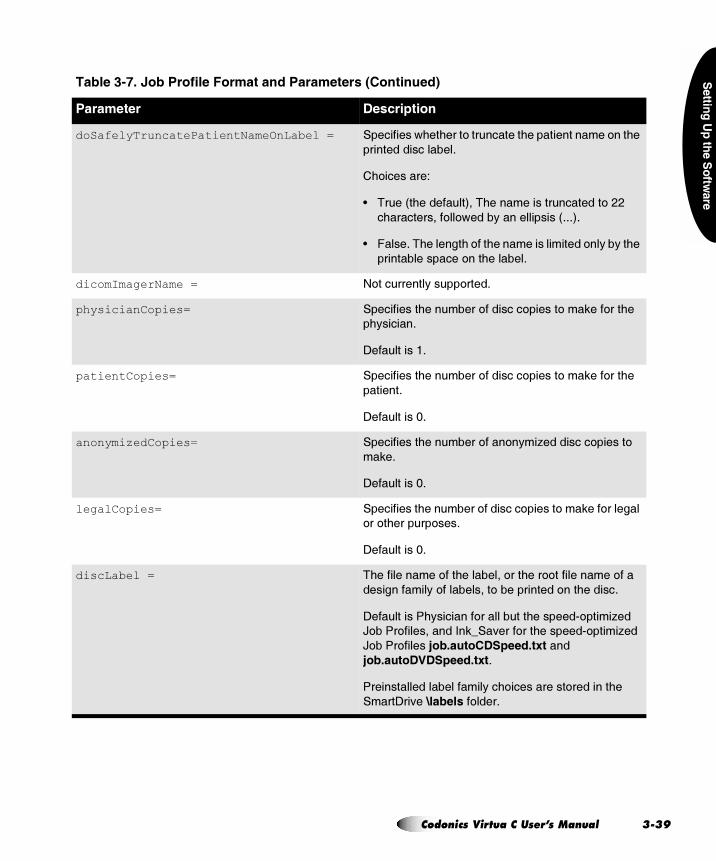
������
�������
������
��
doSafelyTruncatePatientNameOnLabel = ����������6<��<���� ����������<�������������� ���<��
������������������-
�< ��������1�
B A���?�<��������@��A<������������������� �$$�
�<����������� �� 6����3�������������?---@-
B �����-�A<�������<� ���<���������������� ��3��3��<��
���������������� ���<�������-
dicomImagerName = : ���������3���� ����-
physicianCopies= �����������<������� �������� ������ ��(��� ���<��
�<3������-
;����������-
patientCopies= �����������<������� �������� ������ ��(��� ���<��
�������-
;���������!-
anonymizedCopies= �����������<������� ���� �3�,��������� ������ �
�(�-
;���������!-
legalCopies= �����������<������� �������� ������ ��(��� ��������
�� �<������ ���-
;���������!-
discLabel = A<����������� ���<��������� ���<��� ����������� ����
�����������3� ����������� ������������ ���<������-
;����������<3�������� ����������<�������" ����,���
N ���� �������������(D��=���� ���<�������" ����,���
N ���� ������1�&( ���$!���(������
1�&( ����$!���(�-
�����������������������3��< ����������� ��������<��
����;��=��2� &����� ����-�
���� ��0! /���%��& ���'�������%������������ �����
%����� (���� �� ��
`çÇçåáÅë=sáêíì~=`=rëÉêÛë=j~åì~ä PJPV=

PJ
discLabelPhysicianCopy = �����������<���������<���6����������� ���<3�������
� ����� ����� ����������-
����<����������������(� ��� ��������<��=����: D4=�������
?�<��������@���<����������������������<������5�����
���������6������������ �����<3�������� �3-
discLabelPatientCopy = �����������<���������<���6����������� ����������� �����
����� ����������-
����<����������������(� ��� ��������<��=����: D4=�������
?�<��������@���<����������������������<������5�����
���������6������������ ������������� �3-
discLabelAnonymousCopy = �����������<���������<���6����������� ���� �3 ��
� ����� ����� ����������-
����<����������������(� ��� ��������<��=����: D4=�������
?�<��������@���<����������������������<������5�����
���������6������������ ������� �3 ��� �3-
discLabelLegalCopy = �����������<���������<���6����������� ��������� ����� ��
��� ����������-
����<����������������(� ��� ��������<��=����: D4=�������
?�<��������@���<����������������������<������5�����
���������6������������ ����������� �3-
���� ��0! /���%��& ���'�������%������������ �����
%����� (���� �� ��
QM pÉííáåÖ=ré=íÜÉ=pçÑíï~êÉ
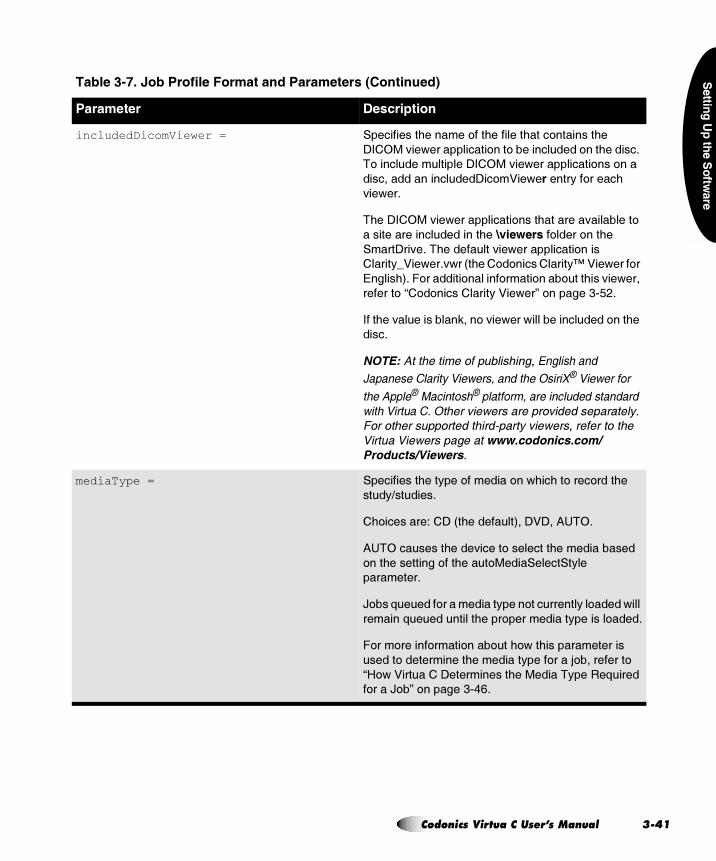
������
�������
������
��
includedDicomViewer = �����������<������ ���<��������<���� ��������<��
;��4��=��6������������ ��� ������������ ���<������-�
A ���������������;��4��=��6������������ ��� ����
��������������������;�� )��6�������3�� �����<�
=��6��-
A<��;��4��=��6������������ ����<��������=��������� �
�����������������������<��2'�������� ����� ���<��
����;��=�-�A<���������=��6������������ �����
������3D)��6��-=6��?�<��� � �����������3O�)��6���� ��
������<@-�� �������� ������� ���� ���� ���<���=��6����
������� �L� � �����������3�)��6��M� ������ #"�$-
����<��=�����������(��� �=��6���6��������������� ���<��
����-
������������������������������=����������
<���� �)������/� � �������� �����>��/� � ������
� �#��� ��-������������������� ������� ���������
����/���� )������� ����������� � �����������!��������������� ����� "������ ����������������
#������#����������������� ����
�������� ������
mediaType = �����������<���3��� ������� ��6<��<�� ���� ����<��
���3*������-
�< ��������1��;�?�<��������@��;);��07A4-
07A4��������<����=����� ���������<�������������
���<���������� ���<���� �������������3���
��������-
N ���2����� ����������3���� ���������3�� �����6����
������2����������<���� ����������3������� ����-
� �� ������ ���� ���� ��< 6��<���������������
����� �����������<��������3���� ����> ���������� �
L+ 6�)���� ��;����������<��������A3�����2�����
� ����N �M� ������ #"% -
���� ��0! /���%��& ���'�������%������������ �����
%����� (���� �� ��
`çÇçåáÅë=sáêíì~=`=rëÉêÛë=j~åì~ä PJQN=
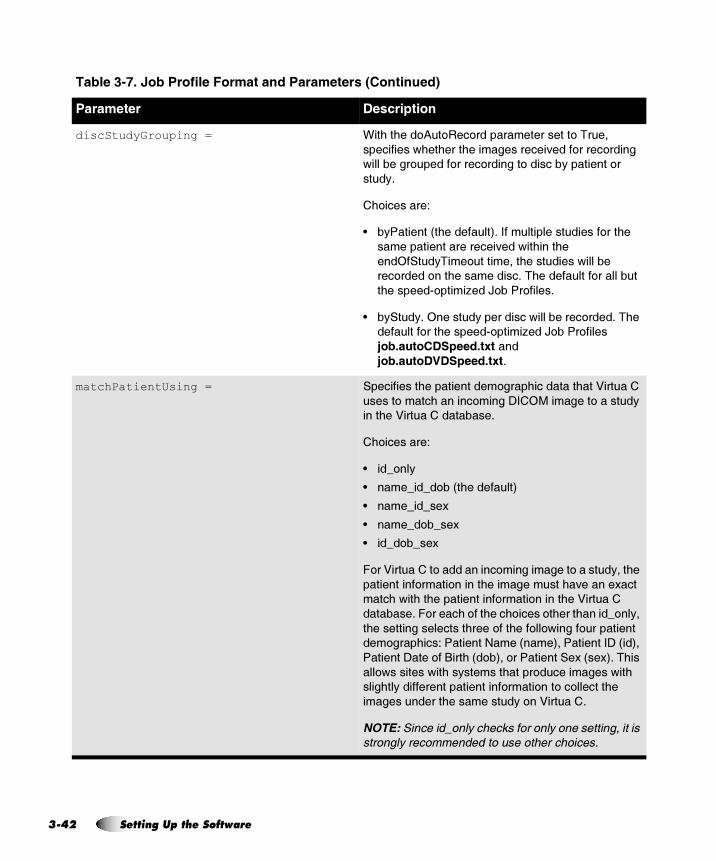
PJ
discStudyGrouping = K��<��<��� 0� ��� ����������������� �A����
����������6<��<����<�������������=���� ����� ������
6��������� ����� ����� ������� �������3��������� ��
���3-
�< ��������1
B �3��������?�<��������@-������������������� ���<��
���������������������=���6��<����<��
���4����3A�� ��������<���������6�������
��� ����� ���<����������-�A<���������� ���������
�<�������" ����,���N ���� �����-
B �3���3-�4������3����������6���������� ����-�A<��
�������� ���<�������" ����,���N ���� ������
1�&( ���$!���(������
1�&( ����$!���(�-
matchPatientUsing = �����������<������������ ����<���������<���)���� ��
����� ����<������� ����;��4�������� ������3�
����<��)���� ����������-�
�< ��������1
B ��D ��3
B ���D��D� ��?�<��������@
B ���D��D��C
B ���D� �D��C
B ��D� �D��C
� ��)���� ��� ����������� ���������� ������3���<��
����������� ���� ������<����������<�=������C����
���<�6��<��<������������� ���� ������<��)���� ��
��������-�� �����<� ���<���< ����� �<����<�����D ��3��
�<�������������������<���� ���<��� �� 6����� ����������
�� ����<���1���������:���?���@�����������;�?��@��
��������;���� ������<�?� �@�� ������������C�?��C@-�A<���
��� 6��������6��<��3������<����� ����������6��<�
����<��3���������������������� ���� ��� �� �������<��
������������<���������3� ��)���� �-
������$����� %�������������������������������������������������� �������������������
���� ��0! /���%��& ���'�������%������������ �����
%����� (���� �� ��
QO pÉííáåÖ=ré=íÜÉ=pçÑíï~êÉ
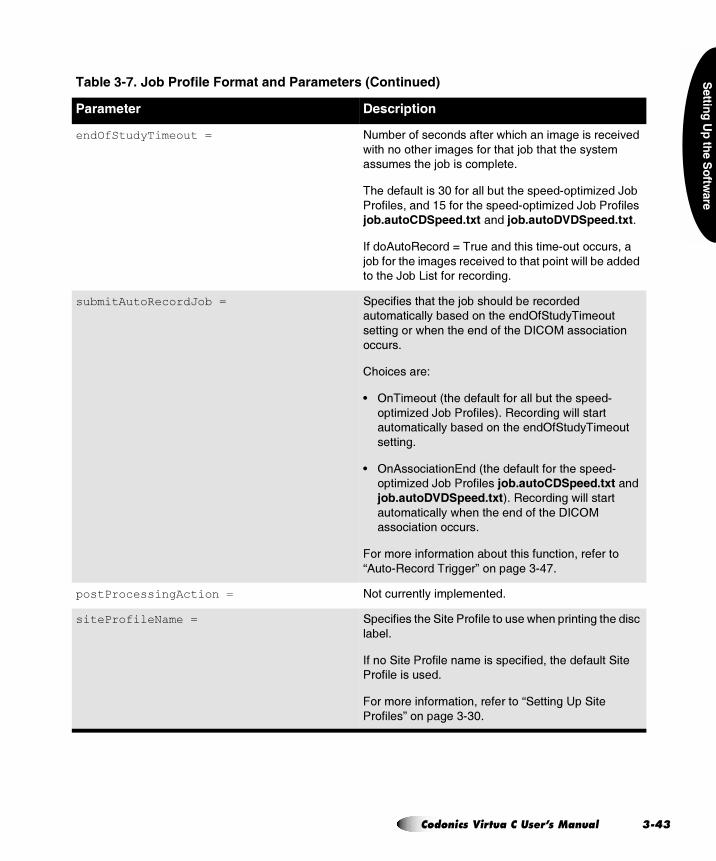
������
�������
������
��
endOfStudyTimeout = :���� ����� ����������6<��<�����������������=���
6��<�� � �<���������� ���<���> ���<����<���3����
�������<��> ������ �����-
A<������������#!�� ����������<�������" ����,���N ��
�� ��������������� ���<�������" ����,���N ���� ������
1�&( ���$!���(������1�&( ����$!���(�-
���� 0� ��� ���I�A��������<������" �� ��������
> ��� ���<�������������=���� ��<���� ����6�������������
� ��<��N ��5����� ����� �����-
submitAutoRecordJob = �����������<����<��> ���< ��������� �����
�� �������3������� ���<�����4����3A�� ��
�������� ��6<����<������ ���<��;��4����� ����� ��
����-
�< ��������1
B 4�A�� ��?�<���������� ����������<�������"
����,���N ���� �����@-���� ������6����������
�� �������3������� ���<�����4����3A�� ��
�������-
B 4�0�� ����� �����?�<���������� ���<�������"
����,���N ���� ������1�&( ���$!���(������
1�&( ����$!���(�@-���� ������6����������
�� �������3�6<����<������ ���<��;��4��
��� ����� �� ����-
� �� ������ ���� ���� ���<�������� ���������� �
L0� "��� ���A������M� ������ #"%.-
postProcessingAction = : ���������3����������-
siteProfileName = �����������<��������� ������ ����6<�������������<�������
�����-
���� �������� ������������������������<��������������
�� �����������-
� �� ������ ���� ���������� �L��������7�������
�� �����M� ������ #"#!-
���� ��0! /���%��& ���'�������%������������ �����
%����� (���� �� ��
`çÇçåáÅë=sáêíì~=`=rëÉêÛë=j~åì~ä PJQP=
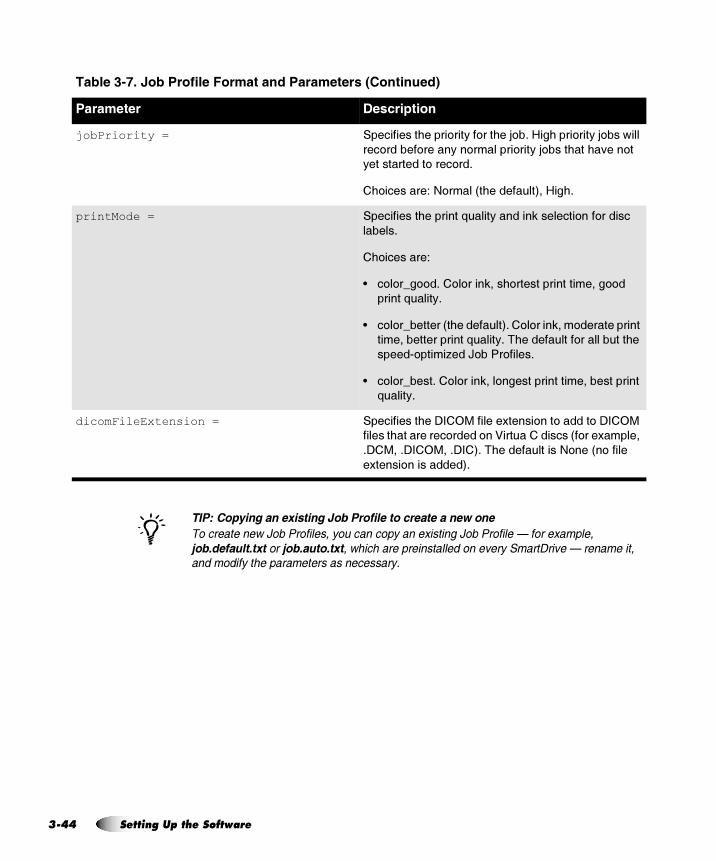
PJ
���������� �� ������ &�# ������ �� ������ � ��� ���
����� � �� ��<��������� ������������������ %�����<��������� �7����� %���� ��
"�#����������������"�#������������������� ��� ����� ����� � ����������� �7�� ��� ���������������� ������ ����� � ����
jobPriority = �����������<����� ���3�� ���<��> �-�+��<���� ���3�> ���6����
��� ������ �����3�� ������� ���3�> ����<���<�=��� ��
3������������ ���� ��-
�< ��������1�: ����?�<��������@��+��<-
printMode = �����������<��������2����3�������(�������� ��� �������
������-
�< ��������1
B � � �D� �-�� � ����(���< ������������������ ��
������2����3-
B � � �D�������?�<��������@-�� � ����(�� �������������
������������������2����3-�A<���������� ����������<��
�����" ����,���N ���� �����-
B � � �D����-�� � ����(��� ����������������������������
2����3-
dicomFileExtension = �����������<��;��4��������C����� ��� ������ �;��4��
�������<���������� ����� ��)���� ��������?� ���C������
-;����-;��4���-;��@-�A<������������: ���?� ������
�C����� ����������@-
���� ��0! /���%��& ���'�������%������������ �����
%����� (���� �� ��
/
QQ pÉííáåÖ=ré=íÜÉ=pçÑíï~êÉ
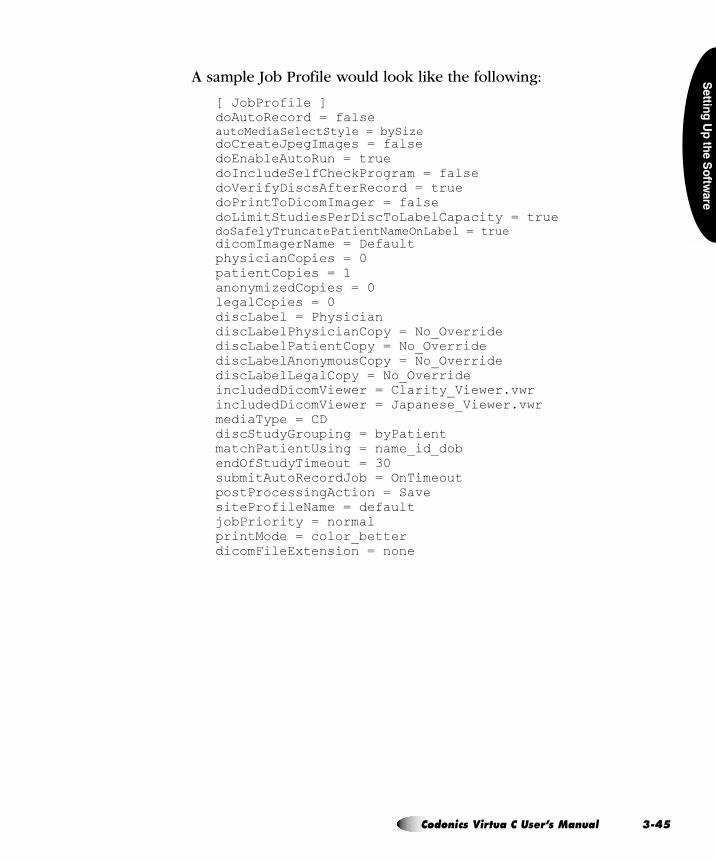
������
�������
������
��
A sample Job Profile would look like the following:
[ JobProfile ]doAutoRecord = falseautoMediaSelectStyle = bySizedoCreateJpegImages = falsedoEnableAutoRun = truedoIncludeSelfCheckProgram = falsedoVerifyDiscsAfterRecord = truedoPrintToDicomImager = falsedoLimitStudiesPerDiscToLabelCapacity = truedoSafelyTruncatePatientNameOnLabel = truedicomImagerName = DefaultphysicianCopies = 0patientCopies = 1anonymizedCopies = 0legalCopies = 0discLabel = PhysiciandiscLabelPhysicianCopy = No_OverridediscLabelPatientCopy = No_OverridediscLabelAnonymousCopy = No_OverridediscLabelLegalCopy = No_OverrideincludedDicomViewer = Clarity_Viewer.vwrincludedDicomViewer = Japanese_Viewer.vwrmediaType = CDdiscStudyGrouping = byPatientmatchPatientUsing = name_id_dobendOfStudyTimeout = 30submitAutoRecordJob = OnTimeoutpostProcessingAction = SavesiteProfileName = defaultjobPriority = normalprintMode = color_betterdicomFileExtension = none
`çÇçåáÅë=sáêíì~=`=rëÉêÛë=j~åì~ä PJQR=

PJ
jÉÇá~=qóéÉë=~åÇ=mêçÑáäÉ=m~ê~ãÉíÉê=pÉííáåÖë
eçï=sáêíì~ `=aÉíÉêãáåÉë=íÜÉ=jÉÇá~=qóéÉ=oÉèìáêÉÇ=Ñçê=~=gçÄ
The following table indicates how Virtua C determines what media type is required for a particular job. This determination is based on the autoMediaSelectStyle and mediaType parameter settings in the Job Profile being used for the job.
eçï=sáêíì~ `=aÉíÉêãáåÉë=íÜÉ=`ìêêÉåíäó=`çåÑáÖìêÉÇ=jÉÇá~=qóéÉ
Depending on how users would like to generally use media, Virtua C can be set up to use Smart Detect or Manual Detect modes to accommodate optimal media selection. For more information on Smart Detect and Manual Detect modes, refer to “Configuring and Loading Media” on page 5-2.
These modes are selected by the doSmartDetectLoadedMediaType parameter setting in the System Profile.
5 If the setting is True, Smart Detect mode is enabled. The media type (CD or DVD) will be automatically detected by reading the top disc loaded from the input bin.
5 If the setting is False, Manual Detect mode is enabled, and the media type will be determined from the inputBin parameter setting in the System Profile or the user selection on the ��������&���� tab on the ��������� screen.
���� ��1! 2�� ������� ���3�������/���%��& ������� ���
�� �����%���������� ��
���2�� ������������
%���������� �� �( (4( +���
�3��,� �; ;); N ����,��P� �!���1��;
N ����,��≥ �!���1�;);
�3����� �; ;); �������3�� ��������������3��
QS pÉííáåÖ=ré=íÜÉ=pçÑíï~êÉ
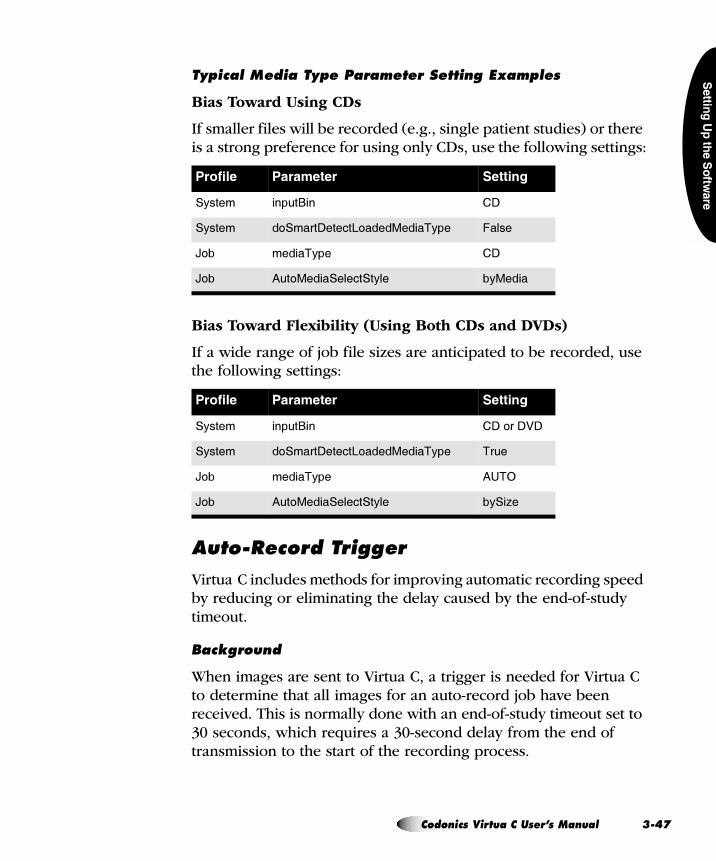
������
�������
������
��
qóéáÅ~ä=jÉÇá~=qóéÉ=m~ê~ãÉíÉê=pÉííáåÖ=bñ~ãéäÉë
Bias Toward Using CDs
If smaller files will be recorded (e.g., single patient studies) or there is a strong preference for using only CDs, use the following settings:
Bias Toward Flexibility (Using Both CDs and DVDs)
If a wide range of job file sizes are anticipated to be recorded, use the following settings:
^ìíçJoÉÅçêÇ=qêáÖÖÉê
Virtua C includes methods for improving automatic recording speed by reducing or eliminating the delay caused by the end-of-study timeout.
_~ÅâÖêçìåÇ=
When images are sent to Virtua C, a trigger is needed for Virtua C to determine that all images for an auto-record job have been received. This is normally done with an end-of-study timeout set to 30 seconds, which requires a 30-second delay from the end of transmission to the start of the recording process.
%��& �� %����� ���� ��
�3��� ������� �;
�3��� � ����;�����5 ���������A3�� �����
N � ����A3�� �;
N � 0� �������������3�� �3�����
%��& �� %����� ���� ��
�3��� ������� �;� ��;);
�3��� � ����;�����5 ���������A3�� A��
N � ����A3�� 07A4
N � 0� �������������3�� �3��,�
`çÇçåáÅë=sáêíì~=`=rëÉêÛë=j~åì~ä PJQT=
PJ
For some systems (typically with fast networks), this setting can be reduced to as low as 10 seconds. For other systems, the end of the DICOM association can be used as the trigger to eliminate this delay altogether.
���������� ��������� � ����� ���� ��� � ��� ����<��������� ��� ������� ��������� ��
������ �&������������������� � �������� ������ � �������������8 ������ ���� ���������
�����������8����� ����&� ��������� �������������������������������������� �
��������� ����������� �!��#��. �����?���� ������<��������� "���� �����������������
� ��������������� �������������������
�������� �� ����� ���� ��� � ������������$������������� ������� ���$����� �
%� ��� ����������� �� *��� ���������������� ���������������� ��� & �� ��
!� ���� ������ ������ ������������� ���"�
jÉíÜçÇ=NW=oÉÇìÅáåÖ=båÇJçÑJpíìÇó=qáãÉçìí=
Job Profiles include an endOfStudyTimeout parameter that tells the Virtua how long to wait after the last image is received before considering a study (or a group of studies for the same patient) to be complete and beginning the automatic recording process. This value defaults to 30 seconds for most Job Profiles. The timeout can be reduced to as low as 10 seconds to increase system performance and reduce the time required to automatically record a disc.
Configuration Guidelines
The endOfStudyTimeout parameter should be set to the highest expected delay from the end of transmission of one image to the end of transmission of the next. The faster and more reliable the network is, the lower the timeout value can be set. Also, smaller images, which transfer more quickly, allow a lower timeout value than larger images. It may take some experimentation to find the optimal setting.
3
3
3
QU pÉííáåÖ=ré=íÜÉ=pçÑíï~êÉ
������
�������
������
��
Troubleshooting
If the endOfStudyTimeout is set too low, it may result in duplicate discs (or sets of discs for multi-disc jobs) being recorded for the same study, with some of the discs containing an incomplete set of images. If this occurs, even occasionally, increase the endOfStudyTimeout setting.
jÉíÜçÇ=OW=qêáÖÖÉê=çå=båÇ=çÑ=^ëëçÅá~íáçå=
Some host systems open one DICOM association for the entire study (for all images) or several simultaneous associations for the entire study with groups of images. For these hosts, the auto-record trigger can be based on the last association closing without the need to wait for a timeout. This mode provides the fastest time to automatically record a disc.
Configuration Guidelines
To allow auto-record to be triggered by the last association closing for a study, set submitAutoRecordJob = onAssociationEnd. To set auto-record back to being triggered by the end-of-study timeout, set submitAutoRecordJob = onTimeout (the default setting for most Job Profiles).
Troubleshooting
If submitAutoRecordJob = onAssociationEnd and the sending host is not compatible with this mode (e.g., it opens one DICOM association per image), duplicate discs (or sets of discs for multi-disc jobs) will be recorded for the same study, with some of them containing an incomplete set of images. If this problem occurs, set submitAutoRecordJob = onTimeout for the Job Profile used by this host or select a different Job Profile with this setting.
`çÇçåáÅë=sáêíì~=`=rëÉêÛë=j~åì~ä PJQV=
PJ
������� ��������#��. ����<���?������ �������� � ����������� �������� ��
����������������� �� ��� ���������� ���� ������ �
������������ � ��&��&��������������� ��������&� �����@������������� ���� ����
������ ���� ������� ��� ���� ���� �� ���� �����$&�&���$���� ��������� ��� �����!�������A��������?������ �"����� �� � ���������� ���������������� �
����������� ��� � ��� ��������������� �������� ���� ���� ���� �
������ �����
�������������#��. ����<���?���#�������=����� ����������� ������ � ������� �
���� � ����������� ����� � ��� �� � ������ ������������� ���� ��
pìééçêíáåÖ=af`lj=gmbd=cçêã~íë
Virtua C Job Profiles can be configured to allow Virtua C to receive and record the following DICOM JPEG compressed image formats: JPEG Baseline, JPEG Extended, JPEG Lossless, JPEG2000 Lossless, and JPEG2000 Lossy. Compressed images can be optionally decompressed to allow recording on disc with viewers that do not support compressed images.
The parameters that can be included as one or more additional lines in a Job Profile text file to support DICOM JPEG compression/decompression are defined in the following table. For general information about creating or modifying a Job Profile, refer to “Setting Up Job Profiles” on page 3-35.
3
3
3
���� ��5! (��62�/%�7�������� ���%������� ���/���%��& ��
%����� (���� �� ��
jpegBaselineSupport = �����������<��N�������������� ������ �*
��� ������ ����� ��-
�< ��������1�
B : ���?�<��������@-�)���� ��� ���� ��������������
�<������N������������-
B ������=�-�)���� ����������������<������N����
��������������� ����������� ��������� ���-
B ;�� �����-�)���� ����������������<������N����
��������������� ������������� ��������� ���-
RM pÉííáåÖ=ré=íÜÉ=pçÑíï~êÉ
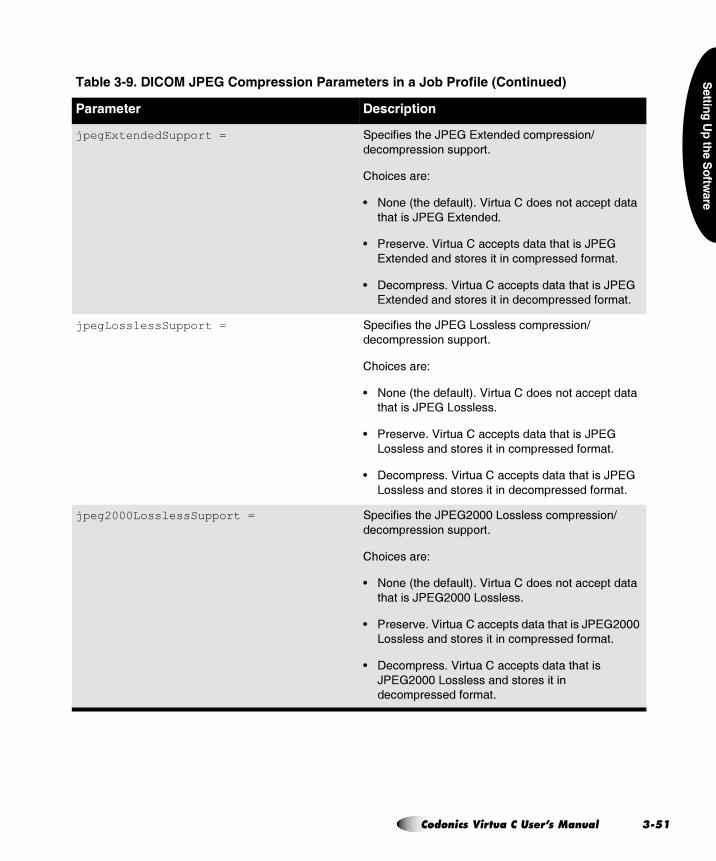
������
�������
������
��
jpegExtendedSupport = �����������<��N�����C�������� ������ �*
��� ������ ����� ��-
�< ��������1�
B : ���?�<��������@-�)���� ��� ���� ��������������
�<������N�����C������-
B ������=�-�)���� ����������������<������N����
�C������������� ����������� ��������� ���-
B ;�� �����-�)���� ����������������<������N����
�C������������� ������������� ��������� ���-
jpegLosslessSupport = �����������<��N����5 �������� ������ �*
��� ������ ����� ��-
�< ��������1�
B : ���?�<��������@-�)���� ��� ���� ��������������
�<������N����5 ������-
B ������=�-�)���� ����������������<������N����
5 ������������� ����������� ��������� ���-
B ;�� �����-�)���� ����������������<������N����
5 ������������� ������������� ��������� ���-
jpeg2000LosslessSupport = �����������<��N���$!!!�5 �������� ������ �*
��� ������ ����� ��-
�< ��������1�
B : ���?�<��������@-�)���� ��� ���� ��������������
�<������N���$!!!�5 ������-
B ������=�-�)���� ����������������<������N���$!!!�
5 ������������� ����������� ��������� ���-
B ;�� �����-�)���� ����������������<������
N���$!!!�5 ������������� ����������
��� ��������� ���-
���� ��5! (��62�/%�7�������� ���%������� ���/���%��& �������� �����
%����� (���� �� ��
`çÇçåáÅë=sáêíì~=`=rëÉêÛë=j~åì~ä PJRN=
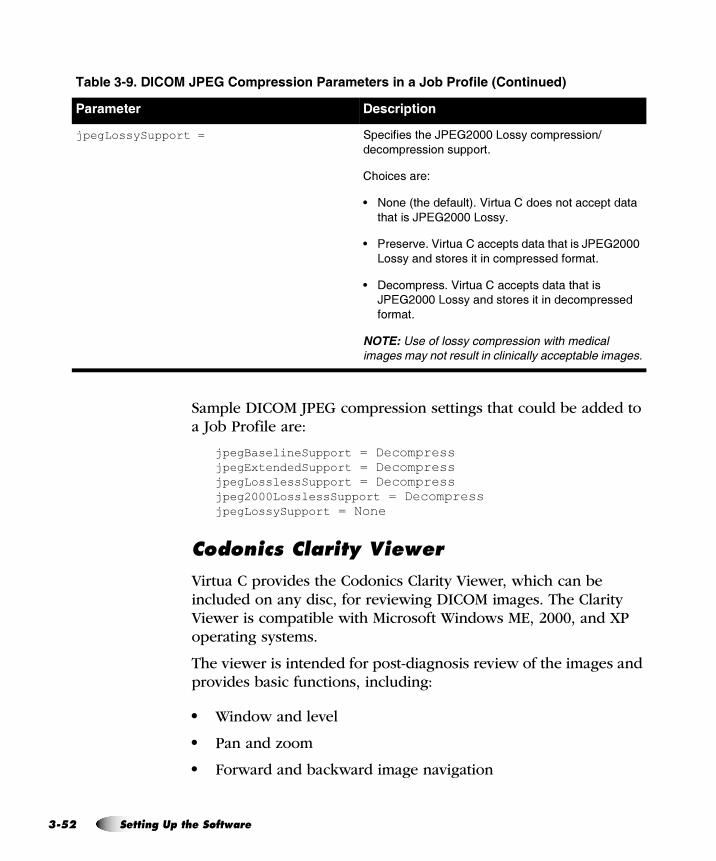
PJ
Sample DICOM JPEG compression settings that could be added to a Job Profile are:
jpegBaselineSupport = DecompressjpegExtendedSupport = DecompressjpegLosslessSupport = Decompressjpeg2000LosslessSupport = DecompressjpegLossySupport = None
`çÇçåáÅë=`ä~êáíó=sáÉïÉê
Virtua C provides the Codonics Clarity Viewer, which can be included on any disc, for reviewing DICOM images. The Clarity Viewer is compatible with Microsoft Windows ME, 2000, and XP operating systems.
The viewer is intended for post-diagnosis review of the images and provides basic functions, including:
5 Window and level
5 Pan and zoom
5 Forward and backward image navigation
jpegLossySupport = �����������<��N���$!!!�5 ��3�� ������ �*
��� ������ ����� ��-
�< ��������1�
B : ���?�<��������@-�)���� ��� ���� ��������������
�<������N���$!!!�5 ��3-
B ������=�-�)���� ����������������<������N���$!!!�
5 ��3������� ����������� ��������� ���-
B ;�� �����-�)���� ����������������<������
N���$!!!�5 ��3������� ������������� ��������
� ���-
����������������������������������� ����������������������������������������������������
���� ��5! (��62�/%�7�������� ���%������� ���/���%��& �������� �����
%����� (���� �� ��
RO pÉííáåÖ=ré=íÜÉ=pçÑíï~êÉ

������
�������
������
��
5 Display and No Display options for study text
5 Basic measurement capabilities
5 Study and series selection
p~ãéäÉ=gçÄ=mêçÑáäÉ=`êÉ~íáçå
Following are the steps used to create a sample Job Profile starting with the default Job Profile, but with the following changes:
5 The profile name is patient (that is, the disc is intended for the patient only)
5 Studies should be recorded automatically, without user intervention
5 Only one copy should be made, and that one is for the patient
5 The end of study will be triggered by the DICOM association closing
1. Verify that no jobs are currently being processed and no studies are being received.
2. Log out and shut down the system (refer to “Logging Out” on page 3-56 and “Shutting Down and Rebooting” on page 3-56).
The device powers off at the end of the shutdown process.
���������������������������� �� ��� ��� �� �������� ��������� ����� �� �
��������������������� ��������� ����� ��� ��� ������ ������ �� � ���� �� ��
������������� ����
3. Remove the SmartDrive from the USB port.
4. Mount the SmartDrive in a USB port on a PC.
The SmartDrive will appear as a standard USB flash drive.
3
`çÇçåáÅë=sáêíì~=`=rëÉêÛë=j~åì~ä PJRP=
PJ
5. From Windows Explorer, open the folder ���������$% on the SmartDrive.
6. Select the file $%'������� and copy it to a new file called $%'�������.
7. Use a text editor (for example, Notepad) to open the file for editing.
8. Make the following modifications to the settings (shown in bold):
[ JobProfile ]doAutoRecord = trueautoMediaSelectStyle = bySizedoCreateJpegImages = falsedoEnableAutoRun = truedoIncludeSelfCheckProgram = falsedoVerifyDiscsAfterRecord = falsedoPrintToDicomImager = falsedoLimitStudiesPerDiscToLabelCapacity = false
RQ pÉííáåÖ=ré=íÜÉ=pçÑíï~êÉ
������
�������
������
��
doSafelyTruncatePatientNameOnLabel = truedicomImagerName = DefaultphysicianCopies = 0patientCopies = 1anonymizedCopies = 0legalCopies = 0discLabel = PhysiciandiscLabelPhysicianCopy = No_OverridediscLabelPatientCopy = No_OverridediscLabelAnonymousCopy = No_OverridediscLabelLegalCopy = No_OverrideincludedDicomViewer = Clarity_Viewer.vwrmediaType = CDdiscStudyGrouping = byPatientmatchPatientUsing = name_id_dobendOfStudyTimeout = 30submitAutoRecordJob = onAssociationEndpostProcessingAction = SavesiteProfileName = defaultjobPriority = normalprintMode = color_betterdicomFileExtension = none
9. When finished modifying the file, save it, unmount the SmartDrive from the PC, and then insert it back into the Virtua C USB port.
10. Power on Virtua C by pressing the System power button.
The Job Profile called “patient” will now be available for DICOM users to select when submitting studies to the device for recording. A Storage device must also be set up on the DICOM host with an AE Title called “patient.” For more information about configuring a DICOM host to support submitting studies to Virtua C, refer to Chapter 4.
`çÇçåáÅë=sáêíì~=`=rëÉêÛë=j~åì~ä PJRR=
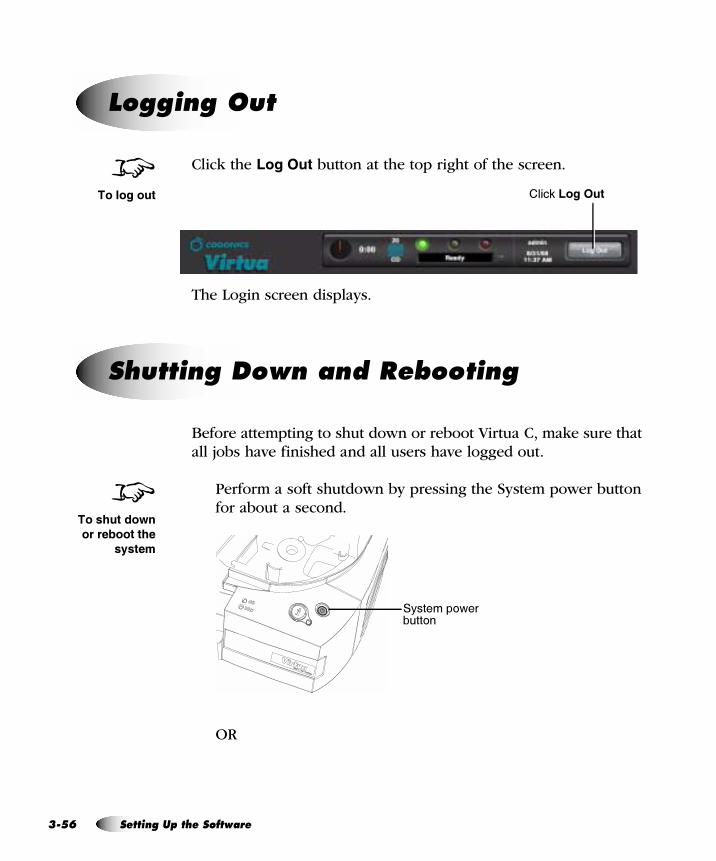
PJ
Click the ������ button at the top right of the screen.
The Login screen displays.
Before attempting to shut down or reboot Virtua C, make sure that all jobs have finished and all users have logged out.
Perform a soft shutdown by pressing the System power button for about a second.
OR
içÖÖáåÖ=lìí
8�������� ����(�,���3
pÜìííáåÖ=açïå=~åÇ=oÉÄççíáåÖ
8����������
�����&�����
�����
�3����� 6������ �
RS pÉííáåÖ=ré=íÜÉ=pçÑíï~êÉ
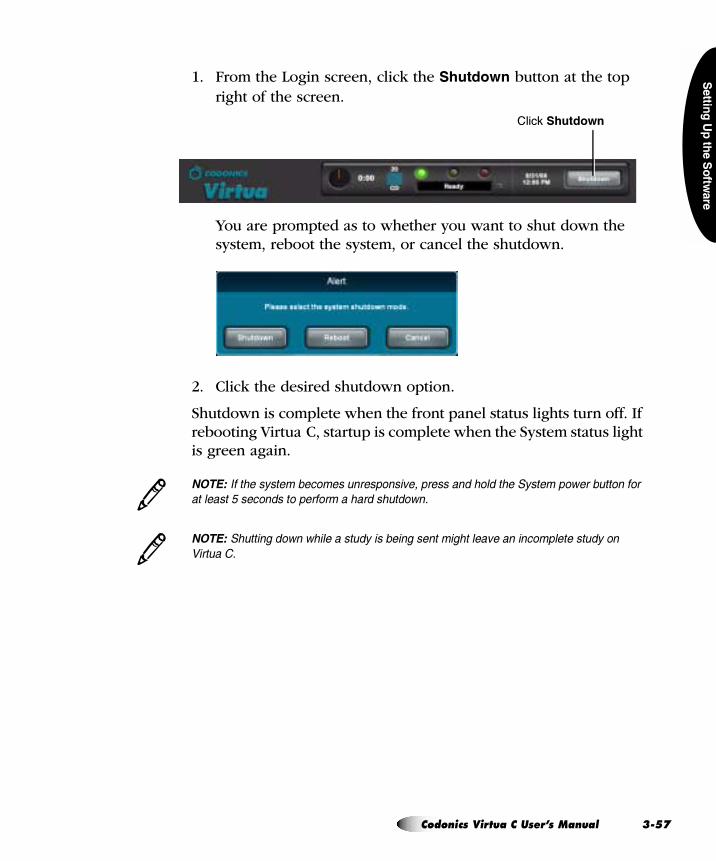
������
�������
������
��
1. From the Login screen, click the �(����� button at the top right of the screen.
You are prompted as to whether you want to shut down the system, reboot the system, or cancel the shutdown.
2. Click the desired shutdown option.
Shutdown is complete when the front panel status lights turn off. If rebooting Virtua C, startup is complete when the System status light is green again.
���������� �� ��� ��� ���� ����� ���� ����������� ��� ����� �����������
��� ��B� �������� ��������������������
���������������������� ���������� ���� �������� �� ����������� ��������
/���� )�
����(�$�����
3
3
`çÇçåáÅë=sáêíì~=`=rëÉêÛë=j~åì~ä PJRT=

��� ������� ������
������
�
= QpÉåÇáåÖ=píìÇáÉë=íç=sáêíì~ `
Codonics Virtua C is a DICOM Storage Class SCP (Service Class Provider) that can accept incoming DICOM Store associations.
Any system that supports DICOM Store should work with the device. Typical DICOM hosts that would connect to the device include:
5 Modality workstations
5 PACS workstations
5 Primary and secondary image acquisition systems
Configuring a DICOM host to send images to the device requires the following settings:
5 The device hostname or IP address. The device must be configured with an IP address that is accessible from the DICOM host.
5 DICOM TCP port. The device uses the TCP port number set up in the network configuration. For more information, refer to “Setting Network Parameters from the Setup Screen” on page 3-23.
`çåÑáÖìêáåÖ=~=qóéáÅ~ä=af`lj=eçëí
`çÇçåáÅë=sáêíì~=`=rëÉêÛë=j~åì~ä QJN=
QJ
5 DICOM AE Title. The device uses the Called AE Title from the DICOM host to control the media type (CD or DVD), content, and printed label on the disc. For more information on how the device uses Called AE Titles, refer to “Sending Studies to Record to Disc” below.
Most DICOM hosts require these settings to successfully connect to the device. Specific details about how to configure a host are usually found in the product’s documentation. Codonics Technical Support also has information about how many systems are configured.
DICOM Store is the primary method used to send radiographic studies to the device.
How a study will be recorded to disc is controlled by specifying preset combinations of job settings stored in the device, called Job Profiles. The device makes each Job Profile available to the DICOM Store user as a Called AE Title. The DICOM Store user can then pick the Called AE Title that corresponds to the Job Profile to be used for a particular study recording job.
The device provides the standard Job Profile AE Titles described in the following table.
pÉåÇáåÖ=píìÇáÉë=íç=oÉÅçêÇ=íç=aáëÅ
���� ,� ! %�� ��������/���%��& ���+��� ����
������+��� ��� 8����� ���3�9� ��
����� A<��> �����2��������<��������������� �������
��� ���������2���������������=���� �-
0� A<��> ������� �������3�2����� ����� �������
6��< �����������=���� �-
0� �; A<��> ������� �������3�2����� ����� ������ ����
�;��6��< �����������=���� �-
O pÉåÇáåÖ=píìÇáÉë=íç=sáêíì~ `
��� ������� ������
������
�
Specific settings associated with Auto and Manual modes can be changed during the record procedure (refer to “Job Options” on page 5-12). A site can also create additional custom Job Profiles. The device supports up to 100 Job Profiles. Job Profiles are stored on the SmartDrive to simplify transfer of settings when a device is swapped for service.
0� �;����� �������� �0� �;����6��<��<��� �� 6����N ���� �����
���������� ����,���� �������1
B ������ ���I�� � �D� �
B ����5�����I���(D��=��
B ����0� ��� ��N ��I� �0�� ����� ����
B ���4����3A�� ��I���
B �������3�� �����I��3���3
� �� ������ ���� �� ���<���������������������� �
A���� #".� ������ #"#.-
0� ;); A<��> ������� �������3�2����� ����� ������ ����
;);��6��< �����������=���� �-
0� ;);����� �������� �0� ;);����6��<��<��� �� 6����N ��
�� ��������������� ����,���� �������1
B ������ ���I�� � �D� �
B ����5�����I���(D��=��
B ����0� ��� ��N ��I� �0�� ����� ����
B ���4����3A�� ��I���
B �������3�� �����I��3���3
� �� ������ ���� �� ���<���������������������� �
A���� #".� ������ #"#.-
;����� ;������ ����������6<����<���������0��A�����
� ���� �����<���3�N ���� �����-�;������> ��
��� ��������<��������������� ���> �� ��� ��-
���� ,� ! %�� ��������/���%��& ���+��� ���������� �����
������+��� ��� 8����� ���3�9� ��
`çÇçåáÅë=sáêíì~=`=rëÉêÛë=j~åì~ä QJP=

QJ
There are many recording and labeling settings that can be controlled by Job Profile parameters. For more information about creating and modifying Job Profiles, and all of the parameters that can be set, refer to “Setting Up Job Profiles” on page 3-35.
Q pÉåÇáåÖ=píìÇáÉë=íç=sáêíì~ `

����� ����� �������
��
����
= RoÉÅçêÇáåÖ=~åÇ=i~ÄÉäáåÖ=~ aáëÅ
This chapter discusses jobs and how to use them to record and label discs.
Jobs control what data is recorded onto discs and how many discs are created. A job always contains at least one study and includes other information necessary to record and label the disc. Information such as media type (CD or DVD), number of copies, DICOM viewer, address of the site, and label design are included in a job.
A list of the current jobs can be viewed on the !��� tab.
gçÄë
`çÇçåáÅë=sáêíì~=`=rëÉêÛë=j~åì~ä RJN=
RJ
To properly record jobs, the Virtua C media type — CD or DVD — must be configured, with that media type loaded in the input bin. The media type that Virtua C expects to be loaded is determined differently, depending on whether Smart Detect or Manual Detect mode is being used. The mode is determined by whether the System Profile doSmartDetectLoadedMediaType parameter setting is enabled or disabled. For more information about this and other profile parameters that affect media type detection, refer to “Media Types and Profile Parameter Settings” on page 3-46.
`çåÑáÖìêáåÖ=jÉÇá~=qóéÉ=~åÇ=iç~ÇáåÖ=jÉÇá~=Ô=j~åì~ä=aÉíÉÅí=jçÇÉ
If Smart Detect mode is disabled, then Virtua C is in Manual Detect mode. In Manual Detect mode, the user controls which media type is configured, and thus assumed to be loaded in the input bin, by selecting it in the ��������&���� tab on the ��������� screen.
Manual Detect mode is useful for sites who primarily use one type of media.
1. Wait for any jobs currently being processed to complete.
2. Click the ��������� button on the Main screen, then click the ��������&�����tab.
`çåÑáÖìêáåÖ=~åÇ=iç~ÇáåÖ=jÉÇá~
8�����������
����������
���� ��!�
����� ����
���� ���
% � ������
����
O oÉÅçêÇáåÖ=~åÇ=i~ÄÉäáåÖ=~ aáëÅ
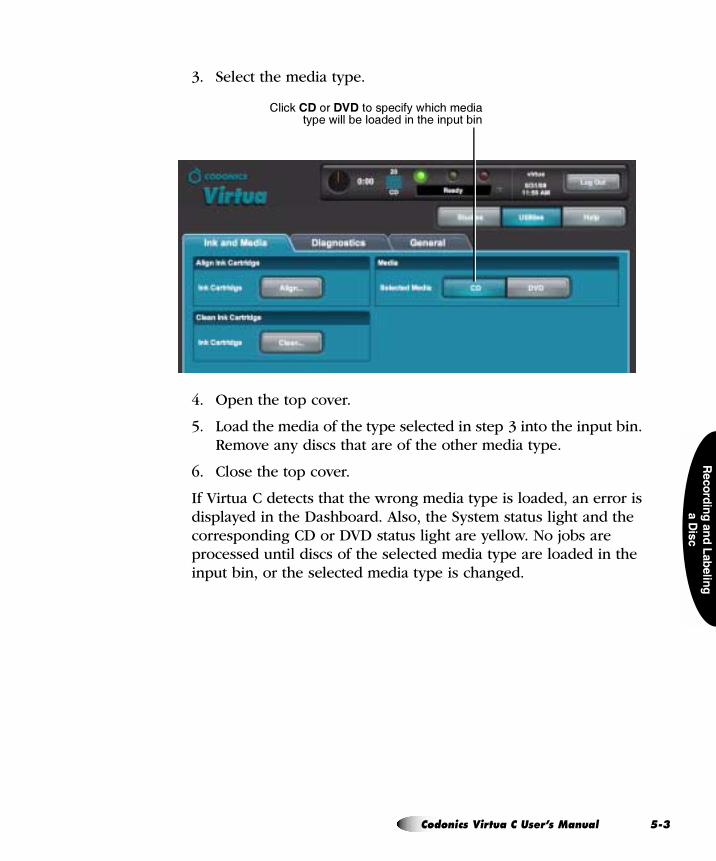
����� ����� �������
��
����
3. Select the media type.
4. Open the top cover.
5. Load the media of the type selected in step 3 into the input bin. Remove any discs that are of the other media type.
6. Close the top cover.
If Virtua C detects that the wrong media type is loaded, an error is displayed in the Dashboard. Also, the System status light and the corresponding CD or DVD status light are yellow. No jobs are processed until discs of the selected media type are loaded in the input bin, or the selected media type is changed.
����(���� ������� �������3�6<��<������3���6�������� ���������<����������
`çÇçåáÅë=sáêíì~=`=rëÉêÛë=j~åì~ä RJP=
RJ
`çåÑáÖìêáåÖ=jÉÇá~=qóéÉ=~åÇ=iç~ÇáåÖ=jÉÇá~=Ô=pã~êí=aÉíÉÅí=jçÇÉ
Smart Detect mode is useful for sites who change media types frequently.
With Smart Detect mode enabled, when Virtua C starts up or whenever the cover is opened and then closed, it loads the first disc in the input bin and detects its media type. Virtua C assumes that all of the other discs in the input bin are of the same media type and sets that type as the configured media type. The selected media type is displayed in the Dashboard.
Virtua C then waits for and processes all jobs that have specified the configured (and loaded) media type. If Virtua C finishes all of the jobs for the configured media type, and there are jobs for the other media type queued, the yellow light in the Dashboard turns on and a status message displays indicating that the jobs and media type are mismatched. Also, the System status light and the corresponding CD or DVD status light are yellow. In this case, you have to replace the current discs in the input bin with those of the other media type.
����������������� ���������� ���� �� ��������� ����������������������� ��� ��� ����
�� ������ �������� ������ �)�C�/��� ���� ���/���� )���������� �����8 ����� �� ����
�� ��������� ���)� �$�� ���������� ��� � �������� �� �� ������ �����@������ ��
1. Wait for any jobs currently being processed to complete.
2. Open the top cover.
3. Load media of the desired type into the input bin. Remove any discs that are of the other media type.
4. Close the top cover.
�������������� ��� ������� ������ ������� ��������� ����� ��� ������������� �
3
8����� ����
������������
�!�����$� �
���������
3
Q oÉÅçêÇáåÖ=~åÇ=i~ÄÉäáåÖ=~ aáëÅ
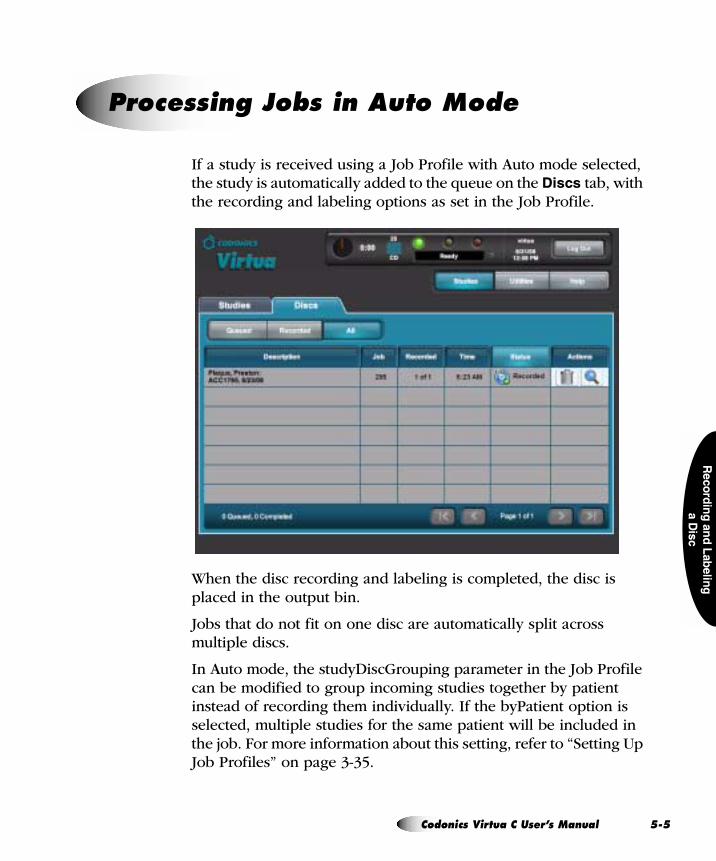
����� ����� �������
��
����
If a study is received using a Job Profile with Auto mode selected, the study is automatically added to the queue on the !��� tab, with the recording and labeling options as set in the Job Profile.
When the disc recording and labeling is completed, the disc is placed in the output bin.
Jobs that do not fit on one disc are automatically split across multiple discs.
In Auto mode, the studyDiscGrouping parameter in the Job Profile can be modified to group incoming studies together by patient instead of recording them individually. If the byPatient option is selected, multiple studies for the same patient will be included in the job. For more information about this setting, refer to “Setting Up Job Profiles” on page 3-35.
mêçÅÉëëáåÖ=gçÄë=áå=^ìíç=jçÇÉ
`çÇçåáÅë=sáêíì~=`=rëÉêÛë=j~åì~ä RJR=
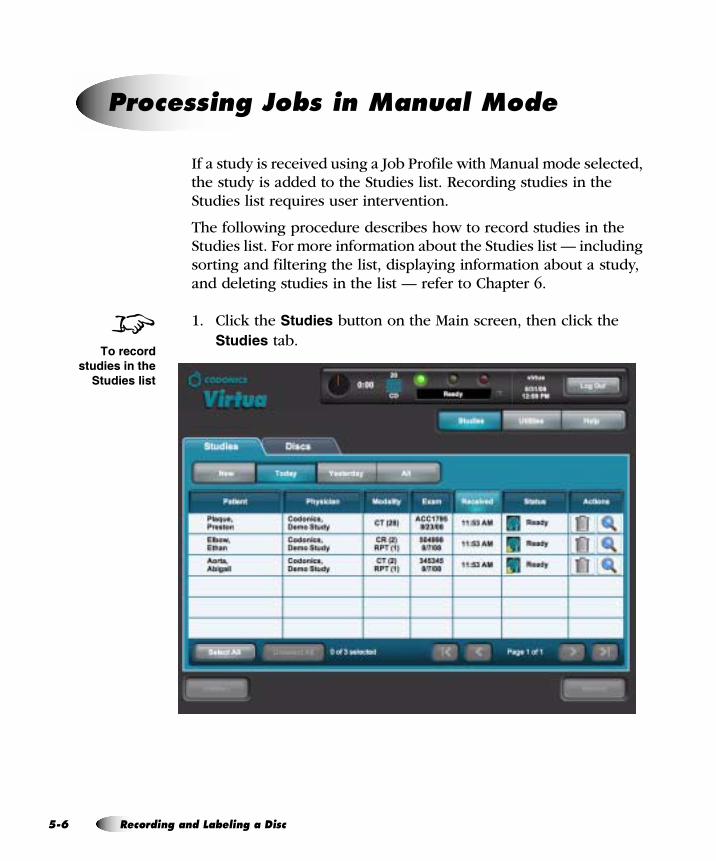
RJ
If a study is received using a Job Profile with Manual mode selected, the study is added to the Studies list. Recording studies in the Studies list requires user intervention.
The following procedure describes how to record studies in the Studies list. For more information about the Studies list — including sorting and filtering the list, displaying information about a study, and deleting studies in the list — refer to Chapter 6.
1. Click the ������� button on the Main screen, then click the ������� tab.
mêçÅÉëëáåÖ=gçÄë=áå=j~åì~ä=jçÇÉ
8���������
�����������
$��������
S oÉÅçêÇáåÖ=~åÇ=i~ÄÉäáåÖ=~ aáëÅ

����� ����� �������
��
����
2. Click each of the studies that you want to include on the disc.
Each selected study is indicated by a check mark and is highlighted. To unselect a study, simply click it again.
�������� �!����� '��������������� '���������� ������ ���� ��� �'������ ���� � � ��
3. When you have selected the studies you want to record on the disc, click the ���� button.
��������������� ���� ��� � � � ����� ��������� ��� �@��������� ���������� ����
����������������������������������������������� �������� ��� �@���
7����<������� ���� �������� ��������������������
������������3
3
3
`çÇçåáÅë=sáêíì~=`=rëÉêÛë=j~åì~ä RJT=
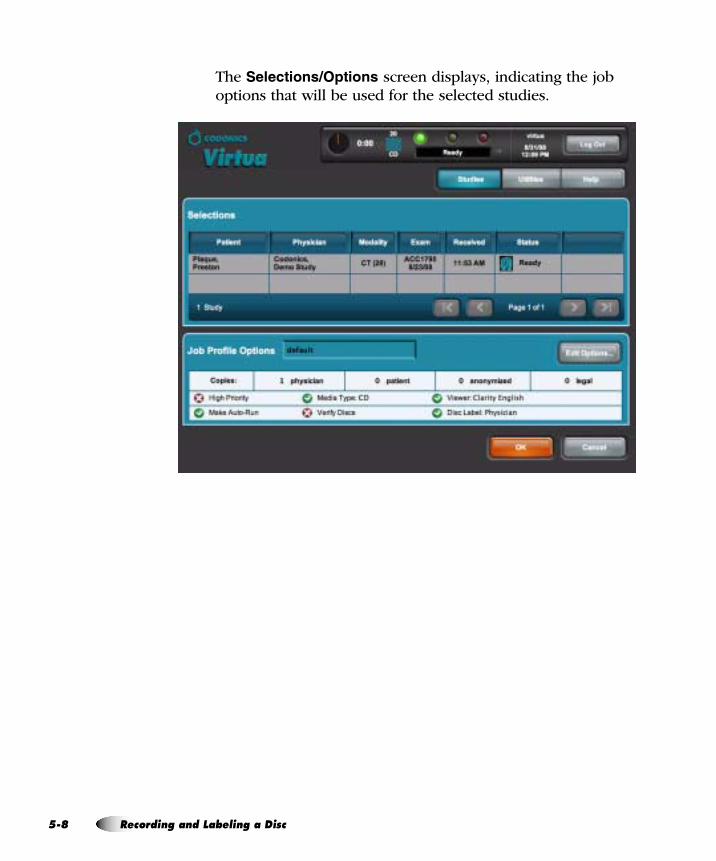
RJ
The ��������)������ screen displays, indicating the job options that will be used for the selected studies.
U oÉÅçêÇáåÖ=~åÇ=i~ÄÉäáåÖ=~ aáëÅ
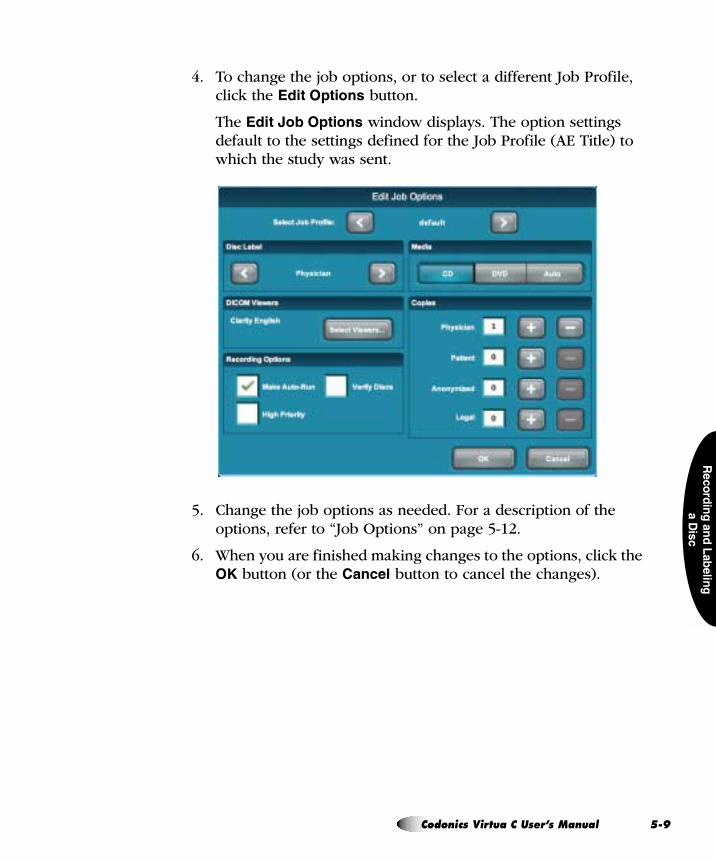
����� ����� �������
��
����
4. To change the job options, or to select a different Job Profile, click the *���������� button.
The *����+%������� window displays. The option settings default to the settings defined for the Job Profile (AE Title) to which the study was sent.
5. Change the job options as needed. For a description of the options, refer to “Job Options” on page 5-12.
6. When you are finished making changes to the options, click the � button (or the ����� button to cancel the changes).
`çÇçåáÅë=sáêíì~=`=rëÉêÛë=j~åì~ä RJV=
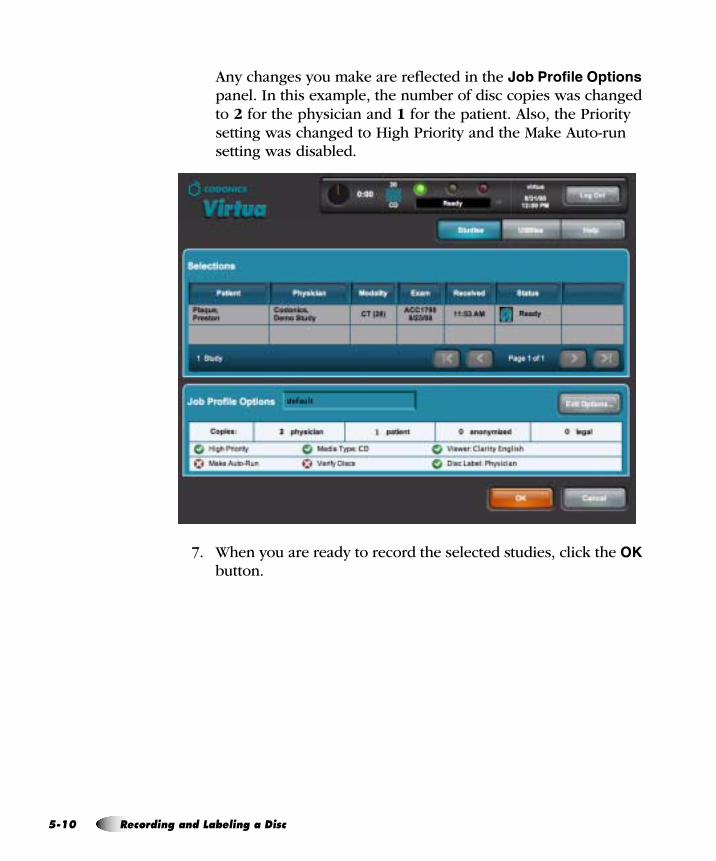
RJ
Any changes you make are reflected in the +%�������������� panel. In this example, the number of disc copies was changed to 2 for the physician and 1 for the patient. Also, the Priority setting was changed to High Priority and the Make Auto-run setting was disabled.
7. When you are ready to record the selected studies, click the � button.
NM oÉÅçêÇáåÖ=~åÇ=i~ÄÉäáåÖ=~ aáëÅ
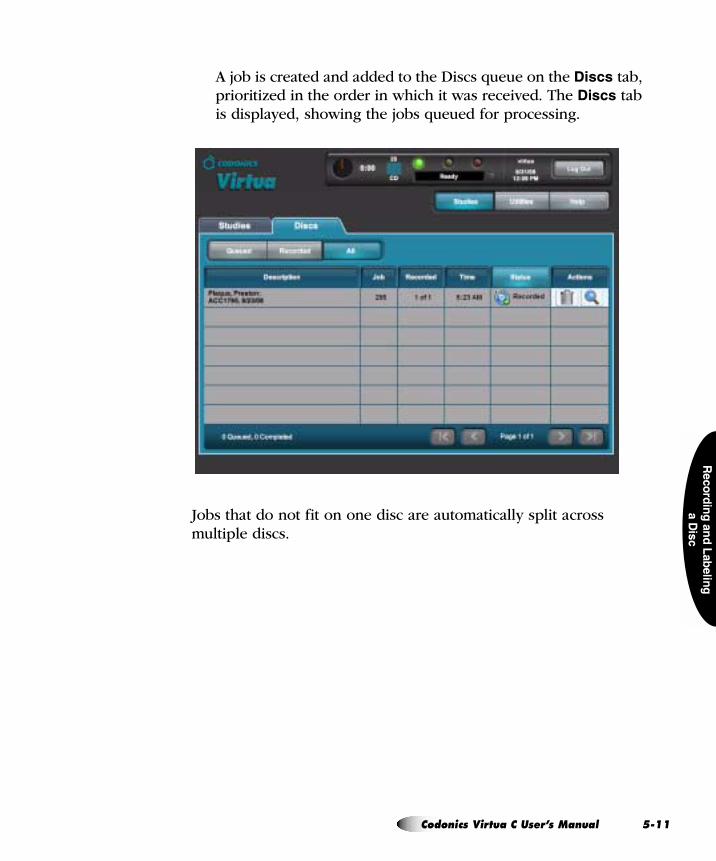
����� ����� �������
��
����
A job is created and added to the Discs queue on the !��� tab, prioritized in the order in which it was received. The !��� tab is displayed, showing the jobs queued for processing.
Jobs that do not fit on one disc are automatically split across multiple discs.
`çÇçåáÅë=sáêíì~=`=rëÉêÛë=j~åì~ä RJNN=
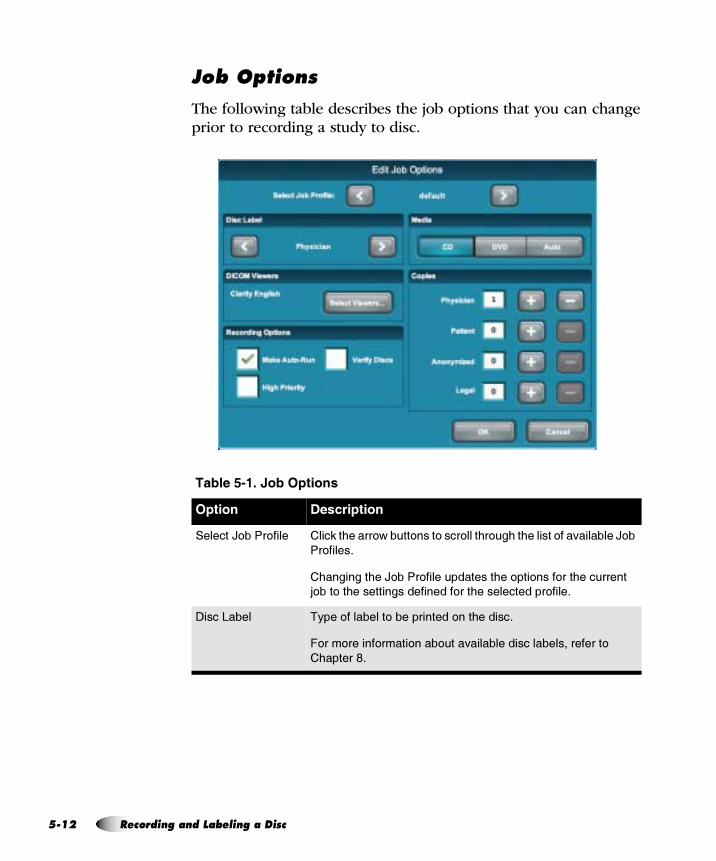
RJ
gçÄ=léíáçåë
The following table describes the job options that you can change prior to recording a study to disc.
���� -� ! /���6�� ���
6�� �� (���� �� ��
�������N ���� ���� ����(��<����� 6���� ���� ���� ����<� �<��<������� ���=��������N ��
�� �����-
�<��������<��N ���� �������������<�� ��� ���� ���<���������
> ��� ��<�������������������� ���<������������� ����-
;����5���� A3��� ��������� ������������ ���<������-
� �� ������ ���� ���� ���=���������������������������� �
�<����� '-
NO oÉÅçêÇáåÖ=~åÇ=i~ÄÉäáåÖ=~ aáëÅ
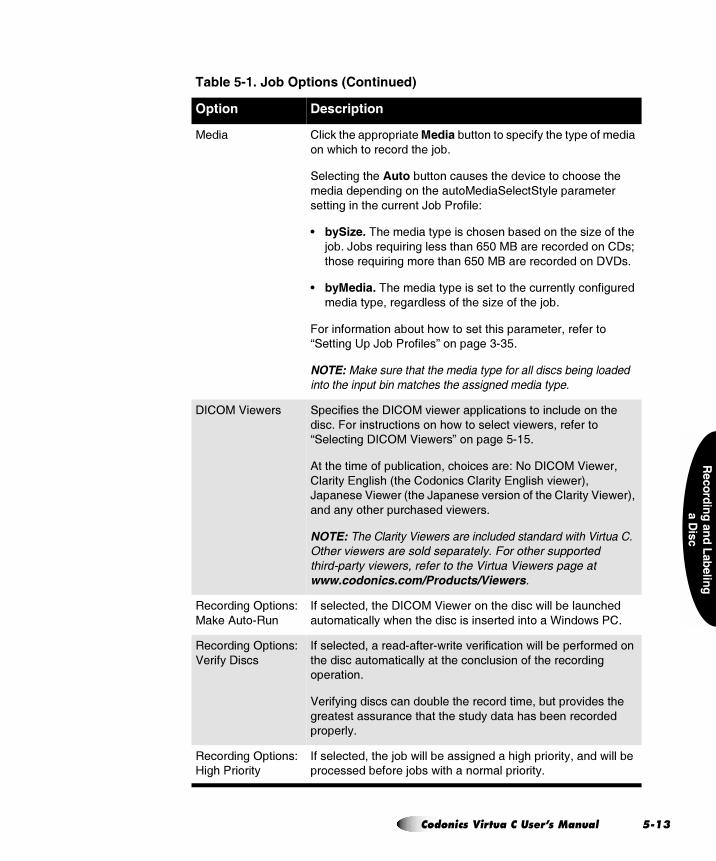
����� ����� �������
��
����
����� ����(��<������ �������%��� ���� ��� �������3��<���3��� �������
��6<��<�� ���� ����<��> �-
�����������<��4����� ���������<����=����� ��< ����<��
��������������� ���<���� �������������3������������
������������<���������N ���� ����1�
B &�$�5�(�A<��������3�������< ���������� ���<����,�� ���<��
> �-�N �����2������������<��� �! ���������� ����� ���;�J�
�< �����2������ ����<��� �! ���������� ����� ��;);�-
B &�%��� (�A<��������3����������� ��<���������3�� ��������
������3��������������� ���<����,�� ���<��> �-
� ����� ���� ���� ��< 6�� ������<�������������������� �
L��������7��N ���� �����M� ������ #"#�-
������-�$ ��� ����� �� ������ �������������� �������� ��
����� �������������� �� ����� ��� ������ ��
;��4��)��6��� �����������<��;��4��=��6������������ ���� �������� ���<��
����-�� ���������� ��� ��< 6�� ��������=��6������������ �
L����������;��4��)��6���M� ������ �"��-
0���<������ ���������� ����< ��������1�: �;��4��)��6����
������3�������<�?�<��� � �����������3�������<�=��6��@��
N��������)��6���?�<��N��������=���� �� ���<��������3�)��6��@��
������3� �<������<�����=��6���-
�������� �)������/� � ���� ������� �������������/���� )������� ����������� �����������!��������������� �
���� "������ ����������������#������#�����������
������ ������������ ������
��� ������4��� ��1�
��(��0� "��
��������������<��;��4��)��6��� ���<�������6�����������<���
�� �������3�6<����<���������������������� ���K��� 6����-
��� ������4��� ��1
)����3�;����
�������������������"�����"6�����=��������� ��6����������� ���� ��
�<��������� �������3�����<��� ����� �� ���<����� ������
������ �-
)����3��������������� �����<����� ������������� =������<��
�������������������<����<�����3������<����������� �����
�� ����3-
��� ������4��� ��1
+��<���� ���3
��������������<��> ��6������������������<��<���� ���3������6�������
�� ���������� ���> ���6��<���� ������� ���3-
���� -� ! /���6�� ��������� �����
6�� �� (���� �� ��
`çÇçåáÅë=sáêíì~=`=rëÉêÛë=j~åì~ä RJNP=
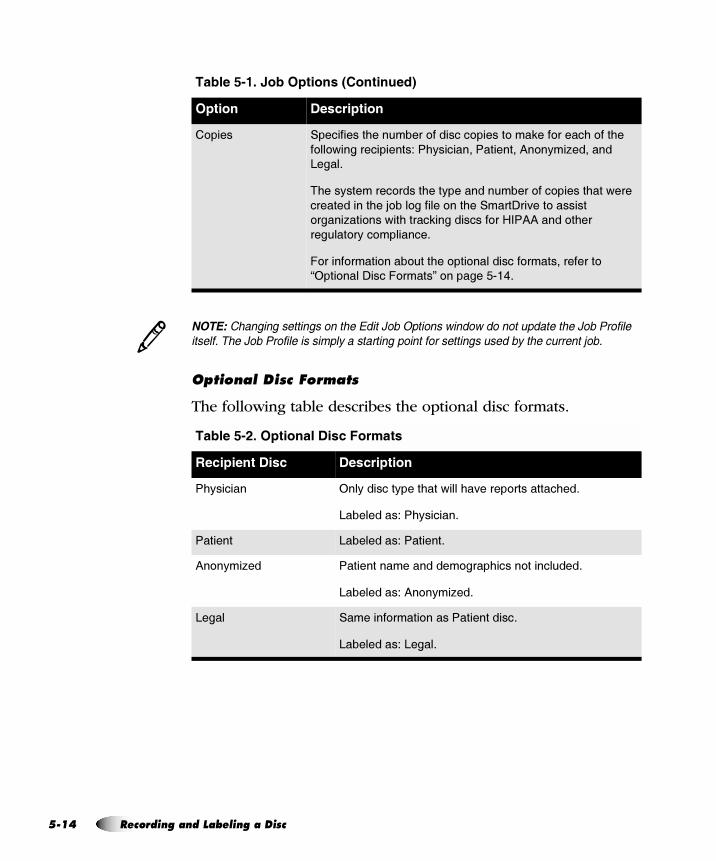
RJ
������)�������� �������� �=���<�������������������������� �� �<��������� �
� ������ �<��������� �������������������������� ����� ������ ����� ��@���
léíáçå~ä=aáëÅ=cçêã~íë
The following table describes the optional disc formats.
� ���� �����������<������� �������� ������ ��(��� �����<� ���<��
� �� 6��������������1��<3�����������������0� �3�,��������
5����-
A<���3������� �����<���3������������ ��� ������<���6����
������������<��> ��� ������� ���<������;��=��� ��������
�����,��� ���6��<�����(����������� ��+��00����� �<���
������ �3�� �������-
� ����� ���� ���� ���<�� ��� ���������� ������������� �
L4��� ����;����� ����M� ������ �"�%-
���� -�)! 6�� ����( ���'����
8�� � ����( �� (���� �� ��
�<3������ 4��3�������3����<���6����<�=����� ���������<��-
5���������1��<3������-
������� 5���������1��������-
0� �3�,�� ������������������ ����<����� ���������-
5���������1�0� �3�,��-
5���� ������� ���� �����������������-
5���������1�5����-
���� -� ! /���6�� ��������� �����
6�� �� (���� �� ��
3
NQ oÉÅçêÇáåÖ=~åÇ=i~ÄÉäáåÖ=~ aáëÅ
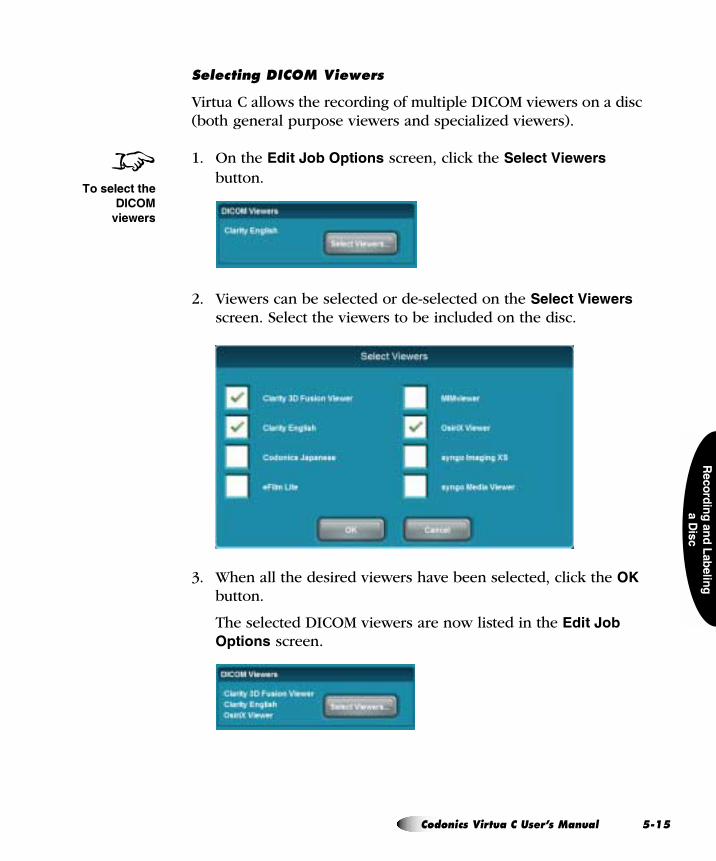
����� ����� �������
��
����
pÉäÉÅíáåÖ=af`lj=sáÉïÉêë
Virtua C allows the recording of multiple DICOM viewers on a disc (both general purpose viewers and specialized viewers).
1. On the *����+%������� screen, click the ������,������ button.
2. Viewers can be selected or de-selected on the ������,������ screen. Select the viewers to be included on the disc.
3. When all the desired viewers have been selected, click the � button.
The selected DICOM viewers are now listed in the *����+%������� screen.
8�����������
���3%
'������
`çÇçåáÅë=sáêíì~=`=rëÉêÛë=j~åì~ä RJNR=
RJ
Please note the following issues before selecting multiple DICOM viewers:
5 Use of multiple viewers on a disc reduces the available disc storage for recording patient studies.
5 The Siemens syngo® XS Imaging Viewer and the eFilm Lite™ Viewer may not be recorded together on a disc. Virtua C will prevent the user from inadvertently selecting these two viewers together.
5 The Siemens syngo XS Imaging Viewer and the Siemens Media Viewer may not be recorded together on a disc. Virtua C will prevent the user from inadvertently selecting these two viewers together.
5 The OsiriX Viewer is intended for the Apple Macintosh platform and runs on Macintosh OS 10.5 or greater. The OsiriX Viewer cannot be used with the Windows operating system. Therefore, if the OsiriX Viewer has been recorded on the disc, it is not included in the list of viewers in the viewer LaunchPad that opens when the disc is loaded in a PC.
5 The MIMviewer™ and Siemens syngo XS Imaging Viewer must be able to read each study on a disc. Each viewer reports a problem if any study on a disc is not compatible. This issue is independent of the number of viewers on a disc.
5 Custom viewers can also be recorded on the disc with the Virtua C standard viewers. However, compatibility should be tested with desired viewers. Refer to the Codonics Virtua 3rd Party Viewer Technical Brief for instructions on use and proper packaging of custom viewers.
5 Discs created with more than one DICOM viewer will not list the viewer names on the label. Labels list the number of viewers (for example, Viewer: 2 DICOM Viewers).
NS oÉÅçêÇáåÖ=~åÇ=i~ÄÉäáåÖ=~ aáëÅ

����� ����� �������
��
����
pÉäÉÅíáåÖ=~=af`lj=sáÉïÉê=íç=sáÉï=fã~ÖÉë=çå=~=aáëÅ
When a disc with multiple viewers is used in Windows, the LaunchPad screen displays.
This screen includes a drop-down menu that lists the available viewers. Select the desired viewer, then click the !���&���������button to launch the viewer.
���������� �$���( !�����������������$ �������� � ��������� � ���� ������� � �����
� ���������� ������� ��3
`çÇçåáÅë=sáêíì~=`=rëÉêÛë=j~åì~ä RJNT=
RJ
Direct to Disc™ is an optional feature that provides an alternate method of recording medical studies to disc. The Direct to Disc function uses a standard Windows file copy instead of DICOM Store. It provides full control over disc content and labeling by allowing any set of files to be copied to Virtua C along with a control file that specifies parameters such as media type, disc label, number of copies, and so on.
The Direct to Disc interface uses a hot folder to facilitate communication between host systems and Virtua C. A hot folder is a shared network folder on Virtua C that is mountable by host systems. Virtua C monitors the contents of the hot folder looking for subfolders and control files sent by host systems. Each subfolder is processed as a separate job by Virtua C.
To submit a job, a host system copies a subfolder containing a set of files to the hot folder. The host system can also copy an optional control file that overrides the default job settings assigned to the hot folder. When a subfolder is received by Virtua C, the contents of the subfolder are recorded to disc and a label is printed on the disc. If a control file is included, settings such as media type, disc label, and number of copies can be tailored for that job.
For information about how to set up Direct to Disc and send jobs, contact your Codonics representative or Codonics Technical Support.
aáêÉÅí=íç=aáëÅ
NU oÉÅçêÇáåÖ=~åÇ=i~ÄÉäáåÖ=~ aáëÅ
������������
���� ���
= StçêâáåÖ=ïáíÜ=píìÇáÉë
Codonics Virtua C automatically manages studies stored on the hard drive and removes the oldest studies that have been successfully recorded to disc to make space for new studies.
When space is needed for new incoming studies, the oldest study that has been recorded to disc is deleted from the hard drive.
If a study has not been recorded, it will remain tagged as a “new” study in the Studies list until it is recorded. It will not be automatically removed regardless of how old it is.
If the hard drive fills up with “new” studies that have not been recorded to disc, and no space remains for any more incoming studies, then no more studies will be accepted. This can be remedied only by recording some studies to disc, which will allow them to be automatically removed, or by manually deleting unrecorded studies from the Studies list.
Additionally, the system can be configured to automatically delete recorded studies that are older than a preset number of days. For information about setting this parameter, refer to “Setting Up the System Profile” on page 3-26.
eçï=píìÇáÉë=^êÉ=píçêÉÇ=~åÇ=oÉãçîÉÇ
`çÇçåáÅë=sáêíì~=`=rëÉêÛë=j~åì~ä SJN=
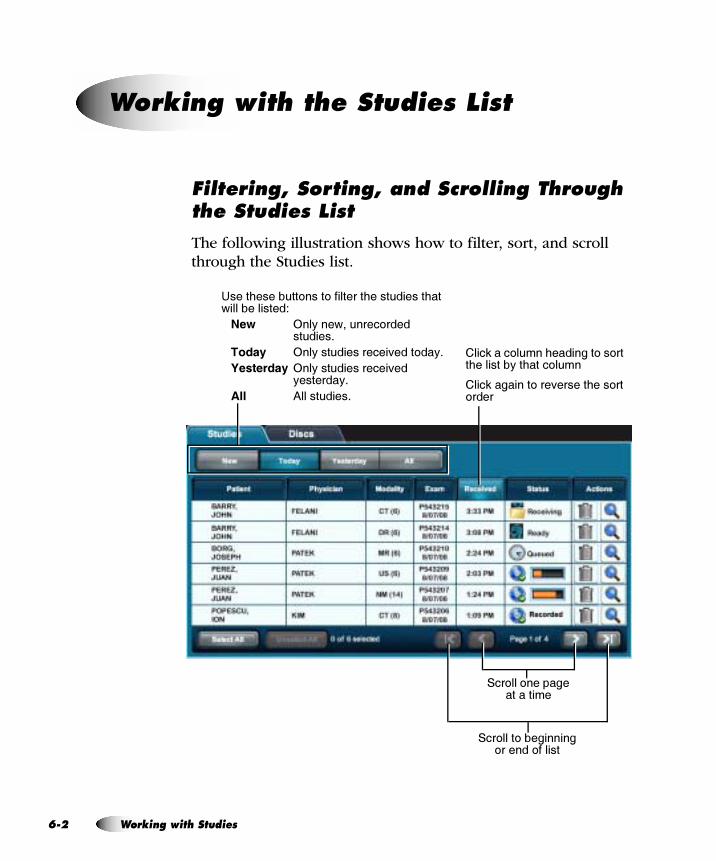
SJ
cáäíÉêáåÖI=pçêíáåÖI=~åÇ=pÅêçääáåÖ=qÜêçìÖÜ=íÜÉ=píìÇáÉë=iáëí
The following illustration shows how to filter, sort, and scroll through the Studies list.
tçêâáåÖ=ïáíÜ=íÜÉ=píìÇáÉë=iáëí
7����<������� ���� ���������<����������<���6�������������1
0�� 4��3���6������ �����������-
��� � 4��3�������������=���� ��3-
6����� � 4��3�������������=���3�������3-
4�� 0���������-
����(���� ���<�������� �� ����<��������3��<���� ��
����(�������� ���=������<��� ��� ����
��� ��� ����������������
��� ���� ����������� ������ ������
O tçêâáåÖ=ïáíÜ=píìÇáÉë
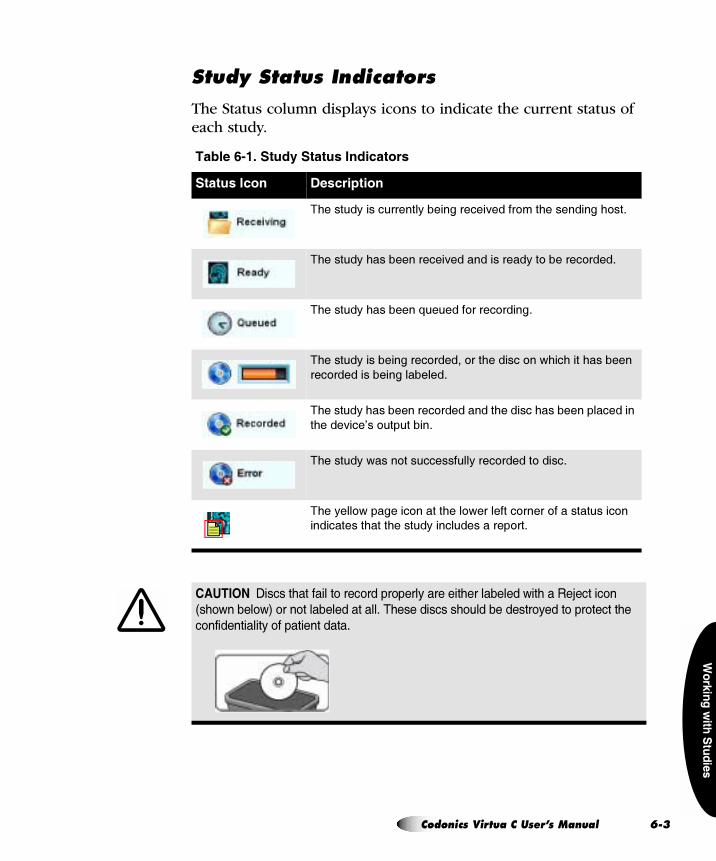
������������
���� ���
píìÇó=pí~íìë=fåÇáÅ~íçêë
The Status column displays icons to indicate the current status of each study.
���� .� ! ��������������� �����
���������� (���� �� ��
A<�����3�����������3������������=����� ��<����������< ��-
A<�����3�<�������������=��������������3�� ������� ����-
A<�����3�<��������2����� ����� �����-
A<�����3������������� ������ ���<������� ��6<��<����<��������
��� ���������������������-
A<�����3�<����������� ����������<�������<������������������
�<����=���E�� �������-
A<�����3�6���� �����������3���� ������ �����-
A<��3��� 6�������� ������<��� 6��������� ����� ������������ ��
�����������<����<�����3�������������� ��-
������� ����������� ��������������������������������� �������%��������
&��� ����� '����������������������#��������������������������������������
��� ������������ ������������
`çÇçåáÅë=sáêíì~=`=rëÉêÛë=j~åì~ä SJP=

SJ
pÉäÉÅíáåÖ=píìÇáÉë
Click a study to select it. Each selected study is indicated by a check mark and is highlighted.
To unselect a study, simply click it again.
7����<������� ���� �������� ���������������������?�������� ��3�6<����<�����3���������������� �0������� ��� ��6����� �@
���������������
Q tçêâáåÖ=ïáíÜ=píìÇáÉë
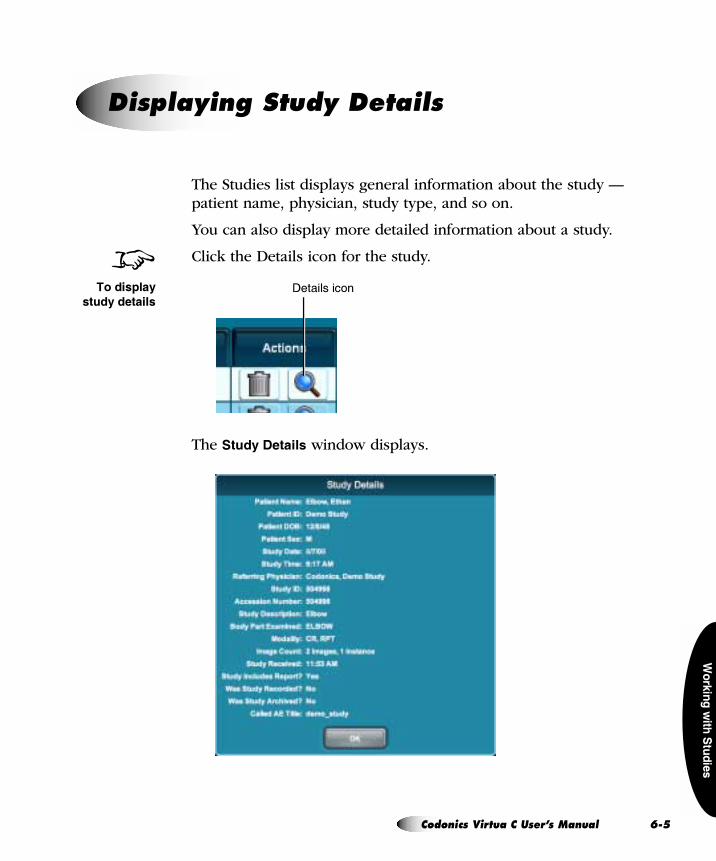
������������
���� ���
The Studies list displays general information about the study — patient name, physician, study type, and so on.
You can also display more detailed information about a study.
Click the Details icon for the study.
The ������(�� �� window displays.
aáëéä~óáåÖ=píìÇó=aÉí~áäë
8������!� �
������ ���;��������� �
`çÇçåáÅë=sáêíì~=`=rëÉêÛë=j~åì~ä SJR=
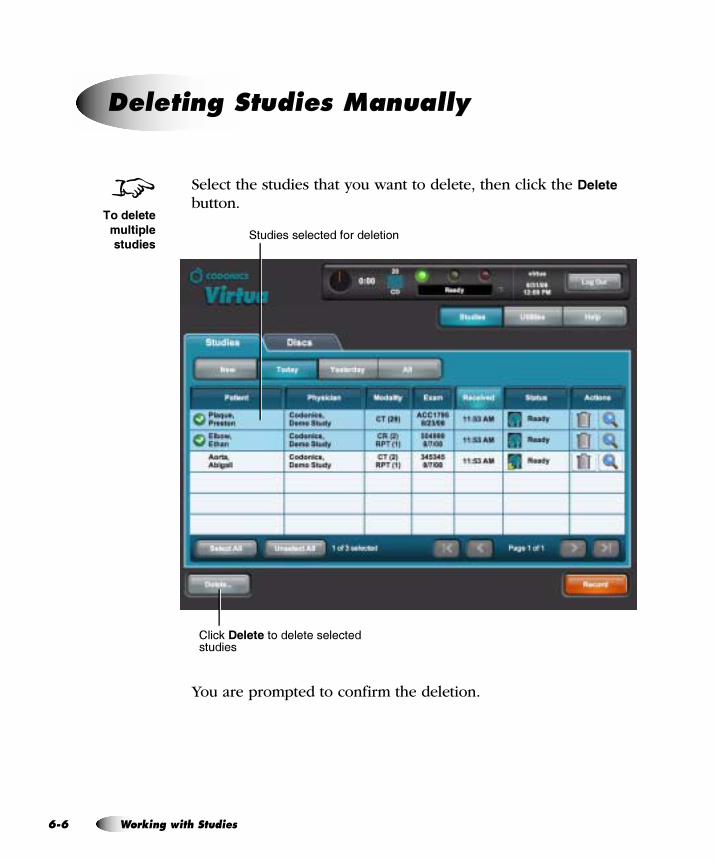
SJ
Select the studies that you want to delete, then click the (����� button.
You are prompted to confirm the deletion.
aÉäÉíáåÖ=píìÇáÉë=j~åì~ääó
8��������
���!��
���������������������� �������� �
����(�������� �����������������������
S tçêâáåÖ=ïáíÜ=píìÇáÉë
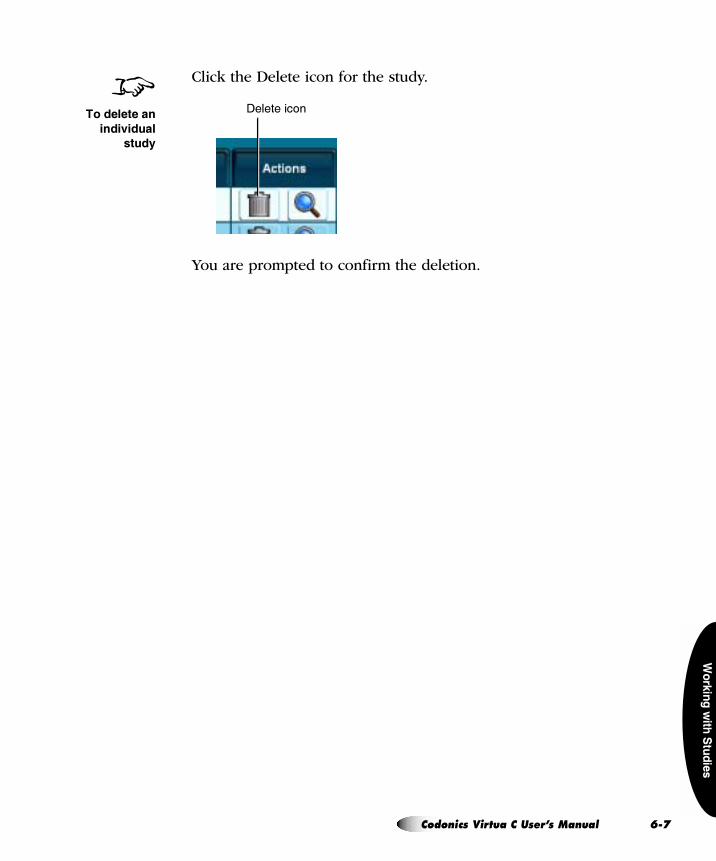
������������
���� ���
Click the Delete icon for the study.
You are prompted to confirm the deletion.
8��������� �
����'�� �
���
;�������� �
`çÇçåáÅë=sáêíì~=`=rëÉêÛë=j~åì~ä SJT=


������������
� ���
= TtçêâáåÖ=ïáíÜ=gçÄë
All jobs that have been sent for recording are listed in the Discs queue on the ( ��� tab.
From this list, you can:
5 Filter, scroll through, and sort the list of jobs
5 Check the status of a job
5 Display detailed information about a job
5 Delete a job
These tasks are covered in the topics in this chapter.
`çÇçåáÅë=sáêíì~=`=rëÉêÛë=j~åì~ä TJN=
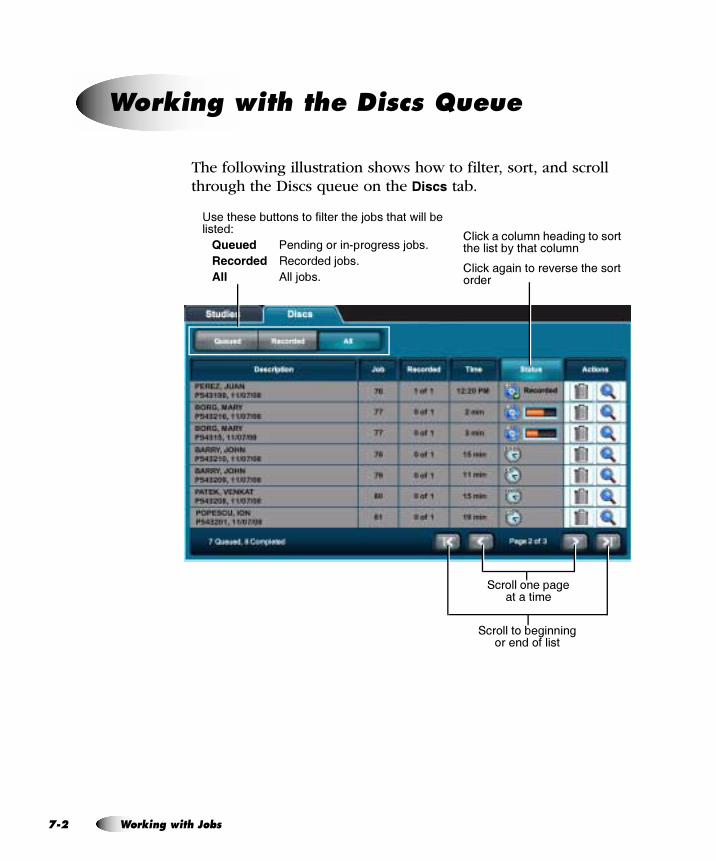
TJ
The following illustration shows how to filter, sort, and scroll through the Discs queue on the ( ��� tab.
tçêâáåÖ=ïáíÜ=íÜÉ=aáëÅë=nìÉìÉ
��� ��� ����������������
��� ���� ����������� ������ ������
7����<������� ���� ���������<��> ����<���6�������������1
7��� �������� ����"�� ������> ��-
�������� ��� �����> ��-
4�� 0���> ��-
����(���� ���<�������� �� ����<��������3��<���� ��
����(�������� ���=������<��� ��� ����
O tçêâáåÖ=ïáíÜ=gçÄë
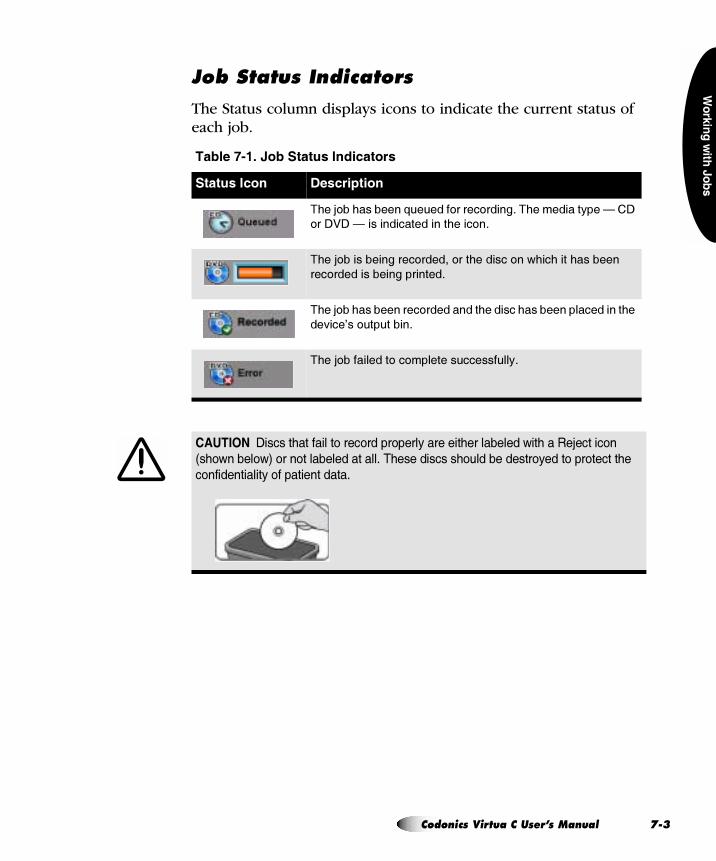
������������
� ���
gçÄ=pí~íìë=fåÇáÅ~íçêë
The Status column displays icons to indicate the current status of each job.
���� 0� ! /������������ �����
���������� (���� �� ��
A<��> ��<��������2����� ����� �����-�A<��������3���H��;�
��;);�H������������������<���� �-
A<��> �������������� ������ ���<������� ��6<��<����<��������
��� ���������������������-
A<��> ��<����������� ����������<�������<�������������������<��
��=���E�� �������-
A<��> ���������� �� ���������������3-
������� ����������� ��������������������������������� �������%��������
&��� ����� '����������������������#��������������������������������������
��� ������������ ������������
`çÇçåáÅë=sáêíì~=`=rëÉêÛë=j~åì~ä TJP=
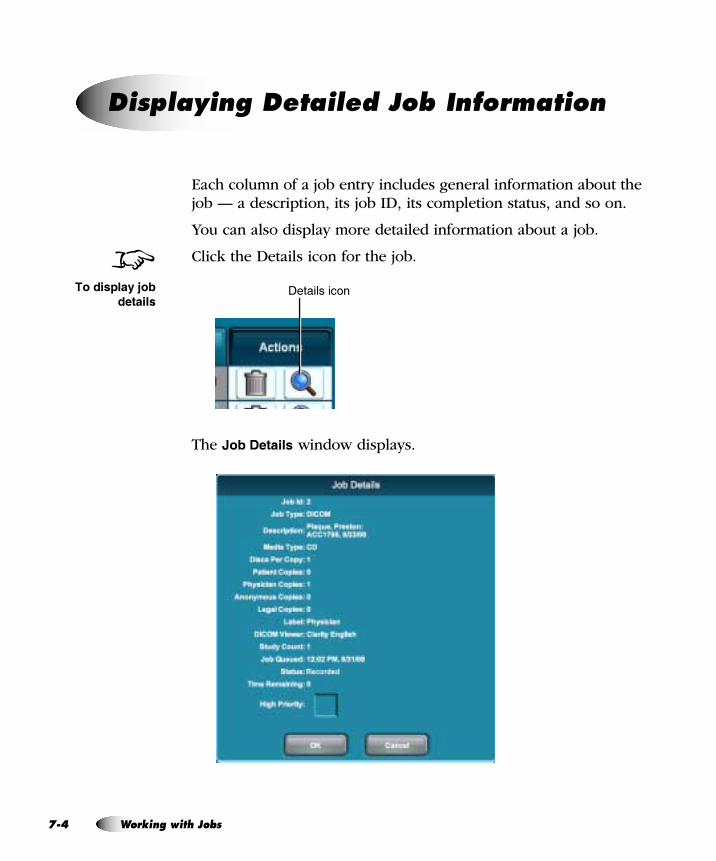
TJ
Each column of a job entry includes general information about the job — a description, its job ID, its completion status, and so on.
You can also display more detailed information about a job.
Click the Details icon for the job.
The /���(�� �� window displays.
aáëéä~óáåÖ=aÉí~áäÉÇ=gçÄ=fåÑçêã~íáçå
8������!� ��1�&
�� ���;��������� �
Q tçêâáåÖ=ïáíÜ=gçÄë
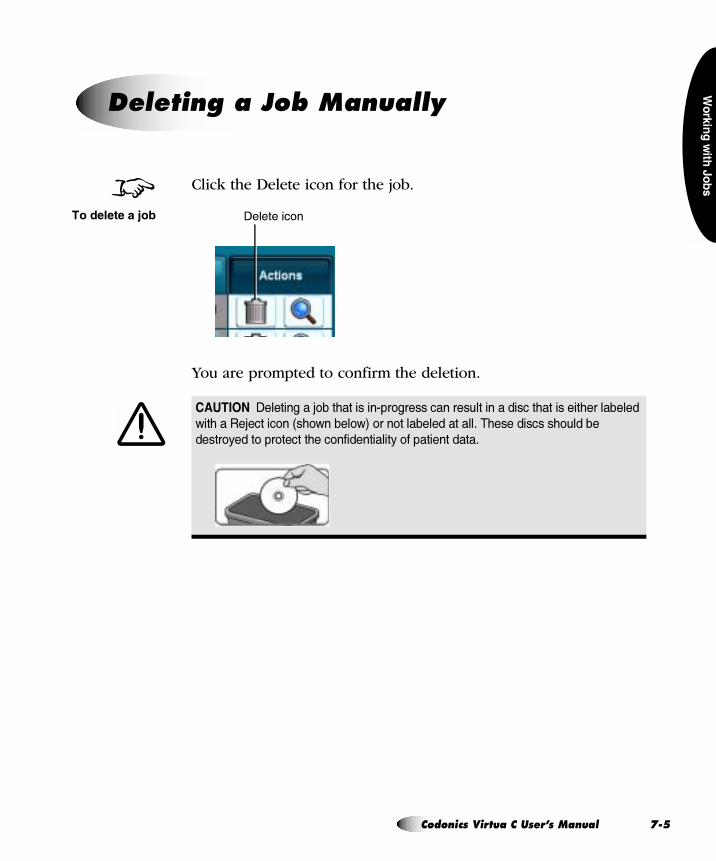
������������
� ���
Click the Delete icon for the job.You are prompted to confirm the deletion.
aÉäÉíáåÖ=~=gçÄ=j~åì~ääó
������� ���������%�������������(����������������������������������������������
�������%��������&��� ����� '����������������������#������������������
����������������������� ������������ ������������
8��������� �1�& ;�������� �
`çÇçåáÅë=sáêíì~=`=rëÉêÛë=j~åì~ä TJR=

������������
������
= UtçêâáåÖ=ïáíÜ=i~ÄÉäë
Virtua C supports preinstalled and site-specific customized disc labels on which site and study information is printed. Job Profiles specify which label to use for a recording job. For jobs that are manually submitted for recording, the label specified in the Job Profile can be overridden using the Job Options function.
This chapter explains:
5 Disc label design families and how they are used by the automatic label selection feature
5 How to add a customized label
`çÇçåáÅë=sáêíì~=`=rëÉêÛë=j~åì~ä UJN=
UJ
A label design family represents the general layout and graphical pattern of a printed label. It is implemented by one or more template files, each of which has a different amount of printable space for study information.
The purpose of label design families is to maximize the amount of graphical content on the label used for promotional purposes. As the number of studies recorded on a disc increases, Virtua C can automatically choose a label in the same design family that allows more studies to be listed on the label. This is usually done by creating a label that removes some promotional graphics to make room for more studies to be printed on the label.
To support this feature, the template files in a label design family must have the same root name, followed by -(x), where x is the number of studies that will fit. For example, the Physician family of labels includes Physician-(3).std and Physician-(5).std.
mêÉáåëí~ääÉÇ=i~ÄÉä=aÉëáÖå=c~ãáäáÉë
The following standard disc label design families are preinstalled on the SmartDrive:
5 Blonde_Boy, Blonde_Boy_Wide
5 Ink_Saver, Ink_Saver_Wide
5 Physician, Physician_Wide
5 Phys_Steth, Phys_Steth_Wide
5 Stethoscope, Stethoscope_Wide
5 Senior_Couple, Senior_Couple_Wide
5 Surgical_Mask, Surgical_Mask_Wide
aáëÅ=i~ÄÉä=aÉëáÖå=c~ãáäáÉë
O tçêâáåÖ=ïáíÜ=i~ÄÉäë
������������
������
The wide version of each standard label family supports wide character sets (for example, Asian character sets).
To support the automatic label selection feature, there is a 3-study and 5-study template in each label design family. In addition, there is a 10-study version of the Ink_Saver label.
cçêÅáåÖ=aáëÅ=pé~ååáåÖ=_~ëÉÇ=çå=i~ÄÉä=pé~ÅÉ
Setting the doLimitStudiesPerDiscToLabelCapacity parameter in a Job Profile file to True forces the job to span studies to additional discs if there are more studies than can fit on the label. For information about creating and modifying Job Profile files, refer to “Setting Up Job Profiles” on page 3-35.
If this parameter is set to False and the label cannot fit the information about all of the job’s studies, the ReadMe.txt file on the disc will list the studies not included on the label.
i~ÄÉä=pÉäÉÅíáçå=_~ëÉÇ=çå=`çéó=qóéÉ
Virtua C supports specifying different labels based on the disc copy type — physician, patient, anonymous, or legal. This allows a site to use the Ink Saver label for in-house physicians but a more attractive label for patients.
For information about specifying the labels for the various copy types, refer to the discLabelCopy parameter descriptions in Table 3-7 on page 3-37.
`çÇçåáÅë=sáêíì~=`=rëÉêÛë=j~åì~ä UJP=
UJ
A custom label can be added for printing on any disc. Typically, custom labels contain special color schemes, the name of the imaging center, a picture of the facility, or the corporate logo.
The label must be designed using the Sure Thing label design application. The Sure Thing label design application is a Windows-based application that is provided on the Accessories and Manuals disc provided with Virtua C.
������������������ ���� �� ����������� �� �� ��������� ���� ���������� ��� ����
������������������ ������� ��� �#�� ��� �����-������������ ��� ����� ���� ��� ������ ��������� ������ ����� ��/���� )������ �� � � ����� ���� ��
�� � ��������� ��� ��������� ���� ���������� ��� ��������������������������$����� ����
����� ��� ��������/���� )������ �
Once the label has been designed, its file can be copied to the SmartDrive to make it available to the device.
�������� ������������ �� � ������ ��� �� �� � *� �� �)*��������+ ������ �
��� ���� �����8 ���������� ���� ��������� ������������������� ����� � ��� ��������� ���� *� �� �������������� ����� ���� ���� ������� ��� �������������������� ������� �
����� ������������ �� � ������ ��� �
������2����������� ��� ���������������� ����� � ������5���� ��� �
&!��������"�� ����� �� ���������� �� ����� �������� ������ ������� �������5����������5&������� ������� ��������� *��� �������� ���� �� �����&!5"�� ������� ��
1. Verify that no jobs are currently being processed and no studies are being received.
2. Log out and shut down the system (refer to “Logging Out” on page 3-56 and “Shutting Down and Rebooting” on page 3-56).
The device powers off at the end of the shutdown process.
^ÇÇáåÖ=~=`ìëíçã=aáëÅ=i~ÄÉä
3
3
3
8���� ���
������ &��
����� ' �� &��
�������'���
Q tçêâáåÖ=ïáíÜ=i~ÄÉäë
������������
������
���������������������������� �� ��� ��� �� �������� ��������� ����� �� �
��������������������� ��������� ����� ��� ��� ������ ������ �� � ���� �� ��
������������� ����
3. Remove the SmartDrive, which is inserted in the USB port behind the green output bin.
4. Mount the SmartDrive in a USB port on a PC.
The SmartDrive will appear as a standard USB flash drive.
5. Copy the labelname.std file (created using the Sure Thing application) to the \labels folder on the SmartDrive.
6. Unmount the SmartDrive from the PC, then insert it back into the device.
7. Reinstall the output bin.
8. Power on the device by pressing the System power button on the Controller front panel.
The label is now ready to use. You can specify this label in the site’s Job Profiles. Also, users can select this label from the Job Options screen. For more information, refer to “Setting Up Job Profiles” on page 3-35 and “Job Options” on page 5-12.
3
`çÇçåáÅë=sáêíì~=`=rëÉêÛë=j~åì~ä UJR=
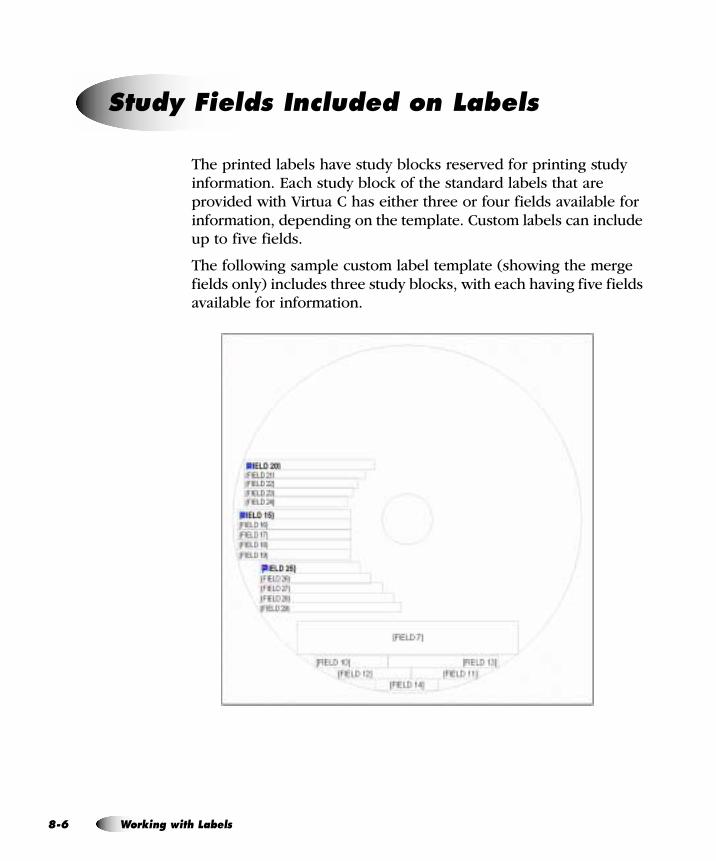
UJ
The printed labels have study blocks reserved for printing study information. Each study block of the standard labels that are provided with Virtua C has either three or four fields available for information, depending on the template. Custom labels can include up to five fields.
The following sample custom label template (showing the merge fields only) includes three study blocks, with each having five fields available for information.
píìÇó=cáÉäÇë=fåÅäìÇÉÇ=çå=i~ÄÉäë
S tçêâáåÖ=ïáíÜ=i~ÄÉäë
������������
������
For standard labels, the following rules determine how many fields each study will have on the disc label:
5 If the label is for discs that will have three studies or less, four study information fields can be included.
5 If the label is for discs that will have four to ten studies, three fields can be included.
The file fields.default.txt in the \labels folder on the SmartDrive controls what information will be printed for each field in a study. This file has section identifiers for 3- and 4-field study blocks. The field ordering under the [ 3FieldStudies ] header corresponds to labels that support 1 to 3 studies, and the field ordering under the [ 4FieldStudies ] header corresponds to labels that support 4 to 10 studies.
You can specify which fields to include for each of these block sizes and in what order they appear.
To include a field, enter an integer value for that field. The integer value indicates at which line in the study block that the field’s information will be inserted. A value of 0 indicates that the information will not be included in the label.
�������� ���� �� ���� ������� ��� ����������� ������������������� �������� ���2���
%���� ������ ���� �� ���� ���������5��� ���� ������$������� ��� ���� �����%������ ������ � �������6���B�������� �����5��������� ������� ����� ����� ��
3
`çÇçåáÅë=sáêíì~=`=rëÉêÛë=j~åì~ä UJT=
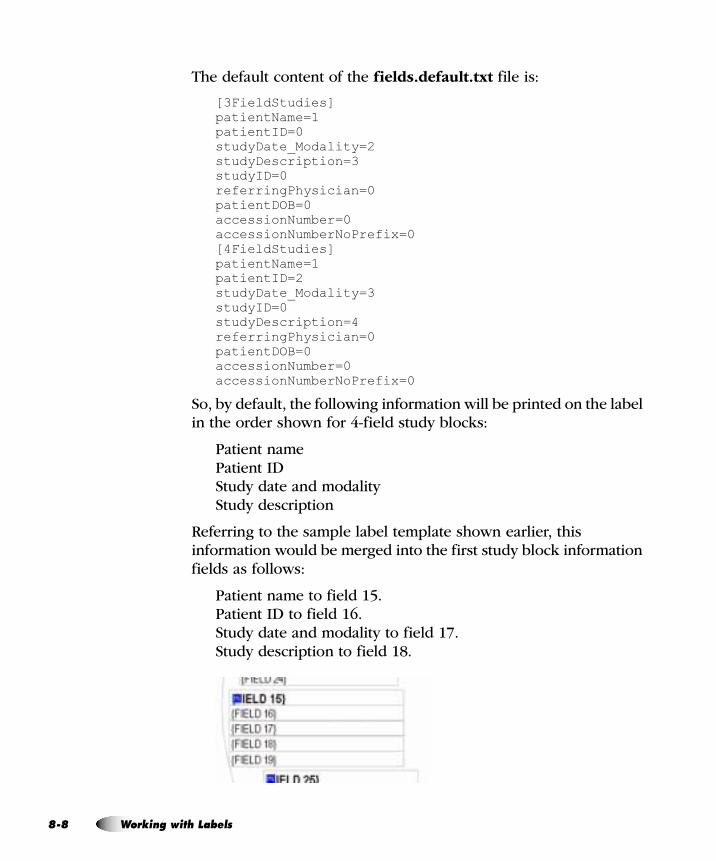
UJ
The default content of the fields.default.txt file is:
[3FieldStudies]patientName=1patientID=0studyDate_Modality=2studyDescription=3studyID=0referringPhysician=0patientDOB=0accessionNumber=0accessionNumberNoPrefix=0[4FieldStudies]patientName=1patientID=2studyDate_Modality=3studyID=0studyDescription=4referringPhysician=0patientDOB=0accessionNumber=0accessionNumberNoPrefix=0
So, by default, the following information will be printed on the label in the order shown for 4-field study blocks:
Patient namePatient IDStudy date and modalityStudy description
Referring to the sample label template shown earlier, this information would be merged into the first study block information fields as follows:
Patient name to field 15.Patient ID to field 16.Study date and modality to field 17.Study description to field 18.
U tçêâáåÖ=ïáíÜ=i~ÄÉäë
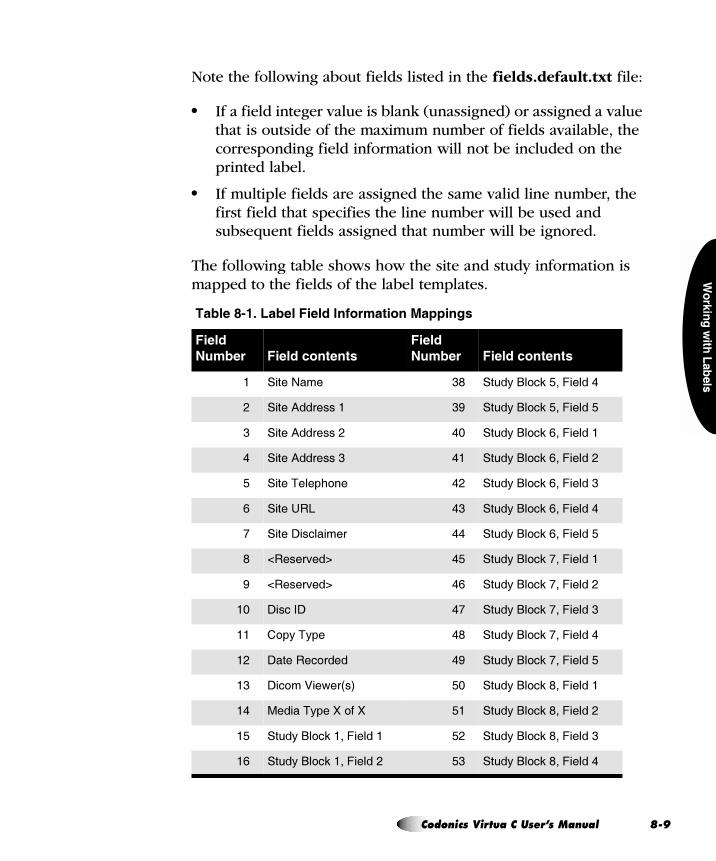
������������
������
Note the following about fields listed in the fields.default.txt file:
5 If a field integer value is blank (unassigned) or assigned a value that is outside of the maximum number of fields available, the corresponding field information will not be included on the printed label.
5 If multiple fields are assigned the same valid line number, the first field that specifies the line number will be used and subsequent fields assigned that number will be ignored.
The following table shows how the site and study information is mapped to the fields of the label templates.
���� 1� ! �����' ������&��� ���2�� ���
' ����
"����� ' �������������
' ����
"����� ' �������������
� �����:��� #' ���3��� �(����������%�
$ �����0��������� #9 ���3��� �(������������
# �����0�������$� %! ���3��� �(� ����������
% �����0�������#� %� ���3��� �(� ��������$�
� �����A����< ��� %$ ���3��� �(� ��������#�
�����7�5� %# ���3��� �(� ��������%�
. �����;��������� %% ���3��� �(� ����������
' P�����=��Q� %� ���3��� �(�.����������
9 P�����=��Q� % ���3��� �(�.��������$�
�! ;�����;� %. ���3��� �(�.��������#�
�� � �3�A3��� %' ���3��� �(�.��������%�
�$ ;������� ����� %9 ���3��� �(�.����������
�# ;�� �)��6��?�@� �! ���3��� �(�'����������
�% ������A3���R� ��R� �� ���3��� �(�'��������$�
�� ���3��� �(������������ �$ ���3��� �(�'��������#�
� ���3��� �(����������$� �# ���3��� �(�'��������%�
`çÇçåáÅë=sáêíì~=`=rëÉêÛë=j~åì~ä UJV=
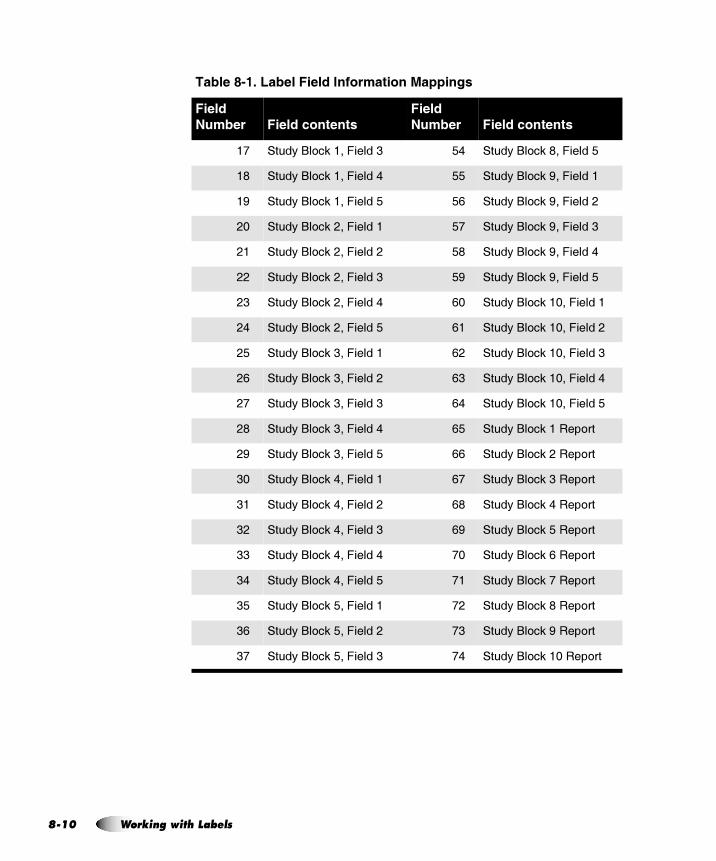
UJ
�. ���3��� �(����������#� �% ���3��� �(�'����������
�' ���3��� �(����������%� �� ���3��� �(�9����������
�9 ���3��� �(������������ � ���3��� �(�9��������$�
$! ���3��� �(�$���������� �. ���3��� �(�9��������#�
$� ���3��� �(�$��������$� �' ���3��� �(�9��������%�
$$ ���3��� �(�$��������#� �9 ���3��� �(�9����������
$# ���3��� �(�$��������%� ! ���3��� �(��!����������
$% ���3��� �(�$���������� � ���3��� �(��!��������$�
$� ���3��� �(�#���������� $ ���3��� �(��!��������#�
$ ���3��� �(�#��������$� # ���3��� �(��!��������%�
$. ���3��� �(�#��������#� % ���3��� �(��!����������
$' ���3��� �(�#��������%� � ���3��� �(������ ���
$9 ���3��� �(�#���������� ���3��� �(�$���� ���
#! ���3��� �(�%���������� . ���3��� �(�#���� ���
#� ���3��� �(�%��������$� ' ���3��� �(�%���� ���
#$ ���3��� �(�%��������#� 9 ���3��� �(������ ���
## ���3��� �(�%��������%� .! ���3��� �(� ���� ���
#% ���3��� �(�%���������� .� ���3��� �(�.���� ���
#� ���3��� �(������������ .$ ���3��� �(�'���� ���
# ���3��� �(����������$� .# ���3��� �(�9���� ���
#. ���3��� �(����������#� .% ���3��� �(��!���� ��
���� 1� ! �����' ������&��� ���2�� ���
' ����
"����� ' �������������
' ����
"����� ' �������������
NM tçêâáåÖ=ïáíÜ=i~ÄÉäë
������������
�������
= VtçêâáåÖ=ïáíÜ=içÅ~äÉë
The locale setting is used to specify regional information displayed by the system, including language, date and time format, the DICOM image viewer, and some patient demographic information. Codonics Virtua C includes several features to support different locales.
rëÉê=fåíÉêÑ~ÅÉ
The user interface — including labels, button text, dialog messages, column headings, and warning messages — is in English by default, but the following languages are also supported at the time of publication:
5 Chinese (PRC)
5 French (France)
5 German (Germany)
5 Italian
5 Japanese
5 Portuguese
5 Spanish (Spain)
5 Turkish
içÅ~äÉJoÉä~íÉÇ=cÉ~íìêÉë
`çÇçåáÅë=sáêíì~=`=rëÉêÛë=j~åì~ä VJN=
VJ
For these languages, there are a few exceptions (Job Profile names, label templates, and disc features) that remain in English.
For other languages, the local language is supported for site information and DICOM demographic information.
The following locale-related features are also supported:
5 Each of the standard disc labels that are provided with Virtua C has a wide version of the label to accommodate wide Eastern Asian characters.
5 For Japan, the default setting for column 2 of the Studies list is the Patient ID instead of the Referring Physician.
5 For Japan, a Japanese DICOM viewer is included. This viewer is the same as the Clarity Viewer, but localized for Japan.
5 Standard disc labels using different fonts are available on the Accessories Disc for languages such as Arabic, Hebrew, Thai, and Korean characters.
oÉéçêíë
Latin-1 and other ISO-8859-based character sets are supported by Virtua C DICOM Structured Reports and HL7 Reports.
DICOM conformant character sets are supported for DICOM Structured Reports.
qáÉê=N=~åÇ=qáÉê=O=oÉÖáçåë
For locales, languages in Tier 1 regions are fully supported. Languages in Tier 2 regions are configured in the device but are not fully verified and supported.
Table 9-1 lists the Tier 1 and Tier 2 locales.
The locale for the device is set in the Locale Profile. For more information, refer to “Setting Up the Locale Profile” on page 9-8.
O tçêâáåÖ=ïáíÜ=içÅ~äÉë
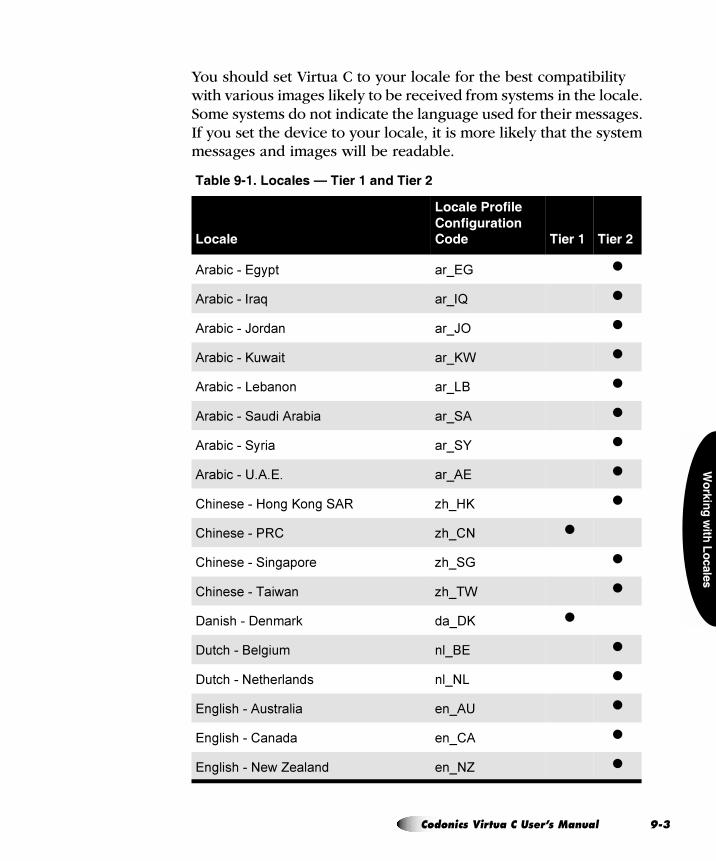
������������
�������
You should set Virtua C to your locale for the best compatibility with various images likely to be received from systems in the locale. Some systems do not indicate the language used for their messages. If you set the device to your locale, it is more likely that the system messages and images will be readable.
���� 5� ! �������:�� ��� ����� ���)
�����
������%��& ���
���& ���� ���
���� � ��� � ���)
Arabic - Egypt ar_EG �
Arabic - Iraq ar_IQ �
Arabic - Jordan ar_JO �
Arabic - Kuwait ar_KW �
Arabic - Lebanon ar_LB �
Arabic - Saudi Arabia ar_SA �
Arabic - Syria ar_SY �
Arabic - U.A.E. ar_AE �
Chinese - Hong Kong SAR zh_HK �
Chinese - PRC zh_CN �
Chinese - Singapore zh_SG �
Chinese - Taiwan zh_TW �
Danish - Denmark da_DK �
Dutch - Belgium nl_BE �
Dutch - Netherlands nl_NL �
English - Australia en_AU �
English - Canada en_CA �
English - New Zealand en_NZ �
`çÇçåáÅë=sáêíì~=`=rëÉêÛë=j~åì~ä VJP=
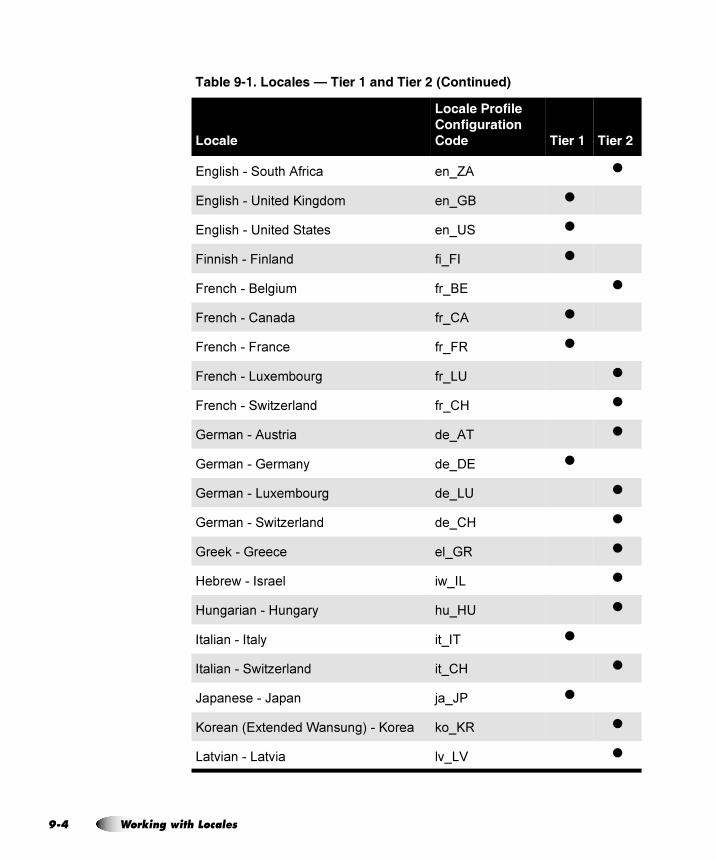
VJ
English - South Africa en_ZA �
English - United Kingdom en_GB �
English - United States en_US �
Finnish - Finland fi_FI �
French - Belgium fr_BE �
French - Canada fr_CA �
French - France fr_FR �
French - Luxembourg fr_LU �
French - Switzerland fr_CH �
German - Austria de_AT �
German - Germany de_DE �
German - Luxembourg de_LU �
German - Switzerland de_CH �
Greek - Greece el_GR �
Hebrew - Israel iw_IL �
Hungarian - Hungary hu_HU �
Italian - Italy it_IT �
Italian - Switzerland it_CH �
Japanese - Japan ja_JP �
Korean (Extended Wansung) - Korea ko_KR �
Latvian - Latvia lv_LV �
���� 5� ! �������:�� ��� ����� ���)������ �����
�����
������%��& ���
���& ���� ���
���� � ��� � ���)
Q tçêâáåÖ=ïáíÜ=içÅ~äÉë
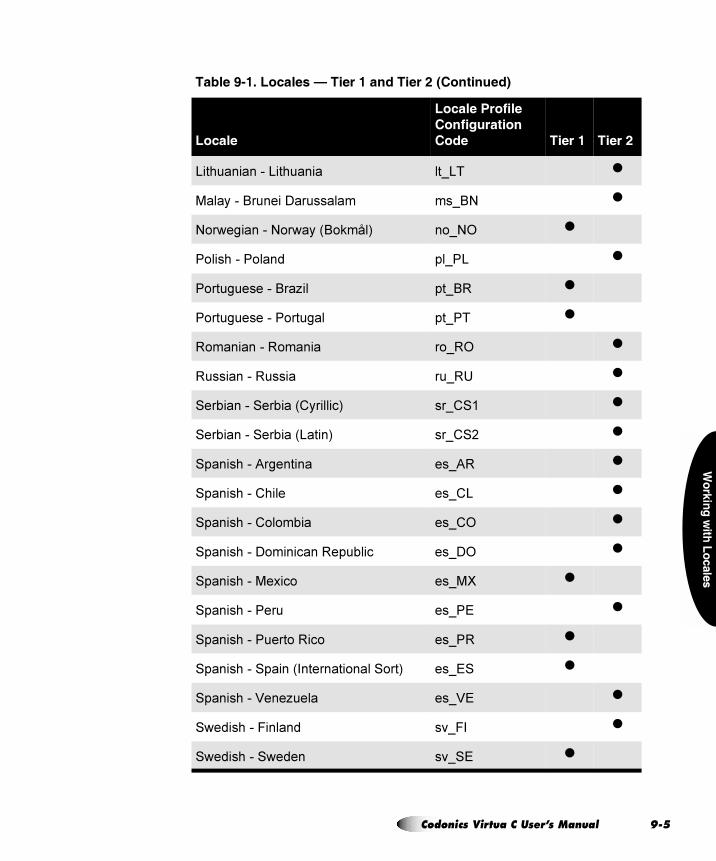
������������
�������
Lithuanian - Lithuania lt_LT �
Malay - Brunei Darussalam ms_BN �
Norwegian - Norway (Bokmål) no_NO �
Polish - Poland pl_PL �
Portuguese - Brazil pt_BR �
Portuguese - Portugal pt_PT �
Romanian - Romania ro_RO �
Russian - Russia ru_RU �
Serbian - Serbia (Cyrillic) sr_CS1 �
Serbian - Serbia (Latin) sr_CS2 �
Spanish - Argentina es_AR �
Spanish - Chile es_CL �
Spanish - Colombia es_CO �
Spanish - Dominican Republic es_DO �
Spanish - Mexico es_MX �
Spanish - Peru es_PE �
Spanish - Puerto Rico es_PR �
Spanish - Spain (International Sort) es_ES �
Spanish - Venezuela es_VE �
Swedish - Finland sv_FI �
Swedish - Sweden sv_SE �
���� 5� ! �������:�� ��� ����� ���)������ �����
�����
������%��& ���
���& ���� ���
���� � ��� � ���)
`çÇçåáÅë=sáêíì~=`=rëÉêÛë=j~åì~ä VJR=
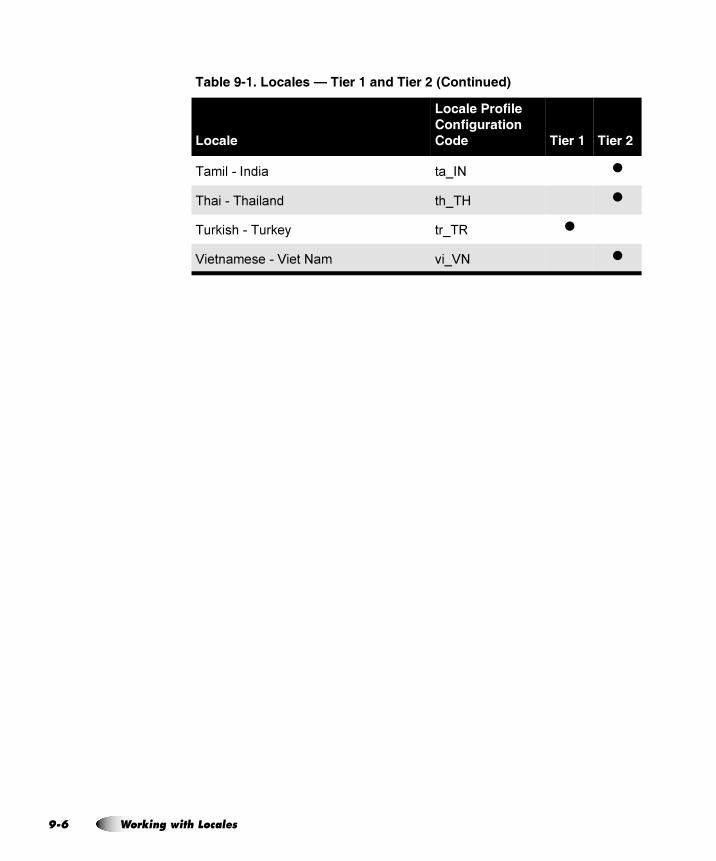
VJ
Tamil - India ta_IN �
Thai - Thailand th_TH �
Turkish - Turkey tr_TR �
Vietnamese - Viet Nam vi_VN �
���� 5� ! �������:�� ��� ����� ���)������ �����
�����
������%��& ���
���& ���� ���
���� � ��� � ���)
S tçêâáåÖ=ïáíÜ=içÅ~äÉë
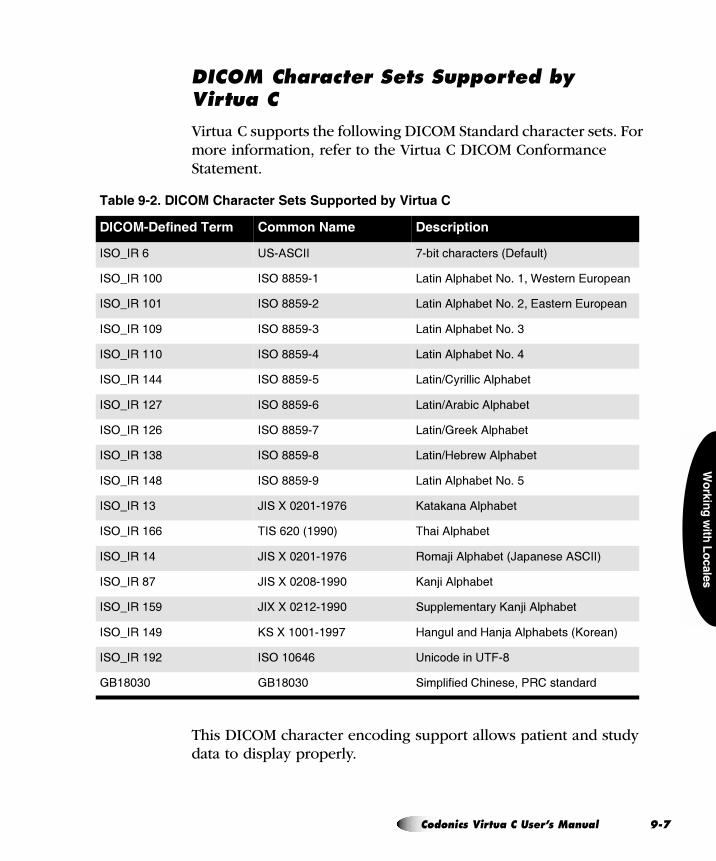
������������
�������
af`lj=`Ü~ê~ÅíÉê=pÉíë=pìééçêíÉÇ=Äó=sáêíì~ `
Virtua C supports the following DICOM Standard character sets. For more information, refer to the Virtua C DICOM Conformance Statement.
This DICOM character encoding support allows patient and study data to display properly.
���� 5�)! (��62��9������������������������4 ��� �
(��62�(�& ������� �����"� (���� �� ��
��4D��� 7�"0���� ."�����<���������?;�����@
��4D����!! ��4�''�9"� 5�����0��<�����: -����K��������� ����
��4D����!� ��4�''�9"$ 5�����0��<�����: -�$������������ ����
��4D����!9 ��4�''�9"# 5�����0��<�����: -�#
��4D�����! ��4�''�9"% 5�����0��<�����: -�%
��4D����%% ��4�''�9"� 5����*�3�������0��<����
��4D����$. ��4�''�9" 5����*0������0��<����
��4D����$ ��4�''�9". 5����*����(�0��<����
��4D����#' ��4�''�9"' 5����*+����6�0��<����
��4D����%' ��4�''�9"9 5�����0��<�����: -��
��4D����# N���R�!$!�"�9. S���(����0��<����
��4D���� A��� $!�?�99!@ A<���0��<����
��4D����% N���R�!$!�"�9. � �>��0��<�����?N��������0����@
��4D���'. N���R�!$!'"�99! S��>��0��<����
��4D�����9 N�R�R�!$�$"�99! ����������3�S��>��0��<����
��4D����%9 S��R��!!�"�99. +���������+��>��0��<������?S ����@
��4D����9$ ��4��! % 7��� ������7A�"'
���'!#! ���'!#! �����������<�������������������
`çÇçåáÅë=sáêíì~=`=rëÉêÛë=j~åì~ä VJT=
VJ
������/���� )����� ������������� ��������������� ������� ��&���� ����)�-����� �
��������� �� ��� ������)����� ��� �����/���� )�������������� ���)�-����� ����
������������ �������������� ��������� ���� ���1����6����������� ����� ������� �
The Locale Profile includes configuration parameters that define locale-specific display elements and functions.
The Locale Profile file — locale.default.txt — is preinstalled on the SmartDrive in the ������������� folder. You can modify this file to specify locale configuration information. For general information about modifying a profile, refer to “Creating and Modifying Profiles” on page 3-6.
The format and parameters of the Locale Profile text file are defined in the following table.
3
pÉííáåÖ=ré=íÜÉ=içÅ~äÉ=mêçÑáäÉ
���� 5��! ������%��& ���'�������%������
%������"� (���� �� ��
T�5 ������ �����U ����� ������������-�A<��������������� ������� ������� �<���
��������������<������-
��&'(������������������� �������
� 0�>��� �;�3���<���=����A���I : ���������3����������-
�6��=�A6���3� �;�����3�I ����������6<��<���� �������$"� ��$%"< ������� ���-
�������3���� ����� ��3�� ��N�������-�4�<������������
�������� ����$"< ��� ���-
�< ��������1�)8��8+-
���, ���I : ���������3����������-
U tçêâáåÖ=ïáíÜ=içÅ~äÉë
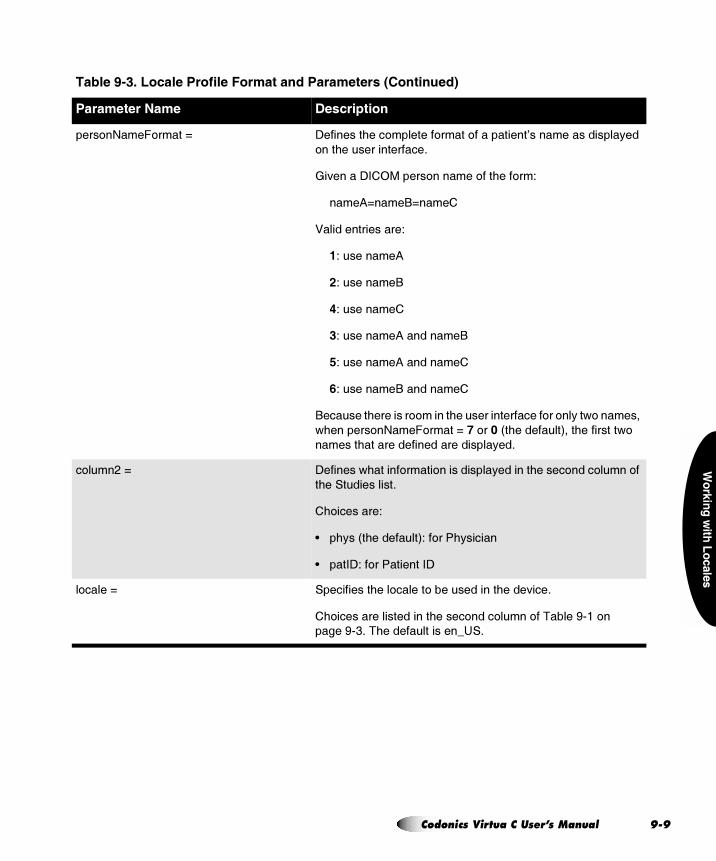
������������
�������
���� �:��� ����I ;��������<��� ������� ���� �����������E���������������3���
���<���������������-
��=�����;��4������ ������ ���<��� �1
���0I����I����
)����������������1
)1�������0
81��������
+1��������
91�������0���������
:1�������0���������
;1�����������������
��������<�������� �����<����������������� �� ��3��6 �������
6<������� �:��� ����I�<� ��*�?�<��������@���<���������6 �
������<�������������������������3��-
� ��$�I ;�������6<������ ���� �����������3�������<����� ���� ��� ��
�<�������������-
�< ��������1
B �<3��?�<��������@1�� ���<3������
B ����;1�� �����������;
� �����I �����������<��� ������ ������������<����=���-
�< ��������������������<����� ���� ��� ��A���� 9"�� ��
���� 9"#-�A<��������������D7�-
���� 5��! ������%��& ���'�������%������������ �����
%������"� (���� �� ��
`çÇçåáÅë=sáêíì~=`=rëÉêÛë=j~åì~ä VJV=
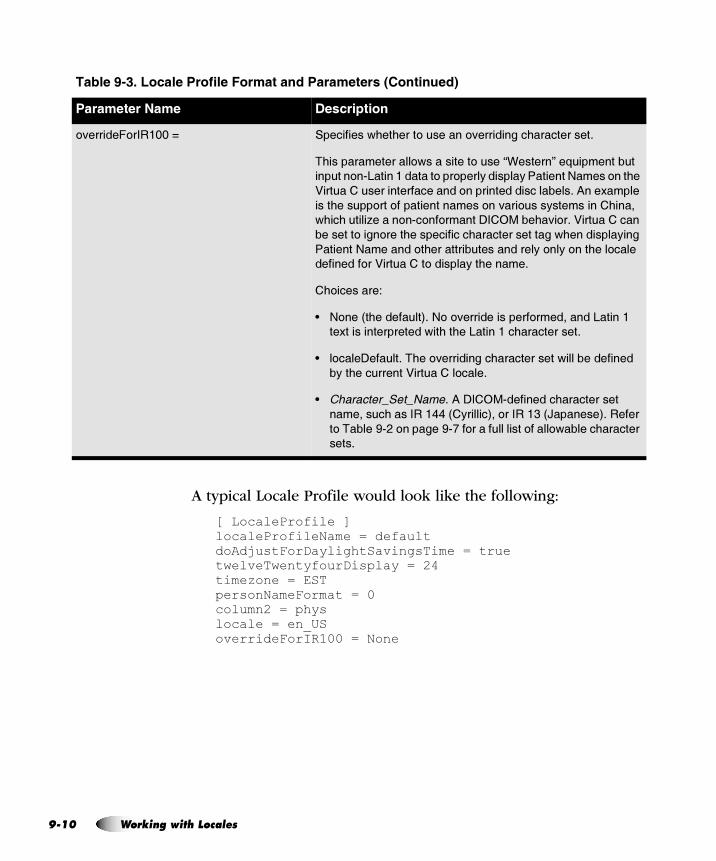
VJ
A typical Locale Profile would look like the following:
[ LocaleProfile ]localeProfileName = defaultdoAdjustForDaylightSavingsTime = truetwelveTwentyfourDisplay = 24timezone = ESTpersonNameFormat = 0column2 = physlocale = en_USoverrideForIR100 = None
=������� ����!!�I ����������6<��<���� ������� =����������<�����������-
A<��������������� 6���������� ����LK������M��2���������
������ �"5������������� ��� ����3�������3���������:���� ���<��
)���� �������������������� ���������������������-�0���C�����
����<����� ��� ��������������� ��=��� ���3���������<�����
6<��<�����,����� �"� �� �����;��4����<�=� �-�)���� ������
�������� ���� ����<������������<����������������6<���������3����
��������:������� �<��������������������3� ��3� ���<��� �����
��������� ��)���� ��� �������3��<�����-
�< ��������1
B : ���?�<��������@-�: � =�������������� ���������5�������
��C�����������������6��<��<��5��������<�����������-
B � ����;�����-�A<�� =����������<������������6���������������
�3��<���������)���� ��� ����-
B )�������%$�%���-�0�;��4�"���������<������������
�������<��������%%�?�3������@�� ������#�?N�������@-�������
� �A���� 9"$� ������ 9".�� ������������� ����� 6������<��������
����-
���� 5��! ������%��& ���'�������%������������ �����
%������"� (���� �� ��
NM tçêâáåÖ=ïáíÜ=içÅ~äÉë

����
����
������
= NMm~íáÉåí=oÉéçêíë
Reports is an optional feature that allows Virtua C to receive patient reports with a patient’s study and record both to disc. Both the DICOM Structured Report and Health Level 7 (HL7) Report formats are supported.
������#�� ��� �$ ����� *��� ������� �. ����� ��� ��)�����)�������� ��������
������������������ �. �� ���� ��������� �� ����� ��� ��� �$ ��
5 A report and study together can be recorded only on “Physician Disc” copies. All other copy types will record only the study to disc and omit the report.
5 A LaunchPad on recorded discs allows a user to choose viewing the study or the report from the study disc. Reports are viewable via a web browser.
5 A yellow page icon is used to designate a report. For those studies that have a matching report, this icon appears in the lower left corner of the existing status icons (e.g., Ready, Recorded, etc.). In certain cases, if a study has a report that is not recorded to the disc, the status will show a flashing yellow page icon.
oÉéçêíëJoÉä~íÉÇ=cÉ~íìêÉë
3
`çÇçåáÅë=sáêíì~=`=rëÉêÛë=j~åì~ä NMJN=
NM
5 Study discs that contain a matching report and study have a yellow page icon on the disc label, indicating that there is a report attached to the study.
5 If there is more than one study and only one report, the report will be attached to the appropriate study. If the report references both studies, it will only be attached to one of the studies.
5 DICOM reports are automatically deleted from Virtua C when the associated study is deleted. HL7 reports are deleted based on parameters set in the HL7 Server Profile.
5 Latin-1 and many other international character sets are supported in the DICOM Structured Reports and HL7 Reports created when studies are recorded.
qïç=jÉíÜçÇë=Ñçê=oÉÅÉáîáåÖ=af`lj=píêìÅíìêÉÇ=oÉéçêíë
Virtua C supports two methods for receiving DICOM Structured Reports: receive reports stored on a PACS or query for reports stored on a DICOM broker (PACS broker or MITRA broker).
Patient Reports are generated when a radiologist reads a study and enters the results into a computer system. Patient reports are initially stored on a Radiology Information System (RIS), but they can also be stored on a PACS system or accessed through a DICOM Broker system. These reports can be sent to the Virtua C in either a DICOM Structured Report format or an HL7 Report format.
A facility will typically need to enable only one interface for reports on the Virtua C, either the DICOM Structured Report interface or the HL7 interface. It is important to understand the patient report workflow at a facility before attempting to configure Virtua C.
eçï=sáêíì~ `=mêçÅÉëëÉë=oÉéçêíë
JO m~íáÉåí=oÉéçêíë
����
����
������
To combine a radiology report with a diagnostic study, Virtua C accepts HL7 reports from the RIS and DICOM studies from the PACS. Once Virtua C receives both the report and study, it will match them together and record both on a disc.
When Virtua C receives a report, it converts the data found inside the report to an internal format that is used to present the report in a viewable format on the disc. The final format of the report can be customized by making changes to the report template.
The final format of the report is controlled by the report template file, template.default.xsl, located in the Report Profile \profiles\report folder on the SmartDrive. This file is in a format similar to HTML and can be edited by an experienced user to create a layout tailored to a specific facility.
The report logo that is placed on the patient report is the image named logo.jpg in the \profiles\report\images folder on the SmartDrive. This file can be replaced with another image to create a custom report logo for each site.
tçêâáåÖ=ïáíÜ=af`lj=píêìÅíìêÉÇ=oÉéçêíë
DICOM Structured Report is a format of patient reports that is defined in the DICOM standard. DICOM Structured Reports provide for excellent workflow within a facility, especially when they are stored on the PACS. When a study is sent from the PACS, the DICOM Structured Report will be sent with the study.
Most PACS systems support the use of DICOM Structured Reports, but the option is not always enabled or in use. Facilities that do not, or cannot, store the reports on the PACS may use a DICOM broker (PACS broker or MITRA broker) to provide Structured Reports to the DICOM systems on the network. Sometimes the broker is built into the RIS or the PACS, or is called a connectivity manager.
������/���� )���������)�-�4����� %������� ��. ����������)��� �����/���� )�
������������ ��� ����)�-�� ������ �3
`çÇçåáÅë=sáêíì~=`=rëÉêÛë=j~åì~ä NMJP=
NM
tçêâáåÖ=ïáíÜ=eiT=oÉéçêíë
Health Level 7 is a standards organization that defines a messaging standard called HL7 used for most system communications within a hospital. HL7 is used to communicate messages in a wide variety of data ranging from patient billing to radiology reports. Radiology reports usually reside on the RIS and are sent using HL7.
Virtua C can accept HL7 reports only from a single RIS.
Virtua C matches an HL7 report to a study as follows:
1. Virtua C matches the patient information in the HL7 report to the patient information in the DICOM study. The information used for matching is controlled by the matchPatientUsing parameter in the HL7 Server Profile.
2. If the patient information matches, then the doMatchAccessionNumber and doMatchExamDate fields in the HL7 Server Profile are used to match a specific report to a study.
pÉííáåÖ=ré=íÜÉ=nop`m=mêçÑáäÉ
The DICOM Query/Retrieve Service Class Provider (QRSCP) Profile includes configuration parameters that must be set up to support the Reports function. It allows Virtua C to query a DICOM QRSCP device, such as a PACS server, for a list of reports. One or more of the reports can then be retrieved and recorded to disc.
The QRSCP Profile file — qrscp.default.txt — is preinstalled on the SmartDrive in the ������������ folder. You can modify this file to specify query/retrieve configuration information. For general information about modifying a profile, refer to “Creating and Modifying Profiles” on page 3-6.
pÉííáåÖ=ré=af`lj=nìÉêóLoÉíêáÉîÉ
JQ m~íáÉåí=oÉéçêíë
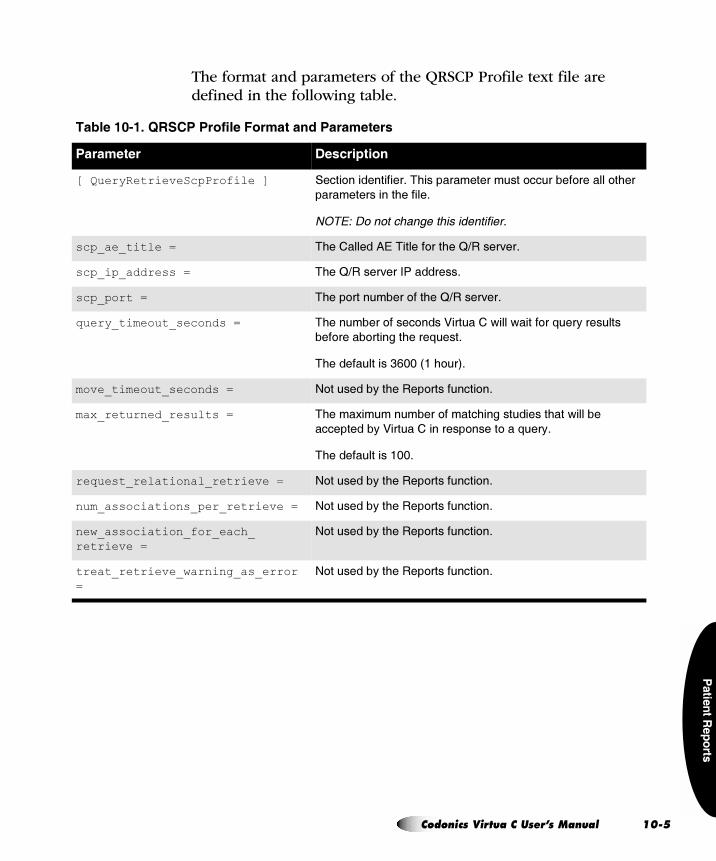
����
����
������
The format and parameters of the QRSCP Profile text file are defined in the following table.
���� ;� ! <8��%�%��& ���'�������%������
%����� (���� �� ��
[ QueryRetrieveScpProfile ] ����� ������������-�A<��������������� ������� ������� �<���
��������������<������-
��&'(������������������� �������
scp_ae_title = A<���������0��A������ ���<��V*�����=��-
scp_ip_address = A<��V*�����=�������������-
scp_port = A<��� �������� ���<��V*�����=��-
query_timeout_seconds = A<������� ����� ����)���� ��6����6����� ��2��3��������
��� ����� �������<����2���-
A<������������# !!�?��< �@-
move_timeout_seconds = : �������3��<����� ��������� �-
max_returned_results = A<���C������� �����<������������<���6�������
����������3�)���� ��������� ����� ���2��3-
A<�������������!!-
request_relational_retrieve = : �������3��<����� ��������� �-
num_associations_per_retrieve = : �������3��<����� ��������� �-
new_association_for_each_
retrieve =
: �������3��<����� ��������� �-
treat_retrieve_warning_as_error
=
: �������3��<����� ��������� �-
`çÇçåáÅë=sáêíì~=`=rëÉêÛë=j~åì~ä NMJR=
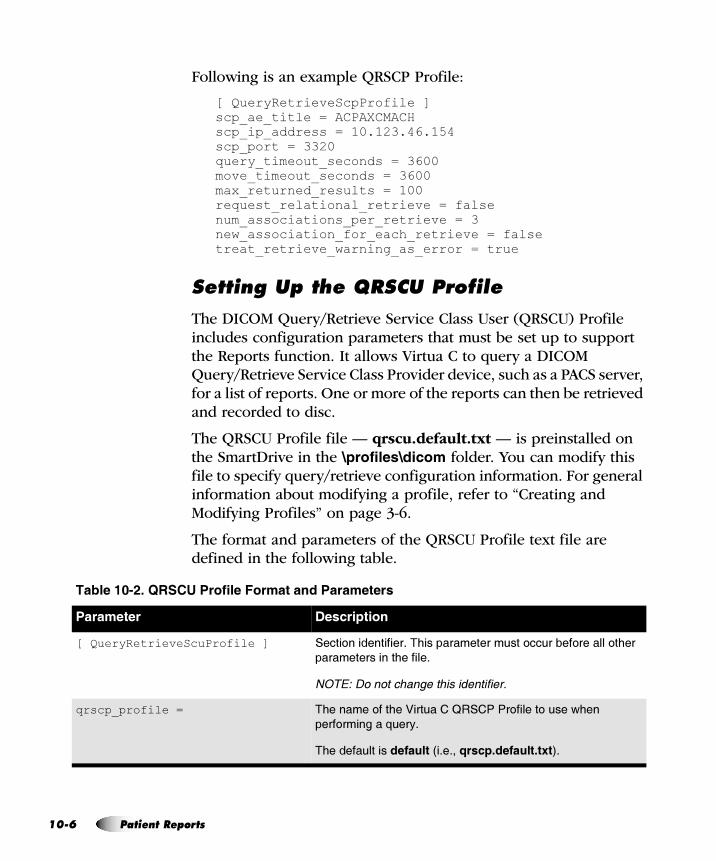
NM
Following is an example QRSCP Profile:
[ QueryRetrieveScpProfile ]scp_ae_title = ACPAXCMACHscp_ip_address = 10.123.46.154scp_port = 3320query_timeout_seconds = 3600move_timeout_seconds = 3600max_returned_results = 100request_relational_retrieve = falsenum_associations_per_retrieve = 3new_association_for_each_retrieve = falsetreat_retrieve_warning_as_error = true
pÉííáåÖ=ré=íÜÉ=nop`r=mêçÑáäÉ
The DICOM Query/Retrieve Service Class User (QRSCU) Profile includes configuration parameters that must be set up to support the Reports function. It allows Virtua C to query a DICOM Query/Retrieve Service Class Provider device, such as a PACS server, for a list of reports. One or more of the reports can then be retrieved and recorded to disc.
The QRSCU Profile file — qrscu.default.txt — is preinstalled on the SmartDrive in the ������������ folder. You can modify this file to specify query/retrieve configuration information. For general information about modifying a profile, refer to “Creating and Modifying Profiles” on page 3-6.
The format and parameters of the QRSCU Profile text file are defined in the following table.
���� ;�)! <8��*�%��& ���'�������%������
%����� (���� �� ��
[ QueryRetrieveScuProfile ] ����� ������������-�A<��������������� ������� ������� �<���
��������������<������-
��&'(������������������� �������
qrscp_profile = A<������ ���<��)���� ��V������� ������ ����6<���
���� �������2��3-
A<��������������� ��?�-�-�� ���!(��� �(�@-
JS m~íáÉåí=oÉéçêíë
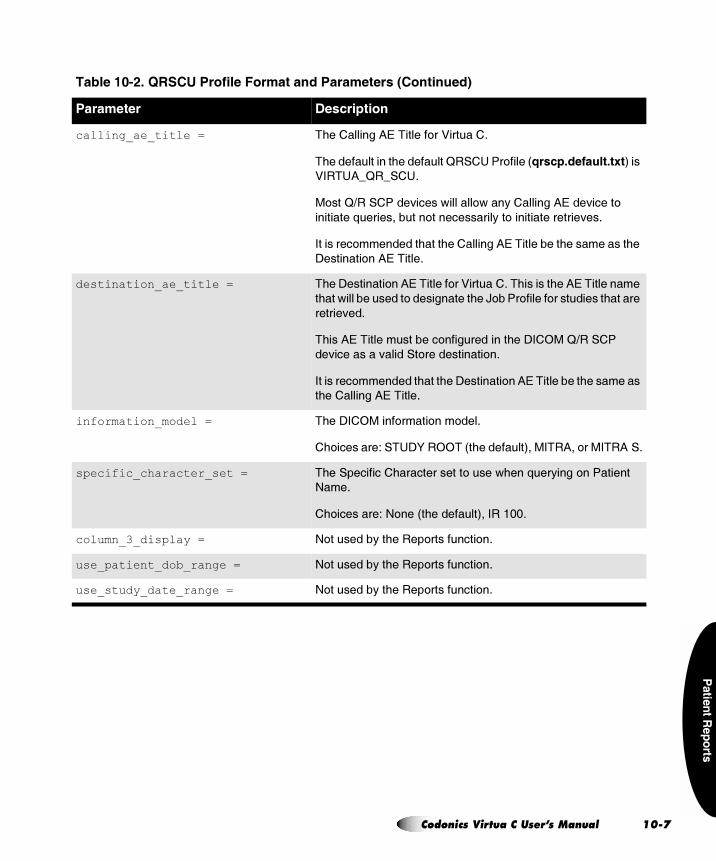
����
����
������
calling_ae_title = A<����������0��A������ ��)���� �-
A<�������������<���������V���7��� �����? ���!(��� �(�@����
)��A70DV�D��7-
� ���V*��������=�����6������� 6���3���������0����=����� �
���������2����������� ������������3�� ����������������=��-
��������� �������<����<����������0��A���������<����������<��
;�������� ��0��A����-
destination_ae_title = A<��;�������� ��0��A������ ��)���� �-�A<�������<��0��A���������
�<���6������������ ������������<��N ���� ������ ����������<�������
������=��-
A<���0��A������������ ������������<��;��4��V*������
��=���������=������� ������������ �-
��������� �������<����<��;�������� ��0��A���������<���������
�<����������0��A����-
information_model = A<��;��4����� ���� �� ���-
�< ��������1��A7;W��44A�?�<��������@����A�0�� ����A�0 �-
specific_character_set = A<������������<������������� ����6<���2��3���� ����������
:��-
�< ��������1�: ���?�<��������@������!!-
column_3_display = : �������3��<����� ��������� �-
use_patient_dob_range = : �������3��<����� ��������� �-
use_study_date_range = : �������3��<����� ��������� �-
���� ;�)! <8��*�%��& ���'�������%������������ �����
%����� (���� �� ��
`çÇçåáÅë=sáêíì~=`=rëÉêÛë=j~åì~ä NMJT=
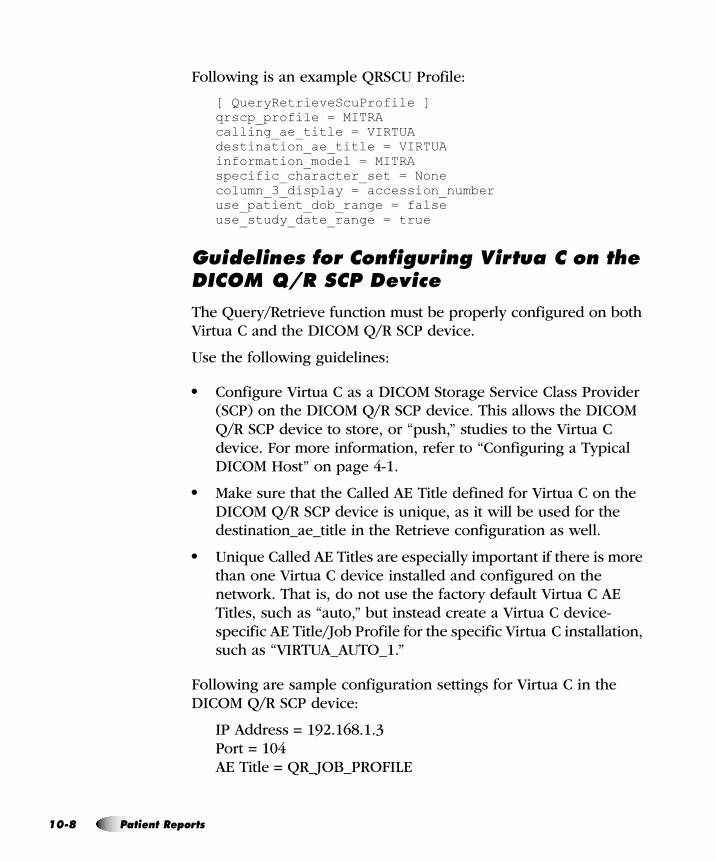
NM
Following is an example QRSCU Profile:
[ QueryRetrieveScuProfile ]qrscp_profile = MITRAcalling_ae_title = VIRTUAdestination_ae_title = VIRTUAinformation_model = MITRAspecific_character_set = Nonecolumn_3_display = accession_numberuse_patient_dob_range = falseuse_study_date_range = true
dìáÇÉäáåÉë=Ñçê=`çåÑáÖìêáåÖ=sáêíì~ `=çå=íÜÉ=af`lj=nLo=p`m=aÉîáÅÉ
The Query/Retrieve function must be properly configured on both Virtua C and the DICOM Q/R SCP device.
Use the following guidelines:
5 Configure Virtua C as a DICOM Storage Service Class Provider (SCP) on the DICOM Q/R SCP device. This allows the DICOM Q/R SCP device to store, or “push,” studies to the Virtua C device. For more information, refer to “Configuring a Typical DICOM Host” on page 4-1.
5 Make sure that the Called AE Title defined for Virtua C on the DICOM Q/R SCP device is unique, as it will be used for the destination_ae_title in the Retrieve configuration as well.
5 Unique Called AE Titles are especially important if there is more than one Virtua C device installed and configured on the network. That is, do not use the factory default Virtua C AE Titles, such as “auto,” but instead create a Virtua C device-specific AE Title/Job Profile for the specific Virtua C installation, such as “VIRTUA_AUTO_1.”
Following are sample configuration settings for Virtua C in the DICOM Q/R SCP device:
IP Address = 192.168.1.3Port = 104AE Title = QR_JOB_PROFILE
JU m~íáÉåí=oÉéçêíë

����
����
������
bå~ÄäáåÖ=af`lj=píêìÅíìêÉÇ=oÉéçêíë
Support for DICOM Structured Reports requires a feature key on the Virtua C SmartDrive. Contact Codonics Technical Support or your Sales Representative to purchase the proper feature key.
If reports are being stored on the PACS, then the feature key is all that is necessary to enable the functionality on the Virtua C. However, the PACS may need to be configured to send the reports with the studies.
If reports are accessed through a broker interface, then query profiles need to be set up in the \profiles\dicom folder on the SmartDrive. The PACS administrator will need to provide the IP address, query port number, and AE Title of the broker interface. In the QRSCU Profile, the information_model setting must be set to MITRA for most brokers or MITRA S for the Siemens Novius.
Once the QRSCU and QRSCP Profiles have been created, the parameter queryProfileName in the Report Profile should be set to the name of the QRSCU Profile that points to the MITRA broker. Using the default profiles to query the broker is not recommended.
Several customizations are available in the Report Profile, report.default.txt, located in the \profiles\report folder on the SmartDrive. These are described in “Modifying the Report Profile” below.
jçÇáÑóáåÖ=íÜÉ=oÉéçêí=mêçÑáäÉ
For general information about modifying a profile, refer to “Creating and Modifying Profiles” on page 3-6.
The Report Profile, report.default.txt, is stored in the \profiles\report folder on the SmartDrive.
pÉííáåÖ=ré=m~íáÉåí=oÉéçêíë
`çÇçåáÅë=sáêíì~=`=rëÉêÛë=j~åì~ä NMJV=
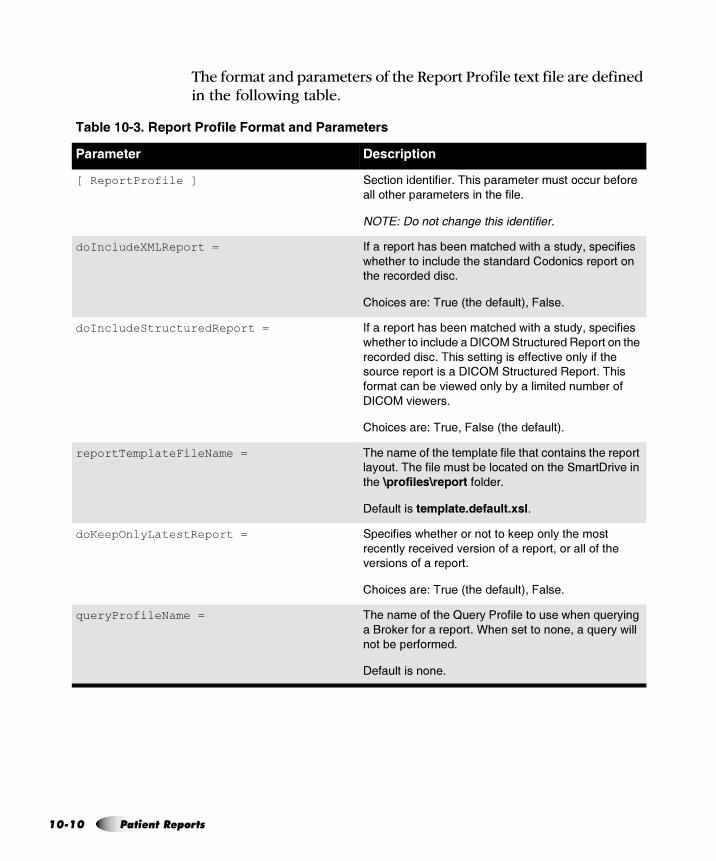
NM
The format and parameters of the Report Profile text file are defined in the following table.
���� ;��! 8������%��& ���'�������%������
%����� (���� �� ��
[ ReportProfile ] ����� ������������-�A<��������������� ������� ���
���� �<�����������������<������-
��&'(������������������� �������
doIncludeXMLReport = �������� ���<�����������<���6��<������3������������
6<��<���� ���������<������������ � �������� ��� ��
�<����� ���������-
�< ��������1�A���?�<��������@�������-
doIncludeStructuredReport = �������� ���<�����������<���6��<������3������������
6<��<���� ����������;��4�������������� ��� ���<��
��� ���������-�A<���������������������=�� ��3�����<��
� ������� ��������;��4�������������� ��-�A<���
� �����������=��6��� ��3��3��������������� ��
;��4��=��6���-
�< ��������1�A����������?�<��������@-
reportTemplateFileName = A<������ ���<����������������<���� ��������<����� ���
��3 �-�A<�������������� ������ ���<������;��=�����
�<��2!�������2��!���� ����-
;�����������!� �(��� �(���-
doKeepOnlyLatestReport = ����������6<��<��� ��� ��� �(���� ��3��<�� ���
�������3������=���=���� �� ������� ���� ������ ���<��
=���� ��� ������� ��-
�< ��������1�A���?�<��������@�������-
queryProfileName = A<������ ���<��V��3��� ������ ����6<���2��3����
���� (���� ������� ��-�K<�������� �� ������2��3�6����
� ��������� ���-
;���������� ��-
JNM m~íáÉåí=oÉéçêíë
����
����
������
A sample Report Profile would look like the following:
[ ReportProfile ]doIncludeXMLReport = truedoIncludeStructuredReport = falsereportTemplateFileName = template.default.xsldoKeepOnlyLatestReport = truequeryProfileName = nonequeryReportFields = id_acc
bå~ÄäáåÖ=eiT=oÉéçêíë
Support for HL7 patient reports requires a feature key on the Virtua C SmartDrive. Contact Codonics Technical Support or your Sales Representative to purchase the proper feature key.
In addition, the RIS and the HL7 Server Profile must be configured. Refer to “RIS Configuration for HL7 Reports” on page 10-12 and “HL7 Server Profile Settings” on page 10-12.
queryReportFields = �����������<����������<���6������������ �2��3��<��
�� (������������-�A<������������< ���� �������<��������
����� �����������������3�� ���2��3��������3���
������������������ ��-
��������������� ������1����������� �����C�������������
��-
������������������������C���������������������3����
������ ����<�������-�;�����������D���-
���� ;��! 8������%��& ���'�������%������������ �����
%����� (���� �� ��
`çÇçåáÅë=sáêíì~=`=rëÉêÛë=j~åì~ä NMJNN=

NM
ofp=`çåÑáÖìê~íáçå=Ñçê=eiT=oÉéçêíë
HL7 reports require proper configuration of both the RIS and Virtua C. The RIS vendor or Interface Team must configure the RIS or Interface Engine to send radiology reports to Virtua C. The following information is required:
5 The preferred HL7 port number
5 The location of the accession number within the HL7 message
5 The uniqueness of the accession number
������=����.���� �������� � ������������ ��� �� ����� �.���� ���������� ���� �
� ���������� ��������������� �������� �������������.���
eiT=pÉêîÉê=mêçÑáäÉ=pÉííáåÖë
For general information about modifying a profile, refer to “Creating and Modifying Profiles” on page 3-6.
The HL7 Server Profile, hl7.server.txt, is stored in the \profiles\report folder on the SmartDrive.
The format and parameters of the HL7 Server Profile text file are defined in the following table.
3
���� ;�,! =�0��������%��& ���'�������%������
%����� (���� �� ��
[ HL7Profile ] ����� ������������-�A<��������������� ������� ���
���� �<�����������������<������-
��&'(������������������� �������
doEnableHL7Reports = ����������6<��<���)���� ��6����������������� �����
+5.���� ���-
�< ��������1�A����������?�<��������@-
portNumber = ;����������<��� �������� ��+5.�� ������ ��-�
A<����< ����������� ��<��=������ =������3��<������
0��������� �-
�< ��������1�1 to 65535. The default is 2575.
JNO m~íáÉåí=oÉéçêíë
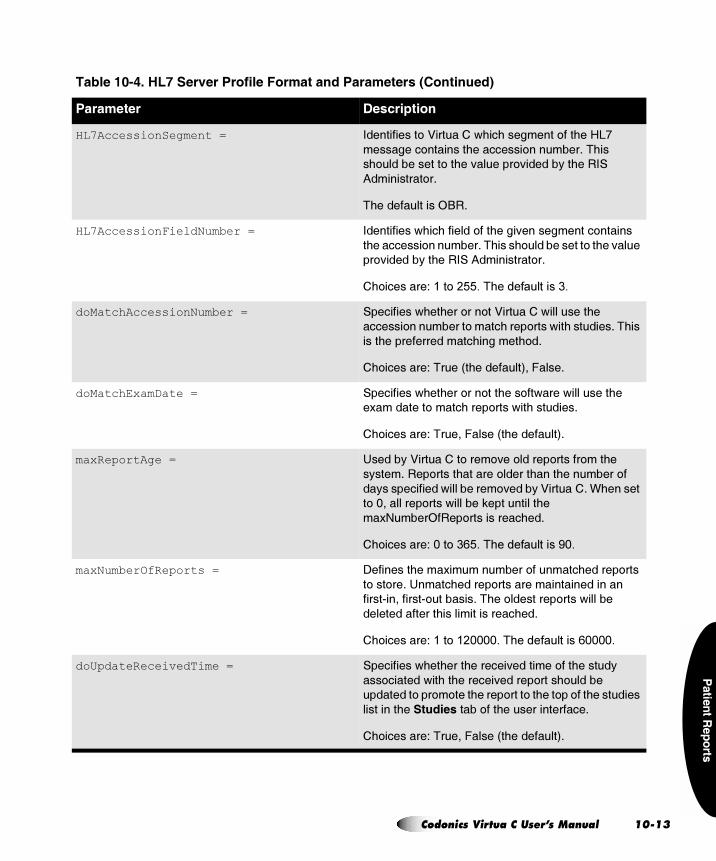
����
����
������
HL7AccessionSegment = ������������ �)���� ��6<��<�������� ���<��+5.�
�������� ��������<��������� ������-�A<���
�< ����������� ��<��=������ =������3��<������
0��������� �-
A<������������4��-
HL7AccessionFieldNumber = �����������6<��<������� ���<����=����������� �������
�<��������� ������-�A<����< ����������� ��<��=����
�� =������3��<������0��������� �-
�< ��������1�1 to 255. The default is 3.
doMatchAccessionNumber = ����������6<��<��� ��� ��)���� ��6��������<��
������� �������� ����<���� ����6��<�������-�A<���
����<���������������<������< �-
�< ��������1�A���?�<��������@�������-
doMatchExamDate = ����������6<��<��� ��� ���<��� ��6����6��������<��
�C�������� ����<���� ����6��<�������-
�< ��������1�A����������?�<��������@-
maxReportAge = 7�����3�)���� ��� ��� =�� ������ ������ ��<��
�3���-���� �����<������� ������<����<������� ��
��3������������6��������� =����3�)���� �-�K<�������
� �!��������� ����6�������(����������<��
�C:���4���� �����������<��-
�< ��������1�0 to 365. The default is 90.
maxNumberOfReports = ;��������<���C������� ������<������ ����
� ��� ��-�7����<������ ������������������������
�����"���������" �������-�A<�� ��������� ����6�������
���������������<���������������<��-
�< ��������1�1 to 120000. The default is 60000.
doUpdateReceivedTime = ����������6<��<����<�������=������� ���<�����3�
��� �������6��<��<�������=������ ����< ������
�������� ��� ����<����� ���� ��<��� �� ���<���������
���������<��$��������� ���<���������������-
�< ��������1�A����������?�<��������@-
���� ;�,! =�0��������%��& ���'�������%������������ �����
%����� (���� �� ��
`çÇçåáÅë=sáêíì~=`=rëÉêÛë=j~åì~ä NMJNP=
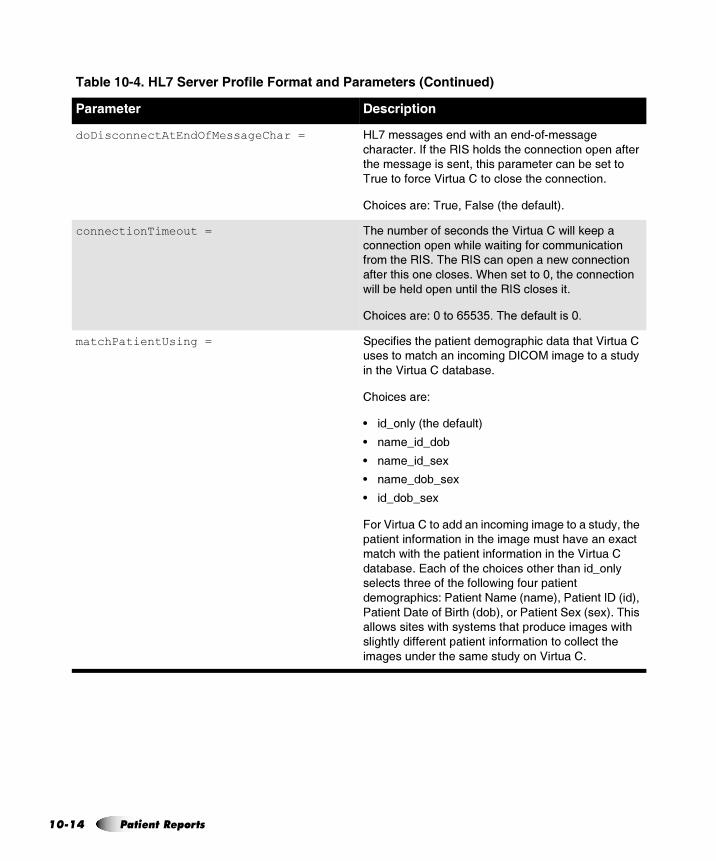
NM
doDisconnectAtEndOfMessageChar = +5.�������������6��<�������" �"�������
�<�������-�����<������< �����<��� ������ �� ����������
�<�������������������<������������������������ �
A���� �� ����)���� ��� ��� ����<��� ������ �-
�< ��������1�A����������?�<��������@-
connectionTimeout = A<������� ����� �����<��)���� ��6����(������
� ������ �� ����6<����6�������� ��� ������ ��
�� ��<�����-�A<���������� ��������6�� ������ ��
�������<��� ����� ���-�K<�������� �!���<��� ������ ��
6�������<���� ����������<�������� ������-
�< ��������1�0 to 65535. The default is 0.
matchPatientUsing = �����������<������������ ����<���������<���)���� ��
����� ����<������� ����;��4�������� ������3�
����<��)���� ����������-�
�< ��������1
B ��D ��3�?�<��������@
B ���D��D� �
B ���D��D��C
B ���D� �D��C
B ��D� �D��C
� ��)���� ��� ����������� ���������� ������3���<��
����������� ���� ������<����������<�=������C����
���<�6��<��<������������� ���� ������<��)���� ��
��������-����<� ���<���< ����� �<����<�����D ��3�
���������<���� ���<��� �� 6����� ����������
�� ����<���1���������:���?���@�����������;�?��@��
��������;���� ������<�?� �@�� ������������C�?��C@-�A<���
��� 6��������6��<��3������<����� ����������6��<�
����<��3���������������������� ���� ��� �� �������<��
������������<���������3� ��)���� �-
���� ;�,! =�0��������%��& ���'�������%������������ �����
%����� (���� �� ��
JNQ m~íáÉåí=oÉéçêíë
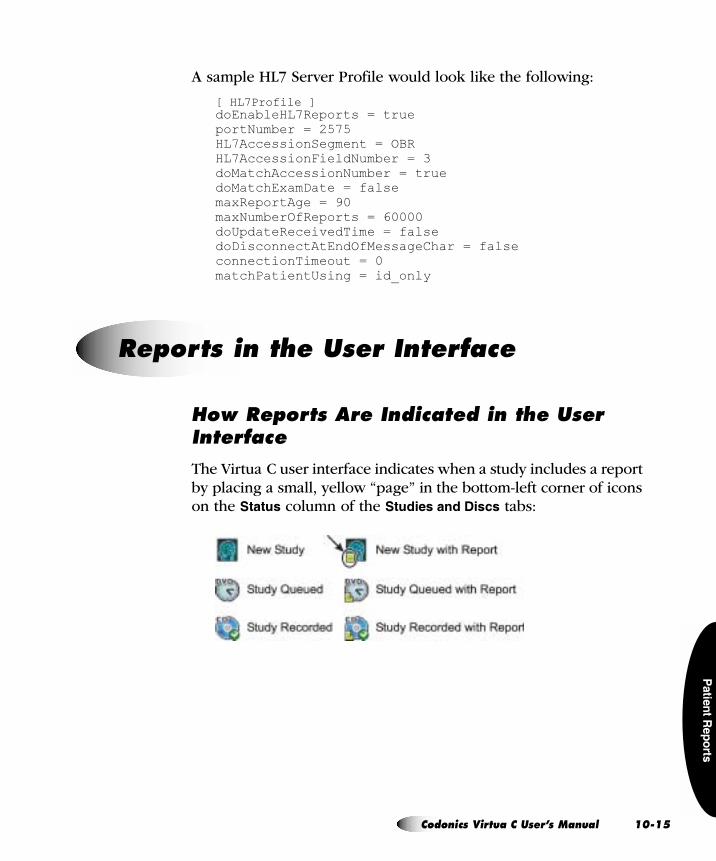
����
����
������
A sample HL7 Server Profile would look like the following:
[ HL7Profile ]doEnableHL7Reports = trueportNumber = 2575HL7AccessionSegment = OBRHL7AccessionFieldNumber = 3doMatchAccessionNumber = truedoMatchExamDate = falsemaxReportAge = 90maxNumberOfReports = 60000doUpdateReceivedTime = falsedoDisconnectAtEndOfMessageChar = falseconnectionTimeout = 0matchPatientUsing = id_only
eçï=oÉéçêíë=^êÉ=fåÇáÅ~íÉÇ=áå=íÜÉ=rëÉê=fåíÉêÑ~ÅÉ
The Virtua C user interface indicates when a study includes a report by placing a small, yellow “page” in the bottom-left corner of icons on the ����� column of the ���� ������( ��� tabs:
=oÉéçêíë=áå=íÜÉ=rëÉê=fåíÉêÑ~ÅÉ
`çÇçåáÅë=sáêíì~=`=rëÉêÛë=j~åì~ä NMJNR=
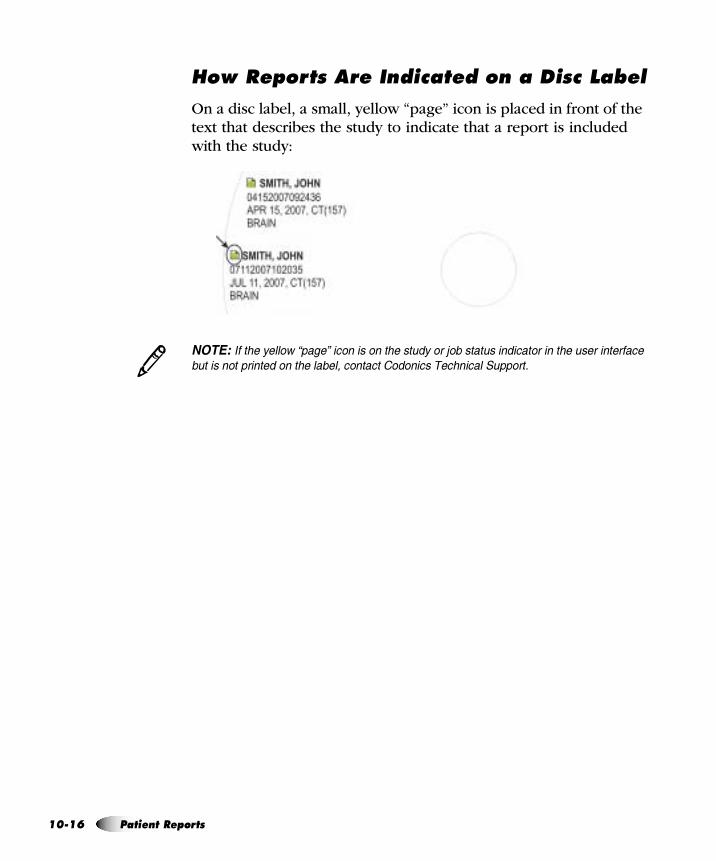
NM
eçï=oÉéçêíë=^êÉ=fåÇáÅ~íÉÇ=çå=~=aáëÅ=i~ÄÉä
On a disc label, a small, yellow “page” icon is placed in front of the text that describes the study to indicate that a report is included with the study:
���������� �� �����+��� ,������������ ��������@������������������� �� ���� ���� �
������������ ������ ���� ���������)�������� ���������������3
JNS m~íáÉåí=oÉéçêíë
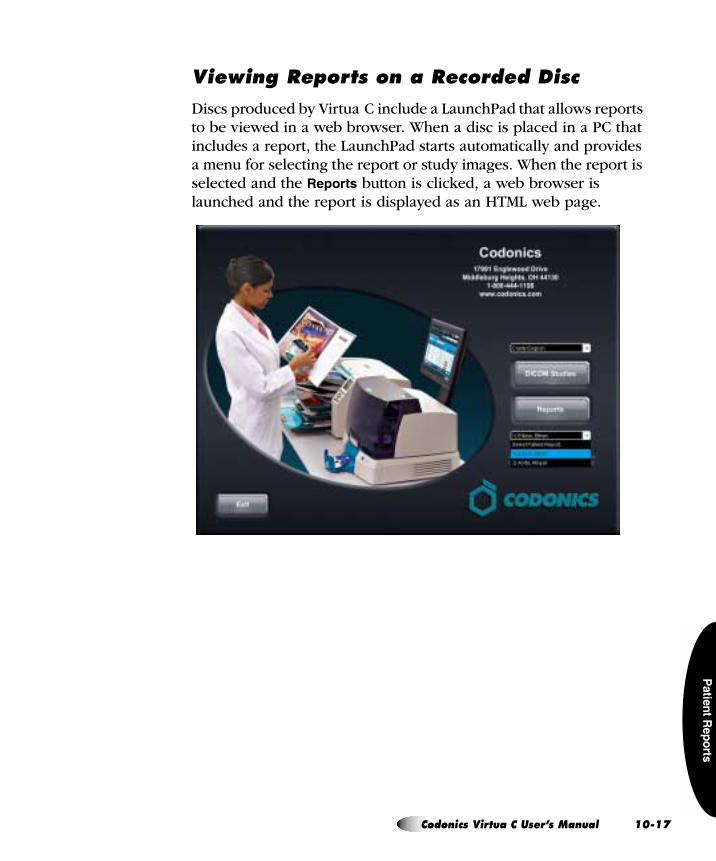
����
����
������
sáÉïáåÖ=oÉéçêíë=çå=~=oÉÅçêÇÉÇ=aáëÅ
Discs produced by Virtua C include a LaunchPad that allows reports to be viewed in a web browser. When a disc is placed in a PC that includes a report, the LaunchPad starts automatically and provides a menu for selecting the report or study images. When the report is selected and the 8������ button is clicked, a web browser is launched and the report is displayed as an HTML web page.
`çÇçåáÅë=sáêíì~=`=rëÉêÛë=j~åì~ä NMJNT=

���� ��� �!����"�
= NNpÅÜÉÇìäÉÇ=^êÅÜáîÉ
Scheduled Archive is an optional feature that provides a method of creating a set of discs that contain all studies received by Virtua C. This provides an economical way to store studies for future referral or importing into PACS systems. Discs are automatically recorded to ensure all new studies are added to the archive. All discs are in DICOM format for easy viewing of studies or transfer to PACS. A viewer is provided to view the images. An index is included on each disc that identifies all studies on that disc and previous discs in the archive.
������#�� ��� �$ ����� *��� ������� ���� ��� ��#����� �� ��� ��)�����)�������
� �������������������������� �. �� ���� �����*��� �� ����� ��� ��� �$ ��
Scheduled Archive operation can be controlled by modifying the Scheduled Archive Profile (refer to page 11-2) or from the Virtua C user interface (refer to page 11-7).
����� �" ��� "!" #���� ��� ��� �������� �� (� ���� �� ��� ���� #�����
$�� ��������' #������ ��$��#������ �� ������� ������'� $�� ��������' #������
��$��#����� ���� �������� �" ��� "!" #���� #��� ������ ���� #������� ������
�$ ��� ��$��#����� (� ������ �� #������� ���������� 9���� %������� �������'� ���
�����'� ���������� ��� �#������� $������ ���� #��� (� �����������
3
`çÇçåáÅë=sáêíì~=`=rëÉêÛë=j~åì~ä NNJN=
NN
Scheduled Archive can be enabled, and default parameter settings defined, by modifying the Scheduled Archive Profile.
For general information about modifying a profile, refer to “Creating and Modifying Profiles” on page 3-6.
The Scheduled Archive Profile, archive.default.txt, is stored in the \profiles\scheduling folder on the SmartDrive.
The format and parameters of the Scheduled Archive Profile text file are defined in the following table.
pÅÜÉÇìäÉÇ=^êÅÜáîÉ=mêçÑáäÉ
���� � ! ��9�������+��9 ���%��& ���'�������%������
%����� (���� �� ��
[ ScheduledArchiveProfile ] ����� ������������-�A<��������������� ������� ���
���� �<�����������������<������-
��&'(������������������� �������
enabled = ��������������<����<������0��<�=��������������������
����������-
�< ��������1�A����������?�<��������@-
runOnMonday =
runOnTuesday =
runOnWednesday =
runOnThursday =
runOnFriday =
runOnSaturday =
runOnSunday =
����������6<��<���3�� ���<��6��(��<����<������
0��<�=���������6������ �������3���-
�< ��������1�A����������?�<��������@-
waitForFullDisc = ����������6<��<����<����<������0��<�=���������6����
6����������� �<��������������������� ���� ������
������.!/� ���<������-
�< ��������1�A���?�<��������@�������-
JO pÅÜÉÇìäÉÇ=^êÅÜáîÉ
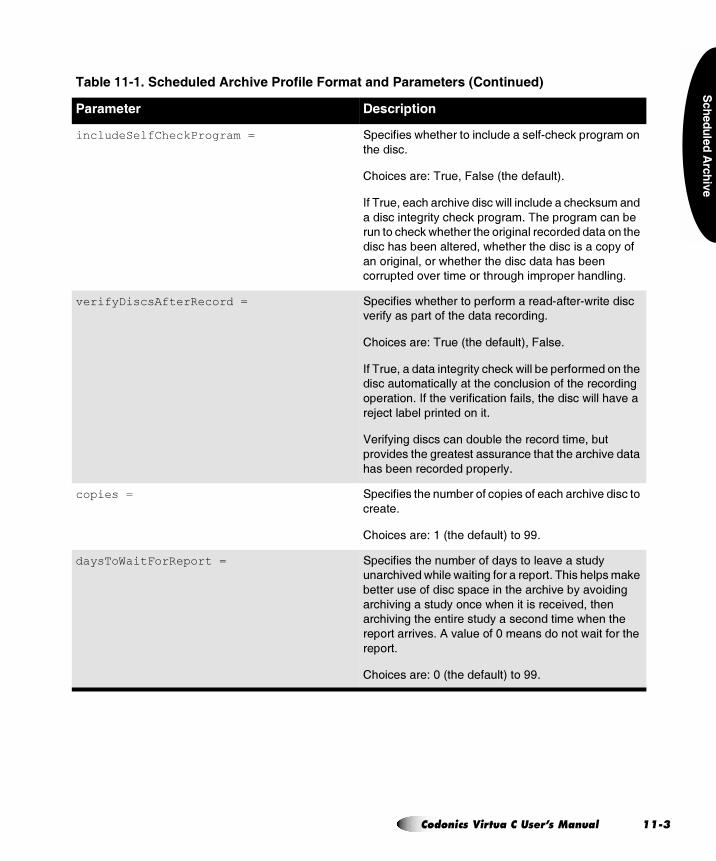
���� ��� �!����"�
includeSelfCheckProgram = ����������6<��<���� ��������������"�<��(��� ���� ��
�<������-
�< ��������1�A����������?�<��������@-
���A�������<����<�=�������6��������������<��(������
���������������3��<��(��� ���-�A<���� �����������
���� ��<��(�6<��<����<�� ����������� ���������� ���<��
�����<�����������������6<��<����<������������� �3� ��
��� ��������� ��6<��<����<������������<��������
� ������� =������� ���<� �<���� ����<�������-
verifyDiscsAfterRecord = ����������6<��<���� ����� ��������"�����"6����������
=����3��������� ���<���������� �����-
�< ��������1�A���?�<��������@�������-
���A�������������������3��<��(�6����������� ���� ���<��
������� �������3�����<��� ����� �� ���<����� ������
������ �-�����<��=��������� ����������<�������6����<�=����
��>������������������ ����-
)����3��������������� �����<����� �����������
�� =������<���������������������<����<�����<�=�������
<����������� ������� ����3-
copies = �����������<������� ��� ����� �����<����<�=�������� �
������-
�< ��������1���?�<��������@�� �99-
daysToWaitForReport = �����������<������� ����3��� ����=�������3�
����<�=���6<����6�������� ������� ��-�A<���<������(��
���������� �����������������<�����<�=���3��= ������
���<�=���������3� ����6<��������������=�����<���
���<�=�����<������������3������ �������6<����<��
��� �������=��-�0�=���� ��!������� �� ��6����� ���<��
��� ��-
�< ��������1�!�?�<��������@�� �99-
���� � ! ��9�������+��9 ���%��& ���'�������%������������ �����
%����� (���� �� ��
`çÇçåáÅë=sáêíì~=`=rëÉêÛë=j~åì~ä NNJP=
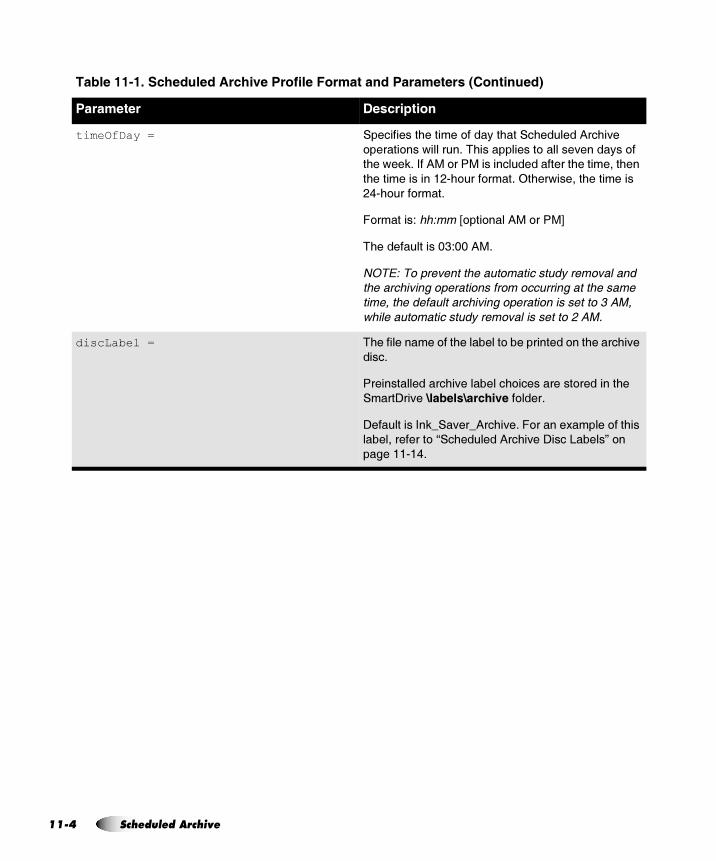
NN
timeOfDay = �����������<������ ����3��<�����<������0��<�=��
������ ���6������-�A<������������ �������=�����3�� ��
�<��6��(-����0�� �����������������������<��������<���
�<�������������$"< ��� ���-�4�<��6������<���������
$%"< ��� ���-
� ������1���(���T ��� ����0�� ����U
A<������������!#1!!�0�-
��&'(�&���� ������������������� ����� ����� ��������� �������������������������������������
�������� ����������� ������������������������*��
������������������ ����� ������������+��*�
discLabel = A<����������� ���<��������� ������������ ���<�����<�=��
����-
����������������<�=���������< ����������� ��������<��
����;��=��2� &���2 ����'��� ����-�
;�����������(D��=��D0��<�=�-�� ������C����� ���<���
�������������� �L��<������0��<�=��;����5�����M� ��
���� ��"�%-
���� � ! ��9�������+��9 ���%��& ���'�������%������������ �����
%����� (���� �� ��
JQ pÅÜÉÇìäÉÇ=^êÅÜáîÉ
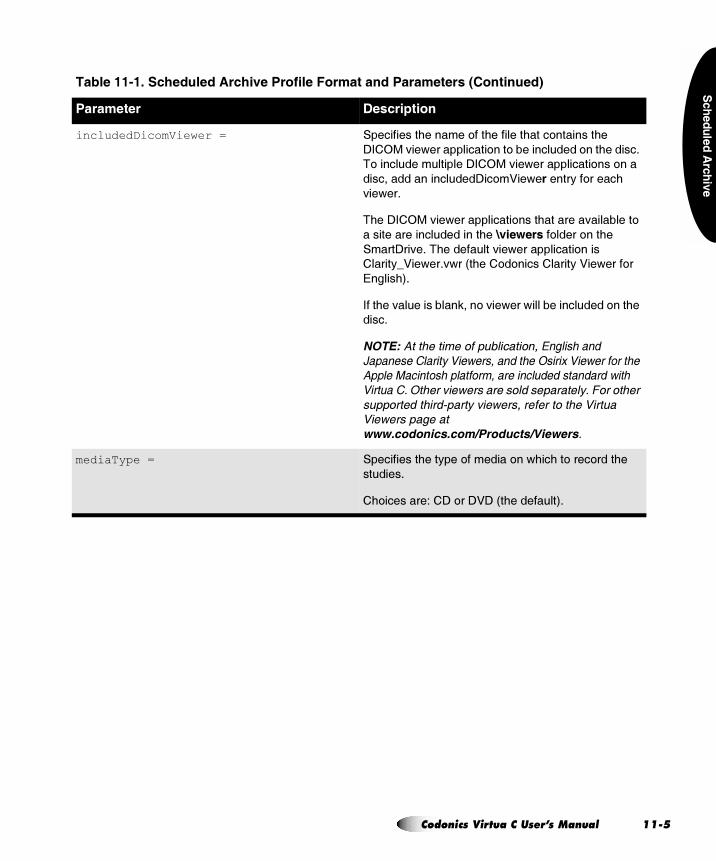
���� ��� �!����"�
includedDicomViewer = �����������<������ ���<��������<���� ��������<��
;��4��=��6������������ ��� ������������ ���<������-�
A ���������������;��4��=��6������������ ��� ����
��������������������;�� )��6�������3�� �����<�
=��6��-
A<��;��4��=��6������������ ����<��������=��������� �
�����������������������<��2'�������� ����� ���<��
����;��=�-�A<���������=��6������������ �����
������3D)��6��-=6��?�<��� � �����������3�)��6���� ��
������<@-
����<��=�����������(��� �=��6���6��������������� ���<��
����-
��������������������������������=����������
<���� �)������/� � �������� �����%�/� � ������� �#��� �-������������������ ������� �������������
/���� )������� ����������� �����������!��������
������� ����� "������ ����������������#������#�����������
������ ������������ ������
mediaType = �����������<���3��� ������� ��6<��<�� ���� ����<��
������-
�< ��������1��;� ��;);�?�<��������@-
���� � ! ��9�������+��9 ���%��& ���'�������%������������ �����
%����� (���� �� ��
`çÇçåáÅë=sáêíì~=`=rëÉêÛë=j~åì~ä NNJR=
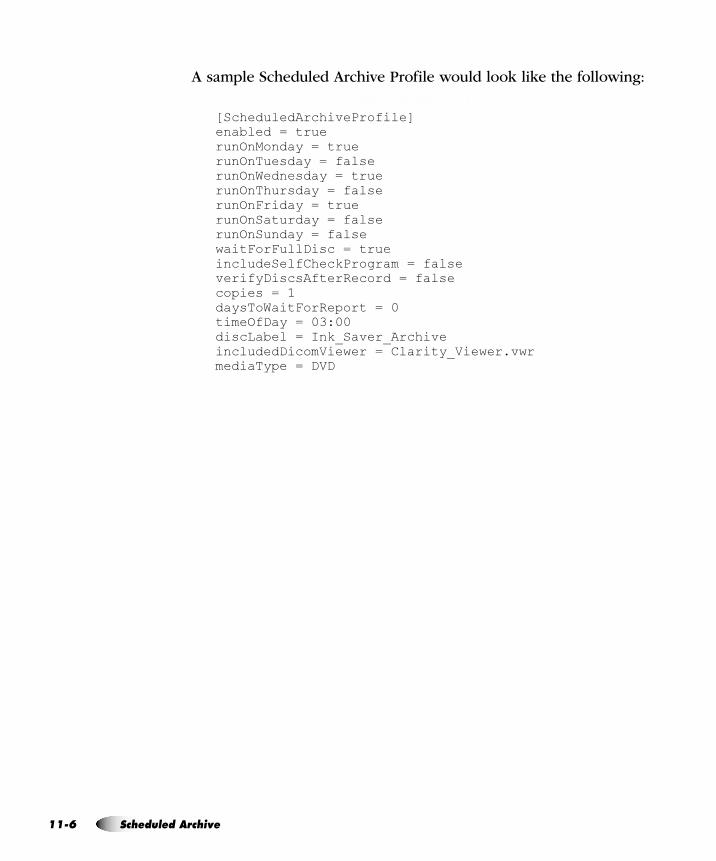
NN
A sample Scheduled Archive Profile would look like the following:
~êÅÜáîÉKÇÉÑ~ìäíKíñí
[ScheduledArchiveProfile]enabled = truerunOnMonday = truerunOnTuesday = falserunOnWednesday = truerunOnThursday = falserunOnFriday = truerunOnSaturday = falserunOnSunday = falsewaitForFullDisc = trueincludeSelfCheckProgram = falseverifyDiscsAfterRecord = falsecopies = 1daysToWaitForReport = 0timeOfDay = 03:00discLabel = Ink_Saver_ArchiveincludedDicomViewer = Clarity_Viewer.vwrmediaType = DVD
JS pÅÜÉÇìäÉÇ=^êÅÜáîÉ
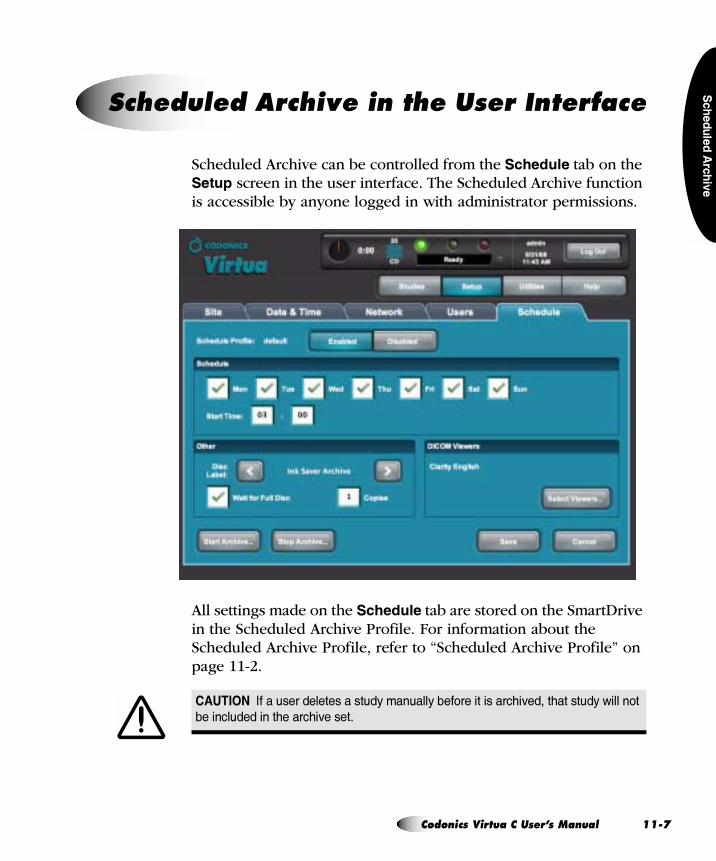
���� ��� �!����"�
Scheduled Archive can be controlled from the��(����� tab on the ����� screen in the user interface. The Scheduled Archive function is accessible by anyone logged in with administrator permissions.
All settings made on the �(����� tab are stored on the SmartDrive in the Scheduled Archive Profile. For information about the Scheduled Archive Profile, refer to “Scheduled Archive Profile” on page 11-2.
pÅÜÉÇìäÉÇ=^êÅÜáîÉ=áå=íÜÉ=rëÉê=fåíÉêÑ~ÅÉ
������� " ������������������������������ ����������������������������� ��������
��������������������������
`çÇçåáÅë=sáêíì~=`=rëÉêÛë=j~åì~ä NNJT=
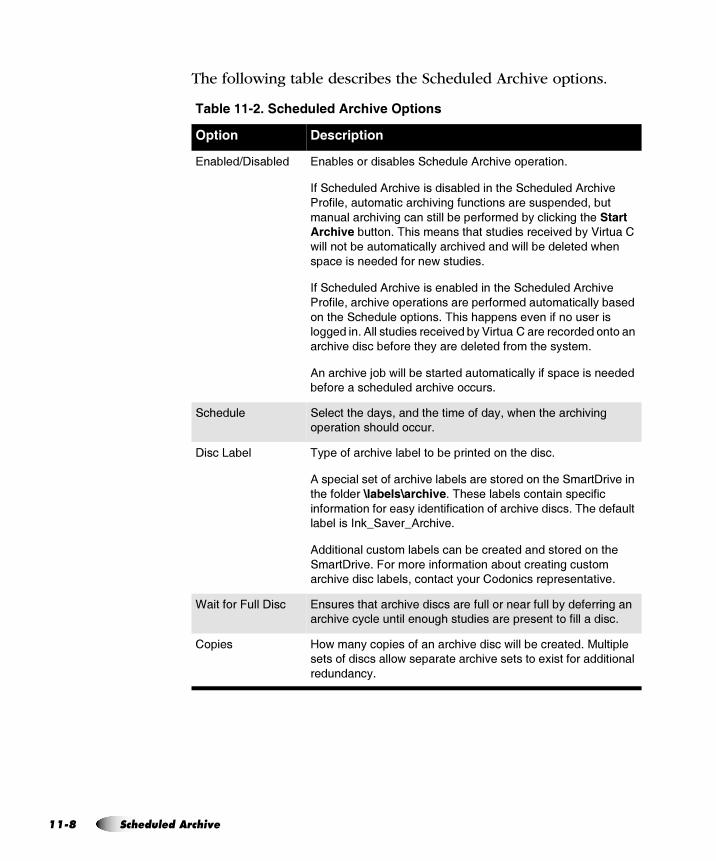
NN
The following table describes the Scheduled Archive options.
���� �)! ��9�������+��9 ���6�� ���
6�� �� (���� �� ��
�������*;������� �������� �������������<�����0��<�=�� ������ �-�
�����<������0��<�=������������������<����<������0��<�=��
�� �������� ��������<�=��������� ��������������������
��������<�=��������������������� �����3�����(�����<��$ ��
4����'����� �-�A<���������<���������������=����3�)���� ��
6����� ������� �������3����<�=�������6���������������6<���
����������������� ����6�������-
�����<������0��<�=�����������������<����<������0��<�=��
�� ���������<�=�� ������ ����������� ������ �������3�������
���<����<����� ��� ��-�A<���<��������=������� ��������
� �������-�0���������������=����3�)���� ��������� ����� �� ����
���<�=���������� ����<�3��������������� ��<���3���-
0�����<�=��> ��6����������������� �������3��������������������
��� �������<���������<�=�� ����-
��<���� ��������<����3��������<������ ����3��6<����<�����<�=����
������ ���< ��� ���-
;����5���� A3��� �����<�=��������� ������������ ���<������-
0������������� �����<�=��������������� ���� ���<������;��=�����
�<��� �����2� &���2 ����'�-�A<������������ ���������������
��� ���� ��� �����3������������� �� �����<�=�������-�A<���������
�����������(D��=��D0��<�=�-�
0����� ������� ����������������������������� ���� ���<��
����;��=�-�� �� ������ ���� ���� �������������� �
���<�=���������������� ������3 ��� � �����������������=�-
K����� ������;��� ��������<������<�=���������������� ������������3��������������
���<�=���3����������� �<��������������������� ������������-
� ���� + 6���3�� ����� ��������<�=�������6��������������-���������
����� ����������� 6�������������<�=�������� ��C����� �������� ����
��������3-
JU pÅÜÉÇìäÉÇ=^êÅÜáîÉ
���� ��� �!����"�
;��4��)��6��� �����������<���3���� ��;��4��=��6������������ ���� �������� ��
�<������-�� ���������� ��� ��< 6�� ��������=��6������������ �
L����������;��4��)��6���M� ������ ��"�!-
�< ��������1�: �;��4��)��6����������3�������<�?�<��� � �����
������3�������<�=��6��@��N��������)��6���?�<��N��������
=���� �� ���<��������3�)��6��@��������3� �<������<�����
=��6���-
������#�� ��� ����������������� �)������/� � ���� ������� �������������/���� )������� ����������� �����������!���
������������ ����� "������ ����������������#������#�����
������������ ������������ ������
������0��<�=� ������3��������������<�=�� ������ �-
�� ��0��<�=� �� ���������<�=�� ������ ���<����������� �����-�0�3��������<���
6����� �����<�=���6<����<�� ������ ��6����� �����6�������
������������<����C�����<�=�� ������ �-
���� �)! ��9�������+��9 ���6�� ��������� �����
6�� �� (���� �� ��
`çÇçåáÅë=sáêíì~=`=rëÉêÛë=j~åì~ä NNJV=

NN
pÉäÉÅíáåÖ=af`lj=sáÉïÉêë
Virtua C allows the recording of multiple DICOM viewers on disc (both general purpose viewers and specialized viewers).
1. On the �(����� tab, click the ������,������ button.
2. Viewers can be selected or de-selected on the ������,������ screen. Select the viewers to be included on the disc.
3. When all the desired viewers have been selected, click the � button.
The selected DICOM viewers are now listed in the �(����� tab.
8�����������
���3%
'������
JNM pÅÜÉÇìäÉÇ=^êÅÜáîÉ
���� ��� �!����"�
Please note the following issues before selecting multiple DICOM viewers:
5 Use of multiple viewers on a disc reduces the available disc storage for recording patient studies.
5 The Siemens syngo XS Imaging Viewer and the eFilm Lite Viewer may not be recorded together on a disc. Virtua C will prevent the user from inadvertently selecting these two viewers together.
5 The Siemens syngo XS Imaging Viewer and the Siemens Media Viewer may not be recorded together on a disc. Virtua C will prevent the user from inadvertently selecting these two viewers together.
5 When the OsiriX Viewer is selected with other viewers, the name of the viewer (OsiriX) is not displayed as a viewer option when a disc is loaded in a PC. The OsiriX viewer is for the Apple Macintosh platform and runs on Macintosh OS 10.5 or greater. The OsiriX viewer cannot be used in a Windows environment. The OsiriX viewer can be selected with other viewers to produce a disc that can be used with Windows or Mac.
5 The MIMviewer and Siemens syngo XS Imaging Viewer must be able to read each study on a disc. Each viewer reports a problem if any study on a disc is not compatible. This issue is independent of the number of viewers on a disc.
5 Custom viewers can be used with other viewers. However, compatibility should be tested with desired viewers. Refer to the Codonics Virtua 3rd Party Viewer Technical Brief for instructions on use and proper packaging of custom viewers.
5 Discs created with more than one DICOM viewer will not list the viewer names on the label. Labels list the number of viewers (for example, Viewer: 2 DICOM Viewers).
`çÇçåáÅë=sáêíì~=`=rëÉêÛë=j~åì~ä NNJNN=
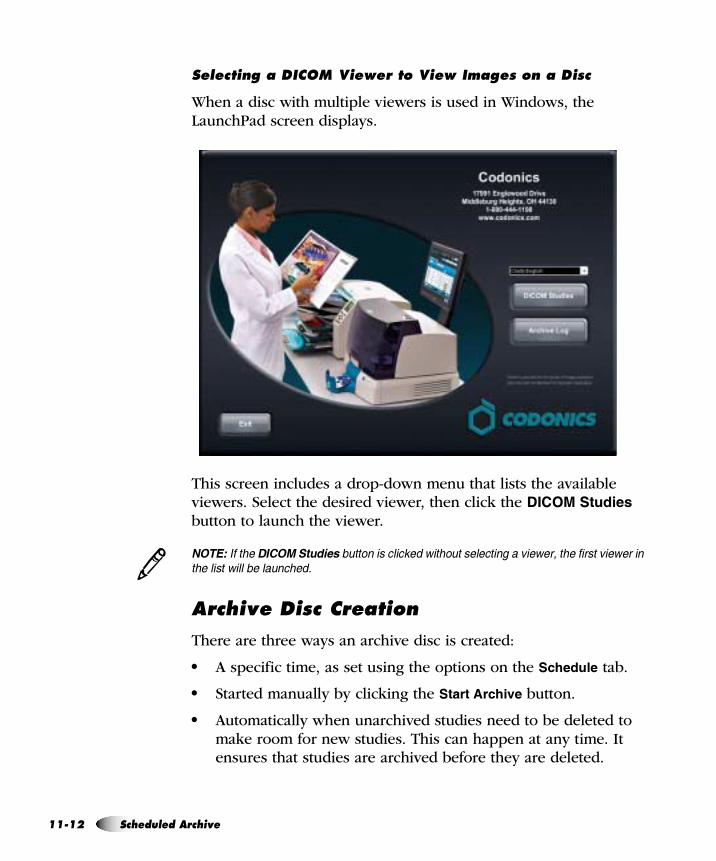
NN
pÉäÉÅíáåÖ=~=af`lj=sáÉïÉê=íç=sáÉï=fã~ÖÉë=çå=~=aáëÅ
When a disc with multiple viewers is used in Windows, the LaunchPad screen displays.
This screen includes a drop-down menu that lists the available viewers. Select the desired viewer, then click the !���&���������button to launch the viewer.
���������� �$���( !�����������������$ �������� � ��������� � ���� ������� � �����
� ���������� ������� ��
^êÅÜáîÉ=aáëÅ=`êÉ~íáçå
There are three ways an archive disc is created:
5 A specific time, as set using the options on the ��9����� tab.
5 Started manually by clicking the �����+��9 �� button.
5 Automatically when unarchived studies need to be deleted to make room for new studies. This can happen at any time. It ensures that studies are archived before they are deleted.
3
JNO pÅÜÉÇìäÉÇ=^êÅÜáîÉ
���� ��� �!����"�
All archive operations keep track of studies that have been successfully written to an archive disc. If an archive operation fails for any reason, the studies are preserved on Virtua C until successfully written to an archive disc. This ensures that studies will not be automatically deleted when an archive operation fails.
^êÅÜáîÉ=aáëÅ=`çåíÉåí
Each archive disc is IHE PDI-compliant with DICOM studies that conform to DICOM Part 10 specifications. Studies on the disc can be imported into PACS or DICOM review workstations. A DICOM viewer can be included on the disc, which allows the studies to be directly viewed on a PC.
^êÅÜáîÉ=içÖ=cáäÉë
The log file archiveLog.csv, which contains a cumulative list of all studies archived on all discs to date, is included at the root level of each archive disc. This means that the last disc on an archive can always be used to search for any study in the archive.
The archive log file is in CSV (Comma Separated Values) format. The archive log can be opened in any spreadsheet application, such as Excel.
Also, when an archive disc is loaded into a PC, the LaunchPad application opens automatically. To open the log file in the PC’s default spreadsheet application, click the +��9 ������ button.
Each line in the log file represents one study in the archive and contains the data in the following order:
Archive Disc Number, Archive Date, Patient Name, Patient ID, Patient DOB, Study Date, Modality, Report Included, Study Description, Referring Physician, Accession Number
Following is a sample study entry:
"A0001", "6/28/07", "FIRENZE, MARY", "000000 06272007152346", "9/11/54", "6/27/07", "DR", "", "PANCREAS", "WOHLERT", "000000 06272007152346 "
`çÇçåáÅë=sáêíì~=`=rëÉêÛë=j~åì~ä NNJNP=
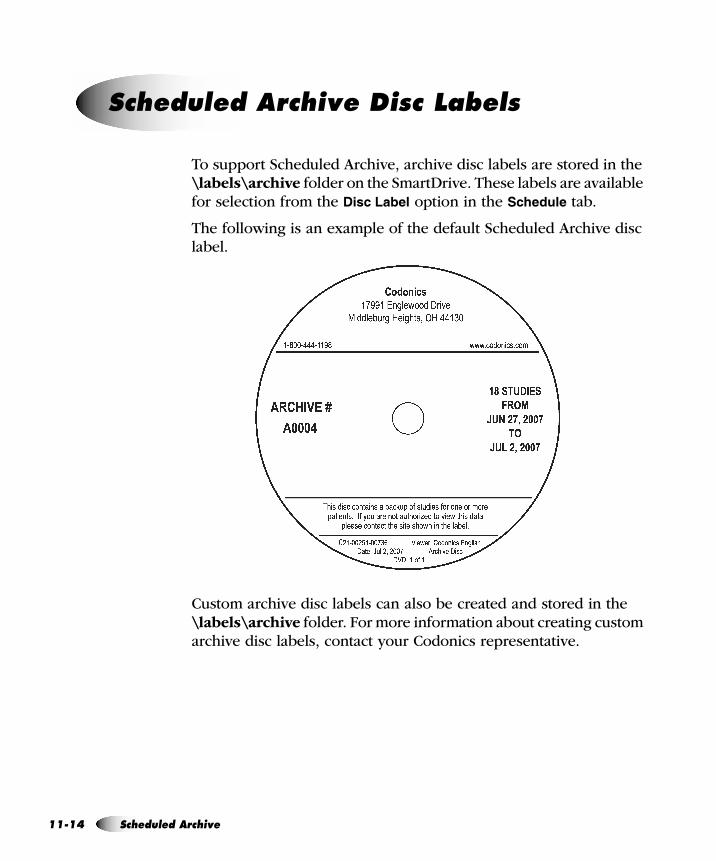
NN
To support Scheduled Archive, archive disc labels are stored in the \labels\archive folder on the SmartDrive. These labels are available for selection from the ( ������� option in the ��9����� tab.
The following is an example of the default Scheduled Archive disc label.
Custom archive disc labels can also be created and stored in the \labels\archive folder. For more information about creating custom archive disc labels, contact your Codonics representative.
pÅÜÉÇìäÉÇ=^êÅÜáîÉ=aáëÅ=i~ÄÉäë
JNQ pÅÜÉÇìäÉÇ=^êÅÜáîÉ
#��������
= NOj~áåíÉå~åÅÉ
Virtua C maintains log files of all recorded studies, patient information, and processing activities. If required to meet your organization’s HIPAA regulations, you can record these files to a disc.
You must be logged in as a user with administrator privileges to perform this procedure.
oÉÅçêÇáåÖ=içÖ=cáäÉë=íç=~=aáëÅ
������� )���������� �������������������� ������������������������ ���������
`çÇçåáÅë=sáêíì~=`=rëÉêÛë=j~åì~ä NOJN=
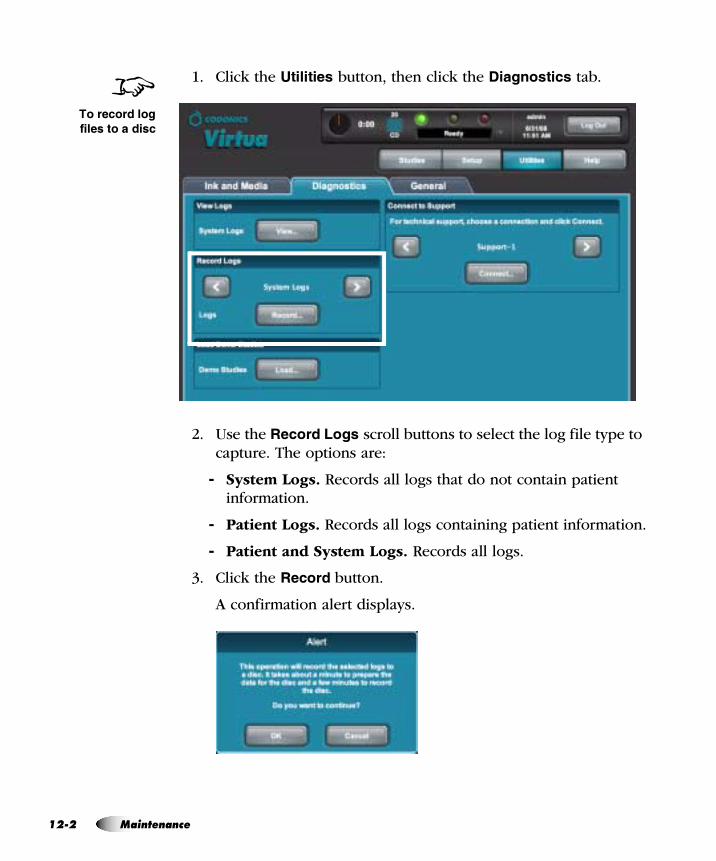
NO
1. Click the ��������� button, then click the !�������� tab.
2. Use the �������� scroll buttons to select the log file type to capture. The options are:
6 System Logs. Records all logs that do not contain patient information.
6 Patient Logs. Records all logs containing patient information.
6 Patient and System Logs. Records all logs.
3. Click the �����button.
A confirmation alert displays.
8�������������
�������� �����
JO j~áåíÉå~åÅÉ
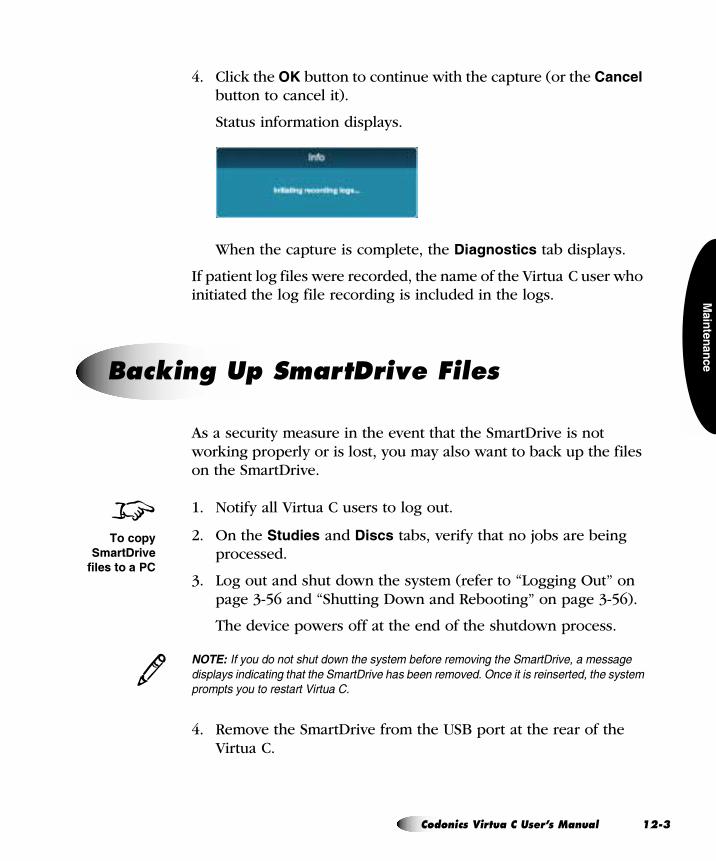
#��������
4. Click the � button to continue with the capture (or the ����� button to cancel it).
Status information displays.
When the capture is complete, the !�������� tab displays.
If patient log files were recorded, the name of the Virtua C user who initiated the log file recording is included in the logs.
As a security measure in the event that the SmartDrive is not working properly or is lost, you may also want to back up the files on the SmartDrive.
1. Notify all Virtua C users to log out.
2. On the ������� and !��� tabs, verify that no jobs are being processed.
3. Log out and shut down the system (refer to “Logging Out” on page 3-56 and “Shutting Down and Rebooting” on page 3-56).
The device powers off at the end of the shutdown process.
���������������������������� �� ��� ��� �� �������� ��������� ����� �� �
��������������������� ��������� ����� ��� ��� ������ ������ �� � ���� �� ��
������������� ���/���� )�
4. Remove the SmartDrive from the USB port at the rear of the Virtua C.
_~ÅâáåÖ=ré=pã~êíaêáîÉ=cáäÉë
8�����!�
$� ����'�
�������� ���
3
`çÇçåáÅë=sáêíì~=`=rëÉêÛë=j~åì~ä NOJP=
NO
5. Mount the SmartDrive in a USB port on a PC or other USB-compatible computer.
The SmartDrive will appear as a standard USB flash drive.
6. Copy the desired folder and files on the SmartDrive to a folder on the PC.
7. When you have finished copying the log files to the PC, unmount the SmartDrive from the computer, then insert it back into the Virtua C USB port.
8. Power on Virtua C by pressing the System power button at the front of Virtua C.
Virtua C provides two user-configurable security features designed to reduce the threat from malicious software attacks by viruses, adware, worms, and trojan horses:
5 A software firewall restricts incoming access to specific network services.
5 A method for external scanning of the Virtua C hard drive by commercial anti-virus programs allows detection of files containing malicious software.
It is important to note that Virtua C security features should be part of an overall strategy for device security. Do not rely on these features as the only means for preventing malicious software attacks.
pÉÅìêáíó=cÉ~íìêÉë
JQ j~áåíÉå~åÅÉ

#��������
pçÑíï~êÉ=cáêÉï~ää
Virtua C utilizes the standard Windows XP Embedded firewall to block incoming connections to network services. A software firewall can be enabled and configured by including several firewall parameters in the Network Profile. For more information, refer to “Network Profile Parameters” on page 3-9.
sáêìë=pÅ~ååáåÖ
Virtua C can provide read-only access to internal hard drive partitions for scanning by commercial anti-virus programs. This is made available to IT departments as an alternative to loading anti-virus software on Virtua C.
IT departments can access the hard drive partitions by remotely mounting the partitions as network drives. The Virtua C partitions and corresponding network names are:
Access to these partitions is read-only to prevent modification of the software.
If malicious software is detected, the remedy is to perform a full re-install of Virtua C software from the Operating Software disc.
The mapped network drives are password-protected to prevent unauthorized access to patient information. Contact Codonics Technical Support to obtain the username and password that allow access to the partitions.
������� *����� ����������������������������������� � ������������ �������
������������������� ������ ��������������+�������,�������� � ���������������(
������������������������������� ������ ���������������������������������������
������������ ��������� �������������� � ���������� ���
kÉíïçêâ=k~ãÉ m~êíáíáçå
drive0 Program partition
drive1 First Data partition
`çÇçåáÅë=sáêíì~=`=rëÉêÛë=j~åì~ä NOJR=
NO
If the firewall is enabled, remote mounting of the partitions requires setting the Network Profile parameter smbFirewallPortOpen to True. For more information, refer to “Network Profile Parameters” on page 3-9.
^ÇÇáíáçå~ä=pÉÅìêáíó=aÉëáÖå=cÉ~íìêÉë
Virtua C software has security implemented at several levels. In addition to the firewall and external virus scanning functions, the following security design features have been implemented:
5 Windows XP Embedded configuration. The Windows XP Embedded operating system has many unnecessary components removed to limit software attacks.
5 Autorun disabled. External software will not run when loaded in the CD/DVD drives or on the USB port.
5 Limited built-in applications. Virtua does not allow access to incoming e-mail, outgoing web access, or other applications not related to the function of the device. This greatly reduces the opportunity for malicious software to enter the system.
5 No keyboard or mouse. Virtua C does not include a keyboard or mouse. Users are limited to accessing Virtua C using an external web-browser. Other applications cannot be loaded or accessed.
JS j~áåíÉå~åÅÉ
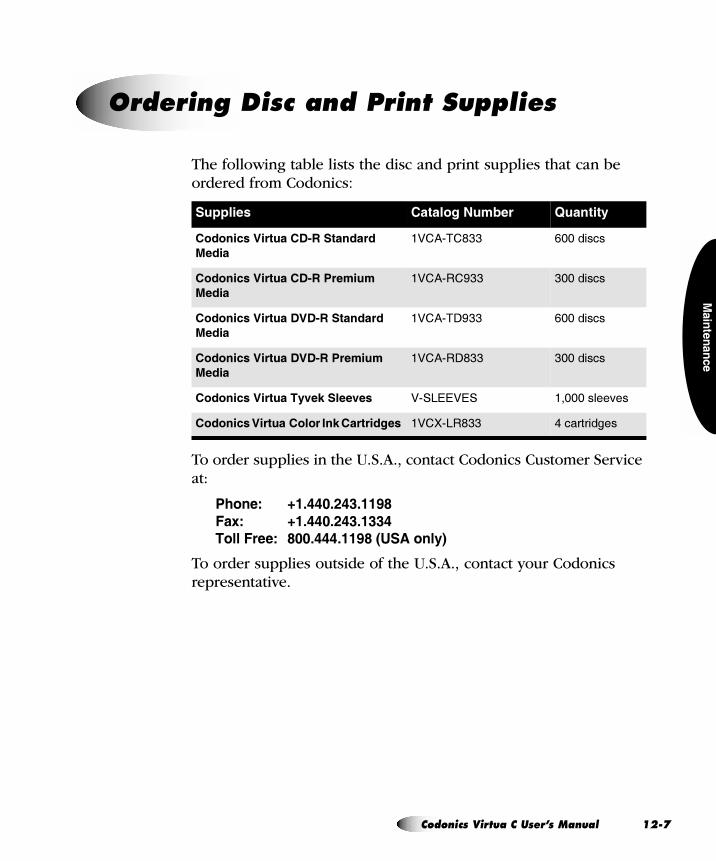
#��������
The following table lists the disc and print supplies that can be ordered from Codonics�
To order supplies in the U.S.A., contact Codonics Customer Service at:
������ ���� ����
���� ���� �
���������� ������������������
To order supplies outside of the U.S.A., contact your Codonics representative.
lêÇÉêáåÖ=aáëÅ=~åÇ=mêáåí=pìééäáÉë
����� �� ������"���� <��� ��
������������ ��=��$ �� ���
%���
�)�0"A�'## !!������
������������ ��=���������
%���
�)�0"��9## #!!������
������������ ����=��$ �� ���
%���
�)�0"A;9## !!������
������������ ����=���������
%���
�)�0"�;'## #!!������
������������ ���'���$���'�� )"�5��)�� ��!!!�����=��
������������ ����������� �������� �)�R"5�'## %�����������
`çÇçåáÅë=sáêíì~=`=rëÉêÛë=j~åì~ä NOJT=
������������� �������������� � �� ������������������������� �������� ���#���
������������� �� ��� ������ �� ������ ���� ����� �� ��� �����������������������������
� *��� ������ ���� ���� *��� ���������)�������� ���������������
To clean the Virtua C enclosure, first power off and unplug the device. Clean the cover with a clean soft cloth or towel slightly moistened with a mild soap and water solution. Allow the cover to completely dry before operating the device again.
If you ever have to reinstall the software or install a software upgrade, refer to “Installing the Software” on page 3-2 or to the Technical Brief that accompanies the software installation disc.
All Virtua Technical Briefs are also available on the Codonics web site (�������� �!��"#����$�%!#& �%$�).
`äÉ~åáåÖ=sáêíì~ `
������� �� ����� ��� ������������������������������!��� ��������
� ������������������������������� ��������� �������������������
3
fåëí~ääáåÖ=pçÑíï~êÉ
#��������
If you have to ship the device for any reason (for example, to return it to Codonics for service), you must use the original boxes and packing materials. If you do not have the original box and packing materials, contact your Codonics representative for instructions on how to return the device.
Before repacking the device, remove the ink cartridge. For information about how to remove the ink cartridge, refer to “Installing the Color Ink Cartridge” on page 2-22.
If the Virtua C is to be transported frequently between sites, remove all discs from the input bin. Shut down Virtua C (refer to “Shutting Down and Rebooting” on page 3-56), close the Recorder cover, and make sure that Virtua C is secured for mobile transportation. This can be accomplished by completely seating the Virtua C into the Docking Tray (catalog no. V-ECO-TRAY) and snugly pulling the Velcro strap around the Recorder, being careful to not over-tighten the strap.
Also, creating multiple Network Profiles can help to conveniently switch from site to site. For more information, refer to “Setting Up Network Profiles” on page 3-7.
mêÉé~êáåÖ=sáêíì~ `=Ñçê=pÜáééáåÖ
mêÉé~êáåÖ=sáêíì~ `=Ñçê=jçÄáäÉ=rëÉ
`çÇçåáÅë=sáêíì~=`=rëÉêÛë=j~åì~ä NOJV=

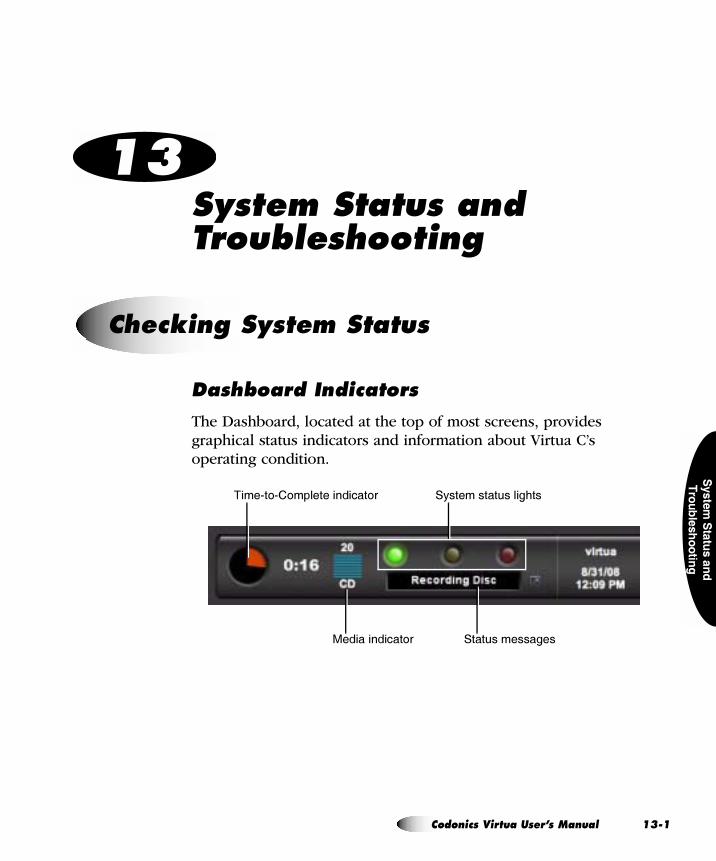
�$���%�������� �
&�������������
�
= NPpóëíÉã=pí~íìë=~åÇ=qêçìÄäÉëÜççíáåÖ
a~ëÜÄç~êÇ=fåÇáÅ~íçêë
The Dashboard, located at the top of most screens, provides graphical status indicators and information about Virtua C’s operating condition.
`ÜÉÅâáåÖ=póëíÉã=pí~íìë
A��"� "� ������������� �
������������� �
�3�������������<��
�������������
`çÇçåáÅë=sáêíì~=rëÉêÛë=j~åì~ä NPJN=
NP
The Dashboard includes the following indicators:
5 Time-to-Complete indicator. This indicates the estimated amount of time remaining for all pending jobs for the currently configured media type to complete. The round “timer” indicates the time remaining as an orange wedge. The larger the wedge, the more time is required. If the timer is solid orange, then at least one hour of time is required to complete all jobs. The digital display next to the timer shows the hours:minutes remaining.
5 Input bin Media indicator. Shows the currently configured media type and how many discs remain in the input bin.
5 System status lights. The three LED-style lights indicate the overall status of Virtua C. For more information about these, refer to the next topic, “Interpreting Dashboard System Status Lights”.
5 Status messages. Messages that provide basic information about Virtua C’s operating state. Clicking the Dashboard displays more detailed status information.
JO póëíÉã=pí~íìë=~åÇ=qêçìÄäÉëÜççíáåÖ

�$���%�������� �
&�������������
�
fåíÉêéêÉíáåÖ=a~ëÜÄç~êÇ=póëíÉã=pí~íìë=iáÖÜíë
System status lights are located on the Dashboard.
The following table explains how to interpret the state of the Dashboard System status lights.
���� �� ! (�9������������������ �9��
������� �9� (���� �� ��
�����1�4� ����3�� ����� �-
A<������3�� ����� ������������)���� ������� ����3�� ��������
����������������������� ���� �������-�A<���������L����3M�
��� �������3������<��;��<� ���������������������-
�����1�����<��� �� �������-
A<����� ������������������������)���� ����������=���������3��
���������������3�� ����� ������� ����� ���������������������
����-�A<��������� ��� ���<������������������;�����2����
�����<��;��<� �����������������������������3��<���������� ��
6<�������������� ������-
W��� 61�4� 0������ ����� �-
0��������� ����� ������������)���� ����2���������������� �����
������������ �����> ��-�A<������������������ ����� �����������3���
����<��;��<� ���������������������-�
�C���������1�5 6� ����(J�N ��K�������?;);@-
���1�4� ������ ����� �-
0������� ����� ������������)���� ������ ���� �����> �������
��2���������������� �-�A<����������������� ����� �����������3���
����<��;��<� ���������������������-
�C���������1�4�� ��;����J�4�� ����(J�����;��=��: ��� ��-
�3�������������<��
`çÇçåáÅë=sáêíì~=rëÉêÛë=j~åì~ä NPJP=
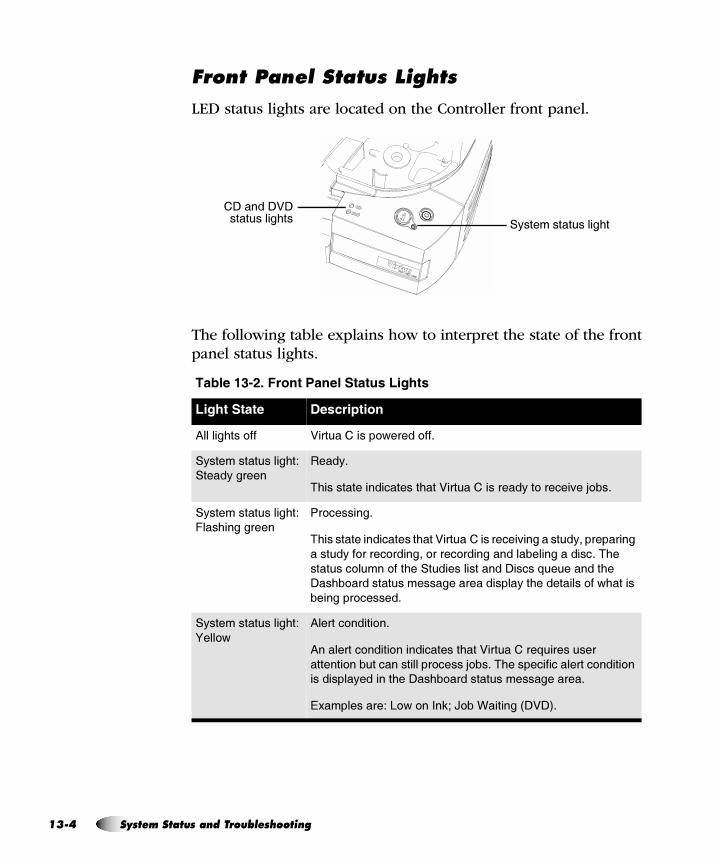
NP
cêçåí=m~åÉä=pí~íìë=iáÖÜíë
LED status lights are located on the Controller front panel.
The following table explains how to interpret the state of the front panel status lights.
���� ��)! '�����%����������� �9��
� �9������ (���� �� ��
0������<��� �� )���� ������ 6����� ��-
�3�������������<�1�
�����3������
����3-
A<��������������������<���)���� ���������3�� ������=��> ��-
�3�������������<�1�
����<���������
�� �������-
A<��������������������<���)���� ����������=���������3������������
�����3�� ����� ������� ����� �������������������������-�A<��
������� ��� ���<������������������;�����2��������<��
;��<� ����������������������������3��<���������� ��6<������
�������� ������-
�3�������������<�1�
W��� 6
0������ ����� �-
0��������� ����� �������������<���)���� ����2���������
������� ����������������� �����> ��-�A<������������������ ����� ��
���������3�������<��;��<� ���������������������-�
�C���������1�5 6� ����(J�N ��K�������?;);@-
�3�������������<�
�;�����;);���������<��
JQ póëíÉã=pí~íìë=~åÇ=qêçìÄäÉëÜççíáåÖ
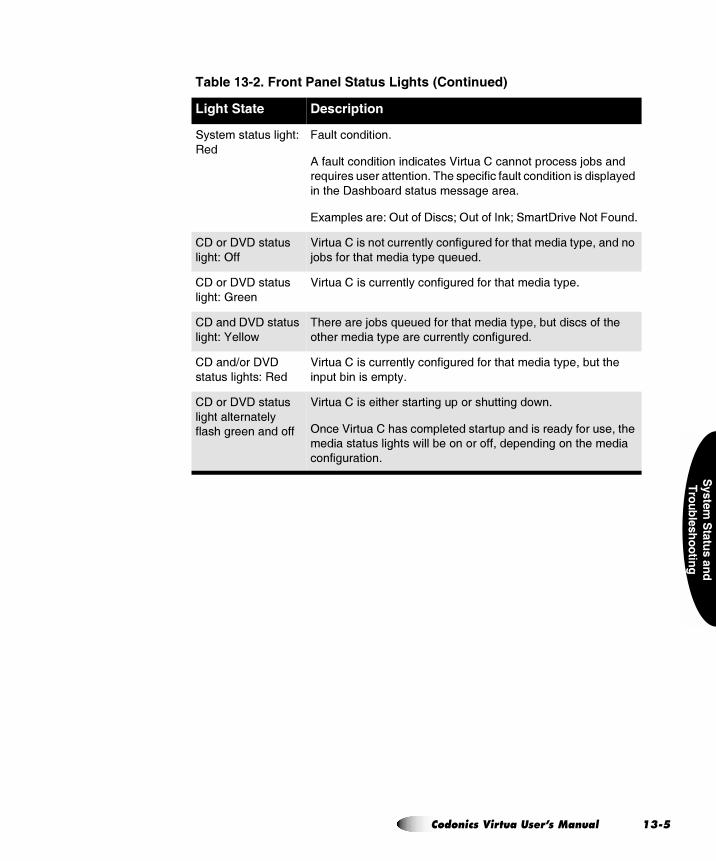
�$���%�������� �
&�������������
�
�3�������������<�1�
���
������ ����� �-
0������� ����� ������������)���� ������ ���� �����> �������
��2���������������� �-�A<����������������� ����� �����������3���
����<��;��<� ���������������������-
�C���������1�4�� ��;����J�4�� ����(J�����;��=��: ��� ��-
�;� ��;);�������
���<�1�4��
)���� ������ ���������3�� ��������� ���<���������3��������� �
> ���� ���<���������3���2���-
�;� ��;);�������
���<�1������
)���� ������������3�� ��������� ���<���������3��-
�;�����;);�������
���<�1�W��� 6
A<��������> ���2����� ���<���������3������������� ���<��
�<���������3��������������3�� �������-
�;����* ��;);�
���������<��1����
)���� ������������3�� ��������� ���<���������3��������<��
���������������3-
�;� ��;);�������
���<������������3�
����<����������� ��
)���� ��������<�������������� ���<������� 6�-
4����)���� ��<���� �������������������������3�� �������<��
��������������<���6������� �� �� �������������� ���<�������
� �������� �-
���� ��)! '�����%����������� �9�������� �����
� �9������ (���� �� ��
`çÇçåáÅë=sáêíì~=rëÉêÛë=j~åì~ä NPJR=
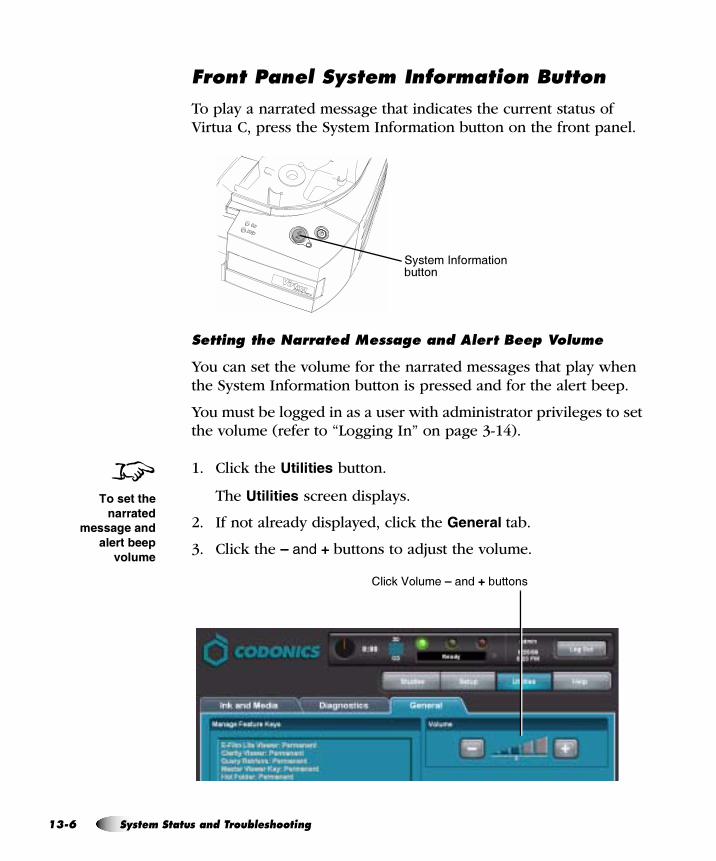
NP
cêçåí=m~åÉä=póëíÉã=fåÑçêã~íáçå=_ìííçå
To play a narrated message that indicates the current status of Virtua C, press the System Information button on the front panel.
pÉííáåÖ=íÜÉ=k~êê~íÉÇ=jÉëë~ÖÉ=~åÇ=^äÉêí=_ÉÉé=sçäìãÉ
You can set the volume for the narrated messages that play when the System Information button is pressed and for the alert beep.
You must be logged in as a user with administrator privileges to set the volume (refer to “Logging In” on page 3-14).
1. Click the ��������� button.
The ��������� screen displays.
2. If not already displayed, click the -�������tab.
3. Click the .�����/�buttons to adjust the volume.
�3������� ���� ����� �
8��������
� �� ��
���� ��� ��
����&��!
'����
����(�) ���/�����.���� ��
JS póëíÉã=pí~íìë=~åÇ=qêçìÄäÉëÜççíáåÖ
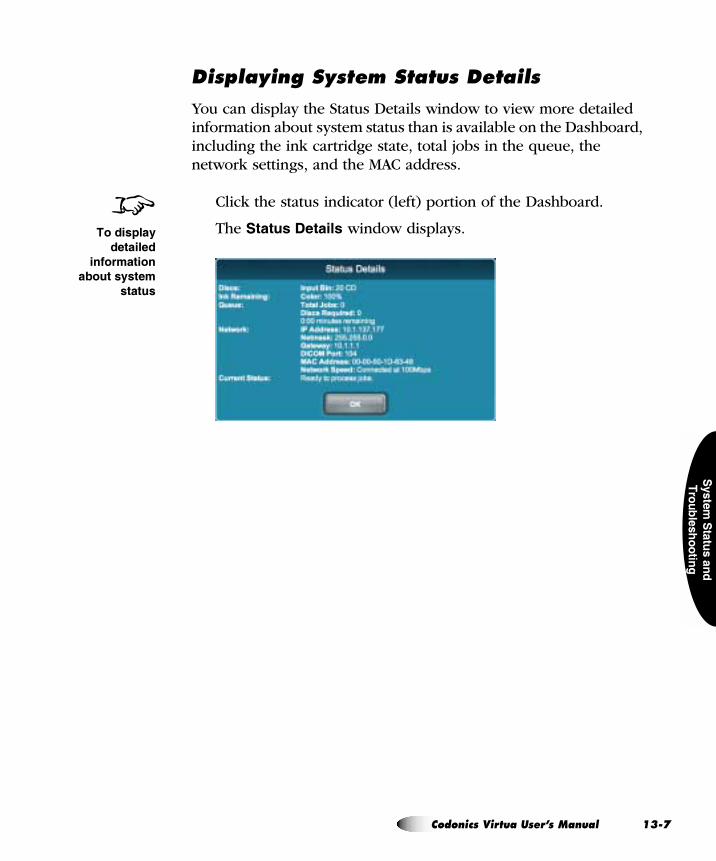
�$���%�������� �
&�������������
�
aáëéä~óáåÖ=póëíÉã=pí~íìë=aÉí~áäë
You can display the Status Details window to view more detailed information about system status than is available on the Dashboard, including the ink cartridge state, total jobs in the queue, the network settings, and the MAC address.
Click the status indicator (left) portion of the Dashboard.
The �������!������ window displays.8
������!� �
�� ����
������ ���
&�������
� �
`çÇçåáÅë=sáêíì~=rëÉêÛë=j~åì~ä NPJT=
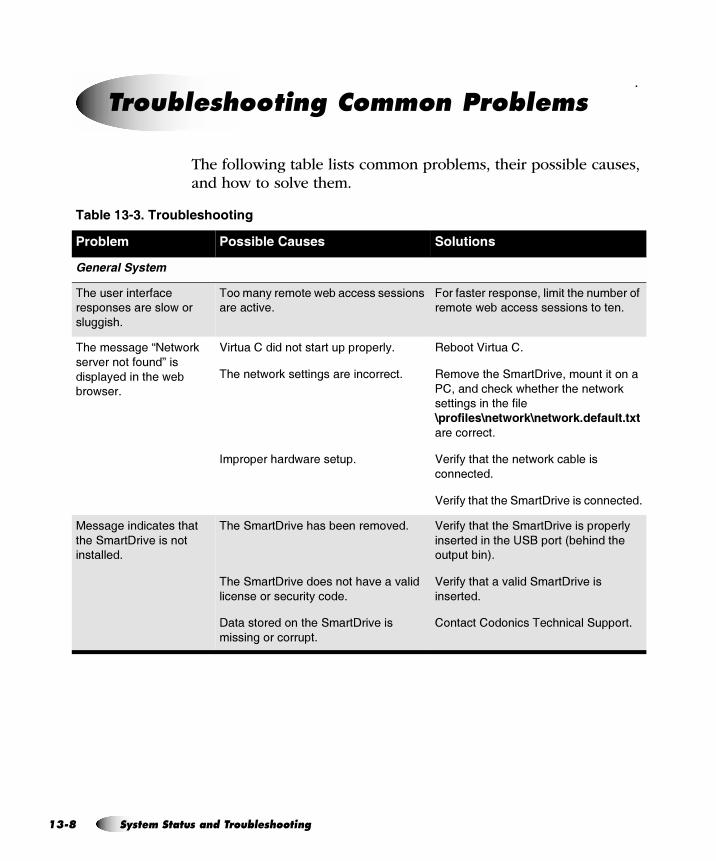
NP
.
The following table lists common problems, their possible causes, and how to solve them.
qêçìÄäÉëÜççíáåÖ=`çããçå=mêçÄäÉãë
���� ���! ��������9��� ��
%����� %��� ��������� ����� ���
��������������
A<����������������
���� ����������� 6� ��
������<-
A ���3��� ���6��������������� ���
��������=�-
� ������������� �����������<������� ��
�� ���6��������������� ���� ����-
A<���������L:��6 �(�
���=���� ��� ��M����
������3�������<��6���
�� 6���-
)���� ������� ������������ ����3-
A<�����6 �(����������������� �����-
��� ����<���6��������-
��� ��)���� �-�
�� =���<������;��=��� ������ ����
���������<��(�6<��<����<�����6 �(�
�������������<�������
2!�������2������2������(��� �(��
����� �����-
)����3��<����<�����6 �(����������
� �������-�
)����3��<����<������;��=������ �������-
�������������������<���
�<������;��=������ ��
���������-
A<������;��=��<���������� =��-
A<������;��=��� ���� ��<�=����=�����
�������� ��������3�� ��-
;������ ���� ���<������;��=�����
������� ��� ����-
)����3��<����<������;��=������� ����3�
�������������<��7���� ���?��<�����<��
�������@-
)����3��<�����=���������;��=�����
��������-
� ������� � �����A��<��������� ��-
JU póëíÉã=pí~íìë=~åÇ=qêçìÄäÉëÜççíáåÖ

�$���%�������� �
&�������������
�
)���� ���������
�������� ����� ��
'�� �� �� ��6 �(-
�����5 �(���� ��6<�������������<��
����6 ��-
7�������� ������6 ��������
� �������� ���<������6 ����<�=�������
� �� ����-
A����<��(�3� ���E�������5 �(� �������
���������<������6 ��-
�� =���<������;��=������ ������
������-�;�������<��������
2!�������2���2���( ����(������
2!�������2���2���('�� (���� ��<��
����;��=������������������ �)���� �������
��� ��)���� �-�)���� ��6����
�� �������3�����������<�� ���������
'�� �� ������� ����6��<��<������6 ���
��������-
����"����������������
� �� ��6 �(-
7�������� ������6 ����<�=�������
� �� ����-
5 �������� ����������(��<��$�!���� ���
�<�������(��<��-��������-�)����3��<����<��
�����������������������<������<��
����6 ��������������3-
A<���������)���� ������
�������������� ��������
������3�������<��6���
�� 6����6��� 6-
A<���� 6����6��� 6����� �����-
A<��K��� 6��������3���� ��� ������ ��
<��<��� �<�� �������3��<���������
)���� ����������������?6<��<�����!$%�C�
. '���C���@-
A<�� ��� �E������������� �����-
����������<���� 6����6��� 6���,�-
�<������<��K��� 6��������3�
��� ��� �-
7����� ��� ��6��<����������������-
)���� ��� ���� ���<��
� 6��������6�������� ��$�
�����-
A<��� ��6��������� ���<��� 6��
�� ����3-
����������< ����<���3����� 6���
��� ������<���� ���������� �������������
��� ����� �� ����)���� ��� �� 6��� ��-
A<���������������� ����
����� ��� �����-
A<��� ��������� ������� ������3-
A<��� ��������� ����������<��� ����� ���
� �����<��<����������������-
�����<��� ������ ���<������ �����6<��<�
)���� ����������� �������-�������� �
L��������7���<��5 ������� ����M� ��
���� 9"'-
A�3�������������� ������<��������<������
������������������������������������
� ���-
���� ���! ��������9��� �������� �����
%����� %��� ��������� ����� ���
`çÇçåáÅë=sáêíì~=rëÉêÛë=j~åì~ä NPJV=

NP
���� ����������
��������<���6�������������
� ��������������3�������<��
�����������-
A<���������������������������� ����
�<�����-
4������������<��<�=�������
�� �������3���������� ��(��� �� ��
��6�������-
�����<���������������������� ��<��
���� ���������������?:�6��W�������3��
A ��3�� ��0��@-
)���� ��6������ �������3��� =�� ���
��������<���<�=����������������3�
��� �����6<�������������������� ����6�
������-�A<������� ���-
������������� ���<���� ��
�� "��� ���> �������
��������� ����� ��
��������������-
A<���������3�� �����������������
�<��N ���� ������������� ��3���3-
A<�����4����3A�� ��=��������<��
N ���� ��������� �� 6-
�����<���������3�� ��������������
����<��N ���� ������ ��3�������-�������� �
L��������7��N ���� �����M� ������ #"#�-
����������<�����4����3A�� ��=����
����<��N ���� ����-
A<����������� ���������
�� ��0���� �)���� �����
�� 6-
� ���0����� ���������������� 6�
��� ���3��6<��<��������� 6����������
����-
A�3�����������������������3��� ���
�����3�6 �(����� ���������� ���0��-
� �������<���0���=��� ��������(����
�<���������6�3�� �����������<��
���� ������ ��;��4���� �����2����-
N ���������������� �����
�������C������������
�3��-
A<��N ���� ����E��������3����������� �
0� ��� �)���� ����������������<�������
�3��������� ���<����,�� ���<��> �-
�����<��������3���� ��;� ��;);��
���������� ��6<��<��3����<��> ���< ���
������ ����-�A ��<������<���������
������������<��N ���� ������������� �
L��������7��N ���� �����M� ������ #"#�-�
A � =��������<��N ���� �������������� ����
����������> ���������� �L�� ��������N ���
���������� ��M� ������ �" -
N ����<���6�������=� ��3�
��� ���������� ��������
������3�������<��;�����
2��-
A<��;�����2����������������� ����
�<�����-
A<��;�����2�����<��� ������ �����
�� ����3-
�����<��;�����2����������� ��<��
���� ���������������?V�����
��� ������ ��0��@-
)����3��<����<����������� ������
��������� ���<��;�����������-
A<��> ������������������ �- A<��������� ���������<������������ �� ��
���<��<���������3�� �������������
�3��-
��(�������<����<��� ��������������<�
�<���������3�� ��������������3��-
���� ���! ��������9��� �������� �����
%����� %��� ��������� ����� ���
JNM póëíÉã=pí~íìë=~åÇ=qêçìÄäÉëÜççíáåÖ
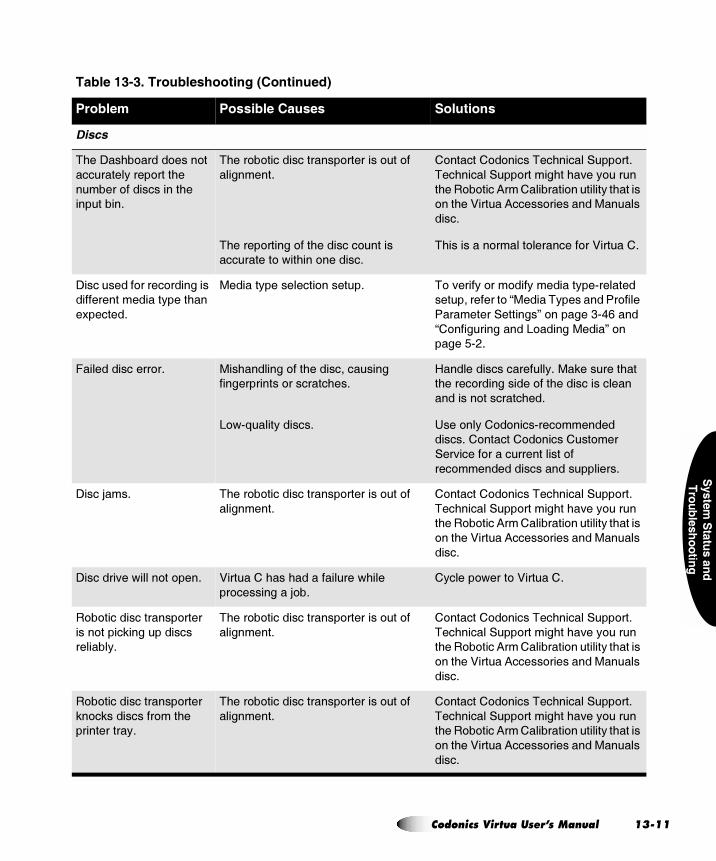
�$���%�������� �
&�������������
�
� ��
A<��;��<� ����� ���� ��
��������3���� ����<��
����� ������������<��
��������-
A<��� � ��������������� �������� �� ��
��������-
A<����� ������ ���<�������� ������
��������� �6��<��� �������-
� ������� � �����A��<��������� ��-�
A��<��������� �����<��<�=��3 ����
�<��� � ����0����������� �������3��<������
���<��)�����0����� ����������������
����-
A<��������� ����� ��������� ��)���� �-
;��������� ����� ���������
����������������3����<���
�C������-
�������3���������� ������- A �=����3� �� ���3�������3��"��������
������������� �L������A3���������� �����
�����������������M� ������ #"% �����
L� �������������5 �����������M� ��
���� �"$-
��������������� �- ���<�������� ���<���������������
������������� ��������<��-
5 6"2����3������-
+�������������������3-���(�������<���
�<����� ����������� ���<����������������
�������� ��������<��-
7��� ��3�� � ����"��� ������
�����-�� ������� � �������� ���
���=����� ���������������� ��
��� ������������������������-
;����>��- A<��� � ��������������� �������� �� ��
��������-
� ������� � �����A��<��������� ��-�
A��<��������� �����<��<�=��3 ����
�<��� � ����0����������� �������3��<������
���<��)�����0����� ����������������
����-
;�������=��6����� �� ���- )���� ��<���<������������6<����
�� ����������> �-
�3����� 6���� �)���� �-
� � ��������������� �����
���� �����(������������
�������3-
A<��� � ��������������� �������� �� ��
��������-
� ������� � �����A��<��������� ��-�
A��<��������� �����<��<�=��3 ����
�<��� � ����0����������� �������3��<������
���<��)�����0����� ����������������
����-
� � ��������������� �����
(� �(���������� ��<��
�����������3-
A<��� � ��������������� �������� �� ��
��������-
� ������� � �����A��<��������� ��-�
A��<��������� �����<��<�=��3 ����
�<��� � ����0����������� �������3��<������
���<��)�����0����� ����������������
����-
���� ���! ��������9��� �������� �����
%����� %��� ��������� ����� ���
`çÇçåáÅë=sáêíì~=rëÉêÛë=j~åì~ä NPJNN=
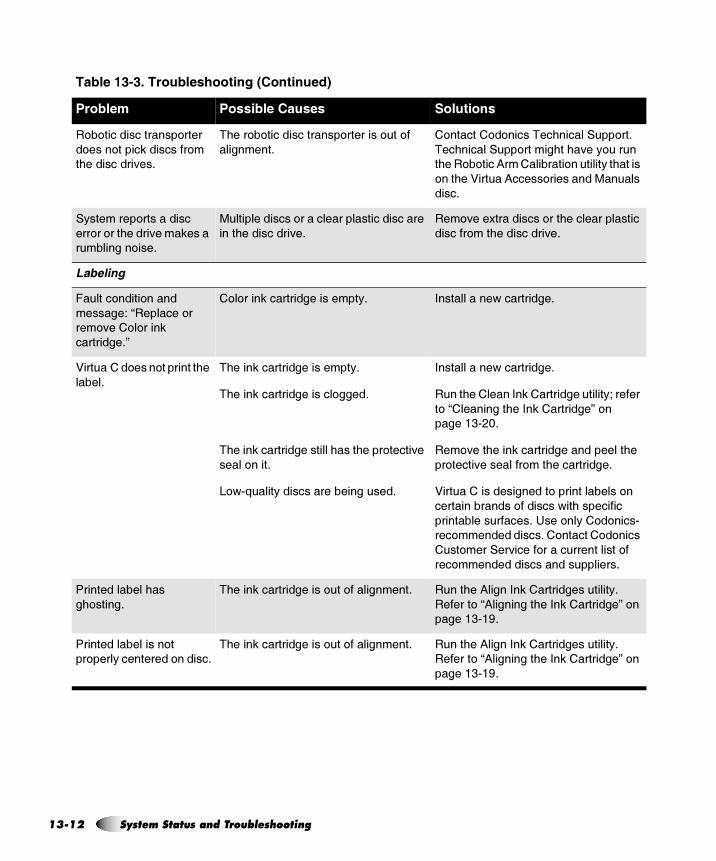
NP
� � ��������������� �����
� ���� �����(��������� �
�<����������=��-
A<��� � ��������������� �������� �� ��
��������-
� ������� � �����A��<��������� ��-�
A��<��������� �����<��<�=��3 ����
�<��� � ����0����������� �������3��<������
���<��)�����0����� ����������������
����-
�3������� �����������
��� �� ���<�����=���(�����
�������� ���-
�������������� ���������������������������
����<����������=�-
�� =���C���������� ���<����������������
������� ��<����������=�-
����� �
������ ����� ������
������1�L�������� ��
�� =��� � ����(�
���������-M
� � ����(�����������������3- ������������6����������-
)���� ��� ���� ���������<��
�����-
A<����(�����������������3-
A<����(���������������� ����-
A<����(�����������������<����<���� �����=��
����� ����-
5 6"2����3��������������������-
������������6����������-
����<����������(����������������3J�������
� �L����������<����(����������M� ��
���� �#"$!-
�� =���<����(���������������������<��
�� �����=��������� ��<�����������-
)���� ��������������� �������������� ��
��������������� ��������6��<����������
�����������������-�7��� ��3�� � ����"
��� �����������-�� ������� � �����
��� ������=����� ���������������� ��
��� ������������������������-
��������������<���
�< �����-
A<����(�������������� �� ����������- ����<��0�������(�����������������3-�
������� �L0���������<����(����������M� ��
���� �#"�9-
������������������ ��
�� ����3���������� ������-
A<����(�������������� �� ����������- ����<��0�������(�����������������3-�
������� �L0���������<����(����������M� ��
���� �#"�9-
���� ���! ��������9��� �������� �����
%����� %��� ��������� ����� ���
JNO póëíÉã=pí~íìë=~åÇ=qêçìÄäÉëÜççíáåÖ
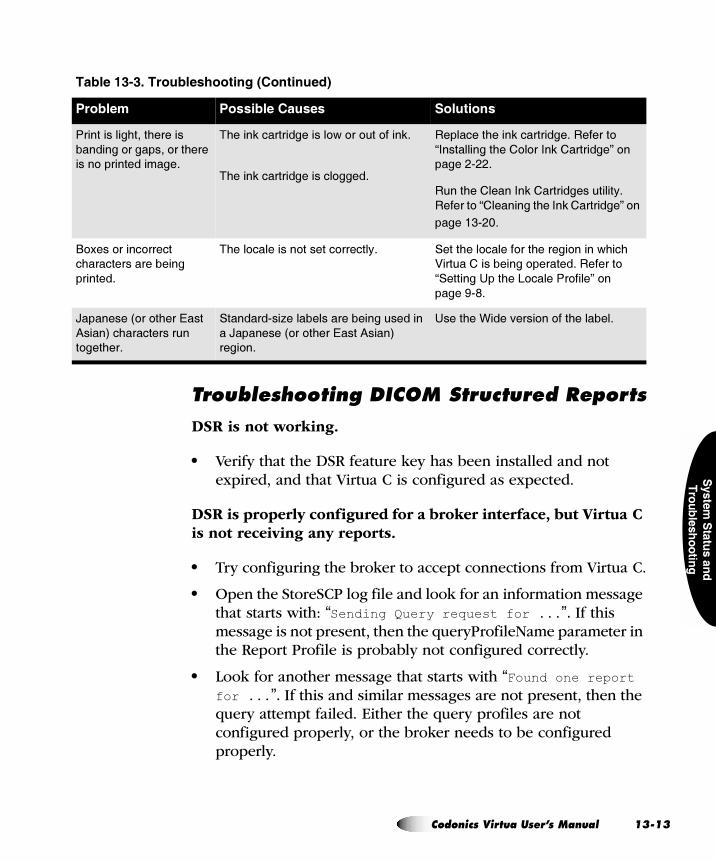
�$���%�������� �
&�������������
�
qêçìÄäÉëÜççíáåÖ=af`lj=píêìÅíìêÉÇ=oÉéçêíë
DSR is not working.
5 Verify that the DSR feature key has been installed and not expired, and that Virtua C is configured as expected.
DSR is properly configured for a broker interface, but Virtua C is not receiving any reports.
5 Try configuring the broker to accept connections from Virtua C.
5 Open the StoreSCP log file and look for an information message that starts with: �Sending Query request for ...���If this message is not present, then the queryProfileName parameter in the Report Profile is probably not configured correctly.
5 Look for another message that starts with �Found one report for ...���If this and similar messages are not present, then the query attempt failed. Either the query profiles are not configured properly, or the broker needs to be configured properly.
������������<����<�������
�������� �������� ���<����
���� �������������-
A<����(��������������� 6� �� �� ����(-
A<����(���������������� ����-
���������<����(����������-�������� �
L������������<��� � ����(����������M� ��
���� $"$$-
����<����������(�����������������3-�
������� �L����������<����(����������M� ��
���� �#"$!-
� C��� ����� ������
�<�������������������
�������-
A<��� ��������� ������� ������3- �����<��� ������ ���<������ �����6<��<�
)���� ����������� �������-�������� �
L��������7���<��5 ������� ����M� ��
���� 9"'-
N��������? �� �<��������
0����@��<������������
� ���<��-
��������"��,��������������������������
��N��������? �� �<��������0����@�
���� �-
7����<��K����=���� �� ���<�������-
���� ���! ��������9��� �������� �����
%����� %��� ��������� ����� ���
`çÇçåáÅë=sáêíì~=rëÉêÛë=j~åì~ä NPJNP=
NP
5 Similar messages may indicate that no reports were found. These indicate that the report is not present on the broker. Try another patient.
DSR is properly configured for a PACS interface, but Virtua C is not receiving any reports.
5 If a PACS is storing the reports, verify that the PACS is configured to send the reports with the studies.
Virtua C is receiving reports, but they are missing text.
5 If this is a broker connection, try changing the information_model parameter in the QRSCU Profile to MITRA S.
5 Follow these steps and contact Codonics Technical Support for additional help:
1. Delete the test study from Virtua C.
2. Change the Report Profile doIncludeStructuredReport parameter setting to false.
3. Reboot Virtua C.
4. Resend the test study with a report to Virtua C.
5. Record the study with report to disc.
6. Record Virtua C Logs to disc.
7. Send the discs to Codonics for further review.
JNQ póëíÉã=pí~íìë=~åÇ=qêçìÄäÉëÜççíáåÖ
�$���%�������� �
&�������������
�
qêçìÄäÉëÜççíáåÖ=eiT=oÉéçêíë
Variations in RIS systems and configuration issues in Virtua C HL7 settings can cause problems. Refer to the following information to troubleshoot HL7 report problems.
kç=eiT=jÉëë~ÖÉë=^êÉ=_ÉáåÖ=oÉÅÉáîÉÇ
1. Verify that Virtua C HL7 settings are correct. All parameters in the Virtua C HL7 Server Profile, hl7.server.txt, are case sensitive and must be spelled exactly as shown in this document. For more information about the HL7 Server Profile, refer to “HL7 Server Profile Settings” on page 10-12.
2. Verify Virtua C is receiving valid HL7 report messages.
The report may not have been received or accepted. Open the HL7 server log file HL7Server.001.0.log and look for the following line:
Received a Valid Report Message, Creating Report File
If the line does not exist, contact Codonics Technical Support. If the line does exist, then continue troubleshooting.
3. Verify that the patient information contained in the HL7 report matches the DICOM study.
The patient information may be different between the study and the report.
Look for the following lines in the HL7 server log file:
Querying database for: PatientRecord:name = APPLE^CANDY^id = ID011235dob = 19720905
Compare the information in the HL7 server log file to the ����0�!������ tab. If it matches, continue troubleshooting. If it is not identical [except for the caret (^) characters], then the match failed on the patient information. Change the value of the
`çÇçåáÅë=sáêíì~=rëÉêÛë=j~åì~ä NPJNR=

NP
matchPatientUsing parameter in hl7.server.txt to exclude the unmatched parameter and try again. If the information still does not match, contact Codonics Technical Support.
4. Verify that the accession number is formatted the same in the HL7 report and the DICOM study.
The match may fail when comparing the exam date or accession number. To determine if this is the problem, change both the doMatchAccessionNumber and doMatchExamDate parameters in hl7.server.txt to false. Delete the study, then re-send the study and the report to the Virtua C. If the match still fails, contact Codonics Technical Support.
If the match succeeds, then you must determine how to configure the doMatchAccessionNumber and doMatchExamDate parameters. At least one of these parameters must be true for proper operation.
a. Record the study to a disc.
b. Compare the exam date and accession number in the report to those on the ������� tab.
c. If the accession numbers do not match, then set doMatchExamDate to true.
d. If the accession numbers do match, then set doMatchAccessionNumber to true.
e. Delete the study and try sending the report and study again.
f. If the match is not successful, contact Codonics Technical Support.
5. Verify that the RIS is properly formatting and sending data fields in the HL7 reports.
JNS póëíÉã=pí~íìë=~åÇ=qêçìÄäÉëÜççíáåÖ
�$���%�������� �
&�������������
�
oÉéçêíë=^êÉ=jáëëáåÖ=fåÑçêã~íáçå=çê=^êÉ=fãéêçéÉêäó=cçêã~ííÉÇ
If the reports appear to be missing information or improperly formatted, the problem may be that:
5 Some data may not be sent by the RIS. It is possible that several of the data fields are blank when received by Virtua C.
5 Some of the fields may be incorrectly filled by the RIS. For example, the RIS may place a random number in the Modality field.
5 Some fields may not be properly formatted. For example, the observation text may be formatted for fixed width display, not variable width display.
The only way to know what is being sent is to examine the log files and the original message. Contact Codonics Technical Support to do this. The most likely solution is to change the report template file, report.default.txt, to properly format fields and to hide fields that have missing or incorrect data.
`çÇçåáÅë=sáêíì~=rëÉêÛë=j~åì~ä NPJNT=
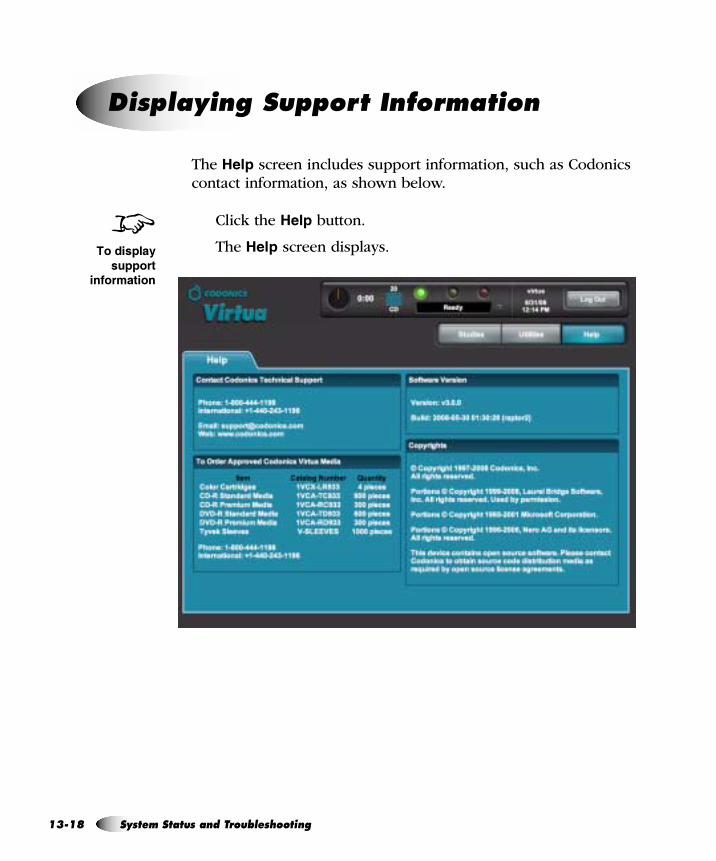
NP
The 1��� screen includes support information, such as Codonics contact information, as shown below.
Click the 1��� button.
The 1��� screen displays.
aáëéä~óáåÖ=pìééçêí=fåÑçêã~íáçå
8������!� �
�!!��
������ ���
JNU póëíÉã=pí~íìë=~åÇ=qêçìÄäÉëÜççíáåÖ
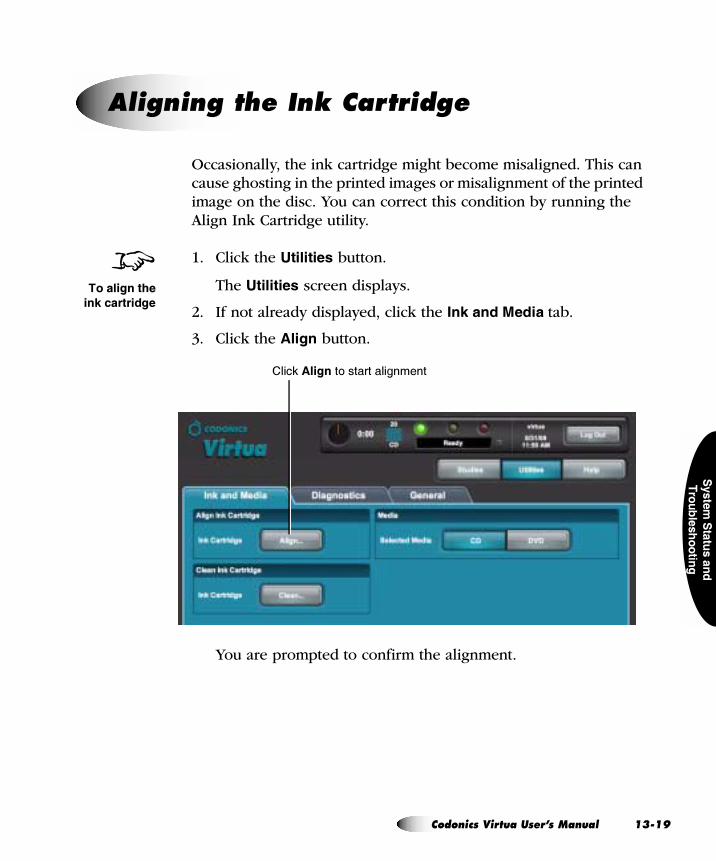
�$���%�������� �
&�������������
�
Occasionally, the ink cartridge might become misaligned. This can cause ghosting in the printed images or misalignment of the printed image on the disc. You can correct this condition by running the Align Ink Cartridge utility.
1. Click the ��������� button.
The ��������� screen displays.
2. If not already displayed, click the ��������&�����tab.
3. Click the ����� button.
You are prompted to confirm the alignment.
^äáÖåáåÖ=íÜÉ=fåâ=`~êíêáÇÖÉ
8��� �������
����� ������
����(�4������ ���������������
`çÇçåáÅë=sáêíì~=rëÉêÛë=j~åì~ä NPJNV=
NP
4. Click the � button to proceed.
Alignment status messages are displayed on the Dashboard.
������#��������� ������� ������ ��� ����� ����������� ���� ������ �������� �������
���������� ����������� ������ �����������D����������� �����������
Occasionally, the ink cartridge might become clogged. This can cause light print, banding, gaps in the print, or no printed image. You can correct this condition by running the Clean Ink Cartridge utility.
Any user can run this utility.
1. Click the ��������� button.
The ��������� screen displays.
2. If not already displayed, click the ��������&�����tab.
3
`äÉ~åáåÖ=íÜÉ=fåâ=`~êíêáÇÖÉ
8������ ����
����� ������
JOM póëíÉã=pí~íìë=~åÇ=qêçìÄäÉëÜççíáåÖ
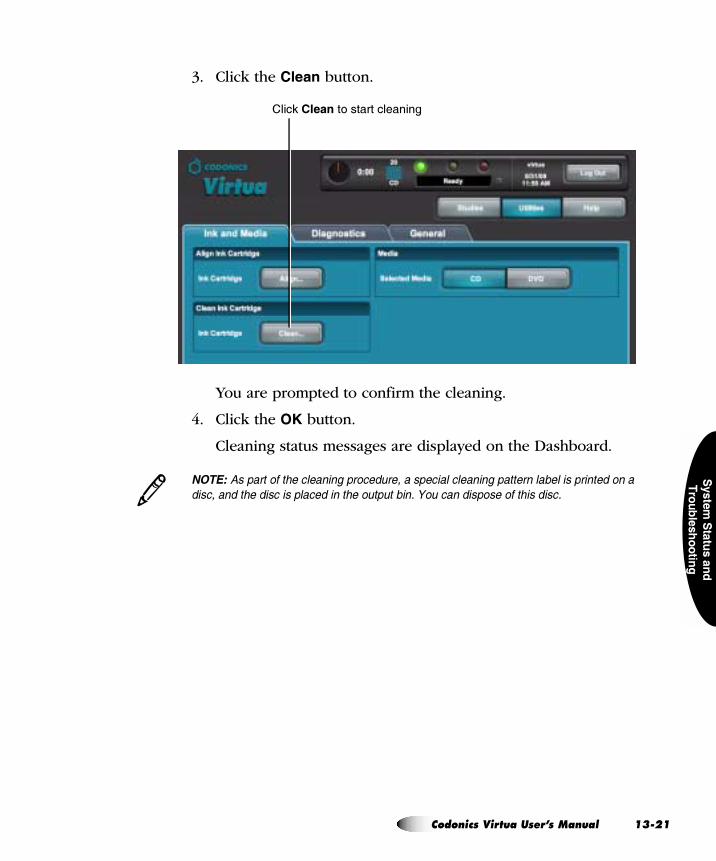
�$���%�������� �
&�������������
�
3. Click the ����� button.
You are prompted to confirm the cleaning.
4. Click the � button.
Cleaning status messages are displayed on the Dashboard.
������#��������� ��� ���������� ��� ����� ������� �������� ������ �������� �������
���������� ����������� ������ �����������D����������� �����������
����(���� ��� ���������������
3
`çÇçåáÅë=sáêíì~=rëÉêÛë=j~åì~ä NPJON=
NP
Virtua C includes demo studies to allow you to verify recording and labeling operations without having to receive studies from other sources on the network.
You must be logged in as a user with administrator privileges to run this utility.
1. Click the ��������� button.
The ��������� screen displays.
2. If not already displayed, click the !���������tab.
iç~ÇáåÖ=aÉãç=píìÇáÉë
8����� ������
�����
JOO póëíÉã=pí~íìë=~åÇ=qêçìÄäÉëÜççíáåÖ

�$���%�������� �
&�������������
�
3. Click the ����button.
The demo studies are loaded and displayed in the ������� tab in the ������� screen, from which they can be recorded and labeled.
����(�,� ��� �� ����<���� �������
`çÇçåáÅë=sáêíì~=rëÉêÛë=j~åì~ä NPJOP=
NP
Virtua C provides a Connect to Support utility that allows Codonics Technical Support personnel to access Virtua C remotely and help users with configuration, troubleshooting, and general product usage questions.
You must be logged in as a user with administrator privileges to run this utility.
�������������� ����� �� ���������� �� �� �� ���� ����� �������)�������
� ���������������������� � ����������8 ����� ���/���� )�
Virtua C must be connected to a LAN that has Internet access for this utility to work. Remote access requires that the firewall at the customer site allow outgoing and incoming network connections to Virtua C on TCP port 5500.
When a connection is made, Codonics Technical Support personnel can see the same screens as you and have the same control over Virtua C as you do. This allows you and Codonics to work cooperatively to solve problems.
You can disconnect the session at anytime. If either Codonics or a user at the site disconnect, only a user at the site can initiate a new connection.
1. Click the ��������� button.
The ��������� screen displays.
2. If not already displayed, click the !�������� tab.
^ääçïáåÖ=oÉãçíÉ=^ÅÅÉëë
������� "����������������������������������������������� �������������
���������#��������$������������
3
8��� ����
������ �����
����������
������� �
$!!��
JOQ póëíÉã=pí~íìë=~åÇ=qêçìÄäÉëÜççíáåÖ
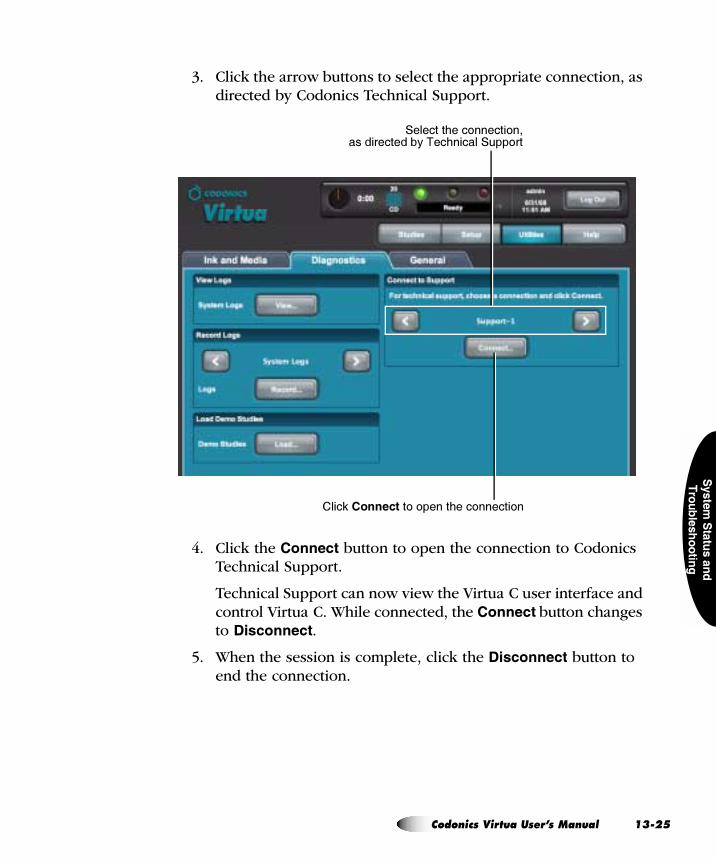
�$���%�������� �
&�������������
�
3. Click the arrow buttons to select the appropriate connection, as directed by Codonics Technical Support.
4. Click the ����� button to open the connection to Codonics Technical Support.
Technical Support can now view the Virtua C user interface and control Virtua C. While connected, the ������button changes to !������.
5. When the session is complete, click the !������ button to end the connection.
��������<��� ������ ���������������3�A��<��������� ��
����(��������� � �����<��� ������ �
`çÇçåáÅë=sáêíì~=rëÉêÛë=j~åì~ä NPJOR=
NP
If your Virtua C is experiencing problems, Codonics Technical Support might ask you to view the system logs that are maintained by Virtua C. The following topic explains how to view the system logs.
Technical Support might also ask you to record the system log files to disc and send the disc to them. For more information on recording system log files to disc, refer to “Recording Log Files to a Disc” on page 12-1.
sáÉïáåÖ=içÖ=cáäÉë
You must be logged in as a user with administrator privileges to view the log files.
1. Click the ��������� button.
The ��������� screen displays.
2. If not already displayed, click the !�������� tab.
póëíÉã=içÖë
������� $������������������������������������ ��������������
�����������������������#��������������������������������������������
���������#��������$������������
8���'���
���������
�����
JOS póëíÉã=pí~íìë=~åÇ=qêçìÄäÉëÜççíáåÖ
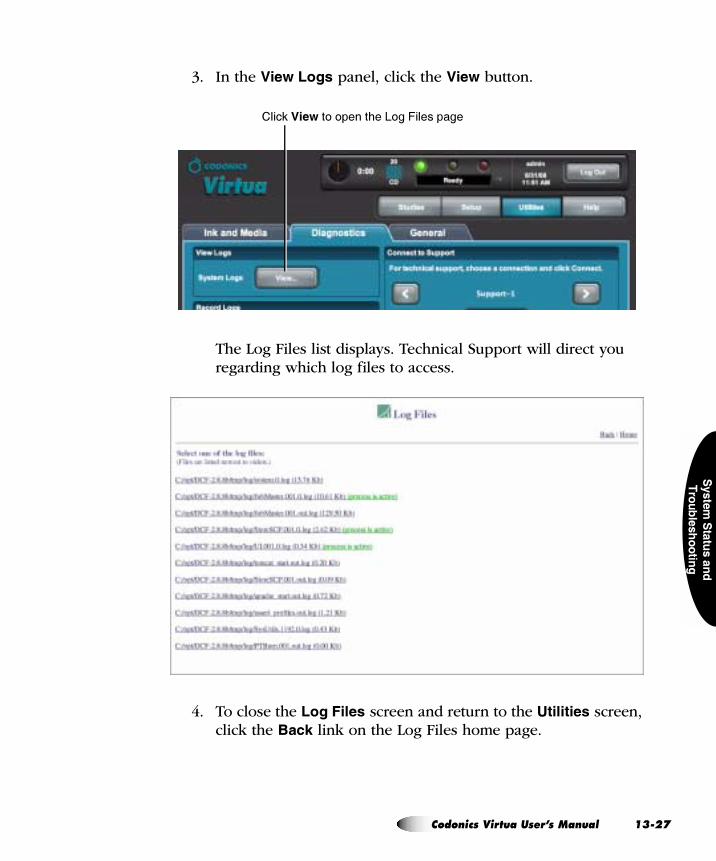
�$���%�������� �
&�������������
�
3. In the ,������� panel, click the ,��� button.
The Log Files list displays. Technical Support will direct you regarding which log files to access.
4. To close the ���2���� screen and return to the ��������� screen, click the 3�� link on the Log Files home page.
����(������� � �����<��5 ������������
`çÇçåáÅë=sáêíì~=rëÉêÛë=j~åì~ä NPJOT=


�'� ����#����
��
����%
���
�
= ^e~ò~êÇçìë=j~íÉêá~ä=fåÑçêã~íáçå
Codonics has set very stringent standards for evaluating products to ensure the marketing of regulatory compliant products worldwide.
We do not intentionally add, nor are we aware, that the products or packaging contain the following materials:
5 Mercury, except as used in lamp applications (for example, scanning lamps, backlit LCDs).
5 Cadmium, except as used as thick film inks on printed circuit boards.
5 Hexavalent Chromium, except as used as thick film inks on printed circuit boards, as chromate conversion coatings on metal surfaces, and as a photoresist on glass panels of cathode ray tubes.
5 Polybrominated diphenyl ethers and polybrominated biphenyls.
5 Bioavailable arsenic (small amounts of arsenic used in glass, LEDs, and semiconductors are not considered to be bioavailable).
5 Bioavailable crystalline silica (small amounts of crystalline silica are used in certain paints, coatings, and filler materials).
5 Polychlorinated biphenyls (PCBs).
j~íÉêá~äë=çÑ=`çåëíêìÅíáçå
`çÇçåáÅë=sáêíì~=`=rëÉêÛë=j~åì~ä ^JN=
^J
5 Asbestos.
5 Organic tin (not used in tin lead solder applications).
5 Ozone-depleting substances such as chlorofluorocarbons, methyl chloroform, and carbon tetrachloride.
j~í¨êá~ìñ=ÇÉ=`çåëíêìÅíáçå
Afin d’obtenir les certificats de conformité de ses produits dans le monde entier, Codonics utilise les standards d’évaluation les plus contraignants pour tester ses produits.
Codonics assure notamment n’avoir ajouté ou avoir été informé que soit ajouté les composants suivants dans son produit et son emballage:
5 Mercure, sauf dans le cas de systèmes d’éclairage (lampe à balayage, rétroéclairage LCD)
5 Cadmium, à l’exception des encres de couche épaisse sur les circuits imprimés
5 Chrome hexavalent, à l’exception des encres de couche épaisse sur les circuits imprimés, des protection de surface métallique et des photo résistances de tubes cathodiques
5 Des éthers de diphényl polybromé ou des biphényls polybromés
5 Arsenic (de très faible quantité d’arsénic sont présents dans le verre, les leds et les semi-conducteurs sans portée atteinte à l’organisme)
5 Cristaux de silicium
5 Biphenyls polychlorés
5 Amiante
5 Matières organiques
5 Substances portant atteinte à la couche d’ozone tels que des carbones chlorofluorés du chloroforme et des tétrachlorures de carbone
O e~ò~êÇçìë=j~íÉêá~ä=fåÑçêã~íáçå
�'� ����#����
��
����%
���
�
During manufacturing operations that produce Codonics products (including packaging), no ozone depleting substances (such as chlorofluorocarbons, methyl chloroform, and carbon tetrachloride) are used.
c~ÄêáÅ~íáçå
Aucun composant susceptible de détruire la couche d’ozone ne sont utilisés lors de la fabrication (emballage inclus) des produits Codonics.
j~åìÑ~ÅíìêáåÖ
`çÇçåáÅë=sáêíì~=`=rëÉêÛë=j~åì~ä ^JP=

�������
���
��
= _péÉÅáÑáÅ~íáçåë�����������1 4���$!"�������������
������4����1 4���$�"����� �������
:���� ��;��=��1 4����'C�;);"�*�;"�����"��3������=�
��� �������� ����1 �;"���;);"�
5�����������A��<� � �31 ��(>��
��������� ��� �1 7��� �%�'!!����
��(�����������1 4���� � ������������?��W@
A<� �<��1 $���;�� ���!�;);������< ��?��� ����������������@
7�������������1 �� ���6����� 6�����������=�������������C�� ���
�� ���� �1 ������������ ����#9!!
�� �31 $���
;������ ����1 �$!���
����������1 ���!*�!!�����"A*����������<������?�N"%�@
��7���$-!�� ���
:��6 �(��� � � ��1 ;��4���� �������?��� ��$�������� ��� ������ ��@�
+AA��K������=���?� ���� ���� ��� ������� �������� �@
����;��=�1 7�������<����=��� ���� ������ �������� ������
;����� ��1 +���<�1��!-�����?$ -.��@
K���<1��'-$����?% -$��@
5����<1�$�-.����?��-���@
K���<�1 #$�����?�%- �(�@
péÉÅáÑáÅ~íáçåë=EbåÖäáëÜF
`çÇçåáÅë=sáêíì~=`=rëÉêÛë=j~åì~ä _JN=
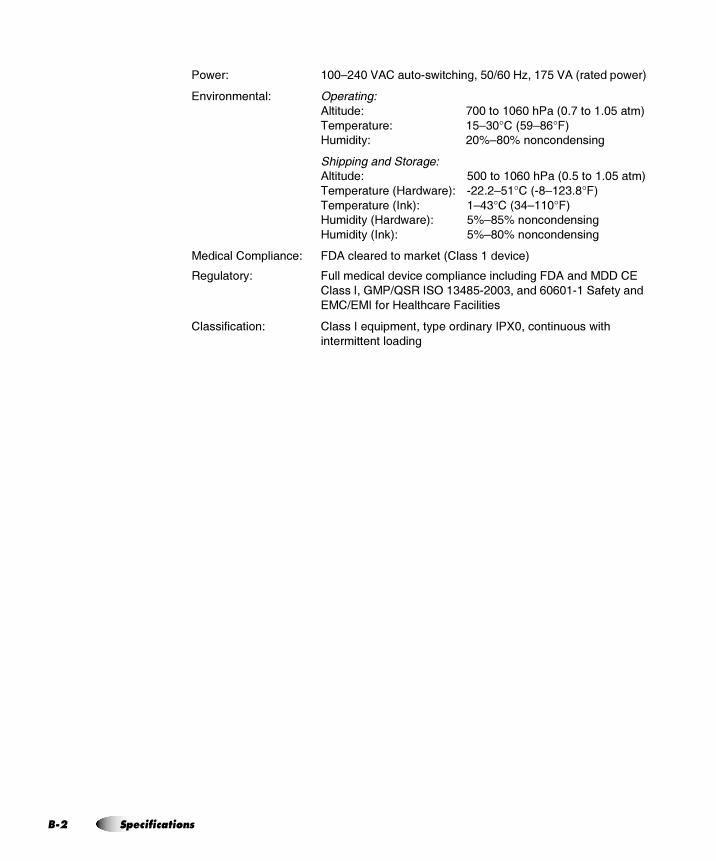
_JO
� 6��1 �!!F$%!�)0���� "�6���<������!* !�+,���.��)0�?������� 6��@
��=�� ������1 �������(
0������1 .!!�� ��! !�<���?!-.�� ��-!����@
A��������1 ��F#!8��?�9F' 8�@
+����31 $!/F'!/�� �� ��������
$��������� �$����(0������1 �!!�� ��! !�<���?!-��� ��-!����@
A���������?+���6���@1 "$$-$F��8��?"'F�$#-'8�@
A���������?��(@1 �F%#8��?#%F��!8�@
+����3�?+���6���@1 �/F'�/�� �� ��������
+����3�?��(@1 �/F'!/�� �� ��������
��������� �������1 �;0���������� ���(���?����������=���@
������ �31 �������������=����� ������������������;0������;;����
������������*V�����4��#%'�"$!!#������ ! !�"�������3�����
���*����� ��+����<���������������
������������ �1 ���������2��������3��� ������3���R!��� ���� ��6��<�
������������� �����
péÉÅáÑáÅ~íáçåë
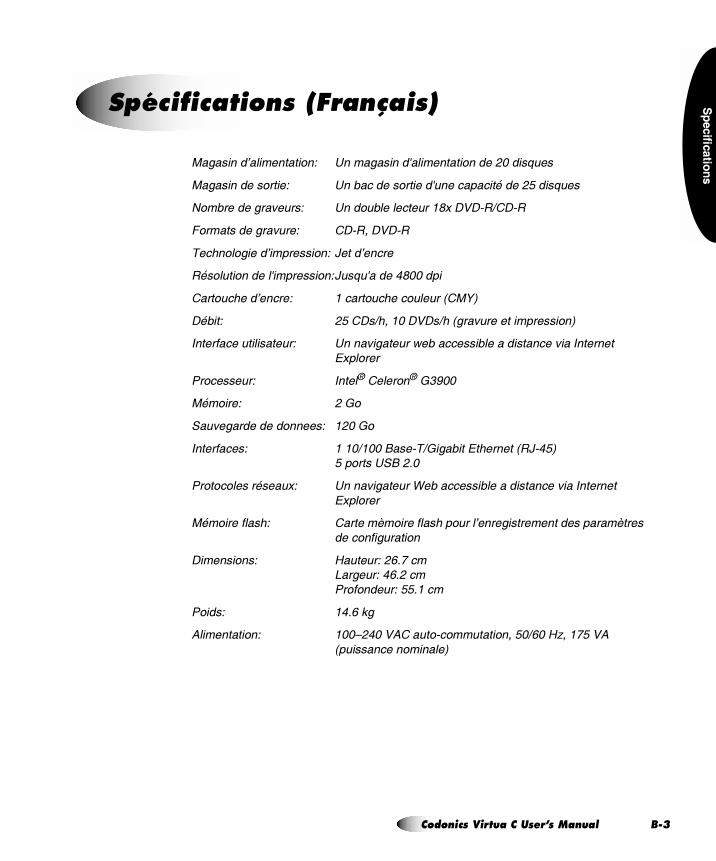
�������
���
��
*������ ,�����������( ���������� -������������ �+.� ��/��
*������ ������( ������� ������� -����������0� �+1� ��/��
������ ��� ���( ��� �����������234��#�"56)�"5
!������� ��� ��( )�"5���#�"5
&�������� ,���������( 7�� ,���
50��������� ��-���������(7��/�-�� ��3..� ��
)�������� ,���( 2�����������������8)*9:
�0���( +1�)��6���2.��#��6��8�� ��������������:
;�����������������( ����� �������������������� ������� ���;������
'4�����
<�������( ;�����)������=�>..
*0����( +�=�
$�� �� � � ����( 2+.�=�
;�������( 2�2.62..�?��"&6=������'������857"�1:1��������$?�+�.
<����������0���4( ����� ������@������������� ������� ���;������
'4�����
*0����������( )�����A�����������������,���������� �������A����
�������������
���������( B�����(�+C�D���E����(��C�+���
<����� ��(�11�2���
<�� �( 2��C��
�����������( 2..F+�.�#�)�����"�������������1.6C.�BG��2D1�#��
8����������������:
pé¨ÅáÑáÅ~íáçåë=Ecê~å´~áëF
`çÇçåáÅë=sáêíì~=`=rëÉêÛë=j~åì~ä _JP=
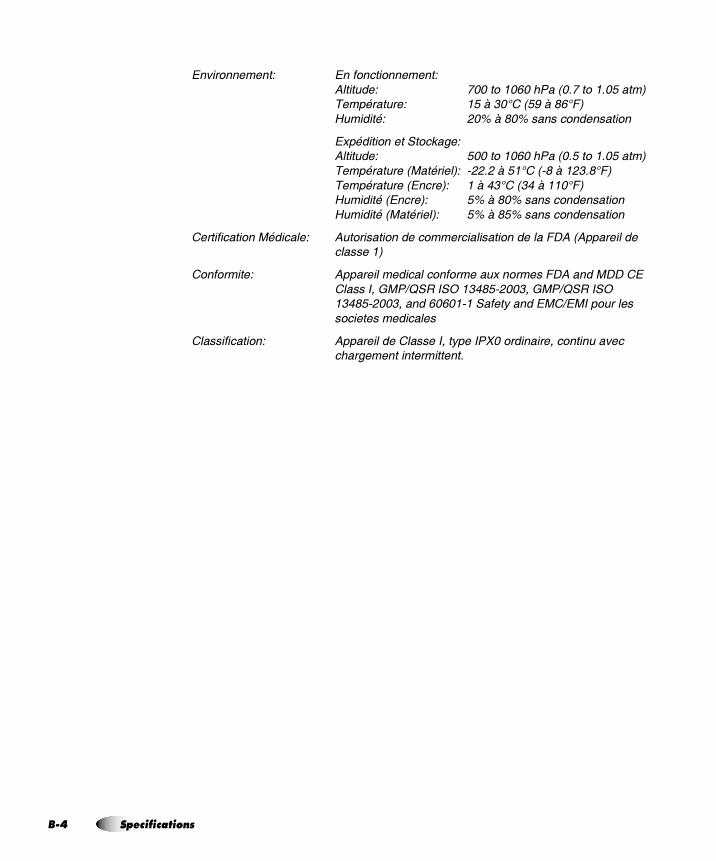
_JQ
'� ��������( '��������������(
������ ( D..����2.C.��<��8.�D����2�.1����:&��0�����( 21�H��.I)�81>�H�3CI!:
B��� ��0(� +.J�H�3.J��������� �������
'4�0 ��������$�����(������ ( 1..����2.C.��<��8.�1����2�.1����:
&��0������8*��0���:( "++�+�H�12I)�8"3�H�2+��3I!:
&��0������8'���:( 2�H���I)�8���H�22.I!:B��� ��0�8'���:( 1J�H�3.J��������� �������
B��� ��0�8*��0���:( 1J�H�31J��������� �������
)������������*0 ����( ������������� ������������������ ����!���8�������� �������2:
)��������( ��������� ���������������4�������!����� �*���)'�
)�����;��=*<6K$5�;$��2��31"+..���=*<6K$5�;$��2��31"+..����� �C.C.2"2�$������� �'*)6'*;���������
�������� �����
)�������������( �������� �)�����;������;<L.��� ���������������� ���������������������
péÉÅáÑáÅ~íáçåë
�� �(
fåÇÉñ
^
���������� ���=����<��6����#"�#
0����� �3�S���� C��$"$
4������ �����4������������6 �(�����������#"$�
������ �����0�������������������:��6 �(��� ������
#"��
�������������������������� ������#"#�
������������ ����#"�%
�������� �������3��#"$$
4������� ����<��(� C� ��� ���#"$�
���������� �����=���������<��������#"$!
0��A�����
V��3*������=��� ����� ��������� ����!"'
0��A�������)������%"$
0� ��%"$
0� �;��%"$
0� �;�������%"#
0� ;);��%"#
0� ;);�������%"#
�������%"$
�����������= ��������������#"
4�������� ����#"�9
0�������(�����������������3���#"�9
������������(��������������#"�9
�� �3�,��� ���������������N ���� ������#"#9
����"=������ �������$"%
���<�=�����������"�
� ���������"�#
������ �����"�$
����������"�%
� �����������"�#
4����'��,������ �����"�#
����'�(��� �(����������"$
�C��������"
0� � ������� ��������"�
0� ��N ���� �����0��A������%"$
0� �;��N ���� �����0��A������%"$
0� �;�������N ���� �����0��A������%"#
0� ;);��N ���� �����0��A������%"#
0� ;);�������N ���� �����0��A������%"#
�� 5 � �����;���3������������3������ ������
#"$9
�� ������������������ ���'"$
�� �������������3�������������N ���� ������#"#.��
#"%
�� "��� ���> ���#"%.
�� "��� ������������#"%.�� �#"�!
_
# ������(�? ��5 ��������< ������@���#"$.
�������;�������������������3������ ������#"$9
`
�������0��A�������%"$
V��3*������=��� ����� ��������� ����!"'
�����������3�N ���� ������#"#���%"$
�������0��A�������)����
0� ��%"$
0� �;��%"$
0� �;�������%"#
0� ;);��%"#
0� ;);�������%"#
�������%"$
�������D��D����������������V���7��� �������!".
��������������(
�����������#"$!
������������$"$$
����������$".
���� ��������� ���� ���"C=�
`çÇçåáÅë=sáêíì~=`=rëÉêÛë=j~åì~ä fJN=
fJO
���$�������%��� � ��� ����"#
�;����������<���$"�
���������������#"%
�;-�$������
�;*;);���� ������$"�
�;"�4�-�$������
�<��������������9".
��� ����������� ������!"$
������3�)��6������� � �����������3�)��6��
��� ����� ����#"$�
��������(�����������������3���#"$!
���������������� ����"CCC�
���������)�������$"'
�:�?� �������� �@��������"CC�
� � ����
� ��������� ���� ���������3���� �����������#"�'
�"�������������"C�=
�< ����������"C�=
�� ������� ���� ���"C�=
6��������"C�=
� � �����������3�)��6����"CCC�=��#"�$���"�#����"9
� � �����)�������������;���������<��-�$�)����
� ��D#D������3�����������V���7��� �������!".
� ��$�����������5 ������� ������9"9
� �������������
� ���� ���"C=��"CC
� ��������6��<�������3�������������"%
� � �����
� ��� �������� ����$"%
��� �������� ����$"%
�<�������$"$�� �$"#
� ������������ ����"CC=
� �����������3��"CC=�
� �������� ��������"CC�
��������� ��������������#"$�
���������� ����#"$�
� ������� ���� ��������3���#"$%
� ������ �A�� ������������+5.����=����� ������
�!"�%
� ��� ����
� � ��������� ����$"%
�������������$"
�����3������ ��������������� ���� ����"C=
������$".
7�������;��=��� ����$"�%
� �=���� �����������<���������"C��� �"C��
��!����> �� ��� �����"�%
��!���� ��� �����<������0��<�=�����"'
� �����������������<������0��<�=���� ��������"#
� ������������3����� ����� ��������"�%
� =������� ������$"�
��� ������=������ ��������� ���� ����$".
��� 5��������5 ���� ������������������� ������
#"#�
a
;��<� ����������� �����#"�
� ��>�����������#"#%
������ ����"CC�
���������������#"#%
��3�A K���� ���� ���������������<������
0��<�=���� ��������"#
;������ ����6<���� ����<�����������0��A������%"#
������������� ���������������������� ������#"#�
������N ��� ���������������������� ������#"#�
�� ���������� ��������#"$$
�� �������;����� �3������������������ ������#"#�
����������������������
=��=��6��'"$
��������������'"$
��������� �D��D����������������V���7��� �������!".
;��������� �
> ����."%
�������� "�
��������6 �(�����������#"$%
�� ��������������$"$���#"$$���#"$%���#"$
;��4�
�������0��A������%"$
�<���������������� ������3�)������9".
� ���������< ���� ���� ���)������%"�
N����� ������ ���������������N ���� �������
#"�!
N����� ������ ��������������C������#"�$
N����� ������#"�!
)���������� ��������������=������������ =������
%"�
;��4���� (�����!"$���!"#
;��4���������=��6�����#"�$
���3%�����0�&������6 �(�����������#"$�
;��4��V��3*������=��� ����� ���
������������!"%�� ��!"'
;��4�����=������������ =�����?���@���=���
� ���������� ���� ���)�����V��3*������=��� ��
��� ������!"'
;��4���� ����%"$
;��4�������������� ������!"�
fåÇÉñ
�� �(
�����������!"9
< 6�)�����6 �(��6��<���!"#
��< ���� �������=������!"$
�� ����< �������#"�#�� ��#"�%
���3%�$�������� ����"�.
���3%��������> �� ��� ����"�#
���3%�������� ��� �����<������0��<�=�����"9
;��4��=��6���
�� �������3�����<����6��<�����������������"�#
������������"��
����������� ����<�����0��<�=�����"9����"�!
����������=��6��� �����������"�.
����������=��6��� ������������<������0��<�=���
��"�$
������� ����������"�
������� ��������� ����<�����0��<�=�����"��
��� �����C����� ������������N ���� ������#"%%
��� �����:�������������N ���� ������#"#9
;������� �;�������������"�'
�����, &���> �� ��� ����"�$
�����, &��� ��� �����<������0��<�=�����"'
������ �������
���(��������$"�
�� ���� ������;��=���#"�
����5���������������N ���� ������#"#9
����5�����������������<������0��<�=���� ������
��"%
����5����0� �3 �� �3�����������N ���� ������
#"%!
����5����5����� �3�����������N ���� ������#"%!
����5������������ �3�����������N ���� ������#"%!
����5�����<3������� �3�����������N ���� ������
#"%!
������������� ����#"$�
�����
���<�=�������� ���������"�#
���<�=������������� �����"�$
���<�=�����������������"�%
� ������ ���� �����"�%
��� ����������������'"%
� ������ ��� ������"�%
� ��������� �����������$"�
%��� �> �� ��� ����"�#
����������$".
��� ������ �������������������������� ��� "#��."#
��������������� ���������������'"#
������3����������� ���������"�$����"'
������3��������������� �������"�%
��� ������3�����$"�'
�� ����< �������#"��
;�����2�����"��
���������> ����� ���� ���."%
��������."$
��� ����."$
� ����."$
������������"����"����."$
�������3�� ���������������N ���� ������#"%$
���� ������2���������"CCC=
� 0�>��� �;�3���<���=����A�������������5 �����
�� ������9"'
� 0� ��� �������������N ���� ������#"#.
� ������N�������������������N ���� ������#"#'
� ;��� �����0����4���������<�������������
+5.����=����� �������!"�%
� ������0� �������������N ���� ������#"#'
� ������+5.��� ��������������+5.����=���
�� �������!"�$
� �����������<��(�� ��������������N ���� ������
#"#'
� ������R�5��� ���������������� ����� ������
�!"�!
� S���4��35�������� ���������������� ����� ������
�!"�!
� 5������������;���A 5�����������3�����������
N ���� ������#"#'
� ����<0������ �:��������������+5.����=���
�� �������!"�#
� ����<�C�;��������������+5.����=����� ������
�!"�#
� �����A ;�� ����������������N ���� ������#"#'
� �����3A�������������:��4�5���������������
N ���� ������#"#9
� ����;�����5 ���������A3�������������
�3������ ������#"$'��#"%
� 7����������=��A�������������+5.����=���
�� �������!"�#
� 7��;�����:��6 �(:�������������:��6 �(�
�� ������#"�!
� )����3;����0������� �������������N ���� ������
#"#'
;��-���;��4�������������� ���
����$�������%��� � ��� ����"#
;);����������<�
���������������#"%
�������������<���$"�
;);-�$������
`çÇçåáÅë=sáêíì~=`=rëÉêÛë=j~åì~ä fJP=
fJQ
b
����?�&�3!�����6��� 6���"9
����3!�������� ����"9
����������������A���������*�������"CC=�
������ ������������� �����������3��"CC�=
������ ������������� �����������������A����
5�=�����"CC=
������ ������������3���������������A����
5�=�����"CC=
������ ��������� ���� �������"CC���
������ �������;���<������"CC=
��������������������<������0��<�=���� ��������"$
�� &���"��� &���� ��� �����<������0��<�=�����"'
������+ �� ����������������3������ ������#"$'
����3��������6 �������������7������ ������#"�'
���" �"���3���� ���#"%.
���4����3A�� ������������N ���� ������#"%#��
#"%'
��� ��> ��������������� ���."#
��� �����3�������������� ��� "#
��;
���� ���"CC��
������� ���� ���"C=���"CC��
�� ��������� ������2���������"CCC=
c
����������"$�� ��"%
������(��� �(��������'".
�������� �������'"'
����6������ ��6������$"%���$"�
����6���������������������:��6 �(��� ������#"��
����������������������3������ ������#"$'
d
@ �� �����6 �(�����������#"$%
����6�3�����������:��6 �(��� ������#"9
���������� �������#"'
e
+�� ����;��� ��� ���"CC=
<�,��� ������������� ���� ���0"��� �0"#
+����<�5�=���.-���+5.���!����������#"�'
�������������> �� ��� ����"�#
+��00�������� ����#"����"�%���$"�
+5.���� ������!"�
�����������!"��
< 6�)�����6 �(��6��<���!"%
����� �������� ����!"�$
�� ����< �������#"���� ��#"�.
+5.����=����� �������!"�$
�C�������!"��
� ������!"�$
�������������������� �����!"�$
��<(���'��(���������!"�$
�C�������!"��
+5.0������ ������:��������������+5.����=���
�� �������!"�#
+5.0������ ������������������+5.����=���
�� �������!"�#
< ����;��4�
� ���������� ���� ���)������%"�
<�������6���� ��4��������������:��6 �(��� ������
#"��
f
�+���;��� ����������"$����"�#
�����
=��6�����#"�$
������=��3A�� ������������������� ������#"#�
�������;�� )��6�������������N ���� ������#"%�
�������;�� )��6���������������<������
0��<�=���� ��������"�
�����������<��(�� ����������������<������
0��<�=���� ��������"#
�������� ���� ������"CCC=�
��� ���� �D ��������������V���7��� �������!".
���� ���%��� �������"$���#"�9���#"$!
��(��������������������$"�
��(�����������5 ������ ���$"�
��(�����������
�����������#"�9
�����������#"$!
������������$"�#��$"$$
����������$".
����������$"�
� ��������������� ��$"�
fåÇÉñ
�� �(
������3�������������$"�
�������������������3������ ������#"$.
���������� ���� ��6������$"'
������������X����� ���������=��� ���"CC���
���4����������6 �(�����������#"$%
��0�2����� �A3�������������:��6 �(��� ������#"9
��0�����������������:��6 �(��� ������#"9
��0�������������������������:��6 �(��� ������#"��
����<�������6��������������:��6 �(��� ������#"�!
��;� ���������������������� ������#"#�
g
?�&��� ����6��� 6��."%
?�&���������3!�������������"�!
N ���� �����
���0��A������������������� ������;��=���%"$
�=�����������;��4���������0��A������%"$
� �3�����#"#$��#"%%
����������#"#.���!"9���!"�$����"$
;��4��N����� ������ �������������#"�!
;��4��N����� ������ �������������
�C������#"�$
�C������#"%�
��������� ��� ������3���"�$
� �����#"#.
> �-�� -�C���#"#�
> �-�� �;-�C���#"#�
> �-�� �;�����-�C���#"#�
> �-�� ;);-�C���#"#
> �-�� ;);�����-�C���#"#
> �-������-�C���#"#�
> �-����-�C���#"#
���3�����#"#.
�������������������� ����#"#.
������������� ������;��=���#"#�
������������ ���� �������#"�#
���������������> �� ��� ����"�$
�����������#"#��� �#"��
����������������� ����� ��> �� ��� ������������
�"�%���"�.����"�$
> �-�� -�C��N ���� ������#"#�
> �-�� �;-�C��N ���� ������#"#�
> �-�� �;�����-�C��N ���� ������#"#�
> �-�� ;);-�C��N ���� ������#"#
> �-�� ;);�����-�C��N ���� ������#"#
> �-������-�C��N ���� ������#"#�
> �-����-�C��N ���� ������#"#
> ���� ���3�����������N ���� ������#"%%
> ��
0� � ����� ����������"�
����������."�
���������������3�����."%
������ ����� ����������"
������3����< 6������������#"%
��� �����"�$
��� ������ �������������������������� ���."�
�� =�����."�
������������� ����."#
N�������������� �����#"�!
N�����C�������� �����#"�!
N����5 �������� �����#"�!
N���$!!!�5 �������� �����#"�!
N���$!!!�5 ��3�� �����#"�!
>���$!!!5 ��������� �������������N ���� ������
#"��
>�������������� �������������N ���� ������#"�!
>����C��������� �������������N ���� ������#"��
>���5 ��������� �������������N ���� ������#"��
>���5 ��3��� �������������N ���� ������#"�$
i
������
���<�=�����������"�%
�� ������������ ���'"$
��� �������'"%
��������������� =��=��6��'"$
�����������������������������'"$
��� ���� ��������� ���������������'"9
���������������'"
������� �������� �������� �3��3����'"#
�������=���������������������������������'"#
������3�����3���� ������� ���������"�$����"'
���3�����������������'"
����������'"$
�� ����< �������#"�$
6����=���� ����'"#
6 �(����6��<��'"��� �'"�!
������6���������"C�C
5���<���
��� �����=��6������!"�.
5���<�������������"�.����"�$
5�;����������<��
���������������#"%
������ ���������������N ���� ������#"#9
`çÇçåáÅë=sáêíì~=`=rëÉêÛë=j~åì~ä fJR=
fJS
,� ����� ����#"$#
5 ������ ����
�������9"�!
�����������9"'
� ���������������5 ������� ������9"9
��� ��(��� �(��������9"'
�������9"�!
� �����
;��4���<���������������� ������3�)������9".
�� ������ �����9"'
�� ������������������������� ����9"'
�����������������9"�
����������5 ������� ������9"'
�������9"$
���������������9"�
� ���� ��� ���<����=�����$"�
� ���� ��������� ����"CC�C�� �"CCC
� �������
���<�=�����"�#
��� ������� ��������$"��� ��$"#
5 ���������������#"$.
,������������������� �������#"$.
,�������������#"��
� �� ���#"�
,���3���� ���#"�
� ������ �������#"��
5 ������������#"��
� � ����5 ���� ������������������� ������#"#�
� ��
���(������������ ����������$"�
5 ���������������#"$.
�3������#"$
�3�����=��6������#"$
j
�������������������3��"CC=�
�������������$"��� ��$"9
% ���4�=���> �� ��� ����"�#
������;������ ����#"% ���"$
������ ������� ��������"
�������N ���� �����0��A������%"$
���<�������7���������������+5.����=����� ������
�!"�%
���<�������7���������������N ���� ������#"%$
�CD�������D�����������������V������� ������
�!"�
�C:���4���� ��������������+5.����=���
�� �������!"�#
�C��� ��0�������������+5.����=����� �������!"�#
�C���30��������������3������ ������#"$'
����
� ��������"$�� ��"%
� ���������������;������ �����"$
� ��������������;������� �����"%
����������$".
��� �����������3�����$"�'
���������� ����"CCC���� �"CCC���
������������� ����#"��� ��#"$
%��� �> �� ��� ����"�#
��������������<��
���������������#"%
������3��
������ ������������������������#"% �� �#"%.
���������� �����������$"�
� �����������"$�� ��"%
� ������������������;������ �����"$
� �����������������;������ �����"%
�������3�� ���������< 6������������#"%
� ����> ���< 6������������#"%
������������������C�������#"%.
����A3�������������N ���� ������#"%���#"%
����A3���������������<������0��<�=���� ������
��"�
���������� ���� ��������� ����"CCC�=
�����������������#"��� ��#"$
���=��6�����"� ����"��
��A�0��� (�����!"$���!"#���!"9
����������$"9
�����3�6 �(����� ����"C���%"�
�������� ��� �����"CC�
=�D��� �D��� ��������������V������� ������
�!"�
k
����������������= ��������������#"
�����(�����������:��6 �(��� ������#"9
���6 �(
�������������������� ����#"$%
��������������������� ��<��$�!���������#"$#
0������0 ������6 �(�����������#"$�
:��6 �(��� �����
� �3�����#"�$
�C������#"�$
fåÇÉñ
�� �(
�����������#".�� �#"�$
0������$!���"�!�������6 �(�����������#"$
0�����������#"$#
���6 �(:�������������:��6 �(��� ������#"�!
��6D��� ����� �D� �D���<D�������=������������
V������� �������!"�
�D��� ����� ��D���D������=������������V�����
�� �������!"�
l
4����R�)��6�����"� ����"��
���������$"�
=������� ����!!�����������5 ������� ������9"�!
m
�0�����!"$���!"#���!"%���!"9
�0����� (�����!"$���!"#
�0���6 �(����� ����"C���%"�
� ��������������#"$�
����6 �����<��������#"$!
����������� ���� ��������� ����"CCC�=
����������� ���-����� ������������������ ���������������N ���� ������#"#9
��������
�� ������������3�� ����� ������> �����"�
���� �:��� ��������������5 ������� ������9"9
�< ��:��������������������� ������#"#�
�<3������� ���������������N ���� ������#"#9
� �������������:��6 �(��� ������#"9
� ��:��������������+5.����=����� �������!"�$
� ���� �������0��� ������������N ���� ������#"%#
� 6��������3����� �)������$"�9
������� ��
����������"CCC�
� ���� ���"CC�C�� �"CCC
���������"CCC���� �"CCC���
�����3��"CC=���� �"CC=���
�����3��������2����� ���3������"C���%"�
��������������� ����������$".
������������ ����< �������#"'
������ �������������N ���� ������#"%%
�� �����
���������� �����=���������<��������#"$!
���������?�������@��#"
+5.����=�����!"�$
5 ������9"'
������3��������������#"% �� �#"%.
���3����?�������@��#"
V�������!"%
V���7���!"
��� �����!"9
������#".
�����������������#"#!�� �#"##
�3�����#"$
������� ������ �3�����#"�'
������� ���������������#"�.
������� ���������������#"$$
��������6 �����<��������#"$!
�� C���3���������� ����6���������2�������"CC=�
��� ��� ��7���E���������"C���
n
V������� ����
�C�������!"
� ������!"�
�������������������� �����!"�
������������!"%
���!(��� �(���������!"%
�C�������!"
2����D�� ���������������V���7��� �������!"
V���7��� ����
�C�������!"'
� ������!"
�������������������� �����!"
������������!"
���(��� �(���������!"
���(��� �(������
�C�������!"'
V��3*������=��� ����� ���
�������0��A�������!"'
� ��������� ��;��4��������=������!"'
������������!"%�� ��!"'
2��3D��� �D��� ��������������V������� ������
�!"�
2��3�� ����:���������������� ����� �������!"�!
2��3��� ���������������������� ����� �������!"��
V����> ��������������� ���."#
V�������3�������������� ��� "#
`çÇçåáÅë=sáêíì~=`=rëÉêÛë=j~åì~ä fJT=
fJU
o
����������������3��"CC=
���� ����2���3���������������"CC��
���� ���������������"CC���
���� � �3���� ���� ���3���-�������� �%�(��������'"#
����3����3�������������� ��� "#
�������������� ��� ������������ ������$"
��� �����)������#"� �� �#"�.
�����=�������3�������������� ��� "#
���������� ����".���$"$
�������,������� ����$"$
��� �����> ��������������� ���."#
��� ��������3�������������� ��� "#
��� ����
� � ��������� ����$"%
� =����$"�
�������������$"
������$".
��� �����������>������� ���$"�
������ �3�� ����������"�%
��>���� ��������� "#��."#��."�
�� ����������� �)�������#"$%
�� ���6�����������#"�#
��� ����� �������!"9
�C�������!"��
� ������!"�!
�������������������� �����!"�!
��!��(��� �(���������!"9
�C�������!"��
��� ���
< 6��������������)���������������������!"��
< 6����������� ����������������!"�
< 6��� ��������3�)�������!"$
� � � ���������������!"#
���������������!"#
=��6���� ����� �������������!"�.
��� ����������
=��=��6���!"�
������������!"9�� ��!"��
��� ��A����������:���������������� ����� ������
�!"�!
��2���D������ ���D������=������������V�����
�� �������!"�
�������� ����"CC=
������!"$���!"#���!"%���!"�$
� � ��������������� ������$"�
� ��������������7������ ������#"�'
��4���������������<������0��<�=���� ��������"$
p
�����3
� ���� �� ����������"C=��"C=�
������� ����"CC=���� �"CC=���
$������� ��� �����<������0��<�=�����"'
$��������������".
��<������0��<�=�����"�
;��4��=��6������������������"�!
;��4��=��6������������ �����������"��
������ ���������"�#
����������� �����"�$
���������������"�%
� �����������"�#
��� ������"'
��<������0��<�=���� ��������"$
�C��������"
� �������"$
�������������������� ������"$
���D��D����������������V������� �������!"�
���D��D������������������V������� �������!"�
���D� �������������V������� �������!"�
��������=��������������3������ ������#"$9
��� ����3��������2����� ���3������"C���%"�
������3�����������$"%�� ��$"
$�����?�&���������> �� ��� ����"�$
$�����0�����������������6 �(�����������#"$%
$���������������� ����"������"�!
$����������������������"��
$�������%��� � ��� �����"#
$��������"3!��������������"'
�������������������"CC�
���=������������ =�����?���@��%"�
$�!���� ���#"$!��#"$#��#"##��#"#%
�<������ ��)�������$"9
�< �(�������� ���� ���"C=�
$��������� ���#"�.
�<������� 6��)������#"� �� �#"�.
������������5����)��6�����"� ����"��
�������������)��6�����"� ����"��
�������: =�����!"9
������������R���������)��6�����"� ����"��
������� �����
����������#"'��#"#!
�C������#"#$
fåÇÉñ
�� �(
� �����#"9��#"#�
���3�����<���������������� ������#"'��#"#!
�������������������� ����#"9��#"#�
�����������#".��#"#!�� �#"##
=��6������������� ��<����������� ���#"##
$��������#"##
����;�������������������������� ������#"#�
����:�������������������� ������#"#�
������ ����:�������������N ���� ������#"%#
����=���� ����������$".
�����;������ ����#"% ���"%
����;��=���$"�
���(������� ����������$"�
� �3����������� ��������$"#
��������� ���#"�
��� ���� ���� ���� ���#"�
�������������N ���� �������#"#�
�� ������ �������#"
7���� ����$"�
7���� ���� ���� ���$"�%
�������<�������6���� ��4��������������:��6 �(�
�� ������#"��
� ��6���
������������#"$�� �#"%���$"'
��������� ����#"�
������#"��� �#"��
��������D�<�������D��������������V���7��� ������
�!".
����������� �����"��� ��"%
�����;���C�����������:��6 �(��� ������#"�!
$ ��4����'����� �����"�$
$ ��4����'�� ��� �����<������0��<�=�����"9
���������� ����< �������#"'
$ ������6 �(�����������#"$%
�����
��=��������������#".
������� �����#"�
> ��������������� ����."#
����������#"��� ��#"$
���3�������������� ���� "#
����������> ��������������� ���."#
�������������3�������������� ��� "#
$ ���� ����6��� 6���#".
$�!�4����'����� �����<������0��<�=�����"9
������
0� � ������ ��������"�
���������� "
�� ��� ��������#"$$
���������������3����� "�
����������� "$
�� ������������3�� ����� ������> �����"�
������ ������ ��������"
��� ������� �������%"$�� �%"%
�� =������ ������ "�
�� =���������3�� "
��� ������� "$
����������� "%
� ������� "$
������� "#
�� ������ "�
������������� "$
$�������� ����"
�����������
� ��� ���� "$
������������ ���� ��� "�
���3������������� "%
$�����������" �� "$
$����� ����6��� 6�� "�
���3;����� ���������������N ���� �������"�
����0� ��� ��N ������������N ���� ������#"%#��
#"%9
$&������6 �(�����������#"$%
����������=�� �������"CC�=
��� ������ ���� ���������3���� �����������#"�'
����A<�������������������������� ���'"%
������"CC=�
�3������� ���� ����� ���$"����#"
�3����� �����#"$
=��6������#"$
�3����� 6������ ���$"�
�3������ �������#"'
�3������ ����
�C������#"$9
� �����#"$.
�������������������� ����#"$.
�����������#"$
�3�������������<���� ��� ������� ����������$"�
�3�������������<�����#"��� ��#"$
���������������#"#���#"%
�����(��������#"$
�3���) ��������������3������ ������#"$9
q
A���� ��������� ��)������%"�
����=��� ����������������"CC���
`çÇçåáÅë=sáêíì~=`=rëÉêÛë=j~åì~ä fJV=

fJN
����������6���� ��4��������������:��6 �(��� ������
#"��
��!� �(��� �(������� ������������������!"#
�������� ������9"$
��������������#"#%
���4�;�3�������������<������0��<�=���� ������
��"%
A��"� "� ������������� ����#"��� ��#"$
���, �������������5 ������� ������9"'
�����D������=�D6������D��D��� ������������
V������� �������!"�
�� ����< �������#"'�� ��#"�#
;��4�������������� ������#"�#�� ��#"�%
��������#"��
���������3������ �������#"'
+5.���� ������#"���� ��#"�.
�����������#"�$
������> �����#"'
���������#"'
�6��=�A6���3� �;�����3�����������5 ������� ������
9"'
r
�������������������� ������#"#�
7���� ��
� ���� ��� ������;��=���$"�%
��D�������D� �D����������������V���7��� ������
�!".
��D���3D����D����������������V���7��� ������
�!".
������� ���
���������� �����=���������<��������#"$!
� �3�����#"�'
������������� ������#"�.
����������#"$$
����6 �����<��������#"$!
���� ���������#"�%��#"�.
���� ���������6<����������� �������3��#"$$
�� ����������� �����#"�'
�� ������������������������� ����#"�'
�� �������C�������#"�9
������������������� �������9"�
7���E�������X���� ����"C���
�����������������7������ ������#"�'
-����������#"$!
-���������� ����"$���$"$���#" ���#"�9���#"$!���#"$$��
�#"$%���#"$
s
�������������> �� ��� ����"�#
=����3;����0������� ���������������<������
0��<�=���� ��������"#
�������� ����#"$.
�����,������������#"$.
)������#".
���;��4���� ��������������=����������
�� =������%"�
�����������$"'
���������������� ����"CCC�
� ���������"CC
� ��������6��<�������3�������������"%
� � ��������� ����$"%
� �������� ����� ���� ���� ���� ������;��=���
#"�
� �������� ��������"CC�
������ ����"CC�
;��4���<���������������� ������9".
;��4�������������� �����6 �(����6��<���!"#
���� ������2���������"CCC=
������ ��������� ���� �������"CC���
�������� �3����� ��������$"#
<�,��� ������������� ���� ���0"��� �0"#
+5.���� �����6 �(����6��<���!"%
�������� ���� ������"CCC=�
������6���������"C�C
� ���� ��������� ����"CC�C�� �"CCC
� ���� ������������$"�
� ������������ ������� ��������$"��� ��$"#
�������������$"��� ��$"9
��������������� ����"CCC���� �"CCC���
�������������������� ����$"9
�������� ��� �����"CC�
� 6������ ���$"�9
�� ����������� ������!"$
�� ��������������"$�� ��"%
���� ���������=��� ����������������"CC���
���� ����2���3���������������"CC��
�������������$"
��� ������#"� �� �#"�.
�� ������������#"$%
�����3�������� ����"CC=���� �"CC=���
������3�����������$"%�� ��$"
�������������������"CC�
������$".�� �$"�'
�<��������$"9
M fåÇÉñ
�� �(
�<������� � �������$"$�� �$"#
�<������� 6���#"� �� �#"�.
����;��=���#"�
� ��6����������#"��� �#"��
� ��6�����������������#"$�� �#"%
����������� �����"��� ��"%
����������������#".
��������� ����������$".
�6�������� �����=�������� ����#"�
A���� ���������%"�
�� ����< �������#"'�� ��#"�#
=���������������$"�
= ������6���������"C=�
'�� �������� ����#"�%
6<����������� �������3��#"$$
=���������������$"�
= ���;�������������������3������ ������#"$9
) ������;�����"CC=�
) ������������� �����������(����"CC=
) ��������������� ����"CC=�
= ������6���������"C=�
t
A ��������������� ��� �����<������0��<�=�����"'
6���� ����;����������������<������0��<�=��
�� ��������"$
6�������
�������"C�C
= �������"C=�
6������������� ����#"�#
K����?K�������������������������� �����2�����@�
���� �����������=���"CCC=�
6����=���� ��� ����������'"#
K��� 6��R����������� �������� ����$"
v
3��� 6�������� ����!"�
`çÇçåáÅë=sáêíì~=`=rëÉêÛë=j~åì~ä fJNN=


![]ÉXXIIJL xxx XXXXXXXX Il XXXXX Il Il // xxxxxx ////7//// Ill < xxx ......ÉXXIIJL xxx XXXXXXXX Il XXXXX Il Il // xxxxxx ////7//// Ill < xxx XXXXXX Il XXXX](https://img.pdfslide.net/doc/110x75/5ff331e59c34a92f096bdc24/xxiijl-xxx-xxxxxxxx-il-xxxxx-il-il-xxxxxx-7-ill-xxx-xxiijl.jpg)


![El zumuqueño edición 62 [Autoguardado]xxxxx [Autoguardado]xxx](https://img.pdfslide.net/doc/110x75/5571fd74497959916999245a/el-zumuqueno-edicion-62-autoguardadoxxxxx-autoguardadoxxx.jpg)