Embed Size (px)
Citation preview

SAS Administration Guide
Version 1.6
09/aug/12

Administration Guide SAS
Version 1.6 2 of 87
Table of contents
1 References ............................................................................................................................ 4
2 Introduction ........................................................................................................................... 5
3 SAS overview ........................................................................................................................ 6
4 SAS management portal ....................................................................................................... 9
4.1 Access ............................................................................................................................................ 9 4.2 Account Manager view ...................................................................................................................10 4.3 Operator view .................................................................................................................................11
5 Customizing SAS environment ........................................................................................... 12
5.1 Appearance and branding...............................................................................................................12 5.2 Communications .............................................................................................................................13
5.2.1 SMS settings ....................................................................................................................13 5.2.2 E-mail settings ..................................................................................................................15 5.2.3 SMS messages ................................................................................................................16 5.2.4 E-mail messages ..............................................................................................................16
5.3 User policies ...................................................................................................................................17 5.4 Token policies .................................................................................................................................18 5.5 Automation policies ........................................................................................................................18
5.5.1 Provisioning rules .............................................................................................................19 5.5.2 Self-service policy .............................................................................................................19 5.5.3 Self-enrollment policy .......................................................................................................19 5.5.4 SAML provisioning rules ...................................................................................................19
6 Managing SAS inventory ..................................................................................................... 20
6.1 Inventory status ..............................................................................................................................20 6.2 Allocating ........................................................................................................................................20 6.3 Managing allocated tokens .............................................................................................................22
7 Managing SAS end-users ................................................................................................... 24
7.1 Creating end-users accounts ..........................................................................................................24 7.1.1 Create User shortcut ........................................................................................................24 7.1.2 Import Users shortcut .......................................................................................................25 7.1.3 LDAP synchronization .......................................................................................................28
7.2 Managing end-users groups ...........................................................................................................28 7.2.1 “Group Maintenance” module ...........................................................................................29 7.2.2 Group Membership module ..............................................................................................29 7.2.3 RADIUS Attribute (Group) module .....................................................................................30
7.3 Managing containers ......................................................................................................................30 7.3.1 Container Maintenance module ........................................................................................31 7.3.2 Container Members module .............................................................................................31
7.4 Authorization and pre-authentication rules.......................................................................................31
8 Managing SAS tokens ......................................................................................................... 33
8.1 Provisioning end-users ....................................................................................................................33 8.1.1 Bulk provisioning ..............................................................................................................33 8.1.2 Automated provisioning ....................................................................................................34 8.1.3 Manual provisioning ..........................................................................................................36 8.1.4 Manual assigning ..............................................................................................................36
8.2 Managing a provisioned/assigned token .........................................................................................39 8.2.1 Suspend...........................................................................................................................41 8.2.2 Unlock ..............................................................................................................................42 8.2.3 New PIN ...........................................................................................................................42 8.2.4 Resync .............................................................................................................................43 8.2.5 Revoke .............................................................................................................................43
9 Managing SAS Auth Nodes ................................................................................................. 45
10 Managing SAS SAML Services ........................................................................................... 48
10.1 Adding SAML Service Providers ......................................................................................................48 10.2 Provisioning SAML Services ............................................................................................................50

Administration Guide SAS
Version 1.6 3 of 87
10.2.1 Manual provisioning ..........................................................................................................50 10.2.2 Auto-provisioning rules .....................................................................................................51
11 Managing SAS reporting ..................................................................................................... 53
11.1 Accessing the SAS reporting modules ............................................................................................53 11.1.1 Account ...........................................................................................................................53 11.1.2 Virtual Server ....................................................................................................................54
11.2 “Available Reports” module .............................................................................................................55 11.3 “My Report List” module .................................................................................................................56 11.4 “My Scheduled Reports” module ....................................................................................................57 11.5 “My Report Output” module ............................................................................................................57
12 Monitoring your SAS ........................................................................................................... 58
12.1 Snapshot summary information .......................................................................................................58 12.2 “User management” page ...............................................................................................................59
13 Requesting changes ........................................................................................................... 60
14 Requesting support ............................................................................................................ 61
appendix A: appearance and branding customization .............................................................. 62
A.1 Custom fonts ..................................................................................................................................62 A.2 Custom colours ..............................................................................................................................64 A.3 Custom buttons ..............................................................................................................................66 A.4 Custom logo images .......................................................................................................................67 A.5 Custom titles ..................................................................................................................................70 A.6 Custom labels .................................................................................................................................72
appendix B: communications customization ............................................................................. 73
B.1 SMS messages tags .......................................................................................................................73 B.2 SMS messages list .........................................................................................................................73 B.3 E-mail messages tags .....................................................................................................................74 B.4 E-mail messages list .......................................................................................................................75
appendix C: SAML default CCS source ..................................................................................... 85
© copyright, Equant 2012
All rights reserved.
The information contained in this document is the property of Equant and its affiliates and subsidiary companies forming part of the Equant group of companies (individually or collectively). No part of this document may be reproduced, stored in a retrieval system, or transmitted in any form or by any means; electronic, mechanical, photocopying, recording, or otherwise, without the prior written permission of Equant. Legal action will be taken against any infringement.
Equant is a member of the France Telecom Group and operates its services under the name Orange Business Services.

Administration Guide SAS
Version 1.6 4 of 87
1 References
SAS welcome guide – <software/hardware> token on <PC/smartphone> ......................................... Ref 1
SAS LDAP synchronization agent configuration guide ........................................................................ Ref 2
MSCT user guide ............................................................................................................................... Ref 3
SAML Authentication with SAS Cloud ................................................................................................ Ref 4

Administration Guide SAS
Version 1.6 5 of 87
2 Introduction
As part of the system that enables your company’s employees to make remote connections to your
company network, your company has chosen to use the Secure Authentication Service provided by
Orange Business Services.
The Secure Authentication Service (SAS) is a security system that ensures only authorized people can
access your company’s network.
About this document
This document is intended for SAS customer operators.
Below is an overview of the chapters in this guide and their content:
Chapter 3: SAS overview – describes some basic principles of SAS.
From chapter 4 to chapter 12 : managing your SAS service – describes how you can use the SAS
management portal to manage user accounts, provision tokens, manage groups, authorizations,
policies, customize your SAS portals and the SAS message contents, view SAS reports, etc.
Chapter 13: requesting changes – gives details of how to request changes that cannot be performed
using your SAS management portal.
Chapter 14: requesting support – gives details of how to contact the Orange Business Services
support center.

Administration Guide SAS
Version 1.6 6 of 87
3 SAS overview
The SAS ensures strong authentication of users who access their company resources via a remote
connection.
Strong authentication combines "what you know" (user name and PIN code) and "what you have" (token
code). This compares to Simple authentication, which is only "What you know" (user name and
Password).
The user’s password, called Passcode, is composed of a PIN code (between 4 and 8 numeric
characters) immediately followed by the token code (the digits displayed by the token).
Login: UserID
Passcode: PIN code + token code
Each token code is unique and it is impossible to predict the value of a future token code.
Example:
The SAS is implemented on the SafeNet Authentication Service Cloud platform. Each customer is
provided with Virtual Servers on this platform. A Virtual Server is an individual account’s authentication
server (virtual).
Orange Business Services is proposing the following Cryptocard tokens with the SAS:

Administration Guide SAS
Version 1.6 7 of 87
Hardware tokens
token type picture battery life usage
metal key fob
(KT 4)
unlimited (replaceable) very frequent usage, ideal in aggressive industrial
environment
plastic key fob
(KT 5)
5 to 7 years frequent usage
lightweight plastic key fob
(crystal)
3 to 5 years normal usage
Software tokens
Software token codes are generated by the Cryptocard MP-1 application on the user’s equipment.
Cryptocard software tokens can run on almost all common devices (Windows PC, iPhone, iPad,
Android devices, Blackberry devices, Symbian phones, Java phones).
software token picture
MP-1 application for PC
MP-1 application for Smartphone
Cryptocard tokens can be configured for
Token-side PIN: PIN must be keyed into the token before an OTP is generated
Server-side PIN: PIN is prepended to the OTP and validated by the server.
Orange Business Services provides Cryptocard tokens configured for server-side PIN by default.

Administration Guide SAS
Version 1.6 8 of 87
SAS management portal and SAS self-service portal
Three useful tools are provided with the SAS:
The SAS management portal allows you to perform day-to-day management activities, such as
creating end-user accounts, provisioning end-users with tokens, suspending tokens, viewing SAS
reports.
For a detailed description of how to use the SAS management portal, refer to chapter 4.
The SAS self-service portal allows end-users to perform strong authentication operations such as:
- change their PIN code
- resynchronize their token to verify that it is functioning properly and in sync with the server.
- Request SMS OTP: this functionality is not available for the moment.
The SAS self-service portal is available at the URL provided in the end-user self-enrollment e-mail.
The Managed Service Change Tool allows customer operators to order tokens and to request
changes that cannot be performed using the SAS management portal (refer to chapter 13).

Administration Guide SAS
Version 1.6 9 of 87
4 SAS management portal
4.1 Access
Before connecting to the SAS management portal:
1. you have to open the SAS “Self-enrollment” e-mail from your mailbox (it may happen that this e-mail
is redirected to your “junk/mail” container) and follow instructions to install the SAS Software Tools
and download/activate the MP software token you will use to authenticate against the SAS
management portal.
2. once you have successfully completed the self-enrollment process, you receive a second e-mail titled
“E-mail validation”: open it and follow instructions (before you can log to the SAS management portal,
you must confirm you own the e-mail associated with your SAS userID).

Administration Guide SAS
Version 1.6 10 of 87
4.2 Account Manager view
When logged to the SAS management portal, you have access to the Account Manager view:
At the top right of the page, you have a welcome message that displays the name of the Service Provider
account created by Orange Business Services (for the SAS administrators of your company) followed by
your userID (e-mail). Click the “ON-BOARDING” tab:
Another account is displayed in the Account module: this is a Subscriber account created by Orange
Business Services too, but dedicated to the end-users of your company that will use the SAS. In some
cases, multiple Subscriber accounts can be listed in the Account module, but generally there is only one
Service Provider account (called “company” in the examples and screenshots of this document) and one
Subscriber account (called “company-sas” in the examples and screenshots of this document) created
for each company. Click the “VIRTUAL SERVERS” tab:
Every account has a Virtual Server, including your Service Provider account.

Administration Guide SAS
Version 1.6 11 of 87
4.3 Operator view
When selecting an account from the Accounts List on the “VIRTUAL SERVERS” tab, a second row of tabs (called sub-tabs in this document) appears through which you can manage the Virtual Server part of the account you just selected (the name of the account being managed is displayed above this row of sub-tabs). Service Provider account’s Operator view:
Subscriber account’s Operator view:
Note that the configuration options are more limited for your Service Provider account’s Virtual Server: this is explained by the fact that this Virtual Server is largely managed by Orange Business Services as it relates to sensitive administrator accounts.

Administration Guide SAS
Version 1.6 12 of 87
5 Customizing SAS environment
We highly recommend that you customize the SAS environment before you begin to provision your end-users with tokens.
5.1 Appearance and branding
By default, the appearance and branding of both Service Provider and Subscriber accounts are inherited from Orange Business Services.
The scope of customization for your Service Provider account is:
the pages of your SAS management portal (including the logon one).
the SAS self-service portal dedicated to the SAS administrators of your company.
the enrollment pages sent to the SAS administrators of your company.
The scope of customization for your Subscriber account is:
the SAS self-service portal dedicated to the SAS end-users of your company.
the enrollment pages sent to the SAS end-users of your company.
By default, the appearance and branding of both Service Provider and Subscriber accounts are
inherited from Orange Business Services.
If you want to customize both Service Provider and Subscriber accounts in the same way, you just have to customize the Service Provider account: appearance and branding of the Subscriber account will be inherited from the Service Provider one.
Go to the “Manage” module of the “VIRTUAL SERVERS” tab, click the hyperlink of the account for which
you want to customize appearance and branding, and go to the “Custom Branding” module of the
“COMMS” sub-tab.
Refer to the appendix “appearance and branding customization” on page 62.

Administration Guide SAS
Version 1.6 13 of 87
5.2 Communications
By default, communications settings of both Service Provider and Subscriber accounts are inherited from Orange Business Services.
Only communications settings of your Subscriber account can be customized (communications settings of your Service Provider account are directly managed by Orange Business Service).
The scope of customization for your Subscriber account is:
the SMS settings (SMS plug-in)
the E-mail settings (SMTP server)
the SMS messages (text and formatting).
the E-mail messages (text and formatting).
Go to the “Manage” module of the “VIRTUAL SERVERS” tab, click the hyperlink of your Subscriber
account and go to the “Communications” module of the “COMMS” sub-tab.
5.2.1 SMS settings
SMS gateways are used to send SMS/OTPs and alerts. There are two options for sending SMS
messages:
Default: SMS messages will be sent via the SAS’s SMS gateway.
The current version of SAS does not yet have its own SMS gateway, but you have the ability to configure a custom one if you meet the criteria below.
Custom: SMS messages will be sent via a gateway service to which your company has subscribed or
SMS modem installed at your site.

Administration Guide SAS
Version 1.6 14 of 87
Click the “SMS Settings” hyperlink to define a custom SMS plug-in for your Subscriber account.
Select the “Custom” option.
Complete the “SMS settings” form.
The options for configuration will vary depending on your SMS plug-in selection. Your gateway service
provider will supply the necessary configuration information.
Other configuration options that may be available, depending on your network and SMS gateway service provider:
Use Proxy: if you will be sending SMS messages via a Proxy Server, select the “Yes” option and add
the Proxy URL, Port number, User Name and Password.
Use Flash SMS: use this option if the gateway supports Flash SMS and you do not want SMS
messages stored on the receiving device.
Use Overwrite SMS: use this option if the gateway supports Overwrite SMS, causing the previous
SMS message stored on the receiving device to be overwritten by each new message.
SMS Mobile Number: you can verify the ability to send SMS messages by entering the number of a
device capable of receiving SMS messages in this field. SMS phone numbers must contain only digits
and must begin with a country code.
Click the “Apply” button to commit any change.

Administration Guide SAS
Version 1.6 15 of 87
5.2.2 E-mail settings
SMTP servers are used to send enrollment messages and alerts. There are two options for sending e-
mail messages:
Default: e-mail messages will be sent via the SAS SMTP server. Note that e-mail sent via this server
will not appear to come from your Subscriber account. In addition, any failed deliveries (e.g. invalid e-
mail address) will be sent to the SAS SMTP server.
Custom: select this option to send e-mail messages via your own SMTP server. E-mail sent via this
server will appear to come from your Subscriber account. Any failed delivery notices will be sent to
your own SMTP server.
Click the “E-mail Settings” hyperlink to define a custom SMTP server for your Subscriber account.
Select the “Custom” option.
Complete the “E-mail settings” form:
From address: this is the “From” name and valid account on your SMTP server from which e-mail will
be sent. For example: System Administrator ([email protected]).
SMTP server and port number: this is the SMTP server name or IP address and port number (e.g.
Name: smtp.mycompany.com Port #: 25).
SMTP user and SMTP password: if the SMTP server requires authentication, enter an account and
password in these fields.
SSL: select this option if your SMTP server is configured to use SSL.
Test To Address: you can verify the ability of your Subscriber account’s Virtual Server to send e-mail
messages by entering a valid e-mail address in the this field, and then clicking the Test button.
Click the “Apply” button to commit any change.

Administration Guide SAS
Version 1.6 16 of 87
5.2.3 SMS messages
You can customize the various SMS/OTP messages that are sent by your Subscriber account’s Virtual Server.
Click the “SMS Messages” hyperlink and select an “SMS Message Type” from the dropdown list (the
message content is displayed in the “Message” window).
Message content can be modified as required, bearing in mind that SMS messages greater than 160
characters in length (including spaces) will be split into 2 or more messages.
Refer to :
the appendix “SMS messages tags” page 73 for details about tags that are used to insert information
from your Subscriber account’s Virtual Server into your SMS message content.
the appendix “SMS messages list” page 73 for details about the SMS messages list.
5.2.4 E-mail messages
You can customize the various e-mail messages that are sent by your Subscriber account’s Virtual Server.
Click the “E-mail Messages” hyperlink and select an “E-mail Message Type” from the dropdown list (the
message content is displayed in the “Body” window).
Message content can be modified as required. Select the Text or HTML option to send content using plain text of HTML respectively.

Administration Guide SAS
Version 1.6 17 of 87
Refer to :
the appendix “E-mail messages tags” page 74 for details about tags that are used to insert
information from your Subscriber account’s Virtual Server into your e-mail message content.
the appendix “E-mail messages list” page 75 for details about the e-mail messages list.
5.3 User policies
Only user policies settings of your Subscriber account can be customized (user policies settings of your Service Provider account are directly managed by Orange Business Service).
User policies affect your end-users accounts, allowing you to determine how to handle consecutive failed
logon attempts.
Go to the “Manage” module of the “VIRTUAL SERVERS” tab, click the hyperlink of your Subscriber
account and go to the “User Policies” module of the “POLICY” sub-tab.
Click the “Account Lockout/Unlock Policy” hyperlink
Complete the “Thresholds and Actions” form:
Account lock threshold: this is the maximum number of consecutive failed logon attempts permitted
for a user. If this value is exceeded, the account will lock. Setting this value to 0 is the equivalent of
disabling this function. Default value: 3
Alert Operator on account lockout: if checked, an alert regarding the User’s Account being locked will
be sent to an Operator.
Alert User on account lockout: if checked, an alert regarding the User’s Account being locked will be
sent by e-mail to the User.

Administration Guide SAS
Version 1.6 18 of 87
Alert Operator on account unlock: if checked, an alert regarding the User’s Account being unlocked
will be sent to an Operator.
Alert User on account unlock: if checked, an alert regarding the User’s Account being unlocked will be
sent by e-mail to the User.
Account lock duration: this is the time in seconds, minutes or hours that must elapse after locking the
account, after which the User’s account will automatically unlock. If set to 0, the account will not
automatically unlock. Default value: 15 minutes.
Click the “Apply” button to commit any change.
5.4 Token policies
Only token policies settings of your Subscriber account can be customized (token policies settings of your Service Provider account are directly managed by Orange Business Service).
During SAS creation, your company completed the Orange Business Service SRF2 document from which token policies settings have been configured by Orange Business Services. However, if you want to update these settings, please use the Orange Business Services MSCT tool (refer to the chapter “Requesting changes” on page 60). In that case, new settings will take effect after new token enrollment.
You have a read-only access to the token policies: go to the “Manage” module of the “VIRTUAL
SERVERS” tab, click the hyperlink of your Subscriber account and go to the “Token Policies” module of
the “POLICY” sub-tab.
5.5 Automation policies
Only automation policies settings of your Subscriber account can be customized (automation policies settings of your Service Provider account are directly managed by Orange Business Service).
Go to the “Manage” module of the “VIRTUAL SERVERS” tab, click the hyperlink of your Subscriber
account and go to the “Automation Policies” module of the “POLICY” sub-tab.
Administration Guide SAS
Version 1.6 19 of 87
5.5.1 Provisioning rules
Refer to the chapter “Automated provisioning” on page 34.
5.5.2 Self-service policy
This policy displays the default and custom URL at which the user can access self service functions such
as PIN management, Resynchronization and SMS OTP resend.
Do not modify the Self service URL or the Self service Unique URL value unless you have installed a stand-alone self-service web server.
5.5.3 Self-enrollment policy
This policy controls self-enrollment thresholds and alerts.
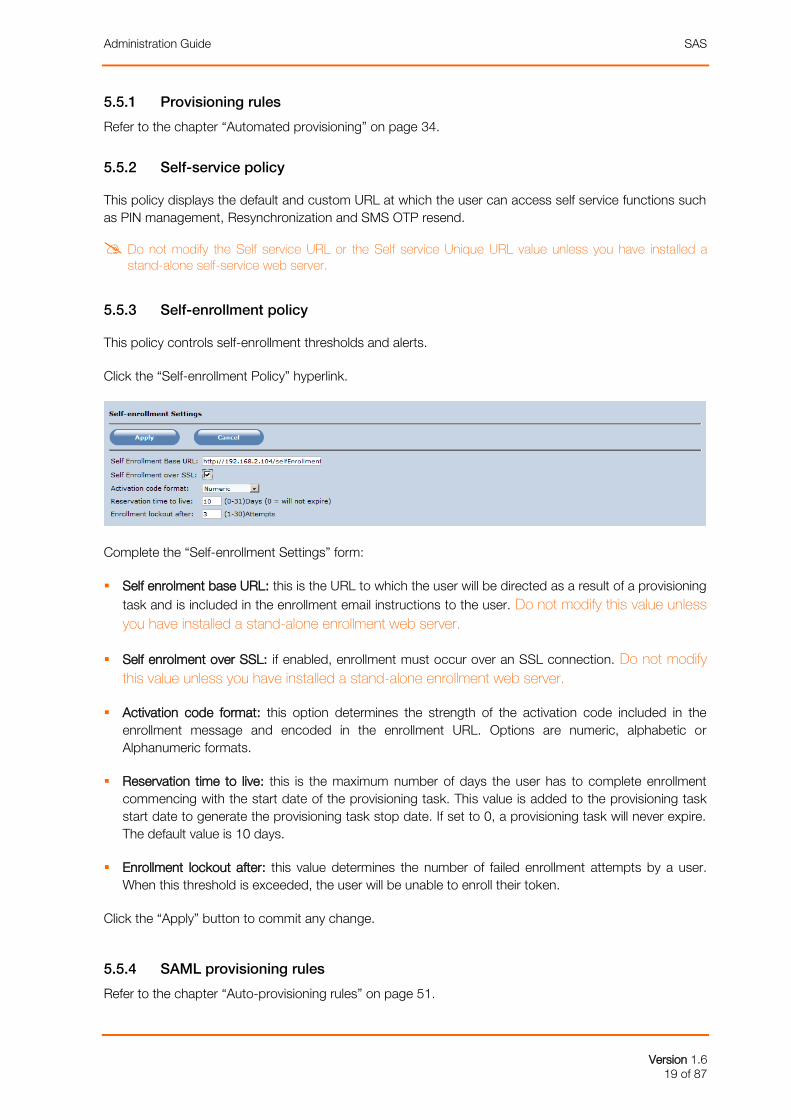
Click the “Self-enrollment Policy” hyperlink.
Complete the “Self-enrollment Settings” form:
Self enrolment base URL: this is the URL to which the user will be directed as a result of a provisioning
task and is included in the enrollment email instructions to the user. Do not modify this value unless
you have installed a stand-alone enrollment web server.
Self enrolment over SSL: if enabled, enrollment must occur over an SSL connection. Do not modify
this value unless you have installed a stand-alone enrollment web server.
Activation code format: this option determines the strength of the activation code included in the
enrollment message and encoded in the enrollment URL. Options are numeric, alphabetic or
Alphanumeric formats.
Reservation time to live: this is the maximum number of days the user has to complete enrollment
commencing with the start date of the provisioning task. This value is added to the provisioning task
start date to generate the provisioning task stop date. If set to 0, a provisioning task will never expire.
The default value is 10 days.
Enrollment lockout after: this value determines the number of failed enrollment attempts by a user.
When this threshold is exceeded, the user will be unable to enroll their token.
Click the “Apply” button to commit any change.
5.5.4 SAML provisioning rules
Refer to the chapter “Auto-provisioning rules” on page 51.

Administration Guide SAS
Version 1.6 20 of 87
6 Managing SAS inventory
6.1 Inventory status
The first thing to do is check the inventory status of your Subscriber account, because you can not
successfully provision your end-users with tokens and authentication methods if this inventory is
insufficient.
Go to the Account module of the ON-BOARDING tab and click your Subscriber account hyperlink. The
allocation module displays a table showing the capacity (determines the maximum number of tokens that
can be in use/assigned to users) and quantity of all token and authentication types allocated to your
Subscriber account’s Virtual Server where:
Maximum: this row shows the total by capacity, token and authentication method allocated to your
Subscriber account’s Virtual Server.
In Use: shows the capacity, tokens and authentication methods consumed by your Subscriber
account’s Virtual Server.
Available: shows unconsumed capacity, tokens and authentication methods.
Deallocate: shows the quantity by type that can be deallocated from your Subscriber account’s Virtual
Server and returned to your Service Provider account’s Inventory.
If you think the amount of unconsumed capacity, tokens and authentication methods are sufficient to
complete the provisioning of your end-users, you can go directly to the chapter “Managing SAS end-
users” on page 24.
If not, there are two cases:
Your Service Provider account’s inventory has enough available capacity, tokens and authentication
methods. The only thing to do is to allocate them to your Subscriber account’s Virtual Server.
Your Service Provider account’s inventory does not have enough available capacity, tokens and
authentication methods. In that case, you have to order a new pool of tokens to Orange Business
Services using the Orange Business Services MSCT tool (refer to the chapter “Requesting changes”
on page 60).
Note that you have the ability to display your Service Provider account’s current inventory by going to the Inventory module of the DASHBOARD tab. Unfortunately, this inventory contains not only available capacity, tokens and authentication methods but also the MP software tokens and related capacity units already used by the SAS administrators of your company. However, the allocation process described below only deals with capacity, tokens and authentication methods that are really available.
6.2 Allocating
Go to the “Account” module of the “ON-BOARDING” tab, click your Subscriber account hyperlink, go to
the “Allocation” module and click the “Allocate” button.

Administration Guide SAS
Version 1.6 21 of 87
Select the “Sale” allocation type, use the drop-down list to select the token type you want to allocate (KT,
MP or GrIDsure), check the “Automatically add Capacity with this allocation” box and click the “Next”
button.
Select the “Default” container, enter the token quantity you want to allocate (this value must be equal to
or lower than the “Available” value, click the “Search” button, select all tokens by checking the box of the
first row (grayed cell) and click the “Next” button.

Administration Guide SAS
Version 1.6 22 of 87
Complete the “Billing References form”, click the “Next” button and click the “Finish” button.
6.3 Managing allocated tokens
Go to the “Manage” module of the “VIRTUAL SERVERS” tab, click your Subscriber account hyperlink, go
to the “Tokens” module of the “TOKENS” sub-tab.
Use the “Search” button to refresh the list of the tokens allocated to your Subscriber account’s Virtual
Server, based on any combination of the following criteria:
Token type: this search criterion refines the list to a specific type of token. If All is selected, then all
tokens regardless of type are listed.
State: these criterions refine the list to tokens in a selected state. Options are:
- Inventory: token is available for assignment to users

Administration Guide SAS
Version 1.6 23 of 87
- Initialize: a hardware token in inventory that must be initialized before it becomes available for
assignment.
- Assigned: the token is no longer in inventory. It has either been manually assigned to a user but
not activated or is part of a bulk provisioning operation and has not yet been enrolled by a user.
- Active: the token is assigned to a user and has been enrolled or used to authenticate.
- Suspended: this indicates that an Operator has placed the token in a suspended state, making it
invalid for authentication but leaving it assigned to a user. This is usually done if there is a security
concern such as a lost or misplaced token. Suspended tokens can be reactivated by an Operator
when the security concern has been resolved.
- Locked: this state occurs when a user exceeds the maximum consecutive failed logon attempts
threshold. A locked token can be reactivated by an Operator. The automatic locking and unlocking
of tokens is controlled by the Account Lockout/Unlock Policy.
- Lost/Failed: is a state applied by an Operator when revoking a token. Revoked tokens are returned
to Inventory in this state where they can be permanently removed or if the token is subsequently
found or determined to function properly, it can be reinitialized into the Inventory state.
- Expired: when the token is expired. This regards only non-Cryptocard tokens imported in the
server.
Serial #: search by partial or complete serial number to find a range or specific token.
Container: lists only those tokens that are held in the selected container.
The result of a search is displayed in the tokens list. From the list you can:
Move tokens: this option is used to move the selected tokens to a different container.
Reset PIN: this option is used to apply the current Server-Side PIN policy to the selected range of
tokens. Note that this function is not available for tokens initialized with Token-side PINs. Tokens must
be in the Inventory state.
Click the serial number hyperlink: this option displays the token operating parameters, in-use statistics
and organizational ownership.
Click the UserID hyperlink: this option gives access to the user’s record and management functions.
This is the equivalent of selecting the UserID from the Search module of the ASSIGNMENT sub-tab.
The “Change Log” button in the Tokens tab displays up to the last five token management operations.
The log displays a row for each token operation that includes the token serial number, the operation or
action, a date/time stamp of the operation, the name of the Operator that performed the action, the
organization to which the Operator belongs (i.e. your company or Orange Business Services) and any
comment entered by the Operator.

Administration Guide SAS
Version 1.6 24 of 87
7 Managing SAS end-users
You can manage only users of your Subscriber account’s Virtual Server (end-users). Users of your Service Provider account’s Virtual Server (SAS administrators of your company) are directly managed by Orange Business Service).
7.1 Creating end-users accounts
There are three ways to create end-users accounts:
Manually, one user at a time using the Create User shortcut.
Manually, importing one or more user records from a flat file.
Automatically by synchronizing with your Active Directory / LDAP server.
You can add users using both manual and automated methods, provided that userIDs are unique. This
allows you to extend authenticating to users that exist in your LDAP directory such as employees, as well
as users that do not, such as contractors or business partners.
7.1.1 Create User shortcut
Go to the “Manage” module of the “VIRTUAL SERVERS” tab, click your Subscriber account hyperlink, go
to the “Shortcuts” left pane of the “ASSIGNMENT” sub-tab and click the “Create User” shortcut.
The minimum requirement for adding a user is “First Name”, “Last Name”, “User ID” and “E-mail”
address. The “Add” button is disabled until these fields are populated.
UserID: must be unique. If an identical UserID already exists, an error message is displayed.
E-mail: address is required. It is used in provisioning and self-enrollment.
Mobile/SMS: this is an optional field. Only digits are allowed in this field.

Administration Guide SAS
Version 1.6 25 of 87
Phone: this is an optional field which may contain spaces, periods (.), dashes (-) and plus signs (+) in
addition to digits
Custom #1, Custom #2 and Custom #3: these are optional fields that can be used to store additional
data related to the user.
Container: Use this option to place the user in a container.
When the four required fields have been completed, clicking the “Add” button creates the record and
opens the “User Management” page.
7.1.2 Import Users shortcut
Bulk import of users is a convenient way to add many users in a single operation. Go to the “Manage”
module of the “VIRTUAL SERVERS” tab, click your Subscriber account hyperlink, go to the “Shortcuts”
left pane of the “ASSIGNMENT” sub-tab and click the “Import Users” shortcut.

Administration Guide SAS
Version 1.6 26 of 87
Select the import file format, the field qualifiers (if any), and then click the “Next” button.
Browse to and select the user data import file, by using the checkbox, disable the “File has a header row”
option if the import file does not include a header row, and then click the “Next” button.

Administration Guide SAS
Version 1.6 27 of 87
In the “Confirm Field Mappings and Import” pane, select the appropriate “Database Field” for each
“Import Data” field. There are 4 required “Database fields” in the “Confirm Field Mappings and Import”
pane: “FirstName”, “LastName”, “UserID” and “E-mail”, each marked by an asterisk (*). “UserID” entries
must be unique.
Optionally, use “Add Field” button and select the appropriate unused field name from the dropdown list to
add further rows. Add field can be used to force data not contained in the import file into the database.
Default values can be created for any added fields. Data entered into any of the “Default Value” fields will
be used to populate user records that do not have data in the corresponding import file field.
Click the “Next” button.
Select the container into which users should be imported.
The “Do not import if the UserID exists in the database” option prevents a user record from being
imported if it already exists in the database.
The “Update user record if the UserID exists in the database” option will overwrite fields in the database
with data from corresponding fields in the import file if a matching “UserID” is found in the database. Note

Administration Guide SAS
Version 1.6 28 of 87
that populated fields in the database will not be overwritten if a corresponding field is not included in the
import file.
Click the “Import” button to complete the process. When import is finished the server will display the
result of the import, showing users that were imported and/or any errors that occurred.
7.1.3 LDAP synchronization
Users can be automatically added, suspended or removed from your SAS virtual server by utilizing the
SAS LDAP Synchronization Agent, eliminating the need to manually create and manage users. The agent
comes with support for standard Active Directory, eDirectory and SunOne. The agent can be configured
to support non-standard schemas.
This method requires the installation of a Synchronization Agent, normally somewhere in the same
network as the AD/LDAP directory.
The agent is configured to monitor the specified LDAP containers (DNs) and groups for changes such as
adding or removing a user, synchronizing and applying these changes at the SAS virtual server.
Note that the SAS supports manual creation of users concurrent with LDAP synchronization, bearing in mind that manually created users will not be modified in any way by an LDAP synchronization provided there is no overlap in UserID. If an overlap occurs, any tokens assigned to the manually created UserID are revoked and marked as lost with a comment, and the UserID is replaced by the overlapping LDAP UserID.
To configure your system for LDAP synchronization, refer to the LDAP synchronization agent
configuration guide [Ref 2].
7.2 Managing end-users groups
Groups are attributes that can be attached to a UserID and used for authorization during the
authentication process. Group attributes provide a way to distinguish between valid users (all users that
can authenticate) and those that should be allowed to authenticate to gain access to a particular
resource.

Administration Guide SAS
Version 1.6 29 of 87
Go to the “Manage” module of the “VIRTUAL SERVERS” tab, click your Subscriber account hyperlink, go
to the “GROUPS” sub-tab.
This sub-tab provides access to all functions necessary to:
Create and Manage Groups (“Group Maintenance” module)
Manage User Group Memberships (“Group Membership” module)
Apply RADIUS Attributes to Groups (“RADIUS Attribute (Group)” module)
7.2.1 “Group Maintenance” module
This module is used to create, modify or remove user groups.
Depending on the ways you used to create end-users accounts, two types of groups are available:
Internal (when user accounts have been created manually). To create an internal group, click the
“New“ button of the “Group Maintenance” module (after selecting the “Internal” group type), enter a
group name and a brief description of its purpose and click the “Add” button.
Synchronized (when user accounts have been created automatically). These groups are synchronized
in your Subscriber account’s Virtual Server from your directory server by the SAS LDAP
Synchronization Agent and can not be created locally from the SAS management portal.
LDAP Synchronization not only synchronizes groups, it also retains each synchronized user’s group membership.
7.2.2 Group Membership module
This module is used to display all members of a group or to modify the memberships of one or more
users.
To view group membership, select the “Search Internal Groups” tab or the “Search Synchronized
Groups” tab of the “Group Membership” module, then use the “Search” function in conjunction with:

Administration Guide SAS
Version 1.6 30 of 87
“Is a member of” option: this refines the list to users that are members of any group or a specific
group.
“Is not a member of” option: this returns a list of users that do not belong to any group, or do not
belong to the specified group.
You can further refine the list by adding the User’s last name or UserID to the search criteria. The
“UserID” hyperlink can be used to display the corresponding “User Detail” form.
If you’re dealing with an internal group: check box(es) to select one or more users. To add member(s)
click the “New” button, use the dropdown to select the group membership to add to the user(s), and
then click the “Add” button (to delete member(s) click the “Remove” button instead of the “New” one).
If you’re dealing with a synchronized group: member(s) cannot neither be added nor removed from
the SAS management portal, they must be added/deleted directly from your directory server.
Changes will be applied to your Subscriber account’s Virtual Server during the next synchronization
cycle.
7.2.3 RADIUS Attribute (Group) module
This module allows RADIUS Attributes to be attached to a group. The attribute will be returned for each
member of the group when they authenticate.
Note that attributes assigned to users have precedence over attributes assigned to a group to which the user belongs.
To set RADIUS attributes, select the appropriate “Internal” or “Synchronized” group within the “RADIUS
Attribute (Group)” module and click the ‘New’ button. The options and input values will vary depending
upon your selection from the various drop-down lists (consult your network equipment vendor’s
documentation for guidance on which attributes to use). Once the attribute is set, click the “Add” button:
this will add the attribute to the Group (repeat as necessary to add more attributes).
To view RADIUS attributes, select the group to view using the “Internal” or “Synchronized” group option
and click the Search button. A list of attributes assigned to the group is displayed. The “Edit” hyperlink for
each attribute can be used to modify the corresponding attribute (likewise, the “Remove” hyperlink is
used to remove the group attribute).
7.3 Managing containers
Containers are used to separate objects (users, tokens or both) for the purposes of management.
Objects can only reside in one container at a time.
When a user is moved between containers, all of the user’s assigned tokens are moved at the same
time.
Containers define an Operator’s Scope – what it is they can manage. If a container is not in an
Operator’s scope, then all of the objects in the container are also not in scope and consequently cannot
be viewed or managed by the Operator.

Administration Guide SAS
Version 1.6 31 of 87
7.3.1 Container Maintenance module
This module is used to create, modify or remove a container.
To create a new container, click the “New” button, then enter a unique container name and brief
description of its purpose, and then click the “Add” button. The new container will appear in the
“Containers List”.
Click the “Edit” hyperlink or the “Remove” hyperlink respectively to edit the container information or
remove it. Note that all objects must be removed from a container before it can be removed.
7.3.2 Container Members module
Containers and their members can be viewed and members moved between containers using this
module.
The Containers view includes two tabs: “Users” and “Unassigned tokens”. To view objects by type, select
the appropriate tab. Recall that tokens assigned to users always reside in the container with the user.
To view the members of a container, select the appropriate “Source Container” and click the “Search”
button. This resulting list displays all objects in the container. Clicking the “UserID” or “Serial Number”
hyperlink displays the object’s details.
To move objects to a different container, select the objects in the list using the check box option, then
select the target container from the “Move to Container” dropdown, and then click the “Move” button.
7.4 Authorization and pre-authentication rules
Just because a user is able to provide a valid one-time passcode does not necessarily mean that they
should be granted access to the network. Other conditions such as network access point, group
membership, account status and other attributes might be important in allowing or denying access.
Pre-authentication rules can be used to apply additional conditions that must be met for authentication to
succeed.
The key advantages of pre-authentication rules are
rules can be applied to LDAP/Active Directory user account attributes.
rules can be applied to user accounts maintained in the internal SQL user data source.
rules can be applied based on network access points (source IP, Agent).
rules can be used to modify the authentication sequence (OTP, LDAP, LDAP + OTP).
changes to user attributes made in LDAP or the internal user data source are immediately effective on
the SAS virtual server.
rules can have a fixed start and/or stop date; a useful feature for transitioning from static passwords to
OTP authentication.

Administration Guide SAS
Version 1.6 32 of 87
There are few limitations to how pre-authentication rules can be used. Rules can be relatively simple,
checking a single attribute such as time of day restrictions or can be complex, checking multiple
attributes such as group membership, network access point and token state.
The authentication proceeds in the following sequence:
1. userID is validated. If valid:
2. pre-authentication rules are applied. If any rule is satisfied:
3. password is validated. If valid, access is granted.
Pre-authentication rules can be configured by Orange Business Services for you (refer to Requesting
changes on p 60). Note that initially, your SAS virtual server is configured with an “Allow All” rule.

Administration Guide SAS
Version 1.6 33 of 87
8 Managing SAS tokens
8.1 Provisioning end-users
You can provision only users of your Subscriber account’s Virtual Server (end-users). Users of your Service Provider account’s Virtual Server (SAS administrators of your company) are directly provisioned by Orange Business Service).
There are several ways to provision users with tokens:
bulk provisioning: any number of users is provisioned in one simple, time-saving step.
automated provisioning: rules are used to evaluate when a user should be issued a token and what
type of token. If the rule evaluates true for a user, a token is issued. If false, the token is revoked.
manual provisioning: used to manually provision users, one user at a time
manual assigning: used to manually assigned tokens to users, one user at a time. This process can be
used when issuing hardware tokens to users, one user at a time and usually where the token can be
handed to the user. In most cases Provisioning should be used instead of Assigning
Note that provisioning represents major time-saving for SAS administrators and is the recommended method for associating a token with a user.
8.1.1 Bulk provisioning
This process is used to provision each of any number of users with a token in a simple point-and-click
process.
Go to the “Manage” module of the “VIRTUAL SERVERS” tab, click your Subscriber account hyperlink, go
to the “Search User” module of the “ASSIGNMENT” sub-tab and click the “Search” button.
Check box(es) to select one or more users, click the “Provision” button, once you have verified the list of
selected users, click the “Provision” button again, and select the type of token to be issued to each of the
users in the list.

Administration Guide SAS
Version 1.6 34 of 87
Click the “Provision” button again and click the ”Confirm” button to complete the process and create a
Provisioning task.
Each user in the provisioning task will receive an e-mail with instructions for enrollment. The content of
the e-mail message varies, depending on the token type.
Provisioning tasks can be modified or recalled for all or some users in the task by clicking the
“Provisioning Tasks” hyperlink of the “Shortcuts” left pane.
8.1.2 Automated provisioning
Provisioning rules are one of the most powerful features of the SAS. They determine under what
conditions tokens will be automatically issued and revoked. Rules are triggered when group
memberships and other user attributes change. This means that if a user becomes a member of a group
included in a rule, the user will be provisioned with a token. Conversely, when the user is no longer a
group member, the token will be automatically revoked.
Provisioning rules can be used with internal groups or LDAP synchronized groups. By combining
provisioning rules with LDAP synchronization, the server can automatically issue and revoke tokens
based on changes made in LDAP. In other words an Operator need not log into the SAS management
portal to create users and provision users with tokens as the combination of LDAP synchronization and
provisioning rules can achieve the same result.
Go to the “Manage” module of the “VIRTUAL SERVERS” tab, click your Subscriber account hyperlink, go
to the “Automation Policies” module of the “POLICY” sub-tab.

Administration Guide SAS
Version 1.6 35 of 87
Click the “Provisioning Rules” hyperlink and click the “New Rule” button.
“Rule Name”: this is a unique, descriptive name for the rule.
“Token Type”: this is the type of token to be provisioned when the rule evaluates true.
“Issue Duplicate Types”: if unchecked a user will not be provisioned with the selected token type if
they already have one of the same type as a result of manually assigning a token or a different rule
evaluating true.

Administration Guide SAS
Version 1.6 36 of 87
“Auto Revoke”: if checked, the token issued by this rule will be revoked if the rule evaluates false for
the user such as when a user has been removed from the monitored group(s).
“Container”: the user must reside in the selected container for the rule to evaluate true.
“Require Expiring”: enable this option to replace RSA tokens assigned to users before they expire.
This options checks the expiration date for all RSA tokens assigned to users in the Rule Groups and
auto-provisions a new token X days before expiration.
- “Provisioning X days before expiration”: this value determines the number of days in advance of
expiration to provision with a replacement token.
- “Auto-revoke token being replaced on successful enrollment”: if selected, this option automatically
revokes the expiring token as soon as the user completes enrolment of the replacement token.
“Groups Filter”: use this option with “*” wildcard to limit the groups displayed in the Groups list.
“Groups”: a list of internal and synchronized groups. Server Groups represent groups that are not
used by the rule whereas Rule groups represent groups to which users must belong for the rule to
evaluate true. Highlight a group and use the appropriate arrow to move it between the group
windows.
8.1.3 Manual provisioning
Note that manual provisioning process is the same as the bulk provisioning one, except that it regards only one user.
Go to the “Manage” module of the “VIRTUAL SERVERS” tab, click your Subscriber account hyperlink, go
to the “Search User” module of the “ASSIGNMENT” sub-tab and click the “Search” button.
To manually provision a token to a user, click its “UserID” hyperlink, click the “Provision” button in the
“Tokens” module, select the type of token to be issued to the user and click the “Provision” button again
to complete the process and create a Provisioning task. The user in the provisioning task will receive an
e-mail with instructions for enrollment. The content of the e-mail message varies, depending on the token
type.
Provisioning tasks can be modified or recalled for all or some users in the task by clicking the
“Provisioning Tasks” hyperlink of the “Shortcuts” left pane.
8.1.4 Manual assigning
Use manual assignment process only for hardware tokens or if the user already has the SAS Software Tool application installed (for software token).
Go to the “Manage” module of the “VIRTUAL SERVERS” tab, click your Subscriber account hyperlink, go
to the “Search User” module of the “ASSIGNMENT” sub-tab and click the “Search” button.
To manually assign a token to a user, click its “User ID”, click the “Assign” button in the “Tokens” module,
refine the inventory list of tokens available for assignment by selecting from the “Token Type” drop-down
list or entering a partial serial number in the “Serial #” field before clicking the “Search” button.

Administration Guide SAS
Version 1.6 37 of 87
Click the “Select” hyperlink corresponding to the token to be assigned, click the “Assign” button to
commit.
The token is now assigned to the user.
In the case of a hardware token, you should give this to the user now along with the initial PIN shown in
the last column of the list. The default policy requires the user to change this PIN on first use of the token
to a value known only to them. The value in the “Initial PIN” field is cleared when the user completes their
PIN change.
In the case of a software token, you must ensure that the SAS Software Tool application is installed on
the user’s device (PC, BlackBerry™, iPhone etc) before proceeding, then:
Click the “Manage” hyperlink and click the “Issue” button.
Choose the delivery method for the token profile, before clicking the “Issue” button to commit.

Administration Guide SAS
Version 1.6 38 of 87
BlackBerry: selecting this option causes the server to send two e-mails to the user, one of which
contains the initial PIN, the other containing the token profile. This method is ideal when using a BES
server to install the SAS Software Tool application on the user’s device in advance of assignment.
Save the token file: this saves the token profile to a location you specified. The file must be transferred
to the user’s device.
E-mail the token and PIN to the user: choose this option to e-mail the token and initial PIN to the user.
Typically this method is used for installation of the MP software token on a laptop.

Administration Guide SAS
Version 1.6 39 of 87
8.2 Managing a provisioned/assigned token
You can manage provisioned/assigned tokens of both Service Provider and Subscriber accounts Virtual Servers except for the revocation option of your Service Provider account that is managed by Orange Business Services.
Go to the “Manage” module of the “VIRTUAL SERVERS” tab, click the hyperlink of the account for which
you want to manage a specific token, go to the “Search User” module of the “ASSIGNMENT” sub-tab,
click the “Search” button.
Click the “User ID” hyperlink corresponding to the user to which the token has been
provisioned/assigned.
The “Tokens” module displays all authentication methods available to the user, usually one or more
tokens. Each entry provide the following information:
“Type”: displays the type of the token (“MP, “KT” etc).
“Serial #”: token serial number hyperlink that displays the corresponding operational parameters and
usage statistics when clicked.
“State”: state of the token/authentication method where:
- Active: the corresponding authentication method can be used to authenticate
- Suspended: the authentication method is associated with the user but has been suspended by an
Operator, preventing it from being used to authenticate until the method is reactivated by an
Operator.

Administration Guide SAS
Version 1.6 40 of 87
- Locked: indicates that the user has exceeded the maximum number of consecutive failed logon
attempts. The token will remain locked until the unlock policy is triggered or an Operator
reactivates the token.
- Assigned: indicates that the token has been assigned to the user but has not yet been used to
authenticate.
- Suspended: this indicates that an Operator has placed the token in a suspended state, making it
invalid for authentication but leaving it assigned to a user. This is usually done if there is a security
concern such as a lost or misplaced token. Suspended tokens can be reactivated by an Operator
when the security concern has been resolved.
- Locked: this state occurs when a user exceeds the maximum consecutive failed logon attempts
threshold. A locked token can be reactivated by an Operator. The automatic locking and unlocking
of tokens is controlled by the Account Lockout/Unlock Policy.
- Lost/Failed: is a state applied by an Operator when revoking a token. Revoked tokens are returned
to Inventory in this state where they can be permanently removed or if the token is subsequently
found or determined to function properly, it can be reinitialized into the Inventory state.
- Expired: when the token is expired. This regards only non-Cryptocard tokens imported in the
server.
“Initial PIN”: initial PIN value to be given to the user when using “Assign” to issue a token. By default
the initial PIN value must be changed by the user during their first authentication.
Click the “Manage” hyperlink corresponding to the token to be managed.
A raw of buttons shows the token management options: a highlighted button indicates an option
available (otherwise, the button is grayed).
Token management options include:
Suspend: use this option to suspend the token, making it invalid for authentication but leaving it
assigned to the user. Suspending a token is useful for situations where the user has forgotten or
misplaced their token as it prevents it from being used until the Operator re-activates the token.
Note that the “Suspend” button is disabled if the token is not in the “Active” state.
Unlock: use this option to reactivate a token that is in the locked state, making it valid for
authentication.
New PIN: use this option to set a new PIN value for a token according to the configured PIN policy.

Administration Guide SAS
Version 1.6 41 of 87
Resync: use this option to resync a token or test the token if there are repeated failed authentication
attempts with this token.
Issue: use this button to create an MP software token profile (token seed and operating parameters) in
conjunction with the “Assign” function.
Revoke: revoke is used to sever the relationship between the user and token.
8.2.1 Suspend
The suspend process may allow a temporary password to be assigned and used as a valid credential
until the token is re-activated:
“No Static Password”: the user’s token will be suspended and the user will not be given a temporary
static password.
“Accept LDAP Password”: the user’s token will be suspended and the user will be allowed to use their
LDAP password to authenticate. Note that this option requires LDAP integration.
“Set Temporary Static Password”: the user’s token will be suspended and the user will be given a
temporary static password which can be used to authenticate:
- “Generate”: generates a static password that complies with the established policy
- “Change static password on first use”: if checked, the user must change the provided static
password to a new value known only to them and which complies with the established policy.
- “No Static Password after”: use this option to limit the life of the temporary password.
- “Comment”: use this area to enter a brief explanation for suspending the token. This forms part of
the permanent token record and can be viewed by other Operators managing this user’s account.

Administration Guide SAS
Version 1.6 42 of 87
8.2.2 Unlock
Its use varies depending on the PIN mode:
Server-side PIN: if the token is locked due to excessive consecutive failed authentication attempts,
clicking the “Unlock” will reactivate the token.
Check the “Set a New PIN” option to create a new PIN for the user for this token or use the “Random”
button to generate a PIN that complies with the policy.
Token-side PIN: a token initialized with a token-side PIN which has been locked by the user by
exceeding the maximum allowed PIN attempts may be unlocked using this function, provided the
token was initialized with the unlock token option enabled. This function should only be used if you are
certain that the person in possession of the token is the rightful owner.
To use this function the user must generate an unlock challenge. The method for doing this varies with
token type. Enter this value into the “Challenge displayed on token” field, click the “Unlock” button to
display an unlock code, give this to the user to enter into their token. If correctly entered, the user will
be required to generate a new PIN, after which the token can be used to authenticate.
8.2.3 New PIN
Note that this option is available where the PIN is evaluated by the Server (Server-side PIN).

Administration Guide SAS
Version 1.6 43 of 87
Use the “Generate” button to automatically create a new PIN that meets the minimum policy
requirements. Note that the default policy requires the user to change this PIN on first use.
8.2.4 Resync
Use this option to resync a token or test the token if there are repeated failed authentication attempts
with this token. Generally resync is not required. Resync does not require the user or Operator to reveal
the PIN associated with a token. Have the user key the Challenge into their token after enabling resync to
generate a Response.
Enter the resulting response into the “Response” field, and then click the “Resync” button. The response provided by the user's token for the displayed challenge should result in a successful test. If so, the token is working properly and in sync with the server.
8.2.5 Revoke
When MP software tokens are revoked they are automatically returned to inventory from which they can
be re-provisioned to other users. Note that each time an MP software token is provisioned, the current
MP template and PIN policy is applied and new encryption keys are generated. This means that there is
no need to recover anything from the original token user and any software still in their possession is no
longer valid for authentication. This also means that MP software tokens (as well as hardware tokens) can
be issued and revoked as often as desired. During revocation, depending of the token type, you are
presented with options to:
Return to Inventory, Initialization required: use this if revoking a hardware token configured for token-
side PIN. In most cases this will apply only apply to RB-1 tokens.
Return to Inventory: use this option if revoking tokens with Server-side or no-PIN configuration. This
assumes that hardware tokens have been returned and can be reused.
Lost: this option should only be used with hardware tokens and only if they will not be recovered. Lost
tokens will still appear in the token inventory list but with the “Lost” status.
Faulty: this option is used to indicate that a token has failed. This choice is useful for warranty claims.

Administration Guide SAS
Version 1.6 44 of 87
A comment such as the reason for revoking the token can be added to a Suspend transaction.
Comments form part of the token permanent history and are also displayed in the token detail.

Administration Guide SAS
Version 1.6 45 of 87
9 Managing SAS Auth Nodes
An Auth Node is any RADIUS client that will send authentication requests to the SAS.
You can manage SAS Auth Nodes of both Service Provider and Subscriber accounts Virtual Servers, however Auth Nodes must be created at the Service Provider account’s Virtual Server level and then shared with the Subscriber account’s Virtual Server.
Go to the “Manage” module of the “VIRTUAL SERVERS” tab, click your Service Provider account
hyperlink and go to the “Auth Node” module of the “COMMS” sub-tab.
Click the “Auth Nodes” hyperlink.
Already configured Auth Nodes are listed and you have the ability to edit or remove them by clicking the
related hyperlinks.
An entry in the Auth Nodes table must be created for every Auth Node. The number of Auth Nodes
cannot exceed the allowed number set (100). Virtual Server will not process authentication requests
received from devices that are not in the list.

Administration Guide SAS
Version 1.6 46 of 87
To add an Auth Node, click the “Add” button.
Fill-in at least the following fields:
“Agent Description”: descriptive name of the RADIUS client.
“Host Name”: hostname of the RADIUS client.
“Low IP Address In Range”: IP Address of the RADIUS client
“Shared Secret/Confirm Shared Secret”: RADIUS shared secret (this must be identical in both SAS
and the RADIUS client).
Some RADIUS Clients are not fully RADIUS compliant and do not support “Challenge-Response” which is
a requirement for server-side PIN changes. If your RADIUS client does not support Challenge-Response
and your SAS account is configured with server-side PIN policy, check the “Exclude from PIN change
requests” to prevent a forced PIN change with the non-compliant RADIUS client.
Auth Nodes become active within minutes of configuration.
Because the Auth Node has to be shared with the Subscriber account, click the “Sharing and Realms
tab”.
Configure as necessary before clicking the “Save” button to commit the configuration.

Administration Guide SAS
Version 1.6 47 of 87
“Allow account lookup based on user name”: the submitted userID will be used to authenticate the
user. The Virtual Server will search the “Shared Auth Node” list in descending order. The first matching
userID will be used to authenticate the user. Use the up/down arrows to move a selected realm up or
down in the priority list. Effectively this means that all userIDs must be unique across all Realms.
“Enable realms”: use this option where userIDs may not be unique across all realms. If enabled,
additional userID information will be used to determine to which realm the user belongs. Typically the
userID will be an email address. Use this feature in conjunction with the Selected Account and Realm
Identifier options.
“Strip realm from userID”: strips all data starting with the delimiter character from the userID. This
allows a submitted userID such as an email address ([email protected]) to be authenticated as
userID.
“Delimiter instance”: uses the first instance of the delimiter (left to right) or last instance of the delimiter
(right to left).
For example, consider two users with the identical userID of BSmith, one belonging to ACME
(acme.com), the other belonging to International Light (IL.com). Configured as follows:
- realms enabled
- strip realm from userID
- delimiter character is “@”
- selected realm=International Light, realm identifier= IL.COM
- the userID of [email protected] would authenticate against the Acme Virtual Server with an
effective userID of BSmith while [email protected] would authenticate against the International Light
Virtual Server with an effect userID of BSmith.

Administration Guide SAS
Version 1.6 48 of 87
10 Managing SAS SAML Services
You can manage only SAS SAML Services of your Subscriber account’s Virtual Server. SAS SAML Services of your Service Provider account’s Virtual Server are directly provisioned by Orange Business Service.
10.1 Adding SAML Service Providers
SAML Service Providers (e.g. Google Apps, Salesforce, Box.net…) can rely on the SAS for
authentication.
Go to the “Manage” module of the “VIRTUAL SERVERS” tab, click your Subscriber account hyperlink and
go to the “SAML Service Providers” module of the “COMMS” sub-tab.
The information displayed below the Add button will be required by your Service Provider.

Administration Guide SAS
Version 1.6 49 of 87
Click the “Add” button to insert a new provider into the list where:
“Friendly Name”: this is a name you assign to the Relying Party for easy identification. This name will
appear in SAML Services lists on the “SAML Services” module of the “ASSIGNMENT” sub-tab and in
the “SAML Provisioning Rules” of the “Automation Policies” module of the “POLICY” sub-tab.
SAML 2.0 Metadata:
- “Upload existing Metadata file”: this is an XML file that is generated by your SAML Service
Provider.
- “Create new Metadata file”: some SAML Service Providers do not provide a metadata file but
instead provide only their Entity ID and Location (essentially the resource being accessed). Use this
option to have the virtual server create and add a metadata file based on this information.
“Entity ID”: this is the “Entity ID” of the SAML Service Provider, typically (but not always) in the form of
a URL. This value will be provided by the SAML Service Provider or can be extracted from the
metadata (XML file) provided by the SAML Service Provider.
For example:
<?xml version="1.0" encoding="UTF-8"?>
<md:EntityDescriptor xmlns:md="urn:oasis:names:tc:SAML:2.0:metadata"
entityID=https://mycompany.salesforce.com
The remaining options are used to customize the appearance of the logon page presented to the user:
“Custom Logo”: this is the logo you want to appear on the logon form presented to your users during
authentication
“Custom CCS”: modify default CSS then upload to modify the appearance of the page (refer to the
appendix “SAML default CCS source” on page 85).
“Custom Button Image”: this is the image used for the logon button.
“Custom Page Title”: this is the page title displayed on the browser tab.
“Custom Icon”: this is the icon displayed on the browser tab.

Administration Guide SAS
Version 1.6 50 of 87
“Custom Login Header Text”: this is the text displayed in the header of the logon form.
“Custom Login Button Text”: this is the text displayed on the logon button.
“Login message”: this is the text, usually containing instructions, displayed between the Logon Header
Text and the Username field.
“Custom Username Text”: this is the label for the user name field.
“Custom Password Text”: this is the label for the password field.
Click the “Apply” button to commit your changes.
10.2 Provisioning SAML Services
10.2.1 Manual provisioning
Go to the “Manage” module of the “VIRTUAL SERVERS” tab, click your Subscriber account hyperlink, go
to the “Search User” module of the “ASSIGNMENT” sub-tab and click the “Search” button.
Click the “User ID” hyperlink corresponding to the user to which the SAML service has to be provisioned.
The “SAML Services” module lists already provisioned SAML Services and you have the ability to edit or
remove them by clicking the related hyperlinks. Click the “Add” button.

Administration Guide SAS
Version 1.6 51 of 87
Complete the “Add SAML Service” form before clicking the “Add” button:
“Service”: lists all of the configured SAML Service Providers.
SAML Login ID: this is the UserID that will be returned to the Service Provider in the SAML assertion
on successful authentication. For example, if your service provider (e.g. Salesforce) requires a userID
of [email protected] and this is identical to the user’s email address, choose the E-mail option.
Doing so allows the user to consistently use their UserID to authenticate regardless of the Service
Providers requirements. In most cases a Service Provider will require either the UserID or E-mail. For
all other cases choose the Custom option and enter the required userID to be returned.
10.2.2 Auto-provisioning rules
SAML provisioning rules automates adding or removing the right for users to authenticate to configured
SAML Service Providers.
Go to the “Manage” module of the “VIRTUAL SERVERS” tab, click your Subscriber account hyperlink, go
to the “Automation Policy” module of the “POLICY” sub-tab.
Click the “SAML Provisioning Rules” hyperlink and click the “New Rule” button.

Administration Guide SAS
Version 1.6 52 of 87
Complete the “Add SAML Auto-create Role” form before clicking the “Add” button:
“Rule Name”: this is a name that describes the rule.
“User is in container”: users affected by this rule must be in the selected container.
“Groups Filter”: use this option with “*” wildcard to limit the groups displayed in the “Groups” list
“Server Groups”: users in these groups are not affected by this rule.
“Rule Groups”: users must be in one or more of these groups to be affected by this rule.
“Relying Parties”: Service Providers in this section are not affected by this rule.
“Rule Parties”: users that belong to one or more of the “Rule Groups” will be able to authenticate
against Service Providers in this section.
“SAML Login ID”: this is the UserID that will be returned to the Service Provider in the SAML assertion.

Administration Guide SAS
Version 1.6 53 of 87
11 Managing SAS reporting
SAS reporting is available at account and account’s Virtual Server level.
You can manage SAS reporting of both Service Provider and Subscriber accounts and corresponding Virtual Servers.
SAS account reporting modules and SAS account’s Virtual Server modules are in different locations, and available reports are different too.
However, reporting management modules are the same for both:
“Available Reports”: this module lists all of the standard reports available. Reports from this list can be
customized and copied to the “My Reports List” module.
“My Report List”: this module lists all reports that can be run. Reports in this module can be
scheduled to run once or periodically at regular, predefined intervals. Delivery options and recipients
are defined in this module.
“My Schedule Reports”: all scheduled reports appear in the “My Scheduled Reports” list. Schedules
can be modified and reports can be run “Now” without modifying the normal schedule.
“My Report Output”: this module lists all reports that are currently in the run state or have completed.
From this list Operators can view or download reports in a variety of formats.
11.1 Accessing the SAS reporting modules
11.1.1 Account
Go to the “Administration” module of the “ADMINISTRATION” tab.
Click the “Report and Billing Management” hyperlink.

Administration Guide SAS
Version 1.6 54 of 87
11.1.2 Virtual Server
Go to the “Manage” module of the “VIRTUAL SERVERS” tab, click the hyperlink of the account for which
you want to manage reporting of the corresponding Virtual Server and go to the “REPORTS” sub-tab.
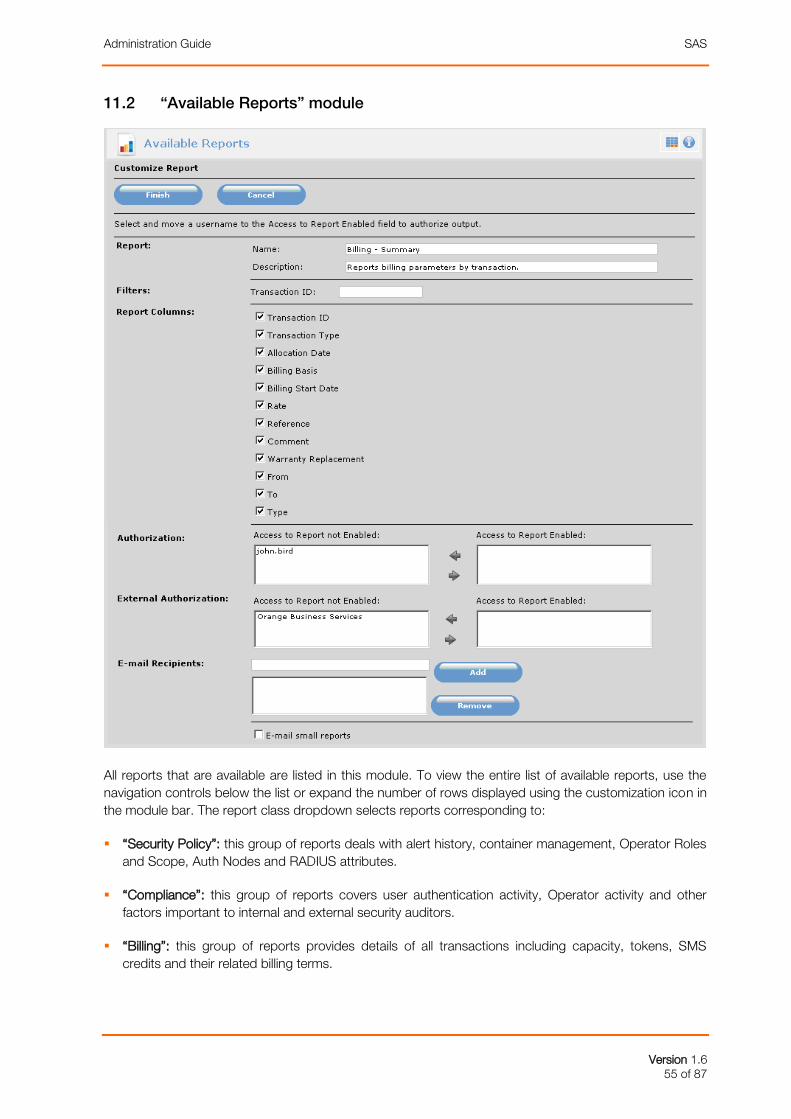
Administration Guide SAS
Version 1.6 55 of 87
11.2 “Available Reports” module
All reports that are available are listed in this module. To view the entire list of available reports, use the
navigation controls below the list or expand the number of rows displayed using the customization icon in
the module bar. The report class dropdown selects reports corresponding to:
“Security Policy”: this group of reports deals with alert history, container management, Operator Roles
and Scope, Auth Nodes and RADIUS attributes.
“Compliance”: this group of reports covers user authentication activity, Operator activity and other
factors important to internal and external security auditors.
“Billing”: this group of reports provides details of all transactions including capacity, tokens, SMS
credits and their related billing terms.

Administration Guide SAS
Version 1.6 56 of 87
“Inventory”: this group of reports provides detailed information on tokens, token ownership, states and
other general inventory information.
To add a report to the “My Report List” module, select a report from the “Available Reports” list, then
click the “Add” button.
Then customize the report. The options for customization vary depending on the type of report selected.
In general:
“Report section”: customize the name of the report and its description. These changes will appear in
the My Reports List module. Note that report names must be unique.
“Filter”: if available, filters provide a way to limit the scope of a report.
“Report Columns”: this shows default fields included in the report. To include/exclude fields,
select/deselect fields using the corresponding check boxes.
“Authorization”: the “Access to Report not Enabled” field lists all Operators that are potential report
recipients. The “Access to Reports Enabled” field lists all Operators that will receive the reports. To
add or remove from the recipient list, highlight the Operators (CTRL Click to select multiple Operators),
and then click the appropriate arrow to move.
“External Authorization”: the “Access to Report not Enabled” field contains your Service Provider that
is potential report recipient. The “Access to Reports Enabled” field lists Service Providers that will
receive the reports. To add or remove from the recipient list, highlight the Service Providers (CTRL
Click to select multiple Service Providers), and then click the appropriate arrow to move.
“E-mail recipients”: the server can send the report by e-mail to addresses in the recipients list. To add
recipients, enter their e-mail address then click the Add button. To remove recipients, highlight their e-
mail address then click the Remove button.
Click the “Finish” button to commit the customizations and add the report to the “My Report List”
module.
11.3 “My Report List” module
This module lists all customized reports. It is from this list that you schedule reports to run. To schedule a
report, select the report then click the “Schedule” button. The schedule report options are:
“Run Now”: the run now option adds the report to the report processing queue. Reports in the queue
are run in chronological order.
“Schedule Begins”: the report will not run prior to this date.
“Frequency”: reports can be scheduled to run on specific days of the week by selecting the
Days/Week option, then selecting the specific days. Alternatively, the report can be scheduled to run
on a monthly basis by selecting the Months/Year option, then selecting the specific months. If
Months/Year is selected, the On day option is enabled. Use this option to specify a day in each month
that the report should run. Reports will not run after the date specified in Expiration Date. By default
report schedules do not expire.
“Run Time”: the time at which the report should begin executing.

Administration Guide SAS
Version 1.6 57 of 87
“Expiration”: the date after which the report will be removed from the “My Scheduled Reports” list.
To commit the report schedule, click the “Finish” button. This adds the report to the “My Scheduled
Reports” module. The report can be modified or removed using the corresponding “Edit” or “Remove”
hyperlink.
11.4 “My Scheduled Reports” module
Scheduled reports to which the Operator is entitled appear in the “My Scheduled Reports” List. The list
shows the report name, run frequency, run time and expiration date.
Click the “Report Name” hyperlink to display or modify the report criteria.
Click “Edit” to update the scheduling of the report.
Select a scheduled report and click the “Run” button to add the report to the report processing queue.
Reports in the queue are run in chronological order. The reporting service checks the queue every 5
minutes and after each report is generated. This means that all reports will be processed in order.
However if no reports are detected, up to 5 minutes may elapse before the service will check the queue
for new report additions.
Clicking the “Run” button does not alter the report’s regular schedule.
11.5 “My Report Output” module
All reports that are running or have completed to which the Operator is entitled are listed in the “Report
Output” table.
Reports can be viewed in the browser by clicking the report name hyperlink. Alternatively they may be
downloaded for local processing by clicking any of the CSV, Tab or HTLM hyperlinks. Reports that are no
longer required can be deleted from the list by clicking the remove hyperlink.

Administration Guide SAS
Version 1.6 58 of 87
12 Monitoring your SAS
12.1 Snapshot summary information
The Snapshot tab provides you with summary information about your SAS virtual server (your service
provider or your subscriber account, depending on the virtual server you are on), including authentication
history, metrics and inventory.
Authentication Activity module: lists up to 100 of the most recent authentications including diagnostic
information.
Authentication Metrics module: displays authentication activity metrics over various periods of time.
Token States module: displays all tokens registered in the Virtual Server by state.
Allocation module: a complete listing of Virtual Server capacity and token inventory, including detailed
transaction records.
References module: displays links to SAS documentation and agents that you may need.

Administration Guide SAS
Version 1.6 59 of 87
12.2 “User management” page
User Detail module: this module displays basic user information. User detail can be modified for all
users that were manually created or imported. User accounts created by LDAP integration /
synchronization must be modified in the LDAP directory.
Tokens module: use this module to assign, provision and manage all tokens associated with an
individual user.
Authentication Metrics module: displays the individual user’s authentication metrics over various
periods of time.
Authentication Activity module: displays authentication history for up to 100 of the user’s most recent
authentications.
Access Restrictions module: use this to set specific times/days and periods during which the user is
allowed to authenticate or conversely prevent a user from being authenticated.
Group Membership module: use this module to add or remove group memberships for the selected
user. Groups can be used to automate provisioning and/or determine if the user is allowed to
authenticate and/or be granted access to specific resources. Note that to modify the memberships of
many users at a time, use the Group Membership module on the Groups tab instead
Radius Attributes module: use this module to apply RADIUS attributes to the selected user. Note that
user attributes take precedence over attributes applied to groups to which the user belongs.

Administration Guide SAS
Version 1.6 60 of 87
13 Requesting changes
Any changes that cannot be performed using your SAS management portal must be required via the
Managed Services Change Tool (MSCT).
These changes include initial token ordering and pre-authentication rule creation request.
MSCT is available at the URL below, using HTTPS, so all transactions are encrypted:
https://equantcc.mhs-pf.com.
Orange Business Services will provide you with your MSCT login and password to log in.
Please refer to MSCT user guide [Ref 3] for details.

Administration Guide SAS
Version 1.6 61 of 87
14 Requesting support
For any problems, please call the Orange Business Services Help Desk at your usual phone number, who
will open a trouble ticket (also called a case).
To open a case, you have to provide the Help Desk with at least the following information, which you
received when ordering the SAS:
company name
customer code
search key 1

Administration Guide SAS
Version 1.6 62 of 87
appendix A: appearance and branding customization
To customize, begin by clicking the Set Customization Inherit hyperlink, clear the Use Customizations
Inherit option, and then click Apply. The module will now display options for customizing Fonts, Colours,
Buttons and Logos. Conversely, to discard customizations, check the set customization inherit option.
if Use Customizations Inherit is re-enabled, the SAS Virtual Server inherits Orange Business Services defaults
A.1 Custom fonts
Click the Custom Fonts hyperlink and select the font-family from the dropdown list.

Administration Guide SAS
Version 1.6 63 of 87
Custom fonts - SAS management portal logon page
Custom fonts - SAS self-service portal

Administration Guide SAS
Version 1.6 64 of 87
Custom fonts - SAS self-enrollment pages
A.2 Custom colours
Click the Custom Colours hyperlink, select the font-family from the dropdown list, enter colours using
standard names (red, green, blue etc.) or use hex values (#F80000, #CC6600 etc.)

Administration Guide SAS
Version 1.6 65 of 87
Custom colours - SAS management portal logon page
Custom colours – SAS management portal pages

Administration Guide SAS
Version 1.6 66 of 87
Custom colours - SAS self-service portal
Custom colours - SAS self-enrollment pages
A.3 Custom buttons
Click the Custom Buttons hyperlink. To select a preset graphic button, click the corresponding radio
button and click Apply. To use an HTML button, enter a colour value (red, green…) or a colour HEX value
(#F80000, #00C800…).

Administration Guide SAS
Version 1.6 67 of 87
To normal and hover button text size, colour and weight can be customized by configuring the Button
Text and Button Hover Text options. As above use standard colour values or enter a HEX value for font
colour.
Custom graphic buttons can also be used. Buttons must be 120 x 28px in png, jpg or gif format. First
upload the button in the Custom Logo Images module, then return to this page and select the button,
text, hover etc.
Click Apply to commit the changes.
A.4 Custom logo images
Click the Custom Logo Images hyperlink. Select the images then click the Upload button. Images can be
replaced with the defaults by clicking the “X” to the right of any custom image or replaced by simply
uploading a new image.
Custom Console Logo must be in no larger than 400 x 100 px in png, jpg or gif format.
Self-Service Logo must be no larger than 162 x 70 px in png, jpg or gif format.

Administration Guide SAS
Version 1.6 68 of 87
Self-Service Banner must be 688 x 70 px in png, jpg or gif format.
Alert Icon must be 30 x 30 px in png, jpg or gif format
The recommend background size is 1800 x 1100 px in png, jpg or gif format. To maintain page loading
speed image size should be less than 50kB.
Custom logo images – SAS management portal logon page
Custom logo images – SAS management portal pages

Administration Guide SAS
Version 1.6 69 of 87
Custom logo images – SAS self-service portal
Custom logo images – SAS self-enrollment pages

Administration Guide SAS
Version 1.6 70 of 87
A.5 Custom titles
Modify the text in the corresponding fields to replace the titles on the console management logon, self-
enrollment and self-service pages.
Custom titles – SAS management portal logon page

Administration Guide SAS
Version 1.6 71 of 87
Custom titles – SAS self-service portal
Custom titles – SAS self-enrollment pages

Administration Guide SAS
Version 1.6 72 of 87
A.6 Custom labels
Use this module to change the Custom # labels displayed in the SAS management portal where:
User custom
Refers to Custom #1, Custom #2 and Custom #3 field labels displayed in User Detail (Virtual Server)
and in user related reports and tables. An example use would be to change Custom #1 to an
employee number or other identifier that could be used to link reports and user information in SAS to
the external system.
Account custom
Refers to Custom #1, Custom #2 and Custom #3 field labels displayed in account related reports and
tables. An example use would be to change Custom #1 to an account number or other identifier that
could be used to link reports and customer information in SAS to the external system.
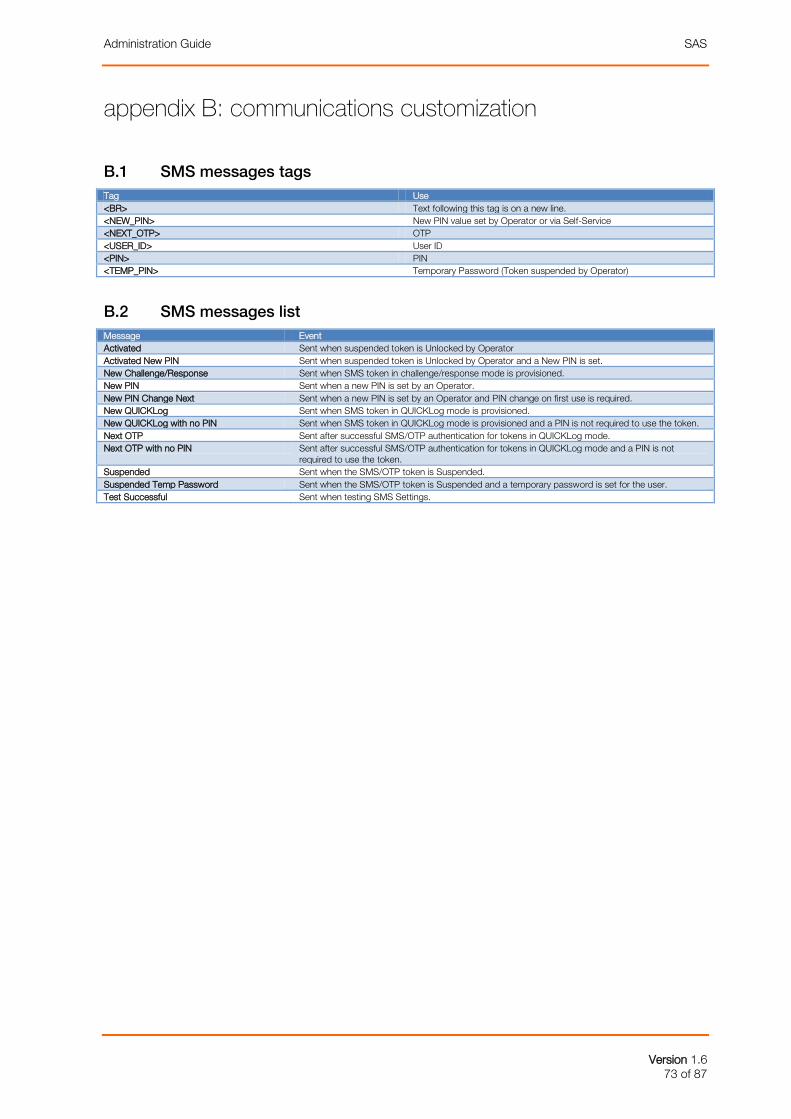
Administration Guide SAS
Version 1.6 73 of 87
appendix B: communications customization
B.1 SMS messages tags
Tag Use
<BR> Text following this tag is on a new line.
<NEW_PIN> New PIN value set by Operator or via Self-Service
<NEXT_OTP> OTP
<USER_ID> User ID
<PIN> PIN
<TEMP_PIN> Temporary Password (Token suspended by Operator)
B.2 SMS messages list
Message Event
Activated Sent when suspended token is Unlocked by Operator
Activated New PIN Sent when suspended token is Unlocked by Operator and a New PIN is set.
New Challenge/Response Sent when SMS token in challenge/response mode is provisioned.
New PIN Sent when a new PIN is set by an Operator.
New PIN Change Next Sent when a new PIN is set by an Operator and PIN change on first use is required.
New QUICKLog Sent when SMS token in QUICKLog mode is provisioned.
New QUICKLog with no PIN Sent when SMS token in QUICKLog mode is provisioned and a PIN is not required to use the token.
Next OTP Sent after successful SMS/OTP authentication for tokens in QUICKLog mode.
Next OTP with no PIN Sent after successful SMS/OTP authentication for tokens in QUICKLog mode and a PIN is not required to use the token.
Suspended Sent when the SMS/OTP token is Suspended.
Suspended Temp Password Sent when the SMS/OTP token is Suspended and a temporary password is set for the user.
Test Successful Sent when testing SMS Settings.

Administration Guide SAS
Version 1.6 74 of 87
B.3 E-mail messages tags
Tag Use <BR> Text following this tag is on a new line.
<accountName /> Company name associated with Virtual Server
<remaining /> The remaining (unused) capacity in the Virtual Server.
<total /> The total capacity allocated to the Virtual Server
<active /> Virtual Server service as set by Service Provider (enabled / disabled)
<type /> Virtual Server service type (account, Virtual Service Provider, Evaluation)
<daysLeft /> Day before Service stop date.
<stepDate /> Service stop date as set by Service Provider
<dateTime /> Timestamp of an event
<firstName> First name of a User
<lastName> Last name of a User
<blackberryURL /> Unique URL for self-enrollment of MP-1 token on BlackBerry generated by Virtual Server.
<reportName /> Name of a report
<name /> User ID
<taskeID /> Provisioning task number generated by Virtual Server.
<count /> Number of users that did not complete self-enrollment before the Provisioning Task expiration.
<username /> A User’s UserID (User Detail)
<Uaddress /> Address (User Detail)
<Ucity /> City (User Detail)
<Uprovince /> State/Province (User Detail)
<Upostal /> Postal/Zip (User Detail)
<Ucountry /> Country (User Detail)
<orgName /> Account Name (Virtual Server)
<Oaddress /> Account address (Virtual Server)
<Oprovince /> Account State/Province (Virtual Server)
<Opostal /> Account Postal/Zip (Virtual Server)
<Ocountry /> Account country (Virtual Server)
<otaURL /> Unique URL for self-enrollment to install MP-1 generated by Virtual Server.
<tokenPIN /> PIN for MP-1 token enrollment on Java phone.
<capLeft /> Remaining Virtual Server license capacity.
<capTotal /> Total Virtual Server license capacity.
<expiryDate /> Server license expiration date
<expiryTime /> Days remaining before license expires.
<capLeft /> Service capacity remaining.
<capTotal /> Service capacity total.
<tokenList /> Serial numbers of tokens no longer associated with users.
<freeSpace /> Disk space remaining.
<diskSize/> Total disk space.
<percentageFree /> Percentage of available space versus total disk size.
<consoleLink /> Unique URL for Operator Validation and logon to management UI.
<username /> Unique UserID used by Operator to logon to management UI.
<unlockTime/> Time a user account will automatically unlock.
<organization /> Account to which a user belongs.
<state /> Operator account status. (active, pending, suspended)
<remaining /> Quantity of SMS Credits in Virtual Server inventory.
<selfEnrollURL /> Unique URL sent to user for self-enrollment.
<addList /> List of users added by synchronization with an external user data source.
<ignoreList /> Total number of users not updated during synchronization as users already exist in the Virtual Server.
<updateList /> Total number of users removed by synchronization as users no longer exist in the external data source.
<removeList /> List of users removed by synchronization as users no longer exist in the external data source.
<totalMarkforRemoval /> Total number of users not found in external data source during synchronization. These users will be removed from the Virtual Server after 24 hours have elapsed.
<markedList /> List of users not found in external data source during synchronization. These users will be removed from the Virtual Server after 24 hours have elapsed.
<tokenType /> Type of token. (KT, MP…)
<time /> Date/Time of request by user to be issued a token.
<oldState /> State of token (assigned, active…) when token was assigned to user.
<newState /> The State a token is moved to by the Virtual Server when the user to which it was assigned can no longer be found.
<serial /> Serial number of a token.
<remaining /> Quantity of a type of token remaining in inventory.
<total /> Total quantity of tokens registered in the Virtual Server.
<failAttempts /> Quantity of consecutive failed logon attempts.

Administration Guide SAS
Version 1.6 75 of 87
B.4 E-mail messages list
The following is a list of e-mail messages and corresponding events that cause the messages to be sent where:
SP Alert: these alerts are only available to accounts where the Service Type is Virtual Service Provider.
Alert: these alerts are available in all account Service Types.
Halerts: these are system alerts and are valid only for the hosting service.
Enrollment: these messages are sent as part of a Provisioning and/or Self-enrollment process.
Account Capacity
Type SP Alert Event Sent when Virtual Server capacity falls below configured event threshold. Subject SAS Account Capacity Body The account <accountName /> is approaching their capacity with <remaining /> remaining of <total /> allocated to them. SMS Content Account <accountName /> approaching capacity. <remaining />/<total /> left.
Account Removed
Type SP Alert Event Sent when an Account (Virtual Server) is removed. Subject SAS Account Removed Body The account <accountName /> has been removed by <operator />. SMS Content Account <accountName /> removed by <operator />.
Account Status Change
Type SP Alert Event Sent when a Virtual Server account is enabled or disabled. Subject SAS Account Status Change Body The account <accountName /> has changed to an <active /> <type /> SMS Content Account <accountName /> changed to an <active /> <type />.
Account Stop Date
Type SP Alert Event Sent X days in advance of Service stop date. Subject SAS Account Stop Date Body The account <accountName /> is approaching their stop date. There are <daysLeft /> day(s) till the stop date on <stopDate />. SMS Content <daysLeft /> day(s) till stop on <stopDate /> for account <accountName />.
Active Evaluation Stop Date
Type SP Alert Event Sent X days in advance of Service stop date for evaluation accounts. Subject SAS Evaluation Stop Date Body The account <accountName /> is approaching their evaluation stop date. There are <daysLeft /> day(s) till the stop date on <stopDate
/>. SMS Content <daysLeft /> day(s) till stop on <stopDate /> for eval account <accountName />.

Administration Guide SAS
Version 1.6 76 of 87
Android Token
Type Enrollment Event Sent to User enrolling MP-1 on an Android device. Subject Over-The-Air (OTA) Installation for Android Device Body <firstName /> <lastName />:
<p>Follow these 2 easy steps to install the MP-1 token on your Android device:</p> <p>Step 1: Tap the icon below to download the MP-1 from Android Market.</p> <p><a href="https://market.android.com/details?id=com.m2m" target="_blank"><img src="https://ssl.gstatic.com/android/market/com.m2m/hi-256-0-fa57afae26ab4810eb581ed44fd0d90c6c763d09" width="75" alt="MP-1 token for Android" height="75" /></a></p> <p>Step 2: Now that the MP-1 is installed, you can click the URL below to install the MP-1 token profile.</p> <otaURL />
SMS Content The MP-1 token Download URL: <otaURL />
Auth Service Down
Type SP Alert Event Sent if an element of the service is downgraded or unavailable. Subject SAS Authentication Service Error Body This message is to report that the SAS authentication service was found to be unresponsive at <dateTime />, during a scheduled check
of the service. SMS Content BlackShield authentication service down at <dateTime />
AuthNode Changes
Type SP Alert Event Sent if an element of the service is downgraded or unavailable. Subject SAS Auth Node Changes Body The Auth Node <nodeName /> in account <accountName /> was <action /> by <changedBy />. SMS Content Auth Node <nodeName /> in <accountName /> <action /> by <changedBy />.
Blackberry PIN
Type Enrollment Event Sent to Users receiving BlackBerry token by e-mail. First of two messages. Subject SAS Auth Node Changes Body <firstName /> <lastName />:
This e-mail will assist you in the installation and activation of your new CRYPTOCard token into your Blackberry. Step one is to install the Token Authenticator and Token Attachment handler application on your BlackBerry. Step two is the installation and activation of the actual token. Please make note of the PIN below, as it is required to activate your token. To install the Token Authenticator "Over-the-Air", browse to the URL below with your BlackBerry. If the application is installed via Desktop Manager (USB) or Blackberry Enterprise Server, this step is not necessary. Again, please make note of your token activation PIN. Your token will be issued to you shortly. <blackberryURL /> Your token activation PIN is: <tokenPIN />
SMS Content

Administration Guide SAS
Version 1.6 77 of 87
Blackberry Token
Type Enrollment Event Sent to Users receiving BlackBerry token by e-mail. Second of two messages. Subject SAS Blackberry Token Body <firstName /> <lastName />:
Your new CRYPTOCard BlackBerry token is attached. To install the token, move the cursor to the attached file at the bottom of this message. Click the trackwheel or trackball and then select the Load Token option on the menu. It will pop up the CRYPTOCard BlackBerry token installation wizard and prompt for the user name and activation PIN. Use the activation PIN received in the previous e-mail. If you have not received an activation PIN, contact your HELP Desk.
SMS Content
SAS MP Token
Type Enrollment Event Sent to Users receiving MP-1 token by e-mail. Subject SAS MP Token Body <<firstName /> <lastName />:
Your new SAS MP token is attached. To install, double click on the attached token. This will launch the SAS Software Tools installation wizard and prompt you for the activation PIN. Use the activation PIN received in the previous e-mail. If you have not received an activation PIN, or you do not have the SAS Software Tools installed, please contact your Help Desk or Administrator.
SMS Content
Completed Report
Type Alert Event Sent to recipients receiving reports by e-mail. Subject SAS Report Results Body <accountName />
Results of the report <reportName /> are attached.
SMS Content
Enrollment Lockout
Type Alert Event Sent when a User exceeds the maximum number of attempts to self-enrol. (Refer to Error! Reference source not found. on page Error!
Bookmark not defined.) Subject Enrollment Lockout Body <accountName />,
The user <name /> has been locked out of self enrollment at <dateTime /> because there have been too many failed attempts to enroll.
SMS Content
User <name /> has been locked out of self enrollment

Administration Guide SAS
Version 1.6 78 of 87
Expired Reservation
Type Alert Event Sent when a Provisioning Task expires before all Users in the task have completed self-enrollment. Subject SAS Reservation is Expired Body Provisioning task <taskID /> has expired in account <accountName /> with <count /> users still pending enrollment.
They will no longer be able to complete enrollment.
SMS Content Reservation expired for user <userName />
Hardware Assignment Notification
Type Alert Event Sent when manually assigning a hardware token. Subject SAS Token Assignment Notification Body A hardware token has been assigned
<firstName /> <lastName />: <userName /> At: <Uaddress /> <Ucity /> <Uprovince /> <Upostal /> <Ucountry /> In company: <orgName /> At: <Oaddress /> <Ocity /> <Oprovince /> <Opostal /> <Ocountry />
SMS Content
Hardware Provisioning Notification
Type Alert Event Sent when auto-provisioning a hardware token. Subject SAS Token Provisioning Notification Body A hardware token has been provisioned
<firstName /> <lastName />: <userName /> At: <Uaddress /> <Ucity /> <Uprovince /> <Upostal /> <Ucountry /> In company: <orgName /> At: <Oaddress /> <Ocity /> <Oprovince /> <Opostal /> <Ocountry />
SMS Content

Administration Guide SAS
Version 1.6 79 of 87
iPhone Token
Type Enrollment Event Sent to User enrolling MP-1 on iPhone or iPad. Subject Over-The-Air (OTA) Installation for iPhone Device Body <firstName /> <lastName />:
<p>Follow these 2 easy steps to install the MP-1 token on your iPhone, iPod, iTouch or iPad:</p> <p>Step 1: Tap the icon below to download the MP-1 from App Store.</p> <p><a href="http://itunes.apple.com/us/app/cryptocard-mp-1-authentication/id421105724" target="_blank"><img src="http://a2.phobos.apple.com/us/r1000/034/Purple/2b/37/84/mzl.zzidcgff.175x175-75.jpg" width="75" alt="MP-1 token for iPhone and iPad" height="75" /></a></p> <p>Step 2: Now that the MP-1 is installed, you can click the URL below to install the MP-1 token profile.</p> <otaURL />
SMS Content The MP-1 token Download URL: <otaURL />
Java ME OTE
Type Enrollment Event Sent to User enrolling MP-1 on Java phone. Subject SAS MP Token for Java-enabled Mobile Device Body <firstName /> <lastName />:
This e-mail will assist you in the Over-the-Air (OTA) installation and activation of your new SAS Multi-Platform (MP) token on your Java-enabled Mobile Device. Initial PIN: <tokenPIN /> Download URL: <otaURL />
SMS Content New BlackShield MP token: PIN:<tokenPIN /> Download URL: <otaURL />
Java ME USB
Type Enrollment Event Sent to User enrolling MP-1 on Java phone via USB desktop connection. Subject SAS MP Token for Java-enabled Mobile Device Body <firstName /> <lastName />:
This e-mail will assist you in the desktop suite (USB) installation and activation of your new SAS Multi-Platform (MP) token on your Java-enabled Mobile Device. Initial PIN: <tokenPIN /> ======================================================================== Download Nokia PC Suite: http://www.nokia.ca/get-support-and-software/software/pc_suite/download MP token installation on Nokia Phone: <nokiaHelpURL /> ========================================================================
SMS Content
License Capacity
Type HAlert Event Sent when Service capacity falls below minimum threshold. Subject SAS License Capacity Warning Body This message is a warning that your SAS system is nearing its maximum license capacity.
Remaining Active Token Capacity: <capLeft /> / <capTotal /> If you require more capacity, contact CRYPTOCard to expand your license.
SMS Content

Administration Guide SAS
Version 1.6 80 of 87
System Capacity warning: <capLeft /> / <capTotal />
License Expiry
Type HAlert Event Sent X days before license expires. Subject SAS License Expiry Warning Body This message is a warning that your SAS system is nearing its license expiry.
Your license expires on <expiryDate />. You have <expiryTime /> day(s) left before SAS shuts down. Contact CRYPTOCard to get your license extended.
SMS Content License expiry warning: Your license expires on <expiryDate />
License Accounts
Type Alert Event Sent when remaining account capacity falls below minimum threshold. Subject SAS License Capacity Warning Body
This message is a warning that your SAS system is nearing its maximum account capacity. Remaining account capacity: <capLeft /> / <capTotal /> If you require more accounts, contact CRYPTOCard to expand your license.
SMS Content System Account Limit warning: <capLeft /> / <capTotal />
List of Token Users Not Found
Type Alert Event Lists token(s) no longer associated with users caused when users are removed from external user source before revoking token. Subject List of SAS Token Users Not Found Body
The following list contains tokens that have had their state set to <newState /> because the users they were assigned to can no longer be found by BlackShield. <tokenList />
SMS Content Tokens have been orphaned in BlackShield. Log in to see the details.
Low Disk Space
Type HAlert Event Sent when disk space falls below minimum threshold. Subject SAS Low Disk Space Warning Body
This message is to report that the free disk space on system drive <driveLetter /> is low. Details: Time of Report: <dateTime /> Free Space: <freeSpace /> bytes. Disk Size: <diskSize /> bytes. Percentage Free: <percentageFree />
SMS Content Low disk space warning. <percentageFree />% free on <driveLetter />
Mail Test
Type Alert Event Sent when testing email/smtp settings. Subject SAS E-mail Configuration Test Body E-mail configuration is correct if you have received this message.

Administration Guide SAS
Version 1.6 81 of 87
SMS Content SMS configuration is correct if you have received this message.
MP PIN
Type Enrollment Event Sent to users receiving MP-1 token by email. First of two messages. Subject SAS MP Token PIN Body
<firstName /> <lastName />: This e-mail will assist you in the installation of your new SAS MP token. Please make note of the PIN below, as it is required to activate your token, which will be issued to you shortly. Your token activation PIN is: <tokenPIN />
SMS Content
Operator E-mail Validation
Type Enrollment Event Sent to user when promoted to Virtual Server Operator. Subject SAS E-mail Validation Body
To activate your Operator account in the SAS Authentication Manager you must logon by following the link and using the e-mail address indicated below: Logon link: <consoleLink /> E-mail: <userName />
SMS Content Welcome to SAS. Logon at <consoleLink />
Operator Lockout Alert
Type Alert Event Sent to Operator when a user account becomes locked. (Account Lockout/Unlock Policy) Subject SAS User Lockout Alert Body
Attention: The following user has been locked out of authentication access until <unlockTime />, following <failedAttempts /> consecutive failed logon attempts: Name: <firstName /> <lastName /> Username: <userName /> Account: <organization />
SMS Content Account <userName /> in organization <organization /> has been locked.
Operator Unlock Alert
Type Alert Event Sent to Operator when a user account becomes unlocked. (Account Lockout/Unlock Policy) Subject SAS User Unlock Alert Body Attention:
The following user's authentication access has been unlocked: Name: <firstName /> <lastName /> Username: <userName /> Account: <organization />
SMS Content Account Unlock Alert: User: <userName /> Organization <organization />

Administration Guide SAS
Version 1.6 82 of 87
Operator Status Change
Type Alert Event Sent when an Operator’s status changes. (active, pending, suspended) Subject Operator Status Change Body
Attention: The following operator's state has been changed to <state /> User Account: <userName /> Account: <accountName />
SMS Content <organization />: <userName />'s operator status changed to <state />
Organization Capacity
Type Alert Event Sent when Virtual Server capacity falls below threshold. Subject SAS Capacity Body
<accountName /> You are approaching your maximum capacity. <remaining /> left out of <total />
SMS Content Approaching capacity: <remaining /> left of <total />
Organization SMS Credits
Type Alert Event Sent when Virtual Server SMS Credits falls below threshold. Subject SAS SMS Credits Body
<accountName />, Your available SMS credits are getting low. You have <remaining /> left.
SMS Content SMS Credits low. <remaining /> left
Provisioning Cancelled
Type Alert Event Sent to users that have not completed self-enrollment when the corresponding provisioning task is cancelled. Subject SAS Provisioning Cancelled Body
<First /> <Last />, your pending token provisioning has been cancelled. The enrollment link you received in a previous E-mail is no longer active.
SMS Content Your token provisioning has been cancelled.
Self Enrollment
Type Enrollment Event Self-enrollment instructions sent to users as part of a provisioning task. Subject SAS Self-enrollment Body
<firstName /> <lastName />: Your self-enrollment account has been created. If you are enrolling a hardware token, and do not have your token yet, please contact your system administrator. Please, go to the following URL to enroll with SAS: <selfEnrollURL /> If the above link does not work, please copy and paste this url to your web browser.
SMS Content SAS Self Enrollment: Enroll at <selfEnrollURL />

Administration Guide SAS
Version 1.6 83 of 87
Software Token Self Enrollment
Type Enrollment Event Self-enrollment instructions containing URL. Subject SAS Self-enrollment Body
<firstName /> <lastName />: Your self-enrollment account has been created. Please, go to the following URL to activate your token: <selfEnrollURL /> If the above link does not work, please copy and paste this url to your web browser.
SMS Content SAS Self Enrollment: Active your token at <selfEnrollURL />
Sync Notification
Type Alert Event Sent each time the Virtual Server is synchronized via the LDAP Sync. Agent. Subject LDAP Sync notification Body
The following actions have been processed for <orgName />: The following <totalAdded /> new users have been added: <addList /> The following <totalIgnored /> new user messages were ignored as the users already exist. <ignoreList /> The following <totalUpdated /> existing users have been removed: <updateList /> The following <totalRemoved /> users have been removed: <removeList /> The following <totalMarkForRemoval /> users have been marked for deletion: <markedList /> They will continue to exist for 24 hours, during which period they have been marked as disabled. If this was a result of a misconfiguration, fixing the configuration will re-enable the users. Note: If you have deleted a user in LDAP, re-creating a new user with the same user name will NOT restore the existing user.
SMS Content
Token Request Ack
Type Enrollment Event Sent to user to acknowledge request to be issued a token. Subject SAS Token Request Acknowledged Body
This message is to confirm that your request for a <tokenType /> token has been received as of <time />.
SMS Content Your request for a BlackShield token has been received.
Token Request Deny
Type Enrollment Event Sent to user when request to be issued a token is denied. Subject SAS Token Request Denied Body This message is to inform you that your request for a <tokenType /> token has been denied. SMS Content Your request for a BlackShield token has been denied.

Administration Guide SAS
Version 1.6 84 of 87
Token User Not Found
Type Alert Event Sent when token state is change when the user to which it was assigned is not found. Subject SAS Token User Not Found Body
The token <serial /> which was assigned to user <userName /> has been changed from state <oldState /> to <newState /> This has occured because the user <userName /> can no longer be found by BlackShield.
SMS Content Token <serial /> has been orphaned as user <userName /> can not be found.
Token User Replaced
Type Alert Event Sent when a User (UserID) with an assigned token is overwritten with an user from a different user source with an identical UserID. For
example, a manually created userID is overwritten during LDAP synchronization which includes an identical UserID. Subject SAS Token User Replaced Body
The token <serial /> which was assigned to user <userName /> has been changed from state <oldState /> to <newState /> This has occured because the user <userName /> has been overwritten by a new user <userName />.
SMS Content Token <serial /> orphaned because user <userName /> was over written.
Token Sub Capacity
Type Alert Event Sent when remaining quantity of tokens in inventory falls below the minimum threshold. Subject SAS Token Capacity Body
<accountName />, You are approaching your remaining capacity available to you. <remaining /> left out of <total /
SMS Content Approaching capacity: <remaining /> left of <total />
User Lockout Alert
Type Alert Event Sent to user when their account becomes locked due to excessive failed consecutive logon attempts Subject SAS User Lockout Alert Body
<firstName /> <lastName />, you have been locked out of authentication access until <unlockTime />, following <failedAttempts /> consecutive failed logon attempts.
SMS Content Your BlackShield account has been locked until <unlockTime />
User Unlockout Alert
Type Alert Event Sent to user when their account becomes unlocked. Subject SAS User Unlock Alert Body <firstName /> <lastName />, you can again attempt to logon to the authentication service. SMS Content Your BlackShield account has been unlocked.

Administration Guide SAS
Version 1.6 85 of 87
appendix C: SAML default CCS source
.tableBanner
{
width: 600px;
border-width: 0px;
border-spacing: 0px;
background-color: white;
}
.tableMain
{
width: 600px;
border-width: 1px;
border-spacing: 0px;
border-style: solid;
border-color: #4682B4;
border-collapse: separate;
background-color: white;
padding: 0px;
}
.tdTopSpaceAboveBanner
{
height: 50px; text-align: center;
}
.tdBanner
{
height: 100px; text-align: center;
}
.tdSpaceBelowBanner
{
height: 50px; text-align: center;
}
.tdLoginHeader
{
height: 50px; text-align: center; font-size: 28px; color: white; background-color: #4682B4; padding-left: 0px; padding-right: 0px;
}
.tdLoginMessage
{
height: 50px; text-align: center; font-size:20px; color: #4682B4;
}
.tdUserNameLabel
{
text-align: right;
font-size: 15px;
color: #4682B4;
padding-left: 70px;
}
.textUserName
{
width: 225px; height: 20px; text-align: left; border-color: #4682B4; border-width: 1px;
}
.tdPasswordLabel
{
text-align: right;
font-size: 15px;
color: #4682B4;
padding-left: 70px;
}
.textPassword
{
width: 225px; height: 20px; text-align: left; border-color: #4682B4; border-width: 1px;
}

Administration Guide SAS
Version 1.6 86 of 87
.tdUserName
{
padding-left: 60px;
}
.tdPassword
{
padding-left: 60px;
}
.td20PxSpace
{
height: 20px;
}
.td40PxSpace
{
height: 40px;
}
.tdUserErrorMessage
{
height: 40px; color: red; text-align: center; font-size: 14px;
}
.tdSubmit
{
text-align: center; height: 30px;
}
.buttonSubmit
{
background-color: white; background-repeat:no-repeat; border-width: 0px; width: 120px; height: 28px; text-align: center; font-size: 14px;
color: white;
}
.tdSpaceBelowLoginWindow
{
height: 80px;
}
.relayingParty
{
text-align: center; font-size: 10px; color:darkblue; height: 20px;
}
.sessionTimeout
{
text-align: center; font-size: 12px; color:blue;
}
.sessionWarning
{
text-align: center; font-size: 14px; color:crimson;
}
.copyRight
{
text-align: center; font-size: 8px; color: darkblue; height: 20px;
}
.td404Error
{
height: 40px; color: red; text-align: left; font-size: 28px;
}
.tdError
{
height: 40px; color: red; text-align: left; font-size: 28px;
}
.tdWarning
{
height: 40px; color: brown; text-align: left; font-size: 28px;
}
.tdInformation
{
height: 40px; color: darkblue; text-align: left; font-size: 28px;
}
.tdSignoutMessage
{
height: 40px; color: red; text-align: left; font-size: 18px;
}
.tdErrorMessage
{

Administration Guide SAS
Version 1.6 87 of 87
height: 40px; color: red; text-align: left; font-size: 14px;
}