Embed Size (px)
Citation preview

SAVE Program User Reference Guide 2013
Systematic Alien Verification for Entitlements
User Reference Guide
For Supe r Use rs, Sup ervisor Users and G e n er a l U ser s
SAVE Program User Reference Guide 2013 Page i
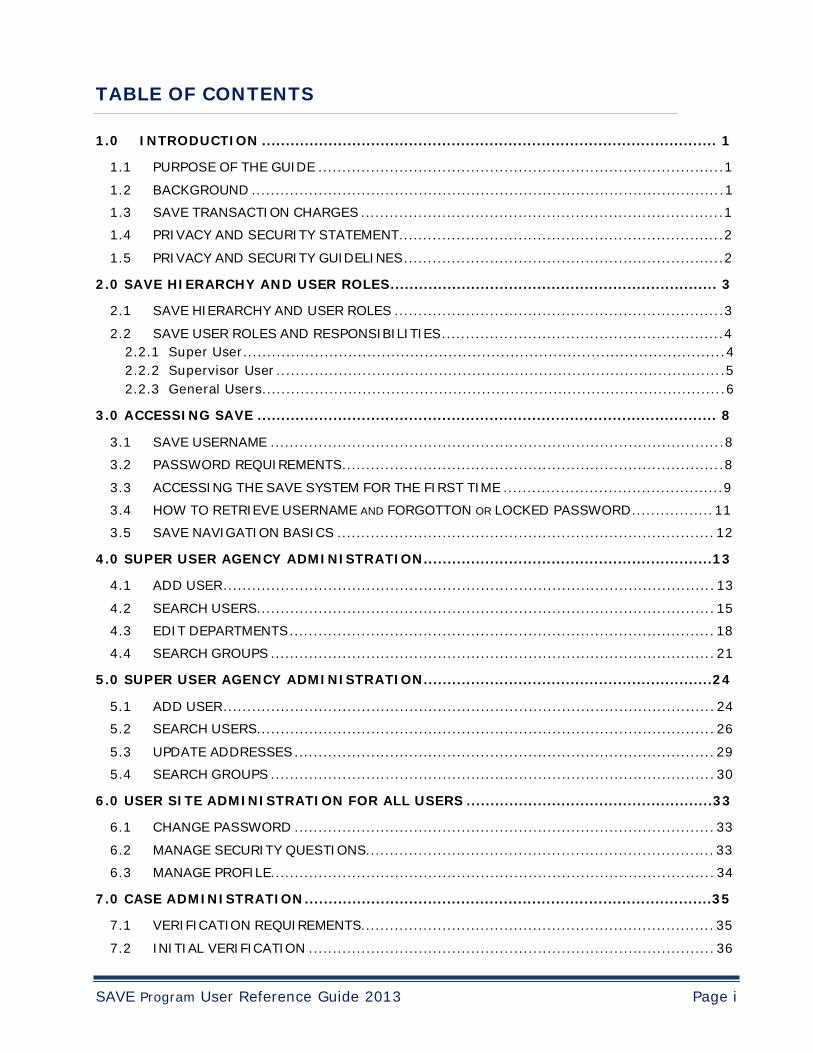
TABLE OF CONTENTS 1.0 INTRODUCTION ................................................................................................ 1
1.1 PURPOSE OF THE GUIDE .....................................................................................1
1.2 BACKGROUND ...................................................................................................1 1.3 SAVE TRANSACTION CHARGES ............................................................................1
1.4 PRIVACY AND SECURITY STATEMENT....................................................................2
1.5 PRIVACY AND SECURITY GUIDELINES...................................................................2 2.0 SAVE HIERARCHY AND USER ROLES..................................................................... 3
2.1 SAVE HIERARCHY AND USER ROLES .....................................................................3
2.2 SAVE USER ROLES AND RESPONSIBILITIES...........................................................4 2.2.1 Super User.....................................................................................................4 2.2.2 Supervisor User ..............................................................................................5 2.2.3 General Users.................................................................................................6
3.0 ACCESSING SAVE ................................................................................................. 8
3.1 SAVE USERNAME ...............................................................................................8
3.2 PASSWORD REQUIREMENTS................................................................................8
3.3 ACCESSING THE SAVE SYSTEM FOR THE FIRST TIME ..............................................9
3.4 HOW TO RETRIEVE USERNAME AND FORGOTTON OR LOCKED PASSWORD................. 11
3.5 SAVE NAVIGATION BASICS ............................................................................... 12 4.0 SUPER USER AGENCY ADMINISTRATION.............................................................13
4.1 ADD USER....................................................................................................... 13
4.2 SEARCH USERS................................................................................................ 15
4.3 EDIT DEPARTMENTS ......................................................................................... 18
4.4 SEARCH GROUPS ............................................................................................. 21 5.0 SUPER USER AGENCY ADMINISTRATION.............................................................24
5.1 ADD USER....................................................................................................... 24 5.2 SEARCH USERS................................................................................................ 26
5.3 UPDATE ADDRESSES ........................................................................................ 29 5.4 SEARCH GROUPS ............................................................................................. 30
6.0 USER SITE ADMINISTRATION FOR ALL USERS ....................................................33
6.1 CHANGE PASSWORD ........................................................................................ 33
6.2 MANAGE SECURITY QUESTIONS......................................................................... 33
6.3 MANAGE PROFILE............................................................................................. 34 7.0 CASE ADMINISTRATION......................................................................................35
7.1 VERIFICATION REQUIREMENTS.......................................................................... 35
7.2 INITIAL VERIFICATION ..................................................................................... 36
SAVE Program User Reference Guide 2013 Page ii
7.2.1 INITIAL VERIFICATION FEATURES ...................................................................... 36 7.3 INITIAL VERIFICATION RESULTS........................................................................ 40
7.4 ADDITIONAL VERFICATION ............................................................................... 44 7.4.1 Second Level Verification ................................................................................ 44 7.4.2 Third Level Verification ................................................................................... 45
7.5 SEARCH CASES................................................................................................ 49
7.6 VERIFICATION CASE RESOLUTION ..................................................................... 57 7.6.1 OVERDUE RESPONSES AND CASE ISSSUES ...................................................... 57 7.6.2 CLOSING CASES............................................................................................ 57
8.0 REPORTS .............................................................................................................58
8.1. MONTH END AGENCY TRANSACTIONS BY BENEFIT REPORT ...................................... 58
8.2 MONTH END TRANSACTIONS BY USER SUMMARY REPORT ......................................... 58 8.3 SAVE BILLING TRANSACTON REPORT ..................................................................... 58
8.4 WEB AGENCY AUDIT REPORT................................................................................. 58 9.0 CUSTOMER SUPPORT AND RESOURCES ...............................................................59
APPENDIX A: GLOSSARY OF TERMS...........................................................................60
SAVE Program User Reference Guide 2013 Page 1
1.0 INTRODUCTION
1.1 PURPOSE OF THE GUIDE
The SAVE User Reference Guide provides an overview of the SAVE administrative and verification process that all users must follow when using the SAVE System. It also outlines the structure and layout of the SAVE System functions available to the various SAVE user roles. All users must follow the guidelines set forth in the SAVE Memorandum of Agreement (MOA) and the responsibilities outlined in this guide.
1.2 BACKGROUND
The SAVE Program provides a verification service to help authorized federal, state and local benefit-issuing and licensing agencies and other governmental entities determine the immigration status of applicants applying for public benefits and or licenses. The SAVE Program verifies the status of non-immigrants, immigrants, and naturalized and derived U.S. citizens. The SAVE Program will not make any determinations on an applicant’s eligibility for a specific public benefit or license. For more information on the SAVE Program’s policies and procedures please refer to the SAVE Program Guide located on the SAVE System Online Resources.
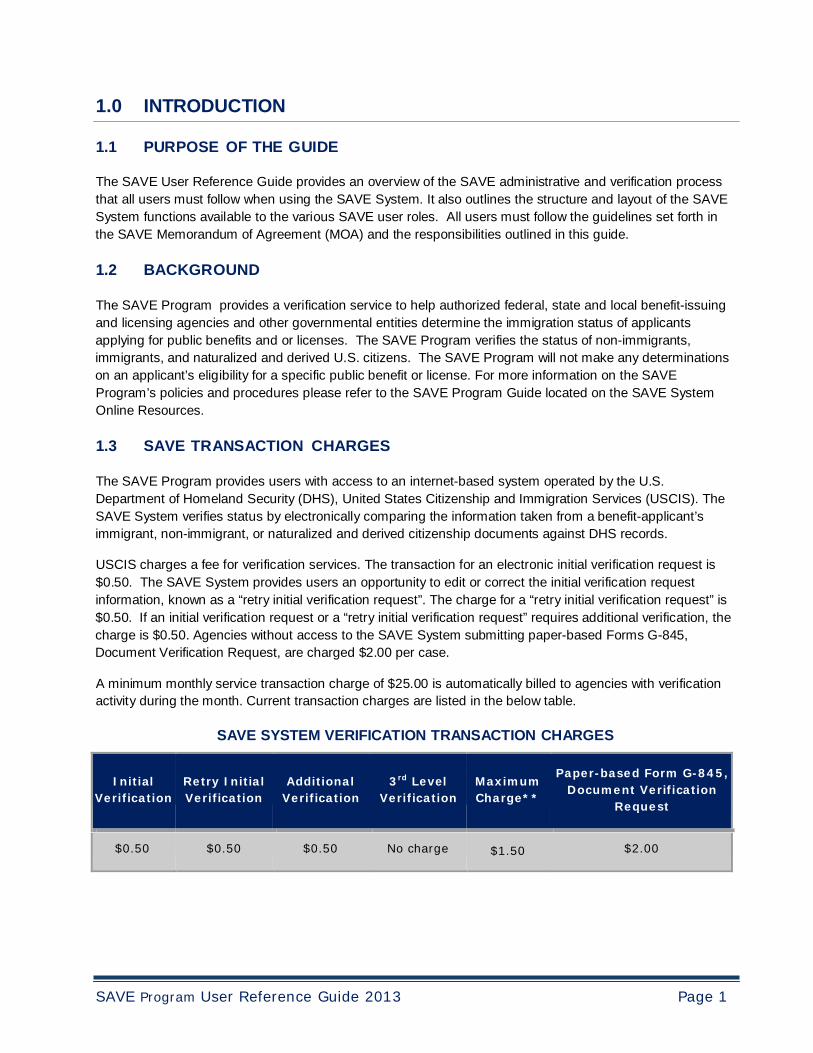
1.3 SAVE TRANSACTION CHARGES
The SAVE Program provides users with access to an internet-based system operated by the U.S. Department of Homeland Security (DHS), United States Citizenship and Immigration Services (USCIS). The SAVE System verifies status by electronically comparing the information taken from a benefit-applicant’s immigrant, non-immigrant, or naturalized and derived citizenship documents against DHS records.
USCIS charges a fee for verification services. The transaction for an electronic initial verification request is $0.50. The SAVE System provides users an opportunity to edit or correct the initial verification request information, known as a “retry initial verification request”. The charge for a “retry initial verification request” is $0.50. If an initial verification request or a “retry initial verification request” requires additional verification, the charge is $0.50. Agencies without access to the SAVE System submitting paper-based Forms G-845, Document Verification Request, are charged $2.00 per case.
A minimum monthly service transaction charge of $25.00 is automatically billed to agencies with verification activity during the month. Current transaction charges are listed in the below table.
SAVE SYSTEM VERIFICATION TRANSACTION CHARGES
Initial
Verification
Retry Initial Verification
Additional
Verification
3rd Level
Verification
Maximum Charge**
Paper-based Form G-845,
Document Verification Request
$0.50
$0.50
$0.50
No charge
$1.50
$2.00
SAVE Program User Reference Guide 2013 Page 2
1.4 PRIVACY AND SECURITY STATEMENT
The use of the SAVE System requires the collection of personally identifiable information. It is essential to protect the privacy of applicants whose personal information is processed through the SAVE System. All users must comply with the Privacy Act, 5 U.S.C. Section 552a, and other applicable laws, policies and regulations. Failure to protect individuals’ information properly can result in identity theft or fraud and can cause considerable inconvenience, harm or embarrassment to the individuals affected.
It is the user’s responsibility to ensure that all personal information collected is safeguarded and used only for the purposes outlined in the SAVE MOA between USCIS SAVE Program and the User Agency. At a minimum, SAVE Program policy recommends taking the steps outlined in the SAVE Self-Assessment Guide to protect personal information and comply with the appropriate regulations. The SAVE Self-Assessment Guide is located on the SAVE System in Online Resources.
1.5 PRIVACY AND SECURITY GUIDELINES
PRIVACY GUIDELINES OVERVIEW
► Allow ONLY authorized employees to use the SAVE System
Ensure that only the appropriate employees handle information and create verification cases.
► SECURE access to the SAVE System Protect passwords used to access the SAVE System and ensure that unauthorized users do not gain access to the system.
► PROTECT and STORE benefit applicants’ information properly Ensure that benefit applicants’ information is stored in a safe and secure location and that only authorized individuals have access to this information.
SAVE Program User Reference Guide 2013 Page 3
2.0 SAVE HIERARCHY AND USER ROLES
2.1 SAVE HIERARCHY AND USER ROLES
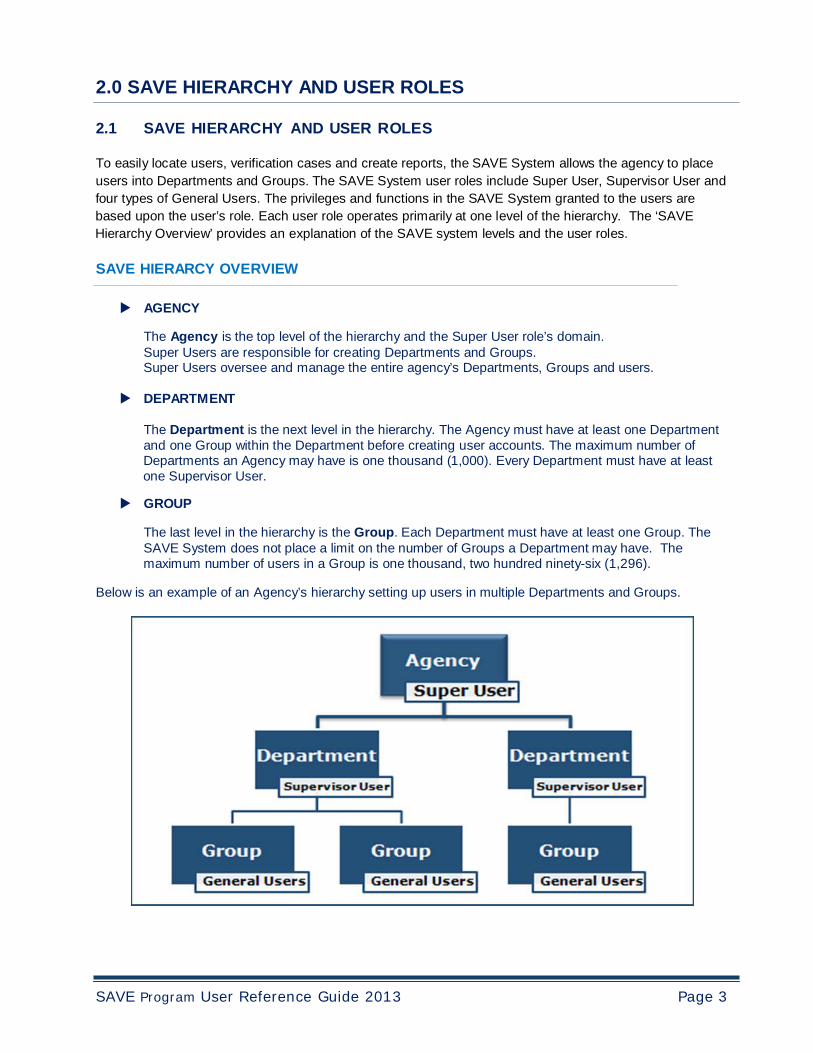
To easily locate users, verification cases and create reports, the SAVE System allows the agency to place users into Departments and Groups. The SAVE System user roles include Super User, Supervisor User and four types of General Users. The privileges and functions in the SAVE System granted to the users are based upon the user’s role. Each user role operates primarily at one level of the hierarchy. The ‘SAVE Hierarchy Overview’ provides an explanation of the SAVE system levels and the user roles.
SAVE HIERARCY OVERVIEW
AGENCY
The Agency is the top level of the hierarchy and the Super User role’s domain. Super Users are responsible for creating Departments and Groups. Super Users oversee and manage the entire agency’s Departments, Groups and users.
DEPARTMENT
The Department is the next level in the hierarchy. The Agency must have at least one Department and one Group within the Department before creating user accounts. The maximum number of Departments an Agency may have is one thousand (1,000). Every Department must have at least one Supervisor User.
GROUP
The last level in the hierarchy is the Group. Each Department must have at least one Group. The SAVE System does not place a limit on the number of Groups a Department may have. The maximum number of users in a Group is one thousand, two hundred ninety-six (1,296).
Below is an example of an Agency’s hierarchy setting up users in multiple Departments and Groups.
SAVE Program User Reference Guide 2013 Page 4
2.2 SAVE USER ROLES AND RESPONSIBILITIES
2.2.1 Super User
The Super User is the administrator for the entire agency. This role is responsible for setting up and managing the agency’s Departments, Groups and User accounts and verification processes as outlined this guide and in the MOA.
When setting up the agency, the Super User must create at least one Department and Group in the SAVE System before he/she can add Super User, Supervisor User and General User accounts.
The Super User can add Departments, update the Departments’ information but cannot delete Departments. The Super User can add and delete Groups within Departments. Deleting a Group within a Department will delete all user roles assigned to the Group.
The Super User can add and delete all user roles, update all users’ profiles, and unlock and reset all users’ passwords. If a user leaves the agency or no longer needs access to the SAVE System, a Super User or Supervisor User must delete the user’s account. Only Super Users can delete a Super User account. If a Super User leaves or is locked out of the SAVE System the agency will not be able to add Super User account or Departments. SAVE Program policy recommends that an agency add and maintain more than one active Super User account in the SAVE System.
The Super User has administration privileges to update his/her profile, password and challenge questions.
The Super User is responsible for managing the verification cases created by Supervisor Users and General Users and ensuring that all verification cases are processed and closed in accordance with procedures outlined in the MOA. The Super User cannot create verification cases in the SAVE System, only manage verification cases.
SUPER USER ROLE OVERVIEW
ADMINISTRATIVE PRIVILEGES VERIFICATION PRIVILEGES Site Administration:
Add Departments
Add Groups
Delete Groups
Add and Delete:
• Super Users • Supervisor Users • All General Users
User Administration:
Change his/her own: • Password • Challenge Questions and Answers • Profile
Reports
Run and view reports
Case Administration
Search and view verification cases
created by all users within the agency’s Departments and Groups
Note: The Super User cannot initiate verification cases.
SAVE Program User Reference Guide 2013 Page 5
2.2.2 Supervisor User
The Supervisor User is the administrator for a Department and all Groups and General Users within the Department. A Department may have more than one Supervisor User.
The Supervisor User can update the Department’s information but cannot create a Department.
The Super User can add and delete Groups within the Department. Deleting a Group within the Department will delete all user accounts assigned to the Group.
The Supervisor User is responsible for managing a Department’s Supervisor User and General User accounts. The Supervisor User can add and delete users, update users’ profiles, and unlock and reset users’ passwords. If a user leaves the Department or Group or no longer needs access to the SAVE System, a Super User or Supervisor User must delete the user’s account. A Supervisor User cannot add or delete Super User accounts.
The Supervisor User has administration privileges to update his/her profile, password and challenge questions.
The Supervisor User can create, manage and complete his/her own verification cases and is responsible for managing all verification cases created by users assigned to Groups under the Department in accordance with the MOA.
SUPERVISOR USER ROLE OVERVIEW
ADMINISTRATIVE PRIVILEGES VERIFICATION PRIVILEGES Site Administration:
Change Department Address
Add Groups
Delete Groups
Add and Delete:
• Super Users • Supervisor Users • All General Users
User Administration:
Change his/her own:
• Password • Challenge Questions and Answers • Profile
Reports:
Run and view reports
Case Administration:
Create initial verification cases
Initiate, view, and complete additional verification cases
View, complete and close verification cases created by Supervisor Users and all General Users within the assigned Department
SAVE Program User Reference Guide 2013 Page 6
2.2.3 General Users
The SAVE System has four General User roles. The General User roles have both administration and case verification privileges based upon user’s ability to submit and view additional verification cases sent to the Immigration Status Verifier (ISV).
General User-View ISV responses for all users in Department – This user has initial and additional verification privileges and can view and complete verification cases for all General Users assigned to Groups within his/her Department. This user has administration privileges to update his/her profile, password and challenge questions.
VIEW ISV RESPONSES FOR ALL USERS IN DEPARTMENT ROLE OVERVIEW
ADMINISTRATIVE PRIVILEGES VERIFICATION PRIVILEGES User Administration:
Change his/her own:
• Password • Challenge Questions and Answers • Profile
Reports
Run and view reports
Case Administration:
Create initial verification cases
Initiate, view and complete additional verification cases
Close initial and additional verification cases
View, complete and close verification cases created by all General Users assigned to Groups within the Department
General User-View ISV responses for all users in Group – This user has initial and additional verification privileges and can view and complete verification cases for all General Users within his/her Group. This user has administration privileges to update his/her profile, password and challenge questions.
VIEW ISV RSEPONSES FOR ALL USERS IN GROUP ROLE OVERVIEW
ADMINISTRATIVE PRIVILEGES VERIFICATION PRIVILEGES User Administration:
Change his/her own:
• Password • Challenge questions and answers • Profile
Reports:
Run and view reports
Case Administration:
Create initial verification cases
Initiate, view and complete additional
verification cases
Close initial and additional verification cases
View, complete and close verification cases created by General Users within the assigned Group
SAVE Program User Reference Guide 2013 Page 7
General User-View user initiated ISV responses - This user has initial and additional verification privileges and can view and complete his/her own additional verification cases. This user has administration privileges to update his/her profile, password, and password challenge questions.
VIEW USER INITIATED ISV RESPONSES ROLE OVERVIEW
ADMINISTRATIVE PRIVILEGES VERIFICATION PRIVILEGES User Administration:
Change his/her own:
• Password • Password Challenge Questions and
Answers • Profile
Reports:
Run and view reports
Case Administration:
Create initial verification cases
Initiate, view and complete additional verification cases
Close initial and additional verification cases
General User-Cannot view ISV responses - This user has initial verification privileges and can initiate additional verification requests but cannot view additional verification cases. This user has administration privileges to update his/her profile, password and challenge questions.
CANNOT VIEW ISV REPONSES ROLE OVERVIEW
ADMINISTRATIVE PRIVILEGES VERIFICATION PRIVILEGES User Administration:
Change his/her own:
• Password • Password Challenge Questions and
Answers • Profile
Reports:
Run and view reports
Case Administration:
Create initial verification cases
Create additional verification cases
View and close initial verification cases
Note: This user cannot view additional verification responses
SAVE Program User Reference Guide 2013 Page 8
3.0 ACCESSING SAVE
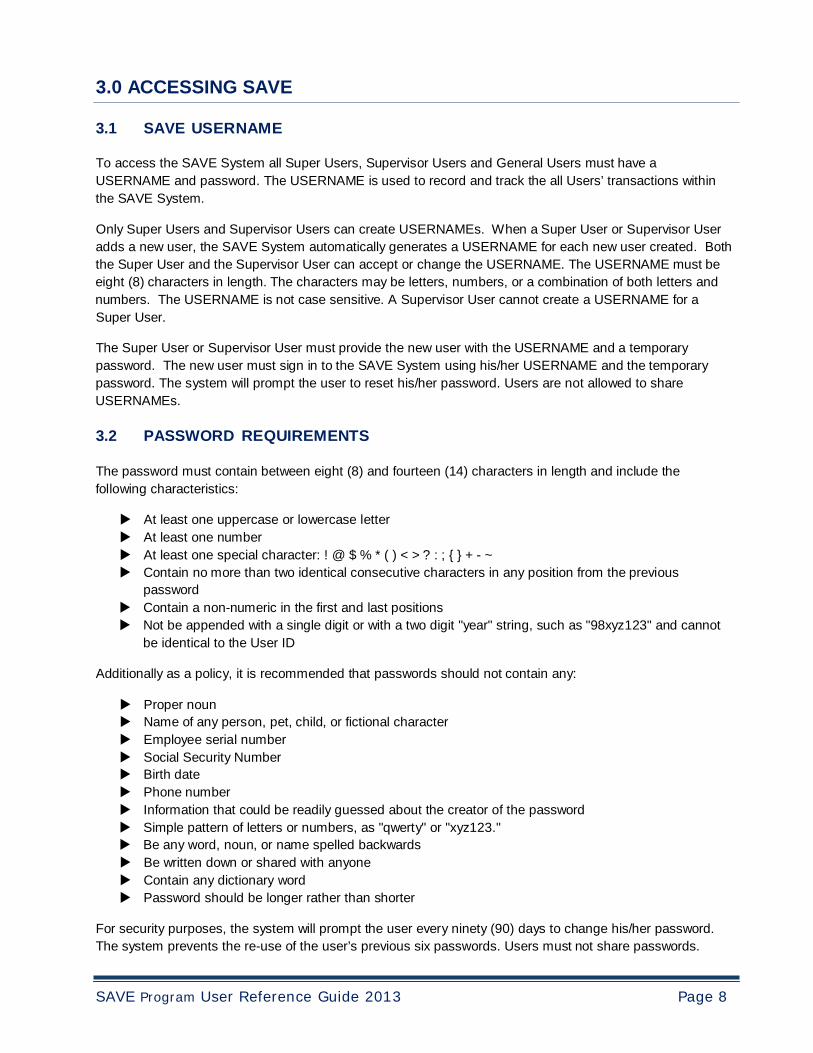
3.1 SAVE USERNAME
To access the SAVE System all Super Users, Supervisor Users and General Users must have a USERNAME and password. The USERNAME is used to record and track the all Users’ transactions within the SAVE System.
Only Super Users and Supervisor Users can create USERNAMEs. When a Super User or Supervisor User adds a new user, the SAVE System automatically generates a USERNAME for each new user created. Both the Super User and the Supervisor User can accept or change the USERNAME. The USERNAME must be eight (8) characters in length. The characters may be letters, numbers, or a combination of both letters and numbers. The USERNAME is not case sensitive. A Supervisor User cannot create a USERNAME for a Super User.
The Super User or Supervisor User must provide the new user with the USERNAME and a temporary password. The new user must sign in to the SAVE System using his/her USERNAME and the temporary password. The system will prompt the user to reset his/her password. Users are not allowed to share USERNAMEs.
3.2 PASSWORD REQUIREMENTS
The password must contain between eight (8) and fourteen (14) characters in length and include the following characteristics:
At least one uppercase or lowercase letter At least one number At least one special character: ! @ $ % * ( ) < > ? : ; { } + - ~ Contain no more than two identical consecutive characters in any position from the previous
password Contain a non-numeric in the first and last positions Not be appended with a single digit or with a two digit "year" string, such as "98xyz123" and cannot
be identical to the User ID
Additionally as a policy, it is recommended that passwords should not contain any:
Proper noun Name of any person, pet, child, or fictional character Employee serial number Social Security Number Birth date Phone number Information that could be readily guessed about the creator of the password Simple pattern of letters or numbers, as "qwerty" or "xyz123." Be any word, noun, or name spelled backwards Be written down or shared with anyone Contain any dictionary word Password should be longer rather than shorter
For security purposes, the system will prompt the user every ninety (90) days to change his/her password. The system prevents the re-use of the user’s previous six passwords. Users must not share passwords.
SAVE Program User Reference Guide 2013 Page 9
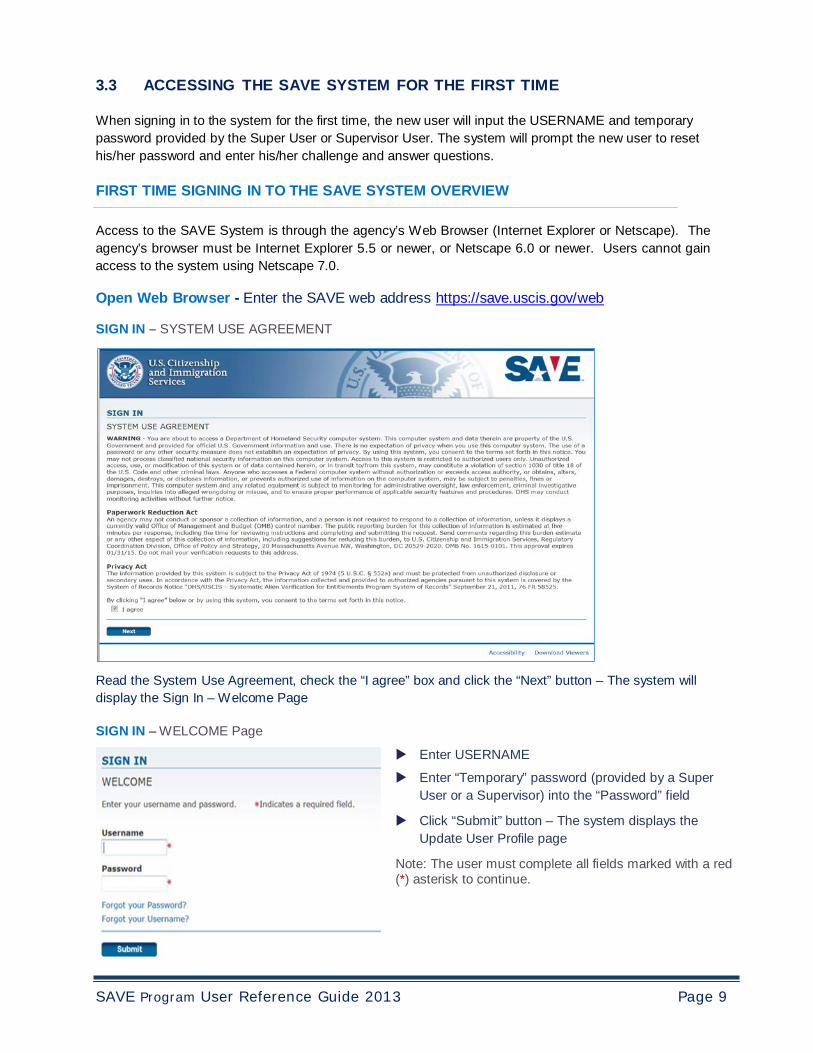
3.3 ACCESSING THE SAVE SYSTEM FOR THE FIRST TIME
When signing in to the system for the first time, the new user will input the USERNAME and temporary password provided by the Super User or Supervisor User. The system will prompt the new user to reset his/her password and enter his/her challenge and answer questions.
FIRST TIME SIGNING IN TO THE SAVE SYSTEM OVERVIEW
Access to the SAVE System is through the agency’s Web Browser (Internet Explorer or Netscape). The agency’s browser must be Internet Explorer 5.5 or newer, or Netscape 6.0 or newer. Users cannot gain access to the system using Netscape 7.0.
Open Web Browser - Enter the SAVE web address https://save.uscis.gov/ web
SIGN IN – SYSTEM USE AGREEMENT
Read the System Use Agreement, check the “I agree” box and click the “Next” button – The system will display the Sign In – Welcome Page
SIGN IN – WELCOME Page
Enter USERNAME
Enter “Temporary” password (provided by a Super User or a Supervisor) into the “Password” field
Click “Submit” button – The system displays the
Update User Profile page Note: The user must complete all fields marked with a red (*) asterisk to continue.
SAVE Program User Reference Guide 2013 Page 10
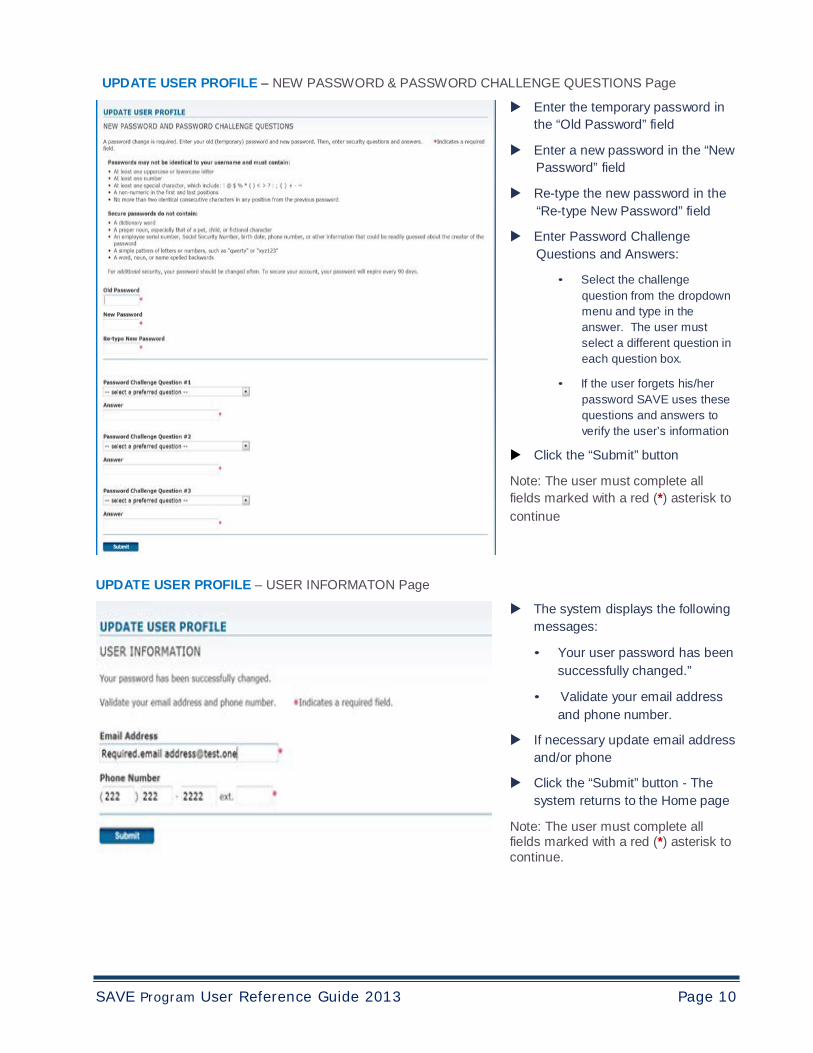
UPDATE USER PROFILE – NEW PASSWORD & PASSWORD CHALLENGE QUESTIONS Page
Enter the temporary password in the “Old Password” field
Enter a new password in the “New Password” field
Re-type the new password in the
“Re-type New Password” field
Enter Password Challenge Questions and Answers:
• Select the challenge
question from the dropdown menu and type in the answer. The user must select a different question in each question box.
• If the user forgets his/her
password SAVE uses these questions and answers to verify the user’s information
Click the “Submit” button
Note: The user must complete all fields marked with a red (*) asterisk to continue
UPDATE USER PROFILE – USER INFORMATON Page The system displays the following
messages:
• Your user password has been successfully changed.”
• Validate your email address and phone number.
If necessary update email address and/or phone
Click the “Submit” button - The system returns to the Home page
Note: The user must complete all fields marked with a red (*) asterisk to continue.
SAVE Program User Reference Guide 2013 Page 11
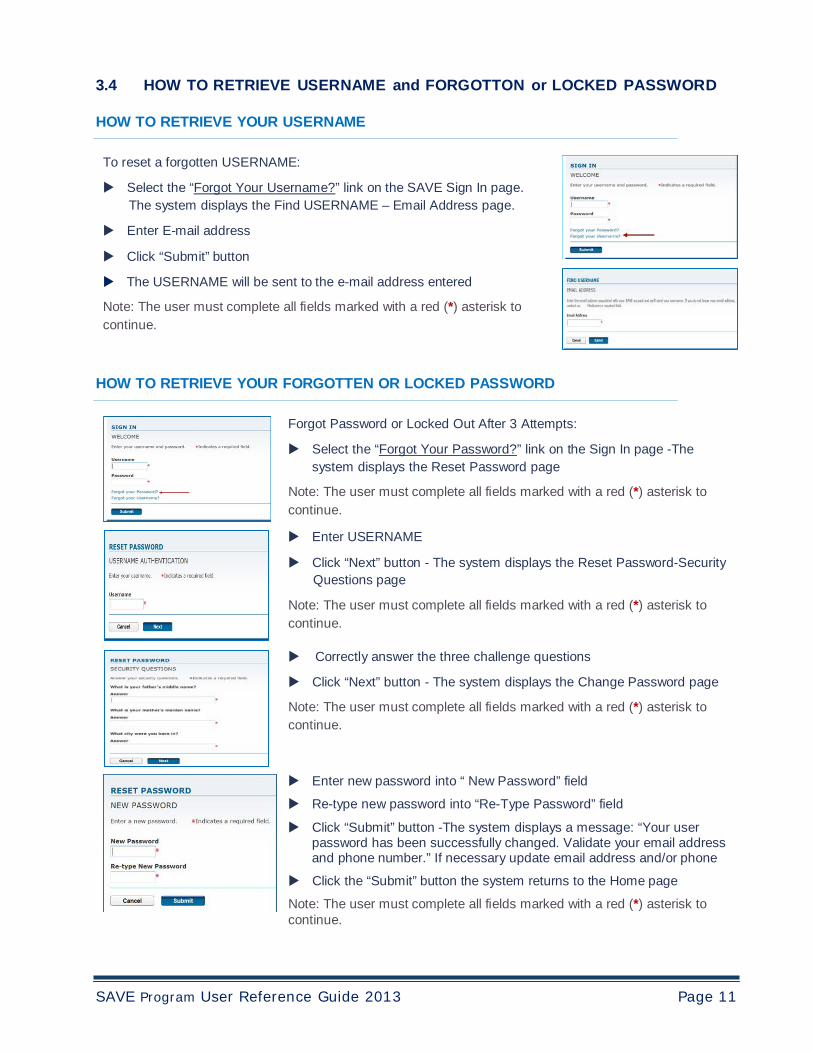
3.4 HOW TO RETRIEVE USERNAME and FORGOTTON or LOCKED PASSWORD
HOW TO RETRIEVE YOUR USERNAME
To reset a forgotten USERNAME: Select the “Forgot Your Username?” link on the SAVE Sign In page.
The system displays the Find USERNAME – Email Address page. Enter E-mail address
Click “Submit” button
The USERNAME will be sent to the e-mail address entered
Note: The user must complete all fields marked with a red (*) asterisk to continue.
HOW TO RETRIEVE YOUR FORGOTTEN OR LOCKED PASSWORD
Forgot Password or Locked Out After 3 Attempts:
Select the “Forgot Your Password?” link on the Sign In page -The system displays the Reset Password page
Note: The user must complete all fields marked with a red (*) asterisk to continue.
Enter USERNAME
Click “Next” button - The system displays the Reset Password-Security Questions page
Note: The user must complete all fields marked with a red (*) asterisk to continue.
Correctly answer the three challenge questions
Click “Next” button - The system displays the Change Password page
Note: The user must complete all fields marked with a red (*) asterisk to continue.
Enter new password into “ New Password” field
Re-type new password into “Re-Type Password” field
Click “Submit” button -The system displays a message: “Your user password has been successfully changed. Validate your email address and phone number.” If necessary update email address and/or phone
Click the “Submit” button the system returns to the Home page
Note: The user must complete all fields marked with a red (*) asterisk to continue.
SAVE Program User Reference Guide 2013 Page 12
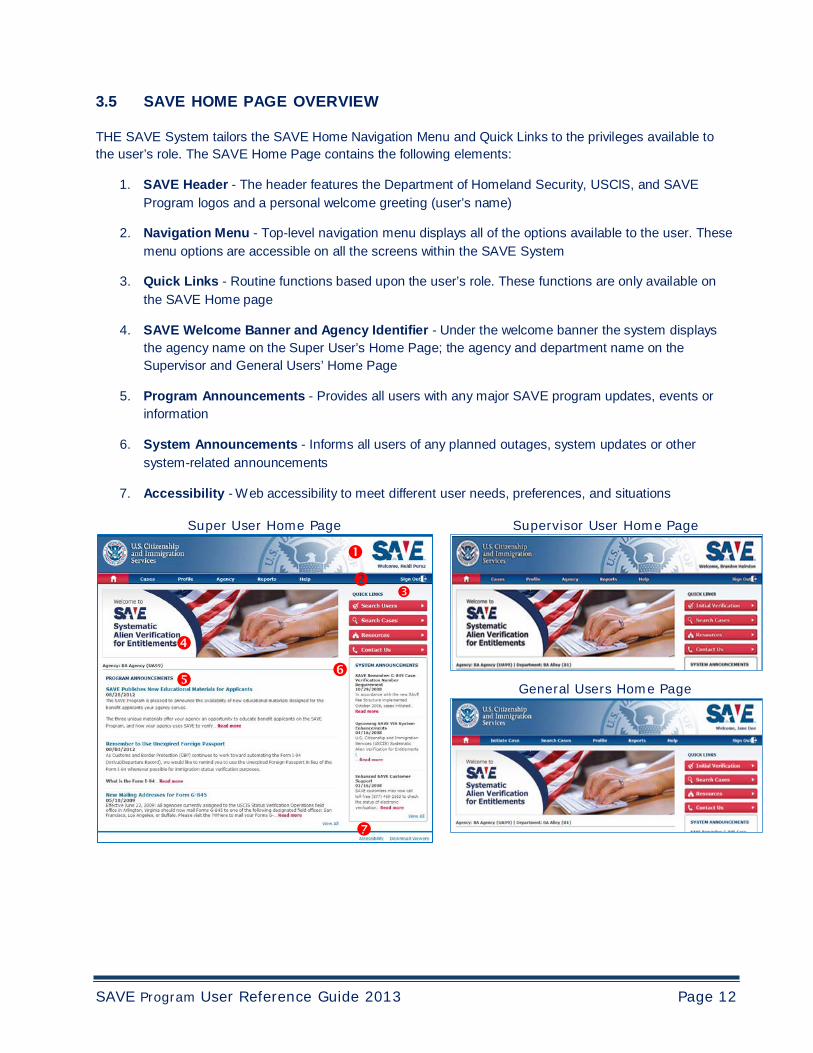
3.5 SAVE HOME PAGE OVERVIEW
THE SAVE System tailors the SAVE Home Navigation Menu and Quick Links to the privileges available to the user’s role. The SAVE Home Page contains the following elements:
1. SAVE Header - The header features the Department of Homeland Security, USCIS, and SAVE
Program logos and a personal welcome greeting (user’s name)
2. Navigation Menu - Top-level navigation menu displays all of the options available to the user. These menu options are accessible on all the screens within the SAVE System
3. Quick Links - Routine functions based upon the user’s role. These functions are only available on
the SAVE Home page
4. SAVE Welcome Banner and Agency Identifier - Under the welcome banner the system displays the agency name on the Super User’s Home Page; the agency and department name on the Supervisor and General Users’ Home Page
5. Program Announcements - Provides all users with any major SAVE program updates, events or
information
6. System Announcements - Informs all users of any planned outages, system updates or other system-related announcements
7. Accessibility - Web accessibility to meet different user needs, preferences, and situations
Super User Home Page
Supervisor User Home Page
General Users Home Page

SAVE Program User Reference Guide 2013 Page 13
4.0 SUPER USER AGENCY ADMINISTRATION
4.1 ADD USER
Under the Agency Tab on the Navigation Menu, Super Users can add Super Users, Supervisor Users and General Users to all the agency’s departments and groups. To add a user the Super User must select the user’s role, Department, Group and enter the user’s personal and sign in information.
ADD USERS FUNCTIONS OVERVIEW
NAVIGATION MENU - AGENCY TAB
ADD NEW USER – ROLE SELECTION Page
On Navigation Menu Click the “Agency Tab” Click the “Add User” link - The system displays
the Add New User - Role Section page. Select a user role from the dropdown menu Click “Next” button - The system displays the
Add New User - Department Selection page Note: The user must complete all fields marked with a red (*) asterisk to continue
ADD NEW USER – DEPARTMENT SELECTION Page
Select the “Department” from the dropdown menu
Click the “Next” button - The system displays the Add New User - Group Selection page showing the User Role and Department Name
Note: The user must complete all fields marked with a red (*) asterisk to continue
ADD NEW USER – GROUP SELECTION Page Select the “Group” from the dropdown menu
Click the “Next” button - The system displays the Add New User-User Information page showing the User Role, Department and Group Name
Note: The user must complete all fields marked with a red (*) asterisk to continue
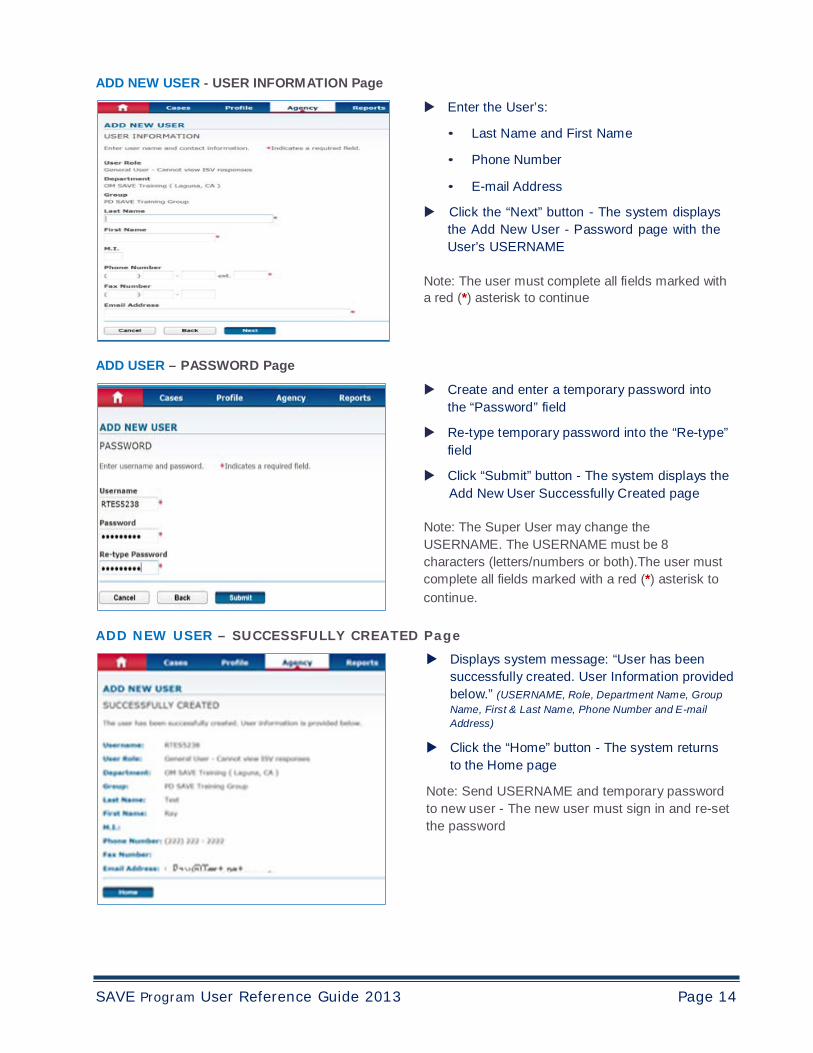
SAVE Program User Reference Guide 2013 Page 14
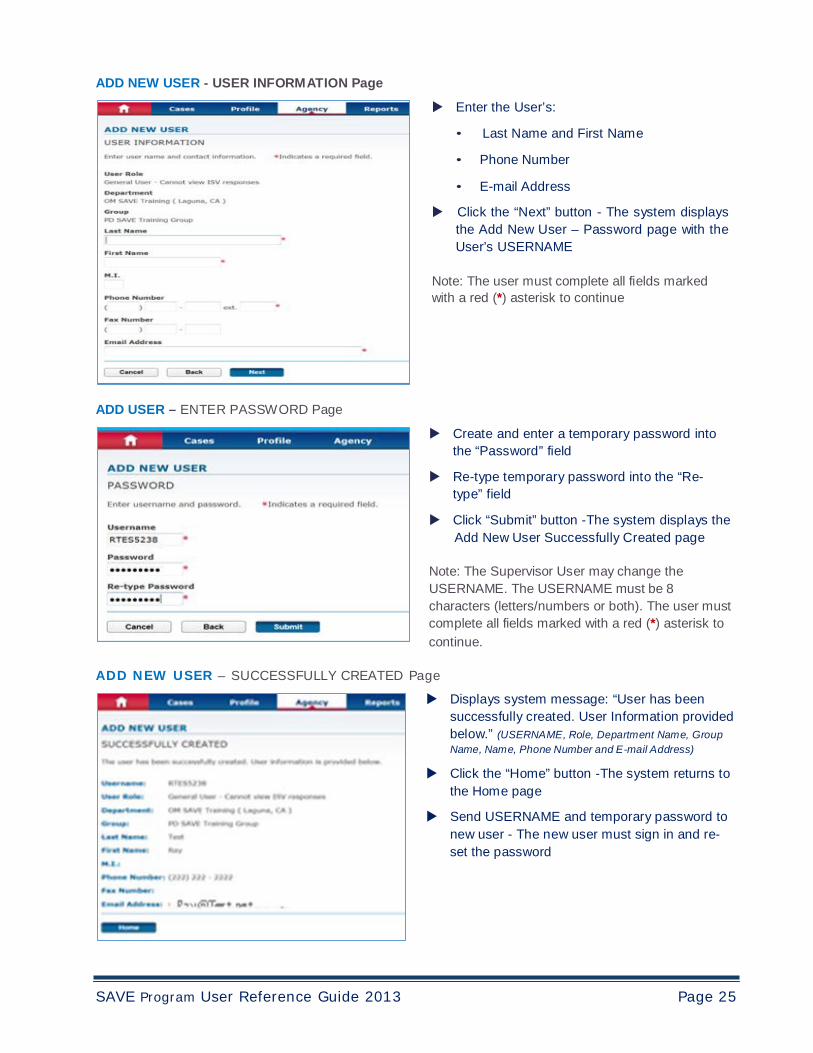
ADD NEW USER - USER INFORMATION Page Enter the User’s:
• Last Name and First Name
• Phone Number
• E-mail Address Click the “Next” button - The system displays
the Add New User - Password page with the User’s USERNAME
Note: The user must complete all fields marked with a red (*) asterisk to continue
ADD USER – PASSWORD Page Create and enter a temporary password into
the “Password” field
Re-type temporary password into the “Re-type” field
Click “Submit” button - The system displays the
Add New User Successfully Created page Note: The Super User may change the USERNAME. The USERNAME must be 8 characters (letters/numbers or both).The user must complete all fields marked with a red (*) asterisk to continue.
ADD NEW USER – SUCCESSFULLY CREATED Page
Displays system message: “User has been successfully created. User Information provided below.” (USERNAME, Role, Departm ent Nam e, Group Name, First & Last Nam e, Phone Number and E-mail Address)
Click the “Home” button - The system returns to the Home page
Note: Send USERNAME and temporary password to new user - The new user must sign in and re-set the password
SAVE Program User Reference Guide 2013 Page 15
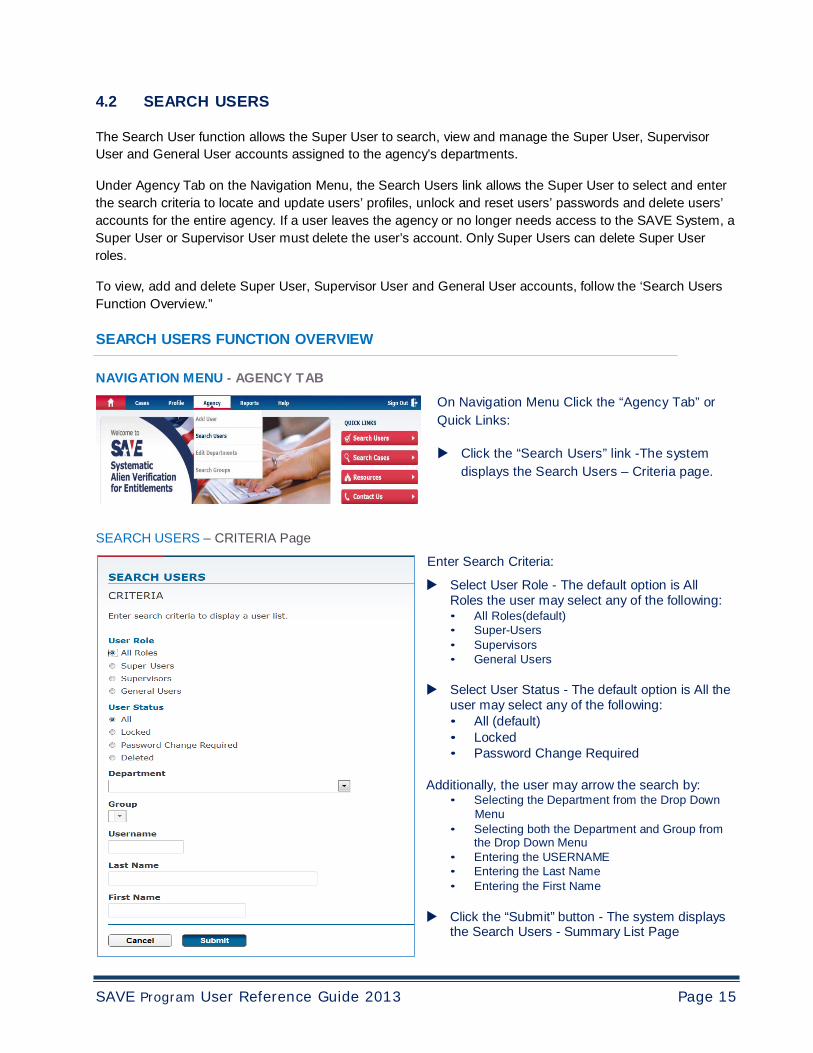
4.2 SEARCH USERS
The Search User function allows the Super User to search, view and manage the Super User, Supervisor User and General User accounts assigned to the agency’s departments.
Under Agency Tab on the Navigation Menu, the Search Users link allows the Super User to select and enter the search criteria to locate and update users’ profiles, unlock and reset users’ passwords and delete users’ accounts for the entire agency. If a user leaves the agency or no longer needs access to the SAVE System, a Super User or Supervisor User must delete the user’s account. Only Super Users can delete Super User roles.
To view, add and delete Super User, Supervisor User and General User accounts, follow the ‘Search Users Function Overview.”
SEARCH USERS FUNCTION OVERVIEW
NAVIGATION MENU - AGENCY TAB
SEARCH USERS – CRITERIA Page
On Navigation Menu Click the “Agency Tab” or Quick Links:
Click the “Search Users” link -The system
displays the Search Users – Criteria page. Enter Search Criteria:
Select User Role - The default option is All Roles the user may select any of the following: • All Roles(default) • Super-Users • Supervisors • General Users
Select User Status - The default option is All the
user may select any of the following: • All (default) • Locked • Password Change Required
Additionally, the user may arrow the search by:
• Selecting the Department from the Drop Down Menu
• Selecting both the Department and Group from the Drop Down Menu
• Entering the USERNAME • Entering the Last Name • Entering the First Name
Click the “Submit” button - The system displays
the Search Users - Summary List Page
SAVE Program User Reference Guide 2013 Page 16
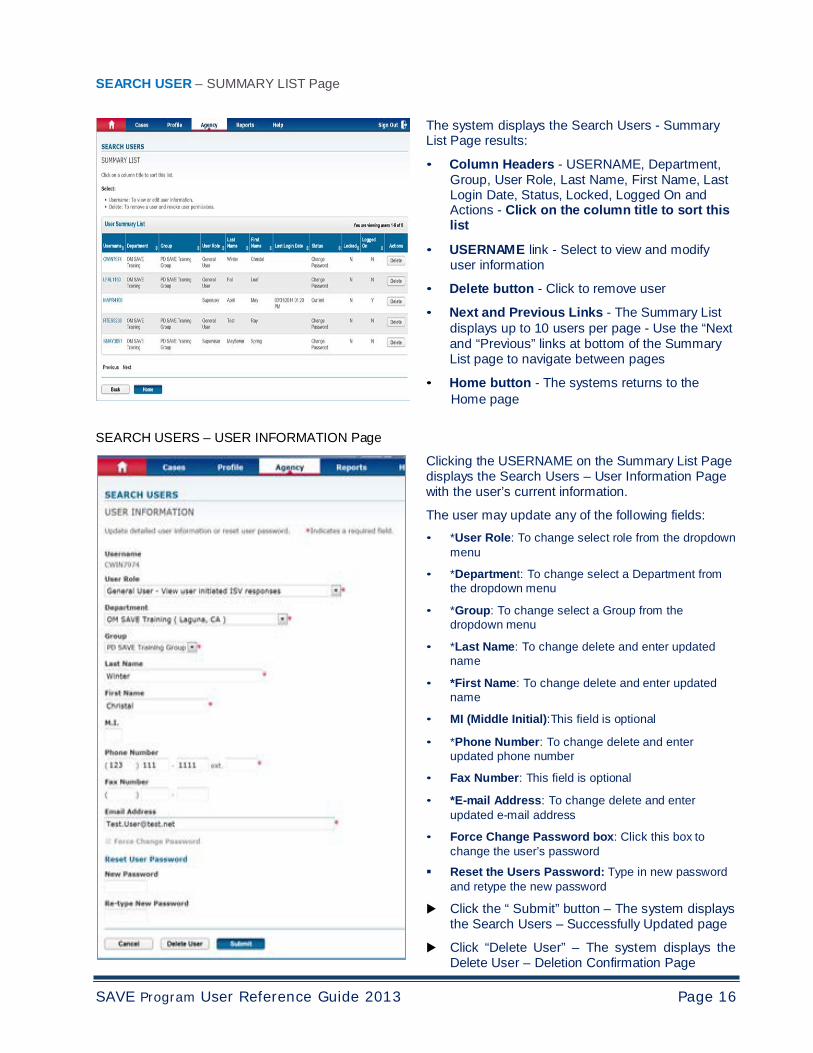
SEARCH USER – SUMMARY LIST Page
The system displays the Search Users - Summary List Page results:
• Column Headers - USERNAME, Department, Group, User Role, Last Name, First Name, Last Login Date, Status, Locked, Logged On and Actions - Click on the column title to sort this list
• USERNAME link - Select to view and modify
user information
• Delete button - Click to remove user
• Next and Previous Links - The Summary List displays up to 10 users per page - Use the “Next and “Previous” links at bottom of the Summary List page to navigate between pages
• Home button - The systems returns to the Home page
SEARCH USERS – USER INFORMATION Page Clicking the USERNAME on the Summary List Page displays the Search Users – User Information Page with the user’s current information.
The user may update any of the following fields: • *User Role: To change select role from the dropdown
menu
• *Department: To change select a Department from the dropdown menu
• *Group: To change select a Group from the
dropdown menu • *Last Name: To change delete and enter updated
name • *First Name: To change delete and enter updated
name • MI (Middle Initial):This field is optional • *Phone Number: To change delete and enter
updated phone number • Fax Number: This field is optional • *E-mail Address: To change delete and enter
updated e-mail address
• Force Change Password box: Click this box to change the user’s password
Reset the Users Password: Type in new password and retype the new password
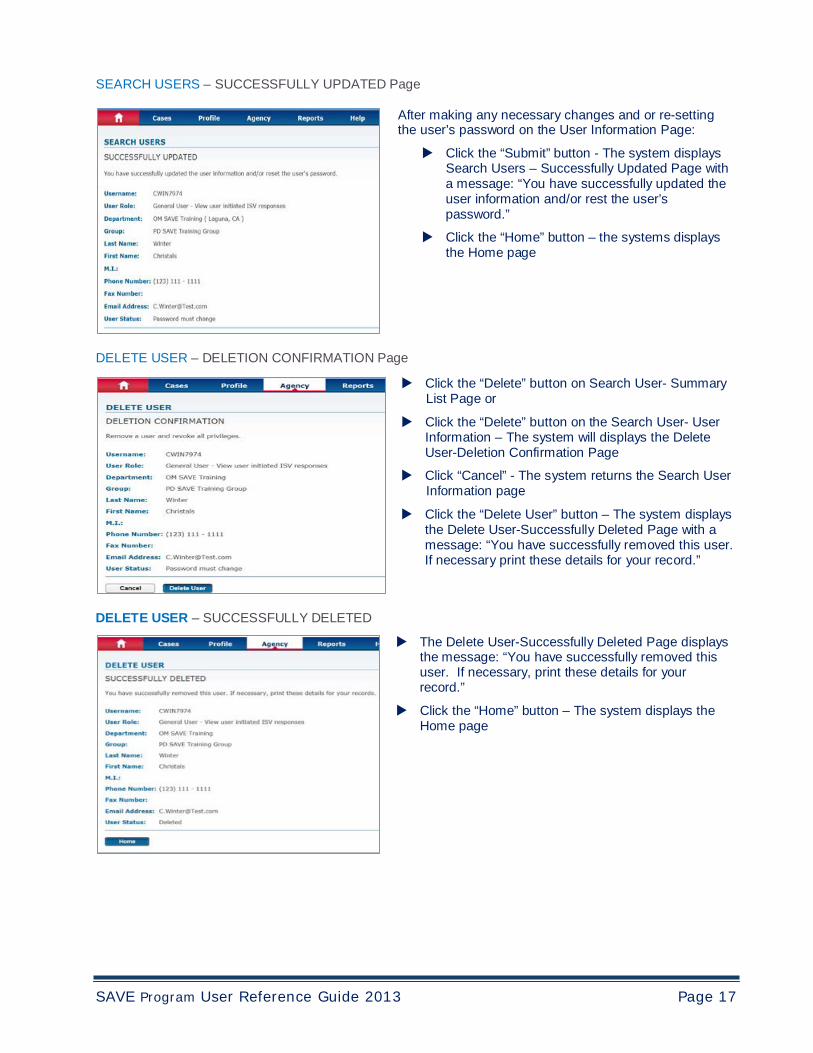
Click the “ Submit” button – The system displays the Search Users – Successfully Updated page
Click “Delete User” – The system displays the Delete User – Deletion Confirmation Page
SAVE Program User Reference Guide 2013 Page 17
SEARCH USERS – SUCCESSFULLY UPDATED Page
After making any necessary changes and or re-setting the user’s password on the User Information Page:
Click the “Submit” button - The system displays Search Users – Successfully Updated Page with a message: “You have successfully updated the user information and/or rest the user’s password.”
Click the “Home” button – the systems displays the Home page
DELETE USER – DELETION CONFIRMATION Page
Click the “Delete” button on Search User- Summary List Page or
Click the “Delete” button on the Search User- User Information – The system will displays the Delete User-Deletion Confirmation Page
Click “Cancel” - The system returns the Search User Information page
Click the “Delete User” button – The system displays the Delete User-Successfully Deleted Page with a message: “You have successfully removed this user. If necessary print these details for your record.”
DELETE USER – SUCCESSFULLY DELETED The Delete User-Successfully Deleted Page displays
the message: “You have successfully removed this user. If necessary, print these details for your record.”
Click the “Home” button – The system displays the Home page
SAVE Program User Reference Guide 2013 Page 18
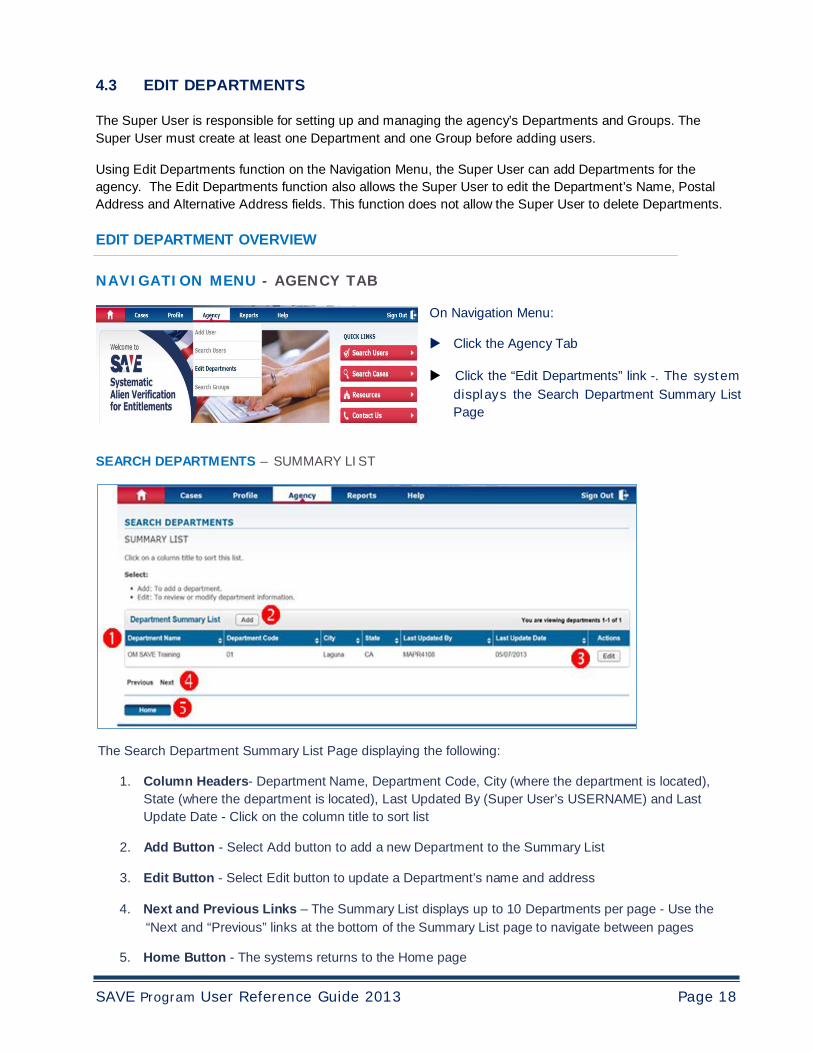
4.3 EDIT DEPARTMENTS
The Super User is responsible for setting up and managing the agency’s Departments and Groups. The Super User must create at least one Department and one Group before adding users.
Using Edit Departments function on the Navigation Menu, the Super User can add Departments for the agency. The Edit Departments function also allows the Super User to edit the Department’s Name, Postal Address and Alternative Address fields. This function does not allow the Super User to delete Departments.
EDIT DEPARTMENT OVERVIEW
NAVIGATION MENU - AGENCY TAB
SEARCH DEPARTMENTS – SUMMARY LIST
On Navigation Menu: Click the Agency Tab Click the “Edit Departments” link -. The system
displays the Search Department Summary List Page
The Search Department Summary List Page displaying the following:
1. Column Headers- Department Name, Department Code, City (where the department is located), State (where the department is located), Last Updated By (Super User’s USERNAME) and Last Update Date - Click on the column title to sort list
2. Add Button - Select Add button to add a new Department to the Summary List
3. Edit Button - Select Edit button to update a Department’s name and address
4. Next and Previous Links – The Summary List displays up to 10 Departments per page - Use the
“Next and “Previous” links at the bottom of the Summary List page to navigate between pages
5. Home Button - The systems returns to the Home page
SAVE Program User Reference Guide 2013 Page 19
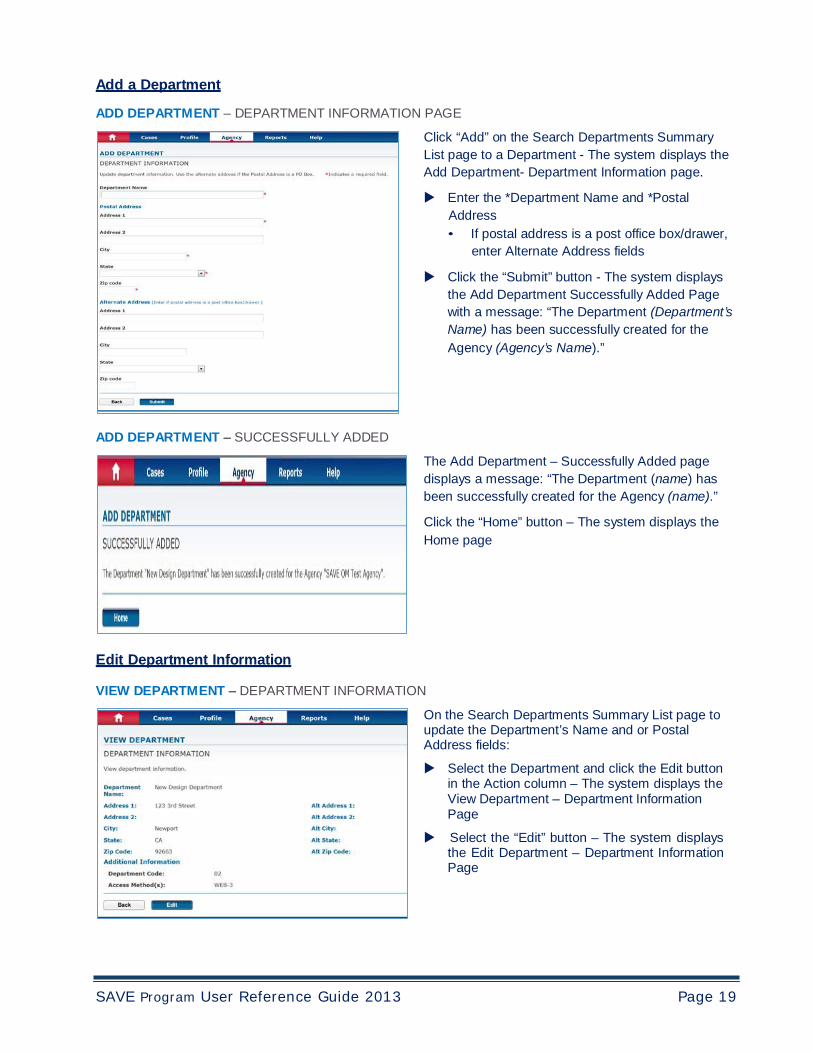
Add a Department
ADD DEPARTMENT – DEPARTMENT INFORMATION PAGE
Click “Add” on the Search Departments Summary List page to a Department - The system displays the Add Department- Department Information page.
Enter the *Department Name and *Postal Address • If postal address is a post office box/drawer,
enter Alternate Address fields
Click the “Submit” button - The system displays the Add Department Successfully Added Page with a message: “The Department (Department’s Name) has been successfully created for the Agency (Agency’s Name).”
ADD DEPARTMENT – SUCCESSFULLY ADDED The Add Department – Successfully Added page displays a message: “The Department (name) has been successfully created for the Agency (name).”
Click the “Home” button – The system displays the Home page
Edit Department Information
VIEW DEPARTMENT – DEPARTMENT INFORMATION
On the Search Departments Summary List page to update the Department’s Name and or Postal Address fields:
Select the Department and click the Edit button in the Action column – The system displays the View Department – Department Information Page
Select the “Edit” button – The system displays the Edit Department – Department Information Page
SAVE Program User Reference Guide 2013 Page 20
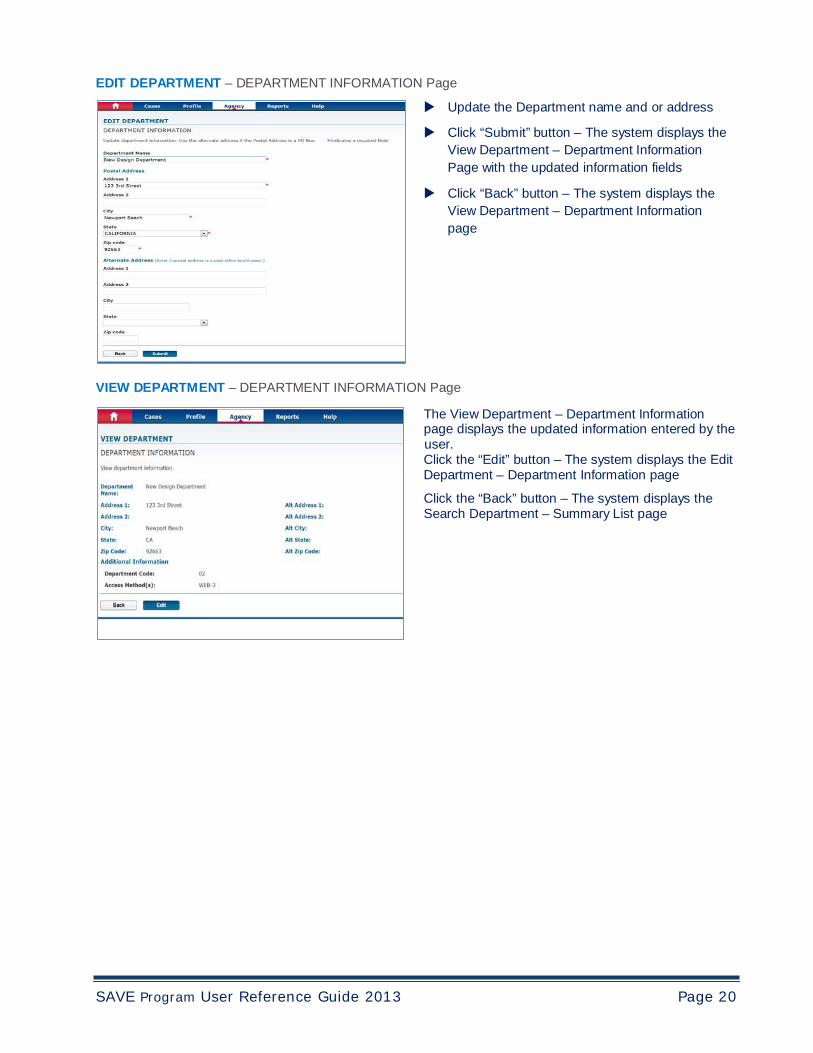
EDIT DEPARTMENT – DEPARTMENT INFORMATION Page
Update the Department name and or address
Click “Submit” button – The system displays the View Department – Department Information Page with the updated information fields
Click “Back” button – The system displays the View Department – Department Information page
VIEW DEPARTMENT – DEPARTMENT INFORMATION Page
The View Department – Department Information page displays the updated information entered by the user. Click the “Edit” button – The system displays the Edit Department – Department Information page
Click the “Back” button – The system displays the Search Department – Summary List page
SAVE Program User Reference Guide 2013 Page 21
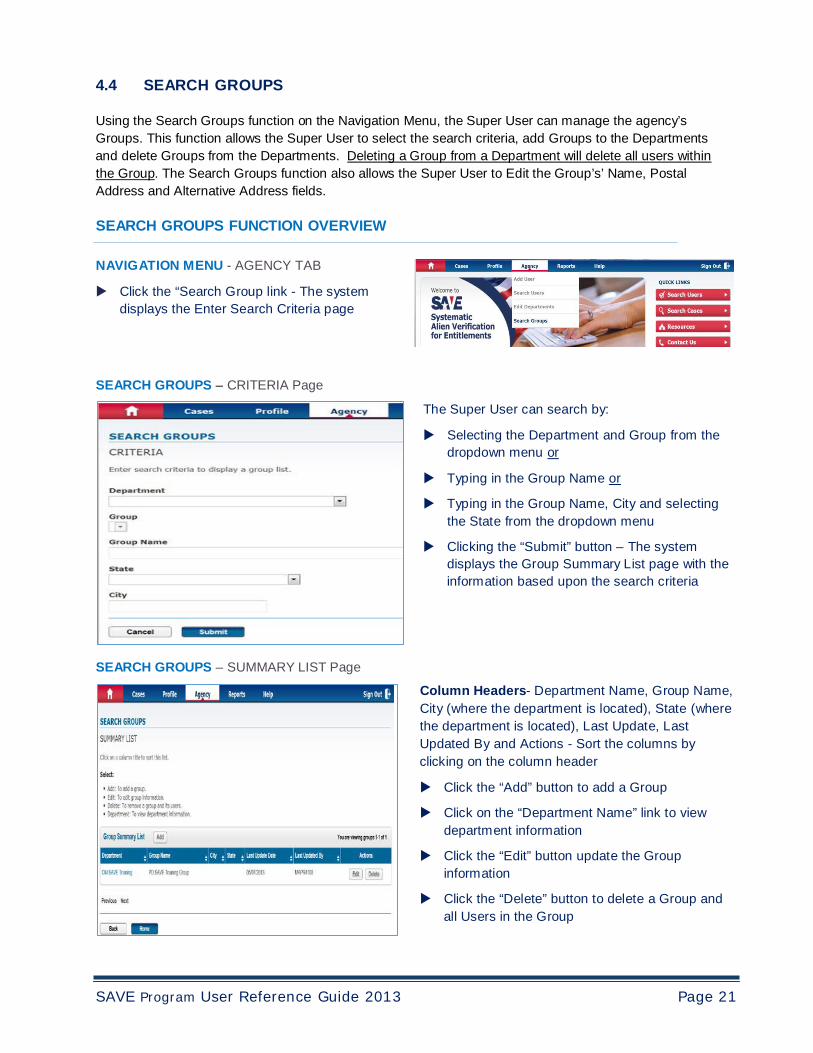
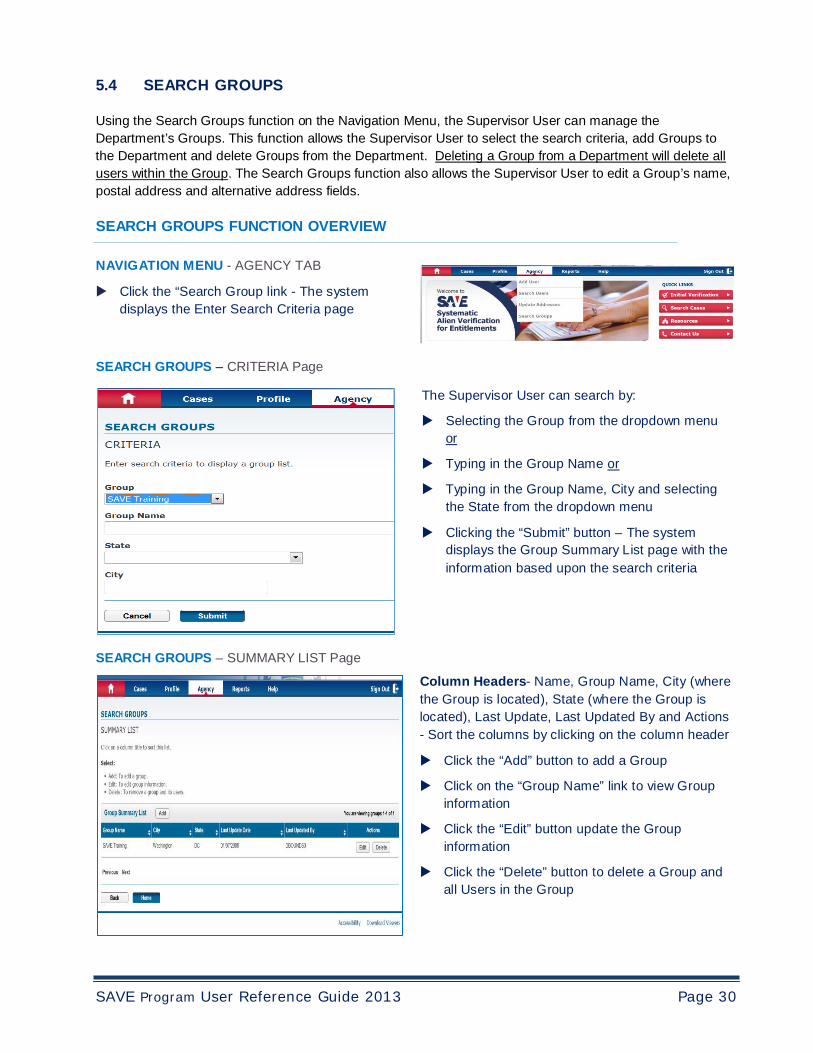
4.4 SEARCH GROUPS
Using the Search Groups function on the Navigation Menu, the Super User can manage the agency’s Groups. This function allows the Super User to select the search criteria, add Groups to the Departments and delete Groups from the Departments. Deleting a Group from a Department will delete all users within the Group. The Search Groups function also allows the Super User to Edit the Group’s’ Name, Postal Address and Alternative Address fields.
SEARCH GROUPS FUNCTION OVERVIEW
NAVIGATION MENU - AGENCY TAB
Click the “Search Group link - The system displays the Enter Search Criteria page
SEARCH GROUPS – CRITERIA Page
The Super User can search by: Selecting the Department and Group from the
dropdown menu or
Typing in the Group Name or Typing in the Group Name, City and selecting
the State from the dropdown menu
Clicking the “Submit” button – The system displays the Group Summary List page with the information based upon the search criteria
SEARCH GROUPS – SUMMARY LIST Page Column Headers- Department Name, Group Name, City (where the department is located), State (where the department is located), Last Update, Last Updated By and Actions - Sort the columns by clicking on the column header
Click the “Add” button to add a Group Click on the “Department Name” link to view
department information
Click the “Edit” button update the Group information
Click the “Delete” button to delete a Group and all Users in the Group
SAVE Program User Reference Guide 2013 Page 22
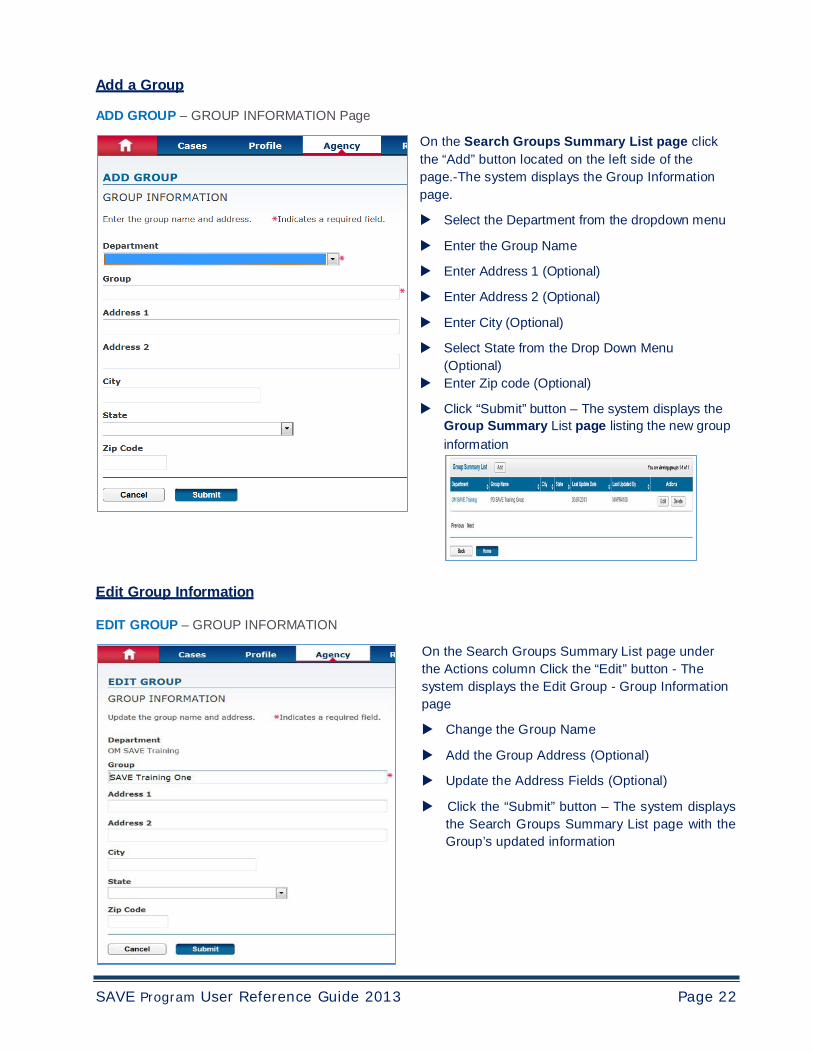
Add a Group
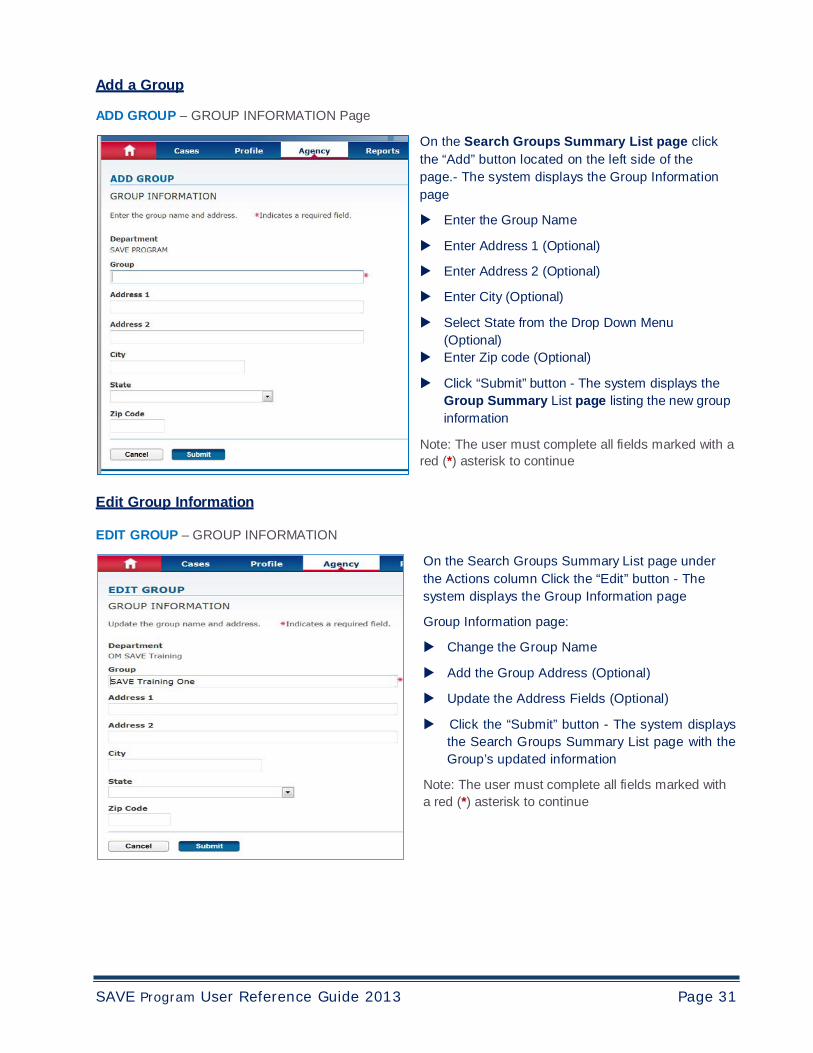
ADD GROUP – GROUP INFORMATION Page On the Search Groups Summary List page click the “Add” button located on the left side of the page.-The system displays the Group Information page.
Select the Department from the dropdown menu Enter the Group Name Enter Address 1 (Optional) Enter Address 2 (Optional) Enter City (Optional) Select State from the Drop Down Menu
(Optional) Enter Zip code (Optional) Click “Submit” button – The system displays the
Group Summary List page listing the new group information
Edit Group Information
EDIT GROUP – GROUP INFORMATION On the Search Groups Summary List page under the Actions column Click the “Edit” button - The system displays the Edit Group - Group Information page
Change the Group Name Add the Group Address (Optional) Update the Address Fields (Optional) Click the “Submit” button – The system displays
the Search Groups Summary List page with the Group’s updated information
SAVE Program User Reference Guide 2013 Page 23
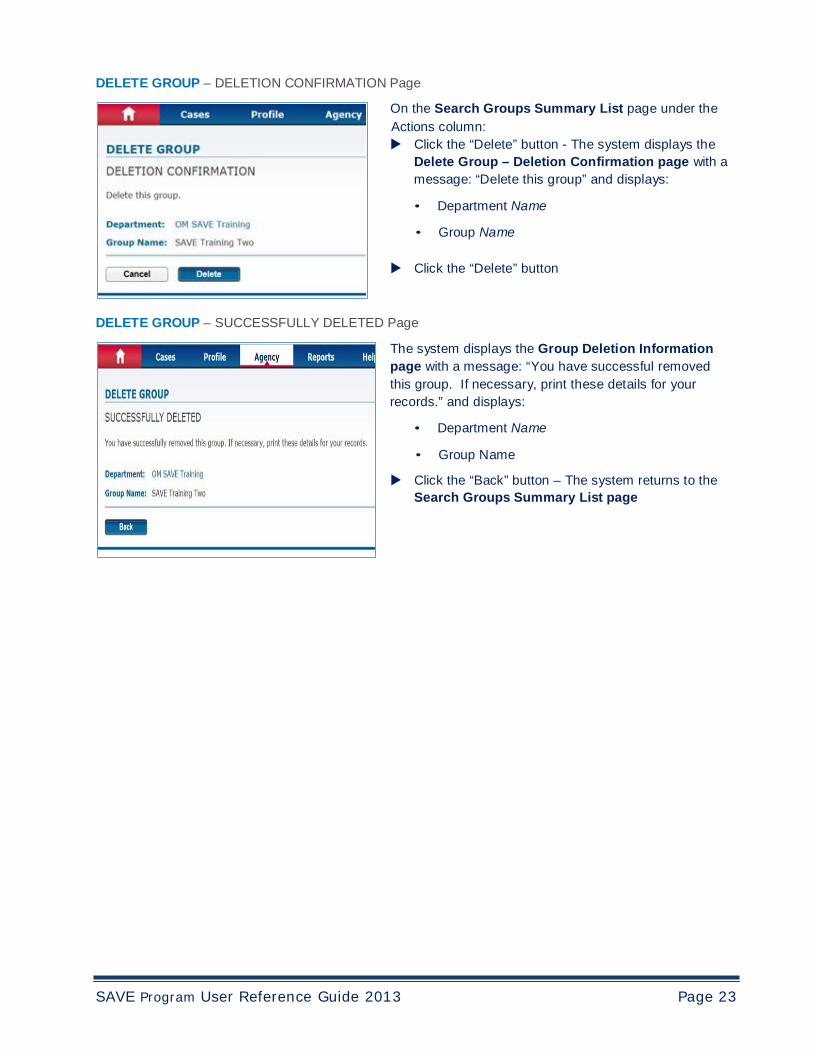
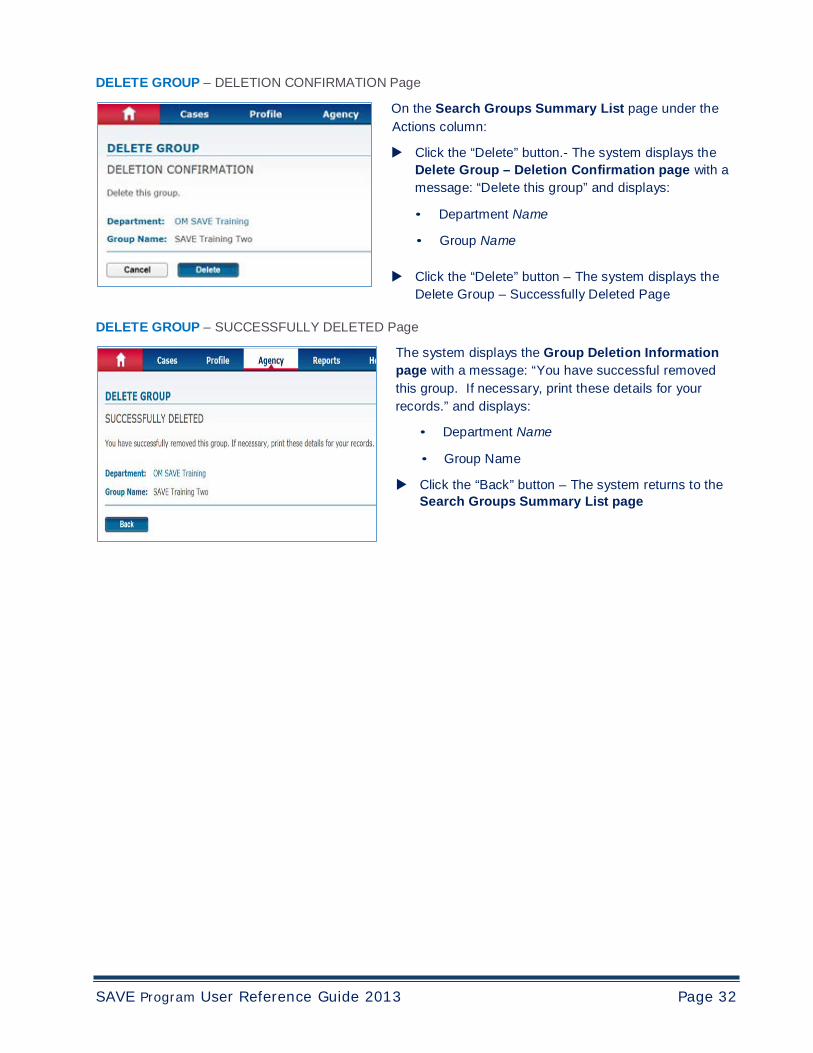
DELETE GROUP – DELETION CONFIRMATION Page
On the Search Groups Summary List page under the Actions column: Click the “Delete” button - The system displays the
Delete Group – Deletion Confirmation page with a message: “Delete this group” and displays:
• Department Name
• Group Name
Click the “Delete” button
DELETE GROUP – SUCCESSFULLY DELETED Page
The system displays the Group Deletion Information page with a message: “You have successful removed this group. If necessary, print these details for your records.” and displays:
• Department Name
• Group Name
Click the “Back” button – The system returns to the Search Groups Summary List page
SAVE Program User Reference Guide 2013 Page 24
5.0 SUPER USER AGENCY ADMINISTRATION
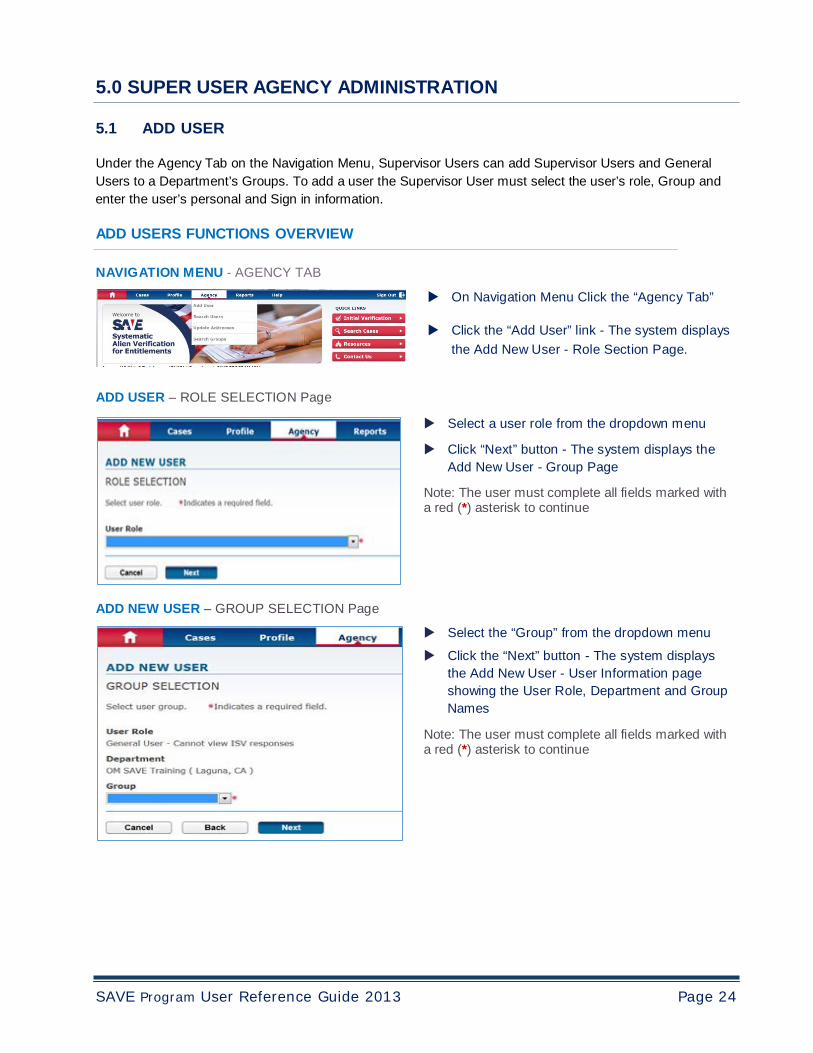
5.1 ADD USER
Under the Agency Tab on the Navigation Menu, Supervisor Users can add Supervisor Users and General Users to a Department’s Groups. To add a user the Supervisor User must select the user’s role, Group and enter the user’s personal and Sign in information.
ADD USERS FUNCTIONS OVERVIEW
NAVIGATION MENU - AGENCY TAB
ADD USER – ROLE SELECTION Page
On Navigation Menu Click the “Agency Tab” Click the “Add User” link - The system displays
the Add New User - Role Section Page. Select a user role from the dropdown menu Click “Next” button - The system displays the
Add New User - Group Page Note: The user must complete all fields marked with a red (*) asterisk to continue
ADD NEW USER – GROUP SELECTION Page Select the “Group” from the dropdown menu
Click the “Next” button - The system displays the Add New User - User Information page showing the User Role, Department and Group Names
Note: The user must complete all fields marked with a red (*) asterisk to continue
SAVE Program User Reference Guide 2013 Page 25
ADD NEW USER - USER INFORMATION Page Enter the User’s:
• Last Name and First Name
• Phone Number
• E-mail Address Click the “Next” button - The system displays
the Add New User – Password page with the User’s USERNAME
Note: The user must complete all fields marked with a red (*) asterisk to continue
ADD USER – ENTER PASSWORD Page Create and enter a temporary password into
the “Password” field
Re-type temporary password into the “Re- type” field
Click “Submit” button -The system displays the Add New User Successfully Created page
Note: The Supervisor User may change the USERNAME. The USERNAME must be 8 characters (letters/numbers or both). The user must complete all fields marked with a red (*) asterisk to continue.
ADD NEW USER – SUCCESSFULLY CREATED Page
Displays system message: “User has been successfully created. User Information provided below.” (USERNAME, Role, Departm ent Nam e, Group Name, Nam e, Phone Number and E-mail Address)
Click the “Home” button -The system returns to the Home page
Send USERNAME and temporary password to new user - The new user must sign in and re- set the password
SAVE Program User Reference Guide 2013 Page 26
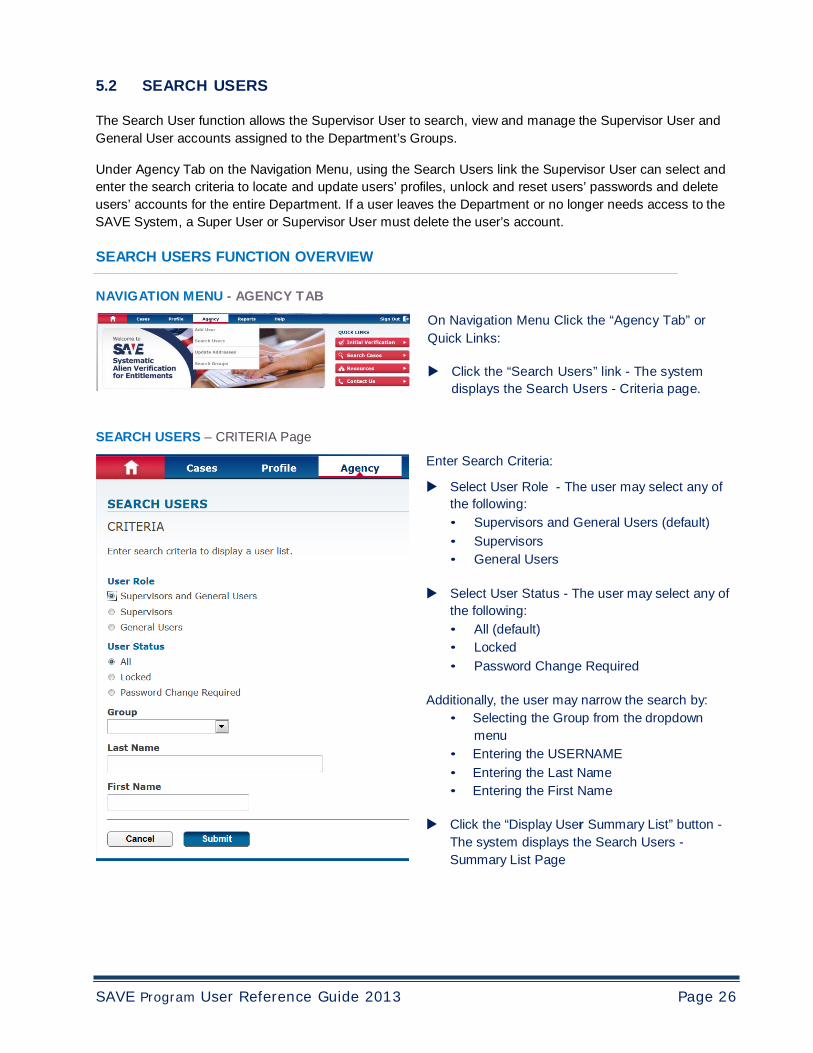
5.2 SEARCH USERS
The Search User function allows the Supervisor User to search, view and manage the Supervisor User and General User accounts assigned to the Department’s Groups.
Under Agency Tab on the Navigation Menu, using the Search Users link the Supervisor User can select and enter the search criteria to locate and update users’ profiles, unlock and reset users’ passwords and delete users’ accounts for the entire Department. If a user leaves the Department or no longer needs access to the SAVE System, a Super User or Supervisor User must delete the user’s account.
SEARCH USERS FUNCTION OVERVIEW
NAVIGATION MENU - AGENCY TAB On Navigation Menu Click the “Agency Tab” or Quick Links: Click the “Search Users” link - The system
displays the Search Users - Criteria page.
SEARCH USERS – CRITERIA Page Enter Search Criteria: Select User Role - The user may select any of
the following: • Supervisors and General Users (default) • Supervisors • General Users
Select User Status - The user may select any of
the following: • All (default) • Locked • Password Change Required
Additionally, the user may narrow the search by:
• Selecting the Group from the dropdown menu
• Entering the USERNAME • Entering the Last Name • Entering the First Name
Click the “Display User Summary List” button -
The system displays the Search Users - Summary List Page
SAVE Program User Reference Guide 2013 Page 27
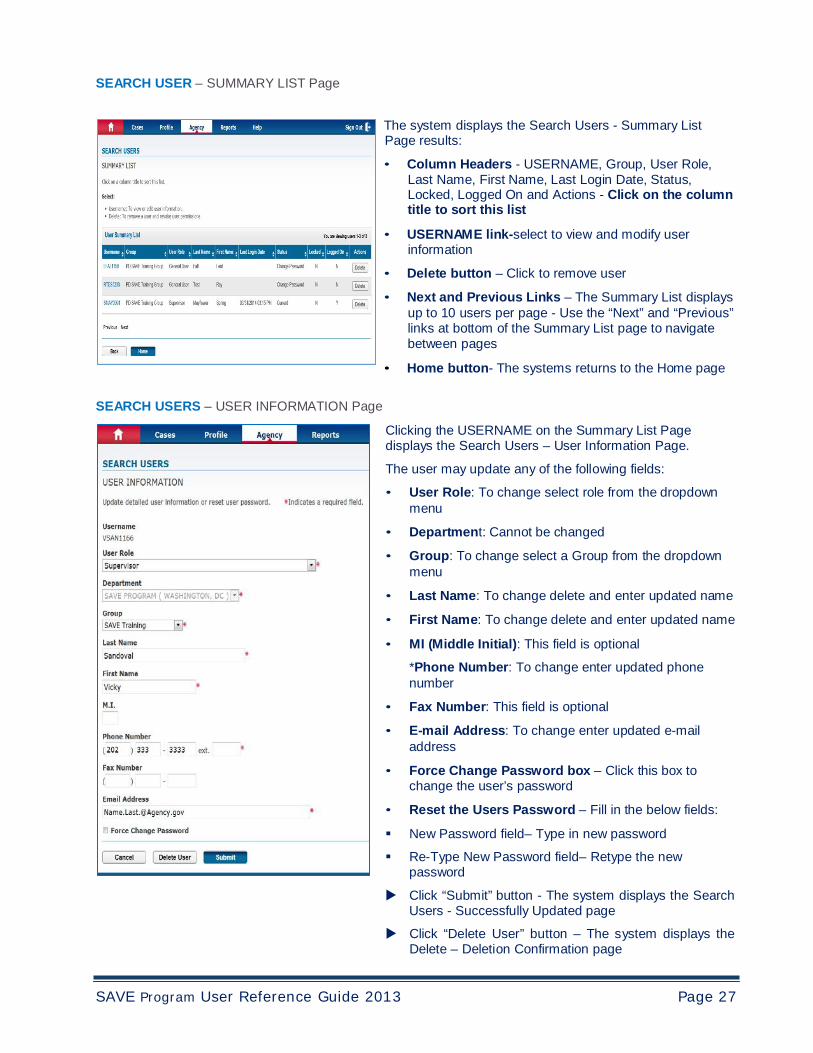
SEARCH USER – SUMMARY LIST Page
The system displays the Search Users - Summary List Page results:
• Column Headers - USERNAME, Group, User Role,
Last Name, First Name, Last Login Date, Status, Locked, Logged On and Actions - Click on the column title to sort this list
• USERNAME link-select to view and modify user
information
• Delete button – Click to remove user
• Next and Previous Links – The Summary List displays up to 10 users per page - Use the “Next” and “Previous” links at bottom of the Summary List page to navigate between pages
• Home button- The systems returns to the Home page
SEARCH USERS – USER INFORMATION Page Clicking the USERNAME on the Summary List Page displays the Search Users – User Information Page.
The user may update any of the following fields:
• User Role: To change select role from the dropdown menu
• Department: Cannot be changed
• Group: To change select a Group from the dropdown menu
• Last Name: To change delete and enter updated name
• First Name: To change delete and enter updated name
• MI (Middle Initial): This field is optional
*Phone Number: To change enter updated phone number
• Fax Number: This field is optional
• E-mail Address: To change enter updated e-mail address
• Force Change Password box – Click this box to change the user’s password
• Reset the Users Password – Fill in the below fields:
New Password field– Type in new password
Re-Type New Password field– Retype the new password
Click “Submit” button - The system displays the Search Users - Successfully Updated page
Click “Delete User” button – The system displays the Delete – Deletion Confirmation page
SAVE Program User Reference Guide 2013 Page 28
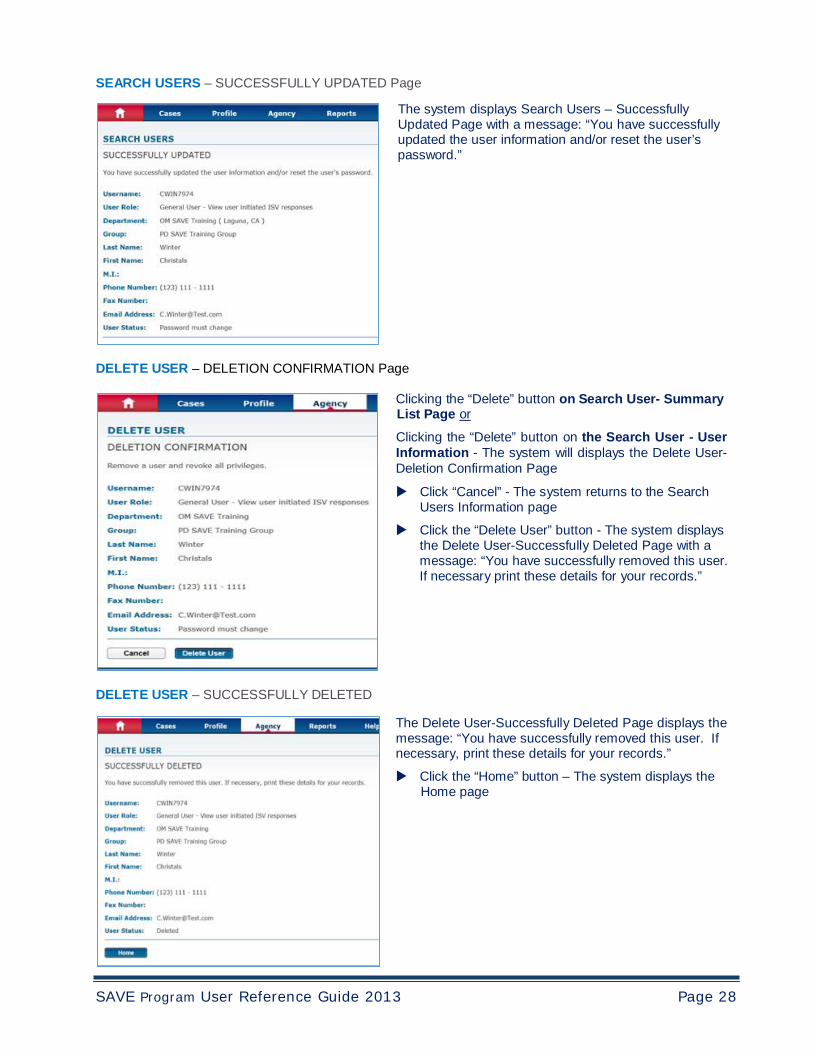
SEARCH USERS – SUCCESSFULLY UPDATED Page
The system displays Search Users – Successfully Updated Page with a message: “You have successfully updated the user information and/or reset the user’s password.”
DELETE USER – DELETION CONFIRMATION Page
Clicking the “Delete” button on Search User- Summary List Page or
Clicking the “Delete” button on the Search User - User Information - The system will displays the Delete User- Deletion Confirmation Page
Click “Cancel” - The system returns to the Search Users Information page
Click the “Delete User” button - The system displays the Delete User-Successfully Deleted Page with a message: “You have successfully removed this user. If necessary print these details for your records.”
DELETE USER – SUCCESSFULLY DELETED
The Delete User-Successfully Deleted Page displays the message: “You have successfully removed this user. If necessary, print these details for your records.”
Click the “Home” button – The system displays the Home page

SAVE Program User Reference Guide 2013 Page 29
5.3 UPDATE ADDRESSES
Using the Update Addresses on the Agency Tab of the Navigation Menu, the Supervisor User can update the Department’s address.
UPDATE ADDRESSSES FUNCTION
NAVIGATION MENU - AGENCY TAB
On Navigation Menu Click the “Agency Tab” Click the “Update Address” link -The system
displays the Search Users – Criteria page.
UPDATE ADDRESSES – DEPARTMENT INFORMATION PAGE
The Supervisor User can update the Postal Address and update or add an Alternative Address for the Department.
Clicking the “Submit” button - The system
displays the Update Addresses – Successfully Updated page
Clicking the “Cancel” button – The system returns to the HOME page
Note: The user must complete all fields marked with a red (*) asterisk to continue.
UPDATE ADDRESSES – SUCCESSFULLY UPDATED PAGE
The Update Addresses – Successfully Updated page displays a message: “You have successfully updated the address of this department: Department Name.”
Clicking the “Home” button – The system returns to the HOME page
Note: The user must complete all fields marked with a red (*) asterisk to continue.
SAVE Program User Reference Guide 2013 Page 30
5.4 SEARCH GROUPS
Using the Search Groups function on the Navigation Menu, the Supervisor User can manage the Department’s Groups. This function allows the Supervisor User to select the search criteria, add Groups to the Department and delete Groups from the Department. Deleting a Group from a Department will delete all users within the Group. The Search Groups function also allows the Supervisor User to edit a Group’s name, postal address and alternative address fields.
SEARCH GROUPS FUNCTION OVERVIEW
NAVIGATION MENU - AGENCY TAB Click the “Search Group link - The system
displays the Enter Search Criteria page
SEARCH GROUPS – CRITERIA Page
The Supervisor User can search by:
Selecting the Group from the dropdown menu or
Typing in the Group Name or
Typing in the Group Name, City and selecting the State from the dropdown menu
Clicking the “Submit” button – The system displays the Group Summary List page with the information based upon the search criteria
SEARCH GROUPS – SUMMARY LIST Page Column Headers- Name, Group Name, City (where the Group is located), State (where the Group is located), Last Update, Last Updated By and Actions - Sort the columns by clicking on the column header Click the “Add” button to add a Group Click on the “Group Name” link to view Group
information
Click the “Edit” button update the Group information
Click the “Delete” button to delete a Group and all Users in the Group
SAVE Program User Reference Guide 2013 Page 31
Add a Group
ADD GROUP – GROUP INFORMATION Page On the Search Groups Summary List page click the “Add” button located on the left side of the page.- The system displays the Group Information page
Enter the Group Name Enter Address 1 (Optional) Enter Address 2 (Optional) Enter City (Optional) Select State from the Drop Down Menu
(Optional) Enter Zip code (Optional) Click “Submit” button - The system displays the
Group Summary List page listing the new group information
Note: The user must complete all fields marked with a red (*) asterisk to continue
Edit Group Information
EDIT GROUP – GROUP INFORMATION
On the Search Groups Summary List page under the Actions column Click the “Edit” button - The system displays the Group Information page
Group Information page: Change the Group Name Add the Group Address (Optional) Update the Address Fields (Optional) Click the “Submit” button - The system displays
the Search Groups Summary List page with the Group’s updated information
Note: The user must complete all fields marked with a red (*) asterisk to continue
SAVE Program User Reference Guide 2013 Page 32
DELETE GROUP – DELETION CONFIRMATION Page
On the Search Groups Summary List page under the Actions column:
Click the “Delete” button.- The system displays the
Delete Group – Deletion Confirmation page with a message: “Delete this group” and displays:
• Department Name
• Group Name
Click the “Delete” button – The system displays the
Delete Group – Successfully Deleted Page
DELETE GROUP – SUCCESSFULLY DELETED Page
The system displays the Group Deletion Information page with a message: “You have successful removed this group. If necessary, print these details for your records.” and displays:
• Department Name
• Group Name
Click the “Back” button – The system returns to the Search Groups Summary List page
SAVE Program User Reference Guide 2013 Page 33
6.0 USER SITE ADMINISTRATION FOR ALL USERS
The Profile Tab on the Navigation Menu allows all users to maintain their account information. This includes changing their password, contact information and the password challenge questions and answers.
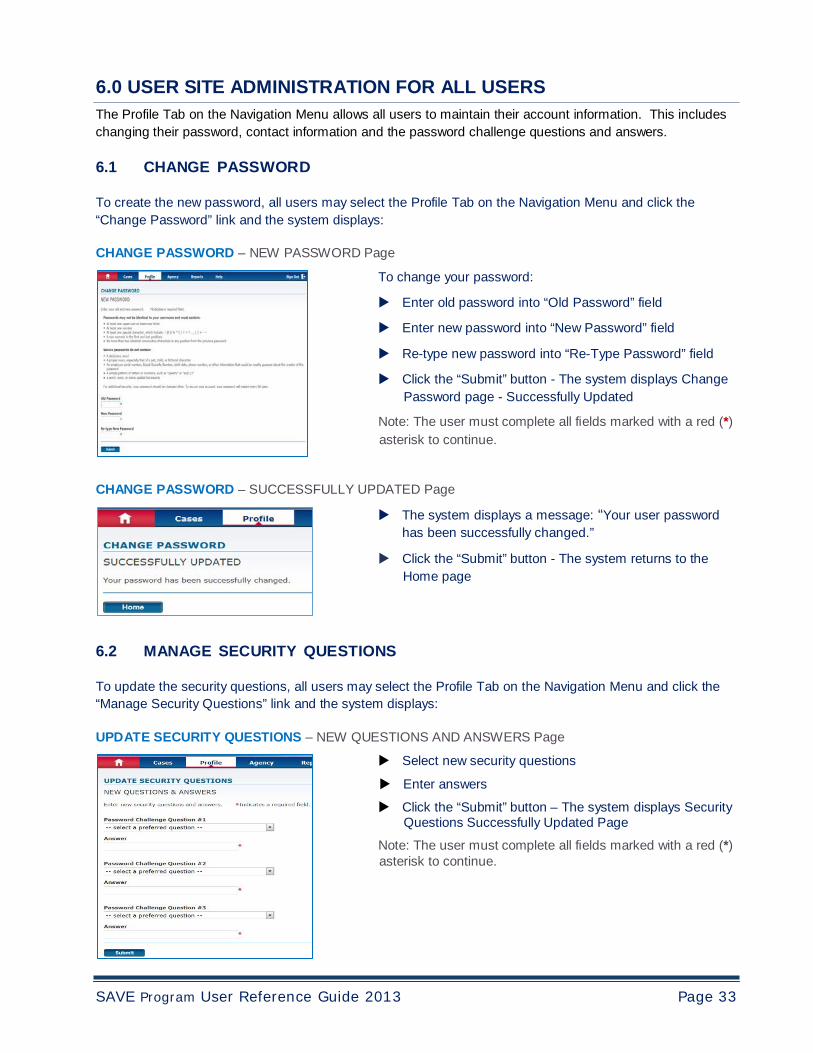
6.1 CHANGE PASSWORD
To create the new password, all users may select the Profile Tab on the Navigation Menu and click the “Change Password” link and the system displays:
CHANGE PASSWORD – NEW PASSWORD Page
To change your password:
Enter old password into “Old Password” field
Enter new password into “New Password” field
Re-type new password into “Re-Type Password” field
Click the “Submit” button - The system displays Change Password page - Successfully Updated
Note: The user must complete all fields marked with a red (*) asterisk to continue.
CHANGE PASSWORD – SUCCESSFULLY UPDATED Page
The system displays a message: “Your user password has been successfully changed.”
Click the “Submit” button - The system returns to the Home page
6.2 MANAGE SECURITY QUESTIONS
To update the security questions, all users may select the Profile Tab on the Navigation Menu and click the “Manage Security Questions” link and the system displays:
UPDATE SECURITY QUESTIONS – NEW QUESTIONS AND ANSWERS Page
Select new security questions
Enter answers
Click the “Submit” button – The system displays Security Questions Successfully Updated Page
Note: The user must complete all fields marked with a red (*) asterisk to continue.
SAVE Program User Reference Guide 2013 Page 34
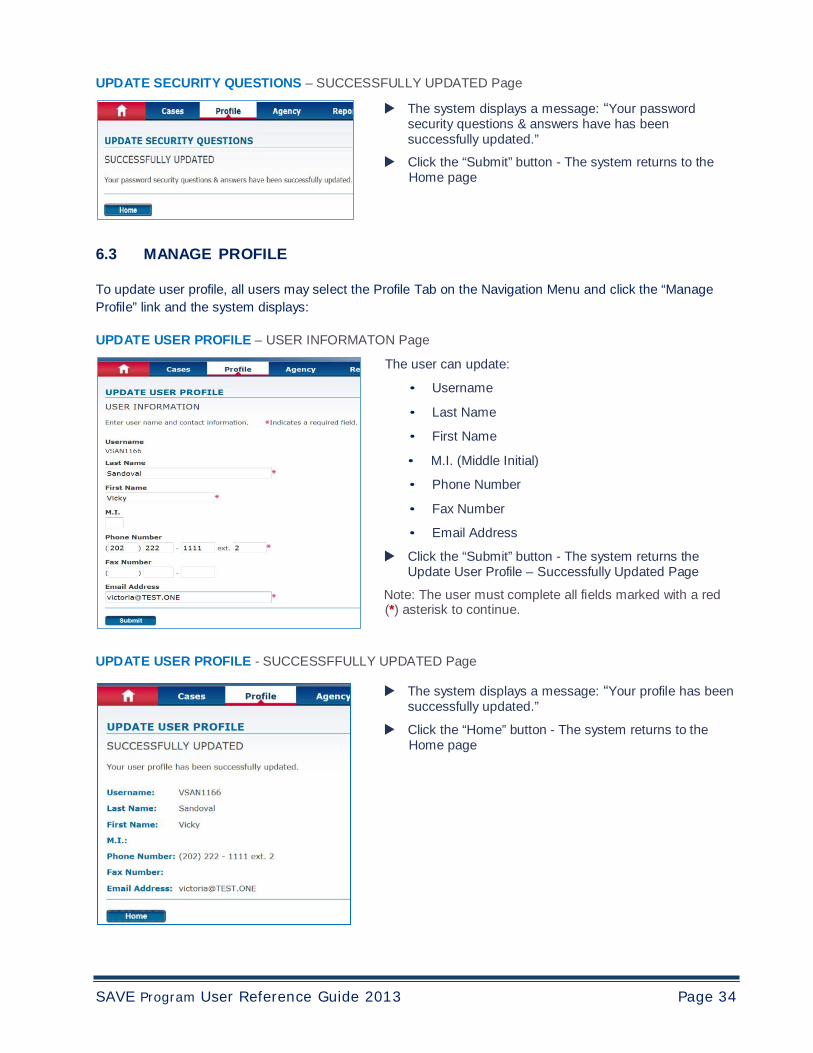
UPDATE SECURITY QUESTIONS – SUCCESSFULLY UPDATED Page
The system displays a message: “Your password security questions & answers have has been successfully updated.”
Click the “Submit” button - The system returns to the Home page
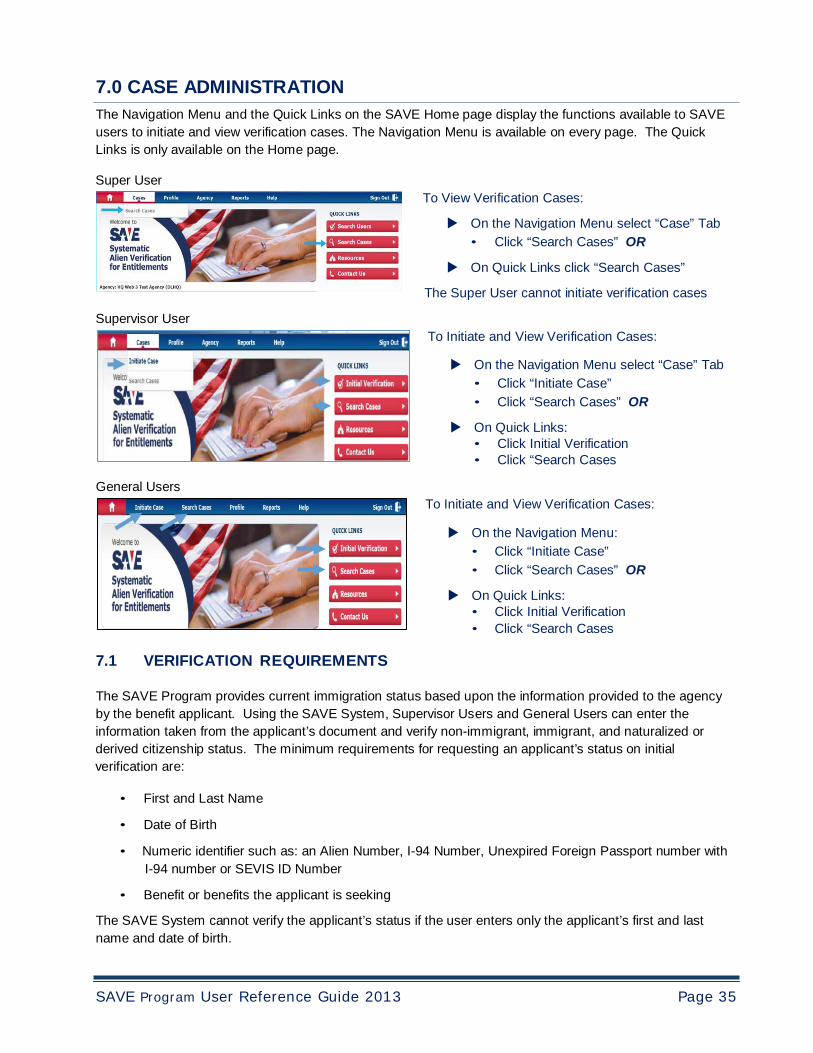
6.3 MANAGE PROFILE
To update user profile, all users may select the Profile Tab on the Navigation Menu and click the “Manage Profile” link and the system displays:
UPDATE USER PROFILE – USER INFORMATON Page
The user can update:
• Username
• Last Name
• First Name
• M.I. (Middle Initial)
• Phone Number
• Fax Number
• Email Address
Click the “Submit” button - The system returns the Update User Profile – Successfully Updated Page
Note: The user must complete all fields marked with a red (*) asterisk to continue.
UPDATE USER PROFILE - SUCCESSFFULLY UPDATED Page
The system displays a message: “Your profile has been successfully updated.”
Click the “Home” button - The system returns to the Home page
SAVE Program User Reference Guide 2013 Page 35
7.0 CASE ADMINISTRATION
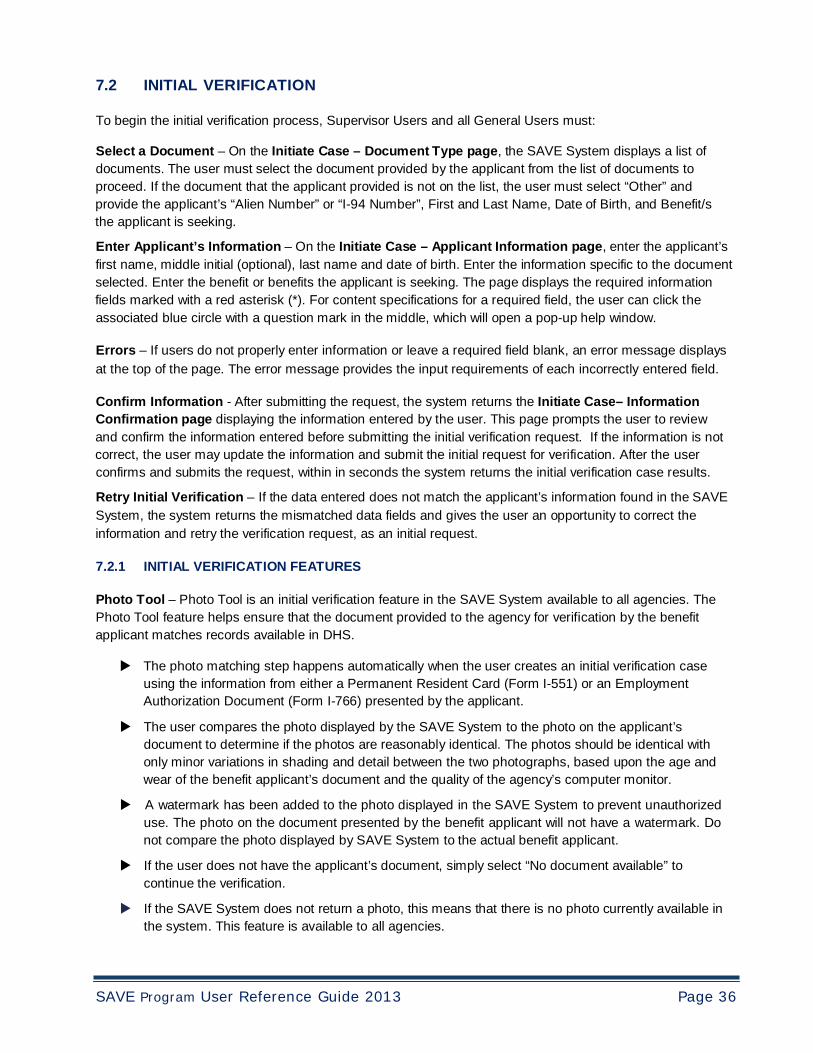
The Navigation Menu and the Quick Links on the SAVE Home page display the functions available to SAVE users to initiate and view verification cases. The Navigation Menu is available on every page. The Quick Links is only available on the Home page.
Super User
Supervisor User
General Users
To View Verification Cases:
On the Navigation Menu select “Case” Tab • Click “Search Cases” OR
On Quick Links click “Search Cases”
The Super User cannot initiate verification cases To Initiate and View Verification Cases:
On the Navigation Menu select “Case” Tab
• Click “Initiate Case” • Click “Search Cases” OR
On Quick Links:
• Click Initial Verification • Click “Search Cases
To Initiate and View Verification Cases:
On the Navigation Menu: • Click “Initiate Case” • Click “Search Cases” OR
On Quick Links:
• Click Initial Verification • Click “Search Cases
7.1 VERIFICATION REQUIREMENTS
The SAVE Program provides current immigration status based upon the information provided to the agency by the benefit applicant. Using the SAVE System, Supervisor Users and General Users can enter the information taken from the applicant’s document and verify non-immigrant, immigrant, and naturalized or derived citizenship status. The minimum requirements for requesting an applicant’s status on initial verification are:
• First and Last Name
• Date of Birth
• Numeric identifier such as: an Alien Number, I-94 Number, Unexpired Foreign Passport number with
I-94 number or SEVIS ID Number
• Benefit or benefits the applicant is seeking
The SAVE System cannot verify the applicant’s status if the user enters only the applicant’s first and last name and date of birth.
SAVE Program User Reference Guide 2013 Page 36
7.2 INITIAL VERIFICATION
To begin the initial verification process, Supervisor Users and all General Users must:
Select a Document – On the Initiate Case – Document Type page, the SAVE System displays a list of documents. The user must select the document provided by the applicant from the list of documents to proceed. If the document that the applicant provided is not on the list, the user must select “Other” and provide the applicant’s “Alien Number” or “I-94 Number”, First and Last Name, Date of Birth, and Benefit/s the applicant is seeking.
Enter Applicant’s Information – On the Initiate Case – Applicant Information page, enter the applicant’s first name, middle initial (optional), last name and date of birth. Enter the information specific to the document selected. Enter the benefit or benefits the applicant is seeking. The page displays the required information fields marked with a red asterisk (*). For content specifications for a required field, the user can click the associated blue circle with a question mark in the middle, which will open a pop-up help window.
Errors – If users do not properly enter information or leave a required field blank, an error message displays at the top of the page. The error message provides the input requirements of each incorrectly entered field.
Confirm Information - After submitting the request, the system returns the Initiate Case– Information Confirmation page displaying the information entered by the user. This page prompts the user to review and confirm the information entered before submitting the initial verification request. If the information is not correct, the user may update the information and submit the initial request for verification. After the user confirms and submits the request, within in seconds the system returns the initial verification case results.
Retry Initial Verification – If the data entered does not match the applicant’s information found in the SAVE System, the system returns the mismatched data fields and gives the user an opportunity to correct the information and retry the verification request, as an initial request.
7.2.1 INITIAL VERIFICATION FEATURES
Photo Tool – Photo Tool is an initial verification feature in the SAVE System available to all agencies. The Photo Tool feature helps ensure that the document provided to the agency for verification by the benefit applicant matches records available in DHS.
The photo matching step happens automatically when the user creates an initial verification case
using the information from either a Permanent Resident Card (Form I-551) or an Employment Authorization Document (Form I-766) presented by the applicant.
The user compares the photo displayed by the SAVE System to the photo on the applicant’s document to determine if the photos are reasonably identical. The photos should be identical with only minor variations in shading and detail between the two photographs, based upon the age and wear of the benefit applicant’s document and the quality of the agency’s computer monitor.
A watermark has been added to the photo displayed in the SAVE System to prevent unauthorized use. The photo on the document presented by the benefit applicant will not have a watermark. Do not compare the photo displayed by SAVE System to the actual benefit applicant.
If the user does not have the applicant’s document, simply select “No document available” to continue the verification.
If the SAVE System does not return a photo, this means that there is no photo currently available in the system. This feature is available to all agencies.
SAVE Program User Reference Guide 2013 Page 37
Employment Authorization Document History - This feature is only available to agencies that are required by law to verify the applicant’s employment authorization history. Agencies that require employment history verification can request and receive up to 18 months of an applicant’s employment authorization history using information from the I-551(Permanent Resident Card) or I-766(Employment Authorization Card) on initial verification. The View Case Details page returns the Initial Verification Results with Employment Authorization Document History Data Section displaying the following data elements:
Employment Authorization Document History exists for this alien: “Start Date (mm/did/ivy)” and “Expiration Date(mm/did/ivy)” or
If no data is found, the Employment Authorization Document History Data Section will display: “No Employment Authorization Document History exists for this alien.”
Grant Date -This feature is only available to agencies that are required by law to verify the applicant’s grant date. Agencies that require the grant date can request and receive the applicant’s grant date on initial verification. When requested on initial verification, the system will return, when available, the grant date for Lawful Permanent Residents, Asylees, Refugees, and Parolees only. If the SAVE System cannot find the grant date, the response in the Grant Date field section of the View Case Details’ page will display “No Grant Date data was found for this person.” The “Request Grant Date” feature applies to the following documents:
I-327, Reentry Permit I-94, Arrival Departure Record I-94 in Unexpired Foreign Passport Unexpired Foreign Passport I-766, Employment Authorization Card I-571, Refugee Travel Document I-551, Permanent Resident Alien Card Temporary I-551 Machine Readable Immigrant Visa with Temporary I-551 Language
Sponsorship Information – This feature is only available to agencies that are required by law to verify the applicant’s sponsorship information. Agencies that require sponsorship information can request and receive Affidavit of Support” information on initial verification for select benefits that require sponsorship verification to determine eligibility. The SAVE System will return the following data elements in the “Affidavit of Support Section:
Sponsor First and Last Name Sponsor Middle Initial; Sponsor Social Security Number; and Sponsor Address More than one sponsor in the event of joint sponsorship - a maximum of five (5)
The SAVE System will return the response “Affidavit of Support data is not applicable for this person” when the applicant status is not:
A LPR who must have sponsorship data in every instance; A LPR who may have sponsorship data but not in every instance; and A LPR with an unknown COA code
If SAVE System cannot find the sponsorship data, the system will return the response “No Affidavit of Support data was found for this person.”
SAVE Program User Reference Guide 2013 Page 38
INITIAL VERIFICATION REQUEST OVERVIEW
The SAVE System provides several options for initiating a verification case to Supervisor Users and Generals. Super Users cannot request and submit verification cases. The following overview provides an example of the basic steps for submitting an initial verification request.
Navigation Menu Options
Supervisor Users - On the Navigation Menu, select Cases Tab, click Initiate Case link or from the Home page use the Quick Links “Initial Verification” option. Selecting either option, the system will display the Initiate Case – Document Type Page.
General Users –On the Navigation Menu, select Initiate Case Tab, or from the Home page use the Quick Links “Initial Verification” option. Selecting either option, the system will display the Initiate Case – Document Type Page.
INITIATE CASE – DOCUMENT TYPE
Select the document presented by the
applicant
The Click the “Next” button – The system displays the Initiate Case - Applicant Information page
Note: Select “Other” if the document is not listed and provide:
• Alien Number or I-94Number • First and Last Name • Date of Birth • Document Description
INITIATE CASE – APPLICANT INFORMATION Page
Enter the applicant’s information Click the question mark next to the field for
more information
Select the Benefit/s – The user may select multiple benefits by holding down the CTRL key on the keyboard and selecting the appropriate benefits
Click the “Next” button – The system displays the Initiate Case – Information Confirmation – If there are data entry errors the system navigates to and displays the Applicant Information Error page
Click the “Back” button – The system returns to the previous page.
SAVE Program User Reference Guide 2013 Page 39
APPLICANT INFORMATION ERROR PAGE If the user does not correctly enter
data into the required fields, the system returns the Applicant Information page displaying an Error Message: “One or more fields are in error. Please make the following corrections.”
The user must make the required correction/s
Click “Next” button – The system displays the Initiate Case – lnformation Confirmation page
INITIATE CASE – INFORMATION CONFIRMATION Page before submitting the request for initial
verification, review information entered to ensure it matches the information presented by the applicant
Click the “Submit” button to submit the initial verification request – Within seconds the system displays the View Case Details page with the Initial Verification Results
Click the “Back” button – The system displays the previous page and the user can modify/correct the data entered
SAVE Program User Reference Guide 2013 Page 40
7.3 INITIAL VERIFICATION RESULTS
The SAVE System checks the applicant’s document information entered by the user against DHS records and within seconds the system returns the View Case Details page containing the Case Verification Number, initial verification data entered, and the initial verification results. There are four possible initial verification case responses:
The applicant’s current status
Retry Initial Verification (optional)
Institute Additional Verification
Institute Third Level Verification (Photo Tool)
The View Case Details page displays:
Printer Icon - View/Print Entire Case Details is located on the top right side of the page below the navigation menu. Click the Printer Icon to print a record copy of the verification case
Initial Verification Results Section – This section displays the Case Verification Number followed by the applicant’s name and in the highlighted blue call-out box the initial verification results.
• Case Verification Number - A system generated Case Verification Number used to identify and search for verification cases. The first 13 digits contain the year (4 digits), day (Julian Date 3 digits) and time (Minutes 2 digits, Seconds 2 digits) the case was submitted for verification and the last two digits are part of an alphanumeric sequence number that identifies the case. Example: “2013115124515YC”
• Applicant’s Name-The system displays the applicant’s name in the upper right corner of the page after the Case Verification Number.
Action Buttons – The system displays the action button appropriate to the system response. The “Close Case” button closes the verification. The “Initiate New Case” button re-submits the initial verification request. The “Request Additional Verification” button allows the user to submit additional information for verification of the case. The action buttons are also available at the bottom of the page and perform the same function as the action buttons at the top of the page.
Initial Response Details Sections – This section contains the system response, record details and status details. This section is expandable. Click on the red arrow next to the section’s title to open or close the section.
Data Submitted Section – This section contains the information the user submitted in the initial verification request and two system-generated fields: Initiated By (the user’s USERNAME) and Initiated On (the date the user submitted the case). This section is expandable. Click on the red arrow next to the section’s title to open or close the section.
The Case Details page accumulates an historic record of data submitted by the user for verification including the initial and additional verification results.
SAVE Program User Reference Guide 2013 Page 41
INITIAL VERIFICATION RESULTS – CURRENT STATUS
VIEW CASE DETAILS – INITIAL VERIFICATION RESULTS Page “Status”
When the system returns the applicant’s status, the View Case Details – Initial Verification Results page displays the:
• Printer Icon – View/Print Entire Case Details
• Case Verification Number
• Applicant’s name
• Current Status
• Action buttons (Top & bottom of page)
• Initial Response Details Section
• Data Submitted Section
The user has the following options:
Click “Request Additional Verification” button to submit additional information for verification or
Click Close Case” button to close the case
INITIAL VERIFICATION RESULTS – INSTITUTE ADDITIONAL VERIFICATION
VIEW CASE DETAILS – INITIAL VERIFICATION RESULTS Page “Institute Additional Verification”
When the system returns the a response, “Institute Additional Verification” the View Case Details – Initial Verification page displays:
• Printer Icon – View/Print Entire Case
Details • Case Verification Number • Applicant’s name • Current Status • Action buttons (Top and bottom of page) • Initial Response Details Section • Data Submitted Section
The user has the following options: Click “Request Additional Verification” button to
submit additional information for verification or
Click “Initiate a New Case” button to request initial verification
Click “Close Case” button to close the case
SAVE Program User Reference Guide 2013 Page 42
INITIAL VERIFICATION RESULTS – RETRY INITIAL VERIFICATION
INITIATE CASE – INITIAL VERIFICATION RETRY Page
If the system returns the Initiate Case-Initial Verification Retry page with a message: “No match found. Check the applicant’s information” the user has the following options:
Correct the data in the returned fields and click “Retry Initial Verification” button to submit an initial verification request or
Click “Request Additional Verification” button to submit additional information for verification or
Click Close Case” button to close the case
INIITIAL VERIFICATION OVEVIEW USING PHOTO TOOL
Photo Tool is available for use with either a Permanent Resident Card (Form I-551) or an Employment Authorization Document (Form I-766) only. To create an Initial Verification Case:
Select Initial Verification Link on the Navigation Menu Select I-551 or I-766 on the Enter Applicant Information Page (Documents List) Enter applicant information into the required fields and select the benefit the applicant is seeking Confirm the information entered on the Confirm Applicant Information page and click “Next” button –
The system returns the Initiate Case - Photo Matching page below:
INITIATE CASE - PHOTO MATCHING PAGE
In this example : User selected – Yes photo matches
The Photo Matching page displays:
The applicant’s photo and a message: “Check the photo below against the photo on the I-551 (Permanent Resident Card) or I- 766 (Employment Authorization Card). Does the photo match the applicant’s document?”
To enlarge the photo image on the page Click to Enlarge link under the photo – the system displays the enlarged photo with water mark “SAVE Use Only”
Match the image on the document presented by the applicant with the photo image on the screen
Select the radio button: Yes-photo matches OR No-no photo does not match OR Document not provided
Click “Next” button - The system returns the Initiate Case – Photo Confirmation page
SAVE Program User Reference Guide 2013 Page 43
INITIATE CASE – PHOTO CONFIRMATION
Confirm the photo in the system matches the photo on the applicant’s document.
Click the “Next” button – The system returns the View Case Details – Initial Verification Results page
Click “Back” button – The system returns to the Initiate case - Photo Matching page
INITIAL VERIFICATION RESULTS - YES – PHOTO MATCHES
VIEW CASE DETAILS – INITIAL VERIFICATION RESULTS “Yes Photo Matches”
The system returns the applicant’s status, View Case Details page displays the:
• Printer Icon – View/Print Entire Case
Details • Case Verification Number
• Applicant’s name
• Current Status
• Action buttons (Top and bottom of page)
• Initial Response Details Section
• Photo Match Section
• Data Submitted Section
The user has the following options:
Click “Request Additional Verification” button to submit additional information for verification or
Click Close Case” button to close the case
Note: Click on the red arrows to open and close the sections. Click the “Printer Icon”- to print the entire Case Details Page for the agency’s records
SAVE Program User Reference Guide 2013 Page 44
7.4 ADDITIONAL VERIFICATION
When requesting additional verification, the system will return the Enter Additional Information – Additional Verification page displaying fields and options to allow the user to submit additional information for verification on the case.
7.4.1 Second Level Verification
Second Level Request: On the Enter Additional Information – Additional Verification page, the user can submit additional information for second level verification such as:
User Case Number (This is the number the Agency uses to track verification cases) AKA (The applicant may have an alias) I-94 Number or Unexpired Foreign Passport Number and Country of Issuance Special Comments (The user may send the Status Verifier comment regarding the case) POC Name – Displays the current user’s name – The user can update this field POC Phone Number – Displays the current user’s phone number – The user can update this field
Second Level Verification Response: The system immediately returns the Case Details page with the initial verification information data, the initial results, the additional verification information, and a system response “DHS Verification in Process.” Within 3 to 5 federal working days, the system will return the applicant’s current status or a request to “Resubmit with Doc.” To view the response, the user must select the “Search Cases” link on the Navigation menu to view the verification status results.
SECOND LEVEL VERIFICATION REQUEST OVERVIEW
ENTER ADDITIONAL INFORMATION – ADDITIONAL VERIFICATION Page
The user may enter any additional information regarding the applicant into the below fields:
• User Case Number (This is the number the agency uses to track verification cases)
• AKA (The applicant may have an alias)
• I-94 Number
• Unexpired Foreign Passport Number
• Country of Issuance –Dropdown menu
• Special Comments (The user may send the Status Verifier comments regarding the case)
Click on the “Question Mark” next to the field for help
Click the “Submit” button – The system displays View Case Details page
Note: If configured: the page will display Request or for Employment History Data box, Grant Date box, or Request for Affidavit of Support box. The user may check the box to request additional information.
SAVE Program User Reference Guide 2013 Page 45
VIEW CASE DETAILS – ADDITIONAL VERIFICATION RESULTS Page
The View Case Details page displays:
• Printer Icon – View/Print Entire Case Details
• Case Verification Number
• Applicant’s name
• System Message: Additional Verification has been sent – Outlined in red box
• Results “DHS Verification in Process.”
• Action buttons (Top and bottom of page)
• Additional Response Details Section
• Data Submitted Section
Click “Return to Search Results” button – The system returns to the Search Case – Summary List page
Click “Enter Additional Verification” button – The system displays the Enter Additional Information page
Note: The User will receive a response back from the status verifier within 3-5 federal working days on the Search Cases – Summary List page
7.4.2 Third Level Verification
Third Level Verification provides three options for submitting additional information and or documents.
1. Submit Attached Document
The user may attach and send a copy (front and back) of the applicant’s documents without adding additional information. If the user attaches and sends the document, there is no need to mail the Form G- 845. The user has the opportunity to update the G-845 mailing address and print a copy of the Form G-845 for the agency’s records. To attach a document:
On the “Attach Document” section of the Enter Additional Verification Results page, the user can
Browse files and attach the desired front and back copy of the applicant’s immigration document. Users must click the “Browse” button to navigate to the location where the copy of the immigration document was saved and select the file. Users must the click “Attach” to successfully upload the file to the case. Files must adhere to the following constraints:
• File type must be one of the following: .JPG, .JPEG, .PNG, .GIF, or .PDF • File size must be no larger than 1.5MB; and • Only one file may be attached to a case
The users can preview the document to ensure the correct file was uploaded. To preview an
uploaded attachment, click the “Click to Enlarge” button to view the attachment
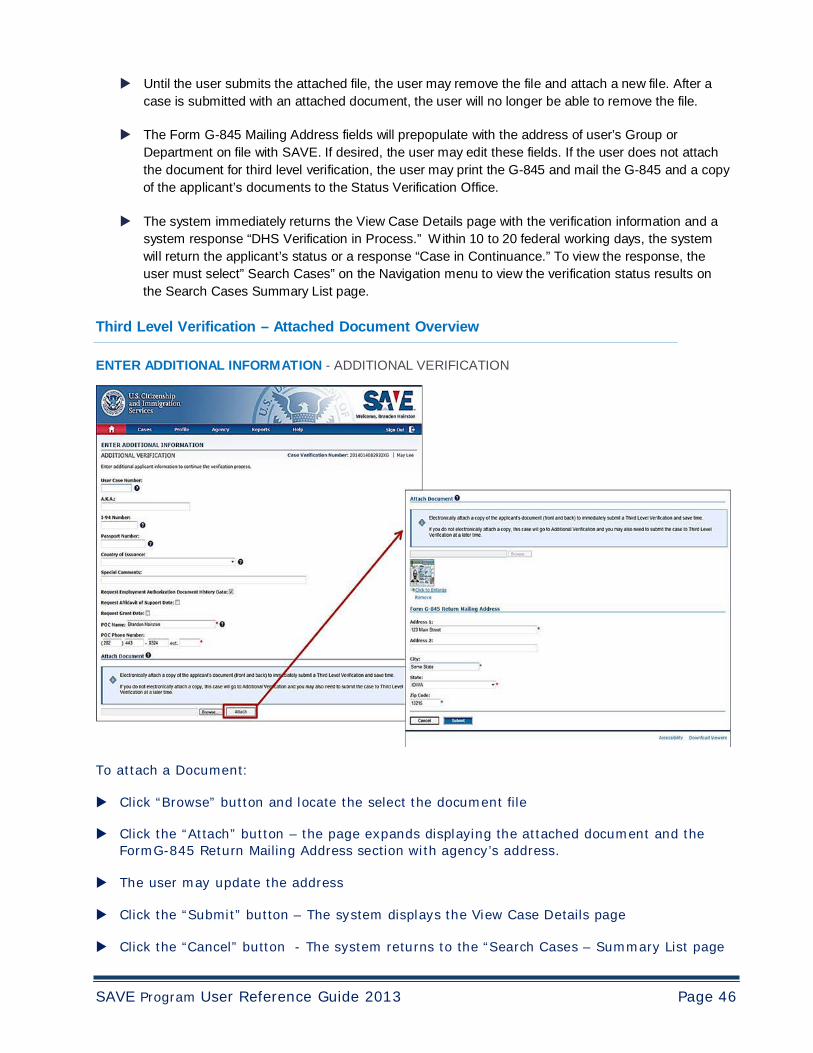
SAVE Program User Reference Guide 2013 Page 46
Until the user submits the attached file, the user may remove the file and attach a new file. After a case is submitted with an attached document, the user will no longer be able to remove the file.
The Form G-845 Mailing Address fields will prepopulate with the address of user’s Group or
Department on file with SAVE. If desired, the user may edit these fields. If the user does not attach the document for third level verification, the user may print the G-845 and mail the G-845 and a copy of the applicant’s documents to the Status Verification Office.
The system immediately returns the View Case Details page with the verification information and a
system response “DHS Verification in Process.” Within 10 to 20 federal working days, the system will return the applicant’s status or a response “Case in Continuance.” To view the response, the user must select” Search Cases” on the Navigation menu to view the verification status results on the Search Cases Summary List page.
Third Level Verification – Attached Document Overview
ENTER ADDITIONAL INFORMATION - ADDITIONAL VERIFICATION
To attach a Document: Click “Browse” button and locate the select the document file
Click the “Attach” button – the page expands displaying the attached document and the
FormG-845 Return Mailing Address section with agency’s address. The user may update the address
Click the “Submit” button – The system displays the View Case Details page
Click the “Cancel” button - The system returns to the “Search Cases – Summary List page
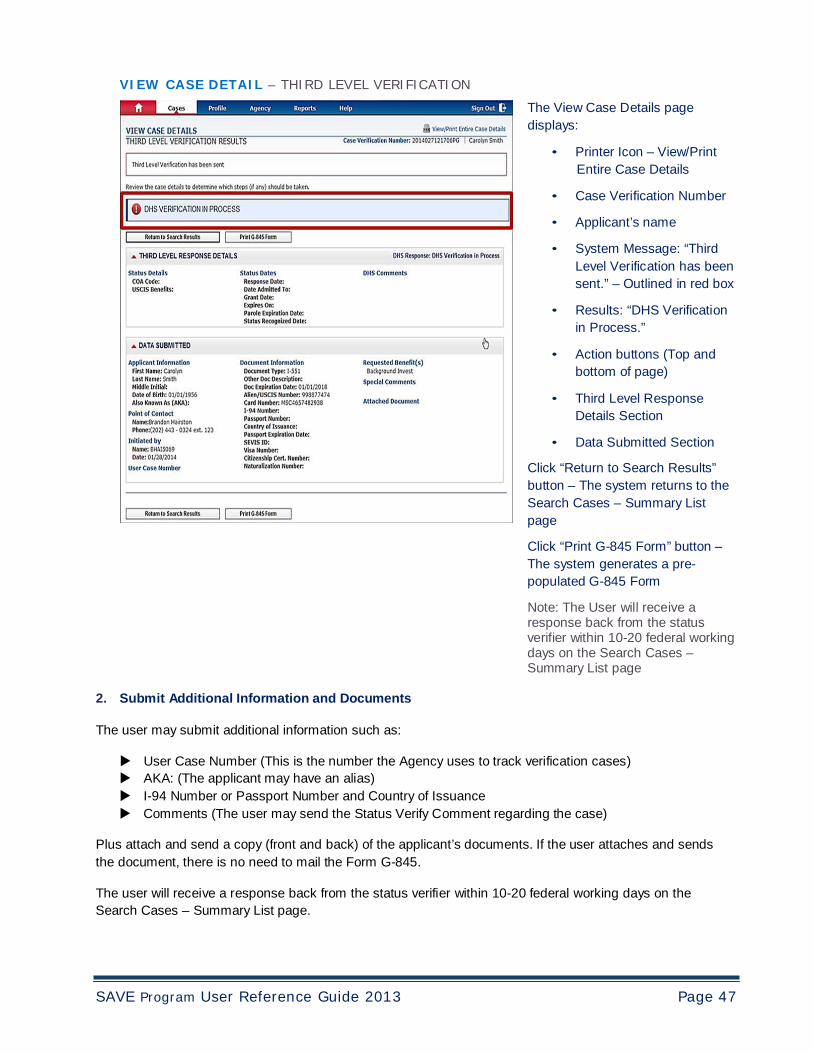
SAVE Program User Reference Guide 2013 Page 47
VIEW CASE DETAIL – THIRD LEVEL VERIFICATION The View Case Details page displays:
• Printer Icon – View/Print Entire Case Details
• Case Verification Number
• Applicant’s name
• System Message: “Third
Level Verification has been sent.” – Outlined in red box
• Results: “DHS Verification
in Process.”
• Action buttons (Top and bottom of page)
• Third Level Response
Details Section
• Data Submitted Section Click “Return to Search Results” button – The system returns to the Search Cases – Summary List page
Click “Print G-845 Form” button – The system generates a pre- populated G-845 Form
Note: The User will receive a response back from the status verifier within 10-20 federal working days on the Search Cases – Summary List page
2. Submit Additional Information and Documents
The user may submit additional information such as:
User Case Number (This is the number the Agency uses to track verification cases) AKA: (The applicant may have an alias) I-94 Number or Passport Number and Country of Issuance Comments (The user may send the Status Verify Comment regarding the case)
Plus attach and send a copy (front and back) of the applicant’s documents. If the user attaches and sends the document, there is no need to mail the Form G-845.
The user will receive a response back from the status verifier within 10-20 federal working days on the Search Cases – Summary List page.
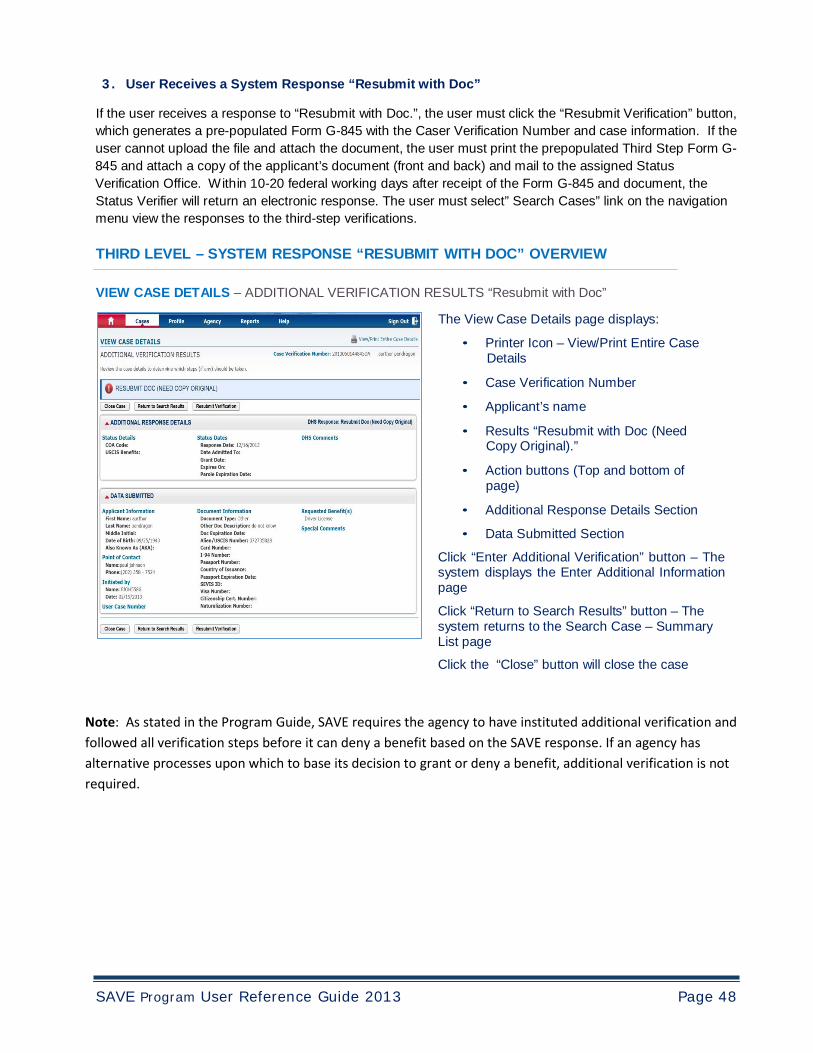
SAVE Program User Reference Guide 2013 Page 48
3. User Receives a System Response “Resubmit with Doc”
If the user receives a response to “Resubmit with Doc.”, the user must click the “Resubmit Verification” button, which generates a pre-populated Form G-845 with the Caser Verification Number and case information. If the user cannot upload the file and attach the document, the user must print the prepopulated Third Step Form G-845 and attach a copy of the applicant’s document (front and back) and mail to the assigned Status Verification Office. Within 10-20 federal working days after receipt of the Form G-845 and document, the Status Verifier will return an electronic response. The user must select” Search Cases” link on the navigation menu view the responses to the third-step verifications.
THIRD LEVEL – SYSTEM RESPONSE “RESUBMIT WITH DOC” OVERVIEW
VIEW CASE DETAILS – ADDITIONAL VERIFICATION RESULTS “Resubmit with Doc”
The View Case Details page displays:
• Printer Icon – View/Print Entire Case Details
• Case Verification Number
• Applicant’s name
• Results “Resubmit with Doc (Need Copy Original).”
• Action buttons (Top and bottom of
page)
• Additional Response Details Section
• Data Submitted Section
Click “Enter Additional Verification” button – The system displays the Enter Additional Information page
Click “Return to Search Results” button – The system returns to the Search Case – Summary List page
Click the “Close” button will close the case Note: As stated in the Program Guide, SAVE requires the agency to have instituted additional verification and followed all verification steps before it can deny a benefit based on the SAVE response. If an agency has alternative processes upon which to base its decision to grant or deny a benefit, additional verification is not required.
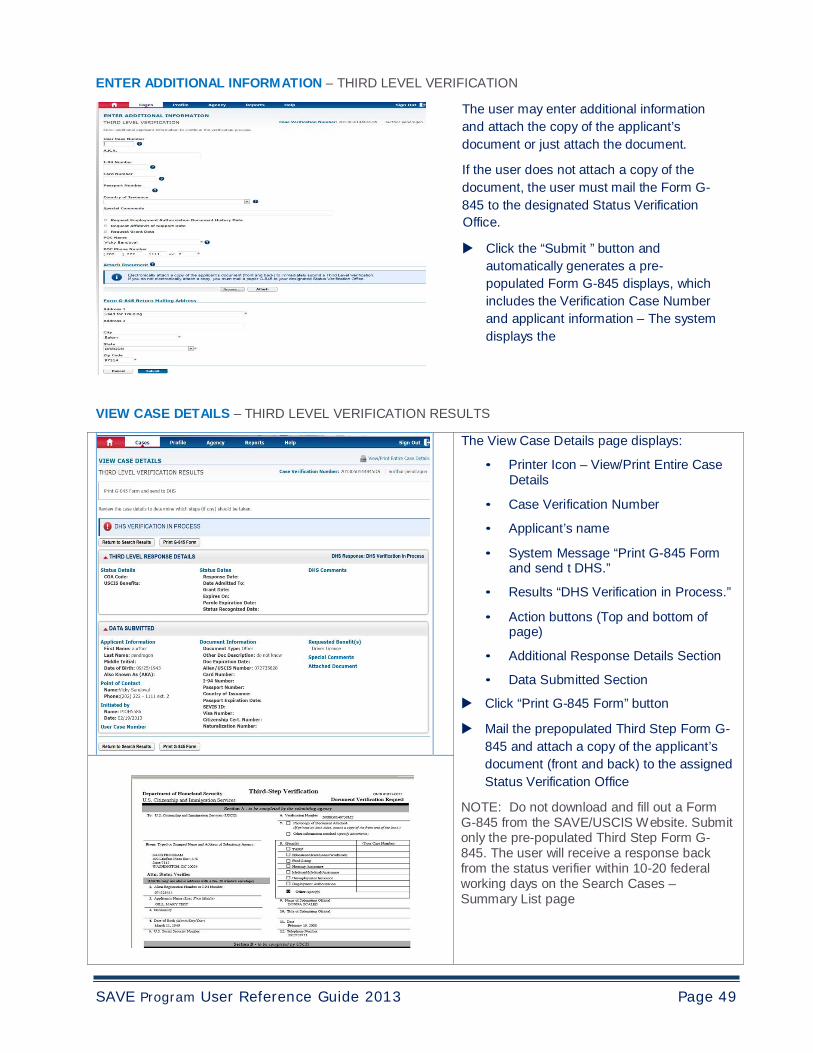
SAVE Program User Reference Guide 2013 Page 49
ENTER ADDITIONAL INFORMATION – THIRD LEVEL VERIFICATION
The user may enter additional information and attach the copy of the applicant’s document or just attach the document.
If the user does not attach a copy of the document, the user must mail the Form G- 845 to the designated Status Verification Office.
Click the “Submit ” button and
automatically generates a pre- populated Form G-845 displays, which includes the Verification Case Number and applicant information – The system displays the
VIEW CASE DETAILS – THIRD LEVEL VERIFICATION RESULTS
The View Case Details page displays:
• Printer Icon – View/Print Entire Case Details
• Case Verification Number
• Applicant’s name
• System Message “Print G-845 Form and send t DHS.”
• Results “DHS Verification in Process.”
• Action buttons (Top and bottom of page)
• Additional Response Details Section
• Data Submitted Section
Click “Print G-845 Form” button Mail the prepopulated Third Step Form G-
845 and attach a copy of the applicant’s document (front and back) to the assigned Status Verification Office
NOTE: Do not download and fill out a Form G-845 from the SAVE/USCIS Website. Submit only the pre-populated Third Step Form G- 845. The user will receive a response back from the status verifier within 10-20 federal working days on the Search Cases – Summary List page

SAVE Program User Reference Guide 2013 Page 50
7.5 SEARCH CASES
The Search Cases function on the Navigation Menu and the Quick Links allows the Super Users, Supervisor Users, and General Users to search for and view verification case status. The case search criteria available are based upon the user’s role.
SUPER USER - CASE SEARCH OVERVIEW
The Default Case Status option is All Open Cases and the Super User may select any of the following search options:
All Open Cases – All cases requiring action, plus all cases in process Cases Requiring Action Responses – These are cases with an initial verification status and cases
with additional verification responses – These cases have not be closed Cases with Additional Verification Responses – These are cases with additional verification
responses – These cases have not been closed Cases with Third Step Verification Responses – These received a Third Level verification
response – These cases have not been closed Cases In Process – These cases have not yet received a response Closed Cases – These cases have been closed
In addition to the Case Status option the search may include any of the below options:
Verification Number: This a SAVE System generated number assigned to the case Alien Number/USCIS Number I-94 Number Passport Number User Case Number: Agency assigned case number for internal tracking purposes Date Initiated From: (mm/did/ivy) Date Initiated To: (mm/did/yyyyy) Department: Select Department from dropdown menu to view a case list for a specific Department Group: Select Group from dropdown menu to view a list of cases for a specific Group
SEARCH CASES – CASE FILTERS Page for SUPER USER
The Super User can view all cases initiated by all users in all Departments within the agency.
Select the “Search Cases” Tab on the Navigation Menu - The system displays the Enter Search Case Criteria page.
Enter search criteria.
Click the "Submit” button – The system displays the Search Case Summary List page
Click the “Cancel” button – The system returns to the Home Page
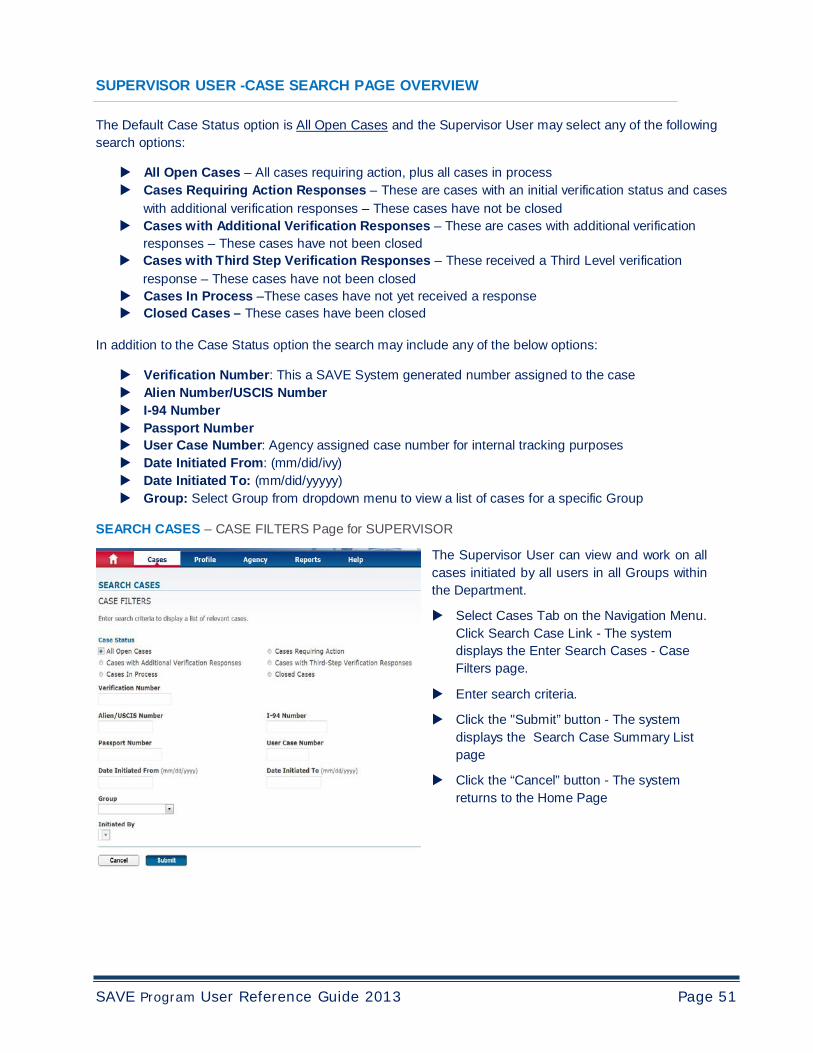
SAVE Program User Reference Guide 2013 Page 51
SUPERVISOR USER -CASE SEARCH PAGE OVERVIEW
The Default Case Status option is All Open Cases and the Supervisor User may select any of the following search options:
All Open Cases – All cases requiring action, plus all cases in process Cases Requiring Action Responses – These are cases with an initial verification status and cases
with additional verification responses – These cases have not be closed Cases with Additional Verification Responses – These are cases with additional verification
responses – These cases have not been closed Cases with Third Step Verification Responses – These received a Third Level verification
response – These cases have not been closed Cases In Process –These cases have not yet received a response Closed Cases – These cases have been closed
In addition to the Case Status option the search may include any of the below options:
Verification Number: This a SAVE System generated number assigned to the case Alien Number/USCIS Number I-94 Number Passport Number User Case Number: Agency assigned case number for internal tracking purposes Date Initiated From: (mm/did/ivy) Date Initiated To: (mm/did/yyyyy) Group: Select Group from dropdown menu to view a list of cases for a specific Group
SEARCH CASES – CASE FILTERS Page for SUPERVISOR
The Supervisor User can view and work on all cases initiated by all users in all Groups within the Department.
Select Cases Tab on the Navigation Menu. Click Search Case Link - The system displays the Enter Search Cases - Case Filters page.
Enter search criteria.
Click the "Submit” button - The system displays the Search Case Summary List page
Click the “Cancel” button - The system returns to the Home Page
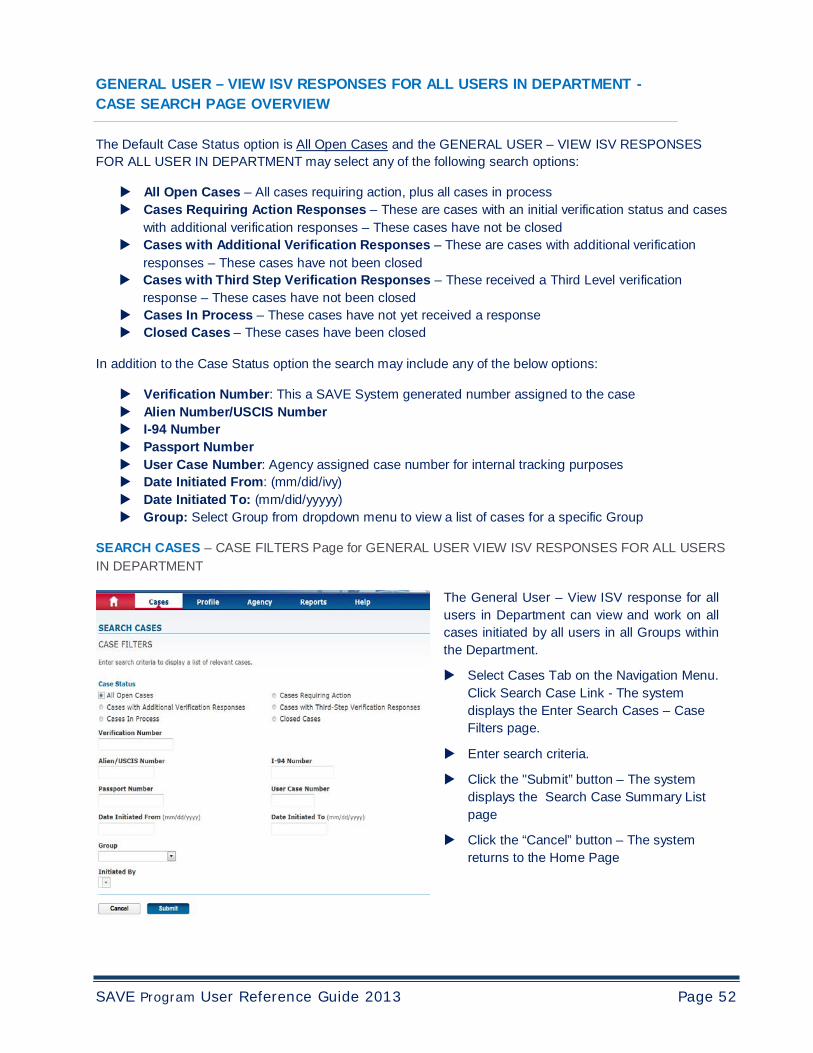
SAVE Program User Reference Guide 2013 Page 52
GENERAL USER – VIEW ISV RESPONSES FOR ALL USERS IN DEPARTMENT - CASE SEARCH PAGE OVERVIEW
The Default Case Status option is All Open Cases and the GENERAL USER – VIEW ISV RESPONSES FOR ALL USER IN DEPARTMENT may select any of the following search options:
All Open Cases – All cases requiring action, plus all cases in process Cases Requiring Action Responses – These are cases with an initial verification status and cases
with additional verification responses – These cases have not be closed Cases with Additional Verification Responses – These are cases with additional verification
responses – These cases have not been closed Cases with Third Step Verification Responses – These received a Third Level verification
response – These cases have not been closed Cases In Process – These cases have not yet received a response Closed Cases – These cases have been closed
In addition to the Case Status option the search may include any of the below options:
Verification Number: This a SAVE System generated number assigned to the case Alien Number/USCIS Number I-94 Number Passport Number User Case Number: Agency assigned case number for internal tracking purposes Date Initiated From: (mm/did/ivy) Date Initiated To: (mm/did/yyyyy) Group: Select Group from dropdown menu to view a list of cases for a specific Group
SEARCH CASES – CASE FILTERS Page for GENERAL USER VIEW ISV RESPONSES FOR ALL USERS IN DEPARTMENT
The General User – View ISV response for all users in Department can view and work on all cases initiated by all users in all Groups within the Department.
Select Cases Tab on the Navigation Menu. Click Search Case Link - The system displays the Enter Search Cases – Case Filters page.
Enter search criteria.
Click the "Submit” button – The system displays the Search Case Summary List page
Click the “Cancel” button – The system returns to the Home Page
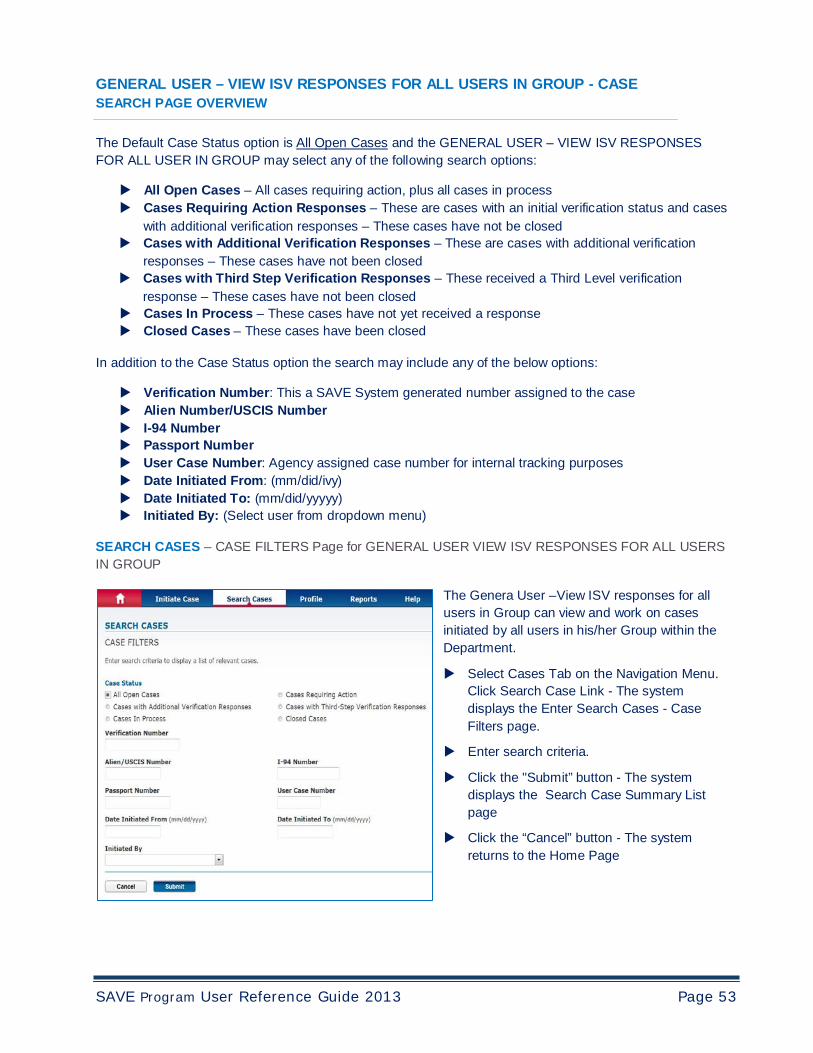
SAVE Program User Reference Guide 2013 Page 53
GENERAL USER – VIEW ISV RESPONSES FOR ALL USERS IN GROUP - CASE SEARCH PAGE OVERVIEW
The Default Case Status option is All Open Cases and the GENERAL USER – VIEW ISV RESPONSES FOR ALL USER IN GROUP may select any of the following search options:
All Open Cases – All cases requiring action, plus all cases in process Cases Requiring Action Responses – These are cases with an initial verification status and cases
with additional verification responses – These cases have not be closed Cases with Additional Verification Responses – These are cases with additional verification
responses – These cases have not been closed Cases with Third Step Verification Responses – These received a Third Level verification
response – These cases have not been closed Cases In Process – These cases have not yet received a response Closed Cases – These cases have been closed
In addition to the Case Status option the search may include any of the below options:
Verification Number: This a SAVE System generated number assigned to the case Alien Number/USCIS Number I-94 Number Passport Number User Case Number: Agency assigned case number for internal tracking purposes Date Initiated From: (mm/did/ivy) Date Initiated To: (mm/did/yyyyy) Initiated By: (Select user from dropdown menu)
SEARCH CASES – CASE FILTERS Page for GENERAL USER VIEW ISV RESPONSES FOR ALL USERS IN GROUP
The Genera User –View ISV responses for all users in Group can view and work on cases initiated by all users in his/her Group within the Department.
Select Cases Tab on the Navigation Menu. Click Search Case Link - The system displays the Enter Search Cases - Case Filters page.
Enter search criteria.
Click the "Submit” button - The system displays the Search Case Summary List page
Click the “Cancel” button - The system returns to the Home Page
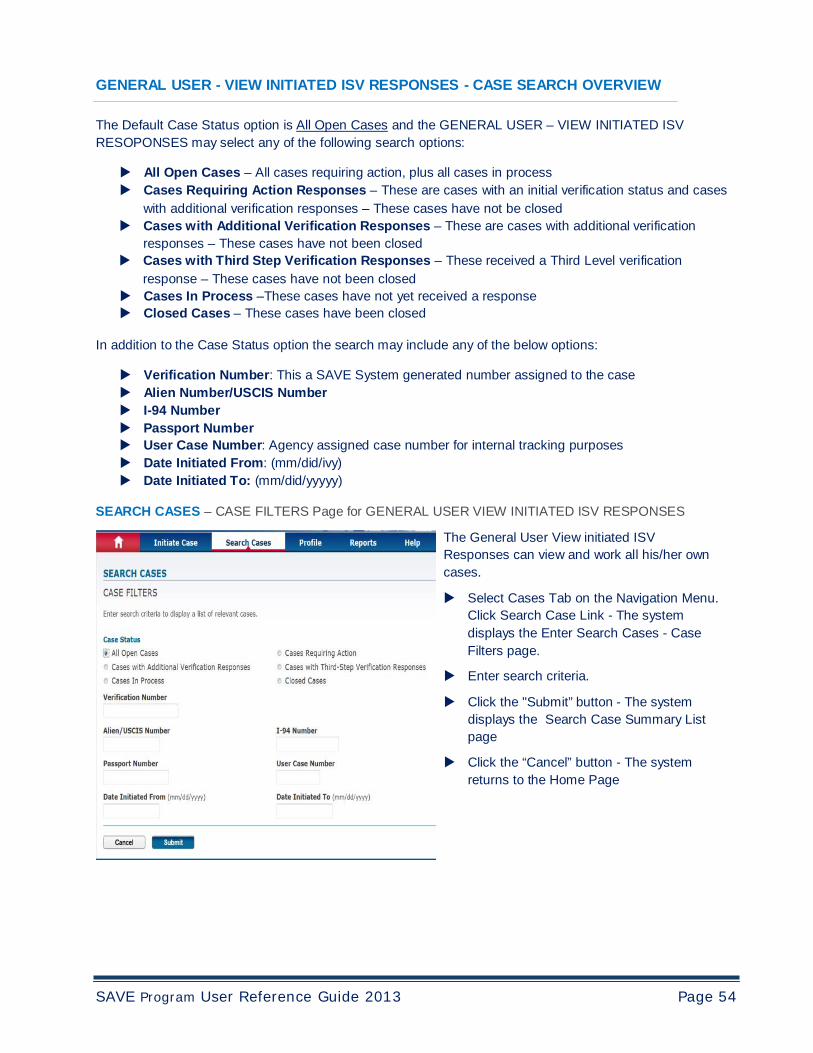
SAVE Program User Reference Guide 2013 Page 54
GENERAL USER - VIEW INITIATED ISV RESPONSES - CASE SEARCH OVERVIEW
The Default Case Status option is All Open Cases and the GENERAL USER – VIEW INITIATED ISV RESOPONSES may select any of the following search options:
All Open Cases – All cases requiring action, plus all cases in process Cases Requiring Action Responses – These are cases with an initial verification status and cases
with additional verification responses – These cases have not be closed Cases with Additional Verification Responses – These are cases with additional verification
responses – These cases have not been closed Cases with Third Step Verification Responses – These received a Third Level verification
response – These cases have not been closed Cases In Process –These cases have not yet received a response Closed Cases – These cases have been closed
In addition to the Case Status option the search may include any of the below options:
Verification Number: This a SAVE System generated number assigned to the case Alien Number/USCIS Number I-94 Number Passport Number User Case Number: Agency assigned case number for internal tracking purposes Date Initiated From: (mm/did/ivy) Date Initiated To: (mm/did/yyyyy)
SEARCH CASES – CASE FILTERS Page for GENERAL USER VIEW INITIATED ISV RESPONSES
The General User View initiated ISV Responses can view and work all his/her own cases.
Select Cases Tab on the Navigation Menu. Click Search Case Link - The system displays the Enter Search Cases - Case Filters page.
Enter search criteria.
Click the "Submit” button - The system displays the Search Case Summary List page
Click the “Cancel” button - The system returns to the Home Page
SAVE Program User Reference Guide 2013 Page 55
GENERAL USER - CANNOT VIEW ISV RESPONSES - CASE SEARCH OVERVIEW
The Default Case Status option is All Open Cases and the GENERAL USER – CANNOT VIEW ISV RESPONSES may select any of the following search options:
All Open Cases – All cases requiring action, plus all cases in process Closed Cases – These cases have been closed
In addition to the Case Status option the search may include any of the below options:
Verification Number: This a SAVE System generated number assigned to the case Alien Number/USCIS Number I-94 Number Passport Number User Case Number: Agency assigned case number for internal tracking purposes Date Initiated From: (mm/did/ivy) Date Initiated To: (mm/did/yyyyy)
SEARCH CASES – CASE FILTERS Page for GENERAL USER CANNOT VIEW INITIATED ISV RESPONSES
The General User - Cannot View initiated ISV Responses can view all his/her own cases.
Select Cases Tab on the Navigation Menu. Click Search Case Link - The system displays the Enter Search Cases - Case Filters page.
Enter search criteria.
Click the "Submit” button - The system displays the Search Case Summary List page
Click the “Cancel” button - The system returns to the Home Page
SAVE Program User Reference Guide 2013 Page 56
THE CASE SUMMARY LIST PAGE
The Case Summary List page displays when the user clicks on the “Submit” button on the Search Case – Case Filter page. Based upon the user’s role and selected search criteria this page will display verification case information for up to ten cases per page. If there are more than ten cases, use the “Next” links and “Previous” buttons to navigate between pages.
The column Headers or titles displayed on the Search Case Summary List page are based on the user’s role and identify the type of information that appears for each case.
The user may sort the columns by clicking on the column header. To open and view a case, the user must click on the Case Verification Number.
The Case Status column contains icons that represent the status for each case displayed as:
Below is an example of the Search Cases Summary List for a Super User.
SUPER USER SEARCH CASE – SUMMARY LIST Page
Click on the Colum Header to sort the column
Click on the Verification Number to view the case

SAVE Program User Reference Guide 2013 Page 57
7.6 VERIFICATION CASE RESOLUTION
The Case Summary List displays the status for all cases submitted for verification. Users are responsible for checking the Case Summary List to obtain the responses for second and third level verification requests. The below table provides an overview of response times to requests for additional verification.
VERIFICATION RESPONSE TIME OVERIVEW
Verification Case Type Timeframe
Initial Verification Response Seconds
Second Level Verification Response 3-5 working days
Third Level Verification Response 10-20 working days
Third Step Form G-845 Verification Response 10-20 working days
Continuance Case Processing 30 working days
7.6.1 OVERDUE RESPONSES AND CASE ISSSUES
Users must contact Customer Support to resolve and close all Second Level verification cases pending an ISV response for over 10 federal working days and Third Level verification cases pending an ISV response for over 20 federal workings days.
Additionally, if SAVE returns a response that is missing information or there is a question regarding the response the user should contact Customer Support to resolve any issues or questions.
For each case, the user must provide the case verification number.
7.6.2 CLOSING CASES
Verification cases remain open on the Search Case Summary List Page for 180 days and are automatically
closed by SAVE after 180 days.
Users are required to complete the SAVE verification process in accordance with the MOA.
After all required actions on the case have been completed, the user is required to close the case. All closed
cases are displayed on the Search Case Summary List page.
SAVE Program User Reference Guide 2013 Page 58
8.0 REPORTS
The Reports Tab on the navigation menu allows a user to run several different reports against the verifications performed. The reports are role-sensitive. The user can only see information in the reports applicable to his/her role. Adobe Acrobat Reader or Microsoft Excel is required to view reports, depending on the report selected.
8.1. MONTH END AGENCY TRANSACTIONS BY BENEFIT REPORT
This report displays the total number of billable-type transactions initiated by an agency by benefit name for a specified month and year. Billable transactions are initial verification and additional verification requests initiated by a user.
8.2 MONTH END TRANSACTIONS BY USER SUMMARY REPORT
This report displays the total number of transactions initiated by a user within an agency/program/state for a specified month and fiscal year. The additional verification query counts in this report may differ from the SAVE Billing Transaction report which counts cases completed. In this report, third step verifications include Manual Form G-845s with a valid initial verification number. However, manual Form G-845 transactions without a case verification number are not included in this report since they are not associated with an electronic verification.
8.3 SAVE BILLING TRANSACTON REPORT
This report displays the total number of billable transactions completed by automated or by manual methods for a specified month and fiscal year beginning October 2009. Billable transactions are initial verifications, initial verification resubmittals, additional verifications, third step verifications, and manual G-845 cases without case verification numbers, which are recognized for billing purposes as cases are resolved. In this report, third step verifications include Manual G-845s with a valid initial verification number.
This report will not necessarily match the Month End Agency Transactions by User Summary Report
because billing is based on completed verifications, not initiated verifications.
8.4 WEB AGENCY AUDIT REPORT
This report displays summary level information for each case initiated by the user for the user-entered query criteria. The report includes the initial query date, alien number, I-94 number, last name, first name, initial query response, additional verification response, third step verification response and the closed date, if applicable. The total number of cases matching the user-entered query criteria will be included on the report.

SAVE Program User Reference Guide 2013 Page 59
9.0 CUSTOMER SUPPORT AND RESOURCES
The SAVE Program offers a variety of customer support options, training and resources that are available to all users on the Navigation Menu’s Help Tab. The Help drop-down menu contain the following links: “View Resource”, “Take the SAVE tutorial (which is currently unavailable)” and Contact Us. Additionally, on the SAVE Home page, users have access to resources and contact information using Quick Links “Resources” and “Contact Us.”
NAVIGATION MENU HELP TAB OVERIVEW
Selecting “View Resources” from the Help dropdown menu or “Resources” from the Quick Links users have access to a variety of materials and guides such as:
SAVE Self-Assessment Guide SAVE Program Guide SAVE System User Guide Where to Mail the Form-G-845 Fact Sheets
Selecting “Contact Us” from the Help dropdown menu or “Contact Us” from the Quick Links user have access to a variety of SAVE customer assistance information:
SAVE CUSTOMER ASSISTANCE (877) 469-2563 7:00 am to 5:00 pm Central Time, except federal holidays SAVE users may check on the status of a pending FormG-845 or SAVE Verification Case. Please provide the SAVE Case Verification Number
TECHNICAL ASSISTANCE
(800) 741-5023 24 hours a day -7 days a week
[email protected] - Send an e-mail with your questions or suggestions
SAVE WEBSITE
www.uscis.gov/SAVE -The SAVE website offers SAVE Program information, publications and training opportunities
SAVE Program User Reference Guide 2013 Page 60
APPENDIX A: GLOSSARY OF TERMS
Additional Verification A request submitted when the applicant's immigration status could not be verified on the initial verification.
Adjustment of Status Describes the process by which a non-immigrant already in the United States becomes a Lawful Permanent Resident. Not to be confused with a "Change of Status" this refers only to non-immigrants changing to another non-immigrant classification.
Admission Number or I- 94 Number
An 11-digit number that is found on the Arrival-Departure Record (Form I-94.)
Alien Any person who is not a citizen or national of the United States.
Alien File (A-File) The history file that contains data and documentation pertaining to an individual non-citizen. An "A"-File is created when any one of several Department of Homeland Security actions occur, for example, application for permanent resident status.
Alien Number The alien registration number, which the Department of Homeland Security assigns to certain aliens, consists of 8 or 9 digits.
Alien Registration Receipt Card, Form I-151
This card was introduced in 1946 and issued to lawful permanent residents. Through 18 years of various revisions, it remained primarily green in color causing it to become known as a "green card." As of March 20, 1996, the Form I-151 is no longer acceptable as evidence of lawful permanent resident status. If a non-citizen is in possession of a Form I-151, it does not revoke his or her lawful permanent resident status; however, the document itself is expired and the applicant should be referred to the Department of Homeland Security for a replacement card.
Arrival/Departure Record (Form I-94)
A document issued to non-citizens when admitted into the United States. Some of these forms are stamped to indicate work authorized status. The Form I-94 contains an 11-digit Admission Number, which may be used as part of the initial verification process if the non-citizen employee does not have an Alien Registration Number.
Asylee An alien in the United States or at a port of entry who is found to be unable or unwilling to return to his or her country of nationality, or to seek the protection of that country, because of persecution or a well-founded fear of persecution.
Asylum Asylum may be granted to a person who is unable or unwilling to return to his or her country of nationality, because they fear persecution.
Automatic Second Step Processing
Automatically pushes “Institute Additional Verification” queries to Second Step.
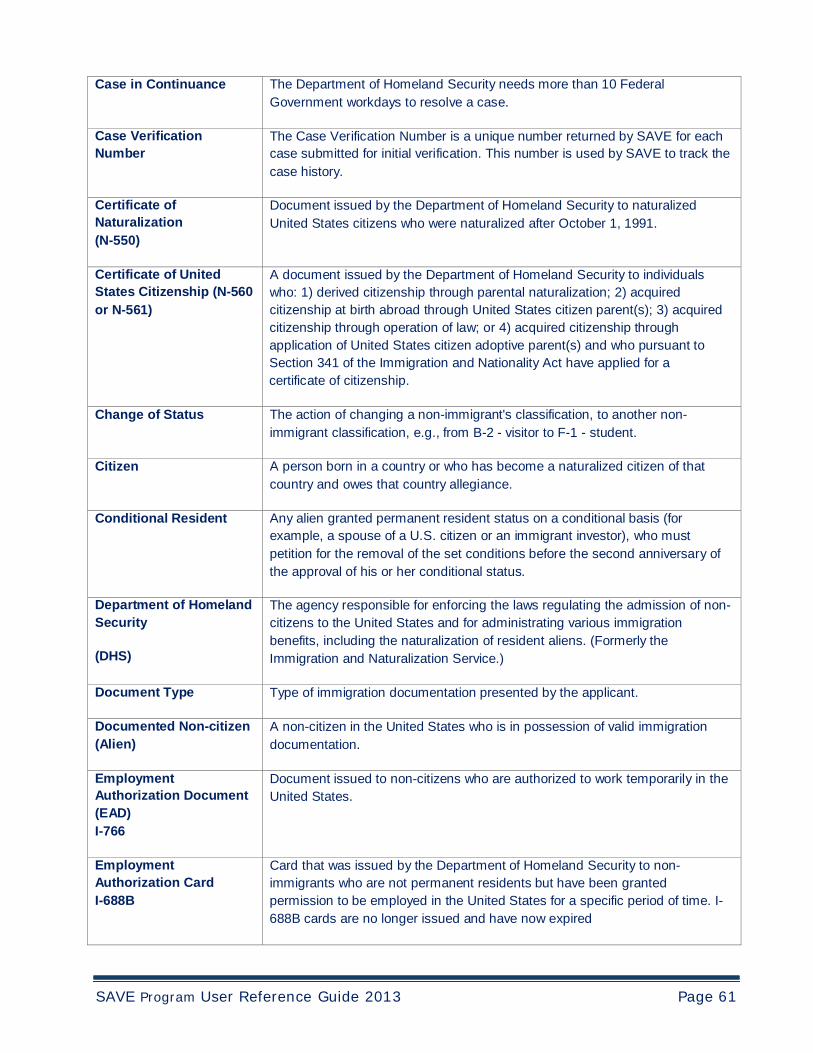
SAVE Program User Reference Guide 2013 Page 61
Case in Continuance The Department of Homeland Security needs more than 10 Federal Government workdays to resolve a case.
Case Verification Number
The Case Verification Number is a unique number returned by SAVE for each case submitted for initial verification. This number is used by SAVE to track the case history.
Certificate of Naturalization (N-550)
Document issued by the Department of Homeland Security to naturalized United States citizens who were naturalized after October 1, 1991.
Certificate of United States Citizenship (N-560 or N-561)
A document issued by the Department of Homeland Security to individuals who: 1) derived citizenship through parental naturalization; 2) acquired citizenship at birth abroad through United States citizen parent(s); 3) acquired citizenship through operation of law; or 4) acquired citizenship through application of United States citizen adoptive parent(s) and who pursuant to Section 341 of the Immigration and Nationality Act have applied for a certificate of citizenship.
Change of Status The action of changing a non-immigrant's classification, to another non- immigrant classification, e.g., from B-2 - visitor to F-1 - student.
Citizen A person born in a country or who has become a naturalized citizen of that country and owes that country allegiance.
Conditional Resident Any alien granted permanent resident status on a conditional basis (for example, a spouse of a U.S. citizen or an immigrant investor), who must petition for the removal of the set conditions before the second anniversary of the approval of his or her conditional status.
Department of Homeland Security
(DHS)
The agency responsible for enforcing the laws regulating the admission of non- citizens to the United States and for administrating various immigration benefits, including the naturalization of resident aliens. (Formerly the Immigration and Naturalization Service.)
Document Type Type of immigration documentation presented by the applicant.
Documented Non-citizen (Alien)
A non-citizen in the United States who is in possession of valid immigration documentation.
Employment Authorization Document (EAD) I-766
Document issued to non-citizens who are authorized to work temporarily in the United States.
Employment Authorization Card I-688B
Card that was issued by the Department of Homeland Security to non- immigrants who are not permanent residents but have been granted permission to be employed in the United States for a specific period of time. I- 688B cards are no longer issued and have now expired
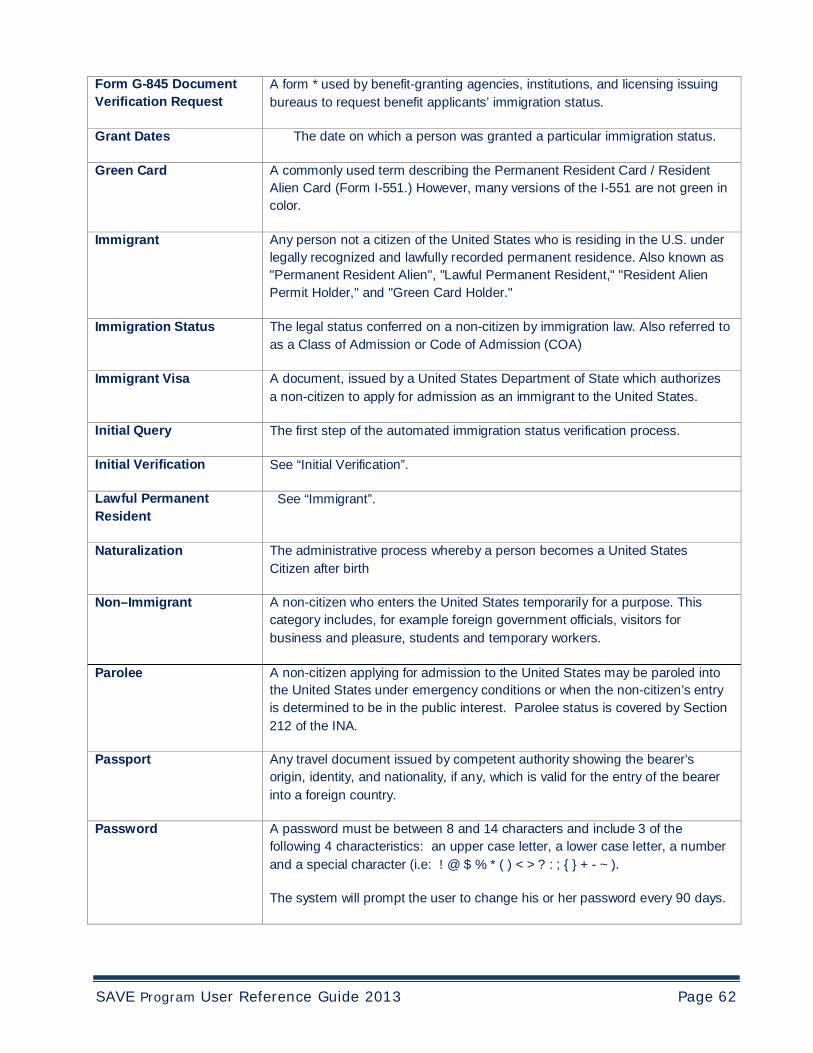
SAVE Program User Reference Guide 2013 Page 62
Form G-845 Document Verification Request
A form * used by benefit-granting agencies, institutions, and licensing issuing bureaus to request benefit applicants’ immigration status.
Grant Dates The date on which a person was granted a particular immigration status.
Green Card A commonly used term describing the Permanent Resident Card / Resident Alien Card (Form I-551.) However, many versions of the I-551 are not green in color.
Immigrant Any person not a citizen of the United States who is residing in the U.S. under legally recognized and lawfully recorded permanent residence. Also known as "Permanent Resident Alien", "Lawful Permanent Resident," "Resident Alien Permit Holder," and "Green Card Holder."
Immigration Status The legal status conferred on a non-citizen by immigration law. Also referred to as a Class of Admission or Code of Admission (COA)
Immigrant Visa A document, issued by a United States Department of State which authorizes a non-citizen to apply for admission as an immigrant to the United States.
Initial Query The first step of the automated immigration status verification process.
Initial Verification See “Initial Verification”.
Lawful Permanent Resident
See “Immigrant”.
Naturalization The administrative process whereby a person becomes a United States Citizen after birth
Non–Immigrant A non-citizen who enters the United States temporarily for a purpose. This category includes, for example foreign government officials, visitors for business and pleasure, students and temporary workers.
Parolee A non-citizen applying for admission to the United States may be paroled into the United States under emergency conditions or when the non-citizen’s entry is determined to be in the public interest. Parolee status is covered by Section 212 of the INA.
Passport Any travel document issued by competent authority showing the bearer’s origin, identity, and nationality, if any, which is valid for the entry of the bearer into a foreign country.
Password A password must be between 8 and 14 characters and include 3 of the following 4 characteristics: an upper case letter, a lower case letter, a number and a special character (i.e: ! @ $ % * ( ) < > ? : ; { } + - ~ ).
The system will prompt the user to change his or her password every 90 days.
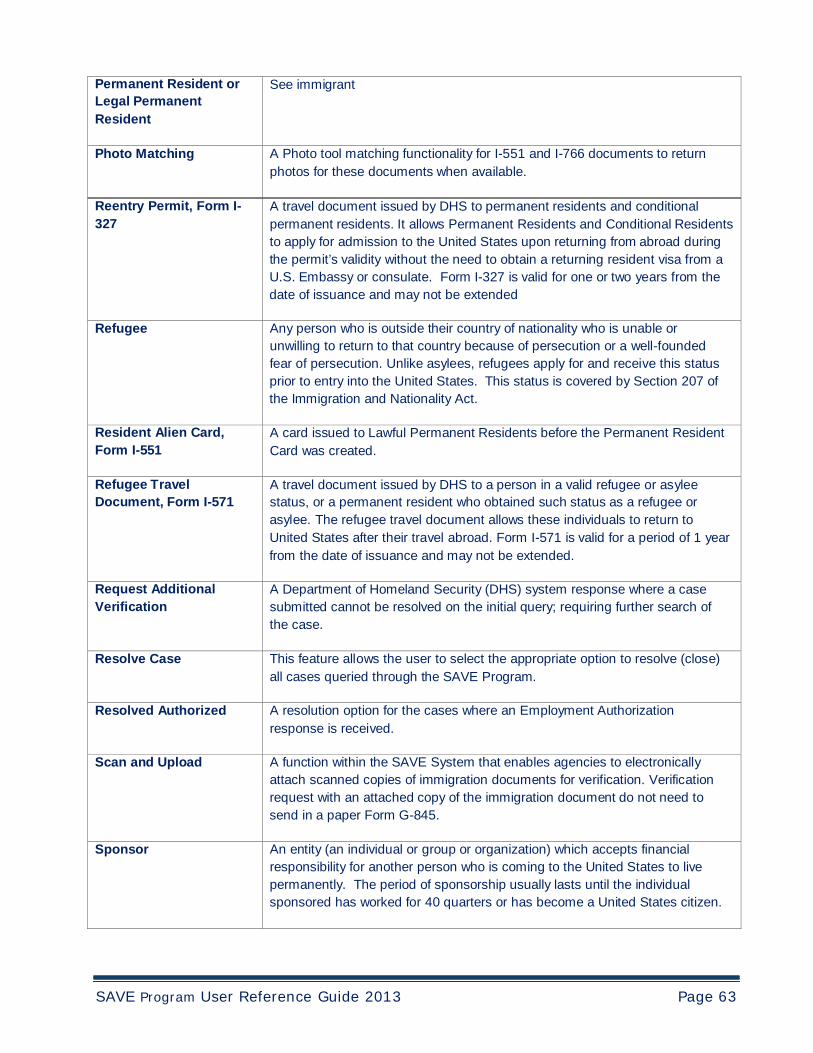
SAVE Program User Reference Guide 2013 Page 63
Permanent Resident or Legal Permanent Resident
See immigrant
Photo Matching A Photo tool matching functionality for I-551 and I-766 documents to return photos for these documents when available.
Reentry Permit, Form I- 327
A travel document issued by DHS to permanent residents and conditional permanent residents. It allows Permanent Residents and Conditional Residents to apply for admission to the United States upon returning from abroad during the permit’s validity without the need to obtain a returning resident visa from a U.S. Embassy or consulate. Form I-327 is valid for one or two years from the date of issuance and may not be extended
Refugee Any person who is outside their country of nationality who is unable or unwilling to return to that country because of persecution or a well-founded fear of persecution. Unlike asylees, refugees apply for and receive this status prior to entry into the United States. This status is covered by Section 207 of the Immigration and Nationality Act.
Resident Alien Card, Form I-551
A card issued to Lawful Permanent Residents before the Permanent Resident Card was created.
Refugee Travel Document, Form I-571
A travel document issued by DHS to a person in a valid refugee or asylee status, or a permanent resident who obtained such status as a refugee or asylee. The refugee travel document allows these individuals to return to United States after their travel abroad. Form I-571 is valid for a period of 1 year from the date of issuance and may not be extended.
Request Additional Verification
A Department of Homeland Security (DHS) system response where a case submitted cannot be resolved on the initial query; requiring further search of the case.
Resolve Case This feature allows the user to select the appropriate option to resolve (close) all cases queried through the SAVE Program.
Resolved Authorized A resolution option for the cases where an Employment Authorization response is received.
Scan and Upload A function within the SAVE System that enables agencies to electronically attach scanned copies of immigration documents for verification. Verification request with an attached copy of the immigration document do not need to send in a paper Form G-845.
Sponsor An entity (an individual or group or organization) which accepts financial responsibility for another person who is coming to the United States to live permanently. The period of sponsorship usually lasts until the individual sponsored has worked for 40 quarters or has become a United States citizen.
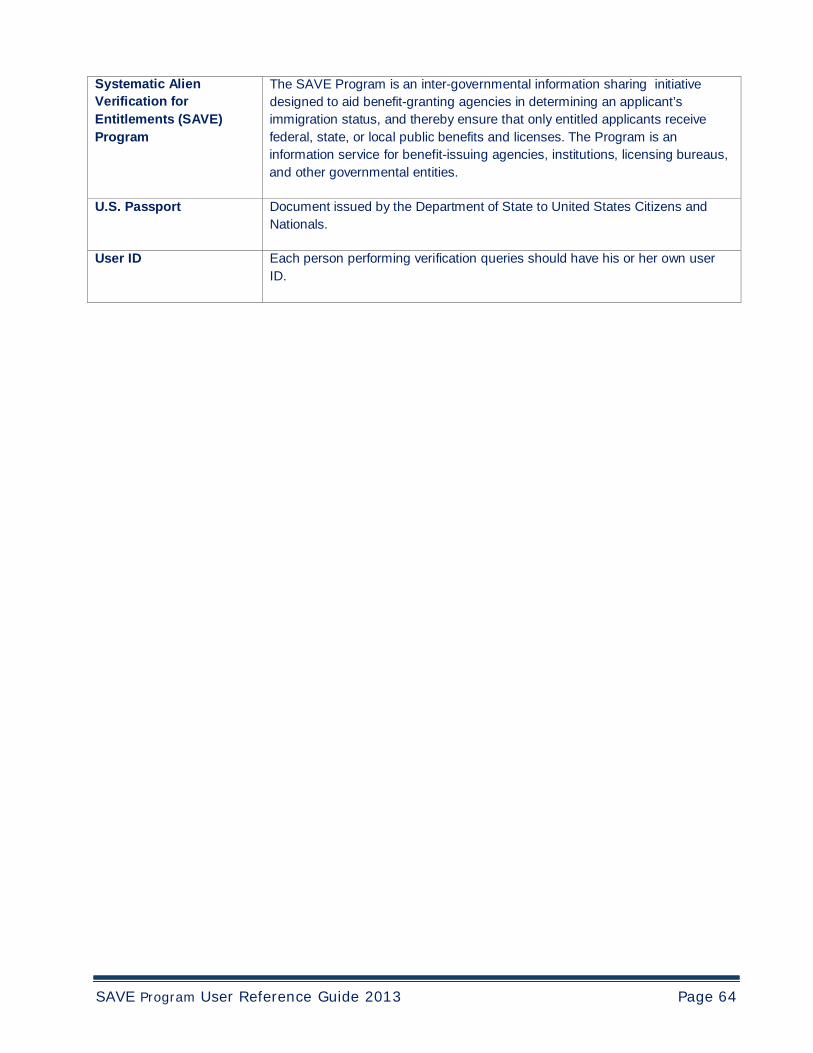
SAVE Program User Reference Guide 2013 Page 64
Systematic Alien Verification for Entitlements (SAVE) Program
The SAVE Program is an inter-governmental information sharing initiative designed to aid benefit-granting agencies in determining an applicant’s immigration status, and thereby ensure that only entitled applicants receive federal, state, or local public benefits and licenses. The Program is an information service for benefit-issuing agencies, institutions, licensing bureaus, and other governmental entities.
U.S. Passport Document issued by the Department of State to United States Citizens and Nationals.
User ID Each person performing verification queries should have his or her own user ID.