Embed Size (px)
Citation preview

School Crossing Guard GuideMay 2017

B
Table of Contents1.0 FOREWORD...........................................................................................................1
2.0 INTRODUCTION .....................................................................................................32.1 Background ...............................................................................................32.2 Intent of the Guide .....................................................................................32.3 Contents of the Guide ................................................................................3
3.0 BACKGROUND INFORMATION ...........................................................................53.1 Legislative Authority...................................................................................53.2 Role of the School Crossing Guard ...............................................................53.3 Definition of a School Crossing ....................................................................53.4 Definition of Terms ....................................................................................53.5 Urban versus Rural School Crossing Locations ............................................. 13 3.6 New versus Existing School Site ................................................................ 13 3.7 Alternative Solutions other than Crossing Guards ......................................... 13
4.0 SITE INSPECTION ...........................................................................................164.1 Who ....................................................................................................... 164.2 Why ....................................................................................................... 164.3 What ...................................................................................................... 164.4 Where .................................................................................................... 174.5 When ..................................................................................................... 174.6 How ....................................................................................................... 18
5.0 SCHOOL CROSSING GUARD WARRANT METHODOLOGIES ................................195.1 Context .................................................................................................. 195.2 Exposure Index Method ............................................................................ 195.3 Gap Study Method ................................................................................... 205.4 Other Factors .......................................................................................... 21
6.0 SCHOOL CROSSING GUARD WARRANT AT SIGNALIZED INTERSECTIONS ...........226.1 Context .................................................................................................. 226.2 Data Collection ........................................................................................ 226.3 Warrant Method ...................................................................................... 23
6.3.1 Exposure Index ....................................................................................................236.3.2 Developing an Exposure Index ............................................................................23
OTC School Crossing Guard Guide ∙ May 2017

COTC School Crossing Guard Guide ∙ May 2017
6.3.3 Using the Exposure Index for Warrants ...............................................................266.3.4 Other Factors .......................................................................................................27
6.4 Signage and Pavement Markings ................................................................ 27
7.0 SCHOOL CROSSING GUARD WARRANT AT ALL WAY STOP-CONTROLLED INTERSECTIONS ................................................... 28
7.1 Context .................................................................................................. 287.2 Data Collection ........................................................................................ 287.3 Warrant Method ...................................................................................... 29
7.3.1 Exposure Index ....................................................................................................297.3.2 Developing an Exposure Index ............................................................................297.3.3 Using the Exposure Index for Warrants ...............................................................327.3.4 Other Factors .......................................................................................................33
7.4 Signage and Pavement Marking Applications ............................................... 33
8.0 SCHOOL CROSSING GUARD WARRANT AT MINOR STREET STOP-CONTROLLED INTERSECTIONS ........................................35
8.1 Context .................................................................................................. 358.2 Data Collection ........................................................................................ 368.3 Exposure Index Method ............................................................................ 36
8.3.1 Developing an Exposure Index ............................................................................368.3.2 Using the Exposure Index for Warrants ...............................................................38
8.4 Gap Study Method ................................................................................... 398.4.1 Phase 1: Safe Gap Time .......................................................................................398.4.2 Phase 2: Gap Surveys and Analyses ....................................................................40
8.5 Other Factors .......................................................................................... 408.6 Signage and Pavement Marking Applications ............................................... 41
9.0 SCHOOL CROSSING GUARD WARRANT AT PEDESTRIAN SIGNALS ....................439.1 Context .................................................................................................. 439.2 Data Collection ........................................................................................ 439.3 Warrant Method ...................................................................................... 44
9.3.1 Exposure Index Method ......................................................................................449.3.2 Developing an Exposure Index ............................................................................449.3.3 Using the Exposure Index for Warrants ...............................................................469.3.4 Other Factors .......................................................................................................46

D
9.4 Signage and Pavement Marking Applications ............................................... 47
10.0 SCHOOL CROSSING GUARD WARRANTS AT PEDESTRIAN CROSSOVERS ...........4810.1 Context .................................................................................................. 4810.2 Data Collection ........................................................................................ 5110.3 Warrant Method ...................................................................................... 51
10.3.1 Exposure Index ....................................................................................................5110.3.2 Developing an Exposure Index ............................................................................5210.3.3 Using the Exposure Index for Warrants ...............................................................5310.3.4 Other Factors .......................................................................................................53
10.4 Signage and Pavement Markings ................................................................ 54
11.0 SCHOOL CROSSING GUARD WARRANTS AT MID-BLOCK LOCATIONS ................5511.1 Context .................................................................................................. 5511.2 Gap Study Method ................................................................................. 55
11.2.1 Phase 1: Safe Gap Time .......................................................................................5511.2.2 Phase 2: Gap Survey and Analyses .....................................................................5611.2.3 Other Factors .......................................................................................................57
11.3 Signage and Pavement Marking Applications ............................................... 58
12.0 SCHOOL CROSSING GUARDS AT ROUNDABOUTS ............................................6212.1 Context .................................................................................................. 6212.2 Best Practice Findings .............................................................................. 6212.3 Warrant Methods ..................................................................................... 6312.4 Next Steps .............................................................................................. 6412.5 Signage and Pavement Marking Applications ............................................... 65
13.0 REMOVAL OF A SCHOOL CROSSING GUARD ...................................................6613.1 Context .................................................................................................. 6613.2 Method ................................................................................................... 66
13.2.1 Site Inspection .....................................................................................................6613.2.2 Data Collection and Removal Warrant..................................................................6713.2.3 Next Steps ...........................................................................................................67
14.0 HUMAN RESOURCES ......................................................................................6914.1 Hiring a School Crossing Guard .................................................................. 69
14.1.1 Recruitment .........................................................................................................7014.2 Duties of a School Crossing Guard Supervisor ............................................. 7014.3 School Crossing Guard Standard Equipment ................................................ 7114.4 Training .................................................................................................. 73
OTC School Crossing Guard Guide ∙ May 2017

EOTC School Crossing Guard Guide ∙ May 2017
14.5 Crossing Guard Positioning at a Crossing .................................................... 7414.6 Incident Response .................................................................................... 75
14.6.1 Near Miss or Disobedience of the Crossing Guard by a Driver ...........................7514.6.2 Disobedience of the Crossing Guard by a Student .............................................. 7614.6.3 Vehicle Collision at a Crossing ............................................................................. 76
14.7 General Practices of School Crossing Guards ............................................... 76
15.0 PUBLIC EDUCATION .......................................................................................7815.1 School Staff ............................................................................................ 7815.2 Parents and Students ............................................................................... 7815.3 General Public ......................................................................................... 78
APPENDIX A: HIGHWAY TRAFFIC ACT INFORMATION
APPENDIX B: SAMPLE SITE INSPECTION FORMS
APPENDIX C: EXPOSURE INDEX METHOD INFORMATION
APPENDIX D: GAP STUDY METHOD INFORMATION
APPENDIX E: SAMPLE GUARD TRAINING AND POSITIONING MANUALS

1OTC School Crossing Guard Guide ∙ May 2017
1.0 FOREWORD
The Ontario Traffic Council (OTC) prepared a School Crossing Guard Guide (SCGG) in 2006 for use by municipalities across the province. Since that time, new guidelines and manuals have been produced, the Highway Traffic Act has been amended and new best practices have emerged. Members of the OTC decided it was time to undertake a comprehensive update of the SCGG to reflect the
Committee Member Jurisdiction
Violet Skirten Brampton
Christine Hopwood Burlington
Karen Accursi Cambridge
Shannon Noonan Cambridge
Slav Potrykus Clarington
Allister Mcllveen Guelph
Christine Vettor Guelph
Dean McMillan Kitchener
Alexei Chkouro London
Shane Maguire London
Valerie Lister Milton
Heide Schlegl Milton
Daniel Prelipcean Ministry of Transportation Ontario
Sheelagh Duffin Mississauga
Kim Hutton Oakville
Marco D’Angelo Ontario Traffic Council
Kerry-Lynn Mohr Ottawa
Rob Cowie Richmond Hill
Sheldon Koo Toronto
Brett Moore Toronto Police Service
Derrick Martin Toronto Police Service
Margie Chung Vaughan
Wai Lam Tang Vaughan
Dhaval Pandya Whitby
Table 1: School Crossing Guard Guide Committee Members
changes in policy and best practice. Members also expressed a strong desire to ensure that the SCGG is easy to understand, justified in its guidance and straightforward to implement. The names of the OTC Committee members and the WSP | MMM Group consulting team that contributed to the development of the 2017 School Crossing Guard Guide are provided in Table 1.
Chapter 1

2OTC School Crossing Guard Guide ∙ May 2017
OTC would like to thank the members of the SCGG Committee for their efforts and dedication in creating this fully updated and revised School Crossing Guard Guide.
The Ministry of Transportation Ontario (MTO) was one of the stakeholders that participated in the development of the School Crossing Guard Guide. While MTO does not administer school crossing guard programs on provincial highways, their Traffic Office has reviewed this Guide and views it as a valuable document to promote school crossing safety and uniformity in the province.
Consultant Team
David Richardson WSP|MMM Group
Brett Sears WSP|MMM Group
Peter Yu WSP|MMM Group
Safiyyah Saleh WSP|MMM Group
Chapter 1
3OTC School Crossing Guard Guide ∙ May 2017
2.0 INTRODUCTION
2.1 Background
Over the years, various programs have been developed across the Province of Ontario with respect to the implementation and standardization of school crossings. In 1992, representatives from both the Ontario Traffic Council (OTC) and the Ontario Ministry of Transportation (MTO) collaborated to prepare a report entitled School Crossing Review 1992. That document was then used as the springboard from which the OTC produced the 2006 School Crossing Guard Guide (SCGG).
Since that time, new technology has evolved for crossing locations, such as a wider range of pedestrian crossovers. In addition, roundabouts have become more prevalent as a form of intersection control. New Ontario Traffic Manuals have been produced and others have been updated. The Highway Traffic Act has also been amended.
With these changes in mind, members of the OTC decided to update both the technical content and the organization of the chapters of the SCGG in order to provide clear direction, and to make the Guide easier to use by practitioners.
2.2 Intent of the Guide
The goal of this Guide is to provide a step-by-step technical approach to determine whether or not a school crossing guard should be provided at a specific location. The Guide is organized as a reference document so that practitioners can turn to the specific area of interest and find an easy to understand, straightforward process to develop a technical recommendation. If the decision is made to provide a school crossing guard, information is included on training and equipment, as well as public
education for those who will come into contact with the guard.
While this Guide covers a broad range of best practices, no document such as this one can cover all contingencies or all situations involving a school crossing guard. Therefore, field experience and knowledge of application are essential in deciding what to do in the absence of specific direction from the Guide itself, and in overriding any recommendations in this Guide.
The practitioner’s fundamental responsibility is to exercise good engineering judgment and experience on technical matters in the best interests of the public and students. Guidelines are provided in this Guide to assist in making those judgments, but they should not be used as a substitute for good judgment.
Application, operational guidelines and procedures should be used with judicious care and proper consideration of the prevailing circumstances. Reasons for departing from the recommended guidelines should be documented.
2.3 Contents of the Guide
The 2017 SCGG begins with the Background Information in Chapter 3, which provides details on the legislative authority and the role of a school crossing guard. This information includes the definition of terms used throughout the Guide, and addresses issues pertaining to urban versus rural school sites, new versus existing sites and crossing solutions other than school crossing guards.
Chapter 2
4OTC School Crossing Guard Guide ∙ May 2017
The Site Inspection chapter describes how to examine school sites to gather data that will be used to determine if a location needs a crossing guard. General information is provided on the warrant analysis of a crossing location, with the methodology explained for two ways to determine if a crossing guard is warranted.
Eight chapters are dedicated to providing warrants for different crossing facilities. Practitioners can quickly refer to the chapter that applies to their type of facility. The types of crossing facilities included in this Guide are:
• Signalized intersections;
• All way stop-controlled intersections;
• Minor street stop-controlled intersections;
• Intersection and mid-block pedestrian signals;
• Pedestrians crossovers;
• Mid-block locations; and
• Roundabouts.
Once it is determined that a school crossing guard is warranted, chapters are provided on human resources needed to staff the location, standard equipment, training and how to respond to incidents.
The process to follow when considering whether or not to remove a school crossing guard is provided in Chapter 13. The removal warrant methodology has been made clear so that decision makers can be confident with the recommendation resulting from the analysis.
Finally, a chapter is provided on public education to give general guidance on how to inform school staff, students, parents, guardians and the general public about the role of a school crossing guard and how to obey the directions of a guard.
Appendices are included at the end of the Guide to provide additional detail and examples of some of the topics addressed in the Guide.
Chapter 2

5OTC School Crossing Guard Guide ∙ May 2017
3.0 BACKGROUND INFORMATION
This chapter provides the context for this Guide by outlining the Legislative Authority for school crossings provided by the Highway Traffic Act. It also defines the role of the school crossing guard and provides other definitions for commonly used terms in the Guide. Finally, it addresses the differences between urban and rural school settings, new and existing school sites and alternative solutions to school crossing guards that should be considered.
3.1 Legislative Authority
The Highway Traffic Act (HTA) sets out the rules of the road in Ontario, including the operation of school crossings and the role of school crossing guards. There are several sections that refer to pedestrians and road crossing regulations. Specific legislation related to school crossings and the operation of school crossing guards is found in section 176 of the HTA and is provided in Appendix A for reference. Of particular importance is the fact that school crossing guards can only be assigned if the speed limit is less than 60 km/h. The references in this Guide are current as of January 23, 2017. Users of this Guide should refer to the original statutes for updates.
3.2 Role of the School Crossing Guard
The role of the school crossing guard is to direct and supervise the movement of persons (as defined in the HTA) across a highway (the HTA term for any public road) by creating necessary gaps in vehicular traffic to provide safe passage at a designated school crossing location.
3.3 Definition of a School Crossing
A school crossing is a location supervised by a school crossing guard that has been recommended through a combination of a site inspection and a warrant evaluation process. These designated school crossings are identified by pavement markings and
signage as described in the Ontario Traffic Manual Books 6 and 11.
3.4 Definition of Terms
There are a number of technical terms used throughout this Guide, and the key ones are defined in this section. Some of these terms are common to other Ontario Traffic Manuals and Guides. In these cases, the definitions previously used in existing manuals and guides have been used again in this School Crossing Guard Guide to maintain consistency.
AADT: Abbreviation for Annual Average Daily Traffic, which is the estimated total traffic volume for a typical day on a particular road segment. AADT data are commonly used to calculate traffic growth on a roadway.
All-way stop: An intersection where STOP signs are installed on all approaches. As per OTM Book 15, vehicles approaching a STOP sign in advance of a crosswalk are required to stop at the stop bar, thereby yielding to vehicular traffic and pedestrians whose arrival preceded theirs before they in turn proceed.
Approval Authority: The Approval Authority in the context of this guide is the agency or regulatory body responsible for carrying out an evaluation process to make an executive decision or recommendation. The approval authority can be those appointed to complete the school crossing guard warrants, and be responsible for the hiring and training of crossing guard personnel.
Conflicting vehicular movement: In the context of this guide, a conflicting vehicular movement is one that interferes with or compromises the safety of the crossing of student volumes. The conflicting
Chapter 3
6OTC School Crossing Guard Guide ∙ May 2017
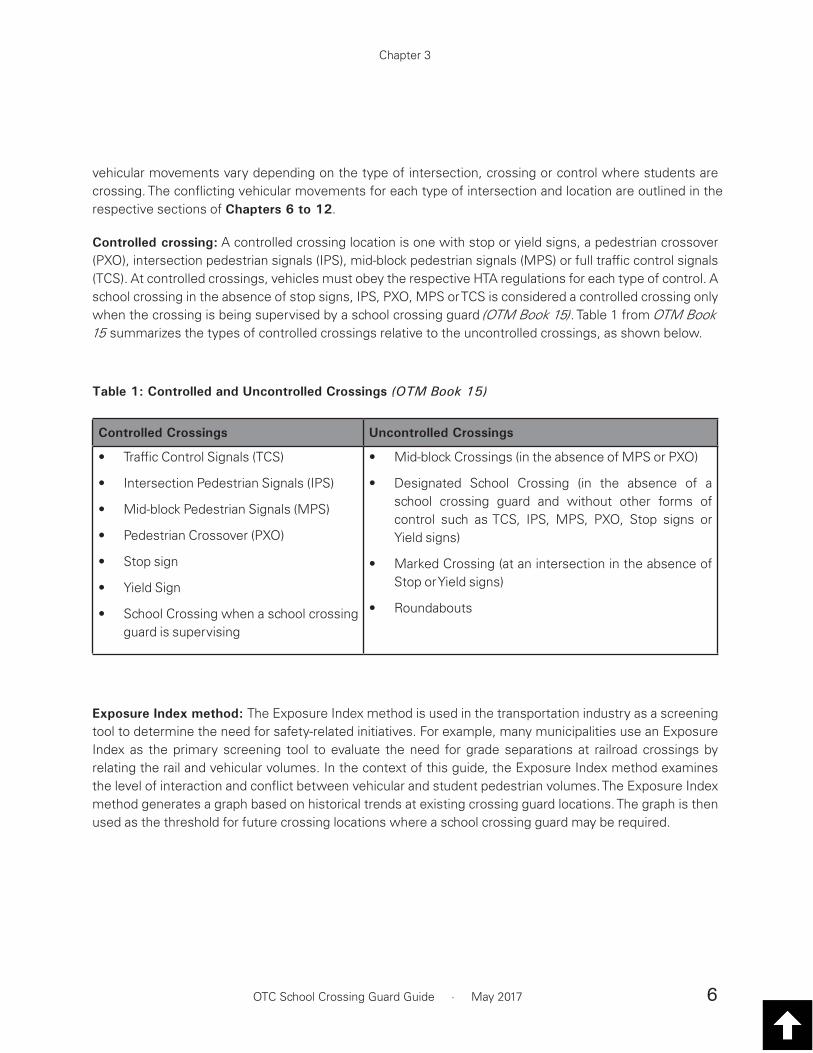
Controlled Crossings Uncontrolled Crossings
• Traffic Control Signals (TCS)
• Intersection Pedestrian Signals (IPS)
• Mid-block Pedestrian Signals (MPS)
• Pedestrian Crossover (PXO)
• Stop sign
• Yield Sign
• School Crossing when a school crossingguard is supervising
• Mid-block Crossings (in the absence of MPS or PXO)
• Designated School Crossing (in the absence of aschool crossing guard and without other forms ofcontrol such as TCS, IPS, MPS, PXO, Stop signs orYield signs)
• Marked Crossing (at an intersection in the absence ofStop or Yield signs)
• Roundabouts
Exposure Index method: The Exposure Index method is used in the transportation industry as a screening tool to determine the need for safety-related initiatives. For example, many municipalities use an Exposure Index as the primary screening tool to evaluate the need for grade separations at railroad crossings by relating the rail and vehicular volumes. In the context of this guide, the Exposure Index method examines the level of interaction and conflict between vehicular and student pedestrian volumes. The Exposure Index method generates a graph based on historical trends at existing crossing guard locations. The graph is then used as the threshold for future crossing locations where a school crossing guard may be required.
Chapter 3
vehicular movements vary depending on the type of intersection, crossing or control where students are crossing. The conflicting vehicular movements for each type of intersection and location are outlined in the respective sections of Chapters 6 to 12.
Controlled crossing: A controlled crossing location is one with stop or yield signs, a pedestrian crossover (PXO), intersection pedestrian signals (IPS), mid-block pedestrian signals (MPS) or full traffic control signals (TCS). At controlled crossings, vehicles must obey the respective HTA regulations for each type of control. A school crossing in the absence of stop signs, IPS, PXO, MPS or TCS is considered a controlled crossing only when the crossing is being supervised by a school crossing guard (OTM Book 15). Table 1 from OTM Book 15 summarizes the types of controlled crossings relative to the uncontrolled crossings, as shown below.
Table 1: Controlled and Uncontrolled Crossings (OTM Book 15)

7OTC School Crossing Guard Guide ∙ May 2017
Gap: In the context of this guide, it is measured as the elapsed time between the rear of a lead vehicle passing a location and the front of the following vehicle passing the same location, as shown in Figure 3-2. Gaps are measured as part of the Gap Study warrant methodology described in Chapter 5.
Figure 3-2: Gap
Gap acceptance level: The minimum gap required for road users, inclusive of pedestrians and drivers, to safely complete a specific manoeuvre such as crossing an intersection or roadway.
Gap Study method: An objective process using site observations to establish the safe gap threshold for pedestrians to cross a roadway, and measuring the available gaps along the roadway to determine if there is a sufficient number of safe gaps. The Gap Study method is one of the school crossing guard warrants that is available to the Approval Authority.
Heavy vehicle percentage: Refers to the proportion of vehicular traffic passing through a given intersection or other reference point composed of trucks, buses and other heavy vehicles weighing over 3,856 kg as per regulatory information provided by Environment and Climate Change Canada, or the weight threshold established by each municipality.
Intersection: The area enclosed by the extension of lateral cub lines or, if none, of the rights-of-way of two or more highways that intersect one another at an angle, whether or not one highway crosses the other (OTM Book 11).
Chapter 3

8OTC School Crossing Guard Guide ∙ May 2017
Intersection pedestrian signal (IPS): Traffic control signals installed at intersections that are dedicated to providing controlled crossing opportunities for pedestrians. This is illustrated below in Figures 3-3 and 3-4. There are no traffic signals facing vehicles on the minor street. These vehicles are controlled by stopsigns, and have the option to proceed into the intersection when it is clear and safe to do so, similar to theoperation of a minor street stop-controlled intersection.
Junior kindergarten (JK): In Ontario, junior kindergarten refers to students who are entering the kindergarten program at age 4.
Legs of an intersection: The part of any one of the roadways radiating from an intersection which is outside the immediate area of the intersection proper. This is illustrated in Figure 3-5.
Mid-block: the segment of a roadway between two intersections as illustrated in Figure 3-6.
Mid-block pedestrian signal (MPS): Traffic control signals that are installed between two intersections and dedicated to providing a controlled crossing for pedestrians. This is shown in Figures 3-7 and 3-8.
Figure 3-3: Intersection Pedestrian Signal (MTO – Driver’s Handbook)
Figure 3-4: Components of an Intersection Pedestrian Signal (OTM Book 15)
Chapter 3

9OTC School Crossing Guard Guide ∙ May 2017
OTM: Abbreviation for Ontario Traffic Manual, which provides information and guidance for transportation practitioners, and promotes uniformity of treatment in the design, application and operation of traffic control devices and systems across the province. The objective is safe driving behaviour, achieved by a predictable roadway environment through the consistent and appropriate application of traffic control devices. The information based on the OTM books are current as of the time of publishing this Guide. Future updates to the OTM books should be followed.
Pedestrian crossover (PXO): Any portion of a roadway, designated by municipal By-law, at an intersection or mid-block, exclusively for pedestrian crossings and designated by signs and pavement markings as prescribed by the regulations in the HTA. There are four types of pedestrian crossovers that can be applied in Ontario. These are further discussed in Chapter 10 of this Guide.
Figure 3-5: Legs of an Intersection Figure 3-6: Mid-block Locations (Guelph)
Figure 3-8: Mid-block Pedestrian Signal (Guelph)
Figure 3-7: Components of a Mid-block Pedestrian Signal (OTM Book 15)
Chapter 3

10OTC School Crossing Guard Guide ∙ May 2017
Pedestrian crosswalk: A crosswalk means:
a. That part of a highway at an intersection that is included within the connections of the lateral lines ofthe sidewalk on opposite sides of the highway measured from the curbs or, in the absence of curbs,from the edges of the roadway; or
b. Any portion of a roadway at an intersection or elsewhere distinctly indicated for pedestrian crossing bysigns or lines or other markings on the surface.
An example is shown in Figure 3-9.
Figure 3-9: Pedestrian Crosswalks
Permissive phase: During a permissive phase, vehicles can manoeuvre in conjunction with other movements that may conflict. For example, permissive left-turns enable drivers to proceed, but only when there is a sufficient gap in the opposing flow. Similarly, right turns on red allow drivers to turn when there is a sufficient gap in the crossing traffic and the pedestrian flow. Additional information on traffic signals are provided in OTM Book 12.
Phase of a traffic signal: The portion of a traffic signal cycle where one or more movements receive a simultaneous green or walk indication. The time required for a single phase is the total of the green display plus the amber and all-red interval times. Similarly, it can be the time required for the walk plus the flashing and solid don’t walk indications. For more information, see OTM Book 12.
Protected phase: During a protected phase, vehicles can manoeuvre without any conflict. For example, protected left-turns require the opposing flow and any conflicting pedestrian movements to be stopped on a red or don’t walk indication. Protected phases can also be applied to through or right turns where separate movements are necessary. For more information, see OTM Book 12
Refuge island: Medians placed in the centre of the roadway at mid-block locations or unsignalized intersections. As per OTM Book 15, refuge islands are intended to assist pedestrians in crossing wide streets by providing a safe storage area in the centre of the road, allowing pedestrians to cross one direction
Chapter 3

11OTC School Crossing Guard Guide ∙ May 2017
of traffic at a time. The presence of a refuge island reduces the time a pedestrian must wait for an adequate gap in the traffic stream and reduces the crossing distance that they must face at one time.
Regulatory sign: A traffic sign advising drivers of an action they must or must not do under a given set of circumstances. Disregarding a regulatory sign constitutes an offence under the HTA.
Right-of-way: In the context of this guide, right-of-way is the allocation of time or priority to a road user, in preference over other road users. Road users include motorists, pedestrians and cyclists.
Roundabout: A raised circular island located in the centre of an intersection, which requires vehicles to travel through the intersection in a counter-clockwise direction around the island. Roundabouts are distinguished by YIELD signs and raised splitter islands on all approaches, and in some cases, gradual widening of the entry approach to two or more lanes. For more information, see OTM Book 15. A roundabout is shown in Figure 3-10.
Rural area: An area outside of the limits of any incorporated or unincorporated city, town, village or other designated residential or commercial area. Further discussion of rural relative to urban areas in the context of this guide is provided in Chapter 3.5.
Stopping sight distance: As per the OTM, stopping sight distance is the distance required by a driver of a vehicle, travelling at a given speed, to bring their vehicle to a stop after an object on the roadway becomes visible. It includes the distance travelled during the decision time plus the vehicle braking distance.
School crossing guard: A person 16 years or older who is directing the movement of persons (as defined in the HTA) across a highway (HTA term for any road) by creating necessary gaps in vehicular traffic to provide safe passage at a designated school crossing location.
Figure 3-10: Roundabout (Ottawa)
School crossing guard warrants: The process of verifying whether one or multiple crossing guards are required for an intersection or location. The warrant process is intended to be an unbiased and consistent evaluation method that is done without outside influence. There may be multiple ways to complete a school crossing guard warrant depending on the type of intersection and location being assessed.
School peak periods: The timeframes in the morning, midday and afternoon during which the majority of students arrive at and depart from school.
School zone: A roadway section with a lower speed limit in the vicinity of a school. The periods during which the lower speed limits are in effect are at the discretion of each municipality.
Sight line: An unobstructed view of a roadway or intersection available to a pedestrian or other road user, which allows the user to anticipate and react to the movements of others, as well as to choose gaps for crossing the roadway. Methods of evaluating sight line distance are provided in the Transportation Association of Canada (TAC) – Geometric Design Guide for Canadian Roads – Part 1: Chapter 1.2.5 Sight Distance.
Chapter 3

12OTC School Crossing Guard Guide ∙ May 2017
Speed bumps and humps: Raised pavement area that extends transversely across the travel way with the primary purpose of acting as a vertical traffic calming measure. Speed bumps usually have more abrupt raised areas and are not typically used on public roadways. Speed humps are more gradual and are utilized extensively in residential areas to reduce both vehicular operating speeds and “through” traffic volumes.
Splitter island: As per OTM Book 15, a splitter island is a raised or painted area on an approach to a roundabout that is used to separate entering and exiting traffic. It also deflects and slows entering traffic, and provides storage space for pedestrians crossing the road in two stages and thus functioning as a refuge island.
Student volume: The total number of students crossing at a given intersection or reference point over a defined period of time. Students are considered those in Junior Kindergarten (JK) to Grade 5. At the discretion of each municipality, more senior grades may be included in the student volume. For the purpose of crossing guard warrants, student volumes may include students walking with their parents. It should be noted that parents walking with their children are not counted. Bused students are not typically recorded in the student count. Crossing Guards would not be assigned for bused students since school buses are equipped with flashing lights and a stop sign and can change their pick up/drop off location if considered unsafe.
Tab: A sign smaller than the primary sign with which it is associated, and mounted below it. There are two types of tab signs:
1. Supplementary tab signs contain additional,related information; and
2. Educational tab signs convey the meaning ofsymbols during their introductory period.
Traffic calming: The utilization of primarily physical measures to reduce the negative effects of motor vehicle use, alter driver behaviour and improve conditions for non-motorized street users.
Traffic control devices: Any sign, signal, marking or device placed upon, over or adjacent to a roadway by a public authority or official having jurisdiction, for the purpose of regulating, warning, guiding or informing road users. For more information, see OTM Book 15.
Traffic control signal (TCS): Any power-operated Traffic Control Device, whether manually, electrically or mechanically operated, by which traffic is alternately directed to stop and permitted to proceed. A Traffic Signal:
1. When used in general discussion, is a completeinstallation including signal heads, wiring,controller, poles and other appurtenances;
2. When used specifically, the term refers to thesignal head which conveys a message to theobserver; and
3. That part of a traffic control signal systemthat consists of one set of no less than threecoloured lenses, red, amber and green,mounted on a frame and commonly referred toas a signal head.
Turn lane: A lane reserved for turning vehicles and so indicated by pavement markings and sometimes supplemented by lane designation signs.
Uncontrolled crossing: In the context of this guide, uncontrolled crossings are locations where pedestrians do not have the right-of-way, and must wait for a safe gap in traffic prior to attempting to enter the roadway.
Urban area: An area of land used primarily for residential, commercial, recreational and/or
Chapter 3

13OTC School Crossing Guard Guide ∙ May 2017
industrial purposes, usually associated with a given city, town, village or incorporated area. Further discussion of rural relative to urban areas in the context of this guide is provided in Chapter 3.5.
Vehicular volume: The number of vehicles that pass a given point on a lane or a roadway, or make a particular movement during a specific time period.
3.5 Urban versus Rural School Crossing Locations
Locations for school crossings in urban and rural locations may exhibit different characteristics including student and vehicular volumes, posted speed limits, topography, driving patterns and mix of vehicle types.
Some municipalities include slight variations in the number of student pedestrians or the volume of vehicular traffic required to warrant a school crossing guard. In general, lower traffic volumes and fewer students are required in rural settings to warrant a school crossing guard compared to urban locations.
As a guide for all of Ontario, this School Crossing Guard Guide has been designed to be tailored to the individual needs of each municipality. The Exposure Index worksheet provided in Appendix C and discussed in Chapter 5 allows municipalities to determine their own threshold given their locally observed volumes of students and vehicles.
Recognizing that tools such as the Exposure Index method or the Gap Study Method are only one step in the overall evaluation of a location for a school crossing guard, observations made during site inspections must be considered. The site-specific characteristics are often the best indicators of the need for school crossing guards, and so it may be irrelevant as to whether a crossing is located within an urban or rural location.
This Guide recommends a thorough site inspection of the local context and the application of the appropriate warrant process in order to evaluate the need for a school crossing guard. Using the steps outlined in this Guide, the Approval Authority will be able to make an informed decision for rural, suburban and urban locations.
3.6 New versus Existing School Site
The need for a school crossing guard at new versus existing school sites can also be assessed using the methodology set forth in this Guide. The site inspection and warrant application processes are designed to mitigate any differences between new and existing school sites so that a well informed decision can be made.
For new school sites, the forecast of student and vehicular traffic volumes likely will need to be analyzed as part of the overall assessment process. The vehicular volumes should be able to be obtained through a Traffic Impact Study that would have been prepared during the process to develop the site plan for the school or through a proxy site survey at a comparable school location. The student volumes can be estimated based on the maximum school enrolment as well as the catchment area of each school. A guard may be proactively assigned at school opening. Once the school opens, the combination of site inspection and warrants may be completed to evaluate if warrants are met and whether the positioning of a guard is appropriate.
3.7 Alternative Solutions other than Crossing Guards
A school crossing guard should not be considered the only or first tool to improve the safety of students as they cross roadways to and from school. Furthermore, school crossing guards should not be assigned as a means of addressing illegal parking. The assignment of a school crossing guard does not impact illegal parking or stopping in the vicinity
Chapter 3

14OTC School Crossing Guard Guide ∙ May 2017
of guard supervision. Instead, parking or stopping concerns should be dealt with through By-law compliance and enforcement.
During the site inspection process (Chapter 4), the surveyor must observe if the following options are feasible depending on the type of intersection or crossing:
Signalized intersections
• Educating students and parents on how toproperly cross at signalized intersections. Forinstance, the use of pedestrian pushbuttons orhow to interpret the signal phases;
• If safer routes that lead to and from the schoolexist, students should be directed to use thoseroutes instead of the signalized intersection;
• If there is a high volume of conflicting trafficon one leg of an intersection, student volumesshould be directed to cross an alternate leg ofthe intersection;
• Review the walk and flashing don’t walktimes to ensure that they are sufficient forstudent pedestrians to walk safely across theintersection. Signal timings may need to beadjusted;
• The installation of traffic calming devices suchas curb extensions, medians or refuge islands;
• Traffic enforcement such as the implementationof speed or red light cameras; and
• Modification of parking regulations based onparking patterns.
All-way stop-controlled intersections
• Educating students and parents on how toproperly cross at all-way stop-controlledintersections;
• If safer routes that lead to and from the school
exist, students should be directed to use those routes instead of at the all-way stop-controlled intersection;
• If there is a high volume of conflicting trafficon one leg of an intersection, student volumesshould be directed to cross an alternate leg ofthe intersection;
• The installation of traffic calming devices suchas curb extensions, medians or refuge islands;
• Conducting signal warrants (OTM Book 12)and all-way stop control warrants (OTM Book5) to evaluate whether traffic signals or an all-way stop-controlled arrangement is the mostsuitable type of control;
• Traffic enforcement such as the implementationspeed cameras; and
• Modification of parking regulations based onparking patterns.
Minor street stop-controlled intersections
• Educating students and parents on how toproperly cross at minor street stop-controlledintersections;
• If safer routes that lead to and from the schoolexist, student pedestrians should be directedto use those routes instead of at the side streetstop-controlled intersection;
• If there is a high volume of conflicting trafficon one leg of an intersection, student volumesshould be directed to cross an alternate leg ofthe intersection;
• The use of signage, traffic devices or markingsthat make drivers aware of the presence of aschool crossing;
• The installation of traffic calming devices suchas curb extensions, speed humps, medians orrefuge islands;
Chapter 3

15OTC School Crossing Guard Guide ∙ May 2017
• Conducting signal warrants (OTM Book 12)and all-way stop control warrants (OTM Book5) to evaluate whether traffic signals or an all-way stop-controlled arrangement are adequatetypes of control;
• Traffic enforcement such as the implementationof speed cameras; and
• Modification of parking regulations based onparking patterns.
Mid-block uncontrolled intersections
• Educating students and parents on how toproperly cross at mid-block locations;
• If safer routes that lead to and from the schoolexist, student pedestrians should be directedto use those routes instead of the mid-blockuncontrolled intersection;
• The installation of traffic calming devices suchas curb extensions, speed humps, medians orrefuge islands;
• Conducting signal warrants and pedestriancrossover (OTM Book 15) warrants to evaluatewhether traffic signals or pedestrian crossoversare adequate types of control;
• Traffic enforcement such as the implementationof speed cameras; and
• Modification of parking regulations based onparking patterns.
Chapter 3

16OTC School Crossing Guard Guide ∙ May 2017
4.0 SITE INSPECTION
Site inspections are an important component of assessing the need for school crossing guards. In addition to the control-specific data collection detailed in the warrant chapters, this chapter outlines the “who, why, what, where, when and how” of the site inspection process.
4.1 Who
The process recommends appointing a Site Inspection Authority, comprised of either a single person or group, who will be responsible for conducting the site inspections as part of the school crossing guard evaluation. Designating a stable person or group as the Site Inspection Authority helps to improve the consistency of site inspections.
4.2 Why
Site inspections are usually the first step taken in the school crossing guard evaluation process. It may be followed by or completed in conjunction with the control-specific warrant surveys such as gap studies or traffic counts. The purpose of the site inspection is to identify and assess apparent hazards at a potential school crossing location. Implementation of a school crossing should be considered only after all of the other options discussed in Chapter 3.7 have been exhausted.
4.3 What
The site inspection report contains information about site conditions. It is used to determine whether the proposed school crossing location is safe for students, or if there are alternative solutions to any identified safety issues that would make the crossing safer. The site inspection should capture, at a minimum, the following operational and geometric characteristics of the potential school crossing location:
• Time period of observations;
• School hours;
• Peak morning, midday and afternoon schoolperiods when the highest number of studentsare walking to or from school;
• School enrolment data and demographics suchas age distribution;
• Weather and road conditions during the siteinspection;
• Proximity of the potential school crossing to theschool;
• Any “near misses” observed;
• Distance of the potential crossing locationto the nearest upstream and downstreamcrossings or intersections;
• Presence of sidewalks in the vicinity of thepotential school crossing location;
• Posted speed limit;
• Observations of aggressive driving patterns andnon-compliance with the Highway Traffic Act;
• Intersection or crossing geometry such as thenumber of lanes in each direction;
• Width of the potential school crossing location;
• Quantity and pattern of school buses or publictransit;
• Availability of alternative routes that would besafer for students to utilize;
• Route surveys that may explain certain routepreferences. For example, major origin anddestination locations, shortcuts, attractions,transit patterns or high traffic volume areas. Itshould be noted that crossing guards would not
Chapter 4

17OTC School Crossing Guard Guide ∙ May 2017
be provided if a certain location is outside the school’s boundary;
• Number of students crossing at the potentialcrossing location;
• Approximate proportion of students beingwalked by parents;
• Existing control type, if any, at the potentialcrossing location;
• Is the existing control, if any, utilized properly?For example, do students know how to use thepedestrian pushbuttons, or are they familiarwith how to cross at a PXO?
• Are there queue spill-overs, illegal parking orlay-bys encumbering the safety of studentscrossing at the potential crossing location?
• Are there any temporary or permanent sightlineobstructions such as hedges, fences, trees orbillboards?
• Are there any steep vertical or horizontalgrades?
• Are there any school staff, patrollers orvolunteers assisting with student crossings?
• Are there any signs or pavement markings inthe vicinity of the potential school crossing, andare they clearly legible and do they conform tothe OTM requirements?
4.4 Where
Site inspections are generally conducted at potential school crossing guard locations that may include:
• Signalized intersections;
• Mid-block locations without any form of trafficcontrol;
• All way stop-controlled intersections;
• Minor street stop-controlled intersections;
• Intersections controlled by an IntersectionPedestrian Signal (IPS);
• Locations controlled by a Mid-block PedestrianSignal (MPS);
• Pedestrian Crossovers (PXO); and
• Roundabouts.
4.5 When
Site inspections should be done during typical school days. The following atypical days should be avoided:
• First and last week of school;
• Christmas break;
• Spring break;
• Statutory, public and “elective” holidays such asRemembrance Day;
• Days that precede or follow a holiday break;
• Professional Activity (PA) days;
• Days that precede or follow a PA day;
• Days with special events at the school such as aconcert or track and field; and
• Days with inclement weather.
Site inspections should be completed during the morning, midday and afternoon school peak periods, which are usually 30 minutes before the school start time, during the lunch period, and 30 minutes after the school dismissal time, respectively. The duration of site inspections may vary depending on the arrival and dismissal pattern of students. The midday peak period may be inspected depending on the school’s policy during the lunch break. The exact timing of the school start and dismissal may also vary among different schools and municipalities. In addition to the initial site inspection conducted at the start of
Chapter 4

18OTC School Crossing Guard Guide ∙ May 2017
the school crossing guard evaluation, regular site inspections may be scheduled to monitor future conditions with or without school crossing guards.
4.6 How
Standard report forms should be developed by each municipality to be used for all site inspections. Appendix B provides sample generic site inspection forms as well as ones from various municipalities in Ontario. This form should cover the list of items noted in the “what” section above. After the inspection form is completed, the information can then be input to the school crossing guard evaluation processes outlined in Chapters 6 to 12.
Logistically speaking, a consistent routing and handling of site inspection requests should be
established. For example, a process should be in place for School Boards to advise the Site Inspection Authority of new school openings, school closings, changes to school boundaries, changes in school start and dismissal times or busing changes that could impact student crossing safety. Contact information of the Site Inspection Authority should be readily accessible to schools, the local police service or any member of the public who may have a question or concern about student safety related to school crossings.
Chapter 4

19OTC School Crossing Guard Guide ∙ May 2017
5.0 SCHOOL CROSSING GUARD WARRANT
METHODOLOGIES
5.1 Context
Once it is determined that other alternatives, as discussed in Chapter 3.7, are not sufficient to provide a safe student crossing environment, a school crossing guard warrant needs to be completed. Based on a best practice review of several municipalities within Ontario, there are two methods to conduct the warrant:
1. Exposure Index method: a warrant methodology suitable for controlled crossing facilities that have conflicting movements between vehicular and student volumes; or
2. Gap Study Method: warrant methodologysuitable for uncontrolled crossing facilities.The Gap Study method may also be used toevaluate some controlled crossing facilities.
In addition to methods 1 and 2, other site-specific factors need to be considered in the school crossing guard warrant process.
An overview of the above methods is provided in the following sections.
5.2 Exposure Index Method
In the transportation industry, the Exposure Index method is used as a screening tool to determine the need for improvement initiatives. For example, many municipalities use the Exposure Index method as the primary screening tool to objectively evaluate the need for grade separations at railway crossings. In this context, the Exposure Index method relates
the average number of trains that cross a specific location along a road and the average daily traffic that crosses the railway at the same location. The Exposure Index is also used by rail authorities such as Metrolinx to evaluate and prioritize the need for grade separations at their at-grade rail crossings because it allows for an “apples to apples” comparison among multiple locations.
In 2002, HDR (formerly iTrans) collaborated with the Town of Oakville to develop Exposure Indices to evaluate the need for school crossing guards at signalized, all-way stop-controlled and minor street stop-controlled crossing facilities. The need for the Exposure Index method was due to the lack of warrant information at controlled crossing locations in the previous OTC School Crossing Guard Guide, and difficulties encountered when applying the Gap Study method at controlled locations. The Gap Study method, featured prominently in the previous OTC School Crossing Guard Guide, does not fully account for the conflicting movements between vehicular and student volumes at controlled crossing facilities.
The 2002 Exposure Indices were developed based on the peak hour vehicular and student volumes at existing school crossing guard locations in the Town of Oakville. The Exposure Index establishes the 85th percentile threshold of the existing locations. This threshold is then used to evaluate the level of conflicting vehicular and student volumes at potential school crossing guard locations. The Exposure Index method can also be used as a
Chapter 5

20OTC School Crossing Guard Guide ∙ May 2017
prioritization tool because it allows for an easy comparison of the level of conflicting movements between different school crossing guard locations.
Exposure Indices were also developed for the Town of Ajax as part of the Traffic Operations at Schools Study, dated March 2006. Because the 2002 and 2006 Exposure Indices were developed based on data collected in the Town of Oakville and the Town of Ajax, respectively, it is recommended that each municipality develop their own Exposure Indices. This approach ensures that the input data accounts for the municipality-specific characteristics.
For municipalities that are not able to develop their own Exposure Indices for reasons such as the lack of existing school crossing guard locations, it is recommended that the Approval Authority consult other municipalities that have similar characteristics such as population, density, school structure, or school arrival and dismissal periods. The Exposure Indices from a suitable municipality can be used as an interim school crossing guard warrant. Eventually, when more crossing guards have been designated, the Approval Authorities have the option of developing their own Exposure Indices.
The Exposure Index method requires the Approval Authority to exercise good engineering judgment on whether an existing school crossing guard location should be included as part of the model input data. For example, if an existing school crossing guard location has seen a drastic decrease in student crossing demand since the school crossing guard inception, then data from this crossing location should not be used to develop the Exposure Index. Other outliers that should not be included are locations where school crossing guards have been provided due to external influences that would have otherwise not resulted in a guard being warranted. The inclusion of such school crossing guard locations will skew the Exposure Indices. The need for school crossing guards due to unique circumstances are
separately evaluated in the consideration of the other site-specific factors, as discussed in Chapter 5.4.
It should be noted that an Exposure Index should be developed for each type of crossing facility. The Exposure Index template is a Microsoft Excel document and instructions on how to access and use it are provided in Appendix C. Because it is important to include only the conflicting vehicular movements in the Exposure Index method, the conflicting movements at each type of crossing facility are provided in each of the respective chapters below, along with step-by-step instructions on how to apply the Exposure Index method:
• Signalized intersectionChapter 6
• All-way stop controlledChapter 7
• Minor street stop controlledChapter 8
• Intersection pedestrian signalChapter 9
• Pedestrian crossover at an intersectionChapter 10
5.3 Gap Study Method
The Gap Study method is an objective means of evaluating whether there are enough safe gaps in traffic along a road for students to cross. The safe gap time is calculated based on the site specific characteristics for each location. The calculated safe gap time is then used as a benchmark for the gaps measured at the crossing facility. If there are insufficient gaps, then a school crossing guard may be considered. Further descriptions of the methodology and gap survey forms are provided in Appendix D.
Chapter 5

21OTC School Crossing Guard Guide ∙ May 2017
Based on the best practice review, the Gap Study method is most effective for evaluating school crossing guard needs at the following types of crossing facilities:
• Minor street stop controlledChapter 8
• Mid-block uncontrolled locationsChapter 11
The Gap Study method is typically not suitable for fully controlled intersections because the gaps provided at these locations are a natural by-product of the control. The exception for this is at more urban locations where conflicting movements are high even when the pedestrian has the right-of-way. Under these circumstances, the gaps available for pedestrians to cross safely should be evaluated.
The step-by-step method of the Gap Study methodology at minor street stop-controlled intersections and at mid-block locations are outlined in Chapters 8 and 11, respectively.
5.4 Other Factors
It is important to note that in addition to the Exposure Index and Gap Study methods, there are several other factors to consider when evaluating the need for a school crossing guard. There may be instances where either controlled or uncontrolled locations fail to meet the Exposure Index or the Gap Study warrant requirements. This does not automatically mean that a school crossing guard should not be considered further. Likewise, locations that satisfy the Exposure Index and Gap Study warrants do not always need a crossing guard. It is the responsibility of the authority to review the following list of factors before completing the warrant evaluation:
• Minimum student crossing volume;
• Collision hazard reporting frequency;
• Motorist behaviour;
• Posted speed limit and speed adherence;
• Number of lanes on each approach;
• Sightline distance for drivers;
• Sightline distance for students;
• Proximity to a school;
• Walking route preference of students;
• Presence of pedestrian facilities; and
• Proportion of students that would requirelonger reaction times.
Because some of the above factors vary depending on the type of crossing facilities being evaluated, the details of these factors are discussed in the individual warrant sections in Chapters 6 to 12.
Chapter 5

22OTC School Crossing Guard Guide ∙ May 2017
6.0 SCHOOL CROSSING GUARD WARRANT AT SIGNALIZED
INTERSECTIONS
This chapter describes the process to determine whether or not to assign a school crossing guard at a signalized intersection. The chapter begins with a description of the data that needs to be collected, followed by the steps required to develop an Exposure Index, along with how to apply the warrant to candidate signalized intersections. Other factors to consider in the warrant process are also provided.
6.1 Context
As per OTM Book 15 – Pedestrian Crossing Treatments, crossing guards are assigned to signalized intersections in order to assist students who encounter conflicting turning movements. Prior to conducting a warrant analysis at a signalized intersection, it is important to understand the fundamental characteristics of this type of crossing facility from the perspective of a school crossing guard. With the exception of protected phases, vehicles are permitted to turn across the parallel pedestrian crosswalks on a “walk” indication. As a result, there may be simultaneous vehicle and pedestrian movements during the pedestrian “walk” and vehicle “green” indications. In addition, vehicles making a “right turn on red” may also conflict with pedestrians on the crosswalk. School crossing guards may be needed at signalized intersections if the degree of vehicle-to-student conflict exceeds the threshold established by the warrant.
As noted in Chapter 3, school crossing guards can only be assigned if the speed limit is less than 60 km/h.
6.2 Data Collection
In addition to the site inspection process outlined in Chapter 4, additional data and observations are needed to complete the school crossing guard warrant at a signalized intersection. These items include:
Quantitative:
• Count the conflicting vehicular volume asspecified in Step 4 of Chapter 6.3.2 during themorning, midday and afternoon school peakperiods;
• Count the number of students that cross eachleg of the intersection during the morning,midday and afternoon school peak periods.Students are considered those in JK to Grade5. At the discretion of each municipality, moresenior grades may be included in the studentvolume. For the purpose of crossing guardwarrants, student volumes include studentswalking with their parents. These counts shouldbe done concurrently with the conflictingvehicular volume count;
• Monitor the vehicular speeds in the vicinity ifspeed compliance is of concern; and
• Note the conflicting vehicular volumes that areheavy vehicles. Higher proportions of heavyvehicles at an intersection may impede thesight lines of motorists or students proceedingthrough the intersection.
Chapter 6

23OTC School Crossing Guard Guide ∙ May 2017
Qualitative:
• Aggressiveness or indecision of drivers duringthe amber and all red indications;
• Poor driver behaviour such as not yieldingthe right-of-way to pedestrians, not comingto a complete stop at the intersection prior toturning on a red display, drivers inching forwardthus intimidating pedestrians in the crosswalk,or drivers manoeuvring through pedestrians asthey cross the roadway; and
• The students appear timid in crossing theroadway or do not seem to be properly trainedon how to cross the road safely. This mayinclude forgetting to push the pedestrianpushbutton if one is present, or enteringthe roadway after the “flashing don’t walk”indication commences.
6.3 Warrant Method
6.3.1 Exposure Index
As discussed in Chapter 5.1, the school crossing guard warrant at a signalized intersection is best evaluated with the Exposure Index method, along with the consideration of other factors. The application of the Exposure Index method is done in two phases. The initial phase is to develop an Exposure Index for signalized intersections. The second phase is to use the Exposure Index method to evaluate candidate signalized intersections as to the need for school crossing guards.
6.3.2 Developing an Exposure Index
The step-by-step procedure for developing an Exposure Index at signalized intersections is provided as follows, with the template provided in Appendix C.
Step 1: Review all of the signalized intersections that currently have school crossing guards in place. Obvious outlier locations where school crossing guards may not normally be needed should not be included since they would skew the threshold established to evaluate candidate school crossing guard locations. For very large municipalities which have a significant number of crossing guard locations, it may be difficult or impractical to review “all” of the crossings in their jurisdictions. Accordingly, these municipalities could gather a representative sample size that is statistically valid as a basis for analysis.
Step 2: Review the duration of current school crossing guard supervision at all of the signalized intersections during the morning, midday and afternoon school peak periods. Then determine a common duration that best satisfies all of the signalized intersections. For example, if school crossing guards are currently implemented at a minimum of 30 minutes at all of the signalized intersections during various school peak periods, then the common duration would be 30 minutes. The purpose of this is to establish a common observation duration so that all subsequent evaluations can be completed on the same basis.
Step 3: For the leg of the intersection that is being crossed with the assistance of a guard, identify the conflicting vehicular movements. In the context of this Guide, the conflicting movements for different legs of a signalized intersection are shown in Figures 6-1 to 6-4. These conflicting vehicular movementshave the most direct correlation with the safetyof student crossings. As noted in Chapter 3.4, apermissive phase is when vehicles can manoeuvrein conjunction with other movements that mayconflict. For example, right turns on red allow driversto turn when there is a sufficient gap in the crossingtraffic and the pedestrian flow.
Chapter 6

24OTC School Crossing Guard Guide ∙ May 2017
On the north leg of the intersection during the east-west green indication, the conflicting vehicular movements are:
• Southbound right turns on red;
• Eastbound left turns during the permissivephase; and
• Westbound right turns during the permissivephase.
These conflicting movements are illustrated in Figure 6-1.
On the south leg of the intersection during the east-west green indication, the conflicting vehicular movements are:
• Northbound right turns on red;
• Westbound left turns during the permissivephase; and
• Eastbound right turns during the permissivephase.
These conflicting movements are illustrated in Figure 6-2.
On the east leg of the intersection during the north-south green indication, the conflicting vehicular movements are:
• Westbound right turns on red;
• Southbound left turns during the permissivephase; and
• Northbound right turns during the permissivephase.
Figure 6-1 Conflicting Movements for Pedestrians on the North Leg
Figure 6-2 Conflicting Movements for Pedestrians on the South Leg
Chapter 6

25OTC School Crossing Guard Guide ∙ May 2017
These conflicting movements are illustrated in Figure 6-3.
On the west leg of the intersection during the north-south green indication, the conflicting vehicular movements are:
• Eastbound right turns on red;
• Northbound left turns during the permissivephase; and
• Southbound right turns during the permissivephase.
These conflicting movements are illustrated in Figure 6-4.
Step 4: Count the conflicting vehicular volume during the school peak periods. The duration of the counts would be based on the uniform duration established in Step 2, and the movements counted are established in Step 3. The counts should be completed on typical school days, as discussed further in Chapter 4.5.
Step 5: Count the student crossing volumes at the leg of the intersection that is being crossed with the assistance of the guard. The count needs to be completed concurrently and for the same duration as the vehicular count in Step 2. Students are at a minimum to be those in JK to Grade 5, and beyond at the discretion of each municipality. Students crossing with their parents should also be included in the count. Bused students are not typically recorded in the student count. Crossing Guards would not be assigned for bused students since school busses are equipped with flashing lights and a stop sign and can change their pick up/drop off location if considered unsafe.
Figure 6-3 Conflicting Movements for Pedestrians on the East Leg
Figure 6-4 Conflicting Movements for Pedestrians on the West Leg
Chapter 6

26OTC School Crossing Guard Guide ∙ May 2017
Step 6: Multiply the student crossing volume by the conflicting vehicular volume for each intersection and for each school period evaluated.
Step 7: Select the school period for each signalized intersection that has the highest product of student crossing volume and conflicting vehicular volume. For example, the morning and afternoon school peak periods were counted at a signalized intersection and the products of student and conflicting vehicular volume were 1,000 and 1,700, respectively. In this case, the conflicting vehicular volume and student crossing volume during the school afternoon peak would be the critical dataset that is used for this intersection.
Step 8: Input the critical dataset of conflicting vehicular volume and the student crossing volume for each signalized intersection into the Exposure Index template that is presented Appendix C.
Step 9: Once Step 8 is complete, the Microsoft Excel worksheet will automatically generate the 85th percentile curve of the input data. This curve represents the threshold used to evaluate the need for school crossing guards at signalized intersections.
6.3.3 Using the Exposure Index for Warrants
Once an Exposure Index has been developed for signalized intersections, the following steps can be taken to evaluate potential school crossing guard locations that are signalized:
Step 1: Establish the leg of the intersection that would be most suitable for a school crossing guard. This is typically based on the observed tendency of how
students cross at an intersection, or based on the preference of the school to establish a safer route. Care should be taken to respect natural “desire lines”, rather than trying to force students to take a more indirect or circuitous route.
Step 2: Identify the conflicting vehicular movements for the leg of the intersection that was established in Step 1. The conflicting movements for each leg of a signalized intersection are shown in Figures 6-1 to 6-4.
Step 3: Count the conflicting vehicular volumes and student crossing volumes during the school peak periods. The duration of the counts would be based on the uniform duration that is used in the Exposure Index method, as established in Step 2 in Chapter 6.3.2. The count should be completed on typical school days, as discussed further in Chapter 4.5.
Step 4: Input the conflicting vehicular volume and student crossing volume to the appropriate table of the Exposure Index template. If the resulting point on the graph that corresponds to the location being evaluated is located above the 85th percentile line, then the Exposure Index warrant is met. If the resulting point is plotted below the 85th percentile line, then the signalized intersection being evaluated does not meet the Exposure Index threshold for requiring school crossing guards. In either case, the other factors discussed in Chapter 6.3.4 need to be considered.
As noted in Chapter 5.2, for municipalities that are not able to develop their own Exposure Indices for reasons such as the lack of existing school crossing guard locations, it is recommended that the Approval Authority consult other municipalities that have similar characteristics such as population, density, school structure, or school arrival and dismissal periods. The Exposure Indices from a
Chapter 6

27OTC School Crossing Guard Guide ∙ May 2017
suitable municipality can be used as an interim school crossing guard warrant. Eventually, when more crossing guards have been designated, the Approval Authority has the option of developing their own Exposure Indices.
6.3.4 Other Factors
As noted in Chapter 5.3, the Exposure Index method should be supplemented with a review of other factors to ensure a comprehensive assessment of the need for school crossing guards is completed. These factors include:
Minimum Student Crossing Volume: To establish a consistent method of evaluation, the minimum number of students crossing during the school peak periods should be set at a threshold of 40 students. A lower value may be used at the discretion of each municipality. For instance, a municipality can establish a minimum threshold of 30 students crossing at a signalized intersection. Regardless of the threshold, the use of a uniform value throughout the municipality provides a quantitative tool for prioritizing the implementation of school crossing guards. The benefits are to ensure consistency of application, and to allow municipalities to focus their resources at school crossings where student utilization is higher. If the student crossing volumes do not meet the minimum threshold, alternate solutions outlined in Chapter 3.7 should be considered to improve the safety of student crossings.
Collision Hazard Reporting Frequency: Over the previous three years, there has been an average of more than two reported collisions per year during school operations that are susceptible to correction by a school crossing guard.
Inadequate Visibility: During the site visit, pedestrian and motorist visibility should be evaluated based on the presence of:
• Vertical or horizontal road geometries;
• Permanent or temporary physical barriers suchas trees, shrubs, billboards, bus shelters orbuildings; or
• High frequency of heavy vehicles.
Methods of evaluating sight distance are provided in the Transportation Association of Canada (TAC) – Geometric Design Guide for Canadian Roads – Part 1: Chapter 1.2.5 Sight Distance.
Number of Gaps Available at Urban Locations: In highly urban locations where mixed uses surround a school site and where the number of conflicting vehicular movements is consistently high, the actual number of gaps during the pedestrian phase should be monitored. Under these circumstances, the Gap Study method can be used to complete the school crossing guard warrant. Details of the Gap Study method are provided in Chapter 5.3.
Proximity to a School: In general, school crossing guards should be assigned at intersections or crossings where the subject school to be served is visible or in proximity. In addition, the site inspection process should also verify which route students prefer to take. The combination of these two aspects will help determine the appropriate location for a school crossing guard. A signalized intersection may meet the Exposure Index requirements, but it may not lead to the preferable route for students.
6.4 Signage and Pavement Markings
As per OTM Book 6 - Warning Signs Section 7, signed school crossings must not be located at pedestrian crossovers or at any signalized intersections. Thus, no school-related signs or pavement markings should be placed at a signalized intersection. Any deviation from the OTM requirements should be supported by a well-documented rationale.
Chapter 6
28OTC School Crossing Guard Guide ∙ May 2017
7.0 SCHOOL CROSSING GUARD WARRANT AT ALL- WAY STOP-CONTROLLED INTERSECTIONS
This chapter describes the process to determine whether or not to assign a school crossing guard at an all-way stop-controlled intersection. The chapter begins with a description of the data that needs to be collected. Next, the steps required to develop an Exposure Index is provided, along with how to apply the warrant to candidate all-way stop-controlled intersections. Other factors to consider in the warrant process are also provided.
7.1 Context
An all-way stop control is when STOP signs are installed on all approaches to an intersection. As per the Highway Traffic Act, vehicles approaching a stop sign at an intersection must stop at the stop bar, or if none, before the nearest crosswalk, thereby yielding to vehicular traffic and pedestrians on the approaches with the right-of-way. From a safety perspective, pedestrians at an all-way stop-controlled intersection are expected to:
• Cross only at marked crosswalks, but not in themiddle of the block or between parked cars; and
• Make eye contact with the driver and ensurethey have come to a complete stop beforeentering the crosswalk.
As per OTM Book 15, stop controls at an intersection provide clear opportunities for pedestrians to cross different legs of intersections. The selection of stop
control is based on guidelines provided in OTM Book 5 – Regulatory Signs. Consistent with OTM Book 5 Section 2, all-way stop controls should not be used where the protection of pedestrians, students in particular, is the prime concern. This concern can usually be addressed by other means such as school crossing guards.
As noted in Chapter 3, school crossing guards can only be implemented if the speed limit is less than 60 km/h.
7.2 Data Collection
In addition to the site inspection process outlined in Chapter 4, additional data and observations are needed to complete the school crossing guard warrant at an all-way stop-controlled intersection. These items include:
Quantitative:
• Count the conflicting vehicular volume asspecified in Step 4 of Chapter 7.3.2 during themorning, midday and afternoon school peakperiods;
• Count the number of students that cross eachleg of the intersection during the morning,midday and afternoon school peak periods.Students are considered those in JK to Grade5. At the discretion of each municipality, moresenior grades may be included in the student
Chapter 7

29OTC School Crossing Guard Guide ∙ May 2017
volume. For the purpose of crossing guard warrants, student volumes include students walking with their parents. These counts should be done concurrently with the conflicting vehicular volume count;
• Monitor the vehicular speeds in the vicinity ifspeed compliance is of concern; and
• Note the conflicting vehicular volumes that areheavy vehicles. Higher proportions of heavyvehicles at an intersection may impede thesight lines of motorists or students proceedingthrough the intersection.
Qualitative:
• Aggressiveness or indecision of drivers;
• Poor driver behaviour such as not yielding theright-of-way to pedestrians, not coming toa complete stop at the intersection, driversinching forward thus intimidating pedestrians inthe crosswalk, or drivers manoeuvring throughpedestrians as they cross the roadway; and
• The students appear timid in crossing theroadway or do not seem to be properlyeducated on how an all-way stop-controlledintersection operates. For example if studentsare unsure of when it is their turn to cross.
7.3 Warrant Method
7.3.1 Exposure Index
As discussed in Chapter 5.1, the warrant at an all-way stop-controlled intersection is best evaluated with the Exposure Index method, along with the consideration of the other factors. The application of the Exposure Index method is done in two phases. The initial phase is to develop an Exposure Index for all-way stop-controlled intersections. The second phase is to use the Exposure Index method
to evaluate candidate all-way stop-controlled intersections as to the need for school crossing guards.
7.3.2 Developing an Exposure Index
The step-by-step procedure for developing an Exposure Index at all-way stop-controlled intersections is provided as follows, with the template provided in Appendix C.
Step 1: Review all of the all-way stop-controlled intersections that currently have school crossing guards in place. Obvious outlier locations where school crossing guards may not normally be needed should not be included since they would skew the threshold established to evaluate candidate school crossing guard locations. For very large municipalities which have a significant number of crossing guard locations, it may be difficult or impractical to review “all” of the crossings in their jurisdictions. Accordingly, these municipalities could gather a representative sample size that is statistically valid as a basis for analysis.
Step 2: Review the duration of current school crossing guard supervision at all of the all-way stop-controlled intersections during the morning, midday and afternoon school peak periods. Then determine a common duration that best satisfies all of the intersections. For example, if school crossing guards are currently implemented at a minimum of 30 minutes at all all-way stop-controlled intersections during various school peak periods, then the common duration would be 30 minutes. The purpose of this is to establish a common observation duration so that all subsequent evaluations can be completed on the same basis.
Chapter 7

30OTC School Crossing Guard Guide ∙ May 2017
Step 3: For the leg of the intersection that is being crossed with the assistance of a guard, establish the conflicting vehicular movements. In the context of this Guide, the conflicting movements for different legs of an all-way stop-controlled intersection are shown in Figures 7-1 to 7-4. These conflicting vehicular movements have the most direct correlation with the safety of student crossings.
On the north leg of the intersection, the conflicting vehicular movements are:
• All southbound movements;
• Eastbound left turns;
• Westbound right turns; and
• Northbound through traffic.
These conflicting movements are illustrated in Figure 7-1.
On the south leg of the intersection, the conflicting vehicular movements are:
• All northbound movements;
• Westbound left turns;
• Eastbound right turns; and
• Southbound through traffic.
These conflicting movements are illustrated in Figure 7-2.
On the east leg of the intersection, the conflicting vehicular movements are:
• All westbound movements;
• Southbound left turns;
• Northbound right turns; and
• Eastbound through traffic.
Figure 7-1 Conflicting Movements for Pedestrians on the North Leg
Figure 7-2 Conflicting Movements for Pedestrians on the South Leg
Chapter 7

31OTC School Crossing Guard Guide ∙ May 2017
These conflicting movements are illustrated in Figure 7-3.
On the west leg of the intersection, the conflicting vehicular movements are:
• All eastbound movements;
• Northbound left turns;
• Southbound right turns; and
• Westbound through traffic.
These conflicting movements are illustrated in Figure 7-4.
Step 4: Count the conflicting vehicular volumes during the school peak periods. The duration of the counts would be based on the uniform duration established in Step 2, and the movements counted are established in Step 3. The count dates should be on typical school days, as discussed further in Chapter 4.5.
Step 5: Count the student crossing volumes at the leg of the intersection that is being crossed with the assistance of the guard. The count needs to be completed concurrently and for the same duration as the vehicular count in Step 2. Students are at a minimum to be those in JK to Grade 5, and beyond at the discretion of each municipality. Students crossing with their parents should also be included in the count. Bused students are not typically recorded in the student count. Crossing Guards would not be assigned for bused students since school busses are equipped with flashing lights and a stop sign and can change their pick up/drop off location if considered unsafe.
Figure 7-3 Conflicting Movements for Pedestrians on the East Leg
Figure 7-4 Conflicting Movements for Pedestrians on the West Leg
Chapter 7

32OTC School Crossing Guard Guide ∙ May 2017
Step 6: Multiply the student crossing volume by the conflicting vehicular volume for each intersection and for each school period evaluated.
Step 7: Select the school period for each intersection that has the highest product of student crossing volume and conflicting vehicular volume. For example, the morning and afternoon school peak periods were counted at an all-way stop-controlled intersection and the products of student and conflicting vehicular volume were 1,000 and 1,700, respectively. In this case, the conflicting vehicular volume and student crossing volume during the afternoon school peak would be the critical dataset that is used for this intersection.
Step 8: Input the critical dataset of conflicting vehicular volume and the student crossing volume for each intersection into the Exposure Index template that is presented Appendix C.
Step 9: Once Step 8 is complete, the Microsoft Excel worksheet will automatically generate the 85th percentile curve of the input data. This curve represents the threshold used to evaluate the need for school crossing guards at all-way stop-controlled intersections.
7.3.3 Using the Exposure Index for Warrants
Once an Exposure Index has been developed for all-way stop-controlled intersections, the following steps can be taken to evaluate potential school crossing guard locations that are all-way stop controlled:
Step 1: Establish the leg of the intersection that would be most suitable for a school crossing guard. This is
typically based on the observed tendency of how students cross at an intersection, or based on the preference of the school to establish a safer route. Care should be taken to respect natural “desire lines”, rather than trying to force students to take a more indirect or circuitous route.
Step 2: Identify the conflicting vehicular movements for the leg of the intersection that was established in Step 1. The conflicting movements for each leg of an all-way stop-controlled intersection are shown in Figures 7-1 to 7-4.
Step 3: Count the conflicting vehicular volumes and student crossing volumes during the school peak periods. The duration of the counts would be based on the uniform duration that is used in the Exposure Index method, as established in Step 2 in Chapter 7.3.2. The count should be completed on typical school days, as discussed further in Chapter 4.5.
Step 4: Input the conflicting vehicular volume and student crossing volume into the appropriate table of the Exposure Index template. If the resulting point on the graph that corresponds to the location being evaluated is located above the 85th percentile line, then the Exposure Index warrant is met. If the resulting point is plotted below the 85th percentile line, then the all-way stop-controlled intersection being evaluated does not meet the Exposure Index threshold for requiring school crossing guards. In either case, the other factors discussed in Chapter 7.3.4 need to be considered.
Chapter 7

33OTC School Crossing Guard Guide ∙ May 2017
7.3.4 Other Factors
As noted in Chapter 5.3, the Exposure Index method should be supplemented with a review of other factors to ensure a comprehensive assessment of the need for school crossing guards is completed. These factors include:
Minimum Student Crossing Volume: To establish a consistent method of evaluation, the minimum number of students crossing during the school peak periods should be set at a threshold of 40 students. A lower value may be used at the discretion of each municipality. For instance, a municipality can establish a minimum threshold of 30 students crossing at an all-way stop-controlled intersection. Regardless of the threshold, the use of a uniform value throughout the municipality provides a quantitative tool for prioritizing the implementation of school crossing guards. The benefits are to ensure consistency of application, and to allow municipalities to focus their resources at school crossings where student utilization is higher. If the student crossing volumes do not meet the minimum threshold, alternate solutions outlined in Chapter 3.7 should be considered to improve the safety of student crossings.
Collision Hazard Reporting Frequency: Over the previous three years, there has been an average of more than two reported collisions per year during school operations that are susceptible to correction by a school crossing guard.
Inadequate Visibility: During the site visit, pedestrian and motorist visibility should be evaluated based on the presence of:
• Vertical or horizontal road geometries;
• Permanent or temporary physical barriers suchas trees, shrubs, billboards, bus shelters orbuildings; or
• High frequency of heavy vehicles.
Methods of evaluating sight distance are provided in the Transportation Association of Canada (TAC) – Geometric Design Guide for Canadian Roads – Part 1: Chapter 1.2.5 Sight Distance.
Number of Gaps Available in Urban Locations: In highly urban locations where mixed-uses surround a school site and where the number of conflicting vehicular movements is consistently high, the actual number of gaps should be monitored. Under these circumstances, the Gap Study method can be used to complete the school crossing guard warrant. Details of the Gap Study method are provided in Chapter 5.3.
Proximity to a School: In general, crossing guards should be deployed at intersections or crossings where the subject school to be served is visible or in proximity. In addition, the site inspection process should also verify which route students prefer to take. The combination of these two aspects will help determine the appropriate location for a school crossing guard. An all-way stop-controlled intersection may meet the Exposure Index requirements, but it may not lead to the preferable route for students.
7.4 Signage and Pavement Marking Applications
Once it is established that school crossing guards are warranted at an all-way stop-controlled intersection, the associated signage and pavement markings required for implementation are outlined below.
(a) As per Section 3.8 of OTM Book 11- Pavement, Hazard and DelineationMarkings, crosswalk lines must be solidwhite parallel retroreflective lines 10cm to 20 cm wide, extending entirelyacross the pavement. The crosswalkmust be at least 2.5 m wide. Widths of 3m to 4 m are typical for urban areas withsignificant pedestrian activity.
Chapter 7

34OTC School Crossing Guard Guide ∙ May 2017
(b) Crosswalk markings for supervised school crosswalks, must conform to the OTM requirements.
(c) School crosswalks may be supplemented with signs and pavement markings warning ofa school crossing ahead. Pavement markings stating “SCHOOL” or “SCHOOL XING” may beprovided on both approaches to the school crossing. Additional details on the use of advancewarning text are available in Section 3.9 of OTM Book 11.
(d) Where a school crossing is located on a multi-lane road, solid white lane lines should be installedon each approach to the school crossing in order to discourage lane changing. The length ofthese lane lines is dependent on the posted speed of the road, and should be based on fieldobservations. A minimum distance of 30 m is suggested.
While these signage applications are based on the OTM series, the Approval Authority is responsible for ensuring that the necessary traffic control devices, signage and pavement markings are implemented in an appropriate manner. Therefore, it is recommended that the Approval Authority review each crossing location on a site-by-site basis to ensure that the site-specific characteristics are considered in the signage and pavement marking application.
Chapter 7

35OTC School Crossing Guard Guide ∙ May 2017
8.0 SCHOOL CROSSING GUARD WARRANT AT MINOR STREET STOP-CONTROLLED INTERSECTIONS
This chapter describes the process to determine whether or not to assign a school crossing guard at a minor street stop-controlled intersection. The chapter begins with a description of the data that needs to be collected. Next, the different warrant methods are described. Other factors to consider in the warrant process are also provided.
8.1 Context
At a minor street stop-controlled intersection, stop signs are provided on the minor street approaches. Generally speaking, the traffic volumes on the uncontrolled or free-flow approaches are higher than the stop-controlled approaches. As per the Highway Traffic Act, vehicles approaching a stop sign at an intersection must stop at the stop bar, or if none, before the nearest crosswalk, thereby yielding to vehicular traffic and pedestrians on the approaches with the right-of-way. From a pedestrian perspective, there are two types of crossing at a minor street stop-controlled intersection:
1. Pedestrians crossing parallel to the free-flowtraffic approach: Traffic from the minor streetapproach is required to stop at the stop barand yield to these pedestrians. This is shownin Figure 8-1. There may be conflicting turningmovements from the free-flow approach thatcompete for the same right-of-way with thesepedestrians. On this basis, the ExposureIndex method is the recommended way ofevaluating the need for school crossing guardsfor the crossing parallel to the free-flow trafficapproach.
Figure 8-1 – Crossing Parallel to the Major Street Approach
2. Pedestrians crossing from the stop-controlledapproach: These pedestrians have to rely ongaps in the free-flow traffic approaches in orderto cross the road. This is shown in Figure 8-2.The need for school crossing guards for thistype of pedestrian crossing can be evaluatedwith either the Exposure Index method orthe Gap Study method because there areconflicting movements and also reliance ongaps in the free-flow approach to cross.
Chapter 8
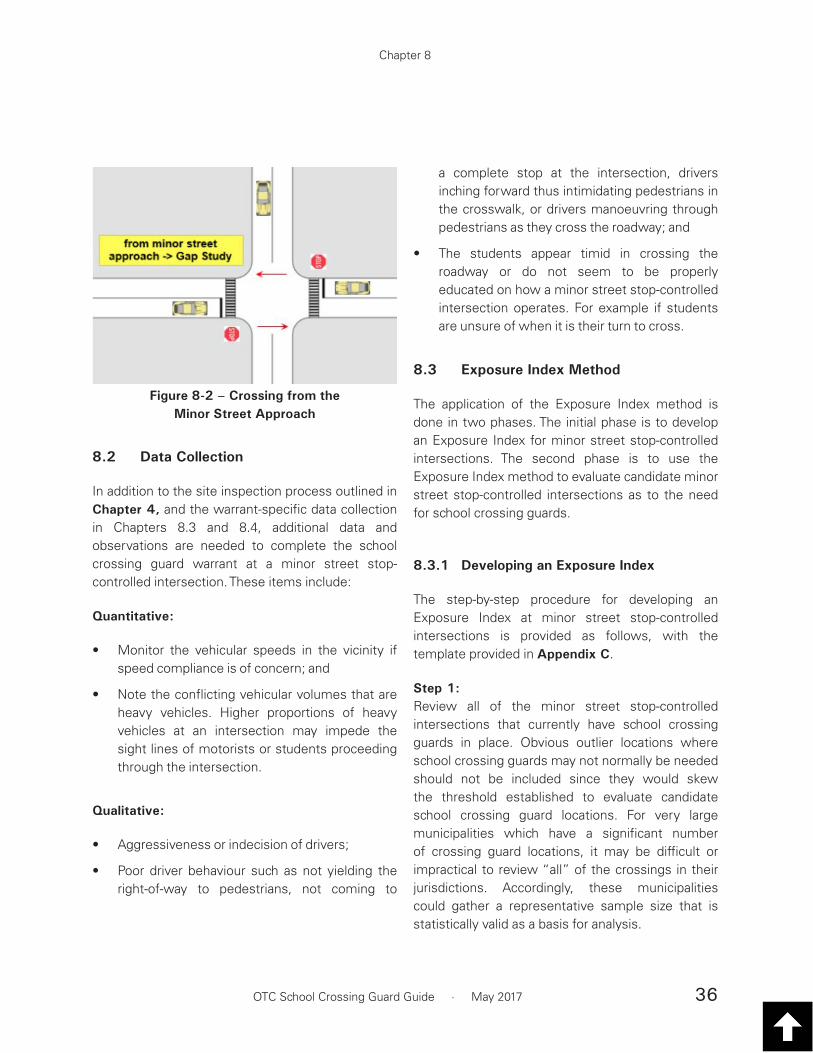
36OTC School Crossing Guard Guide ∙ May 2017
8.2 Data Collection
In addition to the site inspection process outlined in Chapter 4, and the warrant-specific data collection in Chapters 8.3 and 8.4, additional data and observations are needed to complete the school crossing guard warrant at a minor street stop-controlled intersection. These items include:
Quantitative:
• Monitor the vehicular speeds in the vicinity ifspeed compliance is of concern; and
• Note the conflicting vehicular volumes that areheavy vehicles. Higher proportions of heavyvehicles at an intersection may impede thesight lines of motorists or students proceedingthrough the intersection.
Qualitative:
• Aggressiveness or indecision of drivers;
• Poor driver behaviour such as not yielding theright-of-way to pedestrians, not coming to
a complete stop at the intersection, drivers inching forward thus intimidating pedestrians in the crosswalk, or drivers manoeuvring through pedestrians as they cross the roadway; and
• The students appear timid in crossing theroadway or do not seem to be properlyeducated on how a minor street stop-controlledintersection operates. For example if studentsare unsure of when it is their turn to cross.
8.3 Exposure Index Method
The application of the Exposure Index method is done in two phases. The initial phase is to develop an Exposure Index for minor street stop-controlled intersections. The second phase is to use the Exposure Index method to evaluate candidate minor street stop-controlled intersections as to the need for school crossing guards.
8.3.1 Developing an Exposure Index
The step-by-step procedure for developing an Exposure Index at minor street stop-controlled intersections is provided as follows, with the template provided in Appendix C.
Step 1: Review all of the minor street stop-controlled intersections that currently have school crossing guards in place. Obvious outlier locations where school crossing guards may not normally be needed should not be included since they would skew the threshold established to evaluate candidate school crossing guard locations. For very large municipalities which have a significant number of crossing guard locations, it may be difficult or impractical to review “all” of the crossings in their jurisdictions. Accordingly, these municipalities could gather a representative sample size that is statistically valid as a basis for analysis.
Figure 8-2 – Crossing from the Minor Street Approach
Chapter 8

37OTC School Crossing Guard Guide ∙ May 2017
Step 2: Review the duration of current school crossing guard supervision at all of the minor street stop-controlled intersections during the morning, midday and afternoon school peak periods. Then determine a common duration that best satisfies all of the intersections. For example, if school crossing guards are currently implemented at a minimum of 30 minutes at all of the minor street stop-controlled intersections during various school peak periods, then the common duration would be 30 minutes. The purpose of this is to establish a common observation duration so that all subsequent evaluations can be completed on the same basis.
Step 3: For the leg of the intersection that is being crossed with the assistance of a guard, identify the conflicting vehicular movements. In the context of this Guide, the conflicting movements for different legs of a minor street stop-controlled intersection are shown in Figures 8-3 and 8-4. These conflicting vehicular movements have the most direct correlation with the safety of student crossings.
In Figure 8-3, the conflicting vehicular movements for the pedestrian crossing along the minor street stop-controlled approach are:
• Southbound through traffic;
• Eastbound right turns;
• Westbound left turns; and
• All northbound movements.
In Figure 8-4, the conflicting vehicular movements for the pedestrian crossing along the major street approach are:
• Southbound through traffic;
• Eastbound right turns;
• Westbound left turns; and
• All northbound movements.
Figure 8-4 – Conflicting Vehicular Movements for the Major Street Free Flow Leg
Figure 8-3 – Conflicting Vehicular Movements for the Minor Street Stop-controlled Leg
Chapter 8

38OTC School Crossing Guard Guide ∙ May 2017
Step 4: Count the conflicting vehicular volume during the school peak periods. The duration of the counts would be based on the uniform duration established in Step 2, and the movements counted are established in Step 3. The counts should be completed on typical school days, as discussed further in Chapter 4.5.
Step 5: Count the student crossing volumes that are assisted by the school crossing guard. The count needs to be completed concurrently and for the same duration as the vehicular count in Step 2. Students are at a minimum to be those in JK to Grade 5, and beyond at the discretion of each municipality. Students crossing with their parents should also be included in the count. Bused students are not typically recorded in the student count. Crossing guards would not be assigned for bused students since school buses are equipped with flashing lights and a stop sign and can change their pick up/drop off location if considered unsafe.
Step 6: Multiply the student crossing volume by the conflicting vehicular volume for each intersection and for each school period evaluated.
Step 7: Select the school period for each minor street stop-controlled intersection that has the highest product of student crossing volume and conflicting vehicular volume. For example, the morning and afternoon school peak periods were counted at a minor street stop-controlled intersection and the products of student and conflicting vehicular volume were 1,000 and 1,700, respectively. In this case, the conflicting vehicular volume and student crossing volume during the afternoon school peak would be the critical dataset that is used for this intersection.
Step 8: Input the critical dataset of conflicting vehicular
volume and the student crossing volume for each minor street stop-controlled intersection into the Exposure Index template that is presented in Appendix C.
Step 9: Once Step 8 is complete, the Microsoft Excel worksheet will automatically generate the 85th percentile line of the input data. This line represents the threshold used to evaluate the need for school crossing guards at minor street stop-controlled intersections.
8.3.2 Using the Exposure Index for Warrants
Once an Exposure Index has been developed minor street stop-controlled intersections, the following steps can be taken to evaluate potential school crossing guard locations that are minor street stop controlled:
Step 1: Establish the leg of the intersection that would be most suitable for a school crossing guard. This is typically based on the observed tendency of how students cross at an intersection, or based on the preference of the school to establish a safer route. Care should be taken to respect natural “desire lines”, rather than trying to force students to take a more indirect or circuitous route.
Step 2: Identify the conflicting vehicular movements for the leg of the intersection that was established in Step 1. The conflicting movements for the pedestrian crossings along the minor and major approaches are shown in Figures 8-3 and 8-4, respectively.
Step 3: Count the conflicting vehicular volume and student crossing volume during the school peak periods. The duration of the counts would be based on the uniform duration that is used in the Exposure Index
Chapter 8

39OTC School Crossing Guard Guide ∙ May 2017
method, as established in Step 2 in Chapter 8.3.1. The count should be completed on typical school days, as discussed further in Chapter 4.5.
Step 4: Input the conflicting vehicular volume and student crossing volume into the appropriate table of the Exposure Index template. If the resulting point on the graph that corresponds to the location being evaluated is located above the 85th percentile line, then the Exposure Index warrant is met. If the resulting point is plotted below the 85th percentile line, then the minor street stop-controlled intersection being evaluated does not meet the Exposure Index threshold for requiring school crossing guards. In either case, the other factors discussed in Chapter 8.5 need to be considered.
8.4 Gap Study Method
There are two phases to the Gap Study method at a minor street stop-controlled intersection. The first phase is to establish the Safe Gap Time threshold based on the characteristics of the free-flow approach. The second phase is to survey the gaps available in the free-flow approach, and evaluate whether there are enough safe gaps to allow students cross safely.
8.4.1 Phase 1: Safe Gap Time
A Safe Gap Time is the time required during the break in traffic flow that permits students to cross the road safely. Because this parameter will be used as the benchmark for the minor street stop-controlled school crossing guard warrant, it is important that the Approval Authority understands the Safe Gap Time calculation methodology. Safe Gap Time can be calculated as:
Safe Gap Time (G) = Perception & Reaction Time (P) + Crossing Time + Group Factor Time
which is the equivalent to:
G = P + (W / S) + T (N – 1)
The parameters in the Safe Gap Time calculation need to be collected as part of the site inspection process outlined in Chapter 4, and are detailed as follows:
• P = Average perception and reaction time of students (measured in seconds) – This is the time it takes for a student to perceive whether there are any vehicles approaching and to decide whether to cross or wait. If this is not available, assume 4.0 seconds;
• W = width of the roadway (measured in m) – typically measured as the pavement width of the road. However, to err on the conservative side, the width of the roadway could also be considered the crossing distance from where students typically queue while waiting for a safe gap in the traffic stream to the opposite side of the roadway. This is more conservative because students do not always wait to cross at the edge of pavement or on the curb. This parameter is used to calculate the crossing time;
• S = Average walking speed of students (measured in metres per second) – This can be calculated by measuring the amount of time it takes for students to cross the roadway. The width of the roadway can then be related to the time required to calculate the walking speed. This parameter is used to calculate the crossing time. If this is not available, assume 1.0 m/s;
• T = Group factor (measured in seconds) – This factor is used to account for the fact that when more students cross at the same time,
Chapter 8

40OTC School Crossing Guard Guide ∙ May 2017
it takes longer to cross. This is because a large group of students will have to cross in multiple rows instead one. This parameter is used to calculate the group factor time. If this is not available, assume 2.0 seconds; and
• N = Predominant group size – Observe theaverage number of students crossing togetherin increments of five (for example if 3 studentscross together: N = 1, if 8 students crosstogether: N = 2). This parameter is used tocalculate the group factor time.
Sample calculations of the Safe Gap Time are provided in Appendix D.
8.4.2 Phase 2: Gap Surveys and Analyses
Once the Safe Gap Time has been calculated, the following steps need to be completed during the morning, midday and afternoon school peak periods at the minor street stop-controlled intersection being evaluated:
Step 1: Record the number of gaps in the free-flow approach of the minor street stop-controlled intersection and measure the respective durations using a stopwatch. These observations need to be recorded in five minute intervals during the morning, midday and afternoon school peak periods. Sample Gap Survey forms are provided in Appendix D.
Step 2: Record the number of students crossing during the gap survey in each of the five minute intervals. Students are considered at the minimum to be those in JK to Grade 5, and beyond at the discretion of each municipality.
Step 3: Count the number of gaps recorded in each five minute interval that is equal to or higher than the
Safe Gap Time calculated in Chapter 8.4.1. Gaps that are longer than the calculated Safe Gap Time need to be expressed as increments of the Safe Gap Time. This is done by dividing the gap times by the Safe Gap Time. For example, if the Safe Gap Time was calculated to be 10 seconds, and a long gap of 34 seconds was observed, then there would be three gaps that are considered to be Safe Gaps (34 seconds divided by 10 seconds).
Step 4: Count the number of five minute intervals where there are less than four surveyed gaps that are equal to or higher than the Safe Gap Time.
Step 5: Count the total number of five minute intervals surveyed.
Step 6: Determine the proportion of five minute intervals where there are less than four Safe Gap Times.
Step 7: If less than 50% of the five minute intervals surveyed had less than four Safe Gaps, then a school crossing guard is warranted for the stop-controlled crossing at the minor street stop-controlled intersection.
8.5 Other Factors
In addition to the Exposure Index and the Gap Study methods, the School Crossing Guard warrant at minor street stop-controlled intersections needs to also consider the following factors:
Minimum Student Crossing Volume: To establish a consistent method of evaluation, the minimum number of students crossing during the school peak periods should be set at a threshold of 40 students. A lower value may be used at the discretion of each municipality. For instance, a municipality can establish a minimum threshold of 30 students crossing at a minor street stop-controlled
Chapter 8

41OTC School Crossing Guard Guide ∙ May 2017
intersection. Regardless of the threshold, the use of a uniform value throughout the municipality provides a quantitative tool for prioritizing the implementation of school crossing guards. The benefits are to ensure consistency of application, and to allow municipalities to focus their resources at school crossings where student utilization is higher. If the student crossing volumes do not meet the minimum threshold, alternate solutions outlined in Chapter 3.7 should be considered to improve the safety of student crossings.
Collision Hazard Reporting Frequency: Over the previous three years, there has been an average of more than two reported collisions per year during school operations that are susceptible to correction by a school crossing guard.
Inadequate Visibility: During the site visit, pedestrian and motorist visibility should be evaluated based on the presence of:
• Vertical or horizontal road geometries;
• Permanent or temporary physical barriers suchas trees, shrubs, billboards, bus shelters orbuildings; or
• High frequency of heavy vehicles.
Methods of evaluating sight distance are provided in the Transportation Association of Canada (TAC) – Geometric Design Guide for Canadian Roads – Part 1: Chapter 1.2.5 Sight Distance.
Proximity to a School: In general, school crossing guards should be deployed at crossing facilities where the subject school to be served is visible or in proximity. In addition, the site inspection process should verify which route students prefer to take. The combination of these two aspects will help determine the appropriate location for a school crossing guard.
8.6 Signage and Pavement Marking Applications
Once it is established that a school crossing guard is warranted at a minor street stop-controlled intersection, the associated signage and pavement markings required for implementation are outlined below.
(a) As per Section 3.8 of OTM Book 11- Pavement, Hazard and DelineationMarkings, crosswalk lines must be solidwhite parallel retroreflective lines 10 cmto 20 cm wide, extending entirely acrossthe pavement. The crosswalk must beat least 2.5 m wide. Widths of 3.0 m to4.0 m are typical for urban areas withsignificant pedestrian activity.
(b) Crosswalk markings for supervisedschool crosswalks must conform to theOTM requirements.
(c) School crosswalks may be supplemented with signs and pavement markings warning of a school crossing ahead. Pavement markings stating “SCHOOL” or “SCHOOL XING” may be provided on both approaches to the school crossing. Additional details on the use of advanced warning text are available in Section 3.8 of OTM Book 11.
(d) Where a school crossing is located ona multi-lane road, solid white lane linesshould be installed on each approachto the school crossing in order todiscourage lane changing. The lengthof these lane lines is dependent on theposted speed of the road, and should bebased on field observations. A minimumdistance of 30 m is recommended.
Chapter 8

42OTC School Crossing Guard Guide ∙ May 2017
While these signage applications are based on the OTM series, the Approval Authority is responsible for ensuring that the necessary signage and pavement markings are implemented in an appropriate manner. It is recommended that the Approval Authority review each crossing location on a site-by-site basis to ensure that the site-specific characteristics are considered in the signage application. Any deviation from the OTM requirements should be supported by a well-documented rationale.
Chapter 8

43OTC School Crossing Guard Guide ∙ May 2017
9.0 SCHOOL CROSSING GUARD WARRANT AT PEDESTRIAN SIGNALS
This chapter describes the process to determine whether or not to assign a school crossing guard at a pedestrian signal location. The chapter begins with a description of the data that needs to be collected. Next the steps required to develop an Exposure Index is provided, along with how to apply the warrant to candidate pedestrian signal locations. Other factors to consider in the warrant process are also provided.
9.1 Context
Based on OTM Book 15, Section 6.3.1.2, traffic signals that are dedicated primarily to providing a controlled environment for pedestrians to cross a roadway may be installed as pedestrian signals at either:
• Intersections as Intersection Pedestrian Signals(IPS); or
• Between intersections as Mid-block PedestrianSignals (MPS)
Pedestrian signals operate in a “semi-actuated” mode by pedestrians activating a pushbutton to cross the main street. Regular traffic signals control the major roadway approaches. The minor street at an IPS intersection is controlled by stop signs. For IPS intersections, the minor street traffic must be stop controlled, and may cross the intersection during a gap in traffic on the major street or turn during the pedestrian phase if motorists do not conflict with pedestrian crossings. The definition and concept of IPS and MPS are discussed in Chapter 3.
9.2 Data Collection
In addition to the site inspection process outlined in Chapter 4, additional data and observations are needed to complete the crossing guard warrant at an IPS or MPS crossing location. These items include:
Quantitative:
• Count the conflicting vehicular volume asspecified in Step 4 of Chapter 9.3.2 during themorning, midday and afternoon school peakperiods;
• Count the number of students that cross eachleg of the intersection during the morning,midday and afternoon school peak periods.Students are considered those in JK to Grade5. At the discretion of each municipality, moresenior grades may be included in the studentvolume. For the purpose of crossing guardwarrants, student volumes include studentswalking with their parents. These counts shouldbe done concurrently with the conflictingvehicular volume count;
• Monitor the vehicular speeds in the vicinity ifspeed compliance is of concern; and
• Note the conflicting vehicular volumes that areheavy vehicles. Higher proportions of heavyvehicles at an intersection may impede thesight lines of motorists or students proceedingthrough the intersection.
Chapter 9
44OTC School Crossing Guard Guide ∙ May 2017
Qualitative:
• Aggressiveness or indecision of drivers duringthe amber and all red indications, as well asconfusion from the stop-controlled approaches;
• Poor driver behaviour such as not yieldingthe right-of-way to pedestrians, not comingto a complete stop at the intersection prior toturning on a red display, drivers inching forwardthus intimidating pedestrians in the crosswalk,or drivers manoeuvring through pedestrians asthey cross the roadway; and
• The students appear timid in crossing theroadway or do not seem to be properly trainedon how to cross the road safely. This mayinclude forgetting to push the pedestrianpushbutton, or entering the roadway after theflashing Don’t Walk indication commences.
9.3 Warrant Method
The warrant method for IPS and MPS locations are not the same because they differ from a conflicting movement perspective. At an IPS intersection there is the potential for conflicting movements between motorist and pedestrians. For example, vehicular movements from the minor street approach can conflict with the pedestrian phase. At a MPS location there are no conflicting movements because all through volumes must adhere to the traffic signal display. With respect to these differences, the following warrant methods should be applied.
9.3.1 Exposure Index Method
The need for school crossing guard at an IPS intersection is best evaluated with the Exposure Index method, which relates the student volume to the conflicting vehicular movements. The application of the Exposure Index method is done in two phases. The initial phase is to develop an
Exposure Index for IPS intersections. The second phase is to use the Exposure Index method to evaluate candidate IPS intersections as to the need for school crossing guards.
9.3.2 Developing an Exposure Index
The step-by-step procedure for developing an Exposure Index at IPS intersections is provided as follows, with the template provided in Appendix C.
Step 1: Review all of the IPS intersections that currently have school crossing guards in place. Obvious outlier locations where school crossing guards may not normally be needed should not be included since they would skew the threshold established to evaluate candidate school crossing guard locations. For very large municipalities which have a significant number of crossing guard locations, it may be difficult or impractical to review “all” of the crossings in their jurisdictions. Accordingly, these municipalities could gather a representative sample size that is statistically valid as a basis for analysis.
Step 2: Review the duration of current school crossing guard supervision at all of the IPS intersections during the morning, midday and afternoon school peak periods. Then determine a common duration that best satisfies all of the IPS intersections. For example, if school crossing guards are currently implemented at a minimum of 30 minutes at all IPS intersections during various school peak periods, then the common duration would be 30 minutes. The purpose of this is to establish a common
Chapter 9

45OTC School Crossing Guard Guide ∙ May 2017
observation duration so that all subsequent evaluations can be completed on the same basis.
Step 3: For the crossing that is equipped with the IPS and being supervised by a school crossing guard, identify the conflicting vehicular movements. The conflicting movements for an IPS crossing are shown in Figure 9-1.
It should be noted that the need for a school crossing guard at the stop-controlled approaches would be evaluated based on the minor street stop-controlled warrant methodology outlined in Chapter 8. For the major street crossing, a guard should onlybe assigned to the crosswalk that is equipped withthe IPS. The intent is to concentrate the crossingsof the major street to where there are pedestriansignals and a marked crosswalk.
Step 4: Count the conflicting vehicular volumes during the school peak periods. The duration of the counts would be based on the uniform duration established in Step 2, and the movements counted are established in Step 3. The counts should be completed on typical school days, as discussed further in Chapter 4.5.
Step 5: Count the student crossing volumes that are assisted by the school crossing guard. The count needs to be completed concurrently and for the same duration as the vehicular count in Step 2. Students are at a minimum to be those in JK to Grade 5, and beyond at the discretion of each municipality. Students crossing with their parents should also be included in the count. Bused students are not typically recorded in the student count. Crossing Guards would not be assigned for bused students since school buses are equipped with flashing lights and a stop sign and can change their pick up/drop off location if considered unsafe.
Figure 9-1 – Conflicting Movements for Pedestrians at an IPS
Chapter 9
Step 6: Multiply the student crossing volume by the conflicting vehicular volume for each IPS intersection and for each school period evaluated.
Step 7: Select the school period for each IPS intersection that has the highest product of student crossing volume and conflicting vehicular volume. For example, the morning and afternoon school peak periods were counted at an IPS intersection and the products of student and conflicting vehicular volume were 1,000 and 1,700, respectively. In this case, the conflicting vehicular volume and student crossing volume during the afternoon school peak would be the critical dataset that for this IPS intersection.
Step 8: Input the critical dataset of conflicting vehicular volume and the student crossing volume for each IPS intersection into the Exposure Index template that is presented in Appendix C.

46OTC School Crossing Guard Guide ∙ May 2017
Step 9: Once Step 8 is complete, the Microsoft Excel worksheet will automatically generate the 85th percentile line of the input data. This line represents the threshold used to evaluate the need for school crossing guards at IPS intersections.
9.3.3 Using the Exposure Index for Warrants
Once an Exposure Index has been developed for IPS intersections, the following steps can be taken to evaluate potential school crossing guard locations that are IPS controlled:
Step 1: Identify the conflicting vehicular movements for the crossing of the major street that is equipped with the IPS. The conflicting movements for the IPS leg are shown in Figure 9-1.
Step 2: Count the conflicting vehicular volumes and student crossing volumes during the school peak periods. The duration of the counts would be based on the uniform duration that is used in the Exposure Index method, as established in Step 2 in Chapter 9.3.2. The count should be completed on typical school days, as discussed further in Chapter 4.5.
Step 3: Input the conflicting vehicular volume and student crossing volume into the appropriate table of the Exposure Index template. If the resulting point on the graph that corresponds to the location being evaluated is located above the 85th percentile line, then the Exposure Index warrant is met. If the resulting point is plotted below the 85th percentile line, then the IPS intersection being evaluated does not meet the Exposure Index threshold for requiring school crossing guards. In either case, the other factors discussed in Chapter 9.3.4 need to be considered.
Chapter 9
9.3.4 Other Factors
For both IPS and MPS locations, the following factors need to be considered – often in combination to determine the need for school crossing guards:
Minimum Student Crossing Volume: To establish a consistent method of evaluation, the minimum number of students crossing during the school peak periods should be set at a threshold of 40 students. A lower value may be used at the discretion of each municipality. For instance, a municipality can establish a minimum threshold of 30 students crossing at an IPS or MPS location. Regardless of the threshold, the use of a uniform value throughout the municipality provides a quantitative tool for prioritizing the implementation of school crossing guards. The benefits are to ensure consistency of application, and to allow municipalities to focus their resources at school crossings where student utilization is higher. If the student crossing volumes do not meet the minimum threshold, alternate solutions outlined in Chapter 3.7 should be considered to improve the safety of student crossings.
Collision Hazard Reporting Frequency: Over the previous three years, there has been an average more than two reported collisions per year during school operations that are susceptible to correction by a school crossing guard.
Inadequate Visibility: During the site visit, pedestrian and motorist visibility should be evaluated based on the presence of:
• Vertical or horizontal road geometries;
• Permanent or temporary physical barriers suchas trees, shrubs, billboards, bus shelters orbuildings; or
• High frequency of heavy vehicles.

47OTC School Crossing Guard Guide ∙ May 2017
Methods of evaluating sight distance are provided in the Transportation Association of Canada (TAC) – Geometric Design Guide for Canadian Roads – Part 1: Chapter 1.2.5 Sight Distance.
Number of Gaps Available at Urban Locations: In highly urban locations where mixed uses surround a school site and where the number of conflicting vehicular movements at an IPS is consistently high, the actual number of gaps during the pedestrian phase should be monitored. Under these circumstances, the Gap Study method can be used to complete the school crossing guard warrant. Details of the Gap Study method are provided in Chapter 5.3.
Proximity to a School: In general, school crossing guards should be deployed at intersections or crossings where the subject school to be served is visible or in proximity. In addition, the site inspection process should verify which route students prefer to take. The combination of these two aspects will help determine the appropriate location for a school crossing guard. An IPS or MPS location may meet the Exposure Index requirements, but it may not lead to the preferable route for students.
9.4 Signage and Pavement Marking Applications
As per OTM Book 6 - Warning Signs Section 7, signed school crossings must not be provided if pedestrian signals are provided. Thus, no school-related signs or pavement markings should be placed at an IPS or MPS location. Any deviation from the OTM requirements should be supported by a well-documented rationale.
General signage and pavement marking requirements for IPS or MPS locations are provided in OTM Book 15, Section 6.3.1.
Chapter 9

48OTC School Crossing Guard Guide ∙ May 2017
10.0 SCHOOL CROSSING GUARD WARRANTS AT PEDESTRIAN CROSSOVERS
This chapter describes the process to determine whether or not to assign a school crossing guard at a pedestrian crossover (PXO). This chapter begins with a description of the different types of PXOs and the data that needs to be collected. Next, the steps of the warrant process are described.
10.1 Context
Based on OTM Book 15, Section 6.3.2, PXOs provide pedestrians with protected crossing opportunities by requiring motorists to yield to pedestrians within the crosswalk. PXOs mean any portion of a roadway distinctly indicated for pedestrian crossings by signs on the highway and lines or other markings on the surface of the roadway as prescribed by the regulations and the HTA. The presence of a pedestrian in the crosswalk requires motorists approaching the PXO to stop, yield the right-of-way, and proceed only when the pedestrian has crossed the roadway. For additional legislative and By-law information, refer to Chapter 3.1 – Legislative Authority.
There are four types of PXOs:
Level 1 Type A: is distinctively defined by the use of regulatory and warning signs, flashing amber beacons and pavement markings prescribed and illustrated by Ontario Regulation 402/15, Pedestrian Crossover Signs. This treatment system uses internally illuminated overhead warning signs. An illustration of a Level 1 Type A PXO as per MTO is shown in Figure 10-1.
Figure 10-1: Level 1 Type A Pedestrian Crossover
Chapter 10

49OTC School Crossing Guard Guide ∙ May 2017
Level 2 Type B: is distinctly defined by the prescribed use of regulatory and warning signs, rapid rectangular flashing beacons (RRFB) and pavement markings prescribed and illustrated by Ontario Regulation 402/15, Pedestrian Crossover Signs. The system uses both the side-mounted and overhead regulatory signs. An illustration of a Level 2 Type B PXO as per MTO is shown in Figure 10-2. Figure 10-3 illustrates the application of this type of PXO at a mid-block crossing.
Figure 10-2: Level 2 Type B Pedestrian Crossover
Figure 10-3: Level 2 Type B Pedestrian Crossover (Milton)
Chapter 10

50OTC School Crossing Guard Guide ∙ May 2017
Level 2 Type C: is distinctly defined by the prescribed use of regulatory and warning signs, rapid rectangular flashing beacons (RRFB) and pavement markings prescribed and illustrated by Ontario Regulation 402/15, Pedestrian Crossover Signs. The system uses only side-mounted regulatory signs. An illustration of a Level 2 Type C PXO as per MTO is shown in Figure 10-4.
Level 2 Type D: is distinctly defined by the prescribed use of regulatory and warning signs plus pavement markings prescribed and illustrated by Ontario Regulation 402/15, Pedestrian Crossover Signs. The system uses only side-mounted regulatory signs and does not require flashing beacons. An illustration of a Level 2 Type D PXO as per MTO is shown in Figure 10-5. Figure 10-6 illustrates the application of this type of PXO at a minor street stop-controlled intersection.
Figure 10-5: Level 2 Type D Pedestrian Crossover
Figure 10-6: Level 2 Type D Pedestrian Crossover (London)
Chapter 10
Figure 10-4: Level 2 Type C Pedestrian Crossover

51OTC School Crossing Guard Guide ∙ May 2017
10.2 Data Collection
In addition to the site inspection process outlined in Chapter 4, additional data and observations are needed to complete the school crossing guard warrant at a PXO location. These items include:
Quantitative:
• Count the conflicting vehicular volume asspecified in Step 4 of Chapter 10.3.2 duringthe morning, midday and afternoon school peakperiods;
• Count the number of students that cross thePXO during the morning, midday and afternoonschool peak periods. Students are consideredthose in JK to Grade 5. At the discretion ofeach municipality, more senior grades may beincluded in the student volume. For the purposeof crossing guard warrants, student volumesinclude students walking with their parents.These counts should be done concurrently withthe conflicting vehicular volume count;
• Monitor the vehicular speeds in the vicinity ifspeed compliance is of concern; and
• Note the conflicting vehicular volumes that areheavy vehicles. Higher proportions of heavyvehicles at an intersection may impede thesight lines of motorists or students proceedingthrough the intersection.
Qualitative:
• Aggressiveness or indecision of drivers in thevicinity of the PXO;
• Poor driver behaviour such as not yielding theright-of-way to pedestrians, drivers inchingforward thus intimidating pedestrians in thecrosswalk, or drivers manoeuvring throughpedestrians as they cross the roadway; and
• The students appear timid in crossing the
roadway or do not seem to be properly trained on how to cross at the PXO. This may include forgetting to push the pedestrian pushbutton if one is present, or understanding when they can safely enter the crosswalk after the approaching vehicles have stopped.
10.3 Warrant Method
The warrant method at a PXO is dependent on whether the PXO is located at a mid-block location or in the vicinity of an intersection. It is important to distinguish this because a PXO at a mid-block location would have no conflicting vehicular movements since all of the through traffic is required to stop and yield to pedestrians including students. Conversely, a PXO at an intersection would be susceptible to conflicting vehicular movements from the side streets. With respect to this difference, the school crossing guard warrant methods for PXOs located at both locations are outlined below:
Mid-block PXO: The recommended warrant method is based on the consideration of the other factors listed in Chapter 10.3.4.
PXO at an intersection: The recommended warrant method is based on the Exposure Index in conjunction with the consideration of the other factors listed in Chapter 10.3.4.
10.3.1 Exposure Index
The application of the Exposure Index method is done in two phases. The initial phase is to develop an Exposure Index for PXO locations located at an intersection. The second phase is to use the Exposure Index method to evaluate candidate PXOs as to the need for school crossing guards.
Chapter 10

52OTC School Crossing Guard Guide ∙ May 2017
10.3.2 Developing an Exposure Index
The step-by-step procedure for developing an Exposure Index is provided as follows, with the template provided in Appendix C.
Step 1: Review all of the PXOs located at intersections that currently have school crossing guards in place. Obvious outlier locations where school crossing guards may not normally be needed should not be included since they would skew the threshold established to evaluate candidate school crossing guard locations. For very large municipalities which have a significant number of crossing guard locations, it may be difficult or impractical to review “all” of the crossings in their jurisdictions. Accordingly, these municipalities could gather a representative sample size that is statistically valid as a basis for analysis.
Step 2: Review the duration of current school crossing guard supervision at all of the PXO locations being evaluated during the morning, midday and afternoon school peak periods. Then determine a common duration that best satisfies all of the PXO locations. For example, if school crossing guards are currently implemented at a minimum of 30 minutes at all of the locations during various school peak periods, then the common duration would be 30 minutes. The purpose of this is to establish a common observation duration so that all subsequent evaluations can be completed on the same basis.
Step 3: For the crossing that is equipped with the PXO and is being supervised with the assistance of a school crossing guard, identify the conflicting vehicular movements. The conflicting movements for a PXO located at an intersection are shown in Figure 10-7.
It should be noted that the need for a school crossing guard at the stop-controlled approaches
would be evaluated based on the minor street stop-controlled warrant methodology outlined in Chapter 8. For the major street crossing, a guard should onlybe assigned to the crosswalk that is equipped withthe PXO. The intent is to concentrate the crossingsof the major street to where there is a PXO and amarked crosswalk.
Step 4: Count the conflicting vehicular volumes during the school peak periods. The duration of the counts would be based on the uniform duration established in Step 2, and the movements counted are established in Step 3. The counts should be completed on typical school days, as discussed further in Chapter 4.5.
Step 5: Count the student crossing volume that are assisted by school crossing guard. The count needs to be completed concurrently and for the same duration as the vehicular count in Step 2. Students are at a minimum to be those in JK to Grade 5, and beyond at the discretion of each municipality. Students crossing with their parents should also be included in the count. Bused students are not typically recorded in the student count. Crossing guards
Figure 10-7 – Conflicting Movements for a PXO Crossing at an Intersection
Chapter 10

53OTC School Crossing Guard Guide ∙ May 2017
would not be assigned for bused students since school buses are equipped with flashing lights and a stop sign and can change their pick up/drop off location if considered unsafe.
Step 6: Multiply the student crossing volume by the conflicting vehicular volume for each intersection and for each school period evaluated.
Step 7: Select the school period for each PXO location that has the highest product of student crossing volume and conflicting vehicular volume. For example, the morning and afternoon school peak periods were counted at a PXO location and the products of student and conflicting vehicular volume were 1,000 and 1,700, respectively. In this case, the conflicting vehicular volume and student crossing volume during the afternoon school peak would be the critical dataset that is used for this intersection.
Step 8: Input the critical dataset of conflicting vehicular volume and the student crossing volume for each PXO location into the Exposure Index template that is presented in Appendix C.
Step 9: Once Step 8 is complete, the Microsoft Excel worksheet will automatically generate the 85th percentile curve of the input data. This curve represents the threshold used to evaluate the need for school crossing guards at PXO locations at an intersection.
10.3.3 Using the Exposure Index for Warrants
Once an Exposure Index has been developed for PXOs located at an intersection, the following steps can be taken to evaluate potential school crossing guard locations that are PXO controlled:
Step 1: Identify the conflicting vehicular movements for the crossing of the major street that is equipped with the PXO. The conflicting movements for the PXO leg are shown in Figure 10-7.
Step 2: Count the conflicting vehicular volumes and student crossing volumes during the school peak periods. The duration of the counts would be based on the uniform duration that is used in the Exposure Index method, as established in Step 2 in Chapter 10.3.2. The count should be completed on typical school days, as discussed further in Chapter 4.5.
Step 3: Input the conflicting vehicular volume and student crossing volume into the appropriate table of the Exposure Index template. If the resulting point on the graph that corresponds to the location being evaluated is located above the 85th percentile line, then the Exposure Index warrant is met. If the resulting point is plotted below the 85th percentile line, then the PXO location being evaluated does not meet the Exposure Index threshold for requiring school crossing guards. In either case, the other factors discussed in Chapter 10.3.4 need to be considered.
10.3.4 Other Factors
As noted in Chapter 5.3, the following factors need to be considered – often in combination when evaluating the need for a school crossing guard:
Minimum Student Crossing Volume: To establish a consistent method of evaluation, the minimum number of students crossing during the school peak periods should be set at a threshold of 40 students. A lower value may be used at the discretion of each municipality. For instance, a municipality can establish a minimum threshold of 30 students crossing at PXO locations. Regardless of the threshold, the use of a uniform value throughout the municipality provides a quantitative tool for prioritizing the implementation of
Chapter 10

54OTC School Crossing Guard Guide ∙ May 2017
school crossing guards. The benefits are to ensure consistency of application, and to allow municipalities to focus their resources at school crossings where student utilization is higher. If the student crossing volumes do not meet the minimum threshold, alternate solutions outlined in Chapter 3.7 should be considered to improve the safety of student crossings.
Collision Hazard Reporting Frequency: Over the previous three years, there has been an average of more than two reported collisions per year during school operations that are susceptible to correction by a school crossing guard.
Inadequate Visibility: During the site visit, pedestrian and motorist visibility should be evaluated based on the presence of:
• Vertical or horizontal road geometries;
• Permanent or temporary physical barriers such as trees, shrubs, billboards, bus shelters or buildings; or
• High frequency of heavy vehicles.
Methods of evaluating sight distance are provided in theTransportation Association of Canada (TAC) – Geometric Design Guide for Canadian Roads – Part 1: Chapter 1.2.5 Sight Distance.
Number of Gaps Available at Urban Locations: In highly urban locations where mixed-uses surround a school site and where the number of conflicting vehicular movements is consistently high, the actual number of gaps during the pedestrian phase should be monitored. Under these circumstances, the Gap Study method can be used to complete the school crossing guard warrant. Details of the Gap Study method are provided in Chapter 5.3.
Proximity to a School: In general, school crossing guards should be deployed at intersections or crossings where the subject school to be served is visible or in proximity. In addition, the site inspection process should also verify which route students prefer to take. The combination of these two aspects will help determine the appropriate location for a school crossing guard. A PXO location may meet the Exposure Index requirements, but it may not lead to the preferable route for students.
HTA Compliance: Since the operation of a pedestrian crossover relies on the compliance of motorists and pedestrians to the Highway Traffic Act, the compliance rate would be an important indicator of the need for additional safety measures.
10.4 Signage and Pavement Markings
As per OTM Book 6 - Warning Signs Section 7, signed school crossings must not be located at pedestrian crossovers. Thus, no school-related signs or pavement markings should be placed at PXO locations. Any deviation from the OTM requirements should be supported by a well-documented rationale.
General signage and pavement marking requirements for PXOs are provided in OTM Book 15, Section 6.3.1.
Chapter 10

55OTC School Crossing Guard Guide ∙ May 2017
11.0 SCHOOL CROSSING GUARD WARRANTS AT MID-BLOCK LOCATIONS
This chapter describes the process to determine whether or not to assign a school crossing guard at a mid-block location. The chapter begins with a description of the data required to establish the benchmark for the Gap Study method, along with how the Safe gap Time is calculated. Next, the steps to using the Gap Study method are outlined. Other factors to consider in the warrant process are also provided.
11.1 Context
School crossing guards are implemented at mid-block locations to assist students crossing a street as they walk to and from a nearby school. The fundamental difference between mid-block crossings and signalized or unsignalized intersections is that motorists have the right-of-way on the road; thus, students have to rely on available gaps in traffic to cross the roadway. For younger students, this may present a challenge due to their inability to judge vehicular speeds or the time required to safely cross the road. There are generally two types of mid-block crossings:
1. An uncontrolled mid-block crossing that isindicated by pavement markings or signs. Aconcern with this type of mid-block crossinglocation is that they create a false sense ofsafety for the students, since some pedestriansmay mistakenly expect motorists to stop andyield to them once they enter the roadway,even though the vehicle has the right-of-way.
2. A mid-block location that has no pavementmarkings and/or signs. These mid-block locations are casually used by students to crossbecause they are often situated in proximity
to a school or transit facility, and may attract crossings despite the lack of formal pavement markings or signage.
An effective way to improve the safety of mid-block school crossing locations is to assign a school crossing guard to that location, and implement the necessary signage and pavement markings.
11.2 Gap Study Method
Based on the review of best practices in various municipalities, the Gap Study method is the most commonly used and applicable warrant method at mid-block crossings. The Exposure Index method at mid-block locations does not account for the difficulty experienced by students looking for gaps in the roadway due to the absence of any form of clear right-of-way for pedestrians.
There are two phases to the Gap Study method. The first phase is to establish the Safe Gap Time threshold based on the characteristics of a mid-block location. The second phase is to survey the gaps available at the mid-block location and evaluate whether there are enough safe gaps to allow students to cross safely.
11.2.1 Phase 1: Safe Gap Time
A Safe Gap Time is the time required in a break within the traffic flow that permits students to cross the road safely. Because this parameter will be used as the benchmark for the mid-block school crossing guard warrant, it is important that the Approval Authority understand the Safe Gap Time calculation methodology. Safe Gap Time can be calculated as:
Chapter 11

56OTC School Crossing Guard Guide ∙ May 2017
Safe Gap Time (G) = Perception & Reaction Time (P) + Crossing Time + Group Factor Time
which is the equivalent to:
G = P + (W / S) + T (N – 1)
The parameters in the Safe Gap Time calculation need to be collected as part of the site inspection process outlined in Chapter 4, and are detailed as follows:
• P = Average perception and reaction time ofstudents (measured in seconds) – This is thetime it takes for a student to perceive whetherthere are any vehicles approaching and todecide whether to cross or wait. If this is notavailable, assume 4.0 seconds;
• W = width of the roadway (measured in m)– typically measured as the pavement width ofthe road. However, to err on the conservativeside, the width of the roadway could also beconsidered the crossing distance from wherestudents typically queue while waiting for asafe gap in the traffic stream to the oppositeside of the roadway. This is more conservativebecause students do not always wait to crossat the edge of pavement or on the curb. Thisparameter is used to calculate the crossingtime;
• S = Average walking speed of students(measured in metres per second) – This canbe calculated by measuring the amount of timeit takes for students to cross the roadway. Thewidth of the roadway can then be related to thetime required to calculate the walking speed.This parameter is used to calculate the crossingtime. If this is not available, assume 1.0 m/s;
• T = Group factor (measured in seconds) –This factor is used to account for the fact thatwhen more students cross at the same time,it takes longer to cross. This is because a largegroup of students will have to cross in multiplerows instead one. This parameter is used to
calculate the group factor time. If this is not available, assume 2.0 seconds; and
• N = Predominant group size – Observe theaverage number of students crossing togetherin increments of five (for example if 3 studentscross together: N = 1, if 8 students crosstogether: N = 2). This parameter is used tocalculate the group factor time.
Sample calculations of the Safe Gap Time are provided in Appendix D.
11.2.2 Phase 2: Gap Survey and Analyses
Once the Safe Gap Time has been calculated, the following steps need to completed during the morning, midday and afternoon school peak periods at the mid-block location being evaluated: Phase 2 of the Gap Study method includes the following steps:
Once the Safe Gap Time has been calculated, the following items need to be surveyed during the morning, midday and afternoon school peak periods at the mid-block location being evaluated:
Step 1: Record the number of gaps in the roadway and measure the respective durations using a stopwatch. These observations need to be recorded in five minute intervals during the morning, midday and afternoon school peak periods. Sample Gap Survey forms are provided in Appendix D.
Step 2: Record the number of students crossing during the gap survey in each of the five minute intervals. Students are considered at the minimum to be those in JK to Grade 5, and beyond at the discretion of each municipality. Bused students are not typically recorded in the student count. Crossing Guards would not be assigned for bused students since school busses are equipped with flashing lights and a stop sign and can change their pick up/drop off location if considered unsafe.
Chapter 11

57OTC School Crossing Guard Guide ∙ May 2017
Step 3: Count the number of gaps recorded in each five minute interval that is equal to or higher than the Safe Gap Time calculated in Chapter 11.2.1. Continuous long gap times should be expressed as increments of the Safe Gap Time. This is done by dividing long gap times by the Safe Gap Time. For example, if the Safe Gap Time was calculated to be 10 seconds, and a long gap of 34 seconds was observed, then there would be three gaps that are considered to be Safe Gaps (34 seconds divided by 10 seconds).
Step 4: Count the number of five minute intervals where there are less than four surveyed gaps that are equal to or higher than the Safe Gap Time.
Step 5: Count the total number of five minute intervals surveyed.
Step 6: Determine the proportion of five minute intervals where there are less than four Safe Gap Times.
Step 7: If less than 50% of the five minute intervals surveyed had less than four Safe Gaps, then a school crossing guard is warranted at the mid-block location.
11.2.3 Other Factors
In addition to the Gap Study method, the School crossing guard warrant at mid-block locations needs to also consider the following factors:
Minimum Student Crossing Volume: To establish a consistent method of evaluation, the minimum number of students crossing during the school peak periods should be set at a threshold of 40 students. A lower value may be used at the discretion of each municipality. For instance, a municipality can establish a minimum threshold of 30 students
crossing at mid-block location. Regardless of the threshold, the use of a uniform value throughout the municipality provides a quantitative tool for prioritizing the implementation of school crossing guards. The benefits are to ensure consistency of application, and to allow municipalities to focus their resources at school crossings where student utilization is higher. If the student crossing volumes do not meet the minimum threshold, alternate solutions outlined in Chapter 3.7 should be considered to improve the safety of student crossings.
Collision Hazard Reporting Frequency: Over the previous three years, there has been an average of more than two reported collisions per year during school operations that are susceptible to correction by a school crossing guard.
Inadequate Visibility: During the site visit, pedestrian and motorist visibility should be evaluated based on the presence of:
• Vertical or horizontal road geometries;
• Permanent or temporary physical barriers suchas trees, shrubs, billboards, bus shelters orbuildings; or
• High frequency of heavy vehicles.
Methods of evaluating sight distance are provided in the Transportation Association of Canada (TAC) – Geometric Design Guide for Canadian Roads – Part 1: Chapter 1.2.5 Sight Distance.
Proximity to a School: In general, school crossing guards should be deployed at crossing facilities where the subject school to be served is visible or in proximity. In addition, the site inspection process should verify which route students prefer to take. The combination of these two aspects will help determine the appropriate location for a school crossing guard.
Chapter 11
58OTC School Crossing Guard Guide ∙ May 2017
11.3 Signage and Pavement Marking Applications
Once it is established that a school crossing guard is warranted at a mid-block location, the associated signage and pavement markings required for implementation are outlined below.
(a) As per Section 3.8 of OTM Book 11- Pavement, Hazard and DelineationMarkings, crosswalk lines must be solidwhite parallel retroreflective lines 10 cmto 20 cm wide, extending entirely acrossthe pavement. The crosswalk must beat least 2.5 m wide. Widths of 3.0 m to4.0 m are typical for urban areas withsignificant pedestrian activity.
(b) Crosswalk markings for supervisedschool crosswalks must conform tothe OTM requirements. Figures 50and 51 of OTM Book 15 are presentedbelow and, illustrate the requiredcomponents of mid-block uncontrolledschool crossings with designated crossing guards. The layouts providedare for illustrative purposes only anddo not cover every case that may beencountered in the field. Furthermore,the layouts may not show all mandatory components discussed in item d.
(c) School crosswalks may be supplemented with signs and pavementmarkings to caution the presence ofa school crossing ahead. Pavementmarkings stating “SCHOOL” or“SCHOOL XING” may be provided onboth approaches to the school crossing.Additional details on the use of advancewarning text are available in Section 3.8of OTM Book 11.
(d) As per Section 6.3.4 of OTM Book
15, the components of a designated supervised school crossing are provided in the following table:
(e) The recommended distances betweenthe crosswalk and the advanced warningsigns specified in the above table aredependent upon the posted speed limitof the road being crossed as detailed inSection 1.5 of OTM Book 6 – WarningSigns. Details of the pedestrian warningsigns are provided in Section 7 of OTMBook 6.
(f) Where a school crossing is located ona multi-lane road, solid white lane linesshould be installed on each approachto the school crossing in order todiscourage lane changing. The length ofthese lane lines is dependent upon theposted speed of the road, and should bebased on field observations. A minimumdistance of 30 m is recommended.
While these signage applications are based on the OTM series, the Approval Authority is responsible for ensuring that the necessary signage and pavement markings are implemented in an appropriate manner. It is recommended that the Approval Authority review each crossing location on a site-by-site basis to ensure that the site-specific characteristics are considered in the signage application. Any deviation from the OTM requirements should be supported by a well-documented rationale.
Chapter 11

59OTC School Crossing Guard Guide ∙ May 2017
Figure 50: School Crossing with Designated Crossing Guard (Rural Areas)
Chapter 11

60OTC School Crossing Guard Guide ∙ May 2017
Figure 51: School Crossing with Designated Crossing Guard (Urban Areas)
Chapter 11

61OTC School Crossing Guard Guide ∙ May 2017
Required Components Desirable Components Optional Components
• Crossing Guard
• School Crosswalk Markingsfor supervised crossingaccording to OTM Book 11 (different requirements forurban and rural locations)
• School Crossing Sign (Wc-2,Wc-102)
• School Crossing Tab Sign(Wc-2t, Wc-102t)
• School Crossing Ahead Sign(Wc-2A, Wc-102A)
• Crossing Ahead Tab Sign (Wc-2At, Wc-102-At)
• Parking and other sightobstruction prohibition withinat least 30 m of crossings
• Stopping prohibition for aminimum of 15 m on eachapproach to the crossing, and10 m following the crossing
• Refuge Islands and CentreMedians with mandatory:
- Pavement markings on approaches to obstructions
- Keep Right Sign (Rb-25, Rb-125)
- Object Marker Sign (Wa-33L)
- School Zone Maximum Speed Sign (Rb-6)
• School Zone MaximumSpeed When Flashing Sign(Rb-6A)
• Stopping prohibition for aminimum of 30 m on eachapproach to the crossing,and 15 m following thecrossing
• Raised Crosswalk
• Textured Crosswalk
• Advanced Stop Bar
• Safety elementsincluding Barricades,Pedestrian fencing,Gates, Walls, Bollards, or Barriers
Table 15: Components of School Crossing Guard (OTM Book 15)
Chapter 11

62OTC School Crossing Guard Guide ∙ May 2017
12.0 SCHOOL CROSSING GUARDS AT ROUNDABOUTS
12.1 Context
Roundabouts are circular intersections that are used as an alternative form of traffic control to signalized or stop-controlled intersections. Similar to other types of traffic controls, roundabouts should be designed to accommodate pedestrians where there is a reasonable possibility of pedestrian activity. A properly designed roundabout places a high priority on encouraging speed reduction, which then reduces collision severity, especially for pedestrians. A roundabout also reduces the number of conflict points in comparison to a traditional intersection. The following documents have been reviewed for background and best practices:
• An Examination of Pedestrian CrosswalkDesign at Roundabouts, TAC Paper - Phil Weber,2012;
• TAC Synthesis of North American Roundabout Practice, December 2008;
• FHWA Roundabouts: An Informational Guide,2000; and
• NCHRP Report 672 Roundabouts, AnInformation Guide, 2010.
12.2 Best Practice Findings
Based on the review of various municipal guidelines and standards for roundabouts, there is currently insufficient information to evaluate whether a school crossing guard is needed at a roundabout in order to establish a best practice methodology. It should also be noted that some municipalities and guidelines do not recommend implementing school crossing
guards at roundabouts for the following reasons:
• The objectives associated with pedestriancrosswalks at roundabouts compete with theoperation of a roundabout. For example, in anurban environment with high vehicular andpedestrian volumes, there is limited storage forvehicular queues within a roundabout. This mayresult in queue spillover or more aggressivedriving patterns in the vicinity of a roundabout;
• With the landscaping and the nature of aroundabout configuration, it may be challengingto maximize visibility between pedestrians anddrivers;
• It is generally accepted that pedestrians willnot cross at a facility if it takes them too farfrom their intended travel path. The case of aroundabout designed with a crosswalk locatedthree or more passenger car lengths away mayqualify as such a facility;
• Not enough studies have been completed atthe different types of roundabouts that featurea wide range of geometry, provision of splitterislands, flared entries, tapered exits, pedestriancrosswalk setbacks or multi-lane scenarios. Thevariation of these roundabout components mayhave an impact on student safety and whether aschool crossing guard should be assigned;
• Depending on the configuration and size of theroundabout, multiple school crossing guardsmay be necessary. The resources may be moreeffectively allocated at other types of crossingfacilities where only one school crossing guardwould be needed;
Chapter 12

63OTC School Crossing Guard Guide ∙ May 2017
• At the time of preparing this Guide, generalunfamiliarity exists for both pedestrians andmotorists regarding the safe and effective useof roundabouts. The addition of crossing guardsfurther complicates understanding of the right-of-way at this form of traffic control; and
• In Ontario, pedestrians do not have the right-of-way at a roundabout if signs that require driversto yield to pedestrians are not present. Forthis reason, some municipalities are installingpedestrian crossovers on the entrances andexits of roundabouts. The intent is to enhancepedestrian mobility at roundabouts by requiringmotorists to observe pedestrian crossoverrules and stop for pedestrians. Under thesecircumstances, a school crossing guard may notbe needed.
For the above reasons, there is some resistance to implementing school crossing guards at roundabouts. Accordingly, consideration could be given to implementing the guard either downstream or upstream of the roundabout so that it operates similar to a mid-block crossing. This approach provides more storage for vehicular traffic and better visibility between motorists and students.
12.3 Warrant Methods
The Exposure Index method and the Gap Study method are being used by some municipalities to evaluate the need for school crossing guards at a roundabout. As noted earlier, it is recommended that additional studies be done to monitor the need for school crossing guards at roundabouts. The following aspects should be considered when completing a warrant:
Exposure Index Method: As noted in Chapter 5.2, this method relates the conflicting vehicular volume to the student crossing volume. The application of the Exposure Index method is done in two phases. The initial phase is to develop an Exposure Index for roundabouts. The second phase is to use the Exposure Index method to evaluate candidate roundabouts as to the need for school crossing guards. The step-by-step approach to developing an Exposure Index and applying it is the same as outlined in Chapters 6, 7, 8, 9 and 10. The only thing to note is the difference in defining conflicting vehicular movements at a roundabout. The conflicting movements on a leg of a roundabout would be those that travel through the crosswalk. An example of conflicting movements on a leg of a roundabout is shown in Figure 12-1.
Figure 12-1 Conflicting Vehicular Movements at a Leg of a Roundabout
Chapter 12

64OTC School Crossing Guard Guide ∙ May 2017
Gap Study Method: This method can also be applied at roundabouts. The practitioner would have to calculate the safe gap time for the leg that is being evaluated for a school crossing guard. Then the frequency and length of gaps present for pedestrians to cross the leg would have to be surveyed. This method is very similar to the Gap Study method applied at mid-block crossings as described in Chapter 5.3 and applied in Chapters 8 and 11. Any time a vehicle enters or exits the roundabout past the leg that is being evaluated, the measurement for a gap would be reset.
In addition to the Exposure Index or the Gap Study methods, it is imperative to consider the following other factors as part of the school crossing guard warrant at roundabouts:
Minimum Student Crossing Volume: To establish a consistent method of evaluation, the minimum number of students crossing during the school peak periods should be set at a threshold of 40 students. A lower value may be used at the discretion of each municipality. For instance, a municipality can establish a minimum threshold of 30 students crossing at a roundabout. Regardless of the threshold, the use of a uniform value throughout the municipality provides a quantitative tool for prioritizing the implementation of school crossing guards. The benefits are to ensure consistency of application, and to allow municipalities to focus their resources at school crossings where student utilization is higher. If the student crossing volumes do not meet the minimum threshold, alternate solutions outlined in Chapter 3.7 should be considered to improve the safety of student crossings.
Collision Hazard Reporting Frequency: Over the previous three years, there has been an average of more than two reported collisions per year during school operations that are susceptible to correction by a school crossing guard.
Inadequate Visibility: During the site visit, pedestrian and motorist visibility should be evaluated based on the presence of:
• Vertical or horizontal road geometries;
• Permanent or temporary physical barriers suchas trees, shrubs, billboards, bus shelters orbuildings; or
• High frequency of heavy vehicles.
Methods of evaluating sight distance are provided in the Transportation Association of Canada (TAC) – Geometric Design Guide for Canadian Roads – Part 1: Chapter 1.2.5 Sight Distance.
Proximity to a School: In general, school crossing guards should be deployed at intersections or crossings where the subject school to be served is visible or in proximity. In addition, the site inspection process should also verify which route students prefer to take. The combination of these two aspects will help determine the appropriate location for a school crossing guard. A roundabout location may meet the Exposure Index requirements, but it may not lead to the preferable route for students.
12.4 Next Steps
As roundabouts become more prevalent in Ontario, it is recommended that the effectiveness of implementing school crossing guards directly at roundabouts be compared to other safety measures such as implementing PXOs at roundabouts or shifting the guard to a mid-block location. A better understanding of the impact of various aspects of the roundabout on the operation of a school crossing guard should also be established.
Municipalities requiring more information on roundabout design guidelines can refer to the report An Examination of Pedestrian Crosswalk Design at Roundabouts, which is available online, along with other standards related to roundabouts.
Chapter 12

65OTC School Crossing Guard Guide ∙ May 2017
Municipalities can also refer to OTM Book 15- Pedestrian Crossing Facilities, which can be found on the Ministry of Transportation of Ontario’s website library.
12.5 Signage and Pavement Marking Applications
As per OTM Book 6 - Warning Signs Section 7, signed school crossings must not be located at pedestrian crossovers. Therefore, municipalities that are implementing PXOs directly at roundabouts should not provide school crossing signs at these particular locations. Examples of pedestrian crossovers at roundabouts are provided in Section 6.3.2.2 of OTM Book 15. The OTM books currently do not have a formal application of signs related to school crossing guards at roundabouts.
While these signage applications are based on the OTM Book series, the Approval Authority is responsible for ensuring that the necessary traffic control devices, signage and pavement markings are implemented in a safe and predictable manner. Therefore, it is recommended that the Approval Authority review each crossing location on a site-by-site basis to ensure that the site-specific characteristics are considered in the application of signage and pavement markings.
Chapter 12

66OTC School Crossing Guard Guide ∙ May 2017
13.0 REMOVAL OF A SCHOOL CROSSING GUARD
13.1 Context
School crossing guards are implemented for the safety of students. Removal of a crossing guard should be undertaken only after careful inspection and analysis of the existing school crossing guard location to verify that student safety would not be compromised by the removal of the guard. As per OTM Book 15 Section 6.3.4, marked school crossing locations in the absence of a traffic control and without the presence of an adult crossing guard are considered as uncontrolled crossings since they create a false sense of security on the part of pedestrians, particularly children, who may enter the crossing expecting the approaching drivers will see them and stop. If the school crossing is at a PXO, then pedestrians still have the right-of-way.
In certain scenarios, a school crossing guard may be removed without the need to re-evaluate the school crossing location. These scenarios include:
• A school closing or significant downsizing; or
• A school boundary change such that studentsare no longer required to cross at the existingschool crossing guard location.
However, there may be instances where the need to re-evaluate a school crossing guard location should be undertaken based on the following factors:
• Vehicular or student patterns have changed;
• A significant increase in the number of studentsbeing driven or taking schoolbuses; and
• Requests for reassessment from the school,municipality or the public.
In these cases, it is recommended that the school crossing guard Approval Authority conduct site inspections and school crossing guard warrant studies in order to understand whether the removal of a school crossing guard is appropriate.
13.2 Method
In general terms, the site inspection, data collection and warrant process for removing a school crossing guard is the same as that for evaluating the need for a new school crossing guard.
13.2.1 Site Inspection
Once it has been established that a school crossing guard location requires reassessment, site inspections for the subject school crossing are required. It is recommended that the inspections are completed for at least two non-consecutive typical school days. The site inspections should not be conducted during the following atypical days:
• First and last week of school;
• Christmas break;
• Spring break;
• Statutory, public and “elective” holidays such asRemembrance Day;
• Days that precede or follow a holiday break;
• Professional Activity (PA) days;
• Days that precede or follow a PA day; and
• Days with inclement weather.
Chapter 13

67OTC School Crossing Guard Guide ∙ May 2017
Note: If the request for reassessment of the crossing guard is received just before the end of the school year, it is recommended that the inspection be held during the following school year.
In addition to the information provided in Chapter 4 on how to conduct a site inspection, it is important to investigate the changes that may have taken place since the initial implementation of the school crossing guard. For instance, the presence of a new preferred route for students or the construction of new sight line obstructions should be noted. Furthermore, the surveyor should understand the rationale for wanting to remove the school crossing guard before the site inspection so he or she can validate the rationale on site.
13.2.2 Data Collection and Removal Warrant
The data collection required for the removal warrant process should be completed for a minimum of two typical non-consecutive school days. The data collected would then be input to the respective warrant methodology for the type of school crossing facility being evaluated:
• Signalized Intersection Chapter 6
• All-way stop-controlled Chapter 7
• Minor street stop-controlled Chapter 8
• Pedestrian Signal Chapter 9
• Pedestrian crossover Chapter 10
• Mid-block crossing Chapter 11
• Roundabout Chapter 12
The importance of completing the warrant analysis for more than one school day is to have a larger sample size to ensure that the removal of a crossing guard is not skewed by an atypical event.
13.2.3 Next Steps
If any of the school peak periods surveyed continue to meet the school crossing guard warrant, then the school crossing guard should be retained at the crossing location. However, the Approval Authority should also consider the findings from the site inspection that may relate to the initial request for removal of the school crossing guard.
If none of the school peak periods surveyed meet the warrant, the school crossing guard should be removed. Alternative solutions to improving student crossing safety that are outlined in Chapter 3.7 should be considered. Judgment and financial implications may dictate whether subsequent monitoring at the school crossing guard location is necessary.
It is recommended that the school crossing guards not be removed abruptly during a school year. The rationale is that the removal of a crossing guard should be combined with sufficient education for staff, students and parents, as well as the consideration and implementation of other solutions. It is necessary to ensure that there is a sufficient transition period so that the removal of the crossing guard does not confuse students, parents or staff which could lead to negative impacts. In the process of planning for the removal of a school crossing guard, it is important to consider all of the interested parties, including:
• School staff;
• School board;
• Students;
• Parents; and
• Police.
Chapter 13

68OTC School Crossing Guard Guide ∙ May 2017
Given the diversity of interested parties, the methods of communicating the removal of a school crossing guard may include: newsletters, in-class education, emails, social media and parent council meetings with the school board.
Chapter 13

69OTC School Crossing Guard Guide ∙ May 2017
14.0 HUMAN RESOURCES
Once it is determined that a school crossing guard is required for a location, the next step will be to hire, equip and train the guard. The training should address:
• Policies and procedures for the municipality;
• Occupational Health and Safety Act (OHSA);
• Accessibility for Ontarians with Disabilities Act(AODA);
• The position where the guard must stand at acrossing;
• How the guard should guide student pedestrians across the roadway;
• Communication with students and adults, and
• Procedures the guard should follow in the eventof an incident.
14.1 Hiring a School Crossing Guard
Recognizing that each municipality may have slightly different policies that apply to human resources, it is imperative that the municipality ensure that new school crossing guards meet certain minimum standards before being hired. These individuals should be able to demonstrate the physical and mental capacity to handle their assigned duties as a guard.
When establishing standards for new school crossing guards, a municipality should include the following:
1. Adequate levels of hearing, vision andphysical fitness
A candidate should demonstrate adequate levels of hearing, vision and physical fitness during the interview and physical examination process.
The candidate should be physically capable of standing and walking for extended periods of time, and have the agility to react to potential hazards or unforeseen circumstances. They should have good vision, including peripheral vision, in order to observe prevailing conditions and assess approaching traffic to determine crossing safety. The candidate should also have an acceptable hearing level that will enable them to detect the sounds of approaching vehicles from all directions, as well as the ability to discern situations of potential danger. The candidate should be able to hold a sign above their head and also be able to work in adverse weather conditions.
The hiring authority should require a physical examination of a school crossing guard candidate by a licensed physician, paying particular attention to the items listed in the preceding paragraph. The requirement for physical examinations in years after the initial examination would follow municipal guidelines.
2. Character references and an acceptable PoliceVulnerable Sectors Check
It is strongly recommended that all candidates for employment as a school crossing guard be requested to provide a current Police Vulnerable Sectors Check. The requirement for additional checks in subsequent years would follow municipal guidelines.
Chapter 14

70OTC School Crossing Guard Guide ∙ May 2017
3. Functional language ability
It is important that school crossing guards have sufficient command of the English or French language to be able to:
• Explain the rules of safe crossing to thestudents;
• Communicate with adults at their schoolcrossing; and
• Facilitate two-way communication in person orby telephone with supervisory personnel.
In some jurisdictions, the predominant language may not be English and, therefore, the ability to speak another language may be beneficial.
The potential guard must be informed that there is no smoking or drinking alcohol while in uniform. The guard’s children or pets must not accompany the guard while on duty. The guard cannot engage in any other actions that would compromise their ability to perform their required duties or bring criticism from the general public. If the municipality has a Personal Conduct Policy or a Crossing Guard Training manual, copies of these should be given to the guard at the time of hire.
The successful candidate for a regular school crossing guard position will be assigned a school crossing location and given the necessary equipment in order to perform their duties. Training should be conducted at the school crossing site.
A pool of substitute spare guards will be needed to fill absences by other crossing guards. As a general practice, a typical ratio of substitute guards to permanent guards is a minimum of one substitute guard for every 10 permanent school crossing guards.
14.1.1 Recruitment
Suggested ways to recruit new school crossing guards include:
• Request area schools to place an article in theirnewsletter;
• Place a sign at the crossing which notes thata school crossing guard is required at thelocation, and providing a telephone number tocontact;
• Network with the existing guard population;
• Arrange with school officials to display postersin area schools;
• Hand deliver flyers in the areas adjacent to theschool crossing;
• Post an advertisement on the municipalwebsite;
• Post an online advertisement on job websites;
• Advertise on radio stations;
• Place flyers in local stores and businesses in thearea; and
• Place advertisements in local newspapers.
14.2 Duties of a School Crossing Guard Supervisor
If a municipality determines that a school crossing guard is needed, then it is strongly recommended that a staff member be appointed by the municipality to oversee the administration and supervision of the program.
The supervisor will be required to interview prospective school crossing guards along with operating the school crossing guard program. In most municipalities, the supervisors will be responsible for identifying potential new locations, conducting or co-ordinating the hiring of a consultant
Chapter 14

71OTC School Crossing Guard Guide ∙ May 2017
to undertake the required warrant studies in accordance with the criteria set by the municipality, and consulting with the school boards as to the opening or closing of schools. The supervisor should also visit all school crossing locations periodically to ensure that the school crossing guards are performing their duties as required.
14.3 School Crossing Guard Standard Equipment
It is essential that the authority responsible for directing and supervising the movement of persons at a school crossing be readily identifiable. While the provision of clothing would be left with the organization responsible for employing the school crossing guards, the guards should be highly visible. This will ensure their safety and the safety of the persons they are assisting, as well as being recognized as a person of authority. The mandatory and recommended equipment are described in Table 14-1, and optional pieces of equipment also are listed.
Mandatory Equipment Description
STOP Sign As set out in the Highway Traffic Act (HTA) R.R.O 1990 – Reg. 615 (paddle) Section 11
The STOP sign must not be altered in any way outside of the HTA requirements.
Safety Vest The vest must be fluorescent blaze or international orange in colour. Safety vests should meet or exceed the minimum specifications of the Occupational Health and Safety Act (OHSA).
Tear-away vests are available, and municipalities may choose to use them. As an option, the word “GUARD” in 10.5 cm X 33 cm letters may be displayed on the reflective material on the back of the vest.
Table 14-1: Mandatory, Recommended and Optional Equipment for School Crossing Guards
Chapter 14

72OTC School Crossing Guard Guide ∙ May 2017
Recommended Equipment Description
Closed-toe footwear Closed-toe footwear should be worn at all times to assist in mobility and to enable a quick response to a variety of situations.
Raincoat A fluorescent coloured raincoat should be provided to the school crossing guard to be worn during inclement weather. The recommended colours are fluorescent international orange or lime green. The Safety Vest as detailed above must be worn over the raincoat if the raincoat is not compliant with the OHSA.
Optional Equipment
• Armbands
• Clothing and equipment allowance
• Employment identification badge or card
• Gloves
• Insect repellent
• Pad and pencil
• Salt or sand scoop
• Summer hat
• Sunscreen
• Uniform
• Whistle
• Winter boots
• Winter hat
Chapter 14

73OTC School Crossing Guard Guide ∙ May 2017
Chapter 14
14.4 Training
Training should include on-site instruction where the school crossing guard is to be stationed. Instruction should include duties and responsibilities, proper display of the STOP sign, reacting to traffic conditions and dealing with students. Annual seminars should be held to provide continuous training and instruction.
The major function of school crossing guards is the control and direction of pedestrian traffic that is required for the safe crossing of students. The actions of the guard should be uniform, consistent and clearly communicated so that both pedestrians and drivers will know what is required of them. Examples of training manuals from various Ontario municipalities that provide step by step instructions on how a guard should guide student pedestrians across the street are provided in Appendix E.
School crossing guards should be informed about regulations specific to driver and pedestrian responsibilities in relation to school crossings. Parking and yielding the right-of-way should be discussed on site.
School crossing guards should be aware of obstructions and unusual circumstances at their school crossing that can lead to high-risk vehicle and pedestrian conflicts. These could include site obstructions such as hedges or trees, inoperative or missing traffic control signs or devices, roadway or sidewalk construction hazards, standing water or mud. Obstructions in the path of students or school crossing guards that may cause them to detour into the path of a vehicle should be reported to the supervisor as soon as possible.
The school crossing guard should be instructed on the proper procedures to follow should an emergency situation occur at their crossing. The guard must be instructed that the students are their highest priority, and that they must remain at their
school crossing at all times during the emergency.
It is important to emphasize to the school crossing guard that rain, snow, sleet and extreme weather conditions directly impact the safety of the school crossing. Under these conditions, stopping distance may vary depending on road conditions and the ability of the motorist to see may be adversely affected. Visibility and traction are also a potential problem for crossing guards and students. During the winter season, guards should have salt or sand available in the event that the crossing is slippery. Additional clothing for inclement weather and winter months is also important. It is incumbent on the guards to dress appropriately.
All of the training that guards complete should be documented, signed by both the guard and the supervisor or designate, dated, and filed at the municipality. Information including the type of training, the length of the training and the trainer’s name should be recorded in the documentation.

74OTC School Crossing Guard Guide ∙ May 2017
14.5 Crossing Guard Positioning at a Crossing
The crossing guard warrant process identifies which streets warrant a school crossing guard. Knowing this, the position of the guard at a crossing should typically be on the opposite side of the street from the school in the morning period, and on the side of the street closer to the school in the afternoon period. If there is a guard assigned to the crossing during the lunchtime period, the guard typically should stand on the same side of the street as the school at the beginning of the lunchtime period, and on the side opposite the school at the end of the lunchtime period.
The rationale for the position of the guard assigned to cross student pedestrians at one leg of an intersection or mid-block location is based on safety: the crossing guard is positioned where the pedestrians originate. In the morning, the guard needs to be on the opposite side of the street from the school to collect the pedestrians and safely cross them to the school side of the street. In the afternoon, the students are leaving school so the guard needs to be on the same side of the street as the school, and safely cross the pedestrians to the other side of the street. A site inspection should be performed prior to locating the guard in order to identify any extenuating circumstances, such as physical obstructions or topographic constraints, which may require a change to typical guard positioning.
Examples of typical school crossing guard positioning at a mid-block crossing are shown in Figures 14-1 and 14-2. Examples of crossing guard positioning at an intersection, which is the same for stop-controlled or signalized intersections, is shown in Figure 14-3.
Figure 14-1 School Crossing Guard Positioning at Mid-block Crossing (Ottawa)
Figure 14-2 School Crossing Guard Positioning at Mid-block Crossing (Guelph)
Figure 14-3 School Crossing Guard Positioning at an Intersection (London)
Chapter 14

75OTC School Crossing Guard Guide ∙ May 2017
In the event that one school crossing guard is to guide students across two legs of an intersection, the guard should typically stand on the corner where the two legs intersect for the various supervision periods. An example of this is shown in Figure 14-4. The student crossing patterns based on siteinspections should also be considered.
In certain instances, multiple school crossing guards may be needed to supervise different legs of an intersection or crossing facility. This is typically the case at major intersections onto an arterial road or at roundabouts. The school crossing guard warrant can be completed for multiple legs of the intersection and site inspections should help the Approval Authority determine whether multiple guards need to be assigned. Figure 14-5 illustrates examples of multiple guards being assigned to an intersection.
Spare or substitute guards should be trained for all types of school crossings in the municipality.
14.6 Incident Response
This section provides guidance for the school crossing guards on how to handle several types of incidents, including:
• Near miss or disobedience by a driver;
• Disobedience by a child; and
• Motor vehicle collision with a pedestrian orcyclist.
14.6.1 Disobedience by a Driver
In a situation where a motorist disobeys the STOP paddle or was close to colliding with a pedestrian, the appointed school crossing guard should take note of as much information as possible. This information should include:
• Details of the incident along with a diagramportraying the position of the vehicle,pedestrian and guard;
• Details of the vehicle including licenceplate number, make, model, colour and anydistinctive features such as existing damage,customized elements or decals; and
• A description of the driver.
Chapter 14
Figure 14-4 School Crossing Guard Positioning for Two Legs of an Intersection
Figure 14-5 Multiple School Crossing Guards at an intersection (Ottawa)

76OTC School Crossing Guard Guide ∙ May 2017
Once the guard has noted all of the pertinent details of the incident, this information should be reported to the guard’s supervisor. The supervisor will proceed to inform the police. The supervisor should request that the police send a warning letter to the driver informing them of the importance of obeying the rules of the road, especially at a school crossing.
14.6.2 Disobedience by a Student
In the case where a student steps onto the roadway before the school crossing guard signals to them to do so, or does not follow the directions of the crossing guard, the guard must take the following actions:
• Indicate or signal to the student to return to thecurb;
• Explain to the student why their actions aredangerous, and remind them of the safetyprocedures; and
• Inform the supervisor of the School CrossingGuard Program of the student’s behaviour.The supervisor in turn will inform the school’sadministration.
14.6.3 Vehicle Collision at a Crossing
The school crossing guard’s primary responsibility is for the safety of the students crossing the street. If there is an emergency situation, the guard should ask someone to call 911. If no one is available, the guard should call 911 directly.
The guard should not leave the school crossing in the event of a collision. The guard should continue to cross students safely. The guard should not try to move any injured persons, but should request the drivers and witnesses to remain until emergency services arrive. The guard should not enter into a discussion with the drivers involved in the collision,
or attempt to assess the responsibility of any person.
For collisions involving the guard or a pedestrian walking in a crossing that is controlled by guard, the guard must complete an incident report form provided by the supervisor. The information provided by the guard should include:
• A detailed written description of the collision;
• A diagram illustrating the collision;
• The number of students crossing at the time,and their names (if possible);
• Weather conditions;
• Where the school crossing guard was located;
• The license plate numbers of the vehiclesinvolved in the collision;
• Driver descriptions;
• Vehicle descriptions; and
• Date and time.
All collisions must be reported to the guard’s supervisor, whether or not they involved a student.
14.7 General Practices of School Crossing Guards
It is recommended that the following information be provided to the school crossing guard:
• Crossing guards using their personal vehicle totravel to and from their assigned crossing mustpark in a legal parking space. Their vehicle mustbe parked in compliance with all traffic controlsigns, devices and municipal By-laws so as notto obstruct traffic or visibility at or in the vicinityof the school crossing;
Chapter 14

77OTC School Crossing Guard Guide ∙ May 2017
• Guards should work their scheduled times.Putting on the safety vest signifies thebeginning of the guard’s shift, and removing thesafety vest signifies the end of the shift;
• If a person approaches the crossing guard withsuggestions or criticisms about the operationof the school crossing, the person should betreated courteously and then immediatelyreferred to the crossing guard supervisor. Underno circumstances should a guard try to resolveany apparent problems, provide comments tothe person or enter into an argument with theindividual; and
• School crossing guards are the eyes andears of the community and must be aware ofany questionable activity in the area such assuspicious vehicles or people. The guard shouldrecord license plate numbers, the make ofthe vehicle and driver descriptions. The guardshould not get personally involved, but insteadshould alert the supervisor, who in turn willcontact the school administration and the policewith the information.
Chapter 14

78OTC School Crossing Guard Guide ∙ May 2017
15.0 PUBLIC EDUCATION
Student safety does not solely depend on the appointed school crossing guard. Municipalities and schools can incorporate roadway crossing safety along with other awareness programs such as fire safety and stranger danger, which are repeated on an annual basis. Schools can also communicate with parents and guardians regarding school crossing safety via notices, pamphlets and emails, which encourage them to reinforce these rules and procedures with their children at home. This will help ensure that both parents and students fully understand the rules of the road and respect the instructions from school crossing guards. School crossing guard information can also be posted in local newspapers and on municipal websites in order to reach as many people as possible.
This chapter provides a brief description of the efforts that can be taken to inform school staff, parents, students and the general public on the role of school crossing guards and the expected behaviour at crossings controlled by these guards.
15.1 School Staff
School administration and teachers should be encouraged to incorporate safety at school crossings into existing awareness programs such as fire safety, stranger danger and bus safety. If students are taken outside for training on safety around buses, safety with school crossing guards could possibly be incorporated into this session.
A school crossing guard or the administrator of the school crossing guard program could be invited to speak early in the school year at regularly scheduled
school assemblies to explain the role of the guard and the proper behaviour of students at crossing guard locations.
The school crossing guard should be introduced to teachers and administrative staff at a regularly scheduled staff meeting early in the school year so that staff will recognize the guard and understand the role of this individual.
15.2 Parents and Students
Parents and students should be contacted at the beginning of every school year to update them on the presence of school crossing guards and the expected behaviour of students and parents at crossing guard locations. School crossing etiquette with illustrations and diagrams can be developed as part of the overall awareness program. These materials can be sent home with students and distributed through school newsletters and other communication channels.
The information developed to be sent home with students can also be made available to the general public. The material provided to students should contain contact details and references to appropriate municipal websites where more information can be found.
15.3 General Public
The general public may travel past a school with a crossing guard present but have no relationship with the school. These people need to be informed of the role of the school crossing guard and the directions
Chapter 15

79OTC School Crossing Guard Guide ∙ May 2017
that the guard might give. While the general public will not receive information brought home by students, information on a municipality’s website will still be accessible to them. Message boards outside of schools at the beginning of each school year can alert the general public of the presence of school crossing guards and can direct them to web addresses or telephone numbers for more information.
A municipality could run a “Crossing Guard Awareness” campaign with posters, advertisements, articles in local newspapers and posters in businesses and municipal facilities such as community centres. All of this information can also be posted on a municipal website.
Multiple ways to communicate the role of school crossing guards and the responsibilities of pedestrians and motorists at school crossing locations should be utilized to alert as many people as possible on how to cross safely at crossing guard locations.
Chapter 15
Appendix AHIGHWAY TRAFFIC ACT INFORMATION

Legislative Authority The Highway Traffic Act (HTA) sets out the rules of the roads in Ontario, including the
operation of school crossings and school crossing guards. There are several sections that
refer to pedestrians and road crossing regulations. Specific legislation related to school
crossings and the operation of school crossing guards is found in section 176 of the HTA.
The references in this Guide are current as of January 23, 2017. Users of this Guide
should refer to the original statutes for updates.
From the Highway Traffic Act:
Pedestrian Crossing
1. Definitions
(1) In this Act,
“crosswalk” means:
(a) that part of a highway at an intersection that is included within the connections of the lateral lines of the sidewalks on opposite sides of the highway measured from the curbs or, in the absence of curbs, from the edges of the roadway, or
(b) any portion of a roadway at an intersection or elsewhere distinctly indicated for
pedestrian crossing by signs or by lines or other markings on the surface.
“pedestrian crossover” means any portion of a roadway distinctly indicated for
pedestrian crossing by signs on the highway and lines or other markings on the
surface of the roadway as prescribed by the regulations.
140. Pedestrian crossover
Duty of driver
(1) When a pedestrian is crossing on the roadway within a pedestrian crossover, the driver of a vehicle approaching the crossover:
(a) shall stop before entering the crossover;
(b) shall not overtake another vehicle already stopped at the crossover; and
(c) shall not proceed into the crossover until the pedestrian is no longer on the roadway. 2015, c. 14, s. 39 (1).
Duty of pedestrian
(4) No pedestrian shall leave the curb or other place of safety at a pedestrian
crossover and walk, run or move into the path of a vehicle that is so close that it is
impracticable for the driver of the vehicle to comply with subsection (1). 2015, c.
14, s. 39 (2).
Municipal by-laws

(5) No municipal by-law that purports to designate a pedestrian crossover on a
highway on which the speed limit is in excess of 60 kilometres per hour is valid.
R.S.O. 1990, c. H.8, s. 140 (5); 2005, c. 26, Sched. A, s. 21 (1).
144. Traffic control signals and pedestrian control signals
(22) Where portions of a roadway are marked for pedestrian use, no pedestrian
shall cross the roadway except within a portion so marked. R.S.O. 1990, c. H.8,
s. 144 (22).
Pedestrian Right of Way
144. Traffic control signals and pedestrian control signals
(7) When under this section a driver is permitted to proceed, the driver shall yield the right of way to pedestrians lawfully within a crosswalk. R.S.O. 1990, c. H.8, s. 144 (7).
(23) Subject to subsections (24) and (27), a pedestrian approaching a traffic control signal showing a circular green indication or a straight-ahead green arrow indication and facing the indication may cross the roadway. R.S.O. 1990, c. H.8, s. 144 (23).
(24) No pedestrian approaching a traffic control signal and facing a flashing
circular green indication or a solid or a flashing left turn arrow indication in
conjunction with a circular green indication shall enter the roadway. R.S.O. 1990,
c. H.8, s. 144 (24).
(25) No pedestrian approaching a traffic control signal and facing a red or amber
indication shall enter the roadway. R.S.O. 1990, c. H.8, s. 144 (25).
(26) Where pedestrian control signals are installed and show a “walk” indication, every pedestrian facing the indication may cross the roadway in the direction of the indication despite subsections (24) and (25). R.S.O. 1990, c. H.8, s. 144 (26)
(27) No pedestrian approaching pedestrian control signals and facing a solid or flashing “don’t walk” indication shall enter the roadway. R.S.O. 1990, c. H.8, s. 144 (27).
(28) Every pedestrian who lawfully enters a roadway in order to cross may
continue the crossing as quickly as reasonably possible despite a change in the
indication he or she is facing and, for purposes of the crossing, has the right of way
over vehicles. R.S.O. 1990, c. H.8, s. 144 (28).
School crossings
176. (1) In this section,
“school crossing guard” means a person sixteen years of age or older who is
directing the movement of persons across a highway and who is:
(a) employed by a municipality; or

(b) employed by a corporation under contract with a municipality to provide the
services of a school crossing guard. R.S.O. 1990, c. H.8, s. 176 (1); 2005, c. 14,
s. 1 (1).
School crossing guard shall display sign
(2) A school crossing guard about to direct persons across a highway with a speed
limit not in excess of 60 kilometres per hour shall, prior to entering the roadway,
display a school crossing stop sign in an upright position so that it is visible to
vehicles approaching from each direction, and shall continue to so display the
school crossing stop sign until all persons, including the school crossing guard,
have cleared the roadway. 2005, c. 26, Sched. A, s. 29 (1).
Vehicles approaching guard displaying sign
(3) Where a school crossing guard displays a school crossing stop sign as
provided in subsection (2), the driver of any vehicle or street car approaching the
school crossing guard shall stop before reaching the crossing and shall remain
stopped until all persons, including the school crossing guard, have cleared the
roadway and it is safe to proceed. 2005, c. 26, Sched. A, s. 29 (1); 2015, c. 14,
s. 51.
Display of school crossing stop sign
(4) A school crossing guard shall not display on a highway a school crossing stop
sign under any circumstances other than those set out in subsection (2). R.S.O.
1990, c. H.8, s. 176 (4).

Idem
(5) No person other than a school crossing guard shall display on a highway a
school crossing stop sign. R.S.O. 1990, c. H.8, s. 176 (5).
Offence
(5.1) Every person who contravenes subsection (3) is guilty of an offence and on
conviction is liable to a fine of not less than $150 and not more than $500. 2005,
c. 26, Sched. A, s. 29 (2).
Regulations
(6) The Lieutenant Governor in Council may make regulations prescribing the type,
design and specifications of school crossing stop signs. R.S.O. 1990, c. H.8,
s. 176 (6).

Appendix BSAMPLE SITE INSPECTION FORMS

o o o
o o o
o o o
o o o
o o o
o o o
o o o
o o o o
o o o
o o o o o o
o o o
o o
o o o o
o o o o
o o o o o o o o
o o o o o o o o o o o
Site Inspection Report
Site School: Address: School Times AM
PM WTS Yes No
Student Population French Immersion Population No. of Large Buses No. of Students on the Bus
No. of Small Buses No. of Students on the Bus
School: Address: School Times AM PM
WTS Yes No Student Population French Immersion Population No. of Large Buses
No. of Students on the Bus
No. of Small Buses
No. of Students on the Bus
Location: (Please identify the location with reference or
nearest intersection. Indicate nearest school and address) Proximity to School
in front of within feet/metres
Accident History Comments: (during school times) Yes o No o
Date of Inspection: YYYY MM DD
Inspection Time:
AM PM
Requested By:
Prepared By: Request For:
Observers File Number: RT.10
File Number: RT.10
Ward:
Observed By: AM PM AM & PM
Observed By: AM PM AM & PM
Observed By: AM PM AM & PM
Observed By: AM PM AM & PM
Observed By: AM PM AM & PM
Observed By: AM PM AM & PM
Site Conditions School Signs: School Area Signs School Crossing Signs Parking/Stopping Prohibition
Posted Speed Limit: 40 km/hr 50 km/hr 60 km/hr Other:
Visibility of Crossing Pedestrians:
Poor Fair Good Comments:
Sight Obstructions: Hedges Trees Fences Bus Shelter Newspaper Boxes Other (Specify):
Road Grade: Flat Incline Decline
Road Geometrics: Straight Curved Comments:
Road Width: Leg: N S
E
W
Curb to Curb: No. of Bike Lanes No. of Through Lanes No. of Turning Lanes feet/metres
Road Width: Leg: N S
E
W
Curb to Curb: No. of Bike Lanes No. of Through Lanes No. of Turning Lanes feet/metres
Road Conditions: AM: Dry
PM: Dry Wet Snow Covered Ice Wet Snow Covered Ice
Sidewalks: Not Present North South East West Route Survey: Shopping Area
Transit Bus Stop Construction Driveway Parked Vehicle(s) Underpass Within feet/metres Other (specify):

o o o o
o o o o
o o o
o o o o o o
o
o
o o o o
Details Weather Conditions: AM: Dry Sunny Rain Snow Temperature: Other:
PM: Dry Sunny Rain Snow Temperature: Other: Type of Crossing: 4 Way Intersection 3 Way Intersection Midblock (i.e., not an intersection) Type of Control: Traffic Lights Yield Signs No Control Adequate Control
Stop Signs (Traffic is stopped on one street only) All Way Stop (Traffic is stopped in all directions)
Crossing Guard Warrant Survey Location:
Safe Gap Time Safe Gap Time Calculation (if applicable): W (width figure measured in feet)
Signalized Intersection Turning Traffic Count = sec.
Morning Intervals # of
Peds Time (AM)
Gaps Leg: N S E W
# of Gaps
7:30 - 7:35 7:35 - 7:40 7:40 - 7:45 7:45 - 7:50 7:50 - 7:55 7:55 - 8:00 8:00 - 8:05 8:05 - 8:10 8:10 - 8:15 8:15 - 8:20 8:20 - 8:25 8:25 - 8:30 8:30 - 8:35 8:35 - 8:40 8:40 - 8:45 8:45 - 8:50 8:50 - 8:55 8:55 - 9:00
Afternoon Intervals # of
Peds Time (PM)
2:30 - 2:35 2:35 - 2:40 2:40 - 2:45 2:45 - 2:50 2:50 - 2:55 2:55 - 3:00 3:00 - 3:05 3:05 - 3:10 3:10 - 3:15 3:15 - 3:20 3:20 - 3:25 3:25 - 3:30 3:30 - 3:35 3:35 - 3:40 3:40 - 3:45 3:45 - 3:50 3:50 - 3:55 3:55 - 4:00
Leg: Gaps
N S E W # of
Gaps
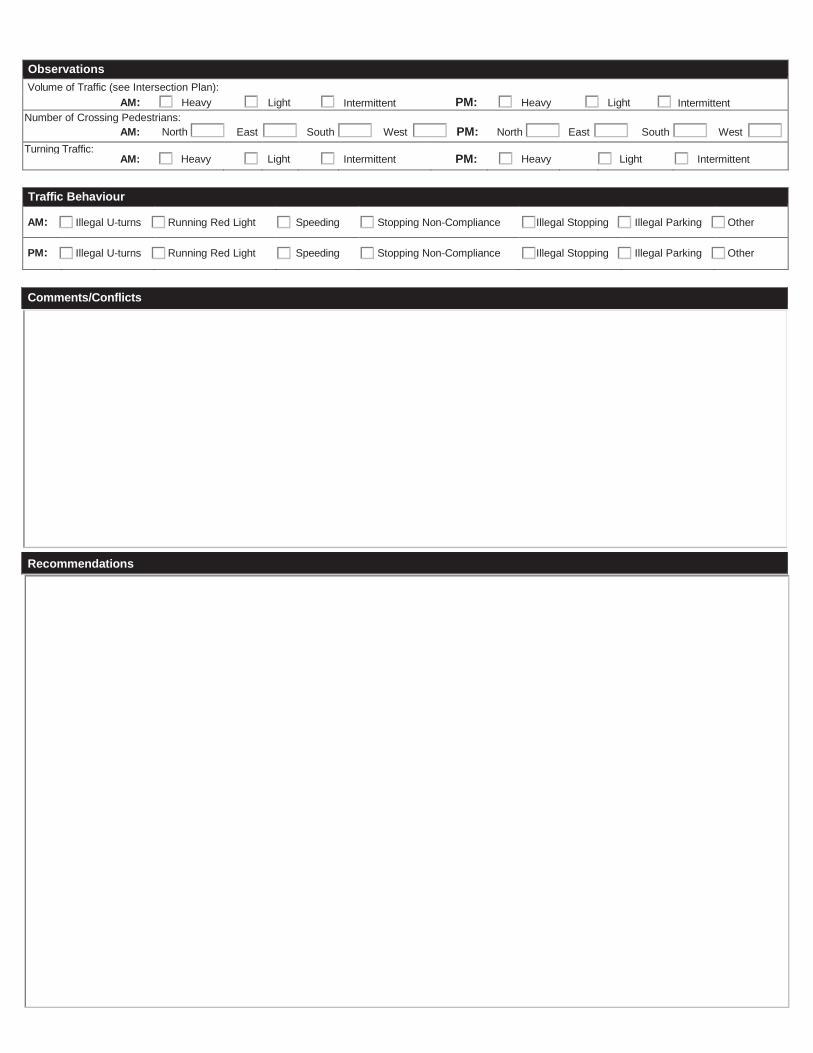
o o o o o o
o o o o o o
o o o o o o o
o o o o o o o
Observations Volume of Traffic (see Intersection Plan):
AM: Heavy Light Intermittent PM: Heavy Light Intermittent Number of Crossing Pedestrians:
AM: North East South West PM: North East South West Turning Traffic: AM: Heavy Light Intermittent PM: Heavy Light Intermittent
Traffic Behaviour
AM:
Illegal U-turns
Running Red Light
Speeding
Stopping Non-Compliance
Illegal Stopping
Illegal Parking
Other
PM: Illegal U-turns Running Red Light Speeding Stopping Non-Compliance Illegal Stopping Illegal Parking Other
Comments/Conflicts
Recommendations

J:\01 PROJECTS\2016 Jobs\16-16029-001.PKH (OTC School Guard Guide 2016)\Deliverables\Final Chapters
for InDesign\Appendix\B - Site Insepction forms\SiteInspectionReport - Guelph.doc
SCHOOL CROSSING - SITE INSPECTION REPORT
OB
SE
RV
ER
Observed By: ________________________________________________________
Day / Date of Inspection: __________________________ Time: ________________
Weather Conditions: � Dry � Sunny � Rain �Snow � Other
SIT
E
Location: ___________________________________________________________
Name of School(s): ____________________________________________________
Type of Crossing: � 4 Way Intersection � 3 Way Intersection � Midblock
Type of Control: � No Control � Traffic Signal � IPS
� All Way Stop � Stop Sign � Yield Sign
OB
SE
RV
AT
IO
NS
School Signs: � Non � School Zone signs
� School Crossing signs � Advance School Crossing signs
Posted Speed: � 40 km/hr � 50 km/hr � 60 km/hr � Other: ______
Pedestrian Sight Distance: _______ (m) � Poor � Fair � Good
Sight Obstructions On: � NE corner due to _________________________________
� SE corner due to _________________________________
� NW corner due to ________________________________
� SW corner due to _________________________________
Road Classification � Local � Collector � Arterial
� 2-lane � 4-lane
Road Grade: � Flat � Incline � Decline
Road Geometrics: � Straight � Curved
Road Width(m): Curb to Curb: ___________ Curb to Median: ____________
Crosswalk Length (m) - used in the calculation of the safe gap time: ____________
Road Conditions: � Dry � Wet � Ice � Snow Covered
Sidewalks: � None � North � South � East � West
Proximity to School: � In front of � Within ____________ m
Route Survey: � Shopping Area � Construction � Driveway
� Parked Vehicle(s) � Transit Bus Stop � Other_________

J:\01 PROJECTS\2016 Jobs\16-16029-001.PKH (OTC School Guard Guide 2016)\Deliverables\Final Chapters
for InDesign\Appendix\B - Site Insepction forms\SiteInspectionReport - Guelph.doc
Other Site Observations:
______________________________________________________________________________________
______________________________________________________________________________________
______________________________________________________________________________________
______________________________________________________________________________________
______________________________________________________________________________________
______________________________________________________________________________________
______________________________________________________________________________________
______________________________________________________________________________________
______________________________________________________________________________________
______________________________________________________________________________________
______________________________________________________________________________________

J:\01 PROJECTS\2016 Jobs\16-16029-001.PKH (OTC School Guard Guide 2016)\Deliverables\Final Chapters
for InDesign\Appendix\B - Site Insepction forms\SiteInspectionReport - Guelph.doc
Sketch � N

Appendix CEXPOSURE INDEX METHOD INFORMATION

Welcome to the Exposure Index MethodTemplate downloadable from here: https://www.dropbox.com/s/jb947jfudjh5vcd/Appendix%20C%20-%20Exposure%20Index%20Template.xlsx?dl=0
Part A: How to develop the exposure method for your municipality
Background
Step 6: Conduct the student and vehicular count for the school periods that are applicable for each municipality. For example, if school crossing guards are typically used during the school morning, midday and afternoon periods, then data
collection would be completed during all three periods.
Step 7: Once data collection is complete multiply the student and vehicular volumes for each location and for each period counted. For example, if the morning and afternoon peaks at 14 signalized intersectiond were counted, then the
morning and afternoon products of student and vehhicular volume would be calculated for each intersection. This process would be repeated for all 14 signalized intersections.
Step 9: Input the critical conflicting vehicular volume and student volumes into the respective columns in the tabs for the type of school crossing location being developed. For example, the data collected at the 14 signalized locations would be
input to the Signalized tab.
Step 10: The 85th percentile threshold line will automatically be graphed in red once you have input the data collected at the existing crossing guard locations. The 85th percentile value that is reprsented by the line would also be calculated.
For example, the 85th percentile product for the 14 signalized crossing locations is 4,277.
Step 10: The red line on the graph represents the Exposure Index relationship between students and conflicting vehicular volume, and what would be the threshold for future school crossing guard evaluations. Please note that Part A does not
influence or indicate whether existing crossing guard locations are warranted or not.
Step 5: Count the number of conflicting vehicular movements for the leg of the intersection being supervised by crossing guards ( the respective conflicting movements for different types of crossing locations are defined in the OTC School
Crossing Guard Guide ). The conflicting movements vary depending on the type of crossing control. For example, 105 conflicting vehicular movements were counted at the leg being supervised by a crossing guard during the 30 minute
observation period.
Step 4: Count the number of students crossing the leg of the intersection supervised by the school crossing guard. The duration of the count would be as per Step 3. For example, 80 students were counted crossing the leg of an intersction
that is assigned with a crossing guard during the 30 minute observation period.
Step 3: Establish the common duration of crossing guard supervision at the chosen examples in Step 2. For example, if crossing guards are assigned for at least 30 minutes at all of the 14 signalized intersections, then the common duration
would be 30 minutes.
Step 2: For the type of crossing facility chosen in Step 1, establish existing locations with crossing guards assigned. For example, there are currently 14 signalized intersections with crossing guards assigned.
Step 1: Select the tab that represents the type of crossing facility that requires an Exposure Index to be developed. For example signalized intersection.
Step 8: For each location, select the critical period that has the highest student-vehicular volume product as calculated in Step 7. For example, if the morning and afternoon products were 8,410 and 5,500, respectively at a signalized
intersection, then the morning would be the critical period.
The Exposure Index method is used in the transportation industry as a screening tool to determine the need for safety-related initiatives. For example, Transport Canada encourages municipalities to use an Exposure Index as the primary
screening tool to evaluate the need for grade separations at railroad crossings. Similar to the proposed Exposure Index method for School Crossing Guards, the Exposure Index method for rail crossings is also one level of evaluation that
should be considered with other criteria.

Step 4: For each crossing facility assessed, multiply the student and vehicular conflicting volumes during each of the peak periods surveyed. For example, 200 conflicting vehicular movements and 40 students were counted during the morning
peak period resulting in a product of 8,000. For the afternoon period, 100 conflicting movements and 30 students were counted resulting in a product of 3,000.
Step 6: Input the critical data set of student volume and conflicting vehicular volume into the Potential Crossing Locations table. For example, 200 would be input to the Conflicting movements column and the 40 would be input to the Student
column.
Step 7: A blue dot will appear on the Exposure Index graph. If the dot is above the red threshold line, then the exposure index warrant is met. If the dot is below the red threshold line, then it does not meet the Exposure Index method.
However, as noted in the Warrant chapters, other factors need to be considered as well in the warrant process. For example, the signalized intersection with 200 conflicting vehicular volume and 40 student results in a blue dot above the red
line, thus meeting the Exposure Index warrant component.
Step 1: Select the tab that represents the type of crossing facility being evaluated. For example signalized intersection.
Step 2: Count the student and conflicting vehicular movements for the common duration chosen in the process of developing the exposure index graph (Part A - Step 3). For example, a 30 minute common period was chosen to develop the
signalized intersection Exposure Index. So the student and conflicting vehicular volumes would be counted for 30 minutes at the signalized locations being evaluated.
Step 5: Select the critical period for each crossing facility that has the highest product of students and conflicting vehicular volumes. For example, the morning period would be critical because its product of 8,000 is higher than the afternoon
product of 3,000.
Part B: How to use the exposure index graph generated
Step 3: Repeat Step 2 of Part B for the applicable school periods for the school periods established in Part A-Step 6. For example, the 30 minute count would be conducted for the morning, midday and afternoon school peak periods.

IDConflicting
movements
Students
(JK-5)+Product ID Conflicting movements Students (JK-5)+ Product
85th percentile curve
1 105 80 8,400 1 200 40 8,000
2 41 5 205
3 703 40 28,120
4 107 102 10,914
5 205 22 4,510
6 92 86 7,912
7 150 138 20,700
8 320 129 41,280
9 376 256 96,256
10 62 62 3,844
11 302 31 9,362
12 215 20 4,300
13 592 158 93,536
14 143 57 8,151
4,277
columns for data input
**School crossing period is based on the common interval of schol crossing guard supervision. Please see Part A-Step 3 of the instructions for more information.
Existing Crossing Guard Locations Potential Crossing Locations
Example from Ajax 2006 Report
0
50
100
150
200
250
300
0 100 200 300 400 500 600 700 800
Stu
de
nt
Vo
lum
es
du
rin
g S
cho
ol
Cro
ssin
g P
eri
od
Conflicting Vehicular Turning Volume during School Crossing Period
Potential Crossing Locations

Appendix D GAP STUDY METHOD INFORMATION

Sample Calculation of Safe Gap Time The following sample midblock location has been chosen to demonstrate how the Safe Gap Time is calculated based on the equation: Safe Gap Time (G) = Perception & Reaction Time (P) + Crossing Time + Group Factor Time
G = P + (W / S) + T (N – 1)
Perception time (P): Because there were not enough students crossing at this midblock location,
the default value of 4.0 seconds is adopted.
Width of roadway (W): The pavement width plus the boulevard width on the side with the
crossing sign was measured. This is the more conservative approach that assumes students
would not wait on the edge of the road and curb, but rather the boulevard area while waiting for a
gap. The distance was measured to be 15.6 m with a measuring wheel.
Average walking speed of students (S): The default value was 1.0 m/s was used because there
were insufficient sample size.
Group factor (T): Information for this was not available at the time of the survey so the default
2.0 seconds is adopted.
Predominant group size (N): From an upstream all-way stop-controlled intersection, students
were observed to be crossing in groups of typically two to three students. It was conservatively
assumed that this trend would continue if a crossing guard was assigned to this midblock location.
Thus, N equals to one since the average group size does not exceed one increment of three.
Based on the above parameters, the Safe gap Time is calculated as:
G = 4 + (15.6 / 1) + 2 (1 – 1) = 19.6 seconds

OTC School Crossing Guard Guide – 2017
GAP SURVEY FORM (MORNING)
Location:
School:
Date:
TIME Gaps over 4 seconds (seconds) # of students Comments
7:30 - 7:35
7:35 - 7:40
7:40 – 7:45
7:45 - 7:50
7:50 - 7:55
7:55 - 8:00
8:00 - 8:05
8:05 - 8:10
8:10 - 8:15
8:15 - 8:20
8:20 - 8:25
8:25 - 8:30
8:30 - 8:35
8:35 - 8:40
8:40 - 8:45
8:45 - 8:50
8:50 - 8:55
8:55 - 9:00
9:00 - 9:05

OTC School Crossing Guard Guide – 2017
GAP SURVEY FORM (MIDDAY) Location:
School:
Date:
TIME Gaps over 4 seconds (seconds) # of students Comments
11:10 - 11:15
11:15 - 11:20
11:20 - 11:25
11:25 - 11:30
11:30 - 11:35
11:35 - 11:40
11:40 - 11:45
11:45 - 11:50
11:50 - 11:55
11:55 - 12:00
12:00 - 12:05
12:05 - 12:10
12:10 - 12:15
12:15 - 12:20
12:20 - 12:25
12:25 - 12:30
12:30 - 12:35
12:35 - 12:40
12:40 - 12:45
12:45 - 12:50
12:50 - 12:55
12:55 - 1:00
1:00 - 1:05

OTC School Crossing Guard Guide – 2017
GAP SURVEY FORM (AFTERNOON) Location:
School:
Date:
TIME Gaps over 4 seconds (seconds) # of students Comments
2:30 - 2:35
2:35 - 2:40
2:40 - 2:45
2:45 - 2:50
2:50 - 2:55
2:55 - 3:00
3:00 - 3:05
3:05 - 3:10
3:10 - 3:15
3:15 - 3:20
3:20 - 3:25
3:25 - 3:30
3:30 - 3:35
3:35 - 3:40
3:40 - 3:45
3:45 - 3:50
3:50 - 3:55
3:55 - 4:00

OTC School Crossing Guard Guide – 2017
It should be noted that these forms can be modified so that the gaps recorded are only the ones that are
equal to or exceed the calculated Safe Gap Time. For example, if the Safe Gap Time was calculated to be
15 seconds, then only gaps equal or exceeding 15 seconds would be recorded. This may be feasible
depending on the frequency of gaps and familiarity of the surveyor with gap surveys. Examples of gap
survey forms from Brampton, Clarington and Mississauga have been provided for reference.

School Crossing Guard Warrant and Gap Study TS-XGD 012
Page 6 of 6
STANDARD OPERATING PROCEDURE Effective: 10/31/2007
Review Date: 7/3/2020
Attachment - Warrant and Gap Study Form
LOCATION DAY: CONTROL SIGNS: SPEED TIME ROAD WIDTH ROAD SURFACE
TIME SAFE GAP TIME GAP : WIDTH/ 3.5 + 4 = SEC.
TIME NO OF PED


Form 2080 - Fillable Page 2 (Rev. 2017 01)
W
3.5+ 4
Morning Intervals
# ofPeds
Time(AM)
GapsLeg: o N o S o E o W
# ofGaps
7:30 - 7:35
7:35 - 7:40
7:40 - 7:45
7:45 - 7:50
7:50 - 7:55
7:55 - 8:00
8:00 - 8:05
8:05 - 8:10
8:10 - 8:15
8:15 - 8:20
8:20 - 8:25
8:25 - 8:30
8:30 - 8:35
8:35 - 8:40
8:40 - 8:45
8:45 - 8:50
8:50 - 8:55
8:55 - 9:00
# ofPeds
Time(PM)
GapsLeg: o N o S o E o W
# ofGaps
2:30 - 2:35
2:35 - 2:40
2:40 - 2:45
2:45 - 2:50
2:50 - 2:55
2:55 - 3:00
3:00 - 3:05
3:05 - 3:10
3:10 - 3:15
3:15 - 3:20
3:20 - 3:25
3:25 - 3:30
3:30 - 3:35
3:35 - 3:40
3:40 - 3:45
3:45 - 3:50
3:50 - 3:55
3:55 - 4:00
Crossing Guard Warrant Survey
Location:
o Safe Gap Time Safe Gap Time Calculation (if applicable):= sec.(width figure measured in feet) ( )
o Signalized Intersection Turning Traffic Count
Weather Conditions: AM: o Dry o Sunny o Rain o Snow Temperature: Other:
PM: o Dry o Sunny o Rain o Snow Temperature: Other:
Type of Crossing: o 4 Way Intersection o 3 Way Intersection o Midblock (i.e., not an intersection)
Type of Control: o Traffic Lights o Yield Signs o No Control o Adequate Control
o Stop Signs (Traffic is stopped on one street only) o All Way Stop (Traffic is stopped in all directions)
Details
Afternoon Intervals


Appendix ESAMPLE GUARD TRAINING AND POSITIONING MANUALS

School Crossing Information Sheet Mar 13, 2017Location Larkspur at Larkspur P.S. MidBlock
Larkspur P.S.
Guard stands on South side a.m.Guard stands on North side p.m.Guard faces East
8:00 a.m.
School 1
8:35 a.m.2:50 p.m. 3:20 p.m.
1. Watch approaching pedestrians.2. Wait for a break in traffic.3. Hold stop sign high, facing it towards the moving traffic, walk where arrow indicates on the "SchoolCrossing Information Sheet" and the painted mark on the road.4. ALL PEDESTRIANS SHOULD REMAIN ON THE SIDEWALK UNTIL CROSSING GUARD INDICATES
S16
School 2
E- W-Leg S-Leg N-Leg N/A
Guard 1 Leg position
Guard 1 Instructions
E- W-Leg S-Leg N-Leg N/AGuard 2 Instructions
Guard 2 Leg position
Schedule
Not Available
Guard Detail Instructions
Image 1
Image 2Guard stands and faces where red arrows are indicated
# of Images1
Standard Publi Separate
City of Brampton CrossingProcedure, 2017

School Crossing Information Sheet Mar 13, 2017FOR THEM TO ENTER THE CROSSWALK.5. Check traffic again and when safe indicate pedestrians to start crossing the street.6. Once pedestrians are off the road, walk back to your starting position and lower the stop sign.
ALL GUARDS MUST PARK ON RIBBON DRIVE Pg 2
Parking Instructions

School Crossing Guard Training Manual Page 8 Last Update: August 22, 2013
Guidelines and Duties
Adult School Crossing Guards perform an important function in the City’s traffic control program. As an Adult School Crossing Guard you have the responsibility of escorting pedestrians across the street during peak hours of traffic flow. Therefore, it is essential you know certain fundamental rules about traffic control and pedestrians behavior so you can perform your duties efficiently and safely at all times. You must be punctual at your designated school crossing. It is essential that you be at your crossing during the hours of duty as assigned to you and that you remain there until you are sure that all of the students have crossed. You must wear the approved reflective vest or jacket and use the “STOP” paddle supplied to you.
Crossing Pedestrians
You are to be ready and waiting at your school crossing at the time specified. The times for your school crossing have been determined based on school times and the municipality is responsible to ensure that the school crossings are covered during the assigned times. Although it may appear that all students have crossed, guards must remain at the school crossing during the assigned times. Failure could result in a pedestrian being injured or killed.
1. Make sure that motorists have adequate sight distance and time to stop when you are getting ready to proceed into the roadway to stop traffic based on weather, roadway conditions and speed of the vehicles.
2. Instruct the pedestrians to look all ways before crossing with you. 3. Make sure that the pedestrians STAY on the curb / sidewalk until you instruct them to
cross. 4. When standing/crossing within the crosswalk, make sure that pedestrians cross in
front of you and that you are facing into the intersection to ensure that you are aware of the pedestrian and vehicle movements.
5. Make sure ALL traffic is completely stopped before instructing pedestrians to cross. 6. Be aware and make yourself visible to any open lanes of traffic, while pedestrians are
crossing. 7. Do not change the way you were trained to do your crossing. 8. Do not leave your crossing for any reason while on duty. 9. Be firm, but friendly and professional.
Use of the Stop Paddle Before Entering the Roadway
1. Be sure that the “STOP” paddle is facing the proper direction and is clearly visible to traffic in both directions.
2. The “STOP” paddle should be held up as high as possible and the other hand is to be extended out horizontally at shoulder length during the crossing of pedestrians.
3. When entering the roadway, hold the “STOP” paddle as high as possible to show approaching motorists your intention to stop them.
4. Do not strike vehicles with your “STOP” paddle; if you do and there are damages, you will be obligated to pay them.
5. When leaving the roadway after pedestrians have crossed, hold the “STOP” paddle as high as possible until you are completely off the traveled portion of the road. This is for your own protection.
6. Do not put the “STOP” paddle on your car or lean it against any objects. Hold it in your hands and you won’t lose it.
7. Do not use the “STOP” paddle to shovel snow, or to break up ice.
8. Do not place any stickers on, or hang any unauthorized items from the “STOP” paddle.
City of Guelph Crossing Procedure, 2013

School Crossing Guard Training Manual Page 9 Last Update: August 22, 2013
Traffic Control at School Crossings Crossing guards cross pedestrians at several different types of intersections. Each location has slight variations in the way they operate. In the City of Guelph, we presently have crossing guards at locations which are at:
1. traffic signals; 2. Intersection Pedestrian Signals (IPS); or 3. Intersections with stop control on the side street only 4. All way stop
Traffic Signals - How They Operate
Signalized intersections work quite differently from other intersections. The crossing guard must work in conjunction with the traffic signal. All crossing guard locations at traffic signals feature pedestrian signals with the ”walk”, flashing “don’t walk”, and the solid “don’t walk”. These signals have the following meanings:
“Walk” - You may start your crossing and have adequate time to finish within the signal phase. The traffic signal is timed to permit a pedestrian to proceed approximately 1/3 the way across under the “WALK” indication. Flashing “Don’t Walk” (Flashing hand) - If you have started to cross prior to the flashing Don’t Walk, you will have adequate time to finish crossing. However, if you have not already started to cross the street,you will not have enough time to finish your crossing during this phase. The Flashing “Don’t Walk” indication is timed to
provide enough time to safely complete your crossing. However, if pedestrians have not started to cross before the end of the WALK indication, there is not enough time to safely cross the street and they should wait until the next WALK indication.
Solid “Don’t Walk” (solid hand) - Do not start to cross the street or be in the road at this time and should get off as soon as possible for your safety. No pedestrians should be in the crosswalk when the solid “Don’t Walk” indication is on.
Keep in mind that signal timings for pedestrians are based on the road width. You will probably notice that the longest phase is the flashing don’t walk. This is quite normal. Also keep in mind that the pedestrian signals are not regulatory, the actual traffic signals (red, amber, green) are. So a vehicle must yield right of way to you if you are in the roadway during the green phase, regardless of what the pedestrian signals indicate.
Intersection Pedestrian Signal (IPS) Intersection Pedestrian Signals, or IPS for short, are pedestrian signals that are located at intersections. This means:
1. The signal will only be activated when the pedestrian push button is pushed. 2. The side street is regulated by a stop sign, rather than a traffic signal.
An IPS, it is treated similar to a signalized location, with special attention paid to turning vehicles from the side street. Turning vehicles – vehicles turning from the side street, which is controlled by a stop sign (rather then traffic signals), may complete their turn at any time when the way is clear of both vehicles and pedestrians. This is regardless of what the traffic signals indicate on the main street – e.g. green, yellow or red. It is the motorist’s responsibility on the side street to complete their turn in safety.

School Crossing Guard Training Manual Page 10 Last Update: August 22, 2013
Crossing Pedestrians safely at a traffic signal (or IPS):
1. If applicable, push the pedestrian push button to activate the pedestrian signals.
2. When the “walk” signal is displayed, walk to the centre of the crosswalk while holding the pedestrians at the curb.
3. When safe, signal the pedestrians to cross the roadway.
4. When the “flashing hand” is displayed, do not allow pedestrians to start crossing, hold them back for the next cycle.
5. When pedestrians have safely reached the farside curb, return to the nearside curb.
Other key points to remember:
1. DO NOT PUSH THE WALK BUTTON IF PEDESTRIANS ARE NOT CROSSING, motorists will be expecting pedestrians to cross the street.
2. Be sure that the WALK indication is on when instructing pedestrians to cross. Do not walk across the street against the walk signal.
3. Report apparent malfunctions. Report any apparent malfunctions in the traffic signal to your coordinator.
4. Hold your stop sign up during the entire time you are on the road.
Traffic Signal Malfunctions
1. While working at the traffic signal, if they stop working (e.g. power outage), the signal should then be treated as a all-way stop control by you and motorists. Continue to cross pedestrians, ensuring that vehicles are fully stopped and yielding right-of-way to you and the pedestrians before crossing.
2. For malfunctioning push buttons (e.g. do not work), contact your coordinator or report it to the City’s Public Works Department at 519.837.5628.
All Way Stop: At all way stop locations the guard is responsible for alternating directions to ensure the continual flow of traffic.
1. When motorists have made eye contact with the Adult School Crossing Guard, (that is,
when all traffic has observed the guard and recognizes the guard’s intention to enter the roadway) and the guard is assured that all vehicular traffic is intending to remained stopped, in the direction they are entering, the Adult School Crossing Guard should promptly enter onto the roadway.
2. Walk ready groups of pedestrians and return to the sidewalk. Don’t stay on the roadway and block traffic for pedestrians that have not reached the intersection.
3. When two guards are scheduled at the same intersection, cross pedestrians in alternating directions to ensure the flow of traffic. Example both guards cross East to West and then North to South, so that the guards are parallel to one another.

6
2.0 HOW TO CROSS CHILDREN 2.1 Rules of the Road • Do not direct traffic at any time for any reason. If there is any sort of a
collision when you direct traffic in any way, you will be held at least partially responsible. Use body language to indicate your intention. If you do not intend to enter the roadway, step back and look as if you are not going out. When you do go out, step up to the side of the curb, looking in all directions.
• Avoid stopping school busses, large trucks, or transit busses whenever possible.
• If an emergency vehicle is going to proceed through your crossing with emergency lights activated and/or sirens sounding, get everyone off the road immediately!
• We are not there to parent children. Do not get involved with activities that are not occurring at your crossing. Our chief responsibility with respect to discipline of the children is as it relates to the use of your facility only.
• Always keep your stop paddle displayed in a conspicuous, upright manner when on the road, or about to enter the roadway, for the entire time you are on the roadway.
• Always give motorists clear, simple messages as to what your intentions are. Be clear and confident as to when you are going to enter the roadway and when you return to the curb.
• On multi lane streets, it is important that you remember that a vehicle stopped in the inside lane will obscure visibility for vehicles in the curb lanes. It can also obscure you from on coming traffic. Be aware of what is happening in every lane before you direct the children to enter the crossing. Remain in the centre of the roadway and keep a good eye on traffic in all lanes for oncoming traffic.
• It is important to remember that any vehicle which comes to a stop too close to your crosswalk presents a potential hazard. A stopped vehicle could be struck from behind by an inattentive driver and pushed into yourself or the children who are in the crosswalk. Be continually aware of approaching or following vehicles.
• Do not expect vehicles to react in a way that is not possible. Virtually all motorists speed. They need time and space in order to react and bring their vehicles to a stop. The best way to avoid confrontations with cars is to wait until there are no vehicles in the vicinity before entering the roadway. This is not always possible at busy locations and at signalised intersections.
• Children are encouraged not to ride ANYTHING on wheels across the road. Talk to the Principal if you have a problem. Roller-blades need to be dealt with on a location by location basis. Contact your supervisor with any problems or questions.
City of Kitchener Crossing Procedure, 2015-2016

7
DO NOT LEAVE YOUR CROSSING FOR ANY REASON FOR THE DURATION OF YOUR SHIFT!!!!!!!!
• In the event of a collision at/near your crossing you may call 911 or have a responsible person call 911. Continue to cross children, away from the accident scene if necessary. Your chief responsibility in the event of a collision is the safety of the students you cross.
• Always inform your supervisor of any uncommon occurrence at your facility.
2.2 The Different Types of Intersections Crossing Guards cross children at several different types of locations. Adult Crossing Guard locations include:
1. mid block location with no stop or signal controls 2. 3 leg intersection with one stop control & 4 leg intersection with 2 stop
controls 3. 4 leg intersection with 4 stop controls 4. signalized intersections 5. Intersection Pedestrian Signals (IPS)
Each location has slight variances in the way they operate. 2.2.1 Locations without traffic signals When working at a location without a traffic control signal, the children are to stay off the road until you are in your position on the road. Please note the following protocol:
• Wait for a gap in traffic on your side of the street.
• When entering the roadway face closest oncoming traffic with stop paddle facing both directions of traffic
• Signal for pedestrians to enter the roadway only when in position on the roadway and sure that traffic in all directions has come to a stop
• Pedestrians enter the road on your command only.
• When the last child has back stepped on the curb, look back from where the children originated to see if any late arrivals are running to the corner, directing them accordingly.
• Move back to the curb, giving a clear indication to the motorist of your intentions. At these locations the primary concern is stopping the major flow of traffic. You must be able to judge speed and distance when doing so. To help establish distance, it is best to establish “points of no return,” in other words, use landmarks to establish points after which vehicles are too close to be safely stopped. For example, you could use a hydro pole that is about 150 metres away from your location. After a vehicle has reached that hydro pole it is too close for you to be able to go out onto the road and have the vehicle safely stop.
8
To determine speed, familiarize yourself with the speed limit, as well as the operating speed. With respect to stop signs please keep these points in mind:
• Speed and distance are not factors. However, compliance and turning movements are.
• You cannot assume that a vehicle will stop for the stop sign unless they are already stopped.
• Vehicles will also make turns and will need to pay attention to many factors, including the Crossing Guard.
• Whenever possible, make eye contact with the stopped or stopping driver, and be clear and confident when entering the roadway.
• At all way stop locations the difficulty is assuming right of way.
• Indecision and delay can lead to dangerous confusion.
• Make eye contact with stopped drivers whenever possible. Use body language to telegraph your intentions.
• When you do go onto the roadway be confident and clear, giving the vehicles no other option than to remain stopped.
Road Position:
• Unless otherwise directed, you should stand just inside the centre line in the lane you are facing.
• There are many locations where the road position is specific to address a particular issue.
• Clarify with your supervisor exactly where the optimal road location for your location is.
2.2.2 Signalized intersections Signalized intersections work quite differently from other intersections. The Crossing Guard must work in conjunction with the traffic signal. All Adult Crossing Guard locations at traffic signals now feature pedestrian signals or “heads,” with the walk signal and the flashing don’t walk as well as the solid don’t walk. These signals have the following meanings:
a) Walk: You may start crossing and have adequate time to finish within the signal phase.
b) Flashing Don’t Walk: If you have started to cross, you will have adequate time to finish crossing. You will not have enough time to start crossing during this phase.
c) Solid Don’t Walk: You should not be in the road at this time and should get off as soon as possible

9
Keep in mind that signal timings for pedestrians are based on road width. You will probably notice that the longest phase is the flashing doesn’t walk. This is quite normal and logical when one considers the intent of this phasing. Ultimately a vehicle must yield right of way to you if you are in the roadway during the green phase, regardless of what the pedestrian heads indicate. When crossing children at a signalized intersection the phasing does not generally allow for the Guard to assume the road position before children start to cross. Children should follow the Crossing Guard, on the Guards command only, onto the roadway, staying a few steps behind until the Guard has reached their ultimate position. Once the last child has passed about ¾ through the intersection, the Guard returns to their corner. When the children originate from the opposite side of the road, they should leave the curb, on the Guards command only, at the time the Crossing Guard leaves the curb. When the last child has passed the Crossing Guard, the Guard returns to the corner, staying one or two steps behind the last crossing child. Intersection pedestrian signals, or IPS for short, are pedestrian signals that are located at intersections. This means:
1. The signal will only be activated when the pedestrian button is pushed. 2. The street with the minor flow is regulated by a stop control, not the signal.
N.B. If the Traffic Signal at an intersection becomes non-operational or flashes red and/or amber continuously, treat the intersection as an all-way stop. Use extreme caution; take your time in crossing students. Call your supervisor.

School Crossing Guard Training Manual Page 11 Last Update: August 22, 2013
How to Cross pedestrians Safely at a Non-signalized Intersection: At uncontrolled locations (no stop sign or traffic signal), the guard is responsible for identifying the safe gaps in the traffic.
1. When all motorists have stopped and recognizes the guard’s intention to enter the roadway and the guard is assured that all vehicular traffic is stopped, the Adult School Crossing Guard should promptly enter onto the roadway.
2. Walk to the centre of the crosswalk while holding the pedestrians at the curb.
3. When safe, signal the pedestrians to cross the roadway.
4. When pedestrians have reached the far side curb, return to the nearside curb.
Suggested Safe Stopping Distances:
40 km/h – 50 m (164 feet)
50 km/h – 60 m (197 feet) 60 km/h – 85 m (279 feet)
It is suggested that the crossing guard determine a point of reference for these distances (e.g. a light standard, sign, etc) Take into consideration the weather conditions. During the morning and afternoon shifts extra precaution should be taken, as drivers must also contend with the glare of the sun. On wet, snowy or icy roadways, considerably more distance must be allowed. Should you have any questions or concerns regarding your crossing, contact your coordinator to discuss them further.
Guelph School Safety Patrol - Working with Student Patrollers: The Guelph School Safety Patrol Program is directed and run by Guelph Police Services, Traffic Division. All training, direction and rules and regulations for this program is the responsibility of Guelph Police. Student patrollers that are at your location have received training and will follow instructions according to their training. If you have a concern or questions direct all inquiries to your Coordinator or Supervisor. The City of Guelph, Transportation Services, ASCG Program has an agreement that all concerns will be addressed with Guelph Police, through the Coordinator. Please do not direct, offer suggestions, or train the student patrollers. If they ask you for clarification, direct them to speak to the teacher at their school, who is responsible for the School Safety Program.
Please note that student patrollers can assist: 1. Holding back pedestrians until you are in the road way and give them the ok to
allow pedestrians to enter the crossing 2. Stop and hold back pedestrians to allow you to exit the road way for vehicle
movement. Please note that student patrollers CANNOT:
1. Enter the roadway 2. Use the stop paddle
Staff observed or reported directing a student patroller will promptly be investigated
and have a follow up with the Supervisor. This follow up may involve discipline, up
to termination from the program, as this is not your responsibility.

Town of Milton Crossing Procedure, 2015


Adult School Crossing Guard Manual
5
BASIC PROCEDURES Generally, the functions of a crossing guard working alone at an unsignalized school crossing include the following:
(a) To restrain children from crossing the roadway when it is unsafe to do so.
(b) To assist the students across when there is an adequate gap in traffic.
(c) To create a gap in heavy traffic and assist students across the roadway.
NOTES:
In performing the above functions, the crossing guard should keep several items in mind:
(a) The guard should wait until several students are assembled before assisting them across the roadway.
(b) The guard should be able to assess the tolerance level of the students. Students can be expected to become impatient after waiting 1 to 1.5 minutes.
(c) In order to avoid accidents and unnecessary disruption of traffic, the guard must endeavour to take advantage of the adequate gaps that normally occur between platoons of vehicles.
(d) The guard must be alert to nearby turning movements, and they should also be aware of traffic that is still two or three blocks from the crossing in order to detect speeding vehicles and any similar problems.
(e) The guard should avoid stopping large trucks, buses, emergency vehicles and funeral processions.
(f) The STOP sign must be treated by the guard with great respect. To avoid confusing motorists and decreasing it’s meaning, the STOP sign must be kept in a lowered position next to the leg when the guard is standing next to the roadway.
NOTES:
City of Ottawa Crossing Procedure, 2005

Adult School Crossing Guard Manual
6
The guard should enter the roadway in the following fashion:
(a) The crossing guard normally stands one step back from the curb, facing the opposite side of the roadway. The children are required to wait behind the guard who keeps the STOP sign out of the sight of motorists. After checking that the traffic, especially in the near lane, has adequate time and space to stop, the STOP sign is raised to at least shoulder height. Even when there are no vehicles in the vicinity, the STOP sign must be used.
(b) When traffic in the near lanes or about to enter the near lanes has stopped, the guard proceeds with raised STOP sign to the centre of the crosswalk.
(c) When all through traffic and turning traffic has halted, the guard signals to the students for them to walk across the roadway in the crosswalk. It is recommended that the crossing guard stand on the intersection side of the crosswalk in the case of a two-way street.
(d) After all students have completed their crossing, the guard returns to the curb with the STOP sign raised. When the curb is reached, the crossing guard must lower the STOP sign and turn so that the guard normally faces the opposite side of the roadway. The guard must not direct the traffic to proceed.
NOTES:
SPECIAL SITUATIONS
(a) If the vision of an unoccupied lane is blocked by a vehicle while the guard is in the crosswalk, the guard should move to a position such that the guard can see any approaching vehicles in the lane and any driver approaching in that lane can see the STOP sign in ample time to stop. In addition, provincial legislation should prohibit vehicles from overtaking other vehicles slowing or stopping for pedestrians.
NOTES:

Adult School Crossing Guard Manual
7
(b) If there are stragglers, the guard should signal to the students to stop before entering the roadway. The guard should try at all times to cooperate with other roadway users by searching for gaps in the traffic and limiting the time that vehicles are stopped.
NOTES:
(c) When working at a signalized intersection, the principal responsibility of the crossing guard is to protect the students from conflicting turning traffic. When the pedestrian signal indicates “Don’t Walk” and/or the main signal head shows a red light, the guard should ensure that children do not step onto the roadway. When the pedestrian signal changes to “Walk”, or the main signal – if alone – changes to a green light, the guard should raise the STOP sign to at least shoulder height and should check that no vehicles are proceeding against a red signal. After also watching for turning traffic which is facing a green signal or turning on a red signal as may be permitted by law, the crossing guard proceeds into the crosswalk and stands on the intersection side of the crosswalk. If the turning traffic passes in the near lane(s), the guard normally proceeds about one third of the way into the crosswalk. If the turning traffic passes on the far half of the roadway, the guard normally takes a position in the middle of the roadway. These positions may be altered depending upon the extent of right or left turning movements.
Upon judging that it is safe to do so, the guard signals for the students to cross. When the pedestrian signal changes to “Don’t Walk” the crossing guard must check that no further students proceed into the crosswalk. In the case of a regular traffic signal head alone, the crossing guard must anticipate the change of the traffic signals. Before the signal changes to red, the crossing guard must signal to the students approaching the crosswalk to stop before entering the crosswalk, the guard should remain on the roadway until the crosswalk is free of students, and the guard must return to the original post with the STOP sign raised. If the amount of turning traffic is heavy, the guard may choose to signal earlier for the children to stop in order to permit a larger number of vehicles to complete their turns.
NOTES:

Adult School Crossing Guard Manual
8
(d) A school crossing traversing a one-way street should be located, if possible, on the approach side where traffic enters the intersection. Most complications arise from turning vehicles, whether turning from a one-way street onto a two-way street, or where two one-way streets intersect. Upon raising the STOP sign, the crossing guard should check for traffic in all directions. Traffic may be traveling the wrong way or may be turning to proceed the wrong way. While on the roadway, it is recommended that the guard stand on the approach side of the crosswalk. On a multi-lane, one-way street the guard should be particularly alert to any lane which does not have a stopped vehicle. If vision of traffic in this lane is obscured due to vehicles stopped in the other lanes, the guard should move from the position in the center of the roadway to a position such that the STOP sign is clearly visible to approaching traffic in the unoccupied lane(s).
NOTES:
(e) On a divided roadway the crossing guard should be stationed on the center median and should handle the roadway as two one-way streets. If turning vehicles pass over the crosswalk, the guard should take up a position on the intersection side of the crosswalk. If there is no turning traffic, then the guard should take up a position on the approach side of the crosswalk. The guard first assists the students to proceed to the median and then assists them to the opposite side of the divided highway.
NOTES:
In the performance of the primary responsibility of supervising pedestrian crossings, the adult school crossing guard must constantly act, look and be alert for all conditions and actions that affect pedestrian safety. Although not a police officer, the crossing guard provides a vitally important service and is expected to be confident, decisive, firm, understanding and fair in creating a safer environment for children on their daily trips to and from school.