Embed Size (px)
Citation preview

Service Manual
Before Using this product, read this manual and follow all safety rules and operating instructions.
ISO7000RRecumbent Bike
MaintenanceThe ISO7000R is virtually maintenance free. After exercising always wipe down your SCIFIT exercise product. Perspiration that continuously settles on the frame, upholstery, covers and console may eventually cause rust or damage. Damage resulting from lack of maintenance is NOT covered under warranty.
If defective components are identified and require replacement, the equipment should be put out of service until repaired.
cautIOnIn order to maintain a safe level of operation, equipment must be inspected on a routine basis for damaged or worn parts. Failure to inspect equipment may result in injury to yourself or others.
ISO7000R Maintenance Schedule
Any mechanical or electrical work conducted within the main body of a medical CE class II unit MUST BE RECALIBRATED. The generic maintenance schedule below should be applied to medical CE and non-medical CE products.
unItED StatES cuStOMER SERVIcEFor assistance in the service of SCIFIT products;
phone : +1 (918) 359-2000fax : +1 (918) 359-2045e-mail: [email protected]
The Product Support department is available by means of email. A voice mail service is available 24 hours a day for recording messages to request technical support and to order replacement parts. Our mailing address is:
SCIFIT Systems Inc.5151 S. 110th E. Ave.Tulsa, OK 74146USA
uK & EuROPEan cuStOMER SERVIcE
phone : +44 1344 300022fax: +44 1344 868838e-mail: [email protected]
SCIFIT LTD (UK)Lexham HouseForest RoadBinfieldBerkshire, RG42 4HPUK
Company Number: 5970624 (UK)
*cOuntRIES OutSIDE OF uK & EuROPEPLEaSE uSE uSa cOntact nuMBERS*
Order online 24/7 at www.SCIFIT.com
Covers, Seat,
Handlebars and Console
Damp Cloth Daily Club Maintenance
LCD Screen LCD TV Screen soft cleaning cloth
Weekly Club Maintenance
Chains (ISO7000R) Lightly Applied Chain Lubricant
Every
6 Months.
Club Maintenance
Nuts and Bolts Tighten When Necessary
Bimonthly Club Maintenance
Base Roller Guide Track Damp Cloth Monthly Club Maintenance
COMPONENT BY WHOMUSE WHEN
Battery Voltmeter Every 6 Mo. Club Maintenance
cautIOnContact your local waste management agency for specific requirements concerning recycling and disposal locations of batteries.

BATTERY REPLACEMENT
IDLER REPLACEMENT
LOWER TORQUE BOARD REPLACEMENT
BI-DIRECTIONAL ASSEMBLY REPLACEMENT
JACK SHAFT ASSEMBLY REPLACEMENT
ELECTRONIC TROUBLESHOOTING GUIDE
ISO7000R EXPLODED VIEW
1 - 3
4 - 6
7 - 10
11 - 15
16 - 19
20 - 22
23 - 27

BATTERY REPLACEMENT INSTRUCTIONS
Use a 5/16 Hex Bit here
USE A PHILLIPS SCREWDRIVER OR CORDLESS DRILL HERE
STEP 1:
Starting on the left side, use a 5/16 (8mm) hex bit to loosen the set screw enough to allow the crank to be removed.
STEP 2:
Repeat step 1 for the right side.
STEP 3:
Remove the phillips screws of the left side cover using a phillips screwdriver or cordless drill allowing the cover to be removed.
STEP 4:
PG. 1
ISO7000R SERVICE MANUAL
Repeat step 3 for the right side. NOTE: The power entry cable will have to be disconnected from the lower torque PC board.

USE A PHILLIPS SCREWDRIVER OR CORDLESS DRILL TO REMOVE
DISCONNECT WIRES FROM BATTERY
STEP 5:
Use a phillips screwdriver to remove the two bracket screws securing the bracket to the frame.
STEP 6:
Carefully pull the battery and bracket away from the frame, then disconnect the battery cable from the battery terminals.
BATTERY REPLACEMENT INSTRUCTIONS PG. 2
ISO7000R SERVICE MANUAL

STEP 7:
Remove the bad battery from the bracket and replace it with a new one placing it in the same position on the bracket as the old one.
STEP 8:
Reconnect the battery cable wires to the new battery as follows: 1. Red cable wire to the Red terminal on the battery. 2. Black cable wire to the Black terminal on the battery.
STEP 9:
Reattach the battery and bracket to the frame with the two phillips screws previously removed in step 5.
STEP 10:
STEP 12:
Completely remove the set screw in the cranks and apply ‘Loctite 248” threadlock to the threads of each set screw before reattaching the left and right cranks back onto the shaft.
BATTERY REPLACEMENT INSTRUCTIONS PG. 3
Connect the power entry cable to the lower torque PC board, then secure the right side cover with the phillips screws that were removed.
STEP 11:
Secure the left side cover with the phillips screws that were removed.
ISO7000R SERVICE MANUAL

IDLER REPLACEMENT INSTRUCTIONS PG. 4
STEP 1:
Follow steps 1 thru 4 of the “BATTERY REPLACEMENT” instructions.
USE 3/16 (5mm) HEX BIT TO LOOSEN
USE A 1/2” (13mm) WRENCH TO LOOSEN
STEP 2:
Starting on the right side use a 3/16” (5mm) hex bit to loosen the two screws securing the brake in place.
STEP 3:
Repeat step 2 for the left side.
STEP 4:
On the right side of the frame there is an access opening to the belt tensioning nut. Use a 1/2” (13mm) wrench to loosen and give the belt some slack to release pressure on the idler.
ISO7000R SERVICE MANUAL

IDLER REPLACEMENT INSTRUCTIONS PG. 5
IDLER
USE A 9/16” (14mm)SOCKET TO REMOVE HARDWARE
STEP 5:
Hold on to the idler assembly inside the frame, then use a 9/16” (14mm) socket to remove the securing screw, lock washer and flat washer.
STEP 6:
Replace the bad idler assembly and secure it back into the frame with the same hardware removed in step 5.
STEP 7:
Make sure the drive belt is centered, then place a belt tension gauge on the drive belt and tighten the belt tension nut until the gauge reads 80 ft/lbs, by adjusting the belt tension nut.
GAUGE SHOULD READ 80 FT/LBS
TIGHTEN TENSION NUT
ISO7000R SERVICE MANUAL

IDLER REPLACEMENT INSTRUCTIONS PG. 6
STEP 8:
Starting on the right side tighten the brake screws that were loosened in step 2, then do the same on the left side.
USE 3/16 (5mm) HEX BIT TO TIGHTEN
STEP 11:
Completely remove the set screws in the cranks and apply ‘Loctite 248” threadlock to the threads of each set screw before reattaching the left and right cranks back onto the shaft.
STEP 9:
Connect the power entry cable to the lower torque PC board, then secure the right side cover with the phillips screws that were removed.
STEP 10:
Secure the left side cover with the phillips screws that were removed.
ISO7000R SERVICE MANUAL

LOWER TORQUE BOARD REPLACEMENT PG. 7
Use a 5/16 Hex Bit here
USE A PHILLIPS SCREWDRIVER OR CORDLESS DRILL HERE
STEP 1:
STEP 2:
Loosen the set screw of the left crank using a 5/16 (8mm) hex to allow the crank to be removed.
Remove the phillips screws of the left side cover using a phillips screwdriver or cordless drill allowing the cover to be removed.
ISO7000R SERVICE MANUAL

LOWER TORQUE BOARD REPLACEMENT PG. 8
BATTERY CABLE
PWR ENTRY CABLE
COMM. CABLE
3-PIN BRAKE CABLE
2-PIN BRAKE CABLE
STEP 3:
Disconnect the five cables attached to the torque board PC. 1. 3-pin brake cable 2. 2-pin brake cable 3. Comm. cable 4. Battery cable 5. Power entry cable (6. Remove main cable, if #P4269)
STEP 4:
Use a phillips screwdriver to remove the four screws and lock washers securing the torque board to the frame.
ISO7000R SERVICE MANUAL

LOWER TORQUE BOARD REPLACEMENT PG. 9
STEP 6:
Secure the lower board with the four lock washers and screws removed from step 4.
STEP 5:
Remove the lower board “Note: If the lower board being removed is a #P4269 DISCARD THE THERMAL PADS AND HEATSINK, DO NOT REUSE.”, then place the new board (#A5361) onto the machine.
ISO7000R SERVICE MANUAL

LOWER TORQUE BOARD REPLACEMENT PG. 10
STEP 7:
Reconnect the five cables previously removed in step 3.
STEP 8:
STEP 9:
Completely remove the set screw in the crank and apply ‘Loctite 248” threadlock to the threads of the set screw before reattaching the crank back onto the shaft.
ISO7000R SERVICE MANUAL
Secure the left side cover with the phillips screws that were removed.

BI-DIRECTIONAL ASSEMBLY REPLACEMENT PG. 11
STEP 1:
Follow steps 1 thru 4 of the “BATTERY REPLACEMENT” instructions.
STEP 2:
Using a 1/2” (13mm) socket start on the left side and loosen BUT DO NOT REMOVE the screws securing the bi-directional assembly.
STEP 3:
Repeat step 2 for the right side.
ISO7000R SERVICE MANUAL

BI-DIRECTIONAL ASSEMBLY REPLACEMENT PG. 12
SLIDE BOTH LEFT AND RIGHT SIDE BEARING BLOCKS BACKWARD TO LOOSEN THE CHAIN TENSION
REMOVE CLIP TO SEPARATE THE CHAIN
MASTER LINK
STEP 4:
Slide the bi-directional assembly backward to loosen the chain tension.
STEP 5:
Slowly rotate the short and long chains to locate the master link on each one, then remove the clip to separate and remove both chains from the machine.
ISO7000R SERVICE MANUAL

BI-DIRECTIONAL ASSEMBLY REPLACEMENT PG. 13
STEP 6:
Return to the bi-directional securing hardware and remove them, allowing the assembly to slide out.
STEP 7:
Place a new bi-directional assembly on the frame and loosely secure the assembly with the screws removed in step 6.
STEP 8:
Reattach the short and long chains with the master link removed in step 5.
ISO7000R SERVICE MANUAL

BI-DIRECTIONAL ASSEMBLY REPLACEMENT PG. 14
SLIDE BOTH LEFT AND RIGHT SIDE BEARING BLOCKS FORWARD TO TIGHTEN THE CHAIN TENSION
STEP 9:
Slide the bi-directional assembly forward to tighten the chain tension. NOTE: A 1/4” chain deflection is recommended for proper tension.
STEP 10:
Once the proper deflection is achieved, tighten the screws using a 1/2” (13mm) socket.
ISO7000R SERVICE MANUAL

BI-DIRECTIONAL ASSEMBLY REPLACEMENT PG. 15
STEP 13:
Completely remove the set screws in the cranks and apply ‘Loctite 248” threadlock to the threads of each set screw before reattaching the left and right cranks back onto the shaft.
STEP 11:
Connect the power entry cable to the lower torque PC board, then secure the right side cover with the phillips screws that were removed.
STEP 12:
Secure the left side cover with the phillips screws that were removed.
ISO7000R SERVICE MANUAL

JACK SHAFT ASSEMBLY REPLACEMENT PG. 16
STEP 1:
STEP 2:
Follow steps 1 thru 4 of the “BATTERY REPLACEMENT” instructions.
Follow steps 2 thru 5 of the “BI-DIRECTIONAL ASSEMBLY REPLACEMENT” instructions.
STEP 4:
Use a 1/2” (13mm) socket to remove the jack shaft securing screws, then remove the assembly.
STEP 3:
Remove the Poly-V belt from the jack shaft pulley .
ISO7000R SERVICE MANUAL

JACK SHAFT ASSEMBLY REPLACEMENT PG. 17
STEP 5:
Slide the poly-V belt onto the pulley of the new jack shaft assembly, then loosely secure it to the frame with the four mounting screws.
STEP 6:
Reattach the short and long chains with the master link onto the jack shaft and bi-directional assemblies, then use a 1/2’ (13mm) socket and secure the jack shaft assembly to the frame.
ISO7000R SERVICE MANUAL

JACK SHAFT ASSEMBLY REPLACEMENT PG. 18
SLIDE BOTH LEFT AND RIGHT SIDE BEARING BLOCKS FORWARD TO TIGHTEN THE CHAIN TENSION
STEP 7:
STEP 8:
Slide the bi-directional assembly forward to tighten the chain tension. NOTE: A 1/4” chain deflection is recommended for proper tension.
Once the proper deflection is achieved, tighten the screws using a 1/2” (13mm) socket.
ISO7000R SERVICE MANUAL

JACK SHAFT ASSEMBLY REPLACEMENT PG. 19
STEP 11:
Completely remove the set screws in the cranks and apply ‘Loctite 248” threadlock to the threads of each set screw before reattaching the left and right cranks back onto the shaft.
STEP 9:
Connect the power entry cable to the lower torque PC board, then secure the right side cover with the phillips screws that were removed.
STEP 10:
Secure the left side cover with the phillips screws that were removed.
ISO7000R SERVICE MANUAL

ELECTRONIC TROUBLESHOOTING GUIDE PG. 20
Intelli-Fit Console Troubleshooting Guide - 10/5/2012
Page | 1
1. Complaint: Display does not light up
Does the console beep with three short beeps (when cranked or plugged in)? _____ yes, replace battery ____ No, continue below Are the fans on? _____ Yes, replace console ____ No, continue below Look into back of console through vent holes; is red light on while cranking the machine or when plugged in to a wall pack? _____ Yes, replace console* ____ No, replace lower board**
**If replacing the lower board, plug in AC adaptor. Test console by running program while operating machine and using fans on high. If display flickers, see complaint 2 below. 2. Complaint: Display is flickering (clarify that display is only flickering and not restarting)
Does it only happen when the fans are turned on?
_____ yes, replace console _____ No, continue below If possible, switch consoles with another unit. Does this fix the problem? _____ yes, replace console _____ No, continue below If the console is powered down, then user rapidly pedals or cranks, does it work normally?
_____ yes, replace battery ______ No, replace lower board 3. Complaint: Display shutting down and returning to menu screen during use
Does it happen when pressing any button on the console? _____ yes, replace console _____ No, continue below
Does it only happen when turning the fans on? _____ yes, replace console _____ No, continue below Does it happen when changing directions? _____Yes, Replace battery _____ No, replace lower board 4. Complaint: Display is erratic (changing without pushing buttons) _____ Replace console
5. Complaint: Display is frozen (will not change, even when any button is pushed)
Does the display go off within 20 seconds after machine stops cranking?
_____ Yes, continue below _____ No, replace console and battery
If the console is powered down, then user rapidly pedals or cranks, does it work normally? _____ yes, replace battery ______ No, replace console
ISO7000R SERVICE MANUAL

ELECTRONIC TROUBLESHOOTING GUIDE PG. 21
Intelli-Fit Console Troubleshooting Guide - 10/5/2012
Page | 2
6. Complaint: Start up resistance is too high (while not in constant work program) Does the resistance decrease to normal at higher RPMs (50 or above)? ____Yes check and or charge battery.
____ No, and firmware is 1.47 or lower, Update firmware to current revision.
7. Complaint: Start up resistance is too high in constant work Constant work will increase torque at lower RPMs. That is the way the program is supposed to operate.
8. Complaint: Resistance is too high (in programs other than constant work)
Is the resistance low on level 1.0, but is maximum at level 1.1 and higher?
_____ Yes, continue below _____ No, always high, replace lower board Are the RPM’s working?
_____ yes, replace lower board _____ No, continue below Is ribbon cable securely plugged into the console and lower board?
_____ Yes, continue below _____ No, secure ribbon cable Is 3 pin cable on brake securely attached to brake and lower board? _____ yes, continue below _____ No, secure 3 pin cable
If possible, switch consoles with another unit. Does this fix the problem? _____ yes, replace console _____ No, replace lower board
9. Complaint: Heart rate not reading correctly
_____ Replace console
10. Complaint: ISO Strength not working correctly and firmware version 1.47 or lower
_____ Upgrade to firmware version 1.54 or later
11. Complaint: No change in resistance
Is this happening in levels 1 to 6 only and firmware version is 1.33 or lower?
_____ yes, upgrade to firmware version 1.54 or later _____ No, replace lower board and provide more detail ______________________ ____________________________________________________________________
ISO7000R SERVICE MANUAL

ELECTRONIC TROUBLESHOOTING GUIDE PG. 22
Intelli-Fit Console Troubleshooting Guide - 10/5/2012
Page | 3
12. Complaint: No resistance Is comm. cable connected securely?
_____ yes, replace lower board ______ No, reconnect comm cable OR _____ inadequate resistance, call Product Support and provide details.
________________________________________________________________________________________________________________________________________________
13. Complaint: Console powers down as soon as user stops cranking or brake stops turning
Is firmware 1.54 or later? ______ yes, follow exiting shipping mode instructions ______ No, replace battery
ISO7000R SERVICE MANUAL

ISO7000R EXPLODED VIEW PG. 23
ISO7000R SERVICE MANUAL

ISO7000R EXPLODED VIEW PG. 24
ISO7000R SERVICE MANUAL

ISO7000R EXPLODED VIEW PG. 25
ISO7000R SERVICE MANUAL

ISO7000R EXPLODED VIEW PG. 26
ISO7000R SERVICE MANUAL
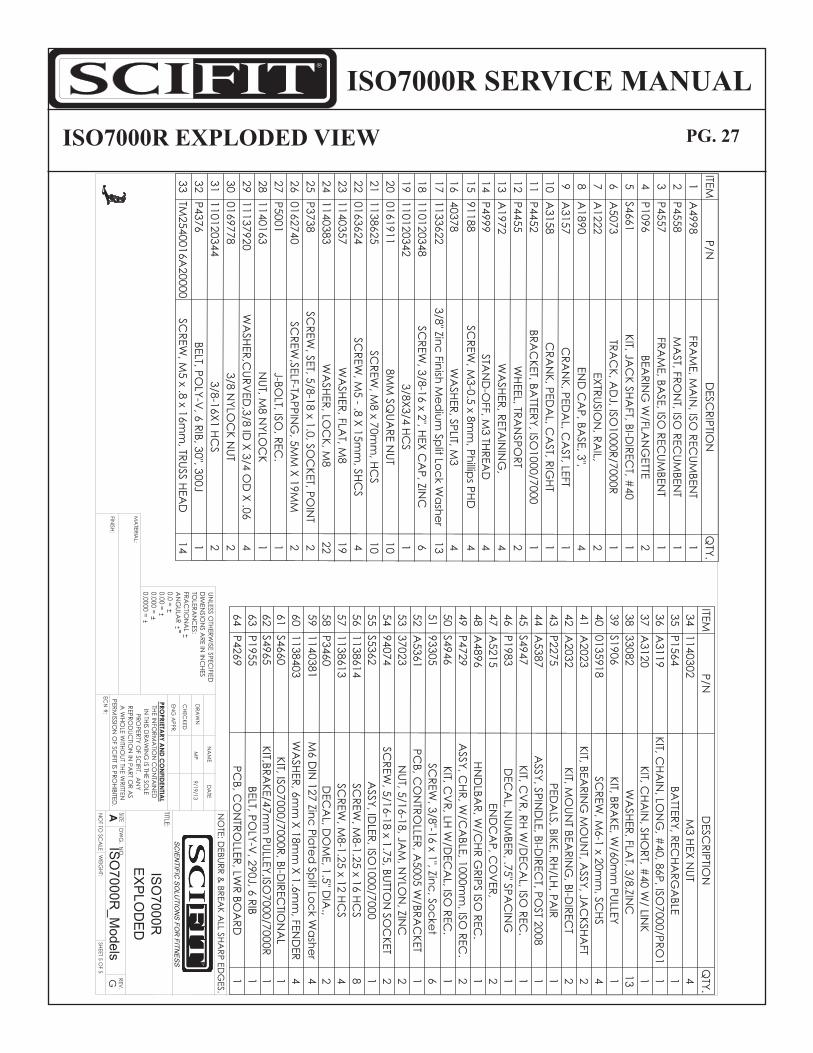
ISO7000R EXPLODED VIEW PG. 27
ISO7000R SERVICE MANUAL

Model number:
Serial number:
Date of Purchase:
Supplied By: ScIFIt Systems Inc.
Service Manual: #P5389B (9/2013)

Order online 24/7 at www.SCIFIT.com