Embed Size (px)
Citation preview

Users’ Operations Manual
Before using this product, read this manual and follow all safety rules and operating instructions.
RST7000 Recumbent Stepper

This page left blank purposely
TABLE OF CONTENTS
SCIFIT Scientific Solutions For Fitness SCIFIT Scientific Solutions For Fitness SCIFIT22
SAFETY INFORMATION . . . . . . . . . . . . . . . . . . . . . . . . . . . . . . . . . . . . . . . . . . . .1
INTRODUCTION . . . . . . . . . . . . . . . . . . . . . . . . . . . . . . . . . . . . . . . . . . . . . . . . . . 2
SPECIFICATIONS . . . . . . . . . . . . . . . . . . . . . . . . . . . . . . . . . . . . . . . . . . . . . . . . . 3
SET-UP & INSTALLATION . . . . . . . . . . . . . . . . . . . . . . . . . . . . . . . . . . . . . . . . . . 4
ASSEMBLY . . . . . . . . . . . . . . . . . . . . . . . . . . . . . . . . . . . . . . . . . . . . . . . . . . . . . . . 5 - 8
PRODUCT OVERVIEW . . . . . . . . . . . . . . . . . . . . . . . . . . . . . . . . . . . . . . . . . . . . . 9
KEYPAD FUNCTIONS . . . . . . . . . . . . . . . . . . . . . . . . . . . . . . . . . . . . . . . . . . . . . .10
BIOMECHANICAL POSTIONING . . . . . . . . . . . . . . . . . . . . . . . . . . . . . . . . . . . .11
ADJUSTMENTS . . . . . . . . . . . . . . . . . . . . . . . . . . . . . . . . . . . . . . . . . . . . . . . . . . .12 - 13
ACCESSORIES . . . . . . . . . . . . . . . . . . . . . . . . . . . . . . . . . . . . . . . . . . . . . . . . . . . . 14
HEART RATE TRANSMITTER STRAP . . . . . . . . . .. . . . . . . . . . . . . . . . . . . . . . .15
PROGRAM INSTRUCTIONS . . . . . . . . . . . . . . . . . . . . . . . . . . . . . . . . . . . . . . . . 16 - 20
SET-UP MODE INSTRUCTIONS . . . . . . . . . . . . . . . . . . . . . . . . . . . . . . . . . . . . . 21 - 27
MAINTENANCE & SERVICE . . . . . . . . . . . . . . . . . . . . . . . . . . . . . . . . . . . . . . . . 28
WARRANTY . . . . . . . . . . . . . . . . . . . . . . . . . . . . . . . . . . . . . . . . . . . . . . . . . . . . . . 29 - 33
WARRANTY CARD . . . . . . . . . . . . . . . . . . . . . . . . . . . . . . . . . . . . . . . . . . . . . . . . 34
S Solutions for Fi FIT S Solutions for Fi SCI FI T
SAFETY I NFORMATI ON
1
Read all instructions before using your SCIFIT exercise machine. Save these instructions for future reference.
C lose supervision is necessary when an exercise machine is being used by or near children or
individuals with disabilities. Keep children away fromextended hand and foot supports.
Use the exercise machine only for its intended use as described in this manual. Do not use attachments that are not recommended by the manufacturer.
Never drop or insert any object into any opening.
Do not use outdoors or in a harsh environment where water is present (i.e. pool or spa areas).
Failure to obey a safety warning can result in an
injury
to yourself and others. Always follow the safetyprecautions to reduce the risk of personal injury.
The purpose of safety symbols is to attract your attention to possible dangers. The safety symbols, and their explanations, deserve your careful attention and understanding.The safety warnings do not, by themselves, eliminate any danger. The instructions or warnings they give are not substitutes for proper accident prevention measures.
Look for these symbols to point out important safety precautions. It means attention! Your safety is involved.
WARNING
CAUTIONFailure to obey a safety warning can result in aninjuryto yourself and others. Always follow the safetyprecautions to reduce the risk of personal injury.

SCIFIT • Scientific Solutions for Fitness • SCIFIT • Scientific Solutions for Fitness • SCIFIT
INTRODUCTION
2
Thank you for your purchase of the SCIFIT RST Recumbent Stepper. We have incorporated the the finest technology and ergonomic design into thismachine to assist you in achieving your fitness goals. However, for your safety, please adhere tothe following recommendations before you beginto exercise.
The SCIFIT RST7000 Recumben t S t eppe r isdesigned for Class “S” (Studio) applications.The intended uses are for Cardio & Pulmonary conditioning as well as physical conditioning andstrength training.SCIFIT equipment is suitable for placement in fitness and recreational facilities. The RST7000 has 200 levels of computer controlled resistance, which ensures that users of all fitness levels will be able toget a challenging but not overwhelming workout.
Consult Your PhysicianConsult your physician or medical specialist before participating in any exercise program, especially if you are pregnant, or if you are suffering from: heart disease, respiratory disease, diabetes, hypertension, high blood pressure, elevated cholesterol, arthritis, or any other diseases or physical complaints.
Adult UsageSCIFIT equipment is designed and intended for adult usage and children of appropriate ages while being supervised. Young children should be kept a safe distance away from equipment.
Cool DownTo prevent muscle injuries and soreness, you should always cool down (at least 5 minutes) by doing a series of stretches after each workout. Train Intelligently
To ensure a future of good health, you should always eat well balanced meals, drink plenty of fluid/water
during a workout and stay fit by exercisingintelligently. Always follow training guide that are
specific to your own physical condition
Stop exercising immediately if you feel nausea, dizziness, sharp pain, or any other physical discomfort. Failure to stop excercising can result in injury or death to yourself.
WARNING
Always stretch after a workout session to reduce the risk of personal injury. Failure to stretch properly may result in injury to yourself.
CAUTION
Guidelines for Healthy AdultsThe American College of Sports Medicine (ACSM) and the American Heart Association (AHA) are continuously updating guidelines and recommendations for physical activity.
The current basic recommendations from ACSM and AHA is:
Do moderately intense cardio 30 minutes a day, five days a week. ORDo vigorously intense cardio 20 minutes a day, three days a week. ANDDo eight to ten strength-training exercises, eight to twelve repetitions of each exercise twice a week.
Moderate-intensity physical activity means working hard enough to raise your heart rate and break a
t, yet still be able to carry on a conversation.aewsIt should be noted that to lose weight or maintain weight loss, 60 to 90 minutes of physical activity may be necessary. The 30 minute recommendation is for the average healthy adult to maintain health and reduce the risk for chronic disease.
To review the latest guidelines and recommendations,
www.acsm.org
Injuries to health may result from incorrect or excessive training. Failure to stop excercising can result in injury or death to yourself.
WARNING
visit the American College of Sports Medicine website:
S Solutions for Fi FIT S Solutions for Fi SCI FI T
SPECIFICATIONS
3
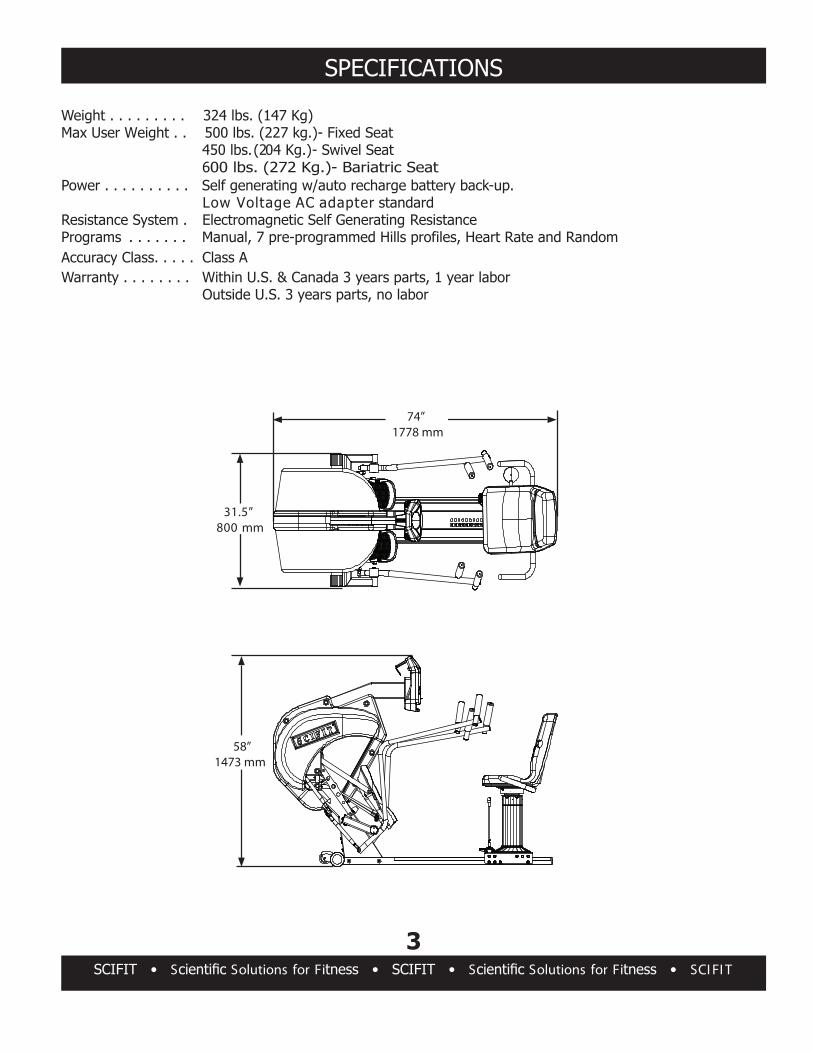
Weight . . . . . . . . . 324 lbs. (147 Kg)
ax User Weight . . 500 lbs. (227 kg.)- Fixed SeatM 450 lbs. (204 Kg.) - Swivel Seat
Power . . . . . . . . . . Self generating w/auto recharge battery back-up. Low Voltage AC adapter standardResistance System . Electromagnetic Self Generating ResistancePrograms . . . . . . . Manual, 7 pre-programmed Hills profiles, Heart Rate and RandomAccuracy Class. . . . . Class AWarranty . . . . . . . . Within U.S. & Canada 3 years parts, 1 year labor Outside U.S. 3 years parts, no labor
31.5”800 mm
74”1778 mm
58”1473 mm
00 lbs. (272 Kg.)- Bariatric Seat6
SETUP & INSTALLATION
S Solutions for Fi FIT S Solutions for Fi SCI FI T
4
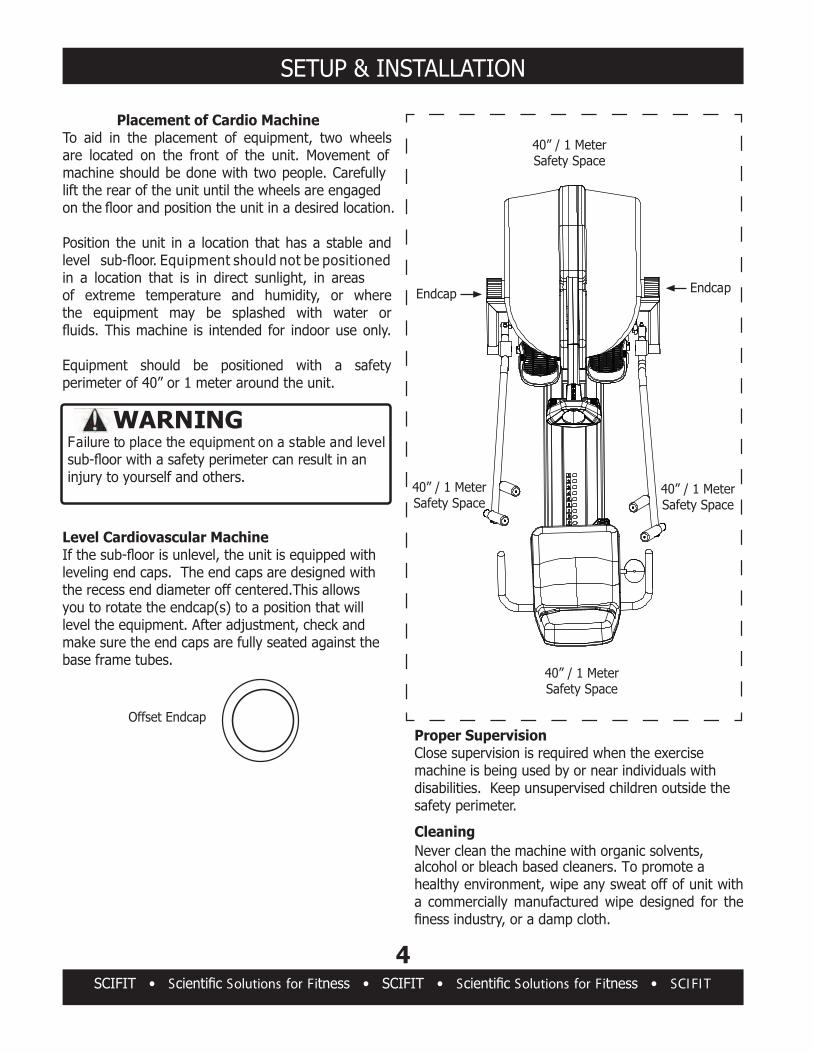
Placement of Cardio MachineTo aid in the placement of equipment, two wheels are located on the front of the unit. Movement of machine should be done with two people. Carefully lift the rear of the unit until the wheels are engaged
oor and position the unit in a desired location. n theo
Position the unit in a location that has a stable and level r. E q u i p m e n t s h o u l d n o t b e p o s i t i o n e d in a location that is in direct sunlight, in areas of extreme temperature and humidity, or where the equipment may be splashed with water or
This machine is intended for indoor use only.
Equipment should be positioned with a safety perimeter of 40” or 1 meter around the unit.
Level Cardiovascular Machinevel, the unit is equipped with
leveling end caps. The end caps are designed with the recess end diameter off centered.This allows you to rotate the endcap(s) to a position that will level the equipment. After adjustment, check and make sure the end caps are fully seated against the base frame tubes.
40” / 1 MeterSafety Space
40” / 1 MeterSafety Space
40” / 1 MeterSafety Space
40” / 1 MeterSafety Space
Offset Endcap
Endcap Endcap
Proper SupervisionClose supervision is required when the exercise machine is being used by or near individuals with disabilities. Keep unsupervised children outside the safety perimeter.
Cleaning
alcohol or bleach based cleaners. To promote ahealthy environment, wipe any sweat off of unit with a commercially manufactured wipe designed for the
try, or a damp cloth.
Failure to place the equipment on a stable and level
injury to yourself and others.
WARNING
Never clean the machine with organic solvents,

ASSEMBLY
S Solutions for Fi FIT S Solutions for Fi SCI FI T
5
SWIVEL SEAT ASSEMBLY
Tools Required:
Step 1: Pull upward the yellow T-handle of the seat adjustment lever, then lift and slide the seat post ontothe frame track making sure the roller guide rail is between the top and bottom wheels of the base.
3/16 Hex wrench1/2” Wrench or socket
Roller guide
Step 2:Attach the handlebar plate to the seat post with (Qty. 4) items #1, #2, #3 and #4 as shown on the drawing below.
Item #1 (x 4)5/16-18 x 1 Socket Flat Head ScrewItem #2 (x 4) 5/16 Flat Washer
Item #3 (x 4) 5/16 Split Washer
Item #4 (x 4) 5/16 Nut
# 1
# 2# 3# 4
ASSEMBLY
SCIFIT • Scientific Solutions for Fitness • SCIFIT • Scientific Solutions for Fitness •
CI FI T6
SWIVEL SEAT ASSEMBLY CONT’D
Tools Required:
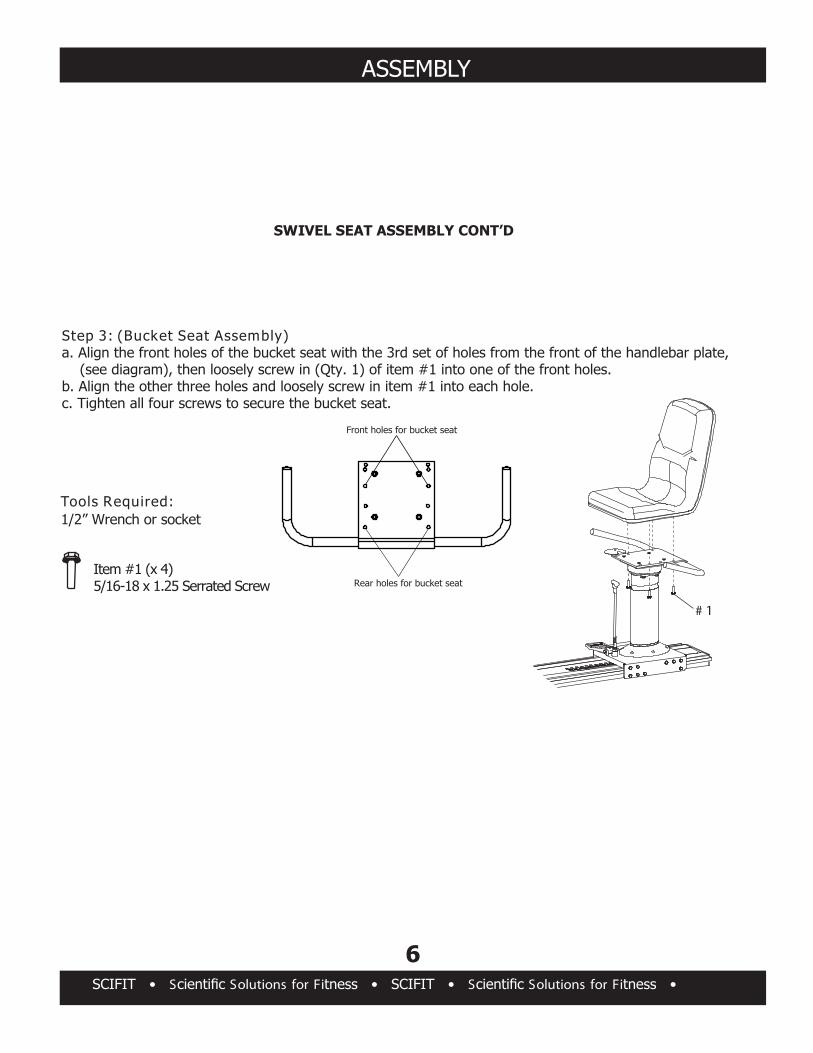
Step 3: (Bucket Seat Assembly)a. Align the front holes of the bucket seat with the 3rd set of holes from the front of the handlebar plate, (see diagram), then loosely screw in (Qty. 1) of item #1 into one of the front holes.b. Align the other three holes and loosely screw in item #1 into each hole.c. Tighten all four screws to secure the bucket seat.
1/2” Wrench or socket
Item #1 (x 4)5/16-18 x 1.25 Serrated Screw
# 1
Rear holes for bucket seat
Front holes for bucket seat
ASSEMBLY
SCIFIT • Scientific Solutions for Fitness • SCIFIT • Scientific Solutions for Fitness • SCI FI T
7
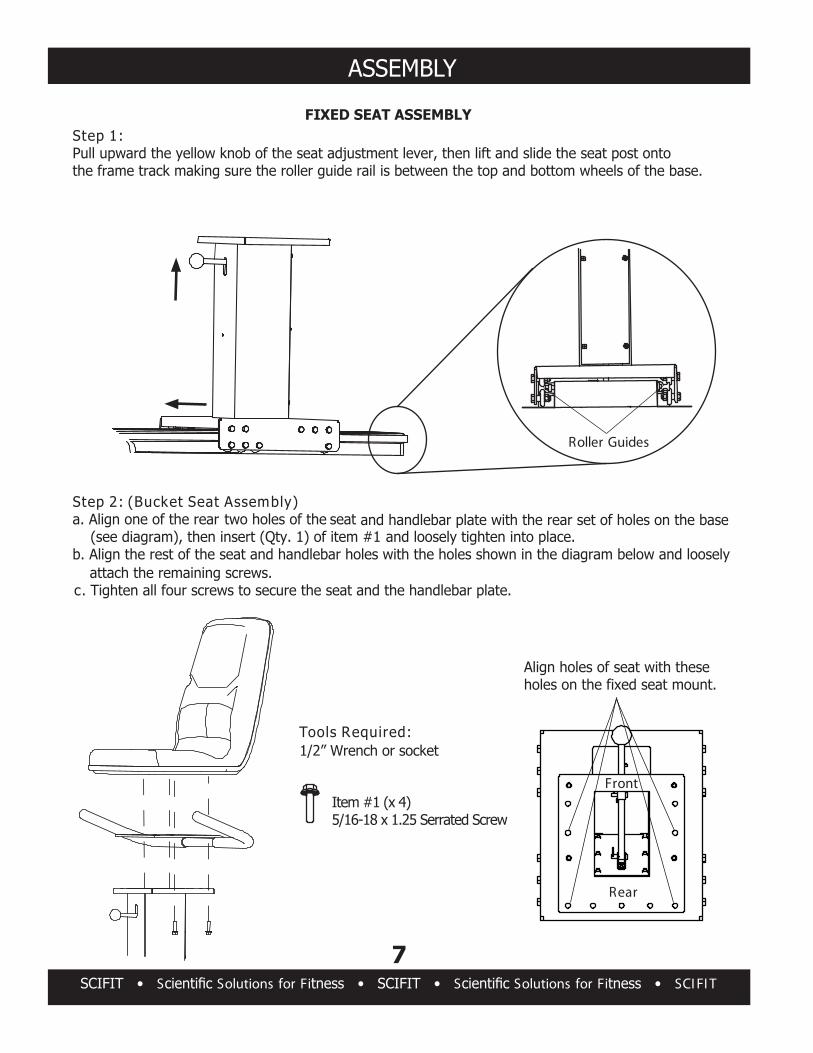
FIXED SEAT ASSEMBLYStep 1: Pull upward the yellow knob of the seat adjustment lever, then lift and slide the seat post ontothe frame track making sure the roller guide rail is between the top and bottom wheels of the base.
Roller Guides
Tools Required:1/2” Wrench or socket
Item #1 (x 4)5/16-18 x 1.25 Serrated Screw
Step 2: (Bucket Seat Assembly)a. Align one of the rear two holes of the seat and handlebar plate with the rear set of holes on the base (see diagram), then insert (Qty. 1) of item #1 and loosely tighten into place.b. Align the rest of the seat and handlebar holes with the holes shown in the diagram below and loosely
c. Tighten all four screws to secure the seat and the handlebar plate.
Align holes of seat with these holes on the fixed seat mount.
Front
Rear
attach the remaining screws.
ASSEMBLY
SCIFIT • Scientific Solutions for Fitness • SCIFIT • Scientific Solutions for Fitness • SCI FI T
8
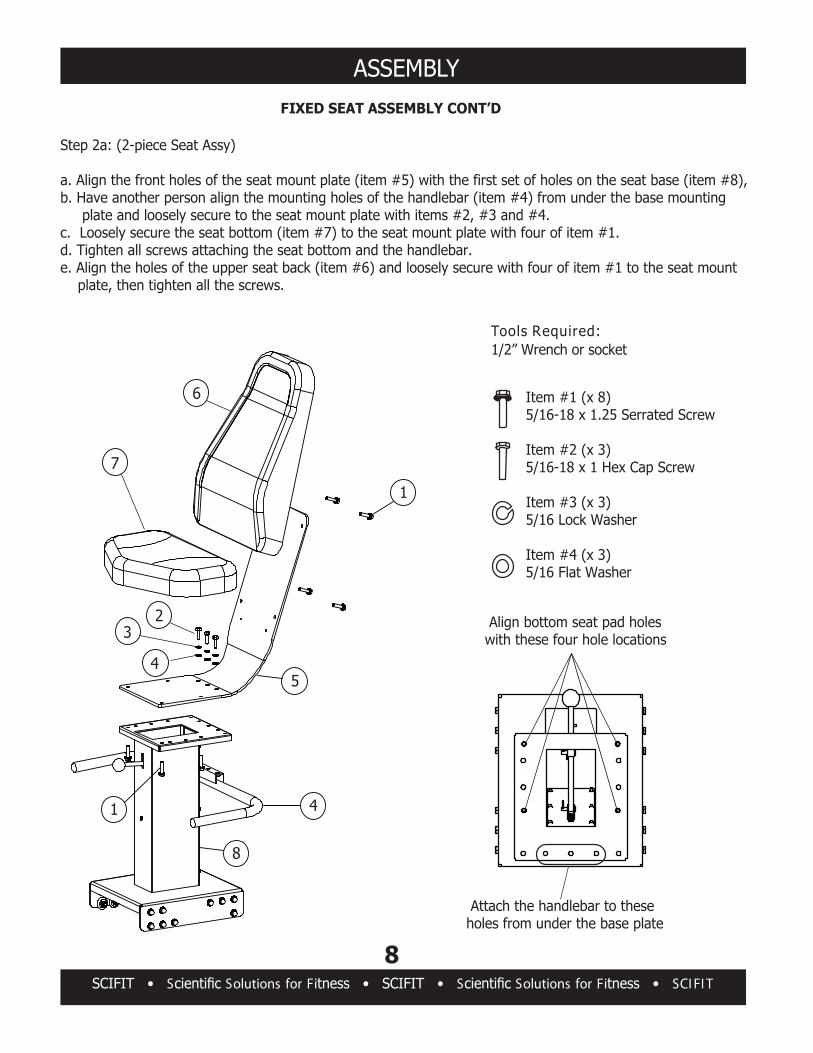
FIXED SEAT ASSEMBLY CONT’D
Item #1 (x 8)5/16-18 x 1.25 Serrated Screw
Item #2 (x 3)5/16-18 x 1 Hex Cap Screw
Item #3 (x 3)5/16 Lock Washer
Item #4 (x 3)5/16 Flat Washer
Tools Required:1/2” Wrench or socket
23
4
1
1
Step 2a: (2-piece Seat Assy)
a. Align the front holes of the seat mount plate (item #5) with the first set of holes on the seat base (item #8),b. Have another person align the mounting holes of the handlebar (item #4) from under the base mounting plate and loosely secure to the seat mount plate with items #2, #3 and #4.c. Loosely secure the seat bottom (item #7) to the seat mount plate with four of item #1.d. Tighten all screws attaching the seat bottom and the handlebar.e. Align the holes of the upper seat back (item #6) and loosely secure with four of item #1 to the seat mount plate, then tighten all the screws.
4
5
6
7
8
Align bottom seat pad holes with these four hole locations
Attach the handlebar to these holes from under the base plate
PRODUCT OVERVIEW
S Solutions for Fi FIT S Solutions for Fi SCI FI T
9
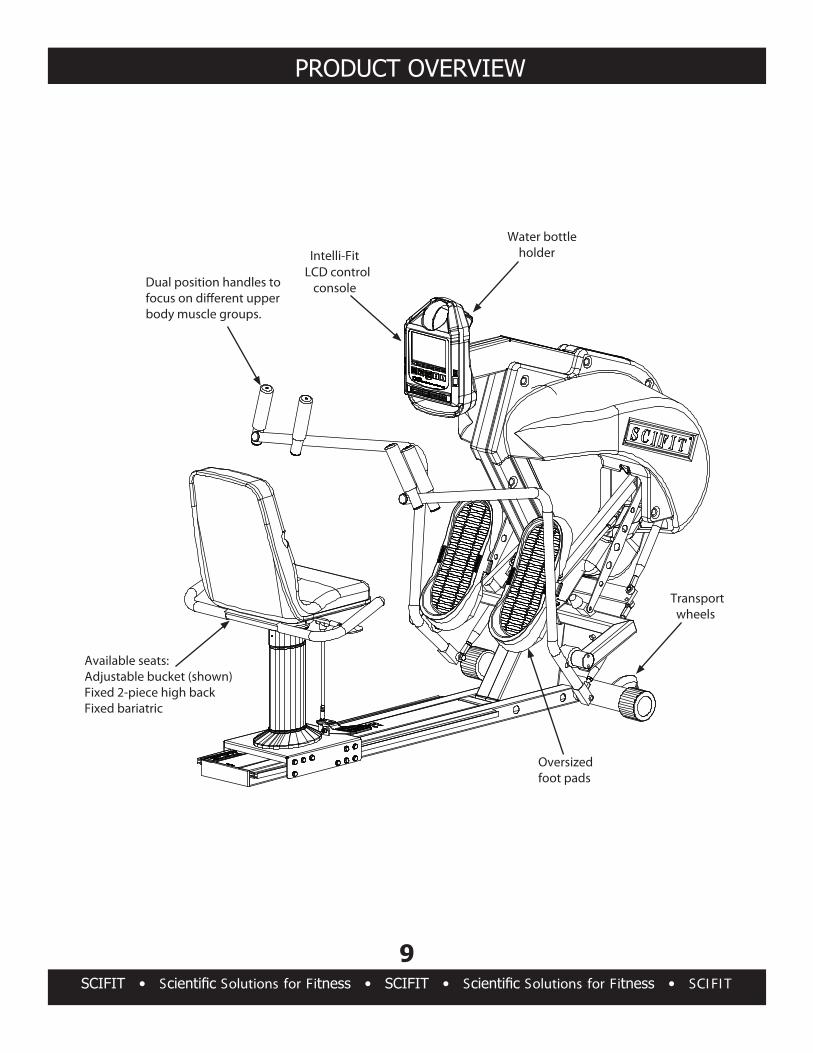
Available seats:Adjustable bucket (shown)Fixed 2-piece high backFixed bariatric
Oversized foot pads
LCD control console
Water bottle holder
Dual position handles to
body muscle groups.
Transport wheels
Intelli-Fit
KEYPAD FUNCTIONS
S Solutions for Fi FIT S Solutions for Fi SCI FI T
10
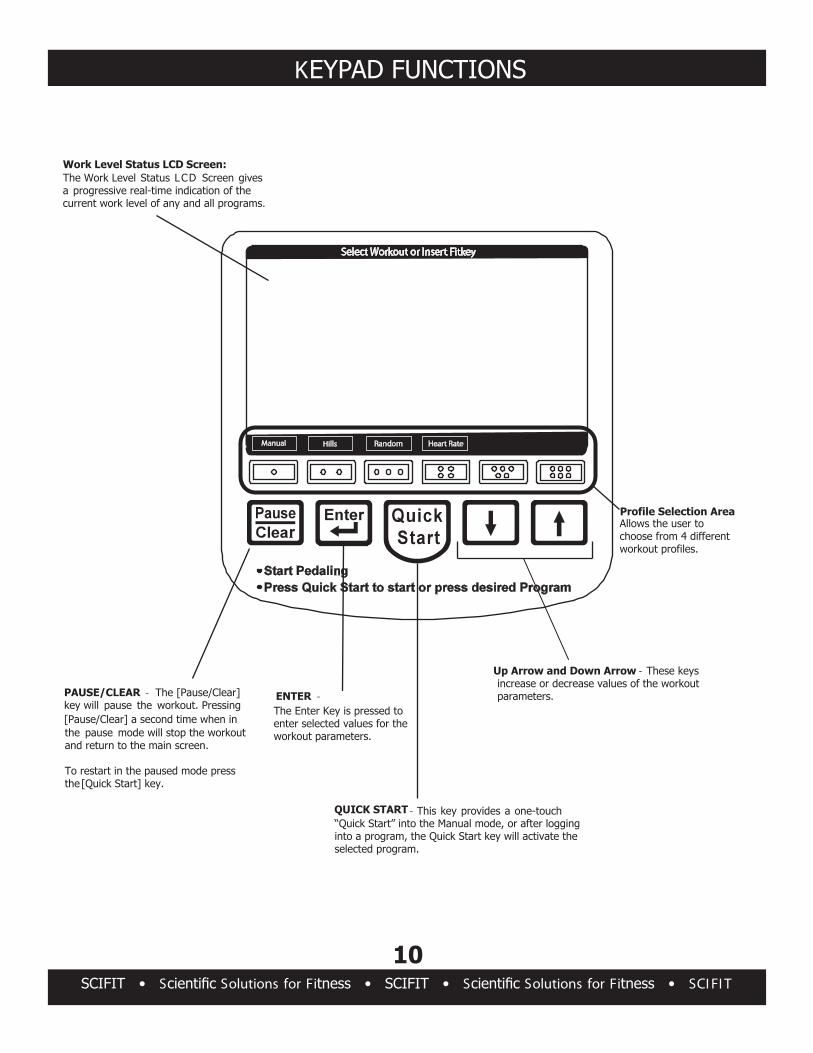
QUICK START - This key provides a one-touch
PAUSE/CLEAR - The [Pause/Clear] key will pause the workout. Pressing[Pause/Clear] a second time when in the pause mode will stop the workoutand return to the main screen.
To restart in the paused mode pressthe[Quick Start] key.
ENTER -
Work Level Status LCD Screen:The Work Level Status LCD Screen gives a progressive real-time indication of thecurrent work level of any and all programs.
Select Workout or Insert Fitkey
Manual Hills Heart Rate
Profile Selection AreaAllows the user to
oose from 4 differenthcworkout profiles.
The Enter Key is pressed toenter selected values for theworkout parameters.
“Quick Start” into the Manual mode, or after logging into a program, the Quick Start key will activate theselected program.
Up Arrow and Down Arrow - These keys increase or decrease values of the workoutparameters.
Random
BI OMECHANICAL POSITIONING
SCIFIT • Scientific Solutions for Fitness • SCIFIT • Scientific Solutions for Fitness • SCI FI T
11
Always follow medical professionals guidelines toreduce the risk of personal injury. Failure to follow their directions may result in injury to yourself.
CAUTION
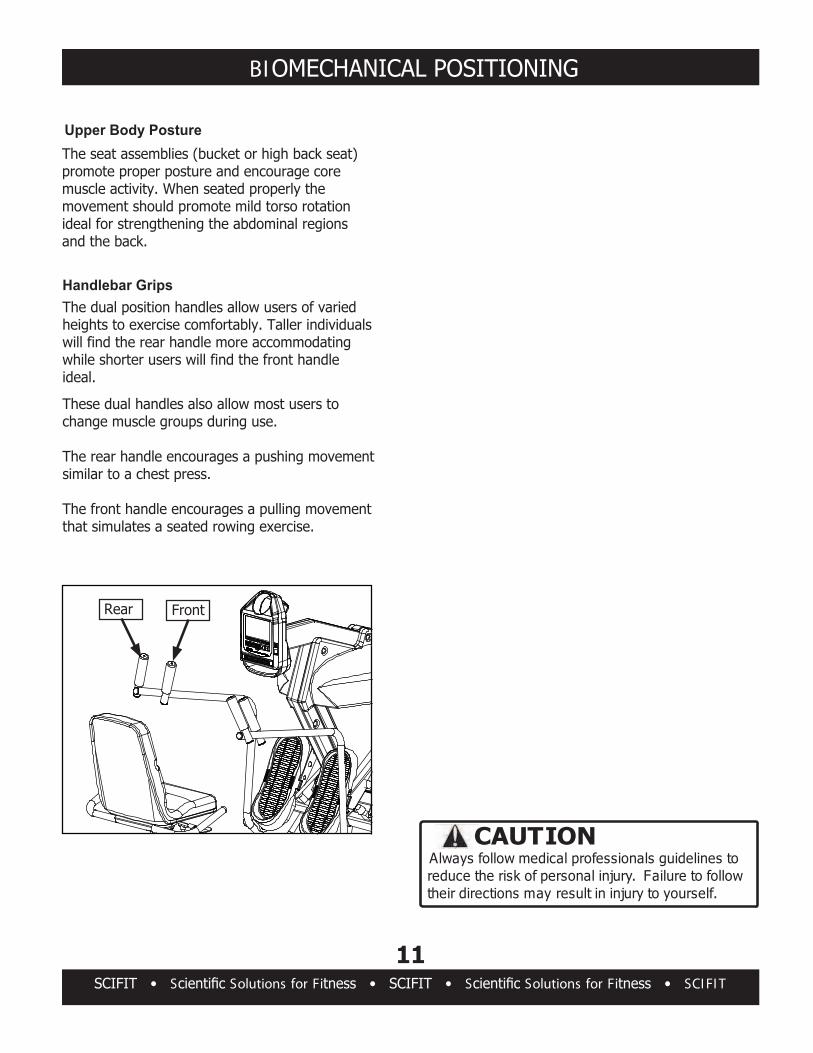
Upper Body Posture
Handlebar GripsThe dual position handles allow users of varied heights to exercise comfortably. Taller individualswill find the rear handle more accommodating while shorter users will find the front handle ideal.
These dual handles also allow most users to change muscle groups during use.
The rear handle encourages a pushing movement similar to a chest press.
The front handle encourages a pulling movement that simulates a seated rowing exercise.
The seat assemblies (bucket or high back seat)promote proper posture and encourage coremuscle activity. When seated properly themovement should promote mild torso rotationideal for strengthening the abdominal regionsand the back.
Front Rear
ADJUSTMENTS
S Solutions for Fi FIT S Solutions for Fi SCI FI T
12
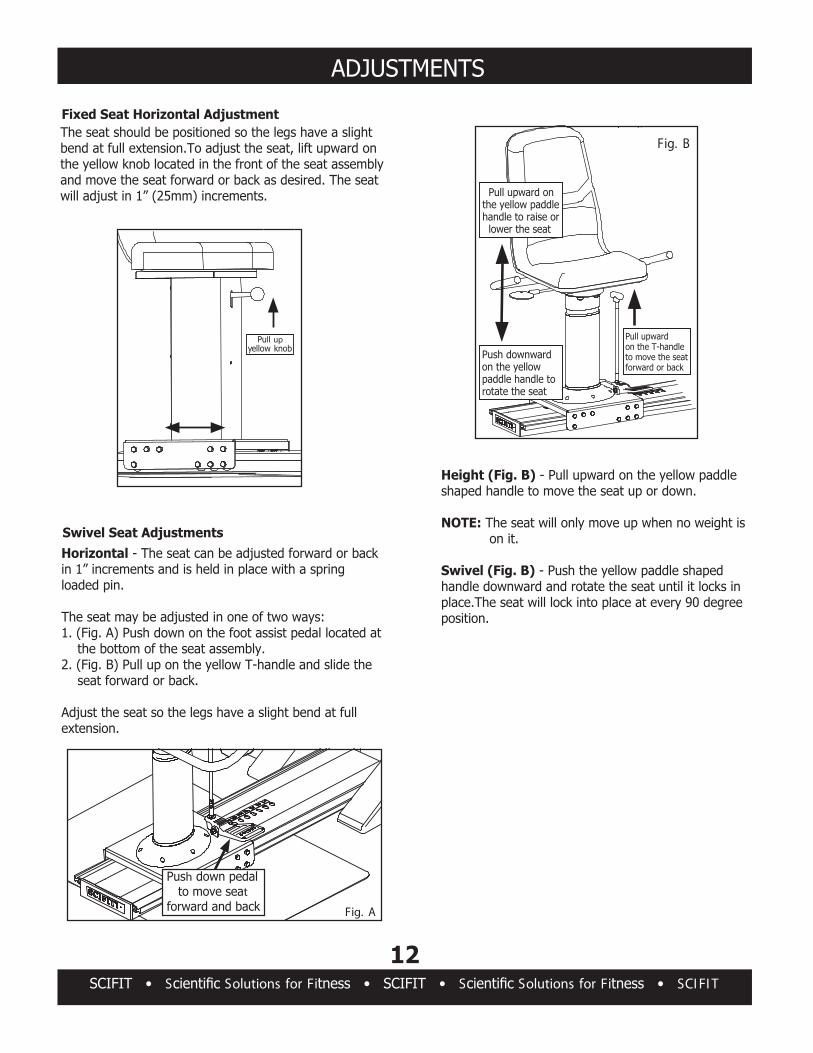
The seat should be positioned so the legs have a slightbend at full extension.To adjust the seat, lift upward on the yellow knob located in the front of the seat assembly and move the seat forward or back as desired. The seat will adjust in 1” (25mm) increments.
Fixed Seat Horizontal Adjustment
Pull up yellow knob
Push down pedal to move seat forward and back Fig. A
Fig. B
Pull upward on the yellow paddlehandle to raise or lower the seat
Horizontal - The seat can be adjusted forward or backin 1” increments and is held in place with a spring loaded pin.
The seat may be adjusted in one of two ways:1. (Fig. A) Push down on the foot assist pedal located at the bottom of the seat assembly.2. (Fig. B) Pull up on the yellow T-handle and slide the seat forward or back.
Adjust the seat so the legs have a slight bend at full extension.
Swivel Seat Adjustments
Height (Fig. B) - Pull upward on the yellow paddleshaped handle to move the seat up or down.
NOTE: The seat will only move up when no weight is on it.
Swivel (Fig. B) - Push the yellow paddle shaped handle downward and rotate the seat until it locks in place.The seat will lock into place at every 90 degree position.
Push downward on the yellow paddle handle to rotate the seat
Pull upward on the T-handle to move the seat forward or back
ADJUSTMENTS
SCIFIT • Scientific Solutions for Fitness • SCIFIT • Scientific Solutions for Fitness • SCI FI T
13
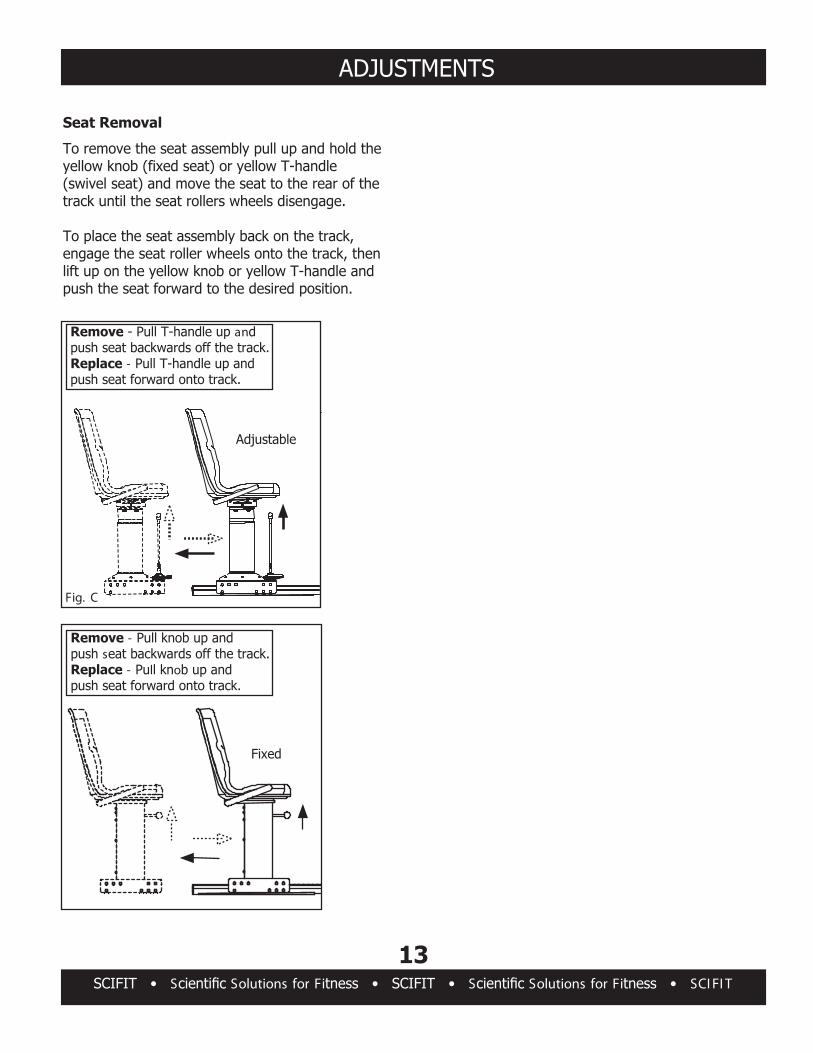
Seat Removal
To remove the seat assembly pull up and hold the yellow knob (fixed seat) or yellow T-handle (swivel seat) and move the seat to the rear of the track until the seat rollers wheels disengage.
To place the seat assembly back on the track, engage the seat roller wheels onto the track, then lift up on the yellow knob or yellow T-handle and push the seat forward to the desired position.
Adjustable
Remove - Pull T-handle up andpush seat backwards off the track.Replace - Pull T-handle up and push seat forward onto track.
Fig. C
Remove - Pull knob up andpush seat backwards off the track.Replace - Pull knob up and push seat forward onto track.
Fixed
ACCESSORIES
S Solutions for Fi FIT S Solutions for Fi SCI FI T
14
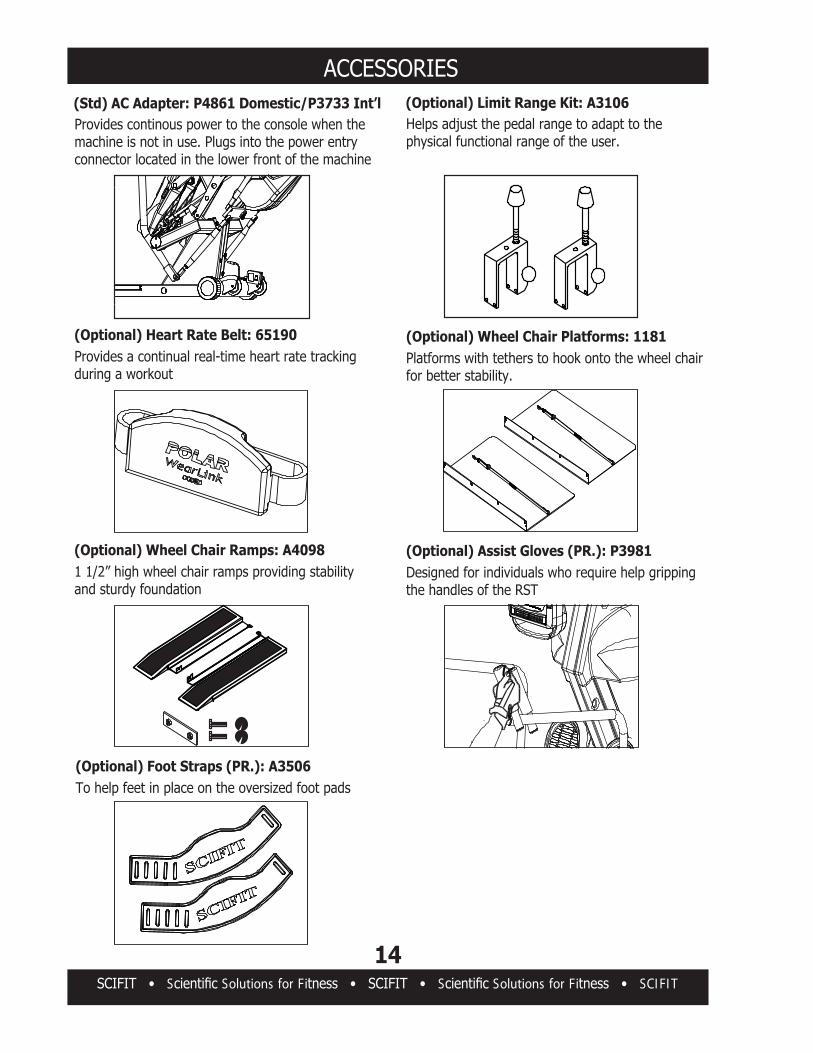
Provides continous power to the console when themachine is not in use. Plugs into the power entry connector located in the lower front of the machine
(Optional) Limit Range Kit: A3106 Helps adjust the pedal range to adapt to the
physical functional range of the user.
(Std) AC Adapter: P4861 Domestic/P3733 Int’l
(Optional) Heart Rate Belt: 65190Provides a continual real-time heart rate trackingduring a workout
(Optional) Wheel Chair Platforms: 1181Platforms with tethers to hook onto the wheel chairfor better stability.
(Optional) Wheel Chair Ramps: A40981 1/2” high wheel chair ramps providing stabilityand sturdy foundation
(Optional) Assist Gloves (PR.): P3981Designed for individuals who require help grippingthe handles of the RST
(Optional) Foot Straps (PR.): A3506To help feet in place on the oversized foot pads
HEART RATE TRANSMITTER STRAP
SCIFIT • Scientific Solutions for Fitness • SCIFIT • Scientific Solutions for Fitness • SCI FI T
15
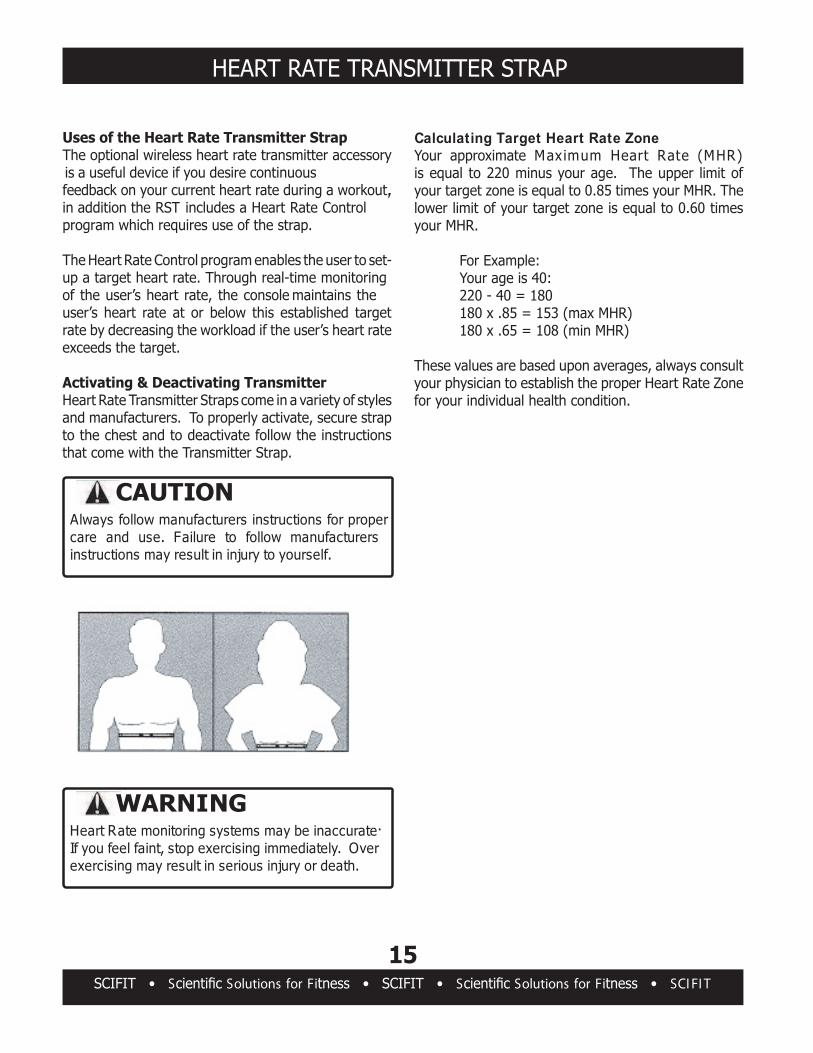
Uses of the Heart Rate Transmitter StrapThe optional wireless heart rate transmitter accessory is a useful device if you desire continuousfeedback on your current heart rate during a workout., in addition the RST includes a Heart Rate Controlprogram which requires use of the strap.
The Heart Rate Control program enables the user to set-up a target heart rate. Through real-time monitoring
eht sniatniam elosnoc eht ,etar traeh s’resu eht fouser’s heart rate at or below this established target rate by decreasing the workload if the user’s heart rate exceeds the target.
Activating & Deactivating TransmitterHeart Rate Transmitter Straps come in a variety of styles and manufacturers. To properly activate, secure strap to the chest and to deactivate follow the instructions that come with the Transmitter Strap.
Calculating Target Heart Rate ZoneYour approximate Maximum Heart Rate (MHR)is equal to 220 minus your age. The upper limit of your target zone is equal to 0.85 times your MHR. The lower limit of your target zone is equal to 0.60 times your MHR.
For Example: Your age is 40: 220 - 40 = 180 180 x .85 = 153 (max MHR) 180 x .65 = 108 (min MHR)
These values are based upon averages, always consult your physician to establish the proper Heart Rate Zone for your individual health condition.
Heart Rate monitoring systems may be inaccurate.
If you feel faint, stop exercising immediately. Over
exercising may result in serious injury or death.
WARNING
Always follow manufacturers instructions for proper
care and use. Failure to follow manufacturers instructions may result in injury to yourself.
CAUTION
PROGRAM INSTRUCTIONS
S Solutions for Fi FIT S Solutions for Fi SCIFIT
16
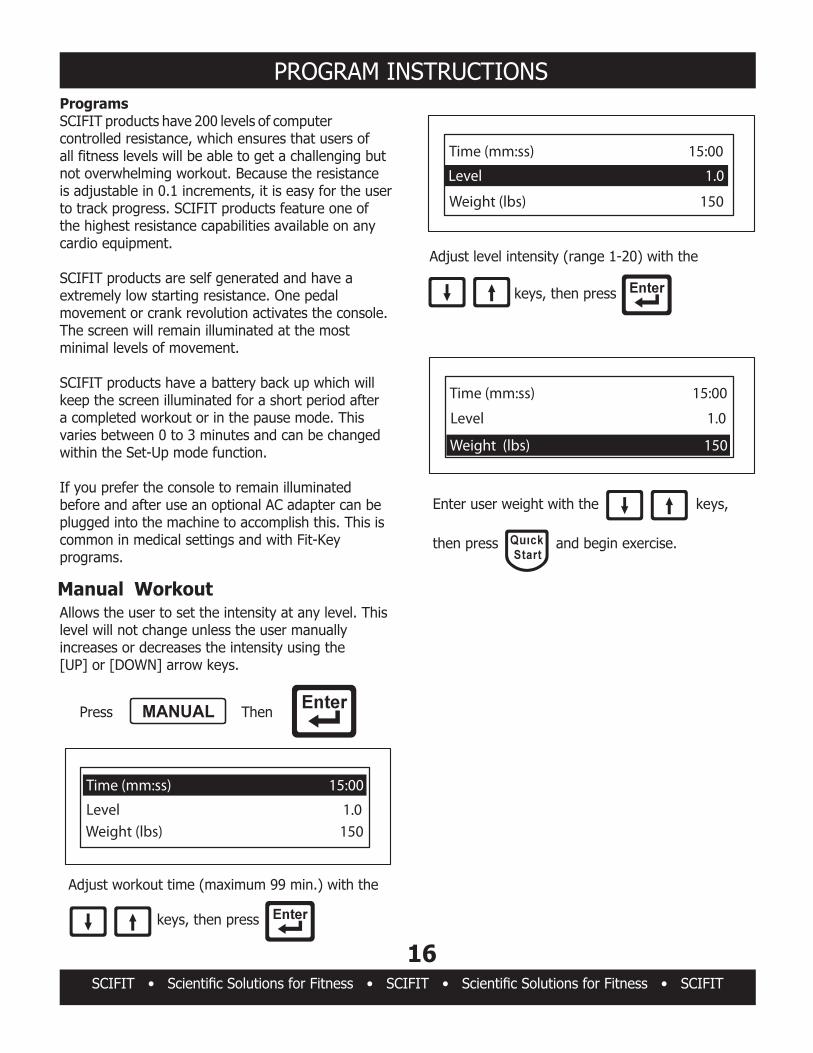
ProgramsSCIFIT products have 200 levels of computer controlled resistance, which ensures that users ofall fitness levels will be able to get a challenging butnot overwhelming workout. Because the resistance is adjustable in 0.1 increments, it is easy for the userto track progress. SCIFIT products feature one of the highest resistance capabilities available on anycardio equipment.
SCIFIT products are self generated and have aextremely low starting resistance. One pedalmovement or crank revolution activates the console.The screen will remain illuminated at the mostminimal levels of movement.
SCIFIT products have a battery back up which willkeep the screen illuminated for a short period aftera completed workout or in the pause mode. This varies between 0 to 3 minutes and can be changedwithin the Set-Up mode function.
If you prefer the console to remain illuminatedbefore and after use an optional AC adapter can beplugged into the machine to accomplish this. This iscommon in medical settings and with Fit-Keyprograms.
MANUAL
Manual Workout
Press Then
Level 1.0 Weight (lbs) 150
Time (mm:ss) 15:00
Time (mm:ss) 15:00
Weight (lbs) 150
Level 1.0
Adjust workout time (maximum 99 min.) with the
keys, then press
Allows the user to set the intensity at any level. Thislevel will not change unless the user manually increases or decreases the intensity using the[UP] or [DOWN] arrow keys.
Adjust level intensity (range 1-20) with the
keys, then press
Time (mm:ss) 15:00
Level 1.0
Weight (lbs) 150
Enter user weight with the keys,
then press and begin exercise.
PROGRAM INSTRUCTIONS
S Solutions for Fi FIT S Solutions for Fi SCIFIT
17
HILLSPress Then
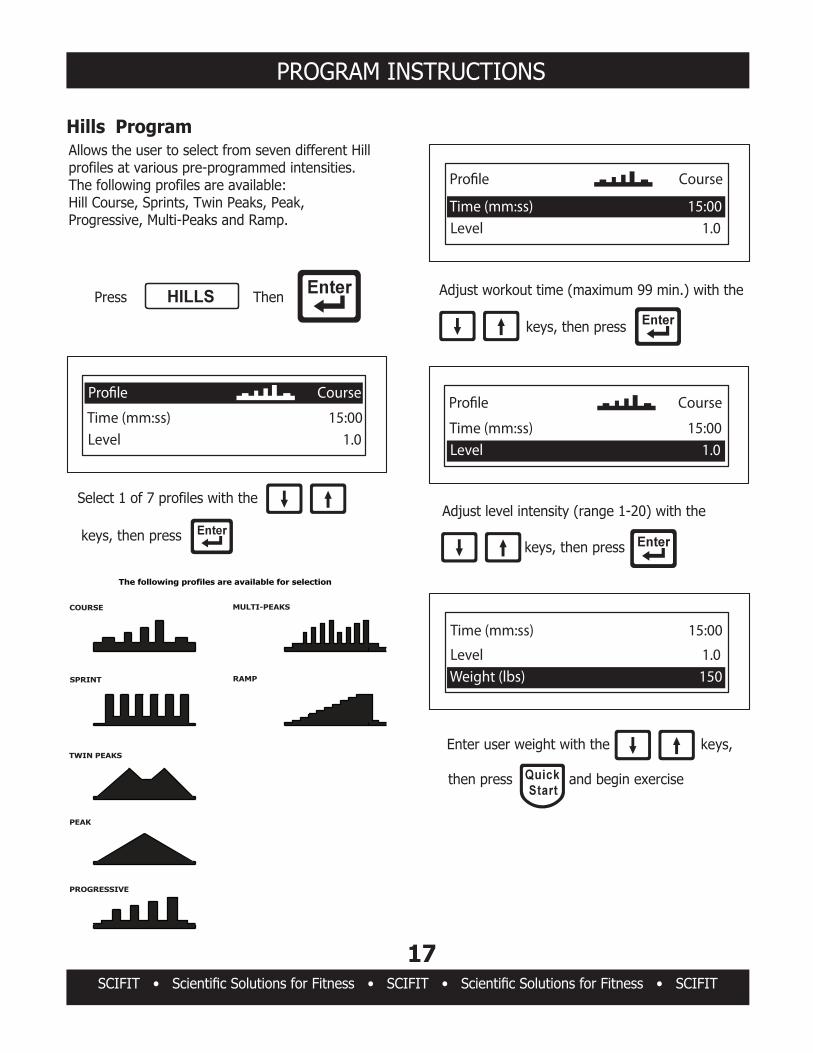
Hills ProgramAllows the user to select from seven different Hill profiles at various pre-programmed intensities. The following profiles are available: Hill Course, Sprints, Twin Peaks, Peak, Progressive, Multi-Peaks and Ramp.
Time (mm:ss) 15:00 Level 1.0
Select 1 of 7 profiles with the
keys, then press
Level 1.0
Adjust workout time (maximum 99 min.) with the
keys, then press
Time (mm:ss) 15:00
Level 1.0
Adjust level intensity (range 1-20) with the
keys, then press
Time (mm:ss) 15:00
Weight (lbs) 150
Time (mm:ss) 15:00
Enter user weight with the keys,
then press and begin exercise
Level 1.0
The following profiles are available for selection
COURSE
SPRINT
TWIN PEAKS
PEAK
PROGRESSIVE
MULTI-PEAKS
RAMP
PROGRAM INSTRUCTIONS
S Solutions for Fi FIT S Solutions for Fi SCIFIT
18
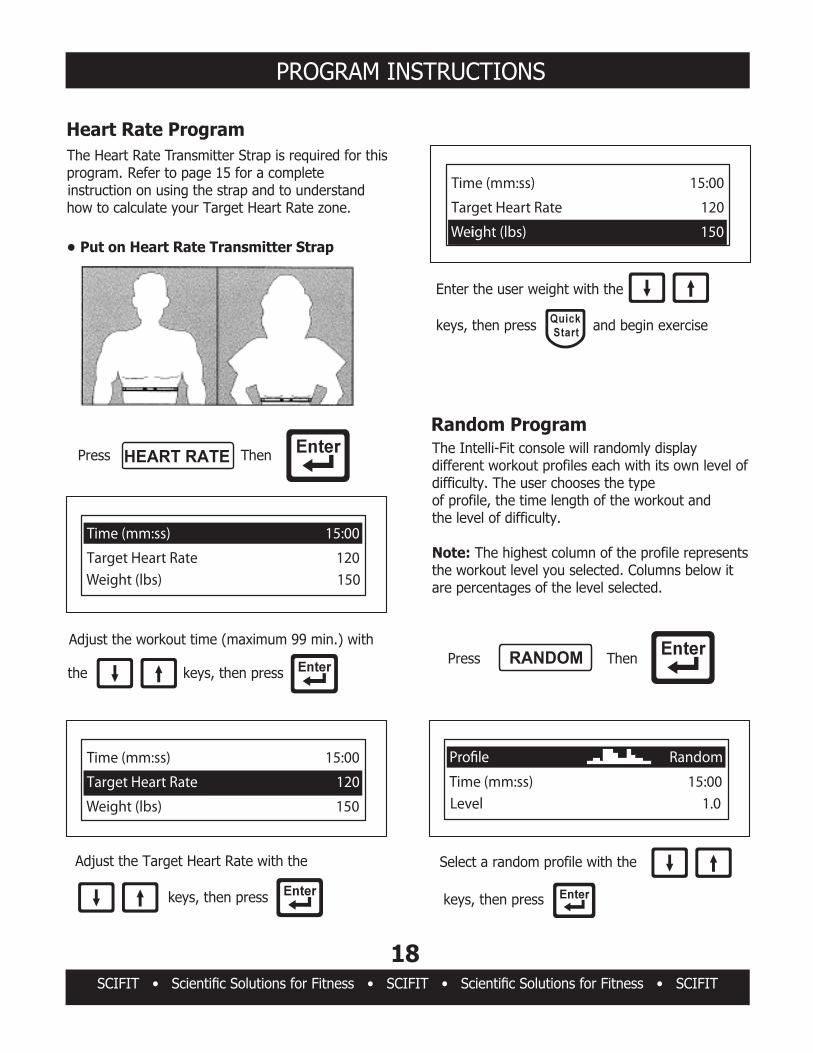
Heart Rate ProgramThe Heart Rate Transmitter Strap is required for this program. Refer to page 15 for a completeinstruction on using the strap and to understand how to calculate your Target Heart Rate zone.
Put on Heart Rate Transmitter Strap
Target Heart Rate 120 Weight (lbs) 150
Time (mm:ss) 15:00
Adjust the workout time (maximum 99 min.) with
the keys, then press
HEART RATEPress Then
Weight (lbs) 150
Time (mm:ss) 15:00
Adjust the Target Heart Rate with the
keys, then press
Target Heart Rate 120
Weight (lbs) 150
Time (mm:ss) 15:00
Enter the user weight with the
keys, then press and begin exercise
Target Heart Rate 120
RANDOMPress Then
Random ProgramThe Intelli-Fit console will randomly display different workout profiles each with its own level ofdifficulty. The user chooses the type of profile, the time length of the workout andthe level of difficulty.
Note: The highest column of the profile representsthe workout level you selected. Columns below it are percentages of the level selected.
Time (mm:ss) 15:00 Level 1.0
Select a random profile with the
keys, then press
PROGRAM INSTRUCTIONS
SCIFIT • Scientific Solutions for Fitness • SCIFIT • Scientific Solutions for Fitness • SCIFIT
19
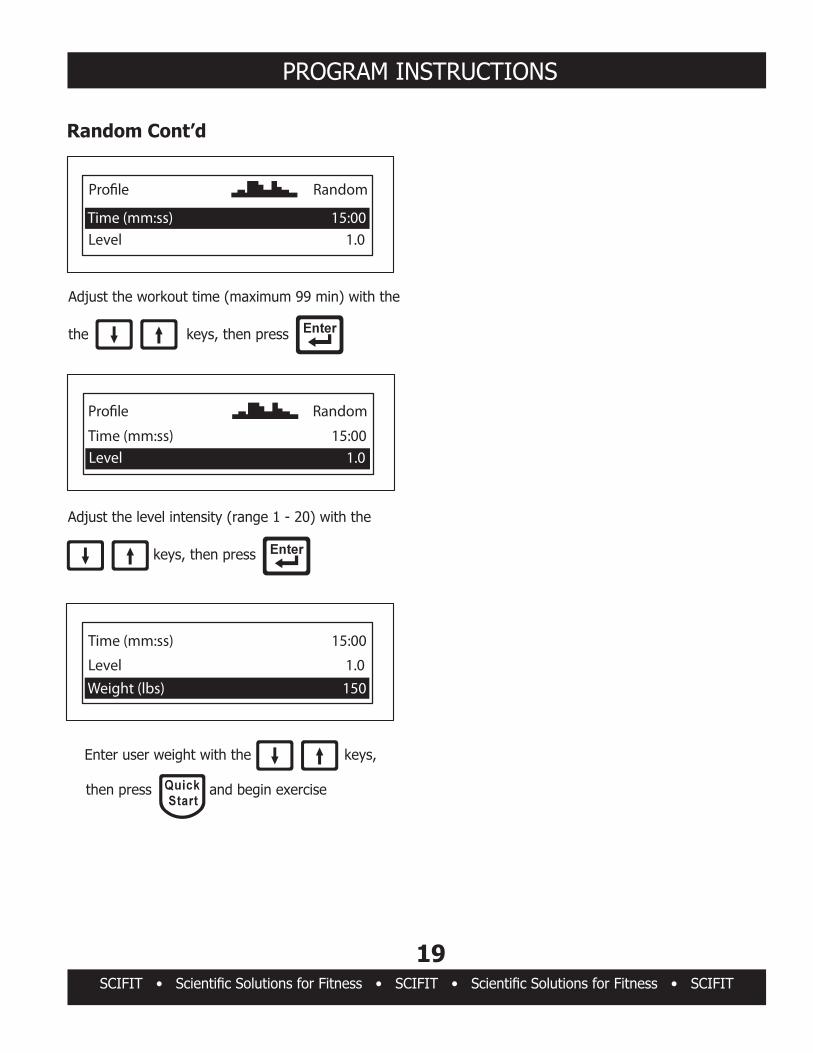
Adjust the workout time (maximum 99 min) with the
the keys, then press
Adjust the level intensity (range 1 - 20) with the
keys, then press
Random Cont’d
Level 1.0 Time (mm:ss) 15:00
Level 1.0 Time (mm:ss) 15:00
Weight (lbs) 150
Time (mm:ss) 15:00
Enter user weight with the keys,
then press and begin exercise
Level 1.0
S Solutions for Fi S Solutions for Fi SCIFIT
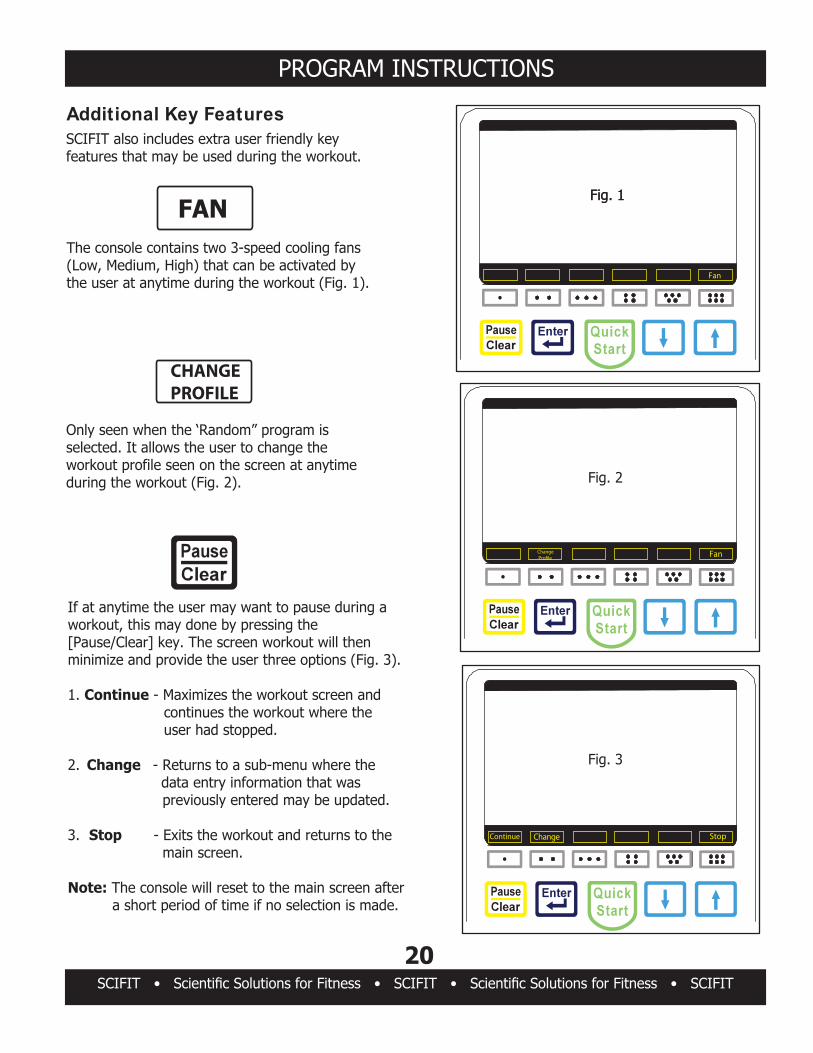
Additional Key Features
SCIFIT also includes extra user friendly key features that may be used during the workout.
Only seen when the ‘Random” program is selected. It allows the user to change the workout profile seen on the screen at anytime during the workout (Fig. 2).
FANThe console contains two 3-speed cooling fans (Low, Medium, High) that can be activated by the user at anytime during the workout (Fig. 1).
If at anytime the user may want to pause during aworkout, this may done by pressing the [Pause/Clear] key. The screen workout will then minimize and provide the user three options (Fig. 3).
1. Continue - Maximizes the workout screen and continues the workout where the user had stopped.
2. Change - Returns to a sub-menu where thedata entry information that was previously entered may be updated.
3. Stop - Exits the workout and returns to the main screen.
Note: The console will reset to the main screen after a short period of time if no selection is made.
20
PROGRAM INSTRUCTIONS
Fan
CHANGEPROFILE
FanChange
Continue Change Stop
Fig. 1Fig. 1
Fig. 2
Fig. 3

SET-UP MODE INSTRUCTIONS
INTELLI-FIT ROTARY CONSOLE SET-UP MODE INSTRUCTIONS The following are brief descriptions for each category that are currently in the Set-Up mode Note: Not all categories will pertain to the workout programs currently installed in your RST7000 Use the [UP] or [DOWN] arrows to make adjustments. After making adjustments the user may press [Quick Start] to save and exit the Set-Up mode at anytime.
NOTE: If you pass the category wanted, you cannot go backwards. Press [Quick Start] and re-enter into the Set-Up mode.
ROTARY: Press the [One dot] key, [Six dot] key and [ENTER] key at the same time. The screen will change and display “OVERLAY” as the first category.
SCIFIT Scientific Solutions For Fitness SCIFIT Scientific Solutions For Fitness SCIFIT
21
Select Workout or Insert Fitkey
Manual Hills Heart RateRandom
SET-UP MODE INSTRUCTIONS
SCIFIT Scientific Solutions For Fitness SCIFIT Scientific Solutions For Fitness SCIFIT
22
CATEGORIES
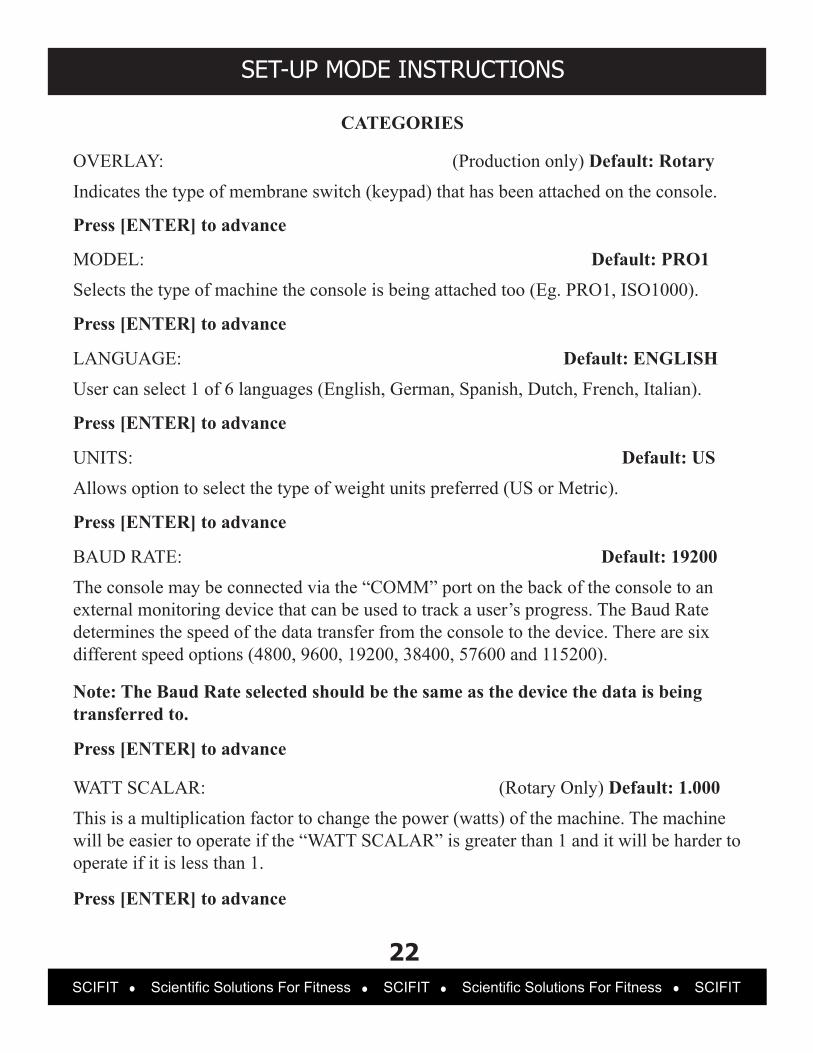
OVERLAY: (Production only) Default: RotaryIndicates the type of membrane switch (keypad) that has been attached on the console.
MODEL: Default: PRO1Selects the type of machine the console is being attached too (Eg. PRO1, ISO1000).
Press [ENTER] to advance
Press [ENTER] to advance
LANGUAGE: Default: ENGLISHUser can select 1 of 6 languages (English, German, Spanish, Dutch, French, Italian).
Press [ENTER] to advance
UNITS: Default: USAllows option to select the type of weight units preferred (US or Metric).
Press [ENTER] to advance
BAUD RATE: Default: 19200The console may be connected via the “COMM” port on the back of the console to an external monitoring device that can be used to track a user’s progress. The Baud Rate determines the speed of the data transfer from the console to the device. There are six different speed options (4800, 9600, 19200, 38400, 57600 and 115200).
Press [ENTER] to advance
Note: The Baud Rate selected should be the same as the device the data is being transferred to.
WATT SCALAR: (Rotary Only) Default: 1.000This is a multiplication factor to change the power (watts) of the machine. The machine will be easier to operate if the “WATT SCALAR” is greater than 1 and it will be harder to operate if it is less than 1.
Press [ENTER] to advance
SET-UP MODE INSTRUCTIONS
SCIFIT Scientific Solutions For Fitness SCIFIT Scientific Solutions For Fitness SCIFIT
23
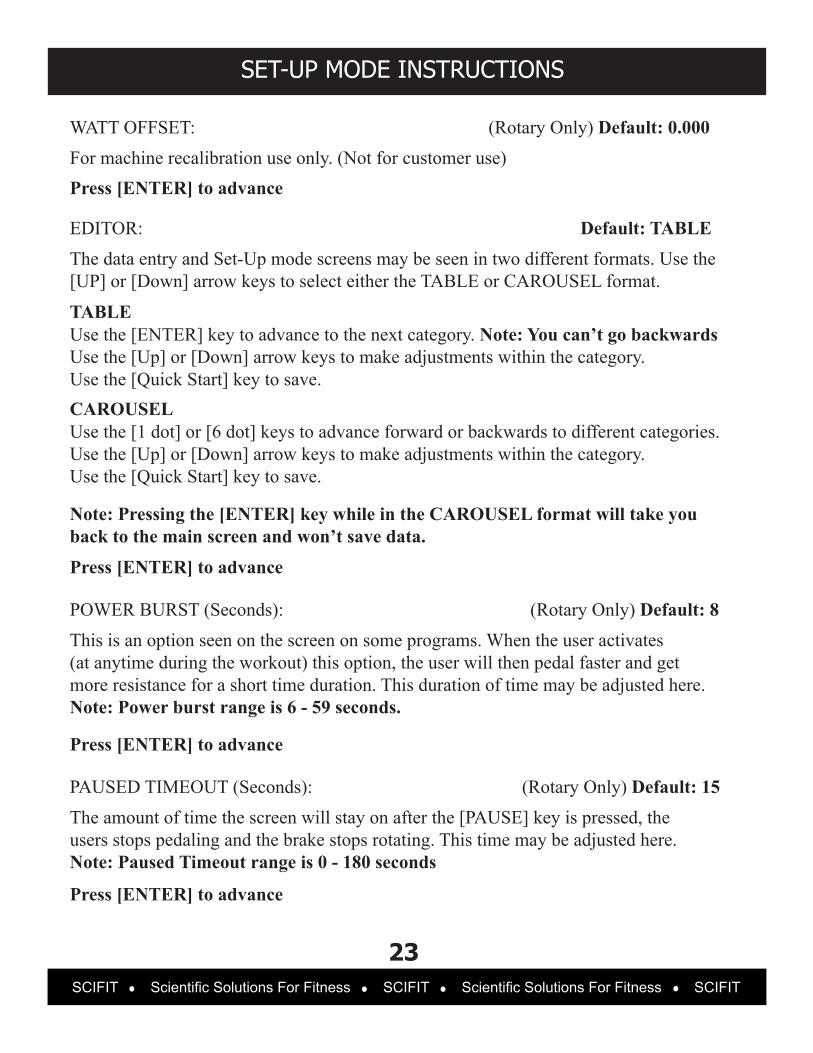
WATT OFFSET: (Rotary Only) Default: 0.000For machine recalibration use only. (Not for customer use)Press [ENTER] to advance
EDITOR: Default: TABLEThe data entry and Set-Up mode screens may be seen in two different formats. Use the [UP] or [Down] arrow keys to select either the TABLE or CAROUSEL format.
Press [ENTER] to advance
TABLEUse the [ENTER] key to advance to the next category. Note: You can’t go backwards Use the [Up] or [Down] arrow keys to make adjustments within the category. Use the [Quick Start] key to save.CAROUSELUse the [1 dot] or [6 dot] keys to advance forward or backwards to different categories. Use the [Up] or [Down] arrow keys to make adjustments within the category. Use the [Quick Start] key to save.
Note: Pressing the [ENTER] key while in the CAROUSEL format will take you back to the main screen and won’t save data.
POWER BURST (Seconds): (Rotary Only) Default: 8This is an option seen on the screen on some programs. When the user activates (at anytime during the workout) this option, the user will then pedal faster and get more resistance for a short time duration. This duration of time may be adjusted here. Note: Power burst range is 6 - 59 seconds.
Press [ENTER] to advance
PAUSED TIMEOUT (Seconds): (Rotary Only) Default: 15The amount of time the screen will stay on after the [PAUSE] key is pressed, the users stops pedaling and the brake stops rotating. This time may be adjusted here. Note: Paused Timeout range is 0 - 180 seconds
Press [ENTER] to advance
SET-UP MODE INSTRUCTIONS
SCIFIT Scientific Solutions For Fitness SCIFIT Scientific Solutions For Fitness SCIFIT
24
UTILIZATION (Hours): Default: 0.00This tracks the amount of time (in hour increments) that the machine has been in use. Note: Hours will not reset when a software upgrade is done.
Press [ENTER] to advance
DEFAULT LEVEL: Default: 1This category controls the starting “DEFAULT LEVEL” seen on the data entry screen for the Manual, Hills and Random programs. If a different starting level is needed, it may be adjusted here. Note: Default Level range is 1 - 20.
Press [ENTER] to advance
THE FOLLOWING CATEGORIES ONLY PERTAIN TO THE FIT-QUIK ROTARY PRESETTINGS
R
FIT-QUIK CARDIO WORKOUT: Default: MANUALAllows the Fit-Quik program to be preset for 1 of 3 workouts: Manual, Hills or Constant Work.
Press [ENTER] to advance
FIT-QUIK WATTS TARGET (WATTS): Default: 20A preset wattage target is selected here when the Fit-Quik program is set for “Constant Work”.
Press [ENTER] to advance
FIT-QUIK PROFILE CARDIO: Default: COURSEWhen the Fit-Quik program is set for “Hills” you may adjust to preselect 1 of 7 workout contours: Course, Sprint, Twin Peaks, Peak, Progressive, Multi-peaks and Ramp.
Press [ENTER] to advance
SET-UP MODE INSTRUCTIONS
SCIFIT Scientific Solutions For Fitness SCIFIT Scientific Solutions For Fitness SCIFIT
25
FIT-QUIK TIME CARDIO (Only affects stage 1): Default: 5.00Sets the time length of the 1st stage for the Fit-Quik program, before initiating the 2nd stage.
Press [ENTER] to advance
FIT-QUIK REVERSE: Default: EnabledSets the option to enable or disable the words “Change Direction” to display at the top of the screen during the Fit-Quik 1st stage workout for those machines that are bidirectional compatible.
Press [ENTER] to advance
Note: The banner will appear approximately every 27 seconds during the 1st stage only.
FIT-QUIK RPM TARGET: Default: Machine DependentSets the RPM target for the 2nd stage of the Fit-Quik program.
Press [ENTER] to advance
FIT-QUIK CHALLENGE TIME (mm:ss): (For 2nd stage) Default: 0:10Allows the option to increase or decrease the time length of the forward portion of the 2nd stage.
Press [ENTER] to advance
FIT-QUIK RECOVERY (mm:ss): (For 2nd stage) Default: 0:35Allows the option to increase or decrease the time length of the reverse portion of the 2nd stage.
Press [ENTER] to advance
SET-UP MODE INSTRUCTIONS
SCIFIT Scientific Solutions For Fitness SCIFIT Scientific Solutions For Fitness SCIFIT
26
FIT-QUIK ISO REPEATS (For 2nd stage): Default: 4Allows the option to set how many times the ISO-Strength portion of the 2nd stage is repeated.
END OF FIT-QUIK ROTARY PRESET CATEGORIES
Workout example: Repeat set at 4.1st stage cardio, then within 2nd stage ISO-Strength.(1) Forward Fast/Slow, Reverse Fast/Slow (2) Forward Fast/Slow, Reverse Fast/Slow (3) Forward Fast/Slow, Reverse Fast/Slow (4) Forward Fast/Slow, Reverse Fast/Slow Workout ends
Press [Enter] to advance
REVERSE BANNER (Rotary only): Default: DisabledAllows option to enable or disable the displaying of the banner “Change Direction” for bidirectional compatible model machines. This category affects the following cardio workout programs: Manual, Constant Work, Hills and Random.
Press [Enter] to advance
ISO BANNER: Default: DisabledAllows option to enable or disable the banners “Fast Forward”, “Slow” and “Reverse Fast” to be shown at the top of the screen during a ISO-Strength workout.
Press [Enter] to advance
THE FOLLOWING PERTAINS ONLY TO “ISO-STRENGTH” PRESETTINGS
ISO FAST TIME: Default: 0:15When the ISO banner is enabled it allows the option to set a length of time to show “Fast Forward” and “Reverse Fast” at the top of the screen.
Press [Enter] to advance
Example: Time set for 15 seconds Fast Forward - displayed 15 seconds Reverse Fast - displayed 15 seconds
ISO SLOW TIME: Default: 0:15When the ISO banner is enabled it allows the option to set a length of time to show “Slow” at the top of the screen.
Press [Enter] to advance
Example: Time set for 15 seconds Slow - displayed 15 seconds
SET-UP MODE INSTRUCTIONS
SCIFIT Scientific Solutions For Fitness SCIFIT Scientific Solutions For Fitness SCIFIT
27
MAINTENANCE & SERVICE
SCIFIT Scientific Solutions For Fitness SCIFIT Scientific Solutions For Fitness SCIFIT
28
UNITED STATES CUSTOMER SERVICEFor assistance in the service of SCIFIT products;
phone : +1-800-745-1373 fax : +1-918-359-2045 e-mail: [email protected]
The Product Support department is available by means of e-mail. A voice mail service is available 24 hours a day for recording messages to request technical support and to order replacement parts. Our mailing address is:
SCIFIT Systems Inc. 5151 S. 110th E. Ave. Tulsa, OK 74146 USA
UK & EUROPEAN CUSTOMER SERVICE
phone : +44 1344 300022 fax: +44 1344 868838 e-mail: [email protected]
SCIFIT LTD (UK) Lexham House Forest Road Binfield Berkshire, RG42 4HP UK
Company Number: 5970624 (UK)
*COUNTRIES OUTSIDE OF UK & EUROPEPLEASE USE USA CONTACT NUMBERS*
Order online 24/ 7 at www.SCIFIT.com
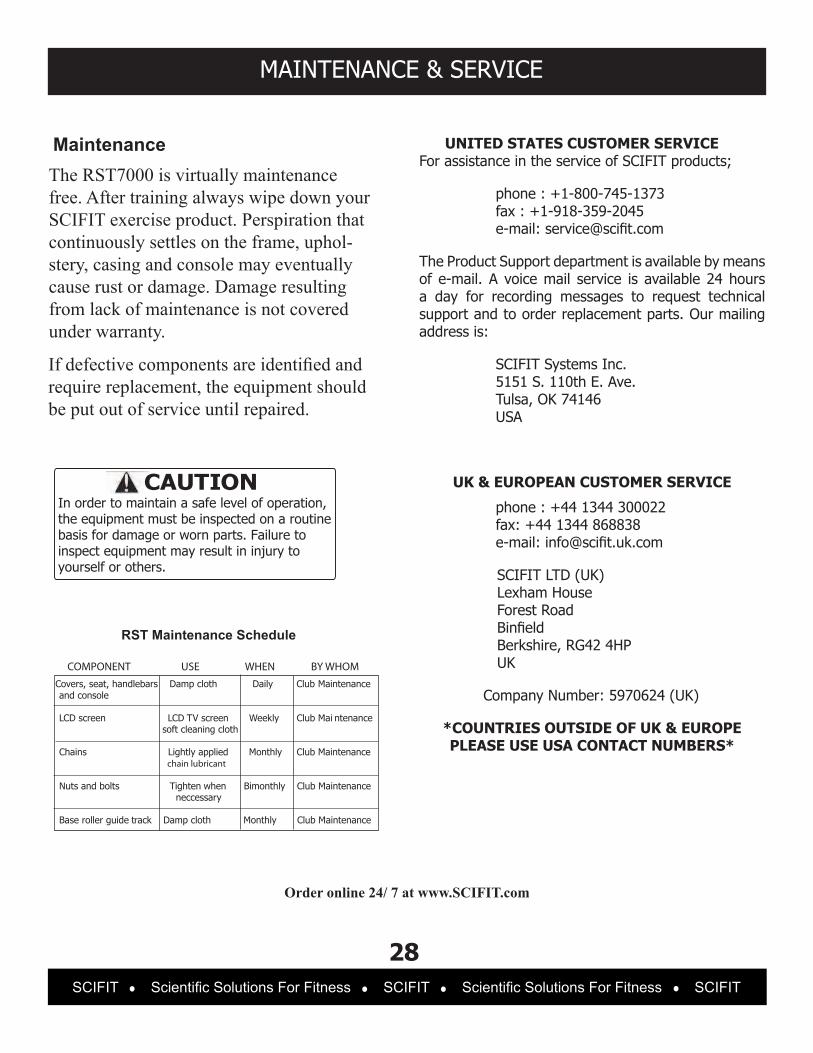
Maintenance The RST7000 is virtually maintenance free. After training always wipe down your SCIFIT exercise product. Perspiration that continuously settles on the frame, uphol-stery, casing and console may eventually cause rust or damage. Damage resulting from lack of maintenance is not covered under warranty.
If defective components are identified and require replacement, the equipment should be put out of service until repaired.
CAUTIONIn order to maintain a safe level of operation,the equipment must be inspected on a routine basis for damage or worn parts. Failure to inspect equipment may result in injury to yourself or others.
SCIFIT • Scientific
RST Maintenance Schedule
Covers, seat, handlebars Damp cloth Daily Club Maintenanceand console
LCD screen LCD TV screen Weekly Club Mai ntenance soft cleaning cloth
Chains Lightly applied Monthly Club Maintenance chain lubricant
Nuts and bolts Tighten when Bimonthly Club Maintenance neccessary
Base roller guide track Damp cloth Monthly Club Maintenance
COMPONENT USE WHEN BY WHOM
WARRANTY
SCIFIT Scientific Solutions For Fitness SCIFIT Scientific Solutions For Fitness SCIFIT
29
It is very important that your SCIFIT machine is registered. This can be done online at http://www.SCIFIT.com/warrantyregistration.shtml or fill out and mail the registration form at the back of this manual.
SCIFIT Statement of Warranty
SCIFIT warranties new products against defective workmanship and/or materials undernormal and proper use subject to the following limitations:
(a) SCIFIT’s obligation to the original purchaser shall apply to:Within the United States and Canada both parts and the cost of labor required to replace or repair a defective product for a period of one (1) year from user/dealer purchase date as documented by *warranty card and if warranty card has not been returned by user/dealer, then date of shipment from the factory. Thereafter, for a period of two (2) years, such obligation shall extend only to the supply of replacement parts or products with any labor costs associated with such replacement or repair to be at Buyer’s expense. Refer to clause (e) for components outside this policy clause.
Outside the United States and Canada replace defective product with no labor for a period of three (3) years from user purchase date as documented by *warranty card and if warranty card has not been returned by user then date of shipment from factory.
*Note: Original purchaser must register their purchased products either by warranty card return, website registration or fax to activate warranty period or shipment date is extent for start of warranty period. A ninety (90) day period is to be given for warranty registration to allow stock rotation and showroom stock, thereafter the registration will be the shipment date for the start of the warranty period.
(b) SCIFIT’s obligation shall be limited to repairing or replacing defective parts. No allowance shall be granted for repairs made by Buyer without SCIFIT’s prior written approval. The decision to replace or repair shall be solely at SCIFIT’s discretion.
(c) SCIFIT’s warranty does not apply to parts requiring replacement or repair due to normal and abnormal wear and tear, improper use, corrosion (perspiration), improper maintenance, improper installation, improper rated, grounded or dedicated electrical circuits or improper storage, nor does it apply where all or part of the product has been altered from its original state by Buyer or a third party.
(d) THIS WARRANTY IS IN LIEU OF ALL OTHER WARRANTIES, EXPRESSED OR IMPLIED, ARISING BY LAW OR OTHERWISE INCLUDING WARRANTY OR MERCHANTABILITY OF FITNESS FOR PARTICULAR PURPOSE, AND IS IN LIEU OF ALL OTHER LIABILITIES OF SCIFIT INCLUDING DIRECT, INDIRECT, SPECIALAND CONSEQUENTIAL DAMAGES OR PENALTIES EXPRESSED OR IMPLIED WHETHER ARISING OUT OF CONTRACT, NEGLIGENCE OR OTHER SORT.
WARRANTY
SCIFIT Scientific Solutions For Fitness SCIFIT Scientific Solutions For Fitness SCIFIT
30
SCIFIT STATEMENT OF WARRANTY
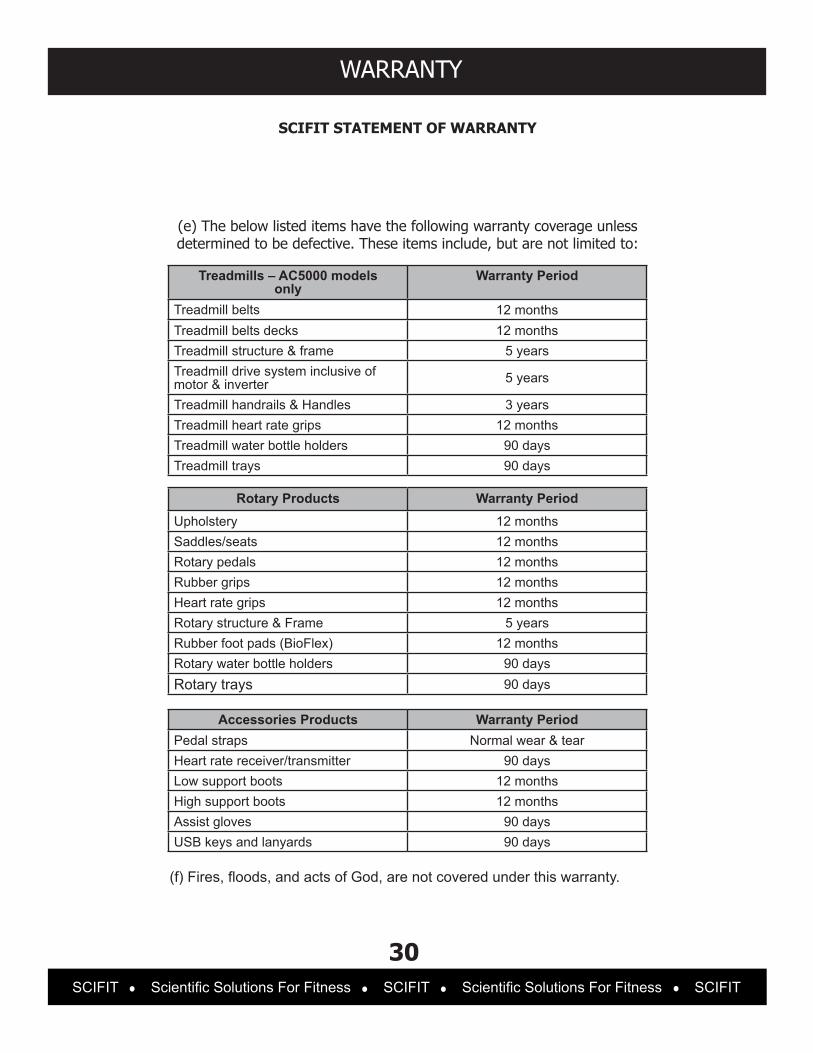
(e) The below listed items have the following warranty coverage unless determined to be defective. These items include, but are not limited to:
(f) Fires, floods, and acts of God, are not covered under this warranty.
Treadmills – AC5000 models only
Warranty Period
Treadmill belts 12 monthsTreadmill belts decks 12 monthsTreadmill structure & frame 5 yearsTreadmill drive system inclusive of motor & inverter 5 years
Treadmill handrails & Handles 3 yearsTreadmill heart rate grips 12 monthsTreadmill water bottle holders 90 daysTreadmill trays 90 days
Accessories Products Warranty PeriodPedal straps Normal wear & tearHeart rate receiver/transmitter 90 daysLow support boots 12 monthsHigh support boots 12 monthsAssist gloves 90 daysUSB keys and lanyards 90 days
Rotary Products Warranty PeriodUpholstery 12 monthsSaddles/seats 12 monthsRotary pedals 12 monthsRubber grips 12 monthsHeart rate grips 12 monthsRotary structure & Frame 5 yearsRubber foot pads (BioFlex) 12 monthsRotary water bottle holders 90 daysRotary trays 90 days
WARRANTY
SCIFIT Scientific Solutions For Fitness SCIFIT Scientific Solutions For Fitness SCIFIT
31
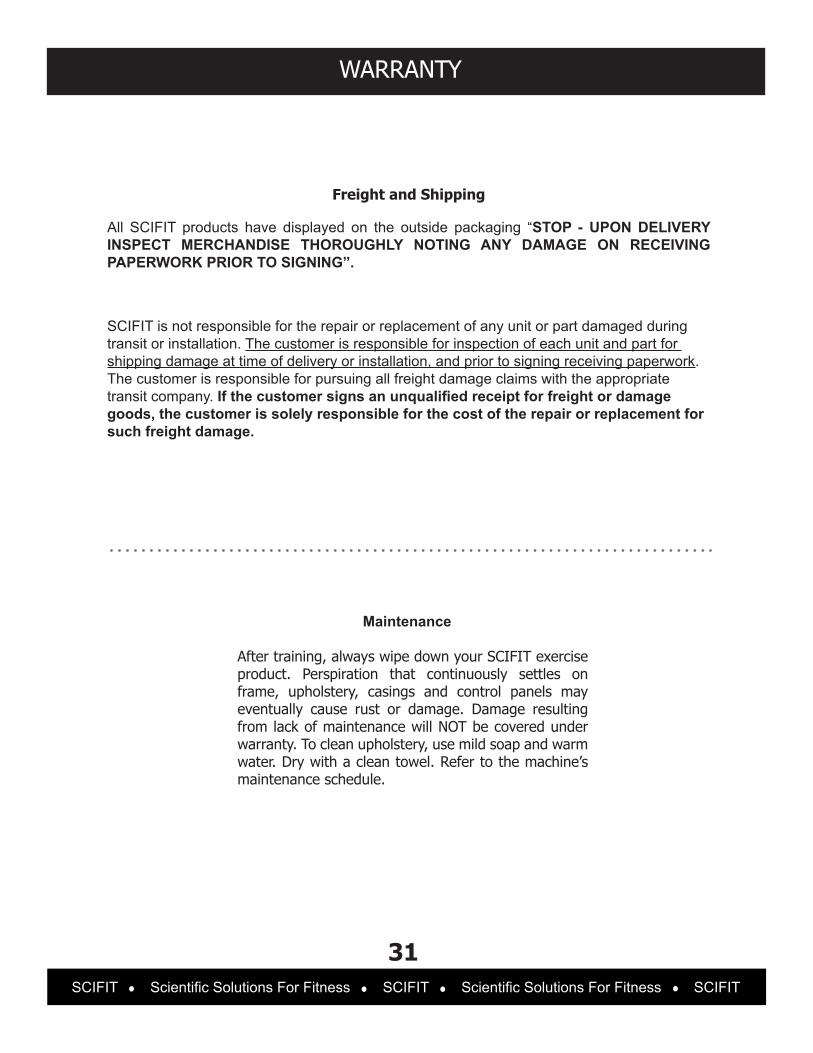
Freight and Shipping
All SCIFIT products have displayed on the outside packaging “STOP - UPON DELIVERY INSPECT MERCHANDISE THOROUGHLY NOTING ANY DAMAGE ON RECEIVING PAPERWORK PRIOR TO SIGNING”.
Maintenance
After training, always wipe down your SCIFIT exercise product. Perspiration that continuously settles on frame, upholstery, casings and control panels may eventually cause rust or damage. Damage resulting from lack of maintenance will NOT be covered under warranty. To clean upholstery, use mild soap and warm water. Dry with a clean towel. Refer to the machine’s maintenance schedule.
SCIFIT is not responsible for the repair or replacement of any unit or part damaged during transit or installation. The customer is responsible for inspection of each unit and part for shipping damage at time of delivery or installation, and prior to signing receiving paperwork. The customer is responsible for pursuing all freight damage claims with the appropriate transit company. If the customer signs an unqualified receipt for freight or damage goods, the customer is solely responsible for the cost of the repair or replacement for such freight damage.
WARRANTY
SCIFIT Scientific Solutions For Fitness SCIFIT Scientific Solutions For Fitness SCIFIT
32
Installation
SCIFIT is not responsible for the repair or replacement of any unit or part damaged during installation. The customer is responsible for inspection of each unit and part for damage at the time of installation. The customer is responsible for pursuing all damage claims with the installer.
Product Support
Assistance for the service of SCIFIT products is available by fax +1-918-359-2045. The product support department is staffed from 7 AM to 5 PM US Central Time Monday through Friday. A voicemail service is available 24 hours daily for recording messages to request technical support and to order replacement parts. Our goal is to return every voicemail call within 30 minutes of when it is placed during our normal business hours.
Please have the following information prior to calling technical support:
• Model number of equipment • Serial number of equipment • Point of contact name and phone number • Detailed description of symptoms encountered
Parts Shipment
During the first 30 days warranty parts will be shipped via overnight delivery. Determination must be made before 2:00 PM US Central Time on any given weekday for next day delivery. During the remainder of the first year warranty period, parts requirements will be filled via ground shipment. The customer will have the option to request overnight or 2nd day parts shipping, but will be charged the difference between the ground shipment cost and the overnight or 2nd day cost.
WARRANTY
SCIFIT Scientific Solutions For Fitness SCIFIT Scientific Solutions For Fitness SCIFIT
33
Return of Parts
SCIFIT is committed to continual improvement in the equipment we market. In order to meet this commitment, the rapid return of defective parts is essential. The examination of the parts by our engineering department leads to changes that insure the same problem does not re-occur. Thank you in advance for your assistance!
When requested by SCIFIT, defective parts must be returned to the SCIFIT factory within 20 days of receipt of replacement part. Otherwise SCIFIT will expect payment on the parts invoice net 30 days.
Please follow these three easy steps for returning parts.
Step 1Keep the box and packing material in which the new parts arrived.
Step 2A UPS prepaid return label will be in the parts box for only those parts that need to be returned. If no prepaid return label is enclosed contact SCIFIT Product Support at 1-800-745-1373. When ALL of the parts are received and inspected at the factory, a credit will be issued for the original parts invoiced. Attention service companies - labor invoices will NOT be paid until the defective parts are returned to the factory.
Step 3Wrap the defective part, place it in the box and affix the return label for safe return.
Service Labor
Where applicable, the SCIFIT product support personnel will arrange a local field service technician to provide field support. Every effort will be made to schedule service during 48 business hours (8 hours per business day) following notification of a problem or as soon as repair parts are available to the field service technician. Where possible, parts will be supplied in advance of the field service technicians so that the product is repaired with one call.
Purchased Parts
All purchased parts will carry a 12 month warranty. Refer to purchased parts shipments and installation for more details.
This Limited Commercial Warranty supercedes the Limited Commercial Warranty printed in the “Users Operation Manual” for all SCIFIT Systems, Inc. products.
If you have questions or require additional information, please contact SCIFIT Systems, Inc. at [email protected]
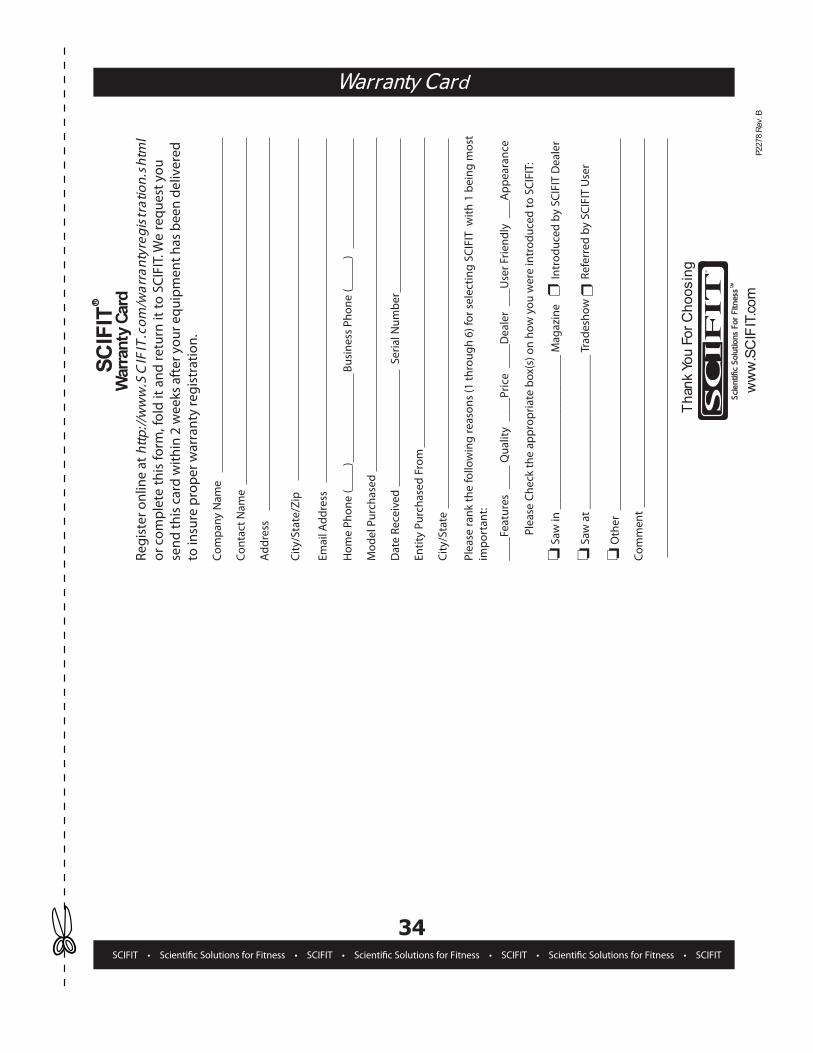
War
rant
y Ca
rdRe
gist
er o
nlin
e at
http
://w
ww
.SC
IFIT
. com
/ war
rant
yreg
istr
atio
n.sh
tml
or c
ompl
ete
this
form
, fol
d it
and
retu
rn it
to S
CIFI
T.W
e re
ques
t you
send
this
car
d w
ithin
2 w
eeks
aft
er y
our e
quip
men
t has
bee
n de
liver
ed
to in
sure
pro
per w
arra
nty
regi
stra
tion.
Com
pany
Nam
e
Cont
act N
ame
Add
ress
City
/Sta
te/Z
ip
Hom
e Ph
one
(___
_)
Bu
sine
ss P
hone
(___
__)
Mod
el P
urch
ased
Dat
e Re
ceiv
ed
S
eria
l Num
ber
Entit
y Pu
rcha
sed
From
City
/Sta
te
Plea
se ra
nk th
e fo
llow
ing
reas
ons
(1 th
roug
h 6)
for s
elec
ting
SCIF
IT w
ith 1
bei
ng m
ost
impo
rtan
t:
____
Feat
ures
___
_ Q
ualit
y _
___P
rice
___
_Dea
ler
___U
ser F
riend
ly _
__A
ppea
ranc
e
Plea
se C
heck
the
appr
opria
te b
ox(s
) on
how
you
wer
e in
trod
uced
to S
CIFI
T:
Saw
in _
____
____
____
____
____
____
_ M
agaz
ine
In
trod
uced
by
SCIF
ITD
eale
r
Saw
at _
____
____
____
____
____
____
_ Tr
ades
how
Re
ferr
ed b
y SC
IFIT
Use
r
Oth
er
Com
men
t
T han
k Yo
u Fo
r C h
oos i
ng
S C I F
I T
Emai
l Add
ress
ww
w.S
C IF
IT.co
mSc
ient
i�c
Solu
tions
For
Fitn
essTM
R
P227
8 R e
v. B
Warranty Card
SCIFIT SCIFIT SCIFIT SCIFIT
34

SCIFIT Systems Inc.5151 South 110th East Avenue Tulsa, OK 74146
From_______________________________________________________________________________________________

Important: Please keep this page for your records
Model Number:_________________________________
Serial Number:_________________________________
Date of Purchase:_________________________________
Manufactured By: SCIFIT Systems Inc. User Manual; #P4803A (8/1/2011)

Order online 24/ 7 at www.SCIFIT. com
Sales: 800.278.3933 or 918.359.2000
Customer Service: 800.745.1373
5151 South 110th East AvenueTulsa, Oklahoma 74146
USA