Embed Size (px)
Citation preview
Service Profile Management (SPM) Users Guide
Intentionally Left Blank
Table of Contents
1.0 OVERVIEW ..................................................................................................................................... 4
1.1. SOFTWARE REQUIREMENTS............................................................................................................. 4
2.0 SIGNING INTO SPM ...................................................................................................................... 4
2.1. IBM REGISTRATION ........................................................................................................................ 6
3.0 NAVIGATION................................................................................................................................ 10
3.1. WEB BROWSER ............................................................................................................................. 10
3.2. SPM SCREEN................................................................................................................................. 11
3.3. SPM NAVIGATION MENU.............................................................................................................. 13
4.0 SPM FUNCTIONS ......................................................................................................................... 16
4.1. SEARCH......................................................................................................................................... 16
4.1.1. Find a Company ................................................................................................................... 16
4.1.1.1. Business Partner Conversion.................................................................................................. 18
4.1.2. Find a Contact ...................................................................................................................... 20
4.1.3. Find a User........................................................................................................................... 23
4.2. ACTION ......................................................................................................................................... 26
4.2.1. Create BP, SP, OSP, or WESS Company ............................................................................. 26
4.2.2. Create SP Application .......................................................................................................... 49
4.2.3. Create Contact...................................................................................................................... 60
4.2.4. Create Helppack ................................................................................................................... 73
4.2.5. Pending Approvals ...............................................................................................................76
4.2.5.1. Company Approvals ................................................................................................................. 77
4.2.5.2. Entitlement Renewals............................................................................................................... 79
4.2.5.3. Application Approvals ............................................................................................................... 80
4.2.6. Pending Changes.................................................................................................................. 81
4.2.6.1. Company Changes ................................................................................................................... 82
4.2.6.2. Company Contact Association Changes ............................................................................... 84
4.2.6.3. Company Contact Association Approvals ............................................................................. 85
4.2.6.4. Company Mass Contacts Relocates ...................................................................................... 88
4.2.6.5. All Company Changes.............................................................................................................. 89
4.2.6.6. Contact Changes ...................................................................................................................... 90
4.2.6.7. Contact Certification Association Changes ........................................................................... 91
4.2.6.8. Contact Certification Association Approvals ......................................................................... 93
4.2.6.9. Internal User Registrations ...................................................................................................... 94
5.0 SIGNING OUT OF SPM ............................................................................................................. 100
6.0 IMPORTANT NOTE ................................................................................................................... 100
1.0 Overview
The Service and Support Profile Management System, or SPM (formerly known as SPDB) manages the IBM Warranty Authorized Business Partner business and Entitlement for PCD support. This includes support for Service Partners, Business Partners, Authorized Service Providers, HelpPack users, Large Accounts and Other Service Providers.
1.1. Software Requirements
. �Windows Operating System
. � Internet Explorer 6.x and higher
2.0 Signing into SPM
Step 1: Open a web browser session.
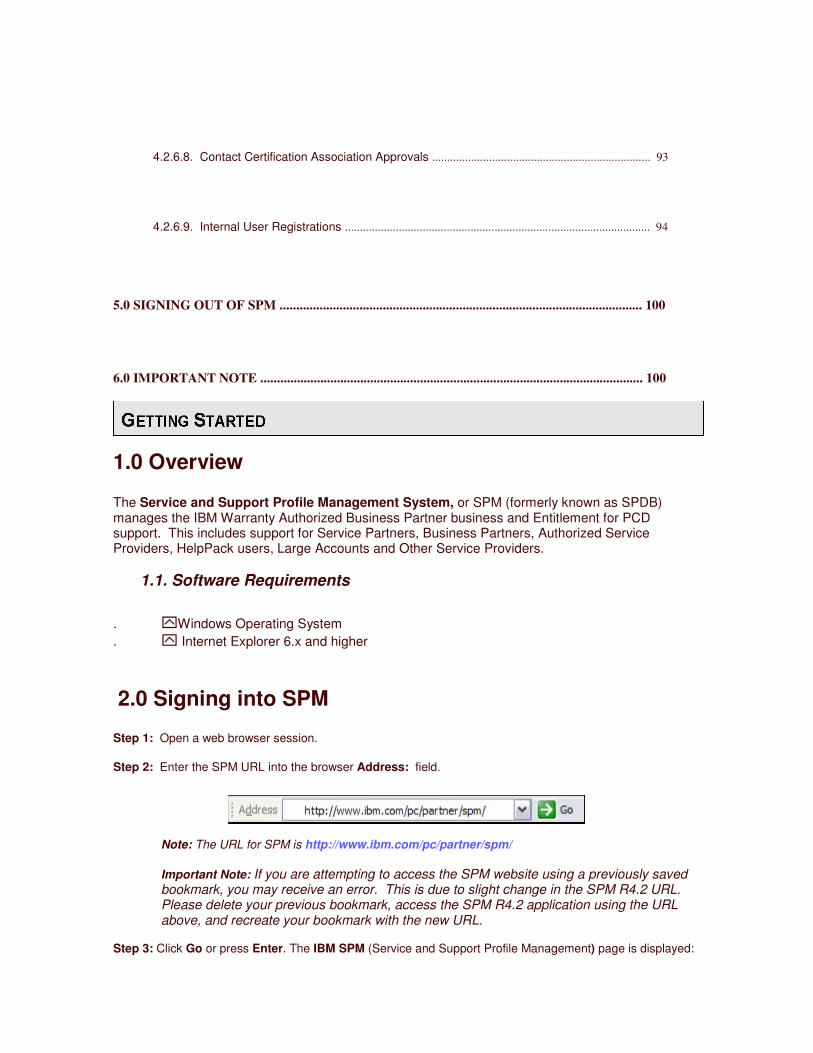
Step 2: Enter the SPM URL into the browser Address: field.
Note: The URL for SPM is http://www.ibm.com/pc/partner/spm/
Important Note: If you are attempting to access the SPM website using a previously saved bookmark, you may receive an error. This is due to slight change in the SPM R4.2 URL. Please delete your previous bookmark, access the SPM R4.2 application using the URL above, and recreate your bookmark with the new URL.
Step 3: Click Go or press Enter. The IBM SPM (Service and Support Profile Management) page is displayed:
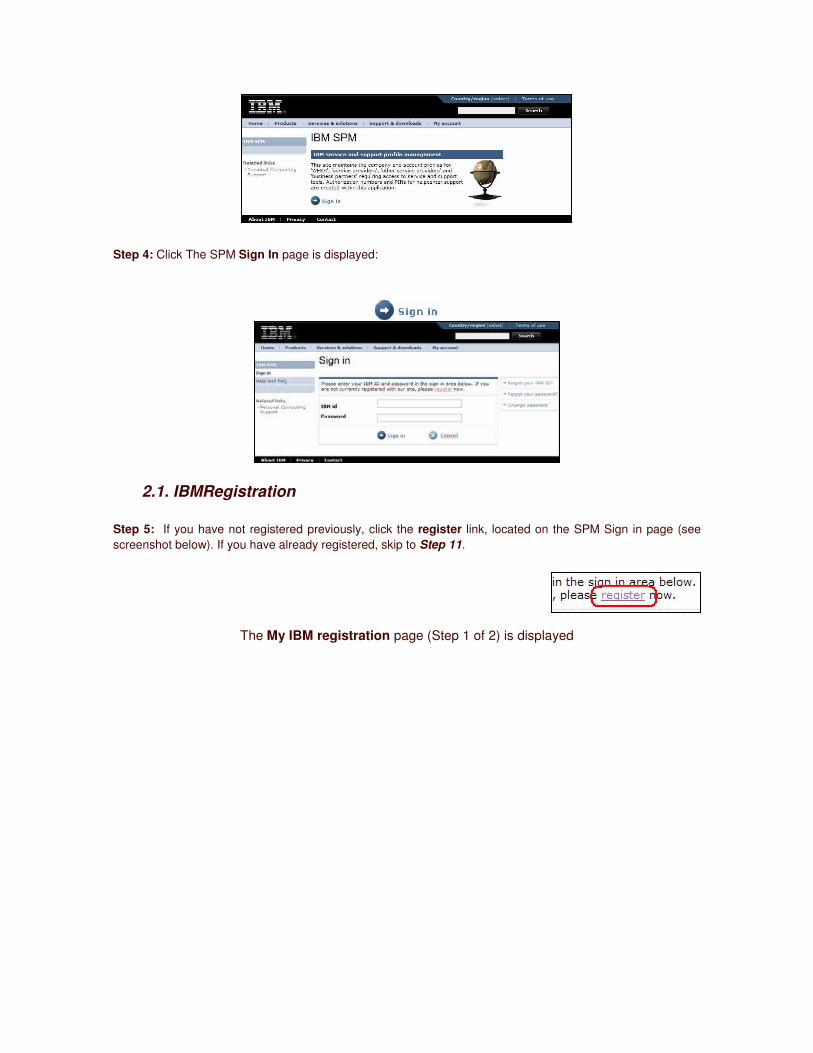
Step 4: Click The SPM Sign In page is displayed:
2.1. IBMRegistration
Step 5: If you have not registered previously, click the register link, located on the SPM Sign in page (see screenshot below). If you have already registered, skip to Step 11.
The My IBM registration page (Step 1 of 2) is displayed
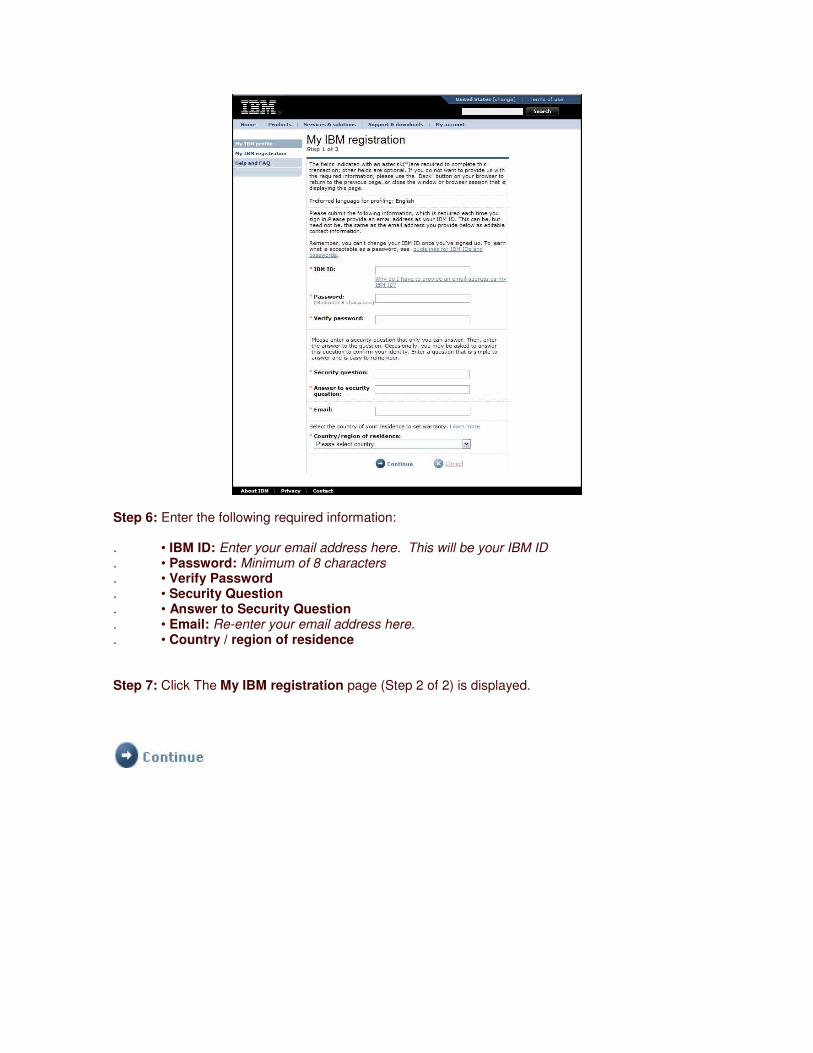
Step 6: Enter the following required information:
. • IBM ID: Enter your email address here. This will be your IBM ID
. • Password: Minimum of 8 characters
. • Verify Password
. • Security Question
. • Answer to Security Question
. • Email: Re-enter your email address here.
. • Country / region of residence
Step 7: Click The My IBM registration page (Step 2 of 2) is displayed.
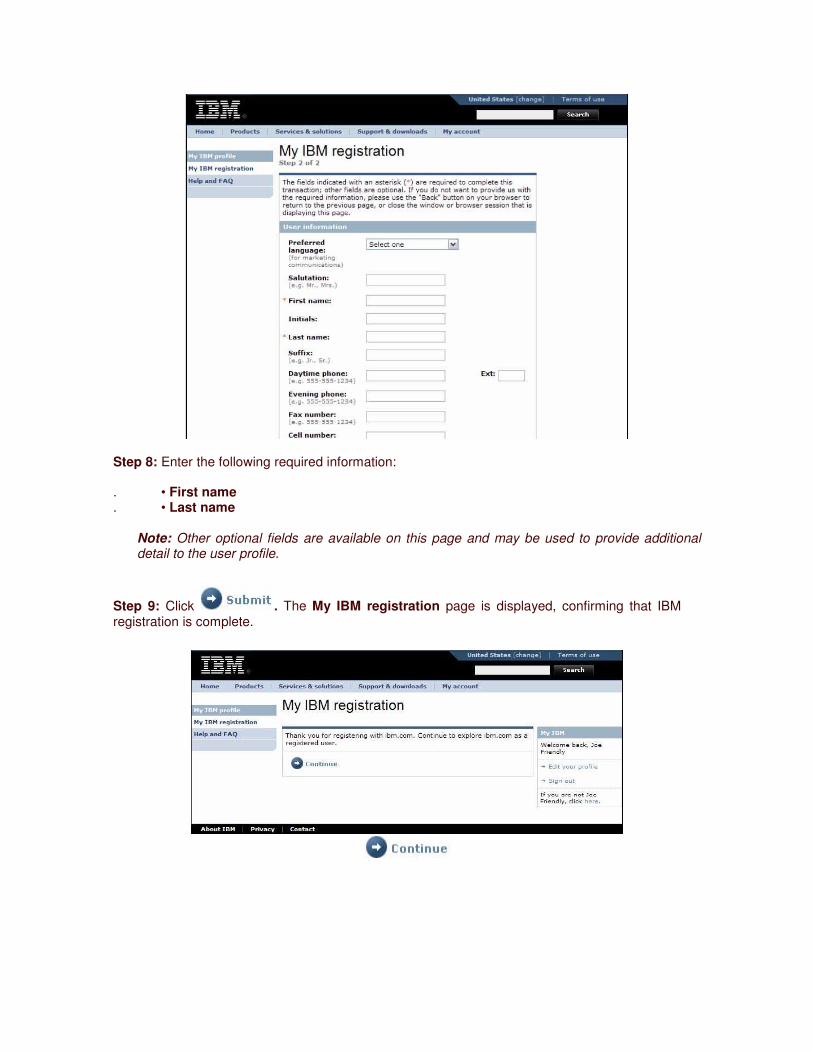
Step 8: Enter the following required information:
. • First name
. • Last name
Note: Other optional fields are available on this page and may be used to provide additional detail to the user profile.
Step 9: Click . The My IBM registration page is displayed, confirming that IBM registration is complete.
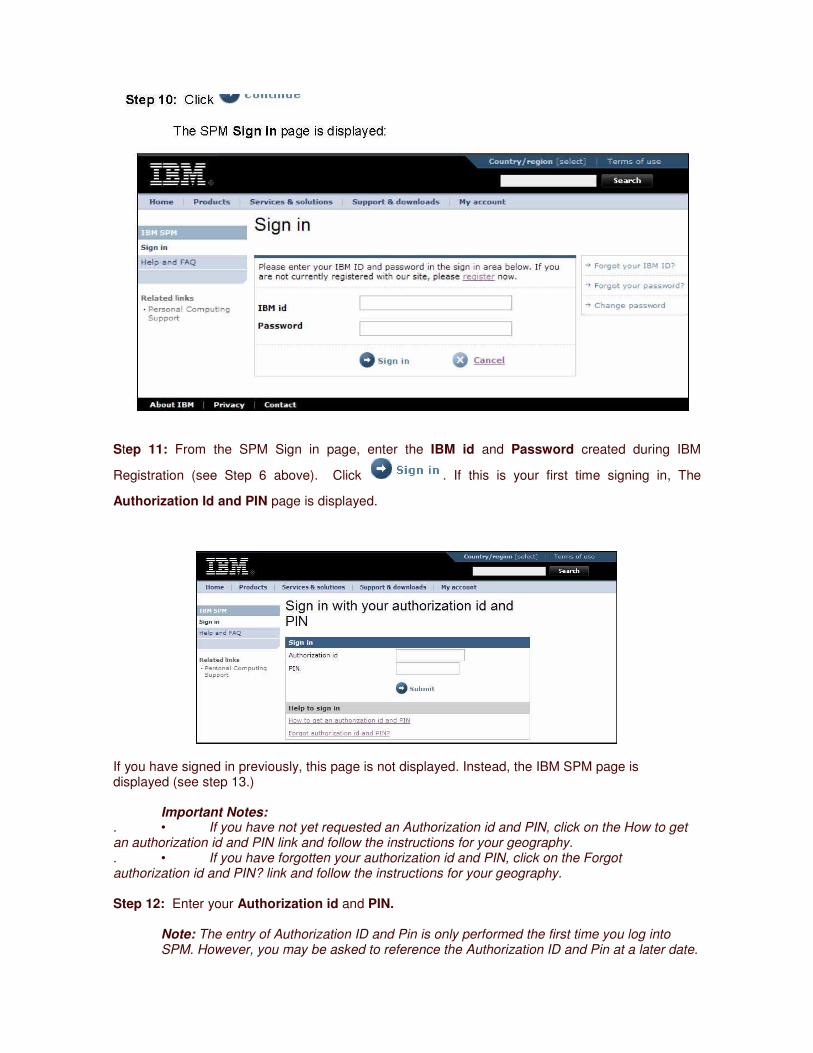
Step 11: From the SPM Sign in page, enter the IBM id and Password created during IBM
Registration (see Step 6 above). Click . If this is your first time signing in, The
Authorization Id and PIN page is displayed.
If you have signed in previously, this page is not displayed. Instead, the IBM SPM page is displayed (see step 13.)
Important Notes: . • If you have not yet requested an Authorization id and PIN, click on the How to get an authorization id and PIN link and follow the instructions for your geography. . • If you have forgotten your authorization id and PIN, click on the Forgot authorization id and PIN? link and follow the instructions for your geography. Step 12: Enter your Authorization id and PIN.
Note: The entry of Authorization ID and Pin is only performed the first time you log into SPM. However, you may be asked to reference the Authorization ID and Pin at a later date.

Please keep them in a safe place.
You are now signed into the SPM site.
3.0 Navigation
SPM uses standard World Wide Web navigation. If you are familiar with the Internet, navigation on the SPM site will be easy to learn.
This chapter discusses standard World Wide Web navigation that is appropriate to the SPM site. It offers a basic understanding of the parts of the screen and how to use them.
At the end of this chapter, you should have a good understanding of how to move around at the SPM site. You will become familiar with:
.• Parts of the screen a. o Internet Explorer b. o SPM site c. oLinks to sites within SPM d. oLinks to non-SPM sites . • SPM Navigation Menu . • Cursor Functions . • Lists, buttons, boxes hyperlinks and other SPM objects . • Search
3.1. Web Browser
Internet Explorer is a common web browser used to access the internet. The screenshot
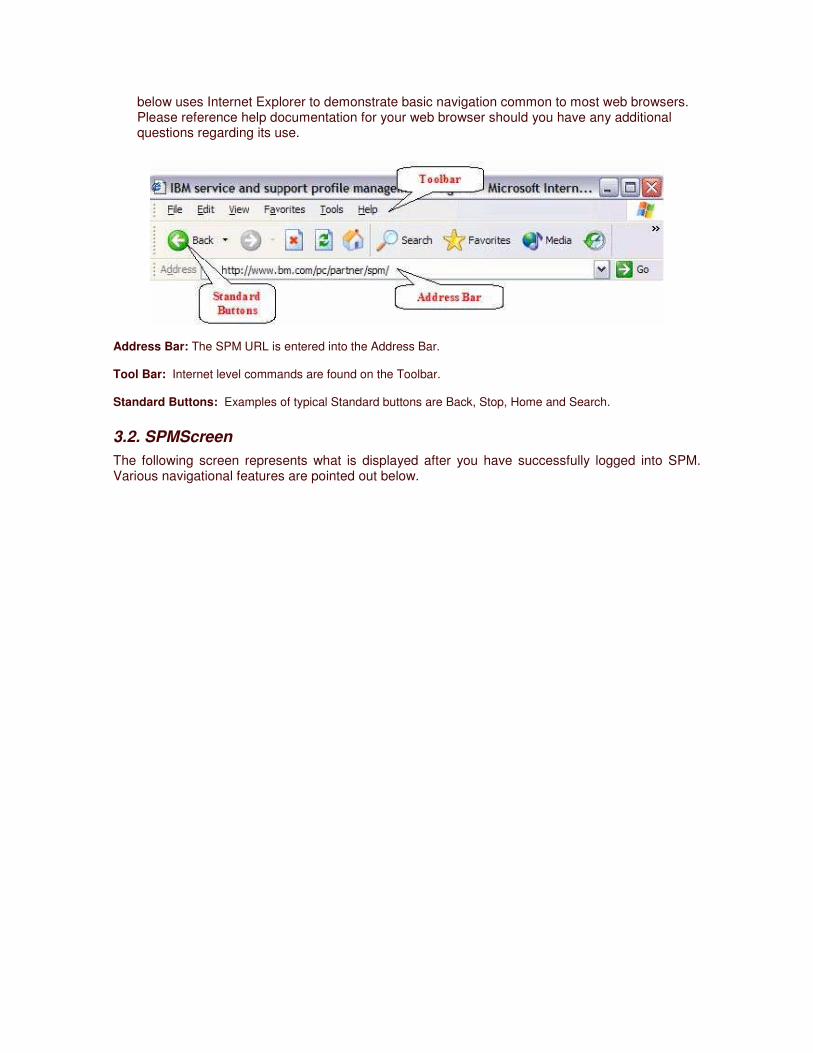
below uses Internet Explorer to demonstrate basic navigation common to most web browsers. Please reference help documentation for your web browser should you have any additional questions regarding its use.
Address Bar: The SPM URL is entered into the Address Bar.
Tool Bar: Internet level commands are found on the Toolbar.
Standard Buttons: Examples of typical Standard buttons are Back, Stop, Home and Search. 3.2. SPMScreen The following screen represents what is displayed after you have successfully logged into SPM. Various navigational features are pointed out below.
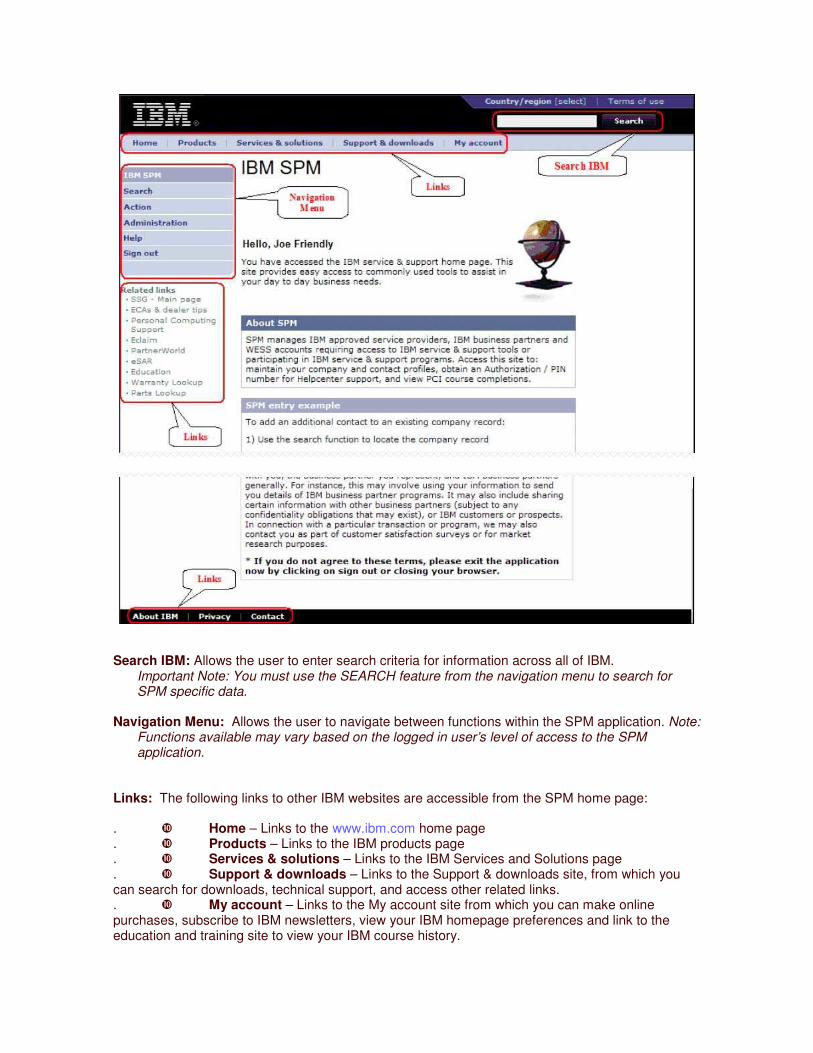
Search IBM: Allows the user to enter search criteria for information across all of IBM.
Important Note: You must use the SEARCH feature from the navigation menu to search for SPM specific data.
Navigation Menu: Allows the user to navigate between functions within the SPM application. Note: Functions available may vary based on the logged in user’s level of access to the SPM application.
Links: The following links to other IBM websites are accessible from the SPM home page:
. �� Home – Links to the www.ibm.com home page
. �� Products – Links to the IBM products page
. �� Services & solutions – Links to the IBM Services and Solutions page
. �� Support & downloads – Links to the Support & downloads site, from which you can search for downloads, technical support, and access other related links. . �� My account – Links to the My account site from which you can make online purchases, subscribe to IBM newsletters, view your IBM homepage preferences and link to the education and training site to view your IBM course history.
Related Links:
. �� SSG – Main page – Links to the Service Support Guide used in IBM service and support profile management. . �� ECAs & dealer tips – Links to a website where you can search for ECAs and dealer tips by Brand, Family, Machine Type, and/or Model. . �� Personal computing support – Links to the IBM Personal computing support page, where you can browse for various support information by product, such as drivers and downloads, publications, and warranty information. . �� Eclaim – Links to the Eclaim.com website. . �� PartnerWorld – Links to the PartnerWorld website. . �� eSAR – Links to the electronic Solution Assurance Review application. . �� Education – Links to the IBM PC Institute business partner website. . �� Warranty Lookup – Links to the IBM warranty status website, where you can enter a valid machine type and serial number to obtain current product warranty status, as well as international warranty information. . �� Parts Lookup – Links to the IBM Parts lookup website, where you can enter a valid machine type and serial number to obtain a list of parts shipped with the system. Other Links:
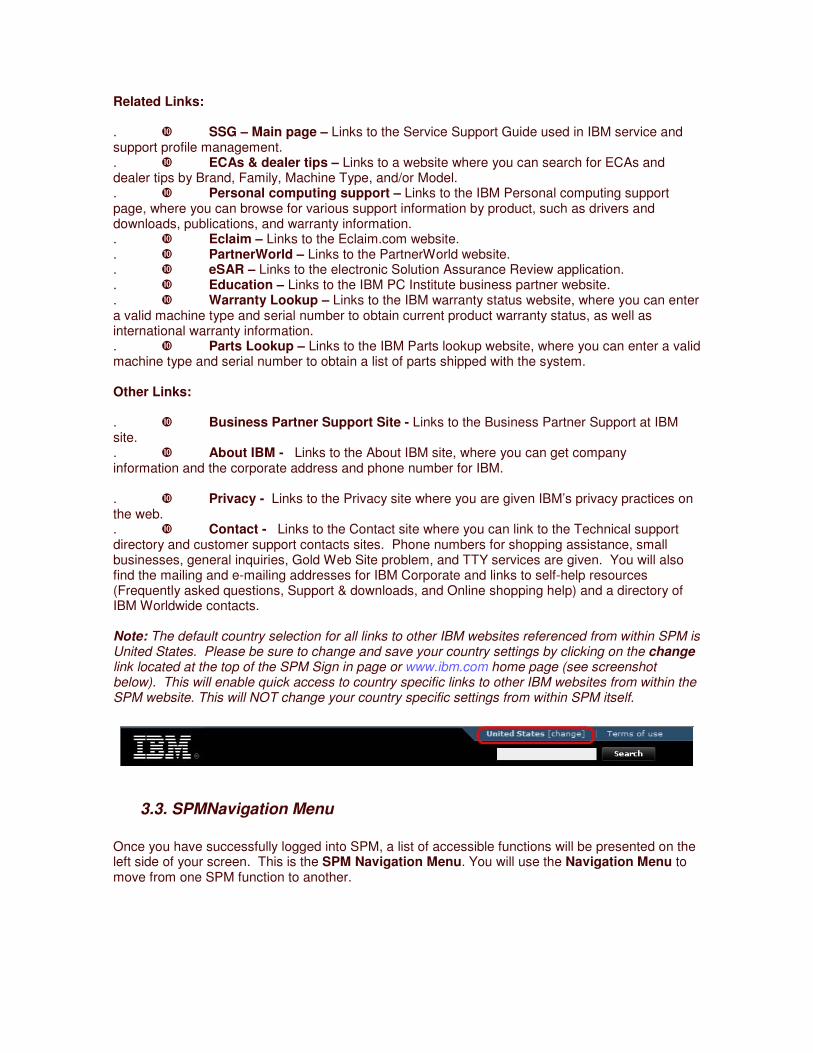
. �� Business Partner Support Site - Links to the Business Partner Support at IBM site. . �� About IBM - Links to the About IBM site, where you can get company information and the corporate address and phone number for IBM. . �� Privacy - Links to the Privacy site where you are given IBM’s privacy practices on the web. . �� Contact - Links to the Contact site where you can link to the Technical support directory and customer support contacts sites. Phone numbers for shopping assistance, small businesses, general inquiries, Gold Web Site problem, and TTY services are given. You will also find the mailing and e-mailing addresses for IBM Corporate and links to self-help resources (Frequently asked questions, Support & downloads, and Online shopping help) and a directory of IBM Worldwide contacts. Note: The default country selection for all links to other IBM websites referenced from within SPM is United States. Please be sure to change and save your country settings by clicking on the change link located at the top of the SPM Sign in page or www.ibm.com home page (see screenshot below). This will enable quick access to country specific links to other IBM websites from within the SPM website. This will NOT change your country specific settings from within SPM itself.
3.3. SPMNavigation Menu
Once you have successfully logged into SPM, a list of accessible functions will be presented on the left side of your screen. This is the SPM Navigation Menu. You will use the Navigation Menu to move from one SPM function to another.
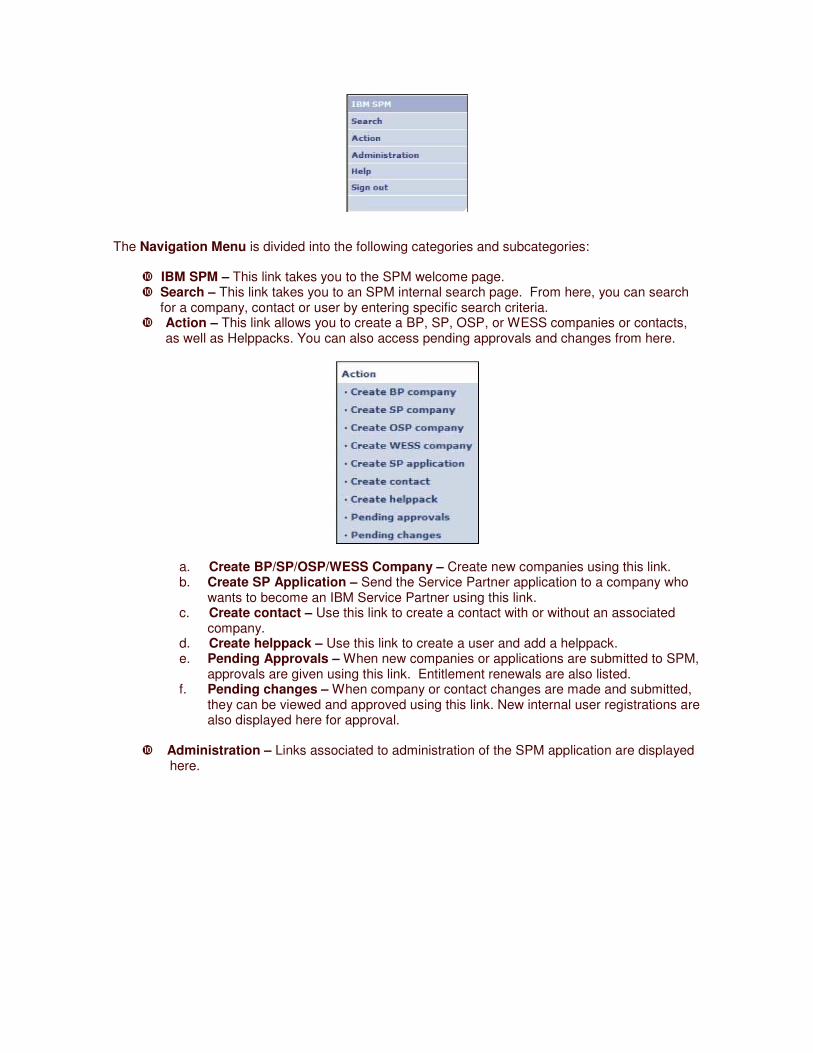
The Navigation Menu is divided into the following categories and subcategories:
��IBM SPM – This link takes you to the SPM welcome page. ��Search – This link takes you to an SPM internal search page. From here, you can search
for a company, contact or user by entering specific search criteria. � Action – This link allows you to create a BP, SP, OSP, or WESS companies or contacts,
as well as Helppacks. You can also access pending approvals and changes from here.
a. Create BP/SP/OSP/WESS Company – Create new companies using this link. b. Create SP Application – Send the Service Partner application to a company who
wants to become an IBM Service Partner using this link. c. Create contact – Use this link to create a contact with or without an associated
company. d. Create helppack – Use this link to create a user and add a helppack. e. Pending Approvals – When new companies or applications are submitted to SPM,
approvals are given using this link. Entitlement renewals are also listed. f. Pending changes – When company or contact changes are made and submitted,
they can be viewed and approved using this link. New internal user registrations are also displayed here for approval.
��Administration – Links associated to administration of the SPM application are displayed
here.
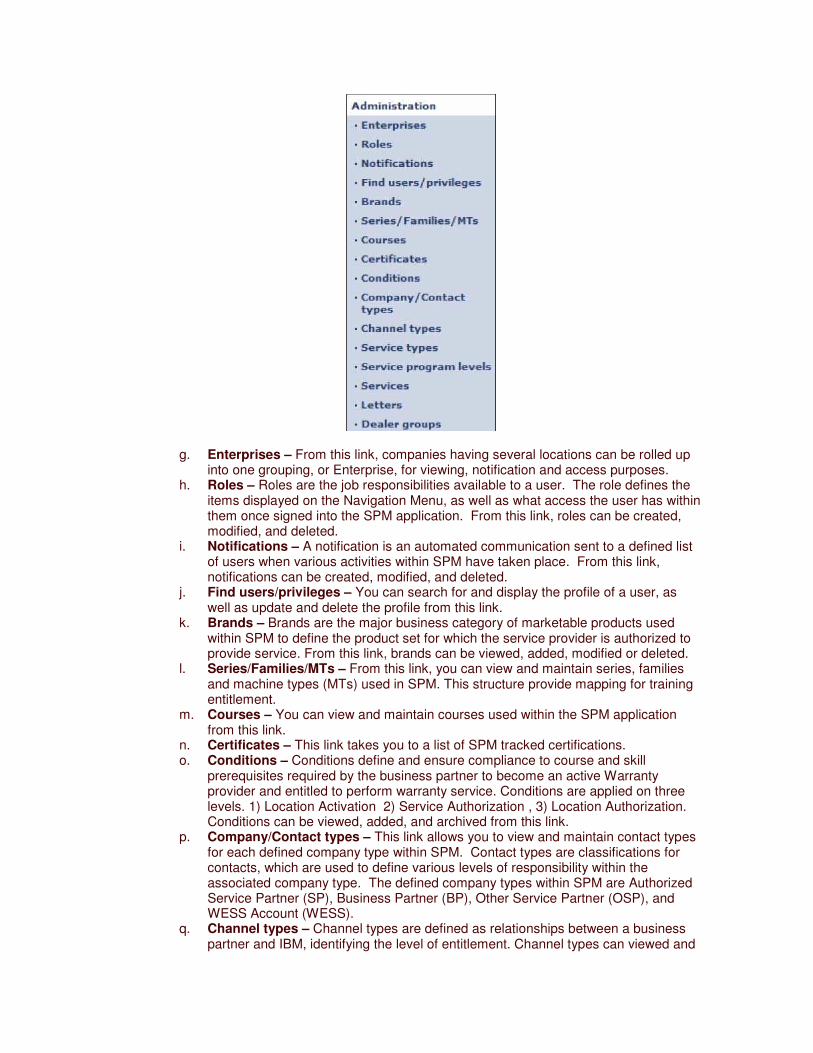
g. Enterprises – From this link, companies having several locations can be rolled up into one grouping, or Enterprise, for viewing, notification and access purposes.
h. Roles – Roles are the job responsibilities available to a user. The role defines the items displayed on the Navigation Menu, as well as what access the user has within them once signed into the SPM application. From this link, roles can be created, modified, and deleted.
i. Notifications – A notification is an automated communication sent to a defined list of users when various activities within SPM have taken place. From this link, notifications can be created, modified, and deleted.
j. Find users/privileges – You can search for and display the profile of a user, as well as update and delete the profile from this link.
k. Brands – Brands are the major business category of marketable products used within SPM to define the product set for which the service provider is authorized to provide service. From this link, brands can be viewed, added, modified or deleted.
l. Series/Families/MTs – From this link, you can view and maintain series, families and machine types (MTs) used in SPM. This structure provide mapping for training entitlement.
m. Courses – You can view and maintain courses used within the SPM application from this link.
n. Certificates – This link takes you to a list of SPM tracked certifications. o. Conditions – Conditions define and ensure compliance to course and skill
prerequisites required by the business partner to become an active Warranty provider and entitled to perform warranty service. Conditions are applied on three levels. 1) Location Activation 2) Service Authorization , 3) Location Authorization. Conditions can be viewed, added, and archived from this link.
p. Company/Contact types – This link allows you to view and maintain contact types for each defined company type within SPM. Contact types are classifications for contacts, which are used to define various levels of responsibility within the associated company type. The defined company types within SPM are Authorized Service Partner (SP), Business Partner (BP), Other Service Partner (OSP), and WESS Account (WESS).
q. Channel types – Channel types are defined as relationships between a business partner and IBM, identifying the level of entitlement. Channel types can viewed and
maintained from this link. r. Service types – Service types identify the relationship between the service
provider and IBM, and can be viewed and maintained from this link. s. Service program levels – This link allows you to view and maintain service
program levels. The Service program is a multi-tiered program enabling incentives for service providers.
t. Services – Services are activities performed by the business partner which fall outside IBM provided brands. A list of these services can be viewed and maintained from this link.
u. Letters – This link is used to view and maintain standard letters that can be printed on demand when an SPM activity takes place.
v. Dealer groups – Use this link to view and maintain brand authorization levels. (Currently only being used for CPPS in EMEA).
�� Help – This link allows you to download documentation to assist you in the use of the SPM application.
�� Sign out – To sign out of the SPM application, click this link. This will return you to the IBM SPM Sign in page.
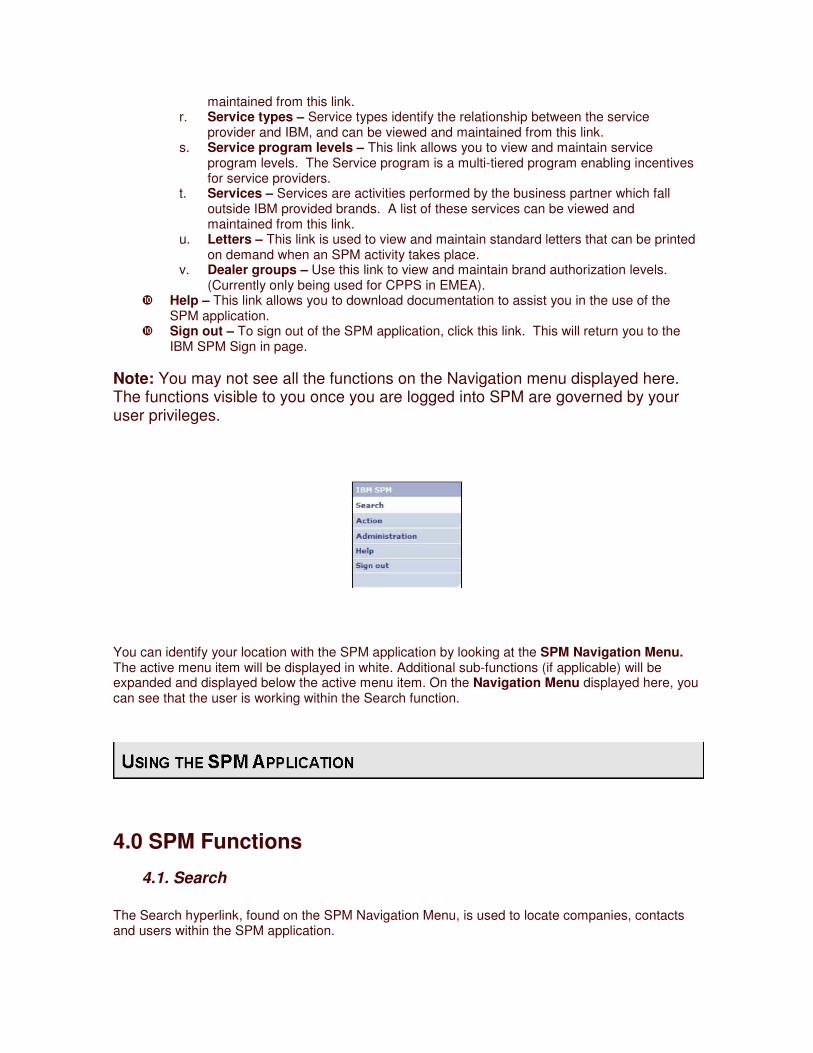
Note: You may not see all the functions on the Navigation menu displayed here. The functions visible to you once you are logged into SPM are governed by your user privileges.
You can identify your location with the SPM application by looking at the SPM Navigation Menu. The active menu item will be displayed in white. Additional sub-functions (if applicable) will be expanded and displayed below the active menu item. On the Navigation Menu displayed here, you can see that the user is working within the Search function.
4.0 SPM Functions
4.1. Search
The Search hyperlink, found on the SPM Navigation Menu, is used to locate companies, contacts and users within the SPM application.
4.1.1. Find a Company:
Step 1: Sign in to the SPM site. See Section 2.0 Signing into SPM for more information.
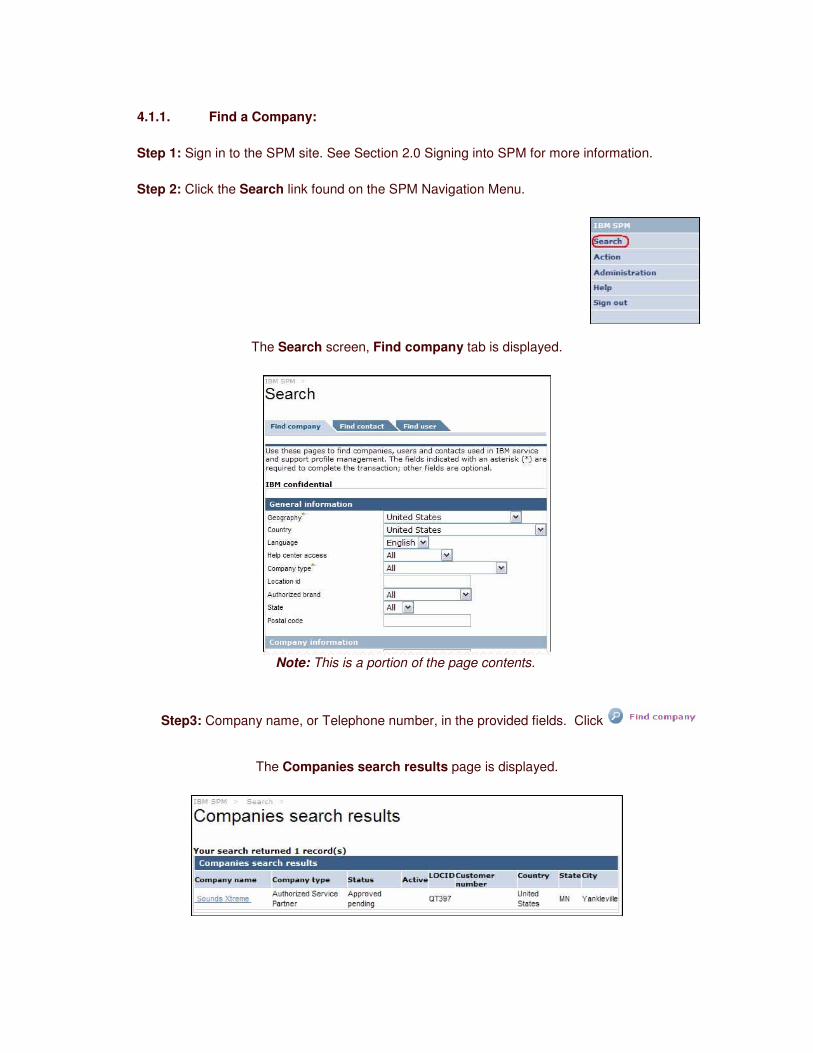
Step 2: Click the Search link found on the SPM Navigation Menu.
The Search screen, Find company tab is displayed.
Note: This is a portion of the page contents.
Step3: Company name, or Telephone number, in the provided fields. Click
The Companies search results page is displayed.
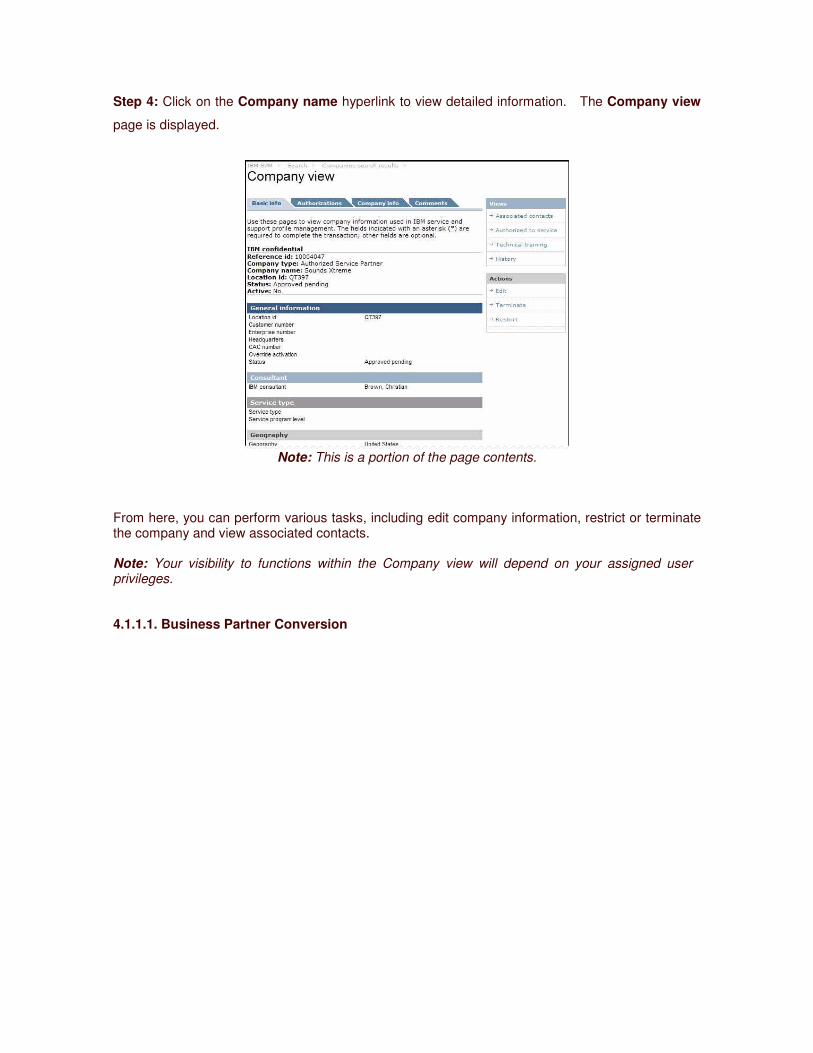
Step 4: Click on the Company name hyperlink to view detailed information. The Company view
page is displayed.
Note: This is a portion of the page contents.
From here, you can perform various tasks, including edit company information, restrict or terminate the company and view associated contacts.
Note: Your visibility to functions within the Company view will depend on your assigned user privileges.
4.1.1.1. Business Partner Conversion
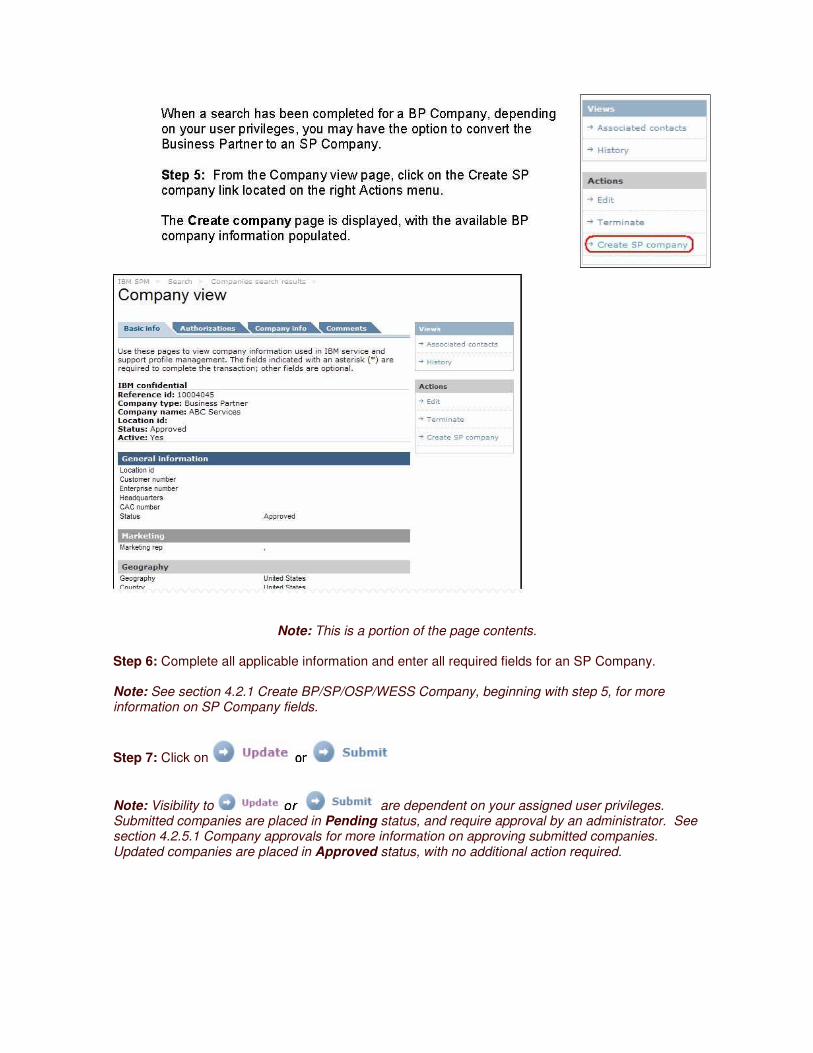
Note: This is a portion of the page contents.
Step 6: Complete all applicable information and enter all required fields for an SP Company.
Note: See section 4.2.1 Create BP/SP/OSP/WESS Company, beginning with step 5, for more information on SP Company fields.
Step 7: Click on
Note: Visibility to are dependent on your assigned user privileges. Submitted companies are placed in Pending status, and require approval by an administrator. See section 4.2.5.1 Company approvals for more information on approving submitted companies. Updated companies are placed in Approved status, with no additional action required.
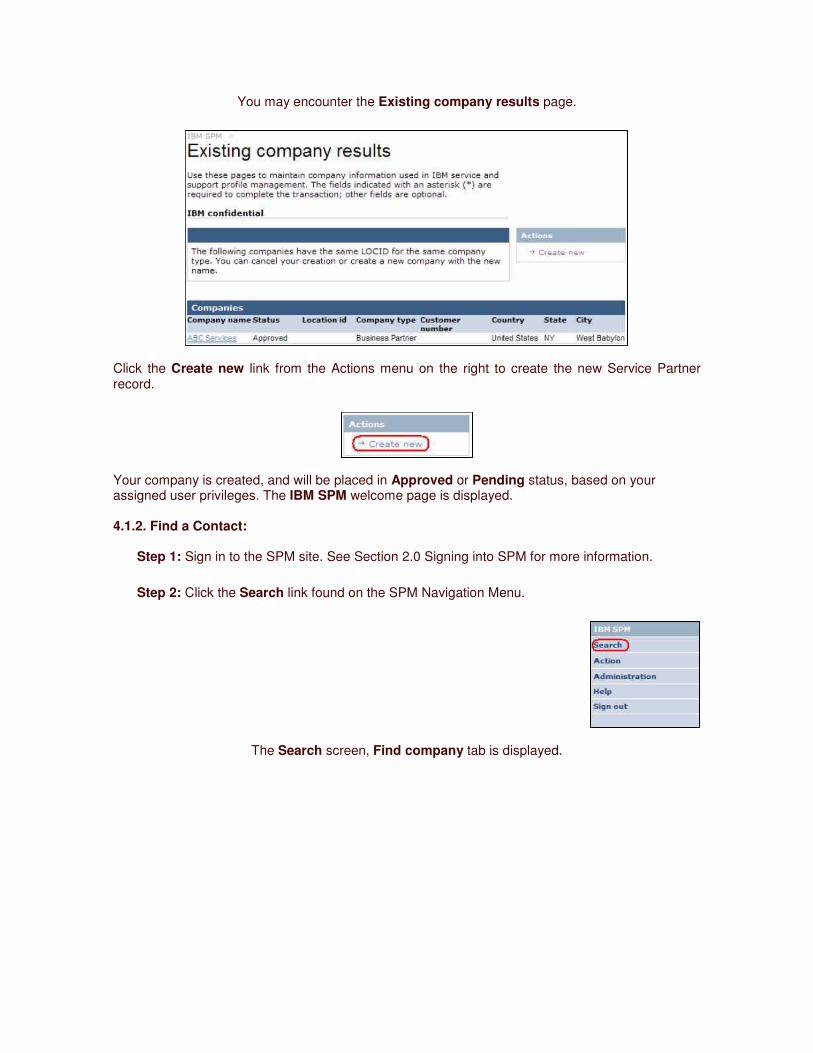
You may encounter the Existing company results page.
Click the Create new link from the Actions menu on the right to create the new Service Partner record.
Your company is created, and will be placed in Approved or Pending status, based on your assigned user privileges. The IBM SPM welcome page is displayed.
4.1.2. Find a Contact:
Step 1: Sign in to the SPM site. See Section 2.0 Signing into SPM for more information.
Step 2: Click the Search link found on the SPM Navigation Menu.
The Search screen, Find company tab is displayed.
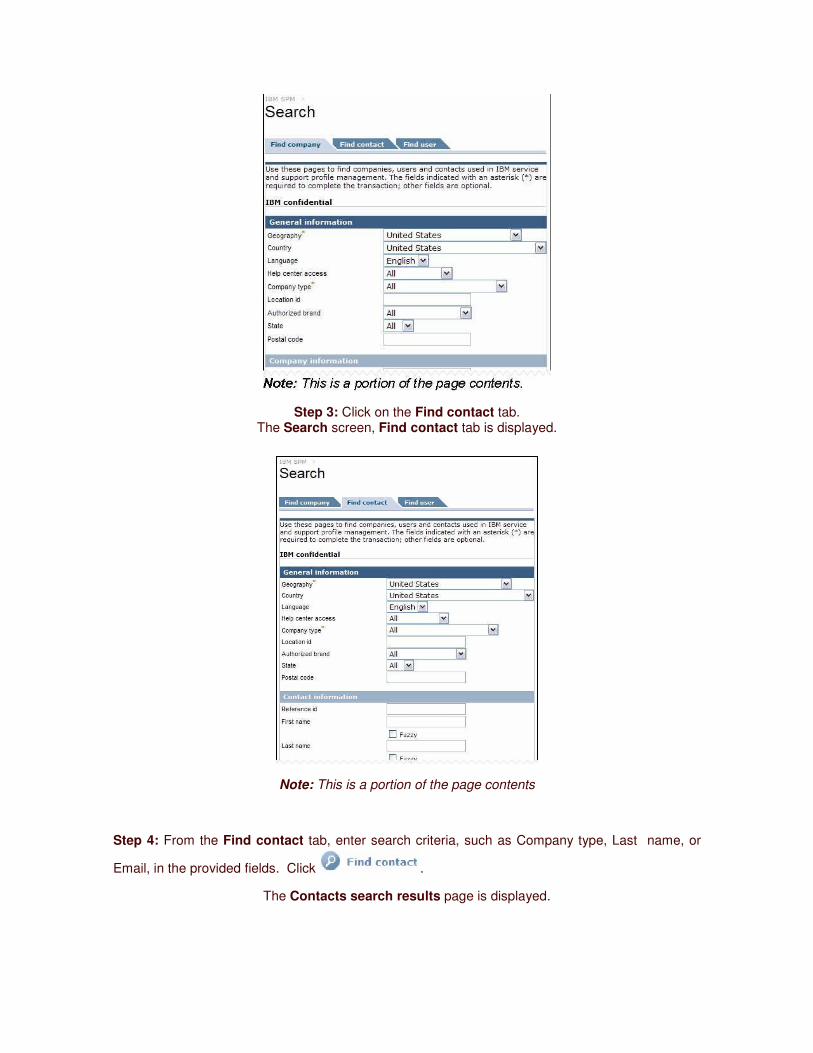
Step 3: Click on the Find contact tab. The Search screen, Find contact tab is displayed.
Note: This is a portion of the page contents
Step 4: From the Find contact tab, enter search criteria, such as Company type, Last name, or
Email, in the provided fields. Click .
The Contacts search results page is displayed.

From here, you can choose to archive contact information for both individual or multiple contacts listed.
Note: Your visibility to archive functions will depend on your assigned user privileges.
Step 5: Click on the Last, first, middle hyperlink to view detailed contact information. The
Contact view page is displayed.
Note: This is a portion of the page contents
From here, you can perform various tasks, including view privileges, edit contact information, and reset or resend pin.
Note: Your visibility to functions within the contact view will depend on your assigned user privileges
4.1.3. Find a User:
Step 1: Sign in to the SPM site. See Section 2.0 Signing into SPM for more information.
Step 2: Click the Search link found on the SPM Navigation Menu.
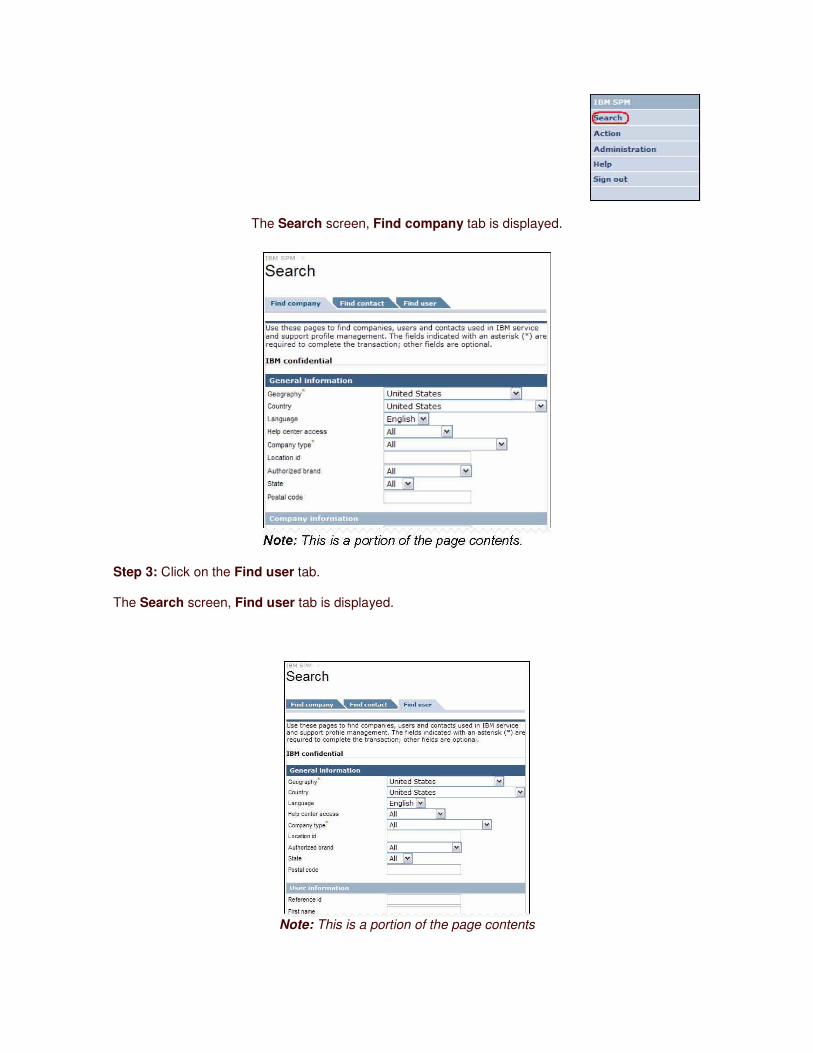
The Search screen, Find company tab is displayed.
Step 3: Click on the Find user tab.
The Search screen, Find user tab is displayed.
Note: This is a portion of the page contents
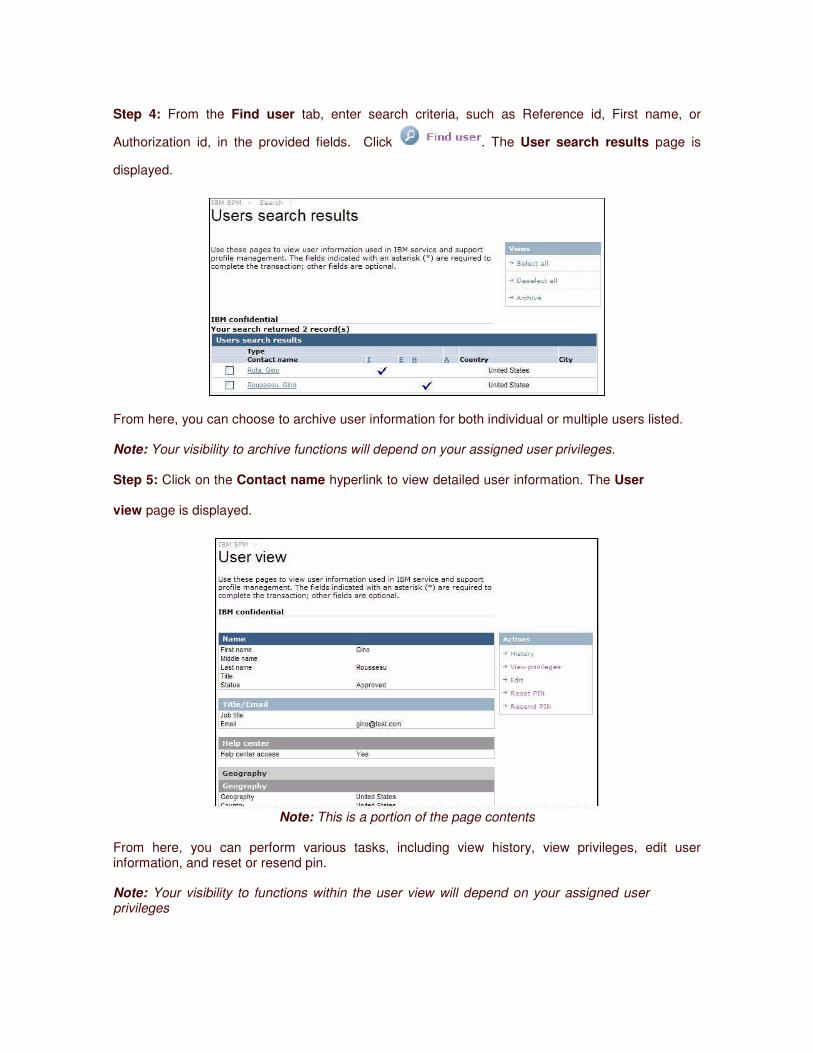
Step 4: From the Find user tab, enter search criteria, such as Reference id, First name, or
Authorization id, in the provided fields. Click . The User search results page is
displayed.
From here, you can choose to archive user information for both individual or multiple users listed.
Note: Your visibility to archive functions will depend on your assigned user privileges.
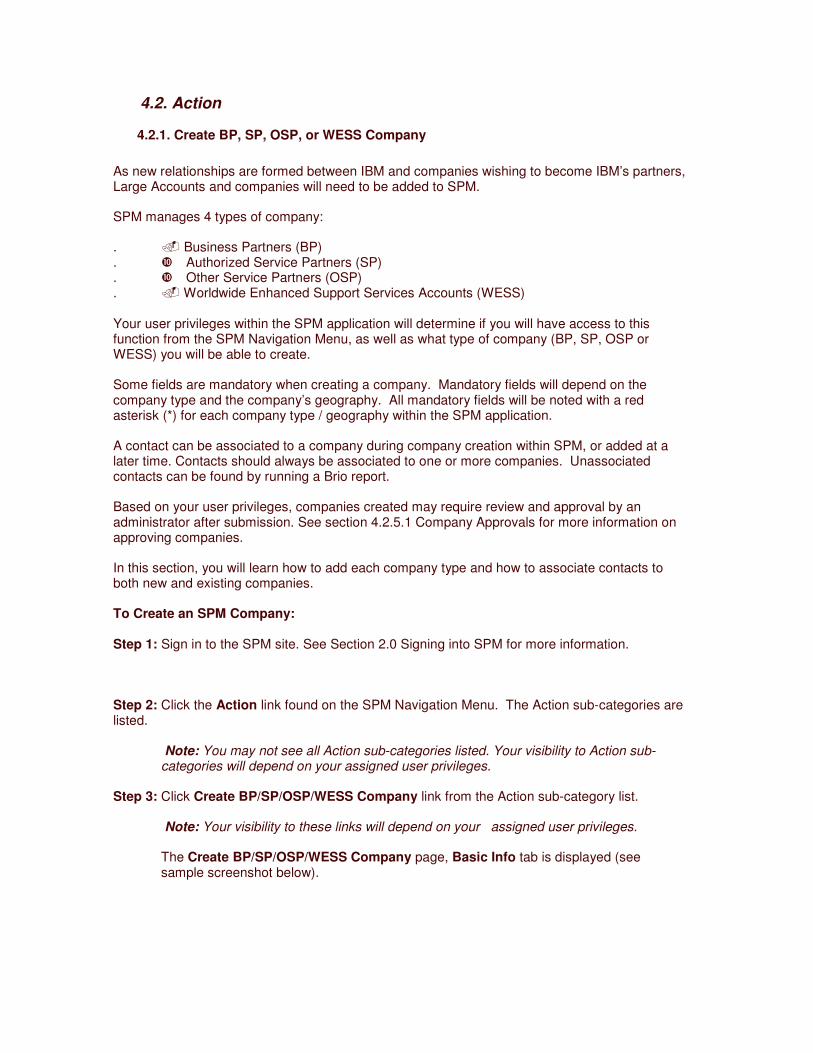
Step 5: Click on the Contact name hyperlink to view detailed user information. The User
view page is displayed.
Note: This is a portion of the page contents
From here, you can perform various tasks, including view history, view privileges, edit user information, and reset or resend pin.
Note: Your visibility to functions within the user view will depend on your assigned user privileges
4.2. Action
4.2.1. Create BP, SP, OSP, or WESS Company
As new relationships are formed between IBM and companies wishing to become IBM’s partners, Large Accounts and companies will need to be added to SPM.
SPM manages 4 types of company:
. � Business Partners (BP)
. ��Authorized Service Partners (SP)
. ��Other Service Partners (OSP)
. � Worldwide Enhanced Support Services Accounts (WESS) Your user privileges within the SPM application will determine if you will have access to this function from the SPM Navigation Menu, as well as what type of company (BP, SP, OSP or WESS) you will be able to create.
Some fields are mandatory when creating a company. Mandatory fields will depend on the company type and the company’s geography. All mandatory fields will be noted with a red asterisk (*) for each company type / geography within the SPM application.
A contact can be associated to a company during company creation within SPM, or added at a later time. Contacts should always be associated to one or more companies. Unassociated contacts can be found by running a Brio report.
Based on your user privileges, companies created may require review and approval by an administrator after submission. See section 4.2.5.1 Company Approvals for more information on approving companies.
In this section, you will learn how to add each company type and how to associate contacts to both new and existing companies.
To Create an SPM Company:
Step 1: Sign in to the SPM site. See Section 2.0 Signing into SPM for more information.
Step 2: Click the Action link found on the SPM Navigation Menu. The Action sub-categories are listed.
Note: You may not see all Action sub-categories listed. Your visibility to Action sub-categories will depend on your assigned user privileges.
Step 3: Click Create BP/SP/OSP/WESS Company link from the Action sub-category list.
Note: Your visibility to these links will depend on your assigned user privileges.
The Create BP/SP/OSP/WESS Company page, Basic Info tab is displayed (see sample screenshot below).
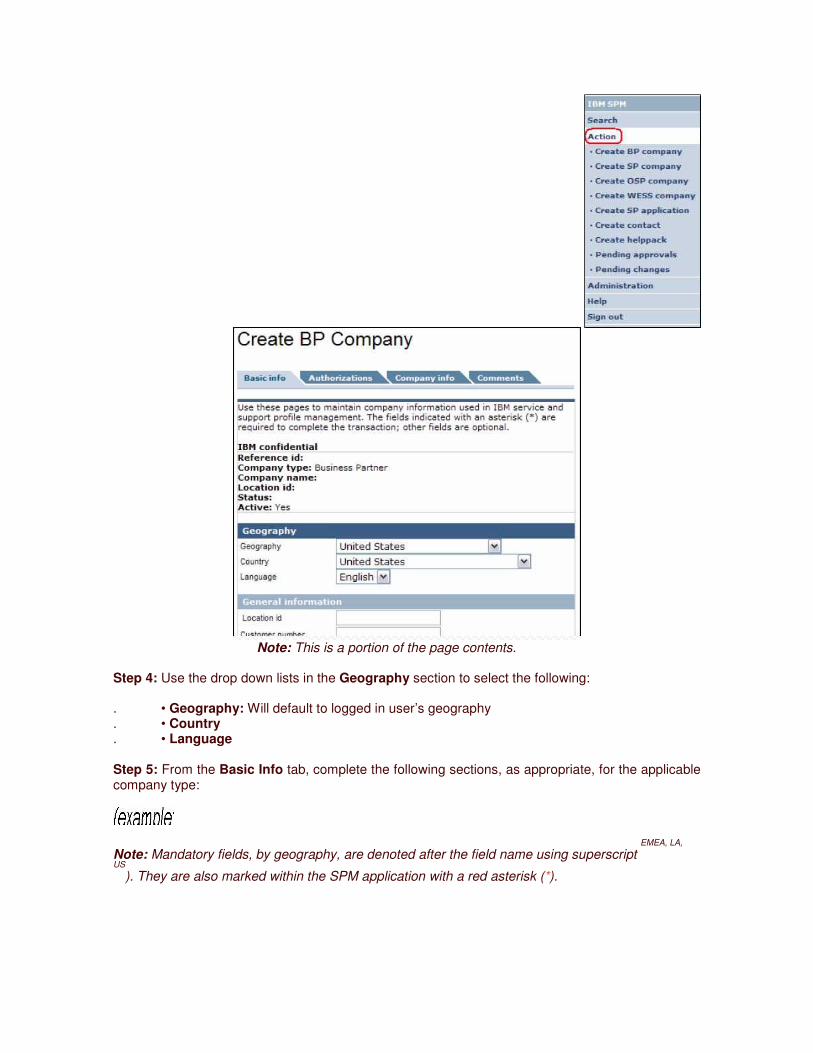
Note: This is a portion of the page contents.
Step 4: Use the drop down lists in the Geography section to select the following:
. • Geography: Will default to logged in user’s geography
. • Country
. • Language Step 5: From the Basic Info tab, complete the following sections, as appropriate, for the applicable company type:
Note: Mandatory fields, by geography, are denoted after the field name using superscript EMEA, LA,
US). They are also marked within the SPM application with a red asterisk (*).

BP Company
General information Section
. • Location id AP, CA
. • Customer number AP, CA, EMEA
. • Enterprise number . • Headquarters
. • CAC number CA
Marketing Section . • Marketing rep Help access Section
• Help center access
SP Company
General information Section
� Location id AP, LA, US
� Customer number AP, EMEA
� Enterprise number � Headquarters � CAC number � Override activation
Consultant Section
� IBM Consultant
Service Type Section AP, CA, EMEA, LA, US
. • Service program level AP, CA, EMEA, LA, US
Help access Section
• Help center access
OSP Company
General information Section
. • Location id AP, LA, US
. • Customer number
EMEA
. • Enterprise number
. • Headquarters
. • CAC number
. • Override activation Consultant Section • IBM Consultant Service type Section AP, CA, EMEA, LA, US
. • Service program level AP, CA, EMEA, LA, US
Help access Section • Help center access
WESS Company
��General information Section . • Customer number . • Enterprise number ��Marketing Section . • Primary marketing rep . • Secondary marketing rep ��Help access Section
• Help center access ��Routing (Headquarters use only) Section
• Case coordinator
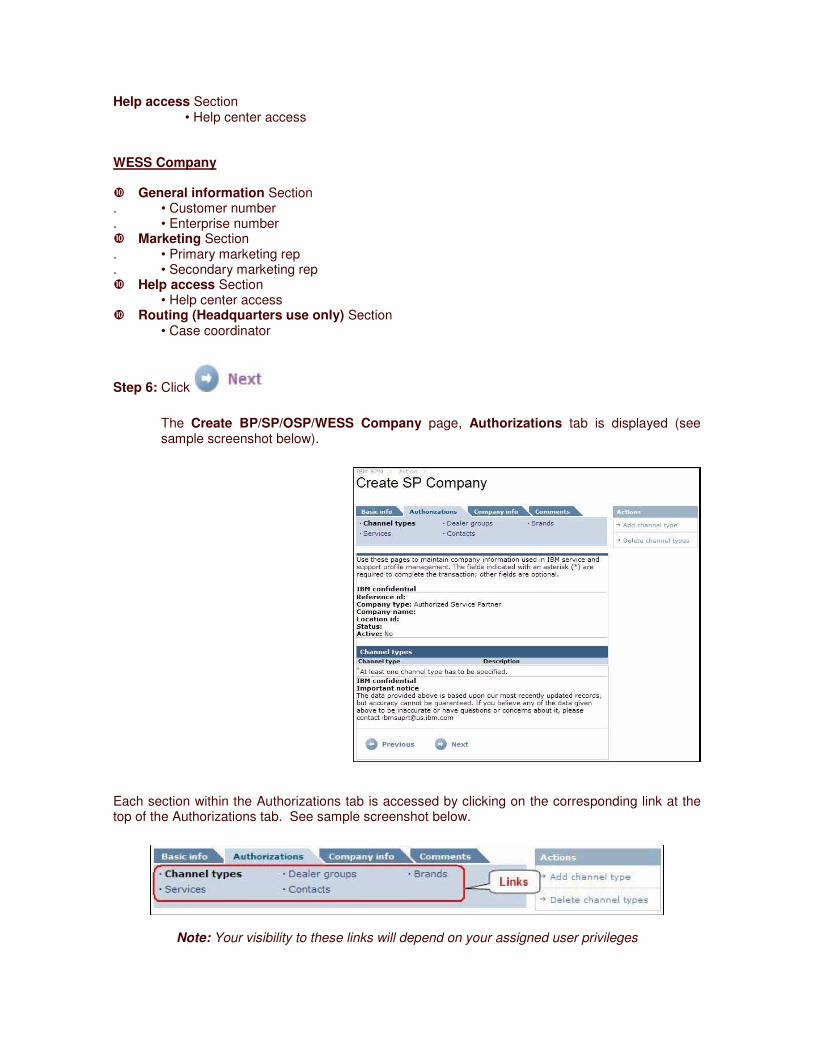
Step 6: Click
The Create BP/SP/OSP/WESS Company page, Authorizations tab is displayed (see sample screenshot below).
Each section within the Authorizations tab is accessed by clicking on the corresponding link at the top of the Authorizations tab. See sample screenshot below.
Note: Your visibility to these links will depend on your assigned user privileges

Step 7: From the Authorizations tab, click on the Channel types link, as appropriate, for the applicable company type.
The Create BP/SP/OSP/WESS Company page, Channel types link is displayed.
Step 8: From the Actions menu on the right, click on the Add channel type link.
The Company channel type association page is displayed.
Paso 9: and click .
The selected Channel type will be displayed.
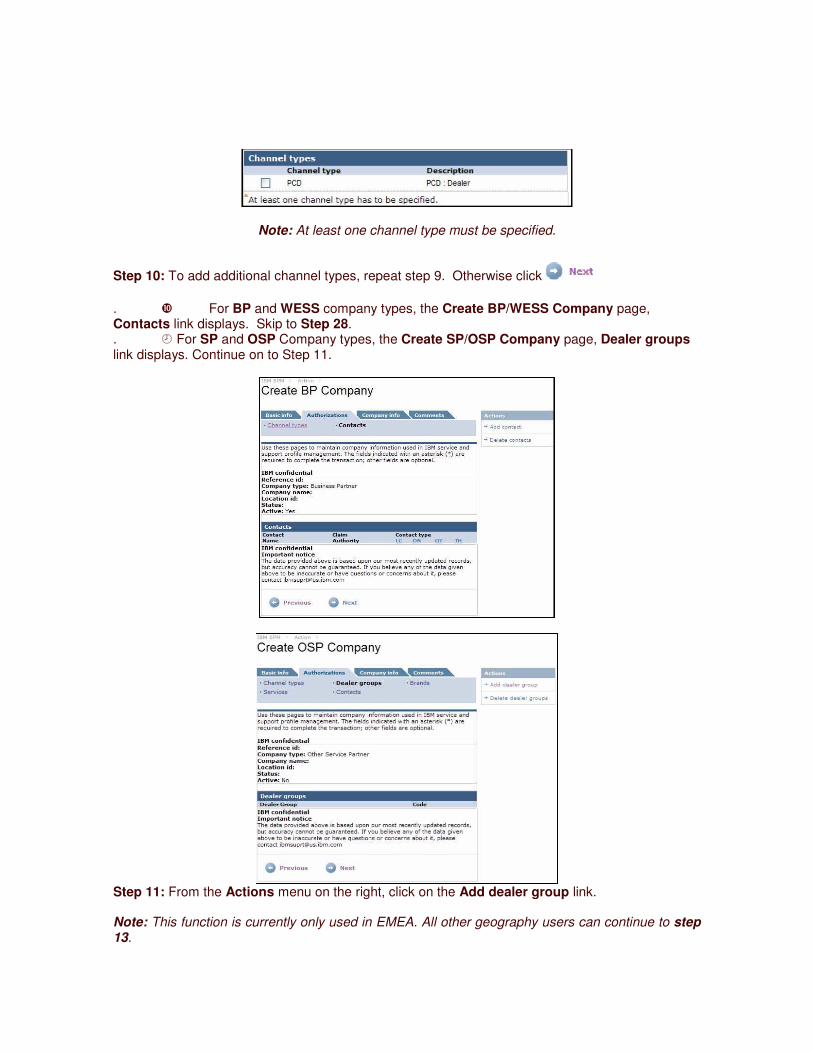
Note: At least one channel type must be specified.
Step 10: To add additional channel types, repeat step 9. Otherwise click
. �� For BP and WESS company types, the Create BP/WESS Company page, Contacts link displays. Skip to Step 28. . � For SP and OSP Company types, the Create SP/OSP Company page, Dealer groups link displays. Continue on to Step 11.
Step 11: From the Actions menu on the right, click on the Add dealer group link.
Note: This function is currently only used in EMEA. All other geography users can continue to step 13.
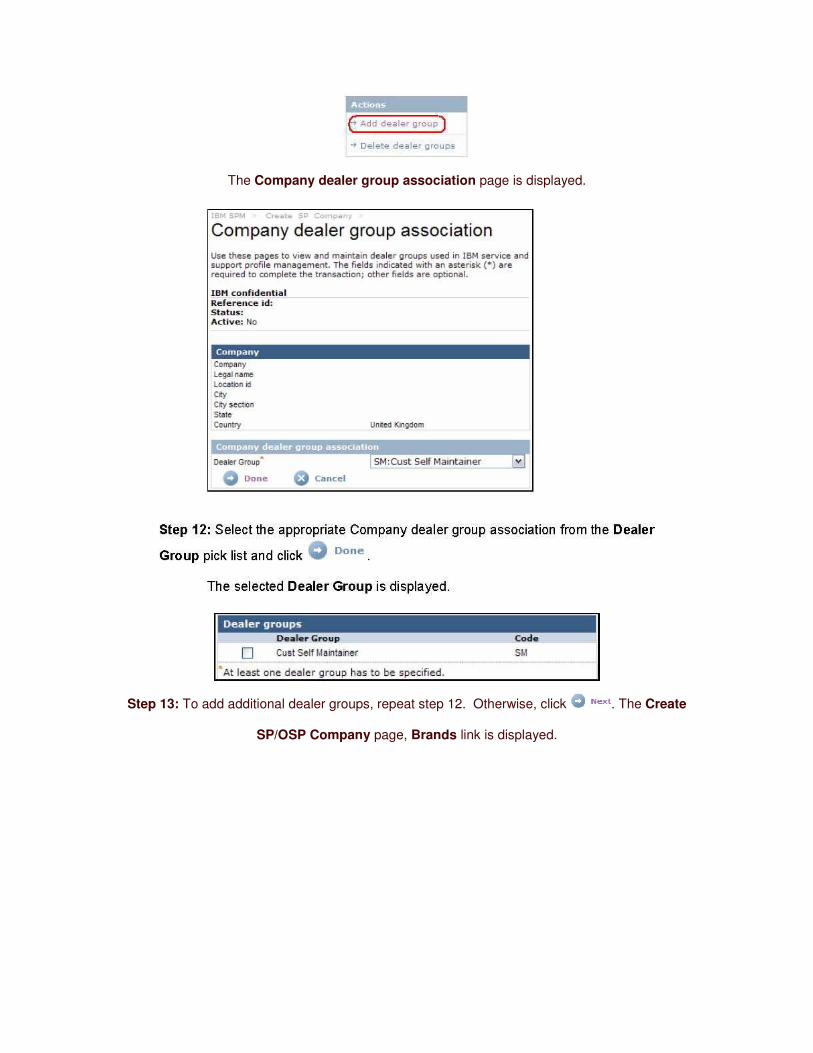
The Company dealer group association page is displayed.
Step 13: To add additional dealer groups, repeat step 12. Otherwise, click . The Create
SP/OSP Company page, Brands link is displayed.

From the Brands link you can choose to approve all brands, add individual brand approval, delete selected brands, authorize ServicePacs for all company brands, add ServicePacs to a selected brand, or Delete ServicePacs from a selected brand.
Note: ServicePacs may not be supported for all brands. Therefore you may not be able to add ServicePacs to all brands associated to the company.
Step 14: To Approve all brands, click the Approve all brands link from the Action menu on the right.
The Create SP/OSP Company page is refreshed, and a list of all approved brands is displayed.
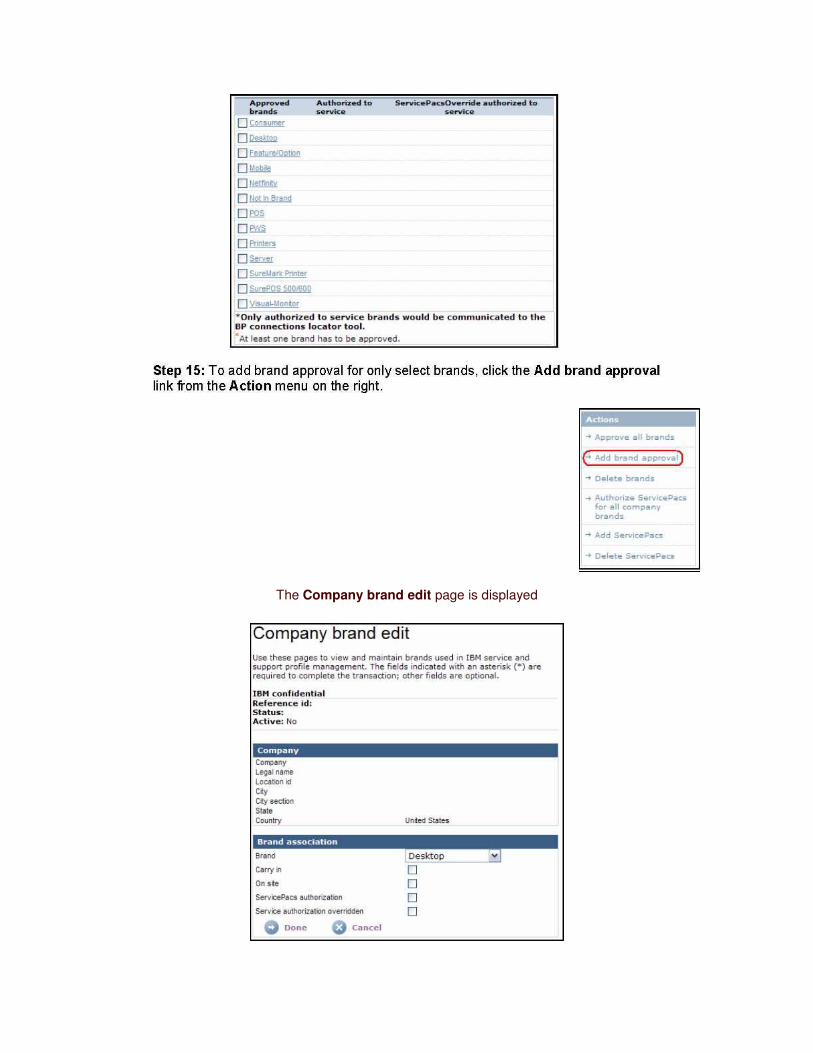
The Company brand edit page is displayed
Step 16: Select the appropriate Brand association from the Brand pick list.
Place a check mark by clicking on the associated box to select Carry in, On site, ServicePacs authorization, or Service authorization overridden for the selected brand.
Note: These options may vary based on the brand selected and your assigned user privileges.
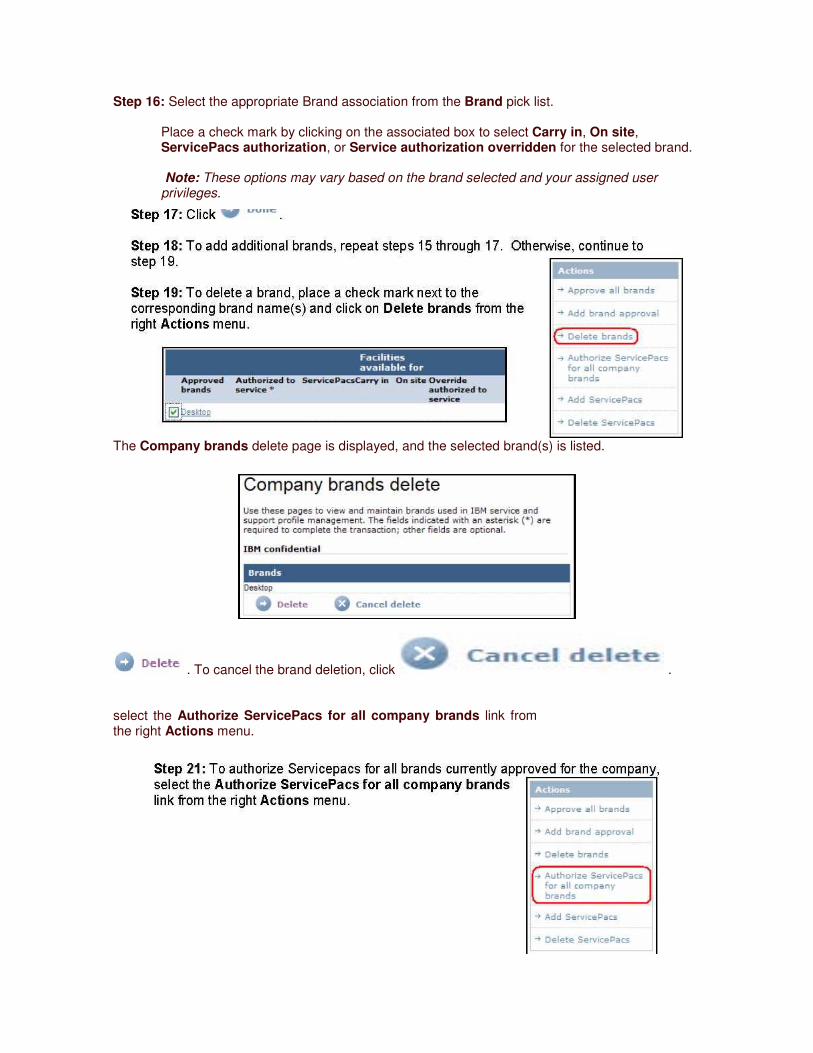
The Company brands delete page is displayed, and the selected brand(s) is listed.
. To cancel the brand deletion, click .
select the Authorize ServicePacs for all company brands link from the right Actions menu.
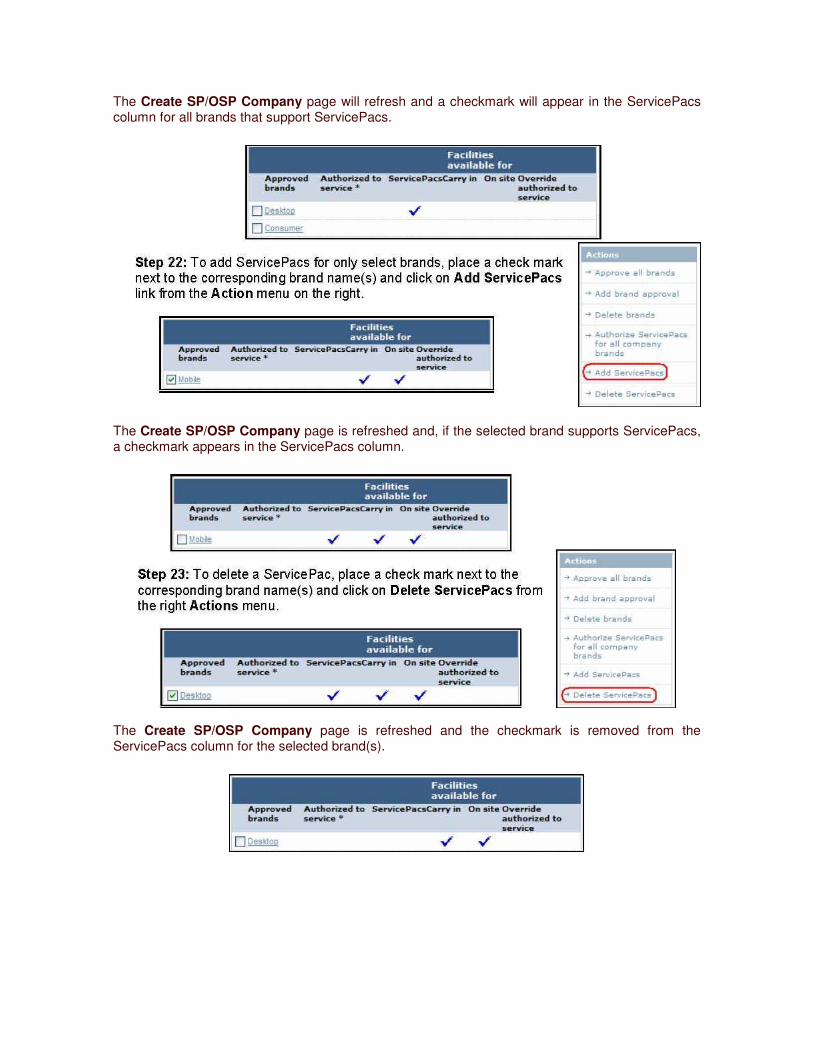
The Create SP/OSP Company page will refresh and a checkmark will appear in the ServicePacs column for all brands that support ServicePacs.
The Create SP/OSP Company page is refreshed and, if the selected brand supports ServicePacs, a checkmark appears in the ServicePacs column.
The Create SP/OSP Company page is refreshed and the checkmark is removed from the ServicePacs column for the selected brand(s).
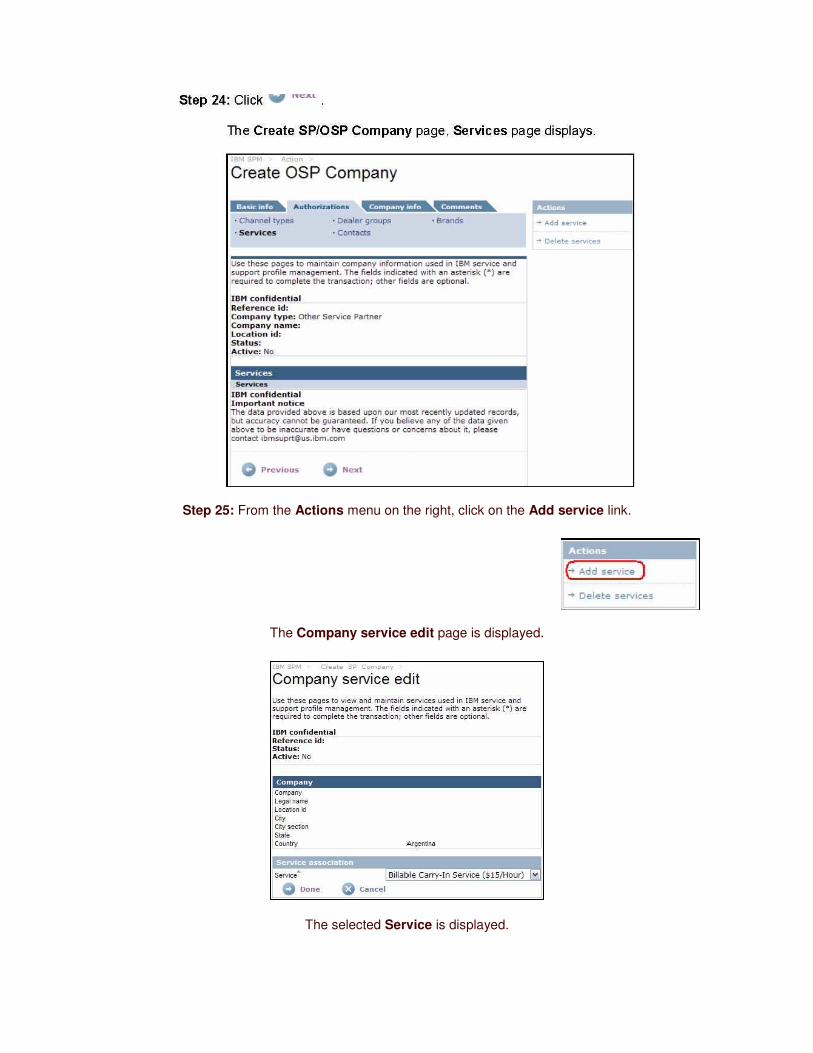
Step 25: From the Actions menu on the right, click on the Add service link.
The Company service edit page is displayed.
The selected Service is displayed.
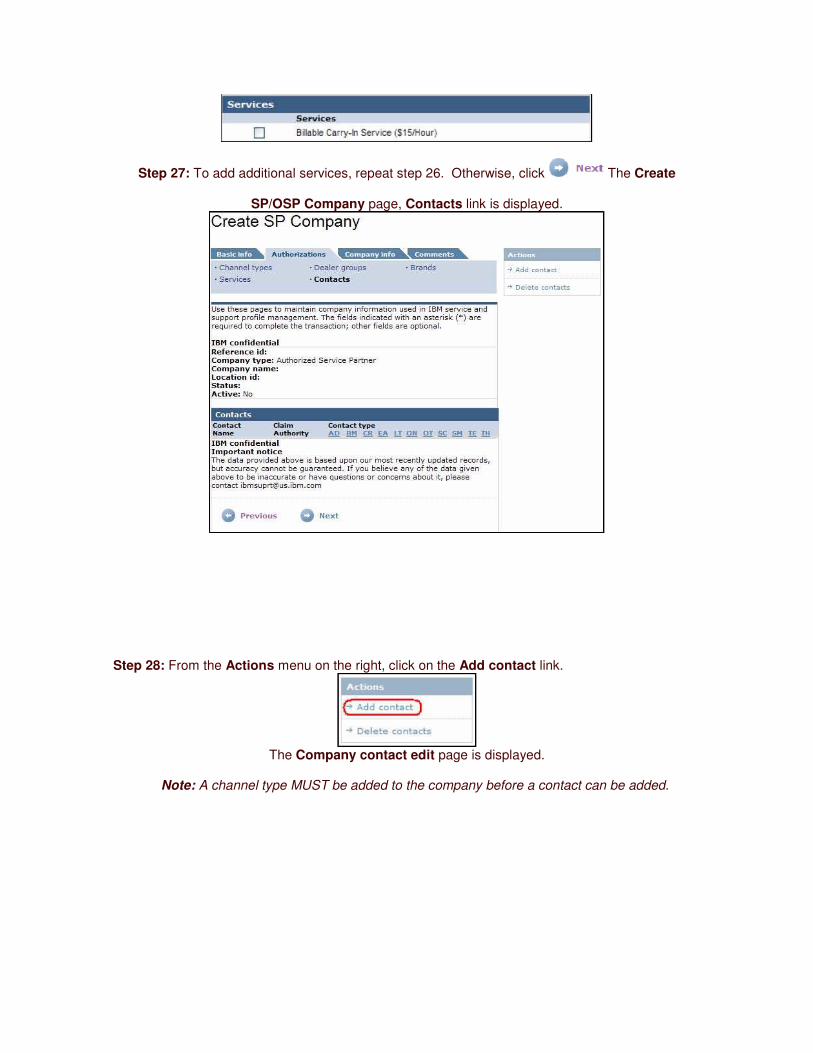
Step 27: To add additional services, repeat step 26. Otherwise, click The Create
SP/OSP Company page, Contacts link is displayed.
Step 28: From the Actions menu on the right, click on the Add contact link.
The Company contact edit page is displayed.
Note: A channel type MUST be added to the company before a contact can be added.
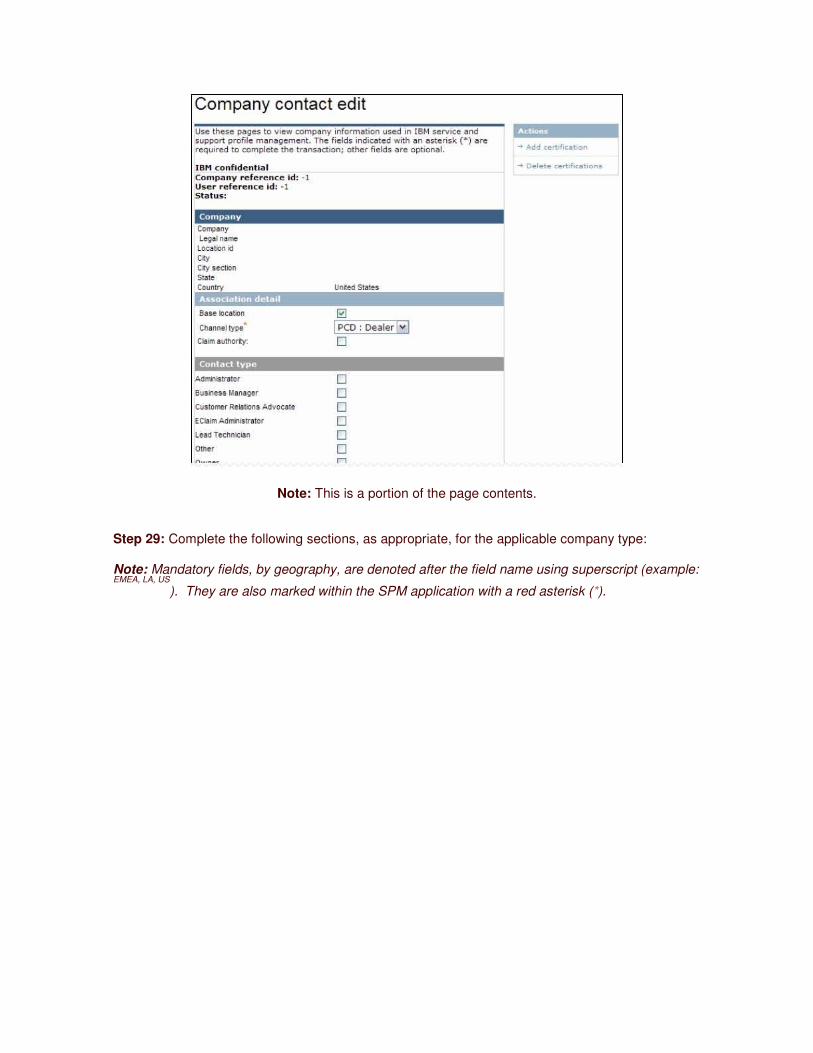
Note: This is a portion of the page contents.
Step 29: Complete the following sections, as appropriate, for the applicable company type:
Note: Mandatory fields, by geography, are denoted after the field name using superscript (example: EMEA, LA, US
). They are also marked within the SPM application with a red asterisk (*).
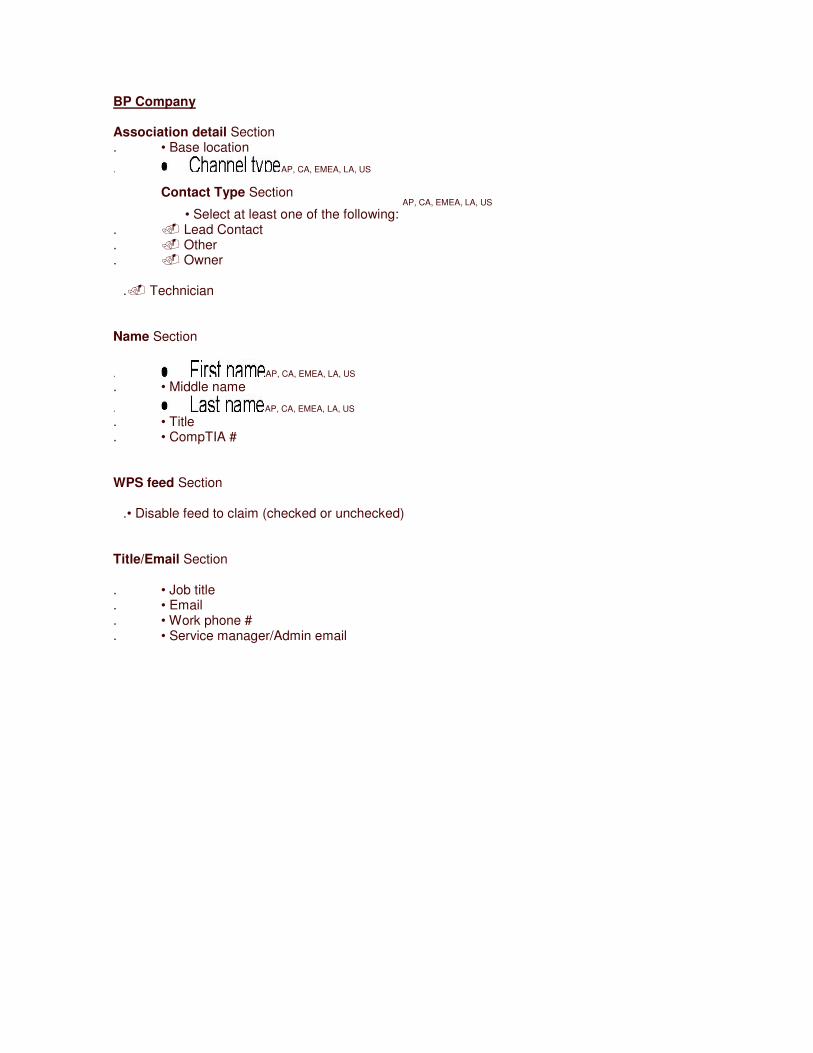
BP Company
Association detail Section . • Base location
. AP, CA, EMEA, LA, US
Contact Type Section
• Select at least one of the following: AP, CA, EMEA, LA, US
. � Lead Contact . � Other . � Owner
.� Technician Name Section
. AP, CA, EMEA, LA, US
. • Middle name
. AP, CA, EMEA, LA, US
. • Title
. • CompTIA # WPS feed Section
.• Disable feed to claim (checked or unchecked) Title/Email Section . • Job title . • Email . • Work phone # . • Service manager/Admin email
Help center Section
� Help center access (Yes/No) AP, CA, EMEA, LA, US
Geography Section
� AP, CA, EMEA, LA, US
� Country
� AP, CA, EMEA, LA, US
Comments Section � Comments
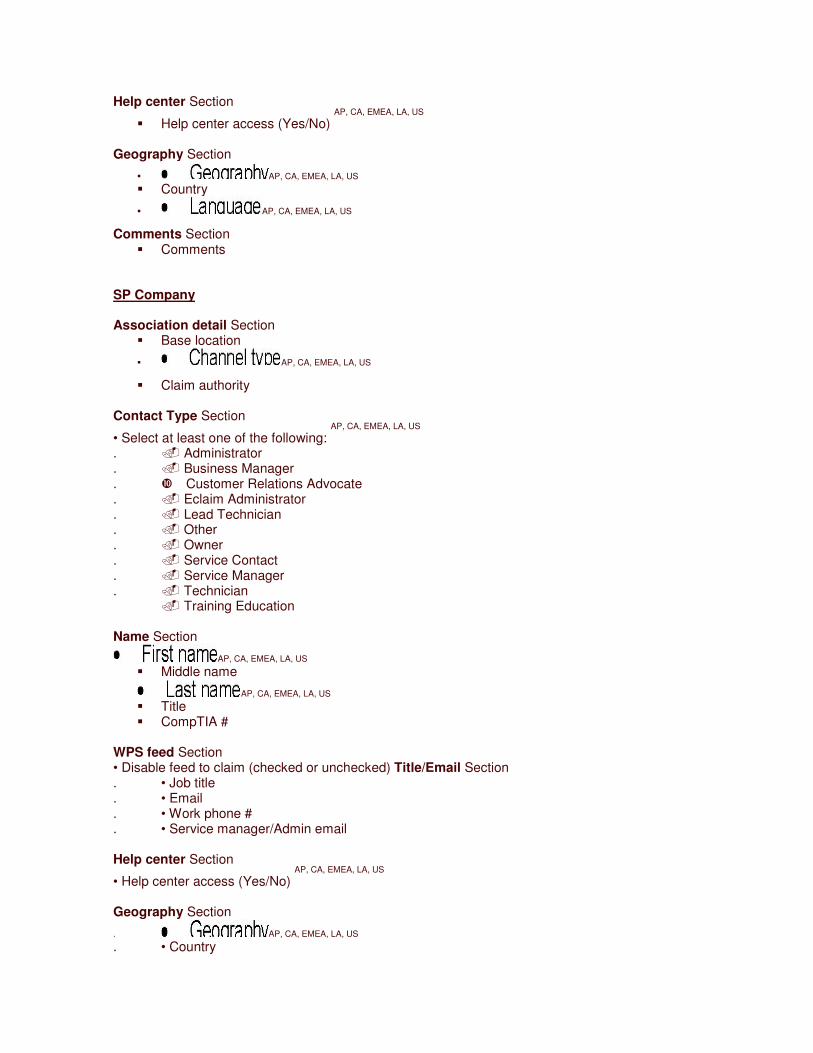
SP Company
Association detail Section � Base location
� AP, CA, EMEA, LA, US
� Claim authority
Contact Type Section
• Select at least one of the following: AP, CA, EMEA, LA, US
. � Administrator . � Business Manager . ��Customer Relations Advocate . � Eclaim Administrator . � Lead Technician . � Other . � Owner . � Service Contact . � Service Manager . � Technician
� Training Education Name Section
AP, CA, EMEA, LA, US
� Middle name
AP, CA, EMEA, LA, US
� Title � CompTIA #
WPS feed Section • Disable feed to claim (checked or unchecked) Title/Email Section . • Job title . • Email . • Work phone # . • Service manager/Admin email Help center Section
• Help center access (Yes/No) AP, CA, EMEA, LA, US
Geography Section
. AP, CA, EMEA, LA, US
. • Country
. AP, CA, EMEA, LA, US
Comments Section • Comments
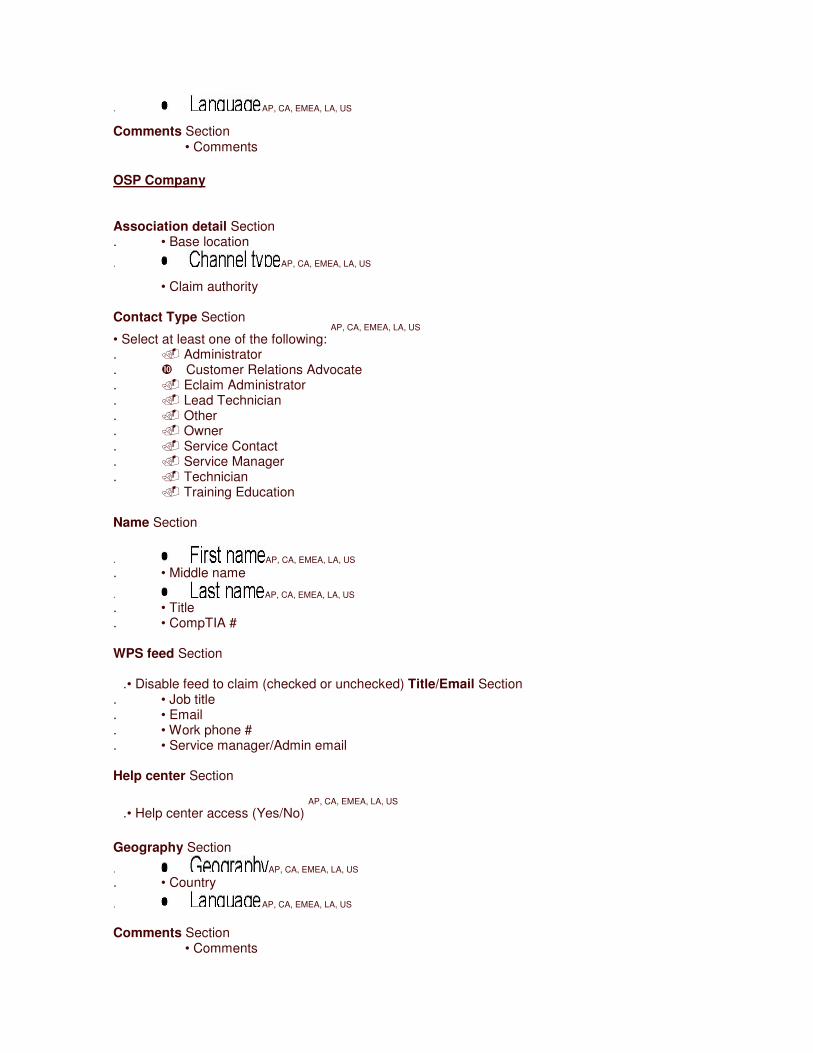
OSP Company
Association detail Section . • Base location
. AP, CA, EMEA, LA, US
• Claim authority Contact Type Section
• Select at least one of the following: AP, CA, EMEA, LA, US
. � Administrator . ��Customer Relations Advocate . � Eclaim Administrator . � Lead Technician . � Other . � Owner . � Service Contact . � Service Manager . � Technician
� Training Education Name Section
. AP, CA, EMEA, LA, US
. • Middle name
. AP, CA, EMEA, LA, US
. • Title
. • CompTIA # WPS feed Section
.• Disable feed to claim (checked or unchecked) Title/Email Section . • Job title . • Email . • Work phone # . • Service manager/Admin email Help center Section
.• Help center access (Yes/No) AP, CA, EMEA, LA, US
Geography Section
. AP, CA, EMEA, LA, US
. • Country
. AP, CA, EMEA, LA, US
Comments Section • Comments
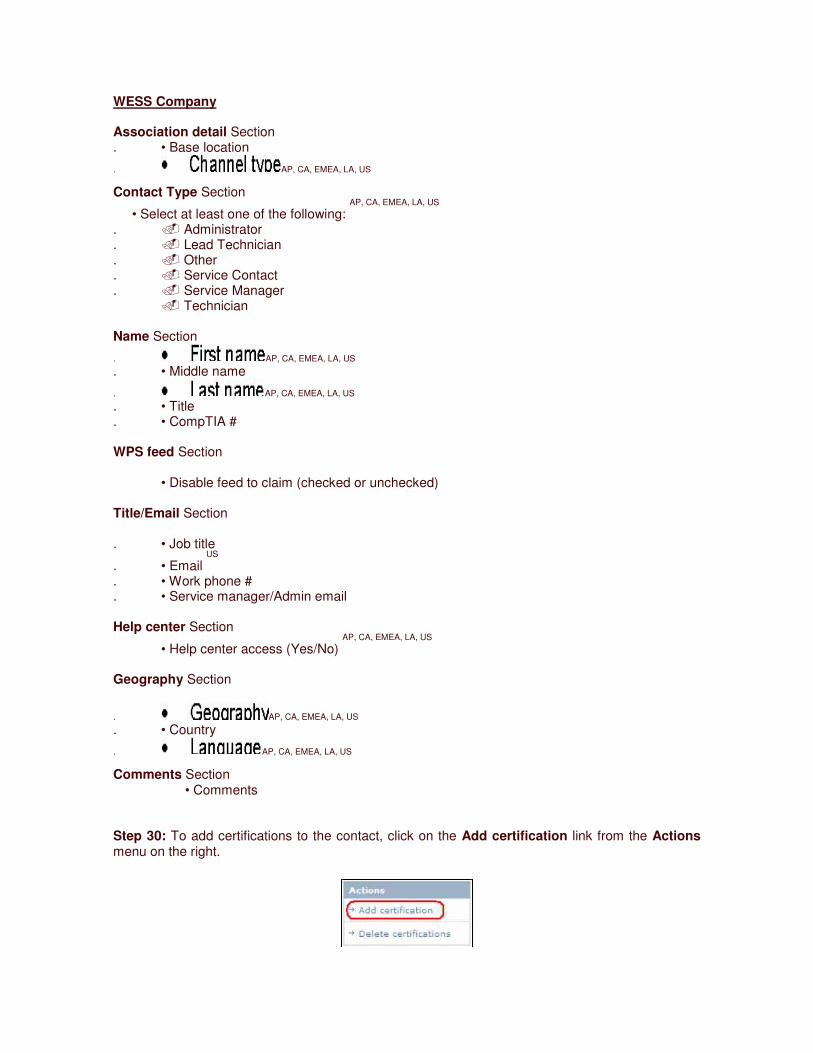
WESS Company
Association detail Section . • Base location
. AP, CA, EMEA, LA, US
Contact Type Section
• Select at least one of the following: AP, CA, EMEA, LA, US
. � Administrator . � Lead Technician . � Other . � Service Contact . � Service Manager
� Technician Name Section
. AP, CA, EMEA, LA, US
. • Middle name
. AP, CA, EMEA, LA, US
. • Title
. • CompTIA # WPS feed Section
• Disable feed to claim (checked or unchecked) Title/Email Section . • Job title
. • Email US
. • Work phone # . • Service manager/Admin email Help center Section
• Help center access (Yes/No) AP, CA, EMEA, LA, US
Geography Section
. AP, CA, EMEA, LA, US
. • Country
. AP, CA, EMEA, LA, US
Comments Section • Comments
Step 30: To add certifications to the contact, click on the Add certification link from the Actions menu on the right.
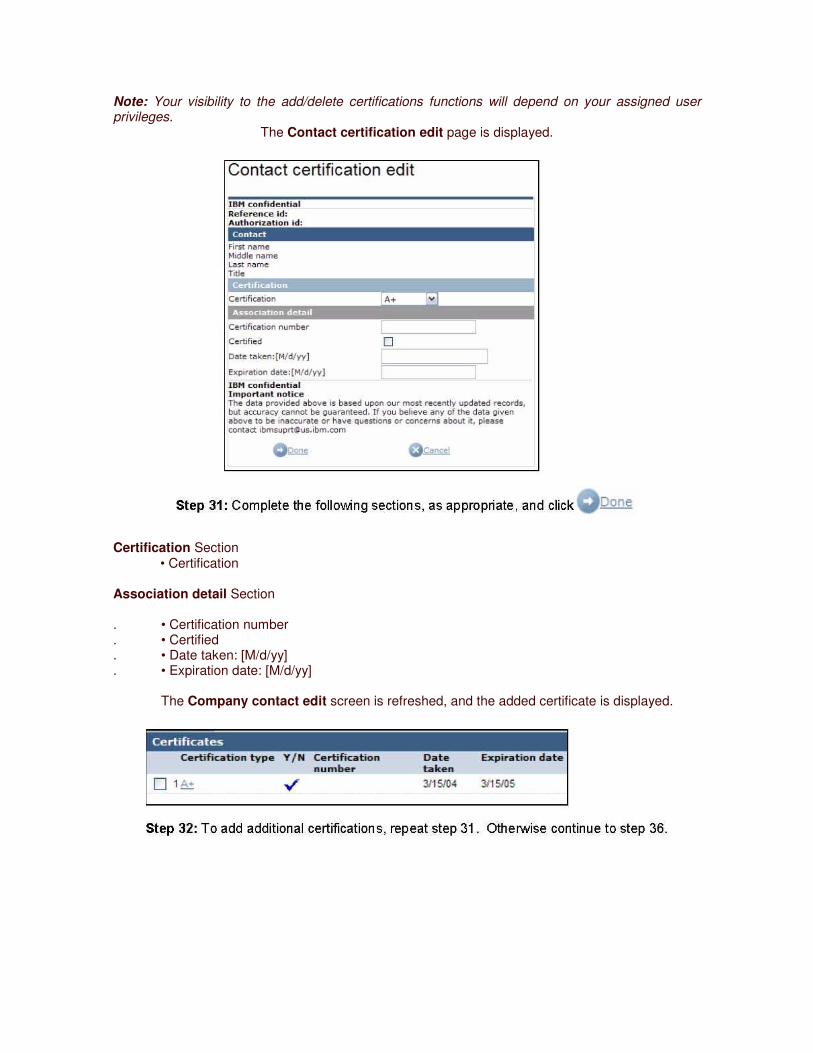
Note: Your visibility to the add/delete certifications functions will depend on your assigned user privileges.
The Contact certification edit page is displayed.
Certification Section • Certification
Association detail Section . • Certification number . • Certified . • Date taken: [M/d/yy] . • Expiration date: [M/d/yy]
The Company contact edit screen is refreshed, and the added certificate is displayed.
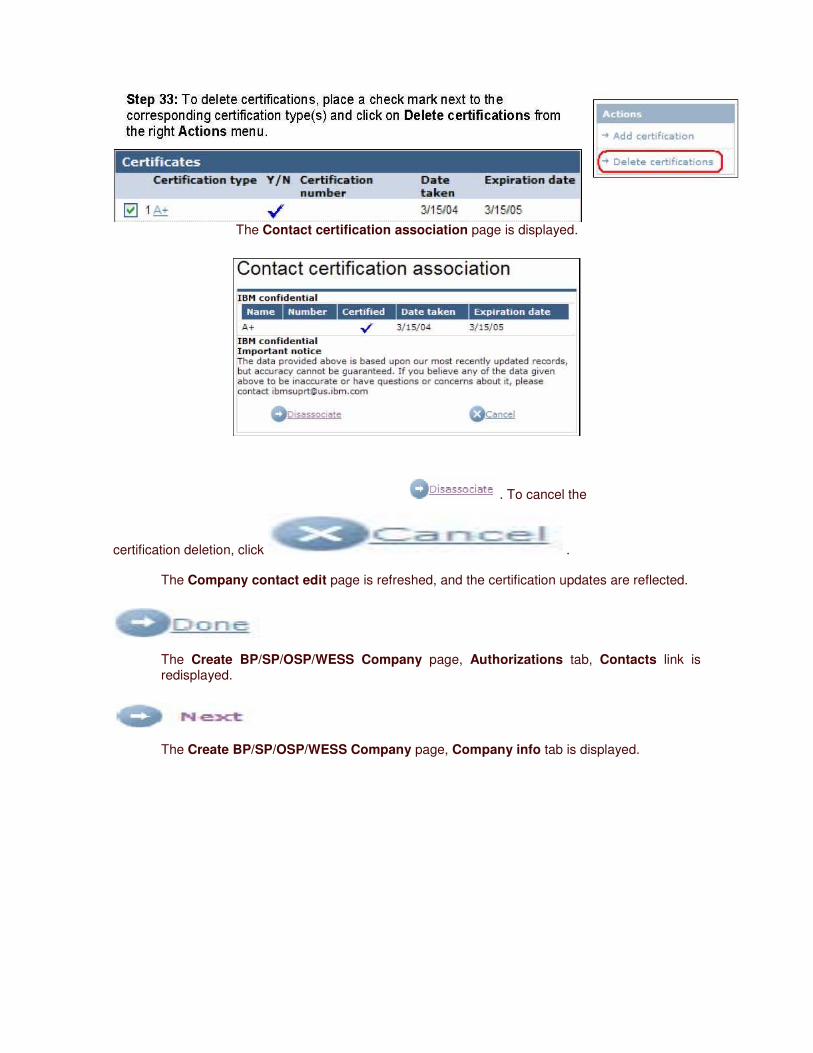
The Contact certification association page is displayed.
. To cancel the
certification deletion, click .
The Company contact edit page is refreshed, and the certification updates are reflected.
The Create BP/SP/OSP/WESS Company page, Authorizations tab, Contacts link is redisplayed.
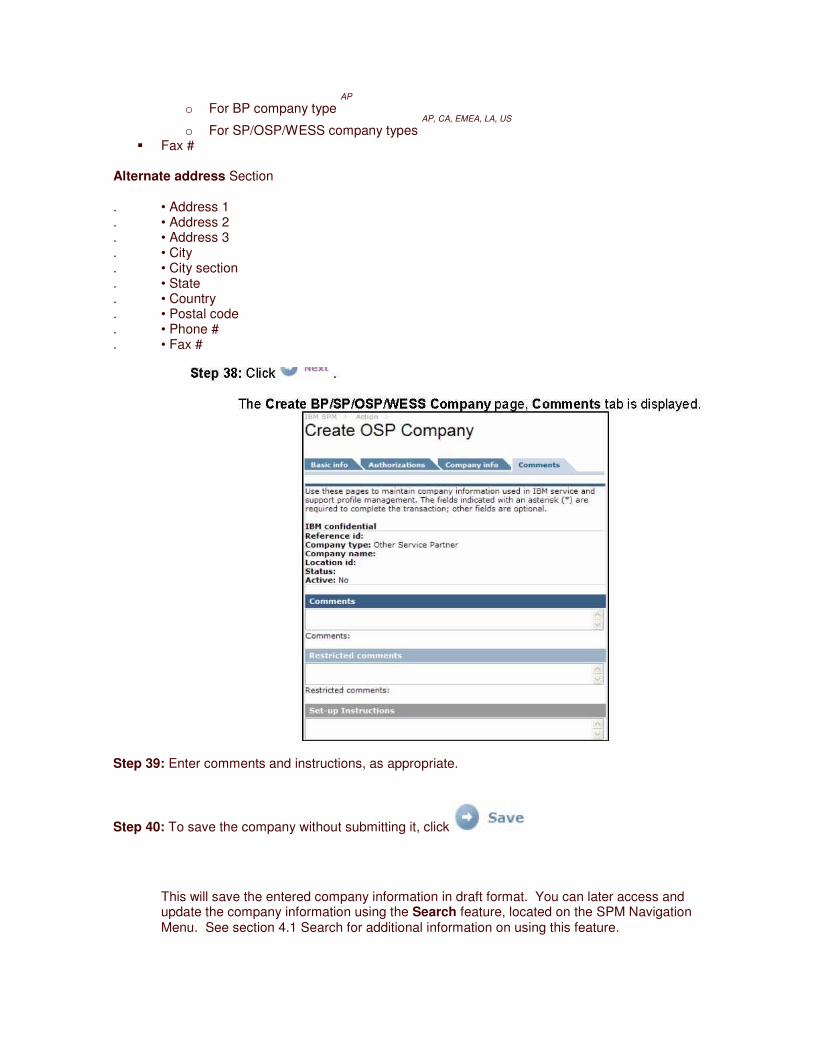
The Create BP/SP/OSP/WESS Company page, Company info tab is displayed.
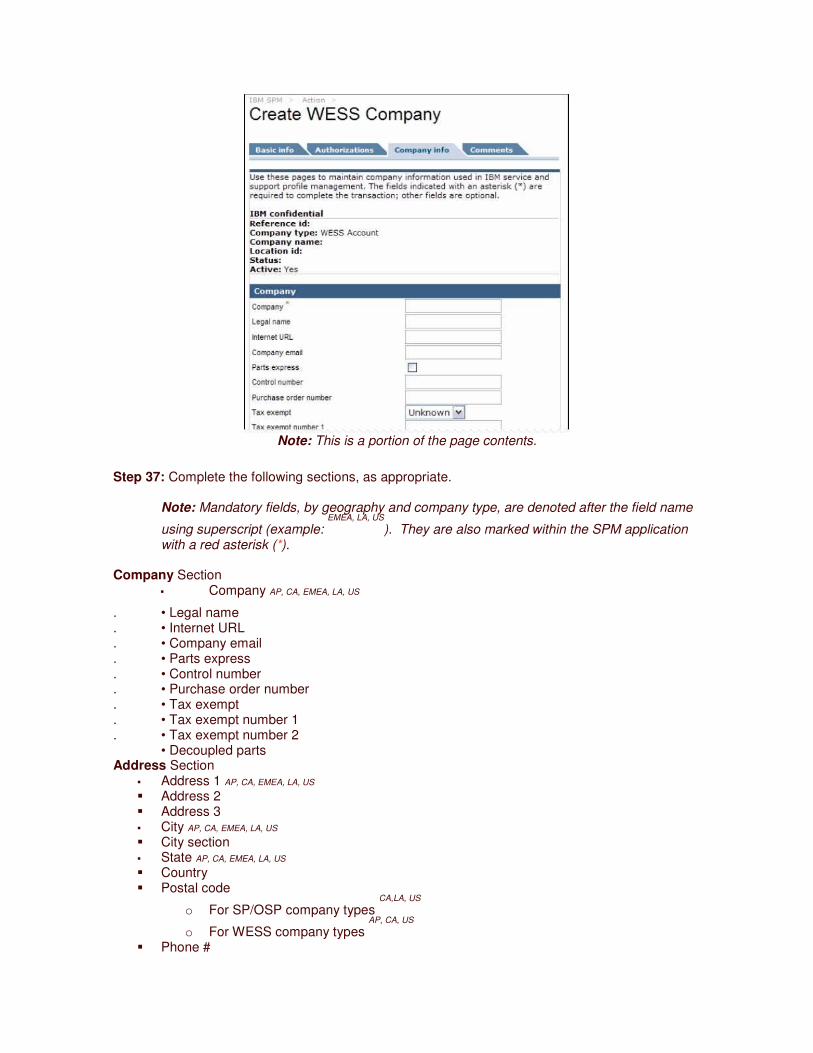
Note: This is a portion of the page contents.
Step 37: Complete the following sections, as appropriate.
Note: Mandatory fields, by geography and company type, are denoted after the field name
using superscript (example: EMEA, LA, US
). They are also marked within the SPM application with a red asterisk (*).
Company Section � Company AP, CA, EMEA, LA, US
. • Legal name
. • Internet URL
. • Company email
. • Parts express
. • Control number
. • Purchase order number
. • Tax exempt
. • Tax exempt number 1
. • Tax exempt number 2 • Decoupled parts
Address Section � Address 1 AP, CA, EMEA, LA, US
� Address 2 � Address 3 � City AP, CA, EMEA, LA, US
� City section � State AP, CA, EMEA, LA, US
� Country � Postal code
o For SP/OSP company types CA,LA, US
o For WESS company types AP, CA, US
� Phone #
o For BP company type AP
o For SP/OSP/WESS company types AP, CA, EMEA, LA, US
� Fax #
Alternate address Section . • Address 1 . • Address 2 . • Address 3 . • City . • City section . • State . • Country . • Postal code . • Phone # . • Fax #
Step 39: Enter comments and instructions, as appropriate.
Step 40: To save the company without submitting it, click
This will save the entered company information in draft format. You can later access and update the company information using the Search feature, located on the SPM Navigation Menu. See section 4.1 Search for additional information on using this feature.
Step 41: To cancel company creation, click
Note: All entered data will be lost.
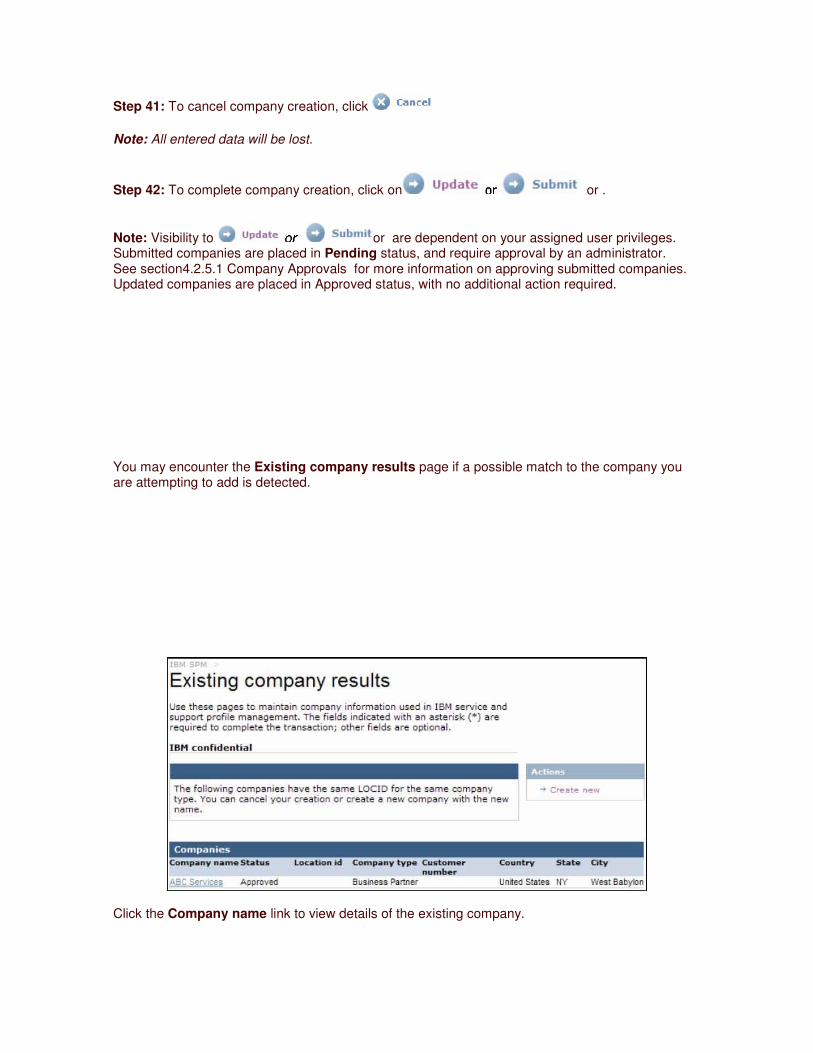
Step 42: To complete company creation, click on or .
Note: Visibility to or are dependent on your assigned user privileges. Submitted companies are placed in Pending status, and require approval by an administrator. See section4.2.5.1 Company Approvals for more information on approving submitted companies. Updated companies are placed in Approved status, with no additional action required.
You may encounter the Existing company results page if a possible match to the company you are attempting to add is detected.
Click the Company name link to view details of the existing company.
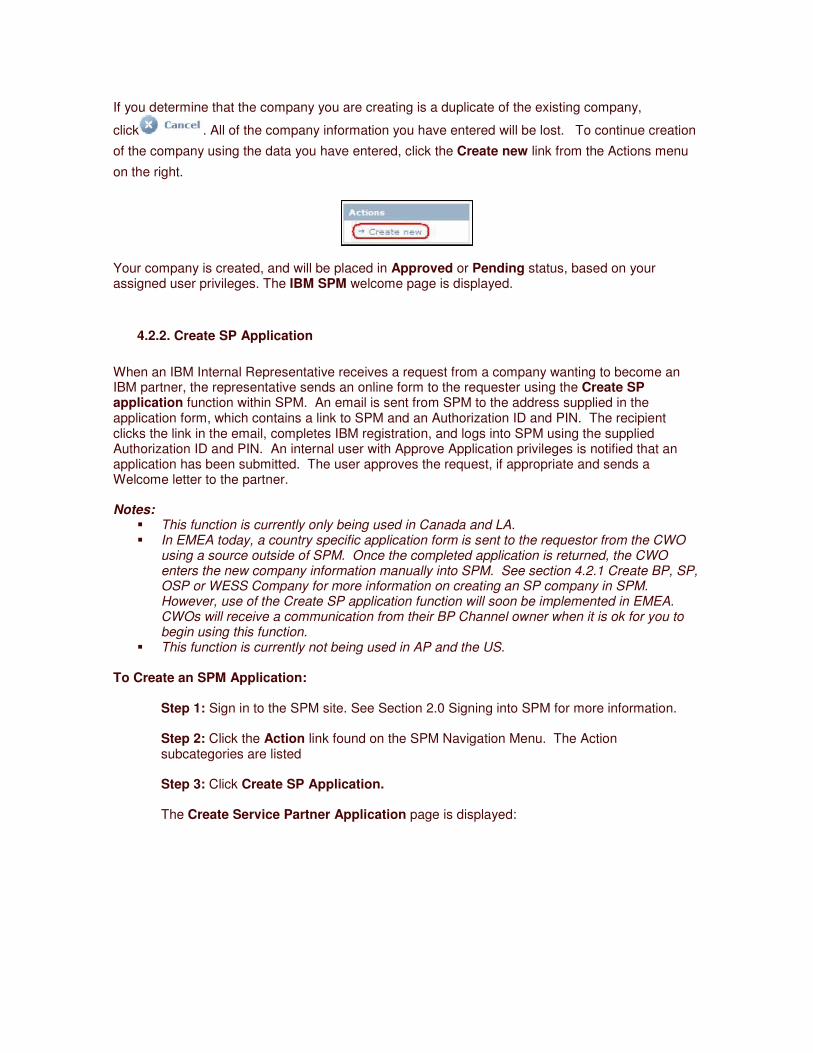
If you determine that the company you are creating is a duplicate of the existing company,
click . All of the company information you have entered will be lost. To continue creation
of the company using the data you have entered, click the Create new link from the Actions menu
on the right.
Your company is created, and will be placed in Approved or Pending status, based on your assigned user privileges. The IBM SPM welcome page is displayed.
4.2.2. Create SP Application
When an IBM Internal Representative receives a request from a company wanting to become an IBM partner, the representative sends an online form to the requester using the Create SP application function within SPM. An email is sent from SPM to the address supplied in the application form, which contains a link to SPM and an Authorization ID and PIN. The recipient clicks the link in the email, completes IBM registration, and logs into SPM using the supplied Authorization ID and PIN. An internal user with Approve Application privileges is notified that an application has been submitted. The user approves the request, if appropriate and sends a Welcome letter to the partner.
Notes: � This function is currently only being used in Canada and LA. � In EMEA today, a country specific application form is sent to the requestor from the CWO
using a source outside of SPM. Once the completed application is returned, the CWO enters the new company information manually into SPM. See section 4.2.1 Create BP, SP, OSP or WESS Company for more information on creating an SP company in SPM. However, use of the Create SP application function will soon be implemented in EMEA. CWOs will receive a communication from their BP Channel owner when it is ok for you to begin using this function.
� This function is currently not being used in AP and the US. To Create an SPM Application:
Step 1: Sign in to the SPM site. See Section 2.0 Signing into SPM for more information.
Step 2: Click the Action link found on the SPM Navigation Menu. The Action subcategories are listed
Step 3: Click Create SP Application.
The Create Service Partner Application page is displayed:
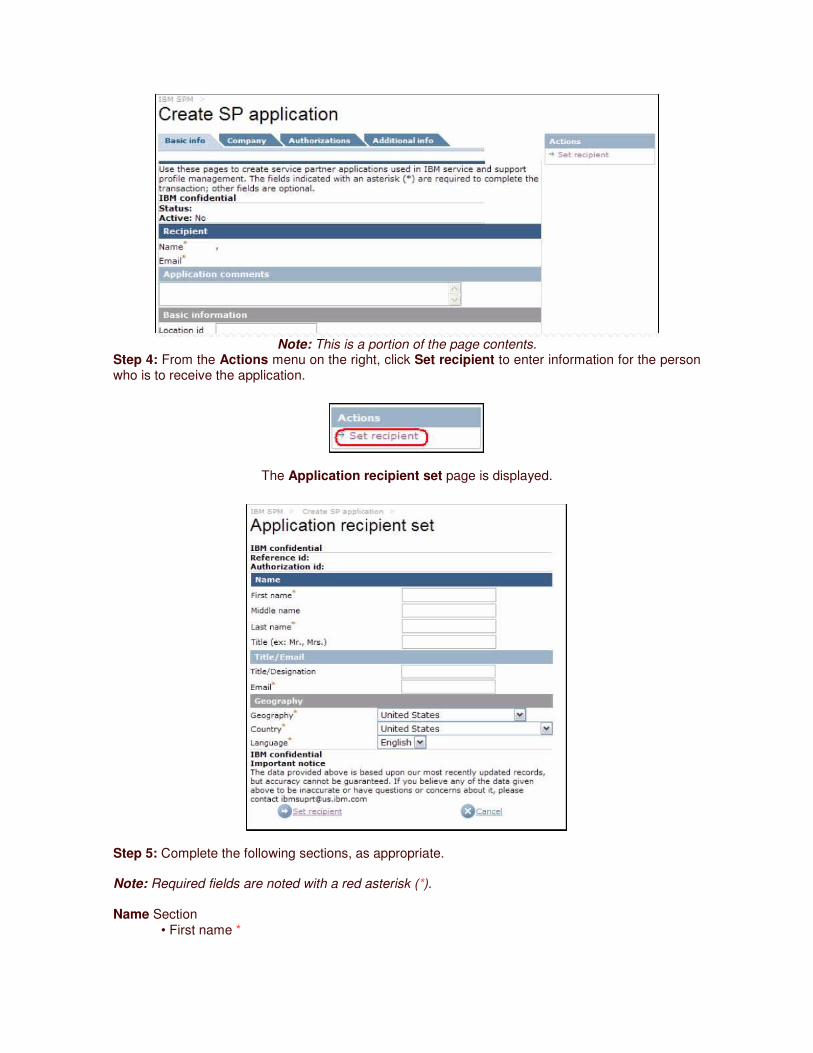
Note: This is a portion of the page contents.
Step 4: From the Actions menu on the right, click Set recipient to enter information for the person who is to receive the application.
The Application recipient set page is displayed.
Step 5: Complete the following sections, as appropriate.
Note: Required fields are noted with a red asterisk (*).
Name Section • First name *
• Middle name • Last name * • Title
Title/Email Section
• Title/Designation • Email *
Geography Section
• Geography * • Country * • Language *
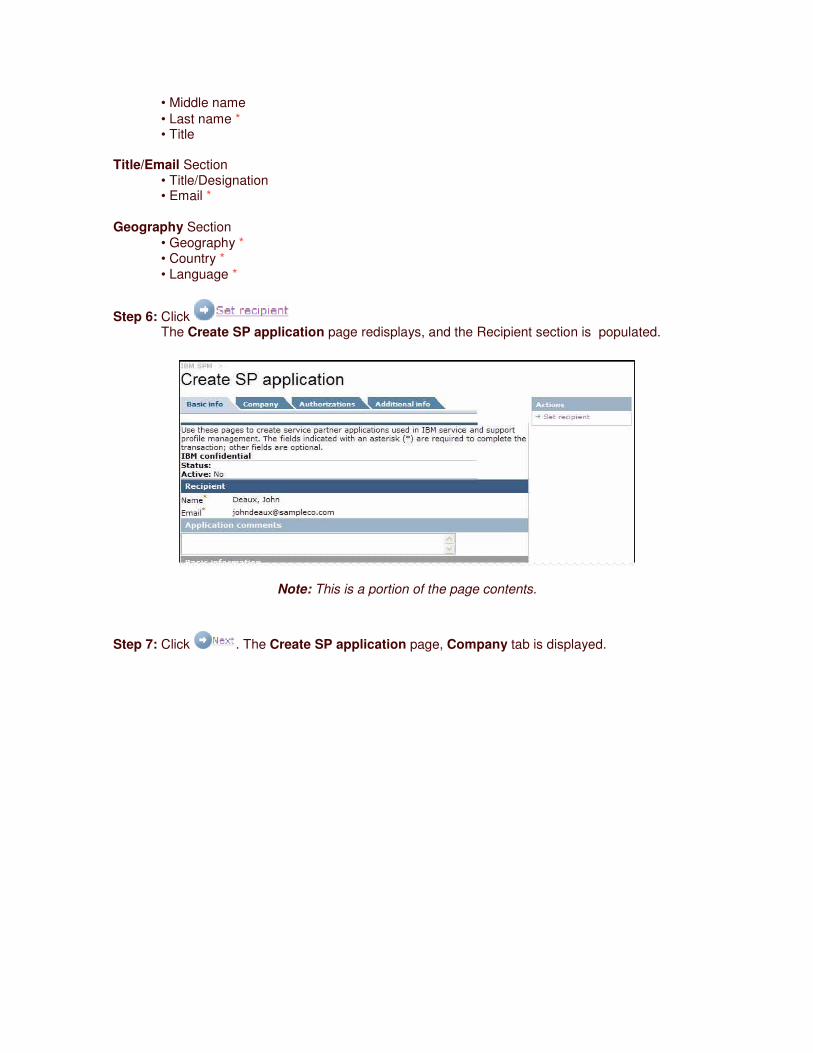
Step 6: Click The Create SP application page redisplays, and the Recipient section is populated.
Note: This is a portion of the page contents.
Step 7: Click . The Create SP application page, Company tab is displayed.
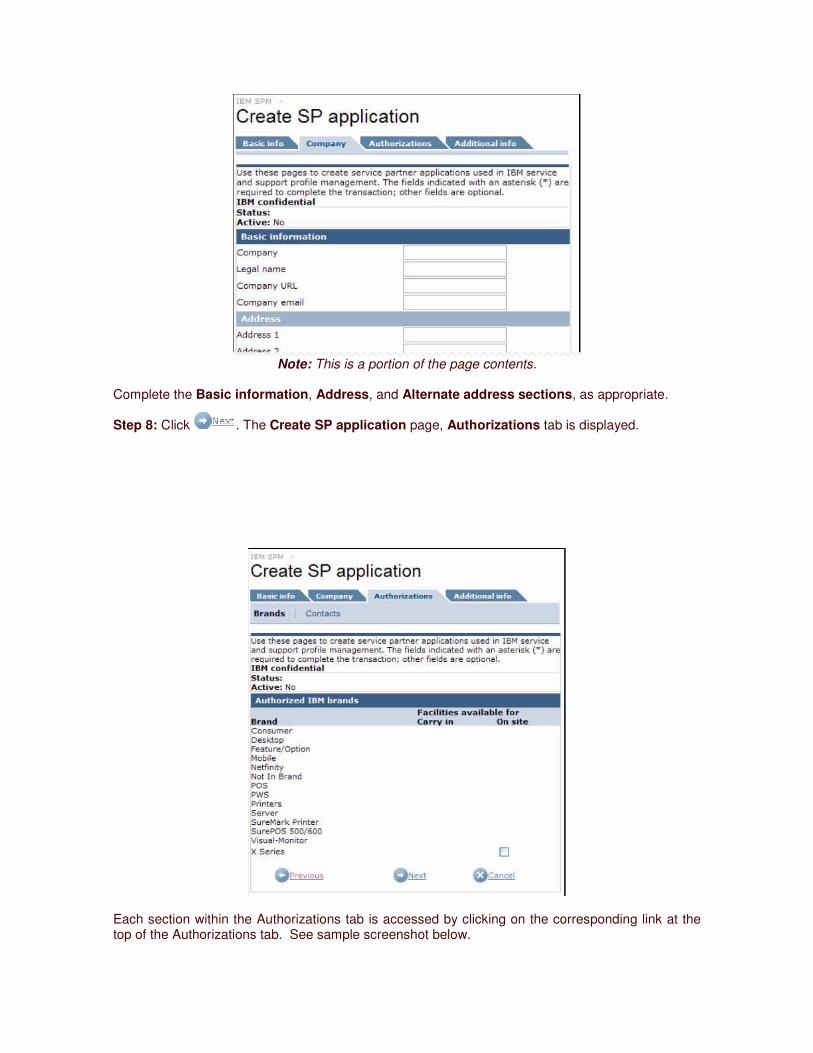
Note: This is a portion of the page contents.
Complete the Basic information, Address, and Alternate address sections, as appropriate.
Step 8: Click . The Create SP application page, Authorizations tab is displayed.
Each section within the Authorizations tab is accessed by clicking on the corresponding link at the top of the Authorizations tab. See sample screenshot below.
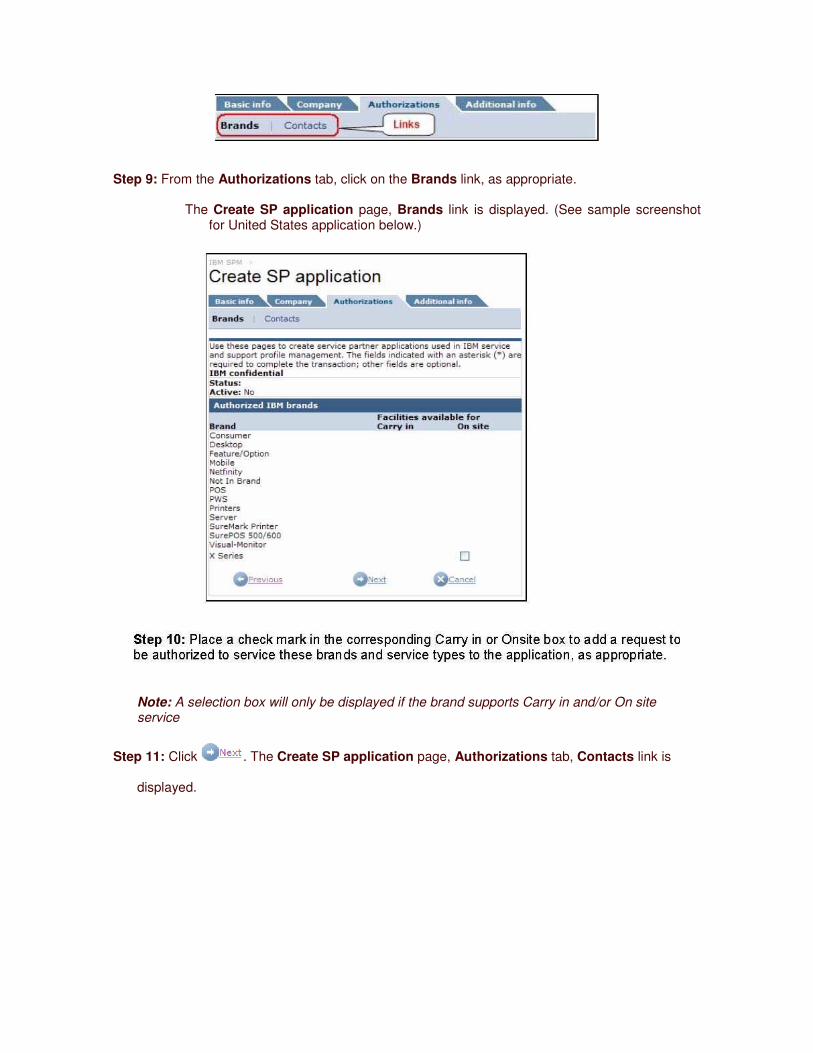
Step 9: From the Authorizations tab, click on the Brands link, as appropriate.
The Create SP application page, Brands link is displayed. (See sample screenshot for United States application below.)
Note: A selection box will only be displayed if the brand supports Carry in and/or On site service
Step 11: Click . The Create SP application page, Authorizations tab, Contacts link is
displayed.
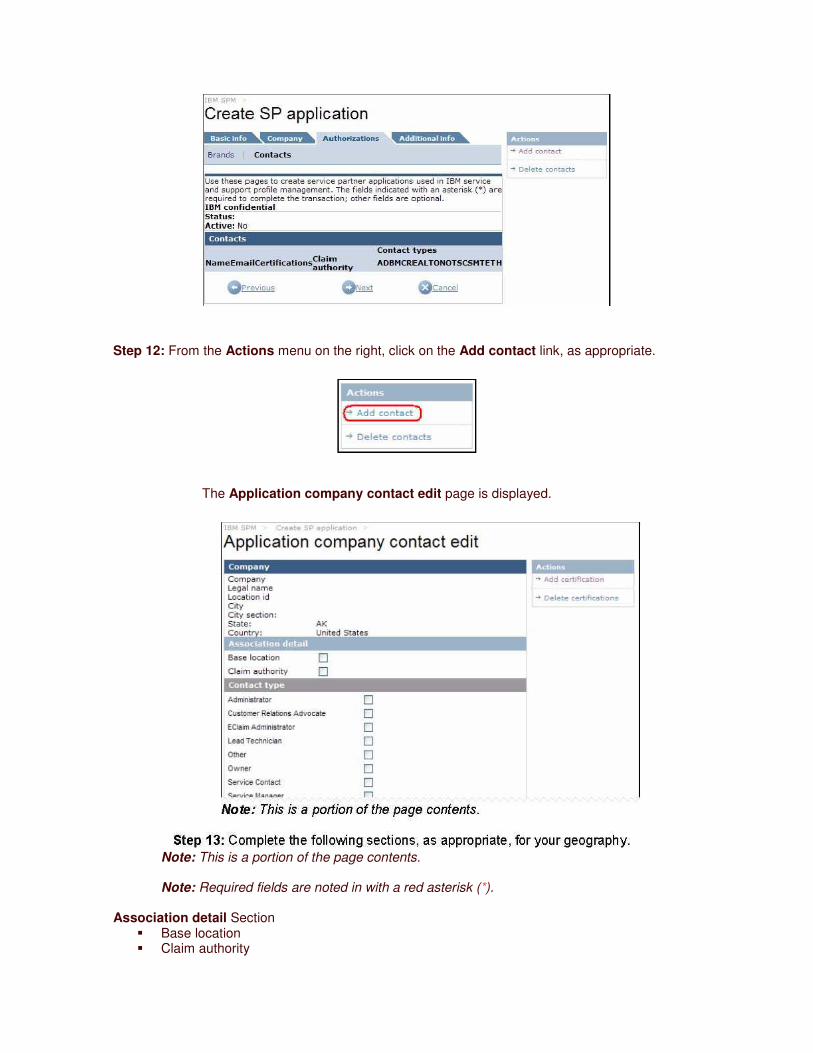
Step 12: From the Actions menu on the right, click on the Add contact link, as appropriate.
The Application company contact edit page is displayed.
Note: This is a portion of the page contents.
Note: Required fields are noted in with a red asterisk (*).
Association detail Section � Base location � Claim authority
Contact Type Section � Select at least one of the following: * . � Administrator . ��Customer Relations Advocate . � Eclaim Administrator . � Lead Technician . � Other . � Owner . � Service Contact . � Service Manager . � Technician . � Training Education Name Section
� First name * � Middle name � Last name * � Title � CompTIA #
Title/Email Section
� Job title � Email � Work phone # � Service manager/Admin email
Geography Section
� Geography * � Country * � Language *
Comments Section
� Comments
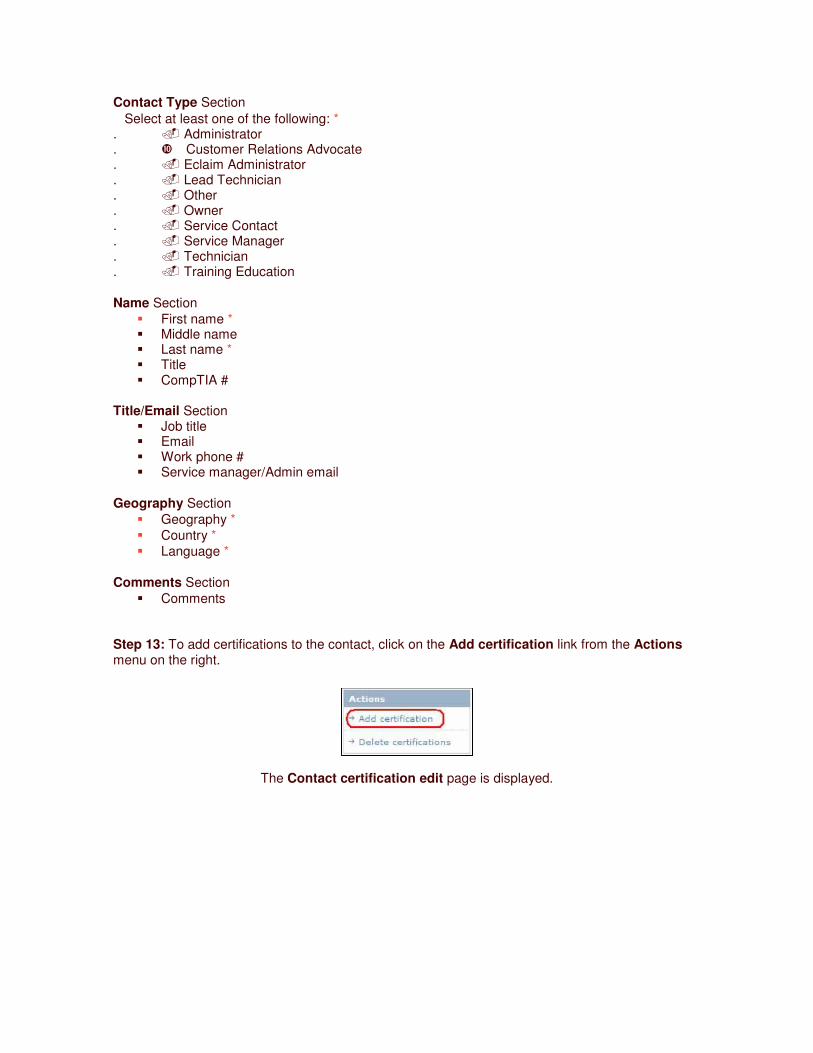
Step 13: To add certifications to the contact, click on the Add certification link from the Actions menu on the right.
The Contact certification edit page is displayed.
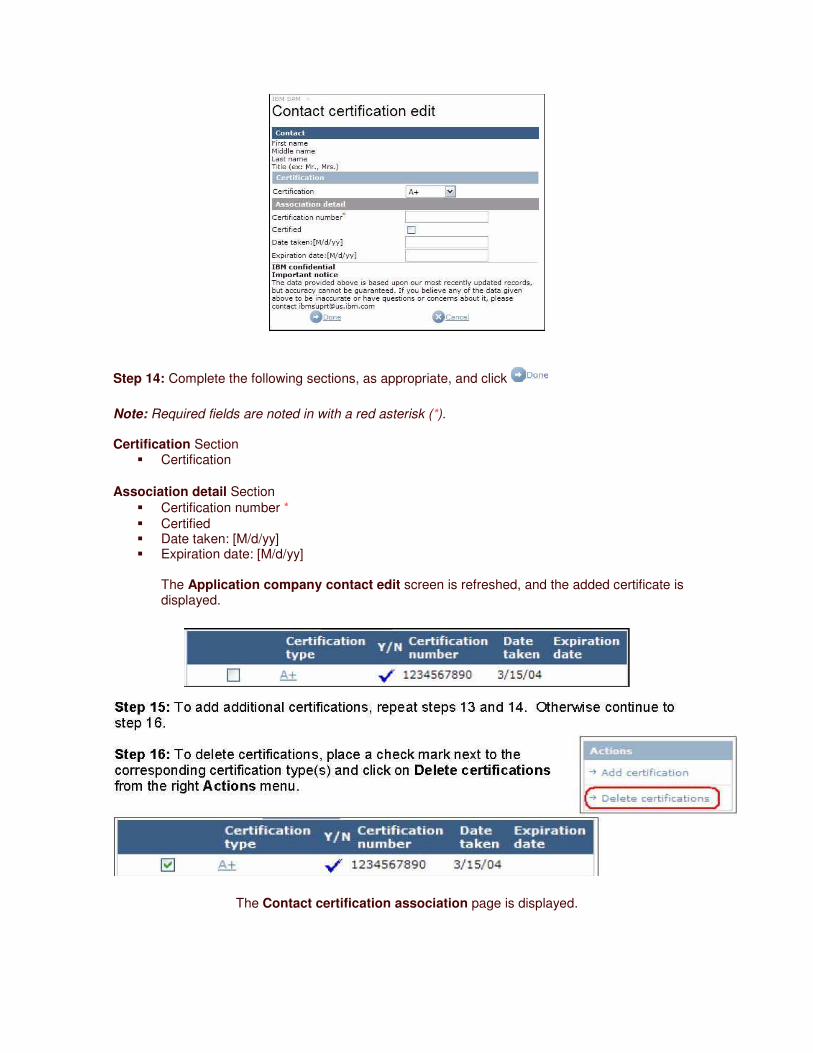
Step 14: Complete the following sections, as appropriate, and click
Note: Required fields are noted in with a red asterisk (*).
Certification Section � Certification
Association detail Section
� Certification number * � Certified � Date taken: [M/d/yy] � Expiration date: [M/d/yy]
The Application company contact edit screen is refreshed, and the added certificate is displayed.
The Contact certification association page is displayed.
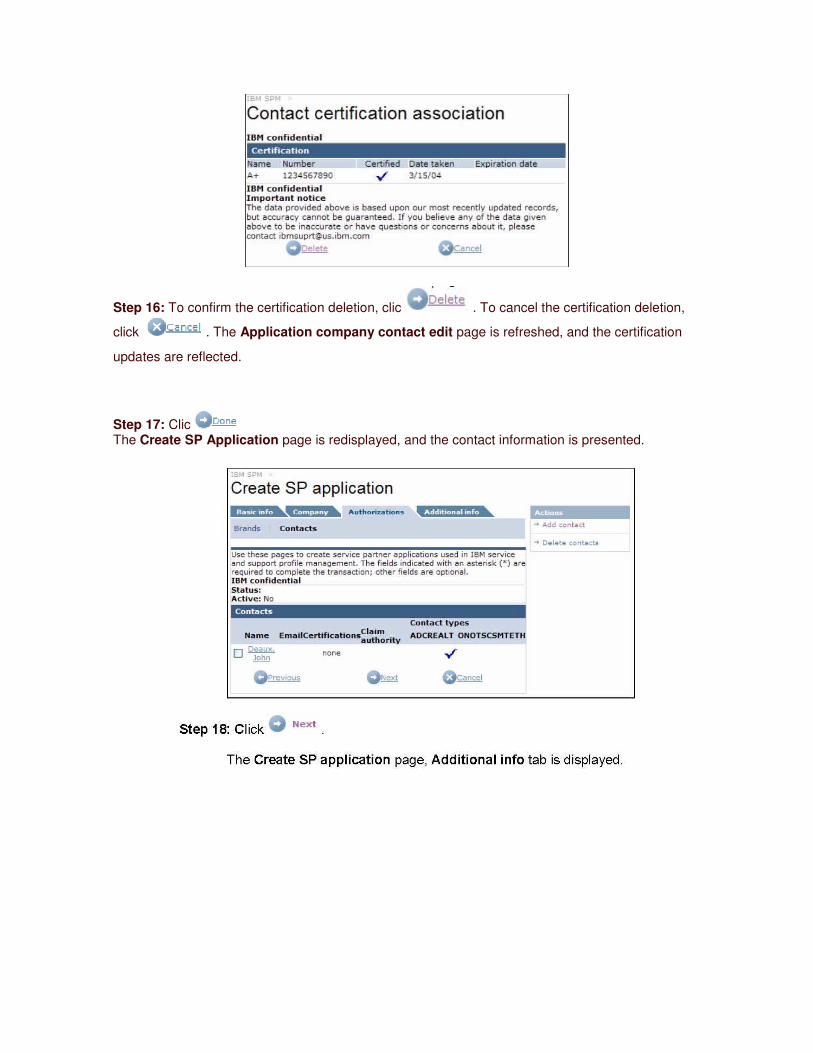
Step 16: To confirm the certification deletion, clic . To cancel the certification deletion,
click . The Application company contact edit page is refreshed, and the certification
updates are reflected.
Step 17: Clic The Create SP Application page is redisplayed, and the contact information is presented.
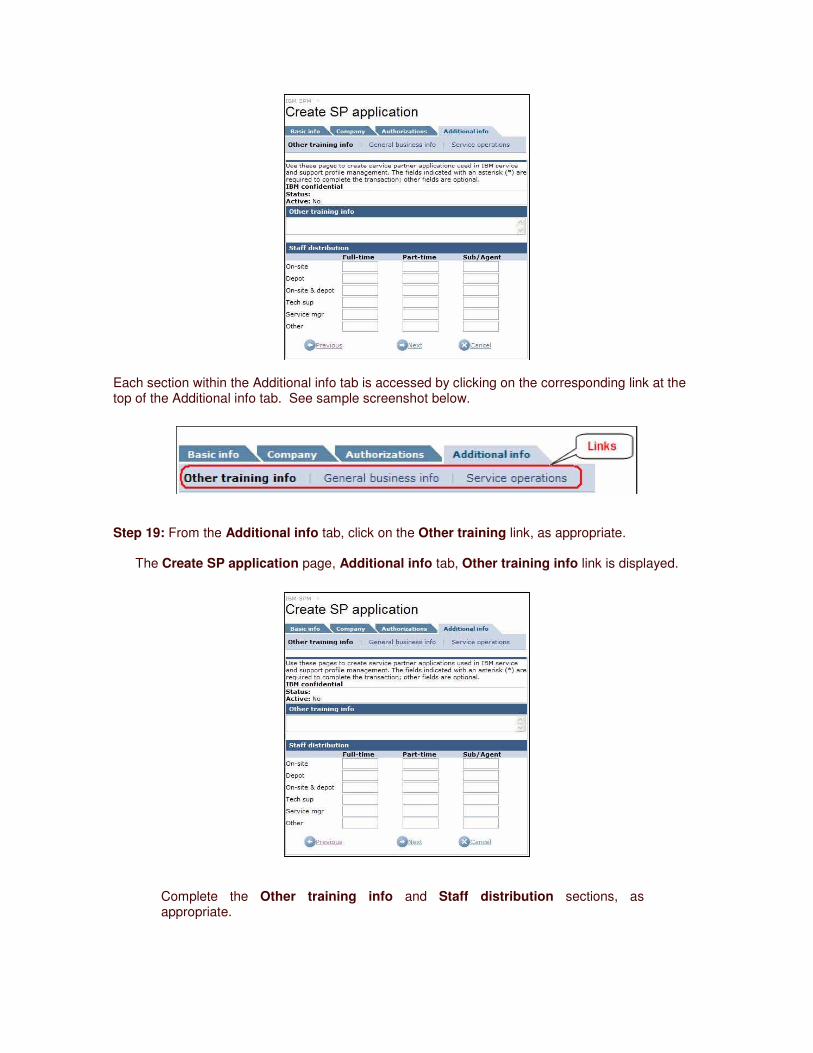
Each section within the Additional info tab is accessed by clicking on the corresponding link at the top of the Additional info tab. See sample screenshot below.
Step 19: From the Additional info tab, click on the Other training link, as appropriate.
The Create SP application page, Additional info tab, Other training info link is displayed.
Complete the Other training info and Staff distribution sections, as appropriate.
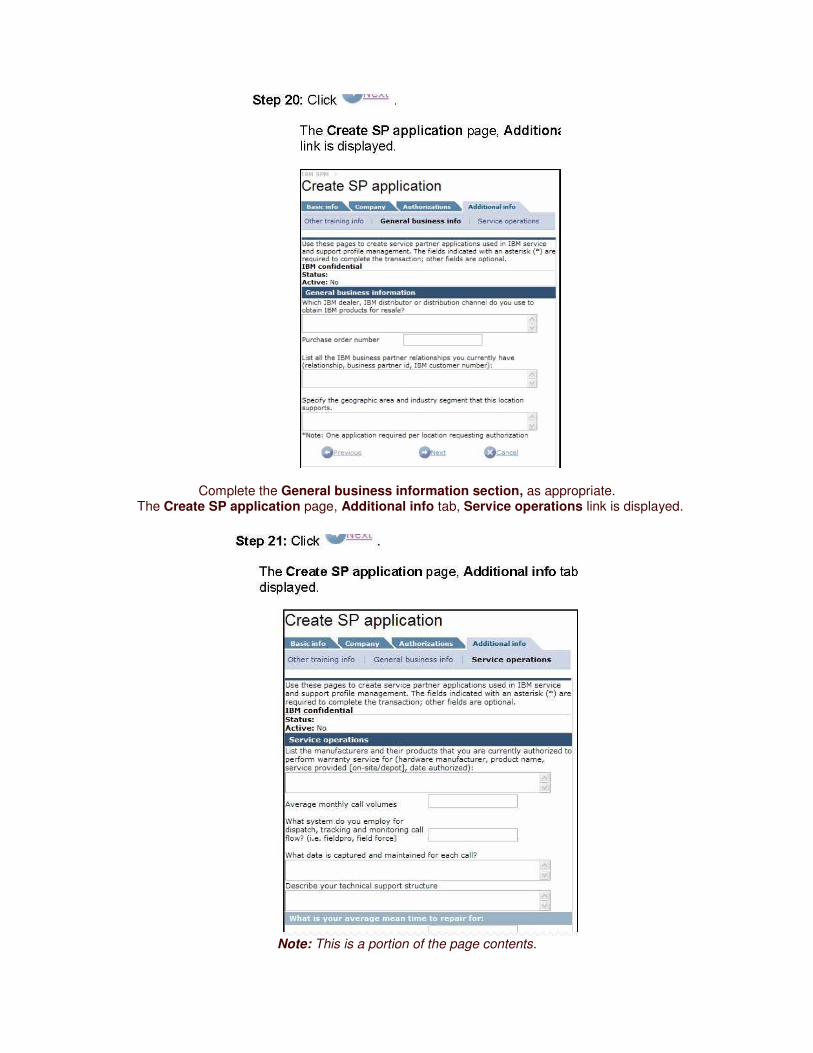
Complete the General business information section, as appropriate. The Create SP application page, Additional info tab, Service operations link is displayed.
Note: This is a portion of the page contents.
Complete the Service operations section, and answer questions in the What is your average mean time to repair for: section, as appropriate.
Step 22: Click
An email is sent to the recipient providing them with a link to the SPM web site, their authorization ID and PIN, and instructions for accessing the SPM site to complete the application.
Once the recipient has completed and submitted the application, it must be approved by an SPM administrator. See section 4.2.5.3 Application Approvals for more information on this process.
4.2.3. Create Contact
Step 1: Sign in to the SPM site. See Section 2.0 Signing into SPM for more information.
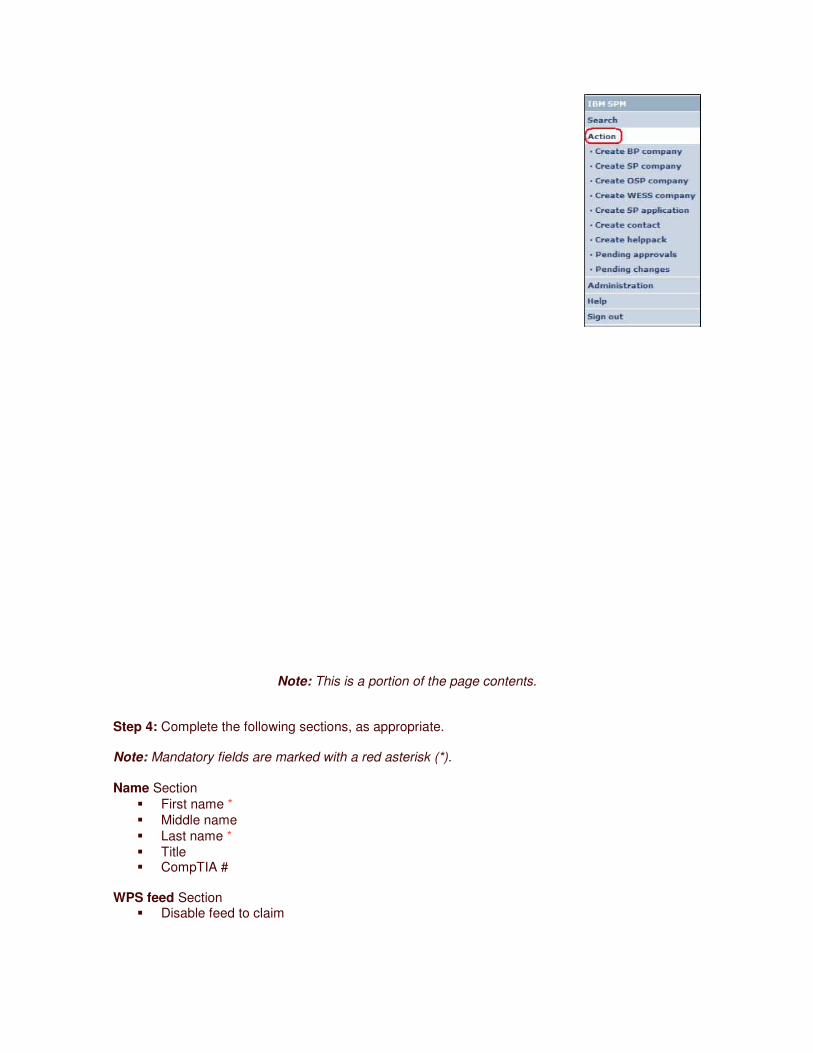
Step 2: Click the Action link found on the SPM Navigation Menu. The Action sub-categories are listed.
Note: You may not see all Action sub-categories listed. Your visibility to Action sub-categories will depend on your assigned user privileges.
Step 3: Click Create contact link from the Action sub-category list.
Note: Your visibility to this link will depend on your assigned user privileges.
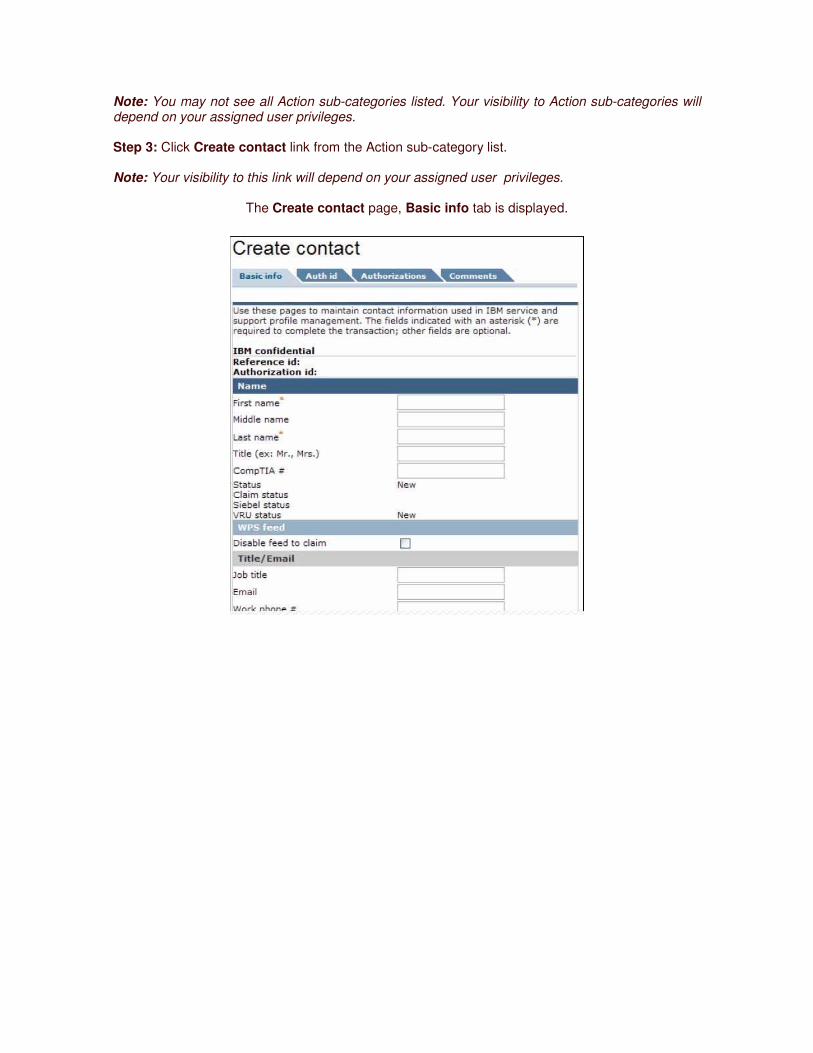
The Create contact page, Basic info tab is displayed.
Note: This is a portion of the page contents.
Step 4: Complete the following sections, as appropriate.
Note: Mandatory fields are marked with a red asterisk (*).
Name Section � First name * � Middle name � Last name * � Title � CompTIA #
WPS feed Section
� Disable feed to claim
Title/Email Section . • Job title . • Email . • Work phone # . • Service manager/Admin email Help center Section • Help center access (Yes/No) *
Geography Section • Geography *
• Country • Language *
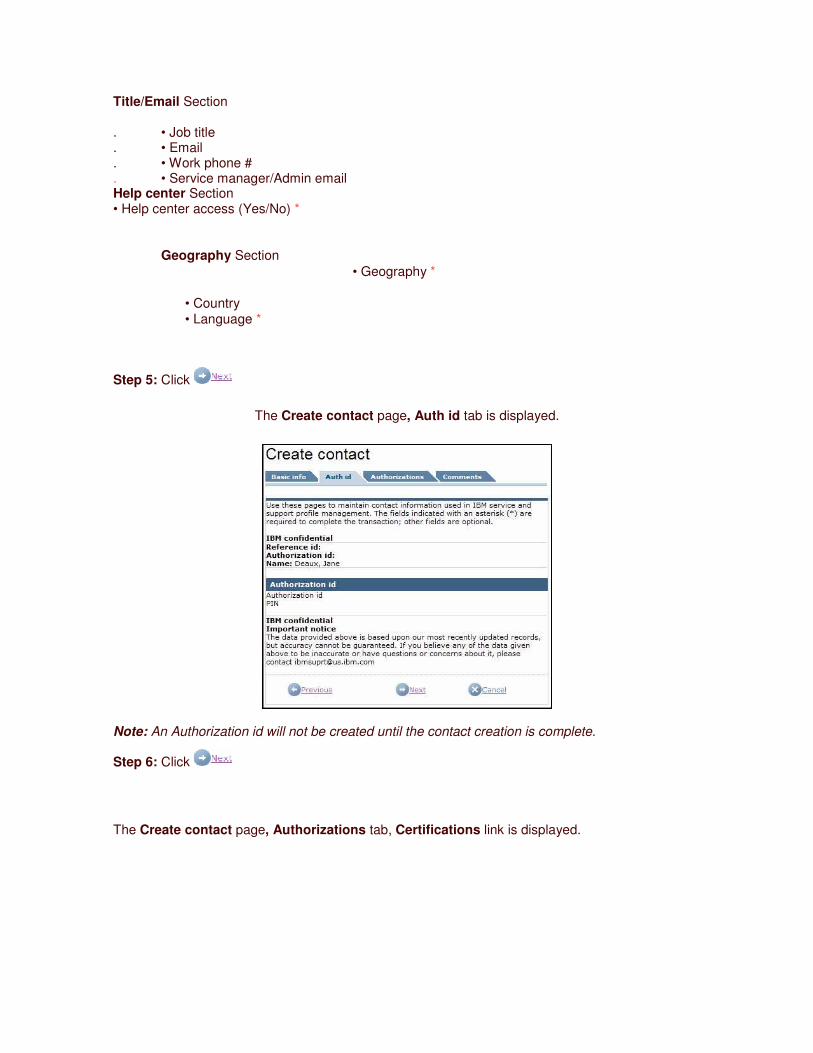
Step 5: Click
The Create contact page, Auth id tab is displayed.
Note: An Authorization id will not be created until the contact creation is complete.
Step 6: Click
The Create contact page, Authorizations tab, Certifications link is displayed.
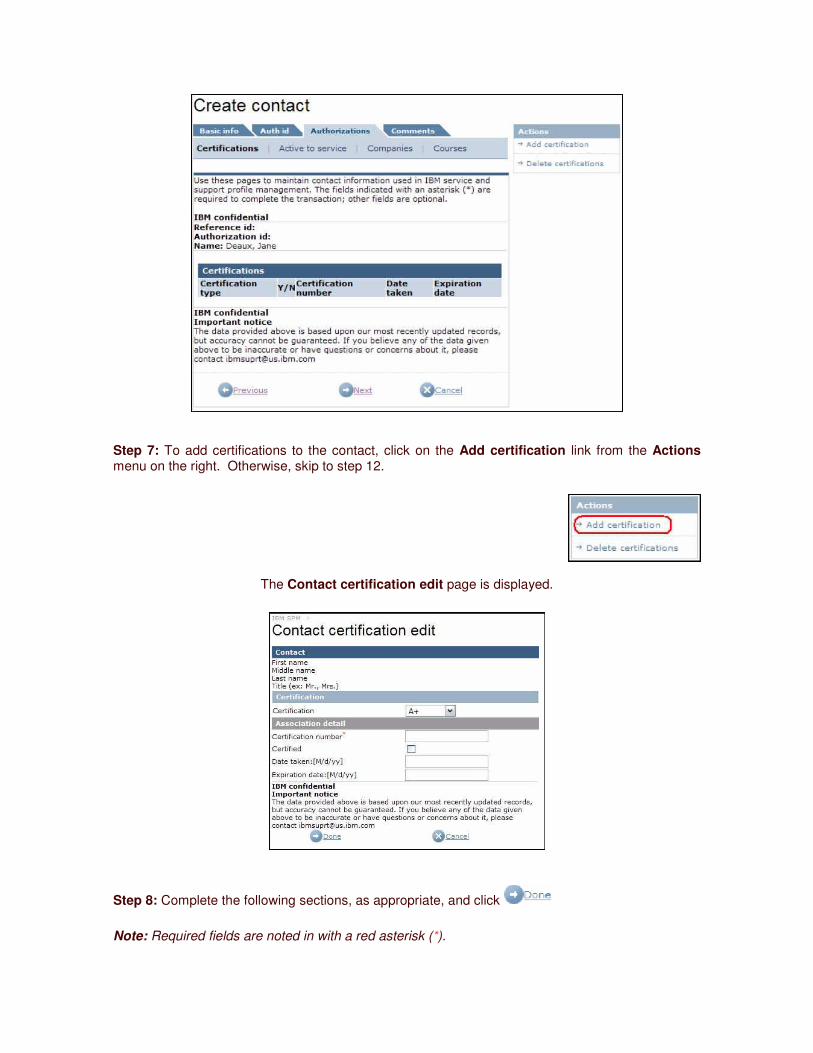
Step 7: To add certifications to the contact, click on the Add certification link from the Actions menu on the right. Otherwise, skip to step 12.
The Contact certification edit page is displayed.
Step 8: Complete the following sections, as appropriate, and click
Note: Required fields are noted in with a red asterisk (*).
Certification Section � Certification
Association detail Section
� Certification number � Certified � Date taken: [M/d/yy] � Expiration date: [M/d/yy]
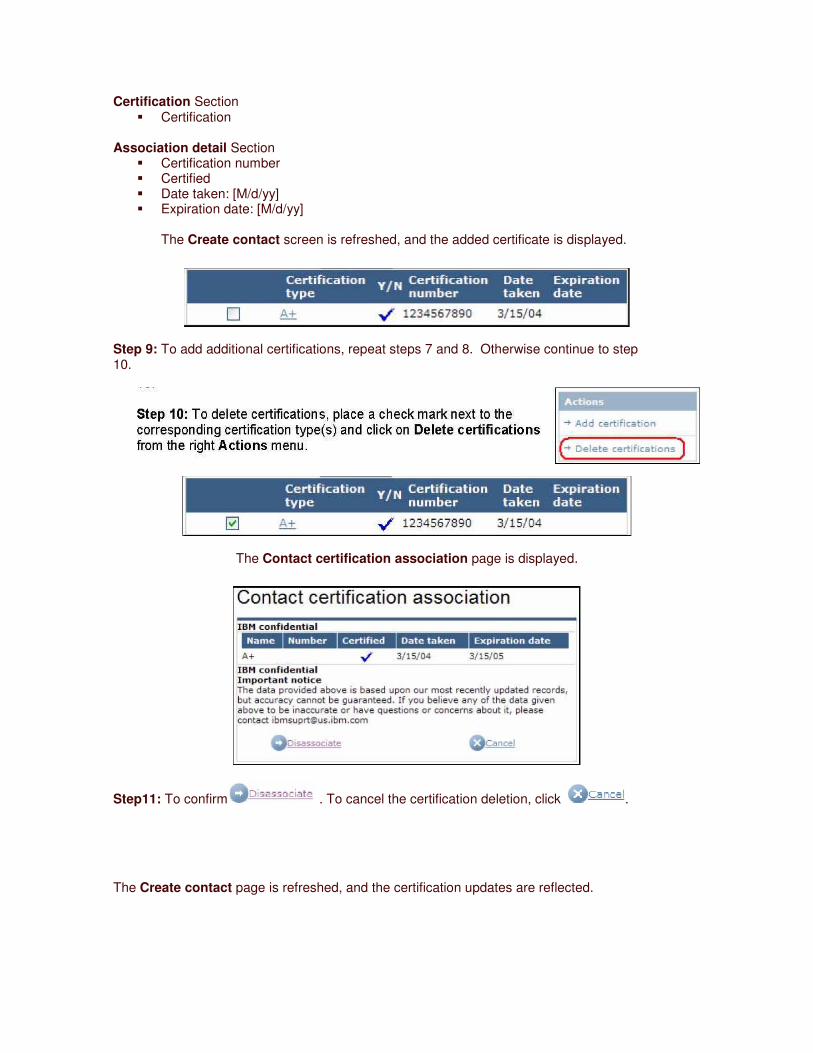
The Create contact screen is refreshed, and the added certificate is displayed.
Step 9: To add additional certifications, repeat steps 7 and 8. Otherwise continue to step 10.
The Contact certification association page is displayed.
Step11: To confirm . To cancel the certification deletion, click .
The Create contact page is refreshed, and the certification updates are reflected.
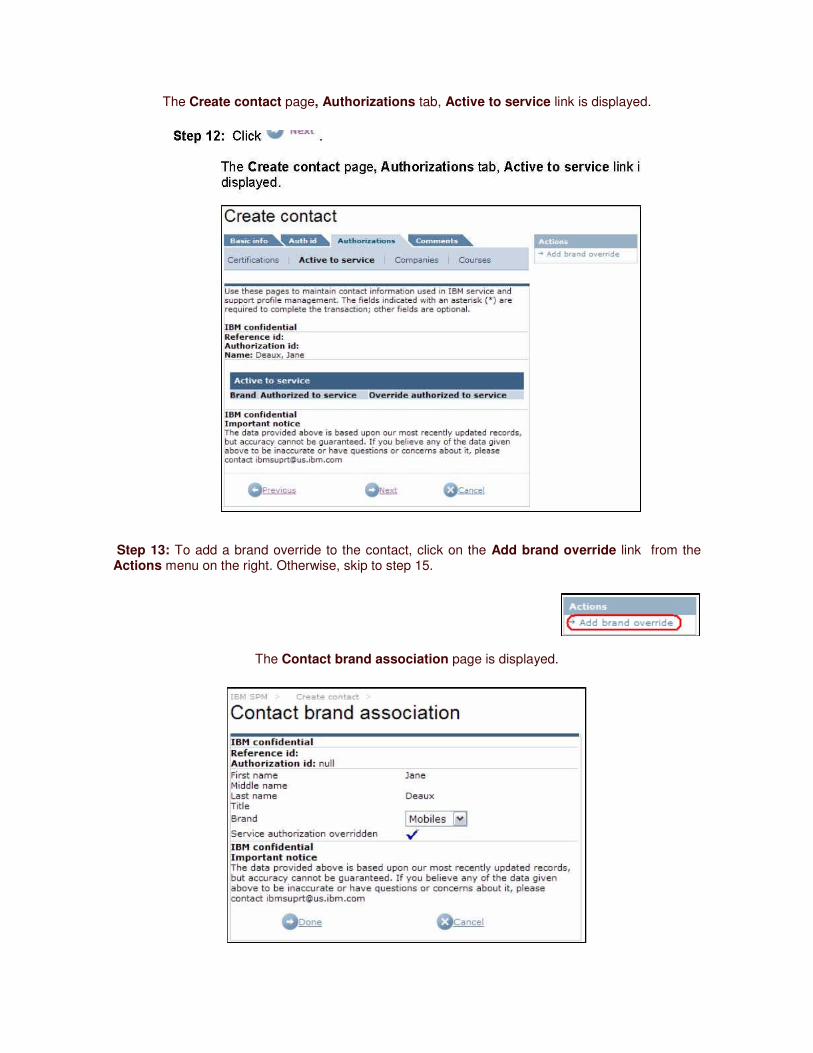
The Create contact page, Authorizations tab, Active to service link is displayed.
Step 13: To add a brand override to the contact, click on the Add brand override link from the Actions menu on the right. Otherwise, skip to step 15.
The Contact brand association page is displayed.

Step 14: Select the appropriate brand from the Brand picklist. Click
The Create contact page, Authorizations tab, Active to service link is refreshed, and the Active to service section is updated with the brand override information.
The Create contact page, Authorizations tab, Companies link is displayed.
Step 16: To associate the contact to a company, click on the Add company link from the Actions menu on the right. Otherwise skip to step 22.
The Contact company association edit page is displayed.
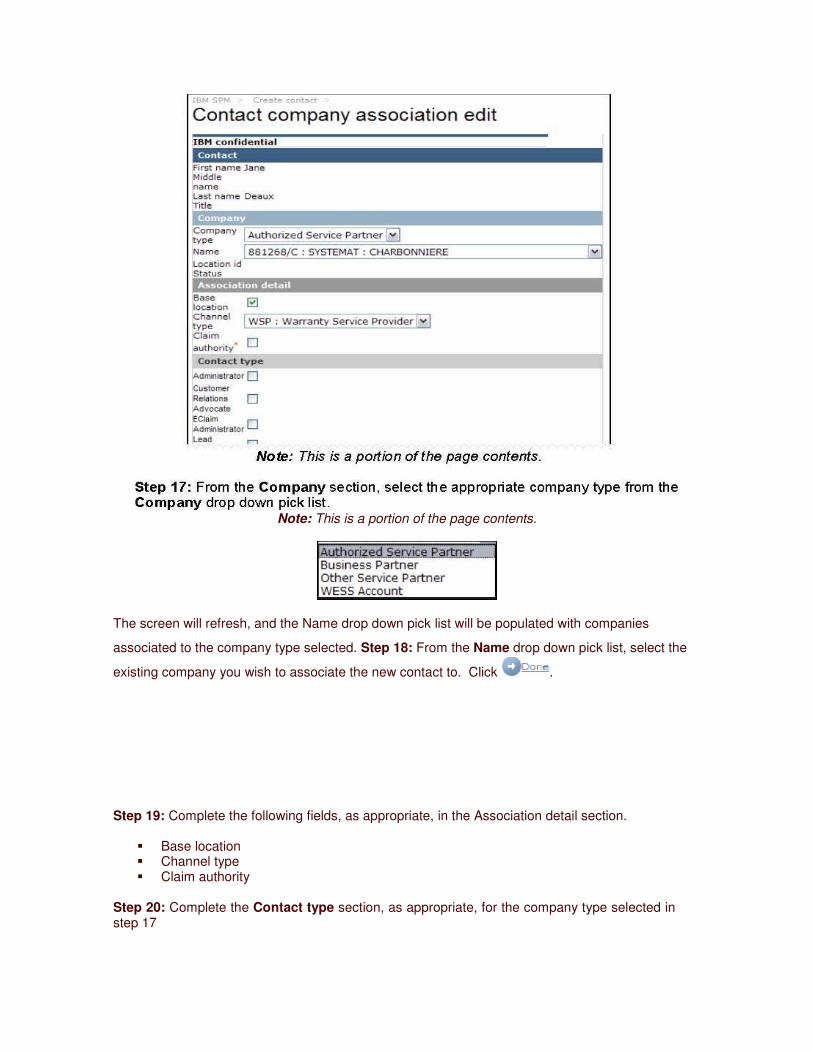
Note: This is a portion of the page contents.
The screen will refresh, and the Name drop down pick list will be populated with companies
associated to the company type selected. Step 18: From the Name drop down pick list, select the
existing company you wish to associate the new contact to. Click .
Step 19: Complete the following fields, as appropriate, in the Association detail section.
� Base location � Channel type � Claim authority
Step 20: Complete the Contact type section, as appropriate, for the company type selected in step 17
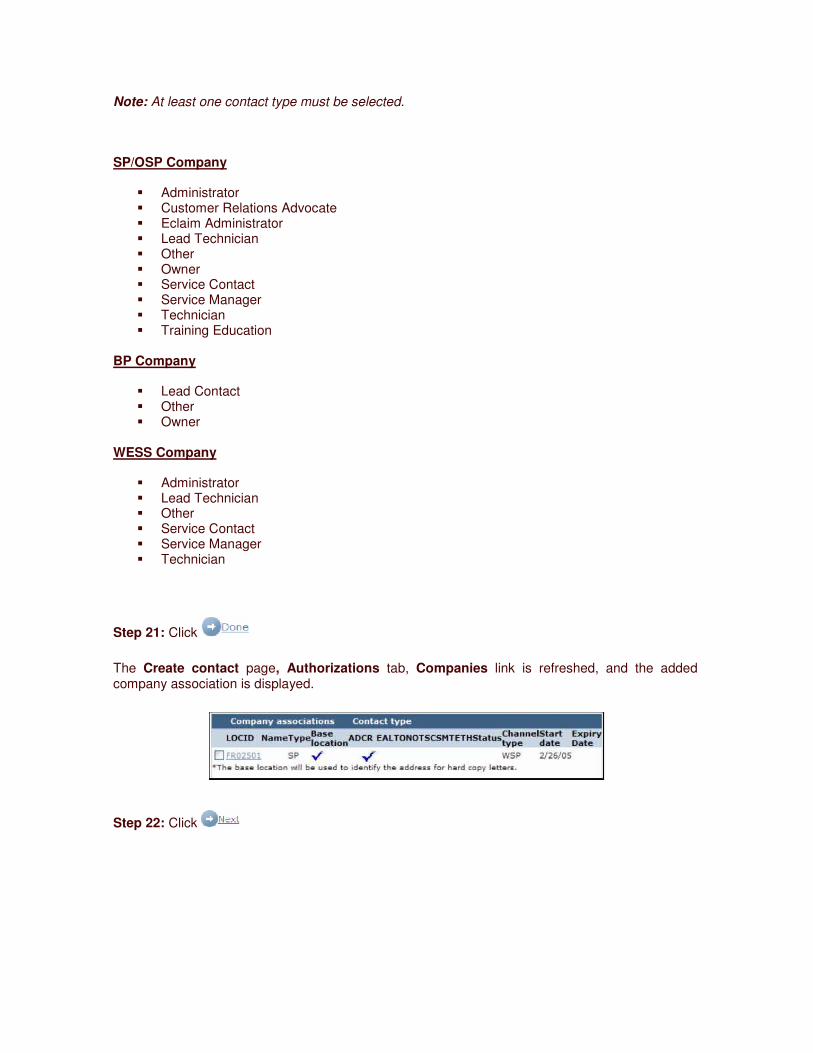
Note: At least one contact type must be selected.
SP/OSP Company
� Administrator � Customer Relations Advocate � Eclaim Administrator � Lead Technician � Other � Owner � Service Contact � Service Manager � Technician � Training Education
BP Company
� Lead Contact � Other � Owner
WESS Company
� Administrator � Lead Technician � Other � Service Contact � Service Manager � Technician
Step 21: Click
The Create contact page, Authorizations tab, Companies link is refreshed, and the added company association is displayed.
Step 22: Click
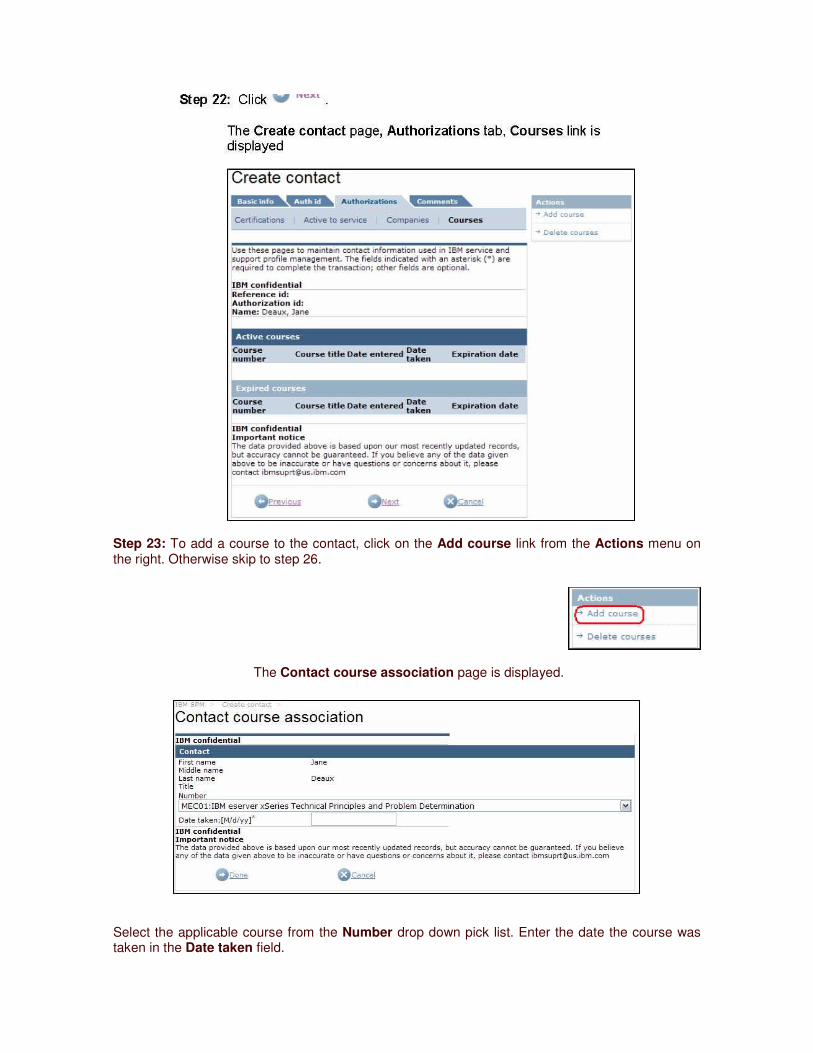
Step 23: To add a course to the contact, click on the Add course link from the Actions menu on the right. Otherwise skip to step 26.
The Contact course association page is displayed.
Select the applicable course from the Number drop down pick list. Enter the date the course was taken in the Date taken field.
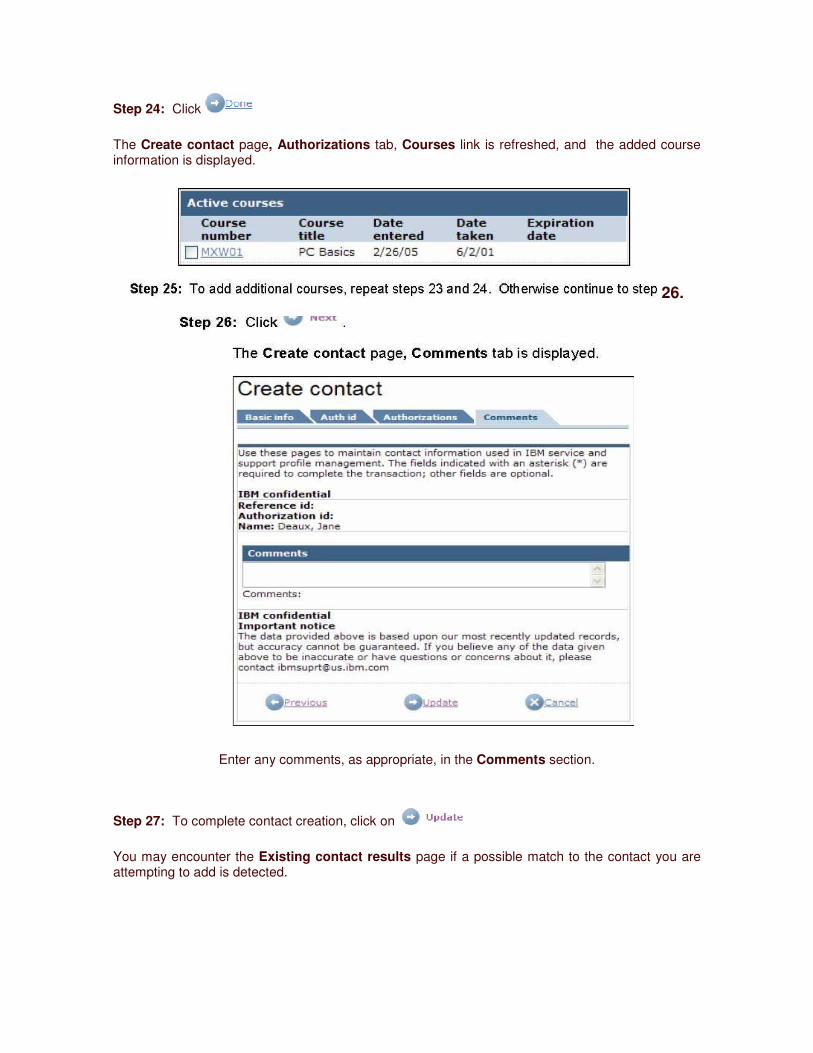
Step 24: Click
The Create contact page, Authorizations tab, Courses link is refreshed, and the added course information is displayed.
26.
Enter any comments, as appropriate, in the Comments section.
Step 27: To complete contact creation, click on
You may encounter the Existing contact results page if a possible match to the contact you are attempting to add is detected.
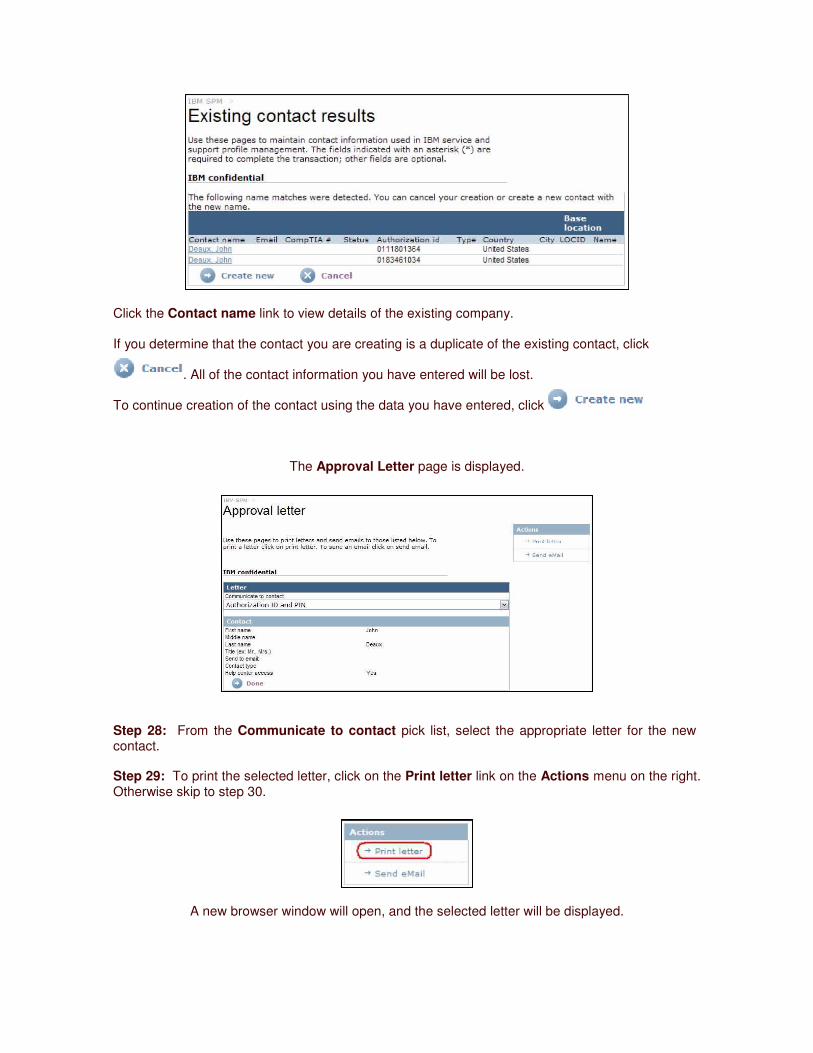
Click the Contact name link to view details of the existing company.
If you determine that the contact you are creating is a duplicate of the existing contact, click
. All of the contact information you have entered will be lost.
To continue creation of the contact using the data you have entered, click
The Approval Letter page is displayed.
Step 28: From the Communicate to contact pick list, select the appropriate letter for the new contact.
Step 29: To print the selected letter, click on the Print letter link on the Actions menu on the right. Otherwise skip to step 30.
A new browser window will open, and the selected letter will be displayed.
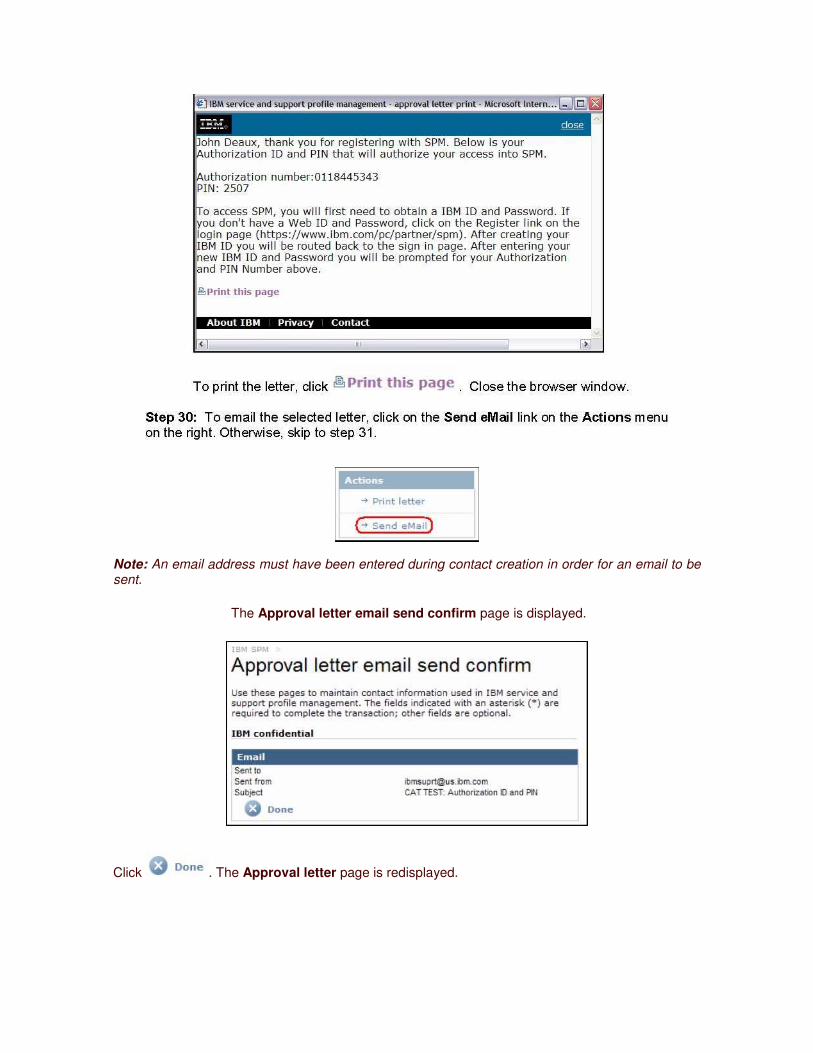
Note: An email address must have been entered during contact creation in order for an email to be sent.
The Approval letter email send confirm page is displayed.
Click . The Approval letter page is redisplayed.
Step 31: Click . Your contact is created, and will be placed in Approved or Pending status, based on your assigned user privileges. The IBM SPM welcome page is displayed.
4.2.4. Create Helppack
Step 1: Sign in to the SPM site. See Section 2.0 Signing into SPM for more information.
Step 2: Click the Action link found on the SPM Navigation Menu. The Action subcategories are listed.
Note: You may not see all Action sub-categories listed. Your visibility to Action subcategories will depend on your assigned user privileges.
Step 3: Click the Create helppack link from the Action sub-category list.
Note: Your visibility to this link will depend on your assigned user privileges.
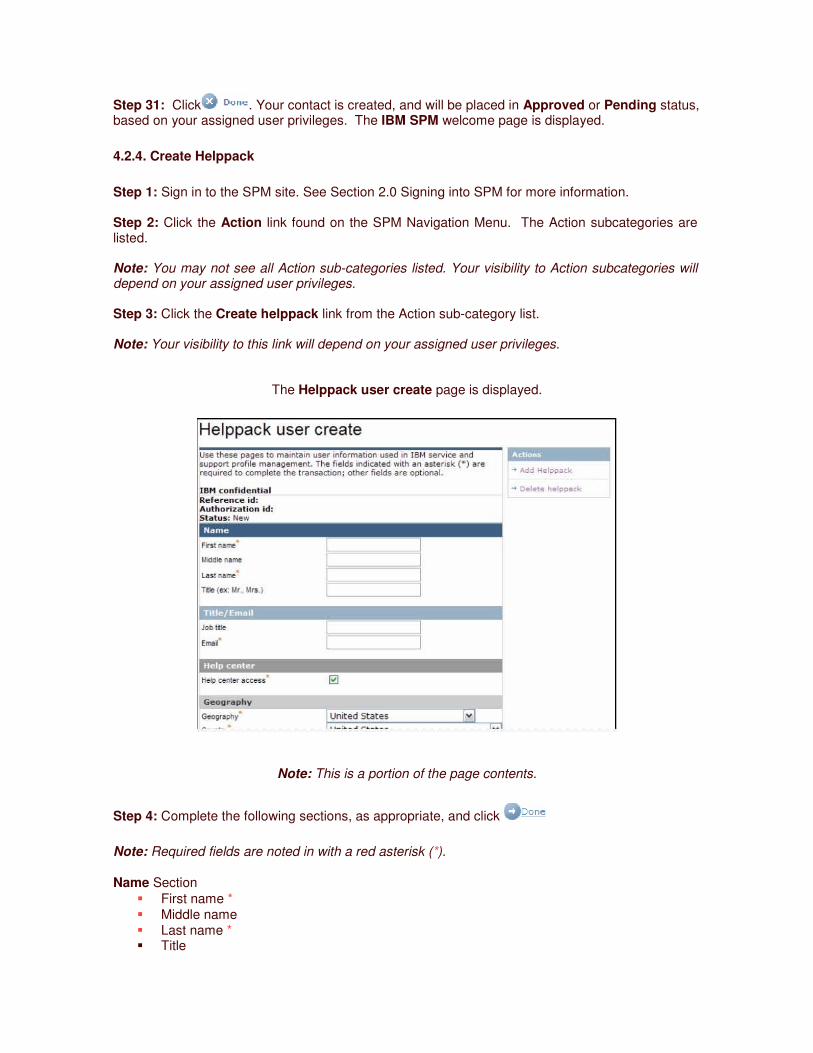
The Helppack user create page is displayed.
Note: This is a portion of the page contents.
Step 4: Complete the following sections, as appropriate, and click
Note: Required fields are noted in with a red asterisk (*).
Name Section � First name * � Middle name � Last name * � Title
Title/Email Section � Job title � Email *
Geography Section
� Geography * � Country * � Language *
Personal address Section
� Address 1 * � Address 2 � Address 3 � City * � City section � State * � Postal code * � Personal phone # � Fax # � Work phone # � Mobile phone #
Comments Section
� Comments
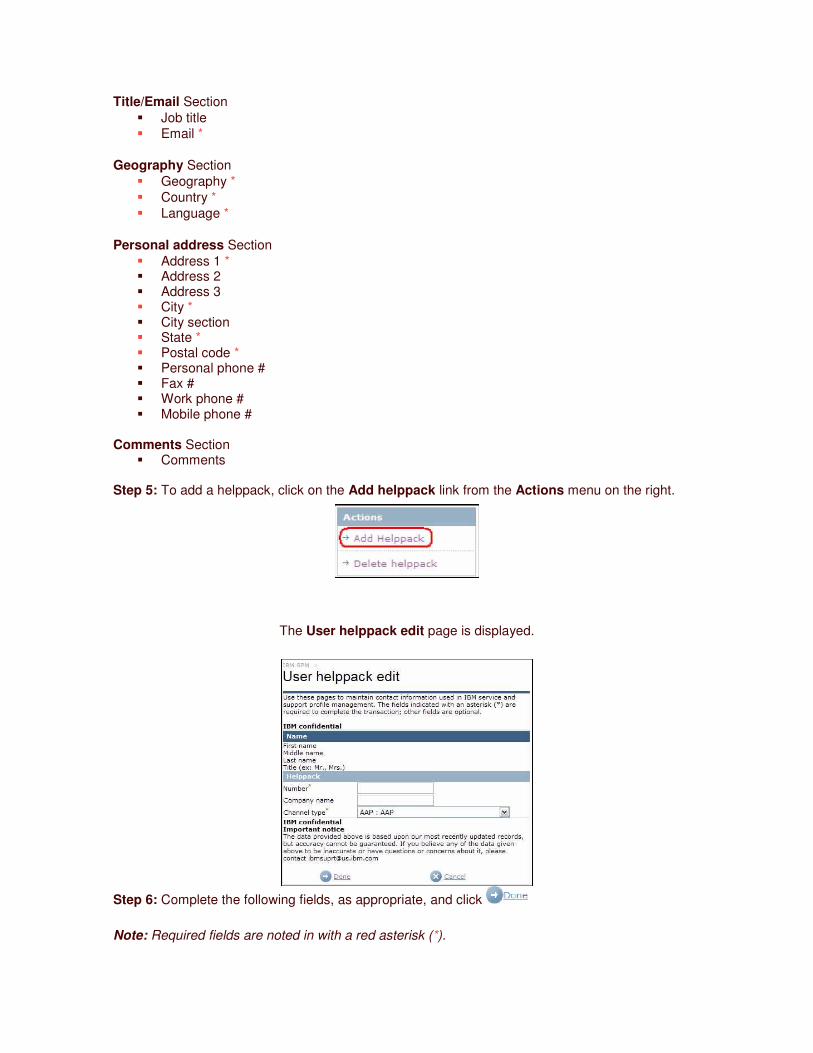
Step 5: To add a helppack, click on the Add helppack link from the Actions menu on the right.
The User helppack edit page is displayed.
Step 6: Complete the following fields, as appropriate, and click
Note: Required fields are noted in with a red asterisk (*).
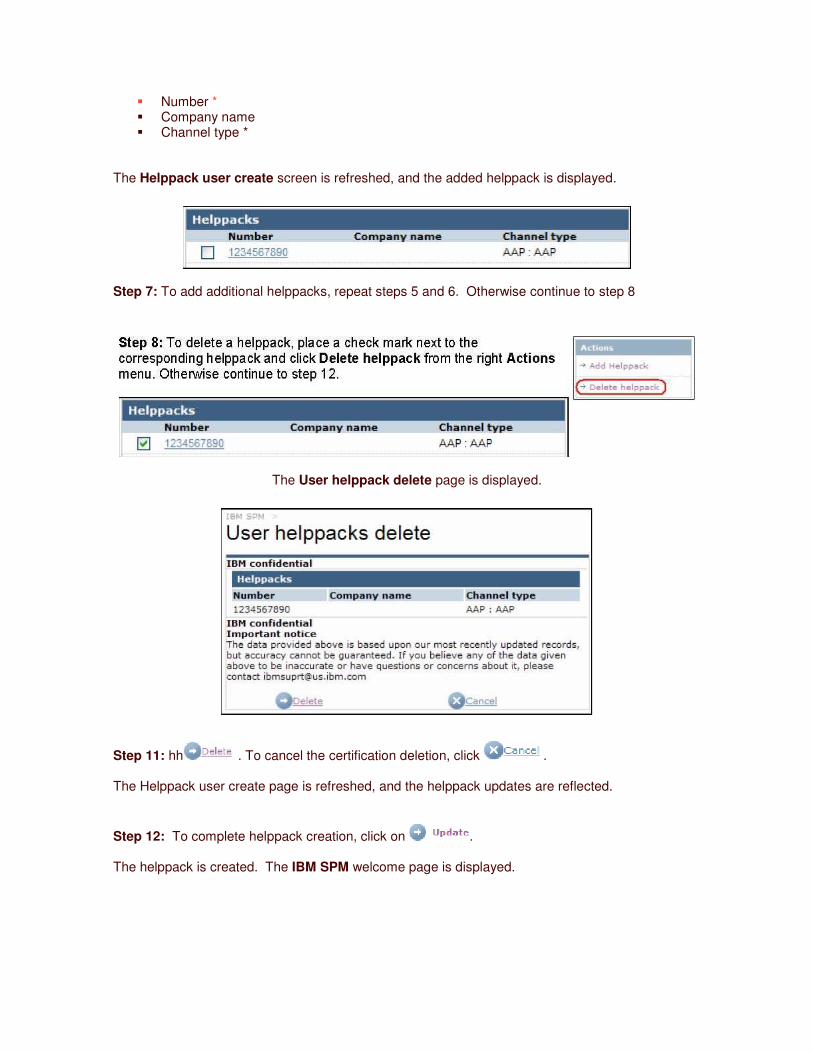
� Number * � Company name � Channel type *
The Helppack user create screen is refreshed, and the added helppack is displayed.
Step 7: To add additional helppacks, repeat steps 5 and 6. Otherwise continue to step 8
The User helppack delete page is displayed.
Step 11: hh . To cancel the certification deletion, click . The Helppack user create page is refreshed, and the helppack updates are reflected. Step 12: To complete helppack creation, click on . The helppack is created. The IBM SPM welcome page is displayed.
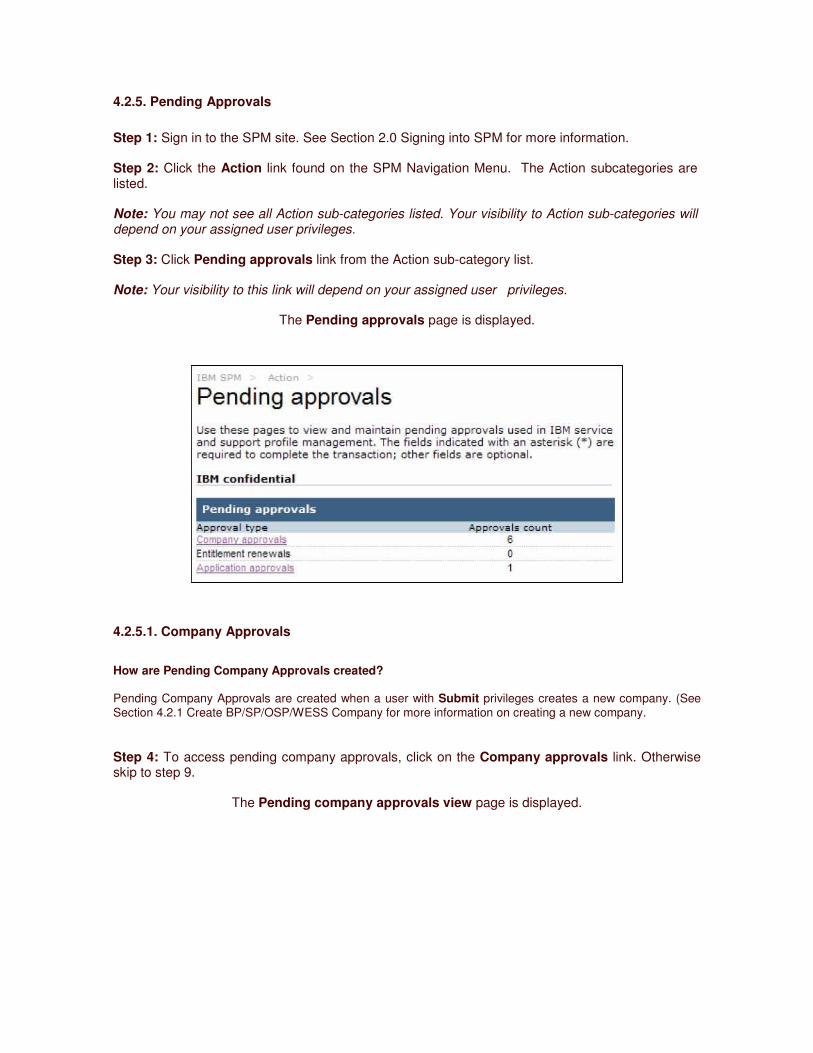
4.2.5. Pending Approvals
Step 1: Sign in to the SPM site. See Section 2.0 Signing into SPM for more information.
Step 2: Click the Action link found on the SPM Navigation Menu. The Action subcategories are listed.
Note: You may not see all Action sub-categories listed. Your visibility to Action sub-categories will depend on your assigned user privileges.
Step 3: Click Pending approvals link from the Action sub-category list.
Note: Your visibility to this link will depend on your assigned user privileges.
The Pending approvals page is displayed.
4.2.5.1. Company Approvals
How are Pending Company Approvals created?
Pending Company Approvals are created when a user with Submit privileges creates a new company. (See Section 4.2.1 Create BP/SP/OSP/WESS Company for more information on creating a new company.
Step 4: To access pending company approvals, click on the Company approvals link. Otherwise skip to step 9.
The Pending company approvals view page is displayed.
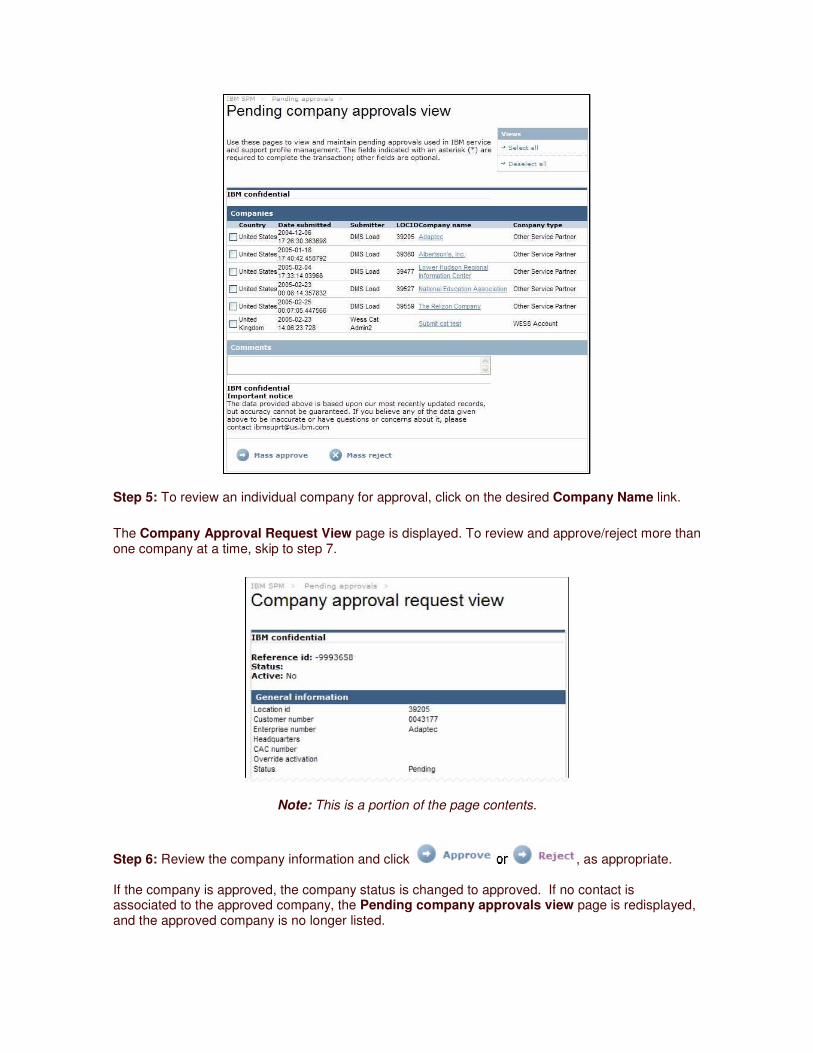
Step 5: To review an individual company for approval, click on the desired Company Name link.
The Company Approval Request View page is displayed. To review and approve/reject more than one company at a time, skip to step 7.
Note: This is a portion of the page contents.
Step 6: Review the company information and click , as appropriate.
If the company is approved, the company status is changed to approved. If no contact is associated to the approved company, the Pending company approvals view page is redisplayed, and the approved company is no longer listed.
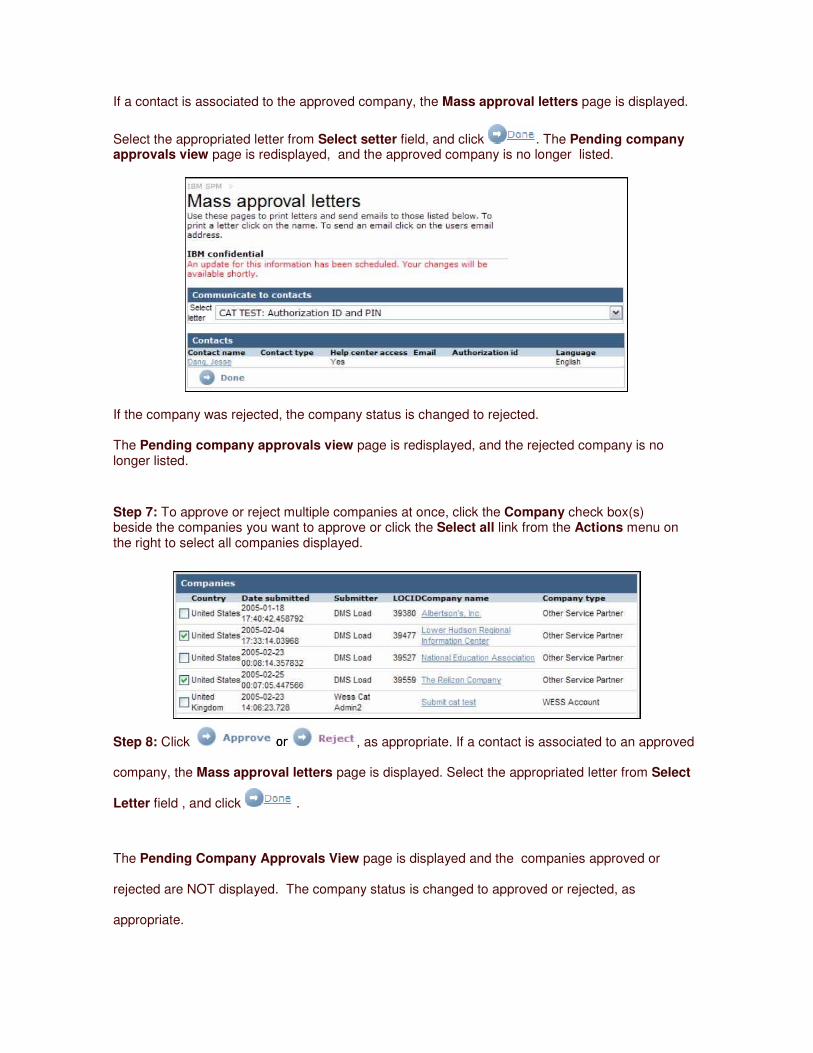
If a contact is associated to the approved company, the Mass approval letters page is displayed.
Select the appropriated letter from Select setter field, and click . The Pending company approvals view page is redisplayed, and the approved company is no longer listed.
If the company was rejected, the company status is changed to rejected. The Pending company approvals view page is redisplayed, and the rejected company is no longer listed.
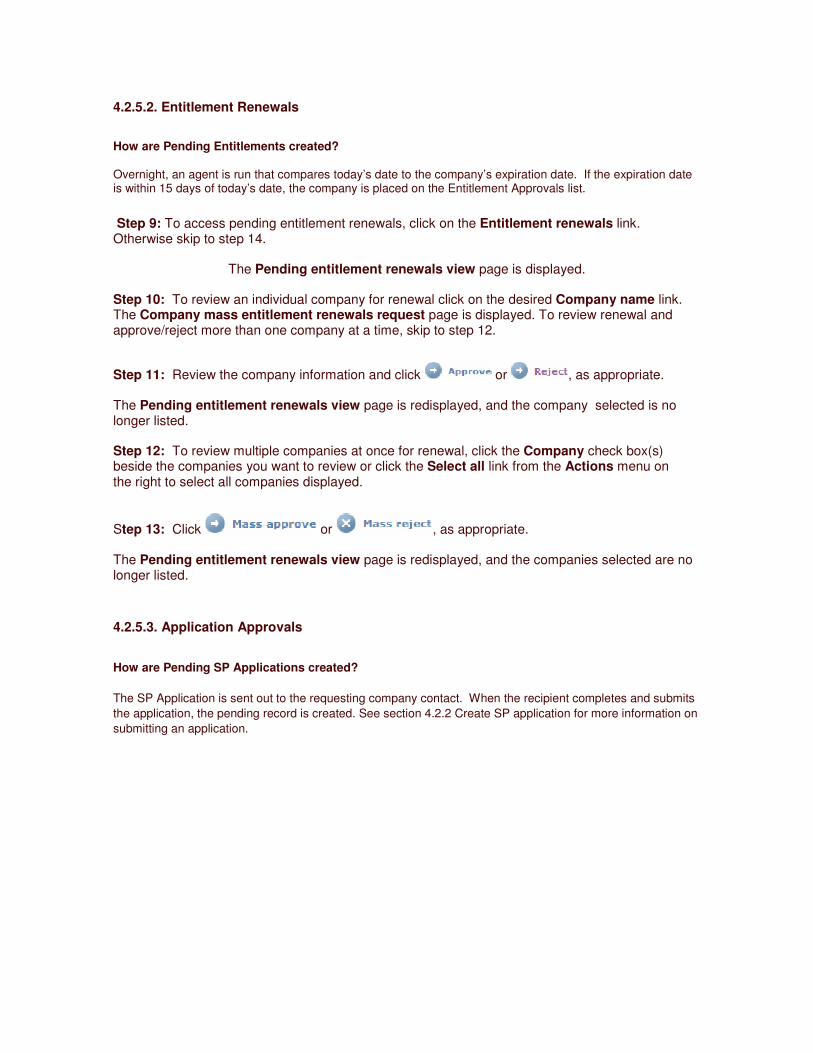
Step 7: To approve or reject multiple companies at once, click the Company check box(s) beside the companies you want to approve or click the Select all link from the Actions menu on the right to select all companies displayed.
Step 8: Click , as appropriate. If a contact is associated to an approved
company, the Mass approval letters page is displayed. Select the appropriated letter from Select
Letter field , and click .
The Pending Company Approvals View page is displayed and the companies approved or
rejected are NOT displayed. The company status is changed to approved or rejected, as
appropriate.
4.2.5.2. Entitlement Renewals
How are Pending Entitlements created? Overnight, an agent is run that compares today’s date to the company’s expiration date. If the expiration date is within 15 days of today’s date, the company is placed on the Entitlement Approvals list.
Step 9: To access pending entitlement renewals, click on the Entitlement renewals link. Otherwise skip to step 14.
The Pending entitlement renewals view page is displayed.
Step 10: To review an individual company for renewal click on the desired Company name link. The Company mass entitlement renewals request page is displayed. To review renewal and approve/reject more than one company at a time, skip to step 12.
Step 11: Review the company information and click or , as appropriate.
The Pending entitlement renewals view page is redisplayed, and the company selected is no longer listed.
Step 12: To review multiple companies at once for renewal, click the Company check box(s) beside the companies you want to review or click the Select all link from the Actions menu on the right to select all companies displayed.
Step 13: Click or , as appropriate.
The Pending entitlement renewals view page is redisplayed, and the companies selected are no longer listed.
4.2.5.3. Application Approvals
How are Pending SP Applications created? The SP Application is sent out to the requesting company contact. When the recipient completes and submits the application, the pending record is created. See section 4.2.2 Create SP application for more information on submitting an application.

Step 15: Click on the desired Company name link.
The Service partner application approval request page is displayed.
Step 16: Review the company information. Navigate through the tabs using the button. Once you finish reviewing the application, click or , as appropriate.
If the application is approved, the Create company page is displayed, and the information from the application is populated. Complete the SP company creation, following the steps outlined in section 4.2.1 Create BP/SP/OSP/WESS Company of this document.
If the application is rejected, the Pending application approvals view is refreshed, and the rejected application is no longer displayed.
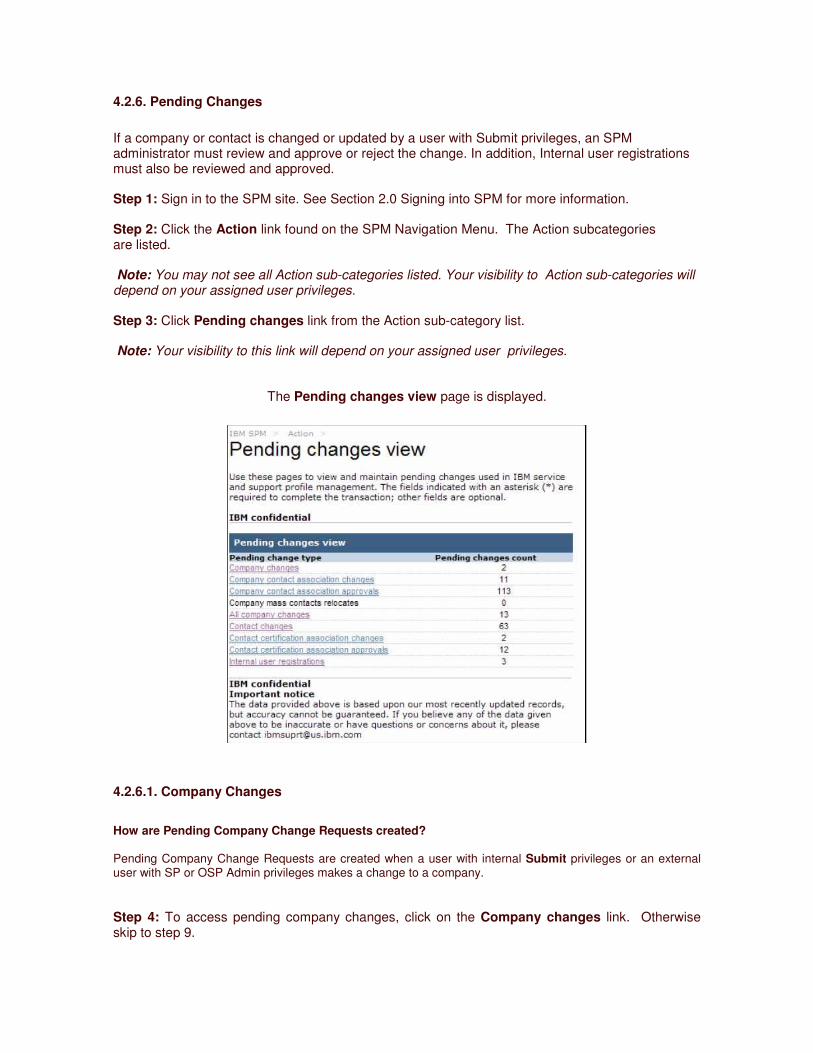
4.2.6. Pending Changes
If a company or contact is changed or updated by a user with Submit privileges, an SPM administrator must review and approve or reject the change. In addition, Internal user registrations must also be reviewed and approved.
Step 1: Sign in to the SPM site. See Section 2.0 Signing into SPM for more information.
Step 2: Click the Action link found on the SPM Navigation Menu. The Action subcategories are listed.
Note: You may not see all Action sub-categories listed. Your visibility to Action sub-categories will depend on your assigned user privileges.
Step 3: Click Pending changes link from the Action sub-category list.
Note: Your visibility to this link will depend on your assigned user privileges.
The Pending changes view page is displayed.
4.2.6.1. Company Changes
How are Pending Company Change Requests created?
Pending Company Change Requests are created when a user with internal Submit privileges or an external user with SP or OSP Admin privileges makes a change to a company.
Step 4: To access pending company changes, click on the Company changes link. Otherwise skip to step 9.

The Pending company changes view screen is displayed.
Step 5: To review changes to an individual company, click on the desired Company name link. Otherwise skip to step 7.
The BP/SP/OSP/WESS company change request page is displayed.
Note: This is a portion of the screen contents.
Step 6: Review the company’s information changes and clic or , as appropriate. Note: Changes are noted with red text beneath the original entry within SPM.
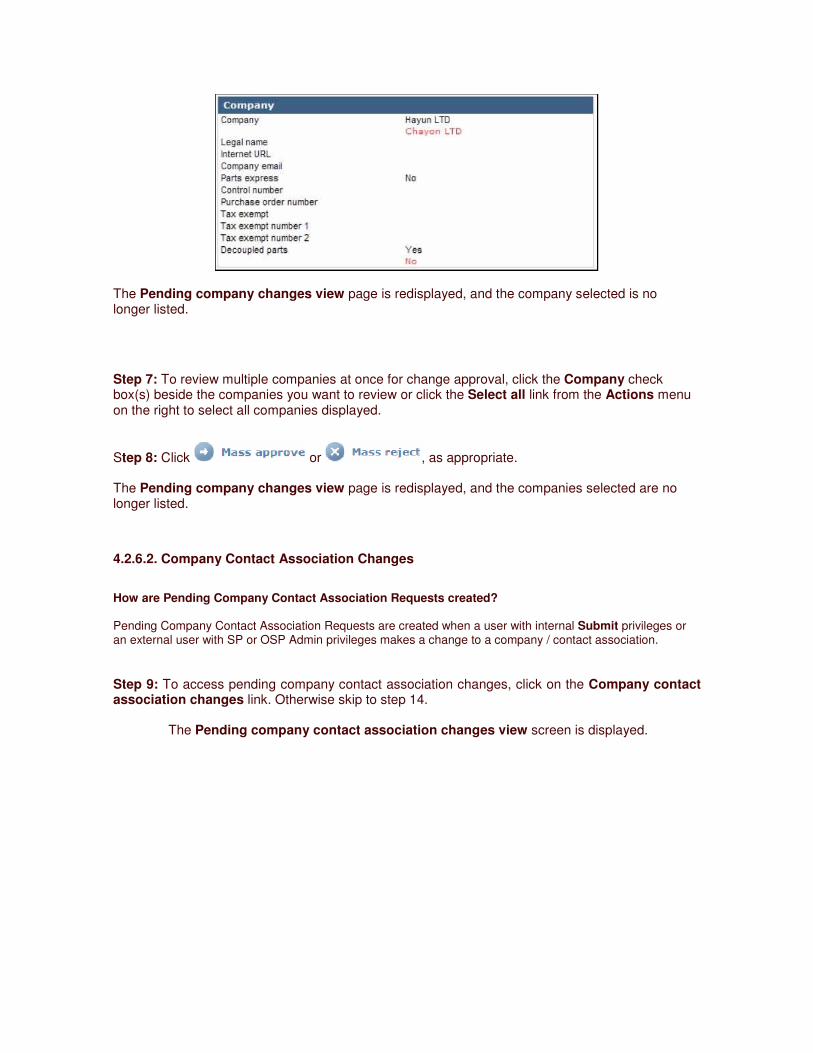
The Pending company changes view page is redisplayed, and the company selected is no longer listed.
Step 7: To review multiple companies at once for change approval, click the Company check box(s) beside the companies you want to review or click the Select all link from the Actions menu on the right to select all companies displayed.
Step 8: Click or , as appropriate.
The Pending company changes view page is redisplayed, and the companies selected are no longer listed.
4.2.6.2. Company Contact Association Changes
How are Pending Company Contact Association Requests created?
Pending Company Contact Association Requests are created when a user with internal Submit privileges or an external user with SP or OSP Admin privileges makes a change to a company / contact association.
Step 9: To access pending company contact association changes, click on the Company contact association changes link. Otherwise skip to step 14.
The Pending company contact association changes view screen is displayed.
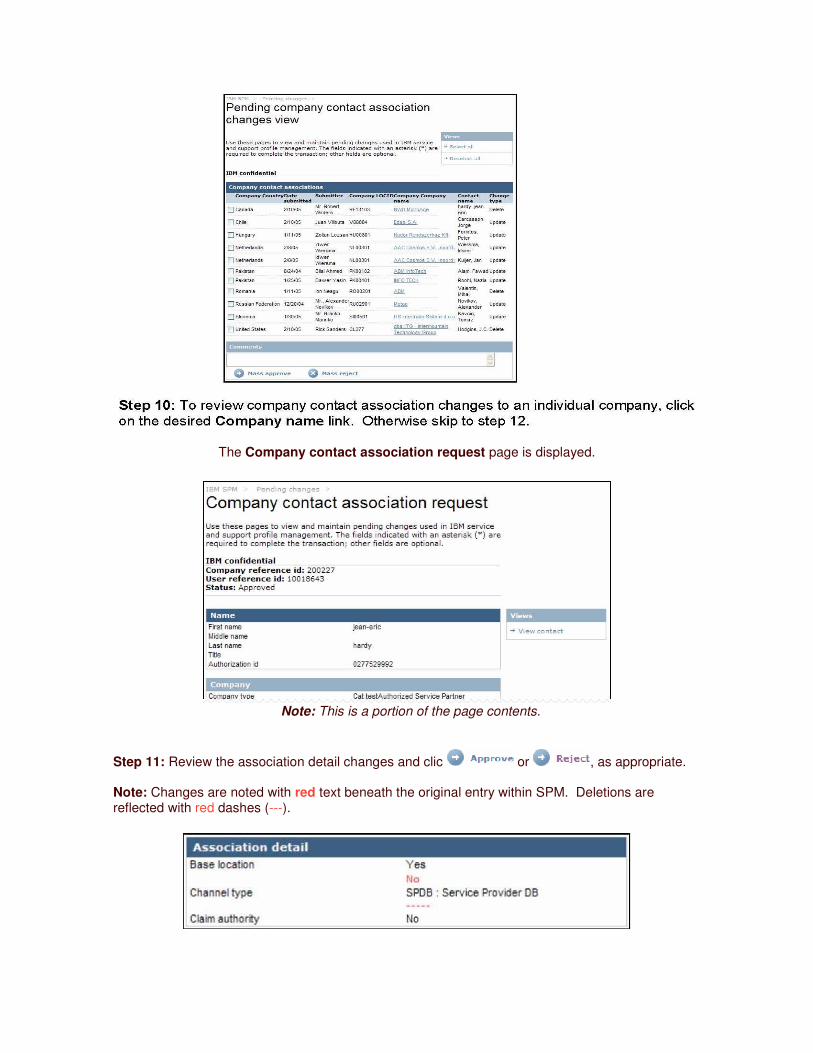
The Company contact association request page is displayed.
Note: This is a portion of the page contents.
Step 11: Review the association detail changes and clic or , as appropriate. Note: Changes are noted with red text beneath the original entry within SPM. Deletions are reflected with red dashes (---).
The Pending company contact association changes view page is redisplayed, and the company selected is no longer listed.
Step 12: To review multiple companies at once for contact association change approval, click the Company check box(s) beside the companies you want to review or click the Select all link from the Actions menu on the right to select all companies displayed.
The Pending company contact association changes view page is redisplayed, and the companies selected are no longer listed.
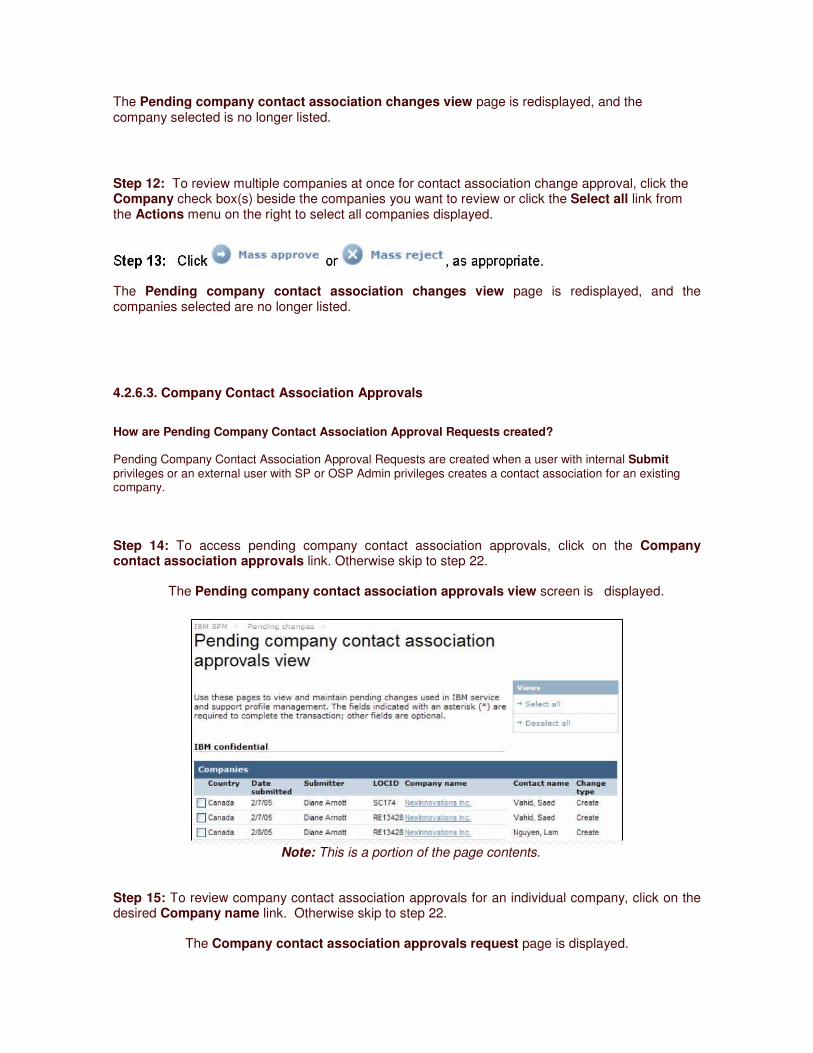
4.2.6.3. Company Contact Association Approvals
How are Pending Company Contact Association Approval Requests created? Pending Company Contact Association Approval Requests are created when a user with internal Submit privileges or an external user with SP or OSP Admin privileges creates a contact association for an existing company.
Step 14: To access pending company contact association approvals, click on the Company contact association approvals link. Otherwise skip to step 22.
The Pending company contact association approvals view screen is displayed.
Note: This is a portion of the page contents.
Step 15: To review company contact association approvals for an individual company, click on the desired Company name link. Otherwise skip to step 22.
The Company contact association approvals request page is displayed.
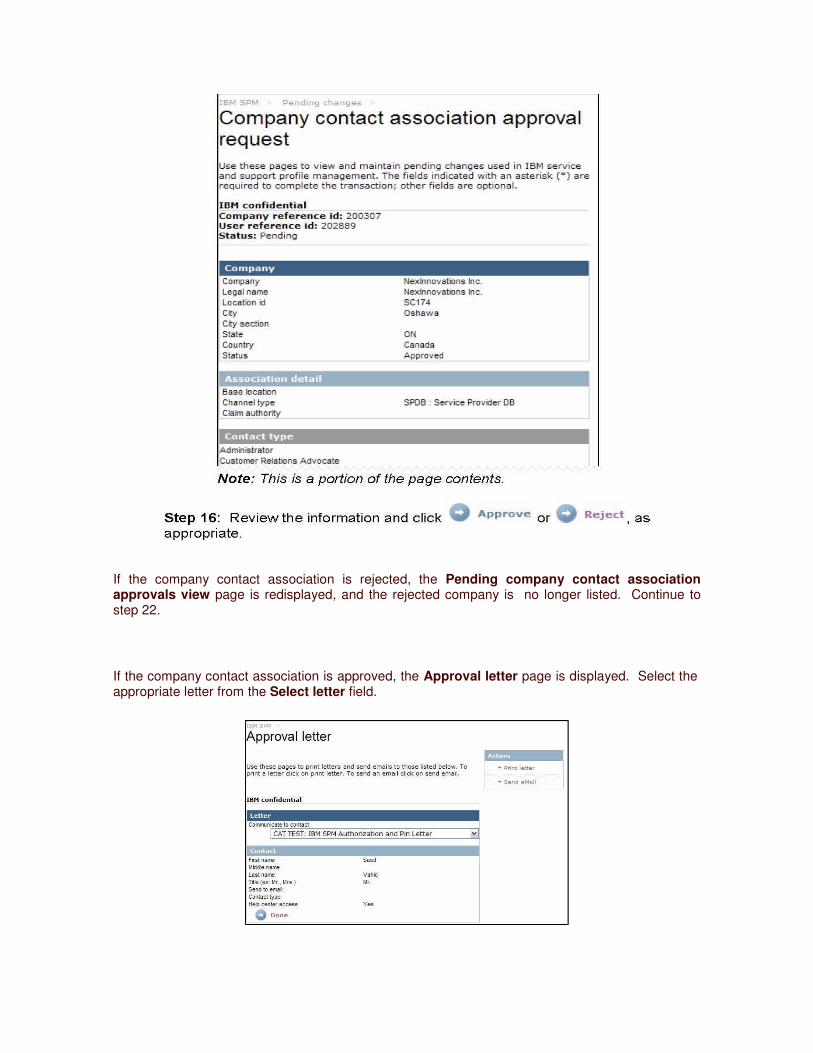
If the company contact association is rejected, the Pending company contact association approvals view page is redisplayed, and the rejected company is no longer listed. Continue to step 22.
If the company contact association is approved, the Approval letter page is displayed. Select the appropriate letter from the Select letter field.
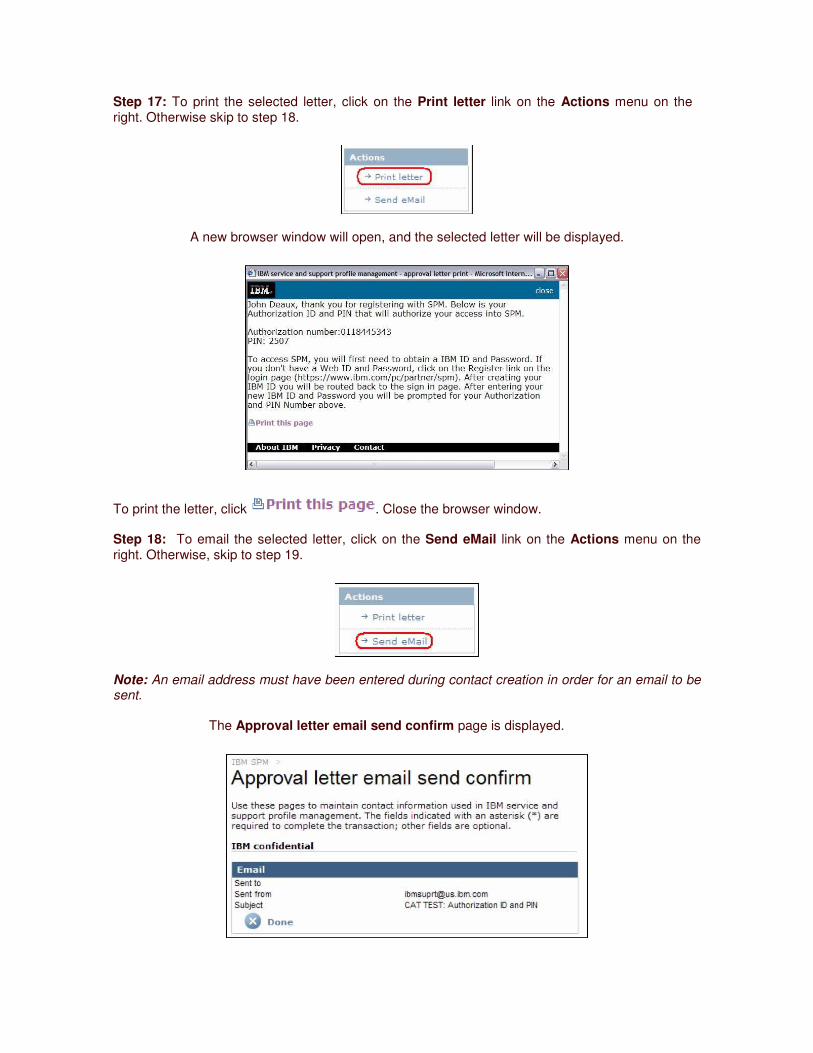
Step 17: To print the selected letter, click on the Print letter link on the Actions menu on the right. Otherwise skip to step 18.
A new browser window will open, and the selected letter will be displayed.
To print the letter, click . Close the browser window.
Step 18: To email the selected letter, click on the Send eMail link on the Actions menu on the right. Otherwise, skip to step 19.
Note: An email address must have been entered during contact creation in order for an email to be sent.
The Approval letter email send confirm page is displayed.
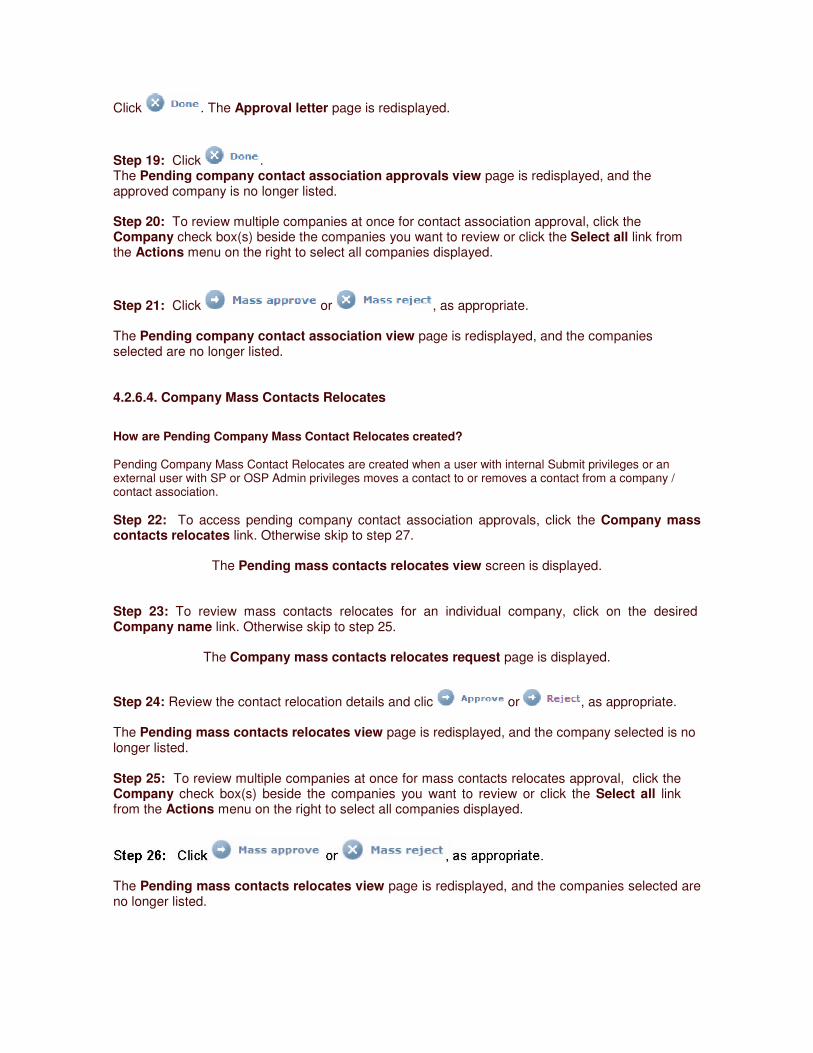
Click . The Approval letter page is redisplayed.
Step 19: Click . The Pending company contact association approvals view page is redisplayed, and the approved company is no longer listed. Step 20: To review multiple companies at once for contact association approval, click the Company check box(s) beside the companies you want to review or click the Select all link from the Actions menu on the right to select all companies displayed.
Step 21: Click or , as appropriate.
The Pending company contact association view page is redisplayed, and the companies selected are no longer listed.
4.2.6.4. Company Mass Contacts Relocates
How are Pending Company Mass Contact Relocates created? Pending Company Mass Contact Relocates are created when a user with internal Submit privileges or an external user with SP or OSP Admin privileges moves a contact to or removes a contact from a company / contact association. Step 22: To access pending company contact association approvals, click the Company mass contacts relocates link. Otherwise skip to step 27.
The Pending mass contacts relocates view screen is displayed.
Step 23: To review mass contacts relocates for an individual company, click on the desired Company name link. Otherwise skip to step 25.
The Company mass contacts relocates request page is displayed.
Step 24: Review the contact relocation details and clic or , as appropriate. The Pending mass contacts relocates view page is redisplayed, and the company selected is no longer listed. Step 25: To review multiple companies at once for mass contacts relocates approval, click the Company check box(s) beside the companies you want to review or click the Select all link from the Actions menu on the right to select all companies displayed.
The Pending mass contacts relocates view page is redisplayed, and the companies selected are no longer listed.
4.2.6.5. All Company Changes
The All company changes link allows you to review all company changes and company contact association changes from one view.
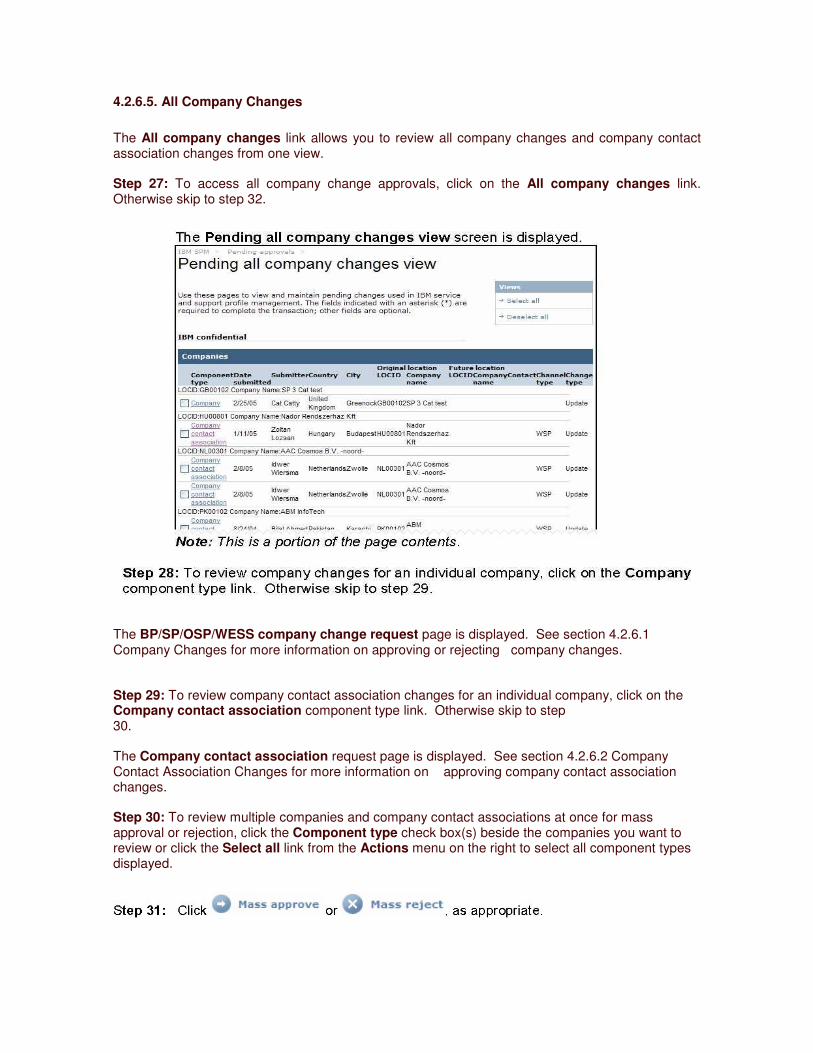
Step 27: To access all company change approvals, click on the All company changes link. Otherwise skip to step 32.
The BP/SP/OSP/WESS company change request page is displayed. See section 4.2.6.1 Company Changes for more information on approving or rejecting company changes.
Step 29: To review company contact association changes for an individual company, click on the Company contact association component type link. Otherwise skip to step 30.
The Company contact association request page is displayed. See section 4.2.6.2 Company Contact Association Changes for more information on approving company contact association changes.
Step 30: To review multiple companies and company contact associations at once for mass approval or rejection, click the Component type check box(s) beside the companies you want to review or click the Select all link from the Actions menu on the right to select all component types displayed.
The Pending all companies change view page is redisplayed, and the component types selected are no longer listed. 4.2.6.6. Contact Changes
How are Pending Contact Change Requests created?
Pending Contact Change Requests are created when a user with internal Submit privileges or an external user with SP or OSP Admin privileges makes a change to a contact (Clicks the Edit link beside the contact). These roles include: BP Admin 2, WESS Admin 2, WESS TSAR & WESS Rep, SP & OSP External Admin privileges.
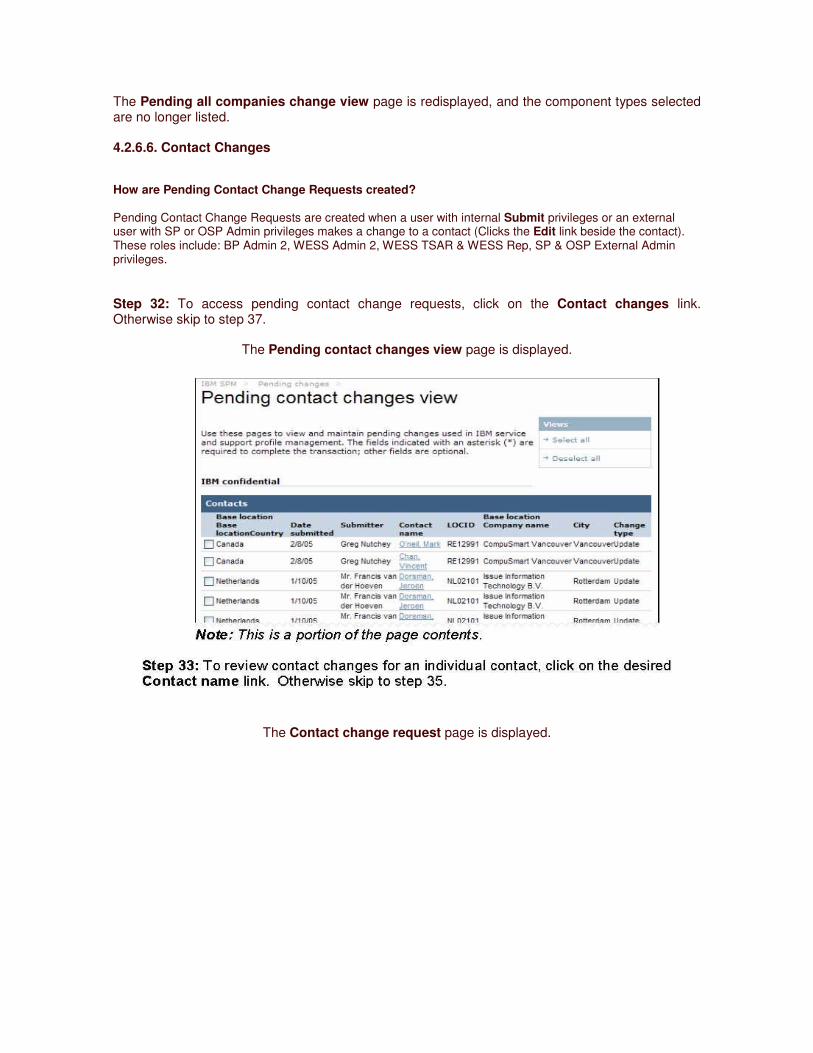
Step 32: To access pending contact change requests, click on the Contact changes link. Otherwise skip to step 37.
The Pending contact changes view page is displayed.
The Contact change request page is displayed.
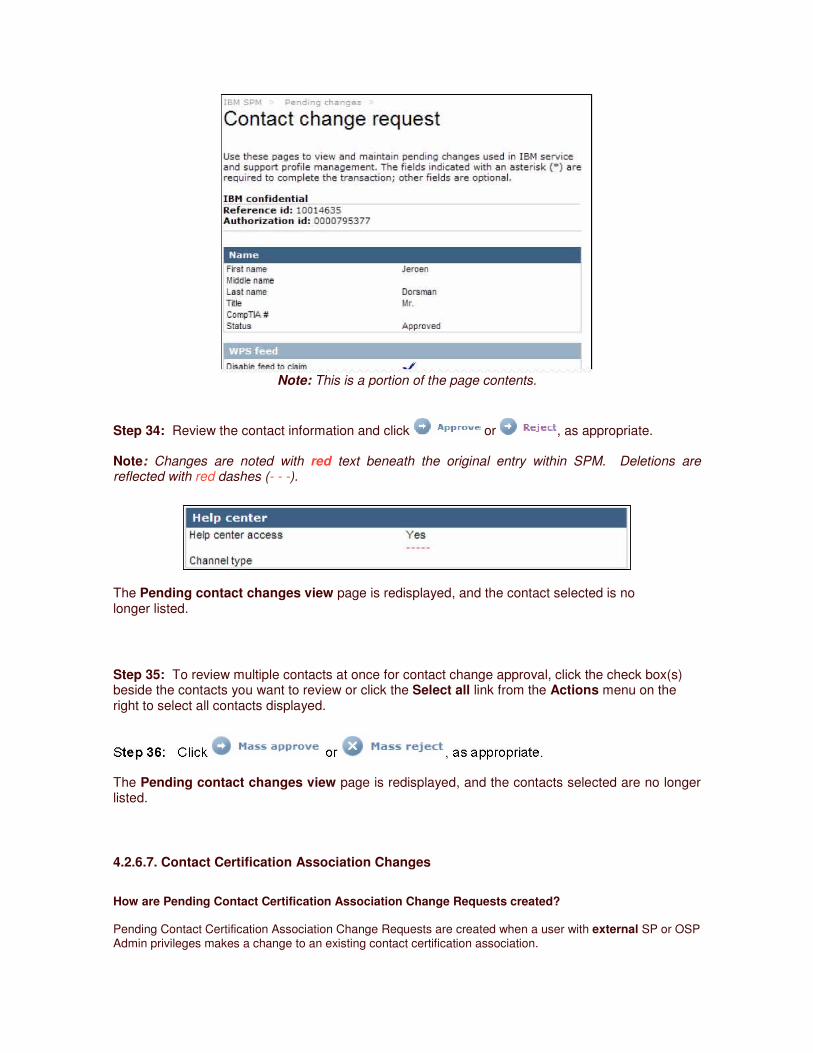
Note: This is a portion of the page contents.
Step 34: Review the contact information and click or , as appropriate.
Note: Changes are noted with red text beneath the original entry within SPM. Deletions are reflected with red dashes (- - -).
The Pending contact changes view page is redisplayed, and the contact selected is no longer listed.
Step 35: To review multiple contacts at once for contact change approval, click the check box(s) beside the contacts you want to review or click the Select all link from the Actions menu on the right to select all contacts displayed.
The Pending contact changes view page is redisplayed, and the contacts selected are no longer listed.
4.2.6.7. Contact Certification Association Changes
How are Pending Contact Certification Association Change Requests created?
Pending Contact Certification Association Change Requests are created when a user with external SP or OSP Admin privileges makes a change to an existing contact certification association.
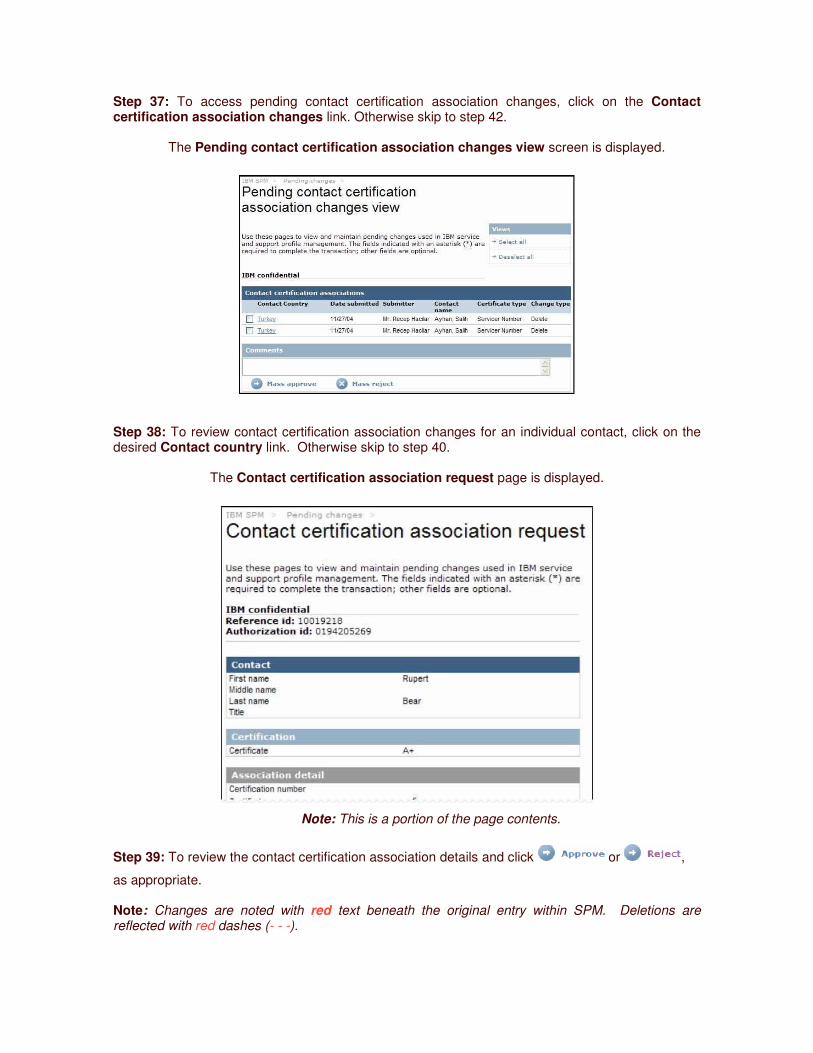
Step 37: To access pending contact certification association changes, click on the Contact certification association changes link. Otherwise skip to step 42.
The Pending contact certification association changes view screen is displayed.
Step 38: To review contact certification association changes for an individual contact, click on the desired Contact country link. Otherwise skip to step 40.
The Contact certification association request page is displayed.
Note: This is a portion of the page contents.
Step 39: To review the contact certification association details and click or ,
as appropriate.
Note: Changes are noted with red text beneath the original entry within SPM. Deletions are reflected with red dashes (- - -).
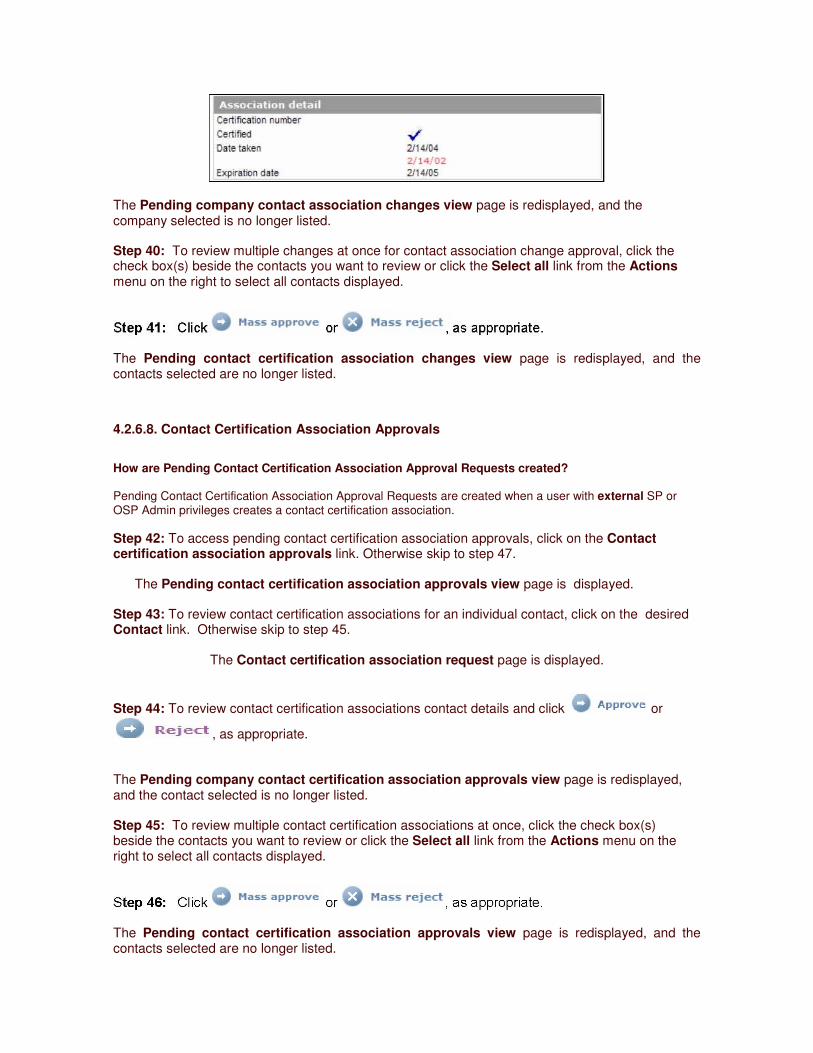
The Pending company contact association changes view page is redisplayed, and the company selected is no longer listed.
Step 40: To review multiple changes at once for contact association change approval, click the check box(s) beside the contacts you want to review or click the Select all link from the Actions menu on the right to select all contacts displayed.
The Pending contact certification association changes view page is redisplayed, and the contacts selected are no longer listed.
4.2.6.8. Contact Certification Association Approvals
How are Pending Contact Certification Association Approval Requests created?
Pending Contact Certification Association Approval Requests are created when a user with external SP or OSP Admin privileges creates a contact certification association. Step 42: To access pending contact certification association approvals, click on the Contact certification association approvals link. Otherwise skip to step 47.
The Pending contact certification association approvals view page is displayed.
Step 43: To review contact certification associations for an individual contact, click on the desired Contact link. Otherwise skip to step 45.
The Contact certification association request page is displayed.
Step 44: To review contact certification associations contact details and click or
, as appropriate.
The Pending company contact certification association approvals view page is redisplayed, and the contact selected is no longer listed.
Step 45: To review multiple contact certification associations at once, click the check box(s) beside the contacts you want to review or click the Select all link from the Actions menu on the right to select all contacts displayed.
The Pending contact certification association approvals view page is redisplayed, and the contacts selected are no longer listed.
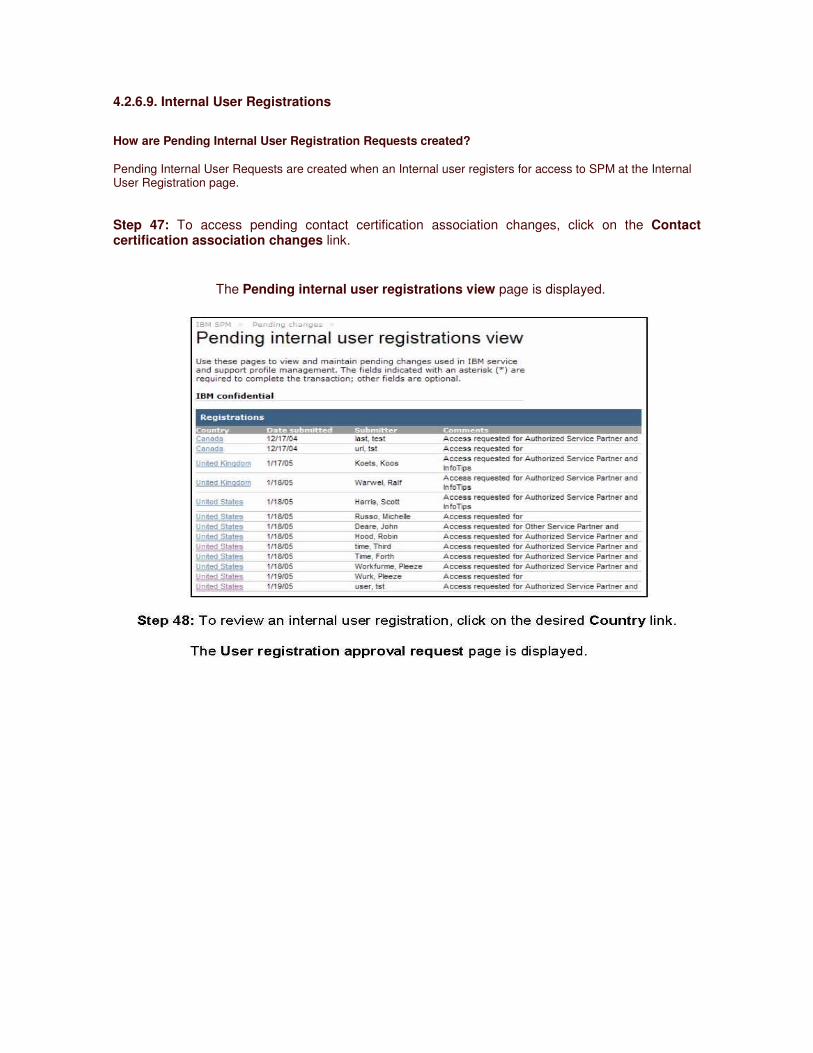
4.2.6.9. Internal User Registrations
How are Pending Internal User Registration Requests created?
Pending Internal User Requests are created when an Internal user registers for access to SPM at the Internal User Registration page.
Step 47: To access pending contact certification association changes, click on the Contact certification association changes link.
The Pending internal user registrations view page is displayed.
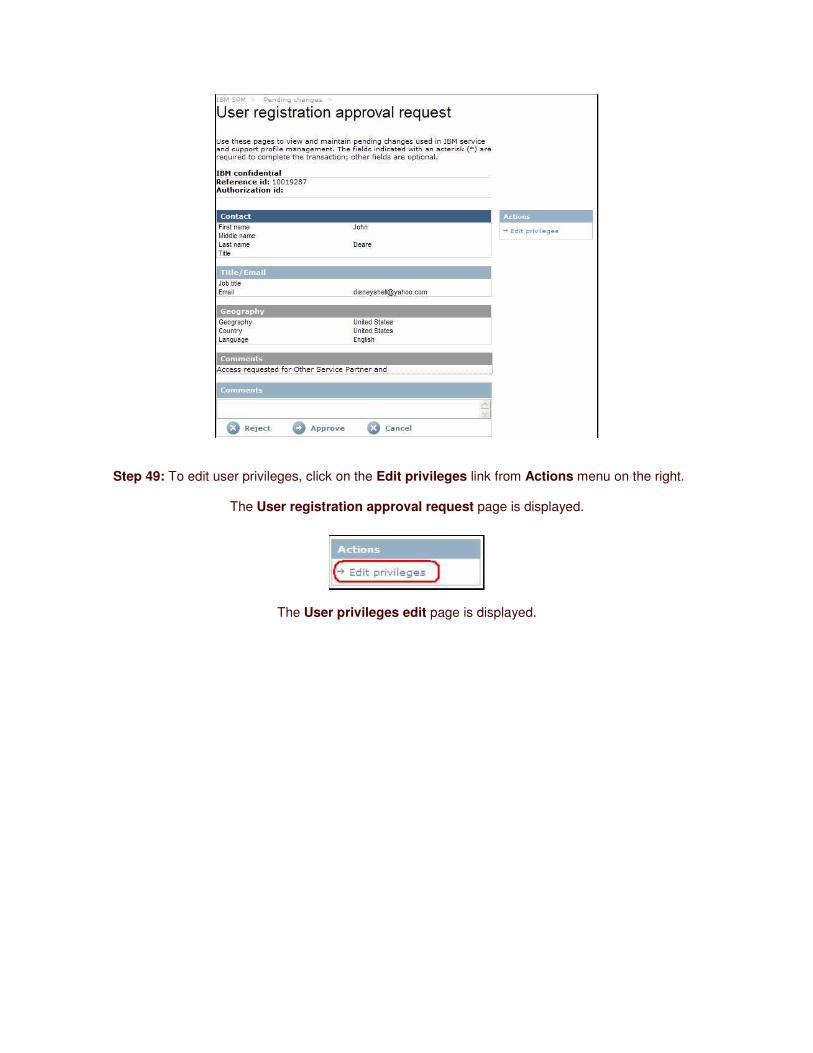
Step 49: To edit user privileges, click on the Edit privileges link from Actions menu on the right.
The User registration approval request page is displayed.
The User privileges edit page is displayed.
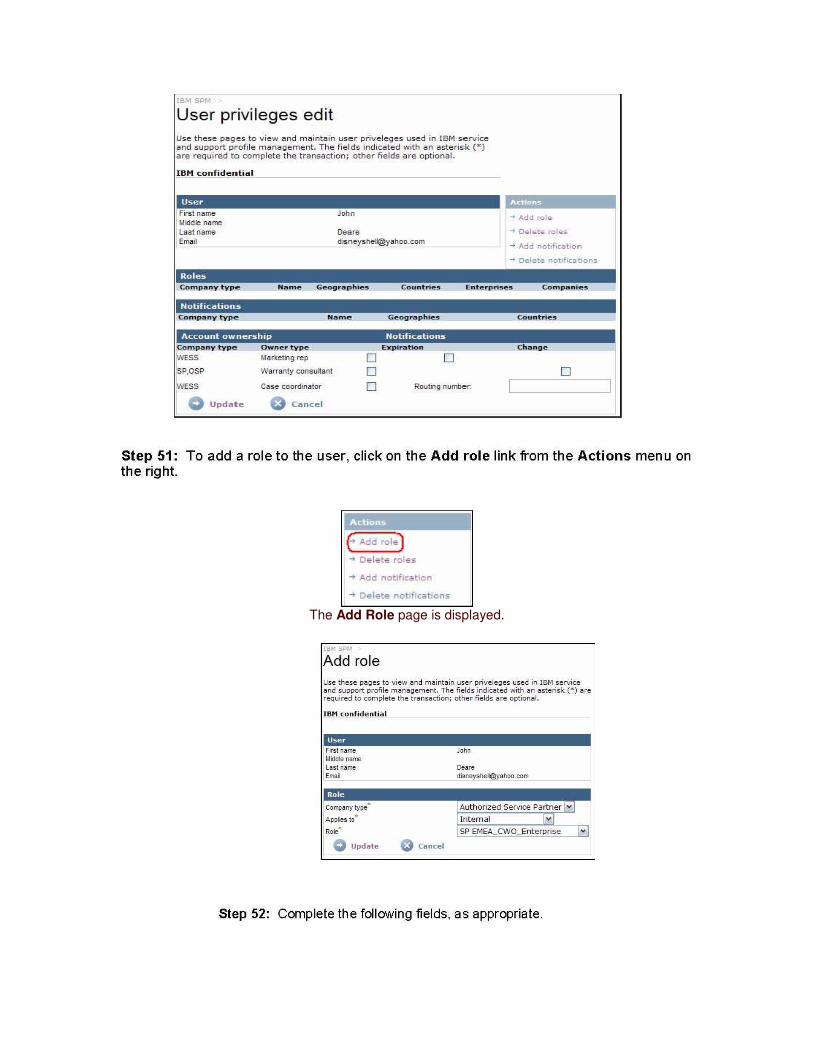
The Add Role page is displayed.
. • Company type
. • Applies to
. • Role
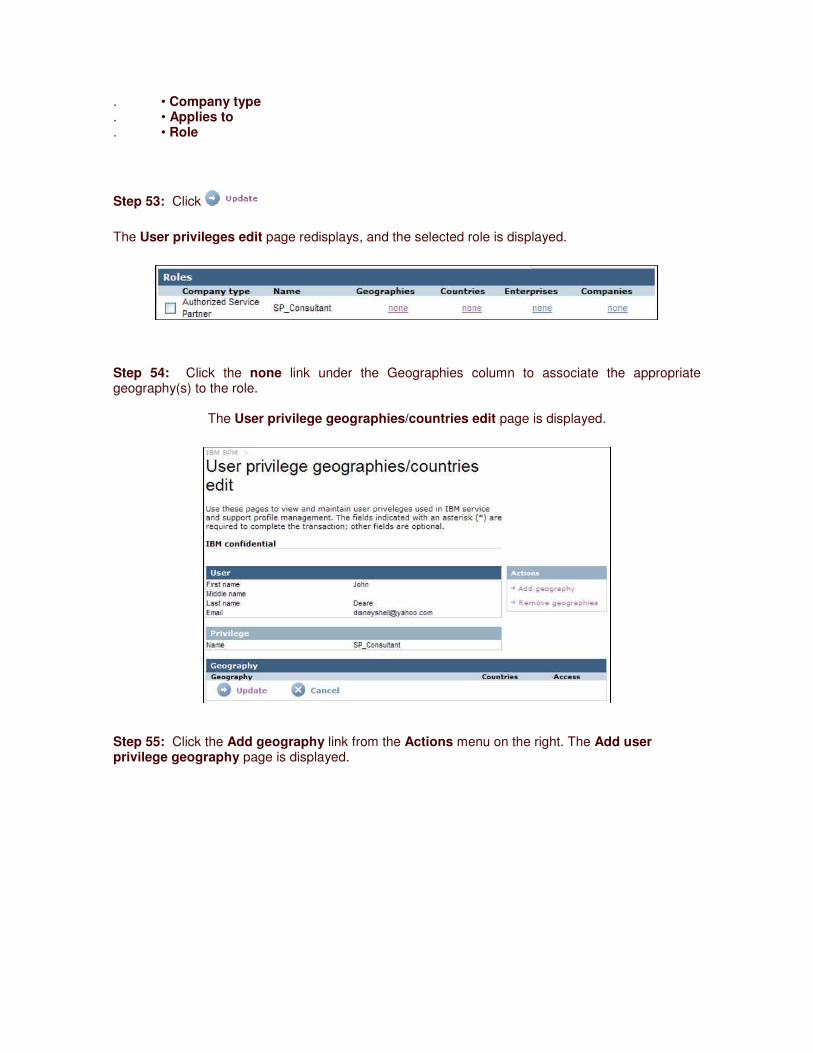
Step 53: Click
The User privileges edit page redisplays, and the selected role is displayed.
Step 54: Click the none link under the Geographies column to associate the appropriate geography(s) to the role.
The User privilege geographies/countries edit page is displayed.
Step 55: Click the Add geography link from the Actions menu on the right. The Add user privilege geography page is displayed.
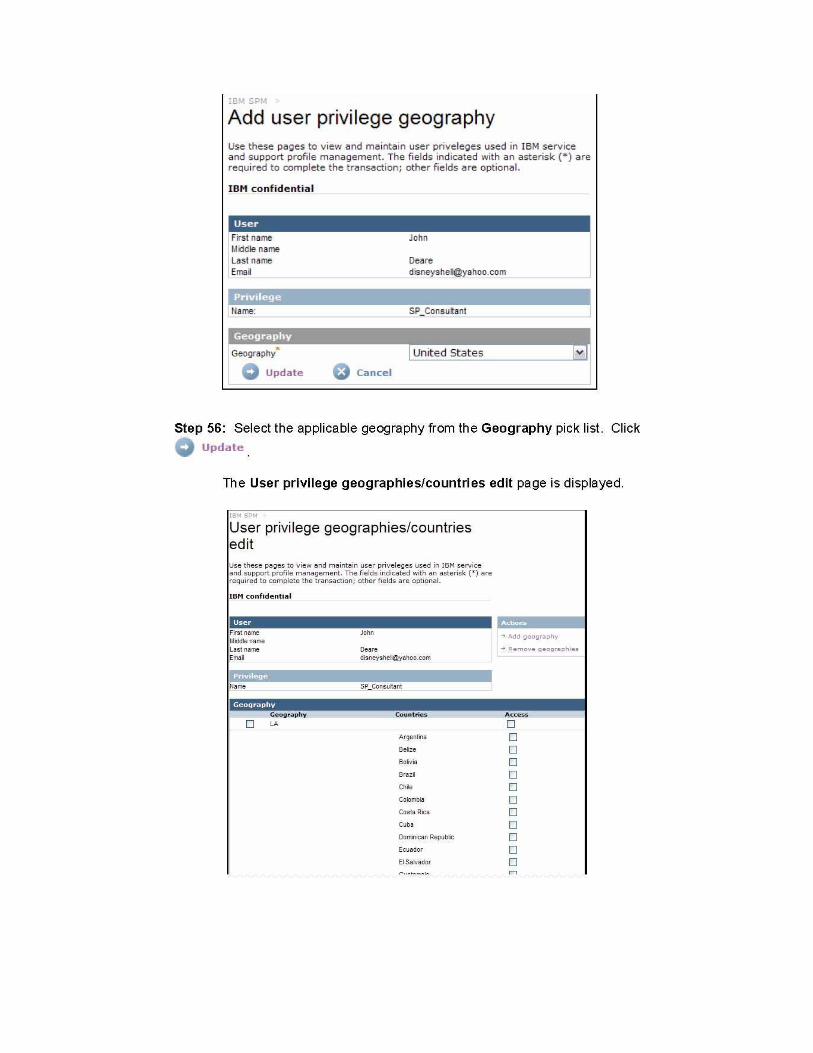
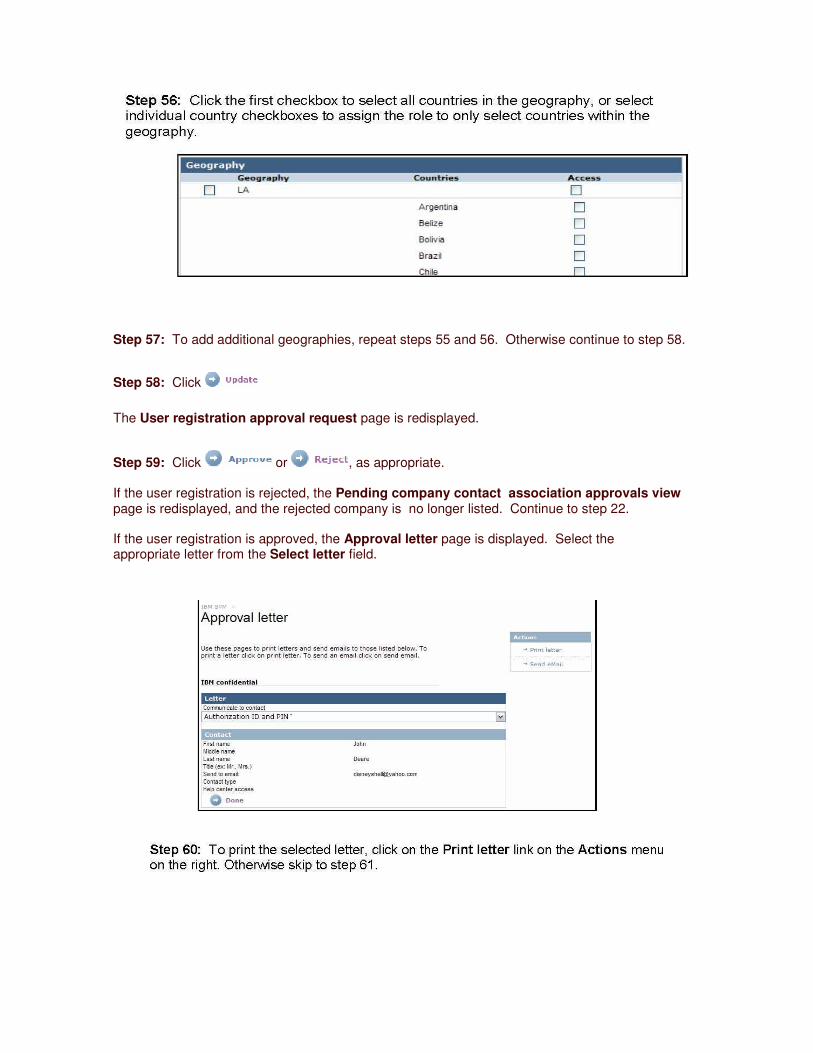
Step 57: To add additional geographies, repeat steps 55 and 56. Otherwise continue to step 58.
Step 58: Click
The User registration approval request page is redisplayed.
Step 59: Click or , as appropriate.
If the user registration is rejected, the Pending company contact association approvals view page is redisplayed, and the rejected company is no longer listed. Continue to step 22.
If the user registration is approved, the Approval letter page is displayed. Select the appropriate letter from the Select letter field.
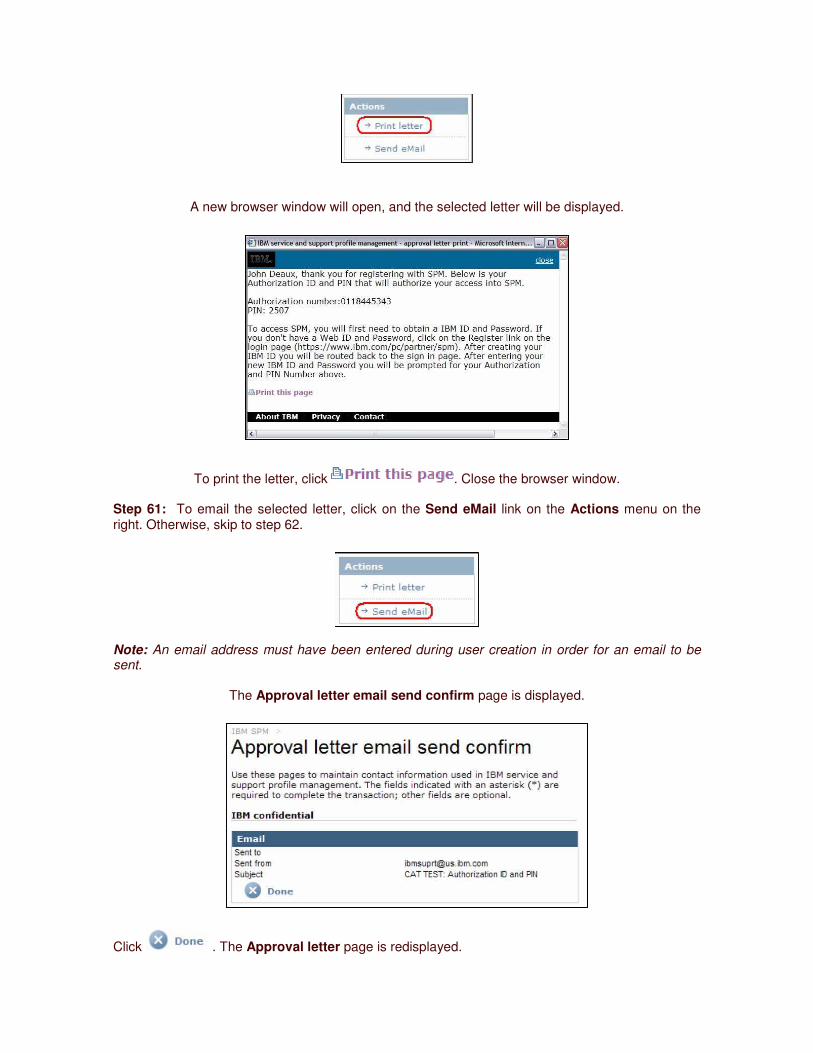
A new browser window will open, and the selected letter will be displayed.
To print the letter, click . Close the browser window.
Step 61: To email the selected letter, click on the Send eMail link on the Actions menu on the right. Otherwise, skip to step 62.
Note: An email address must have been entered during user creation in order for an email to be sent.
The Approval letter email send confirm page is displayed.
Click . The Approval letter page is redisplayed.
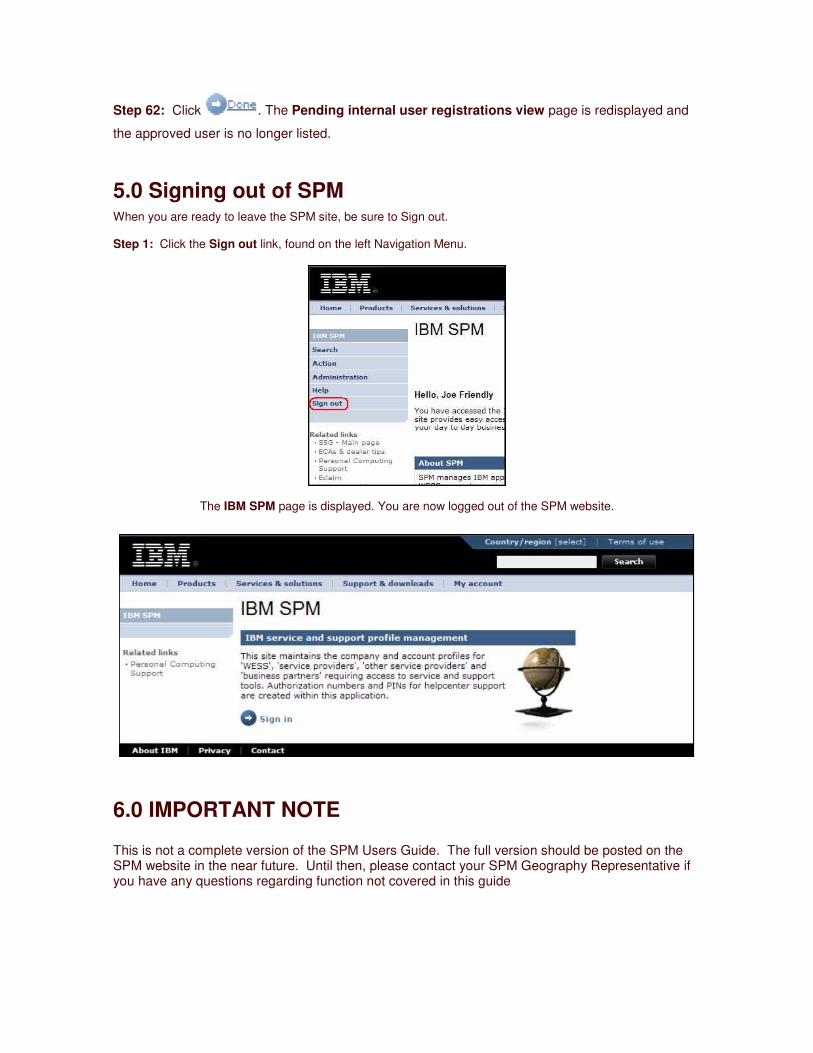
Step 62: Click . The Pending internal user registrations view page is redisplayed and
the approved user is no longer listed.
5.0 Signing out of SPM When you are ready to leave the SPM site, be sure to Sign out. Step 1: Click the Sign out link, found on the left Navigation Menu.
The IBM SPM page is displayed. You are now logged out of the SPM website.
6.0 IMPORTANT NOTE
This is not a complete version of the SPM Users Guide. The full version should be posted on the SPM website in the near future. Until then, please contact your SPM Geography Representative if you have any questions regarding function not covered in this guide