Embed Size (px)
Citation preview

SESSION SIX
Asset Management & Preventive Maintenance

In this Session we will review how Sprocket can be customized to your Asset Management and Preventive Maintenance requirements. We will be covering the following topics with the our End Goal culminating in creating a PM Project. We will briefly review the different types of Assets, then Request Codes, then get into Creating PM’s.
• The 3 Types of Assets – People, Locations, Equipment
• Request Codes
• How to Create PM Projects based on People, Locations, or Equipment
• How to Manage and Edit Existing PM Projects
Preventive Maintenance/Asset Management Overview
PM Project
Asset•Equipment•Equipment
System•Location•Person
Request Code
• Equipment System
Schedule
SECTION ONEAsset Management - People
People records in Sprocket are people/vendors/contractors that reside in Sprocket for any of the following ways; to submit requests, to submit work orders, be assigned to work orders, manage the site or access it for any reason. But note that not all users need to be active. You can have People records in the system to track work performed and/or labor & materials for reporting purposes without that user ever logging in.

When thinking of People as an Asset, think of things like Employee reviews, Safety Training, Training in General. Think of people as a Resource.
In the Person Record there is a Dispatch Tab. Here is where you determine how work is dispatched to this person, (Asset). You can associate this person to a particular Shop, such as Plumbing, and/or to a particular Craft such as Plumber. You can tie this person record to a Location or piece(s) of Equipment, OR, you can Exclude them from a Shop, Craft, Location, Equipment. People will come into play later when we create a PM Project.
People – Dispatch Tab

SECTION TWOAsset Management - Locations
Locations- Locations are a Parent child structure of your facility locations. This is typically designed in a building, Floor, and Room Structure. In a Manufacturing facility your location may be zone, stations etc…. The amount of detail that your Location structure needs depends on your operational and reporting goals with your company. If you would like to report on specific stations/rooms, or would like to have specific locations for your equipment, you may need be more detailed in the breakdown of your Location Structure.

• Creating a New Location – Go to Administration->Work Management->Locations. Click on the New Location Link. If you want this location to be a child of “Sprocket University”, check the As Child Check box. In case you did not select this and the location is outside of the parent, you can click and drag and drop into the parent location as show below.
Asset Management – LocationsCreating a New Location

Asset Management – LocationsCreating a New Location
Fill in the appropriate fields for your location on the Details page. *Note: Your Location Identifier must be unique. It is best practice to follow the naming conventions that you had established at the time of DATA COLLECTION.

Asset Management – LocationsAdd a Schedule to a Location
Add a Scheduled Event to a Location

Asset Management – LocationsAdd a Contact to Location
Add a Contact for your Location

SECTION THREEAsset Management - Equipment
Equipment details can be important to the facilities’ goals for preventive maintenance, work order tracking, capital asset management and forecasting. Its important to manage all the information needed to fit your facilities’ goals. Here are the components of Equipment that we will cover in this Section:
• Equipment Systems Manager• Equipment• Equipment Types• Warranty Types

Equipment – Equipment Systems
Equipment Systems - Equipment Systems are used as a hierarchical classification of equipment used to setup the relationship between Equipment records and appropriate PM Procedures (Request Codes) in Sprocket. By setting up the Equipment Systems in a hierarchy, this allows you to easily report on and manage records.
• Equipment Systems Manager– This tab shows all the different Equipment Systems for this Facility. When you click on a System at the left, a form will appear that shows details of this System, and if it belongs to a Parent System. Here you can add Attributes and Attach Files to the system as well. *Note: When you use the Equipment System on Equipment and/or Request Code, the Attributes and Attached Files will follow the Equipment System.
*Note: To Create New or Archive a Equipment System, right click on the Equipment System name. A window with New and Archive will appear.

Equipment – Equipment SystemsCreating a New Parent Equipment System– Go to Asset Management-> Equipment->Equipment System Manager. Click on the New Equipment System link to create as a Parent System.
If you want to create a Child Equipment System, check the As Child Check box, then click the New Equipment System Link . You will then be prompted to Select Parent Location. Click on the Location that is the parent. A new form will appear. Enter the Child Equipment Name, the Description, and click Save. Your new Child Equipment System will appear in the Equipment System Tree.

Equipment – Equipment Systems
Editing an Existing Equipment System – If you want to eliminate an Equipment System from the tree, you can right click on the location you want to eliminate. A window will appear that shows New or Archive. Click on Archive to eliminate from your tree view. You can also move child Equipment Systems into other Parent systems using Drag and Drop. Click on your Equipment System you want to move, and holding down drag and drop it into/onto the parent location you want.

Equipment – Equipment Systems
• Adding an Attribute – Say you want to add an Equipment Type to your Equipment System… Click on the Add Attribute link. An Attribute Lookup window will open. Select Equipment Type from the dropdown menu, and select the type you would like.

• Attach File – Here you can attach a file associated with your Equipment System, such as a Safety or Instruction Manual pdf or word document. Click the Attach File link. A window will appear. If the file is on your hard drive, then you can browse to where your file is located. Once you locate your file, you will click the Upload button, and the file will then appear under the Attached Files Link.
Equipment – Equipment Systems
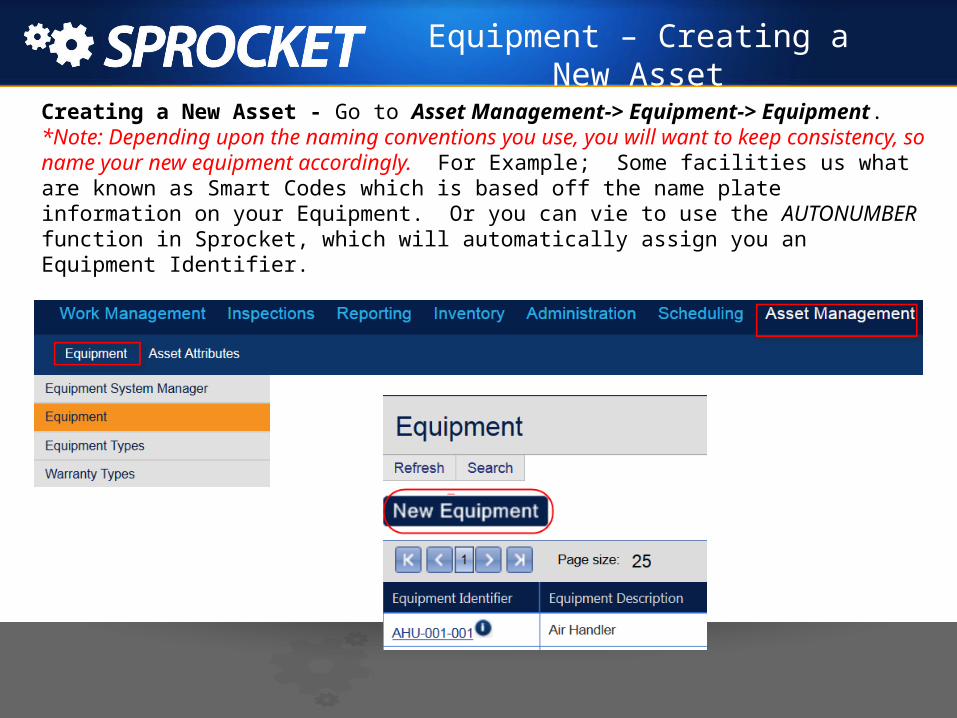
Creating a New Asset - Go to Asset Management-> Equipment-> Equipment. *Note: Depending upon the naming conventions you use, you will want to keep consistency, so name your new equipment accordingly. For Example; Some facilities us what are known as Smart Codes which is based off the name plate information on your Equipment. Or you can vie to use the AUTONUMBER function in Sprocket, which will automatically assign you an Equipment Identifier.
To add a new equipment item, click the New Equipment button.
Equipment – Creating a New Asset

Equipment Management-> Information Tab - Fill in required fields. When finished, click the Save or Save and Exit Button. You can also keep entering new equipment items by clicking on the Save and New button. * Note: You need to click the Save button before you can proceed with entering Attributes, Attaching files, etc.
Equipment – Information Tab

At the bottom of the Equipment Information page, you will notice the Select Attributes, Attach File, Service Location, and Warranty links. In the coming slides we will elaborate on each of these.
Equipment – Select Attributes
Select Attributes – Click the Select Attributes link. A window will pop up. Select from the Attribute Type dropdown. Another box will appear with all of your equipment types. Select all of your Equipment Types, then click the Red X to exit. The Attribute will then appear under Selected Attributes.
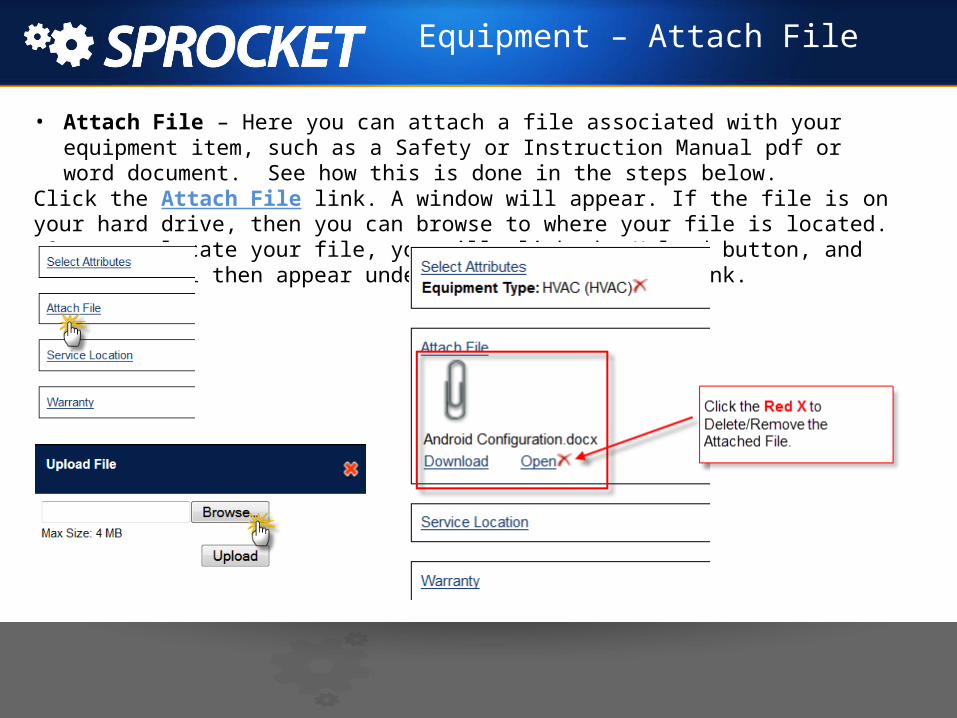
• Attach File – Here you can attach a file associated with your equipment item, such as a Safety or Instruction Manual pdf or word document. See how this is done in the steps below.
Click the Attach File link. A window will appear. If the file is on your hard drive, then you can browse to where your file is located. Once you locate your file, you will click the Upload button, and the file will then appear under the Attached Files Link.
Equipment – Attach File

• Service Location – Again, you can assign a Service Location to an Asset. For example, if you have a company truck that is stored/located with the truck fleet, but for servicing, it goes to the truck service bay, this would be considered its Service Location. Click on the Service Location link. A pop up window with the Location Tree will appear. Click the Location you would like to select as your Service Location. It will then appear under your Service Location.
Equipment – Service Location

• Warranty – Add a Warranty to your equipment item. Click on the Warranty link. A pop up will appear. Fill in the Required information. Click the Save button.
Equipment – Warranty

Equipment – Financial Tab
Financial Tab - Account Codes, Replacement Cost, and Warranty information.
• Account Code – The account code associated/tied to this equipment item.
• Contractor – This is a free text field. You can Include if there is a Contractor involved with the equipment item.
• Purchase Date – Useful for reporting on equipment replacement cost budgeting.
• Purchase Price – Price at time of Purchase• Replacement Cost – Estimated cost to
replace the item. (Take into account the Installation and Labor within the Replacement cost)
• Estimated Replacement Date – Anticipated date Equipment will need to be replaced.
• Warranty Expiration – Keeps track of when the warranty is up, and equipment needs to be replaced.
• Installation Date – Date Equipment Installed at Facility

Equipment – Additional Tab
Additional Tab – This tab will house any Extended Properties associated with this equipment record.Here are some examples of Extended Properties• Belt Size• Horse Power• Voltage• Amps• Wattage• Filters• Etc.

Equipment – Schedule and PM Tabs
Schedule Tab – You can create a Schedule for this Asset/Equipment Item, such as downtime or out of Service.
• PM – This lists the PM Projects that the Equipment Item is on.

Equipment – Inspections, Notes and Kits Tabs
• Inspections – This tab will show any Inspections have been performed on this Asset/Equipment Item.
• Notes – Any Notes associated with this Asset/Equipment Item can be added here.• Kits – Kits are tool kits that are used to perform the maintenance on this equipment item. You
can create a Kit by clicking the ADD KIT link. Then select the items you will need for this tool kit from Inventory. For example, say you need to perform quarterly maintenance on one of your Fleet Trucks. You will need inventory items like an oil filter, an air filter, washer fluid, and antifreeze. Add these items to your kit. In this scenario a Qtr Fleet Truck Maint. Kit is already set up and ready to add.
Adding a Kit to an Asset – Click the ADD KIT link, fill out the form fields, and click Add Item.

Adding a Kit to an Asset Continued…

Equipment – History Tab
History – Sprocket tracks any changes that are saved to an Asset.

Equipment – Equipment and Warranty Types
Equipment Types – Here you can manage and create new Equipment Types or additional classification names for your Asset(s).
Warranty Types - Here you can see different Warranty Types, as well as enter a New Warranty Type. The System Default Warranties are Manufacture and Extended.

Preventative maintenance is important to the health of a facility. Effectively conducting PMs can save a company thousands of dollars in labor and machine maintenance. Sprocket can help an administrator easily set up PM schedules for three different assets: People, Locations, and Equipment. In this section we will cover:
• Request Codes (Procedures)o Materialso Fileso Inspectionso Usage
SECTION FOURCreating Preventive Maintenance
Procedures
Preventive Maintenance – Request Codes
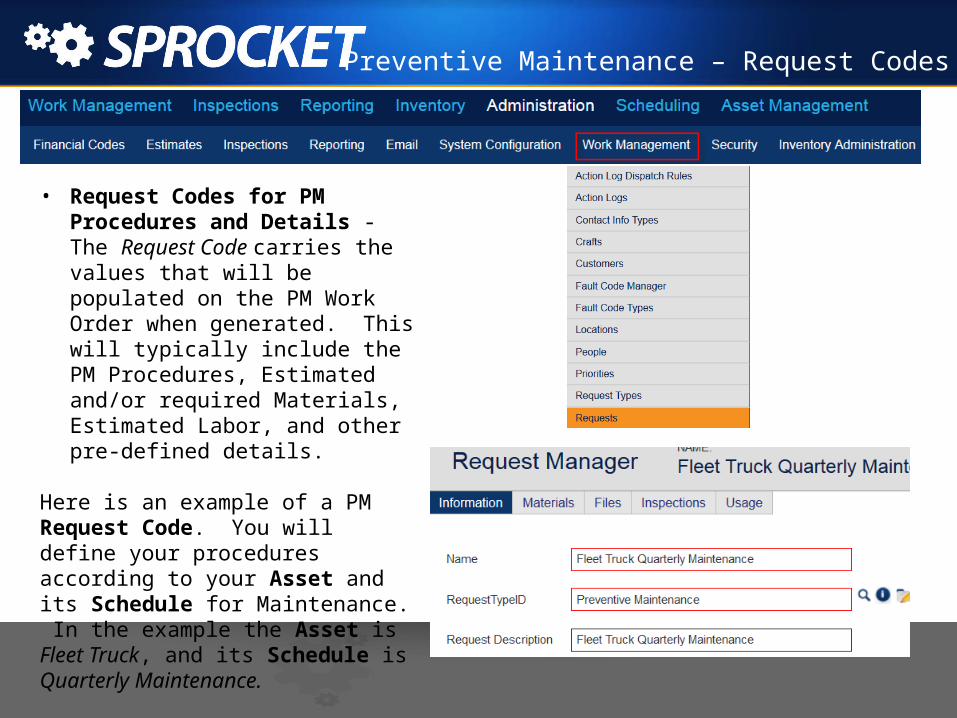
• Request Codes for PM Procedures and Details - The Request Code carries the values that will be populated on the PM Work Order when generated. This will typically include the PM Procedures, Estimated and/or required Materials, Estimated Labor, and other pre-defined details.
Here is an example of a PM Request Code. You will define your procedures according to your Asset and its Schedule for Maintenance. In the example the Asset is Fleet Truck, and its Schedule is Quarterly Maintenance.

Preventive Maintenance – Request Codes
Details of Request Code• Estimated Hours– This field requires an
approximate hour(s) to complete your Request Code Procedure. Includes travel time, prep, actual work, and travel time back. Note that this field is required
• Procedure Hours – “Wrench Time”. How long the actual procedure takes to perform.
• Estimate Material Costs – Allows for Amount in Materials for this Request Code
• Account Code – Your designated Account Codes associated with the Request.
• Project Account - This allows for account codes based on Projects.
• Event Account – These are used if you have Events at your facility, for example; Basketball games or concerts at say a University Events Center.

Request Codes - Dispatching Options and Action Logs
Action Log Rules – Action Log Rules provide the ability to automatically assign an Action Log and Employee based on what information is on the work order.
Action Logs are another way of viewing work orders. They allow your Sprocket system to filter and automatically dispatch incoming work orders based on specified criteria. An Example of Action Log use: If you always assign work orders with location “X” to employee “Y” then you may create an action log for employee “Y” that lists all work orders for location “X
Example: You may create an Action Log Rule that would dispatch work orders that have a specific location, Request Type, Customer to route to a specific employee and action log. You can also use action logs rules to route work based on work shifts.
• Disabled - Pulls Employee From Request Code or leaves the Employee field blank
• Follow Last Assignment - Uses the employee that was assigned to the most recent Work Order with the same Request Code
• Avoid Last Assignment - Uses the same criteria as the Standard heuristic, but deducts 256 points for the Employee that was most recently assigned to a Work Order with the same Request Code
• Standard - Matching criteria are given a point value. The employee with the highest points will be automatically assigned to the Work Order
• Action Log - Action Log dispatching simply pulls the Employee from Action Log. If the Employee is not specified, the heuristic will fall back to the Standard heuristic.
• Equipment System ID – This is used to tie your request code to your Equipment System Parent or Child.

Preventive Maintenance – Request Codes
• Other details for Dispatching, Priority and AccountingThese fields below can be used for Dispatching, Prioritizing, or for Accounting purposes. For example, you can dispatch this Request code according to Craft or Shop, or by Employee.
Require Supervisor Approval – Means the request requires approval by a supervisor.Require Supervisor Assignment – Requires Assignment by a Supervisor in order to begin the work.Is PM Request- This request is Preventive Maintenance related.

Preventive Maintenance – Request Codes
• Procedures – The detailed instructions for the work that needs to be done.
In the Request Comments text box is where your Request Codes Procedures need to go.

Preventive Maintenance – Request CodesMaterials Tab
• Materials – Materials needed for this Request Code – The following steps will show how to add a “Kit” to your Request Code. A Kit is essentially a Tool Kit needed to perform the work for this Request Code. For Example, the Fleet Truck Quarterly Maintenance Request Procedures are as follows: So you would need these Materials an Oil Filter, 3 Quarts of Oil for Oil level check, maybe a Screwdriver, or a drill, etc. These items will make up your Kit.
Procedures Example Materials for KitChange Air Filter Oil FilterDrain Oil 3 Quarts of OilFill Oil (3 Quarts) ScrewdriverCheck Washer Fluid Portable DrillCheck Coolant Level Air Filter
Enter your kit item from your Inventory, Storeroom. Enter Quantity needed, and Select Recommended for the item, or Required. This is tied to your inventory. If marked as Required, this item will be pulled and reserved in Inventory so no one else can have the part. Required essentially reserves the part.

Preventive Maintenance – Request CodesFiles Tab
• Files – In this Tab you can attach files associated with your Request Code, such as a Safety Manual, or a User Manual that may be needed to perform this Request.

Preventive Maintenance – Request CodesInspections and Usage Tabs
• Inspections – Any Inspections that need to be attached/assoc. with this Request Code. When an inspection is required, this means the Inspection must be completed before the Work Order can be closed, or signed off on.
• Usage Tab – This will show you all the Work Orders and PM Projects using this Request.

• Creating a PM Project – PM Project Wizardo Adding Assets to PM o Adding Schedules to PMo Adding Request Codes to PMo Creating a New Request Code within the PM Project Wizardo Inspections attached to the PMo Adding Kits to a PMo Work Orders assigned to the PMo PM Load
• Managing Existing PM Projects
SECTION FIVECreating and Managing PM Projects

Creating a PM Project – Step 1 Project Details
Step 1: Project DetailsName Enter a Name and Description that will help others identify the purpose of this PM project. Note: Sprocket will replace the Name of this PM with an Auto Number, so it doesn’t really matter what is entered into this field, however; It is always good to get in the habit of concisely naming scheduled events in Sprocket. So, for that reason we will name it Air Compressor Semi Annual Recurrence TypeAutomatic: PM will generate automatically according to its scheduleManual: PM does not automatically generate Enable OnThe date the PM will begin automatically generating Disable OnThe date the PM will stop automatically generating. Manual generation will also stop working after this date
Emulate Sequencing- Allows you to have multiple schedules tied to different procedures on one PM Project, that will only generate the least frequent Schedule when the multiple schedules land on the same recurrence.
Helpful Tip: When you name your PM, you should copy the name to your clipboard by highlighting the Name and use Ctrl C to Copy, and later Ctrl V to paste, as you will be utilizing the name again throughout the PM Project creation process.

Creating a PM Project – Step 2 Adding Assets
Step 2: Adding Assets – Based on Equipment, Locations, People
1. Select an asset type from the drop-down.2. Use the Auto-Completing textbox, or the
lookup, to find a specific asset3. Click on the Add ButtonUp/Down LinksUse Up/Down links to arrange your assets. This will affect the order that Work Orders are generated for these assets Edit LinkClick the "Edit" link if you want to make changes to an asset. You will lose your changes by clicking "Edit" Remove LinkClick the "Remove" link to remove an asset from this PM Project.
*Note: You can also create New Assets on the fly within your current PM Project
Creating a PM Project – Step 3 Create your PM Schedule
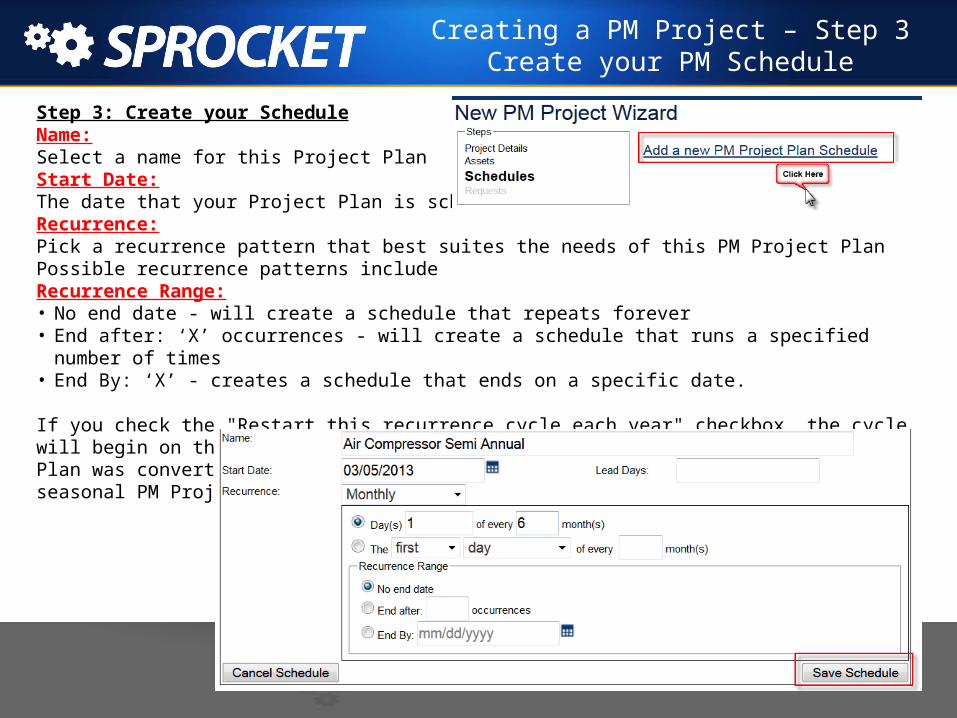
Step 3: Create your ScheduleName:Select a name for this Project Plan Start Date:The date that your Project Plan is scheduled to begin. Recurrence:Pick a recurrence pattern that best suites the needs of this PM Project Plan Possible recurrence patterns include Recurrence Range:• No end date - will create a schedule that repeats forever• End after: ‘X’ occurrences - will create a schedule that runs a specified number of times• End By: ‘X’ - creates a schedule that ends on a specific date.
If you check the "Restart this recurrence cycle each year" checkbox, the cycle will begin on the Start Date of the year following the last time this Project Plan was converted into a Work Order Project. Use this feature to create seasonal PM Project Plans.

Creating a PM Project – Step 4 Add or Create your Request Codes
Step 4: Add or Create your Request CodesSchedule:Select one of the schedules from the previous step to add Requests toRequest Codes:Select a Request Code using either the lookup, or by typing directly into field. Then click "Add" Request Grid:The Request Code grid shows the Request Codes that you have selected.
• You can re-order the request codes using the "Up" and "Down" links• Edit the request code by clicking on the "Edit" link• Remove a request code by clicking on the "Remove" link• Choose a Predecessor to ensure that a particular request will not be scheduled to start before another request.
Remember to Click Save and Exit
*Note: You can also create New Request on the fly within your current PM Project

Creating a New Request Code within your PM Project
Creating a New Request Code
Here is an example of a PM Request Code. You will define your procedures according to your Asset and its Schedule for Maintenance. In the example the Asset is Fleet Truck, and its Schedule is Quarterly Maintenance.
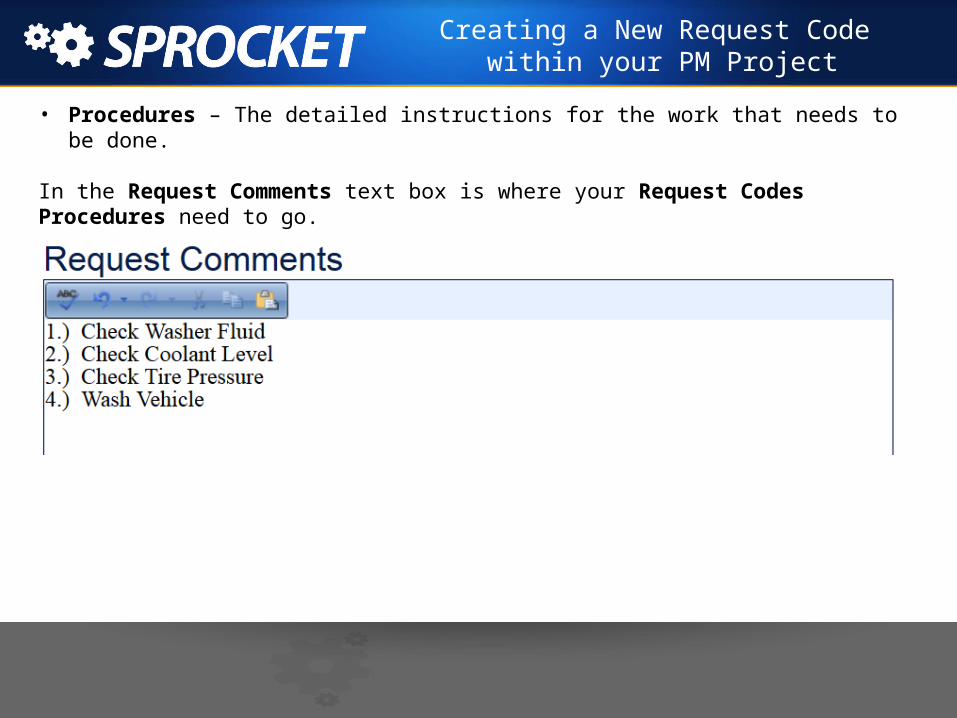
• Procedures – The detailed instructions for the work that needs to be done.
In the Request Comments text box is where your Request Codes Procedures need to go.
Creating a New Request Code within your PM Project

• Materials – Materials needed for this Request Code – As we learned earlier when creating Request Codes, you can add items from inventory in order to complete the work on this PM Projects Request Code.
Creating a New Request Code within your PM Project

• Files – In this Tab you can attach files associated with your Request Code, such as a Safety Manual, or a User Manual that may be needed to perform this Request.
Creating a New Request Code within your PM Project

How to Manage and Edit Existing PM Projects
How to Manage and Edit Existing PM Projects: Go to Scheduling > PM Projects and select the PM you want to edit. Select the Tab you want to make changes in. For example, to change or add another Request Code go to the Requests Tab, and make your changes, Save and Exit.

Asset Management & Preventive Maintenance
You have now learned about Asset Management & Preventive Maintenance. In our next Session you will learn about Inventory Management & Purchasing. If you have further questions, please contact your Sprocket Consultant.