Embed Size (px)
Citation preview

Setup Network File Sharing between Windows PC and A-ScanPlus Microsoft Windows operating system (OS) allows the user to share a specific folder to other computers
on the same local area network. Accutome A-Scan Plus utilizes this feature to transfer exams and
printouts to a PC. The following instructions apply only to Accutome A-Scan Plus software version 4.3.0
or newer and Accutome A-Scan Manager version 1.03.00 or newer .
I. Creating a New Account for File Sharing on Windows 7 or Vista
In order to provide remote file accessing and also limit the permissions of the user account
which allows remote accessing, we recommended setting up a special account with a “Standard
user” type of permission for password protected file sharing.
1. Create a new standard user account “ascanshare”:
a. Click the icon on the lower left corner of the screen and select “Control Panel” on the
pop-out menu.
b. Select “Add or remove user accounts” under “User Accounts and Family Safety” to enter a
new account menu.
c. Select “Create a new account” in “Manage Accounts” menu.

Setup Network File Sharing between Windows PC and A-ScanPlus
d. Enter name of the account you’d like to use for the file sharing. In this example, we use the
name “ascanshare” as the name of the account. Make sure you select “Standard user” as
the account type. Finally, click the “Create Account” button to create the account and
return to the “Manage Accounts” menu.

Setup Network File Sharing between Windows PC and A-ScanPlus
2. Create a password for the account “ascanshare”:
a. The new account will appear in the “Manage Accounts” menu automatically. Double click
on the new account and select “Create a password” to add a password for the account.
b. Enter a new password and confirm the new password. Click “Create password” to finish and
return to the “Manage Accounts” menu.
NOTE: It is very important that this password be recorded exactly as it is typed
(case sensitive) because it will be entered into the A-Scan Plus setup menu for
accessing the shared folder later.

Setup Network File Sharing between Windows PC and A-ScanPlus
c. The new account should now show as being “Password protected”. Close the “Manage
Accounts” menu and any other open windows.
II. Sharing Folder for Windows 7 or Vista We need to select a folder on the PC to share with the A-Scan Plus. To reduce possible errors, it
is recommended to use a folder which is created by the A-Scan Manager installation package.
First, install the A-Scan Manager version 1.03.00 or newer to the computer using an account
with Administrator access. Several folders, such as the default backup folder of A-Scan Plus
studies and default network sharing folder are created by the installation package. The default
network sharing folder called “netshare” is in location “C:\Accutome\Ascan\”. It has all the sub-
folders required by the A-Scan Plus for storing studies and printouts. The following instructions
will use the “netshare” folder and “ascanshare” folders as an example. Users can still follow
these instructions and set up different accounts and folders.
Note: If you prefer to use a folder other than “netshare”, please make sure you create
a sub-folder “ascanplus” and two additional sub-folders “patients” and “printouts” as
sub-folders of “ascanplus”.

Setup Network File Sharing between Windows PC and A-ScanPlus
1. Setting up network file sharing and password protection sharing:
Note: Please follow the path for your OS (Windows 7 or Windows Vista). a. Select “Control Panel” from the Start Menu. b. Click on the highlighted options pictured below.
Windows 7 Windows Vista
c. Select and turn on “Network discovery”, “File sharing”, and “Password protected sharing”.
Save the changes and “Restart” the system.

Setup Network File Sharing between Windows PC and A-ScanPlus
Note: If no settings need to be changed, close window and restart the system.
2. Once the PC has restarted, log in to the administrator account (original).
3. Modify the Read/Write permission of “netshare” folder:
a. Open location “C:/Accutome/Ascan” and right click on folder “netshare” then select
“Properties”. Select “Security” tab on the “netshare Properties” menu then press
“Edit”.

Setup Network File Sharing between Windows PC and A-ScanPlus
b. Press the “Add” button to add a user. In the “Select Users or Groups” menu, enter
“ascanshare” in the box “Enter the object names to select” then press “OK” to add
the user.
c. Select the user “ascanshare” on the list and click “Allow” box for “Full control” in
the “Permissions for ascanshare” box. Then press “Apply”. The menu will update
and “ascanshare” has “Full control” permission to the folder. Click “OK” to exit.

Setup Network File Sharing between Windows PC and A-ScanPlus
4. Sharing the folder “netshare”:
a. Select the “Sharing” tab on the “netshare Properties” menu then press the “Share” button.
b. Check and make sure account “ascanshare” has “Read/Write” (Windows 7) or “Co-owner”
(Windows Vista) in the “Permission Level”. Press the “Share” button to share the folder.
Press “Done”..

Setup Network File Sharing between Windows PC and A-ScanPlus
c. Close all open windows.
NOTE: The shared name includes the computer name and folder name.
For example, the snapshot on the right has the following information:
Computer name: BSCANWIN7PRO5
Folder name: netshare
These two entries combined with the account name and password are very important in
the setup of the A-Scan Plus network connections.
The “Computer name” can also be found on “Computer” -> “Properties” menu.
**These names are specific to
your PC. Please make a note of
them to be used in future steps.

Setup Network File Sharing between Windows PC and A-ScanPlus
III. Configure and Test Network Connection on A-Scan Plus
Network connection features are only available on an A-Scan Plus software version 4.3.0 or
newer. Anyone who has an older version of A-Scan Plus needs either software or both software
and hardware upgrades. The connection should be limited to a TCP-IP “Class-C” local area
network. We recommend that the network has a domain name server (DNS) and a DHCP server.
Also, the A-Scan Plus requires a Cat5/6 RJ45 Ethernet cable to connect to the network. Please
make sure the network and the PC are up and running and connect the A-Scan Plus to the
network before turning on the unit.
1. Configure IP address of the A-Scan Plus unit:
Turn the unit on and go to “Setup” menu. Select the “Network Address” field using the “Tab”
key or the rotary knob. “Automatic” is the default setting and it acquires the IP address via
DHCP. If static IP address is required, you can switch it to “Manual”. After the manual mode is
selected, three entries below will become editable. Please consult the network administrator
for setting of all three entries.
If the “Network Address” is set to “Automatic” and connected to the network, the unit should
get a valid IP address and two other fields from the DHCP server after boot. If the “IP Address”
and other two fields are blank, something must be wrong with the network connection. Please
check the network cable and restart the A-Scan Plus unit. If the problem persists, please contact
the local network administrator to resolve the issue. Please make sure there is a valid IP
address before configuring the network folder section.
Setup Network File Sharing between Windows PC and A-ScanPlus
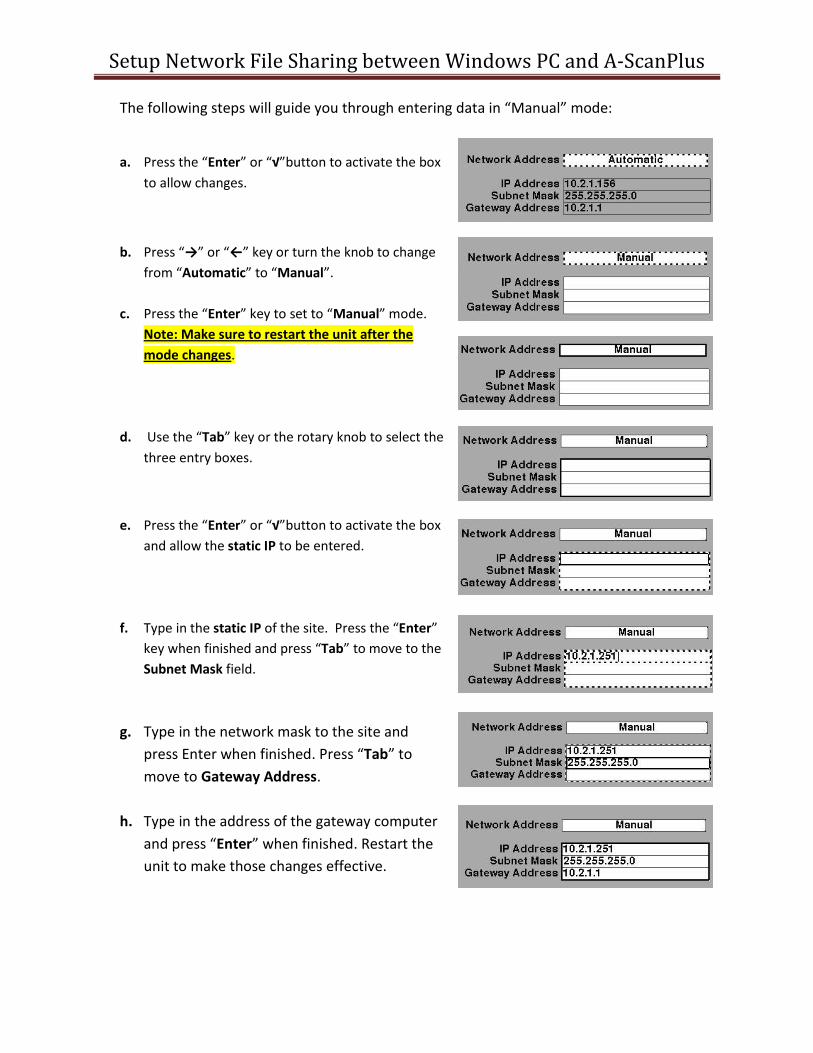
The following steps will guide you through entering data in “Manual” mode:
a. Press the “Enter” or “√”button to activate the box
to allow changes.
b. Press “→” or “←” key or turn the knob to change
from “Automatic” to “Manual”.
c. Press the “Enter” key to set to “Manual” mode.
Note: Make sure to restart the unit after the
mode changes.
d. Use the “Tab” key or the rotary knob to select the
three entry boxes.
e. Press the “Enter” or “√”button to activate the box
and allow the static IP to be entered.
f. Type in the static IP of the site. Press the “Enter”
key when finished and press “Tab” to move to the
Subnet Mask field.
g. Type in the network mask to the site and
press Enter when finished. Press “Tab” to
move to Gateway Address.
h. Type in the address of the gateway computer
and press “Enter” when finished. Restart the
unit to make those changes effective.

Setup Network File Sharing between Windows PC and A-ScanPlus
2. Configure Network Folder:
a. Move the selection to the “Network Folder” section. The first entry is the “On/Off” toggle.
The default is “On”. In case networking is not available or users do not intend to use the
networking features, it can be turned to “Off”. When it is set to “Off”, the “Network Folder”
location in “Patient Records” menu will stop functioning. In this set-up, we will leave it “On”
and focus on how to set up the folder sharing.
b. Previously, we went through setting up an account and sharing a folder from a windows PC
and collected some information. Now we need that information for connecting the
network folder. The following are required fields:
1) Computer name (Host) .
2) Shared folder name (Folder).
3) User name of an account on the PC (User).
4) Password of the account (Pword) .
We got following data from the previous examples:
Computer name (Host): BSCANWIN7PRO5
Shared folder name(Folder): netshare
User name of an account on PC(User): ascanshare
Password of the account(Pword): accutome/2011
Note: Above data only for demonstration, you must get data from your own PC.

Setup Network File Sharing between Windows PC and A-ScanPlus
c. The following steps show how to enter above data into each entry.
Note: Except the “Computer name” field, all other data are case sensitive and have to be
typed in exactly the same case as in the PC.
1) Move from “On/Off” toggle to next
four entries box.
2) Press “Enter” or press “√” button to
activate the box. The border of the
entire box turns to a dashed line and
Host will be selected automatically.
3) Type in the computer name and press
“Enter” when finished. The border of
the box will turn to a dashed line when
you start typing and turn back to solid
after you press “Enter”.
4) Press the “Tab” key to move to the
Folder box.
5) Type in the shared folder name and
press “Enter” when finished.

Setup Network File Sharing between Windows PC and A-ScanPlus
6) Press the “Tab” key to move to the User
box and type in name of the account
and press “Enter”.
7) Press the “Tab” key to move to the
Pword box.
Note: You need to use “Backspace” to
remove “******” characters before
typing in the password.
8) Type in the password of the account and
press “Enter”.
Note: the password will turn back to
“*****” characters after you press
“Enter”.
9) Press “Enter” again to turn the border of
the entire box to solid and you can move
to another section.
10) If you need to make any changes or
found any errors in the data, press
“Enter” again and it will activate the
entire box and use the “Tab” key to
move up and down.
Note: The A-Scan Plus won’t start making any connection until you press the
“Done” button. Please follow the next section for making and testing connections.

Setup Network File Sharing between Windows PC and A-ScanPlus
1. Testing Network Connection on A-Scan Plus
After we configure the network folder connection on the A-Scan Plus, we can start testing the
connection. Make sure the network and the PC are up and running before we can start testing
the connection.
2. Connect to the PC folder:
Press the “Done” button on the unit and the following message will be displayed on the top left
corner of the screen “Changing network folder setting”. If connecting was successful, the
screen will change to the “Default Eye Types” menu. You can now start using the network
folder in the “Patient Records” menu.
3. Troubleshooting the problems:
If something goes wrong, the unit will generate an error sound and the following message will
show up: “Network folder not found. Please check setting”. Press “OK” to clear error message
and go back to “Setup” menu. Please double check the data you entered to “Network Folder”
section and check the PC settings and try again.
Note: If you press “Done” again without making any changes to the Network Folder settings,
it will bypass the error message and the network folder will remain unfound.