Embed Size (px)
Citation preview

Sharepoint Online and 2013 Quick ReferenceGuide

Beginner
1. Create and Set Up A List
2. Start Using A List
3. Introduction to Libraries
4. Share Documents and Manage Versions
5. Follow A Document or Website In Your Organization
6. Update Your Profile
7. Post to The Newsfeed
8. Sync Sharepoint Libraries to Your Computer Using Skydrive Pro
9. Create and Manage A Sharepoint Blog
10. Customize Your Public Website
Intermediate
1. Create and Customize Pages On Your Public Website
2. Organize and Configure A Sharepoint Library
3. Post To A Team Site Feed
PAGE
3
5
8
11
13
15
19
21
23
26
27
29
32
Table of Contents:
2

A SharePoint list is a handy tool for sharing contacts, calendar appointments, tasks, or data with team members and site visitors, and provides the underlying structure for organizing information on your site. This course shows you how to create a list and set it up for your team to use.
Create and Set Up A List
3
Create A List1. Click Settings → Add an app.
2. Search for the list app you want to use and then click the name of the app to create the list. For example, search for “contacts” and then click the Contacts app.
3. Type a name for the list in the Name box and then click Create.
Create A New Column1. At the top of the list, click edit.
Click the plus sign +), and then select the column type from the list that appears.Reset the sorting, filter, and other options, and then click Save.
Share A ListYou can share a list only if you created the list or the site. If you didn't create the list or site, you can email a link to the list instead.
1. Click List → Shared With.
In the Shared With dialog box, click INVITE PEOPLE.Type the names of the people you want to share the list with and then click Share.
Add An Existing Column To A View of the List1. At the top of the list, click the ellipses (...),
and then click Modify this View.
Select the check box for the column you want to add and then click OK.

4
Create and Set Up A List (cont.)
E-mail A Link To A List1. Click List → Email a Link.
Click Allow in the warning that pops up to allow your email program to open a new email message.
A new email message opens with a link to the list included. Add people to the To line, finish the message, and send it.
E-mail A Link To A List1. Click List → Alert Me → Set an alert on this list.2. On the New Alert page, change the title for the alert if you want.3. In the Send Alerts To section, enter the user names or email addresses of people you want alerts
to be sent to.4. Set other options in the Change Type, When to Send Alerts and other sections, and then click OK.

5
A list is a place on a SharePoint site where you can share information with other people in your company. This is where you can store and share contacts, calendar appointments, tasks, or other sorts of information you need to track.
Start Using A List
Where Can I Find A List?1. On your team site, look for the name of the
list in the navigation, or click Settings → Site contents.
2. Click the name of the list to open it.
Add or Edit Multiple Items In A List1. At the top of the list you want to edit, click edit.
Type information in the boxes.
When you’re finished editing, click Stop editing.
Delete Items In A ListThere are multiple ways to delete items in a list. Here’s the quickest way:
1. Select the items you want to delete.2. Click Items → Delete Item.
Add An Item To the List1. In the list where you want to add an item,
click new item.
Enter the information for the list item. Click Save.

6
Start Using A List (cont.)
Edit All the Details In A List Item1. Select the item you want to edit, click the
ellipses (...), and then click Edit Item.
Edit the information in the form that appears. When you’re finished editing, click Save.
3. To filter, select the one or more check boxes.
To save the view you created, click SAVE THIS
VIEW at the top of the list near the Search box.
Create A Personal View Of A List1. At the top of the list, click the ellipses (...) between
the view names and the Search box, and then click Create View.
Choose a view type or start from an existing view.On the Create View page, type a name for the view.Select the columns you want to appear, and use the position numbers to set the order of the columns.Set the sorting, filter, and other options, and then click Save.
Sort or Filter A List By Column Heading and Save The View1. In the list, point to the heading you want to
sort or filter the list by, and then click the arrow that appears
2. To sort by the heading, click A on Top or Z on Top.

• Introduction to lists http://office.microsoft.com/en‐us/sharepoint‐help/introduction‐to‐lists‐HA102771955.aspx
• Add, edit, or delete list items http://office.microsoft.com/en‐us/sharepoint‐help/add‐edit‐or‐delete‐list‐items‐HA102771938.aspx
• Create, change, or delete a view of a list or library http://office.microsoft.com/en‐us/sharepoint‐help/create‐change‐or‐delete‐a‐view‐of‐a‐list‐or‐library‐ HA102774516.aspx
• Create, change, or delete a column in a list or library http://office.microsoft.com/en‐us/sharepoint‐help/create‐change‐or‐delete‐a‐column‐in‐a‐list‐or‐library‐ HA102771913.aspx
7
See Also

8
A document library is a place on a SharePoint site where you can share files, such as Word documents and Excel spreadsheets, with other people.
Introduction To Libraries
How Do I Find A Document Library?1. If your department has a team site, look for
Shared documents or a similar name, typically on the left side.
2. Click the name of the library to open it.
Name the library, and then click Create.
Add Files To A Library
1. There are different ways to add files to a library, but the quickest way is to click the new document link.
You can also add more than one document at a time, and even drag files from Windows Explorer.
How Do I Create A Library?1. On the Settings menu, click Add an app.
Click the library you want to add, in this case Document Library.

9
Introduction To Libraries (cont.)
Rename Files In A Library1. Click on the ellipses next to a file you want
to rename, and then click the ellipses on the callout.
2. Click Edit Properties.3. Rename the file in the Name field and click
Save.
Versioning, Alerts, or Co‐authoring
Libraries have other features to help you be more productive, such as:
• Versioning enables you to track versions of files, so you can see a history of changes, and restore a version if you make a mistake.
• Alerts let you know by mail or text if a file has been changed. You can set an alert for one file or a whole library, and control how often you get alerted.
• Co‐authoring enables you and other co‐workers to edit files at the same time in certain Office programs, such as Word, PowerPoint, and Excel.Delete Files In A Library
1. Click on the ellipses next to a file you want to delete, and then click the ellipses on the callout.
2. Click Delete.3. Click OK to confirm sending the file to the
Recycle Bin.

10
• Introduction to librarieshttp://office.microsoft.com/en‐us/sharepoint‐server‐help/introduction‐to‐libraries‐HA102771924.aspx?CTT=1
• Add or delete files in a library http://office.microsoft.com/en‐us/sharepoint‐server‐help/add‐or‐delete‐files‐in‐a‐library‐HA102803549.aspx?CTT=3
• Enable and configure versioning for a list or library http://office.microsoft.com/en‐us/sharepoint‐server‐help/enable‐and‐configure‐versioning‐for‐a‐list‐or‐library‐ HA102772148.aspx?CTT=3
• Create an alert http://office.microsoft.com/en‐us/sharepoint‐help/create‐change‐or‐delete‐a‐column‐in‐a‐list‐or‐library‐ HA102771913.aspx
See Also

11
Share a document with your co‐workers to allow them to review or edit your document, and learn how to track document versions or return to a previous one.
Note that the capabilities described here depend on whether your organization has set up and customized personal sites and profiles.
Share Documents And Manage Versions
Share A DocumentIf you’re using Office 365, you may be able to invite external users (people not on your network) to share a document, by inviting them as “Guests.” For details, see Share sites or documents with people outside your organization.
To share a document with others in your organization:1. Click SkyDrive in the header at the top of a
SharePoint or Office 365 site in your organization.
2. Click the ellipses (...) next to the document to open the document’s callout and then click Share.
In the Share window, enter the name of each person you want to invite to share the document.
From the drop‐down menu, click the permission, View or Edit, that you want to grant invitees.
Type a message to be sent to all invitees in an email, or click Show Options and then uncheck Send an email invitation.
If you don’t send an email to invitees, they won’t get notified that you’ve shared the document. However, they can see the document if they visit your SkyDrive library, or if they search for the document.
Manage Document VersionsTo see your own most recent version of a SkyDrive Pro document:
1. Click SkyDrive in the header at the top of any SharePoint site in your organization.
2. Click the ellipsis (...) next to the document to display its details page. You can see who edited the document and the date of those changes
To return to your own most recent version of the document, select UNDO CHANGES.

Share Documents And Manage Versions (cont.)
Share A Document1. Click the document link in the email you received informing you that a co‐worker has shared a
document with you.2. If you don’t have edit permission, review the read‐ only document and save any notes or other
work in a separate file.3. If you have edit permission, check out the document, edit it, and click File → Save to save your
changes.
Add More People To The Sharing List
Click the Shared with some people icon in the Sharing column and invite additional people to view or edit the document.
12
• Share items in SkyDrive Prohttp://office.microsoft.com/en‐us/sharepoint‐server‐help/share‐items‐in‐skydrive‐pro‐HA102788380.aspx
• Manage document versions http://office.microsoft.com/en‐us/office365‐sharepoint‐online‐enterprise‐help/manage‐document‐versions‐in‐your‐ skydrive‐pro‐library‐HA103158256.aspx?CTT=1
• Collaborate on documents http://office.microsoft.com/en‐us/sharepoint‐server‐help/collaborate‐on‐documents‐HA102785873.aspx?CTT=1
• Share sites or documents with people outside your organization http://office.microsoft.com/en‐us/office365‐sharepoint‐online‐enterprise‐help/share‐sites‐or‐documents‐with‐
people‐outside‐your‐organization‐HA102894713.aspx
• Video: Share documents http://office.microsoft.com/en‐us/redir/VA102897384.aspx
• Video: Manage SkyDrive Pro document versionshttp://office.microsoft.com/en‐us/redir/VA102897389.aspx
See Also

13
Follow a document to see notifications in your newsfeed when someone updates the document or shares it with others, and to keep the document handy in a followed documents list. Follow a site to keep it accessible in a list of followed sites and to see site feed activity in your own newsfeed.
Note that the capabilities described here depend on whether your organization has set up and customized personal sites and profiles.
Follow A Document or Website In Your Organization
Follow A DocumentBefore you can follow a document, you need permission to access it. You’re granted this permission when another person shares the document with you. Typically, you can follow documents in a Shared with Everyone folder.
To follow a document:1. Browse to a document library on a
SharePoint or Office 365 team site.
2. To browse to your personal library, click SkyDrive Pro in the header.
3. Click the library or folder that contains the document or other file you want to follow.
4. Click the ellipses (...) next to the document.5. Click Follow.
Manage Document Versions1. Click SkyDrive in the header from a SharePoint or
Office 365 site.2. Click Followed Documents in the Quick launch
on the left.
Or, click Newsfeed in the header and then click the number for documents under I’m following.Your followed documents appear under Docs I’m following.
Manage Document Versions1. Go to a SharePoint site that you want to follow.2. Click Follow in the top right of the page.3. If the site has a newsfeed, to stay up to date with
site news, look for updates from the site feed in your own newsfeed.
Follow A Document or Website In Your Organization (cont.)
Find A Web Site That You FollowClick Sites in the header.
Or, click Newsfeed in the header and then click the number for sites under I'm following.
Your followed sites appear under Sites I’m following.
14
• Follow documents to track themhttp://office.microsoft.com/en‐us/office365‐sharepoint‐online‐small‐business‐help/follow‐documents‐to‐track‐them‐ HA102785928.aspx
• Follow sites that interest youhttp://office.microsoft.com/en‐us/office365‐sharepoint‐online‐enterprise‐help/follow‐sites‐that‐interest‐you‐ HA102785930.aspx?CTT=1
• Video: Follow documents http://office.microsoft.com/en‐us/redir/VA102897380.aspx
• Video: Follow a SharePoint site http://office.microsoft.com/en‐us/redir/VA102897383.aspx
See Also

15
Update your profile to introduce yourself to co‐workers and update privacy settings so you can share or hide personal information according to your needs. Note that your profile pages and the items you can edit may differ from the descriptions below, depending on how your administrators have customized profile pages for your organization.
Update Your Profile
Where is my pro�le?You’ll find a link to your profile in the top right corner of any of your organization’s SharePoint 2013 or Office 365 web pages.
View or edit your pro�le
1. Click <your name>→ About Me.
2. Click edit your profile to display the Edit Details.
3. Review or edit your Basic Information page or go to another page by clicking Contact Information or Details.
To review or edit your Newsfeed settings page, click the ellipses (...) and then click Newsfeed Settings.
Update Your Pro�le Picture and DescriptionTo see your own most recent version of a SkyDrive Pro document:
1. Open your profile for editing.2. Under Basic information, click Upload picture.3. Browse to locate the picture you want.4. Click Upload.
16
Update Your Profile (cont.)
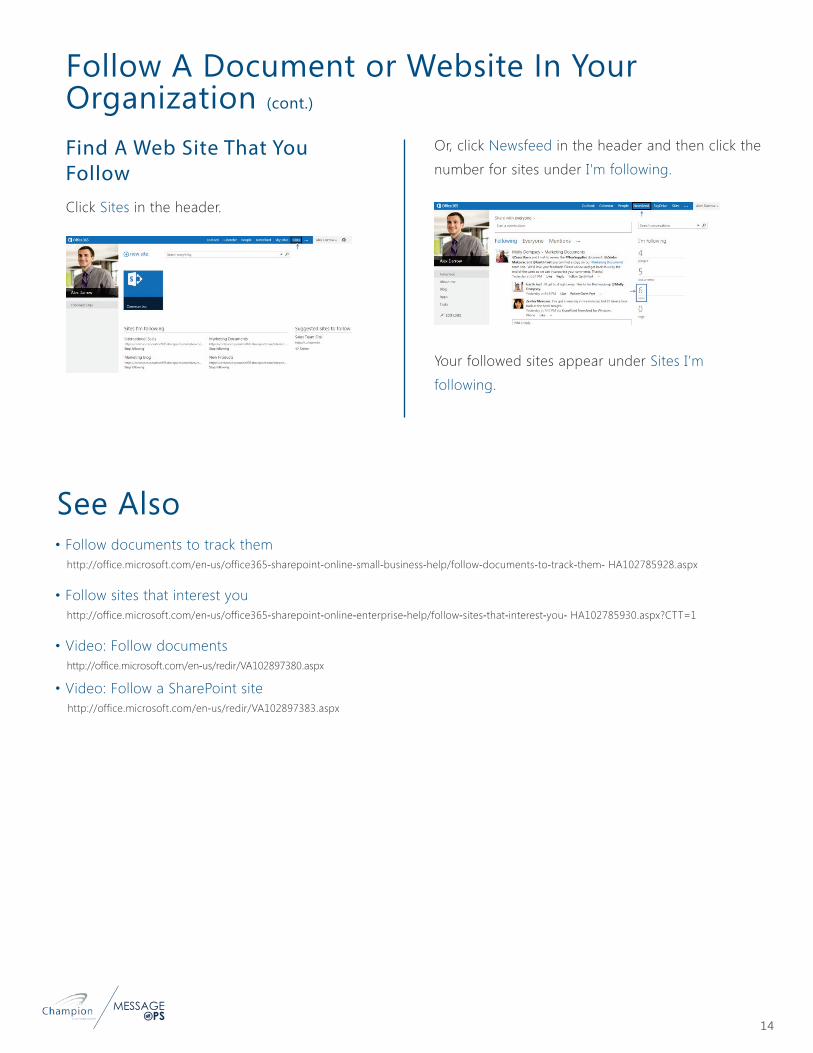
To add or update your About me text, click in the About me box and type a personal description. Use the formatting tools in the ribbon to add special text effects such as color, bold type, and bullets.
Click Save all and close.
List Your Areas of Expertise
1. Open your profile for editing.2. Under Basic Information, click in the Ask Me
About box.
3. Type key words in the box. Separate multiple keywords with semicolons. If you see an appropriate suggestion, click the keyword.
4. Click Save all and close.
Update Your Contact InformationTo see your own most recent version of a SkyDrive Pro document:
1. Open your profile for editing.2. Click Contact Information.
3. Edit your phone number and other contact information as needed.
4. Click Save all and close.
Update Your Personal DetailsTo see your own most recent version of a SkyDrive Pro document:
1. Open your profile for editing.2. Click Details.
3. To list past projects or other information that you might want to share or make note of, add some key words to the Past projects or other list boxes.
4. If you want display or note your birthday, type the date in the Birthday box.
5. Click Save all and close.

17
Update Your Profile (cont.)
To specify which activities you want to be notified about in email, in the Email Notifications section, select the items that interest you.
To specify what information you want to share with people in your organization, update the Who can see this? setting for your Followed Tags, and select or clear the People I follow option and Activities I want to share items as needed.
Update Your Pro�le Privacy Settings1. Open your profile for editing.2. Click Contact Information or Details.3. Under Who can see this? click the down
arrow to the right of an item you want to change.
4. Click Everyone or Only Me.
Update Your Newsfeed Settings1. Open your profile for editing.2. Click the ellipses (...) and then click Newsfeed
Settings.
3. Under Who can see this? click the down arrow to the right of an item you want to change.
4. To see posts in your newsfeed about specific topics, type key words in the Followed #Tags box.
Update Your Newsfeed Privacy Settings1. Open your profile for editing.2. Click the ellipses (...) and then click Newsfeed
Settings.3. To change who can see your list of Followed
#Tags, under Who can see this? click Everyone or Only Me.
4. To change who can see the lists of people that you follow and people who follow you, select or clear the People I follow option.
5. To specify activities you want to share with people in their newsfeeds, select the Activities I want to share items that you want profile visitors to be able to see.

18
• View and set up your profile.http://office.microsoft.com/en‐us/sharepoint‐server‐help/view‐and‐set‐up‐your‐profile‐HA102785967.aspx
• Update your profile privacy settings http://office.microsoft.com/en‐us/office365‐sharepoint‐online‐enterprise‐help/update‐your‐profile‐privacy‐settings‐ HA103338255.aspx
• Update your newsfeed privacy settingshttp://office.microsoft.com/en‐us/office365‐sharepoint‐online‐enterprise‐help/update‐your‐newsfeed‐privacy‐ settings‐HA102781017.aspx
• Video: Update your profile http://office.microsoft.com/en‐us/redir/VA102897378.aspx
• Video: Update your profile privacy settings http://office.microsoft.com/en‐us/redir/VA102897377.aspx
• Video: Update your newsfeed privacy settings http://office.microsoft.com/en‐us/redir/VA104011765.aspx
See Also

19
Start conversations with people in your organization by posting to a newsfeed, either on your personal site, or in team site newsfeeds.
Post To The Newsfeed
View or edit your pro�le
1. Click in the Start a conversation box.2. Type your message.
3. Click Post.
Add A Weblink To A Post
1. Go to the web page you want to link to.2. Copy the web page URL.3. Click Newsfeed at the top of the page (or go
to the team site newsfeed you want).4. Click in the Start a conversation box.5. Right‐click and paste in the web page URL.
View or edit your pro�le
1. Click in the Start a conversation box.2. Type your message. (optional)3. Click the camera button.
4. Browse to the picture you want and click Open.
5. Click Upload.
6. Click in the Display As box, type the words you want to appear as the weblink text, and click the check mark.
7. Click Post.
Add A Link To A Document To A Post1. Go to the SharePoint library that has the
document.2. Click the ellipses menu to open the document
callout.3. Copy the document URL
.
4. Click Newsfeed at the top of the page (or go to the team site newsfeed you want).
5. Click in the Start a conversation box.6. Right‐click and paste in the document URL.7. Click in the Display As box, type the words you
want to appear as the document link, and click the check mark.
8. Click Post.
20
Post To The Newsfeed (cont.)
Add A Video To A Post
Use the same procedure as described above for “Add a weblink to a post.”
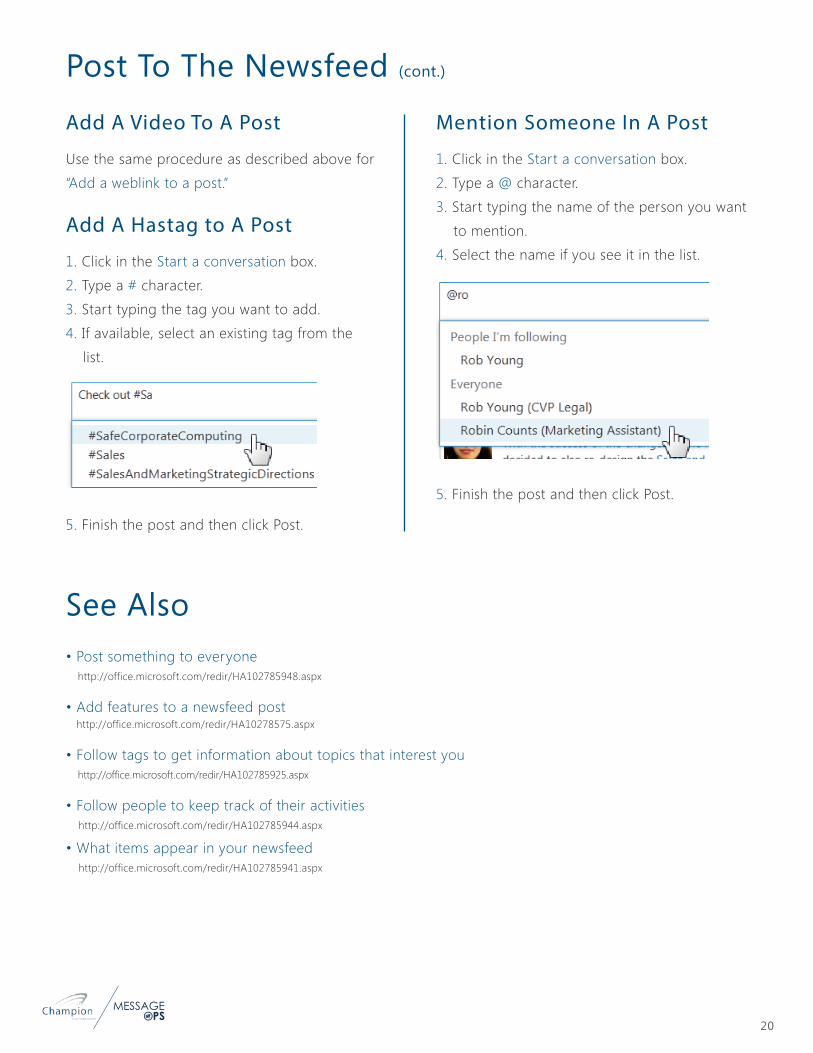
Mention Someone In A Post
1. Click in the Start a conversation box.2. Type a @ character.3. Start typing the name of the person you want
to mention.4. Select the name if you see it in the list.
5. Finish the post and then click Post.
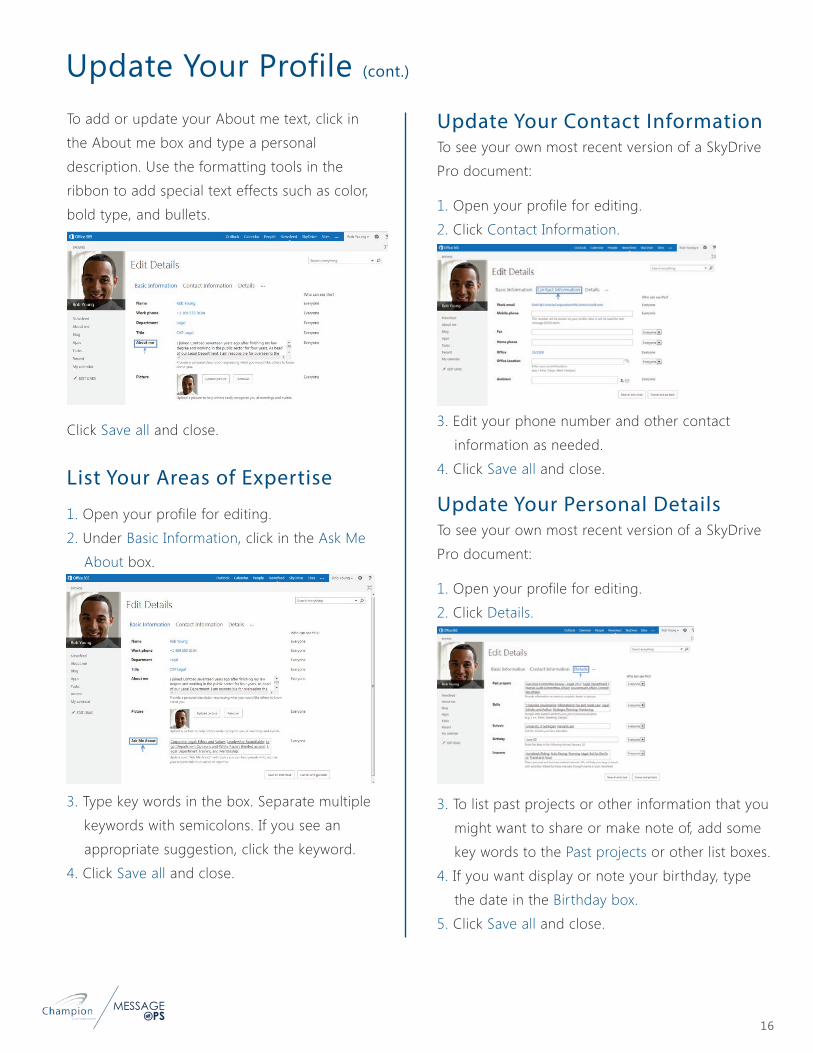
Add A Hastag to A Post
1. Click in the Start a conversation box.2. Type a # character.3. Start typing the tag you want to add.4. If available, select an existing tag from the
list.
5. Finish the post and then click Post.
• Post something to everyonehttp://office.microsoft.com/redir/HA102785948.aspx
• Add features to a newsfeed post http://office.microsoft.com/redir/HA10278575.aspx
• Follow tags to get information about topics that interest youhttp://office.microsoft.com/redir/HA102785925.aspx
• Follow people to keep track of their activities http://office.microsoft.com/redir/HA102785944.aspx
• What items appear in your newsfeed http://office.microsoft.com/redir/HA102785941.aspx
See Also

21
If you have Office 2013, or an Office 365 subscription that includes Office 2013 applications, you can sync your SkyDrive Pro and other SharePoint libraries to your computer. You can then work with your library files directly in your file system, and have access to your files when you’re offline.
Sync Sharepoint Libraries To Your Computer Using Skydrive Pro
Sync Your Skydrive Pro Library1. Go to your SkyDrive Pro library.2. Click Sync at the top of the page.
3. In the SkyDrive Pro wizard, click Sync Now.4. Click Show My Files to go to the synced
library folder.
Find Synced Libraries In Your File System1. Open Files Explorer.2. Look under favorites.3. Your SkyDrive Pro library folder is placed
under Favorites as SkyDrive Pro, or SkyDrive @Organization:
4. Team site library folders are placed under Favorites in the SharePoint folder:
Do Sharepoint Activities With Your Synced Files1. Open the synced library folder in your file
system.2. Right‐click a file, click SkyDrive Pro, and then
click a menu option:
a. Select Go to Browser to see the selected file on the SharePoint site in a Web browser.
b. Select Copy link to copy the file’s Web URL in order to paste the link in another location such as an email.
c. Select Share... to open the Share dialog box on the SharePoint site in order to send an invitation to share the file with other people.
Sync A Team Site LibraryGo to the team site library you want to sync and then do steps 2‐4 described above.

22
Sync Sharepoint Libraries To Your Computer Using Skydrive Pro (cont.)
Manage Synced Sharepoint Libraries1. Click the SkyDrive Pro icon in the Windows taskbar.
2. Select the menu option you want.
• Sync a library to your computerhttp://office.microsoft.com/redir/HA102832401.aspx
• Find libraries you’ve synced on your computerhttp://officecms/sites/preview/search/redir.aspx?AssetId=HA102849774&lc=en‐us
• Manually sync a folder your syncing with a SharePoint libraryhttp://office.microsoft.com/redir/HA102849774.aspx
• Stop syncing a folder with a SharePoint library http://office.microsoft.com/redir/HA102850041.aspx
• Share files in a folder you’re syncing with a SharePoint library http://office.microsoft.com/redir/HA102780982.aspx
See Also

You can create a SharePoint blog to quickly share ideas and information in an informal way.
Create and Manage A Sharepoint Blog
How Do I Create A Blog?1. Open your SharePoint site.2. On the Settings menu, click Site contents.
3. Click new subsite.
4. Enter a title, description, and URL. Under Select a template, select Blog.
5. Click OK.
How Do I Create A Blog?1. On the home page of the SharePoint blog,
under Blog tools, click Create a post.
2. Enter a title, and an optional description.3. In the Category section, select as many
categories as you want the post to be associated to, and click Add.
4. Enter a publish date.5. Click Publish.
Add Categories1. On the home page of the SharePoint blog,
under Blog tools, click Manage categories.2. Click new item.3. Type a category name, and click Save.
23

24
Create and Manage A Sharepoint Blog (cont.)
Break Inheritance From The Parent Site For A Blog1. Open your SharePoint site.2. On the Settings menu, click Site settings.3. Under Users and Permissions, click Site
permissions.4. On the Permissions tab, click Stop Inheriting
Permissions.
5. Click OK.
Create Unique Permissions For Lists and Libraries In A Blog1. Open your SharePoint site.2. On the Settings menu, click Site contents.3. Click on the ellipsis next to Posts and then
click Settings.
4. On the Settings page, click Permissions for this list.
5. On the Permissions tab, click Stop Inheriting Permissions.
6. Click OK.7. You can now add users and groups, and give
them specific permissions. To do that, click Grant Permissions, on the ribbon.
8. Enter a user or group name, or email address.
9. Click Show Options, and then select a permission level from the dropdown. Then click Share.

25
Change A Blog Post LayoutOn the home page of your SharePoint blog, under Blog Tools, select a post layout.
• Introduction: Control user access with permissionshttp://office.microsoft.com/en‐us/support/introduction‐control‐user‐access‐with‐permissions‐HA102771919.aspx
• What is permissions inheritance?http://office.microsoft.com/en‐us/office365‐sharepoint‐online‐enterprise‐help/what‐is‐permissions‐inheritance‐ HA102772762.aspx
See Also
Create and Manage A Sharepoint Blog (cont.)

This course teaches you how to change the design and layout of your public site. You’ll also learn to add your company logo, customize the footer and site navigation, and fine tune your design by customizing the cascading style sheet.
Customize Your Public Website
Change The Look1. Click the Site tab.
2. Click Change the Look.3. Choose a design.4. Change the background picture. Change the
color.5. Choose the site layout.6. Choose the font.7. Click Try it out to preview your changes. 8. When satisfied, click Keep it.
Change The Title and Logo1. Click the Site tab.2. Click Edit Title.3. Replace the default title with your own, and
then click OK.4. Click the Site tab.5. Click Change Logo.6. Click From Computer to upload a logo
image.7. Type a description. 8. Click OK.
26
Change The Page Navigation1. Click the Site tab.2. Click Edit Menu (or click Edit Links on the
page).3. Make the desired changes.4. Click Save.
Customize The Header and Footer1. Click the Site tab.2. Click Edit Site Elements.3. Make the desired changes.4. Click Save.
Customize The CSS1. Click the Site tab.2. Click Edit Style Sheet.3. Make the desired changes.4. Click Save.

Your public website in Office 365 includes web pages that you can customize by adding your own page content, including text, images, videos, and apps. This course teaches you how to add and customize pages, manage pages, and create and manage blog posts.
Create And Customize Pages On YourPublic Website
Add A Page1. From anywhere within your public website
click Page → New.
2. Give the page a name and click Create.3. Click Format Text → Save to save the draft.
Edit A Page1. Navigate to the page on your public website
that you want to edit.2. Click the Page tab and choose Edit.
Upload An Image From Your Computer1. Navigate to the page on your public website
where you want to add an image.2. Click Insert → Picture → From Computer →
Browse.3. Select the desired picture and click Open.
Hide Links In The Navigation1. From within the navigation on your public
website, click Edit Links.2. Click the Hide icon.3. Click Save.
Delete A Page1. Navigate to the page on your public website
that you want to delete.2. Click Page → Delete Page3. Click OK to confirm.
27

Create And Customize Pages On YourPublic Website (cont.)
Create New Blog Posts Using The Blog Post Editor1. Click the BLOG link on your website.2. Under Blog tools, click Create a post.3. Enter a title and body content, including text,
images, videos, etc.4. Select a category and publishing date.5. Click Publish.
Create New Blog Posts With Microsoft Word1. Click the BLOG link on your website.2. Under Blog tools, click Launch blogging app.
Register the blog account if prompted.3. Click the Blog Post tab and choose Publish.
28

29
There are several ways to organize and manage your SharePoint libraries. This intermediate course teaches you how to create and use folders, sort and filter with columns, create custom views of items in the library, and how to restrict access to a library.
Organize And Configure A Sharepoint Library
Create Folders In A Library1. Navigate to the library you want to create a
folder in.2. On the Files tab, choose New Folder.3. Enter a name for the folder and choose Save.
Add Columns To A Library1. Navigate to the library you want to add
columns to.2. On the Library tab, choose Library Settings.3. Scroll down to the Columns section and
choose Add from existing site columns.4. Under Available site columns, choose and
add the columns you want in your library, and then choose OK.
Create A Custom View Of Items In Your Library1. Navigate to the library you want to create a
view for.2. On the Library tab, choose Create View
3. If you want to start from an existing view, choose the view under Start from an existing view.
4. On the Settings page, type a name for the view.
5. Choose Create a Personal View in the Audience section if you don’t want others to use this view.

Organize And Configure A Sharepoint Library
Create A Custom View Of Items In Your Library (cont.)1. Under the Filter section, choose Show items
only when the following is true.2. In the field drop down box, select the column
you want to add, Due Date for example.3. In the next field, choose a condition such as
is equal to, for example.4. In the next field, choose a condition such as
is equal to, for example.5. In the next field, enter a date you will later
filter by, such as 11/15/2014, for example.
6. Finally, in the Folders section of the page, choose Show all items without folders. This option enables you to look at files across folders in a library.
7. Choose OK. The new view appears displaying all files having 11/15/2014 under the Due Date column, regardless of what folder they are in.
Control Who Has Access To Your Sharepoint Library1. Navigate to the library you want to share with
colleagues.2. On the Library tab of the ribbon, choose
Library Settings.3. On the Settings page choose the Permissions
for this document library link.4. If the library inherits permissions from a
parent site, choose Stop Inheriting Permissions on the Permissions tab.
5. Click OK on the message that appears.6. In the Share dialog box, type the names or
email addresses of those who will have access to the library.
7. Optional: Add a short message to tell them about the library, and then select Share.
8. To remove permissions that existed before you stopped inheriting permissions, select those groups or users and then choose Remove User Permissions.
30

31
Organize And Configure A Sharepoint Library
IMPORTANT: Make sure you have permissions to your own library.
Now, only the people that you added in the Share dialog have access to the documents in the library.
• Sync a library to your computerhttp://office.microsoft.com/en‐us/support/sync‐a‐library‐to‐your‐computer‐HA102832401.aspx
• Manage lists and libraries with many itemshttp://office.microsoft.com/en‐us/office365‐sharepoint‐online‐enterprise‐help/manage‐lists‐and‐libraries‐with‐ many‐items‐HA101967267.aspx?CTT=1
See Also

32
Post To A Team Site FeedSome posts or conversations are better suited for a small group of people, rather than the newsfeed on your personal site. For these cases, you can create or start following team sites that contain their own site feeds. For convenience and visibility, posts on team sites you’re following also appear in the newsfeed on your personal site.
NOTE Tasks described in this article may depend on your SharePoint permissions. For more information, see your administrator.
Create A Team Site1. Click Sites at the top of the page.
2. Click New Site.3. Enter a name for the new site and click
Create. The site appears after a few moments. You automatically follow new sites you create.
Invite People To A Team Site1. Go to the team site.2. Click Share at the top of the page.
3. In the Share window, enter the names or email addresses of the people you want to invite to the site.
4. Accept the default Contribute permission so that people can post to the newsfeed.
5. Click Share.

Post To A Team Site Feed
Start Following A Team SiteFollowing a site enables you to find it easily later on your Sites page. It also lets you post to its site feed from your personal site newsfeed.
1. Go to the site you want to start following.2. Click Follow at the top of the page.
Post To A Site Feed While Visit-ing A Team Site1. Go to the team site.2. Find the Newsfeed web part on the team site
Home page.
3. Create the post just as you’d create posts in your personal site newsfeed.
Post To A Team Site Feed From Your Personal Site Newsfeed1. Click Newsfeed at the top of the page.
2. Select the site feed you want to post to from the dropdown menu.
3. Create the post. The post appears with a reference to the team site it’s associated with.
33
• Post something to a small group of people http://office.microsoft.com/en‐us/sharepoint‐help/introduction‐to‐lists‐HA102771955.aspx
• Add features to a newsfeed post http://office.microsoft.com/redir/HA102785751.aspx
• Create a site ttp://office.microsoft.com/redir/HA102773285.aspx
• Share a site http://office.microsoft.com/redir/HA103456668.aspx
See Also

We hope you enjoyed The SharePoint Online and 2013 Quick Reference Guide.
To view other resources in our Tech Tips by MessageOps series, visit our website: www.messageops.com/documentation
877-788-1617
www.messageops.com