Embed Size (px)
Citation preview
Generated by Jive on 2015-07-20+01:001
Gough Lui's Blog: Project: Raspberry Pi DoorSign in Under an Hour!
Posted by Gough Lui Jul 20, 2015
When it comes to me getting some work done, there is really only one place in the house where that happens.
Coincidentally, it's the same place where I get some sleep, hack about with electronics, write code, record
videos, take photos of products, etc. I call it my "room", it gets a little cramped, but that's the least of my issues.
What I really don't need are interruptions. Creatives and coders would probably best sympathize with me
- once you get in the "groove", find your "muse" or get in the "rhythm", the last thing you need is someone
opening your door unexpectedly. Even worse is when you're trying to catch some shuteye, and someone
opens the door and barges in. My family has a habit of doing this, and it's not helped by the fact I tend to
have odd sleeping hours as I'm not "limited" by regular 9-5 engagements, and my hobbies often dictate being
awake at odd hours.
Anyway, it was getting to breaking point several months ago, and I decided to try and solve it once and for
all. I looked around my room to find the PiFace Control and Display I had from the Raspberry Pi New Year's
Party Pack RoadTest which remained unused, as well as a Raspberry Pi Model A (original) which I bought
out of curiosity, having no Ethernet port and just one USB connector. Great! Virtually everything I need to
solve this problem - by making an electronic network-connected door sign which I can change at will from any
computer on the network (or beyond, by tunneling through another Raspberry Pi set to expose its SSH to the
world).
Before I continue further, I must warn everyone that this was a hack borne out of frustration, where time to
a solution was the key. As a result, there are known security problems, namely no authentication, user-side
validation only and web server running on an account with root privileges. Unless you can guarantee the
security and non-maliciousness of the environment where the unit will be deployed, you should NOT use
this as an example to set-up your own door sign. Even then, I probably have missed out a few steps, having
done this a few months ago, fixing any issues I found on the fly and not writing anything down. It's more an
inspiration for others to see what is possible.
Raspberry Pi Model A Set-Up
Setup of the Raspberry Pi Model A is actually quite confusing because of the limited hardware. It's probably
best done interactively, so using an HDMI monitor, USB keyboard and mouse, and USB wireless network
adapter. In order to do this, you will need a USB hub, preferably powered. Or, if you're sneaky like I am ... just
set up the card on the Model B first, then transfer it over to the Model A once you're ready.
The first thing you will need to do all the normal raspi-config configuration. Expanding filesystem, overclocking,
enabling SSH, setting locale, timezone, keyboard layout, disable overscan, enable SPI, change hostname,
change password. The norm. To simplify wireless configuration, I decided to startx and configure Wi-Fi using
the graphical utility, which seems to store any required information in /etc/wpa_supplicant/wpa_supplicant.conf.
Gough Lui's Blog: Project: Raspberry Pi Door Sign in Under an Hour!
Generated by Jive on 2015-07-20+01:002
Once that's done, it's always good to keep yourself up to date with sudo apt-get update and sudo apt-get
upgrade.
Because we will be working with the pi remotely, and we would like to find it easily, a static IP was allocated by
modifying /etc/network/interfaces - in my case, to 192.168.0.36.
iface wlan0 inet manual
wpa-roam /etc/wpa_supplicant/wpa_supplicant.conf
iface default inet static
address 192.168.0.36
netmask 255.255.255.0
gateway 192.168.0.1
Not only that, we also need to modify /etc/resolv.conf to have one line, nameserver 192.168.0.1 or whichever
nameserver you want. In the case of the latest Raspbian distribution, resolv.conf is generated from
resolvconf.conf which needs its local nameserver line commented out, and 127.0.0.1 replaced with your
nameserver of choice, so that DNS resolves work properly (otherwise you will have trouble installing or
updating things. It's good to reboot your unit again and test that it is reachable via SSH on the IP configured.
Another tweak you might want to do is to go back to sudo raspi-config to configure the GPU memory split to be
16Mb - as you will probably only be running in text mode, so freeing RAM for other processes. Now that we've
got the configuration workable remotely, you can pull the card and shove it into the Model A along with the one
wireless adapter and the PiFace Control and Display module.
Then, we need to install the relevant packages. My initial thoughts was that it would be enough to be able to
change the sign by SSHing into the box and running a shell script, but that would get tedious very quickly, so I
wanted a web interface as well. As a result, I decided to install the support packages for pifacecad and lighttpd
as the web server. That's as simple as sudo apt-get install python{,3}-pifacecad lighttpd. At this stage, the
PiFace Control and Display module should be working (or might be after a reboot) - a simple Python3 program
like the following should write a message onto the screen.
#!/usr/bin/env python3
import pifacecad
cad = pifacecad.PiFaceCAD()
cad.lcd.blink_off()
cad.lcd.cursor_off()
cad.lcd.clear()
cad.lcd.backlight_on()
cad.lcd.write("Gough: AWAKE \nCome in!")
If that is working, then we are ready to make the interface work.
Gluing the Web Server to the PiFace Control and Display
Gough Lui's Blog: Project: Raspberry Pi Door Sign in Under an Hour!
Generated by Jive on 2015-07-20+01:003
I decided to go with lighttpd and the tried and trusted cgi interface to allow the web server to make calls to
python. Despite the above example using python3, I decided to go with python (2) instead for this. The first
problem I found was the issue of configuring the web server correctly. In the end, my /etc/lighttpd/lighttpd.conf
looks like this:
server.modules = (
"mod_access",
"mod_cgi",
"mod_alias",
"mod_compress",
"mod_redirect",
# "mod_rewrite",
)
server.document-root = "/var/www"
server.upload-dirs = ( "/var/cache/lighttpd/uploads" )
server.errorlog = "/var/log/lighttpd/error.log"
server.pid-file = "/var/run/lighttpd.pid"
server.username = "pi"
server.groupname = "pi"
server.port = 80
index-file.names = ( "index.php", "index.html", "index.lighttpd.html" )
url.access-deny = ( "~", ".inc" )
static-file.exclude-extensions = ( ".php", ".pl", ".fcgi" )
compress.cache-dir = "/var/cache/lighttpd/compress/"
compress.filetype = ( "application/javascript", "text/css", "text/html", "text/plain" )
# default listening port for IPv6 falls back to the IPv4 port
include_shell "/usr/share/lighttpd/use-ipv6.pl " + server.port
include_shell "/usr/share/lighttpd/create-mime.assign.pl"
include_shell "/usr/share/lighttpd/include-conf-enabled.pl"
$HTTP["url"] =~ "^/cgi-bin/" {
cgi.assign = ( ".py" => "/usr/bin/python" )
}
Significant changes include making the server use the pi username and pi group, and the addition of mod_cgi,
and the last few lines which configure the .py extension to call /usr/bin/python as the interperter. Lighttpd needs
to be restarted with a sudo service lighttpd restart for the changes to take effect (or you could try to use reload,
but restart is just as easy).

Gough Lui's Blog: Project: Raspberry Pi Door Sign in Under an Hour!
Generated by Jive on 2015-07-20+01:004
Now we need an interface and the cgi-script to perform the action. I decided to go and write a simple python
script for the cgi-handler called pidisplay.py, placed inside the cgi-bin directory under /var/www. Of course, it
must be sudo chmod +x pidisplay.py to ensure it is executable.
#!/usr/bin/env python
import cgi
import cgitb
import pifacecad
cgitb.enable()
cad=pifacecad.PiFaceCAD()
cad.lcd.blink_off()
cad.lcd.cursor_off()
cad.lcd.clear()
cad.lcd.backlight_on()
print "Content-type: text/html\n\n<html>"
form=cgi.FieldStorage()
if "lineone" not in form:
print "<h1>Line 1 is Blank</h1>"
else:
text=form["lineone"].value
print cgi.escape(text)
cad.lcd.write(cgi.escape(text))
print "<p>"
cad.lcd.write("\n")
if "linetwo" not in form:
print "<h1>Line 2 is Blank</h1>"
else:
text=form["linetwo"].value
print cgi.escape(text)
cad.lcd.write(cgi.escape(text))
print "<p>"
print "Screen Updated!<p><h1><a href=\"/\">Go Back</a></h1></html>"
The interface was coded as a hand-coded HTML file, called index.html in the /var/www directory. There is a
form for a custom message to be submitted, and there is a list of URL-encoded presets, both of which provide
the lineone and linetwo values to the pidisplay.py file.
Gough Lui's Blog: Project: Raspberry Pi Door Sign in Under an Hour!
Generated by Jive on 2015-07-20+01:005
<html>
<title>Raspberry Pi Door Display</title>
<h1>Raspberry Pi Door Display</h1>
Enter message and hit submit to be displayed on PiFace Control and Display.
<p>
<form action="/cgi-bin/pidisplay.py" method="POST">
Line 1: <input type="text" name="lineone" maxlength="16" size="20" value=""><p>
Line 2: <input type="text" name="linetwo" maxlength="16" size="20" value=""><p>
<input type="submit" value="Submit">
<input type="reset" value="Reset">
</form>
<p><h1>Presets:</h1>
<ul>
<li><a href="/cgi-bin/pidisplay.py?lineone=Gough: SLEEPING &linetwo=Do not disturb">Sleeping</a></li>
<li><a href="/cgi-bin/pidisplay.py?lineone=Gough: NAPPING &linetwo=Do not disturb">Napping</a></li>
<li><a href="/cgi-bin/pidisplay.py?lineone=Gough: WORKING &linetwo=Do not disturb">Working</a></li>
<li><a href="/cgi-bin/pidisplay.py?lineone=Gough: AWAKE &linetwo=Knock to enter">Awake</a></li>
<li><a href="/cgi-bin/pidisplay.py?lineone=Gough: ON PHONE &linetwo=Do not disturb">On Phone</a></li>
<li><a href="/cgi-bin/pidisplay.py?lineone=Gough: NOT HOME &linetwo=Returning later">Not Home</a></li>
</ul>
</html>
With the files in place, we can give it a go.
Mounting it and Using It
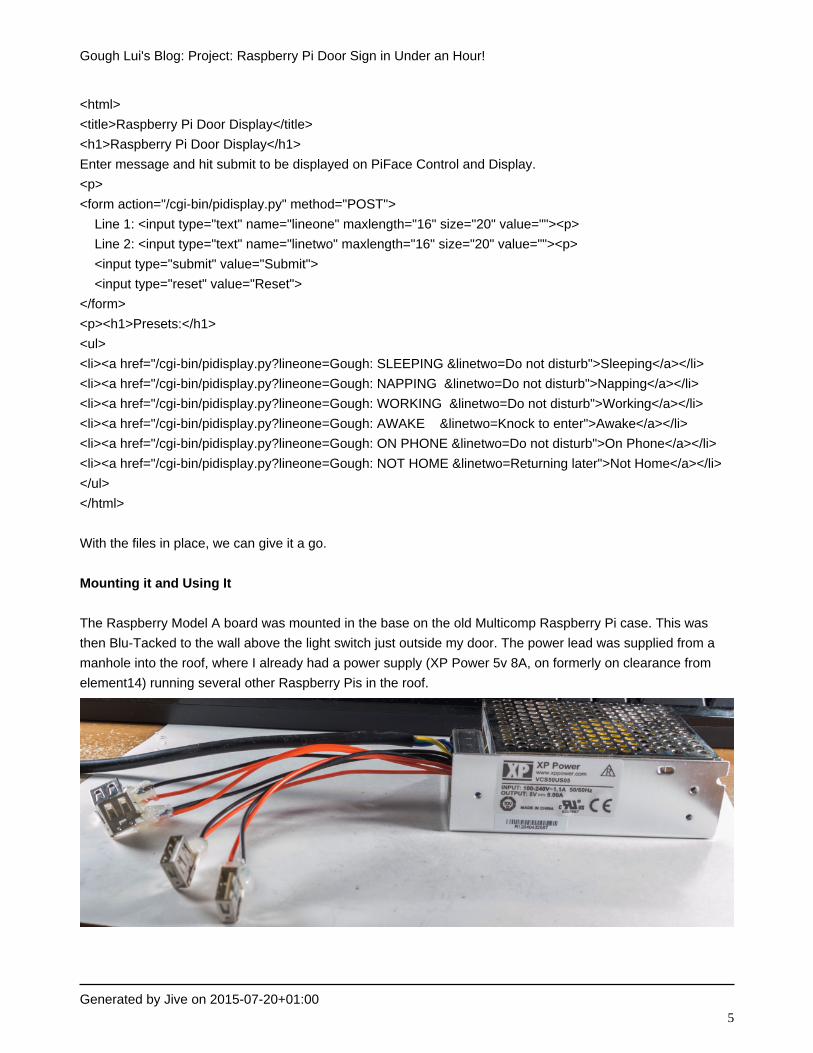
The Raspberry Model A board was mounted in the base on the old Multicomp Raspberry Pi case. This was
then Blu-Tacked to the wall above the light switch just outside my door. The power lead was supplied from a
manhole into the roof, where I already had a power supply (XP Power 5v 8A, on formerly on clearance from
element14) running several other Raspberry Pis in the roof.
Gough Lui's Blog: Project: Raspberry Pi Door Sign in Under an Hour!
Generated by Jive on 2015-07-20+01:006
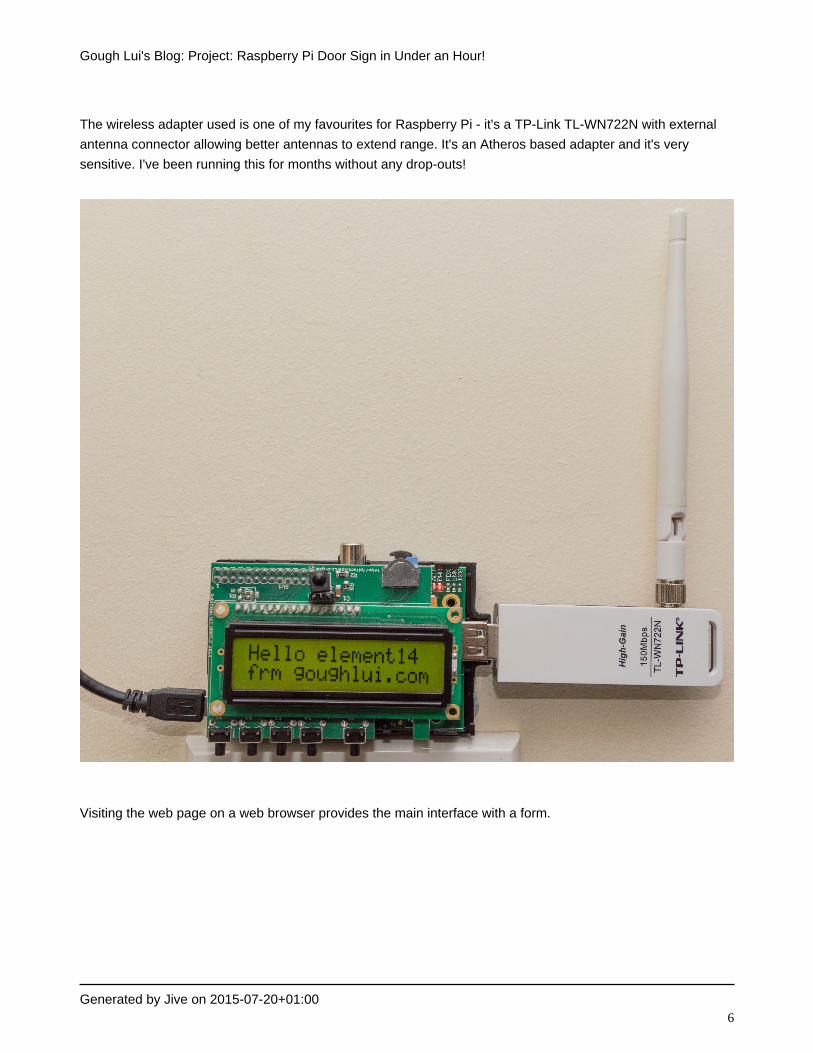
The wireless adapter used is one of my favourites for Raspberry Pi - it's a TP-Link TL-WN722N with external
antenna connector allowing better antennas to extend range. It's an Atheros based adapter and it's very
sensitive. I've been running this for months without any drop-outs!
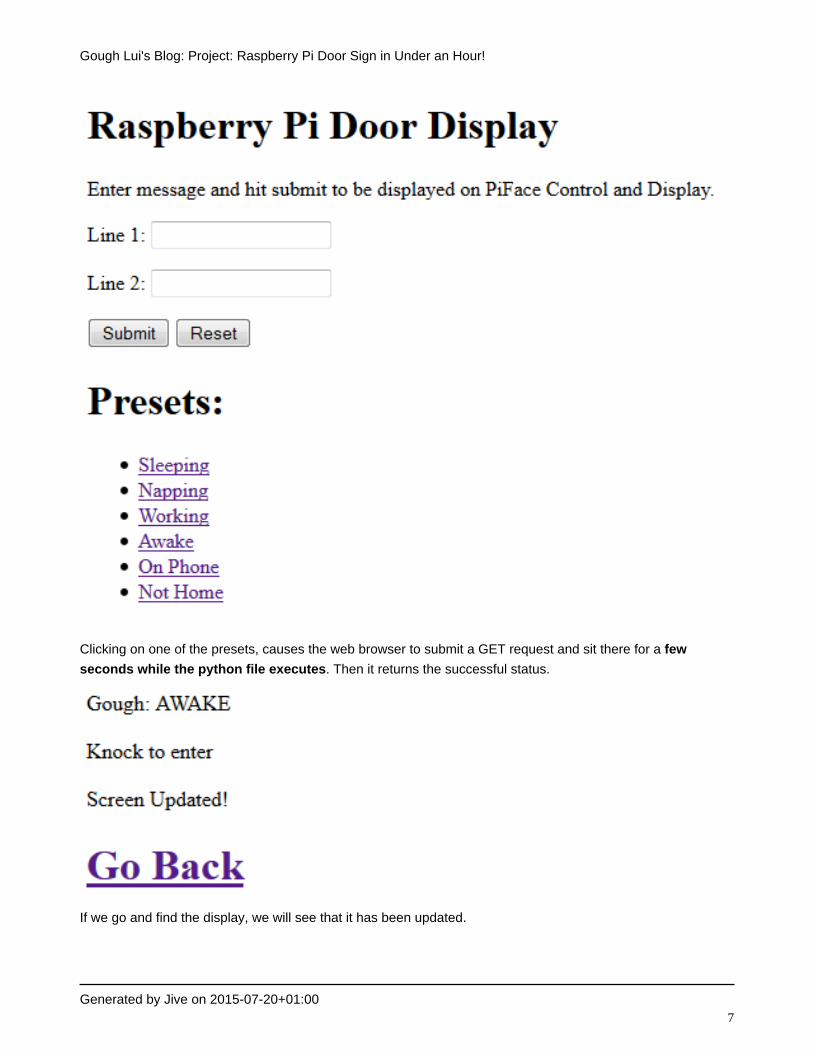
Visiting the web page on a web browser provides the main interface with a form.
Gough Lui's Blog: Project: Raspberry Pi Door Sign in Under an Hour!
Generated by Jive on 2015-07-20+01:007
Clicking on one of the presets, causes the web browser to submit a GET request and sit there for a few
seconds while the python file executes. Then it returns the successful status.
If we go and find the display, we will see that it has been updated.

Gough Lui's Blog: Project: Raspberry Pi Door Sign in Under an Hour!
Generated by Jive on 2015-07-20+01:008
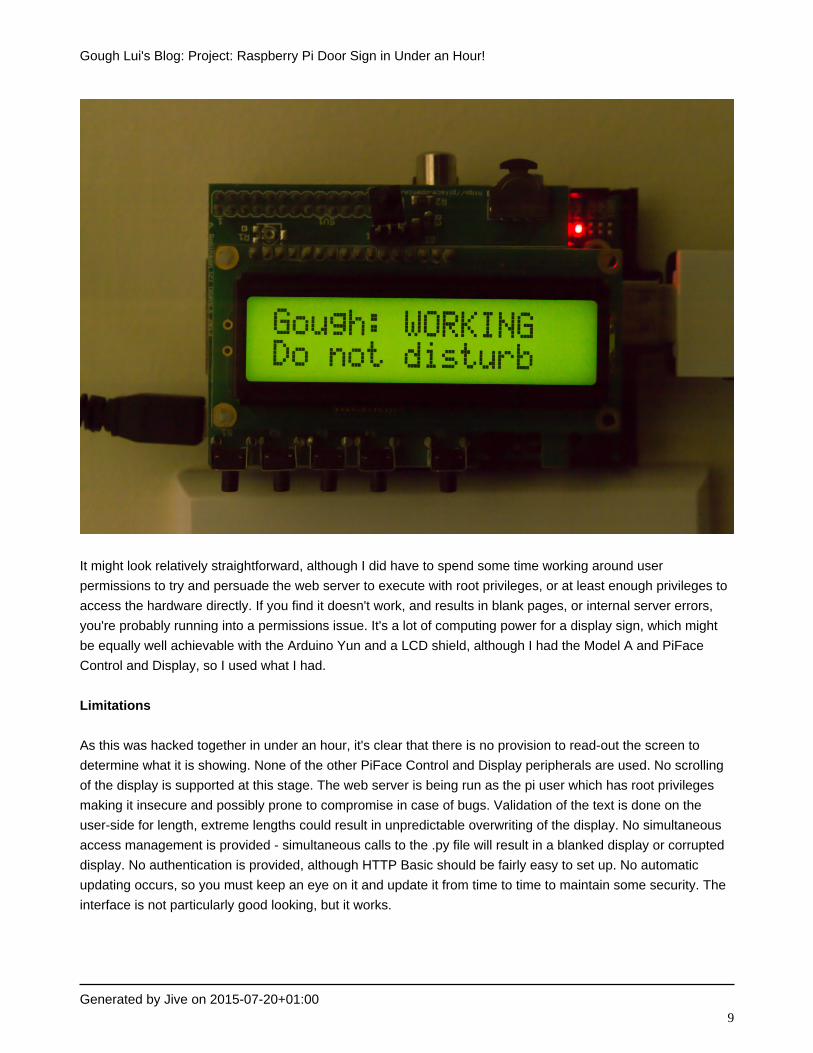
The interface works equally well from virtually any web browser because it doesn't use anything special, HTML
wise. I could easily whip out my phone just to tell everyone that I'm working.
Gough Lui's Blog: Project: Raspberry Pi Door Sign in Under an Hour!
Generated by Jive on 2015-07-20+01:009
It might look relatively straightforward, although I did have to spend some time working around user
permissions to try and persuade the web server to execute with root privileges, or at least enough privileges to
access the hardware directly. If you find it doesn't work, and results in blank pages, or internal server errors,
you're probably running into a permissions issue. It's a lot of computing power for a display sign, which might
be equally well achievable with the Arduino Yun and a LCD shield, although I had the Model A and PiFace
Control and Display, so I used what I had.
Limitations
As this was hacked together in under an hour, it's clear that there is no provision to read-out the screen to
determine what it is showing. None of the other PiFace Control and Display peripherals are used. No scrolling
of the display is supported at this stage. The web server is being run as the pi user which has root privileges
making it insecure and possibly prone to compromise in case of bugs. Validation of the text is done on the
user-side for length, extreme lengths could result in unpredictable overwriting of the display. No simultaneous
access management is provided - simultaneous calls to the .py file will result in a blanked display or corrupted
display. No authentication is provided, although HTTP Basic should be fairly easy to set up. No automatic
updating occurs, so you must keep an eye on it and update it from time to time to maintain some security. The
interface is not particularly good looking, but it works.
Gough Lui's Blog: Project: Raspberry Pi Door Sign in Under an Hour!
Generated by Jive on 2015-07-20+01:0010
There are probably many more limitations that I haven't thought of, but in the end, it was a quick hack that
works. It's fine if you're using it at home, in a network which you keep secure and safe, away from persistent
malicious actors.
Conclusion
At last, the PiFace Control and Display finds a use around the house. Now I have a door sign I can control
from virtually anywhere in the world with my phone and a data connection (Connectbot SSH tunneling + Web
browser). Now, as long as I remember to set it to the right status, I can inform anyone who passes by whether
it's okay to come in. Now, if only my family would actually READ the sign ...4 Views Tags: lcd, display, raspberry_pi, raspberrypi, raspberry-pi, pifacecad
There are no comments on this post