Embed Size (px)
Citation preview

SimaPro Full Update Instructions
Colophon
Title : SimaPro Full Update Instructions
Written by:
PRé Consultants Michiel Oele, Ruba Dolfing
Report version: 6.1
Date: May 2018
Language: English
Availability: PDF
Copyright: © 2018 PRé Consultants bv. All rights reserved. PRé grants the right to distribute and print the unchanged PDF version of this manual for non-commercial purposes only. Parts of the manual may be reproduced in other work only after permission and if a clear reference is made that PRé is the author.
Phone: +31 33 4504010
Fax: +31 33 4555024
Email: [email protected]
Website: simapro.com
2
Contents
1 INTRODUCTION ..................................................................................................................... 3
2 UPDATING THE SIMAPRO SOFTWARE .......................................................................................... 3
2.1 MULTI-USER VERSIONS .................................................................................................................... 3 2.2 PROCEDURE FOR UPDATING SINGLE-USER AND MULTI-USER CLIENT ........................................................... 3
3 UPDATING THE DATABASE ........................................................................................................ 4
3.1 DATABASE UPDATE ......................................................................................................................... 4 3.2 INSTALLING THE UPDATE DATABASE .................................................................................................... 5 3.3 IMPORTING THE UPDATE DATABASE .................................................................................................... 5 3.4 APPENDING SUBSTANCES ................................................................................................................. 8 3.5 UPDATING LINKS IN YOUR PROJECTS TO ECOINVENT 3.4 ......................................................................... 8
3.5.1 Updating links from ecoinvent 2.2 to ecoinvent 3.4 ..................................................................... 8 3.5.2 Updating obsolete links ................................................................................................................ 8 3.5.2.1 Using the replacement files ........................................................................................................ 10 3.5.2.2 Manual replacement (or creating your own replacement file) ................................................... 10
3.6 USING THE REPLACEMENT FILE ON LINKS TO US LCI LIBRARY ................................................................. 11
4 CONTACT US ...................................................................................................................... 12
SimaPro Full Update Instructions
3
1 Introduction This document describes how to update your current software and database from SimaPro 7.3.3 - SimaPro 8.3 to the latest release of SimaPro. In the “What’s new in SimaPro 8.5” document you can find information about the changes in the data, methods and software. You will find detailed instructions below. Please read these carefully. Should you still have questions, please contact
your local SimaPro partner or the PRé helpdesk by email at [email protected]. You may also contact us by phone at +31 33 4504010.
A summary of the update procedure The update procedure can be summarised as follows:
1. Software update: Update your SimaPro single-user or multi-user client software to the latest release. There is no update for the SimaPro database server.
2. Database update: Import the full update database which includes the latest version of all data and methods.
2 Updating the SimaPro software 2.1 Multi-user versions We recommend that multi-user updates are done by your network administrator. Please note that:
All SimaPro multi-user clients have to be updated to the latest SimaPro release.
The SimaPro Database Server software does not need to be updated.
2.2 Procedure for updating single-user and multi-user client The procedure for updating the single-user and multi-user SimaPro client software is as follows:
1. Download the SimaPro installation file SetupSimaPro852.exe from this link to each computer that runs the SimaPro single-user or SimaPro multi-user client.
2. On each computer, double-click SetupSimaPro852.exe to start the installation. Follow the instructions in the setup wizard. You may be asked for your SimaPro registration name and code. The current SimaPro software will be uninstalled and then replaced with SimaPro 8.5.2. Note that your database(s) will not be uninstalled!
3. Next, proceed with the database update procedure as described in section 3.
SimaPro Layout Settings
Note that some layout settings may have changed after updating, so it may be that windows open smaller or larger than usual. The default SimaPro font and size should be Segou UI 11 points. To make any changes to the font size or type, go to Tools> Options> Desktop (tab).
4
3 Updating the database 3.1 Database update
This chapter describes how to update your database. The update process consists of four parts: 1. Installing the update database that contains the new data. 2. Importing the update database into your SimaPro database(s). 3. Doing an append action to merge synonyms in the substance list. 4. Updating links in your projects to the most recent data libraries, or replacing links to obsolete processes.
These steps are described in detail in the following sections. In Box 1 and 2 you will find tips for updating multi-user licences and an overview of the default database locations. You have to follow the database update procedure for each SimaPro database that you want to update. Please note that any changes you have made in the library entries or in the original methods supplied in the Methods library will be lost during the update. Processes, product stages or methods that you have added (for example by copying) to the libraries that are to be updated will still be there. Contact us for assistance if you wish to keep your changes.
Box 1. Updating a database in a multi-user environment
In a multi-user environment, updating a database directly on the database server is very slow due to additional network traffic. If you have one of the professional multi-user licences, you can also do the database update locally on a (fast) PC with the SimaPro client installed. This is much quicker. To do that, login as Manager and check under Tools, User Management that no users are logged into the SimaPro database. If so, you can close SimaPro. Locate the database on the server’s hard drive (see Box 2 for default locations) and copy the database (a set of 77 numbered *.NX1 files) to your local hard drive. In the “Open SimaPro Database” window, choose “Local server”, browse to the directory you copied the database to. Continue with the update instructions in section 3.2. After updating, copy the database back to its original location on the server. Owners of an educational Classroom licence do not have “local server” database access, but should request a temporary single-user licence via [email protected] to do the update locally. We will include further instructions on how to update.
Box 2. Default directories
SimaPro installs updates in the default database directory if no other location is chosen. The default directory depends on the version of Windows where your database server is running:
Windows 7, Windows 8, Windows 10, Windows 2008 server, Windows 2012 server: C:\Users\Public\Documents\SimaPro\Database\
Windows 2003 server: C:\Documents and Settings\All Users\Shared Documents\SimaPro\Database
If you have a multi-user version and cannot find the database in one of the default directories, open the SimaPro database server. In the list of aliases you can see the location(s) of the database directories that are being used.
SimaPro Full Update Instructions
5
3.2 Installing the update database
Download the file SetupFullUpdateDatabase852.exe from this link. In the location where you saved the file, double-click SetupFullUpdateDatabase852.exe to install the “FullUpdate852” database. Make sure SimaPro is closed otherwise you will receive a warning message. You have to do this on each computer with SimaPro single user installed (you may also copy the files). For the multi-user, one installation is sufficient. The “FullUpdate852” database will be installed in the default directory (see Box 2 above). Follow the instructions in the setup wizard. This process will install the update database on your computer, but it will not yet update the active databases. Multi-user version: since we recommend doing the database update locally, the update database does not have to be installed in one of the locations (directory aliases) defined in the SimaPro database server. Instead, you can do the update on a local hard drive and then copy your updated database back to the server (see Box 1). If you notice any older update databases (named Update802, Update805, Update810 or similar) and you are sure you already imported these updates, you can delete these with Windows Explorer to free up disk space and avoid confusion. To avoid deleting useful databases by accident, please open each database before deleting it to check for any projects that need to be kept.
3.3 Importing the update database
Follow these steps to import the new data: 1. Start SimaPro 8.5.2. If you have a multi-user SimaPro licence, log in as Manager. Make sure no other users are
logged in at this moment, because the database will be locked during import. During the update process, users cannot log in to SimaPro.
2. Check if the database you want to update is open in SimaPro. The database name is found in the blue bar at the top of the SimaPro window. If the database is not open, go to File> Open SimaPro Database and select the database you want to update (the database you usually work in).
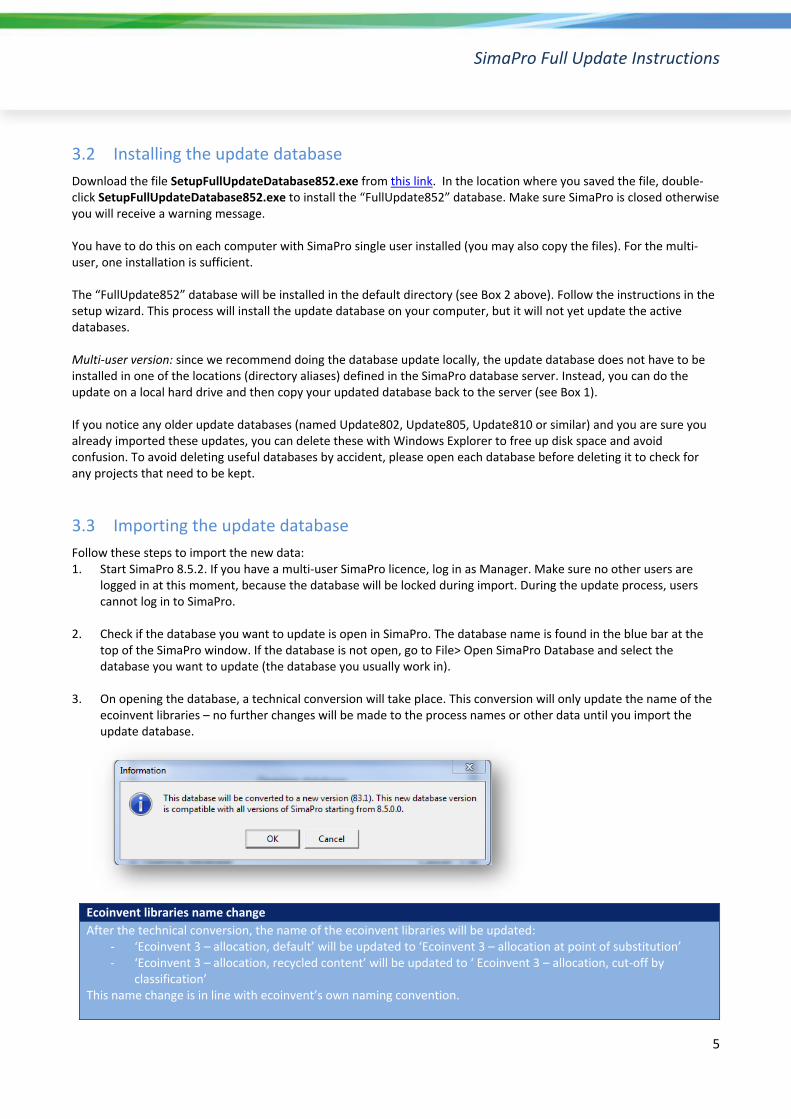
3. On opening the database, a technical conversion will take place. This conversion will only update the name of the ecoinvent libraries – no further changes will be made to the process names or other data until you import the update database.
Ecoinvent libraries name change
After the technical conversion, the name of the ecoinvent libraries will be updated: - ‘Ecoinvent 3 – allocation, default’ will be updated to ‘Ecoinvent 3 – allocation at point of substitution’ - ‘Ecoinvent 3 – allocation, recycled content’ will be updated to ‘ Ecoinvent 3 – allocation, cut-off by
classification’ This name change is in line with ecoinvent’s own naming convention.
6
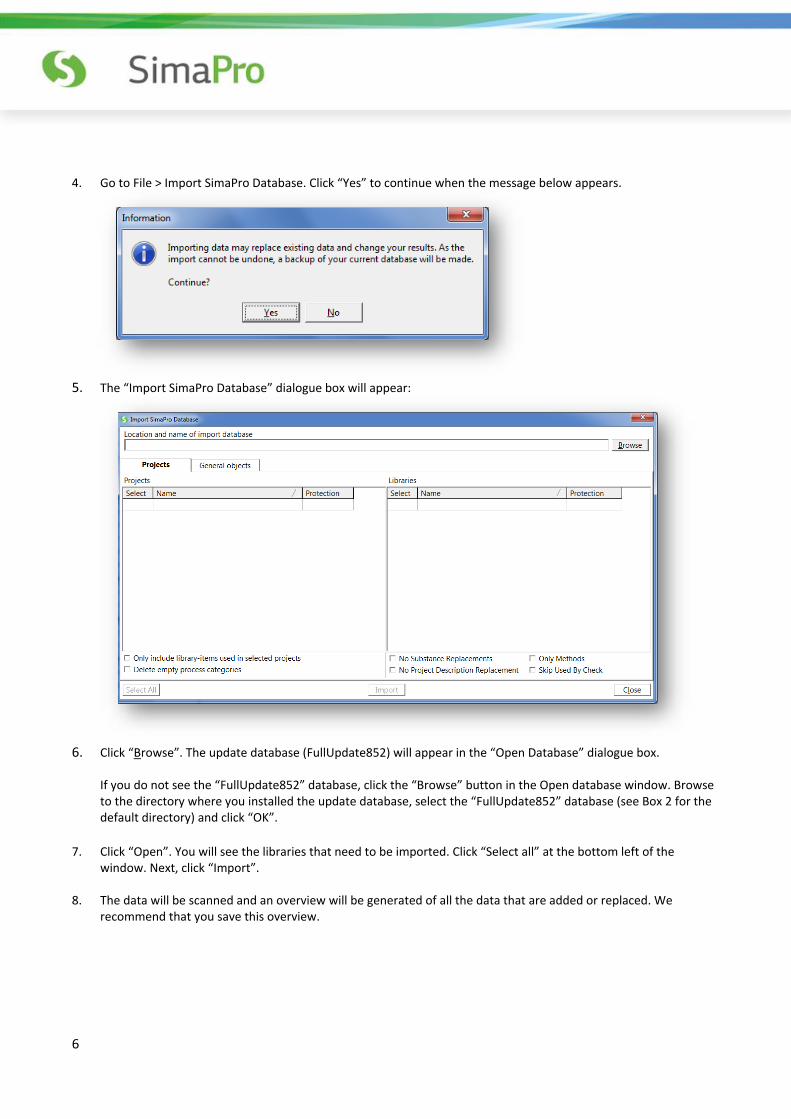
4. Go to File > Import SimaPro Database. Click “Yes” to continue when the message below appears.
5. The “Import SimaPro Database” dialogue box will appear:
6. Click “Browse”. The update database (FullUpdate852) will appear in the “Open Database” dialogue box.
If you do not see the “FullUpdate852” database, click the “Browse” button in the Open database window. Browse to the directory where you installed the update database, select the “FullUpdate852” database (see Box 2 for the default directory) and click “OK”.
7. Click “Open”. You will see the libraries that need to be imported. Click “Select all” at the bottom left of the
window. Next, click “Import”.
8. The data will be scanned and an overview will be generated of all the data that are added or replaced. We recommend that you save this overview.

SimaPro Full Update Instructions
7
9. Click “OK” to start the import process. Before data importing starts, the program will prompt you to make a backup.
After clicking “OK”, select the folder you want the save to backup file in (for example, the default directory; see Box 2). Note: if you click “Cancel”, the update procedure is stopped.
10. The data in the update database will now be imported into the existing database.
Box 3. Import errors
Should SimaPro report any import errors, please save the log file and make screenshots if possible. The overview of issues in the log file may help you to find out what went wrong. For assistance, please send an email to the SimaPro helpdesk at [email protected] and include the log file and any screenshots as attachments. We appreciate it if you could include the results of the database check, which can be done via File > SimaPro Database Management > Check Database.
8
3.4 Appending substances
The next step is to do an “append substances” action to convert some old substance names in your database to the latest substance naming convention in SimaPro. If you do not do this, mismatches between life cycle inventory and impact assessment data may occur, leading to incorrect LCA results. The replacements are defined in the append file that is installed with the update database. Appending merges two synonymous substance names into one. For example, CO2 needs to be appended to Carbon dioxide, the latter being the name used in the most recent version of SimaPro and in the impact assessment methods. Without appending CO2 to Carbon dioxide, any use of the substance named CO2 in processes will not show in the impact assessment results. 1. Go to the “Substances” section under “General Data” in the LCA Explorer screen.
2. Click “Append”. A new window will open.
3. Click “Load” on the right hand side and select the append file: “AppendSubstances852.xlsx”. The append file is
found in the same directory as the update database (see Box 2 for default directories).
4. Click “Append” on the right hand side of the window. After a final confirmation, the substances will be appended.
Depending on the size of your database, this may take some time.
3.5 Updating links in your projects to ecoinvent 3.4
3.5.1 Updating links from ecoinvent 2.2 to ecoinvent 3.4
When carrying out the full update database, if the ecoinvent 2.2 data library was available in your database, it will remain alongside the new ecoinvent 3.4 library. Furthermore, any links in your projects to ecoinvent 2.2 will remain intact. If you wish to change those links from ecoinvent 2.2 to the most recent equivalent version in ecoinvent 3.4 (where possible), you can use the Projects to Libraries Links manager to replace the links manually (please refer to section 3.5.2.2).
3.5.2 Updating obsolete links
Since ecoinvent 3.1, 3.2 or 3.3 will be replaced by the updated 3.4 library, the majority of links will be updated automatically to ecoinvent 3.4. However, a number of processes are no longer supported and are considered obsolete.
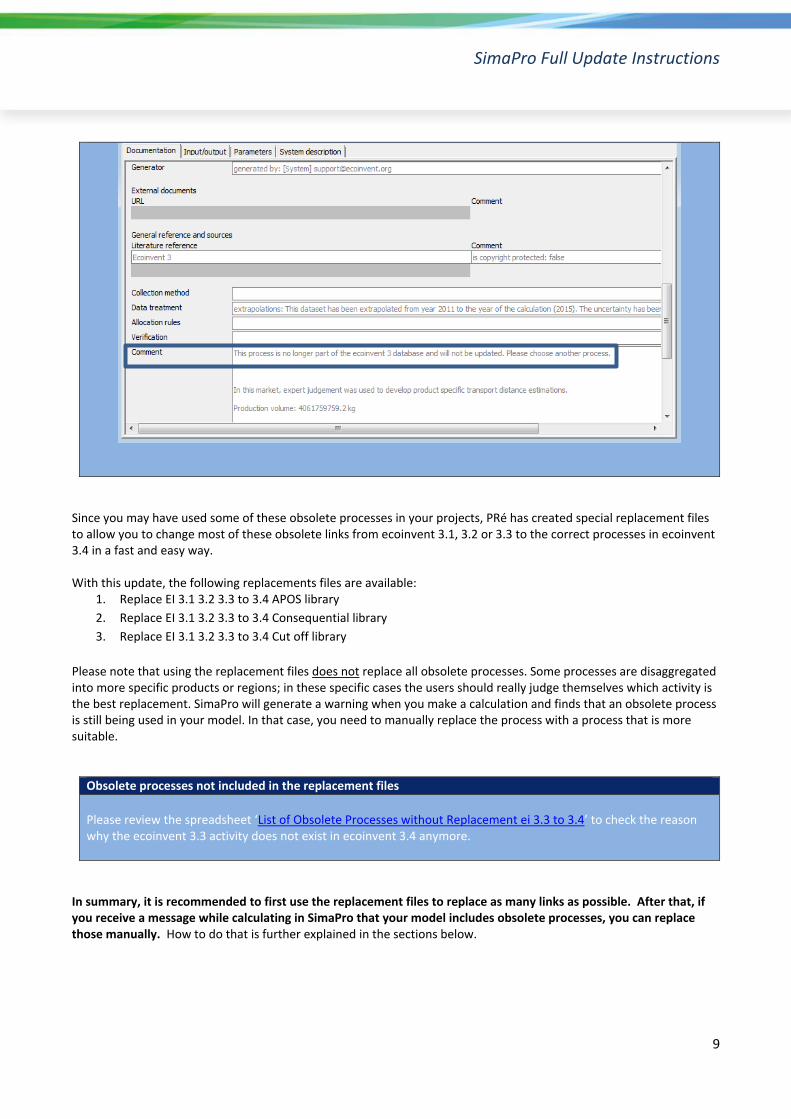
How can I tell which processes are now obsolete? The quickest way to review the obsolete processes is by checking the 'Obsolete' sub-categories in the ecoinvent 3.4 libraries (Material/Others/Obsolete, Energy/Others/Obsolete, etc..). In the Documentation tab of those processes, the Comment field states that the process is no longer part of the ecoinvent 3 database (see screenshot below). If you select any of those processes and click on ' Used by', you will get an overview of the projects which are using the selected obsolete process. In addition, if you calculate a process or product stage that is or contains an obsolete process, you will get a warning message. The warning message indicates which process(es) are obsolete, and you can then replace them using the replacement files (if possible) or manually.
SimaPro Full Update Instructions
9
Since you may have used some of these obsolete processes in your projects, PRé has created special replacement files to allow you to change most of these obsolete links from ecoinvent 3.1, 3.2 or 3.3 to the correct processes in ecoinvent 3.4 in a fast and easy way. With this update, the following replacements files are available:
1. Replace EI 3.1 3.2 3.3 to 3.4 APOS library
2. Replace EI 3.1 3.2 3.3 to 3.4 Consequential library
3. Replace EI 3.1 3.2 3.3 to 3.4 Cut off library
Please note that using the replacement files does not replace all obsolete processes. Some processes are disaggregated into more specific products or regions; in these specific cases the users should really judge themselves which activity is the best replacement. SimaPro will generate a warning when you make a calculation and finds that an obsolete process is still being used in your model. In that case, you need to manually replace the process with a process that is more suitable.
Obsolete processes not included in the replacement files Please review the spreadsheet ‘List of Obsolete Processes without Replacement ei 3.3 to 3.4’ to check the reason why the ecoinvent 3.3 activity does not exist in ecoinvent 3.4 anymore.
In summary, it is recommended to first use the replacement files to replace as many links as possible. After that, if you receive a message while calculating in SimaPro that your model includes obsolete processes, you can replace those manually. How to do that is further explained in the sections below.
10
3.5.2.1 Using the replacement files
Follow the next steps for replacing the obsolete links in your project using one of the replacement files. You can also
refer to this video for general instructions on using the tool: Projects to Libraries Links Manager.
1. Open a project in your updated database. This can be any project.
2. Go to Tools>Projects to Libraries Links Manager.
3. Select the project(s) of which you want to change links (press Ctrl-A to select all projects and Ctrl-Shift-A to
deselect). You can use the filter to select project by (part of the) name.
4. Select the ecoinvent libraries where you want to replace the links. Note: make sure that these ecoinvent libraries
are also selected in the Libraries section in SimaPro.
5. Click “Scan”.
6. View the links found by clicking on the tab “Links”.
7. Click on the “Import replacements” button.
8. Select the appropriate Replacement file which can be found in the database directory (see Box 2) and click “Open”.
9. Check the links which are going to be replaced in the column “Replace name”. Note: It is possible that there are no
replacements found. That means that projects you selected do not contain links that can be replaced using the
replacement files. Nevertheless, there may still be some links that need to be replaced manually.
10. Store your links in order to be able to check afterwards. It is also possible to add new replacement links yourself.
11. Click “Replace” to replace the links to the chosen library. You will get a message how many links are replaced to the
chosen library.
3.5.2.2 Manual replacement (or creating your own replacement file)
Once you determine that your project(s) still contain obsolete links, you can replace these manually by selecting an
alternative process in the relevant process/ product stages records. You can also use the Projects to Libraries Links
Manager to manually replace multiple links that were not replaced using replacement files (please also refer to this
video for an example)
1. Go to Tools>Projects to Libraries Links Manager.
2. Select the ecoinvent libraries where you want to replace the links. Note: make sure that these ecoinvent libraries
are also selected in the Libraries section in SimaPro.
3. Click “Scan”.
4. View the links found by clicking on the tab “Links”. The column “Child name” shows the library.
5. Double click any of the empty cells you want to replace under the column “Replace name”.
6. A dialogue box will open in which you can choose an alternative link in the preferred library. Use the function
“Show as list” on the right hand side of the screen to list all links. Filter the links from the preferred library by
entering the suffix of that library in the filter box at the bottom of your screen.
7. Choose the preferred link and click “Select”.
8. You will get a message ‘* links referencing the same product. Use the selected replacement for them too?’ These
are the same links which are used in different projects or within projects. Choose “Yes” to replace all links. If you
click “No” only the selected link will be replaced.
9. Click “Replace” to replace the links. If you want to replace all links at once and you did not finish the work, you can
export the already selected links to Excel and import it at a later stage by clicking “Export replacements” and saving
your replacement file.

SimaPro Full Update Instructions
11
3.6 Using the Replacement file on links to US LCI library
In the update of the US LCI library (released with SimaPro 8.1), a number of changes were made that require your attention if you have used US LCI data in your projects. Please note that this is an optional step. With this update it was not possible to replace all processes 1:1 with the updated processes. We have decided to import multiple output processes as such, whereas previously we converted these to multiple single output files (some of which were empty). This means that some processes had to become obsolete and a new multiple output process is created. SimaPro, however, cannot replace 4 processes with the same single process during the import database procedure. To ensure that you link to the new processes and thus get the correct updated results, you need to check for any links that need replacement. PRé created a special replacement file to allow you to change the links in your project to the correct processes automatically. How to use this file is described below. Using the replacement file Follow the next steps for replacing the links in your project to your present library to the preferred library using one of the replacement file: 1. Open a project in your updated database. This can be any project. 2. Open the “Project to library links manager” window by going to Tools>Project to library Links Manager. 3. Select the project(s) of which you know that they (could) use the US LCI library. Use Ctrl-A to select all projects
(Ctrl-Shift-A to deselect). You can also use the filter to select project by (part of the) name.
4. Select the US LCI library. 5. Click on Scan. 6. View the links found by clicking on the Links tab. This is an overview of all links to the US LCI library from the
selected processes. 7. Click on the “Import replacements” button. 8. Load the replacement file “"Replace US LCI to SimaPro 810.xlsx” which can be downloaded here. 9. Check the links which are going to be replaced in the column ‘Replace name’. Note that it is possible that no
replacements are needed.
12
10. Store your links in order to be able to check afterwards. It is also possible to add new replacement links yourself. 11. Click on the Replace button to replace the links. You will get a confirmation message how many links are replaced
to the chosen library.
You have now finished the update procedure! Repeat for any other database you wish to update.
4 Contact Us Please contact us or your local partner if you have questions about new features in the SimaPro software or database, or if you have any other questions related to the update.
Website: http://www.pre-sustainability.com/contact
Email: [email protected]
Phone: +31-33-4504010