Embed Size (px)
Citation preview
QSM, Inc. Helpful Hints 2014
1
SLIM‐EstimateandMicrosoftProjectBestPractices
There are many activities to perform during the life of a software development project. No single tool provides all of the functionality or data that is needed to perform all these activities. SLIM‐Estimate is built to estimate projects. Many organizations use Microsoft Excel and Microsoft Project (MS Project) to for detailed planning. Each planning tool offers features that support different, yet complimentary methodologies. SLIM‐Estimate can exchange project data with a number of applications, using the import and export utilities, or the Application Program Interface (API). Although these features are simple, some fore thought is required to take full advantage of SLIM, and share meaningful data with other applications. This paper presents best practices for using SLIM‐Estimate with Microsoft Project for modeling software development life cycles and their detailed Work Breakdown Structures (WBS). Best Practices for project tracking and oversight will be presented in a separate paper on SLIM‐Control.
DefiningtheProductRelationshipHow does SLIM‐Estimate differ from MS Project? The simplest answer is that SLIM‐Estimate is a macro level estimating tool, and MS Project is a micro level planning and scheduling tool. A feature comparison table can be found at the end of this document. The SLIM methodology is actualized in several features that distinguish it as the best estimation tool:
SLIM estimates the entire project based upon software product size and team productivity.
SLIM designates WBS task and resource allocation as a percent of the highest task group (phase) to preserve the relative size of low level activities, i.e., distribution of work required.
SLIM’s software production equation models the non‐linear relationship between effort and duration inherent in software development projects.
SLIM includes defect discovery and removal in determining effort and duration requirements.
SLIM explicitly calculates project risk as a function of product size and team productivity uncertainty.
SLIM promotes in‐depth analysis of a range of project outcomes by logging and comparing alternative solutions.
QSM, Inc. Helpful Hints 2014
2
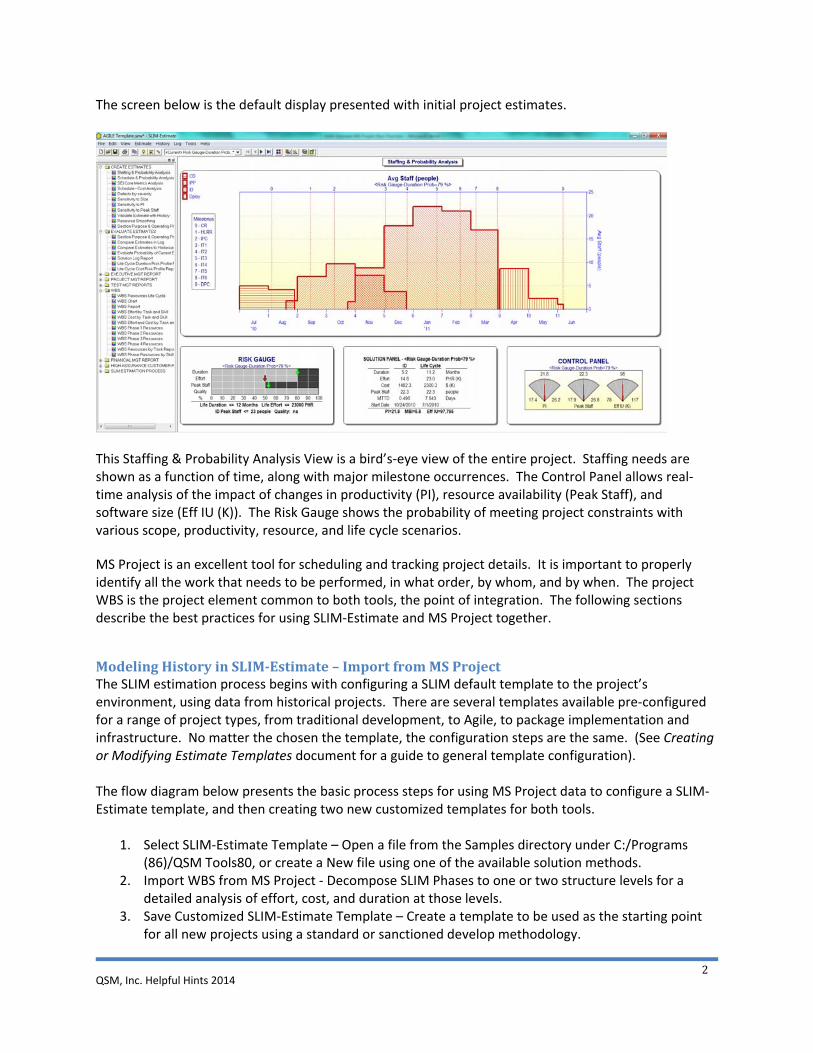
The screen below is the default display presented with initial project estimates.
This Staffing & Probability Analysis View is a bird’s‐eye view of the entire project. Staffing needs are shown as a function of time, along with major milestone occurrences. The Control Panel allows real‐time analysis of the impact of changes in productivity (PI), resource availability (Peak Staff), and software size (Eff IU (K)). The Risk Gauge shows the probability of meeting project constraints with various scope, productivity, resource, and life cycle scenarios.
MS Project is an excellent tool for scheduling and tracking project details. It is important to properly identify all the work that needs to be performed, in what order, by whom, and by when. The project WBS is the project element common to both tools, the point of integration. The following sections describe the best practices for using SLIM‐Estimate and MS Project together.
ModelingHistoryinSLIM‐Estimate–ImportfromMSProjectThe SLIM estimation process begins with configuring a SLIM default template to the project’s environment, using data from historical projects. There are several templates available pre‐configured for a range of project types, from traditional development, to Agile, to package implementation and infrastructure. No matter the chosen the template, the configuration steps are the same. (See Creating or Modifying Estimate Templates document for a guide to general template configuration). The flow diagram below presents the basic process steps for using MS Project data to configure a SLIM‐Estimate template, and then creating two new customized templates for both tools.
1. Select SLIM‐Estimate Template – Open a file from the Samples directory under C:/Programs (86)/QSM Tools80, or create a New file using one of the available solution methods.
2. Import WBS from MS Project ‐ Decompose SLIM Phases to one or two structure levels for a detailed analysis of effort, cost, and duration at those levels.
3. Save Customized SLIM‐Estimate Template – Create a template to be used as the starting point for all new projects using a standard or sanctioned develop methodology.
QSM, Inc. Helpful Hints 2014
3
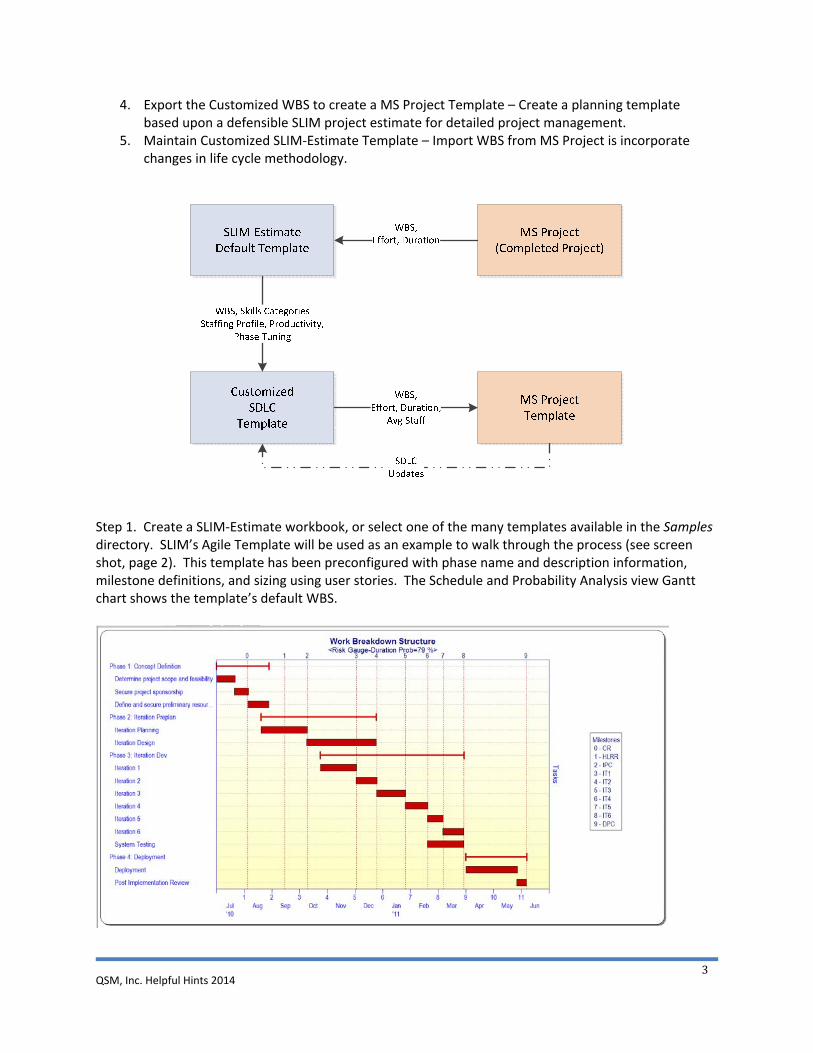
4. Export the Customized WBS to create a MS Project Template – Create a planning template based upon a defensible SLIM project estimate for detailed project management.
5. Maintain Customized SLIM‐Estimate Template – Import WBS from MS Project is incorporate changes in life cycle methodology.
Step 1. Create a SLIM‐Estimate workbook, or select one of the many templates available in the Samples directory. SLIM’s Agile Template will be used as an example to walk through the process (see screen shot, page 2). This template has been preconfigured with phase name and description information, milestone definitions, and sizing using user stories. The Schedule and Probability Analysis view Gantt chart shows the template’s default WBS.
QSM, Inc. Helpful Hints 2014
4
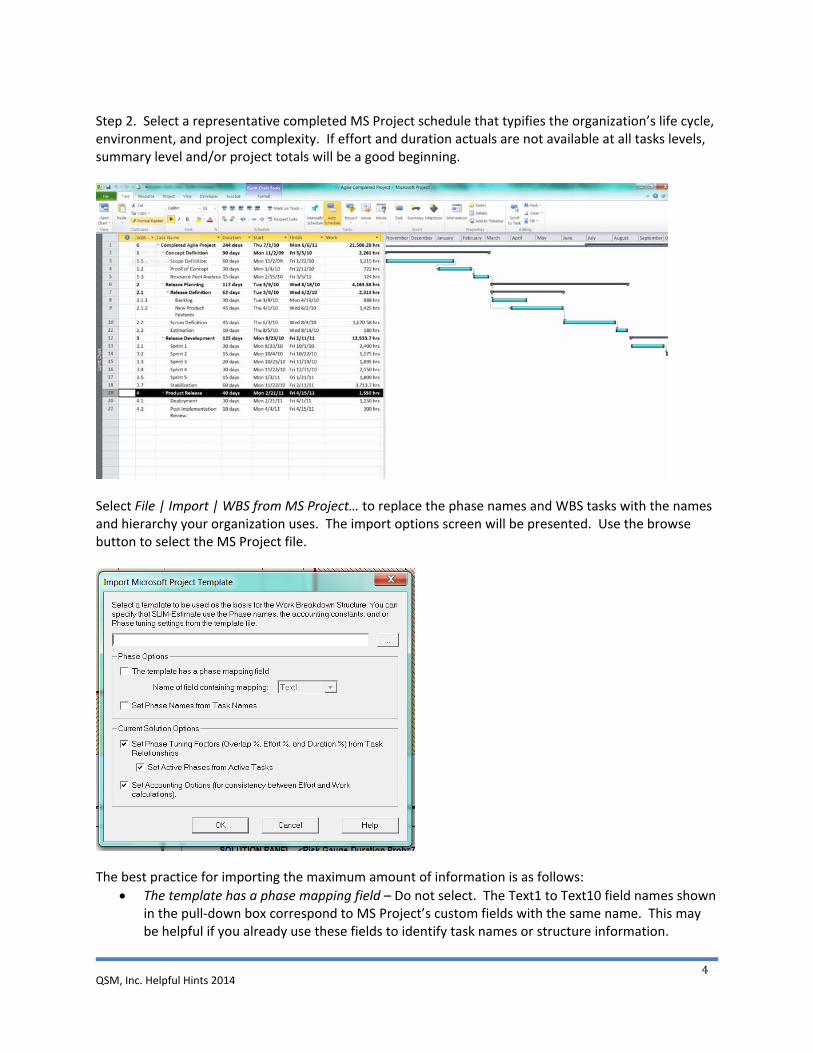
Step 2. Select a representative completed MS Project schedule that typifies the organization’s life cycle, environment, and project complexity. If effort and duration actuals are not available at all tasks levels, summary level and/or project totals will be a good beginning.
Select File | Import | WBS from MS Project… to replace the phase names and WBS tasks with the names and hierarchy your organization uses. The import options screen will be presented. Use the browse button to select the MS Project file.
The best practice for importing the maximum amount of information is as follows:
The template has a phase mapping field – Do not select. The Text1 to Text10 field names shown in the pull‐down box correspond to MS Project’s custom fields with the same name. This may be helpful if you already use these fields to identify task names or structure information.
QSM, Inc. Helpful Hints 2014
5
Otherwise, extra work is required to populate one of these fields and map it to SLIM‐Estimate.
Set Phase Names and Task Names – Select this option. Add ‘Phase x:’ as a prefix to the corresponding summary tasks in MS Project schedule to enable SLIM to properly map task names and hierarchy. Because SLIM converts the actual duration and effort values in MS Project to relative percentages, this data tells SLIM how to adjust all of the children tasks associated with each phase.
Example: Edit Task Name ‘Concept Definition’ to read ‘Phase 1: Concept Definition’
Select Phase Tuning Factors (Overlap %, Effort % , and Duration %) from Task Relationships – Select this option. One of the advantages of importing actual data is that SLIM will preserve the staffing profile and phase relationships reflected by the WBS.
Select Active Phases from Active Tasks – Select this option. SLIM will use the MS Project phase mapping information to designate the active phases, as shown on the Solution Assumptions screen within SLIM‐Estimate.
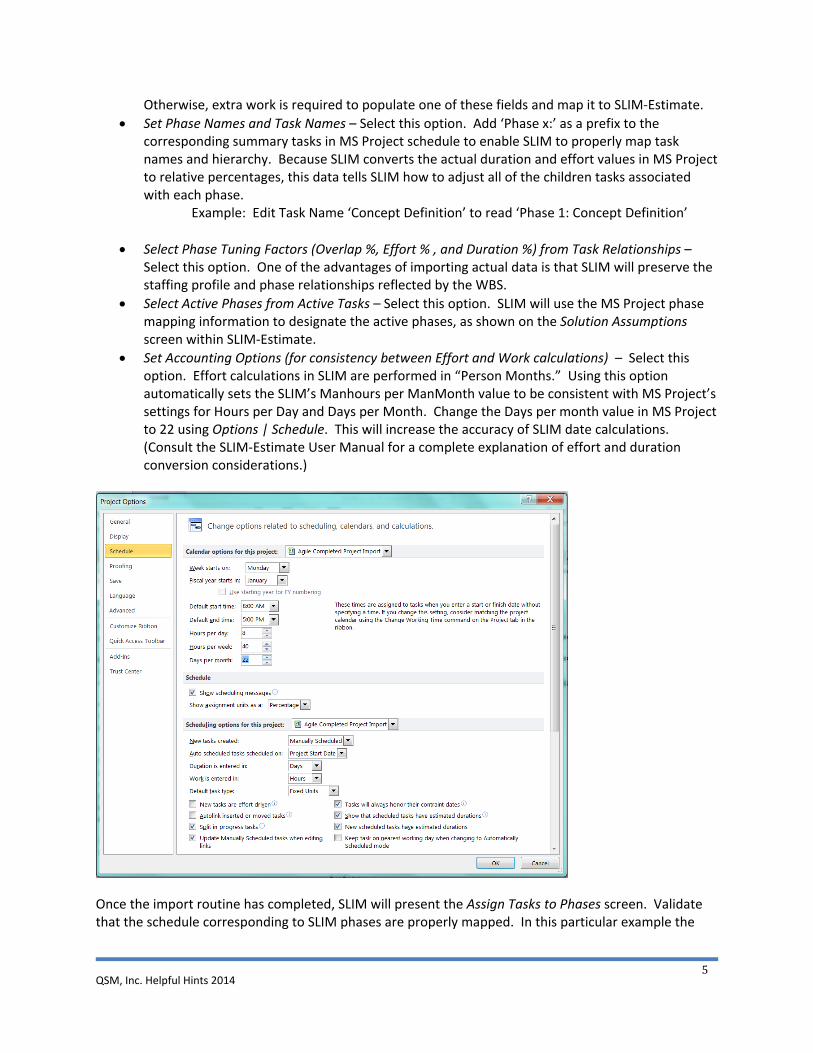
Set Accounting Options (for consistency between Effort and Work calculations) – Select this option. Effort calculations in SLIM are performed in “Person Months.” Using this option automatically sets the SLIM’s Manhours per ManMonth value to be consistent with MS Project’s settings for Hours per Day and Days per Month. Change the Days per month value in MS Project to 22 using Options | Schedule. This will increase the accuracy of SLIM date calculations. (Consult the SLIM‐Estimate User Manual for a complete explanation of effort and duration conversion considerations.)
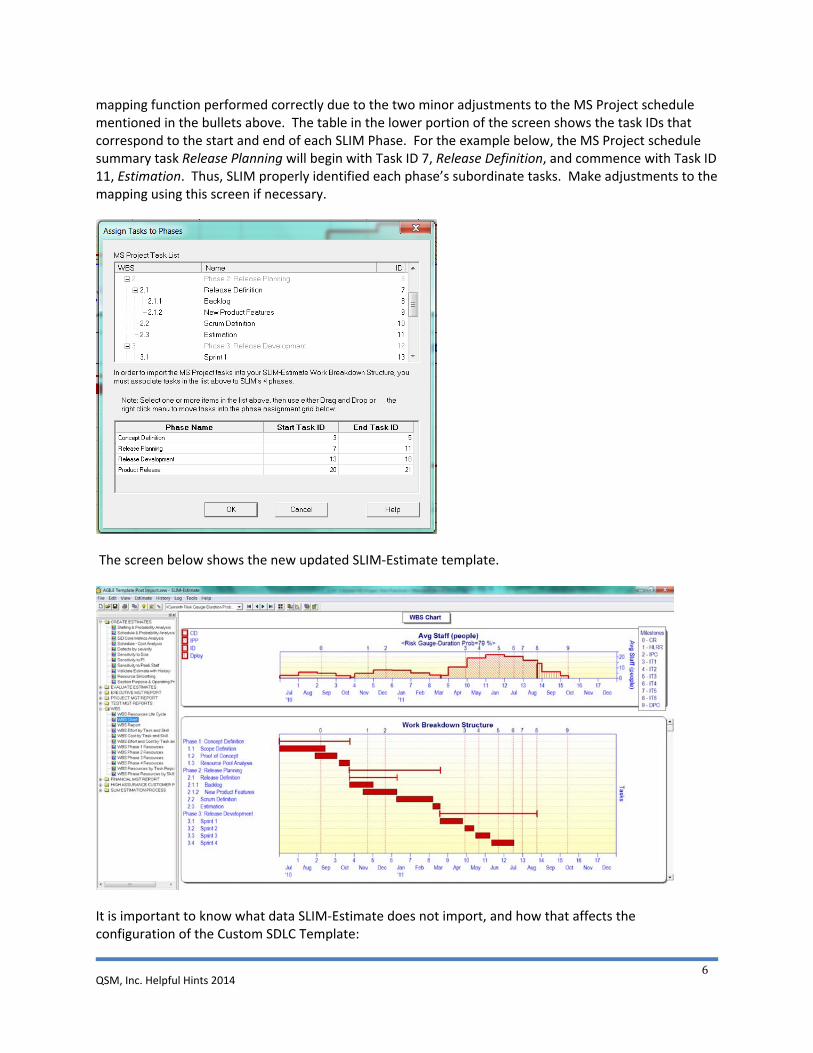
Once the import routine has completed, SLIM will present the Assign Tasks to Phases screen. Validate that the schedule corresponding to SLIM phases are properly mapped. In this particular example the
QSM, Inc. Helpful Hints 2014
6
mapping function performed correctly due to the two minor adjustments to the MS Project schedule mentioned in the bullets above. The table in the lower portion of the screen shows the task IDs that correspond to the start and end of each SLIM Phase. For the example below, the MS Project schedule summary task Release Planning will begin with Task ID 7, Release Definition, and commence with Task ID 11, Estimation. Thus, SLIM properly identified each phase’s subordinate tasks. Make adjustments to the mapping using this screen if necessary.
The screen below shows the new updated SLIM‐Estimate template.
It is important to know what data SLIM‐Estimate does not import, and how that affects the configuration of the Custom SDLC Template:
QSM, Inc. Helpful Hints 2014
7
Task Dependencies – This data has no effect on SLIM’s estimation calculations. Phase subtasks start and end dates are designated as a percentage of phase start or phase end. SLIM calculates the percentage upon import, based upon relative duration of the subtasks. The resulting Gantt chart accurately depicts task relative start and end dates.
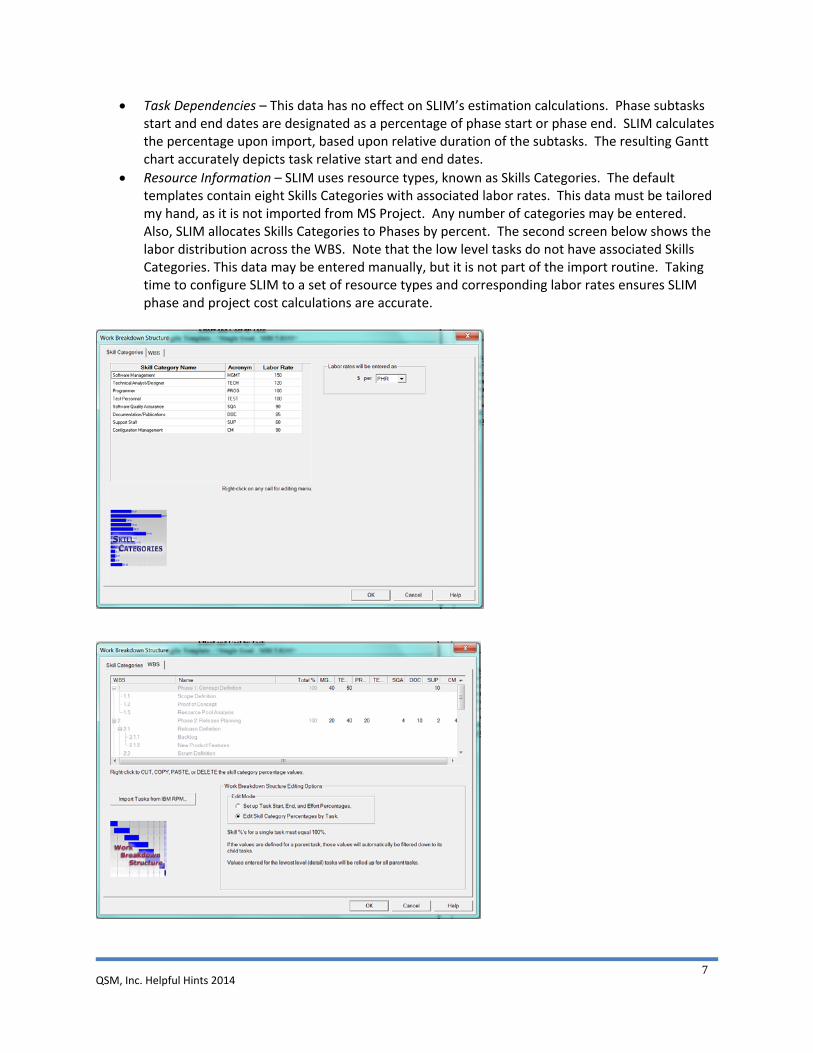
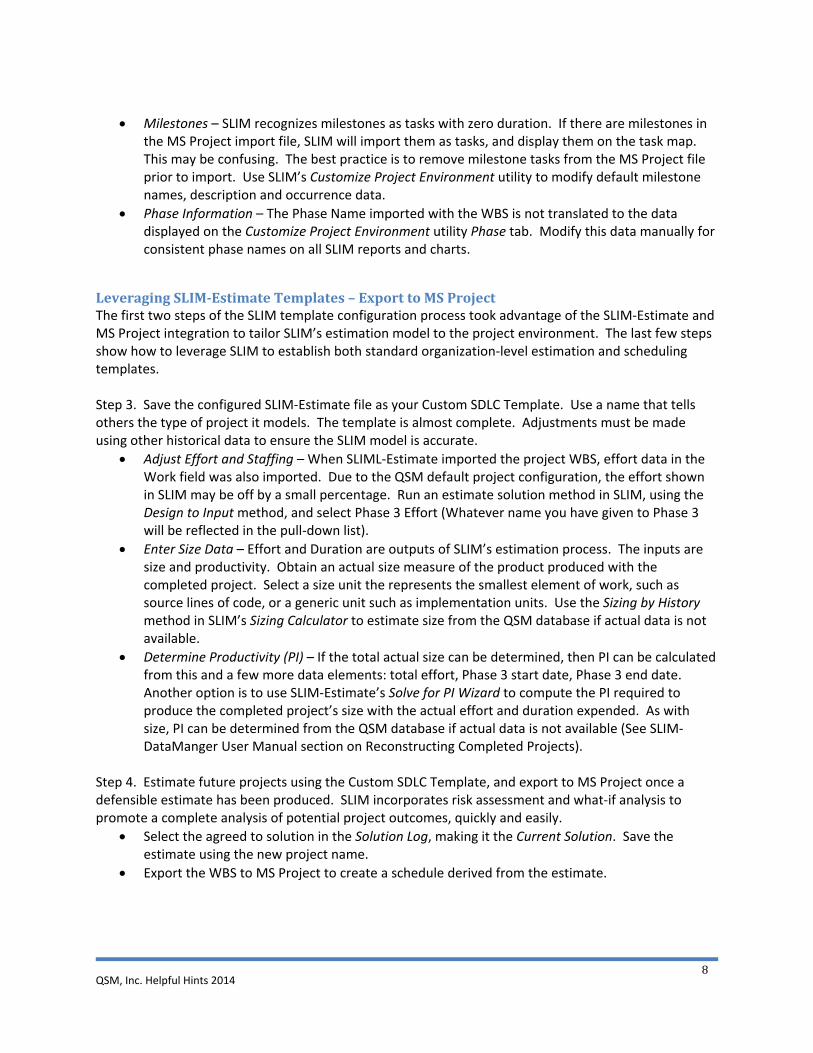
Resource Information – SLIM uses resource types, known as Skills Categories. The default templates contain eight Skills Categories with associated labor rates. This data must be tailored my hand, as it is not imported from MS Project. Any number of categories may be entered. Also, SLIM allocates Skills Categories to Phases by percent. The second screen below shows the labor distribution across the WBS. Note that the low level tasks do not have associated Skills Categories. This data may be entered manually, but it is not part of the import routine. Taking time to configure SLIM to a set of resource types and corresponding labor rates ensures SLIM phase and project cost calculations are accurate.
QSM, Inc. Helpful Hints 2014
8
Milestones – SLIM recognizes milestones as tasks with zero duration. If there are milestones in the MS Project import file, SLIM will import them as tasks, and display them on the task map. This may be confusing. The best practice is to remove milestone tasks from the MS Project file prior to import. Use SLIM’s Customize Project Environment utility to modify default milestone names, description and occurrence data.
Phase Information – The Phase Name imported with the WBS is not translated to the data displayed on the Customize Project Environment utility Phase tab. Modify this data manually for consistent phase names on all SLIM reports and charts.
LeveragingSLIM‐EstimateTemplates–ExporttoMSProjectThe first two steps of the SLIM template configuration process took advantage of the SLIM‐Estimate and MS Project integration to tailor SLIM’s estimation model to the project environment. The last few steps show how to leverage SLIM to establish both standard organization‐level estimation and scheduling templates. Step 3. Save the configured SLIM‐Estimate file as your Custom SDLC Template. Use a name that tells others the type of project it models. The template is almost complete. Adjustments must be made using other historical data to ensure the SLIM model is accurate.
Adjust Effort and Staffing – When SLIML‐Estimate imported the project WBS, effort data in the Work field was also imported. Due to the QSM default project configuration, the effort shown in SLIM may be off by a small percentage. Run an estimate solution method in SLIM, using the Design to Input method, and select Phase 3 Effort (Whatever name you have given to Phase 3 will be reflected in the pull‐down list).
Enter Size Data – Effort and Duration are outputs of SLIM’s estimation process. The inputs are size and productivity. Obtain an actual size measure of the product produced with the completed project. Select a size unit the represents the smallest element of work, such as source lines of code, or a generic unit such as implementation units. Use the Sizing by History method in SLIM’s Sizing Calculator to estimate size from the QSM database if actual data is not available.
Determine Productivity (PI) – If the total actual size can be determined, then PI can be calculated from this and a few more data elements: total effort, Phase 3 start date, Phase 3 end date. Another option is to use SLIM‐Estimate’s Solve for PI Wizard to compute the PI required to produce the completed project’s size with the actual effort and duration expended. As with size, PI can be determined from the QSM database if actual data is not available (See SLIM‐DataManger User Manual section on Reconstructing Completed Projects).
Step 4. Estimate future projects using the Custom SDLC Template, and export to MS Project once a defensible estimate has been produced. SLIM incorporates risk assessment and what‐if analysis to promote a complete analysis of potential project outcomes, quickly and easily.
Select the agreed to solution in the Solution Log, making it the Current Solution. Save the estimate using the new project name.
Export the WBS to MS Project to create a schedule derived from the estimate.
QSM, Inc. Helpful Hints 2014
9
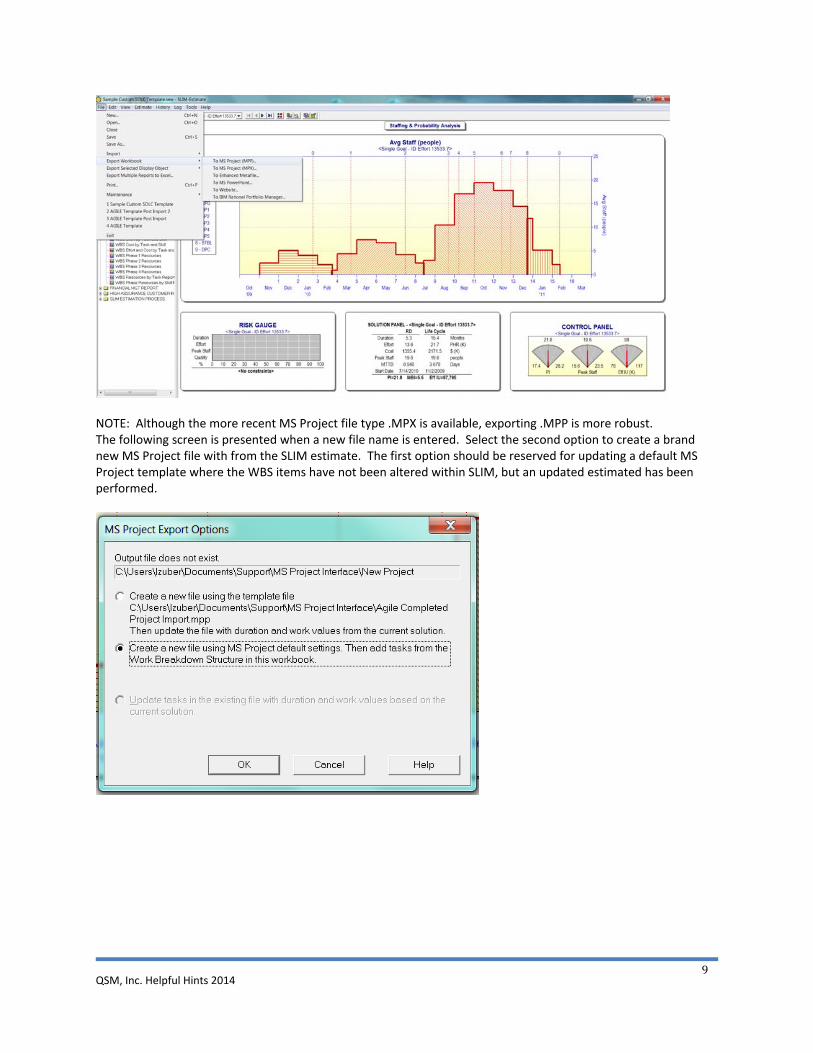
NOTE: Although the more recent MS Project file type .MPX is available, exporting .MPP is more robust. The following screen is presented when a new file name is entered. Select the second option to create a brand new MS Project file with from the SLIM estimate. The first option should be reserved for updating a default MS Project template where the WBS items have not been altered within SLIM, but an updated estimated has been performed.
QSM, Inc. Helpful Hints 2014
10
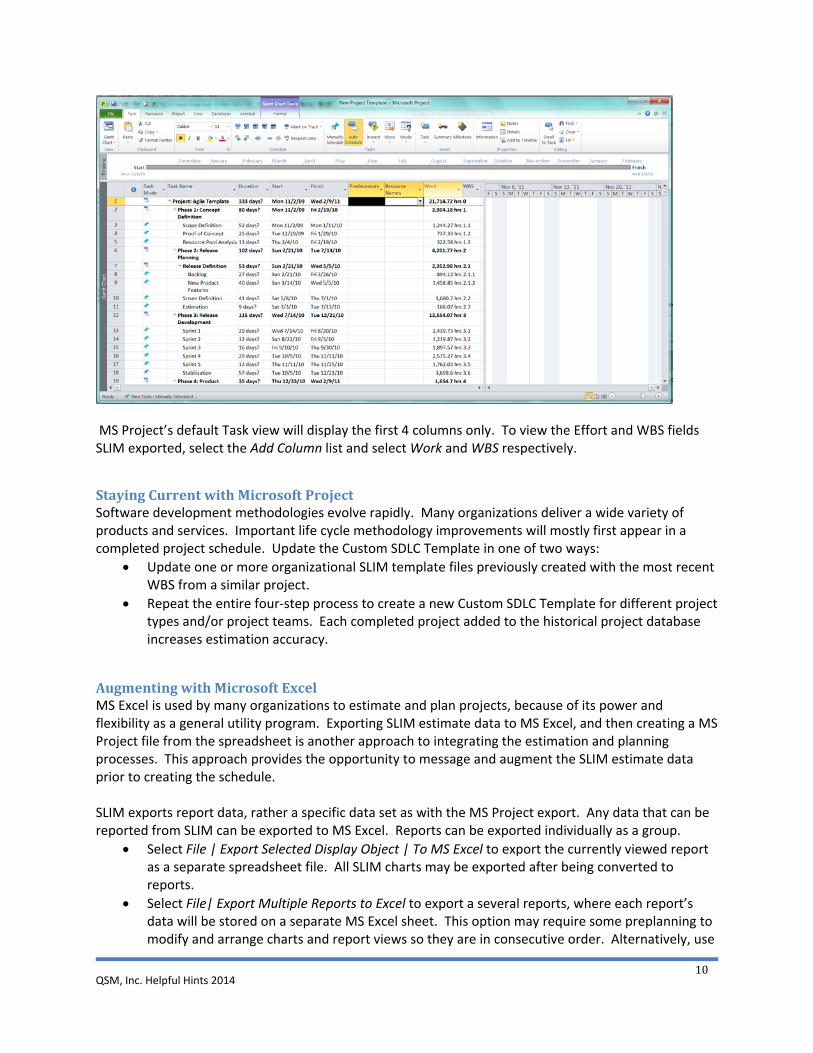
MS Project’s default Task view will display the first 4 columns only. To view the Effort and WBS fields SLIM exported, select the Add Column list and select Work and WBS respectively.
StayingCurrentwithMicrosoftProjectSoftware development methodologies evolve rapidly. Many organizations deliver a wide variety of products and services. Important life cycle methodology improvements will mostly first appear in a completed project schedule. Update the Custom SDLC Template in one of two ways:
Update one or more organizational SLIM template files previously created with the most recent WBS from a similar project.
Repeat the entire four‐step process to create a new Custom SDLC Template for different project types and/or project teams. Each completed project added to the historical project database increases estimation accuracy.
AugmentingwithMicrosoftExcelMS Excel is used by many organizations to estimate and plan projects, because of its power and flexibility as a general utility program. Exporting SLIM estimate data to MS Excel, and then creating a MS Project file from the spreadsheet is another approach to integrating the estimation and planning processes. This approach provides the opportunity to message and augment the SLIM estimate data prior to creating the schedule. SLIM exports report data, rather a specific data set as with the MS Project export. Any data that can be reported from SLIM can be exported to MS Excel. Reports can be exported individually as a group.
Select File | Export Selected Display Object | To MS Excel to export the currently viewed report as a separate spreadsheet file. All SLIM charts may be exported after being converted to reports.
Select File| Export Multiple Reports to Excel to export a several reports, where each report’s data will be stored on a separate MS Excel sheet. This option may require some preplanning to modify and arrange charts and report views so they are in consecutive order. Alternatively, use
QSM, Inc. Helpful Hints 2014
11
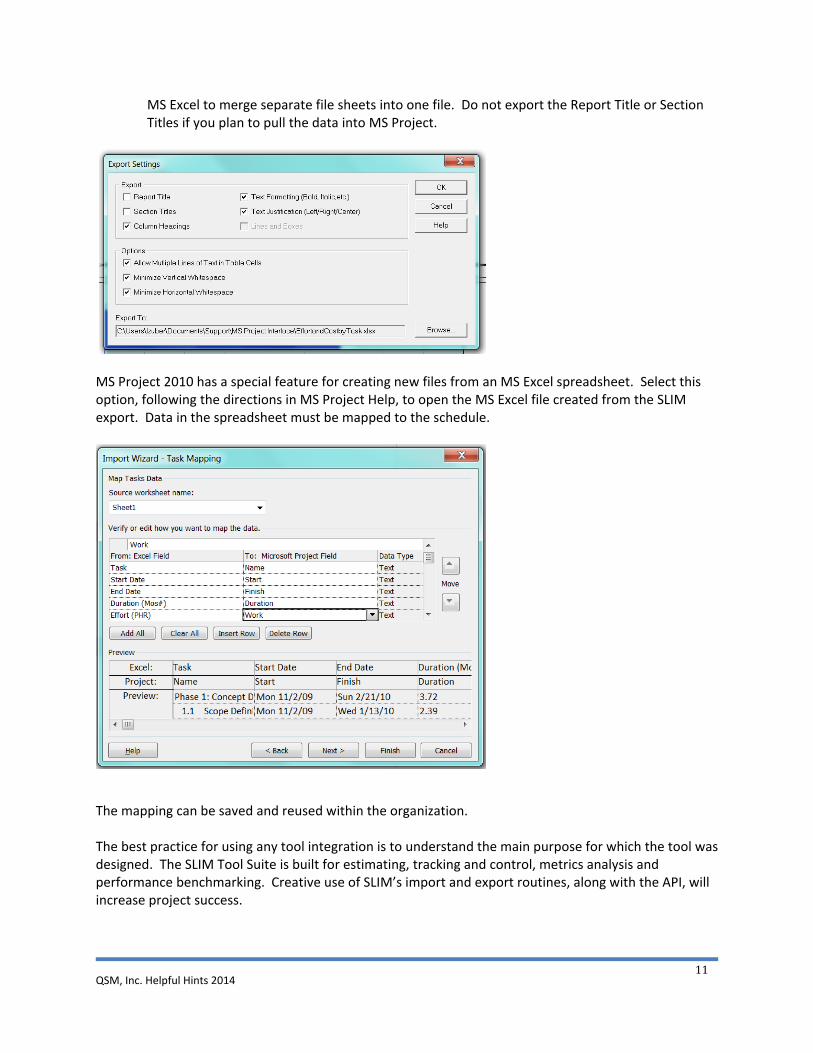
MS Excel to merge separate file sheets into one file. Do not export the Report Title or Section Titles if you plan to pull the data into MS Project.
MS Project 2010 has a special feature for creating new files from an MS Excel spreadsheet. Select this option, following the directions in MS Project Help, to open the MS Excel file created from the SLIM export. Data in the spreadsheet must be mapped to the schedule.
The mapping can be saved and reused within the organization. The best practice for using any tool integration is to understand the main purpose for which the tool was designed. The SLIM Tool Suite is built for estimating, tracking and control, metrics analysis and performance benchmarking. Creative use of SLIM’s import and export routines, along with the API, will increase project success.


![[MS-ACCDT]: Access Template File Format](https://img.pdfslide.net/doc/110x75/6190092cb04f691705454409/ms-accdt-access-template-file-format.jpg)

