Embed Size (px)
Citation preview

721-1011-000 Rev: A December 2016
Spectralink VIEW Certified Configuration Guide
Aerohive Networks Aerohive Access Point AP230
Spectralink VIEW Certified Configuration Guide: Aerohive Networks
721-1011-000_A.docx December 2016 2
Copyright Notice
© 2016 Spectralink Corporation All rights reserved. SpectralinkTM, the Spectralink logo and the names
and marks associated with Spectralink’s products are trademarks and/or service marks of Spectralink
Corporation and are common law marks in the United States and various other countries. All other
trademarks are property of their respective owners. No portion hereof may be reproduced or transmitted
in any form or by any means, for any purpose other than the recipient’s personal use, without the express
written permission of Spectralink.
All rights reserved under the International and pan-American Copyright Conventions. No part of this
manual, or the software described herein, may be reproduced or transmitted in any form or by any
means, or translated into another language or format, in whole or in part, without the express written
permission of Spectralink Corporation.
Do not remove (or allow any third party to remove) any product identification, copyright or other notices.
Notice
Spectralink Corporation has prepared this document for use by Spectralink personnel and customers.
The drawings and specifications contained herein are the property of Spectralink and shall be neither
reproduced in whole or in part without the prior written approval of Spectralink, nor be implied to grant any
license to make, use, or sell equipment manufactured in accordance herewith.
Spectralink reserves the right to make changes in specifications and other information contained in this
document without prior notice, and the reader should in all cases consult Spectralink to determine
whether any such changes have been made.
NO REPRESENTATION OR OTHER AFFIRMATION OF FACT CONTAINED IN THIS DOCUMENT
INCLUDING BUT NOT LIMITED TO STATEMENTS REGARDING CAPACITY, RESPONSE-TIME
PERFORMANCE, SUITABILITY FOR USE, OR PERFORMANCE OF PRODUCTS DESCRIBED
HEREIN SHALL BE DEEMED TO BE A WARRANTY BY SPECTRALINK FOR ANY PURPOSE, OR
GIVE RISE TO ANY LIABILITY OF SPECTRALINK WHATSOEVER.
Contact Information
US Location Denmark Location UK Location
+1 800-775-5330 +45 7560 2850 +44 (0) 20 3284 1536
Spectralink Corporation Spectralink Europe ApS Spectralink Europe UK
2560 55th Street Bygholm Soepark 21 E Stuen 329 Bracknell, Doncastle Road
Boulder, CO 80301 8700 Horsens Bracknell, Berkshire, RG12 8PE
USA Denmark United Kingdom
721-1011-000_A.docx December 2016 3
Contents
Chapter 1: Introduction ....................................................... 4
Certified Product Summary .............................................................................................. 4
Known Limitations ............................................................................................................ 5
Spectralink References .................................................................................................... 5
Support Documents ..................................................................................................... 6
White Papers ............................................................................................................... 6
Product Support ............................................................................................................... 7
Chapter 2: Overview ........................................................... 8
Network Topology............................................................................................................. 8
Chapter 3: Initial Administrative Setup, HiveManager Initialization . 9
Login to Hive Manager, Enter Entitlement Keys, and Initialize Administrative Settings
...................................................................................................................................... 9
Upgrade HiveManager to the Latest Version .................................................................12
Chapter 4: AP Install .......................................................... 13
Import the APs into Managed Devices ...........................................................................13
Upgrade AP Firmware .....................................................................................................16
Chapter 5: Configure Network Settings ................................... 18
Define an External Radius Server ...................................................................................18
Define Network Configuration.........................................................................................20
Configure Network Policy ............................................................................................20
Configure Interfaces and User Access ........................................................................21
Configure and Update Devices ....................................................................................30
721-1011-000_A.docx December 2016 4
Chapter 1: Introduction
Spectralink’s Voice Interoperability for Enterprise Wireless (VIEW) Certification Program is
designed to ensure interoperability and high performance between PIVOT™ by Spectralink®
(87-Series) and 84-Series Wireless Telephones and WLAN infrastructure products.
The products listed below have been tested in Spectralink’s lab and have passed VIEW
Certification.
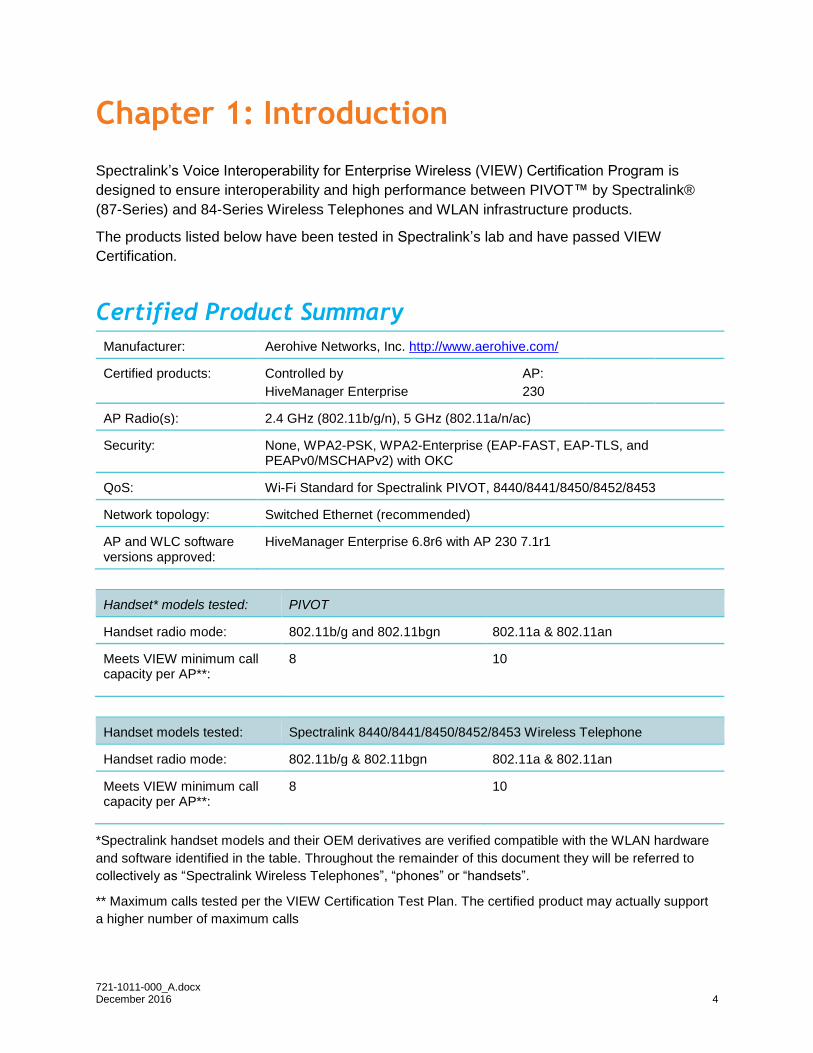
Certified Product Summary
Manufacturer: Aerohive Networks, Inc. http://www.aerohive.com/
Certified products: Controlled by
HiveManager Enterprise
AP:
230
AP Radio(s): 2.4 GHz (802.11b/g/n), 5 GHz (802.11a/n/ac)
Security: None, WPA2-PSK, WPA2-Enterprise (EAP-FAST, EAP-TLS, and PEAPv0/MSCHAPv2) with OKC
QoS: Wi-Fi Standard for Spectralink PIVOT, 8440/8441/8450/8452/8453
Network topology: Switched Ethernet (recommended)
AP and WLC software versions approved:
HiveManager Enterprise 6.8r6 with AP 230 7.1r1
Handset* models tested: PIVOT
Handset radio mode: 802.11b/g and 802.11bgn 802.11a & 802.11an
Meets VIEW minimum call capacity per AP**:
8 10
Handset models tested: Spectralink 8440/8441/8450/8452/8453 Wireless Telephone
Handset radio mode: 802.11b/g & 802.11bgn 802.11a & 802.11an
Meets VIEW minimum call capacity per AP**:
8 10
*Spectralink handset models and their OEM derivatives are verified compatible with the WLAN hardware
and software identified in the table. Throughout the remainder of this document they will be referred to
collectively as “Spectralink Wireless Telephones”, “phones” or “handsets”.
** Maximum calls tested per the VIEW Certification Test Plan. The certified product may actually support
a higher number of maximum calls
Spectralink VIEW Certified Configuration Guide: Aerohive Networks
721-1011-000_A.docx December 2016 5
Known Limitations
Multicast background data causes heavy audio drop in phone calls. This also means
that Push-to-talk is not supported by the Aerohive infrastructure.
Call limiting using WMM_AC (TSPECs) is not supported by the Aerohive infrastructure.
PIVOT phones or 84-series phones operating in Auto power mode will always be at their
full transmission power setting with Aerohive infrastructure.
Spectralink does not support 802.11k, 802.11v, or 802.11r. It may be able to co-exist in
an SSID that has these settings checked in the Aerohive equipment; it was not tested.
The Enable Voice Enterprise setting on the Aerohive was not tested.
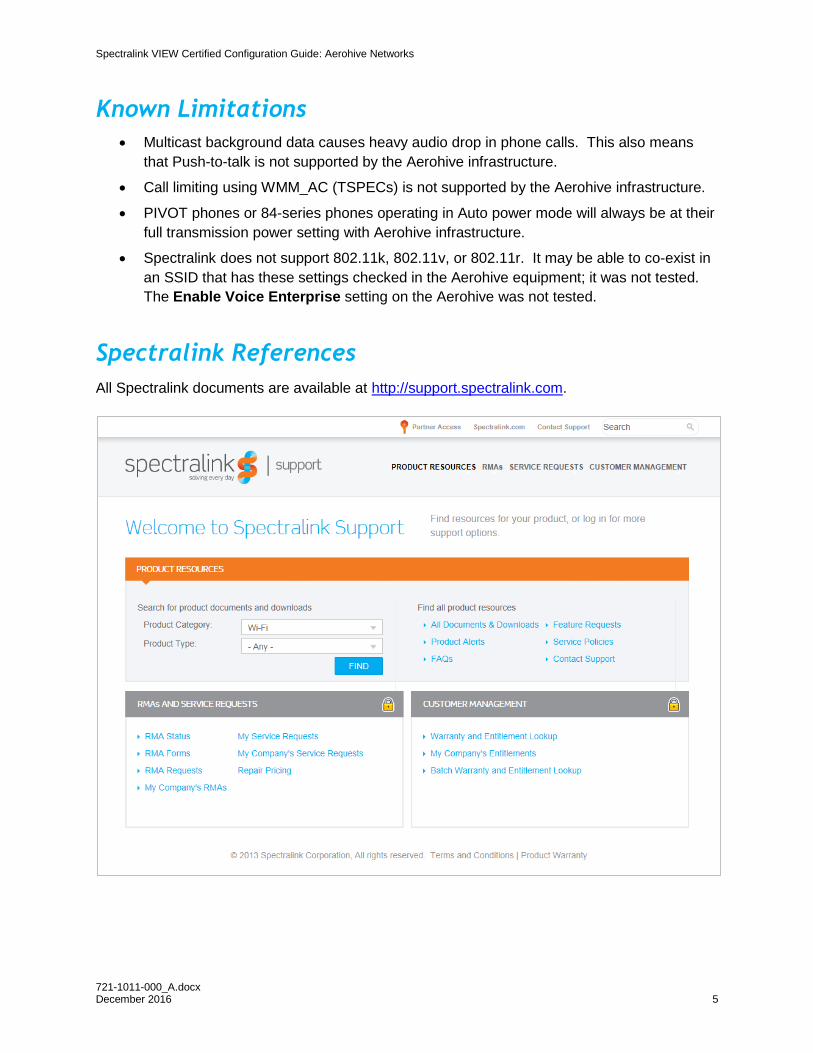
Spectralink References
All Spectralink documents are available at http://support.spectralink.com.
Spectralink VIEW Certified Configuration Guide: Aerohive Networks
721-1011-000_A.docx December 2016 6
To go to a specific product page:
Select the Product Category and Product Type from the dropdown lists and then select the
product from the next page. All resources for that particular product are displayed by default
under the All tab. Documents, downloads and other resources are sorted by the date they were
created so the most recently created resource is at the top of the list. You can further sort the
list by the tabs across the top of the list to find exactly what you are looking for. Click the title to
open the link.
Support Documents
PIVOT by Spectralink Configuration Guide The PIVOT Configuration Guide provides detailed
information about PIVOT menu items that have been developed specifically for the PIVOT
handset.
Spectralink 87-Series Wireless Telephone Deployment Guide The Deployment Guide provides
sequential information for provisioning and deploying the handsets. It covers deployment using
the SLIC tool and CMS as well as manual deployment.
The Spectralink 84-Series Wireless Telephone Administration Guide provides a comprehensive
list of every parameter available on Spectralink 84-Series Wireless Telephones.
The Spectralink 84-Series Deployment Guide is your essential reference for provisioning and
deploying Spectralink 84-Series handsets in any environment.
The Web Configuration Utility User Guide explains how to use a web browser to configure the
Spectralink 84-Series handsets on a per handset basis.
Best Practices for Deploying Spectralink 87-Series Handsets provides detailed information on
wireless LAN layout, network infrastructure, QoS, security and subnets.
White Papers
Spectralink White Papers are available at http://www.spectralink.com/resources/white-papers.
For the Spectralink 84-Series Wireless Telephones, please refer to Best Practices Guide for
Deploying Spectralink 84-Series Handsets for detailed information on wireless LAN layout,
network infrastructure, QoS, security and subnets.
For additional details on RF deployment please see The challenges of ensuring excellent voice
quality in a Wi-Fi workplace and Deploying Enterprise-Grade Wi-Fi Telephony.
These White Papers identify issues and solutions based on Spectralink’s extensive experience
in enterprise-class Wi-Fi telephony. It provides recommendations for ensuring that a network
environment is adequately optimized for use with Spectralink Wireless Telephones.

Spectralink VIEW Certified Configuration Guide: Aerohive Networks
721-1011-000_A.docx December 2016 7
Product Support
If you encounter difficulties or have questions regarding the configuration process, please
contact Spectralink at http://support.spectralink.com or the Aerohive Technical Assistance
Center at (866) 365-9918, or (408) 510-6100, option 2. If you are an international customer
outside North America, please contact your Aerohive Distributor or Partner.
721-1011-000_A.docx December 2016 8
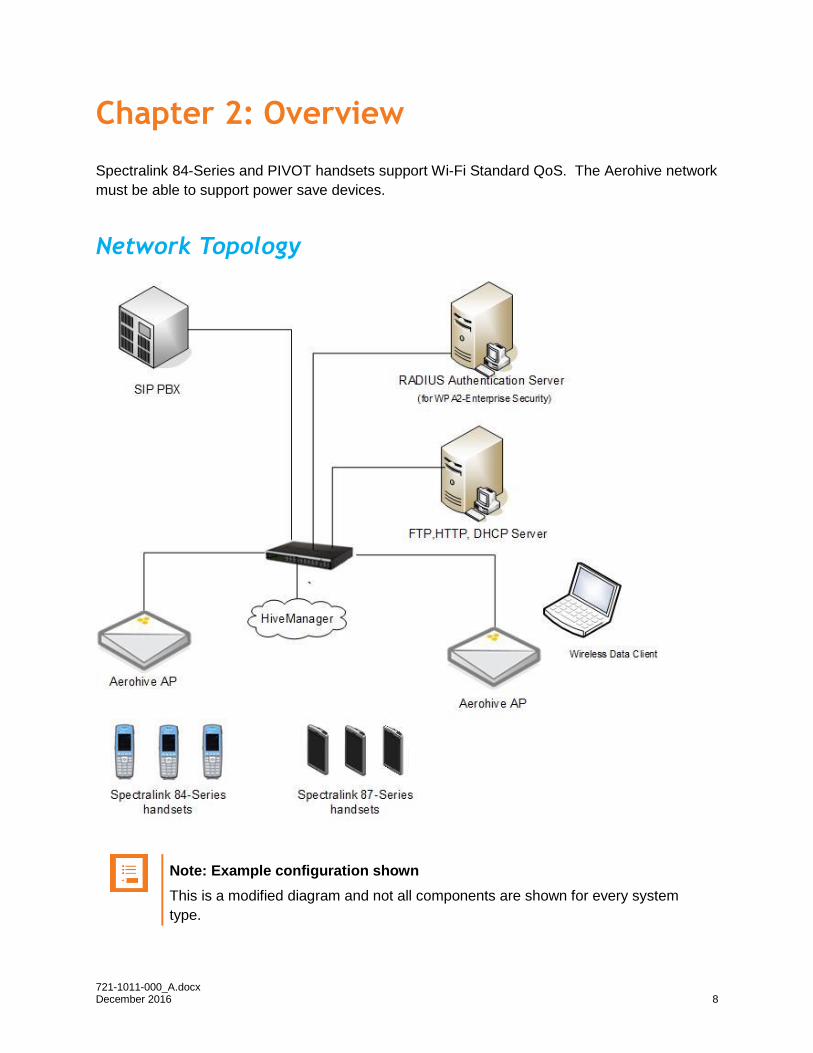
Chapter 2: Overview
Spectralink 84-Series and PIVOT handsets support Wi-Fi Standard QoS. The Aerohive network
must be able to support power save devices.
Network Topology
Note: Example configuration shown
This is a modified diagram and not all components are shown for every system
type.
721-1011-000_A.docx December 2016 9
Chapter 3: Initial Administrative Setup,
HiveManager Initialization
Network infrastructure controls begins with logging in to the HiveManager, installing purchased
licenses, updating HiveManager as necessary, and configuring the access points into a
managed state.
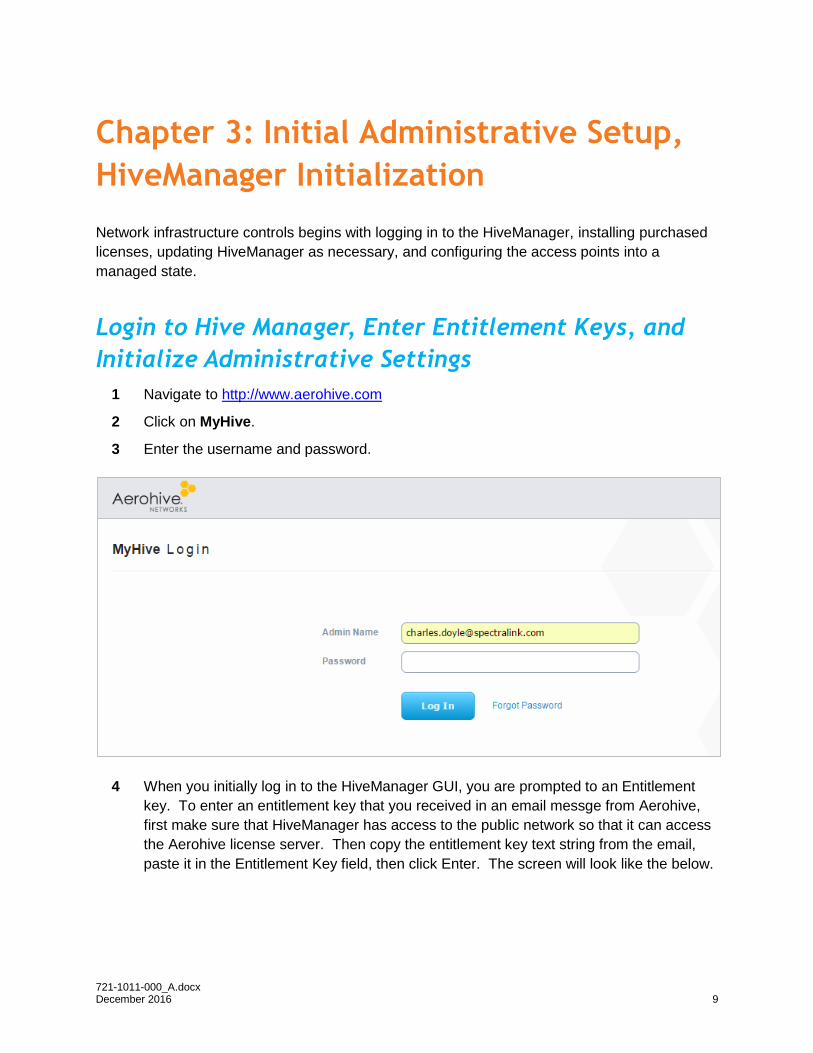
Login to Hive Manager, Enter Entitlement Keys, and
Initialize Administrative Settings
1 Navigate to http://www.aerohive.com
2 Click on MyHive.
3 Enter the username and password.
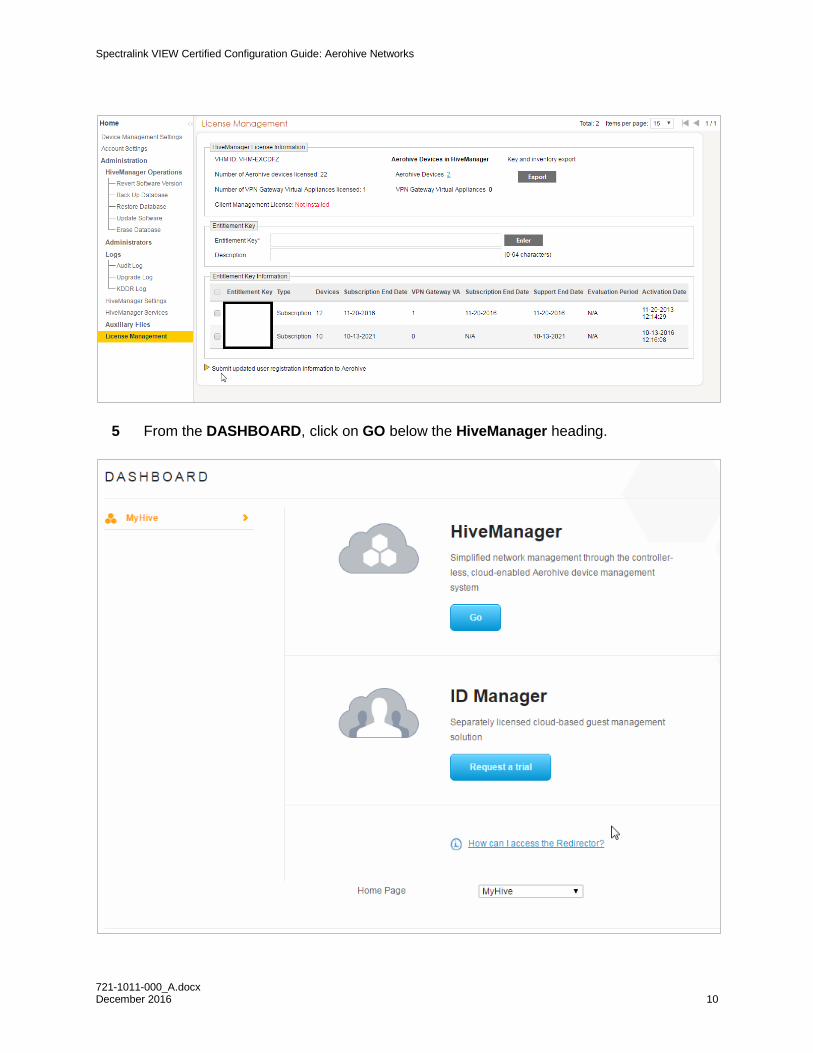
4 When you initially log in to the HiveManager GUI, you are prompted to an Entitlement
key. To enter an entitlement key that you received in an email messge from Aerohive,
first make sure that HiveManager has access to the public network so that it can access
the Aerohive license server. Then copy the entitlement key text string from the email,
paste it in the Entitlement Key field, then click Enter. The screen will look like the below.
Spectralink VIEW Certified Configuration Guide: Aerohive Networks
721-1011-000_A.docx December 2016 10
5 From the DASHBOARD, click on GO below the HiveManager heading.
Spectralink VIEW Certified Configuration Guide: Aerohive Networks
721-1011-000_A.docx December 2016 11
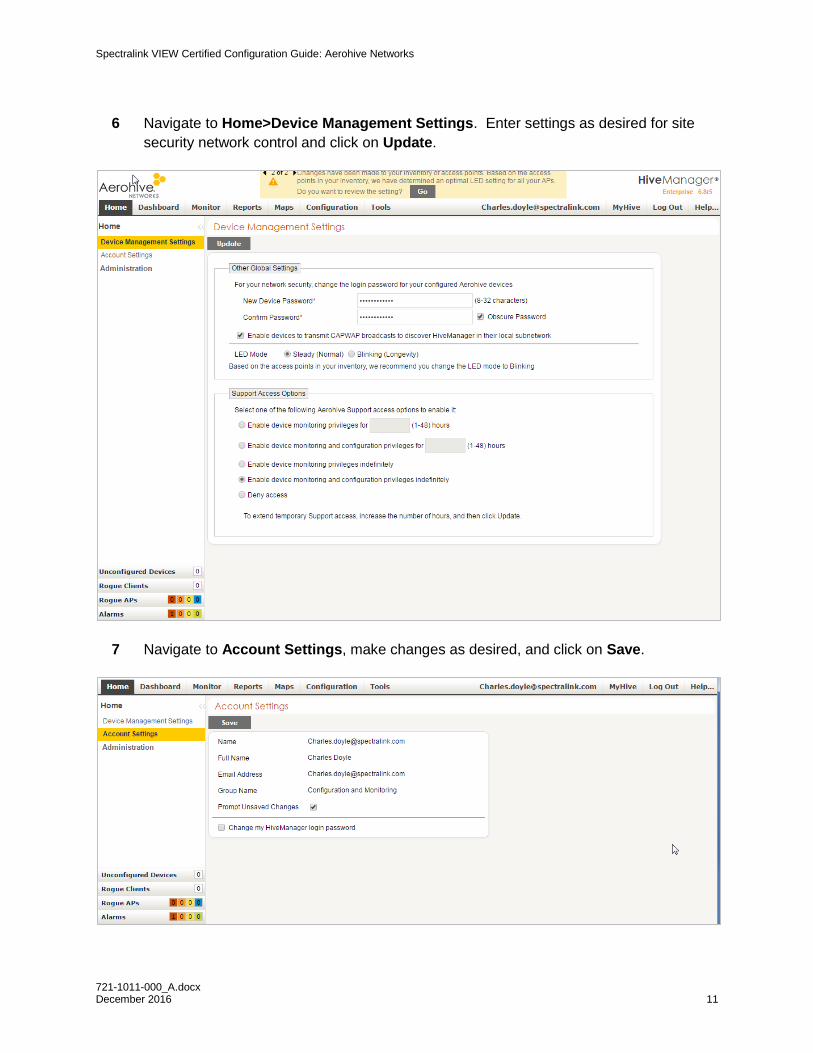
6 Navigate to Home>Device Management Settings. Enter settings as desired for site
security network control and click on Update.
7 Navigate to Account Settings, make changes as desired, and click on Save.
Spectralink VIEW Certified Configuration Guide: Aerohive Networks
721-1011-000_A.docx December 2016 12
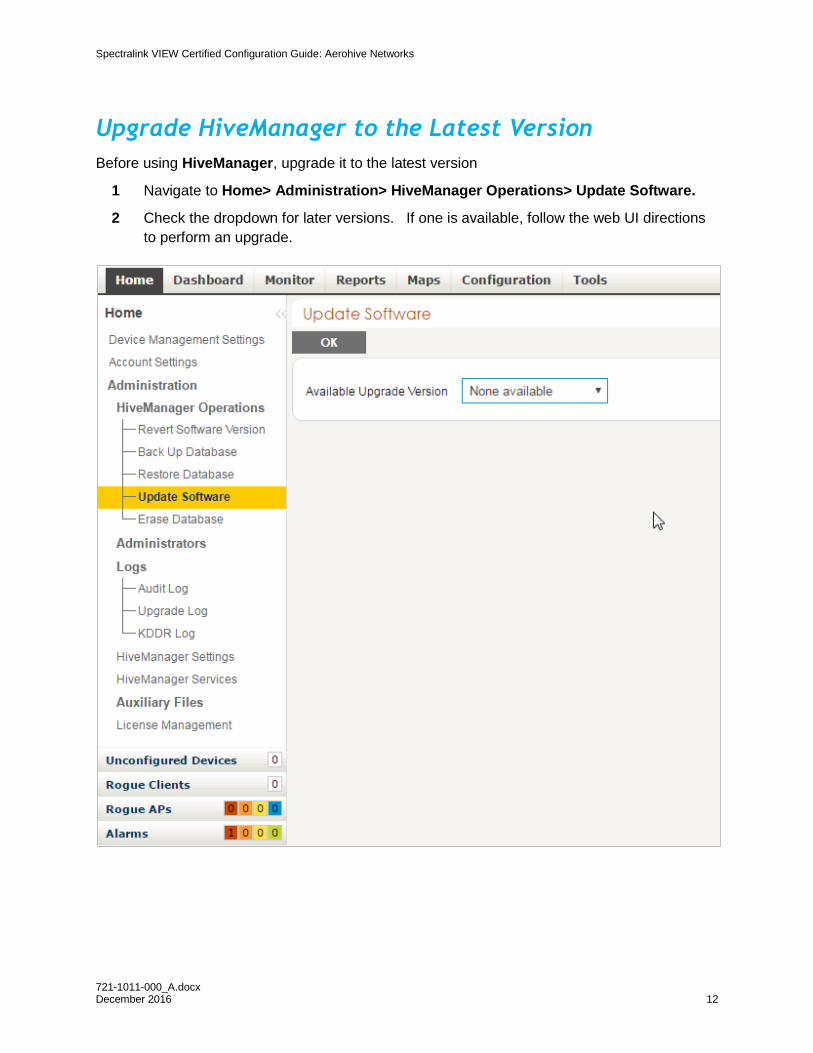
Upgrade HiveManager to the Latest Version
Before using HiveManager, upgrade it to the latest version
1 Navigate to Home> Administration> HiveManager Operations> Update Software.
2 Check the dropdown for later versions. If one is available, follow the web UI directions
to perform an upgrade.
721-1011-000_A.docx December 2016 13
Chapter 4: AP Install
With the administrative support in place, configure the APs into a managed state and upgrade
them if desired.
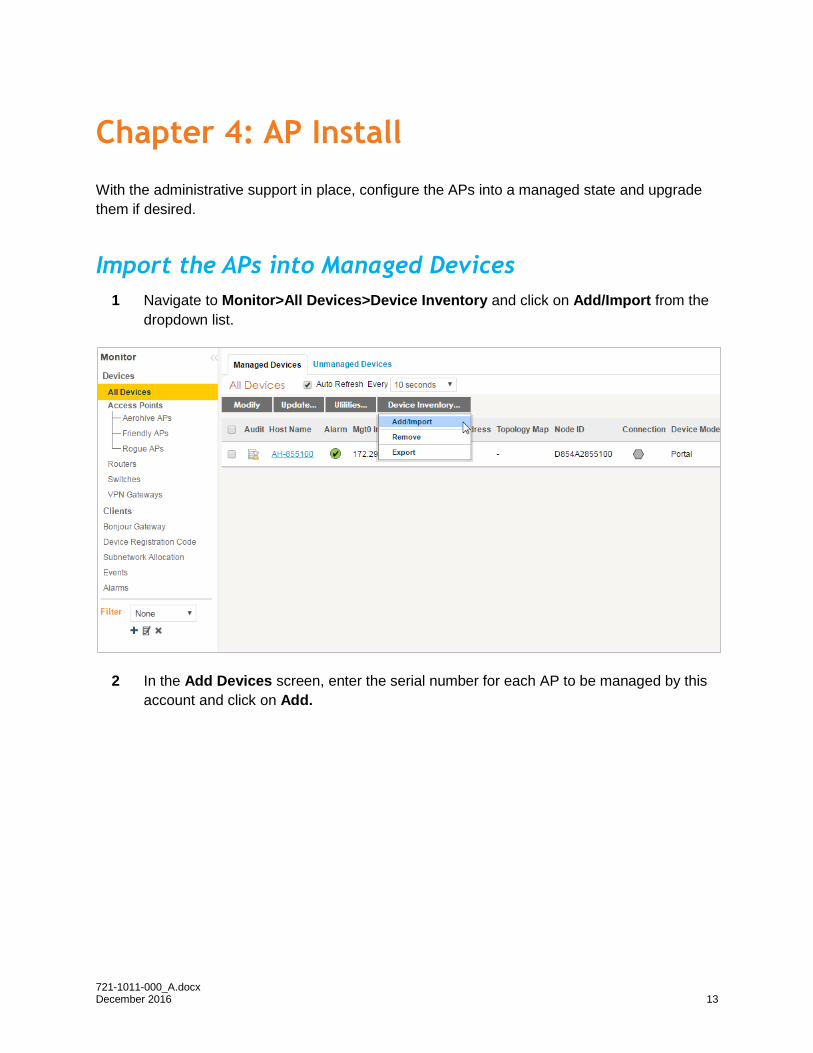
Import the APs into Managed Devices
1 Navigate to Monitor>All Devices>Device Inventory and click on Add/Import from the
dropdown list.
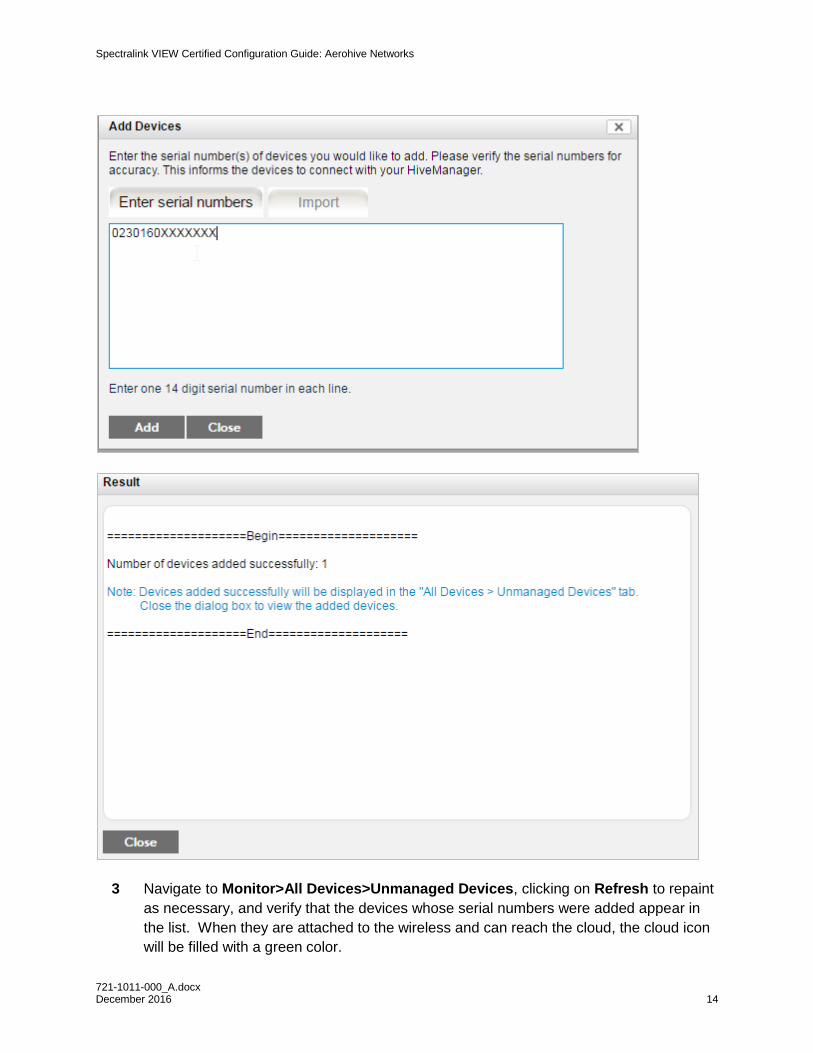
2 In the Add Devices screen, enter the serial number for each AP to be managed by this
account and click on Add.
Spectralink VIEW Certified Configuration Guide: Aerohive Networks
721-1011-000_A.docx December 2016 14
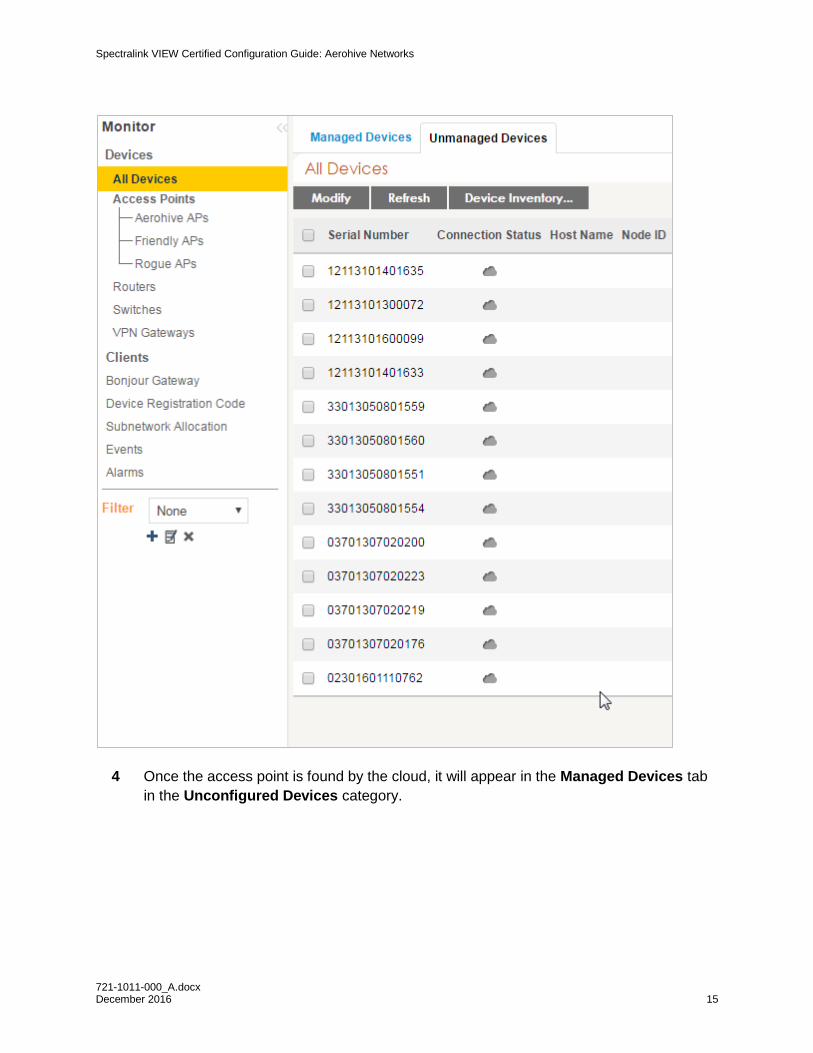
3 Navigate to Monitor>All Devices>Unmanaged Devices, clicking on Refresh to repaint
as necessary, and verify that the devices whose serial numbers were added appear in
the list. When they are attached to the wireless and can reach the cloud, the cloud icon
will be filled with a green color.
Spectralink VIEW Certified Configuration Guide: Aerohive Networks
721-1011-000_A.docx December 2016 15
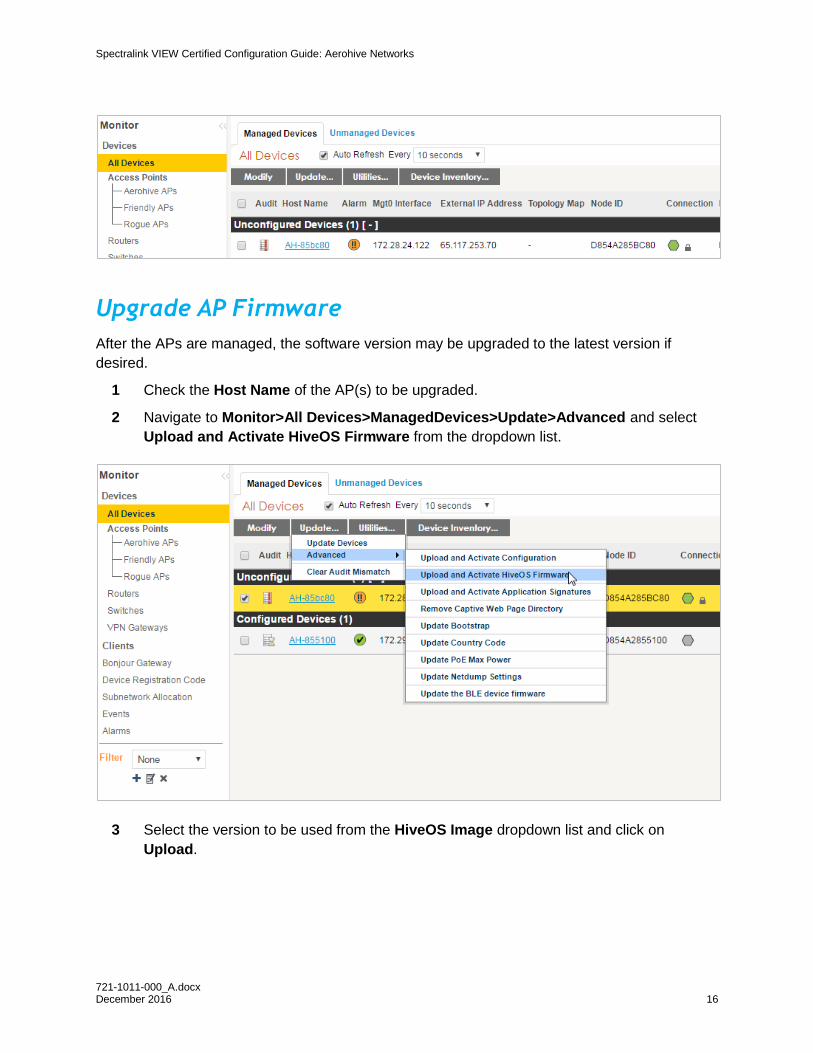
4 Once the access point is found by the cloud, it will appear in the Managed Devices tab
in the Unconfigured Devices category.
Spectralink VIEW Certified Configuration Guide: Aerohive Networks
721-1011-000_A.docx December 2016 16
Upgrade AP Firmware
After the APs are managed, the software version may be upgraded to the latest version if
desired.
1 Check the Host Name of the AP(s) to be upgraded.
2 Navigate to Monitor>All Devices>ManagedDevices>Update>Advanced and select
Upload and Activate HiveOS Firmware from the dropdown list.
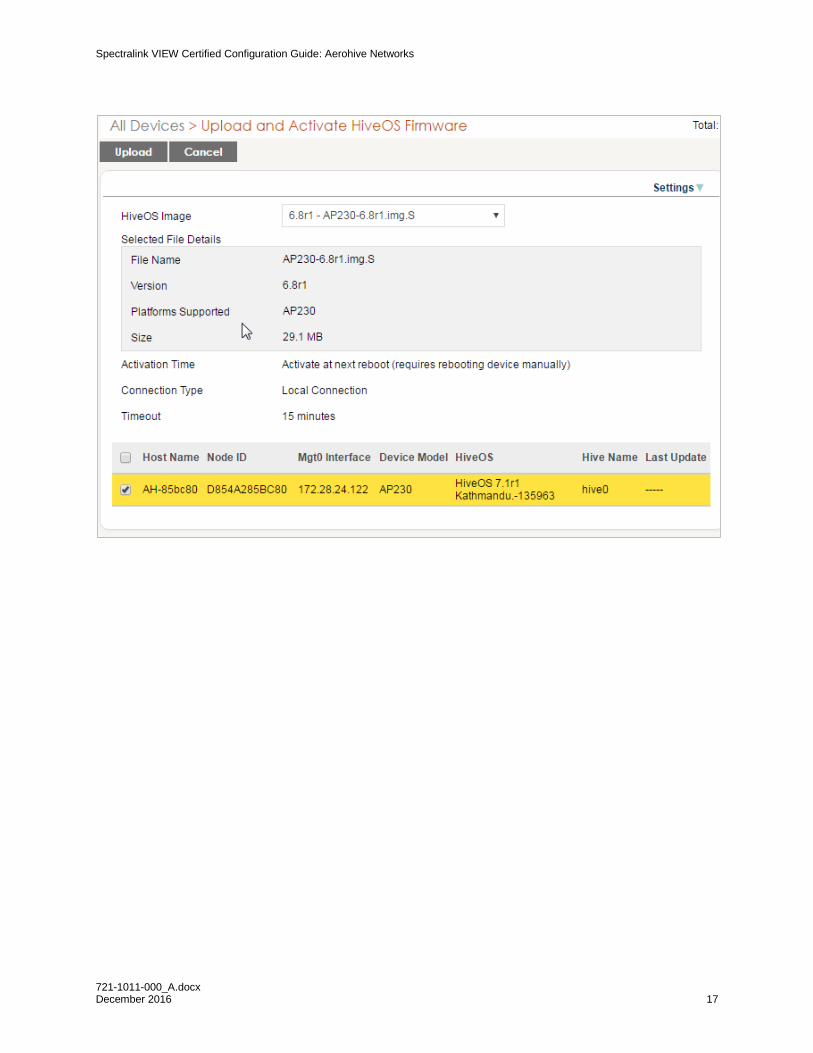
3 Select the version to be used from the HiveOS Image dropdown list and click on
Upload.
Spectralink VIEW Certified Configuration Guide: Aerohive Networks
721-1011-000_A.docx December 2016 17
721-1011-000_A.docx December 2016 18
Chapter 5: Configure Network Settings
The network settings are configured by using the Guided Configuration process. However,
when an external Radius server is used, it must first be defined.
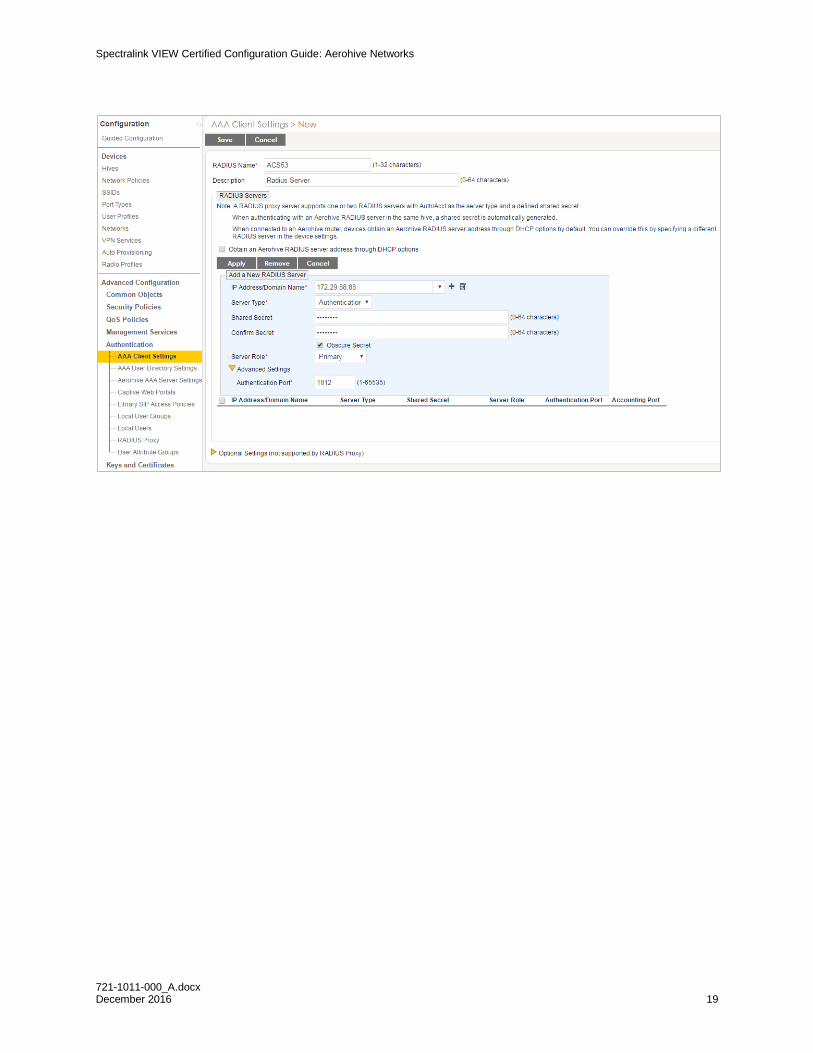
Define an External Radius Server
If Enterprise security is used, and an external Radius server is used, set up the Radius server.
1 Navigate to Advanced Configuration> Authentication> AAA Client Settings
2 Enter these fields:
a RADIUS Name,
b IP Address/Domain Name,
c Server Type as Authenticator,
d Shared Secret, and
e Confirm Secret.
f Touch Save.
Note: Aerohive internal Radius server not tested
The VIEW tests were not performed with the Aerohive internal Radius server. No
data was collected on its use.
Spectralink VIEW Certified Configuration Guide: Aerohive Networks
721-1011-000_A.docx December 2016 19
Spectralink VIEW Certified Configuration Guide: Aerohive Networks
721-1011-000_A.docx December 2016 20
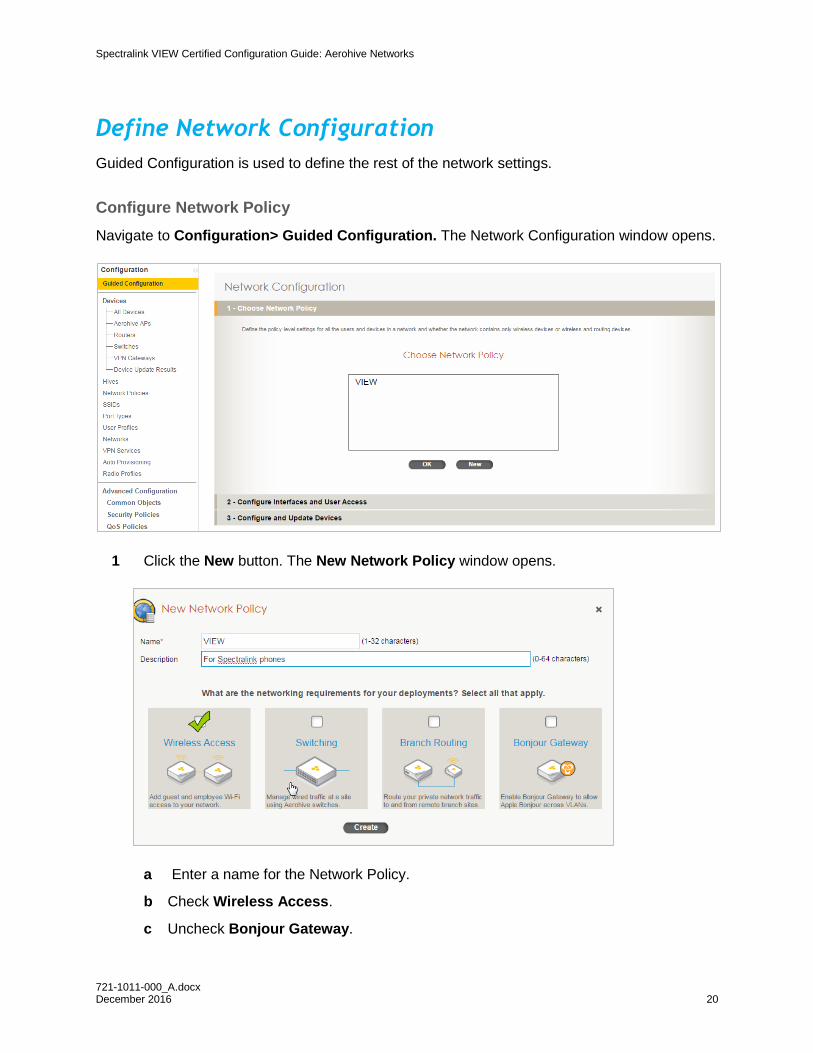
Define Network Configuration
Guided Configuration is used to define the rest of the network settings.
Configure Network Policy
Navigate to Configuration> Guided Configuration. The Network Configuration window opens.
1 Click the New button. The New Network Policy window opens.
a Enter a name for the Network Policy.
b Check Wireless Access.
c Uncheck Bonjour Gateway.
Spectralink VIEW Certified Configuration Guide: Aerohive Networks
721-1011-000_A.docx December 2016 21
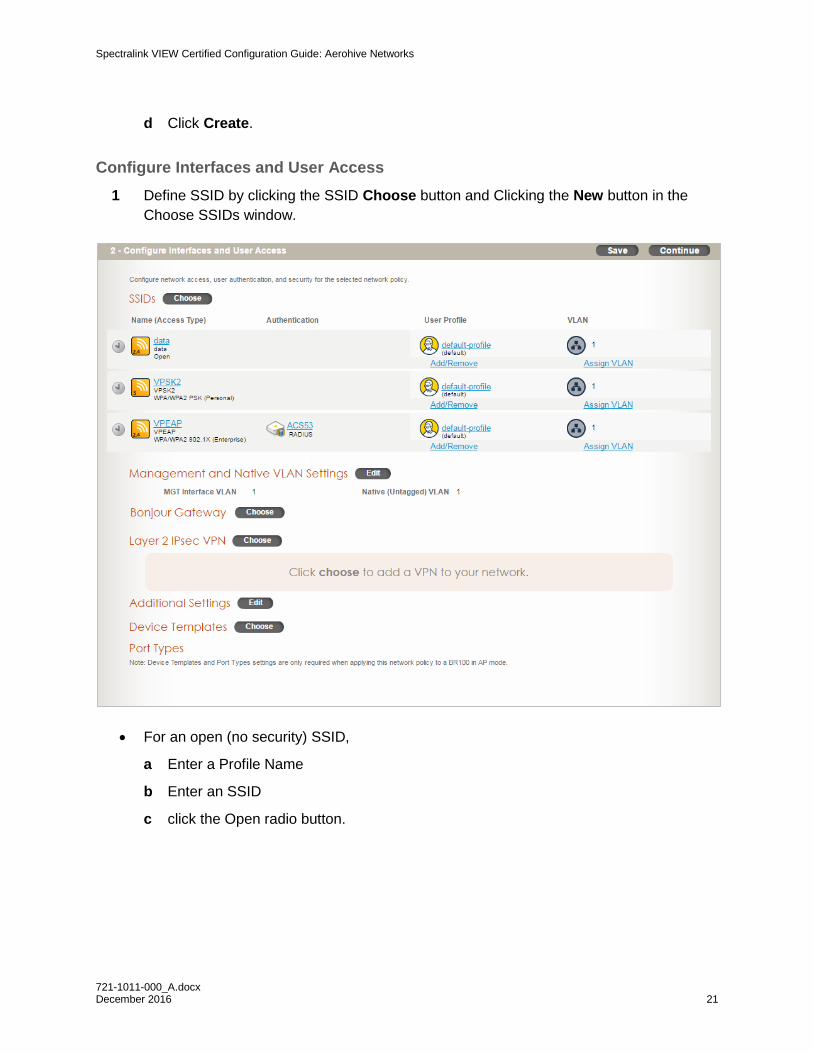
d Click Create.
Configure Interfaces and User Access
1 Define SSID by clicking the SSID Choose button and Clicking the New button in the
Choose SSIDs window.
For an open (no security) SSID,
a Enter a Profile Name
b Enter an SSID
c click the Open radio button.
Spectralink VIEW Certified Configuration Guide: Aerohive Networks
721-1011-000_A.docx December 2016 22
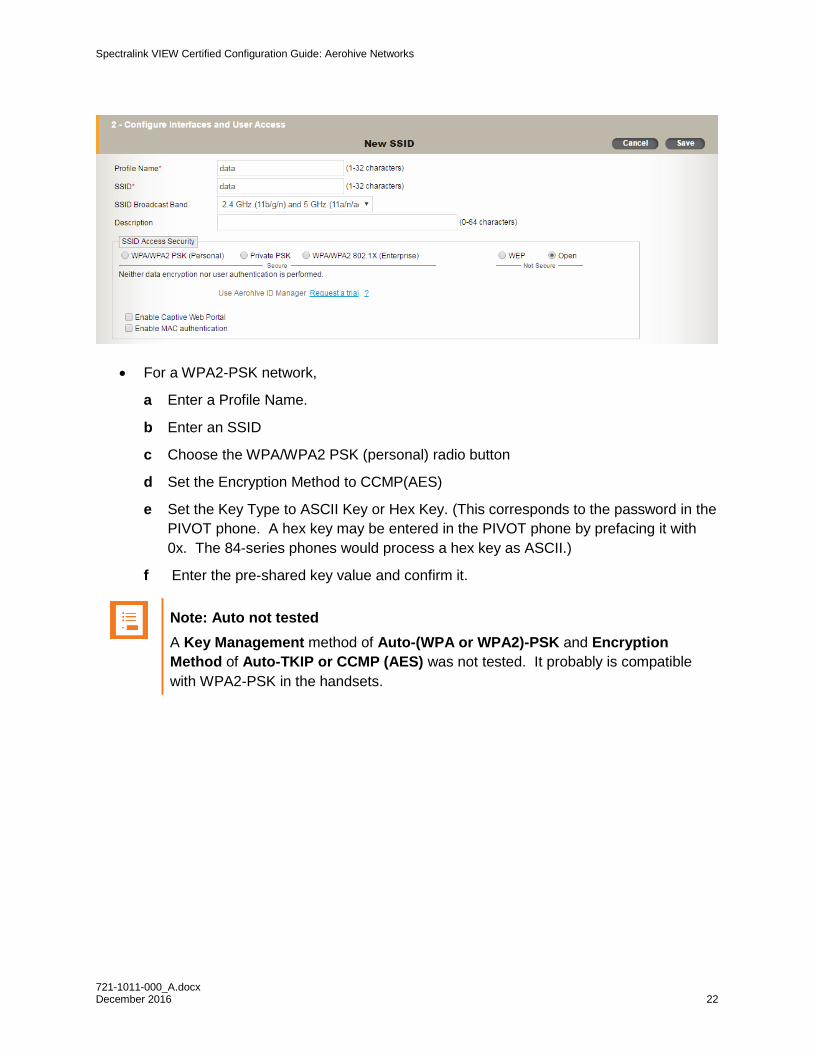
For a WPA2-PSK network,
a Enter a Profile Name.
b Enter an SSID
c Choose the WPA/WPA2 PSK (personal) radio button
d Set the Encryption Method to CCMP(AES)
e Set the Key Type to ASCII Key or Hex Key. (This corresponds to the password in the
PIVOT phone. A hex key may be entered in the PIVOT phone by prefacing it with
0x. The 84-series phones would process a hex key as ASCII.)
f Enter the pre-shared key value and confirm it.
Note: Auto not tested
A Key Management method of Auto-(WPA or WPA2)-PSK and Encryption
Method of Auto-TKIP or CCMP (AES) was not tested. It probably is compatible
with WPA2-PSK in the handsets.
Spectralink VIEW Certified Configuration Guide: Aerohive Networks
721-1011-000_A.docx December 2016 23
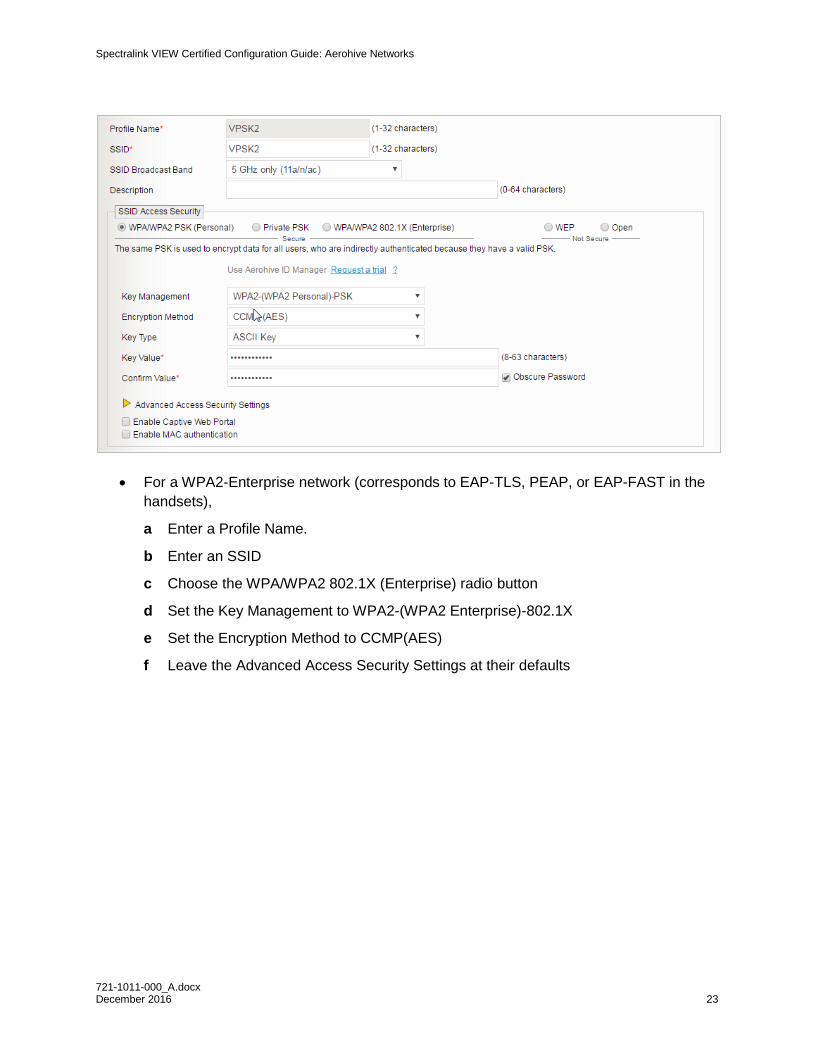
For a WPA2-Enterprise network (corresponds to EAP-TLS, PEAP, or EAP-FAST in the
handsets),
a Enter a Profile Name.
b Enter an SSID
c Choose the WPA/WPA2 802.1X (Enterprise) radio button
d Set the Key Management to WPA2-(WPA2 Enterprise)-802.1X
e Set the Encryption Method to CCMP(AES)
f Leave the Advanced Access Security Settings at their defaults
Spectralink VIEW Certified Configuration Guide: Aerohive Networks
721-1011-000_A.docx December 2016 24
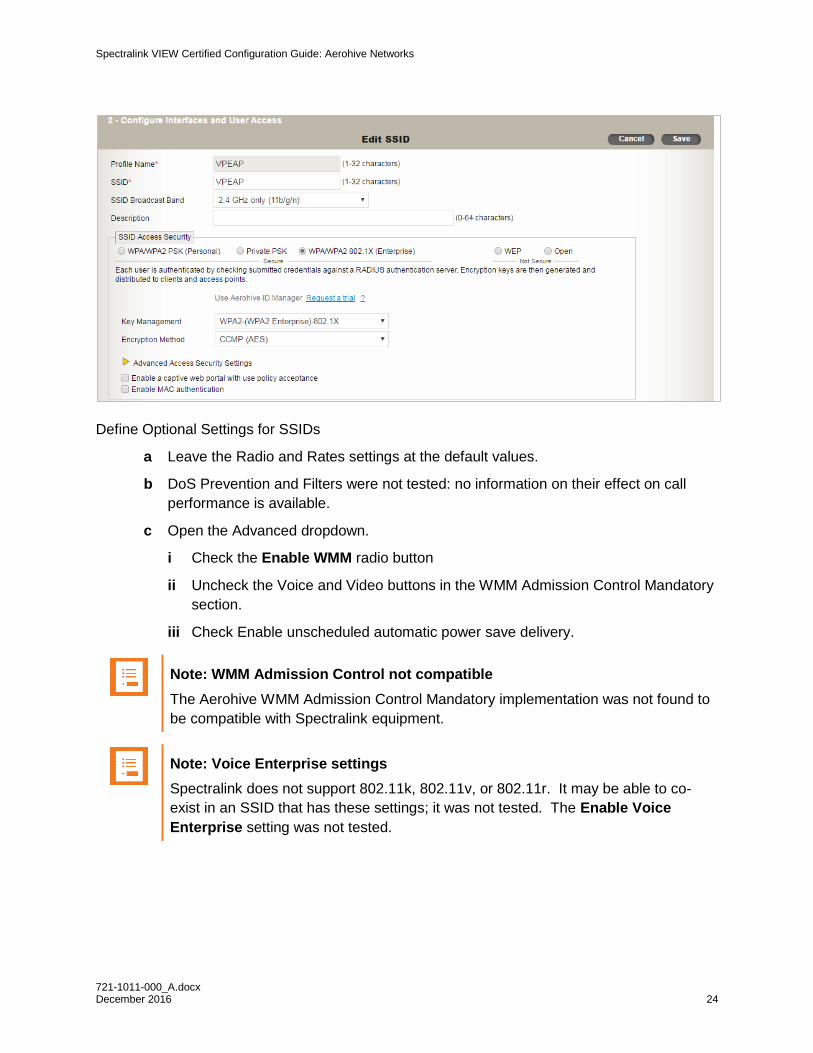
Define Optional Settings for SSIDs
a Leave the Radio and Rates settings at the default values.
b DoS Prevention and Filters were not tested: no information on their effect on call
performance is available.
c Open the Advanced dropdown.
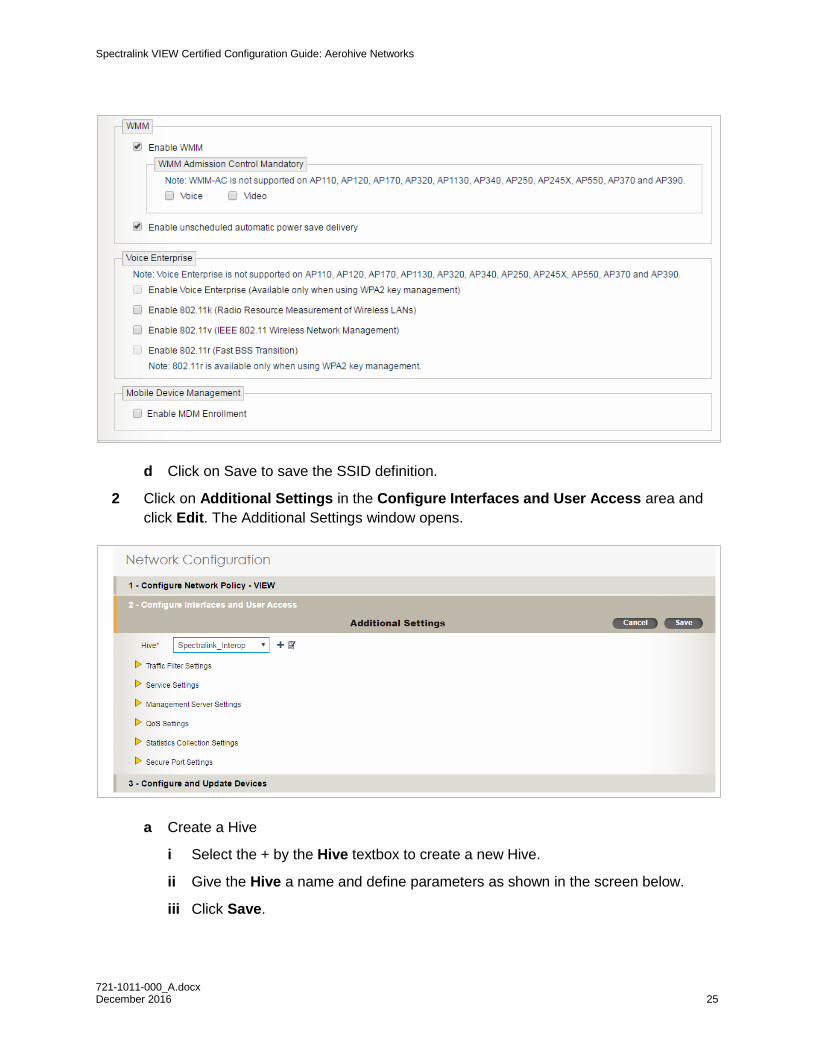
i Check the Enable WMM radio button
ii Uncheck the Voice and Video buttons in the WMM Admission Control Mandatory
section.
iii Check Enable unscheduled automatic power save delivery.
Note: WMM Admission Control not compatible
The Aerohive WMM Admission Control Mandatory implementation was not found to
be compatible with Spectralink equipment.
Note: Voice Enterprise settings
Spectralink does not support 802.11k, 802.11v, or 802.11r. It may be able to co-
exist in an SSID that has these settings; it was not tested. The Enable Voice
Enterprise setting was not tested.
Spectralink VIEW Certified Configuration Guide: Aerohive Networks
721-1011-000_A.docx December 2016 25
d Click on Save to save the SSID definition.
2 Click on Additional Settings in the Configure Interfaces and User Access area and
click Edit. The Additional Settings window opens.
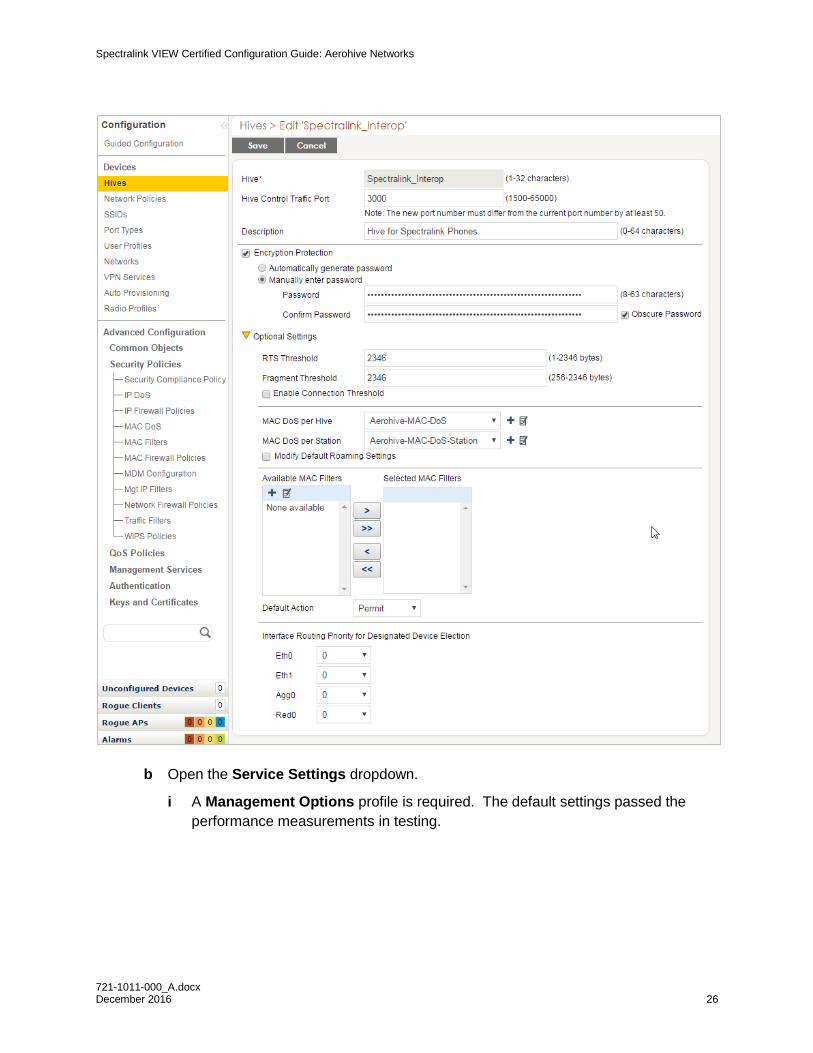
a Create a Hive
i Select the + by the Hive textbox to create a new Hive.
ii Give the Hive a name and define parameters as shown in the screen below.
iii Click Save.
Spectralink VIEW Certified Configuration Guide: Aerohive Networks
721-1011-000_A.docx December 2016 26
b Open the Service Settings dropdown.
i A Management Options profile is required. The default settings passed the
performance measurements in testing.
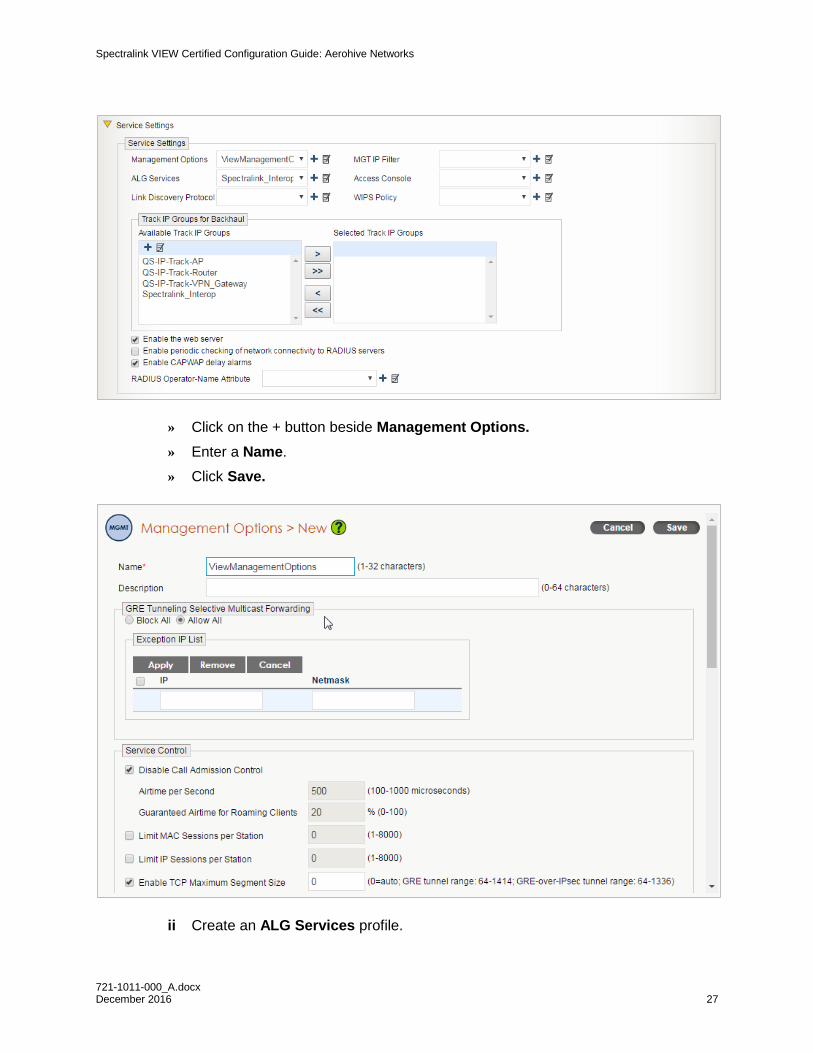
Spectralink VIEW Certified Configuration Guide: Aerohive Networks
721-1011-000_A.docx December 2016 27
» Click on the + button beside Management Options.
» Enter a Name.
» Click Save.
ii Create an ALG Services profile.
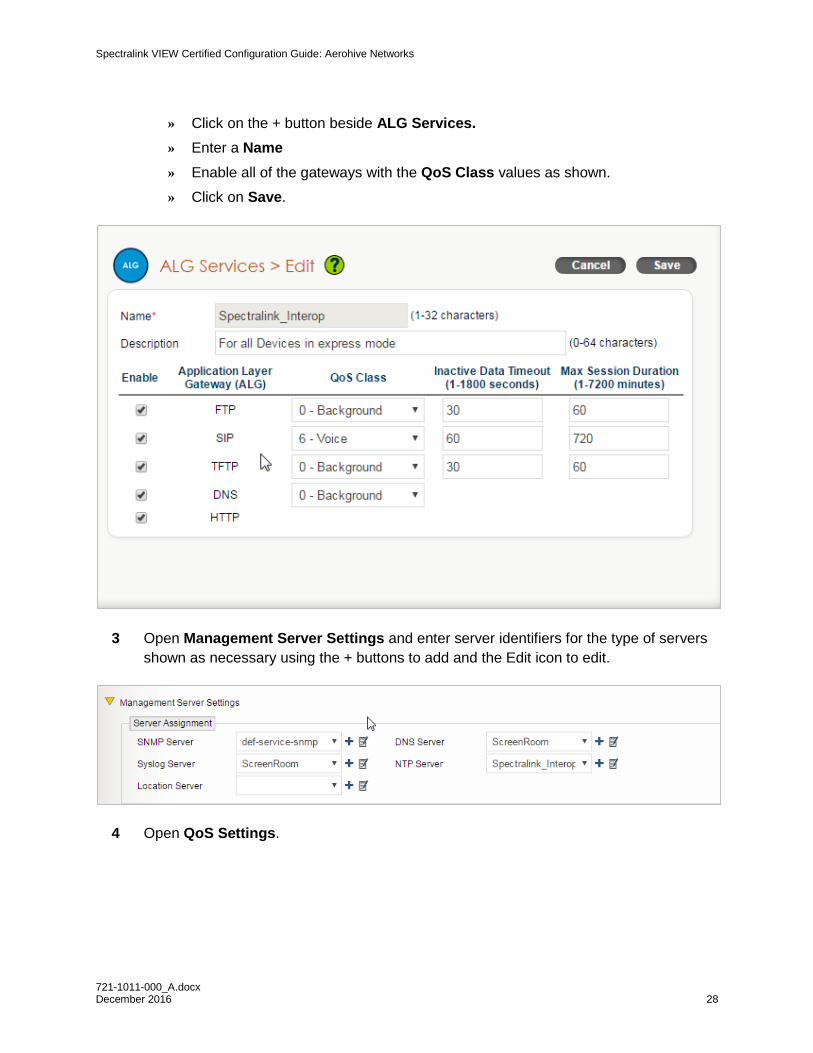
Spectralink VIEW Certified Configuration Guide: Aerohive Networks
721-1011-000_A.docx December 2016 28
» Click on the + button beside ALG Services.
» Enter a Name
» Enable all of the gateways with the QoS Class values as shown.
» Click on Save.
3 Open Management Server Settings and enter server identifiers for the type of servers
shown as necessary using the + buttons to add and the Edit icon to edit.
4 Open QoS Settings.
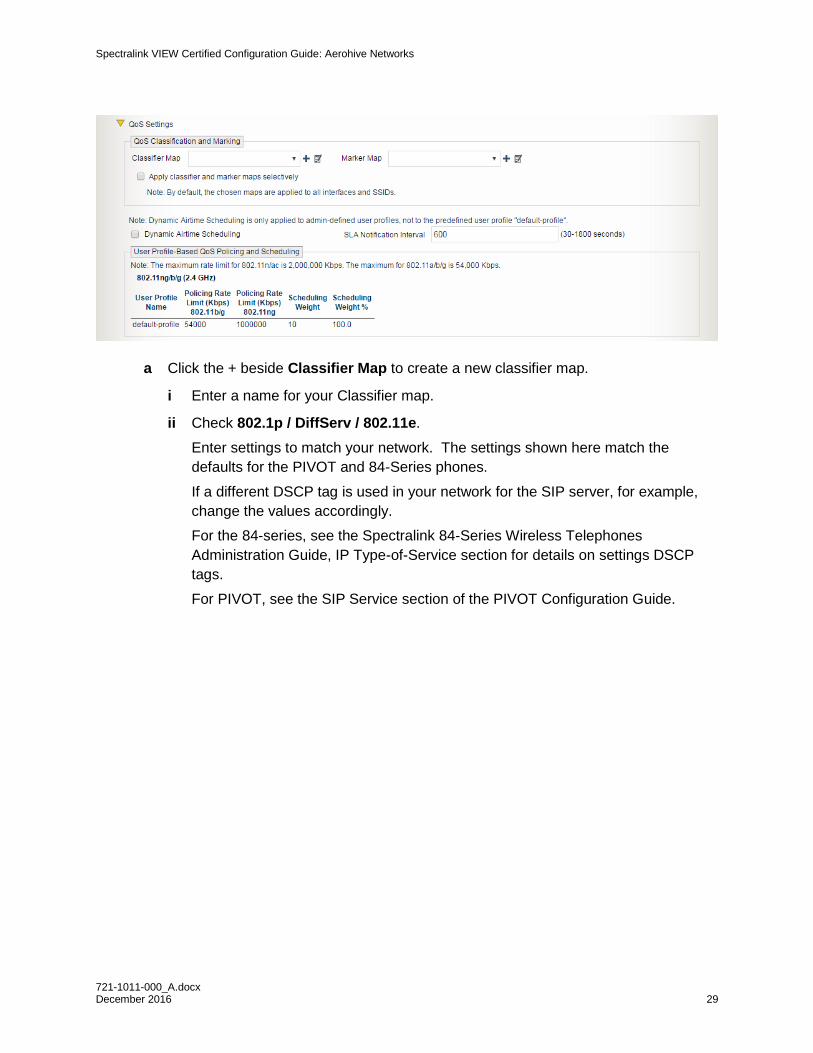
Spectralink VIEW Certified Configuration Guide: Aerohive Networks
721-1011-000_A.docx December 2016 29
a Click the + beside Classifier Map to create a new classifier map.
i Enter a name for your Classifier map.
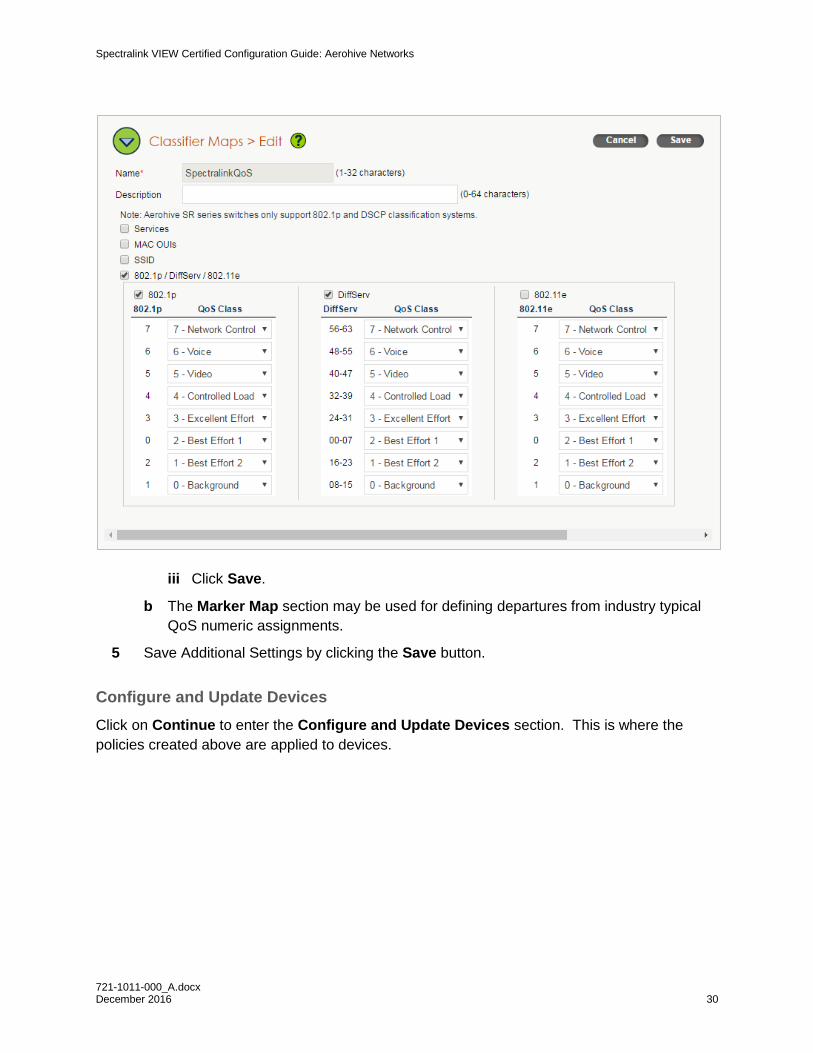
ii Check 802.1p / DiffServ / 802.11e.
Enter settings to match your network. The settings shown here match the
defaults for the PIVOT and 84-Series phones.
If a different DSCP tag is used in your network for the SIP server, for example,
change the values accordingly.
For the 84-series, see the Spectralink 84-Series Wireless Telephones
Administration Guide, IP Type-of-Service section for details on settings DSCP
tags.
For PIVOT, see the SIP Service section of the PIVOT Configuration Guide.
Spectralink VIEW Certified Configuration Guide: Aerohive Networks
721-1011-000_A.docx December 2016 30
iii Click Save.
b The Marker Map section may be used for defining departures from industry typical
QoS numeric assignments.
5 Save Additional Settings by clicking the Save button.
Configure and Update Devices
Click on Continue to enter the Configure and Update Devices section. This is where the
policies created above are applied to devices.
Spectralink VIEW Certified Configuration Guide: Aerohive Networks
721-1011-000_A.docx December 2016 31
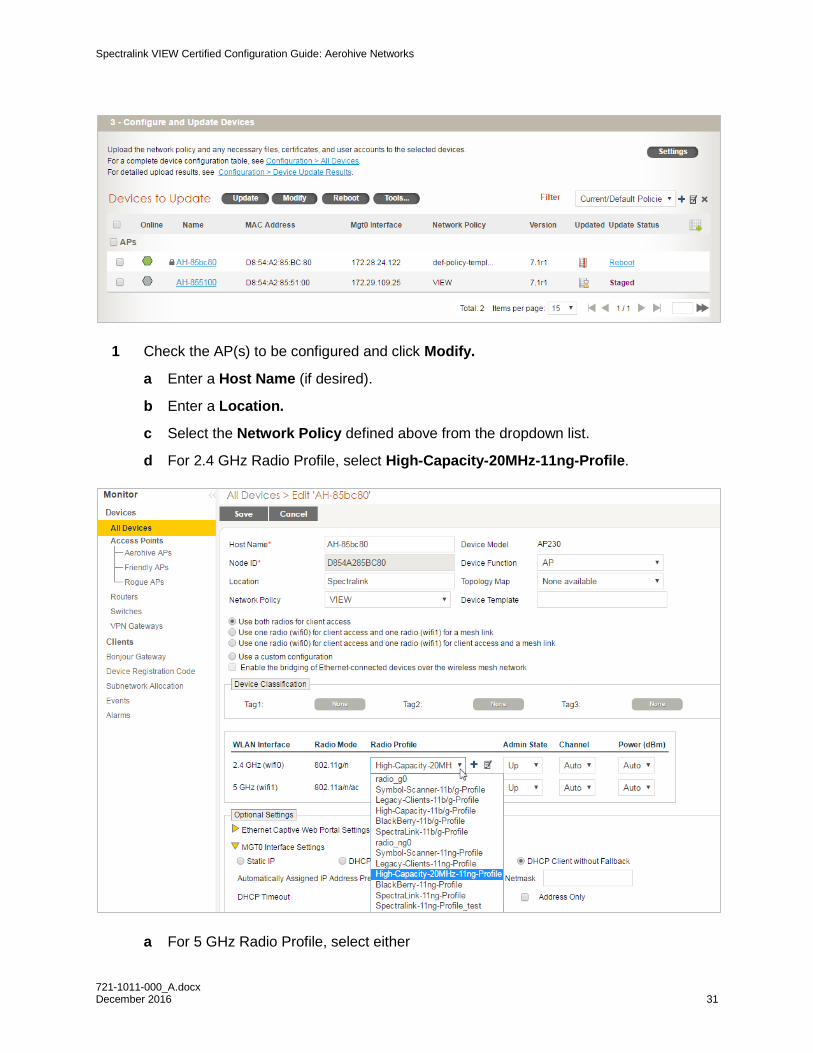
1 Check the AP(s) to be configured and click Modify.
a Enter a Host Name (if desired).
b Enter a Location.
c Select the Network Policy defined above from the dropdown list.
d For 2.4 GHz Radio Profile, select High-Capacity-20MHz-11ng-Profile.
a For 5 GHz Radio Profile, select either
Spectralink VIEW Certified Configuration Guide: Aerohive Networks
721-1011-000_A.docx December 2016 32
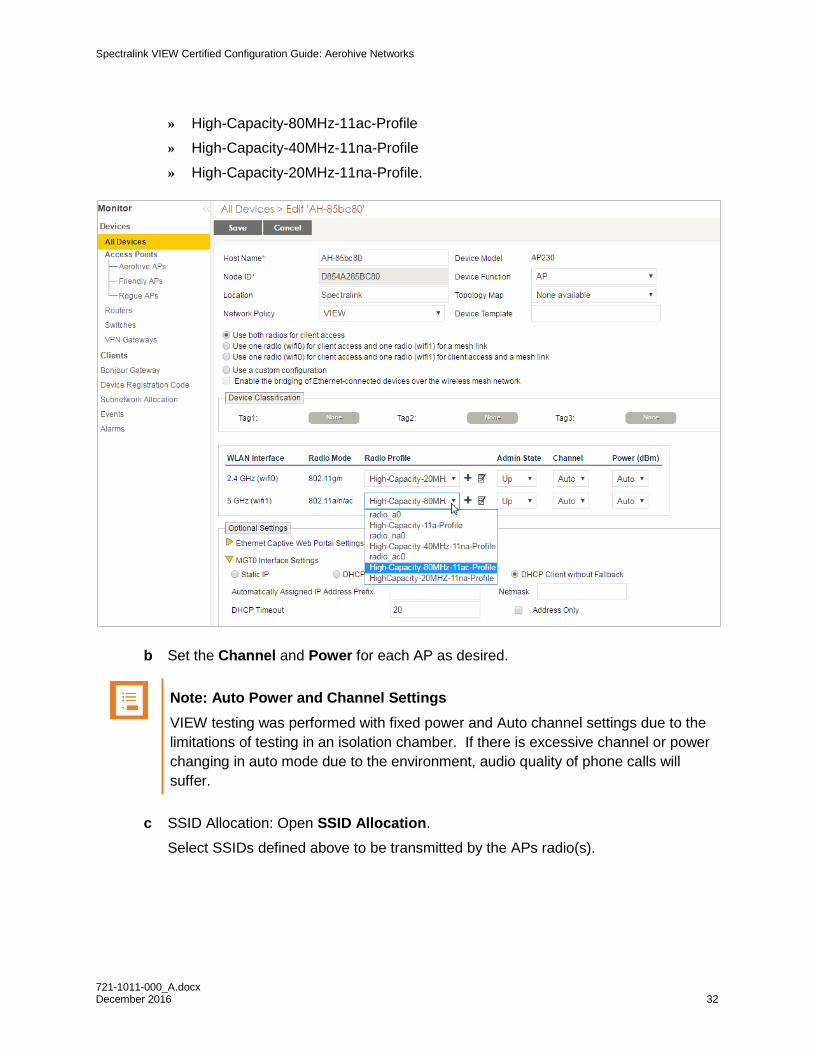
» High-Capacity-80MHz-11ac-Profile
» High-Capacity-40MHz-11na-Profile
» High-Capacity-20MHz-11na-Profile.
b Set the Channel and Power for each AP as desired.
Note: Auto Power and Channel Settings
VIEW testing was performed with fixed power and Auto channel settings due to the
limitations of testing in an isolation chamber. If there is excessive channel or power
changing in auto mode due to the environment, audio quality of phone calls will
suffer.
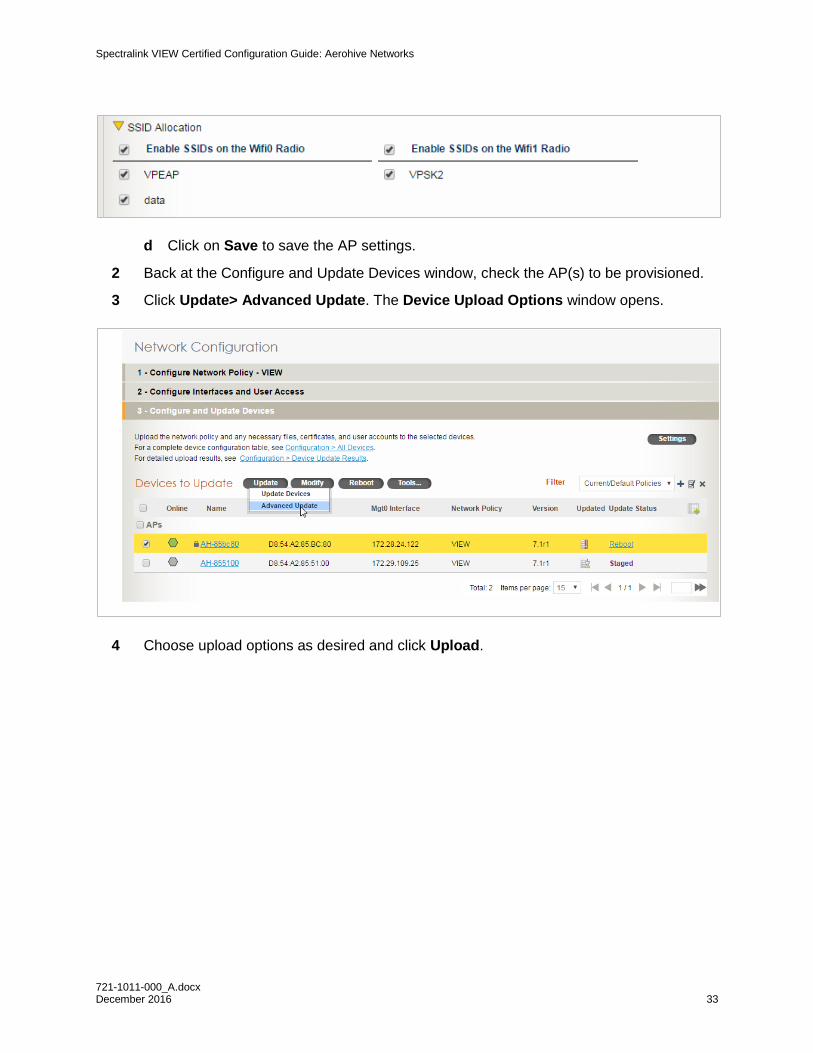
c SSID Allocation: Open SSID Allocation.
Select SSIDs defined above to be transmitted by the APs radio(s).
Spectralink VIEW Certified Configuration Guide: Aerohive Networks
721-1011-000_A.docx December 2016 33
d Click on Save to save the AP settings.
2 Back at the Configure and Update Devices window, check the AP(s) to be provisioned.
3 Click Update> Advanced Update. The Device Upload Options window opens.
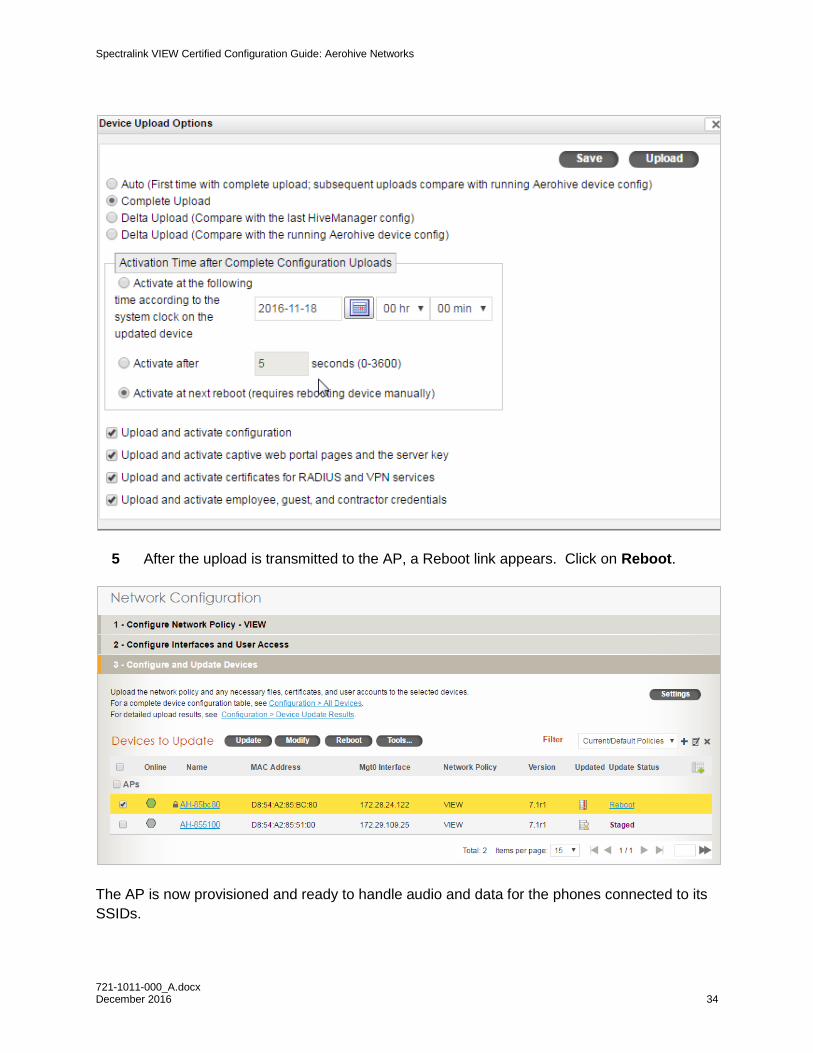
4 Choose upload options as desired and click Upload.
Spectralink VIEW Certified Configuration Guide: Aerohive Networks
721-1011-000_A.docx December 2016 34
5 After the upload is transmitted to the AP, a Reboot link appears. Click on Reboot.
The AP is now provisioned and ready to handle audio and data for the phones connected to its
SSIDs.

Spectralink VIEW Certified Configuration Guide: Aerohive Networks
721-1011-000_A.docx December 2016 35
*****END OF DOCUMENT*****