Embed Size (px)
Citation preview

Spirit Sampler Inst Installation and Operation Manual
For Products: Spirit Sampler Document: SpiritSampler-02-201504

AMERICAS & WORLD HEADQUARTERS
Phone: +1 727-733-2447 Fax: +1 727-733-3962 Sales: [email protected] Orders: [email protected] Support: [email protected]
EUROPE, MIDDLE EAST & AFRICA
Phone: +31 26-319-0500 Fax: +31 26-319-0505 Email: [email protected] Germany : +49 711-341696-0
UK : +44 1865-811118 France : +33 442-386-588
ASIA
Phone: +86 21-6295-6600 Fax: +86 21-6295-6708 Email: [email protected]
Japan & Korea: +82 10-8514-3797
www.oceanoptics.com
Copyright © 2014 Ocean Optics, Inc. All rights reserved. No part of this publication may be reproduced, stored in a retrieval system, or transmitted, by any means, electronic,
mechanical, photocopying, recording, or otherwise, without written permission from Ocean Optics, Inc.
Trademarks All products and services herein are the trademarks, service marks, registered trademarks or registered service marks of their respective owners.
Limit of Liability Every effort has been made to make this manual as complete and as accurate as possible, but no warranty or fitness is implied. The information
provided is on an “as is” basis. Ocean Optics, Inc. shall have neither liability nor responsibility to any person or entity with respect to any loss or damages arising from the information contained in this manual.
Ocean Optics, Inc. 830 Douglas Ave. Dunedin, FL 34698 USA
Manufacturing & Logistics 4301 Metric Dr. Winter Park, FL 32792 USA
Ocean Optics Asia 666 Gubei Road Kirin Tower Suite 601B Changning District Shanghai PRC, 200336
Sales & Support Geograaf 24 6921 EW Duiven The Netherlands
Manufacturing & Logistics Maybachstrasse 11 73760 Ostfildern Germany

SPIRITSAMPLER-02-201504 C


SPIRITSAMPLER-02-201504 i
Table of Contents
About This Manual ......................................................................................................... iii Document Purpose and Intended Audience .............................................................................. iii What’s New in this Document ................................................................................................... iii Document Summary .................................................................................................................. iii Product-Related Documentation ............................................................................................... iii
Upgrades ....................................................................................................................... iii
Chapter 1: Introduction ..................................................................... 1
Spirit Sampler Overview ................................................................................................ 1
System Description ........................................................................................................ 2
Spirit Sampler Software ................................................................................................. 4
Chapter 2: System Set-up ................................................................. 5
Overview ....................................................................................................................... 5
System Power-on .......................................................................................................... 5
Tablet Start-up ............................................................................................................... 7 Tablet Removal from the Case .................................................................................................. 7
Connecting the Outflow Tubes ....................................................................................... 7
Chapter 3: Operation ......................................................................... 9
Overview ....................................................................................................................... 9 Starting Authenticator Software ................................................................................................. 12 Collecting Reference Samples .................................................................................................. 16
Main Menu ..................................................................................................................... 18 Authenticate ............................................................................................................................... 19
Preparing the Sample ........................................................................................................... 19 Authenticating Previously Saved Samples ........................................................................... 21 Identify the Sample ............................................................................................................... 27 Analyze the Sample .............................................................................................................. 28
Admin Functions ........................................................................................................................ 33 Device Configuration ............................................................................................................. 34 Utilities ................................................................................................................................... 42 Shutdown .............................................................................................................................. 53

Table of Contents
ii SPIRITSAMPLER-02-201504
Appendix A: Maintenance ................................................................. 54
Overview ....................................................................................................................... 54
Flow Cells ...................................................................................................................... 54
Battery ........................................................................................................................... 54
Light Source .................................................................................................................. 55
Tablet ............................................................................................................................ 55
Appendix B: Specifications ............................................................... 56
Index ................................................................................................... 58

SPIRITSAMPLER-02-201504 iii
About This Manual
Document Purpose and Intended Audience
This document provides the users of the Spirit Sampler with instructions for setting up and measuring
spirits with their instrument.
What’s New in this Document
This version of the Spirit Sampler Installation and Operation Manual updates maintenance information.
Document Summary
Chapter Description
Chapter 1: Introduction Contains descriptive information about the Spirit Sampler.
Chapter 2: System Set-up Provides instructions for setting up the Spirit Sampler.
Chapter 3: Operation Provides instructions for using the Brand Manager and Authenticator software.
Appendix A: Maintenance Contains maintenance information for the flow cells, battery and light source.
Appendix B: Specifications Lists product specifications.
Product-Related Documentation
You can access documentation for Ocean Optics products by visiting our website at
http://www.oceanoptics.com. Select Support → Technical Documents, then choose the appropriate
document from the available drop-down lists.
Upgrades Occasionally, you may find that you need Ocean Optics to make a change or an upgrade to your system.
To facilitate these changes, you must first contact Customer Support and obtain a Return Merchandise
Authorization (RMA) number. Please contact Ocean Optics for specific instructions when returning a
product.

About This Manual
iv SPIRITSAMPLER-02-201504
Warranty Our 1-Year Warranty covers Ocean Optics OEM equipment from manufacturing defects:
http://www.oceanoptics.com/warranty.asp
This comprehensive warranty ensures you of the highest level of craftsmanship and reliability.
The warranty covers parts and labor needed to repair manufacturing defects that occur during the
warranty period. We also will cover the costs of shipping warranty-related repairs from our customers to
Ocean Optics and from us to our customers.

SPIRITSAMPLER-02-201504 1
Chapter 1
Introduction
Spirit Sampler Overview The Spirit Sampler is an instrument for identifying the authenticity of spirits by comparing the
spectrum of the sample to be verified against a standard spectrum for the chosen brand. The
measurement taken is an absorbance spectrum - light absorbed by the sample is compared
against a standard reference liquid, typically distilled water. The resulting spectrum is compared
against the expected spectrum using a widely used statistical technique known as the sum of
squares of Z-scores. The result is a score that allows a simple classification: pass, fail or almost
matches. The Authenticator software is an easy to use interface that guides the user through the
steps necessary to perform these measurements and automatically performs the necessary
calculations, returning a quick and simple result.
The system is installed in a protective hard shell traveling case, allowing you to take the power
of a quality control lab with you into any environment.
Other convenience features include:
Fast sample analysis (in less than 15 seconds)
Simple data presentation in an easy-to-understand format
Easy loading of samples with separate channels for clear, light and dark spirits
Simple, on-screen prompts to guide you through a measurement

1: Introduction
2 SPIRITSAMPLER-02-201504
Spirit Sampler
System Description The Spirit Sampler Pelican Case™ stores the following Spirit Sampler components:
USB2000+ Spectrometer and UV-VIS lamp built into the case for taking measurements.
A removable touchscreen tablet computer, which can be coupled to the mounted keyboard for
data entry, email and other Windows applications, or detached for truly portable offline data
analysis.
Three pairs of fluid ports labeled for injection and removal of clear (vodka), light (whisky), or
dark (rum) spirit samples

1: Introduction
SPIRITSAMPLER-02-201504 3
Three outflow tubes
Four syringes
LED indicators for battery charge status.
Two standard USB ports for data transfer and peripherals
A standard power connector for overnight recharging
A multi-pocket accessory bag.
The case also includes a cavity for accessory storage.
Spirit Sampler Components
1: Introduction
4 SPIRITSAMPLER-02-201504
Spirit Sampler Components Close-up
Spirit Sampler Software The Spirit Sampler software provides for setting up a customized database and authenticating spirit
samples. It consists of these two main functions:
Authenticator -- Used to collect brand sample absorbance data to initially collect absorbance
data for the Brand Manager to develop spirit profiles. The Authenticator Admin preferences
function allows you to customize your Spirit Sampler system for use in the field to authenticate
spirits. See Chapter 3: Operation for more information on how to use the Authenticator software.
Brand Manager -- Used to develop absorbance profiles for brands specific to your needs and
then export this database for use by the Authenticator in field testing. See Chapter 3: Operation
for more information on using the Brand Manager software.
SPIRITSAMPLER-02-201504 5
Chapter 2
System Set-up
Overview The set-up of the Spirit Sampler is quick and easy. Just apply power to the system, turn on the tablet, and
set up your sampling ports.
System Power-on
The Spirit Sampler can draw power from either the system battery or through the supplied power
cord from the mains. Two status LEDs are provided next to the main power switch. Their
meanings are as follows:
System LEDs Condition Meaning
Green, Off The power cord is NOT plugged in to the system. The main battery is the power source.
Green, Blinking The power cord is plugged in to the system and mains is the source of power. The main battery is actively charging.
Green, Steady The main battery is fully charged. The power cord can be disconnected.
Red, Off The system is turned OFF. Power switch is OFF and/or the tablet is turned OFF.
If power switch is on and the red LED is OFF, then either the tablet is not turned on, or there is an error condition. The system has no power. Either the power switch has not been set to ON, or the battery is dead and needs to be recharged by plugging the power cord into a power source.
Red, Blinking N/A
Red, Steady The system is turned ON. Power switch is ON and the tablet may be turned ON.

2: System Start-up
6 SPIRITSAMPLER-02-201504
There is also a small LED on the tablet itself, just to the right of the power button (along the top-left edge
when opened, viewable from above). This LED has the following states:
Tablet LED Condition Meaning
Dark Mains power is not connected. The tablet may boot if it has sufficient internal battery charge, or it may fail to boot if its internal battery is fully discharged.
Orange Mains power is connected, and the tablet is actively charging. The tablet may or may not have sufficient charge to boot. If it does not boot and the light is orange, please wait 10 minutes for it to accrue enough charge to boot.
White Mains power is connected, but the tablet is not charging because it is fully charged. There should be no reason for the tablet to fail to boot while a white light is showing.
► Procedure
To turn on the Spirit Sampler system,
1. Turn on the main power switch (back left).
2. Boot the tablet by pressing the thin black button along the top-left edge (when opened as a laptop)
of the tablet display. The tablet should then boot directly to the Spirit Sampler Authenticator
software application.
Caution
If the main power switch is turned off while the Authenticator software is running,
undefined behavior can result. Turn the power switch back on, and then reboot the
tablet.
Note
If the main power switch is turned off (or the main battery is completely discharged), the
tablet itself can continue to operate through its own internal battery. However, the tablet
will not be able to authenticate new samples (the spectrometer, lamp and shutters will be
unpowered). Also, the two external USB ports exposed on the main system tray (back
center) will also be unpowered, preventing the tablet from accessing thumb drives,
printers, etc.

2: System Start-up
SPIRITSAMPLER-02-201504 7
Tablet Start-up ► Procedure
To reboot the Spirit Sampler tablet,
1. Be sure that the system is powered on (see System Power-on).
2. On the tablet, swipe from right side of screen.
a. Tap Settings.
b. Tap Power.
c. Tap Restart.
Tablet Removal from the Case
The tablet can be removed from the case by raising the front lid (exposing the keyboard of the tablet),
then pressing the silver button in the back center of the keyboard.
If you decide to remove the tablet for offline operation, the micro-USB power cable will need to be
disconnected for removal, and then reconnected when the tablet is restored.
Connecting the Outflow Tubes The system includes three clear plastic outflow tubes, which may be in the accessory bin (back right) or
accessory bag (lid cavity). These tubes attach to the clear, light and dark channel ports.
Slide these three outflow tubes over the three labeled outflow ports, such that their free ends hang over
the edge of the case (outside the system). Place a beaker or cup beneath these tubes (all three tubes may
point into a single beaker) since they release excess water and spirits from the system during use.
Spirit Sampler Outflow Ports
The Spirit Sampler system, includes a cup holder, it is recommended to unfold it and place it in front of
the outflow tubes and place inside of it a cup to dispose the spirits.

2: System Start-up
8 SPIRITSAMPLER-02-201504
Spirit Sampler Cup Holder

SPIRITSAMPLER-02-201504 9
Chapter 3
Operation
Overview The standard Spirit Sampler Authenticator software menu is organized as follows:

3: Operation
10 SPIRITSAMPLER-02-201504

3: Operation
SPIRITSAMPLER-02-201504 11

3: Operation
12 SPIRITSAMPLER-02-201504
Starting Authenticator Software
► Procedure
1. Double-click the executable. The Spirit Sampler Authenticator Software opens with a dialog
window asking for the default session folder.
2. Click Yes to use the default session folder, located at C:\Users\Spirit Sampler\Documents\Ocean
Optics\Spirit Sampler\sessions\(Spirit Sampler serial number-Automatic default Session number).
–or--
Click No to use a different location for the session folder. The Browse For Folder dialog
window appears for you to browse for the desire location or create a new folder. Then click OK.

3: Operation
SPIRITSAMPLER-02-201504 13
3. Choose to for the software to behave in Admin mode or Field mode:
Admin mode– provides full functionality to the configuration options (such as add, edit and
modify libraries and parameters of the software itself).
Field mode -- provides only the ability to authenticate spirits.

3: Operation
14 SPIRITSAMPLER-02-201504
4. To work in Field mode, click the Switch User… button. In the Admin Login window, type the
password and click Login. After you have entered the admin password, you can switch between
the Admin and Field modes just by clicking the Switch User button in the upper right corner.
5. Allow the system to warm up. There is a minimum recommended warm-up period of around 10
minutes that must be allowed for the light source to stabilize. The Authenticator software
enforces this warm-up period by disabling any further action in the software until the period has
expired. Wait until the status progress bar finishes and click Next.

3: Operation
SPIRITSAMPLER-02-201504 15
Notes
If the tablet appears to be working, but the lamp disconnects itself during the warm-up
procedure (causing an audible beep) this may indicate a low main system battery. Please
plug the system into mains power and let it charge for an hour, and the problem should
not recur.
The Skip button is only for factory debugging purposes; it is never recommended to use
this function. If you do wish to bypass this warm-up period with Administrator
privileges, click the Skip button. A new dialog window appears for you to enter the
admin password and click Login.

3: Operation
16 SPIRITSAMPLER-02-201504
Collecting Reference Samples
The Spirit Sampler Authenticator software walks you through taking reference measurements to be used
by the Brand Manager for creating a profile database. If the unit is being operated for a prolonged period
it may be necessary to perform a reference measurement again to recalibrate the instrument. The software
automatically keeps track of how long it has been since the instrument was referenced and prompts you
when a new reference is necessary.
► Procedure
1. Inject 30 ml of distilled water from a syringe into the ports on the top row to clear the system
to take a reference measurement. Be sure that the tubes connected to the overflow ports on
the bottom row are resting in a container to collect the excess water. Then click Next.
3: Operation
SPIRITSAMPLER-02-201504 17
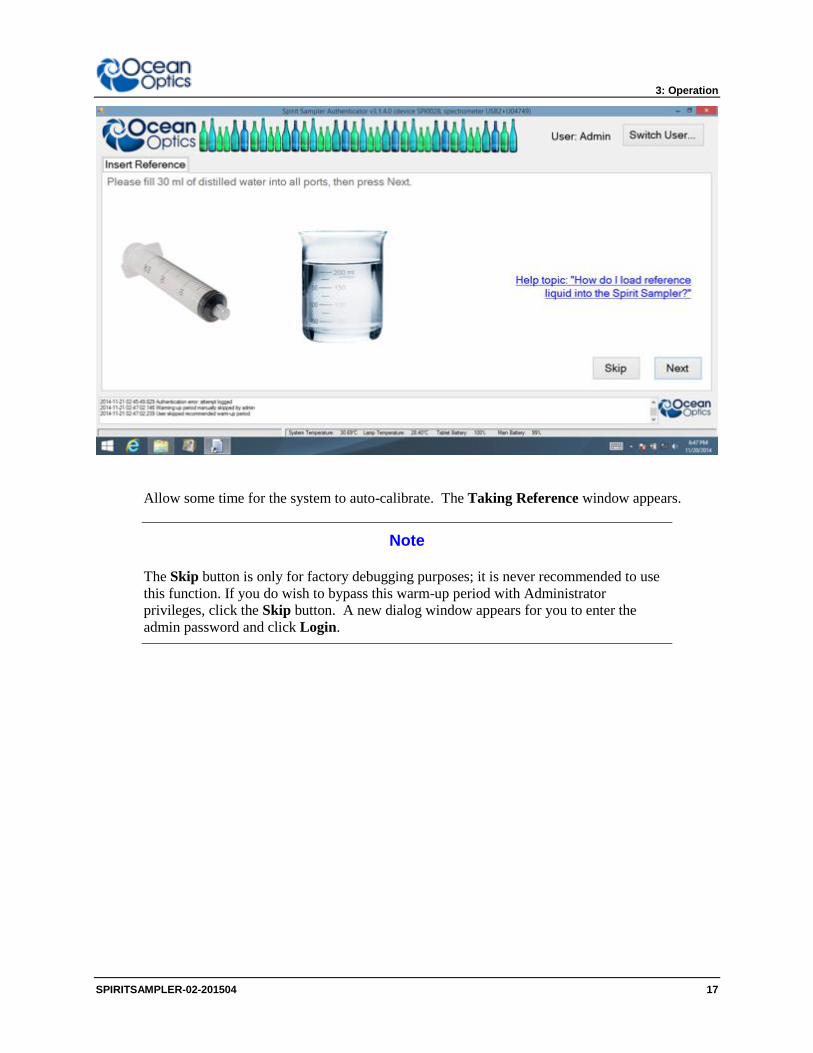
Allow some time for the system to auto-calibrate. The Taking Reference window appears.
Note
The Skip button is only for factory debugging purposes; it is never recommended to use
this function. If you do wish to bypass this warm-up period with Administrator
privileges, click the Skip button. A new dialog window appears for you to enter the
admin password and click Login.

3: Operation
18 SPIRITSAMPLER-02-201504
6. The Taking Reference screen offers the option to perform the following tasks:
Admin: Displays the Admin Menu.
Retry: Retakes the reference auto-calibration.
Next: Displays the Main Menu.
Main Menu The Main Menu allows you to perform the following functions:
Authenticate: Takes the user to the Authentication procedure. See Authenticate.
Reference: Takes the user to the Reference procedure. See Collecting Reference Samples.
Admin: Takes the user to the Admin menu.
Shutdown: Closes the software.

3: Operation
SPIRITSAMPLER-02-201504 19
Authenticate
The Spirit Sampler Authenticator software enables you to analyze spirit samples to confirm product
quality and identity, and to detect counterfeit samples.
Preparing the Sample
► Procedure
1. Inject the spirit to be measured into the appropriate port as follows:
Clear – Vodka
Light – Whisky
Dark – Rum

3: Operation
20 SPIRITSAMPLER-02-201504
2. On the Brand drop down menu, select the brand you wish to verify.
3. You now have the option to perform one of the following tasks:

3: Operation
SPIRITSAMPLER-02-201504 21
Cancel: Return to the Main Menu
Load: Authenticate previously saved samples
Next: Display the Identify Sample screen
Authenticating Previously Saved Samples
The Load button on the Prepare Sample window allows an operator with Administrative privileges to
re-authenticate one or many previously-saved samples to be able to test a recently updated Brand
database.
► Procedure
1. Select the desired Brand in the drop-down menu and click the Load button.
2. On the new window, select the proper .csv brand file(s). These files are usually saved in the
default location: C:\Users\Spirit Sampler\Documents\Ocean Optics\Spirit
Sampler\sessions\spirit-sampler-xxxxx.
3. Click the Open button.

3: Operation
22 SPIRITSAMPLER-02-201504
The software re-authenticates the sample(s) in rapid succession. It graphs all of the samples,
overlapping them on the chart for you to see exactly how they compare in absorbance. The graph
legend shows exactly which samples “Matched,” “Almost Matched” and “Failed.”

3: Operation
SPIRITSAMPLER-02-201504 23
4. To zoom in on the graph, click the Shift key + Mouse Right button + Point with the mouse to the
area of interest. You can easily identify by color the authentication result.
Red = Failed
Yellow = Almost Matched
Green = Matched
To zoom back out on the graph in X and Y dimensions, click the small buttons at the bottom-left
of the chart, beneath and beside the scroll-bar arrows.
5. Select the legend to highlight its corresponding brand file to display an information table.

3: Operation
24 SPIRITSAMPLER-02-201504

3: Operation
SPIRITSAMPLER-02-201504 25
6. The Back button displays the Analyze Sample screen with the last authenticated saved brand
file.
7. You now have the option to perform one of the following tasks:
Done: Returns to the Main Menu.

3: Operation
26 SPIRITSAMPLER-02-201504
Reload: Allows you to authenticate more previously saved samples. Go on to Step 8.
8. After clicking the Reload button, on the new window, select the proper .csv brand file(s) that are
usually saved on the default location: C:\Users\Spirit Sampler\Documents\Ocean Optics\Spirit
Sampler\sessions\spirit-sampler-xxxxx. Then click the Open.
The software re-authenticates the sample(s) in rapid succession and stays in the Analyze Sample
screen, displaying the last saved brand file authentication result.

3: Operation
SPIRITSAMPLER-02-201504 27
9. To see the Sample Detail screen, click the Graph button. Otherwise click Done to go to the
Main Menu.
10. Click Next to go to Identify Sample screen.
Identify the Sample
On the Identify Sample screen, you can enter optional comments about the sample.
► Procedure
1. Enter Notes, Ref Num Id, Ref Text Id and Location entries, as desired.
2. Click Next.

3: Operation
28 SPIRITSAMPLER-02-201504
Analyze the Sample
1. On the Analyze Sample screen, the Spirit Sampler system takes a measurement of the sample
and displays the result: Failed to Match, Almost Matched or Matched.

3: Operation
SPIRITSAMPLER-02-201504 29
2. To see the actual absorbance Graph, click the Graph button.

3: Operation
30 SPIRITSAMPLER-02-201504
3. Click Back to return to the Analyze Sample screen.
4. In the Analyze Sample screen, you have the option to perform the following tasks:
Cancel: Returns to the Main Menu.
Rereference: Takes you to the Reference procedure. Go to Step 5.

3: Operation
SPIRITSAMPLER-02-201504 31
Resample: Measures the spirit again, with the same notes. Go to Step 6.
Save: Saves the spectrum. Go to Step 7.
If the user wishes to “Rereference”. A window message will open, asking “Do you want to re-
take a water reference on channel X only”.
5. Rereference: If the unit is being operated for a prolonged period it may be necessary to perform a
reference measurement again to recalibrate the instrument:
Click Yes to continue, but be sure to reload 30ml of distilled water in the port, and then click
OK.
Click No to cancel the Rereference procedure.

3: Operation
32 SPIRITSAMPLER-02-201504
6. Resample: Measures the spirit again, with the same notes and parameters.
7. Save: To save the spectrum, click the Save button. The file will be saved to the default location:
C:\Users\Spirit Sampler\Documents\Ocean Optics\Spirit Sampler\sessions\spirit-sampler-xxxxx.
When the saving procedure is done, the Analysis Complete screen displays.

3: Operation
SPIRITSAMPLER-02-201504 33
8. The Analyze Complete screen offers the following tasks:
Next sample: Displays the Identify Sample screen.
Another Brand: Displays the Prepare Sample screen.
Home: Displays the Main Menu screen.
Admin Functions
The Admin menu functions allow you to configure the device and perform various utilities. It is mainly
used for Factory Testing and Factory Configuration. It is highly recommended that you do not, under any
circumstances, change or modify any settings on this section unless recommended by the manufacturer.
Caution
Changing the factory settings on the Admin menu could result in bad testing and
authentication.
The following functions are available on the Admin menu for Device Configuration:
Preferences: Change device settings and defaults.
Brand Database: Select brand database for authentication.
Factory Config: Change factory configuration settings.

3: Operation
34 SPIRITSAMPLER-02-201504
The following functions are available for the utilities::
Brand Manager: Create or Modify Brand Databases.
Scope Mode: View spectra directly for alignment.
Session Report: Generate a session report.
Device Configuration
Preferences
Changes device settings and defaults. In the Preferences screen there are 7 different tabs:
Labels: Edit labels within the software.
Device: Modify acquisition parameters in the spectrometer.
Timing: Modify timing acquisition parameters of the software.
Integration: Modify integration time parameters of the spectrometer.
Quality: Modify ratio test parameters for quality control of the spectrum.
SSZ: Modify thresholds and validation for the spirit authentication.
Monitoring: Modify temperature and battery preferences.
Caution
Changing these parameters is not recommended.
Labels
There are options to change the name and amount of the reference liquid that you are prompted to insert
when taking the reference measurement, the name and amount of the port flush liquid, and the labels
applied to each of the three channels available for measurement.

3: Operation
SPIRITSAMPLER-02-201504 35
Device
These settings change some of the basic parameters used by the spectrometer:
Scans to average – The number of spectra averaged during the measurement.
Boxcar Half-Width – Each spectrum is smoothed by applying a boxcar filter. This sets the
number of pixels on each side of the central pixel to use for the averaging.
Electric Dark Correction – This correction subtracts the electric dark contribution to each
spectrum automatically. The check box turns this feature on if checked, or off if unchecked.
Nonlinearity Correction – Corrects the nonlinear response of the detector in the spectrometer
automatically. The check box turns this feature on if checked, off if unchecked.
Debug Mode – Turns on some additional software features to make it easier to track down any
faults in the software.
System ID – The name used to identify the unit. By default it is the serial number of the
spectrometer.
Password – The Administrator password.

3: Operation
36 SPIRITSAMPLER-02-201504
Timing
Warm Up Time – The amount of time in minutes that must be allowed for the light source to
reach a stable temperature.
Select Channel Delay – A delay introduced before acquisition to allow the shutters time to
operate.
Settle Acquisitions – Reserved for future use.
Lamp Timeout – The light source will power down after this period of inactivity.
Allow Skipping Warm-Up – Allows you to skip the system warm-up period.

3: Operation
SPIRITSAMPLER-02-201504 37
Integration
The system automatically attempts to set an optimal integration time during the reference measurement
step.
Target Counts – The system attempts to set an integration time for each channel that achieves this
target intensity.
Error Margin – The upper and lower bounds of the target intensity that are acceptable, specified
as a fraction of the target intensity.
Min Integ – The minimum allowable integration time.
Max Integ – The maximum allowable integration time.
Default – The default integration time, used to initialize the attempt to set the integration time.
Quality
Wavelength UV – Reserved for future use.
Wavelength VIS – Reserved for future use.
Min ratio – Reserved for future use.
Max ratio – Reserved for future use.
Reference QC Enabled – Enables or disables checking the reference liquid against a standard
reference spectrum.

3: Operation
38 SPIRITSAMPLER-02-201504
SSZ
Pass – Maximum score for the sample to qualify as a pass.
Fail – The minimum score for the sample to qualify as a fail.
Number of Samples per Authentication – Each authentication generates this many spectra and
saves each on in a file.
Intra-Sample Delay – Reserved for future use.

3: Operation
SPIRITSAMPLER-02-201504 39
Monitoring
Enable Monitoring – Turn monitoring on or off.
Battery Monitoring – Turn battery monitoring on or off.
Period – The period between checks on the temperatures and battery levels.
Number of Samples – Reserved for future use.
Low Battery Level – The maximum battery level that is reported as low battery.
Critical Battery Level – The maximum battery level that is reported as critical battery.
Fan Always On – Sets the fan to always be on.
Number of Temp Samples – Reserved for future use.
High Temp Level – The minimum temperature that is reported as high.
Critical Temp Level – The minimum temperature that is reported as critical.
Caution
Changing these parameters is not recommended.
Brand Database
This menu option allows you to select a brand database. A dialog box is displayed to select the location in
the file system of the brand database to be used. Once selected this brand database becomes the default
for any subsequent operations.

3: Operation
40 SPIRITSAMPLER-02-201504
On the new Window select the proper database you wish to use for Authentication. Usually is on this
folder: C:\Users\Spirit Sampler\Documents\Ocean Optics\Spirit Sampler\databases\XXXXX.
Inside that folder there is a file named: database.cfg. Highlight the file and click Open.
Factory Config
The Factory Configuration menu option allows the user to:
Restore the unit to the original factory settings
Set the theme of the user interface.
Set the time period for prompting the user to retake a reference measurement.
Set the super user password.
Set the minimum and maximum wavelength for the device.
Caution
The system will ask for a password. This menu should only be accessed by Ocean
Optics.

3: Operation
SPIRITSAMPLER-02-201504 41
Caution
This functionality is for use by Ocean Optics only.
3: Operation
42 SPIRITSAMPLER-02-201504
Utilities
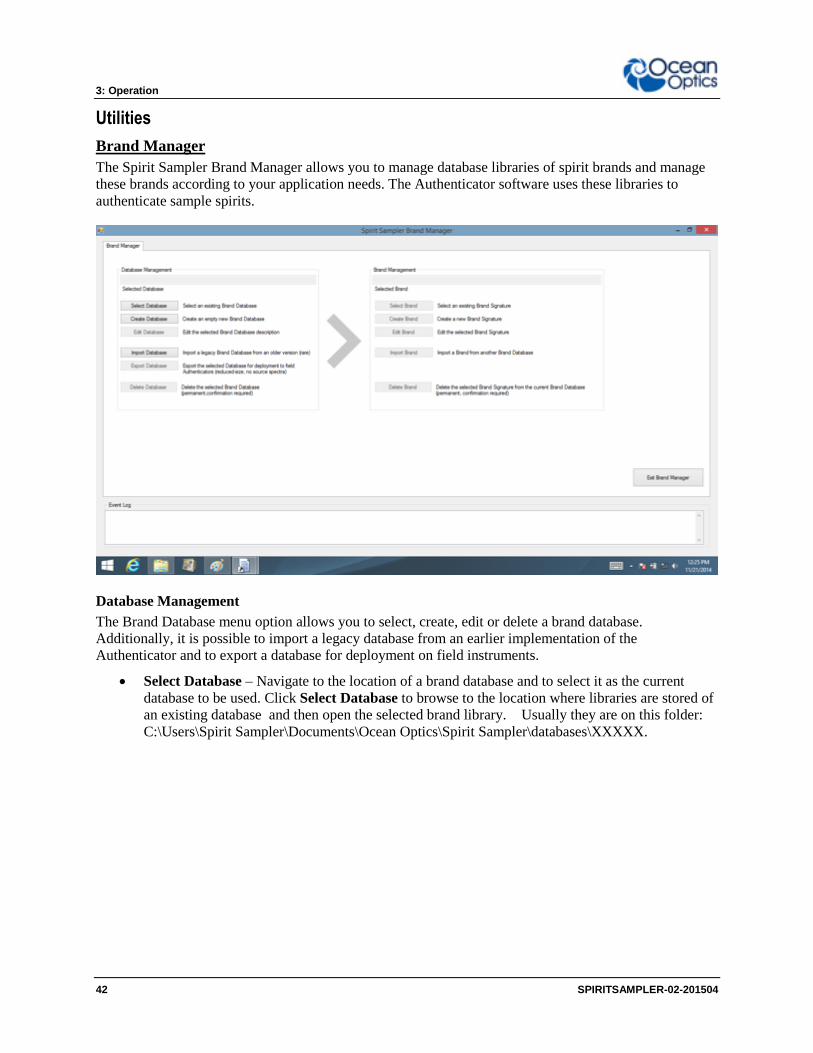
Brand Manager
The Spirit Sampler Brand Manager allows you to manage database libraries of spirit brands and manage
these brands according to your application needs. The Authenticator software uses these libraries to
authenticate sample spirits.
Database Management
The Brand Database menu option allows you to select, create, edit or delete a brand database.
Additionally, it is possible to import a legacy database from an earlier implementation of the
Authenticator and to export a database for deployment on field instruments.
Select Database – Navigate to the location of a brand database and to select it as the current
database to be used. Click Select Database to browse to the location where libraries are stored of
an existing database and then open the selected brand library. Usually they are on this folder:
C:\Users\Spirit Sampler\Documents\Ocean Optics\Spirit Sampler\databases\XXXXX.

3: Operation
SPIRITSAMPLER-02-201504 43
Create Database – Use this function to create a new Brand Database customized to your
measurement needs and save it to a specified location (typically C:\Users\Spirit
Sampler\Documents\Ocean Optics\Spirit Sampler\databases\XXXXX). You are asked to supply a
name for the database and an optional description.

3: Operation
44 SPIRITSAMPLER-02-201504
Edit Database – Change the name and description of an existing database.
Import Database –Use this function to import a legacy Brand database from an older version.
Navigate to the location of a legacy brand database created using a previous version of the
Authenticator.

3: Operation
SPIRITSAMPLER-02-201504 45
Export Database – Export the currently selected database to a location in the file system for
deployment to other (field) Spirit Sampler units.
Delete Database – Permanently delete the currently selected Brand database. This is irreversible.
Confirmation is required by entering a password.

3: Operation
46 SPIRITSAMPLER-02-201504
Brand Management
Brand Management allows you to select, edit or delete a brand signature within the currently selected
brand database (define brand signature spectrum you have created/ defined in the brand library). There is
also the option to import a brand signature created elsewhere.
Select Brand – Select one of the existing Brand Signatures in the current brand database for tasks
such as editing.

3: Operation
SPIRITSAMPLER-02-201504 47
► Procedure
1. To add a new sample by acquiring a spectrum immediately, press New. You are prompted to
inject the sample into the channel selected in the Color field.
2. Click the Yes button. The acquisition of the spectrum begins and a progress bar is displayed –
this step may take a few minutes. When the acquisition is complete you are prompted to save
the source sample.
3. Click Yes. The name of the saved file appears in the Source Samples list, and the spectrum
will appear in the preview graph.
4. Add more samples by repeating this process or by clicking the Add button to include source
data files that have already been created. Each file that is added will appear in the Source
Samples list and be previewed in the graph.
You can select one or more spectra by selecting the source sample file. The associated
spectrum in the graph will be highlighted. You can also select one or more spectra in the
graph by typing Ctrl + left-clicking the mouse. The associated source sample will be
highlighted in the list.
5. Select the wavelengths that will be used in the SSZ model for authentication against this new
brand. A list of wavelengths is displayed in the Wavelengths field and highlighted by vertical
lines in blue on the preview graph. The list of wavelengths can be changed by using the Add
and Del buttons underneath the list of wavelengths. The highlighted wavelengths previewed
in the graph are updated as you add and remove wavelengths. Check the Auto-Compute box
to perform the calculation of the standard deviation for each wavelength.
6. Choose the maximum score for categorizing a sample as a pass with the Thresholds Pass
spin-box. Choose the minimum score for categorizing a sample as a fail with the Thresholds
Fail spin-box.
7. Click the Save button to create the new brand. From the Brand Manager you can click the
Select Brand button to confirm that the brand is now in the database.

3: Operation
48 SPIRITSAMPLER-02-201504
Edit Brand -- Use this function to edit the selected brand signature.
► Procedure
1. You can edit the wavelengths that will be used in the SSZ model for authentication against this
new brand. A list of wavelengths is displayed in the Wavelengths field and highlighted by vertical
lines in blue on the preview graph. The list of wavelengths can be changed by using the Add and
Del buttons underneath the list of wavelengths. The highlighted wavelengths previewed in the
graph are updated as you add and remove wavelengths. Check the Auto-Compute box to
perform the calculation of the standard deviation for each wavelength.
2. Choose the maximum score for categorizing a sample as a pass with the Thresholds Pass spin-
box. Choose the minimum score for categorizing a sample as a fail with the Thresholds Fail
spin-box
3. Click the Save button to create the new brand. From the Brand Manager you can click the Select
Brand button to confirm that the brand is now in the database.

3: Operation
SPIRITSAMPLER-02-201504 49
Import Brand -- Use this function to import an existing brand from another Brand Database.
Delete Brand -- Use this function to delete a Brand Signature from the current Brand Database.
This is irreversible. Confirmation is required by entering a password.

3: Operation
50 SPIRITSAMPLER-02-201504
Scope Mode
Scope mode allows you to see the detail of spectra taken. This is intended for expert users to allow them
to fine tune the parameters of the system.
Scope mode takes a spectrum immediately on pressing the “Start” button. There are options to
temporarily override the settings for the number of scans to average, delay and integration time for the
spectrometer.
Channel – Select the channel(s) to show in scope mode.
Shutter – Select the shutter(s) to close in scope mode.
Override Integ Time – Temporarily override the instrument integration time with the values
specified on this screen.
Averaging – Temporarily override the instrument scans to average with the value specified on
this screen.
Reference QC – Show the reference QC spectrum.
Take Optical Dark – Acquire and show the dark spectrum.
Lamp Test – Perform a lamp test and save the results.

3: Operation
SPIRITSAMPLER-02-201504 51

3: Operation
52 SPIRITSAMPLER-02-201504
Session Report
Session Report allows a set of measurements taken during a session to be summarized. You are prompted
to select one or more result files saved during a session and to produce a summary report for the selected
files. Files are added and removed for the Chosen list using the Add and Remove (or Remove All)
buttons and a summary report is produced by pressing the Generate Report button.

3: Operation
SPIRITSAMPLER-02-201504 53
Shutdown
Clicking the Shutdown button prompts you to flush the ports with a configurable volume and type of
flushing liquid before shutting down the software.

SPIRITSAMPLER-02-201504 54
Appendix A
Maintenance
Overview
The Spirit Sampler system consists of the Sprit Sampler itself, as well as containing a battery for power
that requires charging, a light source, and a tablet.
Flow Cells Solids’ precipitation from sample spirits can potentially lead to particulate build up in one of the Spirit
Sampler flow cells, which sometimes can cause air bubbles to become trapped inside the cell. This air
bubble will cause both reference and sample measurement data to become inaccurate, resulting in
spurious results.
Such particulates can be removed by flushing the cell with either a solution of Ethanol/water or, if
possible, concentrated Ethanol. Ensure the cell is fully purged and leave it for 3-4 hours before re-
inspecting. In the case of stubborn, difficult to remove particulates, it may be necessary to leave the cell
flushed for 24 hours to fully dissolve any residual solid materials.
Battery
The system includes a built-in battery to support up to eight hours of disconnected operation.
However, the battery will eventually discharge and require recharging. If you flip the power
switch on, and the green LED does not come on, the main battery is dead and must be charged.
To charge the main battery (including the secondary battery within the tablet computer), connect
the included power cable to the power socket in the back-left of the main tray next to the power
switch.
A: Maintenance
SPIRITSAMPLER-02-201504 55
Light Source
The Sprit Sampler light source is a deuterium-tungsten halogen type with lamp life of ~1500
hours. The lamp automatically turns off after 60 minutes if it is not used, and then the Spirit
Sampler system must be restarted.
Tablet
Refer to the manufacturer Asus for support.

SPIRITSAMPLER-02-201504 56
Appendix B
Specifications
Specification Value
Dimensions 47 x 38 x 18 cm (18.5 x 14.1 x 6.9 inches)
Weight 9.4 kg (20.8 lbs.)
Power Requirements 100 – 240 V; 50 – 60 Hz; auto-ranging
Battery Life Over one working day on a single charge; <30 minutes charging time
Spectrometer Wavelength
Range Resolution Accuracy
220 – 450 nm 1.0 nm +/- 2.0 nm
Light Source
Type Wavelength range Time to stable output Lamp life Power consumption Operating temperature
Deuterium-Tungsten-Halogen 210 – 1100 nm (deuterium); 400 – 1100 nm (tungsten) 10 minutes (deuterium); 1 minute (tungsten halogen) ~1500 hours 7W 0°C -- +55°C

A: Maintenance
SPIRITSAMPLER-02-201504 57

SPIRITSAMPLER-02-201504 58
Index
A Admin menu, 32
analyze sample, 27
Autenticator software, 4
authenticate, 18
previously saved samples, 20
Authenticator software
starting, 11
B Brand Management, 45
Brand Manager, 41
Brand Manager software, 4
C connecting outflow tubes, 7
D device configuration, 33
document
audience, iii
purpose, iii
summary, iii
I identify sample, 26
M main menu, 17
maintenance, 53
O operation, 9
overview, 1
P power-on, 5
product-related documentation, iii
R reference sample collection, 15
S Scope Mode, 49
Session Report, 51
set-up, 5
shutdown, 52
software, 4
Authenticator, 4
Brand Manager, 4
software map, 9
specifications, 55
Spirit Sampler
software, 4
starting
Authenticator software, 11
start-up
tablet, 7
system description, 2
T tablet
start-up, 7

A: Maintenance
SPIRITSAMPLER-02-201504 59
U upgrades, iii
utilities, 41
W warranty, iv
what's new, iii